
1
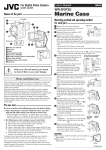
User’s Manual
WR-DV47U
2
1
Marine Case
Mounting method and operating method
for each part
1. Remove the camcorder hand strap or grip strap.
2. Remove the four buckles on the marine case and open the
front lid.
3
3. Align the mark on the marine case’s
4
4. Set the camcorder’s Power Dial to
Power Dial with the mark on the
marine case.
5
6
2
ENGLISH
1 ....... Marine case front lid
2 ....... Buckle
3 ....... Power dial
4 ....... Zoom lever
5 ....... Recording start/stop button
6 ....... Still (snapshot) button
5.
6.
Before use, this unit must be pre-tested
to check if there is any water leakage.
Be sure to perform the following pre-use test before diving.
JVC accepts no responsibility for water leakage or damage to
anything inside the marine case (camcorder, cassette, etc.) due to
careless usage of this product. Be sure to follow correct procedures
when using the marine case.
PLAY
OFF CAME
/PC
9. To start video recording, press the
Recording start/stop button. To stop
video recording, press it again.
• Press the Still button to perform
Snapshot recording. If the flash is
used, its brightness will be darker
than usual due to the marine case.
This is normal and is not a
malfunction.
10. The zoom can be adjusted with the Zoom Lever.
11. When you are finished shooting, turn
the power dial to the right to switch
the camcorder power dial to the Off
position.
Zoom lever
Recording
start/stop
button
Still button
Power lamp
P
PLAY/ C OFF
NOTES:
n The O-ring is made from rubber and is
mounted on the front lid.
n Refer to the camcorder’s instructions for
more information.
ERA 5S D
CAM
1. Before mounting the camcorder inside the marine case, dive
with only the empty marine case and test for water leaks.
• You can easily check for water leaks at a depth of 1 m, where
there is no water pressure. Be sure to perform this test to
ensure the safety of your camcorder.
2. The following are some common causes of water leaks:
A. The marine case is used without attaching the O-ring.
B. The O-ring is not mounted in the correct position.
C. The O-ring is damaged or deformed.
D. There is sand, dirt, hair or other foreign matter on the O-ring.
E. There is sand, dirt, hair or other foreign matter on the contact
surface of the O-ring or on the inside of the lid.
F. The provided strap or silica gel bag is pinched inside the
marine case when the lid is closed.
To protect your camcorder and ensure optimum use, keep the
examples listed above in mind when using the marine case.
the direction of the arrow to set the
camcorder’s Power Dial to “
”.
DSC DS
Pre-use test
8. Turn the marine case’s Power Dial in
5S
RA
This marine case is a precision instrument designed to permit safe
video recording under high water pressure. Please pay careful
attention when handling the unit before and after use, as explained
in this user’s manual.
Each part of the marine case has been subject to strict controls
during the manufacturing process, and the individual functions
have faced stringent tests during the assembly process. Each marine
case has also had to pass water-proof inspections using highpressure water testers. However, damage can sometimes occur
during transport and distribution, or during storage after purchase,
so before diving always carry out the following pre-use test to
verify safety.
7.
LAY
CP
Please read before use.
“OFF”, then open the LCD monitor and
Align
the marks.
insert the camera into the marine case.
Place the included anti-fogging silica
gel in the gap between the camcorder
and the marine case to prevent fogging in the marine case.
• If the camcorder’s Operation Switch is set to “ ”, perform
settings as required then insert the camcorder into the marine
case.
Fit the Power Dial projection on the
marine case over the outer groove of
the Power Switch on the camcorder,
making sure that it is securely fit.
If the camcorder’s Power Switch is
set to the wrong position when the
camcorder is placed in the marine
case, the Power Dial aligning boss on
the marine case may be damaged and
the camcorder’s Power Switch may skid.
Before sealing the marine case, check that there is no sand,
dirt, or other foreign matter on the O-ring mounted on the front
lid or on the O-ring contact surface on the main unit.
Also make sure that the inserted silica gel bag is not pinched. If
you dive with foreign matter trapped in these areas, water will
leak.
Check that the O-ring on the front lid is
correctly mounted in the groove, then
press in the front lid. Flip down the
four buckles in the directions indicated
by the arrows in the figure on the right
to seal the marine case.
DSC PLAY
SC
For Digital Video Camera
GR-DVM70, GR-DVM50,
GR-DVX7, GR-DVX4,
GR-DVX70, GR-DVX40
Names of the parts
LYT0392-001A
EN
Usage precautions
1. Never use any of the following chemicals for cleaning, rust-proofing, fog prevention, repair, or other purposes.
2.
3.
4.
5.
6.
7.
8.
9.
10.
11.
12.
13.
1) Do not clean the marine case with alcohol, gasoline, paint thinner, or other volatile organic solvents, chemical cleaners or similar
agents. (Pure water or lukewarm water is adequate for cleaning.)
2) Do not use rust-proofing agents or the like on metal parts. (Stainless steel and aluminum are used for all metal parts, so pure water
is adequate for cleaning.)
3) Do not use commercially-available anti-fogging agents. (Always use the fogging agent that came with the marine case.)
4) Do not use any silicon grease other than that specified for the O-ring. (Always use the silicon grease that came with the marine
case.)
5) Do not use any adhesives for repairs, etc. (If any repairs are necessary, please consult the store of purchase.)
Direct or indirect use (vaporized chemicals) of any of the above chemicals on the marine case can cause cracks when the marine
case is placed under high pressure.
Exercise caution, as this marine case is a completely airtight structure. If it is left exposed to direct sunlight, or in a car, ship, or on the
beach, the internal temperature can climb extremely high, which may cause the camcorder inside to stop working properly.
If the camcorder is sealed inside the marine case in an area where the humidity and temperature are high, diving will make the
humidity trapped inside the marine case cool down, causing condensation to form and the glass surface to become fogged. It is
recommended that you insert the camcorder into the marine case in an area where the humidity is low and the temperature is close to
that of the water where you will be diving.
If a piece of aluminum foil is cut to approx. 50 cm2 and is inserted into the glass part of the marine case, fog inside the marine case
will adhere to the aluminum foil, as its heat conductivity is higher than that of glass. This is an effective way to quickly reduce fog
inside the marine case.
Do not open or close the case in areas where it may be subjected to water spray or sand.
If you must open the marine case at the diving site in order to replace the battery or tape, observe the precautions below.
1) Select a location safe from water spray and sand.
2) Use the included blower or similar device to completely blow off water between the main unit and the lid section of the marine
case, and to blow off water adhering to the buckles that fasten them. Dry off any water remaining on the marine case with a dry
cloth.
3) When removing the buckles and opening the lid section, be careful that no water drips from your hair or body into the marine
case.
4) In order to avoid touching the camcorder with hands that have salt water on them, place a towel dampened with pure water in a
plastic bag beforehand and use it to wipe any salt off your hands and fingers before touching the camcorder.
After use, wash off adequately with pure water as soon as possible. If the marine case has been used in salt water, soaking the marine
case in pure water for a while is effective for removing the salt.
After washing, wipe off any water with a dry cloth free of salt to completely dry off the marine case. However, do not expose the
marine case to direct sunlight in order to dry it. This can cause discoloration and breakage of the marine case, and can speed up
deterioration of the O-ring.
Wipe the inside of the marine case with just a dry cloth. Maintain the transparency of the front glass inside by wiping it with a silicon
cloth or the like before and after use.
Remove the O-ring from the lid section and wipe off any salt, sand, and other foreign matter. In the same manner, wipe off any adhering
foreign matter from the groove into which the O-ring was fit and from the main unit of the marine case where the O-ring contacted it.
When removing the O-ring from the groove, avoid using sharp-tipped metal objects; instead use a round-tipped object, such as a hair
pin, to avoid damaging the O-ring when you remove it.
When the marine case will be left unused for a prolonged time, to avoid O-ring deformation remove the O-ring from the marine case
groove, apply a thin film of silicon grease, and store it in a clean plastic bag. When setting the O-ring in place to use the marine case
again, carefully check the O-ring for scratches and cracks.
• If there are any scratches or cracks on the O-ring, water leaks will occur.
Since the marine case is made of polycarbonate resin, handle it carefully. In particular, it can be easily scratched by rocks, etc. at the
shooting site and may be damaged if it is dropped or otherwise subject to shock. When going to the shooting site by car, ship, train, or
plane, avoid transporting the camcorder in the marine case. If you take adequate handling precautions, however, there should be no
problem in transporting the camcorder in the marine case for a short distance, for example from the target site to the diving site.
Avoid removing any parts other than those indicated in the user’s manual, altering the marine case, or using any parts other than those
specified. If any problems occur, please consult the store of purchase.
The appearance and specifications of this unit are subject to change without prior notice.
Main specifications
Maximum pressure
Power switch
Recording switch
Main unit dimensions
Main unit weight
Compatible model
Accessories
: Water depth up to 25 meters
: Mechanism can be used
: Mechanism can be used
: 175 (w) x 130 (d) x 150 (h) mm
: 680 g
: GR-DVM70, GR-DVM50, GR-DVX7, GR-DVX4, GR-DVX70, GR-DVX40
: Maintenance kit (silicon grease, anti-fogging silica gel,blower, paper,
silicon cloth, cotton swabs, O-ring)
Für Digital-Camcorder
GR-DVM70, GR-DVM50,
GR-DVX7, GR-DVX4,
GR-DVX70, GR-DVX40
Bezeichnung der Teile
Gebrauchsanleitung
WR-DV47U
2
1
DEUTSCH
Unterwasser-Gehäuse
Installieren des Camcorders und Handhabung der
Unterwasser-Gehäuse-Teile
1. Die Handschlaufe oder das Griffband vom Camcorder abnehmen.
2. Die vier Schließen des Unterwasser-Gehäuses ausklinken und den
Frontdeckel öffnen.
3
3. Die Markierungen des Unterwasser-
4
4.
5
6
1 ....... Frontdeckel
2 ....... Schließe
3 ....... Hauptschalter
4 ....... Zoomhebel
5 ....... Aufnahme-Start/Stopp-Taste
6 ....... Einzelbild (Schnappschuß)-Taste
Vor Gebrauch muß das UnterwasserGehäuse auf seine Wasserdichtigkeit
überprüft werden!
5.
6.
Bitte vor der Ingebrauchnahme durchlesen.
Vor einem Tauchgang bitte den folgenden Eignungstest durchführen.
OFF CAME
/PC
DSC DS
9. Zum Starten und Stoppen der
Zoomhebel
Videoaufnahme die Aufnahme-Start/
Stopp-Taste drücken.
Aufnahme• Zur Schnappschußaufnahme die
Start/StoppTaste
Schnappschußtaste drücken. Bei
Aufnahmen mit Blitz wird die
Einzelbild
Blitzhelligkeit infolge des Unterwasser(Schnappschuß)Taste
Gehäuses verringert. Dies ist keine
Fehlfunktion.
10. Das Camcorder-Objektiv kann mit dem Zoomhebel ein- oder
ausgezoomt werden.
11. Nach der Aufnahme den Hauptschalter
nach rechts drehen, so daß der
Camcorder-Hauptschalter auf Position
Betriebsan“Aus” gestellt ist.
zeige
/P
PLAY C OFF
HINWEISE:
n Der Gummi-Dichtungsring ist am Deckel
angebracht.
n Weitere Angaben siehe die CamcorderBedienungsanleitung.
ERA 5S D
CAM
JVC übernimmt keinerlei Haftung für ungenügende Abdichtung des
Unterwasser-Gehäuses oder für Schäden an dem im UnterwasserGehäuse eingesetzten Gerät und Zubehör (Camcorder, Cassette etc.).
Bitte achten Sie stets auf sachgemäße und sichere Handhabung des
Unterwasser-Gehäuses.
Gehäuses in Pfeilrichtung drehen, um die
Camcorder-Wählscheibe auf “
” zu
stellen.
5S
RA
1. Vor dem Einsetzen des Camcorders erst einmal mit leerem
Unterwasser-Gehäuse tauchen und hierbei die Wasserdichtigkeit
überprüfen.
• Diese Überprüfung kann bereits bei einer Tiefe von 1 m, an dem
kein hoher Wasserdruck vorherrscht, vorgenommen werden.
Führen Sie diese Überprüfung durch, um den sicheren Gebrauch
Ihres Camcorders zu gewährleisten.
2. Falls Wasser eindringt, kann dies auf die folgenden Ursachen
zurückzuführen sein:
A. Wenn der Dichtungsring nicht verwendet wird.
B. Wenn der Dichtungsring nicht einwandfrei sitzt.
C. Wenn der Dichtungsring beschädigt und/oder verformt ist.
D. Wenn Fremdkörper (Sand, Schmutz, Haare etc.) am
Dichtungsring angelagert sind.
E. Wenn Fremdkörper (Sand, Schmutz, Haare etc.) an den
Kontaktflächen des Dichtungsringes oder am Deckel angelagert
sind.
F. Wenn der mitgelieferte Tragegurt oder der Silica-Gel-Beutel
zwischen Deckel und Gehäuse eingeklemmt ist.
Bitte berücksichtigen Sie die hier genannten Beispiele, um Ihren
Camcorder optimal zu schützen und störungsfrei nutzen zu können.
8. Den Hauptschalter des Unterwasser-
PLAY
Eignungstest
7.
LAY
CP
Dieses Unterwasser-Gehäuse ist präzisionsgefertigt und für
Unterwasseraufnahmen bei hoher Wasserdruckeinwirkung geeignet. Bitte
achten Sie unbedingt auf die Handhabungshinweise, die vor und nach
dem Gebrauch gelten.
Alle Bauteile des Unterwasser-Gehäuses unterliegen während der
Fertigung strikten Kontrollen und sind bei der Montage strengen
Belastungstests unterworfen. Jedes Unterwasser-Gehäuse wird zudem auf
Wasserdichtigkeit unter hohem Wasserdruck überprüft. Da bei
Auslieferung, Beförderung und/oder der Aufbewahrung ggf. Schäden
auftreten können, muß vor dem Gebrauch unter Wasser unbedingt jeweils
ein Eignungstest durchgeführt werden, der im folgenden erläutert wird.
DSC PLAY
SC
2
Gehäuse-Hauptschalters und des
Unterwasser-Gehäuses aufeinander
ausrichten.
Die Camcorder-Wählscheibe auf “OFF”
Die
stellen, den LCD-Monitor nach außen
Markierungen
klappen und den Camcorder in das
aufeinander
ausrichten.
Gehäuse einsetzen. Das mitgelieferte
Anti-Beschlag-Silica-Gel zwischen
Camcorder und Gehäuse einlegen, um ein Beschlagen des
Unterwasser-Gehäuses zu verhindern.
• Ist der Camcorder-Moduswähler auf “ ” eingestellt, müssen die
manuellen Einstellschritte vor dem Einsetzen des Camcorders in
das Unterwasser-Gehäuse vorgenommen werden.
Den Hauptschaltergreifer des
Unterwasser-Gehäuses so ausrichten, daß
er einwandfrei fest auf der Außennut des
Camcorder-Hauptschalters aufsitzt.
Ist der Camcorder-Hauptschalter auf
die falsche Position eingestellt, wenn der
Camcorder in das Unterwasser-Gehäuse
eingesetzt wird, kann der
Hauptschaltergreifer des UnterwasserGehäuses beschädigt und der CamcorderHauptschalter hierauf ggf. nicht mehr bewegt werden.
Vor Versiegeln des Unterwasser-Gehäuses sicherstellen, daß der
Dichtungsring am Deckel und die Dichtungsring-Kontaktfläche am
Gehäuse frei von jeder Verunreinigung (Staub, Sand sonstige
Partkel etc.) sind. Zudem sicherstellen, daß der Silica-Gel-Beutel
nicht zwischen Deckel und Gehäuse eingeklemmt wird. Falls die
einwandfreie Abdichtung behindert wird, kann Wasser in das
Gehäuse eindringen.
Sicherstellen, daß der Dichtungsring des
Deckels einwandfrei in seiner Vertiefung
sitzt. Dann den Frontdeckel andrücken.
Nun die vier Schließen wie rechts gezeigt
in Pfeilrichtung andrücken, um den
wasserdichten Zustand des UnterwasserGehäuse zu gewährleisten.
Vorsichtsmaßregeln für den Gebrauch
DE
1. In keinem Fall die folgenden oder ähnliche Chemikalien zur Reinigung, Vorbeugung gegen Rostbefall, Kondensationsniederschlag
2.
3.
4.
5.
6.
7.
8.
9.
10.
11.
12.
13.
oder für Reparaturarbeiten jeder Art verwenden!
1) Zur Reinigung NIEMALS Alkohol, Benzin, Farbverdünner oder sonstige sich verflüchtende organische Lösungsmittel, chemische
Reiniger oder ähnliche Flüssigkeiten oder Sprays verwenden. (Zur Reinigung ausschließlich reines (lauwarmes) Wasser verwenden.)
2) Metallteile NIEMALS mit Rostschutzmitteln behandeln. Alle Metallteile sind aus rostfreiem Stahl oder Aluminium gefertigt und
erfordern daher nur eine Reinigung mit reinem Wasser.
3) NIEMALS herkömmliche Antibeschlagsmittel verwenden. (Ausschließlich das zum Unterwasser-Gehäuse mitgelieferte
Antibeschlagsmittel verwenden.)
4) Für den Dichtungsring AUSSCHLIESSLICH das empfohlene Silicon-Schmiermittel verwenden. (Stets nur das zum UnterwasserGehäuse mitgelieferte Silikon-Schmiermittel verwenden.)
5) NIEMALS selbstklebende Folien etc. für Reparaturarbeiten etc. anbringen. (Falls Reparaturarbeiten erforderlich werden, wenden Sie
sich bitte an Ihre Verkaufststelle)
Direkte oder indirekte (Spraynebel etc.) Einwirkung der oben genannten chemischen Mittel auf das Unterwasser-Gehäuse kann
dazu führen, daß das Unterwasser-Gehäuse unter hoher Wasserdruckeinwirkung Risse aufweist.
Beachten Sie, daß das Unterwasser-Gehäuse absolut luftdicht ist. Wird das geschlossene Unterwasser-Gehäuse hohen Temperaturen
(direkte Sonneneinstrahlung, Aufbewahrung in einem geschlossenen Fahrzeug, Behälter etc., am Strand) ausgesetzt, können im
Gehäuseinneren extrem hohe Temperaturen auftreten. Dies kann zu Funktionsbeeinträchtigungen und/oder Schäden am installierten
Camcorder führen.
Wird der Camcorder an einem Ort mit hoher Luftfeuchtigkeit und hohen Temperaturen im Unterwasser-Gehäuse eingesetzt und
versiegelt, kann es beim Tauchgang infolge der einwirkenden niedrigen Wassertemperaturen zur Kondensationsbildung im Gehäuse
und dabei zum Beschlagen der Glasfläche kommen. Wir empfehlen, den Camcorder an einem Ort zu versiegeln, an dem geringe
Luftfeuchtigkeit und kein allzu großer Unterschied zur Wassertemperatur vorherrschen.
Wird ein Stück Aluminiumfolie von ca. 50cm2 Fläche im Glasbereich des Unterwasser-Gehäuses eingelegt, wird sich die im Gehäuse
vorhandene Kondensationsfeuchtigkeit am Aluminium anlagern, da Aluminium eine höhere Temperaturleitfähigkeit besitzt als Glas.
Auf diese Weise können Sie im Gehäuse befindliche Kondensation rasch beseitigen.
Das Unterwasser-Gehäuse niemals an Orten öffnen, die Wasserspritzern und/oder Sand ausgesetzt sind.
Falls das Unterwasser-Gehäuse bei einer Tauchpause geöffnet werden muß, um den Akku und/oder die Cassette zu wechseln, unbedingt
die folgenden Hinweise beachten.
1) Einen Ort wählen, der vor Wasser- und/oder Sandeinwirkung geschützt ist.
2) Den mitgelieferten Blasebalg oder eine ähnliche Vorrichtung verwenden, um zwischen Gehäuse und Gehäusedeckel bzw. an den
Schließen befindliche Wassertropfen vollständig zu entfernen. Anschließend das Gehäuse sorgfältig mit einem sauberen trockenen
Tuch trockenreiben.
3) Nach dem Ausklinken der Schließen und dem Öffnen des Frontdeckels darauf achten, daß kein Tropf- oder Spritzwasser in das
Gehäuseinnere eindringt.
4) Halten Sie ein mit reinem Leitungswasser befeuchtetes Tuch in einem Plastikbehälter bereit, um Ihre Hände von Salzwasser zu
reinigen, ehe Sie den Camcorder berühren.
Das Unterwasser-Gehäuse nach dem Gebrauch möglichst umgehend mit reinem Wasser spülen. Nach dem Gebrauch in Salzwasser
kann das Gehäuse in einem mit reinem Wasser gefüllten Behälter zur Entfernung des Salzwassers gewässert und gespült werden.
Nach der Reinigung das Gehäuse sorgfältig mit einem sauberen trockenen Tuch trockenreiben. Das Gehäuse niemals zum Trocknen
direkter Sonneneinstrahlung aussetzen! Andernfalls kann das Gehäusematerial spröde werden und/oder Verfärbungen entwickeln.
Zudem kann der Dichtungsring Schaden nehmen.
Das Gehäuseinnere nur mit einem trockenem Tuch auswischen. Die Linseninnenseite vor und nach dem Gebrauch mit einem
Silikontuch o.ä. abreiben, um einwandfreie Lichtdurchlässigkeit zu gewährleisten.
Den Dichtungsring des Frontdeckels abnehmen und Salz, Sand etc. sorgfältig abwischen. Zudem die Dichtungsringvertiefung am Deckel
und die Auflagefläche am Gehäuse sorgfältig reinigen. Den Dichtungsring niemals mit einem spitzen Gegenstand in Berührung bringen.
Zur Entnahme abgerundete Objekte (Haarspange etc.) verwenden, um Schäden am Dichtungsring zu verhindern.
Wird das Unterwasser-Gehäuse über einen längeren Zeitraum nicht verwendet, sollte der Dichtungsring abgenommen werden, um
Verformungen zu verhindern. Den entnommenen Dichtungsring leicht mit Silikon-Schmiermittel einfetten und in einem sauberen
Plastikbeutel aufbewahren. Beim Wiedereinsetzen den Dichtungsring sorgfältig auf Schäden (Kerben, Risse etc.) überprüfen.
• Falls der Dichtungsring Risse oder Kerben vorweist, kann Wasser in das Gehäuse eindringen.
Das Unterwasser-Gehäuse ist aus Polykarbonat gefertigt und muß vorsichtig gehandhabt werden. Bei Kontakt mit harten Unterlagen oder
Gegenständen darauf achten, daß das Gehäuse nicht verkratzt (insbesonders bei Ablage auf Felsen etc.), und das Gehäuse niemals
fallenlassen oder sonstigen heftigen Erschütterungen aussetzen. Bewahren Sie das Unterwasser-Gehäuse bei der Anreise vor dem
Gebrauch nach Möglichkeit in der Tragetasche auf. Vermeiden Sie es, das Gehäuse mit installiertem Camcorder zu befördern oder
aufzubewahren. Bei sorgfältiger Handhabung kann selbstverständlich der Camcorder im Gehäuse installiert und über kürzere Strecken
transportiert werden (z.B. vor dem Tauchen).
Niemals Teile vom Gehäuse entfernen, niemals Umbauten am Gehäuse vornehmen und niemals unzulässige Ersatzteile verwenden.
Falls Sie Fragen haben, wenden Sie sich bitte an Ihre Verkaufsstelle.
Änderungen der Konstruktion und der technische Daten jederzeit ohne Vorankündigung vorbehalten.
Technische Daten
Maximale Druckbelastung
Hauptschalter
Aufnahmeschalter
Gehäuseabmessungen
Gehäusegewicht
Geeigneter Camcorder
Zubehör
: Bis zu 25 m Tauchtiefe
: Ein-/Ausschaltung ist möglich
: Aufnahmestart/-stopp ist möglich
: 175 (B) x 130 (T) x 150 (H) mm
: 680 g
: GR-DVM70, GR-DVM50, GR-DVX7, GR-DVX4, GR-DVX70, GR-DVX40
: Wartungssatz (Silikon-Schmiermittel, Anti-Beschlag-Silica-Gel, Blasebalg, Silikontuch,
Wattestäbchen, Dichtungsring)
Pour caméra vidéo numérique
GR-DVM70, GR-DVM50,
GR-DVX7, GR-DVX4,
GR-DVX70, GR-DVX40
Noms des pièces
2
1
Manuel d’utilisation
WR-DV47U
FRANÇAIS
Coffret marine
Méthode de montage et méthode de
fonctionnement pour chaque pièce
1. Retirer la dragonne ou la courroie de poignée du camescope.
2. Retirer les quatre boucles sur le coffret marine et ouvrir le
couvercle avant.
3
3. Aligner le repère sur la molette
4
4.
5
6
1 ....... Couvercle avant du coffret marine
2 ....... Boucle
3 ....... Molette d’alimentation
4 ....... Levier de zoom
5 ....... Touche de marche/arrêt d’enregistrement
6 ....... Touche d’arrêt sur image (photo)
5.
Cet appareil doit être testé avant l’emploi
pour vérifier qu’il n’y a pas de fuite d’eau.
6.
Veuillez lire avant utilisation.
Ce coffret marine est un instrument de précision conçu pour permettre
l’enregistrement vidéo sûr sous une pression d’eau élevée. Veuillez faire
attention en manipulant l’appareil avant et après l’utilisation, comme
expliqué dans ce manuel d’utilisation. Chaque pièce du coffret marine a
subi des contrôles rigoureux lors de sa fabrication, et les fonctions
individuelles ont fait face à des tests sévères au cours de l’assemblage.
Chaque coffret marine a dû également passer par des contrôles
d’étanchéité en utilisant des testeurs à pression d’eau élevée. Toutefois, des
dommages peuvent quelquefois se produire lors du transport et de la
distribution, ou pendant le stockage après l’achat, par conséquent avant de
faire de la plongée, effectuez toujours le test avant usage suivant pour
vérifier la sécurité.
7.
8. Tourner la molette d’alimentation du
coffret marine dans le sens de la flèche
pour régler la molette d’alimentation du
camescope sur “
”.
PLAY
LAY
CP
1. Avant de placer le camescope dans le coffret marine, plongez avec le
coffret marine vide et vérifiez l’absence de fuites d’eau.
• Vous pouvez facilement vérifier l’absence de fuites d’eau à 1 m de
profondeur, où il n’y a pas beaucoup de pression d’eau. Bien s’assurer
d’effectuer ce test pour garantir la sécurité de votre camescope.
2. Ce qui suit sont des causes courantes de fuites d’eau:
A. Le coffret marine est utilisé sans attacher le joint.
B. Le joint n’est pas monté dans la bonne position.
C. Le joint est endommagé ou déformé.
D. Il y a du sable, de la poussière, des cheveux ou d’autres matières
étrangères sur le joint.
E. Il y a du sable, de la poussière, des cheveux ou d’autres matières
étrangères sur la surface de contact du joint ou sur l’intérieur du
couvercle.
F. La courroie fournie ou le sac de gel de silice est pincé dans le coffret
marine lorsque le couvercle est fermé.
Pour protéger votre camescope et assurer un usage optimum, gardez bien
en mémoire les exemples cités en utilisant le coffret marine.
9. Pour commencer l’enregistrement vidéo,
JVC ne peut être responsable pour des fuites d’eau ou des dommages de
toute chose dans le coffret marine (camescope, cassette, etc.) à cause d’un
usage sans précaution de ce produit. Bien suivre les procédures correctes
en utilisant le coffret marine.
REMARQUES:
DSC DS
Bien s’assurer d’effectuer le test avant emploi suivant, avant de
plonger.
OFF CAME
/PC
5S
RA
Test avant emploi
Levier de
appuyer sur la touche de marche/arrêt
zoom
d’enregistrement. Pour arrêter
Touche de
l’enregistrement vidéo, appuyer de
marche/arrêt
nouveau sur cette touche.
d’enregistrement
• Appuyer sur la touche d’arrêt sur
Touche d’arrêt
image pour effectuer un enregistrement
sur image
(photo)
de photo. Si le flash est utilisé, sa
luminosité sera plus sombre
qu’habituellement à cause du coffret
marine. C’est normal et ce n’est pas un mauvais fonctionnement.
10. Le zoom peut être ajusté avec le levier de zoom.
11. Lorsque vous avez fini la prise de vues,
tourner la molette d’alimentation sur la
Témoin
droite pour commuter la molette
d’alimentation
d’alimentation du camescope sur la
position Off.
/P
PLAY C OFF
ERA 5S D
CAM
DSC PLAY
SC
2
d’alimentation du coffret marine avec le
repère sur le coffret marine.
Régler la molette d’alimentation du
camescope sur “OFF”, puis ouvrir l’écran
Aligner
LCD et introduire le camescope dans le
les repères.
coffret marine.
Placer le gel de silice anti-buée dans
l’espace entre le camescope et le coffret
marine pour éviter la formation de buée dans le coffret marine.
• Si l’interrupteur de fonctionnement du camescope est réglé sur
“ ”, effectuer les réglages nécessaires puis introduire le
camescope dans le coffret marine.
Adapter la projection de la molette
d’alimentation du coffret marine sur la
gorge externe de l’interrupteur
d’alimentation du camescope, en
s’assurant qu’elle est fermement en place.
Si l’interrupteur d’alimentation du
camescope est réglé sur la mauvaise
position lorsque le camescope est placé
dans le coffret marine, le bossage
d’alignement de la molette d’alimentation sur le coffret marine
peut être endommagé et l’interrupteur d’alimentation sur le
camescope peut déraper.
Avant de sceller le coffret marine, vérifier qu’il n’y a pas de sable,
de poussière, ou d’autres matières étrangères sur le joint monté sur
le couvercle avant ou sur la surface de contact avec le joint sur la
partie principale. S’assurer également que le sac de gel de silice
introduit n’est pas pincé. Si vous faites de la plongée avec des
matières étrangères coincées dans ces régions, une fuite d’eau se
produira.
Vérifier que le joint sur le couvercle
avant est monté correctement dans la
rainure, puis presser sur le couvercle
avant. Rabattre les quatre boucles dans
les sens indiqués par les flèches dans la
figure sur la droite pour sceller le coffret
marine.
n Le joint est fait en caoutchouc et est monté
sur le couvercle avant.
n Se référer au mode d’emploi du camescope pour plus d’information.
FR
Précautions d’utilisation
1. Ne jamais utiliser l’un des produits chimiques suivants pour le nettoyage, la protection anti-rouille, la prévention contre la buée, la
2.
3.
4.
5.
6.
7.
8.
9.
10.
11.
12.
13.
réparation, ou d’autres raisons.
1) Ne pas nettoyer le coffret marine avec de l’alcool, de l’essence, du diluant à peinture ni avec d’autres solvants organiques volatils,
nettoyants chimiques ou agents similaires. (De l’eau pure ou de l’eau tiède convient pour le nettoyage.)
2) Ne pas utiliser d’agents anti-rouille ou similaires sur les parties métalliques. (De l’acier inoxydable et de l’aluminium sont utilisés
pour toutes les pièces métalliques, par conséquent l’eau pure convient pour le nettoyage.)
3) Ne pas utiliser d’agents anti-buée disponibles dans le commerce. (Toujours utiliser l’agent anti-buée qui est fourni avec le coffret
marine.)
4) Ne pas utiliser de graisse silicone autre que celle spécifiée pour le joint. (Toujours utiliser la graisse silicone qui est fournie avec le
coffret marine.)
5) Ne pas utiliser de bandes adhésives pour la réparation, etc. (Si une réparation est nécessaire, consulter le magasin où vous avez
acheté le coffret.)
L’utilisation directe ou indirecte (produits vaporisés) des produits chimiques cités ci-dessus sur le coffret marine peut causer des
fêlures lorsque le coffret marine est placé sous haute pression.
Faire attention, car ce coffret marine est une structure complètement étanche. S’il est laissé exposé en plein soleil, ou dans une
voiture, un bateau ou sur la plage, la température interne peut monter très haut, ce qui peut causer un mauvais fonctionnement du
camescope à l’intérieur.
Si le camescope est installé dans le coffret marine dans un endroit où l’humidité et la température sont élevées, plonger refroidira
l’humidité enfermée dans le coffret marine, causant la formation de condensation et la surface de verre deviendra embuée. Il est
recommandé d’introduire le camescope dans le coffret marine dans un endroit où l’humidité est faible à une température proche de
celle de l’eau où vous allez plonger.
Si une pièce de feuille d’aluminium est coupée à 50 cm2 environ et introduite dans la partie en verre du coffret marine, la buée dans
le coffret marine adhérera à la feuille d’aluminium, comme sa conductivité à la chaleur est plus élevée que celle du verre. C’est une
façon efficace de réduire rapidement la buée dans le coffret marine.
Ne pas ouvrir ni fermer le coffret dans des endroits qui peuvent être sujets à des poussières d’eau ou au sable.
Si vous devez ouvrir le coffret marine sur le site de plongée pour remplacer la batterie ou la cassette, observer les précautions ci-dessous.
1) Choisir un endroit à l’abri des poussières d’eau et du sable.
2) Utiliser le soufflet fourni ou un dispositif similaire pour souffler complètement l’eau entre la partie principale et le couvercle du
coffret marine, et souffler l’eau adhérant sur les boucles qui les attachent. Sécher toute eau restant sur le coffret marine avec un
chiffon sec.
3) En retirant les boucles et en ouvrant le couvercle, faire attention que de l’eau de vos cheveux ou de votre corps ne tombe pas dans
le coffret marine.
4) Pour éviter de toucher au camescope avec les mains imprégnées d’eau salée, placer au préalable une serviette trempée d’eau pure
dans un sac en plastique et l’utiliser pour essuyer le sel de vos mains et doigts avant de toucher au camescope.
Après utilisation, bien laver avec de l’eau pure dès que possible. Si le coffret marine a été utilisé dans de l’eau salée, tremper le coffret
marine dans l’eau pure pendant un moment est efficace pour retirer le sel.
Après lavage, essuyer l’eau avec un chiffon sec sans sel pour sécher complètement le coffret marine. Toutefois, ne pas exposer le
coffret marine en plein soleil pour le faire sécher. Ce qui peut causer une décoloration et une rupture du coffret marine, et peut
accélérer la dégradation du joint.
Essuyer l’intérieur du coffret marine avec seulement un chiffon sec. Maintenir la transparence du verre avant à l’intérieur en l’essuyant
avec un chiffon au silicone ou similaire avant et après utilisation.
Retirer le joint du couvercle et essuyer toute trace de sel, sable ou d’autres matières étrangères. De la même manière, essuyer toute
matière étrangère adhérant de la rainure dans laquelle le joint s’adapte et de la partie principale où le joint est en contact. En retirant le
joint de la rainure, éviter d’utiliser des objets métalliques pointus; utiliser à la place un objet à bout arrondi, comme une épingle à
cheveux, pour éviter d’endommager le joint en le retirant.
Lorsque le coffret marine sera laissé inutilisé pendant une longue période, pour éviter la déformation du joint, le retirer de la rainure
du coffret marine, appliquer un léger film de graisse silicone, et le ranger dans un sac en plastique propre. En remettant en place le
joint pour utiliser de nouveau le coffret marine, vérifier soigneusement le joint pour des griffures et des fissures.
• S’il y a des griffures ou des fissures sur le joint, des fuites d’eau se produiront.
Comme le coffret marine est fait de résine de polycarbonate, le manipuler avec soin. Il peut, en particulier, être facilement éraflé par des
rochers, etc. sur le site de prise de vues et peut être endommagé s’il fait une chute ou est sujet à des chocs. Pour se rendre sur le site de
prise de vues en voiture, en bateau, par le train ou l’avion, éviter de transporter le camescope dans le coffret marine. Toutefois, si vous
prenez les précautions adéquates, il ne devrait pas y avoir de problème en transportant le camescope dans le coffret marine pour une
courte distance, par exemple du site cible au site de plongée.
Eviter de retirer des pièces autres que celles indiquées dans le manuel d’utilisation, de modifier le coffret marine, ou utiliser des pièces
autres que celles spécifiées. Si des problèmes se produisent, veuillez consulter le magasin où vous avez acheté le coffret.
La présentation et les caractéristiques de cet appareil sont modifiables sans préavis.
Caractéristiques principales
Pression maximale
Interrupteur d’alimentation
Touche d’enregistrement
Dimensions de la partie principale
Poids de la partie principale
Modèle compatible
Accessoires
: Profondeur d’eau jusqu’à 25 mètres
: Le mécanisme peut être utilisé
: Le mécanisme peut être utilisé
: 175 (l) x 130 (d) x 150 (h) mm
: 680 g
: GR-DVM70, GR-DVM50, GR-DVX7, GR-DVX4, GR-DVX70, GR-DVX40
: Kit d’entretien (graisse silicone, gel silice anti-buée, soufflet, papier, chiffon
silicone, Cotton-tiges, joint)
Manual del usuario
WR-DV47U
1
Procedimiento de montaje y procedimiento de
funcionamiento de cada componente
1.
2.
3
4
3.
4.
5
6
2
1 ....... Tapa frontal de la caja
2 ....... Hebilla
3 ....... Disco de alimentación
4 ....... Mando del zoom
5 ....... Botón de inicio/parada de grabación
6 ....... Botón fijo (fotografiado instantáneo)
Antes de utilizar esta unidad, deberá
hacer una prueba para verificar que no
hay ninguna fuga de agua en ella.
5.
6.
Le rogamos que lea antes de usar.
Esta caja para empleo submarino es un instrumento de precisión diseñado
para permitir la grabación segura de video bajo gran presión de agua.
Preste atención antes de manipular y después de usar la unidad, a las
explicaciones de este manual del usuario.
Cada componente de la caja submarina ha sido sujeto a estrictos controles
durante el proceso de fabricación, y las funciones individuales han sido
perfectamente comprobadas durante el proceso de armado. Cada caja
submarina ha pasado las inspecciones de hermeticidad al agua empleando
comprobadores de agua a alta presión. Sin embargo, como hay riesgo de
que se produzcan daños a veces durante el transporte, distribución o
almacenamiento después de la compra, antes de sumergirla efectúe la
siguiente prueba para verificar la seguridad.
7.
8.
PLAY
9.
Para iniciar la grabación de video,
presione el botón de inicio/parada de
grabación. Para interrumpir la grabación
de video, presiónelo nuevamente.
• Presione el botón fijo para efectuar
grabaciones de fotografiados
instantáneos. Si el flash es utilizado,
su intensidad de brillo quedará más
oscuro que lo usual debido a la caja
submarina. Esto es normal y no es un
fallo.
10. El zoom puede ser ajustado con el
mando del mismo.
11. Cuando haya terminado de filmar, gire el
disco de alimentación hacia la derecha
para colocar el disco de alimentación de
la videocámara en la posición de
desconexión.
NOTAS:
n La junta tórica está fabricada de goma y está
montada sobre la tapa frontal.
n Refiérase a las instrucciones de la
videocámara para mayor información.
OFF CAME
/PC
Mando del
zoom
Botón de
inicio/parada
de grabación
Botón fijo
(fotografiado
instantáneo)
Lámpara de
alimentación
P
PLAY/ C OFF
ERA 5S D
CAM
JVC no aceptará ninguna responsabilidad por fugas de agua ni por daños a
cualquier cosa dentro de la caja submarina (videocámara, cassette, etc.) a
consecuencia de un uso imprudente de este producto. Asegúrese de seguir
los procedimientos correctos cuando utilice la caja submarina.
Gire el disco de alimentación de la caja
submarina en el sentido de la flecha para
poner el disco de alimentación de la
videocámara en la posición “
”.
DSC DS
1. Antes de montar la videocámara dentro de la caja submarina, bucee
con la caja submarina vacía y verifique que no entra agua.
• Podrá comprobar fácilmente si hay fugas de agua a 1 metro de
profundidad, donde no hay presión de agua. Asegúrese de efectuar
esta prueba para garantizar la seguridad de su videocámara.
2. A continuación se indican las causas más comunes de fugas de agua:
A. Se ha utilizado la videocámara sin poner la junta tórica.
B. La junta tórica no está montada en la posición correcta.
C. La junta tórica está dañada o deformada.
D. Hay arena, suciedad, pelos u otras materias extrañas en la junta
tórica.
E. Hay arena, suciedad, pelos u otras materias extrañas en la superficie
de contacto de la junta tórica o en el interior de la tapa.
F. La correa suministrada o la bolsa de gelatina de sílice ha quedado
pellizcada dentro de la caja submarina al cerrar la tapa.
Para proteger su videocámara y asegurar un empleo optimo, cuando vaya a
utilizar la caja submarina tenga en cuenta los ejemplos indicados arriba.
Extraiga la correa para la mano o la correa de empuñadura de la
videocámara.
Extraiga las cuatro hebillas de la caja submarina y abra la tapa
frontal.
Alinee la marca del disco de
alimentación de la caja submarina con la
marca de la caja submarina.
Ponga el disco de alimentación de la
videocámara en la posición “OFF”,
Alinee las
después abra el monitor LCD e inserte la
marcas.
videocámara en la caja submarina.
Coloque la gelatina de sílice contra
empañamiento (incluída), en el espacio
entre la videocámara y la caja submarina para evitar que la misma
se empañe.
• Si el conmutador de operación de la videocámara está ajustada
en “ ”, efectúe los ajustes que sean necesarios, luego inserte la
videocámara dentro de la caja submarina.
Acomode el saliente del disco de
alimentación de la caja submarina sobre
la ranura externa del conmutador de
alimentación de la videocámara,
asegurándose que esté ajustado
firmemente.
Si el conmutador de alimentación de
la videocámara es ajustado en la posición
incorrecta cuando la videocámara sea
colocada en la caja submarina, el
saliente de alineación del disco de alimentación de la caja
submarina podrá dañarse y el conmutador de la videocámara
podrá resbalarse.
Antes de sellar la caja submarina, inspeccione que no haya arena,
suciedad ni materias extrañas en la junta tórica montada en la
tapa frontal o en la superficie de contacto de la junta tórica en la
unidad principal. También asegúrese de que la bolsa de gelatina
de sílice insertada no esté pellizcada. Si usted bucea con materias
extrañas atrapadas en estas áreas, entrará agua.
Verifique que la junta tórica en la tapa
frontal esté correctamente montada en la
ranura y presione la tapa frontal. Baje las
cuatro hebillas en el sentido indicado por
las flechas en la figura de la derecha para
sellar la caja submarina.
5S
RA
Prueba antes del uso
Antes de bucear, asegúrese de efectuar la prueba antes del uso
siguiente.
Caja submarina
DSC PLAY
SC
2
ESPAÑOL
LAY
CP
Para videocámara digital
GR-DVM70, GR-DVM50,
GR-DVX7, GR-DVX4,
GR-DVX70, GR-DVX40
Nombre de los componentes
ES
Precauciones para uso
1. Nunca emplee ninguno de los siguientes productos químicos de limpieza, antioxidantes, antiempañamiento, reparación u otros
2.
3.
4.
5.
6.
7.
8.
9.
10.
11.
12.
13.
propósitos.
1) No limpie la caja marina con alcohol, gasolina, solvente de pintura ni ningún otro solvente orgánico volátil, limpiadores químicos
o agentes similares. (Tanto el agua pura como el agua tibia son adecuadas para la limpieza).
2) No use agentes antioxidantes o similares en las partes de metal. (Todas las partes metálicas son de acero inoxidable, por eso el
agua pura es adecuada para la limpieza).
3) No emplee los agentes antiempañamiento comercialmente disponibles. (Emplee siempre el agente antiempañamiento que viene
con la caja submarina).
4) No emplee ninguna otra grasa de silicona que no sea la especificada para la junta tórica. (Siempre use la grasa de silicona que
viene con la caja marina).
5) No emplee ningún adhesivo para reparación, etc. (Si es necesario realizar reparaciones consulte con la tienda dónde la adquirió).
El uso directo o indirecto (productos químicos atomizados), de cualquiera de los productos químicos de arriba sobre la caja
submarina puede causar grietas cuando se la coloca bajo alta presión.
Tome precauciones ya que esta caja submarina es una estructura completamente hermética. Si se la deja expuesta a la luz solar
directa, en un automóvil o en la playa, la temperatura interna puede aumentar extremadamente, lo que hará que la videocámara en el
interior deje de funcionar correctamente.
Si la videocámara es sellada dentro de la caja submarina en un área donde la humedad y la temperatura son altas, el buceo hará que
la humedad concentrada en el interior de la caja submarina se enfríe, produciendo la formación de condensación y empañamiento de
la superficie del vidrio. Le recomendamos insertar la videocámara dentro de la caja submarina en un área donde la humedad sea baja
y la temperatura sea próxima del agua donde usted buceará.
Si un pedazo de papel de aluminio de aproximadamente 50 cm2 es cortado e insertado dentro de la parte de vidrio de la caja
submarina, la niebla del interior de la caja submarina se adherirá al papel de aluminio, ya que su conductibilidad de calor es superior
que la del vidrio. Esta es una forma efectiva para reducir rápidamente la niebla interna de la caja submarina.
No abra ni cierre la caja en áreas dónde salpique agua o arena.
Si es necesario abrir la caja submarina en el sitio de buceo para reemplazar la pila o la cinta, cumpla con las precauciones a
continuación.
1) Seleccione un lugar seguro dónde no salpique agua ni arena.
2) Emplee la sopladora suministrada o un dispositivo similar para soplar el agua entre la unidad principal y la sección de la tapa de la
caja marina y para soplar el agua en las hebillas de sujeción. Seque el agua que pueda haber en la caja submarina empleando un
paño seco.
3) Cuando extraiga las hebillas y abra la tapa, tome precauciones para que no entren en la caja submarina gotas de agua provenientes
de su cabello o de su cuerpo.
4) Para evitar tocar la videocámara con las manos que tienen agua salada, coloque una toalla humedecida con agua pura en una
bolsa de plástico y empléela para limpiar la sal de sus manos y dedos antes de tocar la videocámara.
Después de usarla, lávela correctamente con agua pura tan pronto como sea posible. Si la caja submarina ha sido empleada en agua
salada, sumérjala en agua pura durante un momento para limpiar la sal.
Después de lavarla, seque completamente el agua sobre la caja submarina con un paño seco que no tenga sal. Se recomienda no
exponer la caja submarina a la luz solar directa para secarla. Esto puede causar la decoloración y la rotura de la caja submarina, y
puede acelerar el deterioro de la junta tórica.
Limpie el interior de la caja submarina con un paño seco simplemente. Mantenga el vidrio frontal limpio y transparente empleando
un paño de silicona o similar antes y después de usar.
Extraiga la junta tórica de la tapa y limpie la sal, arena u otras materias extrañas. De la misma manera, limpie cualquier materia extraña
adherida a la ranura de colocación de la junta tórica y también la unidad principal de la caja submarina dónde la junta tórica hace
contacto. Para extraer la junta tórica de la ranura, evite emplear objetos de metal con punta aguzada; en lugar de ello emplee un objeto
con punta redonda tal como una horquilla para el cabello para evitar dañar la junta tórica al extraerla.
Para evitar que la junta tórica se deforme cuando se deje sin usar la caja submarina durante un período prolongado, extráigala de la
ranura de la caja y aplique una fina película de grasa de silicona, almacenando la junta en una bolsa de plástico. Cuando recoloque
la junta tórica en la caja submarina, inspeccione detenidamente la junta tórica por arañazos o agrietamiento.
• Si hay algun arañazo o grieta en la junta tórica, ocurrirá fuga de agua.
Como la caja submarina está fabricada con resina de policarbonato, manipúlela con precaución. La misma puede ser fácilmente arañada
por las rocas, etc. mientras filma y puede romperse si se la deja caer o se la sujeta a un choque fuerte. Cuando se dirija al lugar de
filmación en automóvil, barco, tren o avión, evite transportar la videocámara en la caja submarina. Si usted toma las precauciones de
manipulación adecuada, no habrá inconveniente en transportar la videocámara en la caja submarina durante distancias cortas, por
ejemplo desde el sitio de llegada al sitio de buceo.
Evite extraer los componentes que no sean los indicados en el manual del usuario, alterar la caja submarina, o emplear componentes
que no sean los especificados. Si ocurre algún problema, consulte con la tienda dónde la adquirió.
El aspecto y las especificaciones de esta unidad están sujetos a cambio sin aviso previo.
Especificaciones principales
Presión máxima
Conmutador de alimentación
Conmutador de filmación
Dimensiones de la unidad principal
Peso de la unidad principal
Modelo compatible
Accesorios
: 25 metros de profundidad
: Es posible emplear el dispositivo
: Es posible emplear el dispositivo
: 175 (A) x 130 (P) x 150 (Alt.) mm
: 680 gr.
: GR-DVM70, GR-DVM50, GR-DVX7, GR-DVX4, GR-DVX70, GR-DVX40
: Juego de mantenimiento (grasa de silicona, gelatina de sílice antiempañamiento,
papel, paño de silicona, isopos de algodón, junta tórica)
Nomi delle parti
2
1
3
4
Manuale Utente
WR-DV47U
1 ....... Coperchio frontale custodia subacquea
2 ....... Leve di chiusura a scatto
3 ....... Manopola di alimentazione
4 ....... Leva zoom
5 ....... Tasto avvio/arresto registrazione
6 ....... Tasto fotogramma (istantanea)
Prima dell’uso sottoporre l’attrezzatura
ad una verifica per controllare che non vi
siano perdite d’acqua.
1.
2.
3.
4.
5.
6.
Leggere prima dell’uso
Questa custodia subacquea è un dispositivo di precisione, progettato per
consentire di effettuare riprese subacquee sicure ad alta profondità.
Prestare molta attenzione quando la si maneggia, prima e dopo del suo
impiego, come spiegato in questo manuale.
Tutte le parti della custodia subacquea sono state sottoposte a controlli
severi durante la fabbricazione e le singole funzioni sono state collaudate
in modo rigoroso durante il loro assemblaggio. Ciascuna custodia
subacquea ha superato test di impermeabilità utilizzando apparecchiature
con acqua ad alta pressione. Tuttavia è possibile che subisca dei danni
durante il trasporto e la distribuzione, o durante la conservazione in
seguito all’acquisto. Per tale motivo occorre sempre effettuare i seguenti
test prima dell’impiego, per verificare che essa garantisca una protezione
efficace.
Custodia subacquea
Metodo di montaggio e funzionamento per
ciascuna parte
5
6
2
7.
8.
Togliere la cinghietta o la maniglietta della videocamera.
Aprire i quattro ganci posti sulla parte esterna della custodia ed aprire
il coperchio frontale.
Allineare il segno sulla manopola di
alimentazione della custodia subacquea
con quello sulla custodia stessa.
Impostare la manopola di alimentazione
della videocamera su “Off”, aprire il
Allineare i
monitor a cristalli liquidi ed inserire la
segni.
videocamera nella custodia subacquea.
Inserire il sacchetto di silice
antiappannamento (in dotazione) nello
spazio compreso tra la videocamera e la
custodia subacquea. Esso serve ad impedire l’appannamento
all’interno della custodia subacquea.
• Se l’interruttore di funzionamento della videocamera è su “ ”,
impostare i parametri come richiesto, quindi inserire la videocamera
nella custodia subacquea.
Collocare nella custodia subacquea la
sporgenza della manopola di alimentazione
sopra la scanalatura esterna dell’interruttore
d’accensione sulla videocamera,
controllando che sia saldamente inserita.
Se l’interruttore d’accensione della
videocamera viene collocato in posizione
sbagliata quando si inserisce la
videocamera nella custodia subacquea, il
dentino d’allineamento della manopola
d’alimentazione sulla custodia subacquea rischia di essere
danneggiato e l’interruttore d’accensione della videocamera di
scivolare.
Prima di chiudere ermeticamente la custodia subacquea, controllare
che non vi siano sabbia, polvere, o altri corpi estranei sulla
guarnizione toroidale montata sul coperchio frontale o sulla superficie
di contatto della guarnizione toroidale sull’unità principale.
Controllare anche che il sacchetto di silice inserito non rimanga
incastrato nel coperchio. Se ci si immerge con dei corpi estranei
intrappolati in queste zone, vi sarà un’infiltrazione d’acqua.
Controllare che la guarnizione toroidale sul
coperchio frontale sia installata
correttamente nella cava, poi premere sul
coperchio frontale. Far ruotare i quattro
ganci nei sensi indicati dalle frecce (figura a
destra) per chiudere ermeticamente la
custodia subacquea.
PLAY
Ruotare la manopola di alimentazione della
custodia subacquea nel senso indicato dalla
freccia per posizionare la manopola di
alimentazione della videocamera su
“
”.
LAY
CP
9.
Per dare inizio alla registrazione, premere il
tasto avvio/arresto registrazione. Premerlo di
nuovo per arrestarla.
Premere il tasto fotogramma per eseguire la
registrazione di un’istantanea.
• Se si adopera il flash, la sua luminosità
sarà minore del solito a causa della
custodia subacquea. Si tratta di una
conseguenza normale e non di un
guasto.
10. È possibile regolare lo zoom agendo
sulla leva omonima.
11.
NOTE:
Leva zoom
Tasto avvio/
arresto
registrazione
Tasto
fotogramma
(istantanea)
Spia di
accensione
P
PLAY/ C OFF
ERA 5S D
CAM
Al termine delle riprese ruotare la
manopola di alimentazione verso destra
per portare la manopola di alimentazione
della videocamera nella posizione “Off”.
DSC DS
Effettuare il seguente test prima di un’immersione.
La JVC non si assume alcuna responsabilità per infiltrazioni d’acqua o danni a
qualsiasi oggetto contenuto all’interno della custodia subacquea (videocamera,
videocassetta) dovuti ad utilizzo improprio di questo prodotto. Si raccomanda di
seguire le procedure corrette quando si utilizza la custodia subacquea.
OFF CAME
/PC
5S
RA
Test prima dell’impiego
1. Prima di installare la videocamera all’interno della custodia subacquea,
immergersi con la custodia vuota e verificare che sia stagna.
• È possibile effettuare in modo semplice un controllo di tenuta ad 1 metro
di profondità, in assenza di pressione dell’acqua. Effettuare questo test per
verificare l’efficacia della protezione della videocamera.
2. Alcune cause comuni di infiltrazioni di acqua:
A. La custodia subacquea viene utilizzata senza aver installato la
guarnizione toroidale.
B. La guarnizione toroidale non è montata nella posizione corretta.
C. La guarnizione toroidale è danneggiata o deformata.
D. Presenza di sabbia, sporco, capelli o altri corpi estranei depositati sulla
guarnizione toroidale.
E. Presenza di sabbia, sporco, capelli o altri corpi estranei depositati sulla
superficie di contatto della guarnizione toroidale, o all’interno del
coperchio.
F. La cinghietta o il sacchetto di gel di silice in dotazione sono rimasti
incastrati all’interno della custodia subacquea quando è stato chiuso il
coperchio.
Per proteggere la videocamera ed assicurare una lunga vita, tenere presenti gli
esempi che seguono quando si utilizza la custodia subacquea.
ITALIANO
DSC PLAY
SC
Per le videocamere digitali
GR-DVM70, GR-DVM50,
GR-DVX7, GR-DVX4,
GR-DVX70, GR-DVX40
n La guarnizione è di gomma ed è montata sul coperchietto anteriore.
n Per maggiori informazioni, consultare il manuale d’istruzioni della
videocamera.
Precauzioni e durante l’impiego
IT
1. Non utilizzare mai i seguenti prodotti chimici per effettuare la pulizia, un trattamento antiruggine, un trattamento antiappannamento o
2.
3.
4.
5.
6.
7.
8.
9.
10.
11.
12.
13.
una riparazione, o per altri scopi.
1) Non pulire la custodia subacquea con alcool, benzina, diluente per vernici, o altri solventi organici volatili, detergenti chimici o
prodotti simili. (L’acqua pura o l’acqua tiepida è sufficiente per la pulizia.)
2) Non utilizzare prodotti antiruggine o simili su parti metalliche. (Tutte le parti metalliche sono in acciaio inossidabile ed alluminio,
per cui l’acqua pura è più che sufficiente per la pulizia.)
3) Non utilizzare prodotti antiappannamento reperibili in commercio. (Utilizzare sempre il prodotto antiappannamento fornito in
dotazione alla custodia subacquea.)
4) Non utilizzare grasso siliconico al infuori di quello specificato per la guarnizione toroidale. (Utilizzare sempre il grasso siliconico
fornito in dotazione alla custodia subacquea.)
5) Non utilizzare prodotti abrasivi per le riparazioni, ecc.. (Se sono necessarie delle riparazioni, consultare il negoziante presso il
quale si è effettuato l’acquisto.) L’utilizzo diretto o indiretto (prodotti chimici vaporizzati) di uno dei suddetti prodotti chimici sulla
custodia subacquea può provocare incrinature quando la custodia subacquea è sottoposta ad alta pressione.
Trattare con cura la custodia subacquea. Se essa viene lasciata esposta alla luce del sole diretta, o in auto, su una nave, o sulla
spiaggia, la temperatura interna può salire a valori estremamente elevati, facendo sì che la videocamera contenuta all’interno della
custodia cessi di funzionare correttamente.
Se la videocamera viene chiusa nella custodia subacquea in un ambiente in cui la temperatura e l’umidità sono elevate, l’immersione
provoca la precipitazione dell’umidità rinchiusa nella custodia subacquea, con conseguente formazione di condensazione e quindi
appannamento della superficie di vetro. Consigliamo di inserire la videocamera nella custodia subacquea in un ambiente in cui vi è
poca umidità e la temperatura è prossima a quella delle acque in cui si progetta di immergersi.
Tagliando un foglio d’alluminio di circa 50 cm2 ed inserendolo nella parte di vetro della custodia subacquea, l’umidità aderisce al
foglio, la cui conduttività al calore è maggiore di quella del vetro. Si tratta di un metodo efficace per ridurre rapidamente
l’appannamento dentro la custodia subacquea.
Non aprire o chiudere la custodia in aree dove può essere soggetta a spruzzi d’acqua o sabbia.
Se si deve aprire la custodia subacquea nel luogo dove si effettua l’immersione, per sostituire la batteria o il nastro, osservare le seguenti
precauzioni.
1) Scegliere un posto al riparo da spruzzi d’acqua e sabbia.
2) Utilizzare la pompetta in dotazione o un dispositivo simile per soffiare completamente via l’acqua dallo spazio tra l’unità
principale della sezione del coperchio della custodia subacquea ed asportare l’acqua che aderisce ai ganci di fissaggio. Asportare
tutta l’acqua che rimane sulla custodia subacquea con un panno asciutto.
3) Quando si tolgono i ganci e si apre la sezione del coperchio, fare attenzione ad evitare che goccioline d’acqua colino dai capelli o
dal corpo e finiscano dentro la custodia subacquea.
4) Per evitare di toccare la videocamera con le mani bagnate di acqua di mare, mettere da parte in anticipo un tovagliolo inzuppato
di acqua pura in un sacchetto di plastica ed utilizzarlo per togliere l’acqua salata dalle mani o dalle dita prima di toccare la
videocamera.
Dopo l’utilizzo, lavare opportunamente con acqua pura, appena possibile. Se la custodia subacquea è stata utilizzata in acqua di
mare, un’immersione della custodia in acqua pura, per un po’ di tempo, è efficace per rimuovere il sale.
Dopo avere sciacquato, asportare l’acqua con un panno asciutto e pulito per asciugare completamente la custodia subacquea. Non
esporre la custodia subacquea alla luce solare diretta per asciugarla, perché ciò può provocare un cambiamento di colore e la rottura
della custodia subacquea ed accelerare il deterioramento della guarnizione toroidale.
Pulire l’interno della custodia subacquea con un panno asciutto. Mantenere trasparente il vetro frontale all’interno asciugando con un
panno siliconico possibile, prima e dopo dell’impiego.
Togliere la guarnizione toroidale dalla sezione del coperchio ed asciugare per asportare sale, sabbia o altri corpi estranei dalla cava della
guarnizione e dalla zona dell’unità principale della custodia subacquea che viene a contatto con la guarnizione. Quando si toglie la
guarnizione dalla cava, evitare di utilizzare oggetti metallici aguzzi; utilizzare invece un oggetto dalla punta rotonda, ad esempio una
spilla per capelli, per evitare di danneggiare la guarnizione quando la si toglie.
Quando si prevede di non utilizzare la custodia subacquea per un tempo abbastanza lungo, per evitare che la guarnizione si deformi,
toglierla dalla cava della custodia subacquea, applicare una pellicola sottile di grasso siliconico e conservarla in un sacchetto di
plastica pulito. Quando si rimette la guarnizione al suo posto per utilizzare di nuovo la custodia subacquea, controllare con
attenzione che non vi siano graffi e incrinature su di essa.
• Se la guarnizione è graffiata o screpolata, si possono produrre infiltrazioni d’acqua.
Poiché questa custodia subacquea è in resina di policarbonato, occorre maneggiarla con cura. In particolare, essa può essere facilmente
graffiata da scogli, ecc. nel luogo in cui si effettuano le riprese, e può essere danneggiata se viene lasciata cadere o comunque sottoposta
ad urti. Se ci si reca sul luogo in cui si effettuano le riprese in auto, nave, treno o aeroplano, evitare di trasportare la videocamera nella
custodia subacquea. Tuttavia, se si prendono opportune precauzioni, non vi dovrebbero essere problemi se si trasporta la videocamera
nella custodia subacquea per un breve tragitto, ad esempio dal luogo delle riprese al luogo dell’immersione.
Evitare di smontare parti ad eccezione di quelle indicate in questo manuale, di modificare la custodia subacquea, o utilizzare parti
che non siano quelle specificate. Se si verificano dei problemi, consultare il negoziante presso il quale si è effettuato l’acquisto.
L’aspetto esterno e le caratteristiche tecniche di questa unità sono soggetti a modifica senza obbligo di preavviso.
Caratteristiche tecniche
Pressione massima
Interruttore generale
Interruttore di registrazione
Dimensioni unità principale
Peso dell’unità principale
Modelli compatibili
Accessori
: Pressione dell’acqua: fino a 25 m
: È possibile utilizzare un meccanismo
: È possibile utilizzare un meccanismo
: 175 (L) x 130 (P) x 150 (H) mm
: 680 g
: GR-DVM70, GR-DVM50, GR-DVX7, GR-DVX4, GR-DVX70, GR-DVX40
: Kit di manutenzione (grasso siliconico, gel di silice antiappannamento, pompetta,
carta, panno siliconico, cotton fioc, guarnizione toroidale)
VICTOR COMPANY OF JAPAN, LIMITED
COPYRIGHT© 1999 VICTOR COMPANY OF JAPAN, LTD.
Printed in Japan
0399FOV UN AP
* *


![fondue set[ de ]](http://vs1.manualzilla.com/store/data/006758581_1-2880f49d79b622423cd1919809a1d29c-150x150.png)