1
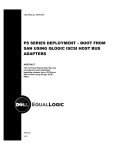
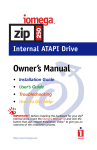
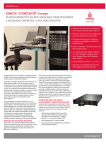
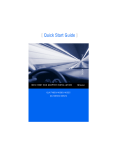
WHITE PAPER
USING IOMEGA STORCENTER
PRO ix4-200r NAS SERVER WITH
VMWARE ESX SERVER 3.5
Introduction
2
Audience
3
Terminology
3
Solution Configuration
3
Hardware
3
Software
4
Deployment Roadmap
4
NIC & SCSI Initiator Configuration
5
VMkernel Port Configuration
5
Adding a Share on StorCenter
8
Creating a NFS Datastore on ESX Server
11
Adding an iSCSI LUN on StorCenter
15
Creating a VMFS Datastore on ESX Server
17
Adding an RDM Disk to Virtual Machine 24
APRIL 2009
Multipathing & Failover Considerations
28
Conclusion
28
STORCENTER IX4-200r NAS WITH VMWARE ESX SERVER 3.5
EXECUTIVE SUMMARY
VMware® ESX Server is virtual infrastructure software for consolidating and managing systems. ESX Server accelerates
service deployments and adds management flexibility by partitioning x86 servers into a pool of secure, portable and
hardware-independent virtual machines. VMware Virtual Infrastructure and ESX Server have gained tremendous
attraction and acceptance in the industry and are considered critical IT components for enterprises and small
businesses alike.
Iomega® StorCenter™ Pro ix4-200r NAS Server is an integrated storage device that offers both NAS and iSCSI
functionality to allow customers flexible deployment options. The product targets small- to medium-sized businesses
with a rich set of features and simplicity of management. The StorCenter ix4-200r is powered by EMC® LifeLineTM
software to allow businesses to protect and share data with EMC’s world class storage and security technologies.
This white paper examines how StorCenter ix4-200r can be used to present storage to VMware ESX Server in a virtual
environment. The paper also provides detailed procedures that illustrate how to create storage on a StorCenter ix4200r in different forms and then utilize the storage on a VMware ESX Server.
INTRODUCTION
VMware Infrastructure 3 supports NAS storage devices using the NFS and iSCSI protocols. StorCenter NAS devices
can present NFS-exported shares and iSCSI LUNs to VMware ESX Server to create Datastores for virtual machines
and virtual disks. An Iomega StorCenter NAS offers greater reliability, ease of use, and ease of management
characteristics that are designed specifically for the needs of small businesses.
VMware ESX Server can connect to iSCSI targets using either software or hardware iSCSI initiators. The LUNs
presented by a target can then be formatted in the proprietary VMFS format. VMware ESX can also use iSCSI LUNs in
the form of RDM to provide direct raw disk access to virtual machines. VMFS is the native storage option on VMware
ESX Server, It’s also how SAN storage and local disks are utilized to create datastores.
NFS is another compelling option for VMware ESX for many reasons. With NFS, VMWare ESX Server supports
advanced features including VMotion, Distributed Resource Scheduler (DRS), high availability (VMHA), and VMware
Consolidated Backup (VCB). NFS offers a highly simplified management model that reduces cost and management
complexity. VMware encapsulates virtual machines into a small number of .vmdk files. NFS is an optimized file-serving
protocol with operational granularity at the file level as opposed to the LUN level.
Iomega StorCenter NAS satisfies requirements for both storage options on VMware ESX Server and is certified in the
VMware Hardware Compatibility List (HCL) with certifications in both NAS and Software iSCSI categories. A
StorCenter NAS device is a proven storage platform for small businesses that want to deploy VMware ESX Server.
White Paper
2
STORCENTER IX4-200r NAS WITH VMWARE ESX SERVER 3.5
AUDIENCE
Information contained in this white paper is intended for Iomega customers, partners, and service personnel involved
in planning, architecting, or administering a VMware environment with an Iomega StorCenter NAS as the storage
device. The readers are expected to have experience with ESX Server and an Iomega StorCenter NAS devices that run
EMC Lifeline software.
TERMINOLOGY
t Datastore: A file system, either VMFS or NFS, that serves as a virtual representation of an underlying pool of
physical storage resources. These physical storage resources can be comprised of SCSI disks from a local server,
Fibre Channel SAN disk arrays, iSCSI SAN disk arrays, or NAS storage arrays.
t Internet SCSI (iSCSI): A protocol for sending SCSI packets over TCP/IP networks.
t iSCSI LUN: iSCSI LUN (Logical Unit Number) is a virtual disk that processes SCSI commands, such as reading
from and writing to storage media.
t Network File System (NFS): A distributed file system providing transparent access to remote file systems. NFS
allows all network systems to share a single copy of a directory.
t Raw Device Mapping (RDM): RDM includes a combination of a pointer, which is a .vmdk file that resides on a
VMFS volume, and a physical raw device that the .vmdk file points to. RDM can either be physical compatibility
mode or virtual compatibility mode.
t Virtual Machine: A virtualized x86 PC on which a guest operating system and an associated application run. A VM is
also a set of discrete files that primarily include a .vmx configuration file and one or more .vmdk virtual disk files.
t Virtual Machine File System (VMFS): A VMware proprietary file system installed onto data stores and used by ESX
Server to house virtual machines.
SOLUTION CONFIGURATION
This section lists hardware and software resources for provisioning StorCenter ix4-200r storage to VMware ESX Server
3.5, as illustrated in this white paper.
HARDWARE
Table 1 lists the hardware resources used in the testing environment for the paper
White Paper
Hardware
Iomega® StorCenter™ Pro
NAS ix4-200r NAS
Quantity
one
Dell PowerEdge 1850
one
Configuration
•Four 500 GB or 1TB (7200 rpm) SATA disks
•RAID 5 across the disks
•One GbE network connection
•Two Intel Xeon 3.00GHz CPUs
•8 GB of memory
•One 146 GB 15k internal SCSI disk
•Four 10/100/1000 MB Ethernet NICs
3
STORCENTER IX4-200r NAS WITH VMWARE ESX SERVER 3.5
SOFTWARE
Table 2 lists the software resources used in the testing environment.
Software
EMC Lifeline 2.0
Quantity
one
VMware ESX Server 3.5
one
VMware Virtual Infrastructure 2.0
one
Configuration
EMC firmware that runs the Iomega
StorCenter Pro ix4-200r NAS
Installed on a Dell PowerEdge 1850
machine
Installed on a Windows client
DEPLOYMENT ROADMAP
Following its installation and initial configuration, the ESX Server can be connected to shared storage that is presented
from the StorCenter ix4-200r over the NFS and the iSCSI network protocols. Figure 1 highlights the steps that should
be followed when connecting the StorCenter ix4-200r storage device to the ESX Server.
Figure 1 High-level roadmap for connecting the ESX Server to a StorCenter ix4-200r
This white paper provides further information on each of these steps as follows:
w NIC and iSCSI initiator configuration in the ESX Server – configuring the physical NIC, software iSCSI initiator or
the iSCSI HBA that will be used to connect the ESX Server to a StorCenter ix4-200r.
w VMkernel port configuration in the ESX Server – configuring the ESX Server for IP storage connections to a
StorCenter ix4-200r for both the NFS and iSCSI network storage protocols.
w Adding Iomega shares to the ESX Server – for NFS, creating and exporting Iomega shares to the ESX Server.
w Creating NFS datastores in the ESX Server – for NFS, configuring NFS datastores in the ESX Server on the
exported shares from a StorCenter ix4-200r.
w Adding iSCSI LUNs to the ESX Server – for iSCSI, creating and sharing Iomega iSCSI LUNs to the ESX Server.
White Paper
4
STORCENTER IX4-200r NAS WITH VMWARE ESX SERVER 3.5
w Creating VMFS datastores in the ESX Server – for iSCSI, configuring VMFS datastores over the iSCSI LUNs that
were provisioned from a StorCenter ix4-200r.
w Adding RDM disks to virtual machines – for iSCSI, alternatively making the LUNs available as RDM disks to the
virtual machines.
w Multipathing and failover in the ESX Server – best practices for designing highly available network architecture in
the ESX Server.
NIC AND ISCSI INITIATOR CONFIGURATION
The NIC and iSCSI HBA drivers provided by VMware as part of the ESX Server distribution should be utilized when
connecting the ESX Server to a StorCenter ix4-200r storage device.
For iSCSI, both the ESX Server software iSCSI initiator and the iSCSI HBA can be used to connect to StorCenter ix4200r iSCSI targets. When using iSCSI HBA, two models by QLogic are currently supported. They are QLA4050c and
QLE4060c; both are certified in the VMware I/O Compatibility Guide for ESX Server 3.5
(http://www.vmware.com/pdf/vi35_io_guide.pdf).
VMKERNEL PORT CONFIGURATION
A VMkernel port allows for the usage of both iSCSI and NFS storage. When the storage has been configured on a
StorCenter ix4-200r, the ESX server host must have a VMkernel port defined with network access to the Iomega device.
1.
Click Configuration >Networking > Add Networking.
Figure 2 Add network
White Paper
5
STORCENTER IX4-200r NAS WITH VMWARE ESX SERVER 3.5
2. Select the VMkernel connection type as shown in Figure 3.
Figure 3 VMkernel selection
3. Select a virtual switch to handle the VMkernel port traffic
Figure 4 Select virtual switch
White Paper
6
STORCENTER IX4-200r NAS WITH VMWARE ESX SERVER 3.5
4. Name the new VMkernel port group and optionally the VLAN ID for the network.
Figure 5 Name the VMkernel port group
5. Verify the settings and finish creating the VMkernel port.
Figure 6 VMkernel port group created
White Paper
7
STORCENTER IX4-200r NAS WITH VMWARE ESX SERVER 3.5
ADDING A SHARE ON AN IOMEGA STORCENTER NAS DEVICE
When using NFS storage, you need to add a share on a StorCenter ix4-200r. Appropriate access permissions must be
set for the VMkernel port on the ESX Server to mount an NFS share. These access permissions are:
w Host access – provide the VMkernel port mount access to the share.
w Read/write access – provide the VMkernel port read/write access to the share.
w Root access – provide the VMkernel port root access to the share.
NFS exports directories with root_squash turned on. This means that root on the client machine will be mapped to the
anonymous UID, which is commonly nobody. The result is that root on the client machine will not be able to access
anything in the exported entry. The no_root_squash option prevents this behavior. Therefore, if you want to secure the
share to be used by ESX, you must enable root account access on your Lifeline. If you choose to leave the share nonsecured, then nothing special needs to be done.
1.
From Settings > Network Services > check Enable NFS Service on StorCenter ix4-200r. Also, check “Allow
Root Account Access” if you intend to secure the NFS share so that the ESX server can access it using the default root
account.
Figure 7 Enable NFS service on the StorCenter ix4-200r
White Paper
8
STORCENTER IX4-200r NAS WITH VMWARE ESX SERVER 3.5
2.
Go to Shared Storage and click Add to create a new share and optionally enable security on it.
Figure 8 Create a new share
When creating the share, ensure Folder is the shared storage type and that Enable security is not checked.
3.
Click Next to specify user access to the secured share.
Figure 9 Specify user access
White Paper
9
STORCENTER IX4-200r NAS WITH VMWARE ESX SERVER 3.5
4.
Click Next to specify host access to the secured share. Make sure you enter the IP address of the VMKernel
port created previously, not the service console port.
Figure 10 Specify host access
5.
Click Apply and a confirmation page should display.
Figure 11 New share created
White Paper
10
STORCENTER IX4-200r NAS WITH VMWARE ESX SERVER 3.5
CREATING AN NFS DATASTORE ON ESX SERVER
VMware Infrastructure 3 management utilities are used to configure and mount NFS shares from the StorCenter ix4200r. The VI client is also used to assign a datastore name to the export. The datastore name is the key reference that
is used to manage the datastore within the ESX environment.
The NFS datastore is viewed as a pool of storage space to support virtual disks. One or more virtual disks are created
within the datastore and assigned to virtual machines. Each virtual machine will use the primary virtual disk to install
the guest operating system and boot information. The additional disks are used to support application and user data.
By default, the ESX Server allows a maximum of eight NFS datastores to be created. To create more NFS datastores,
please change the NFS.MaxVolumes setting to a number no greater than 32. The following settings are recommended
for NFS connections:
NFS.MaxVolumes = 32
NFS.HeartbeatFrequency = 12
NFS.HeartbeatTimeout = 5
NFS.HeartbeatMaxFailures = 10
Net.TcpipHeapSize = 30
The three heartbeat options control heartbeat counts and timeouts. In the event of a brief network connection loss,
reboot, or failure of the NFS server, the ESX Server will not simply fail the NFS datastores. The NFS client in ESX relies
on heartbeats to verify the NFS shares are available. Therefore, increasing the NFS heartbeat frequency will ensure the
NFS datastore I/O can resume much sooner, once the NFS server comes back.
Figure 12 Modify NFS options on ESX Server
White Paper
11
STORCENTER IX4-200r NAS WITH VMWARE ESX SERVER 3.5
The TCP/IP heap is memory used for TCP/IP buffers for NFS, iSCSI, VMotion, etc. The default NFS.SendBufferSize is
264KB, and the default NFS.ReceiveBufferSize is 128KB. So with two sockets per volume, the total heap needed per
volume is 784KB. If you want to create a total of 32 NFS datastores, then you need approximately 25MB in heap size. If
you set the heap size to 30MB, you will ensure the best NFS datastore performance when the maximum number of
datastores are created.
Figure 13 Modify TCP/IP heap size
White Paper
12
STORCENTER IX4-200r NAS WITH VMWARE ESX SERVER 3.5
1. Go to Configuration > Storage > Add Storage…
Figure 14 Add storage to ESX Server
2. Select the Network File System option.
Figure 15 Select NFS type
White Paper
13
STORCENTER IX4-200r NAS WITH VMWARE ESX SERVER 3.5
3. Enter the NFS server and share information on StorCenter ix4-200r.
Figure 16 Mount the NFS share
Either the hostname or the IP address of the StorCenter ix4-200r can be entered here. Ensure that “/nfs” is specified in the folder
path so Lifeline can export an NFS share. A meaningful datastore name is recommended to clearly identify it in ESX Server.
4. Click Next and confirm the settings to create the datastore.
Figure 17 Create NFS datastore
White Paper
14
STORCENTER IX4-200r NAS WITH VMWARE ESX SERVER 3.5
ADDING AN ISCSI LUN ON AN IOMEGA STORCENTER NAS DEVICE
When using iSCSI storage, you need to add an iSCSI LUN on a StorCenter ix4-200r. A total of 32 iSCSI targets can be
created on an StorCenter ix4-200r, with each target holding one single LUN. An iSCSI LUN can be protected by setting
user access controls and iSCSI authentication methods.
The StorCenter ix4-200r supports two methods of target discovery: the SendTargets command, and the Internet
Storage Name Service (iSNS) server. The SendTargets command technique requires that an initiator know the IP
address and port number of the target. It is the simple and default discovery method. The VMware ESX Server only
supports SendTargets; therefore, this is the discovery method used.
After target discovery, an iSCSI initiator can log on with or without authentication. A StorCenter ix4-200r supports the CHAP
authentication method. When CHAP is enabled and an iSCSI LUN is secured, an initiator will need to provide the CHAP
secret to log on. However, if the LUN is not secured, no authentication is required even if the global CHAP setting is enabled.
Iomega customers are recommended to secure iSCSI LUNs, and this is the practice followed in the white paper.
1. From Settings > Network Services > check Enable iSCSI on a StorCenter ix4-200r. Optionally enable iSNS discovery.
Figure 18 Enable iSCSI service
White Paper
15
STORCENTER IX4-200r NAS WITH VMWARE ESX SERVER 3.5
2. Click Shared Storage and click Add to create a new iSCSI LUN and enable security on it.
Figure 19 Add new LUN
3. Proceed to set user access to the LUN.
Figure 20 Set user access to the LUN
White Paper
16
STORCENTER IX4-200r NAS WITH VMWARE ESX SERVER 3.5
In this example, the user account Administrator is given read/write access to the LUN, but other users have no access
to it. This Administrator user account and its password will be the CHAP logon credentials to be used by ESX Server.
4. Click Apply and a confirmation page should display.
Figure 21 Confirmation of the LUN creation
CREATING A VMFS DATASTORE ON THE ESX SERVER
Prior to adding an iSCSI device on the ESX Server, an iSCSI initiator must be installed. Two types of initiators, software
and hardware, can be used in the ESX Server. Each type has a distinct installation method. After installation, however,
both initiators use the same process to discover targets, log on to the targets, scan for new iSCSI LUNs, and create
VMFS datastores using those LUNs. In this white paper, the software iSCSI initiator is used to illustrate the process.
White Paper
17
STORCENTER IX4-200r NAS WITH VMWARE ESX SERVER 3.5
1. Enable the iSCSI client in the VMware ESX firewall. Go to Configuration > Security Profile > Properties…
Figure 22 Enable iSCSI client
2. Click Configuration > Storage Adapters
Figure 23 iSCSI Software Adapter
White Paper
18
STORCENTER IX4-200r NAS WITH VMWARE ESX SERVER 3.5
3. Click the vmnba32 iSCSI software adapter and then click Properties. If the iSCSI initiator is not enabled yet, click
Configure to enable the initiator and use the default iSCSI name.
Figure 24 iSCSI initiator properties
4. Click Dynamic Discovery > Add to enter the iSCSI server information. As mentioned previously, the SendTargets
discovery method is used.
Figure 25 Specify iSCSI server information
White Paper
19
STORCENTER IX4-200r NAS WITH VMWARE ESX SERVER 3.5
5. Click CHAP Authentication > Configure to enter the CHAP authentication credentials for logon to the iSCSI targets
on the StorCenter ix4-200r. The CHAP name should be the user name that is granted read/write access to an iSCSI
LUN. In this example, it’s Administrator. The CHAP secret is the password of the user account as set on the ix4-200r. A
CHAP secret is required to have 12-16 characters if IPSec is not used. Therefore, if the user password is shorter than 12
characters, increase its length with the asterisk “*” character.
Figure 26 Supply CHAP authentication information
6. Go to Configuration > Storage Adapters and click Rescan to discover targets and LUNs on the StorCenter ix4-200r.
Figure 27 Target and LUN discovery
White Paper
20
STORCENTER IX4-200r NAS WITH VMWARE ESX SERVER 3.5
All the targets and LUNs that are either unsecured or granted access to the Administrator user will show up as disks
in the VMware ESX.
7. Go to Configuration > Storage > Add Storage… again to create VMFS datastore.
8. Select the Disk/LUN option.
Figure 28 Select VMFS type
9. Select the iSCSI LUN to create VMFS on.
Figure 29 Select the LUN to be used
White Paper
21
STORCENTER IX4-200r NAS WITH VMWARE ESX SERVER 3.5
10. Review the current disk layout on the disk and proceed
Figure 30 Review disk layout
11. Name the VMFS datastore to be created. Again, give it a meaningful name so it can be easily identified
Figure 31 Name the VMFS datastore
White Paper
22
STORCENTER IX4-200r NAS WITH VMWARE ESX SERVER 3.5
12. Specify the maximum file size allowed on the datastore and the maximum capacity on the datastore
Figure 32 Specify file size and capacity
13. Review the summary and proceed to create the VMFS datastore.
Figure 33 Create VMFS datastore
White Paper
23
STORCENTER IX4-200r NAS WITH VMWARE ESX SERVER 3.5
ADDING AN RDM DISK TO VIRTUAL MACHINE
A raw device mapping (RDM) is a special file in a VMFS volume that acts as a proxy for a raw device. The RDM
provides some of the advantages of a virtual disk in the VMFS file system, while keeping some advantages of direct
access to raw devices. VMware recommends RDM when a virtual machine must interact with a real disk on the SAN
or iSCSI SAN. Two compatibility modes are available for RDM. The physical compatibility mode (a.k.a. pass-through
mode) allows direct access of a SCSI device for those applications that need lower-level control. The virtual
compatibility mode (a.k.a. non pass-through mode) allows an RDM to act exactly like a virtual disk file.
Prior to adding RDM, we need to create a virtual machine first. An iSCSI LUN on an Storcenter ix4-200r can then be
assigned to the virtual machine in either compatibility mode.
1. Go to Inventory > Host > New Virtual Machine… to create a new virtual machine. After naming the virtual machine,
select a datastore in which to store the files for the virtual machine. For illustration purposes, the “Iomega-NFS”
datastore created previously is used in the following figure.
Figure 34 Choose the datastore to hold the virtual machine
2. Follow the instructions on setting the Guest Operating System, CPUs, Memory, Network, and Virtual Disk Capacity
to complete the process of virtual machine creation.
3. Install the guest Operating System using a CD/DVD or ISO image. Power on the virtual machine after installation to
finish all virtual machine configurations.
White Paper
24
STORCENTER IX4-200r NAS WITH VMWARE ESX SERVER 3.5
4. Go to Summary > Edit Settings with the virtual machine powered on or powered off. When in the Virtual Machine
Properties window, click Add to add a new hardware to the virtual machine.
Figure 35 Edit virtual machine settings
5. Select Hard Disk as the hardware to add.
Figure 36 Add a hard disk to virtual machine
White Paper
25
STORCENTER IX4-200r NAS WITH VMWARE ESX SERVER 3.5
6. Choose Raw Device Mappings as the virtual disk type.
Figure 37 Select RDM as the disk type
7. Select the iSCSI LUN on the Storcenter ix4-200r to be used as an RDM disk.
Figure 38 Select the LUN to be used as the RDM
White Paper
26
STORCENTER IX4-200r NAS WITH VMWARE ESX SERVER 3.5
8. Choose which datastore to map to the RDM. The default is to store the RDM with the virtual machine in the same
datastore.
Figure 39 Decide where to map the RDM
9. Select which RDM compatibility mode to use.
Figure 40 Select the compatibility mode
White Paper
27
STORCENTER IX4-200r NAS WITH VMWARE ESX SERVER 3.5
10. Choose the default virtual device/SCSI node and have the RDM disk added into the virtual machine.
11. After the RDM disk is added from ESX Server, the virtual machine needs to rescan its SCSI bus to discover the new
disk. Afterwards, partitions can be created and formatted with a file system type. For a Windows guest, use the Disk
Manager utility; for a Linux guest, use the fdisk utility and file system formatting tools such as mkreiserfs.
MULTIPATHING AND FAILOVER CONSIDERATIONS
An important aspect when configuring an ESX Server network is to ensure that there is redundancy to the ESX Server’s
storage. This redundancy is available when the storage is being accessed by either the NFS protocol or the iSCSI
protocol.
StorCenter ix4-200r has single Gigabit Ethernet on the device; this makes it impossible to configure redundant network
on the device to allow multiple paths into storage. However, highly available network can still be configured on the ESX
Server side to prevent access to storage being lost in case of a NIC or switch failure.
The mechanism on the ESX Server is to configure NIC Teaming between two or more NICs connected to the same
subnet. Additionally, two Ethernet switches configured with the same subnet and connected by an uplink can be
configured.
CONCLUSION
VMware Virtual Infrastructure dramatically improves the efficiency and availability of resources and applications in
organizations of any sizes. VMware customers typically save 50-70% on overall IT costs by lowering both capital and
operational costs and improving operational efficiency and flexibility. This is especially important to small businesses
that normally have a very limited IT budget.
The Iomega StorCenter Pro ix4-200r NAS Server is a high-performance, ease-of-use, and highly reliable storage dev ice
specifically designed to meet the storage challenges that small businesses face daily. The device supports the NFS
protocol and iSCSI protocol, the two predominant ways of utilizing IP storage by the VMware ESX Server. Customers’
total infrastructure costs are further reduced by using an existing Ethernet infrastructure.
The Iomega StorCenter ix4-200r is certified in the VMware Hardware Compatibility List as both NAS and Software
iSCSI storage. It provides reliable and proven storage solutions to small businesses that plan to deploy VMware Virtual
Infrastructure.
©2009 Iomega Corporation. All rights reserved. Iomega, StorCenter, and the stylized “i” logo are either registered trademarks or trademarks of Iomega Corporation in the United States and/or other countries. EMC, Lifeline, and Retrospect are registered trademarks of
EMC Corporation in the U.S. and/or other countries. VMware is a registered trademark of VMware, Inc. Linux is a registered trademark of Linus Torvalds. Microsoft and Windows are either registered trademarks or trademarks of Microsoft Corporation in the United States
and/or other countries. Macintosh and Mac are either registered trademarks or trademarks of Apple Computer Inc. in the United States and/or other countries. Certain other product names, brand names and company names may be trademarks or designations or their
respective owners. Iomega's specific customer support policies (including fees for services) and procedures change as technology and market conditions dictate. Product in photos may vary slightly from product in package. Product capacities are specified in gigabytes
(GB), where 1GB = 1,000,000,000 Bytes. To obtain information about Iomega’s current policies please visit Iomega at www.iomega.com or call 1-888-4iomega (1-888-446-6342). VMWP-0409-05