1
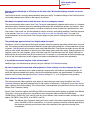
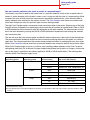
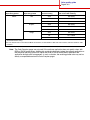
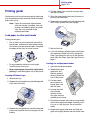
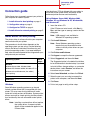
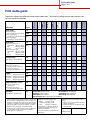
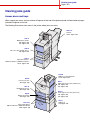
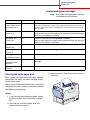
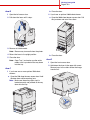
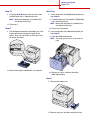
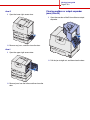
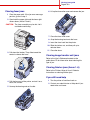
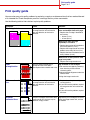
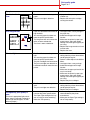
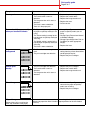
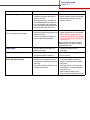
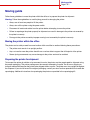
Infoprint Color 1454 & 1464
Help guide
G510-4097-00
Infoprint Color 1454 & 1464
Help guide
G510-4097-00
Help guide
Page 1 of 1
Help guide
Other languages
Help Menu pages
The Help Menu pages, User’s Guide, and Setup Guide
are also available on the publications CD.
Other Help Menu pages available include:
•
•
•
•
Color quality guide
Printing guide
Connection guide
Print media guide
• Clearing jams guide
• Print quality guide
• Repetitive defects
guide
• Moving guide
Setup Guide
The Setup Guide provides information about setting up
the printer and its options.
Publications CD / User’s Guide
The publications CD contains a User’s Guide which
provides information about loading paper, clearing
error messages, ordering and replacing supplies,
installing maintenance kits, and troubleshooting. It
also provides general information for administrators.
Drivers CD
The drivers CD contains the necessary printer drivers
to get your printer up and running.
It may also contain printer utilities, screen fonts, and
additional documentation.
Color quality guide
Page 1 of 6
Color quality guide
This Color Quality guide is intended to help users understand how operations available on the printer can be used
to adjust and customize color output. A brief description of the purpose and operation of the functions available
that affect color output is provided. Additionally, some helpful suggestions are provided on how to use these
functions to produce desirable color output and to solve certain color related problems commonly experienced by
users.
Color Menu
Selections available in the Color Menu provide the user with multiple options that can adjust color characteristics
of the printer.
Note: Values marked by an asterisk (*) are the factory default settings. Values selected in the printer
PostScript or PCL drivers for Windows will override printer settings.
Menu item
Purpose
Values
Print Mode
To determine whether files are
printed in a monochrome grayscale
or in color.
Color*
To adjust the printed color to better
match the colors of other output
devices or standard color systems.
Auto*
Applies different color conversion tables to each
object on the printed page depending on the
type of object and how the color for each object
is specified.
Off
No color correction is implemented.
Manual
Lets you customize the color conversion tables
applied to each object on the printed page
depending on the type of object and how the
color for each object is specified. Customization
is performed using the selections available
under the Manual Color menu item.
4800 CQ*
Default setting.
1200 dpi
Provides the highest resolution output which
generates preferable output for certain images
and graphics. This setting also provides
increased gloss.
Color
Correction
Black & White
Print
Resolution
To define the number of dots printed
per inch (dpi).
Toner
Darkness
To lighten or darken printed output, or 5
conserve toner.
Note: Setting Toner Darkness to
values of 1, 2, or 3 is only effective
when using the PostScript driver.
If Print Mode is Black & White, a setting of 5
increases toner density and darkness to all print
jobs (PCL or PostScript). If Print Mode is Color,
a setting of 5 is the same as 4.
4*
Default toner darkness setting.
3
Reduction in toner consumption.
2
Further reduction in toner consumption.
1
Maximum reduction in toner consumption.
Color quality guide
Page 2 of 6
Menu item
Purpose
Color
Balance
To provide users with the ability to
Cyan
make subtle color adjustments to
Magenta
printed output by increasing or
decreasing the amount of toner being Yellow
used for each color plane individually.
Black
Note: This function is only applied to
files printed using the PostScript
Reset
driver.
Defaults
-5, -4, -3, -2, -1, 0*, 1, 2, 3, 4, 5
To assist users in selecting colors to
be printed. Users can print color
samples pages for each of the RGB
and CMYK color conversion tables
used in the printer.
sRGB
Display
Prints RGB samples using sRGB Display color
conversion tables.
sRGB Vivid
Prints RGB samples using sRGB Vivid color
conversion tables.
The color samples pages consist of a
series of colored boxes along with the
RGB or CMYK combination that
creates the color observed for each
particular box. These pages can be
useful in helping users decide which
RGB or CMYK combinations to use
in their software applications to
create the desired printed color
output.
Off–RGB
Prints RGB samples using Off (or no) color
conversion tables.
Vivid
Prints RGB samples using Vivid color
conversion tables.
US CMYK
Prints CMYK samples using US CMYK color
conversion tables.
Euro CMYK
Prints CMYK samples using Euro CMYK color
conversion tables.
Off–CMYK
Prints CMYK samples using Off (or no) color
conversion tables.
Vivid CMYK
Prints CMYK samples using Vivid CMYK color
conversion tables.
RGB Image
• sRGB Display*: Applies a color conversion
table to produce output that approximates the
colors displayed on a computer monitor.
• sRGB Vivid: Increases color saturation for
the sRGB Display color conversion table.
Preferred for business graphics and text.
• Off: No color conversion is implemented.
• Vivid: Applies a color conversion table that
produces brighter, more saturated colors.
RGB Text
•
•
•
•
Color
Samples
Manual Color
To let users customize the RGB or
CMYK color conversions applied to
each object on the printed page.
Color conversion of the data
specified using RGB combinations
can be customized based on object
type (text, graphics, or image).
Values
RGB
Graphics
CMYK
• -5 is maximum decrease
• 5 is maximum increase
Sets values for Cyan, Magenta, Yellow, and
Black to 0 (zero).
sRGB Display
sRGB Vivid*
Off
Vivid
• US CMYK*: Applies a color conversion table
to approximate SWOP color output.
• Euro CMYK: Applies color conversion table
to approximate EuroScale color output.
• Vivid CMYK: Increases color saturation for
the US CMYK color conversion table.
• Off: No color conversion is implemented.
Color quality guide
Page 3 of 6
Menu item
Purpose
Values
Color Adjust
To manually recalibrate the color
conversion tables, adjusting for
variations in output that can occur as
a result of changing conditions, such
as room temperature or humidity.
No selections exist for this operation.
To conserve toner. If selected, this
setting will override Toner Darkness
settings.
On
Color Saver
Pressing Select initiates this operation.
Applies a lower Toner Darkness level.
Toner Darkness setting is ignored.
Off*
Prints using Toner Darkness setting.
Solving color quality problems
This section is intended to help answer some basic color-related questions and to describe how some of the
features provided in the Color Menu can be used to solve typical color problems.
Note: You should also read the quick reference page entitled “Solving Print Quality Problems,” which
provides solutions for common print quality problems, some of which may affect the color quality of
the printed output.
Frequently asked questions (FAQ) about color printing
What is RGB color?
Red, green, and blue light can be added together in various amounts to produce a large range of colors observed
in nature. For example, red and green light can be combined to create yellow light. Televisions and computer
monitors create colors in this manner. RGB color is a method of describing colors by indicating the amount of red,
green, and blue light needed to reproduce a particular color.
What is CMYK color?
Cyan, magenta, yellow, and black inks or toners can be printed in various amounts to produce a large range of
colors observed in nature. For example, cyan and yellow can be combined to create green. Printing presses,
inkjet printers and color laser printers create colors in this manner. CMYK color is a method of describing colors
by indicating the amount of cyan, magenta, yellow, and black needed to reproduce a particular color.
How is color specified in a document to be printed?
Software applications typically specify document color using RGB or CMYK color combinations. Additionally, they
commonly let users modify the color of each object in a document. Since the procedures to modify colors will vary
depending on the application, refer to the software application Help section for instruction.
How does the printer know what color to print?
When a user prints a document, information describing the type and color of each object in the document is sent
to the printer. The color information is passed through color conversion tables that translate the color into
appropriate amounts of cyan, magenta, yellow, and black toner needed to produce the desired color. The object
type information lets different color conversion tables be used for different types of objects. For example, it is
possible to apply one type of color conversion table to text while applying a different color conversion table to
photographic images.
Color quality guide
Page 4 of 6
Should I use the PostScript or PCL driver for the best color? What driver settings should I use for the
best color?
The PostScript driver is strongly recommended for best color quality. The default settings in the PostScript driver
will provide preferred color quality for the majority of printouts.
Why doesn't the printed color match the color I see on my computer screen?
The color conversion tables used in Auto Color Correction mode generally approximate the colors of a standard
computer monitor. However, because of technology differences that exist between printers and monitors, there
are many colors that can be generated on a computer screen that cannot be physically reproduced on a color
laser printer. Color match can also be affected by monitor variations and lighting conditions. Read the response
to the question “How can I match a particular color (such as a color in a corporate logo)?” on page 5 for
recommendations on how the printer Color Samples pages may be useful in solving certain color matching
problems.
The printed page appears tinted. Can I slightly adjust the color?
Sometimes a user may consider printed pages to appear tinted (for example, everything printed seems to be too
red). This can be caused by environmental conditions, paper type, lighting conditions, or user preference. In these
instances, Color Balance may be used to create more preferable color. Color Balance provides the user with the
ability to make subtle adjustments to the amount of toner being used in each color plane. Selecting positive (or
negative) values for cyan, magenta, yellow, and black under the Color Balance menu will slightly increase (or
decrease) the amount of toner used for the chosen color. For example, if a user believes the overall printed page
to be too red, then decreases to both magenta and yellow could potentially improve color preference.
Is it possible to increase the gloss in the printed output?
Additional gloss can be obtained by printing using the 1200 dpi Print Resolution setting.
My color transparencies seem dark when projected. Is there anything I can do to improve the color?
This problem most commonly occurs when projecting transparencies with reflective overhead projectors. To
obtain the highest projected color quality, transmissive overhead projectors are recommended. If a reflective
projector must be used, then adjusting Toner Darkness settings to 1, 2, or 3 will lighten the transparency.
What is Manual Color Correction?
The color conversion tables applied to each object on the printed page when using the default Auto Color
Correction setting will generate preferred color for the majority of documents. Occasionally a user may want to
apply a different color table mapping. This customization is accomplished using the Manual Color menu and the
Manual Color Correction setting.
Manual Color Correction applies the RGB and CMYK color conversion table mappings as defined in the Manual
Color menu. Users may select any of four different color conversion tables available for RGB objects
(sRGB Display, sRGB Vivid, Vivid, and Off) and any of four different color conversion tables available for CMYK
objects (US CMYK, Euro CMYK, Vivid CMYK, and Off).
Note: The Manual Color Correction setting will not be useful if the software application does not specify
colors with RGB or CMYK combinations, or in certain situations where the software application or
the computer operating system adjusts the colors specified in the application through color
management.
Color quality guide
Page 5 of 6
How can I match a particular color (such as a color in a corporate logo)?
Occasionally users have a need for the printed color of a particular object to closely match a specific color of
interest. A typical example of this situation is when a user is trying to match the color of a corporate logo. While
instances can occur in which the printer cannot exactly reproduce the desired color, users should be able to
identify adequate color matches for the majority of cases. The Color Samples menu items can provide useful
information in helping to solve this particular type of color matching problem.
The eight Color Samples options correspond to color conversion tables in the printer. Selecting any of the Color
Samples options will generate a multiple-page printout consisting of hundreds of colored boxes. Either a CMYK
or RGB combination will be located on each box depending on the table selected. The observed color of each
box is the result obtained by passing the CMYK or RGB combination labeled on the box through the selected
color conversion table.
The user can scan the color samples pages and identify the box whose color is the closest to the desired color.
The color combination labeled on the box can then be used for modifying the color of the object in a software
application. The software application Help section should provide instructions for modifying the color of an object.
Manual Color Correction may be necessary to utilize the selected color conversion table for the particular object.
Which Color Samples pages to use for a particular color matching problem depends on the Color Correction
setting being used (Auto, Off, or Manual), the type of object being printed (text, graphics, or images), and how the
color of the object is specified in the software application (RGB or CMYK combinations). The following table
identifies which Color Samples pages to use:
Color specification of
object being printed
RGB
Classification of
object being printed
Text
Graphic
Image
Printer Color
Correction setting
Color Samples pages to print
and use for color matching
Auto
sRGB Vivid
Off
Off - RGB
Manual
sRGB Vivid*, Vivid, sRGB Display, Off
Auto
sRGB Vivid
Off
Off - RGB
Manual
sRGB Vivid*, Vivid, sRGB Display, Off
Auto
sRGB Display
Off
Off - RGB
Manual
sRGB Vivid*, Vivid, sRGB Display, Off
* The default Manual setting.
Note: The default values for the Manual CMYK classifications are US CMYK for 100V and 110V machines and Euro CMYK for 220V
machines.
Color quality guide
Page 6 of 6
Color specification of
object being printed
CMYK
Classification of
object being printed
Text
Graphic
Image
Printer Color
Correction setting
Color Samples pages to print
and use for color matching
Auto
US CMYK
Off
Off - CMYK
Manual
US CYMK*, Vivid CMYK, Off, Euro CMYK*
Auto
US CMYK
Off
Off - CMYK
Manual
US CYMK*, Vivid CMYK, Off, Euro CMYK*
Auto
US CMYK
Off
Off - CMYK
Manual
US CYMK*, Vivid CMYK, Off, Euro CMYK*
* The default Manual setting.
Note: The default values for the Manual CMYK classifications are US CMYK for 100V and 110V machines and Euro CMYK for 220V
machines.
Note: The Color Samples pages are not useful if the software application does not specify colors with
RGB or CMYK combinations. Additionally, certain situations exist where the software application or
the computer operating system will adjust the RGB or CMYK combinations specified in the
application through color management. In such a situation, the resulting printed color may not be
exactly as expected based on the Color Samples pages.
Printing guide
Page 1 of 2
Printing guide
4 Flex the sheets back and forth to loosen them,
and then fan them.
Get the most out of your printer by properly loading the
trays and setting the types and sizes. Never mix media
types within a tray.
5 Place the paper against the back left corner of
the tray, print side down.
Note: Paper Size cannot be adjusted when
auto size sensing is enabled. Auto size
sensing is enabled by default for printer
trays, but is not available for the
multipurpose feeder.
6 Squeeze the front guide lever and slide the guide
until it firmly touches the stack of paper.
Load paper or other print media
To help prevent jams:
• Flex all stacks of print media back and forth to
loosen them, and then fan them before loading.
Do not fold or crease the print media. Straighten
the edges of the stack on a level surface.
7 Reinstall the tray.
8 If you are loading a different type of media than
was previously loaded in the tray, change the
Paper Type setting for that tray on the operator
panel. See “Set Paper Type and Paper Size” on
page 2.
• Do not exceed the maximum stack height.
Overfilling may cause jams.
• Never remove paper trays while a print job is
printing. It could damage the tray or the printer.
Loading 500-sheet trays
1 Remove the tray.
2 Squeeze the front guide lever and slide the guide
to the front of the tray.
Loading the multipurpose feeder
1 Open the multipurpose feeder.
2 Squeeze the paper
guide lever and
slide the guide all
the way toward the
front of the printer.
3 Flex the sheets
back and forth to
loosen them, and
then fan them.
4 Arrange the stack
of print media
correctly for the
size, type, and print
method you are using.
5 Place the print media, print side up, along the left
side of the multipurpose feeder, and then push it
in as far as it will easily go. Do not force the
media.
3 Squeeze the side guide lever and slide the guide
to the correct position for the size paper you are
loading.
6 Squeeze the paper guide lever and slide the
guide until it lightly touches the side of the stack.
Printing guide
Page 2 of 2
7 If you are loading a different type of media than was previously loaded in the tray, change the Paper Type
setting for that tray on the operator panel. See “Set Paper Type and Paper Size” on page 2.
Loading other input options
For information about loading other input options, refer to the publications CD that came with the printer.
Set Paper Type and Paper Size
If you have set Paper Type and Paper Size to the correct values, any trays containing the same type and size of
paper are automatically linked by the printer.
Note: If the type of the media you are loading is the same as the media previously loaded, you do not need
to change the Paper Type setting.
To change a Paper Type or Paper Size setting:
1 Press Menu until you see Paper Menu, and then press Select.
2 Press Menu until you see Paper Type (or Paper Size), and then press Select.
Tray 1 Type (or Tray 1 Size) appears on the second line of the display.
3 Press Select if you want to change the Tray 1 Type (or Tray 1 Size) setting or press Menu to scroll to another
source.
4 Press Menu to scroll through a list of possible paper types (or sizes).
5 When you see the correct paper type (or size), press Select to save the setting as the default.
6 Press Go to return the printer to the Ready state.
Printing on specialty media (transparencies, labels, and so on)
Follow these instructions when you want to print on media such as transparencies, card stock, glossy paper,
labels, or envelopes.
1 Load the print media as specified for the tray you are using. See “Load paper or other print media” on
page 1 for help.
2 From the printer operator panel, set the Paper Type and Paper Size according to the print media you loaded.
See Set Paper Type and Paper Size for help.
3 From the computer’s software application, set the paper type, size, and source according to the media you
loaded.
a In your word processor, spreadsheet, browser, or other application, select File
Print.
b Click Properties (or Options, Printer, or Setup, depending on the application) to view the printer
driver settings.
c Select the tray containing the specialty media from the Form Source list box.
d Select your media type (transparencies, envelopes, and so on) from the Media Type list box.
e Select the size of the specialty media from the Form Type list box.
f Click OK, and then send your print job as usual.
For more information about paper sizes, types, and weights, see the Print Media Guide page.
Connection guide
Page 1 of 9
Connection guide
Follow these steps to properly connect your printer to
your computer or network system:
1 Install drivers for local printing on page 1.
2 Verify printer setup on page 3.
Using Windows Server 2003, Windows 2000,
Windows XP, and Windows 98 SE, Windows Me,
and Windows NT
1 Insert the drivers CD.
3 Configure for TCP/IP on page 4.
4 Install drivers for network printing on page 5.
If the CD does not auto launch, click Start à
Run, and then type D:\Setup.exe in the Run
dialog box.
Note: USB support is not available for
Windows NT operating systems.
Install drivers for local printing
The printer driver is software that lets your computer
communicate with your printer.
The procedure to install drivers depends on the
operating system you are using. Use the following
table to find driver installation instructions for your
particular operating system. If you need additional
help, refer to the documentation that shipped with your
computer and your software.
Operating system
Use the drivers CD that shipped with your printer to
install the custom printer driver and obtain all the
enhanced printer features and functionality.
Go to
page...
Windows
Windows Server 2003, Windows 2000,
1
Windows XP, Windows 98/Me, Windows NT 4.x
2 Click Install Software.
Note: Some Windows operating systems
require that you have administrative
access to install printer drivers on your
computer.
3 Click Printer and Software.
4 Click Agree to accept the license agreement.
5 Select Suggested, and then click Next.
The Suggested option is the default installation
for local and network-attached setup. If you need
to install utilities, change settings, or customize
device drivers, select Custom, and follow the
instructions on your screen.
Windows 95 and Windows 98 (first edition)
2
Serial printing
2
6 Select Local Attached, and then click Finish.
Macintosh
2
UNIX/Linux
3
7 Select the port you are using to connect the
printer to the computer, and then click Next.
8 Click Done.
Windows
Some Windows operating systems may already
include a printer driver that is compatible with your
printer. This may mean that installation will seem
automatic in later versions of Windows. System printer
drivers work well for simple printing, but they contain
less functionality than our enhanced custom printer
driver.
Note: Installing a custom driver will not replace
the system driver. A separate printer
object will be created and appear in the
Printers folder.
9 Print a test page to verify printer setup.
Connection guide
Page 2 of 9
Using Windows 95 and
Windows 98 (first edition)
Note: Some Windows operating systems
require that you have administrative
access to install printer drivers on your
computer.
1 Turn on your computer.
2 Click Start à Settings à Printers, and then
double-click Add Printer.
Note: USB support is not available for the
Windows 95 operating system.
3 When prompted, select Local printer.
4 Select the manufacturer and model of your
printer, and then click Have Disk.
5 Insert the drivers CD. If the CD launches
automatically, click Exit to return to the Add
Printer Wizard.
6 Specify the location of the custom printer driver
on the drivers CD.
The path should be similar to the following:
X:\Drivers\Print\Win_9xMe\<language>
Where X=the letter of your CD-ROM drive.
For example:
D:\Drivers\Print\Win_9xMe\English.
Macintosh
Macintosh OS 8.6 or later is required for USB printing.
In order to print locally to a USB-attached printer, you
must create a desktop printer icon (Macintosh 8.6–9.x)
or create a queue in the Print Center or Printer Setup
Utility (Macintosh OS X).
Creating a desktop printer icon
(Macintosh 8.6–9.x)
1 Install a printer PostScript Printer Description
(PPD) file on your computer.
Note: A PPD file provides detailed
information about the capabilities of a
printer to your Macintosh computer.
a Insert the drivers CD.
b Double-click Classic, and then double-click
the installer package for your printer.
c Choose the language you want to use and
click OK.
d Click Accept after you read the license
agreement.
e Click Continue after you view the Readme
file.
f Choose a default paper size.
7 Click OK.
g On the Easy Install screen, click Install. All
the necessary files are installed on your
computer.
8 Print a test page to verify printer setup.
h Click Quit when installation is complete.
Serial printing
For information about serial printing, refer to the User’s
Guide on the publications CD.
2 Do one of the following:
Macintosh 8.6–9.0: Open Apple LaserWriter.
Macintosh 9.1–9.x: Open Applications, and
then click Utilities.
3 Double-click Desktop Printer Utility.
4 Select Printer (USB), and then click OK.
5 In the USB Printer Selection section, click
Change.
If your printer does not appear in the USB Printer
Selection list, make sure the USB cable is
properly connected and the printer is turned on.
6 Select the name of your printer, and then click
OK. Your printer appears in the original Printer
(USB) window.
Connection guide
Page 3 of 9
7 In the PostScript Printer Description (PPD) File
section, click Auto Setup. Make sure your
printer PPD now matches your printer.
8 Click Create, and then click Save.
9 Specify a printer name, and then click Save.
Your printer is now saved as a desktop printer.
Creating a queue in Print Center or Printer Setup
Utility (Macintosh OS X)
1 Install a printer PostScript Printer Description
(PPD) file on your computer.
Note: A PPD file provides detailed
information about the capabilities of a
printer to your Macintosh computer.
a Insert the drivers CD.
b Double-click Mac OS X, and then doubleclick the installer package for your printer.
c On the Authorization screen, choose Click
the lock to make changes.
d Enter your password, and then click OK.
e Click Continue on the Welcome screen and
again after you view the Readme file.
UNIX/Linux
Local printing is supported on many UNIX and Linux
platforms, such as Sun Solaris and Red Hat.
Some printer driver packages are available on the
drivers CD. The User’s Guide in each package gives
detailed instructions for installing and using printers in
UNIX and Linux environments.
All the printer driver packages support local printing
using a parallel connection. The driver package for
Sun Solaris supports USB connections to Sun Ray
appliances and Sun workstations.
Verify printer setup
Printing a menu settings page
Print a menu settings page to review the default printer
settings and to verify that printer options are installed
correctly.
Note: For more information about using the
printer operator panel and changing
menu settings, refer to the publications
CD.
f Click Agree to accept the license agreement.
1 Make sure the printer is on.
g Select a Destination, and then click
Continue.
2 Press Menu until you see Utilities Menu, and
then press Select.
h On the Easy Install screen, click Install. All
the necessary files are installed on your
computer.
3 Press Menu until you see Print Menus, and
then press Select to print the page.
i Click Close when installation is complete.
2 Open the Finder, click Applications, and then
click Utilities.
3 Double-click Print Center or Printer Setup
Utility.
4 Do one of the following:
– If your USB-attached printer appears in the
Printer List, you can quit Print Center. A queue
has been created for your printer or Printer Setup
Utility.
– If your USB-attached printer does not appear in
the Printer List, make sure the USB cable is
properly connected and the printer is turned on.
After the printer appears in the Printer List, you
can quit Print Center or Printer Setup Utility.
The message Printing Menus appears on the
display.
4 Verify the options you installed are correctly
listed under “Installed Features.”
If an option you installed is not listed, turn the
printer off, unplug the power cord, and reinstall
the option.
5 Verify the amount of memory installed is
correctly listed under “Printer Information.”
6 Verify the paper trays are configured for the
sizes and types of paper you loaded.
Printing a network setup page
If the printer is attached to a network, print a network
setup page to verify the network connection. This page
Connection guide
Page 4 of 9
also provides important information that helps you
configure for network printing.
Note: If an optional MarkNet print server is
installed, you see Print Net1 Setup on
the display.
1 Make sure the printer is on.
2 Press Menu until you see Utilities Menu, and
then press Select.
3 Press Menu until you see Print Net Setup,
and then press Select. The network setup page
prints and the printer returns to Ready status.
4 Check the first section on the network setup
page and confirm that Status is “Connected.”
If Status is “Not Connected,” your LAN drop may
not be active or your network cable may be
malfunctioning. Consult your network support
person for a solution, and then print another
network setup page to verify that you are
connected to your network.
Configure for TCP/IP
If you have TCP/IP available on your network, we
recommend that you assign an IP address to the
printer.
Assigning a printer IP address
If your network is using DHCP, an IP address is
automatically assigned after you connect the network
cable to the printer.
1 Print a network setup page.
2 Look for the address under the “TCP/IP” heading
on the network setup page.
3 Go to Verify printer setup on page 3 and begin
with step 2.
Note: You can find instructions for other
methods of setting the IP address in the
online documentation on the drivers CD
that shipped with your printer. Launch
the CD, and then click View
Documentation Network Printer
Install.
If your network is not using DHCP, then you must
manually assign an IP address to the printer.
One of the easiest ways is to use the operator panel:
1 Press Menu until you see Network Menu, and
then press Select.
2 Press Menu until you see Standard Network,
and then press Select.
Standard Network appears if you purchased a
printer with a network port on the printer system
board. If you have a MarkNet™ print server
installed in the option card slot, you see Network
Option 1.
3 Press Menu until you see Std Net Setup (or
Network 1 Setup), and then press Select.
4 Press Menu until you see TCP/IP, and then
press Select.
5 Press Menu until you see Set IP Address, and
then press Select.
6 Change the address by pressing Menu to
increase or decrease each number. Press
Select to move to the next segment. Press
Select when you are finished.
The message Saved appears briefly.
7 Press Menu until you see Set IP Netmask, and
then press Select.
8 Repeat step 6 to set the IP Netmask.
9 Press Menu until you see Set IP Gateway, and
then press Select.
10 Repeat step 6 to set the IP Gateway.
11 When you are finished, press Go to return the
printer to the Ready state.
Connection guide
Page 5 of 9
Verifying the IP settings
1 Print another network setup page. Look under
the “TCP/IP” heading and make sure the IP
address, netmask, and gateway are what you
expected.
2 Ping the printer and verify that it responds. For
example, at a command prompt on a network
computer, type ping followed by the new printer
IP address (for example, 192.168.0.11).
If the printer is active on the network, you should
receive a reply.
Install drivers for network printing
After you have assigned and verified the TCP/IP
settings, you are ready to install the printer drivers on
each network computer.
Operating system
Go to page...
Windows
5
Macintosh
8
UNIX/Linux
9
NetWare
9
Windows
In Windows environments, network printers can be
configured for direct printing or shared printing. Both
network printing methods require the installation of a
printer driver.
Supported printer drivers
• Windows system printer driver
• Printer network ports—Windows 95/98/Me,
Windows NT 4.0, Windows 2000, Windows XP,
and Windows Server 2003
Note: Installing a custom driver will not replace
the system driver. A separate printer
object will be created and appear in the
Printers folder.
For basic printer functionality, you can install a system
printer driver. The system printer driver presents a
consistent user interface for use with all the printers on
your network. However, using a custom printer driver
provides enhanced printer features and functionality,
such as printer status alerts.
Follow the steps for your printing configuration and
operating system to configure your network printer:
Printing configuration
Operating system
Direct
Windows 98SE/Me,
Windows NT 4.0,
Windows 2000,
Windows XP, or
Windows Server 2003
• Printer is connected directly to
the network using a network
cable, such as Ethernet.
• Printer drivers are typically
installed on each network
computer.
Shared
• Printer is connected to one of
the computers on the network
using a local cable, such as
USB.
• Printer drivers are installed on
the computer attached to the
printer.
Windows 95 and
Windows 98 (first
edition)
Windows NT 4.0,
Windows 2000,
Windows XP, or
Windows Server 2003
During driver installation, the
printer is set up to be “shared” so
that other network computers
can print to it.
• Custom printer driver
System drivers are built into Windows operating
systems. Custom drivers are available on the drivers
CD.
Direct printing using Windows 98SE/Me,
Windows NT 4.0, Windows 2000, Windows XP, and
Windows Server 2003
Supported network printer ports
To install a custom printer driver and network port:
• Microsoft IP port—Windows NT 4.0,
Windows 2000, Windows XP, and
Windows Server 2003
1 Insert the drivers CD.
If the CD does not auto launch, click Start à
Run, and then type D:\Setup.exe in the Run
dialog box.
2 Click Install Software.
Connection guide
Page 6 of 9
3 Click Printer and Software.
4 Click Agree to accept the license agreement.
5 Select Suggested, and then click Next.
The Suggested option is the default installation
for local and network-attached setup. If you need
to install utilities, change settings, or customize
device drivers, select Custom, and follow the
instructions on your screen.
6 Select Network Attached, the printer
manufacturer, and then click Next.
7 Select the printer you are setting up, and then
click Next.
Shared printing from a server using
Windows NT 4.0, Windows 2000,
Windows XP, and Windows Server 2003
After connecting your printer to a Windows NT 4.0,
Windows 2000, Windows XP, or
Windows Server 2003 computer (which will act as a
server), follow these steps to configure your network
printer for shared printing:
Step 1: Install a custom printer driver
1 Insert the drivers CD.
If the CD does not auto launch, click Start à
Run, and then type D:\Setup.exe in the Run
dialog box.
8 Select Add Port.
2 Click Install Software.
9 Select Lexmark Enhanced TCP/IP Port.Select
TCP/IP Network Port, and then click Add.
3 Click Printer and Software.
10 Enter the information to create the port.
a Enter a port name.
This can be any name that you associate with
the printer, such as Color1-lab4. After the
port is created, this name appears in the list of
available ports.
Note: If you don’t know the IP address, print a
network setup page and look under the
TCP/IP heading. For help, see “Printing a
network setup page” on page 3 and
“Verifying the IP settings” on page 5.
b Enter the IP address in the text box.
If you don't know the IP address, print a
network setup page and look under the TCP/
IP heading. Refer information on printing a
network setup page, see “Printing a network
setup page” on page 3.
4 Click Agree to accept the license agreement.
5 Select Suggested, and then click Next.
6 Select Local Attached,and then click Finish.
7 Select the port you are using to connect the
printer to the computer, and then click Next.
8 Click Done.
9 Print a test page to verify printer installation.
Step 2: Share the printer on the network
1 Click Start
Settings
Printers.
2 Select the printer you just created.
3 Click File
Sharing.
4 Check the Shared check box, and then enter a
name in the Shared Name text box.
11 Click Finished.
5 In the Alternate Drivers section, select the
operating systems of all the network clients that
will print to the printer.
12 Print a test page to verify printer installation.
6 Click OK.
Direct printing using Windows 95 and Windows 98
(first edition)
For information about Windows 95 and Windows 98
(first edition) direct printing, refer to the User’s Guide
on the publications CD.
Note: If you are missing files, you may be
prompted to provide the server operating
system CD.
Connection guide
Page 7 of 9
7 Check the following to make sure the printer was
successfully shared.
– The printer object in the Printers folder now has a
shared indicator. For example, in
Windows NT 4.0, a hand appears under the
printer object.
– Browse Network Neighborhood. Find the host
name of the server and look for the shared name
you assigned to the printer.
5 Close Network Neighborhood.
6 Print a test page to verify printer installation.
Using the peer-to-peer method
With this method, the printer driver is fully installed on
each client computer. Network clients retain control of
driver modifications. The client computer handles the
print job processing.
1 Click Start
Step 3: Install the printer driver (or subset) on
network clients
Using the point and print method
Note: This method is usually the best use of
system resources. The server handles
driver modifications and the print job
processing. This lets network clients
return to applications much faster.
With this method, a subset of driver information is
copied from the server to the client computer. This is
just enough information to send a print job to the
printer.
1 On the Windows desktop of the client computer,
double-click Network Neighborhood.
2 Locate the host name of the server computer,
and then double-click the host name.
3 Right-click the shared printer name, and then
click Install.
4 Wait a few minutes for the driver information to
be copied from the server computer to the client
computer, and for a new printer object to be
added to the Printers folder. The time this takes
varies based on network traffic and other factors.
Settings
Printers.
2 Click Add Printer to launch the Add Printer
wizard.
3 Click Network Print Server.
4 Select the network printer from the Shared
printers list. If the printer is not listed, enter the
path of the printer in the text box.
The path will look similar to the following:
\\<server host name>\<shared
printer name>
Note: If this is a new printer, you may be
prompted to install a printer driver. If no
system driver is available, then you will
need to provide a path to available
drivers.
The server host name is the name of the server
computer that identifies it to the network. The
shared printer name is the name assigned
during the server installation process.
5 Click OK.
6 Select whether you want this printer to be the
default printer for the client, and then click
Finish.
7 Print a test page to verify printer installation.
Connection guide
Page 8 of 9
Macintosh
Note: A PostScript Printer Description (PPD)
file provides detailed information about
the capabilities of a printer to your UNIX
or Macintosh computers.
A PostScript Printer Description (PPD) file must be installed
on each computer used to print to a network printer. In
addition, the computer must also have either a desktop
printer (Mac OS 8.6 to 9.x) or a print queue in Print Center
(Mac OS X). A print queue can be created either through
AppleTalk or IP Printing. Follow the instructions for your
operating system to install a PPD file and create a desktop
printer or print queue.
Mac OS 8.6 to 9.x
Step 1: Install a custom PPD file
Note: Installing the custom PPD is required
only if this is the first time the printer has
been set up. If the printer was previously
installed, go on to Step 2: Create a
desktop printer.
1 Insert the drivers CD into your CD-ROM drive.
2 Double-click Classic.
3 Double-click the Installer icon.
4 Select the language of your operating system,
and then click OK.
5 Click Install to install the PPD file for your printer.
Step 2: Create a desktop printer
1 In the Chooser, select the LaserWriter 8 driver.
2 If you have a routed network, select the default
zone from the list. If you don’t know which zone
to select, look on the Network Setup page under
AppleTalk for Zone.
7 Close the Chooser window.
8 Verify printer installation.
a Click the desktop printer icon you just
created.
b Choose Printing à Change Setup.
– If the PPD file displayed in the PostScript Printer
Description (PPD) file portion of the menu is
correct for your printer, then printer setup is
complete.
– If the PPD file displayed in the PostScript Printer
Description (PPD) file portion of the menu is not
correct for your printer, repeat “Step 1: Install a
custom PPD file” on page 8.
Mac OS X
Step 1: Install a custom PPD file
1 Insert the drivers CD.
Note: A PPD file provides detailed information
about the capabilities of a printer to your
Macintosh computer.
2 Double-click the installer package for your
printer.
3 On the Authorization screen, choose Click the
lock to make changes.
4 Enter your password, and then click OK.
5 Click Continue on the Welcome screen and
again after you view the Readme file.
6 Click Continue after you view the license
agreement, and then click Agree to accept the
terms of the agreement.
7 Select a Destination, and then click Continue.
3 Select the new printer from the list.
8 On the Easy Install screen, click Install. All the
necessary software is installed on your
computer.
4 If you don’t know which printer to select, look on
the Network Setup page under the AppleTalk
heading to find the default name of the printer.
9 Click Close when installation is complete.
5 Click Create.
6 Make sure there is an icon next to the printer
name in the Chooser.
Connection guide
Page 9 of 9
Step 2: Create a print queue in Print Center or
Printer Setup Utility
4 Choose IP Printing from the pop-up menu.
Using AppleTalk
5 Enter the IP address or the printer DNS name in
the Printer’s Address box.
Follow these steps to create a print queue using
AppleTalk. To create an IP print queue, see “Using IP
Printing” on page 9.
6 Choose the printer manufacturer from the
Printer Model pop-up menu.
1 Open Finder, click Applications, and then click
Utilities.
2 Double-click Print Center or Printer Setup
Utility.
3 Choose Add Printer from the Printers menu.
4 Choose AppleTalk from the pop-up menu.
Note: If you don’t know which zone or printer to
select, look on the network setup page
under the AppleTalk heading.
5 Select the AppleTalk zone from the list.
6 Select the new printer from the list, and then
click Add.
7 Verify printer installation:
a Open Finder, click Applications, and then
click TextEdit.
7 Select the new printer from the list, and then
click Add.
8 Verify printer installation:
a Open Finder, click Applications, and then
click TextEdit.
b Choose Print from the File menu.
c Choose Summary from the Print Panel
menu.
d Do one of the following:
– If the PPD file displayed in the Summary window
is correct for your printer, then printer setup is
complete.
– If the PPD file displayed in the Summary window
is not correct for your printer, delete the printer
from printer list in Print Center or Printer Setup
Utility and repeat “Step 1: Install a custom PPD
file” on page 8.
b Choose Print from the File menu.
UNIX/Linux
c Choose Summary from the Print Panel
menu.
Your printer supports both UNIX and Linux network
environments.
d Do one of the following:
For the latest information about installing a network
printer in a UNIX or Linux environment, click View
Documentation on the drivers CD.
– If the PPD file displayed in the Summary window
is correct for your printer, then printer setup is
complete.
– If the PPD file displayed in the Summary window
is not correct for your printer, delete the printer
from printer list in Print Center or Printer Setup
Utility and repeat “Step 1: Install a custom PPD
file” on page 8.
Using IP Printing
Follow these steps to create a print queue using IP
Printing. To create an AppleTalk print queue, see
“Using AppleTalk” on page 9.
1 Open Finder, click Applications, and then click
Utilities.
2 Double-click Print Center or Printer Setup
Utility.
3 Choose Add Printer from the Printers menu.
NetWare
Your printer supports both Novell Distributed Print
Services (NDPS) and regular queue-based NetWare
environments. For the latest information about
installing a network printer in a NetWare environment,
launch the drivers CD and click View Documentation.
Print media guide
Page 1 of 2
Print media guide
MPF 9
•
•
•
•
•
500
•
•
•
•
MPF
•
•
•
•
500
•
•
MPF
•
•
500
•
•
•
2000
•
•
•
MPF
•
•
•
•
•
500
•
•
•
•
MPF
•
•
•
500
•
•
MPF
•
•
Card stock 2
Upper limit, grain long:
Index Bristol: 163 g/m2 (90 lb)
Tag:
163 g/m2 (100 lb)
Cover:
176 g/m2 (65 lb)
Upper limit, grain short:
Index Bristol: 199 g/m2 (110 lb)
Tag:
203 g/m2 (125 lb)
Cover:
216 g/m2 (80 lb)
Transparency
•
•
•
•
•
•
•
•
•
•
•
•
•
•
•
•
•
•
•
•
•
•
•
•
•
•
•
•
•
•
•
•
•
•
•
•
•
•
•
•
•
•
•
•
•
•
•
•
•
•
•
•
•
•
(5.83 x 7.17 in.
to 8.5 x 14 in.)
•
•
Universal
•
•
(2.75 x 5 in.
to 9.01 x 14 in.)
•
•
Universal
2000 8
•
(5.5 x 8.27 in.
to 8.5 x 14 in.)
•
Universal
•
(7.25 x 10.5 in.)
•
Grain long (Light):
60–74.9 g/m2 (16–19.9 lb bond)
Grain long (Normal):
75–119.9 g/m2 (20–31.9 lb bond)
Grain long (Heavy):
120–176 g/m2 (32–47 lb bond)
Executive
500 7
(8.5 x 14 in.)
Plain paper 1, 2
Legal
Source
(8.5 x 13 in.)
Print media
Folio
(8.5 x 11 in.)
Letter
(5.5 x 8.5 in.)
Statement
(182 x 257 mm)
JIS B5
(148 x 210 mm)
A5
(210 x 297 mm)
A4
The printer supports the following standard print media sizes. The Universal setting lets you select custom sizes
up to the maximum specified.
•
•
•
•
•
•
161–169 g/m2 (43–45 lb bond)
Glossy paper
Gloss Book, grain long:
88–176 g/m2 (60–120 lb book)
Gloss Cover, grain long:
162–176 g/m2 (60–65 lb cover)
Labels
Paper: 3
180 g/m2 (48 lb bond)
Dual-Web: 3180 g/m2 (48 lb bond)
Polyester: 220 g/m2 (59 lb bond)
Vinyl: 3, 4 300 g/m2 (92 lb bond)
Integrated forms (labels) 5
Pressure sensitive area:
140–175 g/m2
Paper base (grain long):
75–135 g/m2 (20–36 lb bond)
Envelope 6
MPF
60–105 g/m2 (16–28 lb bond)
1
2
•
•
•
•
•
•
•
•
•
•
•
•
7¾ Envelope (3.875 x 7.5 in.)
DL Envelope (110 x 220 mm)
9 Envelope (3.875 x 8.9 in.)
C5 Envelope (162 x 229 mm)
10 Envelope (4.12 x 9.5 in.)
B5 Envelope (176 250 mm)
Other Envelope (98.4 x 162 mm to 176 x 250 mm)
Paper less than 75 g/m2 (20 lb) is limited to simplex only
at less than 60% relative humidity and is not supported
in duplex. The duplex option supports the same weights
and types as the printer except for paper 60–74.9 g/m2
(16–19.9 lb) grain long bond, A5 cardstock, envelopes,
transparencies, vinyl labels, and polyester labels.
3
Multipurpose feeder weights differ:
• Paper:
199 g/m2 (53 lb)
• Dual-Web: 199 g/m2 (53 lb)
• Vinyl:
260 g/m2 (78 lb liner)
4
Vinyl labels are supported only when
printing environments and media are
20–32.2° C (68–90° F).
g/m2
For 60–176
(16–65 lb) paper, grain long fibers are
recommended. For papers heavier than 176 g/m2
(65 lb), grain short is preferred.
5
Pressure sensitive area must enter the
printer first.
6
Sulfite, wood-free, or up to 100% cotton
bond.
• 100% cotton content maximum weight is
90 g/m2 (24 lb) bond.
• 28 lb bond envelopes are limited to 25%
cotton content.
7
500-sheet tray
8
2000-sheet tray
9
Multipurpose feeder
Print media guide
Page 2 of 2
Storing paper
Use the following guidelines to avoid paper feeding problems and uneven print quality.
• Store paper in an environment where the temperature is approximately 21° C (70° F) and the relative
humidity is 40%.
• Store cartons of paper on a pallet or shelf rather than directly on the floor.
• If you store individual packages of paper out of the original carton, make sure they rest on a flat surface so
the edges do not buckle or curl.
• Do not place anything on top of paper packages.
Avoiding paper jams
The following hints can help you avoid paper jams:
• Do not remove paper trays while a job is printing. Wait for a Load Tray <x> or Ready message before you
remove the tray.
• Use only recommended paper.
• Do not load wrinkled, creased, or damp paper.
• Flex, fan, and straighten paper before you load it.
• Do not overload the trays or the multipurpose feeder. Make sure the stack height does not exceed the
maximum height indicated.
• Push all trays firmly into the printer after loading them.
• Make sure the guides in the trays are properly positioned for the size paper you have loaded.
• Do not send jobs to staple, hole punch, or offset for transparencies, labels, or card stock.
• We recommend that transparencies, labels, card stock, and envelopes not be sent to the optional mailbox
or optional finisher. These specialty media types should be sent to the standard bin.
• If an optional finisher or mailbox is attached to your printer, make sure the printer and option are correctly
aligned. Refer to the Setup Guide that came with your printer or option for alignment instructions.
• Make sure all cables that connect the high capacity feeder or finisher to the printer are correctly attached.
Refer to the Setup Guide for more information.
• If a jam should occur, clear the entire paper path.
Clearing jams guide
Page 1 of 6
Clearing jams guide
Access doors and trays
When a paper jam occurs, the jam number will appear on line one of the operator panel and the number of pages
jammed will appear on line two.
The following illustrations show areas in the printer where jams can occur.
Areas 1–6
Finisher
28<x> Paper Jam
Area A
Multipurpose feeder
200 Paper Jam
250 Paper Jam
Area B
Left access door (beside Tray 1)
200 Paper Jam
Area C
Paper input options:
500-sheet drawer or 2000-sheet drawer
24<x> Paper Jam
Area M
Mailbox or output expander
27<x> Paper Jam
Area D
Front access door
201 Paper Jam
Area T1
Standard tray (Tray 1)
200 Paper Jam
Area E
Duplex mechanism
230 Paper Jam
Area T<x>
Paper input options:
500-sheet drawer or 2000-sheet drawer
24<x> Paper Jam
Area L
Upper right access door (redrive area)
201 Paper Jam
202 Paper Jam
Area K
Lower right access door (fuser area)
201 Paper Jam
202 Paper Jam
Area J
Duplex tray
230 Paper Jam
Clearing jams guide
Page 2 of 6
Understanding jam messages
Note: Always clear the entire paper path when
you receive any jam message.
Paper jam message
Check Areas...
What to do…
200 Paper Jam
A, B, T1
Follow the instructions for clearing Area A, Area B, and Area T1.
(Tray 1 and left access
door beside tray 1)
201 Paper Jam
If the jam message persists, paper may be caught in the image transfer unit. Refer to
the User’s Reference located on the publications CD for information about clearing
this type of jam.
D, K, L
(Fuser area)
202 Paper Jam
If the jam message persists, paper may be caught in the fuser.See “Clearing
fuser jams” on page 6 for instructions.
K, L
(Fuser area)
230 Paper Jam
Follow the instructions for clearing Area D, Area K, and Area L.
Follow the instructions for clearing Area K and Area L.
If the jam message persists, paper may be caught in the fuser. See “Clearing
fuser jams” on page 6 for instructions
E, J
Follow the instructions for clearing Area E and Area J.
C, T<x>
Follow the instructions for clearing Area C and Area T<x>.
A
Follow the instructions for clearing Area A.
M
Follow the instructions for Clearing mailbox or output expander jams
(Area M).
1, 2, 3, 4, 5, 6
Follow the instructions for Clearing finisher jams (Areas 1–6) .
(Duplex area)
24<x> Paper Jam
(Trays 2–4)
250 Paper Jam
(Multipurpose feeder)
27<x> Paper Jam
(Mailbox or output
expander)
28<x> Paper Jam
(Finisher)
Clearing the entire paper path
When a paper jam occurs, the printer stops operating
and displays 2xx Paper Jam and a message to clear
certain printer areas.
After you have cleared the following areas, make sure
all printer covers, doors, and trays are closed, and then
press Go to resume printing.
Area A
1 If you are using the multipurpose feeder, release
the levers on each side of the feeder to open it
flat.
2 Press the pick assembly release lever and
remove all media and jams.
3 Return the feeder to its working position and reload
your media.
Clearing jams guide
Page 3 of 6
Area B
1 Open the left access door.
2 Pull down the lever until it stops.
b Close the door.
2 If you have an optional 2000-sheet drawer:
a Open the 2000-sheet drawer access door. Pull
the jam down and out of the rollers.
3 Remove all visible media.
Note: Remove any torn media from the printer.
4 Return the lever to its upright position.
b Close the door.
5 Close the door.
Note: Open Tray 1 and make sure the entire
media stack is pushed all the way down
into the tray.
Area C
1 If you have one or more optional 500-sheet
drawers:
a Open the 500-sheet drawer access door. Hold
the door down while removing jams.
Note: Make sure the entire paper stack is
loaded correctly and pushed all the way
down into the tray.
Area D
1 Open the front access door.
2 Hold down the lever in the upper left corner.
Remove jams in the rollers under the image
transfer unit.
Clearing jams guide
Page 4 of 6
Area T1
Area T<x>
1 If clearing Area B did not clear your jam, then
carefully open tray 1. Remove any jams.
1 If you cannot clear all the 500-sheet drawer jams
from Area C:
Note: Make sure the paper is pushed all the
way down into the tray.
a Carefully open trays 2 through 4 (all 500-sheet
trays) and remove jams.
Note: Make sure the paper is pushed all the
way down into the tray.
2 Close tray 1.
Area E
1 Pull the duplex mechanism completely out. Look
inside and remove any paper caught in the
rollers. Also, look up inside, as some jams may
be above the rollers.
b Close trays 2 through 4.
2 If you cannot clear the 2000-sheet drawer jam
from Area C:
a Open the 2000-sheet drawer.
Note: Any image printed will not be fused to the
page.
2 Reinstall the duplex mechanism in the printer.
b Remove any jams, and then close the
2000-sheet drawer.
Area J
1 Remove the duplex tray.
2 Remove any jams and then reinstall the tray.
Clearing jams guide
Page 5 of 6
Area K
1 Open the lower right access door.
Clearing mailbox or output expander
jams (Area M)
1 Open the rear door of the 5-bin mailbox or output
expander.
2 Remove any jams, and then close the door.
Area L
1 Open the upper right access door.
2 Pull the jam straight out, and then close the door.
2 Remove jams from the rollers and then close the
door.
Clearing jams guide
Page 6 of 6
Clearing fuser jams
6 Lift up the fuser roller cover and remove the jam.
1 Clear the paper path. If the jam error message
persists, go on to step 2.
2 Open both the upper right and the lower right
access doors (Areas K and L).
CAUTION: The fuser assembly may be hot. Let it
cool before continuing.
7 Close the fuser roller cover.
8 Snap the housing back onto the fuser.
9 Insert the fuser back into the printer.
10 Slide the latches out, and then pull up to
refasten them.
11 Close the doors.
3 Pull down the latches. They slide toward the
center to release the fuser.
Clearing image transfer unit jams
Refer to the User’s Reference located on the
publications CD for information about clearing this
type of jam.
Clearing finisher jams (Areas 1– 6)
Refer to the Finisher Setup & User’s Guide for
instructions on clearing finisher jams.
If you still need help
4 Pull the fuser out of the printer, and set it on a
clean, flat surface.
5 Unsnap the housing and set it aside.
1 Turn the printer off and then back on.
2 Contact your administrator or Help desk if you
need more assistance.
Print quality guide
Page 1 of 4
Print quality guide
You can solve many print quality problems by replacing a supply or maintenance item that has reached the end
of its intended life. Check the operator panel for a message about a printer consumable.
Use the following table to find solutions to print quality problems.
Symptom
Cause
Solution
Repeating defects
Either the print cartridges are defective, Marks occur repeatedly only in one
the image transfer unit and transfer
color and multiple times on a page:
roller are defective, or the fuser is
• Replace the cartridge if the defects
defective.
occur every:
– 48 mm (1.9 in.)
– 97 mm (3.8 in.)
Marks occur down the page
repeatedly in all colors:
• Replace the transfer roll if the defects
occur every 60 mm (2.4 in.)
• Replace the image transfer unit if the
defects occur every 101 mm (4 in.)
• Replace the fuser if the defects occur
every 148 mm (5.8 in.)
Marks occur on every third or sixth
page in any color:
• Replace the image transfer unit.
Color
misregistration
ABCDE
ABCDE
ABCDE
White or colored
line
Streaked
horizontal lines
ABCDE
ABCDE
ABCDE
ABCDE
ABCDE
ABCDE
Color has shifted outside of the
Top to Bottom or Left to Right:
appropriate area or has been
1 Re-seat the cartridges by removing
superimposed over another color area.
them from the printer and then
reinserting them.
2 Adjust the Color Alignment under the
Utilities Menu.
3 Align the image transfer unit.
Either the print cartridges are defective, 1 Replace the color print cartridge
the image transfer unit and transfer
causing the line.
roller are defective, or the fuser is
2 If you still have the problem, replace
defective.
the image transfer unit and transfer
roller.
3 If you still have the problem, replace
the fuser.
The print cartridges, the transfer roller,
image transfer unit, or fuser may be
defective, empty, or worn.
Replace the print cartridge, the transfer
roller, the image transfer unit, or fuser
as needed.
Print quality guide
Page 2 of 4
Symptom
Cause
Streaked vertical
lines
• Toner is smeared before fusing to the • If paper is stiff, try feeding from
paper.
another tray.
• The print cartridge is defective.
• Replace the color print cartridge
causing the streaks.
ABCDE
ABCDE
ABCDE
Solution
• Paper has absorbed moisture due to
high humidity.
• You are using paper that does not
meet the printer specifications.
• The image transfer unit and transfer
roller are worn or defective.
• The fuser is worn or defective.
• Load paper from a fresh package in
the paper tray.
• Avoid textured paper with rough
finishes.
• Make sure the printer’s paper type,
paper texture, and paper weight
settings match the type of paper you
are using.
• Replace the image transfer unit and
transfer roller.
• Replace the fuser.
Print too light
• The Toner Darkness setting is too
light.
• You are using paper that does not
meet the printer specifications.
• The print cartridges are low on toner.
• The print cartridges are defective or
have been installed in more than one
printer.
• Select a different Toner Darkness
setting from the printer driver before
sending the job to print.
• Perform a Color Adjust in the Utilities
Menu.
• Load paper from a new package.
• Avoid textured paper with rough
finishes.
• Make sure the paper you load in the
trays is not damp.
• Make sure the printer’s paper type,
paper texture, and paper weight
settings match the type of paper you
are using.
• Replace the print cartridges.
Print too dark
• The Toner Darkness setting is too
dark.
• The print cartridges are defective.
• Select a different Toner Darkness
setting from the printer driver before
sending the job to print.
• Replace the print cartridges.
Transparency print quality is
poor
• You are using transparencies that do
not meet the printer specifications.
• The Paper Type setting for the tray
you are using is set to something
other than Transparency.
• Use only transparencies
recommended by the printer
manufacturer.
• Make sure the Paper Type setting is
set to Transparency.
Print irregularities
ABCDE
ABCDE
ABCDE
(Print has inappropriate light or dark
spots, toner is smeared, horizontal or
vertical light bands appear, or color
does not project.)
Print quality guide
Page 3 of 4
Symptom
Cause
Solution
Toner specks
• The print cartridges are defective.
• The transfer roller is worn or
defective.
• The image transfer unit is worn or
defective.
• The fuser is worn or defective.
• Toner is in the paper path.
•
•
•
•
•
Toner rubs off the paper easily
when you handle the sheets
• The Type setting is wrong for the type
of paper or specialty media you are
using.
• The Texture setting is wrong for the
type of paper or specialty media you
are using.
• The Weight setting is wrong for the
type of paper or specialty media you
are using.
• The fuser is worn or defective.
• Change Paper Type to match the
paper or specialty media you are
using.
• Change Paper Texture from Normal
to Smooth or Rough.
• Change Paper Weight from Plain to
CardStock (or other appropriate
weight).
• Replace the fuser.
Gray
background
• The Toner Darkness setting is too
dark.
• The print cartridges are defective.
• Select a different Toner Darkness
setting from the printer driver before
sending the job to print.
• Replace the print cartridges.
• The print cartridges are defective.
• The transfer roller is worn or
defective.
• The image transfer unit is worn or
defective.
• Replace the print cartridges.
• Replace the transfer roller.
• Replace the image transfer unit.
Uneven print
density
ABCDE
ABCDE
ABCDE
ABCDE
ABCDE
ABCDE
Ghost Images
ABCDE
ABCDE
ABCDE
ABCDE
Clipped images
(Some of the print is cut off on the
sides, top, or bottom of the paper.)
Replace the print cartridges.
Replace the transfer roller.
Replace the image transfer unit.
Replace the fuser.
Call for service.
Toner level is low in the print cartridges. • Make sure the Paper Type setting is
correct for the paper or specialty
media you are using.
• Replace the print cartridges.
Guides in the selected tray are set for a
different size paper than what is loaded
in the tray.
Move the guides in the tray to the
proper positions for the size loaded.
Print quality guide
Page 4 of 4
Symptom
Cause
Incorrect margins
• Guides in the selected tray are set for • Move the guides in the tray to the
a different size paper than what is
proper positions for the size loaded.
loaded in the tray.
• Set the Paper Size to match the
• Auto size sensing is set to off, but
media in the tray.
you loaded a different size paper in a
tray. For example, you inserted A4
size paper into the selected tray but
did not set the Paper Size to A4.
Skewed print
• Guides in the selected tray are not in • Move the guides in the tray to the
the correct position for the paper size
proper positions for the size loaded.
loaded in the tray.
• Refer to the Card Stock & Label
• You are using paper that does not
Guide available on our Lexmark Web
meet the printer specifications.
site at www.lexmark.com for detailed
specifications.
(Print is inappropriately slanted.)
Solution
Refer to Paper and specialty media
specifications in the User’s Guide on
the publications CD.
Blank pages
• One or more print cartridges are
defective or empty.
• Replace the defective print
cartridges.
Solid color pages
• The print cartridges are defective.
• Your printer requires servicing.
• Replace the print cartridges.
• Call for service.
The paper curls badly once it
prints and exits to a bin
• The Type, Texture, and Weight
settings are not appropriate for the
type of paper or specialty media you
are using.
• The paper has been stored in a high
humidity environment.
• Change Paper Type, Paper Texture,
and Paper Weight to match the
paper or specialty media loaded in
the printer.
• Load paper from a fresh package.
• Store paper in its original wrapper
until you use it.
• Refer to Storing paper in the
User’s Guide on the publications CD.
Moving guide
Page 1 of 1
Moving guide
Follow these guidelines to move the printer within the office or to prepare the printer for shipment.
Warning: Follow these guidelines to avoid injuring yourself or damaging the printer.
• Always use at least two people to lift the printer.
• Always turn off the printer using the power switch.
• Disconnect all cords and cables from the printer before attempting to move the printer.
• Failure to repackage the printer properly for shipment can result in damage to the printer not covered by
the printer's warranty.
• Damage to the printer caused by improper moving is not covered by the printer's warranty.
Moving the printer within the office
The printer can be safely moved from one location within an office to another following these precautions:
• The printer must remain in an upright position.
• Any cart used to move the printer should have a surface able to support the full footprint of the printer.
• Severe jarring movements may cause damage to the printer and must be avoided.
Preparing the printer for shipment
To transport the printer by vehicle or by commercial carrier, the printer must be repackaged for shipment using
the proper packaging. The printer package must be securely fastened to its pallet. Do not use a shipping or
transport method that requires the printer to be shipped without a pallet. The printer must stay upright throughout
the shipment. If you do not have all the original packaging, contact your local service representative to order the
repackaging. Additional instructions for repackaging the printer are provided in the repackaging Kit.
Readers’ Comments — We’d Like to Hear from You
Infoprint Color 1454 & 1464
Help guide
Publication No. G510-4097-00
Overall, how satisfied are you with the information in this book?
Overall satisfaction
Very Satisfied
Satisfied
Neutral
Dissatisfied
h
h
h
h
Very
Dissatisfied
h
How satisfied are you that the information in this book is:
Accurate
Complete
Easy to find
Easy to understand
Well organized
Applicable to your tasks
Very Satisfied
Satisfied
Neutral
Dissatisfied
h
h
h
h
h
h
h
h
h
h
h
h
h
h
h
h
h
h
h
h
h
h
h
h
Very
Dissatisfied
h
h
h
h
h
h
Please tell us how we can improve this book:
Thank you for your responses. May we contact you?
h Yes
h No
When you send comments to IBM, you grant IBM a nonexclusive right to use or distribute your comments in any
way it believes appropriate without incurring any obligation to you.
Name
Company or Organization
Phone No.
Address
G510-4097-00
___________________________________________________________________________________________________
Readers’ Comments — We’d Like to Hear from You
Cut or Fold
Along Line
_ _ _ _ _ _ _Fold
_ _ _and
_ _ _Tape
_ _ _ _ _ _ _ _ _ _ _ _ _ _ _ _ _ _ _ _ _ _ _ _ _ _ _Please
_ _ _ _ _do
_ _not
_ _ staple
_ _ _ _ _ _ _ _ _ _ _ _ _ _ _ _ _ _ _ _ _ _ _ _ _ _ _ _ _Fold
_ _ _and
_ _ Tape
______
NO POSTAGE
NECESSARY
IF MAILED IN THE
UNITED STATES
BUSINESS REPLY MAIL
FIRST-CLASS MAIL
PERMIT NO. 40
ARMONK, NEW YORK
POSTAGE WILL BE PAID BY ADDRESSEE
IBM Corporation
Information Development IBM Printing Systems Depatment
H7FE
Building 004N PO Box 1900 Boulder, CO
80301-9817
_________________________________________________________________________________________
Please do not staple
Fold and Tape
Fold and Tape
G510-4097-00
Cut or Fold
Along Line
Part Number: 75P6580
G510-4097-00
(1P) P/N: 75P6580
Printed in USA