1
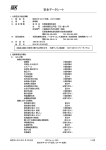
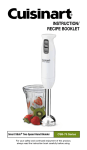
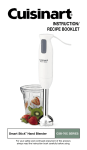
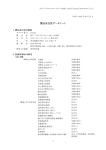
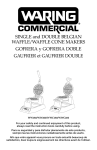
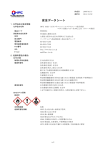
Use & Care for Electric Grill
USA: 1-800-851-8900
840058500
IMPORTANT SAFEGUARDS
When using electrical appliances, basic safety precautions should
always be followed, including the following:
1. Read all instructions.
2. Do not touch hot surfaces. Use handles or knobs.
3. To protect against electrical shock, do not immerse cord
assembly, heating element, or plug in water or other liquid.
4. Close supervision is necessary when any appliance is used by or
near children.
5. Unplug from outlet when not in use and before cleaning. Allow to
cool before putting on or taking off parts and before cleaning the
appliance.
6. Always attach plug to appliance first, then plug cord into the wall
outlet. To disconnect, remove plug from wall outlet.
7. Do not leave the appliance unattended when in use.
8. Do not operate any appliance with a damaged cord or plug, or
after the appliance malfunctions or has been dropped or damaged
in any manner. Call our toll-free customer service number for
information on examination, electrical repair, mechanical repair, or
adjustment.
9. Do not use outdoors.
10. Do not let cord hang over edge of table or counter, or touch
hot surfaces, including the stove.
11. Do not place on or near a hot gas or electric burner, or in a
heated oven.
12. Always use the appliance on a dry, level surface.
13. Do not use appliance for other than intended use.
14. Use extreme caution when moving an appliance containing
hot oil or other hot liquids.
15. Always remove cord before attempting to move the grill.
16. The use of accessory attachments not recommended by
Hamilton Beach/Proctor-Silex, Inc. may cause injuries.
17. Fuel such as charcoal briquettes, is not to be used with appliance.
CONSUMER SAFETY INFORMATION
This appliance is intended for household use only.
If appliance has a variable heat power cord, it is equipped with a
polarized plug. This type of plug has one blade wider than the other.
The plug will fit into an electrical outlet only one way. This is a safety
feature intended to help reduce the risk of electrical shock. If you are
unable to insert the plug into the outlet, try reversing the plug. If the
plug should still fail to fit, contact a qualified electrician to replace the
obsolete outlet. Do not attempt to defeat the safety purpose of the
polarized plug by modifying the plug in any way.
The length of the cord used on this appliance was selected to reduce
the hazards of becoming tangled in, or tripping over a longer cord. If a
longer cord is necessary an approved extension cord may be used.
The electrical rating of the extension cord must be equal to or greater
than the rating of the grill.
Do not operate this grill without drip pan in place.
Do not cover the drip pan or rack with aluminum foil. The holes in
the drip pan must remain open for proper operation of the grill. The
rack should not be covered to allow proper heat circulation. Do not line
the base with aluminum foil.
Do not use another high wattage appliance on the same circuit with
the grill.
Do not leave this appliance unattended while in use.
Do not use charcoal in this appliance.
Do not use any power cord except the one supplied by Hamilton
Beach/Proctor-Silex with the unit.
WARNING: Heating element is not immersible. To reduce the risk of fire
or electrical shock do not immerse cord, plug, or heating element in
water. Do not place in dishwasher.
SAVE THESE INSTRUCTIONS!
2
3
How to Assemble
Parts and Features
Rack
Heating Element
Support
Rod
Cord Receptacle
Drip Pan
Power Cord
1. Place base on countertop.
2. Insert drip pan. Make sure the openings in the base and drip
pan line up for the power cord.
3. Place support rod in small indentations in drip pan.
4. Place the cord receptacle end of the
Cord
heating element through opening in drip Receptacle
pan. Make sure the notched edge is
facing down. Position notch over edge
in drip pan opening, as illustrated.
When properly assembled the heating
element will rest on the support rod.
5. Place rack on top of assembled grill.
Notch
6. Attach power cord to cord receptacle.
How to Grill
Power Cord
Openings
Base
Variable Heat
Power Cord
(Available on
selected models.)
Offers High, Low,
and Off settings.
DO NOT OPERATE THIS GRILL WITHOUT DRIP PAN IN PLACE.
During the first use of the grill some smoke and odor will be
noticed. This is normal with heating appliances and will not
occur after several uses.
1. Assemble grill as instructed above.
2. Always attach power cord to cord receptacle first. Then place
plug into outlet.
3. Preheat grill for 10 minutes. Never leave the grill unattended
when using.
4. For best performance, do not cover more than 75% of the
rack surface with food.
BEFORE FIRST USE: Wash the rack, support rod, drip pan,
and base in hot, soapy water. Rinse and dry thoroughly.
4
Correct Amount to Grill
5
Overloaded Grill
5. Use only plastic or wooden utensils. Do not use metal
spatulas or tongs.
6. When finished grilling, remove plug from outlet. If you have a
power cord with a marked Off, turn to Off first, then remove
plug from outlet.
7. Let grill cool completely, then remove power cord from cord
receptacle.
WARNING: To reduce the risk of fire, clean grill after cooking
one rack load of food. Do not let drippings and grease accumulate
on rack and in drip pan.
Variable Heat Power Cord – Available on selected models
If you have the variable heat power cord, use the High setting for
cooking and the Low setting to keep food warm after cooking.
Grilling Tips
• If grilling meats with a high fat content, such as hamburger,
do not leave the grill unattended. Small flare-ups or smoke
may occur from dripping fat or pieces of meat falling onto
the element.
• To reduce the possibility of smoke, trim all visible fat from
meats. Also, avoid marinades that have a high oil content.
• You may grill fish steaks, but not fish fillets. The fillets tend to
break apart.
• Do not grill breaded products.
Grilling Times
The following cooking times are a guide. Cook to the desired
degree of doneness. The times listed are the total cooking times.
Food should be turned half way through total cooking time.
6
COOKING CHART
Approximate Time
Food
1
10 minutes for rare,
Steaks, ⁄2-inch thick
20 minutes for well done
1
12 to 15 minutes
Hamburgers, ⁄4-inch thick
10 minutes
Fish steaks 1-inch thick
1
20 to 30 minutes
Pork chops, ⁄2-inch thick
20 minutes
Boneless chicken breasts
35 to 45 minutes
Bone-in chicken pieces
10 minutes
Hot dogs
10 to 15 minutes
Sausage patties or links
How to Clean
WARNING: Heating element is not immersible. To reduce the
risk of fire or electrical shock do not immerse cord, plug, or
heating element in water or place in dishwasher.
1. Unplug grill from outlet and let cool completely. Remove
power cord from cord receptacle.
2. Remove rack, heating element, and support rod. Carefully
dispose of any grease in drip pan and base.
3. Wash rack, support rod, drip pan, and base in dishwasher or
hot, soapy water. If necessary, soak and scrub with a nylon
scouring pad. Do not use steel wool or other abrasives. Rinse
and dry. Do not immerse heating element or power cord in
water or other liquid.
4. Some grease or food particles may accumulate where the
heating element connects to the cord receptacle. To clean this
area, let heating element cool completely then carefully wipe
clean with a damp cloth.
7
Recipes
NOTE: If your grill has a variable heat power cord, available on
selected models, use the High setting for these recipes.
Indicates preparation and
grilling times.
Grilling Guidelines
• Grilling Times: Recipe cooking times are estimates. Cooking time
will vary based on the temperature of the grill, the surrounding air,
and the food itself. Watch food carefully while grilling and adjust
the cooking time as necessary.
• Marinating Tips: Never marinate foods in metal containers for
extended lengths of time (2-plus hours). The acids in foods can
react with metal, causing an unpleasant taste. Instead, use glass,
ceramic, or plastic bag containers for marinating.
• Meat Safety Tip: To reduce the risk of spoiling, store meat in the
refrigerator until you’re ready to cook. Never thaw or marinate meat
at room temperature, especially in warm climates.
• Never use leftover marinade as a finishing sauce on cooked foods.
The leftover marinade must first be boiled for one to two minutes to
kill any bacteria from the raw food that was marinated.
• Although some cookbooks may say to bring your food to room
temperature before cooking, with few exceptions, we don’t
recommend this tip for grilled foods. If the temperature is in the
80s or 90s, foods can spoil quickly.
• Always read all safety information.
8
The following recipes are from Grilling For Dummies® by Marie
Rama and John Mariani. Copyright© 1998 IDG Books Worldwide,
Inc. All rights reserved. Reproduced here by permission of the
publisher. ...For Dummies is a registered trademark of IDG Books
Worldwide, Inc.
Basic Burger and “Vary It” Ideas
Grilled Steak 101
Texas Beef Barbecue
Spicy Chili Chicken Wings
Basic Burger
Preparation time: 15 minutes
Grilling time: 22-28 minutes
Yield: 4 servings
11⁄2 pounds ground chuck
1⁄4 teaspoon salt, or to taste
1⁄4 teaspoon pepper
4 hamburger buns
1. Combine the ground chuck, salt, and pepper in a medium
mixing bowl, mixing lightly but thoroughly, using your hands.
Shape the mixture into four patties, each 3⁄4 inch thick in the
center and at the edges. (Even thickness ensures even
cooking and prevents the edges from drying out before
the center is cooked.)
2. Place the patties on grill. Grill for 11 to 14 minutes per
side, turning once. (According to the U.S. Department of
Agriculture, all ground meat should be cooked to at least
medium doneness - 160 degrees - or until the center of
the patty is no longer pink.) Make a small incision in the
center of each patty to determine doneness.
9
3. Toast the buns by placing them, split side down, on the edges
of the grill grid for about 1 minute or until lightly browned.
4. Remove the burgers from the grill and serve on toasted
hamburger buns.
Variation Section:
Italian Burger: Add the following ingredients to the ground meat
mixture: 1 egg yolk, 1⁄4 cup grated onion, 1 large clove garlic
minced, 2 tablespoons chopped fresh basil or 2 teaspoons dried
crushed basil, 1⁄2 teaspoon dried oregano, and salt and pepper
to taste. Place grated Parmesan cheese on top of each burger
(if desired) about 2 minutes before the burger is done and grill
until the cheese melts.
Mexican Burger: Add the following ingredients to the ground
meat mixture: 1⁄4 cup finely chopped onion, 1⁄2 to 1 teaspoon
seeded and chopped jalapeno pepper, 3⁄4 teaspoon ground
cumin, and salt and pepper to taste. Serve on toasted buns
or in warmed tortillas with a prepared tomato salsa or taco
sauce, and slices of ripe avocado.
Asian Spiced Burger: Add the following ingredients to
the ground meat mixture: 1⁄4 cup finely chopped scallions,
3 tablespoons teriyaki sauce, 1 large clove garlic, minced,
and salt and pepper to taste.
Grilled Steak 101
Preparation time: 5 minutes
Grilling time: 35-45 minutes
Yield: 2 to 3 servings
2 tablespoons olive oil
1 boneless sirloin beef steak, cut 1-inch thick
(about 1 pound total)
1 clove garlic, crushed
Salt and pepper to taste
10
1. In a small bowl, combine the olive oil and garlic. Generously
rub or brush the flavored oil on both sides of the steaks.
Sprinkle the steaks lightly with salt and pepper.
2. Place the steaks on the grill. Grill 35 to 45 minutes for
medium doneness, turning every 15 minutes.
3. Remove the steaks from the grill, cover loosely with foil and let
the steaks rest for a few minutes before thinly slicing across
the grain. Season with salt and additional pepper
(if desired) before serving.
Texas Beef Barbecue
Preparation time: 10 minutes
Marinating time: 3 hours or overnight
Grilling time: 35-45 minutes for medium-rare
Yield: 2 to 3 servings
1 cup bottled chili sauce
1 teaspoon ground cumin
1⁄2 cup beer
1⁄2 teaspoon dried red pepper flakes
1⁄3 cup vegetable oil
1⁄4 cup finely chopped green onion (white and green parts)
1 boneless beef top round steak, cut 1-inch thick
(about 1 pound)
3 tablespoons chili powder
Salt to taste (optional)
1. In a medium bowl, make the marinade by combining all the
ingredients except the steak.
2. Place the steak in a glass baking dish or a large, resealable
plastic bag. Pour the marinade over the steak, turning to coat.
Cover the dish or seal the bag, pressing out as much air as
possible. Refrigerate 3 hours or overnight.
11
3. Remove the steak from the marinade, shaking off any excess.
Discard the marinade. If desired, sprinkle the steak with salt.
Place the steak on the grill and grill 35 to 45 minutes for
medium doneness, turning every 15 minutes.
4. Transfer the steak to a cutting board and let stand for
5 minutes, loosely covered with foil. Thinly slice across
the grain.
Spicy Chili Chicken Wings
Preparation time: 20 minutes
Marinating time: 2 to 4 hours
Grilling time: 25-30 minutes
Yield: 2 main dish servings or 4 appetizer servings
11⁄2 pounds chicken wings (about 8 wings)
3 tablespoons olive oil
3 tablespoons fresh lime juice
4 large cloves garlic, peeled and minced
2 teaspoons ground cumin
2 teaspoons ground coriander
2 teaspoons paprika
1 teaspoon peeled and grated ginger
1 teaspoon salt, or to taste
1⁄2 teaspoon hot chili powder or cayenne pepper
1⁄2 teaspoon cinnamon
1. Rinse the chicken wings under cold running water and pat
dry with paper towels. Cut off the wing tips at the joints and
discard the tips. (Or wrap and freeze tips to use later to add
flavor to canned or homemade soups and stocks.)
2. Combine all the remaining ingredients in a large, resealable
plastic bag or mixing bowl, blending them well.
12
3. Add the chicken wings; toss well to coat the wings in the
oil-spice mixture. Seal the bag, pressing out any air, or cover
the bowl; refrigerate for 2 to 4 hours.
4. Place the wings on the grill. Grill for 25 to 30 minutes or until
done, turning with tongs every 10 minutes to prevent burning
and to ensure even cooking. To test for doneness, cut into the
thickest part of the wing, the meat should be white, with no
trace of pink and the juices should run clear.
Plum Fancy Pork Swords
Nutritional Information
Recipe Courtesy of the National Pork
Per Serving
Serving Size: 1
Producers Council
Nutrient
Per Serving
Preparation time: 10 minutes
Calories
183
Marinating time: 1 hour
Total Fat
5g
Cholesterol
44mg
Grilling time: 10 minutes
Sodium
1340mg
Yield: 4 Servings
Protein
19g
4 bamboo skewers
(soak in water before using)
3⁄4 pound ham, fully cooked, cut into 1-inch cubes
1⁄4 cup plum preserves
1 tablespoon Dijon-style mustard
1 teaspoon lemon juice, fresh
1⁄4 teaspoon cinnamon
Place ham in shallow bowl. Combine remaining ingredients
in small pan. Heat until dissolved. Pour sauce over ham.
Marinate for 1 hour. Place cubes on bamboo skewers that
have been soaked in water. Grill for 10 minutes. Turn skewers
frequently. Baste with sauce.
13
Heartland Barbecue Pork Chops
Nutritional Information
Per Serving
Recipe Courtesy of the National Pork
Serving Size: 1
Producers Council
Nutrient
Per Serving
Calories
371
Preparation Time: 5 minutes
Total Fat
11g
Cooking Time: 30 minutes
Cholesterol
104mg
Servings: 4
Sodium
382mg
Protein
39g
4 pork chops, bone-in or boneless,
1
about 1 ⁄4 inch thick
1⁄2 cup bottled barbecue sauce
1⁄3 cup honey
1 tablespoon Worcestershire sauce
1 teaspoon prepared mustard
Dash hot pepper sauce
For sauce, mix all ingredients except pork chops together in a
small bowl. Place pork chops on the grill. Grill chops for about
10 minutes, until nicely browned on one side; turn and brush
liberally with sauce. Grill for 10 minutes more; turn and brush
with more sauce. Grill for 5 to 10 minutes more, turning and
brushing with sauce. Discard any leftover sauce. Serve chops
immediately.
14
Spicy Grilled Shrimp
1⁄2 cup soy sauce
1 tablespoon olive oil
1 tablespoon sesame oil
5 tablespoons cajun seasoning mix
2 tablespoons fresh lemon juice
2 tablespoons fresh minced ginger
2 teaspoons dry mustard
2 teaspoons hot pepper sauce
24 large raw shrimp, peeled and deveined, tails on
Combine all ingredients except shrimp. Mix well then add
shrimp. Marinate 1 to 4 hours. Drain marinade and discard.
Place shrimp on grill and cook 2 minutes. Turn and cook
2 minutes longer or until done.
Salmon with Dill
1⁄2 pound salmon steak
1 tablespoon lime juice
1 teaspoon dill weed
Brush salmon with lime and sprinkle with dill weed. Spray
grill with cooking spray. Cook salmon 4 minutes. Turn and cook
4 minutes or until done. Makes 2 servings.
15
TWO YEAR LIMITED WARRANTY
Hamilton Beach/Proctor-Silex, Inc. warrants this appliance to be free from defects in
material and workmanship for a period of two (2) years from the date of original
purchase, except as noted. There is no warranty with respect to the following, which
may be supplied with this appliance: glass parts, glass containers, cutter/strainer,
nonstick soleplate and/or nonstick cooking surfaces. This warranty extends only to
the original consumer purchaser and does not cover damage from abuse, neglect, use
for commercial purposes, or any other use not found in the printed directions.
HAMILTON BEACH/PROCTOR-SILEX, INC. EXPRESSLY DISCLAIMS ALL RESPONSIBILITY
FOR CONSEQUENTIAL DAMAGES OR INCIDENTAL LOSSES CAUSED BY USE OF
THIS APPLIANCE. Some states or provinces do not allow this exclusion or limitation
of incidental or consequential losses, so the foregoing disclaimer may not apply to
you. If you have a claim under this warranty, DO NOT RETURN THE APPLIANCE TO
THE STORE! Please call our CUSTOMER SERVICE NUMBER. (For faster service
please have model and series numbers ready for operator to assist you.)
CUSTOMER SERVICE NUMBER
In the U.S. 1-800-851-8900
Web site address: www.proctorsilex.com
KEEP THIS NUMBER FOR FUTURE REFERENCE!
This warranty gives you specific legal rights, and you may also have other legal rights
which vary from state to state, or province to province.
HAMILTON BEACH PROCTOR-SILEX, INC.
Washington, North Carolina 27889
840058500
Web site address: www.proctorsilex.com
6/99