1
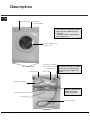
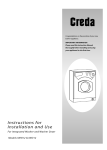
Instructions for Installation and Use
6kg Washer Dryer
Aquarius
Aquarius+
To the Installer:
Before installation, fill in the product details on the back cover of this
book. The information can be found on the rating plate.
To the User:
You must read these instructions prior to installing and using the
appliance and then retain them for future reference.
Description
GB
Dispenser drawer Control panel
(● Varies by Model)
●
Please record the Model number and
Serial number of your machine on the
back cover of this book for future
reference.
- The Serial number can be found on
the inside door trim.
Interlocking door and
release lever.
Front adjustable feet
Drainage hose
Cold water inlet points
and attached fill hoses
(blue connectors)
Mains cable
! DO NOT remove either of the
attached fill hoses OR the ‘Y’ piece
connector, even if you have both
Hot and Cold water supplies (see
page 7).
Hooked end support
Two transit fixings
! BOTH must be removed
BEFORE you use your
machine (see page 6).
Plumbing indicator line
Rating plate
‘Y’ piece connector
Back feet
2
Contents
WASHER DRYER
GB
Description
Description, 2
Wash Labels Explained, 4
Installation, 5-8
Contents
Unpacking
Remove the transit fixings
Location
Levelling
Water connection
Drainage connection
Electrical connection
Before you start using your machine
Wash Labels
Explained
Control Panel Features, 9
Installation
Aquarius
Aquarius+
Programmes and Option Modifiers, 10-16
Control Panel
Features
Starting a wash and dry programme
Drying
Programme table
Option modifiers and special features
Detergents and Laundry, 17
Programmes
Something
and Option
Detergents
Care and
Precautions
Wrong Modifiers
and Laundry Maintenance and Advice Troubleshooting
Detergent dispenser
Care and Maintenance, 18
Cleaning your machine
Fuses
Changing the plug
Precautions and Advice, 19-20
General safety
Saving energy and respecting the environment
Disposal
Something Wrong? - Troubleshooting, 21-23
Service, 24
Before calling for assistance
Spare parts
Key Contacts
! Keep this instruction book on hand in order to refer to it when necessary. Take it with you when you move,
and should you sell this appliance or pass it on to another party, make sure that this booklet is supplied
along with the appliance so that the new owner may be informed about warnings and suggestions on how
the machine works.
Service
3
Wash Labels Explained
GB
The number inside the wash tub shows the maximum water temperature, in ˚C.
If there are no bars, the garment can be spun and rinsed as normal.
One bar indicates a reduced spin speed programme should be used.
Two bars mean the clothes need a mild wash action, but can be spun and rinsed normally. Such
items should not be wrung out by hand.
If the tub contains a hand, wash the item on a Hand Wash programme.
A triangle means that you can safely use a cold, dilute solution of bleach.
A triangle with a cross over it means the item cannot be bleached.
A circle inside a square means you can tumble dry the garment.
The dots indicate temperature
- one dot for lower heat.
- two dots for higher heat.
A cross over this symbol shows you should not tumble dry the garment.
A circle means the garment is suitable for dry-cleaning.
A letter inside the circle is to tell the dry-cleaner which chemical wash and method to use.
4
Installation
4. Remove the
polystyrene base.
GB
Description
! Read these instructions carefully: the following
pages contain important information on installation
and suggestions on how the appliance works.
Unpacking
Installation
! IMPORTANT check
when unpacking your
machine:
! This is a part of the
polystyrene base and
should have stayed intact
when you removed the
base.
! If it has broken off and
is still in the machine...
remove it... while the
machine is still laying on
its side on the top cap.
Wash Labels
Explained
2. Lift off the polystyrene
top cap and remove the
four corner posts.
Contents
1. Using scissors, cut
carefully along one corner
post to remove the film.
Control Panel
Features
5. Stand the machine
upright.
Programmes
Something
Detergents
Precautions
Care and
and Option
Wrong and Laundry Maintenance and Advice Troubleshooting
Modifiers
! We recommend that a
second person helps to raise
and lower the machine.
3. Carefully lay the left
side of the machine down
onto the top cap.
! We recommend that a
second person helps to raise
and lower the machine.
! Continue to read the rest
of these instructions
carefully; the following
pages contain important
information on installation
and troubleshooting.
! Protect the environment - please dispose of the
packaging material carefully and considerately.
Service
5
Installation
GB
Remove the transit fixings
3. Hold, slide sideways and pull to
remove.
IMPORTANT: Follow these instructions to remove the
TWO transit fixings (see Description for location).
! Situated one either
side of the rear panel,
BOTH transit bolts
MUST be removed
before use.
4. For safety, insert one of the
the plastic covers (supplied with
your machine) over the hole.
! Repeat steps 1 to 4 to remove the second transit bolt.
Location of transit bolts.
! Packaging materials are not children's toys.
! Failure to do so may cause damage to your machine.
Location
! It is important the TWO transit fixings come out intact.
! Be sure to remove TWO bolts,
TWO washers, TWO rubber
grommets and TWO nylon
spacers (see pic).
Where you install your machine will affect its
performance:
! For your safety and to comply with electrical
regulations, seek professional advice if you want to
install your machine in a bath or shower room.
●
1. Unscrew the bolt using a
13mm spanner.
●
●
2. STOP when 3 threads can be
seen.
Make sure that the electrical socket and water
taps are easily accessible. You should switch off
the machine’s electrical and water supplies
when you are not using it for extended periods.
Make sure that you allow enough space for the
machine. Select a space at least 60cm wide,
60cm deep and 85cm high. Also leave enough
space to open the door fully, so that you can load
and unload it easily.
Where possible, the machine should be positioned
on a solid floor to minimise vibration.
! Take care when you move the machine not to rip any
floor coverings. The weight of the machine may cause
indentations in some floor coverings.
Did you know?...
●
●
●
●
6
...the transit fixings are fitted to ensure that your machine is undamaged during delivery.
...both of the transit fixings MUST BE removed before using the machine, be sure to remove TWO bolts,
TWO washers, TWO rubber grommets and TWO nylon spacers, not doing so will lead to excessive
vibration, movement of the machine and could eventually lead to internal damage.
...the majority of problems with noisy machines are due to the transit fixings not being removed.
...you will be charged for a service engineers visit if a problem with your machine is caused by incorrect
installation or misuse.
Installation
Levelling
Benefits of cold fill
●
●
●
COLD
WATER
SUPPLY
‘Y’ piece connector
Cold water fill hose (Blue Connectors)
●
Programmes
Something
Detergents
Precautions
Care and
and Option
Wrong and Laundry Maintenance and Advice Troubleshooting
Modifiers
Connecting the cold water inlet hoses with the ‘Y’
piece connector.
! Remember: please use the new hoses supplied,
fitted to the machine. Old hoses may cause leaks due
to worn out washers or may be split due to water
pressure.
! Remember: This is a cold-fill machine... BOTH fill
hoses (blue connectors) fitted to the rear of the
machine MUST be connected to the COLD water
supply (via the ‘Y’ piece connector).
! Before making connections to the cold water
supply, allow the water to run freely from the supply
tap until it is perfectly clear.
Control
Panel
Features
●
Modern detergents are designed to give the best
cleaning results at low temperatures. Biological
detergents contain enzymes which are active
between 30˚C and 53˚C, giving greater results at
lower temperatures.
Cold water relaxes fabrics, whilst hot water can
seal in stains.
Improved stain removal with cold water.
The most commonly used programme at present is
40˚C, which will take on cold water even if hot and
cold were available.
You can heat the water required to finish the wash
cycle, which makes it more economical than taking
water heated in a tank by an immersion heater or
gas boiler.
Installation
Water Connection
Wash Labels
Explained
! If it is placed on a fitted or loose carpet, adjust the
feet in such a way as to allow enough room for
ventilation beneath the machine.
! We recommend fitting a 3/4" sealing cap
to the hot water supply tap (if present), to
ensure there are no leaks. Sealing caps
can be purchased from Hotpoint Service
on 08709 077 077 or all good DIY and
Plumbing outlets.
Contents
1. Move your machine into its final location, taking
care not to trap or kink the hoses.
2. Turn one or both front feet
anti-clockwise by hand until the
feet cannot be turned any more.
When adjusting the feet, use a
spirit level to check the machine
stands level, from side to side
and from front to back.
The spring on each foot will stop
them coming loose.
GB
Description
Your machine will be noisy if the two front feet are not
adjusted so that the machine stands firm and level.
! The machine must be levelled from side to side and
from front to back.
1. Screw the ‘Y’ piece connector onto the cold water
supply until tight.
2. Fit a 3/4" sealing cap to the hot water supply, to
prevent unused supply leaking.
3. Turn ON the COLD water supply tap and check for
leaks, tighten if necessary.
4. Leave the unused HOT water supply turned OFF.
Hints and tips
! Make sure there are no kinks or bends in the hose.
! The water pressure at the supply tap must be within
the values indicated in the Technical Details table
(see page 20).
! If the water inlet hoses are not long enough, you can
purchase an extended hose from Hotpoint Service on
08709 077 077.
! Always use a new inlet hose.
! Check the water inlet hose at least once a year,
replace if cracked as worn hoses could split under
water pressure.
! Turn on the water supply and check that the
connections do not leak. If there is a leak, turn off
the water supply, disconnect the hoses and check
that the sealing washers are in place. Refit the hoses
and turn on the water supply.
Did you know?...
●
●
Service
●
...the most common cause of problems with water connection is that the customer has not turned the
supply tap on..
...it is very important to ensure that your hoses or cables are not kinked or squashed when the machine
is pushed back into its location, as this can lead to your machine failing to fill or empty the water.
...the majority of problems with noisy machines are due to the feet not being adjusted correctly to
level the machine.
7
Installation
GB
Drainage Connection
Electrical connections
! Although you may need to move the hooked end
support along the grey drainage hose, DO NOT remove
it.
Before plugging the appliance into the mains socket,
make sure that:
●
the socket is earthed and in compliance with the
applicable law.
●
the socket is able to sustain the appliances
maximum power load indicated in the Technical
Details table (see page 20).
●
the supply voltage is included within the values
indicated in the Technical Details table (see page 20).
●
the socket is compatible with the machines plug.
If this is not the case, replace the socket or the
plug, ensuring a 13A fuse is fitted.
! Whichever drainage method you use, make sure that
the hooked end support is fixed level to, or above the
‘Plumbing Indicator Line’ (see Description page 2).
We recommend one of the following:
Standpipe method:
1. Make sure the standpipe
height is a minimum 500mm up to
a maximum 1200mm from the
floor.
2. Insert the drainage hose
approximately 100mm into the
standpipe.
Hooked end
support
minimum:
500mm
maximum:
1200mm
Under sink method:
1. Cut off the blocked end of the
under sink drainage unit, or
remove the blanking plug if fitted.
2. Fix the hooked end support a
minimum of 800mm from the
floor.
3. Use a hose clip (eg. a jubilee
clip) to securely attach the grey
drainage hose end to the under
sink drainage unit.
! The machine should not be installed in an outdoor
environment, not even when the area is sheltered,
because it may be very dangerous to leave it exposed
to rain and thunderstorms.
! When the machine is installed, the mains socket
must be within easy reach and should be connected to
a suitable electrical supply.
! Do not use extensions or multiple sockets.
! The power supply cable must never be bent or
dangerously compressed.
! The power supply cable must only be replaced by an
authorised serviceman.
! The company denies all liability if and when these
standards are not respected.
Before you start using your machine
Hose clip
minimum:
800mm
from floor
The first wash cycle
Once the appliance has been installed and before you
use it for the first time, run a wash cycle without
detergent and no laundry. This will check your
installation, connections and drainage and will
thoroughly clean the interior before you carry out an
actual wash programme on your laundry.
This will take approximately 21/2 hours to complete.
! Run the 95˚ White Cotton programme 'B', without
laundry and without detergent.
! During this cycle check for any leaks from under the
machine. If present ensure all hoses are securely
tightened.
Did you know?...
●
●
●
●
8
...it is very important to ensure that your hoses or cables are not kinked or squashed as this can lead
to your machine failing to fill or empty the water.
...it is very important to respect the dimensions given within the drainage connection methods (see above).
...if using the undersink drainage method remember to cut off the blocked end, or remove the blanking plug.
...you will be charged for a service engineers visit if a problem with your machine is caused by incorrect
installation or misuse.
Control Panel Features
Aquarius control panel
Programme listing
Indicator
lights
Start/Cancel
button
GB
On/Off
button
Description
Option buttons
and lights
Contents
Variable Temperature
dial
Drying Times
dial
Wash Labels
Explained
Detergent dispenser
drawer
Programme selector
dial
Programme listing
Indicator
Option buttons
lights
and lights
Digital display
Start/Cancel
button
Installation
Aquarius+ control panel:
On/Off
button
Control Panel
Features
Variable Temperature
button
Drying Times
button
Programmes
Something
Detergents
Precautions
Care and
and Option
Wrong and Laundry Maintenance and Advice Troubleshooting
Modifiers
Detergent dispenser
drawer
Programme selector
dial
Control panel features
●
Programme listing: To consult a straight forward chart of the different programmes available.
●
Option buttons: To select the options available (see Programme Table and Option Modifiers).
●
Option lights: When an option is selected, the corresponding light is illuminated.
Variable Temperature: To reduce the selected programmes wash temperature (see Programme Table and Option
Modifiers).
- dial (Aquarius only): Turn to required temperature. When the programme has finished return the dial to its original setting.
- button (Aquarius+ only): Each press of the button will reduce the wash temperature by 5˚C.
●
Drying Times: To set the drying time.
- dial (Aquarius only): Turn to required time. When the programme has finished return the dial to its original setting.
- button (Aquarius+ only): Press to select drying times from 1 to 3 hours (see Setting Drying Programmes).
●
Programme selector dial: To select the programme you require. The knob stays still during the cycle.
●
Start/Cancel button: To start the programme, or to cancel it if incorrect settings were selected.
●
On/Off button: To turn the washing machine on and off.
●
Indicator lights: Shows if the door is locked (when lit, the door cannot be opened) and the stage of the
programme that the machine has reached (wash, rinse or spin).
Service
●
9
Starting a Programme
GB
Starting a typical wash and dry programme
1. Switch the machine on by
pressing the On/Off button.
7. Select drying time or level (if available on your model):
- Aquarius only, Timed drying:
Turn the Drying Times dial to
the required time.
! When the programme has
finished return the dial to its
‘Off’ position.
2. Sort your laundry into groups
by washcare labels. Load the
machine.
Close the machine door by
pushing it until it clicks.
3. Add detergent and fabric
conditioner to the dispenser
drawer.
! Refer to detergent
manufacturer’s dosage
instructions.
4. Turn the programme
selector dial to the required
programme.
5. Select any optional wash
feature(s) (see Option Modifiers)
you require by pressing the
appropriate button(s).
- Indicator lights will show what
you have chosen.
6. Reduce the programmes wash
temperature:
- Aquarius only: Turn the
Variable Temperature dial to the
reduced temperature you
require.
! When the programme has
finished return the dial to its
maximum setting.
- Aquarius+ only: Press the Variable Temperature
button until the required temperature shows in the
display.
Each press will reduce the wash temperature by 5˚C.
- Aquarius+ only, choose either’:
●
Auto ‘Sensor Dry’ - Press the Drying Times
button once, ‘Auto’ will appear in the display.
●
Timed drying - Press the Drying Times button,
until the required time is shown in the display.
8. Start the programme by pressing the
Start/Cancel button for at least 3 seconds.
The ‘Door Locked’ indicator will light up.
●
To stop/change a programme once the machine
has started:
- Press the Start/Cancel button for 3 seconds.
- Select ‘Pump Out’
on the Programme selector
dial.
When the machine has finished emptying:
- Turn the Programme selector dial to the new
programme required (you may need to add detergent).
- Check optional wash feature(s), wash temperature
and drying time selected (in STEPS 5, 6 and 7):
change if necessary.
- Press the Start/Cancel button to start the new
programme.
9. During the programme,
indicator lights will show you what
stage in the programme the
machine has reached.
10. A short time after the
programme has finished the
‘Door Locked’ indicator will go
out. You can open the machine
door and remove your laundry.
11. Switch the machine off by pressing the On/Off
button.
! Do not allow children to play with the machine or
tamper with the controls.
! Do not overload the machine. This may damage the
laundry and reduce the quality of the wash.
The maximum load (Cotton) is 6kg WASH / 5kg DRY.
! Do not try to open the dispenser drawer during any
programme.
! Do not try to open the machine door when the ‘Door
Locked’ indicator is lit.
10
Drying
Setting drying programmes
GB
1.
Wash Labels
Explained
4.
5.
6.
Remove the wet laundry and in drum dosing ball (if used) until the correct ‘Drying Weight Load’
(see Drying table, below) is left in the drum.
Close the door until it clicks shut.
Turn the programme selector dial to drying programme M (see Programme table).
Select HIGH HEAT (see Option modifiers) if drying cottons by pressing the Drying High Heat option
button: the corresponding light will show selection.
Set the required drying time or autodry option (see Drying option, below).
When all selections have been made press the Start/Cancel button. The door will lock.
A short time after the programme has finished the ‘Door locked’ indicator light will go out and the door
can be opened.
Contents
2.
3.
Description
Independent drying only programme:
Drying option
Timed Drying programmes:
Where you can select the length of the drying time suitable for your load.
Aquarius+ - Press the Drying Times button twice and ‘3’ will appear in the display, indicating 3 hours
drying time.
- Each subsequent press of the Drying Times button will reduce the drying time shown in
the display in 30 minute increments until ‘1’ (1 hour) is displayed.
- Pressing the Drying Times button again after ‘1’ is displayed cancels the drying
programme, ‘Off’ will appear in the display, no drying programme is selected.
Aquarius
- Use the Drying Times dial to select the drying time.
- The dial does not rotate during the cycle, turn it to the ‘Off’ position after the programme
has finished.
Control Panel
Features
Programmes
Something
Detergents
Precautions
Care and
and Option
Wrong and Laundry Maintenance and Advice Troubleshooting
Modifiers
●
Installation
●
Auto Drying programme ‘Sensor Dry’(if available, Aquarius+ only):
When selected the machine will automatically sense when the laundry is dry and switch off.
- Press the Drying Times button ‘Auto’ will appear in the display.
! Remember, with both the ‘Timed Drying’ programme and the Auto ‘Sensor Dry’ programme (if available),
the Drying High Heat option needs to be selected if drying non-delicate loads (eg. Cottons).
Drying table
Fabric
*for smaller loads reduce the drying time accordingly.
Programme
Dry Weight load
Heat setting
Aquarius only
Aquarius+ only
Time Setting*
(approx)
Cottons
B,C,D,E & F
5kg max.
HIGH
max.
3 hours
Synthetics
G&K
3kg max.
LOW
max.
2 hours
Service
! It is recommended that you separate your drying loads into similar fabric types, as this will increase
the drying efficiency.
11
Drying
GB
Important information
Operating the machine
! To improve the life expectancy of your machine, it is recommended that you do not stop or cancel your
programme during the drying cycle.
! It is recommended that you allow the programme to complete its full cycle, which includes completing the
‘cool tumble’.
! A 20 minute ‘cool tumble’ is included at the end of drying, allowing fabrics to cool down, minimising
creasing - The load may still be warm when removed from the machine.
! If your machine is not permanently plumbed in, turn on the cold water supply and hook the drain hose over the
sink to enable the condensing action to work.
! The dryer is intended for use only where water is used for the cleaning process.
! Be careful not to touch the drum at the top, as this area does get hot during drying.
! On no account should liquid fabric conditioner be added during the drying process.
! Misuse of the dryer may create a fire hazard.
will show in Display, Aquarius+ only).
! Select HIGH heat by pressing the ‘Drying High Heat’ option button (
will show in
If this option is not selected the programme will automatically default to low heat (
Display, Aquarius+ only).
! A spin cycle may be carried out during the drying programme.
! Your machine is fitted with a revolutionary self-clean filter, which will flush with water during drying - therefore
you may hear water entering the machine during the drying cycle.
! The Drying Times dial (Aquarius only) DOES NOT rotate - Return the dial to the ‘Off’ position at the end of each
drying cycle.
Drycare tips
Items not suitable for tumble drying:
●
●
●
●
●
●
12
Garments with the ITCL code DO NOT TUMBLE DRY.
Woollens.
Large, bulky items eg. quilts, bedspreads, pillows etc... expand when dry, preventing air flow through the
machine.
Items containing plastic film, foam rubber or rubber like materials eg. pillows, cushions, PVC rainwear or
inflammable articles which contain inflammable substances eg. towels contaminated with hair lacquer,
Fibreglass (eg. some types of curtains).
Items which have been dry cleaned.
4
3
3
1
3
6
-
-
-
-
-
800
Max
800
Special
400
800
800
600
800
Max
Max
Max
Max
-
-
-
Reduce Creases
Drying High Heat
-
-
Rinse Hold
-
Time Delay
Time Delay
Reduce Creases, Time Delay
Drying High Heat, Time Delay
Time Delay
Time Delay
Rinse Hold, Time Delay
Time Delay
Time Saver, Time Delay
Time Saver, Extra Rinse
-
Reduce Creases, Rinse Hold,
Reduce Creases, Rinse Hold,
Drying High Heat, Rinse Hold,
Time Delay
Extra Rinse
Extra Rinse
Drying High Heat, Rinse Hold,
Drying High Heat, Reduce Creases,
Time Delay
Drying High Heat, Reduce Creases,
Drying High Heat, Rinse Hold,
Time Saver, Time Delay
Time Saver, Extra Rinse
Rinse Hold, Extra Rinse
Drying High Heat, Rinse Hold,
Drying High Heat, Reduce Creases,
Rinse Hold, Time Delay
Drying High Heat, Reduce Creases,
Drying High Heat, Rinse Hold,
Time Saver, Time Delay
Time Saver, Extra Rinse
Time Delay
Drying High Heat, Rinse Hold,
-
6
6
1
4
Programmes
Something
Detergents
Precautions
Care and
and Option
Wrong and Laundry Maintenance and Advice Troubleshooting
Modifiers
Children’s Dresses
Shirts
Blouses
Set of Pyjamas
Items of Underwear
6
2
4
2
Bath Towels
SYNTHETIC
Shirts
= 3kg
Blouses
Set of Pyjamas
Items of Underwear
Pillow Cases
Control Panel
Features
2
4
4
1
4
Installation
13
Wash Labels
Explained
Bath Towels
SYNTHETIC
Hand Towel
= 6kg
Shirts
Blouses
Set of Pyjamas
Items of Underwear
3
5
6
2
4
-
-
-
-
-
Ariel Colour Liquid
Ariel Colour Liquid
Dreft
Dreft
Ariel Colour
Ariel Colour
Ariel Colour
Ariel Colour
Ariel Colour
Ariel Bio Powder /
Tablets
Ariel Bio Liquid
Recommended
Detergent
Children’s Dresses
Shirts
Blouses
Set of Pyjamas
Items of Underwear
COTTON 2
= 5kg 6
0 : 02
0 : 10
0 : 15
0 : 25
-
Normal
Light
Normal
Normal
Normal
Normal
Light
Normal
Heavy
Max
-
COTTON 2
= 6kg 1
6
3
6
3
-
0 : 50
0 : 30
0 : 55
0 : 45
1 : 05
1 : 45
1 : 00
2 : 00
2 : 20
Normal
Heavy
Aquarius+
Available Options
Two examples of maximum DRYING loads for different fabric:
-
-
-
-
Hi / Lo 5 / 3
25
30
30
40
5
6
5
2 : 30
0 : 20
Aquarius
Available Options
Two examples of maximum WASH loads for different fabric:
This partial programme ensures the appliance is emptied
of water.
This partial programme completes two full rinses and then
a slow spin.
Rinse & Spin
Mixed
R&S -
Pump Out
All
Aquarius & Aquarius+: Select the drying time and
temperature for the items you wish to dry, or...
Aquarius+ only: Select an auto drying programme and
choose the level of dryness you require.
Drying
Cottons (HIGH heat)
Synthetics (LOW heat)
M
PO D
A gentle cycle for delicate items labelled as Hand Wash
only.
Handwash
Delicates
(not Wool/Silk)
H
L
This partial programme completes the intermediate speed
final spin.
A very short refresh programme for lightly soiled mixed
fabrics.
Fast Wash
Mixed
(not Wool/Silk/Handwash)
30
K
Slow Spin
Delicates
For silk garments labelled as machine washable.
Machine Washable
Silk
40 -
J
-
A special cycle for Hand Wash wool that will not shrink
your garments exclusively approved by Woolmark.
Gold Woolmark Approved
Handwash Wool
40
H
SS
A cycle designed to wash a variety of man-made fibres
Man-made fibres
Coloured Synthetics & Acrylics and fibre mixtures.
40
G
This partial programme completes the maximum speed
final spin.
40
A less energy efficient intensive 40˚C cycle for more
stubborn soiling.
Standard
Non Colourfast Cotton
60
F
Fast Spin
Cotton
40
A fast cycle for lightly soiled heat resistant cotton & linen
fabrics.
Fast Wash
Colourfast Cotton
60
E
-
60
An intensive cleaning, energy efficient cycle using the
Standard
Colourfast Cotton (IEC 60456*) maximum load capacity.
60
D
60
6
6
Spin
Speed
Contents
Service
FS
60
An intensive cleaning programme for heavily soiled hard
wearing fabrics.
Superwash
Colourfast Cotton
60
C
95
For hard wearing heat resistant cotton and linen.
Hygienic
White Cotton
95
B
30
A cool temperature cycle to loosen stains before selecting
a main wash programme.
Prewash
Mixed
Temp Max Load Approximate
Soil
(˚C)
(kg)
Programme Time Level
(h : min)
P
Description
A
Label Programme Type / Fabric
Description
ID
Programme Table
Programme Table *Programme setting for test in accordance with IEC 50229 and EN 50229
GB
Option Modifiers and
Special Features
GB
Option modifiers
! Not all options can be used on all programmes - (see Programme Table for option availability).
●
Drying High Heat:
Use this option to select a higher drying temperature for more hard wearing or heat resistant cotton material.
When a drying only cycle is selected the default temperature is low heat - press the Drying High Heat option
button to select the high heat programme. On a wash and dry setting, high heat can only be selected if a cotton
wash is selected first. If a synthetic wash programme is selected with a drying programme, the temperature
is limited and high heat cannot be selected. This is to prevent damage to more delicate fabrics.
●
Reduced Creases:
Selecting this option will run the wash programme with a more gentle action and lower spin speed, in addition
to carrying out an additional rinse to ensure your laundry has fewer creases and will require less ironing.
●
Rinse Hold:
Selecting this option will pause the cycle in the final rinse with the fabric conditioner keeping the laundry
fresh until you are ready to complete the programme. The Rinse Hold light will flash to indicate the cycle is
paused. The machine will stay in this state, tumbling the load occasionally until either the Start/Cancel button
is pressed or the Rinse Hold button is pressed again to continue the cycle.
●
Time Saver:
Use this option for smaller loads less than the capacity listed for the material and programme type (see
Programme Table). This option reduces washing time saving energy. The time saved depends on the original
programme duration and wash temperature - the longer the original wash programme the more time is saved
using this option.
●
Extra Rinse (Aquarius only):
Provides a full extra rinse to ensure the maximum possible detergent removal, particularly useful for people
with sensitive skin.
●
●
Time Delay (Aquarius+ only):
Use this option to delay the programme start by up to 24 hours. The display will show the delay chosen.
Each press of the button increases the Time Delay in increments of 1 hour. If you press the button again
after 24 shows in the display the machine will reset the Time Delay and show ‘OFF’ in the display, pressing the
button after this will start the Time Delay selection from 1 hour. Once the countdown reaches zero the
programme will start.
Variable Temperature:
Use this option to reduce the wash temperature below the maximum for the programme you have chosen.
- Aquarius only (if available on your model), turn the dial to the reduced temperature required.
When the programme has finished reset the dial to 95. If the dial is left at maximum (95), the wash
temperature will be the maximum for the chosen programme.
- Aquarius+ only, each press of the button will reduce the wash temperature by 5˚C. The new wash
temperature will be shown in the display. If you press again after ‘OFF’ has been displayed, the
machine will revert to the original higher temperature.
●
Variable Drying Times:
Use this option to select the drying options required (see Setting drying programmes).
- Aquarius only, turn the dial to the required drying programme time in minutes. If this is selected
before the wash programme is started, the machine will carry out a ‘wash and dry’ cycle.
When the programme has finished reset the dial to the ‘Off’ positions.
- Aquarius+ only, each press of the button allows you to select between ‘Auto’ drying and a drying time
(in minutes). If this is selected before the wash programme is started, the machine will carry out a
‘wash and dry’ cycle.
14
Option Modifiers and
Special Features
Special features
GB
●
Description
! Not all special features can be used on all programmes - (see Programme Table for option availability).
Fast Wash:
●
Contents
The Fast Wash programmes are designed for lightly soiled loads delivering quick results for smaller loads, using
less energy. For loads with stains or increased soil levels which require deeper cleaning, use the standard or
intensive wash cycles.
Wash & Dry:
Wash Labels
Explained
On most programmes a wash cycle can be immediately followed by a drying cycle. To select this simply select
the desired wash programme and then select a drying time (Aquarius and Aquarius+) or an auto dryness level
(Aquarius+only) and the appropriate temperature for the drying cycle (default is LOW heat, press the Drying
High Heat option button for cottons). Press the Start/Cancel button and the wash cycle will start and when
complete, the drying cycle will automatically commence.
●
Installation
Note: The maximum capacity for a Wash & Dry load is:
- Cottons
5kg
- Synthetics
3kg
Handwash:
●
Control Panel
Features
A gentle action programme for delicate items and items labelled as hand wash only.
Not for Wool or Silk garments (use the special programmes for those materials).
Handwash Wool Approved:
●
Programmes
Something
Detergents
Precautions
Care and
and Option
Wrong and Laundry Maintenance and Advice Troubleshooting
Modifiers
The wool wash cycle on Hotpoint machines has been tested and approved by the Woolmark Company for washing
garments labelled as ‘hand wash’, provided that the ‘garments’ are washed in accordance to the instructions
issued by the manufacturer of this machine.
- This cycle is selected by turning the Programme Selector dial to the wool programme and selecting the ‘Wash
Enhance’ option modifier (see Programme Table and Option Modifiers).
! We recommend using a wool wash liquid when using Wool programmes.
Super Silent Wash:
Using the latest brush-less electric motors and damper technology the noise levels during the washing phase
are significantly lower than a conventional machine.
●
Aquarius+ only: Display
If time delay is selected this shows the time remaining until the start of the wash programme in hours – counting
down each hour.
It also displays time to end of the wash programme in hours and minutes counting down each minute.
! Please note time can go up as well as down depending on load absorbency, load size and water temperature.
Note: We recommend that if you use colour catcher sheets in your appliance that these only be used inside
a wash bag, as otherwise they can affect the performance of your machine.
Did you know?…
●
●
Service
●
… when an option button is selected the corresponding light is illuminated.
… if the option selected is incompatible with the programme selected, the button will flash and the option will
not be enabled.
… if you set an option that is incompatible with an option selected previously, only the last option selected will
be enabled.
15
Option Modifiers and
Special Features
GB
Automatic features
Unbalanced load detection
The machine has an inbuilt feature to prevent it from spinning too fast with an unbalanced load.
When an unbalanced load is detected, the machine will attempt to redistribute the load in order to
balance it evenly to achieve full spin speed.
If this is not possible and an unbalanced load remains the spin speed will be reduced, depending on the amount
of unbalance detected. This is to prevent the machine from damaging itself or its surroundings and to prevent
excessive noise from the machine.
! If the spin result is unsatisfactory following a reduced spin speed attempt to rectify the unbalanced load, then
on completion of the programme the load can be redistributed evenly in the drum by hand. Select a spin cycle.
Note: Do not attempt to spin heavy or absorbent single items as the machine cannot distribute these evenly.
If you need to wash a single item you will need to add some other items as ballast to allow the machine to distribute
the load evenly throughout the drum.
No water detection
The machine will automatically detect if it cannot take in water and will notify you by...
- Aquarius models: flashing the Prewash light.
- Aquarius+ models: flashing ‘H20’ on the digital display.
If this occurs please check the appliance is plumbed in correctly, with both fill hoses fitted to the cold water supply
using the ‘Y’ piece connector (see Installation ‘Water connection’).
Energy saving and water levels
Modern machines are designed to be as environmentally friendly as possible.
To achieve this water levels are kept to a minimum to ensure they are economic and use the lowest energy
possible. Unlike older appliances you will not see high water levels in the drum during washing.
! We recommend always washing as close to a full load as possible (see Programmes Table for the maximum
load size of your selected programme).
16
Detergents and Laundry
Detergent dispenser
Washcare Tips
●
Grate
Drawer release catch
●
Fabric conditioner compartment.
Maximum: 120ml
Adding fabric conditioner
Pour the recommended amount of fabric conditioner into
the compartment. Do not exceed the maximum fill line.
Pre-Wash
When selecting prewash, add detergent to both the
pre-wash and the main wash compartments.
Do not use the machine if the item to be washed
does not have a wash label.
Before washing laundry we recommend you:
●
●
●
Pre-treat awkward stains with washable treatments.
Do not wash any items that have previously been
treated with solvents.
Close zips, fasten belts, tie strings and close
press studs to prevent tangling.
Empty all objects from pockets as they may
damage the laundry and the machine.
Programmes
Something
Detergents
Precautions
Care and
and Option
Wrong and Laundry Maintenance and Advice Troubleshooting
Modifiers
Dispensing liquid detergent
We recommend the use of a detergent dosing ball, as
provided by your detergent manufacturer.
●
Control Panel
Features
Dispensing tablets
Tablets can be dispensed via the machine drum or via
the dispenser drawer.
! Please CHECK the detergent pack for dispensing
instructions.
! Incorrect use can damage your laundry.
! Remember you will be charged for a service
engineers visit resulting from a detached bra wire.
Installation
Dispensing powder detergent
To achieve the best wash results the manufacturer’s
recommended amount of detergent should be
measured and added to the main detergent
compartment.
Wash Labels
Explained
Main wash detergent
compartment.
Maximum:
400ml powder
or
200ml liquid
Contents
Pre-wash detergent compartment.
Maximum:
200ml powder
or
100ml liquid
DO NOT overload or underload the machine (see
the Programme Table for maximum load), in addition
to reducing the quality of the wash this may also
damage your laundry and the machine, whilst
causing the machine to become unstable and noisy.
We strongly recommend that you DO NOT wash
underwired bras in this machine. Should the
wires become detached it could cause damage to
your laundry and the machine. If the washcare
label states that the bra is machine washable,
then we advise placing it in a sealed pillow case or
a similar washbag.
Description
! Do not put any items into the drawer, other than
detergents designed to be released from the drawer,
as they may cause damage or blockage.
GB
! Remember you will be charged for a service
engineers visit to rectify malfunction resulting from
objects such as coins, pens, hair grips etc. falling
from pockets.
Limit the size of absorbent loads ie. towels, to half
loads to give good washing and rinsing results.
●
Place small items in a wash bag.
●
Always follow the care label on items when
choosing the wash programme.
●
Wash non-colourfast items or really dirty items
separately as they may affect other laundry.
●
Did you know that with Hotpoint and Ariel you’ll get the best washing results?
Certain laundry products work better in some machines than others. At Hotpoint we know this is true because
we’ve done the research to prove it. We used real everyday clothes and ran tests to find out which washing powder
works best with Hotpoint. The results proved that Hotpoint and Ariel produces the best washing results on all your
clothes.
Ariel can meet all your laundry needs. It is available as a biological powder for everyday wash loads. Colour powder to
keep your clothes staying brighter for longer and a Non-Bio powder for when you need brilliant cleaning but are
concerned about sensitive skin.
Did you know?...
Service
●
...undissolved detergent left in the drawer or on clothes can be due to incorrect dosing or using the incorrect
dispensing method - CHECK the detergent manufacturers instructions on the pack for dispensing and
dosage advice.
17
Care and maintenance
GB
Moulded plug
Cleaning
! The plug must not be used without the fuse cover in place.
! Unplug your machine when cleaning it and before all
maintenance operations.
! Do not clean any part of the machine with abrasive
cleaners, scouring agents, acids, any bleach or metal
polish as they may cause damage.
●
Use a damp cloth or silicon polish to clean the
exterior surfaces of the appliance.
●
Clean the internal surface of the door bowl regularly
with a soft cloth. A build up of soap powder and
water hardness residue may result in water leaking
from the door.
●
Always leave the appliance door ajar to prevent
unpleasant odours from forming.
Cleaning the dispenser drawer and compartments
It is advisable to clean the dispenser drawer regularly.
! Do not try to clean any part of the dispenser drawer
while the machine is running.
If a replacement fuse holder/cover is
required, it must be of the same colour
coding or wording as shown on the base
of the plug.
Replacements are available from authorised dealers.
Changing the plug
The wires in the power cord are coloured in accordance
with the following:
Green and Yellow
(Earth) wire to terminal
marked ‘E’, symbol ,
or coloured green and
yellow.
Blue (Neutral) wire to
terminal marked ‘N’ or
coloured black.
13A ASTA approved
fuse to BS1362.
Brown (Live) wire to
terminal marked ‘L’ or
coloured red.
Cord clamp
1. Pull out the drawer until it
reaches its stop.
2. Press the drawer release
button to remove the dispenser
drawer (see pic).
3. Clean and dry the dispenser
drawer, syphons, grate and
fabric conditioner exit channel
(A), ensuring any build up of
detergent and fabric conditioner
is fully removed.
! Failure to do so may lead to
the machine leaking from the
dispenser drawer.
Also regularly clean the
outlet pipe area (B).
4. Relocate the dispenser drawer
and push it firmly back into place.
A
B
! We recommend a maintenance wash 2 or 3 times a
year, to avoid a build up of greasy deposits and water
hardness residue. Run the 95˚ White Cotton programme,
with the normal amount of detergent but no laundry.
●
Where the drying only option is regularly used, do
this on a monthly basis.
18
! If the plug being replaced is a non-rewirable type,
then the cut-off plug must be disposed of safely.
DO NOT leave it where it can be inserted into a socket
and create a shock hazard.
! The power supply cord should be checked periodically
and replaced by a cord specially prepared for this
machine and fitted only by authorised technicians (see
Service). Replacement power cords can be purchased,
at an extra cost from our Genuine Parts and
Accessories department or authorised dealers.
! The manufacturer denies any responsibility should any
of these rules not be followed.
! If in doubt about any of the above consult a
qualified electrician.
Precautions and advice
General safety
●
●
●
●
●
●
●
●
●
Saving energy and respecting the
environment
Environmentally-friendly technology
If you only see a little water through your appliance
door, this is because thanks to the latest Hotpoint
technology, your machine only needs less than half the
amount of water to get the best results: an
objective reached to respect the environment.
If you use your machine between late in the
afternoon and the early hours of the morning, you
will help reduce the electricity board’s peak load.
Recycling and Disposal information
As part of Hotpoint’s continued commitment to
helping the environment, Hotpoint reserve the right
to use quality recycled components to keep down
customer costs and minimise material wastage.
●
Please dispose of packaging and old appliances
carefully.
●
To minimise risk of injury to children, remove the
door and plug - then cut off mains cable,flush with
the appliance. Dispose of these parts separately
to ensure that the appliance can no longer be
plugged into a mains socket, and the door cannot
be locked shut.
Disposal of old electrical appliances
The European Directive 2002/96/EC on Waste Electrical
and Electronic Equipment (WEEE), requires that old
household electrical appliances must not be disposed
of in the normal unsorted municipal waste stream. Old
appliances must be collected separately in order to
optimise the recovery and recycling of the materials
they contain and reduce the impact on human health
and the environment.
The crossed out “wheeled bin” symbol on the
product reminds you of your obligation, that
when you dispose of the appliance it must
be separately collected.
Consumers should contact their local authority or
retailer for information concerning the correct
disposal of their old appliance.
Service
Saving on detergent, water, energy and time
●
To avoid wasting resources, the machine should
be used with a full load. A full load instead of two
half loads allows you to save up to 50% on energy.
●
Programmes
Something
Detergents
Precautions
Care and
and Option
Wrong and Laundry Maintenance and Advice Troubleshooting
Modifiers
●
Use the correct quantity of detergent, depending
on the water hardness, how soiled the garments
are and the amount of laundry you have, to avoid
wastage and to protect the environment: despite
being biodegradable, detergents do contain
ingredients that alter the natural balance of the
environment. In addition, avoid using fabric
softener as much as possible.
Control Panel
Features
●
●
Installation
●
Treating stains with a stain remover or leaving
them to soak before washing will cut down the
need to wash them at high temperatures.
A pro gramme at 60˚C instead of 90˚C or one at
40˚C instead of 60˚C will save up to 50% on
energy.
Wash Labels
Explained
●
●
GB
Contents
●
The pre-wash cycle is only necessary on extremely
soiled garments. Avoiding it will save on detergent,
time, water and between 5 and 15% energy.
Description
●
Unplug your appliance when cleaning it and during
all maintenance operations.
This machine should only be used by adults and in
accordance with the instructions.
Do not overload or underload the machine. In
addition to reducing the quality of the wash,
this may also damage your laundry and the machine.
Do not pull on the power supply cable to unplug
the appliance from the electricity socket. Pull the
plug out.
Do not open the machine door while the
appliance is in operation.
Do not open the detergent dispenser while the
appliance is in operation.
Never force the machine door: this could damage
the safety lock mechanism designed to prevent
any accidental opening.
Turn off the water tap after every wash. This will
limit the wear of your appliances water system
and also prevent leaks.
In the event of a malfunction, do not under any
circumstances touch internal parts in order to
attempt repairs.
Always keep children well away from the appliance
while in operation. Do not let children play with the
machine or tamper with the controls.
The appliance door tends to get quite hot during
the cycle.
Should it have to be moved, proceed with the
help of two or three people and handle it with the
utmost care. Never try to do this alone, because
the appliance is very heavy.
Before loading your laundry into the machine,
make sure the drum is empty.
Check the water fill hose at least once a year. If
you see any cracks, replace it immediately:
during the wash cycles, high water pressure could
cause a cracked hose to split open.
! Never use hoses that have already been used.
In the unlikely event of something not working see the Troubleshooting section.
●
19
Precautions and advice
GB
Safety advice
! This machine was designed and built in compliance
with the applicable international safety regulations.
The following information is provided for your safety
and should be read carefully.
●
●
●
●
●
●
●
●
●
●
●
●
●
●
●
●
●
●
20
This machine is designed for domestic use only.
Before using your machine make sure that the TWO
transit bolts, TWO rubber grommets and TWO
spacers have been removed (see page 5).
Any electrical work necessary to install this
machine should be carried out by a qualified
electrician.
Do not plug your machine into a socket when your
hands are wet.
Do not try to modify this machine in any way.
Do not let children play with the machine or with its
controls.
Do not lean on the door or use the door to lift or
move the machine.
Do not wash garments that have previously been
treated with solvents.
Do not connect the machine to a single outlet
instantaneous water heater.
Do not connect the machine directly to a watersoftening unit; use the recommended amount of
detergent for the water hardness in your area.
Do not overload or underload the machine. In
addition to reducing the quality of the wash, this
may also damage your laundry and the machine.
Do not pull on the power supply cable to unplug
the appliance from the electricity socket. Pull the
plug out.
Do not touch the drain water as it could reach very
high temperatures (over sink drainage).
Never force the machine door; this could damage
the safety lock mechanism design to prevent any
accidental opening.
In the event of a malfunction, do not under any
circumstances touch internal parts in order to
attempt repairs.
Should it have to be moved, proceed with the help
of two or three people and handle it with the
utmost care. Never try to do this alone, because
the appliance is very heavy.
Before loading your laundry into the machine, make
sure the drum is empty.
Be careful not to touch the drum at the top, as
this area does get hot during drying.
Technical Details Chart
Models
Dimensions
WD645, WD640,
WD440, WD420
59.5cm wide
85cm high
60cm deep
Capacity
From 1 to 6kg Wash
From 1 to 5kg Dry
Electric
connections
Voltage 220/240 50Hz
Max absorbed power 1700W-2100W
Water
connections
Maximum pressure 1 MPa (10 bar)
Minimum pressure 0.05 MPa (0.5 bar)
Drum capacity 54 litres
Spin Speed
up to 1400 rpm - WD645, WD640,
WD440
up to 1200 rpm - WD420
Control
programme
according to
IEC50229
60˚C cotton (programme D)
with Wash Enhance
- Wash run with a 6kg load
- Dry run with 5kg and 1kg loads
This appliance is compliant with the
following European Community
Directives:
- 73/23/EEC & 93/68/EEC
(Low Voltage) and subsequent amendments.
- 89/336/EEC,92/31/EEC & 93/68/EEC
(Electromagnetic Compatibility) and subsequent
amendments.
Something Wrong? - Troubleshooting
If your machine seems not to be working, GO through the following troubleshooting suggestions BEFORE you call your
Service Centre (see Service).
GB
Problem:
The machine won’t start:
(Nothing lights up on
the control panel).
Possible causes / Solution:
●
●
●
●
●
●
●
The machine fails to fill
with water.
●
●
●
●
●
The machine does not
drain or spin (although
it has drained/spun
during previous wash
cycles).
●
The programme takes
a long time.
●
●
●
Programmes
Something
Detergents
Precautions
Care and
and Option
Wrong and Laundry Maintenance and Advice Troubleshooting
Modifiers
●
The Start/Cancel button has not been pressed, for at least 3 seconds - Press and
hold the Start/Cancel button until the machine starts to operate.
The machine has failed to take in water (see Installation)
- Is the ‘Wash’ indicator light flashing (Aquarius only)?
- Is ‘H20’ shown in the display (Aquarius+ only)?
Check that:
- Both of the cold water inlet hoses are connected to the cold water supply
tap, using the ‘Y’ piece connector.
- The hoses are not kinked.
- The cold water supply tap is turned on... Ensure that it is turned fully on.
- The water pressure is sufficient (see Technical Details Chart).
- The inlet filters are not blocked... Turn off the water, unscrew both fill hoses at
the back of the appliance, then remove and clean the filters.
Note: Modern machines use less water and the water taken into the machine is
automatically adjusted depending on the load in the drum. For this reason, you may
not always be able to see water in the drum: But if the load is ‘wet’ and the machine
completes the wash cycle then the amount of water into the machine is sufficient.
Control Panel
Features
The machine does not
drain or spin (during
the first wash cycle,
after installation).
The appliance door is not shut properly - Close the door firmly and try the machine again.
The Start/Cancel button has not been pressed, for at least 3 seconds - Press and
hold the Start/Cancel button until the machine starts to operate.
The cold water supply tap is not turned on
- Aquarius only: ‘Wash’ indicator light is flashing on the control panel.
- Aquarius+ only: ‘H20’ is shown in the display.
Aquarius+ only: Have you selected Time Delay (see Programmes and Option Modifiers).
Installation
●
Wash Labels
Explained
●
Check the appliance is fully plugged into the socket and switched on.
Is the socket ok? Try another appliance in the socket to check.
Is the fuse in the plug ok? If not, replace it, fuse must be 13 Amps (see Care and Maintenance).
There has been a power failure - Check another electrical device in your home to
see if this is the case.
The ON/OFF button has not been pressed.
The Start/Cancel button has not been pressed, for at least 3 seconds - Press and
hold the Start/Cancel button until the machine starts to operate.
Contents
●
Lights illuminate on the
control panel but the wash
cycle will not start.
Description
Section 1: All Aquarius Models - General Troubleshooting
Has the drain hose been installed correctly (see Installation).
Are the drain hose, standpipe or undersink connections blocked?
Note: If the drain hose is connected to an undersink ‘U’ trap - Check that the
sink trap blanking plug was removed before the drain hose was connected. This
is the most common installation fault.
Is the drain hose kinked or squashed - Check the hose at the back of the machine.
Carry out the additional checks listed below...
There has been an unbalanced load in the drum and the machine could not spin Try the machine again with a different wash load (see ‘ Automatic Features’,
Programmes and Option modifiers).
Has the ‘Rinse Hold’ option been selected? ‘Rinse Hold’ indicator light will flash.
- To complete the paused programme press either the Start/Cancel button
or the Rinse Hold button (see Programmes and Option modifiers).
Service
If the machine completes the wash cycle, it is unlikely there is a problem.
Check the programme table to be sure the programme you have selected is that most
suited for your needs - The table also gives an indication of approximate programme
times you can expect.
Note: The programme times listed in the Programme Table are approximate.
Options selected can affect the programme times (see Programmes and Option
Modifiers). The wash load, temperature and pressure of the incoming water supply
can cause some variation in the programme times.
21
Something Wrong? - Troubleshooting
GB
There is too much foam
in the drum during the wash
cycle.
●
●
●
Check that the detergent you have used is suitable for ‘Automatic’ machines.
Refer to the detergent manufacturers recommendations to ensure that you have
not used too much detergent.
If you have used the wrong type of detergent (or too much), select a Rinse
programme to flush out your machine.
Steam is coming from the
dispenser drawer.
●
This is not a fault, we have designed the machine to release steam from the drawers
during hot washes. It may also vent during drying.
The machine makes a noise
or vibrates too much during
the spin cycle.
●
The transit fixings were not removed correctly (see Installation ‘Remove the transit
fixings’)
- Failure to remove all the parts of the transit fixings will cause the machine to
vibrate excessively during spin.
Note: There are TWO transit fixings that need to be removed - two bolts, two
washers, two rubber grommets and two nylon spacers.
The machine is not level (see Installation) - Adjust the feet so that the machine
stands firm on the floor (ie, it does not rock) and ensure the machine is level from
front to back and from side to side.
The machine is closed in, between furniture cabinets and the wall (see Installation).
Perhaps the machine was attempting to spin an unbalanced load - Try the machine
again with a different wash load.
When you sort your laundry into wash groups, check all loose items, such as coins
are removed from the laundry. Check the drum at the end of each cycle and
remove any loose items (coins etc).
Note: ‘Super Silent’ refers to wash sound level only - there will always be
some motor and drum noise during spin.
●
●
●
●
The machine leaks:
... from behind or underneath:
●
Check each end of both cold water inlet hoses, ensuring connections at both ends
are tight and not leaking (see Installation).
●
Check all connections on the ‘Y’ piece connector - to ensure they are tight and not
leaking (see Installation).
●
Depending on the installation method used (see Installation). Check that:
- the drain hose is firmly secured to the undersink ‘U’ trap, or...
- the drain hose is positioned correctly into the standpipe.
●
Check that your water pressure is within limits (see Technical Details Chart).
- If too high, try turning the cold water supply tap down slightly and try the
machine again (see Installation).
... from the dispenser drawer (water leaking down the front of the machine):
●
Check that the detergent dispenser is not blocked or obstructed.
- Remove the drawer from the machine and clean it (see Care and Maintenance).
Not all the detergent has
been flushed out of the
dispenser drawer.
●
●
●
●
The dispenser drawer will
not close properly or is
collecting water.
22
●
Check the cold water supply tap is turned on sufficiently (see Installation).
Is your water pressure is within limits (see Technical Details Chart), if it is too low it
may not be sufficient to flush all the detergent out of the drawer.
Check that the detergent dispenser is not blocked or obstructed.
- Remove the drawer from the machine and clean it (see Care and Maintenance).
Is your water pressure too low? (see Technical Details Chart).
Note: Are you using detergent tablets? - If yes, please check the detergent
manufacturers instructions on the side of the detergent box, not all detergent
tablets are suitable for use in the dispenser drawer some need to be placed
into the machine drum with the wash load for them to dissolve correctly.
Check that the detergent dispenser is not blocked or obstructed.
- Remove the drawer from the machine and clean it (see Care and Maintenance).
Something Wrong? - Troubleshooting
Section 2: All Aquarius Models - Problems with the Drying cycle?
Description
The laundry is not dry
after using the dry
programme.
GB
Your machine uses cold water to condense the moisture extracted from the load
Check that:
●
Both of the cold water inlet hoses are connected to the cold water supply tap,
using the ‘Y’ piece connector.
●
The inlet hoses are not kinked.
●
The cold water supply tap is turned on.
Contents
Different load types need different heat settings. Some need HIGH heat, some need
LOW heat.
Check that:
●
HIGH heat option has been selected if you are drying Cottons.
Wash Labels
Explained
Different load types need different drying times.
Check that:
●
The Drying time selected was sufficient for the load.
A 20 minute ‘Cool Tumble’ period is included at the end of the drying cycle Always allow the machine to complete the full drying cycle to ensure this cool
tumble period occurs.
The machine spins during
the drying cycle.
●
This is normal and is not a fault - The machine may sometimes spin during the
drying cycle to improve drying efficiency.
The Drying Times dial does
not count down (Aquarius
only).
●
This is normal and is not a fault - You must always return the Drying Times dial
manually to the ‘Off’ position at the end of each drying cycle.
Programmes
Something
Detergents
Precautions
Care and
and Option
Wrong and Laundry Maintenance and Advice Troubleshooting
Modifiers
●
Control Panel
Features
The load is warm at the end
of the drying cycle.
Installation
Note: Your machine contains an out of balance spin protection device, if the out
of balance is too great the machine automatically spins at a lower speed. Check
that the load was spun correctly at the and of the wash cycle before the
machine advanced into the drying cycle, then try another rinse and spin and
repeat the drying cycle.
Section 3: Specific Error Messages on the Control Panel
Your machine carries out automatic checks at various stages of the wash cycles - Error messages will be displayed
on the control panel to indicate there is something wrong.
The error message displayed is dependent upon which machine you have:
Error message:
‘Wash’ indicator light is
flashing on Aquarius
models
OR
‘H20’ flashing in the display on
Aquarius+ models
‘Door Locked’ indicator
light is flashing on Aquarius
models
OR
The display shows ‘door’ on
Aquarius+ models
This indicates that the machine has failed to take in water (see Installation).
Check that:
●
both of the cold water inlet hoses are connected correctly to the cold water
supply tap, using the ‘Y’ piece connector.
●
the cold water inlet hoses are not kinked.
●
the cold water supply tap is turned on... Ensure it is turned fully on.
●
the water pressure is sufficient (see Technical Details Chart).
This indicates that the door is not closed properly.
Close the door firmly and try the machine again.
●
Service
23
Service
195057720.00
06/2006 - SIMLEX . Four Ashes, Wolverhampton
GB
Before calling the Service Centre:
●
●
Spare Parts
Use the troubleshooting guide to see if you can
solve the problem yourself (see Troubleshooting).
If not, turn off the machine and call the Service
Centre closest to you.
! You will be charged for a service engineers visit if a
problem with your machine is caused by incorrect
installation or misuse.
This is a complex machine. Repairing it yourself or
having a non-authorised person try to repair it could
cause harm to one or more persons, could damage
the machine and could invalidate the spare parts
warranty.
Call an authorised technician if you experience problems
while using the machine.
The spare parts have been designed exclusively for
this appliance and not for other uses.
Key Contacts
After Sales Service
Over 1100 trained specialists, directly employed by us, ensure that you can have
complete confidence in both the appliances and services we offer.
Repair Service and Information Help Desk
UK: 08709 066 066
Monday to Friday, 8am to 7.30pm
Saturday, 8.30am to 5.30pm
Sunday, 9.30am to 3.30pm
www.hotpointservice.co.uk
Republic of Ireland: 0818 313 413
Note: Our operators will require the following information:
Model number
Serial number
Date of purchase
Model number and Serial number can be found on the inside of the door.
Extended Warranties
UK: 08709 088 088
Monday to Sunday, 8am to 8pm
www.hotpointservice.co.uk
Republic of Ireland: 0123 002 333
Genuine Parts and Accessories
UK: 08709 077 077
Monday to Friday, 8.30am to 5pm
Saturday, 8.30am to 12noon
www.hotpointservice.co.uk
Republic of Ireland: 0818 313 413
www.hotpoint.co.uk
Indesit Company UK Limited, Morley Way, Peterborough, PE2 9JB