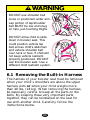
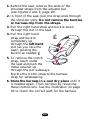
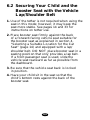
1
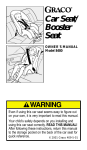
Car Seat/ Booster Seat OWNER'S MANUAL Models 8482 & 8483 Even if using this car seat seems easy to figure out on your own, it is very important to read this manual. Your child’s safety depends on you installing and using this car seat correctly. READ THIS MANUAL! After following these instructions, return this manual to the storage pocket on the back of the car seat for quick reference. © 2001 Graco 424-5-01 Table of Contents 1. Warnings to Parents and Other Users . . . . . . . .4 2. Important Safety Information . . . . . . . . . . . .5-10 2.1 About Your Child . . . . . . . . . . . . . . . . . . .5 2.2 About Using this Car Seat in Your Vehicle . . . . . . . . . . . . . . . . . . . . .8 2.3 When the Car Seat is Not Occupied . . . . .10 2.4 Life and Condition of the Car Seat . . . . . .11 3. Features and Components . . . . . . . . . . . . .12-13 4. Selecting a Suitable Location for the Car Seat . . . . . . . . . . . . . . . . . . . . .14-15 5. Use of the Car Seat with the Built-in Harness . . . . . . . . . . . . . .16-38 5.1 Positioning the Harness Straps . . . . . . . . .16 5.2 Selecting a Suitable Location in the Vehicle . . . . . . . . . . . . . . . . . . . . . .21 A. Vehicle Belt Systems that are NOT Safe for Use with the Car Seat . . . . . . . .22 B. Vehicle Belt Systems that ARE Suitable for Use with the Car Seat . . . . . .25 5.3 Positioning and Securing the Car Seat in your Vehicle . . . . . . . . . . .27 5.4 Securing your Child in the Car Seat with Built-in Harness . . . . . . . . . . . . . . . .35 5.5 Using the Car Seat in an Airplane . . . . . .38 6. Use of the Booster Seat without the Built-in Harness . . . . . . . . . . . .39-46 6.1 Removing the Built-in Harness . . . . . . . .41 6.2 Securing your child and the Booster Seat with the Vehicle Lap/Shoulder Belt . . . . .43 6.3 Using the Booster Seat in an Airplane . . .46 2 7. Cupholder (optional) .......................................47 8. Cleaning and Maintenance.........................48-50 9. Registering Your Car Seat ...............................51 10. Replacement Parts ...........................................52 Our goal is to make every product the best it can be! We are also committed to supporting our products after purchase. If you would like to speak to Graco about your product, please call our Customer Service Department at 1-888-224-6549 or visit our Internet website at www.gracobaby.com. Our knowledgeable staff is ready to answer any questions you may have concerning parts, use or maintenance. When you call, please have the model and serial numbers ready so your call may be processed quickly and efficiently. These numbers can be found on a sticker on the underside of your car seat. Keep this manual in the storage compartment on the back of the car seat. 3 1. Warnings to Parents and Other Users DO NOT install or use this car seat until you read and understand the instructions in this manual and in your vehicle owner’s manual. DO NOT let others install or use the car seat unless they understand how to use it. Failure to properly use this car seat increases the risk of serious injury or death in a sharp turn, sudden stop or crash. Your child’s safety depends on you installing and using this car seat correctly. Your child’s safety depends on: 1. Choosing the correct use mode of the car seat depending on your child’s size. 2. Inserting the harness straps (if needed) in the proper slots for your child. 3. Selecting a suitable location for the car seat in your vehicle. 4. Properly routing the vehicle seat belt. 5. Properly securing the car seat in the vehicle using a seat belt designed to restrain the car seat and your child. Many seat belts are NOT safe to use with this car seat, even though they can easily be threaded through or around the car seat. 6. Properly securing your child in the car seat. 4 2. Important Safety Information No car seat can guarantee protection from injury. However, proper use of this car seat reduces the risk of serious injury or death to your child. 2.1 About Your Child Instructions for the use of this car seat and your vehicle’s seat belt differ greatly depending on the size of your child. Be sure you are using the car seat in the correct mode and with the correct features for your child. Failure to use the car seat in a manner that is appropriate for your child’s size may increase the risk of serious injury or death. When you switch from one mode of use to another, be sure to review the sections of this manual that apply to that mode. NEVER LEAVE YOUR CHILD UNATTENDED. NEVER ALLOW THE CHILD TO BUCKLE HIMSELF into the car seat at any time. This unit must be installed and adjusted only by an adult. 5 Your child should use the built-in harness if: child weighs from 20 to 40 lbs. (9 to 18 kg), and is between 27 and 40 inches (69 and 102 cm) in height, AND child is at least one year old and can sit upright unassisted, AND child’s shoulders are below top harness slots. If shoulders are above top harness slots, child is too large for built-in harness. You must remove the harness and use the booster seat with your vehicle’s lap and shoulder belt system. If your child is between 30 and 40 lbs., he should continue to use the harness if his shoulders are below the upper harness slots. We highly recommend use of the built-in harness for as long as it is suitable and comfortable for your child. With built-in harness 20 lbs. (9 kg) 40 lbs. (18 kg) 30 lbs. (14 kg) 6 Your child should use the VEHICLE shoulder and lap belts BUT NOT the built-in harness if: child weighs from 30 to 80 lbs. (14 to 36 kg), and is between 35 and 54 inches (89 and 138 cm) in height, AND child’s shoulders are above top harness slots, AND child’s ears are below top of booster seat. If tops of ears are above top of seat, child is too large for booster seat. Without built-in harness 80 lbs. (36 kg) 7 2.2 About Using this Car Seat in Your Vehicle YOUR CHILD CAN BE INJURED in a vehicle even if you are not in a crash. Common events such as sudden braking and sharp turns can injure your child if the car seat is not properly installed or if your child is not properly secured in the car seat. THERE ARE MANY KINDS OF VEHICLES, seat belt systems and occupant protection systems. As a result, it is not possible for this manual to tell you everything you need to know about putting this car seat in your vehicle. You must carefully follow the instructions provided by your vehicle manufacturer, in addition to the information in this manual. SOME VEHICLES DO NOT HAVE ANY safe location for this car seat, and many vehicles have seat belt systems that must not be used with the car seat because those systems will not safely hold the car seat or your child in place. Refer to section 4, “Selecting a Suitable Location for the Car Seat” (page 14), and section 5.2 “Selecting a Suitable Location in the Vehicle” (page 21) and to your vehicle owner’s manual for information. THIS CHILD RESTRAINT conforms to all applicable Federal Motor Vehicle Safety Standards. 8 THIS RESTRAINT is certified for use in Motor Vehicles. It is certified for use in Aircraft only when used with the built-in harness. When used as a booster without the harness, this restraint is not certified for use in aircraft. For aircraft use see section 5.5, “Using the Car Seat in an Airplane” on page 38. CONTINUOUS USE OF A CAR SEAT may cause damage to a vehicle seat. To protect vehicle upholstery, use a car seat mat, towel or thin blanket under the seat. 9 2.3 When the Car Seat is Not Occupied NEVER LEAVE A CAR SEAT UNSECURED IN YOUR VEHICLE. When you are not using the car seat, either remove it or make sure that it is securely belted in the vehicle. An unsecured car seat can be thrown around and may injure occupants in the event of a sharp turn, sudden stop or crash. PARTS OF THE CAR SEAT CAN BECOME VERY HOT if the seat is left in the sun. Contact with these parts can burn your child’s skin. Cover the car seat with a blanket if it will be exposed to the sun, and always touch the surface of any metal or plastic parts before putting your child in the car seat. WHEN NOT USING THE CAR SEAT for long periods, store it in a plastic bag in a cool, dark, dry place. DO NOT PLACE HEAVY OBJECTS ON CAR SEAT while in storage. Heavy objects may deform car seat over a period of time. 10 2.4 Life and Condition of the Car Seat REPLACE THE CAR SEAT AFTER AN ACCIDENT of any kind. An accident can cause damage to the car seat that you cannot see. EVEN IF THE CAR SEAT IS NOT INVOLVED IN AN ACCIDENT, stop using it and throw it away after the date molded into the back of the car seat. Example: “Do not use this child restraint after December 2007.” DO NOT MODIFY YOUR CAR SEAT or use any accessories or parts supplied by other manufacturers. Only make adjustments to the car seat as recommended in these instructions. NEVER USE THE CAR SEAT IF IT HAS DAMAGED OR MISSING PARTS. Do not use a cut, frayed or damaged car seat harness or vehicle seat belt. NEVER GIVE THIS CAR SEAT TO SOMEONE ELSE without also giving them this manual. NEVER USE A SECOND-HAND CAR SEAT or a car seat whose history you do not know. 11 3. Features and Components Harness slot Harness clip* Shoulder belt positioner Harness strap Harness buckle Crotch strap *Certain models are equipped with a two-piece harness clip. 12 Adjuster bar lock Harness plate Locking clip storage* Adjuster bar Tether strap** Owner’s manual storage compartment — Tether clip Expiration date *The locking clip is stored on the back of the car seat. You will need to use it with certain types of vehicle seat belts. **Some vehicles are now (or can be) equipped with tether anchor points behind some vehicle seats. A tether anchors the top of the car seat to the body of the vehicle. When used properly with the vehicle seat belt, a tether helps reduce injury in a sharp turn, sudden stop or crash. 13 4. Selecting a Suitable Location for the Car Seat Following are some basic recommendations for both use modes of the car seat. See section 5, “Use of the Car Seat with the Built-in Harness” (page 16) for more information about a safe location for the car seat in that mode. According to accident statistics, children are safer when properly restrained in rear vehicle seating positions, rather than front seating positions. For a vehicle with a front passenger air bag, refer to your vehicle owner’s manual as well as these instructions for car seat installation. We recommend that, whenever possible, you secure the car seat in the center position of the seat directly behind the front seats . However, this position is often only equipped with a lap belt and cannot be used when this car seat is used without the built-in harness. If you want to use the tether, locate a seating position equipped with tether anchors. If your vehicle does not have a tether anchor, it may be possible to install one. Contact your vehicle dealership for the proper anchor location and installation. A tether anchor parts kit may be purchased by calling Graco Customer Service at 1-888-224-6549. 14 Be Sure Your Vehicle Seat Meets These Requirements THE VEHICLE SEAT MUST FACE FORWARD. DO NOT place car seat in a rear-facing vehicle seat or a side-facing vehicle seat . DO NOT use this car seat in any vehicle seat in which the front of the car seat hangs over the edge of the vehicle seat . 15 5. Use of the Car Seat with the Built-in Harness Use of this car seat with the built-in harness is meant for a child: who weighs from 20 to 40 lbs. (9 to 18 kg) and is between 27 and 40 inches (69 and 102 cm) in height, AND who is at least one year old and can sit upright unassisted, AND whose shoulders are below top harness slots. If shoulders are above top harness slots, child is too large for built-in harness. You must remove the harness and use the booster seat with your vehicle’s lap and shoulder belt system. 5.1 Positioning the Harness Straps Failure to properly adjust the harness straps for your child increases the risk of serious injury or death in the event of a sharp turn, sudden stop or crash. The harness straps must be properly adjusted to fit your child according to the following instructions. 16 1. Unthread strap from open end of harness clip ; or for models with a two-piece harness clip, squeeze both buttons and pull clip apart . 2. Push the release buttons on the harness buckle . Unbuckle both harness straps. Move the straps apart to make room for your child. 3. Place your child in the seat with his bottom flat against the seat. 4. Check the crotch strap. There are two possible positions for it. Choose the position that is closest to but not under your child. If you need to move the strap, reach under the seat and push the metal retainer up through the slot sideways . Push it back down through the appropriate slot, making sure the red button faces out, and tug on it to be sure that it is properly secured. 17 5. There are three positions for the shoulder harness straps. The harness straps must go into the slots that are even with or just above your child’s shoulders . 6. If straps are in the proper slots, go to step 9 on page 19. To adjust position of harness straps, first remove child from car seat. Behind the seat, rotate the red lock out of the way and lift adjuster bar to remove straps from harness plate and adjuster bar , . 7. From front of car seat, pull strap ends through slots and reinsert them through the appropriate slots as determined in step 5 above. 18 8. Behind car seat, reassemble straps onto adjuster bar exactly as shown , . 9. Inspect the harness straps from the front and back of the car seat to be sure the straps are inserted at the same level and that they are not twisted. Twisted belts can create slack in the harness straps and reduce the protection provided by the car seat. Pull on harness to make sure it is secure. 10. Return child to the seat. Make sure straps are flat and tight against child’s shoulders. Tighten harness so that you can slip only one finger between harness strap and child’s shoulder. Tighten harness by pulling on loose webbing behind seat . 19 11. Push adjuster bar down firmly to secure straps . Rotate red lock down into locked position . Straps ends must extend a minimum of 2” below harness plate and should be near equal 2”+ in length. The components of your harness are now properly positioned for your child. Remember to check the shoulder and crotch straps as your child grows and move them to the next position when necessary. 20 5.2 Selecting a Suitable Location for the Car Seat Some seating positions in your vehicle may not be safe locations for this car seat when used with the built-in harness. In fact, some vehicles do not have any seating positions that can be used safely with the car seat. Improper placement of the car seat increases the risk of serious injury or death. Follow the instructions in this section and in your vehicle owner’s manual to select a location for the car seat. If you are not sure where to place the car seat in your vehicle, contact your vehicle manufacturer or Graco Children’s Products Inc., 1-888-224-6549. 21 Be Sure Your Vehicle Seat Belt Meets These Requirements The vehicle seat belt must be designed to hold the car seat tightly at ALL times. There are a variety of seat belt systems that are NOT safe for use with the car seat because they will not hold the car seat tightly at all times. We will first describe the seat belts that are NOT safe for use and then we will describe those that ARE safe for use. Pay careful attention to these systems; some of the seat belts that are not safe to use look very much like seat belts that are safe to use. If you are unsure, contact the vehicle manufacturer or call Graco at 1-888-224-6549. Many seat belt systems are NOT safe to use with the car seat, even though they can easily be threaded through the car seat. Carefully read this section for information on seat belt systems and refer to your vehicle owner’s manual and any labels on your vehicle’s seat belt. You may need to have a special seat belt installed by your vehicle dealer before using the car seat. A. Vehicle Belt Systems that are NOT Safe for Use with the Car Seat DO NOT use the following types of vehicle belt systems with your car seat. They will not hold the car seat securely in place. The metal locking clip provided with this product will NOT make any of these vehicle belts safe. 22 DO NOT use a lap belt that stays loose and can move until it locks in a crash or sudden stop . This belt has an Emergency Locking Retractor, E.L.R. It is often seen in combination with a motorized shoulder belt. Since these lap belts will loosen if pulled on slowly, the car seat may shift to an unsafe position. This vehicle belt will NOT safely restrain the car seat. However, you may be able to convert your E.L.R. belt to one that is safe to use. See your vehicle owner’s manual for more information or contact your vehicle manufacturer. DO NOT use a lap/shoulder combination belt where each strap has a retractor at one end and is attached to the latchplate at the other end of the belt . This vehicle belt will NOT safely restrain the car seat. 23 DO NOT use vehicle belts that are attached to the door in any way or that move along a track to automatically surround the passenger when the door is closed . These vehicle belts will NOT safely restrain the car seat. DO NOT use a vehicle belt that is anchored forward of the seat crease . This vehicle belt will NOT safely restrain the car seat. If you have one of the above vehicle belt systems, DO NOT use it to secure the car seat. Look for a vehicle seat location that has a suitable seat belt (see the next section) or contact your vehicle manufacturer about installing a seat belt system that can be used to secure the car seat. 24 B. Vehicle Belt Systems that ARE Suitable for Use with the Car Seat The following vehicle belt systems can be used with your car seat, IF the seat location meets all other requirements of these instructions AND THOSE IN YOUR VEHICLE OWNER’S MANUAL. Lap belt that is manually adjusted and stays tight . This type of vehicle belt is tightened by pulling on the excess belt once it is buckled. This type of vehicle belt is most often found in the rear center seating position. A lap belt can only be used in combination with the built-in harness of the car seat. To use the car seat without the built-in harness, you must use a vehicle seat with a lap/shoulder belt. Lap belt that cannot lengthen once it is buckled . This belt has an automatic locking retractor (A.L.R.) that does not allow the vehicle belt to lengthen without unbuckling the belt and starting over. A lap belt can only be used in combination with the built-in harness of the car seat. To use the car seat without the built-in 25 harness, you must use a vehicle seat with a lap/shoulder belt. Lap/shoulder combination belt with a locking latchplate . Once it is buckled, this type of belt has a latchplate that will not allow the lap portion of the belt to loosen. This vehicle belt does not require a locking clip. Lap/shoulder combination belt with a latchplate that can slide freely along the belt . This type of belt MUST be converted to prevent movement of the lap portion of the belt. You must use the Locking clip locking clip provided with the car seat (see “To install the locking clip” on page 31), unless your vehicle’s seat belt can be converted in another way that is described in your vehicle owner’s manual. Failure to use the locking clip or convert the seat belt in another way will allow the car seat to move out of position. See your vehicle owner’s manual or contact your vehicle manufacturer for more information. 26 5.3 Positioning and Securing the Car Seat in Your Vehicle Installation of your car seat varies depending on the type of seat belt system you have in your vehicle. Carefully review the following pages to determine the proper installation requirements. There are many kinds of vehicles, seat belts, and occupant protection systems. As a result, it is not possible for this manual to tell you everything you need to know about putting this car seat in your vehicle. You must carefully follow the instructions provided by your vehicle manufacturer, in addition to the information in this manual. Before proceeding, be sure you have read and understood the section on safe and unsafe vehicle belt systems. Failure to properly secure the car seat in the vehicle increases the child’s risk of serious injury or death in the event of a sharp turn, sudden stop or crash. Carefully follow these instructions and those in your vehicle owner’s manual to be sure your car seat is properly located, positioned, and held tightly at all times. 1. Make sure you have adjusted the harness straps to fit your child as explained in section 5.1, “Positioning the Harness Straps” (page 16) and selected a suitable location for the car seat as explained in section 4 (page 14) and section 5.2 (page 21). 27 2. If a front passenger seat is used, slide the vehicle seat rearward as far as possible from the dashboard. If a rear seat is used, make sure the seat in front of it is moved forward enough and is upright enough to allow room for the car seat. 3. Be sure that the vehicle seat back is locked in position. 4. Place the car seat firmly against the back of a forward-facing vehicle seat. If you are using the tether, lay it over the back of the vehicle seat so it won’t get hidden behind the back of the car seat. 5. Thread the seat belt: Follow diagram if you are using a lap/shoulder belt Follow diagram if you are using a lap-only belt 28 6. Buckle the vehicle belt. Make sure the buckle tongue goes into the correct buckle, and not the adjacent one . The vehicle belt should not be twisted or turned. 7. Now the vehicle seat belt must be tightened. Push down hard with your knee or free hand in the middle of the car seat . Then pull and tighten the vehicle belt. If you have a lap-only belt, go to step 8. If you have a lap/ shoulder combination belt, go to step 9. 8. Tightening a lap-only belt: An automatically adjusted lap belt is tightened by feeding the vehicle belt back into its retractor while pushing down hard on the car seat. Make sure that vehicle belt is locked in place and very tight. 29 A manually adjusted lap belt is tightened by pulling on the excess belt while pushing down hard on the car seat. However, you may have trouble tightening the belt because of the upright angle at which you must pull. You may have to unbuckle the vehicle belt, estimate a belt length that will make the vehicle belt very tight, then buckle it again. 9. Tightening a lap/shoulder combination belt: A lap/shoulder combination belt with a locking latchplate is tightened by pulling hard on the shoulder portion of the vehicle belt while pushing down hard on the car seat. However, you may have trouble tightening the belt because of the upright angle at which you must pull. You may have to unbuckle the vehicle belt, estimate a belt length that will make the vehicle belt very tight, then buckle it again. 30 A lap/shoulder combination belt with a latchplate that can slide freely along the belt requires the locking clip, unless your vehicle’s seat belt can be converted in another way that is described in your vehicle owner’s manual. See your vehicle owner’s manual to find out if your vehicle belt can be converted to prevent movement of the lap portion of the belt. Otherwise, the locking clip MUST be used. 10. To install the locking clip: a. Tighten the buckled vehicle belt by pushing down hard on the car seat and pulling hard on the shoulder belt. b. While continuing to push down on the car seat, let go of the shoulder strap and pinch the two straps together just behind the buckle tongue. c. While still pinching the straps together, unbuckle the vehicle belt. Do not allow the straps to slip. d. Connect the lap ½ belt to the shoulder inch belt by placing the locking clip on the belts about ½ inch from the buckle tongue as shown . 31 e. Re-buckle the belt and pull hard on the lap belt to be sure it does not move. f. Repeat this procedure if the lap belt is loose or lengthens when pulled. Remove locking clip from vehicle seat belt when not being used with a car seat. The belt will not properly restrain an adult or child and serious injury could occur. Store locking clip under its tab on the back of the car seat. Do not use locking clip as a vehicle belt shortener. 32 11. To secure the tether: a. Make sure tether is securely attached to the car seat. b. Fasten the tether clip to the anchor point . Styles and locations of the anchor points vary. Consult your vehicle owner’s manual about how to use an anchor point in your vehicle. c. Tighten the tether strap securely. To tighten, pull on free end of strap . You may need to retighten the vehicle belts after tether installation. d. To loosen, lift up on the metal tongue of the buckle . When not using tether, place tether behind car seat or tuck between vehicle seat back and bottom. 33 Safety Check 12. Make sure that the car seat is properly secured by the vehicle seat belt system by performing the following test EVERY TIME YOU DRIVE WITH YOUR CHILD: Holding the car seat near the vehicle belt path, Twist and pull the car seat firmly forward and to both sides to make sure the vehicle seat belt does not lengthen or loosen and the car seat does not easily move . If you find that your car seat shifts or your vehicle seat belt slips or becomes loose, check that you have followed steps 1-11 correctly, or see section 4, “Selecting a Suitable Location for the Car Seat” (page 14), and section 5.2 “Selecting a Suitable Location in the Vehicle” (page 21). DO NOT USE ANY SEATING LOCATION WHERE THE VEHICLE BELT DOES NOT HOLD THE CAR SEAT TIGHTLY. 34 5.4 Securing Your Child in the Car Seat with the Built-in Harness Failure to properly secure your child in the car seat increases the risk of serious injury or death in the event of a sharp turn, sudden stop or crash. In a crash, the car seat provides NO protection for your child unless the harness straps are properly secured. Follow these instructions carefully to properly secure your child. Adjust the harness system snugly every time you place your child in the car seat. Be aware that something as simple as changing a jacket may require a change in the length of the harness. To secure your child, follow these steps: 1. Make sure that the harness and crotch straps are properly positioned for your child according to section 5.1, “Positioning the Harness Straps” (page 16). 2. Avoid bulky clothing. Make sure that your child is dressed in clothing which: a. Allows the harness straps to securely latch into the crotch buckle between your child’s legs. b. Keeps the straps on your child’s shoulders. 35 3. Place child in car seat so that the child’s bottom rests against the back of the car seat. 4. Pull harness straps around your child. Snap each buckle tongue into the buckle of the crotch strap . Make sure you hear a “click”. Check that harness is securely latched by pulling on the straps. If harness straps are not buckled, the car seat provides NO protection for your child. DO NOT use car seat if harness does not latch properly. Call Graco at 1-888-224-6549. Check that harness straps are not twisted. 36 5. Rethread shoulder harness strap through harness clip or, for two-piece harness models, push clip halves together until you hear a “click” . 6. Position harness clip at middle of child’s chest, level with armpits and away from child’s neck. Make sure straps are flat and tight against child’s shoulders. You should not be able to insert more than one finger between harness and child’s shoulder . Final Safety Check 8. Check that harness straps are tight and not twisted. Check that harness clip and all buckles are securely fastened. Recheck that the seat is tightly held by the vehicle belt. 37 5.5 Using the Car Seat in an Airplane This car seat may be installed in an airplane ONLY for a child between 20 and 40 lbs., and ONLY when the built-in harness is used. Since airlines have some restrictions about the use of car seats, notify the airline ahead of time that you intend to bring the car seat on board. For the safety of your child, use the car seat in forward-facing aircraft seats only. Follow the flight attendant’s instructions about car seat placement. Install your car seat on an airplane the same way it is installed in an automobile. Always be sure that the airplane seat belt is adjusted so that it tightly holds the car seat in place at all times. 38 6. Use of the Booster Seat without the Built-in Harness Use of this car seat as a booster without the built-in harness is meant for a child: who weighs from 30 to 80 lbs. (14 to 36 kg), and is between 40 and 54 inches (102 and 138 cm) in height, AND whose shoulders are above top harness slots, AND whose ears are below top of booster seat. If tops of ears are above top of seat, child is too large for booster seat. If your child is between 30 and 40 lbs., he should continue to use the harness if his shoulders are below the upper harness slots. We highly recommend use of the built-in harness up to 40 lbs. DO NOT use the booster seat in this manner with a lap-only belt. 39 Failure to properly secure your child and the booster seat in your vehicle increases the risk of serious injury or death in the event of a sharp turn, sudden stop or crash. The vehicle restraint straps must be properly positioned to fit your child according to the following instructions and those in your vehicle owner’s manual. In a crash, the booster seat provides NO protection for your child unless the vehicle lap and shoulder belts are properly secured. Use only the vehicle’s lap and shoulder belt system when restraining the child in this booster seat. NEVER use a vehicle lap-only belt across front of child; severe abdominal, head and/ or neck injuries or death may result in the event of a sharp turn, sudden stop or crash. Vehicle belts MUST lay flat against child and MUST NOT be twisted. 40 DO NOT use shoulder belt loose or positioned under arm. Lap portion of lap/shoulder belt MUST be low and snug on hips, just touching thighs. DO NOT allow child to slide down in booster seat. This could position vehicle lap belt across child’s abdomen and vehicle shoulder belt over neck or face. If child will not keep vehicle restraint properly positioned, DO NOT use this booster seat. Use a different child restraint system. 6.1 Removing the Built-in Harness The harness of your booster seat must be removed when your child’s shoulders are above the upper harness slots or when your child weighs more than 40 lbs. (18 kg). When removing the harness, be especially careful to keep all the parts on the belts. By keeping these very important parts together, they can be reinstalled on the seat for use with another child. Carefully follow the instructions below. 41 1. Behind the seat, remove the ends of the shoulder straps from the adjuster bar (see figures 2 and 3, page 18). 2. In front of the seat, pull the strap ends through the shoulder slots. Do not remove the buckles or harness clip from the straps. 3. Pull the right hand strap and buckle down through the slot in the seat. 4. Pull the right hand strap and buckle completely up through the left hand slot (as you face the seat), guiding the buckle as needed . 5. To remove the crotch strap, reach under the seat and push the metal retainer up through the slot sideways. Buckle the crotch strap to the harness strap for safekeeping. 6. Store the harness in a cool dry place until it is needed again. Then reinstall by reversing these instructions. See the illustration on page 50 to check the correct path for the harness. 42 6.2 Securing Your Child and the Booster Seat with the Vehicle Lap/Shoulder Belt 1. Use of the tether is not required when using the seat in this mode; however, it may keep the seat more stable. See pages 14 and 33 for instructions on tether use. 2. Place booster seat firmly against the back of a forward-facing vehicle seat suitable for the booster seat as explained in section 4, “Selecting a Suitable Location for the Car Seat” (page 14) and equipped with a lap/ shoulder belt. DO NOT place booster seat in a seating position that only provides a lap belt. If a front passenger seat is used, slide the vehicle seat rearward as far as possible from the dashboard. 3. Be sure that the vehicle seat back is locked in position. 4. Have your child sit in the seat so that the child’s bottom rests against the back of the booster seat. 43 5. Place vehicle lap belt across child’s thighs and through the cutouts in the sides of the booster seat. Place shoulder belt in front of the child. Fasten the buckle and pull up on the shoulder belt to tighten . Make sure buckle tongue goes into the correct buckle, and not the adjacent one . Seat belt should not be twisted or turned. 6. If vehicle belt lays across child’s neck, head or face, redirect belt by using the shoulder belt positioner. Thread vehicle shoulder belt through positioner exactly as shown . Choose the position that directs belt across the child’s chest. NEVER place high end of shoulder belt under child’s arm. Use of any shoulder belt in this manner can cause serious injuries or death in the event of a sharp turn, sudden stop or crash. 44 7. Adjust positioner as high as possible without shoulder belt touching child’s neck. To adjust, unhook bottom of positioner, slide up or down to desired height and thread bottom hook into closest loop below . 8. Check to be sure shoulder belt is properly positioned over shoulder and snug against child. Final Safety Checks 9. Make sure that: the booster seat and your child are secured with both a lap and shoulder belt, not a lap belt only, AND vehicle lap belt is NOT TWISTED, and runs across child’s thighs and through cutouts on sides of booster seat, AND vehicle shoulder belt runs across child’s chest and belt positioner (if needed) puts the belt in the proper position, not across the face or neck. 45 6.3 Using the Booster Seat in an Airplane This Restraint is not certified for Aircraft use. Aircraft seat restraints are not equipped with shoulder straps, so it would be impossible to properly secure a larger child in the booster seat on an airplane. 46 7. Cupholder (optional) 1. Insert the two prongs of the cupholder into the two slots on either the left or right side of the seat . 2. Push cupholder down until the clip snaps on to the bottom of seat . Check that cupholder is secure by pulling on it. Clip 47 8. Cleaning and Maintenance BLOT THE SEAT COVER with a damp sponge using a mild soap solution and cool water. If necessary, the cover may be removed and machine washed. CAR SEAT METAL AND PLASTIC PARTS may be cleaned by wiping with a mild soap and water solution. DO NOT USE BLEACH. Use of bleach may weaken plastic parts. HARNESS STRAPS may be spot cleaned or replaced. DO NOT IMMERSE THE HARNESS STRAPS IN WATER. Doing so may weaken the harness straps. BUCKLE may be cleaned with a damp cloth. NEVER LUBRICATE THE BUCKLE. If the harness buckle sticks, check for dropped food or sticky drinks that may have been spilled, dirt, etc. Remove foreign objects with tweezers and/or clean with cotton swab. If you cannot get the harness to remain tight with the buckle securely locked, do not use this car seat. Call Graco at 1-888-224-6549 to purchase a replacement harness. 48 TO REMOVE THE SEAT COVER FOR CLEANING: 1. Remove the shoulder straps from the adjuster bar behind the seat. 2. From the front of the seat, pull the strap ends through the shoulder slots . Do not remove the buckles or harness clip from the straps. 3. Remove elastic loops from around two pegs on the bottom and two pegs on the top of car seat. 4. Remove elastic binding from bottom, sides and top of seat as shown . 49 5. Lift cover off seat, pushing harness straps, crotch strap and hardware through slots in cover. DO NOT USE car seat without the seat cover. 6. Machine wash cover in cold water on delicate cycle and drip-dry. DO NOT USE BLEACH. 7. To put the seat cover back on, reverse the preceding instructions. Thread the harness straps through the appropriate holes in the seat cover. See the illustration at right and section 5.1, “Positioning the Harness Straps” (page 16) to properly secure the harness straps back on the seat . 8. Secure the seat cover to the seat: wrap the elastic binding over the top and bottom of the seat and attach four loops. 50 9. Registering Your Car Seat Model No. Serial No. Purchase Date Dear Customer, Please fill in the above information. The model and serial numbers can be found on a label underneath your car seat. Fill out the prepaid registration postcard attached to the seat cover and mail it today. Child restraints could be recalled for safety reasons. You must register this restraint to be reached in a recall. Send your name, address and model/serial numbers to: Graco Children’s Products Inc. P.O. Box 100 Elverson, PA, 19520-9974 or call 1-888-224-6549 For recall information, call the U.S. Government’s Auto Safety Hotline at 1-800-424-9393 (202-366-0123 in D.C. area). 51 10. Replacement Parts Instructions for ordering car seat parts: Complete the form that follows. Your car seat model and serial numbers MUST be included on the form to ensure proper replacement parts. Your model number can be found on a sticker on the underside of your car seat. Payment must accompany your order. Parts List: *Price: Locking clip . . . . . . . . . . . . . . . . . . . . . . . . . .$5.00 Harness with buckles and harness clip . . . . .$12.00 Seat cover . . . . . . . . . . . . . . . . . . . . . . . . . . .$35.00 Crotch strap with buckle and metal retainer . .$8.00 Tether strap . . . . . . . . . . . . . . . . . . . . . . . . . .$10.00 2-Piece Chest Clip . . . . . . . . . . . . . . . . . . . . .$5.00 Cupholder . . . . . . . . . . . . . . . . . . . . . . . . . . . .$7.00 *Prices subject to change without notice IF YOU NEED HELP If you have any questions or need any parts not listed, please call toll-free: 1-888-224-6549 or visit our Internet website, www.gracobaby.com. Return the form at right with payment to: GRACO CHILDREN’S PRODUCTS INC. CUSTOMER SERVICE DEPARTMENT P.O. BOX 100, MAIN STREET ELVERSON, PA 19520 52 Model No. Serial No. (Both numbers required) Locking clip Harness with buckles and harness clip Seat cover Crotch strap w/buckle Tether strap 2-Piece Chest Clip Cupholder Subtotal: Shipping & handling*: Sales tax**: Total: * $15.00 outside the continental U.S. **CA 6%, IL 6.25%, IN 5%, NY 8.25%, OH 5.75%, PA 6%, SC 5% Check or money order enclosed (payable to Graco Children’s Products Inc.) Charge to credit card: Visa MasterCard Account #: Expiration date: Signature: SHIP TO: Name Address City, State, Zip ( ) Telephone $5.00 Discover Keep this manual in the storage compartment on the back of the car seat. Graco Children’s Products Inc. Elverson, PA 19520 1-888-224-6549