1
Introduction
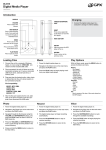
SKIP/SEARCH
ML660
MENU
Digital Media Player
PLAY/PAUSE
VOLUME
DISPLAY
V:1329-0730-09
MENU
• Press to select an item from the main menu.
• Press to access the sub-menu of the current
mode.
• Press and hold to return to the main menu.
VOLUME
• Press to activate the volume adjust mode, then
press the SKIP/SEARCH buttons to adjust the
volume.
Charging
MINI-USB
1 Connect the digital media player to a computer to charge it’s internal battery.
MICROPHONE
SKIP/
SEARCH
POWER
HEADPHONE
JACK
Music Player
CURRENT
TRACK TIME
REPEAT
BATTERY
TRACK/
ALBUM
Loading Files
Music
1 Connect the unit to a computer (Windows,
Apple, or Linux) using the MINI-USB connection and the included USB cable.
1 Power the digital media player on.
2 Once connected, the unit will show up on the
connected computer as if it were a connected
USB thumb drive, external hard drive, or
memory card.
3 Drag and drop the desired audio, video,
photo, or ebook files into the unit’s drive location on the connected computer.
File Compatibility:
MODE
ID3 TAG
4 After the files are loaded onto the unit,
right-click on the drive and eject it from the
computer, then disconnect the USB cable.
TRACK
LENGTH
VOLUME
MUSIC: MP3, WMA
VIDEO: MTV
VOICE: WAV
PHOTOS: JPEG, BMP
EBOOK: TXT
EQUALIZER
2 Navigate to the Music icon on the main menu
and press the MENU button.
3 Press the PLAY button to begin playing music from your digital media player.
Play Options
While in Music mode, press the MENU button to
access the Music sub-menu.
Repeat
• No Repeat
• Repeat One
• Repeat All
• Random All
• Folder Normal
• Folder Repeat
• Folder Random
Equalizer
• Normal
• Pop
• Rock
• Classic
• Jazz
• Bass
Play Rate
• 1.00X
• 1.14X
• 1.33X
• 0.67X
• 0.80X
Folder
Classified
Playlist
Photo
Record
Voice
1 Power the digital media player on.
1 Power the digital media player on.
1 Power the digital media player on.
2 Navigate to the Photo icon on the main menu
and press the MENU button.
2 Navigate to the Record icon on the main
menu and press the MENU button.
2 Navigate to the Voice icon on the main menu
and press the MENU button.
3 Navigate through the file browser using the
SKIP/SEARCH buttons, and press the MENU
button to select a JPEG or BMP photo file.
3 The digital media player will begin recording
automatically.
3 Press the SKIP/SEARCH buttons to cycle
through the available recordings.
4 Press the PLAY/PAUSE button to stop or
resume recording.
4 Press the PLAY button to begin playing the
selected recording.
5 Press and hold the MENU button to return to
the Main Menu.
5 Press and hold the MENU button to return to
the Main Menu.
4 Press the SKIP/SEARCH buttons to cycle
through all of the photos in the current directory.
5 Press and hold the MENU button to return to
the Main Menu.
ML660-IB.indd 1
7/30/2009 1:30:00 PM
Video
File-type Requirements: MTV
Use the included Video Conversion Software to
convert video files to the MTV format so that they
can play on the digital media player.
1 Power the digital media player on.
2 Navigate to the Video icon on the main menu
and press the MENU button.
3 Press the SKIP/SEARCH button to navigate
through the file browser, and press the MENU
button to select an MTV video file.
4 Press and hold the MENU button to return to
the Main Menu.
Running Video Conversion
Software
System Requirements: Windows 2000, ME, or
XP
1 Connect the digital media player to a computer (Windows, Apple, or Linux) using the
MINI-USB connection and the included USB
cable.
Setup
Power Saving
• Auto-Off
• 15 Minutes
• 30 Minutes
• 60 Minutes
• 90 Minutes
• 120 Minutes
• Close
Language
• English
• French
• Spanish
Display
• Brightness
• Low
• Medium
• High
• Backlight
• 15 Seconds
• 30 Seconds
• 1 Minute
• Close
System Tools
• Reset
• System Information
2 Once connected, the unit will show up on the
connected computer as if it were a connected
USB thumb drive, external hard drive, or
memory card.
3 Open the drive for the connected digital media player on your computer to view the file
and folder contents
4 Double-click on the “VideoConvert” file to
open the Video Conversion software.
Using the Video Conversion
Software
4 Click on “Output Video” to select a destination for the converted video file.
5 Click “Start Conversion” to begin converting
the selected video file.
This video conversion software may be blocked by
some anti-virus applications. If you are experiencing
issues when attempting to run this program, please disable your anti-virus software or try using another computer. Re-enable your anti-virus software immediately
after you finish using the video conversion software.
Please note, disabling your anti-virus software exposes
your computer to potential threats. Disable at your own
risk.
System Requirements: Windows 2000, ME, or
XP
1 Follow the “Running Video Conversion Software” directions on the previous page.
2 After the program opens, click on the “Input
Video” button in the Video Converter software.
3 Browse to and double-click on any of the following video file types:
AVI, WMV, ASF, MPG, MOV, QT, VOB, RM,
RMVB, MPEG4, 3GP
FCC Warnings
NOTE: This equipment has been tested and
found to comply with the limits for a Class
B digital device, pursuant to Part 15 of the
FCC Rules. These limits are designed to
provide reasonable protection against harmful
interference in a residential installation. This
equipment generates, uses, and can radiate
radio frequency energy and, if not installed
and used in accordance with the instructions, may cause harmful interference to
radio communications. However, there is no
guarantee that interference will not occur in a
particular installation. If this equipment does
cause harmful interference to radio or television reception, which can be determined by
turning the equipment off and on, the user is
encouraged to try to correct the interference
by one or more of the following measures:
Increase the separation between the equipment and receiver.
Connect the equipment into an outlet on a
circuit different from that to which the receiver
is connected.
Consult the dealer or an experienced radio/
TV technician for help.
CAUTION: Danger of explosion if battery is
incorrectly replaced. Replace only with the
same or equivalent type.
WARNING: Lithium batteries, like all
rechargeable batteries are recyclable and
should be recycled or disposed of in normal
household waste. Contact your local government for disposal or recycling practices in
your area. They should never be incinerated
since they might explode.
Reorient or relocate the receiving antenna.
Battery shall not be exposed to excessive
heat such as sunshine, fire or the like.
GREEN INITIATIVE
INTERNATIONAL SUPPORT
SERVICE INFORMATION
Environmental Commitment to ‘Protect for Today and
Sustain for Tomorrow’
To download this User’s Guide in English, Spanish,
or French, visit the support section at www.gpx.
com.
Address: 2116 Carr Street, St. Louis MO, 63106
Phone: 1-314-621-2881
Fax: 1-314-588-1805
Email: [email protected]
Parts Email: [email protected]
Website: www.gpx.com
2009 marks the official launch of DPI, Inc.’s corporate
campaign for a greener and cleaner world. DPI and
its four brands, iLive, WeatherX, Capri, and GPX, are
building upon environmental initiatives introduced
at all of their facilities to help formulate and sustain
significant and important conservation efforts within its
manufacturing and marketing communities. In addition
to targeting and selecting energy efficient product
features, and structuring ‘green office’ procedures,
other initial program efforts include:
Para transferir esta guía de usuario en inglés,
español, o francés, visite la sección de la ayuda en
www.gpx.com.
Pour télécharger ce guide de l’utilisateur en anglais,
espagnol, ou français, visitez la section de soutien
chez www.gpx.com.
Reduction of all packaging sizes
Recyclable plastics for clamshell packages, with a
plan to eventually replace plastic with recyclable
paper
Recycled fiber board in place of the polyfoam in packing boxes
Recycled plastics in place of the virgin material in
product construction
© 2009 Digital Products International (DPI, Inc.) | All other trademarks appearing herein are the property of their respective owners. Specifications are subject to change without notice
ML660-IB.indd 2
7/30/2009 1:30:01 PM