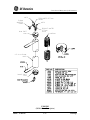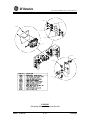
1
GE OSMONICS F-801 INTERNAL REVERSE OSMOSIS UNIT Operation and Maintenance Manual Revision E This Revision Supersedes P/n 12552 Rev. D F-801 INTERNAL REVERSE OSMOSIS UNIT Installation, Operation and Maintenance Manual TABLE OF CONTENTS CHAPTER ONE: GENERAL INFORMATION Section The Manual Safety Summary Applications Contraindications Environmental Considerations Theory of Operation Fluid Components Monitors and Controls Optional Equipment Specifications Inlet Water Requirements Flow Rates Electrical Requirements Membrane Performance Characteristics Environmental Requirements Disposal Electromagnetic Interference Service Assistance Return Goods Authorization (RGA) Symbols and Abbreviations 1.1 1.2 1.3 1.4 1.5 1.6 1.7 1.8 1.9 1.10 1.10.1 1.10.2 1.10.3 1.10.4 1.10.5 1.11 1.12 1.13 1.14 1.15 Page 1-1 1-3 1-3 1-4 1-4 1-5 1-6 1-7 1-9 1-11 1-12 1-13 1-13 1-14 1-15 1-16 CHAPTER TWO: INSTALLATION GUIDELINES AND INITIAL SYSTEM START UP 2-1 Section Installation Considerations Installation Procedure Product Water Analysis Procedure 2-3 2-3 2-5 CHAPTER THREE: SYSTEM OPERATION 3-1 Section Daily Start-up Procedure Bicarbonate Container Filling Shut Down Procedure 3-3 3-6 3-6 12552e 2.1 2.2 2.3 3.1 3.2 3.3 A 27 February 2004 CHAPTER FOUR: ROUTINE MAINTENANCE 4-1 Section Routine Maintenance of F-801 Internal RO System Daily / Per Treatment Maintenance Weekly Maintenance Monthly Maintenance Quarterly Maintenance Annual Maintenance Specific Maintenance Procedures and Instructions Motor Lubricant Procedure Leak Repair Pre-filter Replacement F-801 Cleaning Indications Pre-Cleaning Preparation Pre-Cleaning Procedure Cleaner Recirculation and Dwell Time Post-Cleaning Rinse Procedure BIOSAN Pre Cleaning Preparation BIOSAN Cleaning Procedure BIOSAN Recirculation and Dwell Time BIOSAN Post Cleaning Rinse Procedure F-801 Disinfection Indications Formaldehyde Disinfection Preparation Formaldehyde Pre-Disinfection Procedure Formaldehyde Disinfection and Dwell Time Formaldehyde Post-Disinfection Rinse Procedure “RENALIN®” Disinfection Procedure (Peracetic Acid and Peroxide-Based Compounds such as Renalin®, Minncare™, & Peracidin™) “RENALIN®” Pre-Disinfection Preparation “RENALIN®” Disinfection and Dwell Time “RENALIN®” Post-Disinfection Rinse Procedure Product Water Culture Product Water Culture Procedure System Storage Formaldehyde Storage Procedure BIOSAN Storage Procedure 4-3 4-3 4.1 4.1.1 4.1.2 4.1.3 4.1.4 4.1.5 4.2 4.2.1 4.2.2 4.2.3 4.3 4.3.1 4.3.1.1 4.3.1.2 4.3.1.3 4.3.2 4.3.2.1 4.3.2.2 4.3.2.3 4.4 4.4.1 4.4.1.1 4.4.1.2 4.4.1.3 4.4.2 4.4.2.1 4.4.2.2 4.4.2.3 4.5 4.5.1 4.6 4.6.1 4.6.2 12552e B 4-5 4-5 4-6 4-6 4-7 4-7 4-7 4-9 4-11 4-12 4-12 4-13 4-14 4-16 4-16 4-17 4-18 4-20 4-20 4-21 4-22 4-23 4-24 4-25 4-26 4-28 4-29 4-30 4-31 4-31 4-32 27 February 2004 CHAPTER FIVE: TROUBLESHOOTING 5-1 Table of Content RO Fails to Run RO Runs Intermittently Motor Runs Hot Low Pump Pressure Pressure Gauge Vibrates Erratically Excess Product Pressure (too high) Product Flow Too Low Product Flow Too High Membrane Product Pressure Too Low Leaks Low Percent Rejection Rejection Display Fluctuates TDS Value High RO Fails to Draw Disinfectant RO Pump Leaks 5-3 5-5 5-5 5-6 5-6 5-7 5-7 5-7 5-8 5-9 5-9 5-9 5-10 5-10 5-11 5-12 CHAPTER SIX: DRAWINGS 6-1 CHAPTER SEVEN: SPARE PARTS LIST 7-1 Section 12552e 5.1 5.2 5.3 5.4 5.5 5.6 5.7 5.8 5.9 5.10 5.11 5.12 5.13 5.14 5.15 C 27 February 2004 This page intentionally left blank 12552e D 27 February 2004 F-801 Internal RO System by GE Osmonics F-801 Internal RO System CHAPTER ONE: GENERAL INFORMATION 12552e – 27 Feb 04 1-1 General Information F-801 Internal RO System by GE Osmonics This page intentionally left blank. 12552e – 27 Feb 04 1-2 General Information F-801 Internal RO System by GE Osmonics 1.1 The Manual This manual has been prepared to provide the operator with information and instructions regarding the installation, use, maintenance and troubleshooting of the GE Osmonics F-801 Internal Reverse Osmosis System. CAUTION: When used as a medical device, Federal law restricts this device to sale by or on the order of a physician. Per CFR 801.109 (b)(1). The manual has been written in narrative form supplemented with schematics and drawings for clarification. The operator can perform most procedures mentioned in this manual. Any exceptions will be clearly identified by a qualifying statement. 1.2 Safety Summary Words in BOLD CAPITAL letters are used to identify labels on the device and key safety or qualifying statements. A list of all symbols and abbreviations is located at the end of this chapter. See Technote 120 for a glossary of relevant terms. This safety summary does not contain all of the safety statements in the manual. Other safety statements are included within the manual text and are enhanced and defined as follows: NOTE: Statements that provide further clarification. CAUTION: Statements identifying conditions or practices that could result in equipment or other property damage. WARNING: Statements identifying conditions or practices that could result in personal injury or loss of life. READ THIS MANUAL: Prior to operating or servicing this device, this manual must be read and understood. Keep this and other associated manuals for future reference and for new operators or qualified service personnel. A note sheet is provided at the end of each chapter for operators to make notations that may be valuable to other users. USE PROPER POWER CONNECTIONS: Use proper wiring and connection methods to satisfy hospital electrical codes. DO NOT REMOVE COVERS OR PANELS: To avoid electrical shock hazard, do not remove covers or panels when power is supplied to the device. Do not operate the device when covers or panels are removed. 12552e – 27 Feb 04 1-3 General Information F-801 Internal RO System by GE Osmonics USE PROPER WATER AND DRAIN CONNECTIONS: Use proper water and drain connections to prevent contamination of the RO and danger to the patient. To ease confusion, the Quick Disconnect (QD) fittings have been colorcoded. Both the male and female fittings are colored. The color coding is; Green = FEED water, Red = WASTE water, White = PERMEATE (Product) water. SHOCK HAZARD: Connect this device to a proper ground connection in accordance with the National Electrical Code. DO NOT under any circumstances remove the ground wire or ground prong from any power plug. DO NOT use an extension cord with this equipment. Keep the surface under the RO(s) free of liquids. Fix any leaks from the hemodialysis unit promptly. DEVICE LABELING: Do not under any circumstances; remove any Caution, Warning or any other descriptive labels from the devices until the conditions warranting the label are eliminated. DO NOT OPERATE IN A FLAMMABLE ATMOSPHERE: To avoid fire or explosion, do not operate this device in an explosive environment or near flammable anesthetics. DO NOT TRY TO CATCH THE EQUIPMENT IF IT STARTS TO FALL OVER: The overall assembly is weighty and can cause physical harm. 1.3 Applications The F-801 Internal Reverse Osmosis (RO) System is designed to purify water by forcing water through a semi-permeable RO membrane. Water purified by reverse osmosis has had approximately 95% of the dissolved ions and approximately 99% of most other contaminants removed. The quality of the purified water, referred to as product water or permeate, depends on the quality of the feed water and normally is equal to or exceeds AAMI standards. Such water is suitable for hemodialysis applications. 1.4 Contraindications WARNING: GE Osmonics systems are not designed, sold, or intended for use in producing water for injection Furthermore, GE Osmonics systems are not intended to be used outside of the device specifications and limitations, as outlined in this manual and other related materials. 12552e – 27 Feb 04 1-4 General Information F-801 Internal RO System by GE Osmonics 1.5 Environmental Considerations Prior to the installation of the F-801 RO System, it will be necessary to provide utilities and create an environment suitable for the trouble free operation of the RO system and its accessories. POWER: The F-801 operates on 115 VAC single-phase power. Histories of power failure, power surges, and low line voltages should be noted and reported to the manufacturer or their agent as they may create adverse conditions for the operation of equipment. WATER: Reverse osmosis systems require a reliable water source. The F-801 RO needs a minimum of 30-PSI pressure at a minimum flow of 1.6 gallons per minute. It is important that water is flowing at the design flow rate when testing water pressure rather than reading static pressure. DRAIN: A drain outlet is required by the RO system. The drain must have a minimum capacity of 1.6 gallons per RO per minute of continuous flow for as long as and as often as the RO is operating. TEMPERATURE: The F-801 RO is normally connected to a cold water supply. The performance specifications of the RO are based on 77°F (25°C) feed temperature. Each degree Fahrenheit the feed water temperature falls, the RO product flow decreases approximately 1.5%, and each degree Celsius drop, the product flow is reduced by 3% (See Technote 113 for the “Temperature Correction Factors” chart). In climates where the winter water temperature drops significantly below 77°F it may be necessary to temper (heat) the water. WARNING: The temperature of the tempered water should be monitored closely with a thermometer as high temperatures can damage the RO membranes and possibly harm the patient. Refer to the inlet water requirements (Section 1.10.1) for the maximum operating temperature for the F-801 RO. CAUTION: It is necessary to keep the RO from freezing to prevent serious damage to the RO unit. NOISE: The RO unit does not generate significant noise levels. Hard walls may reflect noise and will make the RO seem louder. 12552e – 27 Feb 04 1-5 General Information F-801 Internal RO System by GE Osmonics WATER PURITY: Plumbing materials can significantly contribute to the contamination of the water. Metallic pipes (with the exception of 316 stainless steel) must be eliminated once the purification process has begun. Schedule 40 or 80 PVC pipes, polypropylene, PVDF, and other FDA recommended materials are suitable for most grades of purified water. Care must also be exercised in the choice of a thread sealant. Teflon tape is suitable for all threaded connections in this system. WARNING: Ordinary pipe dope must be avoided since it may leach objectionable and potentially dangerous impurities into the water. 1.6 Theory of Operation The F-801 Portable Reverse Osmosis system (RO) purifies a given feed water (by way of reverse osmosis) for use in hemodialysis applications. The F-801 RO possesses monitoring for pressure, product water quality and membrane performance (percent rejection). The unit includes pre-filtration to remove particulates greater than 5 microns, which could clog orifices or damage components. The RO pump provides the pressure required to push water through the RO membrane. The fluid controls provide a means of managing flow rates and pressures. The following paragraphs detail the function of these fluid control components, which are used within the RO. 12552e – 27 Feb 04 1-6 General Information F-801 Internal RO System by GE Osmonics 1.7 Fluid Components Pre-filter: From the feed water, the fluid path flows through the softener (optional) on through the carbon tank and then into the pre-filter, located in a blue housing mounted on the side of the hemodialysis unit. It is a cartridge type filter with a nominal filtration rating of five microns. Pressure Adjust Regulator: Used to adjust the product pressure. The pressure is displayed on the product pressure gauge, on the front of the RO. High-Pressure Pump: Provides up to a 200 PSI boost of the inlet water to the Reverse Osmosis Membrane Assembly (ROMA). The RO pump pressure is displayed on a 0 to 300 PSI gauge mounted outside the RO, below the product pressure gauge. The pressure is factory set at 150 PSI. Reverse Osmosis Membrane Assembly (ROMA): One is included in the F-801 RO. A ROMA is an assembly that includes the membrane housing, end caps, fittings, and a membrane. The thin film membrane will produce 600 (±15%) gallons per day of product water, depending on membrane condition and water temperature. Waste Flow: The Waste Flow is controlled by a length of 1/8" capillary tubing. The length of the tube is factory determined to correctly govern the wastewater flow to drain. CAUTION: This tube must not be shortened. Dialyze/Flush Valve: The Dialyze/Flush Valve is used to flush the membrane surface of rejected contaminants, and to accelerate the rinse out of cleaners or disinfectants from the RO. Some pump noise (chattering) is normal in the flush position. The RO is in "flush" from the full open (flush) to just before the fully closed (dialyze) position. CAUTION: Excessive “chattering” may be eliminated by slowly moving the valve from the full flush position towards “DIALYZE”. Product Recirculation Check Valve: Prevents over-pressuring of the product supply. When the product pressure exceeds the set point of the pressure regulator, the product recirculation check valve opens. Excess product water is then recirculated back to the inlet water flow. 12552e – 27 Feb 04 1-7 General Information F-801 Internal RO System by GE Osmonics Feed Port: The Feed Port is a green colored quick-disconnection port for the introduction of feed water to the RO. The port has a check valve that closes when there is no hose connected to the fitting. Product Port: The Product Port is a white colored quick-disconnection port for the output of purified product water. The port has a check valve that closes when there is no hose connected to the fitting. Waste Port: The Waste Port is a red colored quick-disconnection port for the output of concentrate or waste to the drain. The port has a check valve that closes when there is no hose connected to the fitting. 12552e – 27 Feb 04 1-8 General Information F-801 Internal RO System by GE Osmonics 1.8 Monitors and Controls RO Power Switch: The RO Power Switch is mounted on the back of the remote monitor module. The switch is used to turn the F-801 RO unit on and off. Inlet Water Sensor: Monitors the quality of the inlet water. Inlet quality is compared to the outlet (product) water quality and is displayed as "percent rejection" on the front panel. Product Water Sensor: The Product Water Sensor is used in conjunction with the inlet water sensor by the percent-rejection circuitry to calculate the membrane rejection rate. The rate of rejection is displayed from 70% - 99% in a 5 LED array on the front panel. Total Dissolved Solids (TDS) Sensor: Samples the product water quality via the sensor probe, and the final quality of the product water is indicated on a digital display on the front panel as TDS in mg/L and ppm. The monitor is temperature compensated to adjust the display value to changing water temperature. Pressure Adjust Regulator: The Pressure Adjust Regulator inside the RO is used to set the maximum product pressure needed to supply a dialysis machine. Adjusting this regulator will also result in small adjustments in the pump pressure. Pre and Post filter Pressure Gauges: The Pre-filter pressure gauges are mounted on top of the pre-filter housing and display the feed water pressure from zero to 100 PSI. The two gauges are used to determine the feed water pressure and when compared against each other to determine fouling of the filter (delta pressure). Product Pressure Gauge: The Product Pressure Gauge reads the product pressure from 0 to 100 PSI and is located on the RO module right side panel. Product pressure will read zero (or close to) when the product line is not connected to a dialysis unit and the product hose is connected to the product fitting and the valve is open. The Fresenius dialysis machine requires a minimum inlet pressure of 20 PSI. Pump Pressure Gauge: The Pump Pressure Gauge reads the pump pressure from 0 to 300 PSI and is located on the RO module right side panel. It is used for monitoring during operation and when adjusting the pump pressure, and is located on the front of the RO. 12552e – 27 Feb 04 1-9 General Information F-801 Internal RO System by GE Osmonics Dialyze/Flush Valve: The Dialyze/Flush Valve is a 1/4-turn ball valve. When in the dialyze mode, the valve is in the closed position. When the valve is turned at any point towards flush, the valve is open. The closer to the flush point, the more the valve is open. When in flush, the valve bypasses the waste flow tube. Percent Rejection Display: The Percent Rejection Display is a 5 LED array that indicates how the RO membranes are performing. The lights correspond to 99%, 95%, 90%, 85%, and >70% rejection. The 99% light, when illuminated, indicates a need to evaluate the RO system performance. RO units do not normally perform in excess of 99%; verify this reading with an independent meter and take corrective action if indicated. Some RO membranes will achieve this level of performance under optimum conditions. Product Water Total Dissolved Solids (TDS) Display: The Product Water Total Dissolved Solids (TDS) digital display indicates product water purity in mg/L (ppm). It is temperature compensated to adjust the value of the display with changing water temperature for better accuracy. Less Than 0.5 mg/L Check System Lamp: The Less Than 0.5 mg/L Check System lamp illuminates when the TDS reading is 0.5 mg/L or less. This indicates a need to evaluate the RO system performance. RO units do not normally have this low product TDS. Verify this reading with an independent meter and take corrective action if indicated. NOTE: RO membranes may achieve this level of performance under optimum conditions (good feed water). Alarm Set: The Alarm Set switch allows the operator to set the TDS levels at which the alarm will sound. The alarm should be set at twice the initial TDS reading. If the set point is exceeded, an audible alarm will sound. NOTE: Choose the alarm set point that is closest to twice the initial installation TDS reading. Alarm Mute: The Alarm Mute switch will mute the audible alarm for 30 - 45 seconds. A red indicator lamp is displayed on the switch when the mute switch has been pressed. 12552e – 27 Feb 04 1 - 10 General Information F-801 Internal RO System by GE Osmonics 1.9 Optional Equipment GE Osmonics offers a number of optional items to adapt the equipment to meet specific needs. Options are available to improve the quality of the feedwater to the RO. Frequently requested options are briefly described in the following paragraphs. If more information is needed, or if other options are desired, please consult the factory. Refer to Chapter xx for catalog part numbers. Carbon Filter Tanks remove chlorine/chloramine from the feed water, preventing damage to the RO membrane and injury to patients. The filter incorporates a bed of granular activated carbon. Two sizes of carbon tanks come in semi-automatic control valve and exchange head styles. WARNING: Carbon is not regenerated and must be replaced when exhausted. WARNING: A suitable carbon filter should always be present as pretreatment for the RO unit in order to prevent chlorine/chloramine damage to the thin film RO membrane and harm to the patient. GE Osmonics strongly recommends the use of two carbon tanks, used in a series configuration. Softeners remove calcium, magnesium, and other scale producing contaminants from the feed water. Their removal prevents the build-up of scale on the membrane surface. A control valve drives the regeneration of the softener, and will remove the hardness ions with a brine solution and rinse the ion exchange bed afterwards. The control valve is normally governed by a semi-automatic time clock. There are two sizes of softener tanks available. Multi-Media Filter Tanks are a multi layered filtration system that consists of various sized rocks as the media layers. The media are selected on the basis of their size and specific gravities. Capable of removing ninety-eight percent of all particles greater than ten microns, the multi-media filter is employed to remove suspended solids and particulates from the water. The use of the multi-media filter will extend the life of the pre-filter and RO membrane. Multi-media filters are not portable and not commonly used with portable RO systems. Dealkalizers are used to lower the pH of alkaline feed water. Water with pH levels above 8.5 with chloramines present can reduce the performance of the carbon filters and thin-film membranes. A control valve drives the regeneration rinsing of the dealkalizer. The control valve is normally governed by a semi-automatic time clock. There are two sizes of dealkalizer tanks available. 12552e – 27 Feb 04 1 - 11 General Information F-801 Internal RO System by GE Osmonics 1.10 Specifications: 1.10.1 Input Water Requirements Minimum Maximum Input flow Rate 2.0 GPM N/A Temperature (water) 10°C (50°F) 32°C (90°F) NOTE: Operating at lower temperatures may make it impossible for the F-801 RO to produce adequate permeate for the dialysis machine. pH (operating) TF Membranes 5.5 10.5 pH w/chloramines present (operating) TF Membranes 5.5 8.5 pH (cleaning) TF Membranes 2.0 11.0 Pressure, dynamic 30 PSI 100 PSI 1.10.2 Flow Rates Product Flow based on the following conditions: New Membranes Operating Pressure: 150 PSI Product Pressure: 1 PSI Feed Water Temperature: 77°F (25°C) GPM LPM GPD LPD .41 1.55 588 2225.8 Membrane flux may vary ±15% Waste Flow: 2000ml/min (±10%) 1.10.3 Electrical Requirements Motor 1/3 HP Voltage 115 V~ Hertz 60 Amps 10 Phase single Power Cord (length) 8 ft (2.4 m) 12552e – 27 Feb 04 1 - 12 General Information F-801 Internal RO System by GE Osmonics 1.10.4 Membrane Performance Characteristics Salt rejection (TF Membranes): Test Solution: Conductivity: Operating Pressure: Product Back pressure: 1.10.5 95% minimum at initial testing at factory. Inlet water 1000 PPM NaCl 2000 micro mhos-cm 200 PSI 0 PSI Environmental Requirement Minimum Ambient Temperature 4°C (39°F) Maximum 32°C (90°F) Storage Temperature 2°C (36°F) 32°C (90°F) Altitude N/A 10,000 feet CAUTION: This equipment must not be allowed to freeze. components, including RO membranes may result. Irreparable harm to various NOTE: The user/operator should recognize that moisture can be caused by condensation and is not necessarily an equipment leak. This equipment will function in the presence of condensation. 1.11 Disposal Disposal of this product or parts must be carried out according with local disposal codes. 1.12 Electromagnetic Interference This equipment can generate, uses and can radiate radio frequency energy and, if not installed and used in accordance with these instructions, may cause harmful interference to other devices in the vicinity. However, there is no guarantee that interference will not occur in a particular installation. If this equipment does cause harmful interference with other devices, which can be determined by turning the equipment off and on, the user is encouraged to try to correct the interference by one or more of the following measures: • Reorient or relocate the receiving device • Increase the separation between the equipment • Connect the equipment into an outlet on a circuit different from that to which the other device(s) is connected • Consult the field service technician or manufacturer for help. 12552e – 27 Feb 04 1 - 13 General Information F-801 Internal RO System by GE Osmonics 1.13 Service Assistance If service assistance is required, please take the following steps: Consult the “Troubleshooting” section of this manual (Chapter Five). If the problem cannot be identified and corrected by any of the procedures found in that section, then... Contact your Facility Equipment Technician. If the technician is unable to help then… Call GE Osmonics Technical Service Department at (800) 633-3080 or (206) 395-2200. Technicians are available for all calls between 7:00 a.m. and 4:30 p.m. PST, Monday through Friday. Technicians are also available at other times for emergency calls only. Product consultants will be on hand to discuss the problem with you and endeavor to rectify it over the phone. If the problem appears to be of a more serious nature, you will be given instructions regarding the action to be taken. Prior to making the phone call, you must be prepared to answer two questions: 1. What RO do you have, i.e. F-801 2. What is the serial number of your RO? (Label, found on back of Remote Monitor.) RO SERIAL NUMBER: ______________________ 12552e – 27 Feb 04 1 - 14 General Information F-801 Internal RO System by GE Osmonics 1.14 Return Goods Authorization (RGA) Procedure If you wish to return goods for, warranty evaluation and/or credit please have your original sales order, invoice and device serial number available when you call GE Osmonics. Call GE Osmonics at (800)-633-3080 and request Technical Service. A GE Osmonics Technical Service representative will provide instructions and a return authorization number, which needs to be clearly written on the outside of the box used to ship your materials. All equipment must be shipped to GE Osmonics with the freight prepaid by the customer. Call our Customer Service Center with any questions or issues concerning freight claims and a representative will discuss your situation. All materials to be returned must be rendered into a non-hazardous condition prior to shipping. 12552e – 27 Feb 04 1 - 15 General Information F-801 Internal RO System by GE Osmonics 1.15 Symbols and Abbreviations “RENALIN®” Refers to Peracetic Acid and Peroxide-based Compounds, such as Renalin®, Minncare™, Peracidin™ (20% peroxide, 4% Peracetic Acid) ASTM American Society for Testing and Materials AAMI Association for the Advancement of Medical Instrumentation CA Cellulose Acetate C Celsius CSA Canadian Standards Association cc Cubic Centimeters cf Cubic Foot (feet) cfu/ml. Colony Forming Units per milliliter cm Centimeters DI Deionization F Fahrenheit FDA Food and Drug Administration Ft Foot (feet) GPD Gallons Per Day GPM Gallons Per Minute GHT Garden Hose Thread gr Grains GAC Granular Activated Carbon HZ Hertz HP Horse Power lbs. Pounds LED Light Emitting Diode LPD Liters Per Day LPM Liters Per Minute Kohm One Thousand Ohms m. Meter mg/L. Milligrams Per Liter 12552e – 27 Feb 04 1 - 16 General Information F-801 Internal RO System by GE Osmonics ml. Milliliters MNPT Male National Pipe Thread MSDS Material Safety Data Sheet Megohm/cm Million Ohms/Centimeter mw Molecular Weight NaCl Sodium Chloride N/A Not Applicable NPT National Pipe Thread NSF National Sanitation Foundation PA Polyamide P/N Part Number ppm Parts Per Million psi Pounds Per Square Inch PVC Polyvinyl Chloride QD Quick Disconnect RO Reverse Osmosis ROMA Reverse Osmosis Membrane Assembly TB Terminal Barrier Strip: “TB2” (Example: “TB2-1” refers to the terminal marked number 1 on the Power Supply Terminal Barrier Strip) TF Thin Film TDS Total Dissolved Solids UL Underwriters Laboratory VAC Volts Alternating Current WFI Water for Injection WT Weight ~ Volts Alternating Current 12552e – 27 Feb 04 1 - 17 General Information F-801 Internal RO System by GE Osmonics NOTES: 12552e – 27 Feb 04 1 - 18 General Information F-801 Internal RO System by GE Osmonics F-801 Internal RO System CHAPTER 2: INSTALLATION GUIDELINES AND INITIAL SYSTEM START-UP 12552e - 27 Feb 04 2-1 Installation Guidelines and Instructions F-801 Internal RO System by GE Osmonics This page intentionally left blank. 12552e - 27 Feb 04 2-2 Installation Guidelines and Instructions F-801 Internal RO System by GE Osmonics 2.1 Installation Considerations 1. The RO unit requires 115 VAC power for operation and consumes 10 amps of current. 2. The RO unit requires nominally 1.6 GPM water at 30 PSI. Warmer feed water (up to 25°) will produce more permeate, and will consume more water. The water may also require some pretreatment to ensure maximum performance and suitability. GE Osmonics recommends that feed water be chlorine/chloramine free and solids above 5 microns in size be filtered out. 3. A drain with a minimum capacity of 1.6 GPM is required for the RO unit. 4. Back flow prevention may be required in accordance with local codes. 5. Special connections may be needed to connect to water supply. Connections vary with different facilities. 2.2 Installation Procedures: CAUTION: If a carbon tank is present on the RO system, the carbon tank must be completely rinsed of all carbon fines and ash before connecting to the RO unit. Otherwise, irreparable damage to the TF membrane will result (refer to Carbon Manual). WARNING: Do not rinse carbon tanks until they are ready to be used in service. Carbon tanks that have been wetted and allowed to sit unused will grow bacterial. WARNING: The ROMA is stored with 1 wt.% sodium metabisulfite from the factory. Follow all Material Safety Data Sheet (MSDS) guidelines that are included with the RO. CAUTION: Supply water with a pH above 8.5 and containing chloramines will adversely affect the operation of the RO membrane. 1. For installation of the pretreatment cart and RO to the dialysis machine cabinet, and all tubing connections (except product to use), refer to the Installation Drawing section of the system manual, or contact GE Osmonics for Drawing p/n 1239784. 2. Connect the product to use line to the product line rinse extension (GE Osmonics p/n 12393) and route to drain. 3. Connect the feed water line to water supply and route the RO waste line to drain. 4. Turn the water supply on and allow the water to flow through the system to drain for 3-5 minutes. 12552e - 27 Feb 04 2-3 Installation Guidelines and Instructions F-801 Internal RO System by GE Osmonics NOTE: There will be little or no flow through the product line at this time. 5. Make sure that the RO power switch is in the OFF position. Plug the power cord into a 115 VAC grounded outlet. Do not use an extension cord or an adapter. 6. Ensure the dialyze/flush valve is in the dialyze position. 7. Turn the RO power switch on and run the system for 30 minutes. Observe displays and note stabilization of rejection and TDS. 8. After a minimum of 3 hours run time, disinfect and rinse the RO unit with an approved disinfectant before using for hemodialysis treatment (refer to Chapter Four for instructions on disinfection). WARNING: After disinfection, the product water must be verified free of residual disinfectant. WARNING: Ensure that TDS and membrane performance (% rejection) are normal for the regions water quality. Consult your facility physician. An AAMI analysis and bacteria test of the product water must be obtained and interpreted before using the RO unit for hemodialysis treatment (refer to the Product Water Analysis procedure and the Product Water Culture Procedure). CAUTION: New RO units with thin film (TF) membranes must be rinsed to drain with normal pressures for a minimum of three (3) hours before exposure to disinfectants such as Renalin and a minimum of six (6) hours before exposure to formaldehyde. NOTE: Ideally, rejection will be 95% or greater. If less than 95%, extend rinse period an additional 30 minutes. 9. Close the product valve and remove the product rinse extension line. Connect product line to inlet line on the dialysis machine. Open the product valve. 10. Start the dialysis machine into a rinse cycle. 11. Set the product water TDS alarm limit switch as prescribed by the physician. The switch is normally set to twice the initial TDS reading (or “next higher” setting) at start-up. WARNING: The TDS alarm limit should not be moved from this setting unless instructed by a physician. 12552e - 27 Feb 04 2-4 Installation Guidelines and Instructions F-801 Internal RO System by GE Osmonics 12. Perform the following checks: Pump pressure gauge: between 140 – 160 PSI Pre-filter pressure differential: Both above 30 PSI, no greater difference than 8 PSI above clean filter readings. Product pressure: between 35-40 PSI. Percent rejection: greater than 95%, continue to rinse if lower. TDS at normal for region. 13. The RO product may be used in conjunction with hemodialysis treatment equipment only after obtaining test results which validate compliance with excepted standards. AAMI Product Water Panel Microbiological Culture (colony count) results Endotoxin (pyrogen) level testing (if applicable) 14. The F-801 RO is now ready for use. 2.3 Product Water Analysis Procedure: In order to ensure that the RO is performing at or above AAMI (Association for the Advancement of Medical Instrumentation) Standards, it is necessary to perform an AAMI Water Quality Analysis test. For new units, the RO must be operated (rinsed to drain) for at least two hours before taking a sample, to ensure that the membranes are free of preservative or other contaminants which would invalidate the test. WARNING: There are many documented clinical risks in using less than AAMI Standard product water (refer to Technote 103, "AAMI Hemodialysis Water Quality Standards"). NOTE: Follow the procedures recommended by your water quality-testing laboratory if they vary from the following steps. Materials Required: Produce water sampling kit, sterile gauze, tape, and container (such as a small bucket). 1. Ensure that all pre-RO devices are operating correctly and are performance verified by the appropriate testing. 2. Connect the RO unit to the required utilities (feed water, drain, power). 3. With the dialysis machine on, operate the RO unit with product and waste flows to drain for at least 15 minutes after the product water quality has stabilized before drawing the water sample. 12552e - 27 Feb 04 2-5 Installation Guidelines and Instructions F-801 Internal RO System by GE Osmonics 4. Close the product valve on the F-801, and disconnect the product line from the inlet water line of the dialysis machine. Tape a sterile gauze around the opening of the inlet water line to the dialysis machine. 5. Hold the product line over the container and run product water for 60 seconds. 6. Aseptically remove the lid from the sample bottle and rinse the bottle twice with RO product water. 7. Fill the bottle completely with RO product water and cap it immediately. 8. Fill out the laboratory requisition form. Ensure the requisition form has, at a minimum, information to identify the facility or location of the RO, the serial number or facility equipment number to ensure which RO was tested and name, phone number and address of whom to contact. 9. Place the bottle and the completed requisition in the pre-addressed mailer and mail it directly to the laboratory. NOTE: Total chlorine must be measured on-site. Tests for Chlorine/Chloramine (total chlorine) are not typically reported on the AAMI Analysis. Chlorine and chloramine dissipate from the water sample over time and reported results will be inaccurate. 12552e - 27 Feb 04 2-6 Installation Guidelines and Instructions F-801 Internal RO System by GE Osmonics NOTES: 12552e - 27 Feb 04 2-7 Installation Guidelines and Instructions F-801 Internal RO System by GE Osmonics This page intentionally left blank. 12552e - 27 Feb 04 2-8 Installation Guidelines and Instructions F-801 Internal RO System by GE Osmonics F-801 Internal RO System CHAPTER 3: SYSTEM OPERATION 12552e – 27 Feb 04 3-1 System Operation F-801 Internal RO System by GE Osmonics This page intentionally left blank. 12552e – 27 Feb 04 3-2 System Operation F-801 Internal RO System by GE Osmonics 3.1 Daily Start-up WARNING: Verification of the absence of all sanitizers, cleaners, disinfectants and chlorine/chloramines must be performed before RO product water is used for any patient related uses. WARNING: Use of exhausted carbon in the presence of chlorine/chloramines will result in damage to the F-801 RO membrane and may cause serious patient injury. CAUTION: When moving the F-801 assembly, push only on the handle and in the direction of travel. The only exception to this should be when loading into elevators or going across thresholds when the gap is greater than 1” or the threshold is uneven. The F-801 should be pulled over these to prevent the machine from tipping over or causing damage to the casters. CAUTION: Do not push unit sideways as this may cause the unit to tip over. If it is necessary (such as in tight patient areas), use extreme caution and do not push it in a direction where it could fall onto someone. CAUTION: Do not try to catch the equipment if it starts to fall over. If moving up or down a ramp, get help if unable to handle the load. NOTE: Obtain a copy of the F-801 Operation Log Sheet (see Technote section of system manual). All the start-up data for the RO may be recorded on this log sheet. 1. Connect the RO unit to the required utilities (feed water, drain, and power). 2. Ensure that all the valves in the water supply line to the RO are open. 3. Ensure that all pre-RO devices have been flushed and tested and are operating within their specifications. 4. Ensure that the product line is connected to the inlet water supply line of the dialysis machine. Open the product valve located on the end of the product line. If the product valve is closed, no product water will be delivered to the dialysis machine. 5. Turn on the water supply. 12552e – 27 Feb 04 3-3 System Operation F-801 Internal RO System by GE Osmonics WARNING: Only the cold water supply should be used. If blending of hot and cold water is to occur, an appropriate temperature blend valve must be used, and the temperature of the incoming water supply must be continuously monitored, and not be allowed to rise above 30°C (86°F). Excessively high water temperature may cause severe patient injury or death. 6. Turn the F-801 RO unit ON. The on/off switch is located on the back of the remote monitoring module atop the dialysis machine. CAUTION: Some pump noise (chattering) is normal in the flush position. Excessive pump noise (chattering) can be damaging to the pump. The RO is in “flush” from the full open (flush) position to just before the fully closed (operate) position. Adjust it by partly closing the flush valve to reduce chattering of the pump. 7. The "Percent Rejection" monitor should indicate 95% rejection within 2 minutes of start-up. It is normal for rejection to drop off until membranes have rinsed up to optimum quality. 8. The TDS monitor should stabilize within 2 minutes of start-up. The TDS during this time may be higher than the alarm set point. The audible alarm may be muted at this time by pressing the alarm mute switch. The alarm mute switch will silence the audible alarm for 30 - 45 seconds each time the switch is used. WARNING: When the RO is used for dialysis service, a test for disinfectant residual MUST be performed. 9. Perform the following routine checks before each use and record on the Operation Log sheet. WARNING: Any data that does not meet minimum standards set at your facility must be reported to the medical director. The RO should not be placed in service until readings are acceptable. Read the pump pressure gauge, it should read between 140 – 160 PSI. Read the inlet pre-filter pressure gauge, it should read between 30 – 100 PSI. Read the outlet pre-filter pressure gauge, it should read between 30 – 100 PSI with no more than 8 PSI difference between initial clean pre and post filter readings. Compare log sheet recordings for changes. Read the product pressure gauge, it should read between 35 – 40 PSI. The product pressure should be read with the product water hose connected to the Fresenius inlet, or with the product outlet valve closed. 12552e – 27 Feb 04 3-4 System Operation F-801 Internal RO System by GE Osmonics NOTE: If the product pressure or product flow is insufficient, a low dialysate flow alarm will occur on the dialysis machine. Small adjustments to the product pressure may be made with the pressure adjust knob located inside the RO module on the feed water line. Read the percent rejection. It should display in the green region between 8595% rejection. WARNING: The product water must be shown to meet AAMI Standard Water Quality in the % rejection range displayed on that particular water source (refer to Technote 103, AAMI Maximum Allowable Contaminant Level). Read the total dissolved solids (TDS). It should read normal for the region. The alarm should be set to twice the initial installation TDS reading or the next higher setting. WARNING: The product water must be shown to meet AAMI Standard Water Quality in the TDS range displayed on that particular water source (refer to AAMI Maximum Allowable Contaminant Level). NOTE: Mg/L may be used interchangeably with parts per million (PPM). NOTE: An alarm light is located to the right of the mute button that will illuminate if the product water total dissolved solids displays less than 0.5 mg/L. This is a rare phenomenon that can occur if the source or feed water is already highly purified; otherwise, the system needs to be checked. 10. The F-801 RO is now ready for use. Proceed with normal set-up routine. 12552e – 27 Feb 04 3-5 System Operation F-801 Internal RO System by GE Osmonics 3.2 Bicarbonate Container Filling RO water may be dispensed from the product line of the F-801 Internal RO system for use in filling bicarbonate jugs, drawing water samples, etc. 1. With the dialysis machine OFF and the F-801 ON and all tests and checks performed; a. Close the product valve on the product line. b. Disconnect the product line from the dialysis machine inlet water line. NOTE: GE Osmonics recommends to cover the inlet water line with sterile gauze and secure with tape. The inlet water line to the dialysis machine and the product line from the RO unit when disconnected, should always be treated as aseptically as possible. The inlet water line to the dialysis machine is not routinely disinfected, and is a prime place for bacteria to proliferate. c. Using aseptic technique, place the line over the bicarbonate container, open the product valve and dispense as needed. d. When finished dispensing, close the product valve, reconnect the product line to the inlet water line of the dialysis machine and open the product valve. 2. Continue with your normal set-up routine. 3.3 Shut Down Procedure The following procedure, when performed in sequence, will significantly decrease the water pressure built-up in the RO system and prevent splashing. 1. Turn OFF the dialysis machine. 2. Turn OFF the F-801 RO unit. 3. Turn OFF the inlet water supply, wait one minute. 4. Disconnect the feed water line from the water source. 5. Remove the drain line from the drain. 6. Disconnect from the utilities and store the RO. NOTE: If the F-801 RO is to be stored for more than 24 hours (RO not being operated), the RO should be stored in an approved disinfectant or storage solution (Not ‘RENALIN®’ or other type oxidizing products). Refer to the disinfection or storage procedure in this manual. 12552e – 27 Feb 04 3-6 System Operation F-801 Internal RO System by GE Osmonics NOTES: 12552e – 27 Feb 04 3-7 System Operation F-801 Internal RO System by GE Osmonics This page intentionally left blank. 12552e – 27 Feb 04 3-8 System Operation F-801 Internal RO System by GE Osmonics F-801 Internal RO System CHAPTER FOUR: ROUTINE MAINTENANCE 12552e – 27 Feb 04 4- 1 Routine Maintenance F-801 Internal RO System by GE Osmonics This page intentionally left blank. 12552e – 27 Feb 04 4- 2 Routine Maintenance F-801 Internal RO System by GE Osmonics 4.1 Routine Maintenance of F-801 Internal RO System GE Osmonics RO systems have been designed to operate with a minimum of operator attention. Like all mechanical systems they will operate longer and with less trouble when operator maintenance is performed regularly. Operator maintenance on a GE Osmonics reverse osmosis system is limited to maintaining performance logs, cleaning and disinfection, replacement of damaged or failed parts and periodic lubrication. The maintenance procedures have been categorized by their frequency of action and are as follows: WARNING: Prior to performing any electrical maintenance unplug the RO power cord from the wall receptacle. WARNING: Do not perform maintenance while RO is being used for patient treatment. CAUTION: Perform system disinfection as per established facility protocol and referring to the disinfection procedure in this manual. NOTE: The first part of this section provides the timelines and simple instructions for maintenance of your RO. The specific instructions and procedures for the more complex maintenance items are provided in the second part of this section. 4.1.1 1. Daily/Per Treatment Maintenance Test and record the hardness level of the feed water in the pretreatment log. The hardness level should be less than two grains per gallon. Refer to appropriate pretreatment manual for detailed instructions. NOTE: Check the softener output for hardness level at the end of the operational day to confirm adequate softener capacity for next days treatment. 2. Observe and record salt level in the brine tank (for systems with water softener pretreatment). 3. Observe and record the Chlorine/Chloramine concentrations in the pretreatment log. Follow the instructions included with each test kit. WARNING: Take corrective action or contact your local service representative if any optional pretreatment device fails to provide adequate treatment of feed water before continuing with the use of the RO unit. 12552e – 27 Feb 04 4- 3 Routine Maintenance F-801 Internal RO System by GE Osmonics 4. Observe and record the pre-filter inlet and outlet pressure gauges on the operation log. The difference in the pressure values will help measure the condition of the filter cartridge. When the pressure differential (delta P) increases 8 PSI above the clean, initial delta P, the cartridges need to be changed (or sooner if the pre-filter core appears soiled). Refer to section 4.2 for specific instructions on changing pre-filter. 5. Observe and record the percent rejection and TDS water quality readings in the operation log. 6. Observe and record the pump pressure reading. It should be between 140 – 160 PSI. Adjustments may be made on the pump head. Refer to drawing section for details. 7. Observe and record the product pressure reading. Reading should be 35 – 40 PSI (with F-801 product valve closed or connected to dialysis unit but not operating). Adjustments to the product pressure may be made with the pressure adjust regulator knob located inside the RO module. NOTE: After adjusting product pressure, verify that pump pressure is within normal range. 8. Measure and record the feed water temperature if blending hot and cold water. CAUTION: Damage may occur to the RO system membrane if the incoming water temperature is higher than 32°C (90°F). WARNING: Injury to the patient may result with water temperatures higher than 98°F. NOTE: Systems with blending valves usually have thermometers installed in the plumbing. Hand held thermometers may also be used. The water temperature has a significant effect on the flow rate of the RO membrane (refer to Technote 113 Temperature Correction Factor chart) and on the evaluation of the membrane's need to be cleaned. Feed water temperature blending assemblies can be used on portable RO units, however GE Osmonics does not supply them. 9. Disinfect the F-801 RO unit per established facility protocol (refer to Disinfection Procedure) if RO unit has sat dormant for longer than 24 hours or has been stored for long periods of time. 12552e – 27 Feb 04 4- 4 Routine Maintenance F-801 Internal RO System by GE Osmonics 4.1.2 1. Weekly Maintenance Observe, or measure, and record the waste and product flow rates on the operation log. Allow the water temperature to stabilize before attempting to record the results. This will help prevent errors due to fluctuating temperature. a. Waste flow 2000 ml/min (±10%) b. Product flow 1580 ml/min (150 PSI pump pressure and 25 C feed water temperature) with product line disconnected from dialysis machine and line open to atmosphere. Refer to Technote 113 for Temperature Correction Factors. 2. Observe, or measure, and record the feed water temperature. Systems with blending valves have thermometers installed in the plumbing. A hand held thermometer may also be used. The water temperature has a significant effect in the product flow rate of the RO membrane and on the evaluation of the membranes’ need to be cleaned. 3. Disinfect the system if needed. chapter. 4.1.3 1. Refer to the disinfection procedure in this Monthly Maintenance Take a product water culture to test for bacteria colony forming units count (<200 cfu/ml). Refer to the product water culture procedure in this chapter. Disinfect if results indicate higher cfu count. NOTE: Water cultures should be taken prior to disinfection and after disinfection to determine effectiveness. 2. Visually inspect the pre-filter core, if you are using cartridge pre-filtration. CAUTION: On occasion, the pressure differential between the two pre-filter gauges will not alter significantly, however, the pre-filter will be soiled. If the core of the prefilter is dirty, particulates are breaking through the pre-filter and traveling downstream and causing damage to the pump and RO membranes. If this is the case, the pre-filter will require more frequent replacement on a routine basis. 3. Check the pump pressure settings. The pressure should be 150 PSI ± 10 PSI, and should not exceed 200PSI. 4. Check the product pressure setting. Adjust the pressure as needed with the regulator inside the cabinet. 5. Perform trend analyses from the log sheets. 12552e – 27 Feb 04 4- 5 Routine Maintenance F-801 Internal RO System by GE Osmonics 4.1.4 Quarterly Maintenance 1. Clean the RO Membranes. Refer to the RO membrane cleaning procedure in this chapter. 2. Disinfect the RO machine. The RO should be disinfected after cleaning. Refer to the membrane disinfection procedure in this chapter. 3. Verify the TDS and percent rejection readings with an independent monitoring device every 3 months. 4. Check the quick-disconnect fittings and hoses. They should seat securely and fluid should shut off when they are disconnected. 5. Test feed water (tap water). Test for; a. Iron presence (critical when Renalin is used) b. pH alteration c. Chlorine / chloramines shifts d. Hardness fluctuations CAUTION: If feed water changes in its constituents, the pretreatment components may need to be reassessed for proper capacity. 6. Inspect casters and caster mounting plates for damage. If damage is evident, replace casters. 7. Tighten all hardware for the pretreatment stand assembly. This includes casters, handle bolts, leg attaching bolts, etc. 4.1.5 Annual Maintenance 1. An AAMI Water Quality Analysis of the product water should be conducted at least yearly. (Refer to the Water Quality Analysis Procedure in Chapter two.) 2. Check the monitoring for accuracy. 3. Check the gauges for correct functioning. 4. Check the ball valves for correct operation. 5. Check the tubing and fittings for leaks or wear. 6. Check the switch and lights for correct operation. 7. Check all pre RO devices for correct operation. 8. Lubricate the motor. Refer to the lubricating instructions in this chapter. 12552e – 27 Feb 04 4- 6 Routine Maintenance F-801 Internal RO System by GE Osmonics 4.2 4.2.1 Specific Maintenance Procedures and Instructions Motor Lubricant Procedure NOTE: Only perform this procedure on motors that have plugs on each end of the motor and have instructions on the motor identification plate indicating the requirement. NOTE: During initial start-up and after performing motor lubrication procedure, a hot oily smell may be detected. This is normal and should fade away. 1. Remove the plastic plugs at both ends of the motor housing near the motor shaft. 2. Follow instructions on motor identification plate for type and quantity of oil to be added. If unable to read motor plate, add 30 drops of SAE 20 wt. nondetergent motor oil into the opening. 3. Replace the plastic plugs. 4. Turn on the motor and run for 10 minutes. 4.2.2 Leak repair General information: Any leak from any part of the system should be corrected as soon as possible. Left unattended, leaks can cause secondary damage necessitating expensive repairs. NOTE: Use FDA/NSF approved silicone sealant or Teflon tape on all threaded connections. Threaded Connections: 1. Prior to performing this maintenance on any threaded fitting, release the pressure on the piping/tubing system (i.e., turn off the pump, open a drain port, etc.) 2. Remove the connecting tubing. 3. Re-tape the pipe threads with 2 or 3 wraps of Teflon tape. (It is not necessary to remove the old Teflon tape, although it may be advisable to do so if tape is loose or in otherwise poor shape). 4. Re-insert the threaded fitting into the opening and tighten hand tight. Be careful to avoid cross threading. Tighten further using a wrench only if necessary, and only about one-half turn. 5. Re-connect piping, pressurize, and inspect for leaks. 12552e – 27 Feb 04 4- 7 Routine Maintenance F-801 Internal RO System by GE Osmonics 6. If the leak is still present, de-pressurize system again and tighten the fitting another quarter-turn. Check again for leaks. (Over tightening can crack the female fitting). 7. If the leak continues, it may be necessary to replace the male threaded fitting and/or the female threaded fitting. Tubing connections: 12552e – 27 Feb 04 4- 8 Routine Maintenance F-801 Internal RO System by GE Osmonics 1. Prior to performing this maintenance on any tube fitting, release any pressure on the tubing system (i.e., turn off the pump, open a drain port, etc.). 2. Remove the red locking clip (if applicable). 3. Push the dark gray collar in towards the body of fitting (light gray). releases the ‘gripper’, which holds the tubing in place. 4. Hold the gray collar in while gently pulling the tube away from the fitting. It may be helpful to wiggle the tube side-to-side slightly while pulling. 5. Remove the gray collar by pulling straight out. Reach into the opening with a small, blunt (non-scratching) probe and remove the O-ring. (Inspect the collar to insure that all grippers are intact.) 6. Rinse the O-ring with warm running water to remove any dirt or debris and set aside to dry on a clean paper towel. 7. Clean the inside of the fitting with a wet cotton swab or paper towel to remove any dirt or debris. Be sure not to leave any cotton fibers from the swab or towel inside the fitting. 8. Lubricate the O-ring sparingly with silicone O-ring lubricant and place the Oring back inside the fitting. 9. Replace the gripper collar. 10. With a tubing cutter or sharp utility knife, cut off approximately ½” to 1” of the tube. Carefully cut the tube as square (perpendicular to the length) as possible. Inspect remaining tubing for marks/scratches and replace/repair as necessary. 11. Place the tube in the fitting opening and push firmly until the tube seats fully in the fitting (completely ‘bottomed out’). 12. Pull back on the tubing to seat the grippers, and re-install the locking clip (if applicable) between the light gray body of the fitting and the dark gray collar (flat side towards the body). 13. Re-pressurize the system (if applicable) and inspect for leaks. 14. If the leak is not resolved, start over or simply replace the entire tube fitting or tube. This 4.2.3 Pre-filter Replacement 1. Turn OFF the Dialysis machine and the F-801 RO system. Shut the feed water OFF. 2. Ensure that the drain line is in the drain receptacle with the proper air gap. 3. Slowly turn the blue pre-filter housing counter-clockwise, being careful to vent any remaining water pressure. 12552e – 27 Feb 04 4- 9 Routine Maintenance F-801 Internal RO System by GE Osmonics 4. Carefully remove the housing (bottom part) from its head. Empty the water and used pre-filter cartridge. 5. Inspect the central core of the used pre-filter for dirt or rust. If discoloration is present in the cartridge interior, the filter has been in service too long and should be replaced sooner, or at a delta pressure lower than 8 PSI. 6. Check the O-ring in the groove of the filter housing. Replace the O-ring (GE Osmonics p/n 40694) if it appears worn or damaged. 7. Clean and rinse the pre-filter housing. a. Optional; a 1% bleach solution may be used to sanitize the housing, rinse thoroughly. 8. Insert the new pre-filter cartridge into the housing. Ensure that the pre-filter is firmly in place. 9. Re-install the housing, tighten clockwise. 10. Turn ON the feed water and check for leaks. This will also purge the air from the pre-filter housing. 11. If there are no leaks, the RO system is ready for use. 12552e – 27 Feb 04 4- 10 Routine Maintenance F-801 Internal RO System by GE Osmonics 4.3 F-801 Cleaning Indications Foulants such as minerals, silt and organic substances may collect on the RO membrane surface and cause the RO membrane to foul and diminish in its function. Many of these foulants are prevented by proper selection of pretreatment equipment, while others are treatable only with more sophisticated designs. Regardless of the foulant, it is essential to clean the membrane promptly once cleaning is indicated. The longer a foulant is allowed to remain in contact with the RO membrane, the more difficult it will be to remove. In severe cases, repeated cleanings may be required. NOTE: Some foulants CANNOT be removed with cleaning and membrane performance may not be fully restored. Observe the appearance of the cleaning solution before discarding it. If the solution is heavily soiled, repeat the cleaning procedure with fresh solution of the same type (high pH or low pH). Routine cleaning of the RO membranes in conjunction with regular disinfection will keep bacteria counts at a minimum and the RO membrane performance at its best. Cleaning removes the silt, organic and mineral deposits that collect on the RO membrane surface which, if left untreated, encourage bacterial growth and will eventually impair the RO membranes' ability to perform. Disinfection kills most of the bacteria that may be present in the system, but it does not remove the deposits on the membrane. There are a variety of indications for cleaning membranes. The most common is a reduced product flow rate. Remember that a reduction in inlet water temperature can also result in a reduced flow rate. Refer to Technote 113 "Temperature Correction Factors" to determine the reduction in flow that can be attributed to reduced water temperature. Clean the membranes whenever the temperature compensated flow rate drops by 10%. A loss in the membrane performance (percent rejection) or increase in TDS of the product water may also be an indication to clean the membranes. A good preventative maintenance practice is to clean the membranes on a quarterly basis, and more often if needed. CAUTION: Membranes that have not been cleaned for a long time may actually incur damage during cleaning as perforations are exposed that were masked by accumulations of foulant. Regular maintenance cleaning is the best assurance of long membrane service. 12552e – 27 Feb 04 4- 11 Routine Maintenance F-801 Internal RO System by GE Osmonics 4.3.1 Pre-Cleaning Preparation There are two types of cleaners available, a low pH cleaner (Calcium/Iron removal) and a high pH cleaner (Silt/Organics removal). GE Osmonics provides these cleaners in liquid form. The low pH cleaner attacks mineral scale deposits such as calcium, magnesium and iron build-up, and should be used first. The high pH cleaner will remove accumulated silt and organic matter from the RO membrane. CAUTION: The different cleaners must not be mixed together. Introduce the low pH cleaner first, thoroughly rinse the system, and then use the high pH cleaner. WARNING: The solution is a mild irritant to eyes and skin. It is recommended that protective gloves and eye protection be worn when handling the cleaner. Neither respiratory protection nor special ventilation are required. Materials Required: LIQUICLEAN 103™ – (Low pH liquid) - GE Osmonics Part No. 1228653 (1 Gal) LIQUICLEAN 511™ – (High pH liquid) - GE Osmonics Part No. 1228791 (1 Gal) • high and low pH cleaner • 2 Gallons pretreated water • Disinfect container with volume of 2 ½ gallon or more • pH test strips • phosphate testing kit (optional) • product rinse line (clear hose with male QD fitting on one end, open on the other) • “DO NOT USE” warning labels (not provided by GE Osmonics) • cleaning / disinfect log sheets • most current log sheets for water quality comparison • sterile gauze and tape 4.3.1.1 Pre-Cleaning Procedure Read and understand instructions on cleaner container before beginning procedure. 1. Connect the water inlet line to the water supply and the waste line to drain. Turn the RO unit and water supply on. 2. Close the product valve. Disconnect the product line (white QD) from inlet line of the Fresenius dialysis machine. Cover exposed inlet water line with sterile gauze and secure with tape. 3. Connect the product rinse line to the product line and direct to clean drain receptacle. Open the product valve. 12552e – 27 Feb 04 4- 12 Routine Maintenance F-801 Internal RO System by GE Osmonics 4. Turn the RO on for five minutes and establish a pre-cleaning % rejection, TDS and pH record on the cleaning disinfect log sheet. 5. Prepare the cleaning solution by adding the amount of cleaner as specified on the labeling to two gallons of pretreated or RO product water. CAUTION: Water to be used must be chlorine free or damage to the RO membranes may result. 6. Turn the RO power switch off and close the product valve. WARNING: Label machine with appropriate warning signs such as "Do Not Use / Contains Cleaner" to prevent use of the RO until it is properly rinsed. 7. Connect the product line to the white fitting on the disinfect/cleaning tank. Open the product valve. 8. Connect the feed line (green QD) from the pre-filter outlet to the green fitting on the disinfect tank. 9. Connect the drain line (red QD) extension and connect the female portion to the red fitting on the disinfect tank. CAUTION: By connecting all the lines to the disinfect/cleaning tank, the system is set-up for recirculation. Never leave the unit unattended in the recirculation mode. 4.3.1.2 Cleaner Recirculation and Dwell Time 1. Turn the Dialyze/Flush valve to the Flush position and open the product valve. The Flush mode will allow the flow of cleaner only to the rejection side of the RO membrane to flush surface particulates away. Very little or no product water will be made in flush mode. 2. Turn the RO power switch ON. Let the RO operate for 5 to 10 minutes in the flush mode. Pump pressure during this step should read approximately 40 – 80 PSI. CAUTION: Some pump noise (chattering) is normal in the flush position. Excessive pump noise (chattering) can be damaging to the pump. The RO is in “flush” from the full open (flush) position to just before the fully closed (dialyze) position. Adjust it by partly closing the flush valve to reduce chattering of the pump. CAUTION: DO NOT ALLOW PUMP TO RUN DRY. Damage will occur if pump is run dry. 12552e – 27 Feb 04 4- 13 Routine Maintenance F-801 Internal RO System by GE Osmonics CAUTION: Check that there is waste flow within 10 seconds. If not, turn off the RO and verify that the disinfect-line is connected properly. CAUTION: Do not allow air or foam to be drawn into the RO system, as this will damage the pump. NOTE: The % rejection will fall below 85% and the TDS will rise considerably when the cleaner is re-circulated through the F-801 RO unit. NOTE: The cleaners will foam; this is normal. If using a closed container, provide a vent to the atmosphere to relieve pressure. 3. Verify that the F-801 and Fresenius dialysis unit are properly labeled with warning signs to prevent use during cleaning process. WARNING: The F-801 RO machine in now completely filled with cleaning solution and must NOT be used to supply water to the Fresenius dialysis machine or for any other purpose until a complete rinse procedure has been performed. See Cleaner Rinse Procedure below. 4. Let the RO stand dormant with cleaning solution in it for sixty minutes with a maximum of overnight. 4.3.1.3 Post-Cleaning Rinse Procedure 1. After the dwell time, remove the waste hose and clear accessory flush line from the cleaning solution and place it in the drain with the appropriate air gap. 2. Turn the RO on and run cleaning solution to the drain until the container is empty. This aids in emptying the container of cleaning solution. CAUTION: DO NOT ALLOW THE PUMP TO RUN DRY. As an alternative, the solution may be poured in the drain. CAUTION: Do not allow air or foam to be drawn into the RO system, as this will damage the pump. 3. When the disinfect/cleaning tank is empty, turn the F-801 RO unit OFF. 4. Reconnect the feed line to the pre-filter outlet (green QD). 5. Open the product valve. 12552e – 27 Feb 04 4- 14 Routine Maintenance F-801 Internal RO System by GE Osmonics 6. Ensure that the water supply to the RO unit is on. If it is partially closed, rotate the dialyze/flush valve to the full flush position. 7. Turn ON the F-801 RO unit and operate in the flush mode for 5-10 minutes. This will aid in rinsing the system quickly. CAUTION: Some pump noise (chattering) is normal in the flush position. Excessive pump noise (chattering) can be damaging to the pump. The RO is in “flush” from the full open (flush) position to just before the fully closed (dialyze) position. Adjust it by partly closing the flush valve to reduce chattering of the pump. 8. Rotate the dialyze/flush valve to the dialyze position. 9. Turn the F-801 RO unit ON. Rinse for 20 minutes with the Dialyze/Flush valve in the Dialyze position until the % rejection and TDS monitors’ displays normalize (e.g. 'usual' % rejection and 'usual' TDS reading). Refer to your operating log for 'usual' readings and compare to the pre-cleaning values. A. During this rinse period, rotate the Dialyze/Flush valve to the Flush position briefly and then back to Dialyze three times to build-up and release pump pressure. This aids in flushing the cleaner from the system. 10. Test the product water for post-cleaning pH and compare it to the pre-cleaning pH level. The values should be the same or very close to the pre-cleaning pH. If it is not, continue rinsing in the Dialyze position until equalization of the value occurs. 11. When all of the parameters (% Rejection, TDS, pH) have normalized, operate the RO for an additional 20 minutes in rinse mode. NOTE: Repeat the cleaning procedure with the other pH cleaner. GE Osmonics recommends using a low pH cleaner first, followed by a high pH cleaner after rinsing thoroughly. 12. Turn the F-801 RO unit OFF. 13. Close the product valve and then disconnect the clear accessory flush tubing from the product line (white QD / valve) and store properly. Reconnect the product line to its original connection and open the product valve. 14. Remove the “Do Not Use/Contains Cleaner” warning label. CAUTION: The F-801 RO unit must be disinfected after the cleaning procedure. 12552e – 27 Feb 04 4- 15 Routine Maintenance F-801 Internal RO System by GE Osmonics 4.3.2 BIOSAN Pre-Cleaning Preparation BIOSAN is a liquid cleaner/descaler agent intended for use in removing mineral scale and organic biofilm and is a short-term storage solution for RO water systems. WARNING: The solution is a mild irritant to eyes and skin. It is recommended that gloves (latex/vinyl) and eye protection be worn when handling BIOSAN. Neither respiratory protection nor special ventilation are required. CAUTION: BIOSAN is not intended for use in Hemodialysis Machines. NOTE: BIOSAN can be used as a low pH cleaner or as a short term (two weeks) storage solution. Materials Required: BIOSAN - GE Osmonics Part No. 14962 (1 Gal) • product water • Disinfect container with volume of 2 ½ gallon or more • pH test strips • product rinse line (extension hose) • “DO NOT USE” warning labels (not provided by GE Osmonics) • cleaning / disinfect log sheets • most current log sheets for water quality comparison • sterile gauze and tape 4.3.2.1 BIOSAN Cleaning Procedure Read and understand all BIOSAN cleaning instructions before beginning procedure. 1. Connect the water inlet line to the water supply, and the waste and product lines to drain. Turn the RO unit and water supply on. 2. Establish the pre-cleaning % rejection, pH and TDS readings and record them on the Cleaning/Disinfect Log Sheet. 3. Turn the RO OFF. 4. Close the product valve. Disconnect the product line (white QD) from inlet line of the Fresenius dialysis machine. Cover exposed inlet water line with sterile gauze and secure with tape. 5. Connect the product rinse line to the product line and direct to clean drain receptacle. Open the product valve. 12552e – 27 Feb 04 4- 16 Routine Maintenance F-801 Internal RO System by GE Osmonics 6. Prepare the cleaning solution by adding the amount of cleaner as specified on the labeling to two gallons of pretreated or RO product water. CAUTION: Water to be used must be chlorine free or damage to the RO membranes may result. 7. Turn the RO power switch off and close the product valve. WARNING: Label machine with appropriate warning signs such as "Do Not Use / Contains BIOSAN" to prevent use of the RO until it is properly rinsed. 8. Connect the product line to the white fitting on the disinfect/cleaning tank. Open the product valve. 9. Connect the feed line (green QD) from the pre-filter outlet to the green fitting on the disinfect tank. 10. Connect the drain line (red QD) extension and connect the female portion to the red fitting on the disinfect tank. CAUTION: By connecting all the lines to the disinfect/cleaning tank, the system is set-up for recirculation. Never leave the unit unattended in the recirculation mode. 4.3.2.2 BIOSAN Recirculation and Dwell Time 1. Rotate the Dialyze/Flush valve to the Dialyze position. This will allow the BIOSAN to pass from the rejection side of the membrane through to the product side of the membrane for total system exposure to the cleaning solution once the RO is turned on in disinfect mode (step #2). 2. Turn the F-801 RO unit ON. Let the RO operate for three minutes. CAUTION: Check that there is waste flow within 10 seconds. If not, turn RO OFF and verify that the disinfect line is connected properly. CAUTION: DO NOT ALLOW PUMP TO RUN DRY. Damage will occur if pump is run dry. CAUTION: Do not allow air or foam to be drawn up into the RO unit, as this will damage the pump. NOTE: BIOSAN will foam; this is normal. If using a closed container, provide a vent to the atmosphere to relieve pressure. 12552e – 27 Feb 04 4- 17 Routine Maintenance F-801 Internal RO System by GE Osmonics 3. Turn the Dialyze/Flush valve to the Flush position and operate RO for an additional 5-10 minutes. The Flush mode will allow the flow of cleaner only to the reject side of the RO membrane to flush particles away. Very little or no product water will be made. Pump pressure during this step should read approximately 40-80 PSI. CAUTION: Some pump noise (chattering) is normal in the flush position. Excessive pump noise (chattering) can be damaging to the pump. The RO is in “flush” from the full open (flush) position to just before the fully closed (operate) position. Adjust by partly closing the flush valve to reduce the chattering of the pump. NOTE: The % rejection will fall below 85% and the TDS will rise considerably when the cleaner is re-circulated through the F-801 RO unit. 4. Turn the F-801 RO unit OFF. WARNING: The F-801 RO machine in now completely filled with BIOSAN cleaning solution and must NOT be used to supply water to the Fresenius dialysis machine or for any other purpose until a complete rinse procedure has been performed. See Cleaner Rinse Procedure below. 5. Allow the BIOSAN to dwell in the RO for a minimum of one hour. NOTE: Thin-film RO membranes: The F-801 RO unit may be stored in BIOSAN for up to two weeks. 4.3.2.3 BIOSAN Post-Cleaning Rinse Procedure 1. After the dwell time, remove the waste hose and clear accessory flush line from the cleaning solution and place it in the drain with the appropriate air gap. 2. Turn the RO on and run cleaning solution to the drain until the container is empty. This aids in emptying the container of cleaning solution. CAUTION: DO NOT ALLOW THE PUMP TO RUN DRY. As an alternative, the solution may be poured in the drain. CAUTION: Do not allow air or foam to be drawn into the RO system, as this will damage the pump. 3. When the disinfect/cleaning tank is empty, turn the F-801 RO unit OFF. 4. Reconnect the feed line to the pre-filter outlet (green QD). 12552e – 27 Feb 04 4- 18 Routine Maintenance F-801 Internal RO System by GE Osmonics 5. Open the product valve. 6. Ensure that the water supply to the RO unit is on. If it is partially closed, rotate the dialyze/flush valve to the full flush position. 7. Turn ON the F-801 RO unit and operate in the flush mode for 5-10 minutes. This will aid in rinsing the system quickly. CAUTION: Some pump noise (chattering) is normal in the flush position. Excessive pump noise (chattering) can be damaging to the pump. The RO is in “flush” from the full open (flush) position to just before the fully closed (dialyze) position. Adjust it by partly closing the flush valve to reduce chattering of the pump. 8. Rotate the dialyze/flush valve to the dialyze position. 9. Turn the F-801 RO unit ON. Rinse for 20 minutes with the Dialyze/Flush valve in the Dialyze position until the % rejection and TDS monitors’ displays normalize (e.g. 'usual' % rejection and 'usual' TDS reading). Refer to your operating log for 'usual' readings and compare to the pre-cleaning values. A. During this rinse period, rotate the Dialyze/Flush valve to the Flush position briefly and then back to Dialyze three times to build-up and release pump pressure. This aids in flushing the cleaner from the system. 10. Test the product water for post-cleaning pH and compare it to the pre-cleaning pH level. The values should be the same or very close to the pre-cleaning pH. If it is not, continue rinsing in the Dialyze position until equalization of the value occurs. 11. When all of the parameters (% Rejection, TDS, pH) have normalized, operate the RO for an additional 20 minutes in rinse mode. 12. Turn the F-801 RO unit OFF. 13. Close the product valve and then disconnect the clear accessory flush tubing from the product line (white QD / valve) and store properly. Reconnect the product line to its original connection and open the product valve. 14. Remove the “Do Not Use/Contains BIOSAN” warning label. CAUTION: The F-801 RO unit must be disinfected after the cleaning procedure. 12552e – 27 Feb 04 4- 19 Routine Maintenance F-801 Internal RO System by GE Osmonics 4.4 F-801 Disinfection Indications DETERMINATION OF MICROBIAL CULTURING AND DISINFECTION FREQUENCY IS THE RESPONSIBILITY OF THE OPERATING FACILITY. The following is recommended for critical applications where bacteria and endotoxins are a major concern, such as for Hemodialysis. Disinfection should occur when bacterial growth is above the limits set by the facility, or when over 200 CFU/ml (maximum AAMI standard) is detected. Routine disinfection at lower CFU counts will inhibit colonization of bacteria in the system and the distribution plumbing. Rapid re-growth of bacteria following disinfection, or excessively high colony counts (i.e. TNTC), may indicate a need for more aggressive intervention. Strategies such as increased frequency of disinfection, longer dwell times, or alternative chemical agents may be employed. CAUTION: Glutaraldehyde and Actril™ are not recommended disinfectants for the F-801. 4.4.1 Formaldehyde Disinfection Preparation WARNING: Always wear rubber gloves, apron and facemask. Use proper ventilation during disinfection and rinse-out. A face respirator with an organic cartridge to remove formaldehyde fumes may be worn. DO NOT BREATHE FUMES OR ALLOW FORMALDEHYDE TO COME IN CONTACT WITH SKIN OR EYES. Refer to MSDS supplied by manufacturer of the formaldehyde or formalin product. WARNING: Label the machine with appropriate warning signs such as "Do Not Use / Contains Formaldehyde" to prevent use of the RO until it is properly rinsed. CAUTION: New replacement thin film membranes must be rinsed to drain with normal pressures for a minimum of six (6) hours before first exposure to formaldehyde, or irreversible damage may occur. No mandatory pre-rinse of the membranes is required for future disinfections. CAUTION: No sanitizing agent containing chlorine should be used to sanitize this system. Use of chlorine will damage membranes. 12552e – 27 Feb 04 4- 20 Routine Maintenance F-801 Internal RO System by GE Osmonics Materials Required: • 200 ml. Formaldehyde, 37% • 1 gallon pre treated or RO water • Disinfect container with volume of 2 ½ gallon or more • formaldehyde test kit • product rinse line (extension hose) • “DO NOT USE” warning labels or signs (not provided by GE Osmonics) • cleaning / disinfect log sheets • most current log sheets for water quality comparison • proper protective body wear • sterile gauze and tape 4.4.1.1 Formaldehyde Pre-Disinfection Procedure Read and understand all formaldehyde disinfection instructions before beginning procedure. 1. 2. Connect the water inlet line to the water supply, and the waste and product lines to drain. Close the product valve. Disconnect the product line (white QD) from inlet line of the Fresenius dialysis machine. Cover exposed inlet water line with sterile gauze and secure with tape. 3. Connect the product rinse line to the product line and connect the product line to the white fitting on the disinfect/cleaning tank. Open the product valve. 4. Connect the feed line (green QD) from the pre-filter outlet to the green fitting on the disinfect tank. 5. Connect the drain line (red QD) extension and connect the female portion to the red fitting on the disinfect tank. CAUTION: By connecting all the lines to the disinfect/cleaning tank, the system is set-up for recirculation. Never leave the unit unattended in the recirculation mode. NOTE: Follow your facility’s procedure for formaldehyde disposal. The drain line may have to be placed in a container. Verify that the operate/flush valve is in the OPERATE position. 12552e – 27 Feb 04 4- 21 Routine Maintenance F-801 Internal RO System by GE Osmonics CAUTION: Formaldehyde or Formalin is usually provided in a clinical setting in a 37% solution. Check the labeling on the packaging to make certain this is the case. If the solution is other than 37%, the dilution will require adjustment. The end solution should not exceed 2.2%. Consult the Medical Director or Director of Nursing to determine the correct solution strength. GE Osmonics will not be responsible for any damaged components due to incorrect solution strength. 4.4.1.2 Formaldehyde Disinfection and Dwell Time 1. Rotate the Dialyze/Flush valve to the Dialyze position. This will allow the formaldehyde to pass from the rejection side of the membrane through to the product side of the membrane for total system exposure to the cleaning solution once the RO is turned on in disinfect mode (step #2). 2. Turn the F-801 RO unit ON. Let the RO operate for 5-10 minutes. Product pressure during this step should read near zero. CAUTION: Check that there is waste flow within 10 seconds. If not, turn RO OFF and verify that the disinfect line is connected properly. CAUTION: DO NOT ALLOW PUMP TO RUN DRY. Damage will occur if pump is run dry. CAUTION: Do not allow air or foam to be drawn up into the RO unit, as this will damage the pump. 3. Before the disinfect reservoir is emptied, collect a 10mL sample of solution from the product rinse line to be tested for the presence of formaldehyde. This test should indicate the presence of formaldehyde. WARNING: Ensure the machine is labeled with appropriate warning signs such as "Do Not Use / Contains Formaldehyde" to prevent use of the RO until it is properly rinsed. 4. Turn off the F-801 RO and allow to dwell for 24 hours (4 hours minimum). NOTE: The RO may be stored for up to one year at this time. If this is the case, a 0.5% solution may be used instead of 2%. 12552e – 27 Feb 04 4- 22 Routine Maintenance F-801 Internal RO System by GE Osmonics 4.4.1.3 Formaldehyde Post-Disinfection Rinse Procedure 1. After the dwell time, remove the waste hose and clear accessory flush line from the disinfect solution and place it in the drain with the appropriate air gap. Connect the feed line to the pre-filter outlet. 2. Connect the feed line to the water supply. Ensure that the water supply to the RO unit is ON. If it is partially closed, rotate the dialyze/flush valve to the full flush position. 3. Turn ON the F-801 RO unit and operate in the flush mode for 2-3 minutes. This will aid in rinsing the system quickly. CAUTION: Some pump noise (chattering) is normal in the flush position. Excessive pump noise (chattering) can be damaging to the pump. The RO is in “flush” from the full open (flush) position to just before the fully closed (dialyze) position. Adjust it by partly closing the flush valve to reduce chattering of the pump. 3. Rotate the dialyze/flush valve to the dialyze position. 4. Turn the F-801 RO unit ON. Rinse for 20 minutes with the Dialyze/Flush valve in the Dialyze position until the % rejection and TDS monitors’ displays normalize (e.g. 'usual' % rejection and 'usual' TDS reading). Refer to your operating log for 'usual' readings and compare to the pre-cleaning values. A. During this rinse period, rotate the Dialyze/Flush valve to the Flush position briefly and then back to Dialyze three times to build-up and release pump pressure. This aids in flushing the cleaner from the system. 5. Test product water for formaldehyde with test kit. If the test is positive, continue to rinse until a negative test is obtained. 6. When test for formaldehyde is negative, turn the F-801 RO unit OFF. 7. Close the product valve and then disconnect the clear accessory flush tubing from the product line (white QD / valve) and store properly. Reconnect the product line to its original connection and open the product valve. 8. Remove the “Do Not Use/Contains Formaldehyde” warning label. 9. The F-801 Internal RO system is now ready for use. NOTE: Success of the disinfection procedure may be ascertained by taking a water culture after completion. See the Product Water Culture Procedure in this chapter. 12552e – 27 Feb 04 4- 23 Routine Maintenance F-801 Internal RO System by GE Osmonics 4.4.2 Peracetic Acid/Peroxide-Based Compounds (Renalin®) Disinfection Procedure Renalin®, Minncare™, Peracidin™ and others are trade names for compounds based on Peracetic Acid and Hydrogen Peroxide compounds, and are common in dialysis facilities. The products referred to in this procedure typically have 20% hydrogen peroxide and 4% peroxacetic acid before dilution. Other products are available with these same chemicals in different ratios; these are not acceptable for use in the F-801 RO. Actril™ and other compounds with different combinations of these chemicals must not be used on polyamide (thin-film) membranes. The name, “Renalin®” will be used in this manual to refer to acceptable products. WARNING: Follow all Material Safety Data Sheet (MSDS) precautions and OSHA Standards. CAUTION: New replacement thin film membranes must be rinsed to drain with normal pressures for a minimum of three (3) hours before first exposure to Renalin. No mandatory pre-rinse of the membranes is required for future disinfections. CAUTION: ‘RENALIN®’ is corrosive to most metals other than stainless steel. The F-801 RO uses only compatible materials. ‘RENALIN®’ type products contain oxidizing agents and are potentially damaging to thin film (polyamide) membranes. It is imperative that all the precautions and instructions are followed correctly. Failure to comply with these instructions, which incorporate instructions from the membrane manufacturer, will jeopardize the system performance and the warranty. CAUTION: No sanitizing agent containing chlorine should be used to sanitize this system. Use of chlorine will damage membranes. Materials Required: • • • • • • • • • • correct amount of disinfectant, per manufacturers’ instructions 1.5 gallons coldest RO water Disinfect container with volume of 2 ½ gallon or more product rinse line (extension hose) “DO NOT USE” warning labels or signs (not provided by GE Osmonics) cleaning / disinfect log sheets most current log sheets for water quality comparison sterile gauze and tape gross & residual disinfectant test strips proper protective body wear 12552e – 27 Feb 04 4- 24 Routine Maintenance F-801 Internal RO System by GE Osmonics 4.4.2.1Renalin® Pre-Disinfection Preparation CAUTION: When ‘RENALIN®’ is to be used as a disinfectant, several preparatory steps are required by GE Osmonics as well as the membrane manufacturer. Failure to comply with these instructions, which incorporate instructions from the membrane manufacturer, will jeopardize the system performance and warranty. a. The system must be free of all incompatible materials. b. Clean the membranes with an acid such as 0.1% HCl or 0.4% phosphoric acids. Calcium and Iron Cleaner may be used as an alternate. It is essential that all iron and other transition metals be removed from the membrane surface. CAUTION: The RO system must be disconnected from the tempered water source (if present). The solution temperature must be monitored closely. At temperatures above 25° the ‘RENALIN®’ solution becomes very aggressive towards the RO membranes and will damage them in a short period of time. The disinfection procedure will raise the temperature of the solution. The operator must be prepared to add RO ice to the solution or discontinue the procedure when the water temperature approaches 77ºF /25°C. NOTE: At a minimum, a low pH cleaning should be performed prior to disinfection. It is preferred that a low and high pH cleaning be done. 1. Read and understand the ‘RENALIN®’ disinfection procedure. Pay particular attention to steps a and b in CAUTION statement above before initiating the procedure. 2. Ensure the cleaning/disinfectant container is clean. Add 1-1/2 gallons (5.7 liters) of RO permeate (product water) to the container. 3. Add disinfectant concentrate per manufacturer’s recommendation to the container and mix to prepare a 1:100 (1%) dilution. WARNING: Label the machine with appropriate warning signs such as "Do Not Use/ Contains Disinfectant” to prevent use of the RO until properly rinsed. 4. Close the product valve. Disconnect the product line (white QD) from inlet line of the Fresenius dialysis machine. Cover exposed inlet water line with sterile gauze and secure with tape. 5. Connect the product rinse line to the product line and connect the product line to the white fitting on the disinfect/cleaning tank. Open the product valve. 12552e – 27 Feb 04 4- 25 Routine Maintenance F-801 Internal RO System by GE Osmonics 6. Connect the feed line (green QD) from the pre-filter outlet to the green fitting on the disinfect tank. 7. Connect the drain line (red QD) extension and connect the female portion to the red fitting on the disinfect tank. CAUTION: By connecting all the lines to the disinfect/cleaning tank, the system is set-up for recirculation. Never leave the unit unattended in the recirculation mode. 4.4.2.2Renalin® Disinfection and Dwell Time 1. Verify that the dialyze/flush valve is in the DIALYZE position. 2. Turn the RO ON and circulate the solution through the system for five minutes. After three minutes of circulation, test the product line for the presence of disinfectant. Test by performing the following steps. If test results are negative, continue circulating until a positive test is achieved. a. b. c. d. e. Close the product valve. Remove product line from tank. Hold line over sample container and slowly open the product valve. Test solution with a “gross” presence disinfectant test strip. If positive, close the product valve, return line to tank, and open product valve. WARNING: If a positive PRESENCE test result is not achieved, continue to recirculate for an additional 3-5 minutes, then perform presence test again. Recirculate and re-test as necessary until a positive test is obtained. CAUTION: Check that there is waste flow within 10 seconds. If not, turn RO OFF and verify that the disinfect line is connected properly. CAUTION: DO NOT ALLOW PUMP TO RUN DRY. Damage will occur if pump is run dry. CAUTION: Do not allow air or foam to be drawn up into the RO unit, as this will damage the pump. CAUTION: Do not allow the solution temperature to climb above 25°C during this step. Failure to control temperature will result in rapid deterioration of the membrane, resulting in poor rejection. 12552e – 27 Feb 04 4- 26 Routine Maintenance F-801 Internal RO System by GE Osmonics 3. Turn off the RO; do not operate the RO dry. CAUTION: Do not allow air to be drawn up into the RO unit as this will damage the pump. 4. Disconnect the drain line from the tank and re-attach the drain line extension. SECURE the drain line extension in the drain. Make sure the RED QD connector is fully joined and latched (listen for the ‘click’). 5. CLOSE the ‘Product Valve’. Disconnect the product line from the tank, and attach the product rinse line extension’ to the product line. The Product Valve should remain closed at this time. WARNING: Make sure the drain line is secured in the drain. Disinfectant will be flowing out of the drain line during this step. Turn the RO unit power switch ON and observe the disinfectant level in the tank. It will begin to empty to drain. Turn the power switch OFF when the disinfectant tank is almost empty. CAUTION: Do not allow air to be drawn up into the RO unit as this will damage the pump. 6. Disconnect the feed water line (green QD) from the disinfect tank, and disconnect the RO drain line extension (red QD). This closes the internal valves in the QD connectors, sealing the lines to prevent leakage of disinfectant. 7. Allow the RO to soak in the disinfecting solution for 36 minutes -12 hrs. Thirty-six minutes contact time is expected to result in 90% bacteria kill; 12 hours is expected to kill 99% of the bacteria. The minimum amount of soak to achieve disinfection is better for the membranes. CAUTION: Renalin may not be left in contact with RO membrane for longer than 12 hours or damage to the RO membrane will occur. Do not store the unit in an overly warm room such as a utility room with a water heater, or boiler room during dwell time. 8. Ensure that “Do Not Use / Contains Disinfectant” signs are displayed in appropriate places. CAUTION: The RO system is now filled with the disinfectant solution. THE USER MUST ENSURE THAT THE MACHINE IS NOT USED to provide water for any purpose whatsoever until the unit has been thoroughly rinsed and tested to verify absence of residual disinfectant in the product water stream. 12552e – 27 Feb 04 4- 27 Routine Maintenance F-801 Internal RO System by GE Osmonics 4.4.2.3Renalin® Post-Disinfection Rinse Procedure 1. After the dwell time, ensure that the drain line is in the drain with appropriate air gap, the feed line is connected to the pre-filter outlet, and that the clear accessory flush line is connected to the product line and placed in the drain receptacle with the appropriate air gap. 2. Open the product valve. 3. Connect the feed line to the water supply. Turn ON the water supply. CAUTION: Ensure that there is flow to drain. 4. Rotate the dialyze/flush valve to the flush position. 5. Turn the F-801 RO unit ON. Rinse for 20 minutes with the Dialyze/Flush valve in the Dialyze position until the % rejection and TDS monitors’ displays normalize (e.g. 'usual' % rejection and 'usual' TDS reading). Refer to your operating log for 'usual' readings and compare to the pre-cleaning values. A. During this rinse period, rotate the Dialyze/Flush valve to the Flush position briefly and then back to Dialyze three times to build-up and release pump pressure. This aids in flushing the cleaner from the system. 6. Test product water for disinfectant with test kit. If the test is positive, continue to rinse until a negative test is obtained. 7. When test for disinfectant is negative, turn the F-801 RO unit OFF. 8. Close the product valve and then disconnect the clear accessory flush tubing from the product line (white QD / valve) and store properly. Reconnect the product line to its original connection and open the product valve. 8. Remove the “Do Not Use/Contains Disinfectant” warning label. 9. The F-801 Internal RO system is now ready for use. NOTE: Success of the disinfection procedure may be ascertained by taking a water culture after completion. See the Product Water Culture Procedure in this chapter. 12552e – 27 Feb 04 4- 28 Routine Maintenance F-801 Internal RO System by GE Osmonics 4.5 Product Water Culture FREQUENCY: Once a month or more often, depending upon culture results, and unit protocol. We recommend before and after disinfection. Materials Required: • • Bucket or similar container Sterile specimen container, such as Millipore (red) or 3M Commercial Standard Plate count sampler, or a container your lab may require RATIONALE: This procedure will help ensure that the microbial count of the product (RO) water falls within the AAMI Hemodialysis Water Standard. The AAMI standard maximum allowable concentration for bacteria in product water is 200 colony-forming units. A bacterial count above the maximum level may be harmful to the hemodialysis patient. OTHER: Consult your lab to find out what type of sterile container to use and how much product (RO) water is required to perform the test. Make certain that your laboratory is informed of the correct procedure for performing a product water culture. A "spread plate method" NOT a "calibrated loop" technique should be used, with tryptic soy agar or equivalent agar, NOT blood or chocolate agar. If tested incorrectly, the results may be inaccurate. The sample should be assayed within 30 minutes of obtaining it, or refrigerated (5°C) immediately and assayed within a 24 hour period. Obtain the samples wearing long sleeves and a mask to prevent contamination of samples, use a “mid-stream” “clean catch” type procedure. 12552e – 27 Feb 04 4- 29 Routine Maintenance F-801 Internal RO System by GE Osmonics 4.5.1 Product Water Culture Procedure This procedure assumes the RO is connected to power and water, and is in operating condition. 1. Close the product valve and connect the extension hose to the product line. . Place the other end in a drain and open the product valve. 2. Turn on the RO unit. Allow the RO unit to run for 10-15 minutes. 3. Close the product valve on the product line and remove the extension hose. 4. Aseptically clean inside and outside of the product line quick disconnect fitting with three Betadyne swabs (optional). 5. Using aseptic technique, hold the product line over a container, and allow approximately 100 cc of product (RO) water to flow to the drain (or allow product water to flow for 30 seconds). 6. Maintaining aseptic technique, hold the product line over the sterile container with the product water flowing. 7. Fill the container with RO product water. (If using commercial samplers, follow the manufacturer's instructions.) 8. Aseptically cap the specimen container immediately. 9. Label the specimen appropriately with: • • • • • 10. Test to be performed - "culture / colony count" Sample source - product water/RO, machine serial number and room location Time and date sample obtained Person who obtained specimen Any other pertinent information or procedures your facility or lab requires The samples should be assayed within 30 minutes of obtaining or refrigerated at 5° C immediately and assayed within a 24-hour period. 12552e – 27 Feb 04 4- 30 Routine Maintenance F-801 Internal RO System by GE Osmonics 4.6 System Storage This storage procedure has been established to store F-801 RO machines. It is not recommended that a unit be dormant longer than 24 hours without disinfectant. ROs that have been left unused for more than 24 hours risk the possibility of colonizing bacteria and exceeding acceptable limits. ROs to be stored should first be disinfected with one of the procedures in this chapter. The RO should be stored in a location where it cannot freeze or become overly hot. CAUTION: ‘RENALIN®’ products (Renalin®, Minncare™, Peracidin™. etc.) are not acceptable solutions for storage of systems. Exposure of more than 12 hours to RENALIN® will result in irreversible damage to the membranes. 4.6.1 Formaldehyde Storage Procedure WARNING: Always wear rubber gloves, an apron and a facemask. If the room has ventilation, use it. If not, wear a face respirator with an organic cartridge to remove formaldehyde fumes. DO NOT BREATHE FUMES OR ALLOW FORMALDEHYDE TO COME IN CONTACT WITH SKIN OR EYES Refer to the MSDS supplied by the manufacturer of the formaldehyde/formalin product. 1. If formaldehyde is chosen to disinfect the RO, follow the instructions for formaldehyde disinfection. 2. Do not rinse out after the disinfectant has been circulated in the machine. 3. Disconnect the disinfect line, the feed water line, the waste line, power and the product line. 4. Coil the hoses and power cord, and cover the RO with a large plastic bag to protect the RO from dust. WARNING: After storage, the RO unit must be completely rinsed of formaldehyde, and a bacterial culture performed and interpreted before use. Perform AAMI analysis if it has been one year or more since last done. NOTE: All ROs can be safely stored in 0.5 to 2 % formaldehyde for up to one year. 12552e – 27 Feb 04 4- 31 Routine Maintenance F-801 Internal RO System by GE Osmonics 4.6.2 BIOSAN Storage Procedure WARNING: It is recommended that gloves (latex/vinyl) and eye protection be worn when handling BIOSAN. 1. Follow the BIOSAN procedure in this chapter. 2. Do not rinse the RO out after BIOSAN has been circulated in the RO. 3. Disconnect the disinfect line, waste line, feed water line, power and product line. 4. Coil the hoses and power cord, and cover the RO with a large plastic bag to protect the RO from dust. WARNING: After storage, the RO unit must be completely rinsed of BIOSAN, and a bacterial culture performed and interpreted before use. Disinfect RO unit if necessary. Perform AAMI analysis if it has been one year or more since last done. CAUTION: The F-801 RO may be stored for up to two weeks in BIOSAN. After two weeks, if longer storage is needed, the RO may be rinsed and re-packed with BIOSAN. 12552e – 27 Feb 04 4- 32 Routine Maintenance F-801 Internal RO System by GE Osmonics NOTES: 12552e – 27 Feb 04 4- 33 Routine Maintenance F-801 Internal RO System by GE Osmonics This page intentionally left blank. 12552e – 27 Feb 04 4- 34 Routine Maintenance F-801 Internal RO System by GE Osmonics F-801 Internal RO System CHAPTER FIVE: TROUBLESHOOTING 12552e - 27 Feb 04 5- 1 Troubleshooting F-801 Internal RO System by GE Osmonics This page intentionally left blank. 12552e - 27 Feb 04 5- 2 Troubleshooting F-801 Internal RO System by GE Osmonics Table of Contents SECTION TITLE PAGE 5.1 RO Fails to Run 5-5 5.2 RO Runs Intermittently 5-5 5.3 Motor Runs Hot 5-6 5.4 Low Pump Pressure 5-6 5.5 Pressure Gauge Vibrates Erratically 5-7 5.6 Excess Product Pressure (too high) 5-7 5.7 Product Flow Too Low 5-7 5.8 Product Flow Too High 5-8 5.9 Membrane Product Pressure too Low 5-9 5.10 Leaks 5-9 5.11 Low Percent Rejection 5-9 5.12 Rejection Display Fluctuates 5-10 5.13 TDS Value High 5-10 5.14 RO Fails to Draw Disinfectant 5-11 5.15 RO Pump Leaks 5-12 12552e - 27 Feb 04 5- 3 Troubleshooting F-801 Internal RO System by GE Osmonics This page intentionally left blank. 12552e - 27 Feb 04 5- 4 Troubleshooting F-801 Internal RO System by GE Osmonics 5.1 RO Fails to Run 1. a. b. c. d. Power off. Check position of power switch. Check power cord (plugged in). Check outlet and circuit breaker/fuse panel for power with voltmeter. Check fuses in RO monitor panel. 2. Improper line voltage. a. Verify that line and equipment voltages are compatible. b. Check to make sure that combination of RO and other equipment that may be plugged into the same outlet are not overloading the circuit. 3. Loose electrical connections. a. Check all wiring connections to verify solid connection. b. Verify that plug is securely connected to outlet. 4. c. d. Pump motor inoperative. Verify that voltage supply is correct and motor is wired for correct voltage. Correct as necessary. Motor thermal overload switch tripped (most motors have automatic internal reset). Motor will restart when it cools approximately 10-15 minutes. Correct reason for the overload. Remove pump head and try restarting motor. Replace motor. a. b. c. d. Pump inoperative. Inspect pump and motor coupling for wear. Clean any debris or liquid from connection area. Replace pump. See 5.4. a. b. 5. 5.2 1. RO Runs Intermittently Loose electrical connection. a. Verify that all wiring connections are secure. b. Verify that plug is securely connected to outlet. 2. a. b. c. d. 3. Pump pressure too high. Adjust pressure at pump head. Check waste flow-path for obstruction. See 5.1.4 See 5.1.5 Thermal overload trips a. Verify line voltage and motor amperage draw. b. Disassemble pump/motor at clamp and inspect coupler for wear. c. Pump pressure too high (see 5.2.2). 12552e - 27 Feb 04 5- 5 Troubleshooting F-801 Internal RO System by GE Osmonics 4. Pump inoperative a. Inspect pump and motor coupling for wear. b. Clean any debris or liquid from connection area. 5.3 Motor Runs Hot NOTE: Under normal conditions, the temperature of the motor may operate up to 40 C (104 F) above ambient (room) temperature. 1. a. b. c. d. e. Pump/motor binding. Remove pump head and try restarting motor. Inspect pump and motor coupling for wear. Clean any debris or liquid from connection area. See 5.4 Replace pump. a. b. c. d. Excessive current draw. Verify that flow rates and pressures are within RO specifications. Check motor/pump coupling for alignment. Confirm amperage draw with meter. Motor insulation shorted, replace motor. 2. 3. Voltage too low. a. Check voltage against serial label and motor label, correct condition. 5.4 1. Low Pump Pressure No pressure develops above level of feed pressure. Verify motor operation and water line connections. Verify flush valve is in the dialyze position. Verify (lower than normal) flow from product, if high see membrane problem. Verify (lower than normal) flow from waste, if high check flush valve operation. e. Pump damaged or worn out, replace pump. a. b. c. d. 2. A. B. C. D. Pressure develops but does not achieve normal operating pressure. Waste or product flow too high. a. Check water temperature and flow rate. b. Check quality of product water. Faulty inlet pressure regulator. a. Replace regulator. Pump adjusted improperly a. Adjust pump at pump head and regulator. Pump worn out or damaged. a. Replace pump. 12552e - 27 Feb 04 5- 6 Troubleshooting F-801 Internal RO System by GE Osmonics E. Flush valve is partly open a. Open and close valve and then measure and compare to original specifications. F. Pre-filter is plugged a. Replace pre-filter. 5.5 Pressure Gauge Vibrates Erratically 1. Air in gauge tubing. a. Loosen tube fitting at gauge to bleed air. 2. Obstruction in pressure gauge orifice. a. Remove obstruction. 3. Pump telegraphing (making noise) a. Inspect pump and motor coupling for wear. 4. Faulty gauge. a. Replace gauge. 5.6 Excess Product Pressure (too high) 1. Inlet pressure regulator improperly adjusted. a. Adjust pressure regulator to correct product setting. 2. Product flow rate too high. a. Decrease pump operating pressure if above specifications. b. Feed water temperature too high. Reduce temperature or discontinue use of RO to prevent damage to membranes. c. Damage or failure of membrane has occurred, replace membranes. 5.7 Product Flow Too Low Low water temperatures, fouled membrane elements, or inadequate pump pressure can cause low product flow. A partial blockage of the feed stream (dirty pre-filter) can also result in low product water flow by causing the pump to draw a strong vacuum. Similarly, an obstruction (defective check valve) in the product flow path may cause reduced flow. 1. Pump pressure too low. a. See 5.4 2. Low feed water temperature. a. Verify product production with Tech Note 121 Temperature Correction. b. Install or adjust temperature blending valve. 3. Membrane fouled or scaled. a. Review trend analysis logs for flow. b. Clean membrane with both high and low pH cleaners. c. If flow is not recoverable, replace membrane. 12552e - 27 Feb 04 5- 7 Troubleshooting F-801 Internal RO System by GE Osmonics 4. Center tube of ROMA collapsed from operating at high temperatures. a. Correct temperature problem. b. Replace membrane. 5. a. b. c. d. 6. 5.8 Check softener pretreatment for brackish (high salt) water. Check inlet water for high conductivity. Check water softener for proper function. Regenerate softener. Check supply water for hardness and conductivity. Feed water fouling membrane (change in feed water). a. Check for change in feed water quality. b. Check with city water department. Product Flow Too High 1. Rejection Satisfactory A. Pump pressure too high. a. Adjust pressure regulator setting to specifications. B. Feedwater temperature too high. a. Adjust temperature blending valve. b. Correct plumbing error that allows the cold water to be heated. 2. Rejection Unsatisfactory A. Waste flow too low. a. Check waste flow rate. b. Check for blockage or kink in waste line. c. Quick disconnect not connected completely. B. High pH and chlorines in feed water. a. Check feedwater for higher than 8.5 and the presence of chloramines. b. Check pH reduction equipment if applicable. c. Contact GE Osmonics. C. ROMA internal seals damaged, dirty, or dislodged. a. Disassemble ROMA, clean and inspect “O” rings and seals. D. Membrane hydrolyzed (exposed to oxidant). a. Verify condition of pretreatment equipment. E. Membrane damaged (or ruptured). a. Check for high product pressure. b. Check for product line being back pressured. F. Normal membrane rejection decline (over time). a. Perform AAMI water lab analysis. b. Replace membrane if indicated by analysis. 12552e - 27 Feb 04 5- 8 Troubleshooting F-801 Internal RO System by GE Osmonics 5.9 Membrane Product Pressure Too Low 1. Product flow rate below specifications for temperature and pressure. a. Clean or replace membrane. 2. Flow demand exceeds flow capacity of membrane. a. Correct condition demanding excessive flows. b. Increase temperature of feed water and/or pump pressure (within operating limits). Continuously monitor temperature. 5.10 Leaks 1. General information: Any leak from any part of the system should be corrected as soon as possible. Left unattended, leaks can cause secondary damage necessitating expensive repairs. 2. Refer to the Maintenance Procedures for Leak Repair. 5.11 Low Percent Rejection The overall membrane performance can be affected by a number of factors. Poor rejection performance, as well as high TDS, can result from fouled membranes, low pump pressure, inadequate waste flow, or feed water problems. An apparent performance problem could be caused by a defective sensor or circuit board, and not be a membrane issue at all. The recommended first step for any ‘membrane performance’ question is to confirm the rejection percentage and product TDS with a hand-held RO/TDS meter. If the product water quality is poor, investigate the membrane. However, if the water quality tests ‘normal’, investigate the monitoring circuits. 1. Disinfectant or cleaner left in RO unit. a. Check for presence of disinfectant or cleaner, rinse as necessary. 2. Waste flow too low. a. Pump not operating correctly, see 5.4. b. Check waste flow control. c. Check for obstruction or kink in waste line. 3. Pump pressure too low. a. Adjust pressure regulator. b. Adjust pump settings. c. Pump not operating correctly, see 5.4. 4. Product flow too high. a. See 5.8 5. Membrane scaled or fouled. a. Verify condition of pretreatment equipment. b. See membrane cleaning procedure in this manual. 12552e - 27 Feb 04 5- 9 Troubleshooting F-801 Internal RO System by GE Osmonics 6. Erroneous meter readout. a. Verify water quality with independent meter and check conductivity probe connection. b. Check all quick-disconnect connections. c. Replace inlet water sensor probe. d. Replace product water sensor probe (percent rejection). e. Replace monitor circuit board. 7. Membrane failure. a. Replace membrane. 8. Change in feed water TDS. a. Verify feed and product water quality with independent meter. b. Softener problem, rinsing out high levels of salt. 9. Normal membrane rejection decline (over time). a. Perform AAMI water lab analysis. b. Replace membrane if indicated by analysis. 5.12 1. Rejection Display Fluctuates Display cycles (fluctuates) up and down. a. Check for defective product recirculation check valve and replace if necessary. 5.13 TDS Value High The overall membrane performance can be affected by a number of factors. Poor rejection performance, as well as high TDS, can result from fouled membranes, low pump pressure, inadequate waste flow, or feed water problems. An apparent performance problem could be caused by a defective check valve, sensor or circuit board, and not be a membrane issue at all. The recommended first step for any ‘membrane performance’ question is to confirm the rejection percentage and product TDS with a hand-held RO/TDS meter. If the product water quality is poor, investigate the membrane. However, if the water quality tests ‘normal’, investigate the monitoring circuits. 1. 2. Disinfectant or cleaner left in RO unit. a. Check for presence of disinfectant or cleaner, rinse as necessary. Air bubble trapped on sensor probe. a. With RO operating, open and close the product valve to dislodge air. b. With RO operating, rotate the Dialyze/Flush valve back and forth to dislodge air. 3. Waste flow too low. a. Measure and compare to original data. Correct as necessary. 12552e - 27 Feb 04 5- 10 Troubleshooting F-801 Internal RO System by GE Osmonics 4. Waste pressure too low. a. Adjust pump settings. 5. Product flow too high. a. See 5.8 6. Membrane scaled or fouled. a. Verify condition of pretreatment equipment. b. See membrane cleaning procedure in this manual. 7. a. b. c. d. e. f. Erroneous meter readout. Verify water quality with independent meter. See 5.12.7 TDS water probe wire disconnected or loose. Replace TDS water sensor probe. Replace thermistor. Replace monitor circuit board. 8. Membrane failure. a. Replace membrane. 9. Change in feed water TDS. a. Verify feed and product water quality with independent meter. b. Communicate with municipal water plant. c. Softener problem, rinsing out high levels of salt. 10. Normal membrane rejection decline (over time). a. Perform AAMI water lab analysis. b. Replace membrane if indicated by analysis. 5.14 RO Fails to Draw Disinfectant 1. Pre-filter bowl leaking on vacuum. a. Tighten bowl b. Inspect and clean pre-filter bowl seal / replace seal. c. Replace filter bowl 2. Disinfect line kinked or plugged. a. Clear disinfect line. 3. Air leak on disinfect draw line. a. Check that quick disconnect fitting is connected securely. b. Check tube for cracks or holes. c. Replace quick disconnect fitting. 4. Motor fails to turn on. a. See 5.1 12552e - 27 Feb 04 5- 11 Troubleshooting F-801 Internal RO System by GE Osmonics 5.15 RO Pump Leaks 1. Tubing connection leaking. a. Tighten or reconnect tubing fitting. 2. Mechanical seal failure (leaks out vent hole). a. Replace pump. 12552e - 27 Feb 04 5- 12 Troubleshooting F-801 Internal RO System by GE Osmonics NOTES: 12552e - 27 Feb 04 5- 13 Troubleshooting F-801 Internal RO System by GE Osmonics This page intentionally left blank. 12552e - 27 Feb 04 5- 14 Troubleshooting F-801 Internal RO System by GE Osmonics F-801 Internal RO System CHAPTER SIX: DRAWINGS 12552e – 27 Feb 04 6-1 Drawings F-801 Internal RO System by GE Osmonics This page intentionally left blank. 12552e – 27 Feb 04 6-2 Drawings F-801 Internal RO System by GE Osmonics REMOTE MONITOR MODULE PANEL F-801 RO and Cart Assembly (Component Layout) 12552e – 27 Feb 04 6-3 Drawings F-801 Internal RO System by GE Osmonics PREFILTER CARBON TANK SHORT BACK PREFILTER CARBON TANK SOFTENER PREFILTER CARBON TANKS * A three tank option is available, please consult factory. F-801 RO (Typical Pretreatment Configurations) 12552e – 27 Feb 04 6-4 Drawings F-801 Internal RO System by GE Osmonics Assembly Instructions 1. Remove plugs from the tank head. 2. Install the input elbow, output nipple, and the sample valve in locations shown. Use Teflon tape and thread in approximately 3-5 turns. OUTPUT INPUT TANK HEAD 40480 SAMPLE VALVE 40291 OUTPUT NIPPLE 40268 INPUT ELBOW 40268A F-801 RO (GAC Tank Fitting Assembly) 12552e – 27 Feb 04 6-5 Drawings F-801 Internal RO System by GE Osmonics 40571 ELBOW ADAPTER 40564 DUAL PORT 12104 FEED WATER FITTING 40569 40572 PRODUCT WATER FITTING 40570 40599A 2.5" X 40" ROMA 12093 SINGLE PORT 12103 F-801 RO (ROMA Part Description) 12552e – 27 Feb 04 6-6 Drawings F-801 Internal RO System by GE Osmonics 60158 40704 40738 OUT IN *40095 *60370 *60240 *40605 *40095 F-801 RO (Pre-filter Assembly) 12552e – 27 Feb 04 6-7 Drawings F-801 Internal RO System by GE Osmonics MANIFOLD ASSEMBLY 14731 MOTOR 30014 PUMP ASSEMBLY 12168−1 INPUT ASSEMBLY 12285−1 F-801 RO (Plumbing Module, Main Components) 12552e – 27 Feb 04 6-8 Drawings F-801 Internal RO System by GE Osmonics 60360 30014 SEE DETAIL ’B’ 12285−1 (SEE DETAIL ’A’) 50003 12922 12168−1 40568 40569 1234489 40676 12131 50012 DETAIL ’A’ DETAIL ’B’ F-801 RO (Plumbing Module, Component Details) 12552e – 27 Feb 04 6-9 Drawings F-801 Internal RO System by GE Osmonics 40576 (2X) 40564 PART OF ITEM 40947 40947 40561 40948 PART OF ITEM 40948 F-801 RO (Plumbing Module, Component Details) 12552e – 27 Feb 04 6 - 10 Drawings F-801 Internal RO System by GE Osmonics 40564 40561 12922 40742 40677 14731 60002 60041 40569 41614 12130 50112 F-801 RO (Plumbing Module, Component Details) 12552e – 27 Feb 04 6 - 11 Drawings F-801 Internal RO System by GE Osmonics F-801 RO (Plumbing Module, Tubing) 12552e – 27 Feb 04 6 - 12 Drawings F-801 Internal RO System by GE Osmonics A (12") B (8") C (5 3/4") B (5 3/4") See Detail ’A’ on next sheet B (3 1/2") See Detail ’B’ on next sheet A (5") A (10") D (2") C (15 1/2") B (12 1/4") D (10") A (10") D (45") D (3 3/4") Item Letter A B C D LEGEND Description 3/8” Tubing, Translucent (Natural) 3/8” Tubing, White 1/4" Tubing, Translucent (Natural) 1/8” Tubing, White Part No. 60020 60032 60184 60298 F-801 RO (Plumbing Module, Tubing) 12552e – 27 Feb 04 6 - 13 Drawings F-801 Internal RO System by GE Osmonics 41036 40671 40254 40143 40077 40602 DETAIL ’A’ 40564 12288 DETAIL ’B’ F-801 RO (Plumbing Module, Component Details) 12552e – 27 Feb 04 6 - 14 Drawings F-801 Internal RO System by GE Osmonics 60307 12110 40332 40584 SEE DETAIL ’A’ 20178 40602 12131 12201 40570 60051 40569 40564 40571 40218 12131 PLUS SIDE DETAIL ’A’ Note: The ‘plus side’ of the check valve (p/n 40584) should face towards the small manifold (p/n 12201). F-801 RO (Manifold Assembly) 12552e – 27 Feb 04 6 - 15 Drawings F-801 Internal RO System by GE Osmonics 20177 12359 12329 12213 30026 12310 12324 12312 12315 F-801 RO (Monitor Module, Front Section) 12552e – 27 Feb 04 6 - 16 Drawings F-801 Internal RO System by GE Osmonics 12776 30010 FUSE INSIDE (20012) 60002 20203 60041 12311 F-801 RO (Monitor Module, Back Section) 12552e – 27 Feb 04 6 - 17 Drawings F-801 Internal RO System by GE Osmonics NOTE: ALL TUBING IS 3/8" I.D. BRAIDED HOSE UNLESS OTHERWISE NOTED. RO MEMBRANE PERMEATE TUBING (1/4" OD POLYETHYLENE TUBE) (65" LENGTH OF 60184) PREFILTER HOUSING ASSEMBLY (12197) ADAPTER, 3/8" HOSE TO 3/8" STEM (40672) GREEN MALE Q.D. (12886) GREEN FEMALE Q.D. (12734) RO PUMP DISCHARGE HOSE TO RO HOUSING INLET (12208) MEMBRANE HOUSING ASSEMBLY (12173) PREFILTER FEEDWATER HOSE (CONNECT TO CARBON TANK) (12388) FEED F−801 RO SYSTEM FEEDWATER HOSE RO MEMBRANE HOUSING F−801 RO SYSTEM FLUID CHASSIS (12174) SUPPORT SCREWS RO MEMBRANE WASTE HOSE (12374) PRODUCT WASTE PRODUCT−TO−USE HOSE 2 PIECE (12205) RED MALE Q.D. (12731) WHITE FEMALE Q.D. (40693) WHITE MALE Q.D. (40717) VALVE (40316) HOSE ADAPTER (40581) RED FEMALE Q.D. (12733) WASTE−TO−DRAIN HOSE 2 PIECE (12207) FLUSH HOSE (12393) WHITE FEMALE Q.D. (40762) F-801 RO (General Hose Connections) 12552e – 27 Feb 04 6 - 18 Drawings F-801 Internal RO System by GE Osmonics GREEN QUICK DISCONNECT RED QUICK DISCONNECT F−801 WATER SUPPLY HOSE. REMOVE FROM PREFILTER OUTLET PORT AND CONNECT TO DISINFECT TANK SUCTION PORT FITTING. F−801 WASTE−TO−DRAIN. DISCONNECT QUICK−CONNECT FITTING FROM REST OF HOSE, AND CONNECT TO DISINFECT F−801 PRODUCT−TO−USE HOSE. DISCONNECT QUICK−CONNECT FITTING FROM REST OF HOSE, AND CONNECT TO DISINFECT TANK. F-801 RO (Disinfect / Cleaning Connections) 12552e – 27 Feb 04 6 - 19 Drawings 12552e – 27 Feb 04 6 - 20 INPUT POWER 110/120 VAC, 60HZ FROM POWER CORD GREEN WHITE BLACK 10 A FUSE SLOW−BLOW RO PUMP POWER SWITCH PUMP MOTOR POWER SUPPLY F-801 Internal RO System by GE Osmonics F-801 RO (High Voltage Electrical, 60Hz) Drawings F-801 Internal RO System by GE Osmonics RED RED GREEN RED GREEN RED BLUE YELLOW GREEN F-801 RO (Low Voltage Electrical) 12552e – 27 Feb 04 6 - 21 Drawings WATER SUPPLY PREFILTER 12552e – 27 Feb 04 6 - 22 PRODUCT WATER QUALITY SENSOR (TDS) THERMISTOR EXCESS PRODUCT CHECK VALVE FEEDWATER SENSOR CARBON TANK STANDARD PRETREAT PRODUCT TO USE PRODUCT WATER QUALITY SENSOR (PERCENT REJECTION) PRESSURE REGULATOR PUMP PRESSURE GAUGE RO MEMBRANE HOUSING PRODUCT PRESSURE GAUGE RO PUMP WASTE FLUSH VALVE DRAIN FLUSH WASTE RESTRICTOR WASTE METERING ORIFICE F-801 Internal RO System by GE Osmonics F-801 RO (Plumbing Schematic) Drawings F-801 Internal RO System by GE Osmonics TOOLS REQUIRED: 1. FLAT BLADE SCREWDRIVER. 2. 3/4" WRENCH OR EQUIVALENT. 3. TOWEL. PROCEDURE: 1. TURN OFF POWER AND WATER TO UNIT. 2. OPEN FRONT COVER AND EXPOSE PUMPHEAD. 3. REMOVE ACORN NUT. NOTE: DO NOT LOSE WASHER. 4. USE SCREWDRIVER AND TURN SCREW AS SHOWN. CLOCKWISE TO INCREASE PRESSURE, COUNTER CLOCKWISE TO DECREASE PRESSURE. EACH 90° ROTATION WILL CHANGE PRESSURE ABOUT 25 PSI. 5. REPLACE WASHER (IF IT CAME OFF) AND ACORN NUT. 6. TURN ON WATER AND POWER AND THEN CHECK PRESSURE READING. REPEAT AS NECESSARY. PRESSURE ADJ. SCREW DECREASE WASHER INCREASE ACORN NUT PUMP F-801 RO (Pump Pressure Adjustment Procedure) 12552e – 27 Feb 04 6 - 23 Drawings F-801 Internal RO System by GE Osmonics “Push-In” Fitting Instructions 12552e – 27 Feb 04 6 - 24 Drawings F-801 Internal RO System by GE Osmonics NOTES: 12552e – 27 Feb 04 6 - 25 Drawings F-801 Internal RO System by GE Osmonics This page intentionally left blank. 12552e – 27 Feb 04 6 - 26 Drawings F-801 Internal RO System by GE Osmonics F-801 Internal RO System CHAPTER SEVEN: SPARE PARTS LIST 12552e – 27 Feb 04 7-1 Spare Parts List F-801 Internal RO System by GE Osmonics This page intentionally left blank. 12552e – 27 Feb 04 7-2 Spare Parts List F-801 Internal RO System by GE Osmonics F-801 Internal RO System SPARE PARTS LIST NOTE: Part Numbers are subject to change and should be verified when ordering spare parts. CATALOG NUMBER PARTS 12093 12103 12104 12106 12128 12130 12131 12163 12168-1 12173 12197 12211 12213 12285-1 12288 12310 12311 12312 12315 12318 12320 12331 12334 12337 12352 12355 12357 12359 12496 12497 12498 12499 12885 12888 12552e – 27 Feb 04 DESCRIPTION Housing for ROMA End cap, Waste End cap, Input / Product Retaining Pin Pre-filter Housing Assembly Flush Valve Bracket Sensor Probes, Total Dissolved Solids, Feed, Product Connector Rod Pump assembly ROMA, 40”, TF (complete assembly) Pre-filter assembly Disinfect tank assembly 8-32 Painted Screw Manifold assembly, Input Flow control orifice Printed Circuit Board, % Rejection Printed Circuit Board, Conductivity Printed Circuit Board, Display Power Supply, 115~ ROMA mounting strap ROMA / Monitor mounting bracket Stand, 2 tank Spacer, undercarriage Leg, Left Pre-treat strap, V-style Spacer, aluminum Leg, Right Lens, Red, for Display PCB Cabinet attaching kit Carbon tank fitting kit Hardware kit ROMA fitting kit Stand, 2 tank handle assembly Hose Kit (For all hose connections) 7-3 Spare Parts List F-801 Internal RO System by GE Osmonics CATALOG NUMBER PARTS (cont.) DESCRIPTION 12922 14398 14399 14665 14731 20012 20177 20178 20203 30010 30014 30026 40077 40080 40092 40093 40095 40165 40291 40332 40480 40571 40572 40584 40599A 40602 40676 40694 40696 40704 40741 40947 40948 41555 41614 50003 50012 50017 50041 60002 10-32 Painted Screw Pre-treat strap, A-style Pre-treat strap, B-style Manual, F-801 Internal RO System Manifold assembly, Main Fuse, 10 Amp, Slo Blow Lens cover, for LED Thermistor Switch, RO Pump Power Fuse Holder, Panel mount Motor, 1/3 HP, 110/230 V, 50/60 Hz Selector knob Tee, PVC, 1/4" fnpt Nipple, PVC, 3/8 x short O-ring, large O-ring, small Washer, rubber, for Female Garden Hose Fittings Pump, 100 GPH, SS, W/Regulator Sample Valve O-ring, for product recirculation check valve GAC tank head Lockclip, 3/8” SF Lockclip, 1/4" SF Product recirculation check valve Membrane, TF, 40” Reducer bushing, 1/4 mnpt x 1/8 fnpt Nipple, PVC, 1/4 mnpt x close O-ring, Pre-filter (9 7/8”) Filter, 5 Micron, 9 7/8" Pre-filter mounting bracket Gauge, 100 PSI, pre-filter Gauge, 100 PSI Gauge, 300 PSI Hose Clamp, 5/8” Valve, ball, 1/4 fnpt Clamp, Pump to Motor Rubber foot Caster, Dual Wheel Pump-to-Motor Coupling Clamp, strain, 3/4" 12552e – 27 Feb 04 7-4 Spare Parts List F-801 Internal RO System by GE Osmonics CATALOG NUMBER PARTS (cont.) DESCRIPTION 60041 60278 60307 60360 60369 1234489 Clamp, strain, 7/8” Grommet, 7/8x5/8x16GA Terminal, QD, 18-22GA, 1/4" tab female Motor mount Cotter Pin, for retaining pin Regulator, Product Pressure Adjustment FITTINGS 12612 12613 12731 12732 12734 12886 40143 40218 40254 40268 40268A 40561 40564 40568 40569 40570 40576 40605 40671 40672 40677 40693 40716 40717 40742 40743 41036 41083 41566 12552e – 27 Feb 04 Quick-disconnect (Male) for Disinfect container, Red Quick-disconnect (Male) for Disinfect container, Green Quick-disconnect (Male) for Waste hose, Red Quick-disconnect (Female) for Waste hose, Red Quick-disconnect (Female) for Feed hose, Green Quick-disconnect (Male) for Pre-filter outlet, Green Tee, 1/8” tube Elbow, 1/4" tube x 1/8 mnpt Straight, 1/8” tube x 1/8” mnpt Straight, Garden Hose Thread, male Elbow, Garden Hose Thread, male Union, speed-fit bulkhead, 3/8 Elbow, speed-fit, 3/8 x 3/8 stem Elbow, speed-fit, 3/8 x 3/8 mnpt, swivel Elbow, speed-fit, 3/8 x 1/4 mnpt, swivel Elbow, speed-fit, 1/4 x 1/4 mnpt, swivel Straight, 1/8” tube x fnpt Adapter, Garden Hose Thread x 3/8 barb Straight, speed-fit, 3/8 x 1/4 mnpt Adapter, speed-fit, 3/8 x 3/8 barb Union, speed-fit bulkhead, 1/4 Quick-disconnect (Female) for Product hose, White Quick-disconnect (Female) for Disinfect container, White Quick-disconnect (Male) for product hose, White Elbow, speed-fit, 1/4 x 1/4 stem Elbow, PVC, 3/8 fnpt Elbow, speed-fit union, 3/8 Straight, speed-fit, 3/8 x 1/4 fnpt Elbow, speed-fit, 1/4 x 3/8 stem 7-5 Spare Parts List F-801 Internal RO System by GE Osmonics CLEANERS 14962 1228653 1228791 Membrane Cleaner, BIOSAN, 1 gal., liquid Cleaner, LIQUICLEAN 103™,1gal., Low pH, liquid Cleaner, LIQUICLEAN 511™,1gal., High pH, liquid TESTS 11656 14604 50033 70001 Total Chlorine Test Kit Silt Density Index (SDI) Test Kit Hardness Test Kit Water Test Kit, AAMI Standards OPTIONAL 40695 40698 Filter, 1 Micron, 9 7/8" Filter, Carbon, 9 7/8" 12552e – 27 Feb 04 7-6 Spare Parts List F-801 Internal RO System by GE Osmonics NOTES: 12552e – 27 Feb 04 7-7 Spare Parts List F-801 Internal RO System by GE Osmonics This page intentionally left blank. 12552e – 27 Feb 04 7-8 Spare Parts List Call (253) 395-2200 for additional information, (800) 633-3080 in the U.S., or visit www.osmonics.com Corporate Headquarters 5951 Clearwater Drive Minnetonka, MN 55343-8995 USA (952) 933 2277 Phone (952) 933-0141 Fax Kent Operations 7848 South 202nd ST Kent, WA 98032-1345 USA (253) 395-2200 Phone (253) 395-2363 Fax