1
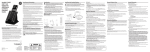
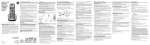
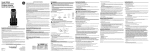
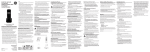
Quick Set-Up Guide
for Optional/
Additional
Model 28311
2 in 1 - Skype
Cordless Handset
Commission has prepared a helpful booklet, “How To Identify
and Resolve Radio/TV Interference Problems.” This booklet is
available from the U.S. Government Printing Office, Washington,
D.C. 20402. Please specify stock number 004-000-00345-4 when
ordering copies.
Notice: The changes or modifications not expressly approved by the
party responsible for compliance could void the user's authority to
operate the equipment.
Hearing Aid Compatibility
(HAC)
This telephone system meets FCC standards for Hearing Aid
Compatibility.
FCC RF Radiation Exposure
Statement
This equipment complies with FCC RF radiation exposure limits
set forth for an uncontrolled environment. This equipment
should be installed and operated with a minimum distance of 20
centimeters between the radiator and your body. This transmitter
must not be co-located or operated in conjunction with any other
antenna or transmitter.”
For body worn operation, this phone has been tested and meets
the FCC RF exposure guidelines when used with the belt clip
supplied with this product. Use of other accessories may not
ensure compliance with FCC RF exposure guidelines.
CAUTION:
RISK OF ELECTRIC SHOCK
DO NOT OPEN
WARNING: TO
PREVENT FIRE OR
ELECTRICAL SHOCK
HAZARD, DO NOT
EXPOSE THIS
PRODUCT TO RAIN
OR MOISTURE.
for use with Model 28310
2 in 1 - Skype Internet
& Standard Phone
Interference Information
This device complies with Part 15 of the FCC Rules. Operation is
subject to the following two conditions: (1) This device may not
cause harmful interference; and (2) This device must accept any
interference received, including interference that may cause
undesired operation.
This equipment has been tested and found to comply with the
limits for a Class B digital device, pursuant to Part 15 of the FCC
Rules. These limits are designed to provide reasonable protection
against harmful interference in a residential installation.
This equipment generates, uses, and can radiate radio
frequency energy and, if not installed and used in accordance
with the instructions, may cause harmful interference to
radio communications. However, there is no guarantee that
interference will not occur in a particular installation.
Privacy of Communications may not be ensured when using this
product.
If this equipment does cause harmful interference to radio or
television reception, which can be determined by turning the
equipment off and on, the user is encouraged to try to correct the
interference by one or more of the following measures:
•Reorient or relocate the receiving antenna (that is, the
antenna for radio or television that is “receiving” the
interference).
•Reorient or relocate and increase the separation between
the telecommunications equipment and receiving antenna.
•Connect the telecommunications equipment into an outlet
on a circuit different from that to which the receiving
antenna is connected.
If these measures do not eliminate the interference, please
consult your dealer or an experienced radio/television technician
for additional suggestions. Also, the Federal Communications
Model 28311
00019159 (Rev. 0 DOM E/S)
07-19
Printed in Malaysia
Thomson Inc.
10330 North Meridian Street
Indianapolis, IN 46290
© 2007 Thomson Inc.
Trademark(s) ® Registered
Marca(s) Registrada(s)
THE LIGHTNING
FLASH AND ARROW
HEAD WITHIN THE
TRIANGLE IS A
WARNING SIGN
ALERTING YOU OF
“DANGEROUS
VOLTAGE” INSIDE
THE PRODUCT.
CAUTION: TO REDUCE THE
RISK OF ELECTRIC SHOCK, DO
NOT REMOVE COVER (OR
BACK). NO USER
SERVICEABLE PARTS INSIDE.
REFER SERVICING TO
QUALIFIED SERVICE
PERSONNEL.
THE EXCLAMATION
POINT WITHIN THE
TRIANGLE IS A
WARNING SIGN
ALERTING YOU OF
IMPORTANT
INSTRUCTIONS
ACCOMPANYING
THE PRODUCT.
SEE MARKING ON BOTTOM / BACK OF PRODUCT
Introduction
CAUTION: When using telephone
equipment, there are basic safety
instructions that should always be
followed. Refer to the IMPORTANT
SAFETY INSTRUCTIONS provided with
this product and save them for future
reference.
IMPORTANT: Because cordless phones
operate on electricity, you should have at
least one phone in your home that isn’t
cordless, in case the power in your home
goes out.
If you have purchased an extra handset
apart from your original purchased unit
you may find a detailed description of its
functions in the User’s Guide provided with
your original purchased unit.
If you have purchased an extra handset
that is not of the same type as your
original handset you may still use the
original User’s Guide to help explain the
new handsets basic functions and options.
Installation
Your cordless phone uses a digital security system to
protect against false ringing, unauthorized access, and
charges to your phone line.
INSTALLATION NOTE: This product
operates at a frequency of 1.9GHz. to
provide communication with minimal
interference from other electronic devices.
To further minimize the possibility of
interference, the base of the cordless
telephone should not be placed near or
on top of a TV, microwave oven, or VCR. If
interference continues, move the cordless
telephone further away from these
appliances.
Important Installation
Guidelines
Handset Layout
earpiece
display
Navigational/
selection
(button)
LED alert
(indicator)
Left soft
(button)
Call/
Speaker
(button)
Belt
clip
2 AAA
Nickel-metal
Hydride batteries
a/A *
(button)
Space/zero
(button)
Handset
Selects the current menu item or confirms a
setting, depending on the current screen. LED light
indicator alerts to Voicemail Waiting and Skype
Authorization requests.
Right soft button
Cancels the last action or returns to the previous
screen, depending on the current screen.
Call/Speaker button
Initiates or answers a call. During a call, activates
speaker.
End/Skype status
When in a call, ends the call. From idle, provides
access to Skype status menu with a short press.
Navigational/Selection button
• Avoid sources of noise and heat, such as motors,
fluorescent lighting, microwave ovens, heating
appliances and direct sunlight.
• Avoid areas of excessive dust, moisture and low
temperature.
• Avoid other cordless telephones.
• Never install telephone wiring during a lightning storm.
• Never install telephone jacks in wet locations unless the
jack is specifically designed for wet locations.
• Never touch non-insulated telephone wires or
terminals, unless the telephone line has been
disconnected at the network interface.
• Use caution when installing or modifying telephone
lines.
Make sure your package includes the items shown here.
Battery
compartment
cover
Left soft button
Digital Security System
Parts Checklist
Charge Cradle
Button Descriptions
Press the outer ring to navigate up, down, left,
or right. Press the round button in the center to
select/confirm a setting.
Upper/Lower case and numeric button
Registration
YOU MUST REGISTER THE HANDSET BEFORE USE!
After the optional handset has charged for 16 hours;
Screen displays Press reset button on base and insert
handset in charger. Handset will automatically register
to base.
NOTE: Once a handset has completed
registration successfully, HANDSET X
shows on the handset’s display, X stands
for handset number, you can rename your
handset.
NOTE: The maximum number of handsets
which can be registered to the system is 4.
NOTE: The new handset will be
automatically UPDATED or DOWNGRADED
to the actual software version of the base.
Handset Name
This menu allows you to enter a name for the handset,
which displays on the top banner of the idle screen.
1. From the idle screen, press
to enter the main
menu.
When in text editor, changes to lower-case, uppercase, or numeric entry.
2. Press
and
to select Settings.
3. Press
and
to select Cordless settings.
Space and Zero button
4. Press
and
to select Handset name.
When in text editor, allows entry of a space, plus
sign, or zero.
5. Enter the handset name (up to 12 characters).
6. Press
to save your selection.
NOTE: If you make a mistake, use the
button to backspace and delete one
character at a time or press and hold to
delete all.
# button
When in text editor, it provides a symbol table.
NOTE: The handset display will turn off
after 60 seconds of inactivity to save
battery life. Lift from cradle to activate or
if handset was not on the charge cradle,
press the END button to toggle between
the Change Status and Idle Screen.
Installing the Handset
Battery
NOTE: You must install the handset
batteries before using the cordless
handset.
CAUTION: To reduce the risk of fire or
personal injury, use only the Thomson
Inc. approved model BYD NiMH H-AAA
900mAh 1.2V, rechargeable Nickelmetal Hydride AAA batteries, which are
Right soft
compatible with this unit.
(button)
1. Locate batteries and battery door which are packaged
together inside a plastic
bag and are separate
End/Skype
from the handset.
status
2. Locate the battery
(button)
compartment on the
back of the handset.
3. Insert the batteries.
4. Close the battery
compartment by
pushing the door up
until it snaps into place.
# (button) 5. Plug the AC power
adaptor of the charge
cradle into an electrical
outlet.
6. Place the handset in
the charge cradle. The
CHARGE indicator turns
on, verifying the battery is charging.
Allow handset to charge for 16 hours prior to first use.
If you do not properly charge the handset, battery
performance is compromised.
microphone
De-Registration
This feature allows you to remove a registered handset
from connection to base. During the de-registration
process, keep the handset near the base.
Use the Deregister function to deregister your handset
from a base station.
1. From the idle screen, press
to enter the main
menu.
2. Press
and
to select Settings.
3. Press
and
to select Cordless settings.
4. Press
and
to select Deregister handset.
WARNING: It is not recommended that a
handset be de-registered unless absolutely
necessary because once a handset is
de-registered, that handset’s telephone
features cannot be used until the handset is
re-registered.
5. Select NO, if you do not want to de-register.
6. If you select YES, then screen will display Your handset
is not registered to base station any more!.
Re-Register Your Handset
Use the Register function whenever you need to register
your handset with a base station, for instance when
registering the handset with a base station other than the
one you are already registered to.
1. From the idle screen, press
to enter the main
menu.
2. Press
and
to select Settings.
3. Press
and
to select Cordless settings.
4. Press
and
to select Register handset.
5. Screen displays Press reset button on base station and
insert hand-set in charger. Handset will automatically
register to base.
NOTE: To make registration possible, make
sure that the base station has registration
mode enabled. This is done by pressing
Reset on the back of the base station.
Intercom Operation
The intercom feature allows you to have a conversation
with another registered handset without tying up the
telephone line, allowing you to still receive incoming calls.
Making an Intercom Call
(Handset to Handset Intercom Call)
1. From the idle screen, press
menu.
2. Press
and
to enter the main
to select INTERCOM.
3. Press
and
to select from any available
registered handset or Internal Call to All. The receiving
handset(s) rings. Wait for the person at the receiving
handset to press
to connect the call.
NOTE: To cancel, press
handset.
on the sending
4. When finished, press
on either handset to
deactivate the intercom.
NOTE: The system is expandable up to 4
handsets (by purchase of optional Model
28311 handset with recharge cradle).
When 4 handsets are registered, the
system can handle 2 separate intercom
operations at once, for example, 1st
handset intercoms with 2nd handset while
3rd handset intercoms with 4th handset.
Receiving an Intercom Call
When you receive an intercom call, your handset rings
with the selected melody and the Handset ID of sending
phone shows in the display. To answer the call press�
.
Advanced Intercom
Features
Receiving an Incoming Call
During an Intercom Call
If you receive an external telephone call (landline or Skype)
during an intercom call, both parties on the intercom call
will receive a double beep in the earpiece. The handset
displays the Caller’s ID (if available) and Answer call?.
a) To ignore the incoming call, press
.
NOTE: If a 3rd handset is registered to the
system, the external call can be answered
by this handset and the intercom call can
continue at the same time.
b) To answer the call, press
. Selecting Yes will
connect your handset to the external call and will
place the intercom call on hold.
You may now switch between the intercom call and the
external call or conference the other handset to the
external call.
a) To switch between the external call and the
intercom call: Press
, (Swap calls). This puts the
external call on Hold. The external caller will hear
a double beep every 10 seconds to indicate they
are on Hold. You can return to the intercom call by
pressing�
again.
b) To conference the other handset to the external
call:
Press
, then p�����
ress
and
to select Join in
Conference.
c) To end the conference call, both handsets must
press
.
NOTE: The current status of each handset
shows at the top of the handset display.
i.e. Intercom, Landline Call, Skype Call or
Confererence Call as you progress through
the steps above.
Using Intercom w/External Phone
Calls
During a telephone call, you may use the intercom
function to page another handset and have an off line,
private (two-way) intercom conversation. You may also
have a three-way conversation between the external
caller and the handsets, or you may transfer the external
telephone call to another handset.
Two-Way Calling
1. During an external call, press
Hold.
2. Press
to select OPTIONS.
3. Press
and
to put the call on
to select Invite Handset.
4. Press
and
to select from any available
registered handset or Internal Call to All. The receiving
handset(s) is paged and emits a tone. Wait for the
person at the receiving handset to press
to
connect the call. Both intercom users may now speak
privately. The external caller will not hear the intercom
conversation.
5. When finished, press
on either handset to
deactivate the intercom. The originating handset
displays Landline Call and On Hold.
6. Press
to re-connect to the external call.
Three-Way Calling
Regular Method:
For use with 2 handsets and an external landline call
During a landline call with a handset, the other registered
handset(s) display Landline Busy. To have a second
handset join the call;
1. Press
.
Changing the Battery
CAUTION: To reduce the risk of fire or
personal injury, use only the Thomson
Inc. approved model BYD NiMH H-AAA
900mAh 1.2V, rechargeable Nickelmetal Hydride AAA batteries, which is
compatible with this unit.
1. Make sure handset is OFF (not in TALK mode) before
you replace battery.
2. Remove the battery compartment door.
3. Remove the batteries from the handset.
4. Insert the new batteries.
5. Put the battery compartment door back on.
6. Place handset in the base or handset charge cradle to
charge. Allow the handset battery to properly charge
(for 16 hours) prior to first use or when you install a
new battery pack. If you do not properly charge the
phone, battery performance will be compromised.
Battery Safety Precautions
• Do not burn, disassemble, mutilate, or puncture.
Batteries of this type could release toxic materials
which can cause injury.
• To reduce the risk of fire or personal injury, use only
the Nickel-metal Hydride battery listed in the User’s
Guide.
• Keep batteries out of the reach of children.
• Remove batteries if storing over 30 days.
NOTE: The RBRC seal on the battery used in your Thomson Inc. product
indicates that we are participating in a program to collect and recycle the
rechargeable battery (or batteries).
For more information go to the RBRC web site at www.rbrc.org
or call 1-800-8-BATTERY or contact a local recycling center.
2. P������
ress �
to connect. The original handset will hear a
beep to indicate another handset has joined the call.
NOTE: The above procedure will only work for
a Landline Call. For three way calling with an
external Skype call, use the “Invite Handset”
method.
“Invite Handset” Method:
For use with 2 handsets and a Skype Call or landline call
1. During an external call, press�
to put the call on
Hold.
2. Press
3. Press
to select OPTIONS.
and
to select Invite Handset.
4. Press
and
to select from any available
registered handset or Internal Call to All. The receiving
handset(s) is paged and emits a tone. Wait for the
person at the receiving handset to press
to
connect the call.
5. Press
on the originating handset to select
OPTIONS.
6. Press
and
to select Join in Conference.
7. To end conference call, both handsets must press
.
Transferring External Calls to Other
Handsets
1. Follow steps 1 - 6 for Three Way Calling Invite Handset
Method.
2. After conference is established, press
on
originating handset. External call is connected to the
second handset.
Service
— www.GE.com/phones —
If trouble is experienced with this equipment, for repair or
warranty information, please contact customer service at 1-800448-0329. If the equipment is causing harm to the telephone
network, the telephone company may request that you
disconnect the equipment until the problem is resolved.
This product may be serviced only by the manufacturer or
its authorized service agents. Changes or modifications not
expressly approved by Thomson Inc. could void the user’s
authority to operate this product. For instructions on how to
obtain service, refer to the warranty included in this guide or call
customer service at 1-800-448-0329.
Or refer inquiries to:
Thomson Inc.
Manager, Consumer Relations
P O Box 1976
Indianapolis, IN 46206
Attach your sales receipt to the booklet for future reference or
jot down the date this product was purchased or received as a
gift. This information will be valuable if service should be required
during the warranty period.
Purchase date _________________________________________
_______
Name of store _________________________________________
_______
Limited Warranty
What your warranty covers:
•Defects in materials or workmanship.
For how long after your purchase:
•One year, from date of purchase.
(The warranty period for rental units begins with the first
rental or 45 days from date of shipment to the rental firm,
whichever comes first.)
What we will do:
•Provide you with a new or, at our option, a refurbished unit.
The exchange unit is under warranty for the remainder of
the original product’s warranty period.
How you get service:
•Properly pack your unit. Include any cables, etc., which were
originally provided with the product. We recommend using
the original carton and packing materials.
•”Proof of purchase in the form of a bill of sale or receipted
invoice which is evidence that the product is within the
warranty period, must be presented to obtain warranty
service.” For rental firms, proof of first rental is also required.
Also print your name and address and a description of the
defect. Send via standard UPS or its equivalent to:
Thomson Inc.
11721 B Alameda Ave.
Socorro, Texas 79927
•Pay any charges billed to you by the Exchange Center for
service not covered by the warranty.
•Insure your shipment for loss or damage. Thomson Inc.
accepts no liability in case of damage or loss.
•A new or refurbished unit will be shipped to you freight
prepaid.
What your warranty does not cover:
•Customer instruction. (Your User’s Guide provides
information regarding operating instructions and user
controls. Any additional information, should be obtained
from your dealer.)
•Installation and setup service adjustments.
•Batteries.
•Damage from misuse or neglect.
•Products which have been modified or incorporated into
other products.
•Products purchased or serviced outside the USA.
•Acts of nature, such as but not limited to lightning damage.
Product Registration:
•Please complete and mail the Product Registration Card
packed with your unit. It will make it easier to contact you
should it ever be necessary. The return of the card is not
required for warranty coverage.
Limitation of Warranty:
•The warranty stated above is the only warranty applicable
to this product. All other warranties, express or implied
(including all implied warranties of merchantability or
fitness for a particular purpose) are hereby disclaimed.
No verbal or written information given by Thomson Inc.,
its agents, or employees shall create a guaranty or in any
way increase the scope of this warranty.
•Repair or replacement as provided under this warranty
is the exclusive remedy of the consumer. Thomson
Inc. shall not be liable for incidental or consequential
damages resulting from the use of this product or arising
out of any breach of any express or implied warranty
on this product. This disclaimer of warranties and
limited warranty are governed by the laws of the state
of Indiana. Except to the extent prohibited by applicable
law, any implied warranty of merchantability or fitness
for a particular purpose on this product is limited to the
applicable warranty period set forth above.
How state law relates to this warranty:
•Some states do not allow the exclusion nor limitation of
incidental or consequential damages, or limitations on how
long an implied warranty lasts so the above limitations or
exclusions may not apply to you.
•This warranty gives you specific legal rights, and you also
may have other rights that vary from state to state.
If you purchased your product outside the USA:
•This warranty does not apply. Contact your dealer for
warranty information.
Guía de instalación
rápida para el
Modelo 28311
2 en 1 - Auricular
Inalámbrico Skype
Opcional/Adicional
Si estas medidas no eliminan la interferencia, favor de consultar a
su distribuidor o a un técnico de radio/televisión experto por otras
sugerencias. También, la Comisión Federal de Comunicaciones (FCC)
ha preparado un folleto muy útil, “How To Identify and Resolve Radio/
TV Interference Problems” (“Como Identificar y Resolver Problemas
de Interferencia de Radio/Televisión”). Este folleto se puede obtener
del U.S. Goverment Printing Office, Washington, D.C. 20402. Favor de
especificar el número 004‑000‑00345‑4 cuando haga su pedido.
Aviso: Los cambios o las modificaciones no no expreso aprobados por
el partido responsable de conformidad podían anular la autoridad del
usuario para funcionar el equipo.
Compatibilidad con
Audífonos (CCA)
Se juzga que este teléfono es compatible con audífonos, en base a las
normas de la FCC.
Instalación
Descripciones de Botónes
Sistema Digital de Seguridad
Su teléfono inalámbrico usa un sistema de seguridad digital
para evitar el timbrado falso, el uso no autorizado y cargos a
su línea telefónica.
NOTA SOBRE LA INSTALACIÓN: Este producto
opera a una frecuencia de 1.9 GHz. para
suministrar comunicación con interferencia
mínima de otros dispositivos electrónicos. Para
adicionalmente minimizar la posibilidad de
interferencia, la base del teléfono inalámbrico
no deberá ser colocada cerca de o encima
de una TV, horno de microondas, o VCR. Si
la interferencia continúa, mueva el teléfono
inalámbrico más lejos de estos aparatos.
Declaración de la FCC sobre
Exposición a la Radiación RF Pautas Importantes de la
Este equipo cumple con los límites a la exposición de radiación
RF de la FCC establecidos para un ambiente no controlado. Este
equipo deberá ser instalado y operado a una distancia mínima de 20
centímetros entre el radiador y su cuerpo. Este transmisor no debe
de ser colocado u operado en conjunto con alguna otra antena o
transmisor”.
Para ser portado en el cuerpo, este teléfono ha sido probado y
cumple con los lineamientos de exposición a RF de la FCC cuando
se use con el clip para cinturón suministrado con este producto. El
uso de otros accesorios puede no asegurar el cumplimiento con los
lineamientos de exposición RF de la FCC.
ADVERTENCIA: PARA
PREVENIR
EL RIESGO DE
UNFUEGO O DE UNA
SACUDIDA
ELECTRICA, NO
EXPONGA
ESTE APARATO A LA
LLUVIA O A LA
HUMEDAD.
para uso con Modelo 28310
2 en 1 - Skype
Teléfono Estándar y de Internet
Información de
Interferencias
Este artefacto cumple con la Parte 15 de las Reglas de la FCC.
Su funcionamiento es sujeto a las dos condiciones siguientes: (l)
Este artefacto no puede causar interferencia dañosa, y (2) Este
artefacto debe aceptar cualquier interferencia recibida, incluyendo
interferencia que puede causar un funcionamiento no deseado.
Este equipo ha sido probado y cumple con los límites para un
artefacto digital de la Clase B, de conformidad con la Parte 15 de las
Reglas de la FCC. Estos límites han sido diseñados para proporcionar
una protección razonable contra una interferencia dañosa que pueda
existir en una instalación doméstica.
Este equipo genera, usa y puede radiar la energía de frecuencia
de una radio y, si no fuera instalado y usado de acuerdo con las
instrucciones, puede causar interferencia dañosa a las transmisiones
radiales. Sin embargo, no hay garantía que la interferencia no
ocurrirá en una instalación en particular.
La aislamiento de comunicaciones no puede ser asegurada al usar
este producto.
Si este equipo causa en efecto una interferencia dañosa a la
recepción de la radio o de la televisión, lo cual puede ser determinado
apagando y prendiendo el equipo, le animamos a Ud. de tratar de
corregir la interferencia por medio de una (o más) de las sugerencias
siguientes:
• Cambie la posición o la ubicación de la antena (quiere decir
la antena de la radio o de la televisión que está recibiendo la
interferencia).
•Cambie la posición o cambie la ubicación y aumente la distancia
entre el equipo de telecomunicaciones y la antena receptora de
la radio o de la televisión que está recibiendo la interferencia.
•Conecte el equipo de telecomunicaciones a una toma en un
circuito diferente del circuito al cual la antena receptora esté
conectada.
ATTENTION:
RIESGO DE SACUDIDA
ELÉCTRICA NO ABRA
EL RELÁMPAGO Y LA
PUNTA DE FLECHA
DENTRO DEL TRIÁNGULO
ES UNA SEÑAL DE
ADVERTENCIA,
ALERTÁNDOLE A UD. DE
QUE HAY "VOLTAJE
PELIGROSO" DENTRO DEL
PRODUCTO.
CUIDADO: PARA REDUCIR
EL RIESGO DE UNA SACUDIDA
ELÉCTRICA, NO QUITE LA
CUBIERTA (O PARTE
POSTERIOR) NO USE PARTES
DE REPUESTO DENTRO.
CONSULTE A ALGUNA
PERSONA CALIFICADA DEL
SERVICIO DE REPARACIONES.
EL SIGNO DE
EXCLAMACIÓN DENTRO
DEL TRIÁNGULO ES UNA
SEÑAL DE
ADVERTENCIA,
ALTERTÁNDOLE A UD. DE
QUE EL PRODUCTO, TRAE
INCLUCIDO,
INSTRUCTIONES MUY
IMPORTANTES.
VEA ADVERTENCIA EN LA PARTE POSTERIOR/BASE DEL PRODUCTO.
Modelo 28311
00019159 (Rev. 0 DOM E/S)
07-19
Impreso en Malaysia
Introducción
CUIDADO: Cuando utilice equipo
telefónico, hay instrucciones básicas de
seguridad que siempre deben seguirse.
Refiérase a la guía de INSTRUCCIONES DE
SEGURIDAD IMPORTANTES provista con
este producto y guárdela para referencia
futura..
IMPORTANTE: Como los teléfonos
inalámbricos operan con electricidad, usted
debe tener por lo menos un teléfono en su
casa que no sea inalámbrico, en caso de una
interrupción de corriente.
NOTE: Si usted ha comprado un auricular
extra aparte de la unidad original adquirida,
usted puede encontrar una descripción
detallada de sus funciones en la Guía del
Usuario suministrado con la unidad original
comprada.
Si usted compró un auricular extra que no
sea del mismo tipo que su auricular original
aún puede utilizar la Guía del Usuario original
para que le ayude a explicar las funciones
básicas y opciones de los nuevos auriculares.
(Estas opciones de auricular son accesadas
ya sea presionando el botón menú o el
directorio en el auricular.
Lista de Partes
Formato del Auricular
bocina
navegación/
selección
(botón)
El indicador
de luz LED le
alerta
Botón de
Función
Programable
Izquierda
a/A *
(botón)
Broche de
cinturón
espacio y
cero (botón)
2 AAA
los baterías de
Níquel- Hidruro
Metálico
Auricular
Selecciona el elemento del menú actual o
confirma una configuración, dependiendo de la
pantalla actual. El indicador de luz LED le alerta
de Correo de Voz en Espera y de Solicitudes de
Autorización Skype.
Tecla de Función Programable Derecha
Cancela la última acción o regresa a la pantalla
previa, dependiendo de la pantalla actual.
Botón Llamada/Bocina
Inicia o responde una llamada. Durante una
llamada, activa el altavoz.
Botón Terminaron /Estatus Skype
Durante una llamada, termina una llamada. Desde
el estado inactivo, suministra acceso al menú de
Skype con una breve presión.
Botón de navegación/selección
Presione el anillo exterior para navegar arriba,
abajo, a izquierda, o derecha. Presione el botón
redondo en el centro para seleccionar/confirmar
una selección.
Botón de letras mayúsculas/minúsculas y
números
¡UD. DEBE REGISTRAR AMBOS TELEFONOS CON LA BASE
PRINCIPAL ANTES DE USARLOS!
Después del auricular opcional ha cargado por 16 horas;
Se muestra en la pantalla Oprimir botón de reiniciar en
estación base y colocar microteléf. en cargador. El auricular
automáticamente registrará con la base.
NOTA: una vez que un auricular haya
terminado el registro exitosamente,
Microteléfono X se muestra en la pantalla del
auricular, X se refiere al número de auricular,
usted puede renombrar su auricular.
NOTA: el número máximo de auriculares que
pueden ser registrados en el sistema es de 4.
NOTA: el nuevo auricular será ACTUALIZADO
o DEGRADADO automáticamente a la versión
de software real de la base.
Nombre del Auricular
Este menú le permite ingresar un nombre para el auricular,
el cual se visualiza en el aviso superior de la pantalla
inactiva.
1. Desde la pantalla inactiva, presione
menu principal.
para entrar al
y
para seleccionar Ajustes.
3. Presione
y
inalámbricos.
para seleccionar Ajustes
Cuando está en el editor de texto, permite la
entrada de un espacio, del signo más, o del cero.
4. Presione
y
microteléfono.
para seleccionar Nombre
Botón #
5. Ingrese el nombre del auricular (hasta 12 caracteres).
Cuando está en el editor de texto, cambia a
minúsculas, mayúsculas, o entrada de números.
Botón Espacio y Cero
Cuando está en el editor de texto, suministra una
tabla de símbolos
NOTA: la pantalla del auricular se apagará
después de 60 segundos de inactividad
para ahorrar vida de la batería. Levante
el auricular de la base para activar o si el
auricular no estaba en la base de carga,
presione el botón END para alternar entre
el Cambiar Estatus y Pantalla Inactiva.
Instalar el Teléfono
pantalla
Llamada/
Bocina
(bóton)
Asegúrese de que su paquete incluye los artículos
mostrados aquí.
Puerta del
compartimento
de batería
• Evite fuentes de ruido y calor, como motores, hornos de
micro ondas, o lámparas de luz fluorescente, radiadores
eléctricos o luz de sol directa.
• Evite áreas con polvo, humedad excesiva o
temperaturas demasiado bajas.
• Evite colocar cerca de otros teléfonos o computadoras
personales.
• Nunca instale cableado telefónico durante una
tormenta de relámpagos.
• Nunca instale enchufes telefónicos en localizaciones
mojadas a menos que el enchufe haya sido diseñado
específicamente para localizaciones mojadas.
• Nunca toque cables o terminales no aislados, a menos
que la línea telefónica haya sido desconectada en la
interfaz de la red.
• Utilice precaución cuando instale o modifique líneas
telefónicas.
Base para carga del
auricular
Thomson Inc.
10330 North Meridian Street
Indianapolis, IN 46290
© 2007 Thomson Inc.
Trademark(s) ® Registered
Marca(s) Registrada(s)
Instalación
Tecla de Función Programable Izquierda
Registro
Instalar la Batería del Auricular
NOTA: Usted debe conectar la batería del
auricular antes de utilizar el aparato.
PRECAUCION: Para reducir el riesgo de
fuego o lastimaduras personales, use
solamente la batería de Níquel- Hidruro
Botón de
Metálico (Ni-MH) modelo H-AAA 900mAh
Función
1.2V, aprobado por Thomson Inc. eso es
Programable
compatible con esta unidad.
Derecha
1. Localice la puerta de la batería y la baterías que vienen
empacadas juntos dentro de una bolsa de plástico y están
separados del auricular.
Botón
2. Localice el compartimento
Terminaron
de las baterías en la parte
/Estatus
posterior del auricular.
Skype
3. Inserte las baterías.
4. Cierre el compartimento
de la batería empujando
la puerta hacia arriba
hasta que embone en su
lugar.
5. Conecte el adaptador de
la corriente eléctrica AC
#(botón)
dentro de la carga en un
enchufe eléctrico.
6. Coloque el auricular sobre
la base. El indicador de
carga se ilumina para
verificar que el aparato
está cargando.
micrófono
Deje que el teléfono se cargue durante 16 horas
antes de utilizarlo por primera vez. Si usted no carga
adecuadamente el teléfono, el funcionamiento de la
batería podría deteriorarse.
2. Presione
6. Presione
para guardar su selección.
NOTA: Si usted comete un error, use el botón
para retroceder y eliminar un caracter a la vez o
presione y sostenga para eliminarl os todo.
Para Cancelar el Registro
Esta característica le permite remover un auricular
registrado de la conexión con la base. Durante el proceso
de cancelación del registro, mantenga el auricular cerca
de la base.
Use la función Désenregistrer para quitar el registro al
auricular de una estación de base.
1. Desde la pantalla inactiva, presione
para entrar al
menu principal.
y
para seleccionar Ajustes.
3. Presione
y
inalámbricos.
para seleccionar Ajustes
4. Presione
y
microteléfono.
para seleccionar Dar baja
2. Presione
ADVERTENCIA: No es recomendable que se
cancele el registro de un auricular a menos
que sea absolutamente necesario porque
una vez que la cancelación ha sido llevada a
cabo, las funciones del teléfono no pueden
usarse hasta que el auricular vuelva a ser
registrado.
5. Seleccione NO si usted no quiere cancelar el registro.
6. Si usted selecciona SI, la pantalla le indica Su teléfono ya no
está registrado en la estación base.
Para Volver a Registrar su Auricular
Use la función Registrar cuando usted necesite volver a
registrar su auricular con su estación base o cuando registre
el auricular con una estación base distinta de aquella con la
que usted ya está registrado.
1. Desde la pantalla inactiva, presione
para entrar al
menu principal.
y
para seleccionar Ajustes.
3. Presione
y
inalámbricos.
para seleccionar Ajustes
4. Presione
y
microteléfono.
para seleccionar Registar
2. Presione
5. La pantalla le indica Oprimir botón de reiniciar en estación
base y colocar microteléf. en cargador. El auricular
automáticamente registrará con la base.
c) Para terminar la llamada de conferencia, ambos
auriculares deben presionar
.
NOTA: para hacer posible el registro,
asegúrese de que la estación base tenga
habilitado el modo de registro. Esto es
efectuado presionando Reset en la parte
posterior de la estación base.
Operación del Interfono
La función del interfono le permite tener una conversación
con otro auricular registrado sin ocupar la línea telefónica,
permitir que usted todavía reciba llamadas entrantes.
Para Hacer una Llamada desde
el Interfono
(Llamada de Intercomunicación de Auricular
a Auricular)
1. Desde la pantalla inactiva, presione
menu principal.
2. Presione
y
para entrar al
para seleccionar Intercomunic.
3. Presione
y
para seleccionar de alguno de los
auriculares registrados disponibles o Llam. interna a
todos.... Los timbres de auricular(es) receptor(es). Espere a
que la persona en el auricular receptor presione
para
conectar la llamada.
NOTA: Para cancelar el localizador, oprima el
botón
en el auricular que llama.
4. Para cancelar, presione el botón
en cualquier
auricular para desactivar el interfono.
NOTA: El sistema es expandible hasta a 4
teléfonos (comprando el teléfono opcional
Modelo 28311 con base para recarga. Cuando
4 auriculares están registrados, el sistema
puede manejar a la vez 2 operaciones
de intercomunicación por separado, por
ejemplo, el 1er. auricular se intercomunica
con el 2o. auricular mientras que el 3er.
auricular se intercomunica con el 4o.
auricular.
Para Recibir una Llamada del
Interfono
NOTA: el estado actual de cada auricular se
muestra en la parte superior de la pantalla
del auricular: ejemplo, Intercomunicación,
Llamada de Línea Terrestre, Llamada de
Skype o Llamada de Conferencia, conforme
usted progrese a través de los pasos
anteriores.
Para Utilizar el Interfono con
Llamadas Telefónicas Externas
Durante una llamada de interfono, usted puede utilizar la
función del interfono para localizar otro auricular y tener
una conversación privada de dos personas, fuera de la
línea. Usted puede también tener una conversación de
tres personas entre la llamada externa y los auriculares, o
usted puede transferir la llamada telefónica externa a otro
auricular.
Conversación Entre Dos
Personas
1. Durante una llamada externa, presione
en espera la llamada.
2. Presione
3. Presione
para poner
para seleccionar Opciones.
para seleccionar Invitar microteléfono.
y
4. Presione
y
para seleccionar de alguno de los
auriculares registrados disponibles o Llam. interna a
todos.... Los timbres de auricular(es) receptor(es). Espere a
que la persona en el auricular receptor presione
para
conectar la llamada. Ambos usuarios del interfono pueden
hablar en privado. La persona en la llamada externa
no escuchará la conversación entre las personas en el
interfono.
5. Para cancelar, presione el botón
en cualquier
auricular para desactivar el interfono. El auricular de
origen muestra Llam. línea terrestrel y En Espera.
6. Presione
externa.
para volver a conectar con la llamada
Cuando usted reciba una llamada de intercomunicación,
su auricular timbra con la melodía seleccionada y la ID de
Auricular del teléfono emisor se muestra en la pantalla. Para
responder la llamada presione
.
Conversación Entre Tres
Personas
Funciones Avanzadas del
Interfono
Para uso con 2 auriculares y una llamada de línea terrestre
externa
Para Recibir una Llamada
Entrante Durante una
Conversación en el Interfono
Si usted recibe una llamada de un teléfono externo (línea
terrestre o Skype) durante una llamada de intercomunicación,
ambas partes en la llamada de intercomunicación recibirán
y escucharán un doble bip. El auricular muestra la ID del que
llama (si está disponible) y ¿Responder llamada?.
a) Para ignorar la llamada entrante, presione
.
NOTA: si un 3er. auricular está registrado
en el sistema, la llamada externa puede ser
respondida por este auricular y la llamada de
intercomunicación puede continuar al mismo ti.
b) Para responder la llamada, presione
. Seleccionar Si
conectará su auricular a la llamada externa y colocará la
llamada de intercomunicación en retención.
Usted puede ahora alternar entre la llamada de
intercomunicación y la llamada externa o conferenciar con el
otro auricular en la llamada externa.
a) Para alternar entre la llamada externa y la llamada
de intercomunicación: presione
, (intercambio de
llamadas). Esto coloca la llamada externa en retención.
La persona externa que llama escuchará un doble bip
cada 10 segundos para indicar que está en retención.
Usted puede regresar a la llamada de intercomunicación
presionando�
otra vez.
b) Para conferenciar con el otro auricular en la llamada
externa:
Presione
, luego presione �
y
para seleccione
Partic. en conferencia.
Método Regular:
Durante la llamada de línea terrestre con un auricular, otro(s)
auricular(es) registrado(s) muestra(n) Línea terrestre está
ocupada. Para que un segundo auricular se una a la llamada;
1. Presione
.
2.����������
Presione �
para conectar. El auricular original
escuchará un bip para indicar que otro auricular se ha
unido a la llamada.
NOTA: El procedimiento anterior funcionará
solamente para una Llamada de Línea
Terrestre. Para una llamada de tres vías con una
llamada Skype externa, use el método “Invitar
Microteléfono”.
“Invitar Microteléfono” Método:
Para uso con 2 auriculares y una Llamada Skype o llamada
de línea terrestre
1. Durante una llamada externa, presione
en espera la llamada.
2. Presione
para seleccionar Opciones.
3. Presione
y
para poner
para seleccionar Invitar microteléfono.
4. Presione
y
para seleccionar de alguno de los
auriculares registrados disponibles o Llam. interna a
todos.... Los timbres de auricular(es) receptor(es). Espere a
que la persona en el auricular receptor presione
para
conectar la llamada.
5. Presione
en el auricular de origen para seleccionar
Opciones.
6. Presione
y
para seleccionar Partic. en
conferencia.
7. Para a terminar la llamada de conferencia, ambos
auriculares deben presionar
.
Para Transferir Llamadas Externas
a Otros Auriculares
1. Siga los pasos 1 - 6 para el Conversación De Tres Personas
Invitar Microtelefono Método
2. Después de que la conferencia sea establecida, presione
en el auricular de origen. La llamada externa es
conectada al segundo auricular.
Cómo Cambiar la Batería
PRECAUCION: Para reducir el riesgo de
fuego o lastimaduras personales, use
solamente la batería de Níquel- Hidruro
Metálico (Ni-MH) modelo H-AAA 900mAh
1.2V, aprobado por Thomson Inc. eso es
compatible con esta unidad.
1. Asegúrese de que el teléfono esté desactivado OFF (no en
el modo hablar) antes de cambiar la batería.
2. Quite la tapa del compartimiento de la batería.
3. Quite las baterías del auricular.
4. Inserte las baterías nueva.
5. Vuelva a poner la tapa del compartimiento de la batería.
6. Coloque el auricular sobre la base. Deje que el teléfono se
cargue durante 16 horas antes de utilizarlo por primera
vez. Si usted no carga adecuadamente el teléfono, el
funcionamiento de la batería podría deteriorarse.
Precauciones de Seguridad
para la Batería
• No queme, desarme, mutile, o agujere. Igual que otras
baterías de este tipo, materiales tóxicos pueden escaparse
y causarle daño.
• Para reducir el riesgo de fuego o daño personal, use
unicamente la batería del Níquel-Cadmio indicada en la
Guía del Usuario.
• Mantenga las baterías fuera del alcance de los niños.
• Quite las baterías si va a guardar el aparato durante más
de 30 días.
NOTA: El sello RBRC en la batería utilizada en su producto Thomson Inc.
indica que estamos participando en un programa para recolectar y
reciclar batería(s) recargable(s).
Para más información vaya al sitio web de RBRC en www.rbrc.org o llame
al 1-800-8-BATTERY o contacte a su centro de reciclado local.
Cómo Obtener Servicios
de Mantenimiento
— www.GE.com/phones —
Si usted experimenta problemas con este equipo, para reparaciones
o para información de garantía, comuníquese con el departamento
de servicio al cliente al 1-800-448-0329. Si el equipo está causando
daños a la red telefónica, la compañía telefónica puede pedirle que
desconecte su equipo hasta que el problema haya sido resuelto.
Este producto puede únicamente ser reparado por el fabricante o sus
agentes de reparación autorizados. Cualquier cambio o modificación
no aprobados expresamente por Thomson Inc. podría ser motivo de
anulación de la autoridad del usuario para operar este producto. Para
recibir instrucciones sobre cómo obtener servicios de mantenimiento,
por favor consulte la garantía incluida en esta Guía, o llame a
Información para el Usuario, 1-800-448-0329.
O envíe sus preguntas a:
Thomson Inc.
Gerente, Servicio al Consumidor
P.O. Box 1976
Indianápolis, IN 46206
Adjunte su recibo al folleto, para futura referencia, o anote la fecha
en la que se compró o recibió este producto como regalo. Esta
información será valiosa si se llegase a requerir durante el período
de garantía.
Fecha de compra___________________________________________
Nombre de la tienda________________________________________
Garantía Limitada
Lo que cubre su garantía:
• Defectos de materiales o de trabajo.
Por cuánto tiempo después de la compra:
• Un año, a partir de la fecha de compra.
(El periodo de garantía para unidades arrendadas se
inicia con la primera renta o 45 días de la fecha del
embarque a la firma de arrendamiento, lo que ocurra
primero).
Lo que haremos:
• Proporcionarle una unidad nueva o, a nuestra opción, una
reacondicionada. La unidad de intercambio quedará bajo
garantía por el resto del periodo de garantía del producto
original.
Cómo obtener servicio:
• Empaque bien la unidad, incluyendo todos los cables, etc.,
que originalmente venían con el producto. Se recomienda
usar el cartón y materiales de empaque originales.
• “Prueba de compra como factura o recibo de compra,
que ofrezca evidencia de que el producto está dentro
del periodo de garantía, debe ser presentado para
obtener servicio bajo garantía.” Para compañías de
arrendamiento, se requiere como evidencia el primer
contrato de renta. También escriba claramente su
nombre, dirección y la descripción del defecto. Mande vía
UPS o un servicio de paquetería equivalente a:
Thomson Inc.
11721 B Alameda Ave.
Socorro, Texas 79927
• Pague cualquier cargo que le facture el Centro de
Intercambio por servicio que no esté cubierto por
garantía.
• Asegure su empaque para prevenir pérdida o daño.
Thomson Inc. no acepta responsabilidad en caso de
pérdida o daño.
• Un aparato nuevo o uno remozado se le enviará con los
cargos pagados.
Lo que no cubre la garantía:
• Instrucciones al cliente. (Su manual de propietario
le proporciona la información con respecto a las
instrucciones de operación y los controles del usuario.
Cualquier información adicional debe obtenerse con su
agente de ventas.
• Ajustes de instalación y de preparación del servicio.
• Baterías.
• Daño por mal uso o negligencia.
• Productos que han sido modificados o incorporados a
otros productos.
• Productos comprados o que han recibido servicio fuera
de los Estados Unidos.
• Desastres naturales, por ejemplo y sin limitarse a ellos,
daños por relámpagos.
Registro del Producto:
• Por favor llene y envíe por correo la Tarjeta de Registro
del Producto que se embarcó con su producto. Hará más
fácil que hagamos contacto con usted si fuera necesario.
No se requiere la devolución de la tarjeta para tener la
cobertura de la garantía.
Limitaciones sobre la Garantía:
• La garantía especificada anteriormentes es la única
garantía aplicable a este producto. Cualquier otra
garantía, expresa o implícata (incluyendo todas las
garantías implícitas de mercado o de salud para
cualquier propósito) son considerdas no validas.
Ninguna informacieon verbal o escrita otorgado
por Thomson Inc., sus agentes, o empleados será
considerada para crear una garantía ni para aumentar
bajo ninguna circunstancia la cobertura de esta
garantía.
• La reparación o reemplazo de un producto como se
especifica bajo esta garantía es el remedio exlusivo
del consumidor. Thomson Inc. no se hace responsible
por daños incidentales, daños derivados como
consecuencia del uso este producto, o como resultado
del incumplimeinto de cualquier garantía implícita o
expresa de este producto. La invalidez de las garantías
o las garantías limitadas están reglamentadas por las
leyes del estado de Indiana. Excepto por el alcance
establecido por las leyes aplicables cualquier garnatía
implícita de mercado o de salud para cualquier
proposito, en este producto es limitada al período de
garantía especificado anteriormente.
Cómo se Relaciona la Ley Estatal a esta Garantía:
• Algunos estados no permiten la exclusión ni limitación
de daño incidental o derivado de alguna consecuencia,
o la limitación con respecto al período de tiempo que
debe aplicarse para garantías implícitas, por lo tanto las
limitaciones y exclusiones mencionadas anteriormente
pueden no ser aplicables para usted.
• Esta garantía le ofrece derechos legales específicos, y
usted puede tener otros derechos legales que varían de
estado a estado.
Si compró su producto fuera de los Estados Unidos:
•Esta garantía no se aplica. Vea a su distribuidor para
información sobre la garantía.