1
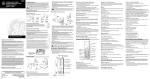
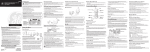
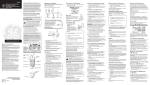
26929
40-Channel 900Mhz Caller ID with
Call Waiting Cordless Telephone
User's Guide
INTRODUCTION
INSTALLATION
Your Caller ID phone stores and displays specific
information, provided by your local telephone company, to
subscribers of Caller ID or similar caller identification
services. You must subscribe to one of these services in
order to use this unit.
DESKTOP INSTALLATION
NOTE: For desktop charging only, the handset is able
to charge facing up or down.
Your Caller ID phone enables you to:
• Identify callers before you answer the phone.
5
• View the time and date of each incoming call.
• Record up to 40 Caller ID messages sequentially.
1
2
• Know who called while you were away.
IMPORTANT: Because cordless phones operate on
electricity, you should have at least one phone in your
home that isn’t cordless, in case the power in your
home goes out.
CAUTION: When using telephone equipment,
there are basic safety instructions that should
always be followed. Refer to the IMPORTANT
SAFETY INSTRUCTIONS provided with this
product and save them for future reference.
CAUTION:
RISK OF ELECTRIC SHOCK
DO NOT OPEN
WARNING: TO PREVENT FIRE OR
ELECTRICAL SHOCK HAZARD, DO
NOT EXPOSE THIS PRODUCT TO
RAIN OR MOISTURE.
THE LIGHTNING FLASH
AND ARROW HEAD
WITHIN THE TRIANGLE
IS A WARNING SIGN
ALERTING YOU OF
“DANGEROUS
VOLTAGE” INSIDE THE
PRODUCT.
CAUTION: TO REDUCE THE RISK OF
ELECTRIC SHOCK, DO NOT REMOVE
COVER (OR BACK). NO USER
SERVICEABLE PARTS INSIDE. REFER
SERVICING TO QUALIFIED SERVICE
PERSONNEL.
THE EXCLAMATION
POINT WITHIN THE
TRIANGLE IS A
WARNING SIGN
ALERTING YOU OF
IMPORTANT
INSTRUCTIONS
ACCOMPANYING THE
PRODUCT.
NOTICE: The Industry Canada label identifies certified equipment. This
certification means that the equipment meets certain telecommunications
network protective, operational and safety requirements. The Industry Canada
does not guarantee the equipment will operate to the user’s satisfaction.
NOTE : The phone automatically defaults to touchtone dialing. To change to pulse (rotary) dialing, see
“Tone/Pulse Dialing.” If you don’t know which type of
service you have, check with the phone company.
4
1. Place the handset in the base.
3. Plug the power supply cord into an AC outlet. The
CHARGE/IN USE indicator comes on indicating that the
battery is charging.
Make sure your package includes the items shown here.
Before installing this equipment, users should ensure that it is permissible to
be connected to the facilities of the local telecommunications company. The
equipment must also be installed using an acceptable method of connection.
The customer should be aware that compliance with the above conditions
may not prevent degradation of service in some situations.
PM
REPT
CALL
#
4. After charging, connect the telephone line cord to the
wall jack.
TALK
button
10:28 10/20
PM
REPT
CALL
#
03
3175551234
FRED PAGE
VOLUME
button
5. Set the RINGER switch on the handset to ON.
TALK
TONE
button
CALL BACK/
REDIAL button
VOLUME
ABC
2
DEF
3
4
JKL
5
MNO
6
7
TUV
8
WXYZ
9
OPER
0
PQRS
TONE
*
CAUTION: Users should not attempt to make such connections themselves,
but should contact the appropriate electric inspection authority, or electrician,
as appropriate.
NOTES: This equipment may not be used on coin service provided by the
telephone company.
Party lines are subject to telephone company tariffs and, therefore, you may
not be able to use your own telephone equipment if you are on a party line.
Check with your local telephone company.
INTERFERENCE INFORMATION
This equipment generates and uses radio frequency energy which may
interfere with residential radio and television reception if not properly
installed and used in accordance with instructions contained in this manual.
Reasonable protection against such interference is ensured, although there is
no guarantee this will not occur in a given installation. If interference is
suspected and verified by switching this equipment on and off, the user is
encouraged to try to correct the interference by one or more of the following
measures: Reorient the radio/television receiver’s antenna, relocate the
equipment with respect to the receiver, plug the equipment and receiver into
separate circuit outlets. The user may also wish to consult a qualified radio/
television technician for additional suggestions. This equipment has been
fully tested and complies with all limits for Class B computing devices
pursuant to part 15 FCC Rules and Regulations. This device complies with
RSS-210 of Industry Canada. Operation is subject to the following two
conditions: (1) This device may not cause interference, and (2) This device
must accept any interference, including interference that may cause
undesired operation of the device.
ATLINKS Communications Canada, Inc.
(An Alcatel / Thomson Joint Venture)
© 2001 ATLINKS Communications Canada, Inc.
Trademark(s) ® Registered
Model 26929C/D
Marque(s) ® déposée(s)
15790500 (Rev. 0 CAN E)
01-19
Printed in China
REDIAL
CHANNEL
MEMORY
OFF
ON
Base
Handset
Belt clip
4
MODULAR JACK REQUIREMENTS
You need an RJ11 (CA11A) type modular phone
jack, which is the most common type of phone jack
and might look like the one pictured here. If you
don’t have a modular jack, call your local phone
company to find out how to get one installed.
This feature helps to locate a misplaced handset.
Press the PAGE button on the base. The handset beeps
continuously for about 2 minutes or until you press any button
on the handset. You can also press PAGE again to cancel.
INSTALLATION NOTE: Some cordless telephones
operate at frequencies that may cause interference to
nearby TVs and VCRs. To minimize or prevent such
interference, the base of the cordless telephone
should not be placed near or on top of a TV or VCR. If
such interference continues, move the cordless
telephone farther away from the TV or VCR.
DIGITAL SECURITY SYSTEM
Your cordless phone uses a digital security system to
provide protection against false ringing, unauthorized
access, and charges to your phone line.
When you place the handset in the base, the unit verifies
its security code. After a power outage or battery
replacement, you should place the handset in the base for
about 20 seconds to reset the code.
2. Set the RINGER switch on the handset to ON.
3. Place the handset in the base.
4. Plug the power supply into the base and then into an AC
outlet.
The CHARGE/IN USE indicator comes on indicating that
the battery is charging.
Allow the phone to charge for 12 hours before using
the first time. If you don't charge the phone
properly (for 12 hours) when you first set up the
phone, performance of the battery will be
compromised.
CALLER ID WITH CALL WAITING
IMPORTANT: In order to use this unit, you must
subscribe to either the standard Name/Number Caller
ID Service or Caller ID with Call Waiting Service. To
know who is calling while you are on the phone, you
must subscribe to Caller ID with Call Waiting Service.
RECEIVING AND STORING CALLS
This adjustment allows you to select tone (touch-tone) or
pulse (rotary) mode dialing. The phone is automatically set
for touch-tone use.
REVIEWING RECORDS
As calls are received and stored, the display is updated to
let you know how many calls have been received.
8
WXYZ
9
3. Press TONE*.
• Press the arrow down button to scroll through the call
records from the most recent to the oldest.
*
OPER
0
FORMAT
button
PULSE
• Press the arrow up button to scroll through the call
records from the oldest to the newest.
DELETE/
FLASH
button
2. Press and hold the CHANNEL button for 2 seconds until
the phone beeps.
MEMORY
FORMAT
DELETE
ON
MEMORY
button
1. Make sure the phone is OFF.
FLASH
RINGER
switch
3. Press #.
RECEIVING A CALL
2. Press the TALK button.
MAKING A CALL
To make a call, press the TALK button before you dial and
press it again to hang up.
REDIAL
While the phone is on, press the REDIAL button to redial
the last number you dialed (up to 32 digits). If you get a
busy signal, and want to keep dialing the number, just
press REDIAL again (you don't have to turn the phone off
and back on).
FLASH
Use the FLASH button to activate custom calling services
such as call waiting or call transfer, which
are available through your local phone company.
TIP: Don’t use the TALK button to activate custom
calling services such as call waiting, or you’ll hang up
the phone.
• To display the last Caller ID record reviewed, make sure
the phone is OFF. Then press REDIAL. To dial the number,
press REDIAL again. The number dials automatically.
DELETING RECORDS
VOLUME
Use the DELETE button to erase the record currently shown
in the display or all records.
The VOLUME button controls the volume of the
handset's earpiece.
DELETING THE CURRENT RECORD
VOICE MESSAGING
1. Make sure the phone is OFF.
2. Use the arrow buttons to display the desired Caller ID record.
Provided your phone
company offers voice
messaging service and you
subscribe to it, the CHARGE/
IN USE indicator on the base
flashes when the phone is
not in use to indicate there is
a message waiting. It stops
flashing after the message
has been reviewed.
3. Press DELETE. The display shows ERASE CALL ID?
4. Press DELETE again to erase the record.
CHARGE/ IN USE
DELETING ALL RECORDS
1. Make sure the phone is OFF.
PAGE
CHARGE/IN USE indicator
CALLER ID FEATURES
This unit receives and displays information transmitted by
your local phone company. This information can include
the phone number, date, and time; or the name, phone
number, date, and time. The unit can store up to 40 calls
for later review.
1. Press and hold the CHANNEL button until “AREA
CODE=000” shows in the display.
NOTE: To clear your local area code, press and hold
the CHANNEL button until your area code appears in
the display, then press 000.
CHANGING THE NUMBER FORMAT
The FORMAT button lets you change the format of the
displayed number. The available formats are as follows.
7-digit
7-digit telephone number.
10-digit
3-digit area code + 7-digit telephone
number.
11-digit
long distance code “1” + 3-digit area code +
7-digit telephone number.
3. Press CALL BACK. The number dials automatically.
NOTE: Check with your local phone company
regarding name service availability.
TUV
OFF
SETTING YOUR LOCAL AREA CODE
2. If the number will not dial as shown, press the FORMAT
button. Repeat if necessary, until the correct number of
digits are shown.
7
REDIAL
3. Press CALL BACK. The number dials automatically.
When the memory is full, a new call automatically replaces
the oldest call in memory. NEW appears in the display for
calls received that have not been reviewed.
6
CALL BACK
2. Use the arrow buttons to display the desired Caller ID record.
1. Use the arrow buttons to scroll to the number you want
to call back.
MNO
#
1. Make sure the phone is OFF.
When you receive a call, the information is transmitted by
the phone company to your Caller ID telephone between
the first and second ring.
5
PQRS
DIALING A CALLER ID NUMBER
2. Use the handset number pad to enter your 3-digit code.
JKL
1. Check the display to see who is calling.
1. Remove the handset hook; turn it upside down, and put
it back in the slot. You need to do this so the handset
doesn't fall out of the base when it is on the wall.
Caller ID name
4
CORDLESS PHONE BASICS
FLASH
Caller ID phone number
• Press the FLASH button to put the current person on
hold so that you can answer the incoming call.
#
FORMAT
FRED PAGE
2. Press and hold the CHANNEL button for 2 seconds until
the phone beeps.
Mounting bracket
RINGER
3175551234
3
CHANNEL
button
DELETE
PAGE
03
FINDING THE HANDSET
3. Follow the voice instructions to complete your transaction.
CALL BACK
Users should ensure for their own protection that the electrical ground
connections of the power utility, telephone lines and internal metallic water
pipe systems, if present, are connected together. This precaution may be
particularly important in rural areas.
#
DEF
CID REVIEW
GHI
CHARGE/ IN USE
CALL
2
RINGER
1
FRED PAGE
1
REPT
ABC
CHANNEL
03
PM
1
TONE
Because it is necessary to charge the handset for 12 hours
prior to connecting the phone for use the first time, it is
better to leave the unit on a flat surface during initial
charge before attempting to hang it on the wall.
3175551234
GHI
10:28 10/20
4. Hang up when finished. The phone returns to Pulse
(rotary) service.
2. Press the TONE button (*) after your call is answered.
1. Make sure the phone is OFF.
CID REVIEW
Number of calls
Date
Provided you subscribe to Caller ID with Call Waiting
service from your phone company, you are able to see who
is calling when you hear the call waiting beep. The caller
identification information appears in the display after you
hear the tone.
TONE
VOLUME
TALK
1. Call the bank’s information line.
TONE/PULSE DIALING
2
10:28 10/20
This feature enables Pulse (rotary) service phone users to
access touch-tone services offered by banks, credit card
companies, etc., by pressing the TONE button to temporarily
make the phone touch-tone compatible. To get information
about your bank account, for example, you would:
The RINGER switch must be ON for the handset to ring
during incoming calls.
Allow the phone to charge for 12 hours before
using the first time. If you don't charge the phone
properly (for 12 hours) when you first set up the
phone, performance of the battery will be
compromised.
3
Repairs to certified equipment should be made by an authorized Canadian
maintenance facility designated by the supplier. Any repairs or alterations
made by the user to this equipment, or equipment malfunctions, may give the
telecommunications company cause to request the user to disconnect the
equipment.
While talking, you might need to manually change the
channel in order to get rid of static. Press and release the
CHANNEL button to advance to the next clear channel.
RINGER SWITCH
WALL MOUNT INSTALLATION
PARTS CHECKLIST
Time
NOTE: The ringer does not have to be on for this
feature to work.
2. Raise the base antenna.
NOTE : The phone automatically defaults to touchtone dialing. To change to pulse (rotary) dialing, see
“Tone/Pulse Dialing.” If you don’t know which type of
service you have, check with the phone company.
BEFORE YOU BEGIN
5
6
8. Raise the base antenna.
3
CHANNEL BUTTON
TEMPORARY TONE
SEE MARKING ON BOTTOM / BACK OF PRODUCT
We bring good things to life.
IMPORTANT INFORMATION
6. Attach the wall
mount bracket by
inserting the two
tabs at the top
and then
snapping the tab
at the bottom into
place.
7. Slip the mounting
holes over the
wall plate posts
and slide the unit
down firmly into place. (Wall plate not included.)
To get the most from your new phone, we suggest that you
take a few minutes right now to read through this user's guide.
IMPORTANT: In order to use this unit, you must
subscribe to either the standard Name/Number Caller
ID Service or Caller ID with Call Waiting Service. To
know who is calling while you are on the phone, you
must subscribe to Caller ID with Call Waiting Service.
5. After charging, plug telephone line cord into the wall jack.
Then stuff the
excess ine cord
into the mounting
8
7
bracket.
MEMORY
Store up to ten 24-digit numbers in memory for quick
dialing. This memory feature is in addition to the 40 Caller
ID records that can be stored in the Caller ID memory log.
STORING A NUMBER IN MEMORY
1. Make sure the phone is OFF.
2. Press the MEMORY button.
3. Press the memory location number (0-9).
4. Press MEMORY again. The display shows ENTER NAME.
NOTE: If you don't want to enter the name, skip step 5.
5. Use the keypad to store a name (up to 15 characters).
More than one letter or character is stored in each of the
number keys. For example, to enter Joe Smith, press 5
for J; press 6 three times for O; press 3 two times for E;
press 1 to enter a space before you start entering the
last name; press 7 four times for S; press 6 for M; press
4 three times for I; press 8 for T; and 4 two times for H.
If you're using two letters consecutively that are stored
in the same number key, you must press FORMAT
between the letters. For example, if you enter Barb,
press 2 two times for B; press FORMAT; press 2 for A; 7
three times for R; and 2 two times for B. You need to
press FORMAT between the B and the A since they are
stored within the same number key.
2. Use the arrow buttons to display the desired Caller ID record.
6. Press MEMORY. The display shows ENTER TEL NUMBR.
3. Press and hold DELETE. The display shows ERASE ALL?
7. Use the keypad to enter the number you want to store
(up to 24 digits). To add a pause, See “Inserting a Pause
in the Dialing Sequence.”
4. Press DELETE again to erase all records.
8. Press MEMORY again to store the number.
CONNECTING A HEADSET TO THE
DIALING A STORED NUMBER
1. Make sure the phone is ON by pressing the TALK button.
2. Press MEMORY.
3. Press the number (0-9) for the desired memory location.
The number dials automatically.
1. Make sure the phone is OFF.
2. Press MEMORY.
3. Use the arrow buttons to scroll through the numbers
stored in memory until the desired number is shown.
4. Press CALL BACK. The numbers dials automatically.
IMPORTANT: If you make test calls to emergency
numbers stored in memory, remain on the line and
briefly explain the reason for the call to the dispatcher.
Also, it’s a good idea to make these calls in off-peak
hours, such as early morning or late evening.
INSERTING A PAUSE IN THE DIALING
SEQUENCE
Press the REDIAL button to insert a delay in the dialing
sequence of a stored telephone number when a pause is
needed to wait for a dial tone (for example after you dial 9
for an outside line, or to wait for a computer access tone).
Each pause counts as 1 digit in the dialing sequence.
REVIEWING AND DELETING STORED
NUMBERS
1. Press MEMORY, then use the arrow keys to view the
entry.
2. While the entry is displayed, press DELETE to delete the
entry. The display shows ERASE MEMO?
3. Press DELETE a second time to delete the entry.
CHAIN DIALING FROM MEMORY
Use this feature to make calls which require a sequence of
numbers such as using a calling card for a frequently
called long distance number. Basically, you dial each part
of the sequence from memory. The following example
shows how you can use chain dialing to make a call
through a long distance service:
The Number For
Memory Location
Long distance access number
Authorization code
Frequently called long distance number
7
8
9
1. Make sure the phone is ON.
2. Press MEMORY and then press 7.
3. When you hear the access tone, press MEMORY and
then press 8.
4. At the next access tone, press MEMORY and then 9.
TIP: Wait for the access tones before pressing the next
memory button, or your call might not go through.
For hands free
conversation, connect the
headset (optional) to the
HEADSET jack as shown.
The handset receiver and
microphone are disabled
when the headset is
connected.
Headset
jack
HEADSET
- OR -
HANDSET
Adjust the headset to rest
comfortably on top of your
head and over your ear.
Move the microphone to
approximately 2 to 3 inches
from your mouth.
Signal
Meaning
A long warbling tone
(with ringer on)
One short beep, one
long beep (several times)
Three short beeps
Four short beeps
Signals an incoming call
TELEPHONE
Problem
Solution
Dial tone is OK, but
can't dial out
• Make sure the tone/
pulse setting is
programmed
correctly.
Page signal
Out of range
Low battery warning
Handset does not ring
TROUBLESHOOTING TIPS
CALLER ID
Headset
plug
• Press the TALK button to answer or place a call before
using the headset.
CONNECTING THE BELT CLIP
CAUSES OF POOR RECEPTION
Problem
Solution
• Aluminum siding
No Display
• Is battery fully charged? Try
replacing the battery.
• If you are using AC power,
make sure that the unit is
connected to a nonswitched electrical outlet.
Disconnect the unit from
the plug and plug it in
again.
• Did you order Caller ID
service from your local
telephone company?
• Foil backing on insulation
• Heating ducts and other metal construction can shield
radio signals
• You’re too close to appliances such as microwaves,
stoves, computers, etc.
There are two slots, one on
each side of the handset.
• Attach the belt clip by
inserting the sides of the
belt clip into the slots.
Snap the ends of the belt
clip into place.
To keep your telephone working and looking good, follow
these guidelines:
• Avoid putting the phone near heating appliances and
devices that generate electrical noise (for example,
motors or fluorescent lamps).
• DO NOT expose to direct sunlight or moisture.
• Avoid dropping the handset, as well as other rough
treatment to the phone.
• Clean the phone with a soft cloth.
• Never use a strong cleaning agent or abrasive powder
because this will damage the finish.
• Retain the original packaging in case you need to ship
the phone at a later date.
• Periodically clean the charge contacts on the handset
and base with a clean pencil eraser.
HANDSET SOUND SIGNALS
• Atmospheric conditions, such as strong storms
• Base is installed in the basement or lower floor of the house
Slot for
belt clip
Slot for
belt clip
• Base is plugged into an AC outlet with other electronic devices
• Baby monitor is using the same frequency
You experience static,
noise, or fading in
and out
Unit beeps
• Handset battery is low.
CHANGING THE BATTERY
• You’re out of range of the base.
Make sure the telephone is OFF before you replace
battery.
MESSAGE INDICATORS
1. Remove the battery compartment
door.
The following indicators show the status of a
message or of the unit.
2. Disconnect the cord attached to
the battery pack and remove the
battery pack from the handset.
ERROR
3. Insert the new battery pack and
connect the cord into the jack
inside the handset.
Caller information has been interrupted
during transmission or the phone is
excessively noisy.
ENTER NAME
Prompt telling you to enter a name for
one of the 10 memory locations.
4. Put the battery compartment door
back on.
5. Place handset in the base to
charge. If you don’t charge the
handset battery properly (for 12 hours)
when you first set up the phone and/or
when you install a new battery pack,
the battery’s long-term performance
will be compromised.
BATTERY SAFETY PRECAUTIONS
ERASE ALL?
Prompt asking if you want to erase all
Caller ID records.
ERASE CALL ID?
Prompt asking if you want to erase the
current Caller ID record that is shown
on the display.
ERASE MEMO?
END OF LIST
Prompt asking if you want to erase one
of the 10 numbers stored in the
phone's outgoing memory.
Indicates there is no additional
information in the Caller ID memory
log.
• Do not burn, disassemble, mutilate, or puncture. Like
other batteries of this type, toxic materials could be
released which can cause injury.
NEW
• To reduce the risk of fire or personal injury, use only the
battery listed in the User’s Guide.
Indicates call or calls have not been
reviewed.
UNKNOWN
The incoming call is from an area not
serviced by Caller ID or the information
was not sent.
PAGING YOU
Someone has pressed the PAGE button
on the base.
BLOCKED
The person is calling from a number
that has been blocked from
transmission.
REPT
Repeat call message. Indicates that a
new call from the same number was
received more than once.
• Keep batteries out of the reach of children.
• Remove batteries if storing over 30 days.
Contains
Nickel-Cadmium
Rechargeable Battery
Ni-Cd
Must be Recycled or
Disposed of Properly
NOTE: This product contains a nickelcadmium rechargeable battery and
must be recycled or disposed of
properly. We suggest that you check
with your local Environmental Agency
regarding recycling or disposal.
NO DATA
No Caller ID information was received.
Caller ID Error Message • The unit displays this
message if it detects
anything other than valid
Caller ID information
during the silent period
after the first ring. This
message indicates the
presence of noise on the
line.
Memory Dialing
TELEPHONE
Problem
Solution
No dial tone
• Check installation:
— Is the base power cord
connected to a working
outlet?
— Is the telephone line cord
connected to the base unit
and the wall jack?
• Disconnect the base from
the wall jack and connect
another phone to the same
jack. If there is no dial tone
in the second phone, the
problem might be your
wiring or local service.
• Is the handset out of range
of the base?
• Make sure the battery is
properly charged (12
hours).
• Is the battery pack installed
correctly?
• Did the handset beep
when you pressed the
TALK button? Did the
CHARGE/ IN USE indicator
come on? The battery may
need to be charged.
• Make sure the RINGER
switch on the handset is
turned to ON.
• You may have too many
extension phones on your
line. Try unplugging some
phones.
• See solutions for “No dial
tone.”
• Change channels
• Is handset out of range?
Move closer to the base.
• Does the base need to be
relocated?
• Charge battery.
• Make sure base is not
plugged into an outlet with
another household
appliance.
• Place handset in base for
20 seconds to reset the
security code. If that
doesn’t work, charge
battery for 12 hours.
• Clean charging contacts on
handset and base with a
soft cloth, or an eraser.
• See solutions for “No dial
tone.”
• Replace battery.
• Did you program the
memory location keys
correctly?
• Did you follow proper
dialing sequence?
• Make sure the tone/pulse
setting is programmed
correctly.
• Did you reprogram
numbers into memory
after power outage or
battery replacement?
TELEPHONE NETWORK INFORMATION
Should your equipment cause trouble on your line which
may harm the telephone network, the telephone company,
where practicable, may notify you that temporary
discontinuance of service may be required. Where prior
notice is not practicable and the circumstances warrant
such action, the telephone company may temporarily
discontinue service immediately.
The telephone company may make changes in its
communications facilities, equipment, operations or
procedures where such action is required in the operation
of its business. If these changes are expected to affect the
use or performance of your telephone equipment, the
telephone company will likely give you adequate notice to
allow you to maintain uninterrupted service.
Notice must be given to the telephone company upon
termination of your telephone from your line.
REN NUMBER
ACCESSORY ORDER FORM
On the bottom of this equipment is a label indicating,
among other information, the FCC Registration number
and Ringer Equivalence Number (REN) for the equipment.
You must, upon request, provide this information to your
telephone company.
(OR CALL 1-800-338-0376 FOR ACCESSORIES ONLY)
The REN is useful in determining the number of devices
you may connect to your telephone line and still have all
of these devices ring when your telephone number is
called. In most (but not all) areas, the sum of the RENs of
all devices connected to one line should not exceed 5. To
be certain of the number of devices you may connect to
your line as determined by the REN, you should contact
your local telephone company.
CATALOG NO.
DESCRIPTION
✂
Use the same procedure to change a stored number as you
do to store a number—you’re just replacing the phone
number with a different one.
GENERAL PRODUCT CARE
HEADSET AND BELT CLIP
OPERATION
SERVICE
ATLINKS Communications Canada, Inc., warrants to
the purchaser or gift recipient that if any
manufacturing defect becomes apparent in this
product within
1 year from the original date of purchase, it will be
replaced free of charge, including return
transportation.
This warranty does not include damage to the
product resulting from accidents, misuse or leaking
batteries.
Should your product not perform properly during
the warranty period, either:
1. Return it to the selling dealer with proof of
purchase for replacement,
OR
2. Remove the batteries (where applicable), and pack
product complete with accessories in the original
carton (or equivalent).
— Mail prepaid (with proof of purchase) and
insured to:
ATLINKS Communications Canada, Inc.
c/o Thomson multimedia Ltd.
6200 Edwards Boulevard
Mississauga, Ontario
Canada L5T 2V7
The provisions of this written warranty are in
addition to and not a modification of or subtraction
from the statutory warranties and other rights and
remedies contained in any applicable legislation,
and to the extent that any such provisions purport to
disclaim, exclude or limit any such statutory
warranties and other rights and remedies, such
provisions shall be deemed to be amended to the
extent necessary to comply therewith.
If you are unable to find a qualified servicer for out
of warranty service, you may write to:
ATLINKS Communications Canada, Inc.
c/o Thomson multimedia Inc.
P.O. Box 0944
Indianapolis, Indiana, U.S.A., 46206-0944
CUSTOMER: CUT ALONG DOTTED LINE.
CHANGING A STORED NUMBER
(white) (black)
PRICE*
QTY.
TOTAL
5-2462 5-2463 $4.95
5-2444 5-2425 $36.35
Replacement battery
$10.95
5-2461
Belt clip
Headset
For credit card purchases
Your complete charge card number, its expiration date and your
signature are necessary to process all charge card orders.
Copy your complete account number from your VISA card.
My card expires:
Copy your complete account number from your
Master Card or Discover.
Copy the number above your
name on the Master Card
My card expires:
____________________________________________________________________
Authorized Signature
*Prices are subject to change without notice.
Total Merchandise.........................................$_______________
Sales Tax........................................................$_______________
We are required by law to collect the appropriate sales tax for each individual state,
county, and locality to which the merchandise is being sent. Duties will apply for
shipments to Canada.
Use VISA or Master Card or Discover preferably. Money order or check must be in U.S.
currency only. No COD or Cash. All accessories are subject to availability. Where
applicable, we will ship a superseding model.
$5.00
Shipping/Handling....................................... $_______________
Total Amount Enclosed.................................$_______________
Mail order form and money order or check (in U.S. currency)
made payable to Thomson multimedia Ltd. to:
Thomson multimedia Inc.
Mail Order Department
P.O. Box 8419
Ronks, PA 17573-8419
Name_______________________________________________________
Address_____________________________________ Apt.____________
Attach your sales receipt to this booklet for future
reference. This information is required if service is
needed during the warranty period.
City ________________________State________ ZIP_________________
PURCHASE DATE
____________________________________________________________
Please make sure that this form has been filled out completely.
NAME OF STORE
____________________________________________________________
Daytime Phone Number (
)_______________________________