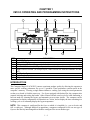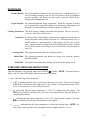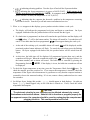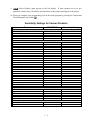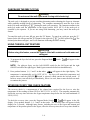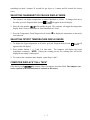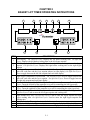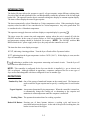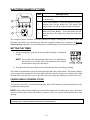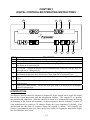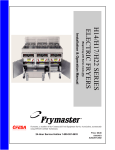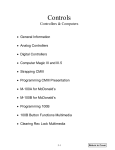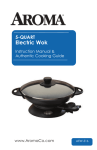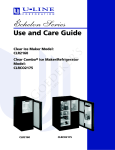
1
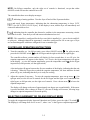
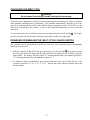
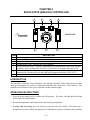
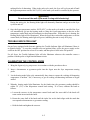
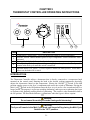
Basket Lift Timers - Pages 2-1, 2-5
User’s Manual
Digital Controller - Page 3-1
SOLID STATE
Solid State (Analog) Controller - Page 4-1
ON
OFF
Frymaster Fryer Controllers
Computer Magic III.5 (CM III.5) - Page 1-1
Thermostat Controller – Page 5-1
Frymaster, a member of the Commercial Food Equipment Service Association, recommends
using CFESA Certified Technicians.
24-Hour Service Hotline
1-800-551-8633
*8195916*
SEPT 2008
NOTICE
U.S.
This device complies with Part 15 of the FCC rules. Operation is subject to the
following two conditions: 1) This device may not cause harmful interference, and 2)
This device must accept any interference received, including interference that may
cause undesired operation. While this device is a verified Class A device, it has been
shown to meet the Class B limits.
CANADA
This digital apparatus does not exceed the Class A or B limits for radio noise emissions
as set out by the ICES-003 standard of the Canadian Department of Communications.
Cet appareil numerique n’emet pas de bruits radioelectriques depassany les limites de
classe A et B prescrites dans la norme NMB-003 edictee par le Ministre des
Communcations du Canada.
CHAPTER 1
CM III.5 OPERATING AND PROGRAMMING INSTRUCTIONS
1
4
6
3
8
2
5
7
ITEM
DESCRIPTION
1
2
3
4
Left LED Display.
Right LED Display.
Temperature Check and Program Lock Switch.
Left ON/OFF Switch. (In full-pot fryers, either switch will turn the controller on and off.)
Right ON/OFF Switch. (In full-pot fryers, either switch will turn the controller on and
off.)
Left Product Buttons.
Right Product Buttons.
Program Mode Switch.
5
6
7
8
INTRODUCTION
The Computer Magic III (CM III.5) ensures consistent product quality by allowing the operator to
enter specific cooking parameters for up to 12 products. These parameters remain stored in the
computer’s memory. Pressing a single button initiates a cooking cycle using the stored parameters
so that every batch is fried the same way. For fryers equipped with basket lifts, the computer also
controls lowering and raising the basket. Other features include a melt-cycle for solid shortening, a
boil-out mode for cleaning the frypot, and automatic recovery-time checks. The computer can be
programmed to display temperatures in Fahrenheit or Celsius, and to display the time remaining in a
cooking cycle or to constantly display the frypot temperature.
NOTE: This computer is configured for the fryer on which it is installed (i.e., gas or electric and
full- or split-pot). Although identical in appearance, computers configured for use on one type of
fryer are not directly interchangeable with those configured for use on another type.
1-1
DEFINITIONS
Product Button: One of the numbered buttons on the control panel. A setpoint and up to 12
sets of cooking parameters (one set for each product) can be programmed
into the computer. The buttons are also used to enter the values for the
setpoint and cooking parameters.
Frypot Setpoint: An operator-determined frying temperature. When the computer is turned
on, it automatically brings the cooking oil or shortening to the setpoint and
maintains it at that temperature until the computer is turned off.
Cooking Parameters: The set of cooking variables associated with a product. They are sensitivity,
cook time, shake time, and hold time.
Sensitivity: A built-in feature, which adjusts cooking time to compensate for the drop in
frypot temperature when product enters the oil. Different products vary in
density, batch size, and temperature. Food products will also vary in cook
time. A proper sensitivity setting will assure a high-quality product. Setting
0 is the least sensitive and setting 9 is the most sensitive (see the chart on
page 1-5).
Cooking Time: The operator-determined time for cooking a product.
Shake Time: The operator-determined time during the frying cycle when the product
should be shaken.
Hold Time: The operator-determined time product can be held before being served.
COMPUTER OPERATING INSTRUCTIONS
Switches. NOTE: A decimal between
Turn the computer on by pressing either of the ON/OFF
digits 1 and 2 in either LED Display indicates that the unit is heating.
1. One of the following will be displayed:
a.
, indicating that the fryer is operating in the melt-cycle mode. The fryer will remain
in the melt-cycle mode until the temperature of the cooking oil or shortening reaches 180°F
(82°C) or the melt-cycle is canceled by the operator.
b.
, indicating that the frypot temperature is 21ºF (12ºC) higher than the setpoint. Do
nothing; the controller will allow the oil to cool to the setpoint before firing the burners or
energizing the elements.
c.
, indicating that the frypot temperature is 21ºF (12ºC) lower than the setpoint. Do nothing; the controller will raise the oil temperature to the setpoint.
d.
, indicating that the frypot temperature is within the cooking range. NOTE: For
.
best results, cooking should not be attempted unless the display indicates
1-2
e.
f.
, indicating a heating problem. Turn the fryer off and call the Frymaster hotline.
, indicating the frypot temperature is in excess of 410ºF (210ºC). If this appears in the
display, turn the fryer off immediately! NOTE: In computers used in the European Union
(those with the CE mark), the temperature is 395°F (202°C).
g.
, indicating that the computer has detected a problem in the temperature measuring
and control circuits. Turn the fryer off and contact an authorized servicer.
2. When
appears in the displays, press a product switch to initiate a cook cycle.
a. The display will indicate the programmed cook time and begin to count down. On fryers
equipped with basket lifts, the product basket will be lowered into the frypot.
b. If a shake time is programmed, an alarm will sound at the specified time and the display will
read SH#, where “#” will be the button number. The alarm will sound for 3 seconds then selfcancel. If no shake time has been programmed, sh# will not appear during the cook cycle.
c. At the end of the cooking cycle, an audible alarm will sound, cooc will be displayed, and the
associated product button indicator will flash. To cancel the cook alarm, press the flashing
button. On fryers equipped with basket lifts, the product basket will be raised from the
frypot.
d. At this time, the hold time will be displayed (if programmed greater than zero), and the
countdown will begin. When the countdown reaches zero, hD# will be displayed (where # is
the button number) and an alarm will sound. The hold alarm is canceled by pressing the
Programming Switch . NOTE: If the display is in use, the hold time countdown will not
be displayed.
3. To check the frypot temperature at any time, press the Temperature Check Switch
once. To
check the setpoint, press the switch twice. If you suspect the temperature is incorrect, check the
temperature of the frypot with a thermometer or pyrometer to verify that the computer readout is
reasonably close to the measured reading. If it is not, contact a factory authorized service center
for assistance.
4. On full-pot fryers, during idle periods,
should appear in both displays. On split-pot
should appear only on the side that is turned on. If not, check the actual
fryers,
temperature and setpoint.
CAUTION
The electronic circuitry in your computer can be affected adversely by current
fluctuations and electrical storms. Should it fail to function or program properly for
no apparent reason, the computer should be reset by unplugging the computer and
plugging it back in. This could prevent a service call.
1-3
COMPUTER PROGRAMMING INSTRUCTIONS
1. Enter the programming mode by pressing the Program Mode Switch .
will appear in
the left display. If you enter the programming mode by mistake, press the switch again to exit
the programming mode. NOTE: If you try to enter the programming mode while the computer
is cooking, the display will flash
.
2. Press product buttons 1, 6, 5 and 0 in that order. Unless this code is entered, programming will
not be accepted. This is to prevent unauthorized persons from changing your current instructions.
3. sp-r (Setpoint) will appear in the left display. Any previously programmed setpoint will
appear in the right display. To change the setpoint, enter the desired setpoint temperature using
the number keys. The highest programmable setpoint is 375ºF (191ºC). Press the Program
Mode Switch
to lock in the new setpoint (or the old setpoint, if it was not changed).
NOTE: On split-pot fryers, sp-R indicates the setpoint for the right frypot. After the right
frypot setpoint has been programmed, sp-L (left frypot setpoint) will appear in the left display.
Enter the setpoint for the left frypot in the same manner as for the right frypot.
4. selp (Select Product) will appear in the left display. Press the product button to be
programmed (or press
to return to the normal operating mode). In full-pot fryers, any
product button, including L and R may be used. In split-pot fryers, product buttons L and 1-5
are used for the left frypot and buttons R and 6-0 are used for the right frypot.
5. sens (Sensitivity) appears in the left display. Any previously programmed sensitivity setting
appears in the right display. To change the sensitivity setting, enter the new setting and press
to lock it in. If the setting was not changed, pressing
accepts the previous setting. A chart
has been provided on page 1-5 to assist in choosing a sensitivity setting. It is meant as a guide
only and the settings may be changed to suit different needs.
6. cooc (Cook Time) appears in the left display. Any previously programmed cooking time will
appear in the right display. Pressing
will accept the current cooking time. To change the
to lock in the new time.
cooking time, enter the new time using the Number keys. Press
7. sh_ (Shake Time) appears in the left display. If your product requires shaking during the cooking process, set the number of seconds to cook before shaking using the number keys.
For example, entering “30” means the product needs to be shaken after it has been cooking for
30 seconds. At the end of 30 seconds, an alarm will sound and the product switch will flash for
3 seconds. If the product does not require shaking, enter “0”. The number entered will appear in
the right display. Press
to lock in the programmed time.
8. hd_ (Hold Time) appears in the left display. Set the time the product may be held before
disposal, anything from 13 seconds to 60 minutes. If you do not wish to use the hold time
feature, enter 0. Press
to lock in the time.
1-4
9. selp (Select Product) again appears in the left display. If more products are to be programmed, return to Step 5 and follow all instructions to this point, repeating for each product.
10. When you complete your programming, lock in the whole program by pressing the Temperature
Check/Program Lock Switch
.
Sensitivity Settings for Various Products
Product
Chicken
chicken fillet, 1 ¼ oz.
chicken fillet (frozen), 4 oz.
chicken patty (frozen), 5 oz.
frozen chicken
fresh chicken, 9 pieces
Potatoes
steak fries
regular fries, ½-inch
shoestrings, ¼-inch
shoestrings, 3/8-inch
tater tots
hash browns
farm fries
Seafood
crab cakes
clam cakes
large scallops
small scallops
shrimp (35 to a lb.)
shrimp (40 to 75 to a lb.)
shrimp (75 to 100 to a lb.)
cod, 2 ½ oz.
flounder fillet, 7 oz.
flounder, whole, 10-12 oz.
cod fillet, 3 ½ oz.
perch, 5 oz.
haddock, 7 oz.
clams
oysters
strip clams (fresh)
strip clams (frozen)
Vegetables
okra
eggplant
zucchini
mushrooms
onion rings (frozen)
cauliflower
Other
corn dogs
chicken fried steak patty
350° F/76° C
Sensitivity Setting
3:25
4:20
6:15
5
5
5
5
5
3:43
3:16
1:50
2:40
2:05
2:05
1:14
5
5
5
5
5
5
5
4:00
4:00
3:25
1:10
2:15
1:45
1:10
3:25
4:35
6:25
4:35
4:30
6:25
2:00
1:10
0:35
0:45
3
3
3
3
3
3
3
7
3
3
7
3
7
3
4
4
4
4:30
4:00
3:00
3:45
3:00
1:45
4
4
4
4
4
4
5:00
4
5
1-5
CANCELING THE MELT-CYCLE
DANGER
Do not cancel the melt-cycle mode if using solid shortening!
The melt-cycle is designed to prevent scorching shortening and overheating the frypot or elements
while gradually melting blocks of shortening. The computer automatically starts the fryer in the
melt-cycle mode and displays
during the melt-cycle operation. The computer remains in the
melt-cycle mode until the temperature in the frypot reaches 180°F (82°C) or the melt-cycle is
canceled by the operator. If you are not using solid shortening, you may cancel the melt-cycle
feature.
To cancel the melt cycle on a full pot, press the "R" button. To cancel on a split pot, press the "L"
button for the left side pot and the "R" button for the right side.
will be replaced by . The
decimal point between digits 1 and 2 will illuminate indicating the unit is heating.
USING THE BOIL-OUT FEATURE
CAUTION
Before using this feature, ensure the frypot is filled with a mixture of cold water and
detergent.
1. To program the fryer for boil-out, press the Program Mode
left display.
Switch.
will appear in the
NOTE: For split-pot fryers, use the left ON/OFF switch for the left frypot and the right
ON/OFF switch for the right frypot. Both frypots cannot be boiled out simultaneously.
2. Press product buttons 1, 6, 5 and 3 in that order. boil will appear in the right display. The
temperature is automatically set for 195ºF (91ºC). The fryer will attain this temperature and
remain there until the ON/OFF
Switch is pressed, which cancels the boil-out mode. If
boilover occurs, turn off the fryer immediately, allow it to cool, then re-enter the boil-out mode
to continue the process.
FRYER RECOVERY TIME CHECK FEATURE
The recovery check is a measurement of the elapsed time required for the fryer to raise the
temperature of the cooking oil from 250°F to 300°F (121°C to 149°C). The computer automatically
checks the recovery time each time the frypot temperature drops below the low-end benchmark of
250°F (121ºC).
To check the recovery time, press the Program Mode Switch
.
will appear in the left
display. Press product buttons 1, 6, 5 and 2 in that order. The recovery time will appear in both
displays for 5 seconds. Although many factors, including the size of the frypot and amount and
temperature of the product placed in the frypot, affect the recovery time, the recovery time should be
1-6
something less than 2 minutes 30 seconds for gas fryers or 1 minute and 40 seconds for electric
fryers.
SELECTING FAHRENHEIT OR CELSIUS DISPLAY MODE
1. The computer can display temperatures in either Fahrenheit or Celsius. To change from one to
will appear in the left display.
the other, press the Program Mode Switch .
2. Enter the code number 1 6 5 8 on the number keypad. The computer will toggle the temperature
display from Celsius to Fahrenheit or from Fahrenheit to Celsius.
3. Press the Temperature Check/Program Lock Switch
selected mode.
to display the temperature in the newly
SELECTING FRYPOT TEMPERATURE DISPLAY MODE
1. To display the frypot temperature at all times, press the Program Mode Switch
appear in the left display.
.
will
2. Press product buttons 1, 6, 5 and L in that order. The computer will display the frypot
temperature constantly. NOTE: During the cooking process, the cooking time will not be
displayed, but timing is taking place.
3. To return to the countdown timer display, repeat Steps 1 and 2.
COMPUTER DISPLAYS "CALL TECH"
If the display reads CALL TECH, the memory chip or its support circuit has failed. The computer cannot be repaired in the field and must be returned to the factory.
1-7
CHAPTER 2
BASKET LIFT TIMER OPERATING INSTRUCTIONS
1
5
7
ITEM
1
2
3
4
5
6
7
8
9
10
11
3
9
10
4
6
11
2
8
DESCRIPTION
LED Display – On Full-Pot Fryers: Displays the left basket cooking time. On Split-Pot
Fryers: Displays the left basket cooking time or the left frypot setpoint.
LED Display – On Full-Pot Fryers: Displays the right basket cooking time or the frypot
setpoint. On Split-Pot Fryers: Displays the right basket cooking time or the right frypot
setpoint.
Left Frypot Temperature Check Switch – On Full-Pot Fryers: Press to toggle between the
right side cook time and the fryer setpoint (shows in right display). On Split-Pot Fryers:
Press to toggle between the left side setpoint and cook time display.
Right Frypot Temperature Check Switch – On Full-Pot Fryers: Press to toggle between the
right side cook time and the fryer setpoint. On Split-Pot Fryers: Press to toggle between
the right side setpoint and cook time display.
Left On/Off Switch – On Full-Pot Fryers: Turns the controller on or off. On Split-Pot
Fryers: Turns the left half of the controller on or off for controlling the left frypot only.
Right On/OFF Switch – On Full-Pot Fryers: Turns the controller on or off. On Split-Pot
Fryers: Turns the right half of the controller on or off for controlling the right frypot only.
Left Number Key Pad – On Full-Pot Fryers: Used to enter the left frypot cooking time. On
Split-Pot Fryers: Used to enter the left frypot setpoint and cooking time.
Right Number Key Pad – On Full-Pot Fryers: Used to enter the frypot setpoint and right
frypot cooking time. On Split-Pot Fryers: Used to enter the right frypot setpoint and
cooking time.
Boil-Out Switch – This switch activates the boil-out mode.
Left Basket Lift Switch – This switch initiates a cooking cycle for the left basket lift.
Right Basket Lift Switch – This switch initiates a cooking cycle for the right basket lift.
2–1
INTRODUCTION
The basket lift timer allows the operator to specify a frypot setpoint, assign different cooking times
for each of the left and right basket lifts, and independently control the operation of the left and right
basket lifts. The operator can also choose constant cooking time display or constant setpoint display.
The timer will not display the actual frypot setpoint.
The timer automatically selects Fahrenheit or Celsius temperature values. When entering the frypot
setpoint, values less than 191 are considered to be Celsius temperatures. Any value greater than 190
is considered to be a Fahrenheit temperature.
The operator can toggle between cook time display or setpoint display by pressing
.
The timer stores the current time and temperature settings when the unit is turned off with the
ON/OFF switches. In the event of a power failure, or if the circuit breaker is switched off, the time
and temperature settings should be rechecked for accuracy. NOTE: The ON/OFF switches DO
NOT control the AC power supply to the fryer, they only turn the controller on or off.
The timer has three error display messages:
HELP, indicating a heating problem. Turn the fryer off and call the Frymaster hotline.
HOT, indicating that the frypot temperature is above 385°F (196°C). If this display is seen, turn the
fryer off immediately.
, indicating a problem in the temperature measuring and control circuits. Turn the fryer off
and contact an authorized servicer.
NOTE: This controller is configured for the fryer on which it is installed (i.e., gas or electric and
full- or split-pot). Although identical in appearance, computers configured for use on one type of
fryer are not interchangeable with those configured for use on another type.
DEFINITIONS
Number Key Pad: One of the groups of numbered buttons on the control panel. The buttons are
used to enter the frypot setpoint and to specify a cooking time for each basket
lift.
Frypot Setpoint: An operator-determined frying temperature. When the controller is turned on,
it automatically brings the cooking oil or shortening to the setpoint and
maintains it at that temperature until the computer is turned off.
Cooking Time: The operator-determined time for cooking a product.
Basket Lift Button: Pressing one of these buttons initiates a cooking cycle and lowers its
associated basket into the frypot. At the end of the specified cooking time, the
basket is raised out of the frypot.
2–2
TIMER OPERATING INSTRUCTIONS
1. Turn the timer on.
On Full-Pot Units: Press either ON/OFF
switch. The left basket cooking time will appear in
the left LED display and the right basket cooking time or the setpoint will appear in the right
LED display. To toggle between the setpoint and cooking time in the right display, press either
Temperature Check Switch .
On Split-Pot Units: Press the left ON/OFF
switch for the left frypot and the right switch for
the right frypot. The left basket cooking time or the left frypot setpoint will appear in the left
LED display. The right basket cooking time or right frypot setpoint will appear in the right LED
display. To toggle either display between the setpoint and cooking time, press the corresponding
Temperature Check Switch .
2. Adjust the setpoint. (NOTE: When entering Celsius temperatures the value displayed may
decrease by one degree shortly after it is entered. This is normal and is due to the internal
Fahrenheit to Celsius conversion process.)
On Full-Pot Units: If the cooking time is displayed, press either Temperature Check Switch
to toggle to the setpoint display. The last entered setpoint will be displayed in the right LED
display. To change the setpoint, enter a new temperature with the right Number Key Pad. Press
either Temperature Check Switch
to return to the cooking time display. If you do not need to
change the setpoint, return to the cooking time display by pressing either Temperature Check
Switch .
On Split-Pot Units: If the cooking times are displayed, toggle to the setpoint display by pressing
the corresponding Temperature Check Switch . The last entered setpoints will be displayed in
the LED windows. To change a setpoint, enter a new temperature with the corresponding
Number Key Pad. Press the corresponding Temperature Check Switch
to return to the
cooking time display. If you do not need to change the setpoint, return to cooking time display
by pressing the corresponding Temperature Check Switch .
3. Enter the cook times.
The Basket Lift Timer will time the cooking cycle for the time displayed in the left and right LED
displays. To change the time on the left timer – enter a new time with the left Number Key Pad.
To change the time on the right timer – enter a new time with the right Number Key Pad.
4. Initiate a cook cycle.
Press the left Basket Lift switch , or the right Basket Lift switch
to initiate a timed cook
cycle. The corresponding displayed time will begin to count down. At time-out, the basket lift
raises the basket from the cooking oil/shortening. An audible alarm alerts the operator that
cooking is completed, and the display shows COOC. Press the corresponding basket lift switch
to cancel the alarm and reset the timer.
NOTE: If a basket lift switch is pressed during a cooking cycle, the cycle is cancelled and the
basket is raised from the frypot.
2–3
CANCELING THE MELT-CYCLE
DANGER
Do not cancel the melt-cycle mode if using solid shortening!
The melt-cycle is designed to prevent scorching shortening and overheating the frypot or elements
while gradually melting blocks of shortening. The timer automatically starts the fryer in the meltcycle mode and remains in this mode until the temperature in the frypot reaches 180°F (82°C) or the
melt-cycle is canceled by the operator. If you are NOT using solid shortening, you may cancel the
melt cycle feature.
To cancel the melt-cycle on a full-pot unit, press the right Basket Lift switch . On a split-pot unit,
press the left Basket Lift switch
to cancel the left frypot, or the right Basket Lift switch
to
cancel the right frypot.
USING THE BOIL-OUT FEATURE
Press the Boil-Mode switch
to reset the timer to 195°F (91°C).
On Full-Pot Units, the controller will maintain the frypot temperature at 195°F (91°C) until either
ON/OFF switch is pressed to turn the controller off.
On Split-Pot Units, the controller will maintain both frypot temperatures at 195°F (91°C) until the
frypots are turned off. To turn off the left frypot, press the left ON/OFF
switch. To turn off the
right frypot, press the right ON/OFF switch.
2–4
ELECTRONIC BASKET LIFT TIMER
ITEM
DESCRIPTION
1
Cooking Time Display – Displays the cooking time as
it counts down.
2
Timer Arrow Buttons – Allow the operator to assign a
cooking time for the basket lift. The basket will
remain in the oil until the indicated time has elapsed.
3
Basket Lift Timer Button – Lowers the basket lift and
starts the timer. The basket rises when the cook time
elapses.
1
2
3
The electronic basket lift timer allows the operator to assign a cooking time to control basket lift
operation. The basket rises automatically when the assigned cooking time is complete. It does not
control the fryer, though it may be purchased in a combined panel with a thermostat included.
SETTING THE TIMER
1. Set the cooking time using the arrows beneath the display, as illustrated
at right.
NOTE: Ten seconds is the minimum time that can be set. Anything less
will convert to 10 seconds. This is the amount of time required
for the basket to fully lower into the oil.
2. Press the basket lift timer button to lower the basket into the oil and begin cooking.
The basket lift automatically raises the basket when the timer has counted down. The display changes
to the original total cooking time. Press the basket lift timer button to begin a new cooking cycle using
the same time as the previous cycle; or, press the arrows to change the cooking time for the next cycle.
CANCELLING A COOKING CYCLE
To cancel the cook cycle, press the basket lift timer button. The basket rises and the display shows the
original total cooking time.
NOTE: If the basket-lift timer button is pressed while the basket is in motion (up or down), the button
must be pressed again to allow the basket to continue. Allow 10 seconds for the basket lift to stop
moving.
This basket lift timer is available in many variations. While the front of the fryer may include a thermostat or other
controlling features, this basket lift timer will function as described above.
2–5
CHAPTER 3
DIGITAL CONTROLLER OPERATING INSTRUCTIONS
2
4
5
3
1
6
7
8
ITEM
DESCRIPTION
1
Lighted Display – LED display for a full-pot fryer or the right side of a split-pot fryer.
2
Lighted Display – LED display for the left side of split-pot fryer.
On/Off Switch – Either switch controls a full-pot; on split-pot fryers, each switch controls
3
the frypot on its respective side.
C/F Switch – Toggles the display between Fahrenheit and Celsius on a full-pot fryer, or
4
the right side of a split-pot fryer.
Temperature/Setpoint Display Switch –Toggles the display between frypot temperature
5
and setpoint temperature on a full-pot fryer, or the right side of a split-pot fryer.
Up Arrow – Raises setpoint temperature on a full-pot fryer, or the right side of a split-pot
6
fryer.
Down Arrow – Lowers the setpoint temperature on a full-pot fryer, or the right side of a
7
split-pot fryer.
8
Melt-Cycle Cancel Switch – Cancels the melt-cycle mode of a full-pot fryer, or the right
side of a split-pot fryer.
INTRODUCTION
The Digital Controller allows the operator to program the frypot setpoint and to toggle the display
between the frypot temperature and the programmed setpoint. The setpoint is an operatordetermined frying temperature. When the controller is turned on, it automatically brings the cooking
oil/shortening to the setpoint and maintains it at that temperature until the controller is turned off.
Units manufactured for export to CE countries display the frypot temperature by default. Units
manufactured for other than CE countries display the setpoint by default. This controller also
features a programmable melt-cycle cancel switch and a switch for toggling the temperature display
between Fahrenheit and Celsius.
3–1
NOTE: On full-pot controllers, only the right set of controls is functional, except that either
ON/OFF switch will turn the controller on or off.
The controller has three error display messages:
, indicating a heating problem. Turn the fryer off and call the Frymaster hotline.
and actual frypot temperature, indicating that the shortening temperature is above 395°F
(202°C) [or 410°F (210°C) for CE fryers]. If this display is seen, turn the fryer off immediately and
contact an authorized servicer.
, indicating that the controller has detected a problem in the temperature measuring circuits
and control circuits. Turn the fryer off and contact an authorized servicer.
NOTE: This controller is configured for the fryer on which it installed (i.e., gas or electric and fullor split-pot). Although identical in appearance, controllers configured for use on one type of fryer
are not interchangeable with those configured for use on another type.
CONTROLLER OPERATING INSTRUCTIONS
1. Turn the controller on. On full-pot units, press either ON/OFF switch . On split-pot units,
press the left ON/OFF switch
for the left frypot and the right switch for the right frypot.
The controller software version number will display for four seconds then, in non-CE units, the
setpoint temperature will appear in the display. In CE units, the frypot temperature will appear
for the frypot
in the display – to view the setpoint temperature, press the temperature switch
in question (in full-pot units, use the right switch).
A decimal point will appear between the first two numbers of the display, indicating that the unit
is heating. When the frypot has reached the setpoint temperature, the heat indicator decimal
point will go out, indicating that the fryer is ready for cooking.
2. Adjust the setpoint if necessary. To raise the setpoint temperature, press an up arrow . On
split-pot units, use the left set of controls for the left frypot and the right set of controls for the
right frypot; on full-pot units, use the right set of controls. Press a down arrow
to lower the
setpoint temperature.
The display will change at the rate of approximately one-degree per second initially. If the arrow
is pressed and held, after a change of about 12°, the rate of change will increase, allowing large
changes in setpoint temperature to be made quickly.
SELECTING FAHRENHEIT OR CELSIUS DISPLAY MODE
To toggle the temperature display between Fahrenheit and Celsius, press the right C/F switch
.
The display(s) will change from xxx°F to xxx°C, where “xxx” is the frypot or setpoint temperature.
3–2
CANCELING THE MELT-CYLE
DANGER
Do not cancel the melt-cycle mode if using solid shortening!
The melt-cycle is designed to prevent scorching shortening and overheating the frypot or elements
while gradually melting blocks of shortening. The controller automatically starts the fryer in the
melt-cycle mode and remains in this mode until the frypot temperature reaches 180°F (82°C) or the
melt-cycle is cancelled by the operator. If you are not using solid shortening, you may cancel the
melt-cycle.
To cancel the melt-cycle on a full-pot unit, press the right melt-cycle cancel switch
pot unit, press the left switch for the left frypot or the right switch for the right frypot.
. On a split-
DISABLING OR ENABLING THE MELT-CYCLE CANCEL SWITCH
The controller can be programmed to disable the melt-cycle cancel switch to prevent accidentally
canceling the melt-cycle.
1. With the controller in the OFF mode, press the melt-cycle cancel switch
(for a split-pot, press
the left switch for the left frypot and the right switch for the right frypot; for a full-pot, press the
right switch). The display will show either "0", meaning that the melt-cycle can be bypassed or
a "1" meaning that the melt-cycle cannot be bypassed.
2. To change the bypass configuration, press and hold the melt-cycle cancel switch for five to six
seconds to toggle the "0" to "1" or "1" to "0". Release the switch when the display shows the
desired setting.
3–3
CHAPTER 4
SOLID STATE (ANALOG) CONTROLLER
2
4
5
6
SOLID STATE
1
ITEM
1
2
3
4
5
6
7
3
7
DESCRIPTION
Power Supply Rocker (ON/OFF) Switch – Turns the controller ON or OFF.
Power On Light – Indicates the controller is ON.
Temperature Control Knob – Used to set the desired frying temperature.
Heating Mode Light – Indicates the fryer is heating.
Trouble Indicator Light – Indicates a malfunction of a fryer control circuit or an overheat
condition. Reset by turning the ON/OFF switch OFF for 30 seconds, then back to ON.
Melt Cycle Light – Indicates the unit is operating in the melt-cycle mode. The fryer will
automatically exit the melt-cycle when the frypot temperature reaches 180°F (82°C).
Melt-Cycle Switch – Turns the melt-cycle ON or OFF.
INTRODUCTION
The Solid State Controller (often referred to as an “Analog Controller”) allows the operator to adjust
the frypot temperature by means of a knob and graduated scale on the face of the controller. The
controller also includes a melt-cycle switch and a trouble indicator light.
OPERATING INSTRUCTIONS
1. Press the power supply rocker switch to the ON position. The Power On light and the Heating
Mode light will both illuminate.
2. Rotate the temperature control knob to the desired frying temperature.
3. If using solid shortening, press the melt-cycle switch to the ON position. The melt-cycle is
designed to prevent scorching shortening and overheating the frypot or elements while gradually
4–1
melting blocks of shortening. When in the melt-cycle mode, the fryer will cycle on and off until
the frypot temperature reaches 180°F (82°C) or the melt-cycle mode is cancelled by the operator.
DANGER
Do not cancel the melt-cycle mode if using solid shortening!
During the melt-cycle, the Heating Mode light will alternately illuminate and go out as the fryer
cycles on and off.
4. Once the frypot temperature reaches 180°F (82°C), or the melt-cycle mode is cancelled, the fryer
will automatically go into the heating mode to bring the frypot temperature to that set on the
temperature control knob and will maintain it at that temperature. When the fryer is heating, the
Heating Mode light will be illuminated. When the frypot has reached the temperature set on the
control knob, the Heating mode light will go out, indicating the unit is ready for frying.
TROUBLE INDICATOR LIGHT
On gas fryers equipped with electronic ignition, the Trouble Indicator light will illuminate if there is
an ignition failure. To reset the controller after an ignition failure, place the power supply rocker
switch in the OFF position for at least 30 seconds, and then place it back in the ON position.
For all fryers, the Trouble Indicator light will also illuminate whenever the controller senses a
problem with the probe or high-limit thermostat circuit.
CALIBRATING THE CONTROL KNOB
1. Bring the frypot to frying temperature in accordance with the procedures above.
2. Insert a thermometer or pyrometer probe into the frypot near the fryer temperature-sensing
probe.
3. Let the heating mode light cycle automatically three times to ensure the cooking oil/shortening
temperature is uniform. Stir, if necessary, to get all cooking oil/shortening in bottom of frypot
melted.
4. Whenthe heating mode light illuminates for the fourth time, the pyrometer reading should be
within 5°F (2°C) of the temperature control knob setting. If it is not, calibrate the knob as
follows:
a. Loosen the setscrew in the temperature control knob until the outer shell of the knob will
rotate on the insert inside the knob.
b. Rotate the outer shell of the knob until the index line on the knob aligns with the mark that
corresponds to thermometer or pyrometer reading.
c. Hold the knob and tighten the setscrew.
4–2
d. Recheck the thermometer or pyrometer reading and the temperature control knob setting the
next time heating mode light illuminates.
e. Repeat Steps 4-a through 4-d until the thermometer or pyrometer reading and knob setting
agree within 5°F (2°C).
f. If calibration cannot be attained, call a Factory Authorized Service Center.
4. Remove the thermometer or pyrometer probe.
4–3
CHAPTER 5
THERMOSTAT CONTROLLER OPERATING INSTRUCTIONS
ON
OFF
5
1
4
2
3
ITEM
DESCRIPTION
1
Temperature Control Knob – Use to set thermostat control to desired temperature.
ON/OFF Switch- enables/disables power to fryer components. Switch illuminates when
2
activated.
3
Heating Mode Light – Indicates the fryer is heating.
Melt Cycle Light – Indicates the unit is operating in the melt-cycle mode. The fryer will
4
remain in the melt-cycle until this switch is turned off.
Optional Basket Lift Timers – Lowers respective basket lift when pressed. When timer
5
times-out, the basket lift is raised.
INTRODUCTION
The Thermostat Controller utilizes a thermostat that is directly connected to a temperature knob
mounted on the control panel. Rotating the knob to the desired cooking temperature physically
Switch in the ON
adjusts the thermostat control to that temperature. Placing the ON/OFF
position supplies power to the fryer’s components and causes the switch to illuminate. Placing the
Melt Cycle
Switch in the ON position causes the fryer to cycle on for a few seconds and off for a
longer period. The purpose is to prevent scorching shortening, and to prevent overheating the frypot
or elements while gradually melting blocks of shortening. This switch is also illuminated when in
the ON position. The Heat Mode Indicator
illuminates when the frypot is below setpoint.
DANGER
Do not cancel the melt-cycle mode if using solid shortening!
CAUTION
The fryer will remain in the Melt Cycle mode until turned off by placing the Melt Cycle
Switch in the "OFF" position.
5-1
The Thermostat Controller requires no programming – the operator has only to set the thermostat
knob to the desired cooking temperature. However, the controller does require calibration by a
factory-authorized servicer from time to time, normally every six months.
On fryers equipped with basket lift timers, pressing the button in the center of a timer causes the
associated basket lift to lower the basket into the frypot. At the end of the prescribed cooking time,
the timer will raise the basket from the frypot. The cooking time is set by rotating the timer knob
clockwise until the index mark indicates the desired cooking time.
Although mounted on the same control panel, the basket lift timers are totally independent of the
controller.
5-2
THIS PAGE INTENTIONALLY LEFT BLANK
8700 Line Avenue, Shreveport, Louisiana 71106
TEL 1-318-865-1711
FAX (Parts) 1-318-688-2200
PRINTED IN THE UNITED STATES
FAX (Tech Support) 1-318-219-7135
SERVICE HOTLINE
1-800-551-8633
Price: $6.00
819-5916
SEPT 08