1
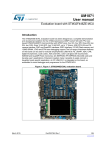
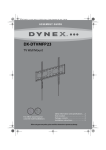
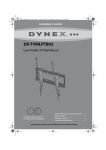
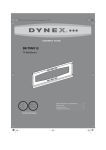
Quick Setup Guide
Soundbar Home Theater Speaker | DX-SB114
Congratulations on your purchase
of a Dynex Soundbar Home
Theater Speaker System.
FEATURES
CONNECT THE SOUNDBAR
Top view
Choose one connection option below that fits your audio source device (e.g., TV, projector,
DVD/Blu-ray player, gaming console etc.).
CONNECT THE SUBWOOFER
(OPTIONAL)
Connect one end of the subwoofer
speaker cable (not included) to the
subwoofer and the other end to the
soundbar.
CAUTION: Turn off or unplug all devices while you are making connections.
NOTE: If you have multiple devices connected to a TV or projector, connecting directly to the TV or projector will ensure
audio plays through your soundbar from all of your devices.
Package contents
Standby
DSP
Standard
Theater
News
BASS
VOL
AUDIO QUALITY
JACK TYPE (on source device)
Back view
Digital optical cable (not included)
GOOD
3.5 mm audio cable (included)
GOOD
RCA Audio cable (included)
Remote control
RCA IN
AC adapter
SUBWOOFER OUT
OPTICAL IN
DC IN
18V
L
R
AUX IN
RCA IN
SUBWOOFER OUT
RCA audio cable
OPTICAL IN
3.5 mm audio cable
Remote control
Wall mounting template
Before using your new product, please read these
instructions to prevent any damage.
#
1
Item
Standby indicator
Description
Lights when the soundbar is in standby mode.
2
(Power) button
and indicator
Press to turn on the soundbar. The indicator lights green.
Press again to return the soundbar to standby mode.
3
(Input) button
DSP (Digital Signal
Processor) button and
indicator
#
10
11
Item
RCA IN (R and L) jacks
AUX IN jack
Press repeatedly to cycle through the sound source options
(RCA>AUX IN>OPTICAL IN).
Press repeatedly to cycle through the DSP sound modes:
• Standard - Lets you enjoy normal sound.
• Theater - Best for enjoying movies. Bass frequencies
are enhanced.
• News - Select for clear voice reproduction.
The corresponding indicator lights to indicate the sound
mode selected.
5
BASS button and indicator
Press to activate the bass frequency enhancement. The
indicator lights green. Press again to turn off the bass
frequency enhancement.
6
VOL +/– buttons
Press to increase or decrease the volume of the soundbar.
7
Hanging brackets
Use to hang the soundbar on a wall.
8
SUBWOOFER OUT jack
Connect a powered subwoofer to this jack.
9
DC IN jack
Connect the AC adapter to this jack to power the soundbar.
SUBWOOFER OUT
OPTICAL IN
CONNECT THE AC ADAPTER
TV, projector, or
DVD/Blu-ray player
Back of the soundbar
CAUTIONS:
• Make sure that the electrical outlet matches the AC adapter’s input requirements of 100-240 V,
50/60 Hz before connecting.
• Use only the AC adapter provided.
• Plug in the AC adapter only after all other connections have been made.
OUTPUT
DIGITAL
OPTICAL
DC IN
18V
L
R
AUX IN
RCA IN
SUBWOOFER OUT
OPTICAL IN
1 Connect the AC adapter to the DC IN jack on the back of the soundbar.
2 Plug the other end of the AC adapter into a power outlet or surge protector.
Digital optical cable (not included)
Back of the soundbar
- OR -
12
4
Digital connections (BEST)
1 Connect one end of the digital optical cable (not included)
to your soundbar. Connect the other end into the Digital
Optical Output port on your audio source device.
2 Change the device’s audio output to 'PCM' format
(typically found in Audio Settings). Refer to the
documentation that came with your audio source device
(e.g., TV, projector, DVD/Blu-ray player, etc.) for more
information.
3 After connecting power, see USING YOUR SOUNDBAR on the
next page.
13
14
15
OPTICAL IN jack
(Power) button
INPUT button
DSP buttons
Description
If your TV (or other audio source device) has RCA OUT jacks,
connect the RCA cables to your source device and these jacks.
If your TV (or other audio source device) has an AUX OUT or
headphone jack, connect the 3.5 mm audio cable to your
source device and this jack.
If your TV (or other audio source device) has an Optical OUT
jack, connect a digital optical cable (not included) to your
source device and this jack.
Press to turn on the soundbar. Press again to return the
soundbar to standby mode.
Press repeatedly to cycle through the sound source options
(RCA>AUX IN>OPTICAL IN).
Press repeatedly to cycle through the DSP sound modes
(Standard>Theater >News ). The corresponding indicator on
the soundbar top panel lights to indicate the sound mode
selected.
16
BASS button
Press to activate the bass frequency enhancement.
17
VOL +/– buttons
Press to increase or decrease the volume of the soundbar.
18
(Mute) button
Press to mute the sound from the soundbar. Press again to
restore the sound.
AUX IN connections (GOOD)
1 Connect the right-angled end of the 3.5mm audio cable to
your soundbar. Plug the other end into the Audio Output
port or headphone jack on your audio source device.
2 After connecting power, see USING YOUR SOUNDBAR on
the next page.
Subwoofer
AUX IN
RCA IN
Subwoofer cable (not included)
- PICK ONE AUX IN
L
R
DC IN
18V
L
R
DC IN
18V
CABLE
BEST
Soundbar
Back of the soundbar
DC IN
18V
L
R
AUX IN
RCA IN
TV, projector, or
DVD/Blu-ray player
SUBWOOFER OUT
OPTICAL IN
Back of the soundbar
OUTPUT
AUDIO
DC IN
18V
L
R
AUX IN
RCA IN
SUBWOOFER OUT
OPTICAL IN
4
POSITION YOUR SOUNDBAR
You can set the soundbar on a flat surface
(go to Step 6).
You can mount your soundbar on the wall
(go to Step 5).
3.5 mm audio cable (included)
- OR -
- OR RCA Audio connections (GOOD)
1 For an RCA audio connection, connect the right-angled
connectors to your soundbar. Connect the other end of the
RCA cables into the Audio Output ports on your audio
source device.
2 After connecting power, see USING YOUR SOUNDBAR on
the next page.
TV, projector, or
DVD/Blu-ray player
Back of the soundbar
OUTPUT
AUDIO
R
L
DC IN
18V
L
R
AUX IN
RCA IN
SUBWOOFER OUT
OPTICAL IN
NOTE: Make sure the cable ends match the color of the ports.
RCA audio cable (included)
OVER
5
Listening to your soundbar
1 Press the
(Power) button to turn on your soundbar or remote control. The power indicator
turns green.
2 Turn on the audio source device connected to your soundbar and begin playback.
3 Press the
button on the soundbar or remote control repeatedly to cycle through the sound
sources until you hear sound from your soundbar.
MOUNTING YOUR SOUNDBAR ON A WALL (OPTIONAL)
YOU WILL NEED:
Screws (2)
Measuring tape
Wall Mounting template
Pencil
Level
Stud finder
(optional for wood
stud installation)
Drill and
drill bit
Hammer
#10 wood screw (or similar)
1 1/2" length
NOTE: If you use the OPTICAL IN connection, change the source device’s audio source to ‘PCM’ format. Refer to
the documentation you received with the audio source device, such as your TV, for additional information.
Screwdriver
4 Adjust the volume on your soundbar or the audio source device to a comfortable level.
Tape
WARNING: Continuous use of high volume sound may permanently damage your hearing.
Wall anchors (2)
5 Press the
NOTE: Mounting instructions are also provided on the wall mounting template.
1 Select a location close to your TV and directly in front of the viewing/listening position. For best
sound quality, choose a location where sound waves are not blocked by furniture or other obstacles.
2 Position the wall mount template where you want to mount it and make sure it is level (A). Tape it to
the wall (B), then use a pencil to mark the screw hole locations (C). Remove the wall mount
template.
A
B
C
TROUBLESHOOTING
Check this list for a possible troubleshooting solution before calling for service (800-305-2204).
Also, check the online FAQs at dynexproducts.com.
Problem
Possible Solutions
The power does not
come on.
• Make sure that the AC adapter is securely plugged into the power outlet and the soundbar.
The remote control
does not work.
•
•
•
•
Remove any obstacles in the path between the remote control and the soundbar IR sensor.
Replace the battery.
Point the remote control at the remote control sensor on the soundbar.
Move closer to the soundbar. The remote control reach is approximately 23 ft.
•
•
•
•
•
•
•
Make sure that the volume level of the soundbar or your source device is set to an adequate level.
Make sure that the volume is not muted. Press the (mute) button on the remote control.
Make sure the correct audio source is selected. Press the button repeatedly to switch to the correct audio source.
Make sure that the sound mode is suitable for the audio source. Press the DSP button to select a proper sound mode.
Make sure the power is on and all connections are secure.
Make sure the audio cable is connected to the Audio Output (not the Audio Input) on your source device.
If you are connected to an MP3 player, make sure the volume is turned up on the MP3 player.
Wall
3 Install wall anchors (not included) into the marked locations using the instructions that came with
your anchors.
NOTES:
• If you have drilled into a stud, wall anchors are not required.
• See the instructions that came with your wall anchors to determine the drill bit size.
No sound or very
low-level sound is
heard from the
soundbar.
CAUTION: Use wall anchors designed for your wall type.
4 Secure two screws (not included) into the wall or wall anchors (if necessary). The screws must
protrude from the wall by about 1/2" (12.7 mm). Use a #10 wood screw (or similar) 1 1/2" in length.
16 in. (406 mm)
Note: The sound modes are memorized for each input, unless you disconnect the AC adapter from the wall outlet.
Your soundbar is not
working properly.
• Unplug the AC adapter from the wall outlet and then try plugging it in again after 30 seconds.
The sound is breaking
up or buzzing.
• Make sure all connections are secure and cables are not broken or damaged.
• If you are using the OPTICAL IN connection, make sure the source device’s audio source is set to “PCM” format. Refer
to the documentation your received with the audio source device (e.g. TV, projector, DVD/Blu-ray player, etc.) for
additional information.
• Connect to a different source device (e.g. TV, projector, DVD/Blu-ray player) to see if the buzzing still occurs. If it does
not, this may be an issue with the original source device.
• Use a different connection method (e.g. try Optical instead of AUX) between the soundbar and the source device to
make sure the jacks on both devices are still working.
½ in. (12.7 mm)
5 Align the speaker hanging brackets with the screws, then hang the soundbar on the screws.
WARNING: Improper installation can result in
serious injury or damage to your soundbar. If
necessary, seek the assistance of a professional.
(Power) button again to turn off your soundbar. The standby indicator lights red.
• Turn off or mute the internal speakers of your source device. Refer to the device manual for instructions.
I can hear sound from
my TV and my soundbar.
My TV remote does not • Controlling your soundbar with your TV remote is a feature of your TV. See the documentation that came with your TV.
control the volume of
my soundbar.
6
USING YOUR SOUNDBAR
Using the remote control
1 Remove the plastic tab from the battery compartment before using the remote control for the first time.
2 Point the remote control directly at the IR sensor on the front of the soundbar. You must be within
approximately 23 ft. (7 m) of the soundbar.
IR sensor
IMPORTANT SAFETY INSTRUCTIONS
1
2
3
4
5
6
7
8
9
Read these instructions.
Keep these instructions.
Heed all warnings.
Follow all instructions.
Do not use this apparatus near water.
Clean only with dry cloth.
Do not block any ventilation openings. Install in accordance with the manufacturer's instructions.
Do not install near any heat sources such as radiators, heat registers, stoves, or other apparatus (including amplifiers) that produce heat.
Do not defeat the safety purpose of the polarized or grounding-type plug. A polarized plug has two blades with one wider than the other. A
grounding type plug has two blades and a third grounding prong. The wide blade or the third prong are provided for your safety. If the
provided plug does not fit into your outlet, consult an electrician for replacement of the obsolete outlet.
10 Protect the power cord from being walked on or pinched particularly at plugs, convenience receptacles, and the point where they exit from the
apparatus.
11 Only use attachments/accessories specified by the manufacturer.
12 Use only with the cart, stand, tripod, bracket, or table specified by the manufacturer, or sold with the apparatus.
When a cart is used, use caution when moving the cart/apparatus combination to avoid injury from tip-over.
13 Unplug this apparatus during lightning storms or when unused for long periods of time.
14 Refer all servicing to qualified service personnel. Servicing is required when the apparatus has been damaged in any way, such as power-supply
cord or plug is damaged, liquid has been spilled or objects have fallen into the apparatus, the apparatus has been exposed to rain or moisture,
does not operate normally, or has been dropped.
15 To reduce the risk of fire or electric shock, do not expose this device to rain, moisture, dripping, or splashing, and no objects filled with liquids,
such as vases, shall be placed on it.
16 An apparatus with a three-prong, grounding-type plug is a Class I apparatus, which needs to be grounded to prevent possible electric shock.
Make sure that you connect any Class I device to a grounding-type, three-prong outlet.
17 The wall plug is the disconnecting device. The plug must remain readily operable.
18 Batteries should not be exposed to excessive heat such as sunshine, fire, or the like.
WARNING: Danger of explosion if battery is incorrectly replaced. Replace only with the same or equivalent type.
Placement
•
•
•
The soundbar cabinet is made out of plastic and is therefore sensitive to extreme temperatures and humidity, do not put it in locations subject
to direct sunlight or in humid places, such as near an air conditioner, humidifier, bathroom, or kitchen.
Do not put water or other liquids close to the soundbar. If liquid is spilled over the soundbar, it may be damaged.
The soundbar should be placed on a sturdy, flat surface that is free from vibration, or mounted on a wall. Do not put the soundbar on an uneven
or unstable surface, where it may fall and cause damage.
Using close to a TV or computer
Some older TVs and computer monitors are magnetically sensitive devices and as such are likely to suffer discoloration or picture distortion when
conventional speakers are placed nearby. If discoloration problems persist, try moving the soundbar away from your TV or monitor.
LEGAL NOTICES
FCC Statement
This device complies with Part 15 of the FCC Rules. Operation is subject to the following two conditions: (1) this device may not cause harmful
interference, and (2) this device must accept any interference received, including interference that may cause undesired operation.
This equipment has been tested and found to comply with the limits for a Class B digital device, pursuant to Part 15 of the FCC Rules. These limits are
designed to provide reasonable protection against harmful interference in a residential installation. This equipment generates, uses and can radiate
radio frequency energy and, if not installed and used in accordance with the instructions, may cause harmful interference to radio communications.
However, there is no guarantee that interference will not occur in a particular installation. If this equipment does cause harmful interference to radio
or television reception, which can be determined by turning the equipment off and on, the user is encouraged to try to correct the interference by
one or more of the following measures:
• Reorient or relocate the receiving antenna.
• Increase the separation between the equipment and receiver.
• Connect the equipment into an outlet on a circuit different from that to which the receiver is connected.
• Consult the dealer or an experienced radio/TV technician for help.
FCC warning: Changes or modifications not expressly approved by the party responsible for compliance with the FCC Rules could void the user’s
authority to operate this equipment.
CANADIAN NOTICE
CAN ICES-3 (B)/NMB-3(B)
Standard Television Receiving Apparatus — Appareil de réception télévision ordinaire, Canada BETS-7 / NTMR-7.
ONE-YEAR LIMITED WARRANTY
Visit www.dynexproducts.com for details.
CONTACT DYNEX:
SPECIFICATIONS
Designs and specifications are subject to change without notice.
Dimensions (approx.)
31.5 × 3.5 × 2.7 in. (800 × 89 × 70 mm)
Weight
4.4 lbs. (2 kg)
Power source
20 W per channel at 10% THD
Frequency response
150 Hz ~ 15 kHz
Subwoofer source
2V
For customer service, call 800-305-2204 (U.S. and Canada) or 01-800-926-3020 (Mexico)
www.dynexproducts.com
DYNEX is a trademark of Best Buy and its affiliated companies.
Registered in some countries.
Distributed by Best Buy Purchasing, LLC
7601 Penn Ave South, Richfield, MN 55423 U.S.A.
©2014 Best Buy. All rights reserved.
Made in China
V1 ENGLISH 14-0550