1
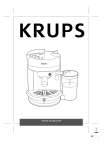
instr uctions
Coffee Maker
EC5/7
Strength selector
(depending on model)
Water tank
Cap with safety valve
Steam knob
Boiler outlet
Steam tube
Drip tray
ON/OFF Switch
Drip tray
Measuring spoon
Carafe with lid
Filter
Steam nozzle
Filter holder
Adaptor for cups (if fitted)
Nozzles
Coffee Maker EC5/7
2
Thank you for choosing this coffee machine. To get the very
best out of your new coffee machine it is advisable to read
these instructions before using the appliance. This is the only
way to ensure optimum results and maximum safety.
Using for the first time
Carefully unpack the coffee maker and remove all the packaging
material. Before using wash the accessories and surfaces. Do not
immerse the coffee maker in water; simply wipe with a cloth and
mild detergent if necessary. Do not put in the dishwasher or use
harsh, abrasive cleaners.
For the best tasting results prior to making coffee we recommend
that you flush the coffee maker out with cold water only, without
using coffee to remove any dust which may still be inside the coffee maker. To do this follow the directions ‘Preparing the coffee’.
Installation
• Place the coffee maker on a flat work surface at a safe distance
from taps and sinks.
• Check that the voltage corresponds to that indicated on the
appliance rating plate.The appliance must always be connected
to a well-earthed socket rated at 10A minimum.The manufacturer is not liable for damage caused by inadequate earthing of
the appliance.
• In the event of incompatibility between the plug on the appliance and the socket, have the plug replaced by a qualified service engineer.
If the cable is damaged or requires replacing, contact a service
centre authorised by the manufacturer only.
• Never install the machine in an environment that can reach a
temperature less than or equal to 0°C (the appliance may be
damaged if the water freezes).
3
Coffee Maker EC5/7
How to prepare the espresso coffee
1 Unscrew the water tank cap by turning it anti-clockwise.
fig. 1
2 Using the carafe supplied (fig. 1) pour water into the boiler (fig.
2) according to the amounts shown in the table on page 10.
Do not exceed the amounts shown as this could cause the
appliance to malfunction.
While filling the boiler make sure the ON/OFF switch is in the
OFF position.
3 Carefully close the boiler cap by turning it clockwise.
4 Insert the filter into the filter-holder. (fig. 3).
5 Fill the filter with ground coffee using the measures described in
the table (page 10) about 7 g per cup. Fill the filter evenly in
small doses to prevent the ground coffee from overflowing. (fig.
4).
fig. 2
IMPORTANT: Before adding the ground coffee to the filter
holder, make sure there is no coffee left from previous usage.
It is important to use medium ground coffee. (Avoid using too
finely ground coffee otherwise the filter can become blocked).
6 Remove any excess coffee from the filter rim (fig. 5).
7 Attach the filter holder to the machine by positioning the handle to the left of the boiler outlet, then pushing upwards and
turning the handle to the right (fig. 6).
fig. 3
8 Place the carafe with the lid on the drip tray, make sure the
nozzles on the filter holder fit inside the opening on the carafe’s
lid (fig. 7).
Make sure that the steam knob is turned off.
fig. 4
fig. 5
fig. 6
Coffee Maker EC5/7
6
4
fig. 7
9 If the machine is supplied with a strength selector, position the
lever according to the flavour of coffee desired, “light”, “medium” or “strong” (fig.8).
10 Press the ON/OFF switch (fig. 9). The switch will light up.
11 The coffee will start to flow after approximately three minutes.
Turn off the power switch after sufficient coffee has been dispensed.
12 Before unscrewing the boiler cap or removing the filter holder,
residual pressure must be released by slowly turning the steam
knob (fig. 10) so that the residual steam can escape.
Note: for safety reasons the cap turns freely and cannot be
opened when the boiler is hot.The tank therefore cannot be
refilled until all the water has been used or the boiler cools
down (to make this a quicker process, open the steam knob).
13 To detach the filter holder, turn the handle from right to left.
To remove the used coffee lock the filter with the built-in lever
and let the coffee fall out by knocking the over turned filter
holder.
8
fig. 8
fig. 9
Coffee made directly into cups
The carafe can be used to make 2 or 4 cups of coffee.
If you prefer to make 2 cups only, fit the adaptor for cups to the
lower section of the filter-holder (fig. 12) and place the cups directly underneath the nozzles. In this way, the coffee will flow directly
into the cups.
fig. 10
fig. 11
1
fig. 12
5
Coffee Maker EC5/7
Making Cappuccino
A cappuccino is an espresso coffee with a froth topping made by
heating milk.
• Fill a heat resistant container/jug with approximately 3 fl.oz. of
cold milk for each cappuccino or refer to the table (page 10).
The milk should be cold from the refrigerator and semiskimmed as this gives the best results.When choosing the container bear in mind that the volume of milk will increase 2 or 3
times.
fig. 13
Models without strength selector
fig. 14
fig. 15
fig. 16
1
1 Follow the steps 1-10 in the paragraph "Making Espresso
Coffee".
Note that the amount of water needed to make 2 cups of cappuccino is greater than that required for 2 cups of normal coffee as it is also necessary to produce the steam to froth the
milk.
2 Place the steam nozzle in the milk ensuring that the nozzle
opening is just under the surface of the milk, as shown in fig. 13
and open the steam valve by turning the steam knob anti-clockwise.
3 Move the jug up and down under the steam nozzle as in fig. 14
(this will give maximum froth).
4 Froth the milk until there is sufficient froth, then turn the steam
knob clockwise to close the steam valve.
5 Allow the coffee to drip through the filter holder into the
carafe, it takes about 3 minutes,then switch the appliance OFF.
Warning: always empty the boiler of any residual water or
steam after using the appliance by slowly turning the
steam knob which will release the residual steam.
6 Pour the coffee into 2 large cups then gently pour, or preferably
spoon the frothy milk onto the coffee, then sprinkle on a little
chocolate powder for perfect cappuccino coffee.
7 If more cups of cappuccinos are required follow the instructions
above, first ensuring that the boiler has cooled down.
Models fitted with strength selector
1 Follow the steps 1-10 in the paragraph "Making Espresso
Coffee".
For best results the strength selector should be set to “MEDIUM”.
2 Allow the coffee to drip into the jug until it reaches the number
2 marked on the side of the jug, then select "CAPPUCCINO".
Follow steps 2-3 in the paragraph “Models without strength
selector” to froth the milk for cappuccino.
Coffee Maker EC5/7
6
3 Froth the milk until the steam in the boiler has been completely
used then turn the steam knob clockwise to close the steam valve
and set the ON/OFF switch to “OFF”.
Follow steps 6-7 to finish your cappuccino.
Cleaning the milk frother
IMPORTANT: always clean the milk frother and steam
nozzle immediately after use.
Proceed as follows:
• By turning the steam knob (fig. 15), allow a little steam to
come out for a few seconds.
• Unscrew the steam nozzle by turning clockwise (carefully to
avoid being burnt). Check that the 3 holes shown in fig. 16 are
not blocked. If necessary, clean them with the help of a pin
• Wash the steam tube and steam nozzle thoroughly with warm
water.
• Re-attach the steam nozzle.
Hints
Making good espresso and cappuccino is not difficult however it
does require practice.The following tips will help you get the best
results from your machine:
• Warm the cups before filling with coffee.
• Use an espresso coffee for best results.
• Freshly ground coffee provides the best flavour.To maintain
flavour, fresh coffee is best stored in an airtight container in a
cool place, even in the fridge.
7
Coffee Maker EC5/7
Cleaning the filter holder
About every 300 coffees, clean the filter holder for ground coffee
as follows:
• Remove the filter
• Clean the inside of the filter holder. Never wash in a dishwasher.
• Rinse all components and clean the metal filter thoroughly in hot
water using a brush (fig. 17). Make sure the holes in the metal filter are not blocked. If necessary, clean with a pin (fig. 18).
Failure to clean as described above invalidates the guarantee.
fig. 17
Cleaning the espresso boiler outlet
About every 300 coffees, the espresso boiler outlet must be
cleaned as follows:
• check that the coffee machine is not warm and unplug from the
mains;
• using a screwdriver, unscrew the two screws that hold the outlet of the espresso boiler (fig. 19);
• clean the boiler with a damp cloth (fig. 20);
• clean the outlet thoroughly in hot water using a brush. Make
sure the holes are not blocked. If necessary, clean with a pin.
• rinse the outlet under the tap, still scrubbing it;
• replace the outlet of the espresso boiler ensuring the screws
are replaced firmly.
Failure to clean as described above invalidates the guarantee.
fig. 18
Descaling
fig. 19
It is advisable to clean the calcium from the machine every 300
cups of coffee. It is recommended that the specific (store-bought)
products for descaling espresso coffee machines be used.
Safety Warnings
2
fig. 20
• This appliance is designed to make coffee.Take care during use
to avoid burns caused by sprays of hot water or steam and
avoid any improper use
• When the appliance is in use, do not touch any of the machine’s
hot surfaces.
• After unpacking, make sure that the machine is complete and
undamaged. In case of doubt, do not use the appliance and seek
the advice of a qualified service professional.
• Packaging materials (plastic bags, foam polystyrene, etc.) should
not be left within the reach of children as this could be a
potential source of danger.
• This appliance is to be used for domestic use only. Any other
use is to be considered improper and therefore, dangerous.
Coffee Maker EC5/7
8
• The manufacturer takes no responsibility for damage derived
from improper use.
• Never touch the appliance with wet or damp hands.
• Never allow the appliance to be used by children or unfit persons.
• Do not allow children to play with the appliance.
• In the event of breakdown or malfunctioning, turn the appliance
off immediately and do not touch. For repairs, please contact a
Service Centre authorized by the manufacturer. Failure to observe
the above points may affect the safe use of the appliance.
• The power cable must never be replaced by the user. If the
cable should become damaged, or needs to be replaced, please
contact a Service Centre authorized by the manufacturer.
• When the appliance is not in use, turn off and disconnect the
plug from the socket.
• As with any electrical appliance, whilst the instructions aim to
cover as many eventualities as possible, caution and common
sense should be applied when operating your appliance, particularly in the vicinity of young children.
9
Coffee Maker EC5/7
Table
To make
Water quantity in the carafe
Coffee quantity
in the filter
Milk quantity
in the carafe
2 espressos
4
2
2 cappuccinos
Use Max. 1 carafe filled to the
level 4
Water level must coincide with steam
symbol on the carafe
4
2
4 espressos
4
2
Use Max. 2 carafes filled to the
level 4
Water level must coincide with the
bottom part of the metal band
4 cappuccinos
4
2
Coffee Maker
10
Electrical requirements
Before using this appliance ensure that the voltage indicated
on the product corresponds with the main voltage in your
home, if you are in any doubt about your supply contact your
local electricity company.
The flexible mains lead is supplied connected to a B.S. 1363 fused plug
having a fuse of 13 amp capacity. Should this plug not fit the socket outlets in your home, it should be cut off and replaced with a suitable plug,
following the procedure outlined below.
Note: Such a plug cannot be used for any other appliance and should
therefore be properly disposed of and not left where children might find
it and plug it into a supply socket - with the obvious consequent danger.
N.B. We recommend the use of good quality plugs and wall sockets that
can be switched off when the machine is not in use.
important: the wires in the mains lead fitted to this appliance are
coloured in accordance with the following code:
Green and Yellow to Earth
13 amp
Fuse
Brown
to Live
Blue to
Neutral
GREEN ANDYELLOW EARTH
BLUE
NEUTRAL
BROWN
LIVE
As the colours of the wires in the mains lead of this appliance may not
correspond with the coloured markings identifying the terminals in your
plug, proceed as follows:
The wire which is coloured green and yellow must be connected to the
terminal in the plug which is marked with the letter E or by the earth
symbol
or coloured green or green and yellow.
The wire which is coloured blue must be connected to the terminal
which is marked with the letter N or coloured black.
The wire which is coloured brown must be connected to the terminal
which is marked with the letter L or coloured red.
When wiring the plug, ensure that all strands of wire are securely
retained in each terminal. Do not forget to tighten the mains lead clamp
on the plug. If your electricity supply point has only two pin socket outlets, or if you are in doubt, consult a qualified electrician.
Should the mains lead ever require replacement, it is essential that this
operation be carried out by a qualified electrician and should only be
replaced with a flexible cord of the same size.
After replacement of a fuse in the plug, the fuse cover must be refitted.
If the fuse cover is lost, the plug must not be used until a replacement
cover is obtained. The colour of the correct replacement fuse cover is
that of the coloured insert in the base of the fuse recess or elsewhere
on the plug. Always state this colour when ordering a replacement fuse
cover.
Only 13amp replacement fuses which are asta approved to B.S. 1362
should be fitted.
This appliance conforms to the Norms EN 55014 regarding the suppression of radio interference.
Warning - this appliance must be earthed
11
Coffee Maker EC5/7
Cord Clamp