1
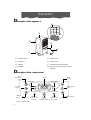
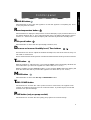
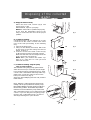
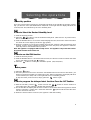
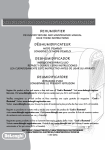
T
hank you for choosing this appliance. This Owner's Manual will provide you with valuable
information necessary for the proper care and maintenance of your new appliance. If properly maintained, your appliance will give you many years of trouble-free operation. Please
take a few moments and read the instructions thoroughly and familiarize yourself with all of
the operational aspects of this appliance.
This unit can be conveniently moved from room to room within your home and set-up in just minutes.
I M P O R TA N T S A F E G U A R D S
Read all instructions before using this dehumidifier. To reduce the risk of fire, electric shock, or injury to persons when using your dehumidifier follow basic safety precautions, including the following:
1) After transporting the appliance, wait 1 hour before using it.
2) Do not store or use gasoline, oil, sulphur or other flammable vapors and liquids in the vicinity of
this or any other appliance. Do not install the appliance near source of heat. Read product labels
carefully. Common sense and caution must be used when installing, operating and maintaining any
appliance.
3) This appliance must be used by adults only. Do not allow children to play with the appliance. Do not
leave children unattended in an area where the appliance is operating. Do not allow them to
sit or stand on the appliance.
4) This appliance is designed to dehumidify domestic living areas, and must not be used for other
purposes. It must be operated in an encolsed area to be most effective. Close all doors,
windows, and other outside openings to the room.
5) The appliance must not be modified in any way, as any modifications may be extremely dangerous.
6) Do not operate any appliance with a damaged cord or plug or after the appliance malfunctions, or
has been damaged in any manner. Return appliance to the nearest authorized service facility for
examination, repair or adjustment.
7) The use of accessory attachments is not reccommended by the appliance manufacturer. It may
cause injuries.
8) Do not use outdoors.
9) For your safety and protection, this dehumidifier is equipped with a three prong grounding plug on the
power cord. Do not, under any circumstances, cut or remove the round grounding prong from the plug.
10) Your dehumidifier must plug directly into a properly grounded and polarized three-prong outlet.
If the wall outlet will not accept a three prong plug, or if you are not sure the outlet is adequately
grounded or protected by a time delay fuse or circuit breaker, have a qualified electrician install the
proper outlet. Do not use an extention cord or an adapter plug.
11) Never unplug the dehumidifier by pulling on the power cord. Always grip the plug firmly and pull
straight out from the outlet. Do not pinch, bend, or knot the power cord.
12) Always remove the plug from the socket before performing cleaning or maintenance operations
and when not in use.
13) Do not place heavy or hot objects on the top of the appliance.
14) Clean the air filter at least once a week.
15) The appliance must always remain upright or laid on one side during transportation. Remember to
drain the tank before transporting the appliance.
16) WARNING: Handling the cord on this product will expose you to lead, a chemical known to the State
of California to cause [cancer, and] birth defects or other reproductive harm. Wash hands after hand
ling.
SAVE THESE INSTRUCTIONS
THIS PRODUCT IS FOR HOUSEHOLD ONLY
3
ENGLISH
I n t r o d u c t i o n a n d Wa r n i n g
Description
D
escription of the appliance
4
1
2
5
6
3
7
8
1.
Control panel
5.
Water Tank
2.
Cabinet
6.
Power Cord
3
Wheels
7.
Continuous Draining Outlet
8.
Pump connection (only on some
4.
Air Filter
models)
D
escription of the control panel
Room
temperature
button
°F/°C
MODE
button
Display
ON light
Defrost light
Fan speed
button
TURBO POWER
button
Pump light *
Tank warning light
TIMER
button
* (only on some models)
4
Decrease
humidity level/
time button
STAND-BY
button
Increase
humidity level/
time button
PUMP button *
S
TAND-BY button
Press this button to start /stop the appliance. To turn the appliance completely off, remove the plug from the outlet.
R
oom temperature button
Press this button to display the Temperature on the LCD display. If you press the button once
the display will show the °F . If you press the button twice, the display will show the temperature in °C. After few seconds, the display will automatically show the humidity level.
F
AN speed button
Press this button to select the Fan Speed (High, Medium, Low).
D
ecrease or increase Humidity Level/ Time buttons
These buttons are used to adjust the desired humidity level, with 5% increments; they are
also used to set the timer.
From 0 -10 the hours increase by 30 min. and from 10-24 the hours increase by 1 hour increments.
T
IMER button
With the appliance switched ON, if you press the TIMER button the display will show the
hours after which you want the appliance to switch OFF (1-2-3... hours ).
With the appliance in the STAND-BY position, if you press the TIMER button the display will
show the hours after which you want the appliance to switch ON (1-2-3... hours ).
M
ODE button
Press this button to select the Fan only or Dehumidifier modes.
T
URBO POWER button
Use this button to activate the “turbo power” function. In this mode, the appliance will
operate at maximum fan speed and in continuous mode. If pressed again, the unit will
revert back to previous settings.
P
UMP button (only on pump models)
Use this button to activate the heavy-duty pump system for active drainage.
5
ENGLISH
Control panel
Display lights
O
N light
When the STAND-BY button is pressed to start the unit, the ON light will come on automatically. The light will go off again when the unit is switched off.
NOTE: After a power outage, the unit will not switch itself on again automatically. When the
power supply has been reestablished, please press the STAND-BY button to start the unit
again.
T
ANK Warning light
If the water tank is full, improperly positioned or missing, the tank warning light will start
blinking.
An alarm will sound until the tank is either emptied or correctly positioned into place.
D
EFROSTING light
With an ambient temperature of less than 15°C, (59°F) the appliance performs defrosting
cycles.
While the appliance is defrosting, the defrosting light comes on and remains on until defrosting is completed.
During the defrosting cycle only the following 4 keys are active:
pump button, stand-by button, temperature button, timer button.
P
UMP light (only on some models)
Once the pump button is pressed the pump light will switch on.
If the pump light flashes it means that the pump is not functioning properly.
6
1. Allow at least 12 inches (30cm) of space on all sides of the unit for good air circulation.
2. Install your dehumidifier on a floor, table, or shelf. When installing the unit on a table or shelf,
make sure the table or shelf is strong enough to support the weight of the unit with a full
bucket.
Note: The dehumidifier needs to be secured when installed on a table or a shelf.
Do not sit or stand on the dehumidifier.
3. The tank must be properly positioned.
4. Castor wheels let you move the dehumidifier easily.
.
in )
1 20 c m
3
(
.
in m)
1 20 c
(3
Choosing the proper location for the unit
1. Use the unit in a basement to help prevent moisture damage.
2. Use the unit in cooking, laundry, bathing, and dishwashing areas that have excessive moisture.
3. Use the unit to prevent moisture damage anywhere books or valuables are stored.
4. Place the unit where you want to have comfortable conditions.
List of components
For models equipped with pump system:
• 16 ft. (5 m) clear hose with Quick-Connect connection
• 3 ft. (1 m) clear hose
For all other models:
• 3 ft. (1 m) clear hose
Required tools and assembly time
Collection tank:
No assembly or plumbing necessary.
Continuous draining outlet:
To use the Continuous Draining feature the following tools will be necessary:
• 1.5mm (0.2 in.) drill bit (to drill open the draining outlet)
• Drill tool
The estimated assembly time is 1-2 minutes.
Pump system and Quick-Connect 16ft. hose (only on models equipped with pump system):
No tools necessary. The estimated assembly time is 1-2 minutes.
7
ENGLISH
Installation Instructions
Disposing of the collected
water
A) Empty the tank manually.
When the tank is full, remove (fig.1) and
empty it into a sink.
When finished, replace it properly.
NOTE: The tank must be positioned properly.
If you hear the intermittent sound of the
beep, it means the tank is not in the proper
position.
fig. 1
B) Continuous draining.
Condensed water can be drained via a hose
connected to the outlet located in the lower
part of the tank proceeding in the following
way:
1. remove the water tank.
2. Using a 5 mm drill bit, (0.2 inches) drill a hole
in the base of the tank along the torus as
shown in figure 2.
3. Connect a hose to the hose connector (fig.
3). Be sure the hose does not kink or bend.
Make sure that the hose is not higher than the
hose connection (see figure 4).
NOTE: When you remove the rubber cap
keep it in a safe place in case you want
drain into the tank.
Drill
fig. 3
C) Continuous draining using the pump
(only on pump models)
The exclusive heavy-duty pump system allows
water removal of up to 13.12 feet (4m) in height.
If you want the water to flow directly to a drain,
connect the condensation discharge tube supplied to the connection pipe located on the
lower part of the unit (Fig. 5).
Select the dehumidifying function and press the
PUMP button.
Note: With the condensation discharge hose
missing and the pump switched ON, the pump
light will start blinking and the appliance will be in
the stand-by position. To eliminate this problem
insert the hose and switch the pump button ON.
The condensation hose can be discharged into
a drain. If you are using the heavy-duty pump
function, the condensation hose can also be
discharged through an open window.
fig. 2
Hose
fig. 4
Drain
SH
1 PU
2
fig. 5
8
S
tand-by position
Once the power outlet is plugged in, the display will show on the left side the degree of humidity you want to reach (the default data is 60) and on the right side the display will show (for
a minute) two dots, followed by the room humidity level.
H
ow to Select the Desired Humidity Level
1) Push the stand-by button.
2) Press the
button to set the desired humidty level. (30% means a dry environment,
80% a humid environment).
3) Push the MODE button to choose the dehumidifying function; the function is selected when
the small dot on the display is under the
symbol).
4) When the appliance reaches the humidity set point the appliance will automatically stop
working. As soon as the humidity increases above the set point, the appliance will automatically resume dehumidification operation.
Note: The appliance is equipped with a safety device. The appliance only works after 3 minutes from the last time it was turned off.
H
ow to use the FAN function
1) Push the stand-by button.
2) Push the MODE button to choose the FAN function; the function is selected when the small
dot on the display is under the
symbol).
3) Press the
button to modify the ventilation speed (min/med/max).
T
urbo power
1) Press the
button.
2) The turbo power function is an automatic dehumidification function that is used when you
wish to operate the appliance at maximum power. When in this mode, the display will show
on the left side (two dots) and on the right side the room humidity present.
To stop the turbo power function, simply press the
button again.
H
ow to program the delayed start function: From the OFF Position
1) With the unit OFF, press the
button and use the
button to set the number of
hours after which the appliance should start functioning.
2) On the left side the display will show the number of hours after which the appliance should
start the operation (1-24h) and a small dot under the
symbol indicates that the timer
function has been selected.
3) When the selected time is reached, the appliance will start working.
9
ENGLISH
Selecting the operations
Selecting the operations
H
ow to Program the delayed stop function: From the ON Position
1) Press the
button and use the + or - button to set the number of hours after which the
appliance should stop functioning.
2) The left side the display will show the number of hours after which the appliance should stop
the operation (1-24h) and a small dot under the
symbol indicates that the timer function has been selected.
3) When the selected time is reached, the appliance will stop working.
10
• The safety device has
been activated
ENGLISH
Care and Maintenance
WARNING
Electrical Shock Hazard
Always disconnect power supply cord from outlet before performing any maintenance.
Failure to follow the below precautions could result in the electrical shock or personal
injuries.
M
aintenance
Your dehumidifier is designed to serve you year-round.
Listed below are the care and maintenance instructions
C
leaning the Front Panel and Cabinet
• Using a soft cloth, clean the front panel and cabinet with warm water and a mild soap or
detergent. NOTE: Never sprinkle water into the appliance in order to prevent risk of shortcircuit and fire.
• Never use gasoline, thinner or any other similar chemicals for cleaning.
• Do not use bleach or abrasives.
C
leaning the Air Filter
If the filter is dirty, air circulation is compromised and the efficiency of the dehumidifying
decreases. It is therefore good practice to clean the filter at regular intervals. The frequency
depends on the duration and conditions of operation.
• To remove the air filter, pull it out (Fig. 6).
• Use a vacuum cleaner to remove dust accumulations from
the filter. If the filter is very dirty, wash in warm water and
rinse several times.
• After washing the filter, allow it to dry completely before
replacing it.
fig. 6
11
Tr o u b l e s h o o t i n g t i p s
Often times, a problem is minor and a service call may not be necessary. Use this troubleshooting guide to identify possible problems you may be experiencing.
Problem
Unit does not operate
Possible cause
•Check power cord connection.
•Check if water tank is full
•Check water tank is properly installed.
•Check if the unit is not turned on.
•The desired humidity may
be lower than the room
humidity.
Remedy
•Plug into the power outlet
•Empty the tank
•Position the tank correctly
•Turn the unit on
•Clean the filter
Dehumidifying capacity (moi- •Air filter is dirty and /or
blocked.
sture removal) low
•Ambient room temperature •Increase the room tempetoo low.
rature
•Poor airflow
•Improve the airflow
circulation/obstruction
•The desired humidity is lower
then the room humidity
Relative Humidity setting not •There are windows or
doors opened
reached after long period of
•Area/room is too large for
operation
the capacity of the dehumidifier
•Check that the doors and
the windows are closed.
The appliance does not work • The safety device has
in the 3 minutes since the last
been activated
swith off
•Wait 3 minutes to pass
The display shows
“E1”/“E2”/“E3”
The pump lamp blink
12
•Contact the Service
Center
• The condensation discharge hose is not positioned
corretly or is bent.
•The pump does not work.
• Contact the Service
Center
ENGLISH
L i m i t e d Wa r r a n t y
This warranty applies to all home appliances with De’Longhi or Kenwood brand names.
FOR CONTIGUOUS UNITED STATES ONLY
Limited Warranty
We warrant each De’Longhi appliance to be free from defects in material and workmanship.
From the purchase date, our obligation under this warranty is to provide one (1) year free parts
and labor on the entire appliance, with an additional four (4) years free on any part of the sealed system consisting of the compressor, evaporator, condenser and factory connected refrigerant tubing. Labor and all other parts during the additional four (4) year warranty are to be
paid by the owner. All appliances in need of repair are to be shipped to an authorized
De’Longhi service center at the owner’s expense, and De’Longhi will then incur the return shipping costs. After the first five (5) years of ownership, all expenses (all parts, labor and shipping)
are to be paid by the owner of the unit. This warranty shall apply only if the appliance is used
in accordance with the factory directions that accompany it, and on an Alternating Current
(AC) circuit. This warranty is in lieu of all other warranties and representations, expressed or
implied, and all other obligations or liabilities on our part. We do not authorize any other person or company to assume for us any liability in connection with the sale or use of our appliance. This warranty shall not apply to any appliance that has been repaired or altered outside
our factory nor shall it apply to any appliance that has been subjected to misuse, negligence
or accidents.
If repairs become necessary, see contact information below:
U.S. Residents:
Please contact our toll free hotline at 1-800-322-3848 or log onto our website at www.delonghi.com.
For all accessories, spare parts or replacement parts, please contact our parts division at 1800-865-6330.
Residents of Canada:
Please contact our toll free hotline at 1-888-335-6644 or log onto our website at www.delonghi.com.
Other countries:
Please visit: www.delonghi.com.
13