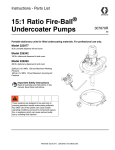
1
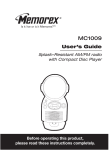
RCD224UK PORTABLE CD RADIO OPERATING INSTRUCTIONS Please read and follow this instruction manual carefully before using the unit and retain it for future reference TABLE OF CONTENTS SAFETY INSTRUCTIONS .................................................... 2 FUNCTIONS AND CONTROLS ................................................. 4 POWER SOURCE ......................................................... 5 A. DC POWER OPERATION ...........................................................................................................................................5 B. AC OPERATION...........................................................................................................................................................5 CD PLAYER OPERATION .................................................... 5 CD PROGRAMMED PLAY...............................................................................................................................................6 RADIO RECEPTION ....................................................... 6 TIPS FOR GOOD RADIO RECEPTION ..........................................................................................................................6 USING HEADPHONES (NOT INCLUDED) .......................................... 6 READ THIS IMPORTANT INFORMATION BEFORE USING YOUR HEADPHONES ..................................................6 TROUBLESHOOTING GUIDE.................................................. 7 CARE AND MAINTENANCE .................................................. 7 Product Specification: + Sideloading CD/CDR player + AM/FM Radio (Analogue Tuning) AM Frequency : 530 1710 KHZ FM Frequency : 88108 MHZ + LCD display for CD function + 20track programmable memory + Stereo earphone jack + Random / Repeat function + DC 6V (UM2)X4 Batteries (Excluding Battery) + Output power: 0.5Wx2 + AUX IN (signal input ) function + AC/DC Adaptor Input Jack. 1 l SAFETY INSTRUCTIONS WARNING: IF CONNECTED TO AN AC OUTLET: TO PREVENT FIRE OR SHOCK HAZARD, DO NOT EXPOSE THIS APPLIANCE TO RAIN OR MOISTURE. THE IMPORTANT SAFETY INSTRUCTIONS SHALL INCLUDE, IF AND AS APPLICABLE TO THE APPLIANCE, STATEMENTS THAT CONVEY TO THE USER THE INFORMATION ITEMIZED IN THIS PARAGRAPH: 1. Read instructions All the safety and operating instructions should be read before the appliance is operated 2. Retain instructions The safety and operating instructions should be retained for future reference. 3. Heed Warnings All warnings on the appliance and in the operating instructions should be adhered to. 4. Follow instructions All operation and use instructions should be followed. 5. Water and Moisture The appliance should not be used near water; for example, near a bathtub, washbowl, kitchen sink, laundry tub, in a wet basement, or near a swimming pool, and the like. 6. Ventilation The appliance should be situated so that its location or position does not interfere with its proper ventilation. For example, the appliance should not be situated on a bed, sofa, rug, or similar surface that may block the ventilation openings; or placed in a builtin installation, such as a bookcase or cabinet that may impede the flow of air through the ventilation openings. 7. Heat The appliance should be situated away from heat sources such as radiators, heat registers, stoves or other appliances (including amplifiers) that produce heat. 8. Power Sources The appliance should be connected to a power supply only of the type described in the operating instructions or as marked on the appliance. 9. Grounding or Polarization Precautions should be taken so that the grounding or polarization means of an appliance is not defeated. 10. PowerCord Protection Power supply cords should be routed so that they are not likely to be walked on or pinched by items placed upon or against them, paying particular attention to cords at plugs, convenience receptacles and the point where they exit from the appliance. 11. Cleaning The appliance should be cleaned only as recommended by the manufacturer. 12. Power Lines An outdoor antenna should be located away from power lines. 13. Outdoor Antenna Grounding If an outside antenna is connected to the receiver, be sure the antenna system is grounded so as to provide some protection against voltage surges and built up static charges. 14. Nonuse Periods The power cord of the appliance should be unplugged from the outlet when left unused for a long period of time. 15. Object and Liquid Entry Care should be taken so that objects do not fall and liquids are not spilled into the enclosure through openings. 16. Damage Requiring Service The appliance should be serviced by qualified service personnel when: A. The power supply cord or the plug has been damaged; or B. Objects have fallen, or liquid has been spilled into the appliance; or C. The appliance has been exposed to rain; or D. The appliance does not appear to operate normally or exhibits a marked change in performance; or E. The appliance has been dropped, or the enclosure damaged. 17. Servicing The user should not attempt to service the appliance beyond that described in the operating instructions. All other servicing should be referred to qualified service personnel. 2 Follow the advice below for safe and appropriate operations. ON PROTECTION AGAINST LASER ENERGY EXPOSURE · As the laser beam used in this compact disc player is harmful to the eyes, do not attempt to disassemble the casing. · Stop operation immediately if any liquid or solid object should fall into the cabinet. · Do not touch the lens or poke at it. If you do, you may damage the lens and the player may not operate properly. · Do not put anything in the safety slot. If you do, the laser diode will be ON when the CD door is still open. · If the unit is not to be used for a long period of time, make sure that all power sources are disconnected from the unit. Remove all batteries from the battery compartment, and unplug the power cord or the ACDC adaptor if used, from the wall outlet. Make it a practice to remove the ACDC adaptor by grasping the main body and not by pulling the cord. · This unit employs a laser. The use of controls or adjustment or performance of procedures other than those specified here may result in exposure to hazardous radiation. ON PLACEMENT · Do not use the unit in places which are extremely hot, cold, dusty or humid. · Place the unit on a flat and even surface. · Do not restrict the airflow of the unit by placing it in a place with poor ventilation, by covering it with a cloth or by placing it on a carpet. ON CONDENSATION · When left in a heated room where it is warm and damp, water droplets or condensation may form inside the unit. · When there is condensation inside the unit, the unit may not function normally. · Let it stand for 1 to 2 hours before turning the power on, or gradually heat the room up and dry the unit before use. 3 FUNCTIONS AND CONTROLS 1. 2. 3. 4. 5. 6. 7. 8. 9. OPEN BUTTON PROG BUTTOM REPEAT BUTTON RANDOM BUTTON CD STOP BUTTON REW BUTTON F.FWD BUTTON PLAY / PAUSE BUTTON TELESCOPIC ANTENNA 10. TUNING KNOB 11. POWER ON/OFF BUTTON 12. AUX IN JACK 13. HEADPHONE JACK 14. DC 6V MAINS 15. POWER INDICATOR 16. CD TRACK DISPLAY 17. SPEAKER 18. HANDLE 19. FREQUENCY INDICATOR 20. FM STEREO INDICATOR 21. CD DOOR 22. VOLUME CONTROL 23. FUNCTION SELECTOR(AUX IN/CD/RADIO) 24. BAND SELECTOR(FMST/FM/AM) 25. BATTERY CASE 4 POWER SUPPLY This unit operates with 4 X SIZE “C’ (UM2) batteries or from AC120V/60Hz line adaptor externally( not included) A. DC POWER OPERATION 1. 2. 3. 4. Open the BATTERY CASE (#25) Insert 4 pcs Size “C” (UM2) batteries (not included) according to the polarity diagram on the back cabinet. Close theBATTERY CASE (#25). Turn the POWER ON/OFF (11#) to ON position, the POWER INDICATOR(#15) will be turned red IMPORTANT: Be sure that the batteries are installed correctly. Wrong polarity may damage the unit. Note: For better performance and longer operating time, we recommend the use of alkalinetype batteries. (a) Do not mix old and new batteries. (b) Do not mix alkaline, standard (carbonzinc) or rechargeable (nickelcadmium) batteries. If the unit is not to be used for an extended period of time, remove the battery. Old or leaking battery can cause damage to the unit and may void the warranty. B. AC POWER OPERATION –Optional Function Remark:this unit doesn’t provide the AC/DC adaptor.we suggest you to buy the proper AC/DC adaptor with below character to connect the AC directly. Input: AC 230V /50HA / Output : 6V / 600MA Dia 3.5mm DC Jack 1. Connect the DC Jack into the DC 6V MAINS (#14) on the side of the unit. 2. Connect the other terminal of the AC/DC Adaptor to the wall outlet 3. Turn the POWER ON/OFF (11#) to o”ON” position, the POWER INDICATOR(#15) will be turned red CD PLAYER OPERATION 1. 2. Set the FUNCTION SELECTOR (#23) to the "CD" position. Open the CD DOOR (#21). Place an audio CD with its label side upward in the CD compartment and close the CD DOOR(#21). 3. After a few seconds, the total number of tracks on the CD will appear in the CD TRACK DISPLAY (#16). 4. Press the CD PLAY/PAUSE BUTTON (#8) and the CD will start playing from the first track. The CD Track Display will light steadily. 5. Adjust the VOLUME CONTROL (#22) to obtain the desired sound level from the SPEAKER (#17). 6. To suspend playing, press the CD PLAY / PAUSE Button (#8). The CD Track Display will flash. To resume playing, press the CD PLAY / PAUSE BUTTON(#8) again. 7. You can choose to play your favorite track directly by pressing the CD F.FWD BUTTON(#7) to skip forward or CD REW BUTTON(#6) to skip backward. The CD TRACK DISPLAY (#16) will indicate the correct track number selected. 8. To repeat playing a particular track, press the REPEAT BUTTON(#3) once. The LCD display will show “ONE” ( That means it will repeat the current song) 9. To repeat playing entire CD , Press the REPEAT BUTTON(#3) twice , the LCD display will appear “ALL” (that means it will repeat the entire tracks of the disc.) ; Press the REPEAR BUTTON (#3) three times, it will stop the REPEAT function and back to normal play 10. To play randomly , Press RANDOM BUTTON(4#) once, The LCD display will show “SHUF” and play the songs randomly; Press RANDOM BUTTON(4#) again, the “SHUF” will be disappeared ,then back to the normal play. 11. To stop playing, press the CD STOP BUTTON(#5). 12. When you wish to turn off the CD Player, set the POWER ON/OFF BUTTON (#11) to the "OFF" position. 5 CD PROGRAMMED PLAY This function allows the tracks to be played in a programmed sequence. 1. Under CD stop or playing condition, press the PROG. BUTTON (#2). The CD TRACK DISPLAY (#16) will display “01” and the PROG on the display will flash. 2. Press the CD F.FWD BUTTON (#7) or CD REW BUTTON (#6) to select the song to be programmed. 3. Press the PROG. BUTTON(#2) again to store selection. The CD TRACK DISPLAY (#16) will advance to “02”. 4. Press the CD F. FWD BUTTON(#7) or CD REW BUTTON(#6) to select the next song to be programmed and press the PROG. BUTTON(#2) to store selection. 5. The max. programmable tracks reaches as 20 tracks merely for memory save. 6. Press CD STOP BUTTON (#5) to end programming and return to normal play mode. 7. To check the programmed tracks, press PROG. BUTTON(#2) continuous to show all the programmed songs. The CD TRACK DISPLAY(#16) will display the program number first and then followed by the flashing track number. 8. Press CD PLAY/PAUSE BUTTON (#8) to begin programmed play. The first track in program will appear in the CD TRACK DISPLAY(#16) and the” PROG” will light steadily. 9. To cancel programmed play, press the CD STOP BUTTON (#5). 10. As long as the unit remains on and the CD DOOR(#21) is not opened, you can resume programmed play any time by pressing the PROG. BUTTON(#2) and then CD PLAY/PAUSE BUTTON(#8) in stop condition. RADIO RECEPTION 1. 2. 3. 4. 5. 6. Set the FUNCTION SELECTOR(#23) to the "RADIO" position. Set the BAND SELECTOR(#24) to either "AM", or “FM” for the desired radio band. To receive a weak (noisy) FM station, set the BAND SELECTOR(#24) to the “FM” position. The reception may be improved, but the sound will be monaural (MONO). While you switch the BAND SELECTOR(#24) to “FM St”, once you get the right FM station, then the FM STEREO INDICATOR(#20) will be getting GREEN Adjust the TUNING KNOB(#10) to obtain the desired radio station. Adjust the VOLUME CONTROL (#22) to obtain the desired sound level. When you wish to turn off the Radio, set the POWER ON/OFF BUTTON (#11) to the "OFF" position or switch the FUNCTION SELECTOR(#23) to CD / AUXIN position. TIPS FOR GOOD RADIO RECEPTION 1. 2. To insure maximum FM tuner sensitivity, the TELESCOPIC ANTENNA(#9) should be fully extended and rotated to obtain the best possible reception. The FM STEREO INDICATOR(#20) will light steadily when a stereo program is being received. When tuning in AM reception, be sure to place the unit in a vertical position. To insure the maximum AM sensitivity, try repositioning the unit until the best reception is obtained. AUX IN FUNCTION 1. Set the FUNCTION SELECTOR(#23) to AUX IN position 2. Plug the external signal jack into the AUXIN jack (#12) , then the unit will be used as speaker 3. Adjust the volume by the VOLUME CONTROL(#22) 4. Stop this function ,power off the unit or switch the FUNCTION SELECTOR(#23) to other position Remark: While using this function , other functional key are invalid except the VOLUME CONTROL( #22) USING HEADPHONES (NOT INCLUDED) Inserting the plug of your headphones into the HEADPHONE JACK (#13) will enable you to listen to the CD and Radio in private. When using headphones, the SPEAKER (#17) will be disconnected. READ THIS IMPORTANT INFORMATION BEFORE USING YOUR HEADPHONES 1. Avoid extended play at very high volume as it may impair your hearing. 2. If you experience ringing in your ears, reduce the volume or shut off your unit. 3. Do not use while driving a motorized vehicle. This is dangerous and also illegal in some areas. 4. Keep the volume at a reasonable level even if your headset is an openair type designed to allow you to hear outside sounds. Please note excessively high volume may still block outside sounds. 6 TROUBLESHOOTING GUIDE Should you experience difficulties in the use of this player please refer to the following chart. PROBLEM POSSIBLE CAUSE · The unit is disconnected from the AC outlet · The AC outlet has no power REMEDY · Connect to an outlet. There is no display and the unit will not · The AC outlet is controlled by a play wall switch · Weak batteries Poor AM or FM reception Unit ON but there is low or no volume CD skip while playing AM: Weak on distant stations FM: Telescopic Antenna not extended · The volume Control has been turned all the way down · Try the unit on another outlet · Do not use an outlet that is controlled by a wall switch · Replace with fresh batteries · Rotate the cabinet for better reception · Extend Telescopic Antenna · Turn the volume control to a higher output · Check the bottom of the disc and clean it necessary with a soft cleaning cloth, always wipe from the center out · Clean with a commercially available lens cleaner · Dirty or scratched discs · Dirty lens CARE AND MAINTENANCE 1. 2. 3. 4. Clean your unit with a damp (never wet) cloth. Solvent or detergent should never be used. Avoid leaving your unit in direct sunlight or in hot, humid or dusty places. Keep your unit away from heating appliances and sources of electrical noise such as fluorescent lamps or motors. If dropouts or interruptions occur in the music during CD play, or if the CD fails to play at all, its bottom surface may require cleaning. Before playing, wipe the disc from the center outwards with a good soft cleaning cloth. 7