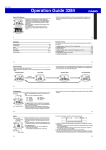
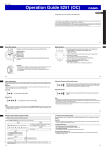
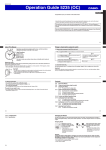
1
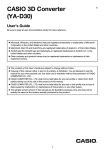
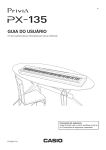
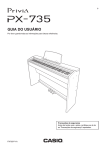
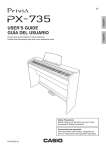
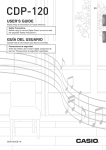
MA1104-EA
Operation Guide 5098/5099/5101
ENGLISH
Congratulations upon your selection of this CASIO watch.
Note that CASIO COMPUTER CO., LTD. assumes no responsibility for any
damage or loss suffered by you or any third party arising through the use of this
product or its malfunction.
E-1
Button operations are indicated using the letters A through C shown in the
illustration.
About This Manual
<Module 5098>*
Night symbols
B
*
@ +
<Modules 5099 and 5101>*
Hand Functions
B @ + >
>
6 Day symbols
*
6
* The module number is engraved on the back cover of the watch case.
<Regular timekeeping>
z Hour Hand
x Second Hand
c Minute Hand
v 24-hour Hand: As with the <Modules 5099 and 5101>, midnight is indicated when
the <Module 5098> 24-hour hand is straight upwards. The hand
makes one revolution every 24 hours.
<Minute counter>
b Ornament
n Minute Hand (elapsed time)
This User’s Guide uses numbers shown above to identify watch hands.
E-2
E-3
Important!
The A button is designed to protect against accidental
pressing. Use a thin pointed object to press the
depression of the button to operate it.
Things to check before using the watch
1. During regular timekeeping, observe the movement of the x Second Hand.
Is the x Second Hand moving smoothly at one-second intervals?
NO
YES
Is the x Second Hand moving at
two-second intervals or is it stopped
completely?
The watch is charged sufficiently.
For details about charging, see
“Charging the Watch” (page E-9).
NEXT
YES
Power is low. Charge the watch by placing
it in a location where it is exposed to light.
For details, see “Charging the Watch”
(page E-9).
Go to step 2.
E-4
2. Check the current location setting.
Use the procedure under “Specifying Your Current Location and Setting the Time”
(page E-27) to configure your location setting.
Important!
Proper time calibration signal reception and time settings depend on correct location
setting. Make sure you configure these settings correctly.
3. Set the current time.
x To set the time using a time calibration signal
See “To get ready for a receive operation” (page E-19).
x To set the time manually
See “Specifying Your Current Location and Setting the Time” (page E-27).
The watch is now ready for use.
x For details about the watch’s radio controlled timekeeping feature, see “Radio
Controlled Atomic Timekeeping” (page E-16).
E-5
Contents
E-2
About This Manual
E-5
Things to check before using the watch
E-9
Charging the Watch
E-15 To recover from the sleep state
E-16 Radio Controlled Atomic Timekeeping
E-19 To get ready for a receive operation
E-22 To perform manual receive
E-24 To check the result of the latest receive operation
E-26 Timekeeping
E-27 Specifying Your Current Location and Setting the Time
E-32 Using the Minute Counter
E-33 To perform an elapsed time operation
E-6
E-7
E-34 Hand Home Position Adjustment
Charging the Watch
E-40 Troubleshooting
The face of the watch is a solar cell that generates power from light. The generated
power charges a built-in rechargeable battery, which powers watch operations. The
watch charges whenever it is exposed to light.
E-46 Specifications
Charging Guide
Whenever you are not wearing the watch, leave it in a location where
it is exposed to light.
x Best charging performance is achieved by exposing the watch to
light that is as strong as possible.
E-8
E-9
Operation Guide 5098/5099/5101
When wearing the watch, make sure that its face is not
blocked from light by the sleeve of your clothing.
x The watch may enter a sleep state (page E-15) if its face is
blocked by your sleeve even only partially.
Warning!
Leaving the watch in bright light for charging can cause it to become quite hot.
Take care when handling the watch to avoid burn injury. The watch can become
particularly hot when exposed to the following conditions for long periods.
x On the dashboard of a car parked in direct sunlight
x Too close to an incandescent lamp
x Under direct sunlight
Important!
x Keep the watch in an area normally exposed to bright light when storing it for long
periods. This helps to ensure that power does not run down.
x Storing the watch for long periods in an area where there is no light or wearing it in
such a way that it is blocked from exposure to light can cause power to run down.
Make sure that the watch is exposed to bright light whenever possible.
E-10
E-11
Power Levels
B
Level
+
You can get an idea of the watch’s power level by
observing the movement of the x Second Hand in the
regular timekeeping.
x If the x Second Hand is moving normally at one-second
intervals, power is at Level 1.
x If the x Second Hand is moving at two-second intervals,
power is at Level 2, which is quite low. Expose the watch
to light as soon as possible so it can charge.
@
Hand Movement
Function Status
1
Normal.
All functions enabled
2
x Second Hand moves at two-second
intervals.
Time calibration signal reception
disabled
3
z Hour Hand, x Second Hand and
c Minute Hand stopped at 12 o’clock.
All functions disabled
x When power drops to Level 3, all functions will be disabled but the watch will
continue to keep time internally for about one week. If you recharge the battery
sufficiently during this period, the analog hands will move automatically to the
correct setting and regular timekeeping will resume. After one week, all settings
(including timekeeping) will be cleared. Recharging the battery will reset all settings
to their initial factory defaults.
Moves at two-second
intervals.
E-12
E-13
Charging Times
Power Saving
Level Change *2
Exposure Level (Brightness)
Daily
Operation *1
Outdoor sunlight (50,000 lux)
8 minutes
3 hours
35 hours
Window sunlight (10,000 lux)
30 minutes
8 hours
134 hours
Window sunlight on cloudy day
(5,000 lux)
48 minutes
13 hours
216 hours
8 hours
149 hours
–––
Indoor fluorescent lighting (500 lux)
Level 3
Level 2
Level 1
Power Saving enters a sleep state automatically whenever the watch is left for one
week in an area where it is dark.
What happens when the watch is in the sleep state
* 1 Approximate exposure each day to generate power for normal daily operation.
* 2 Approximate exposure to take power up one level.
x The above times are for reference only. Actual times depend on lighting conditions.
x For details about the operating time and daily operating conditions, see the “Power
Supply” section of the Specifications (page E-46).
x All regular timekeeping hands move to 12 o’clock and stop.
n Minute Hand (elapsed time) moves to 0 and stops.
x Auto Receive becomes disabled.
x Internal timekeeping functions continue to operate normally.
To recover from the sleep state
Move the watch to a well-lit area or press any button.
x It can take up to 14 minutes for the watch to recover from the sleep state to normal
operation. Do not perform any button operations during that time.
E-14
E-15
Radio Controlled Atomic Timekeeping
This watch receives a time calibration signal and updates its time setting accordingly.
However, when using the watch outside of areas covered by time calibration signals,
you will have to adjust the settings manually as required. See “Specifying Your
Current Location and Setting the Time” (page E-27) for more information.
Approximate Reception Ranges
Japanese Signal
500 kilometers
Fukushima
This section explains how the watch updates its time settings when the city name
selected as the current location is in Japan or China, and is one that supports time
calibration signal reception.
Shangqiu City (China)
TOKYO (TYO)
Fukushima (Japan), Fukuoka/Saga (Japan)
Shangqiu
Shanghai
Chengdu
Hong Kong
Fukuoka/Saga
1,000 kilometers
E-18
1,500 kilometers
E-17
E-16
x Even when the watch is within range of a transmitter, signal reception may be
impossible due to the effects of geographic contours, structures, weather, the time
of year, the time of day, radio interference, etc. The signal becomes weaker at
distances of approximately 500 kilometers, which means that the influence of the
above conditions becomes even greater.
x Signal reception may not be possible at the distances noted below during certain
times of the year or day. Radio interference may also cause problems with
reception.
− Fukushima or Fukuoka/Saga (Japan) transmitters: 500 kilometers (310 miles)
− Shangqiu (China) transmitter: 500 kilometers (310 miles)
x As of January 2011, China does not use Daylight Saving Time (DST). If China does
go to the Daylight Saving Time system in the future, some functions of this watch
may no longer operate correctly.
x Using this watch in a country covered by a time calibration that is different from the
countries it supports may result in incorrect time indication due to local application
of summer time, etc.
Changchun
Beijing
watch can receive the signal from the transmitter
If your location setting is this: The
located here:
HONG KONG (HKG)
Chinese Signal
500 kilometers
To get ready for a receive operation
1. The antenna of this watch is located on its 12 o’clock side. Position the watch with
12 o’clock facing towards a window as shown in the nearby illustration. Make sure
there are no metal objects nearby.
x Signal reception normally is better
at night.
x The receive operation takes from
12 o’clock
two to seven minutes, but in some
cases it can take as long as 14
or
minutes. Take care that you do not
perform any button operation or
move the watch during this time.
E-19
Operation Guide 5098/5099/5101
x Signal reception may be difficult or even impossible under the conditions
described below.
Inside or
among
buildings
Inside a
vehicle
Near
household
appliances,
office
equipment,
or a mobile
phone
Near a
construction
site, airport,
or other
sources of
electrical
noise
Near
high-tension
power lines
Among
or behind
mountains
2. What you should do next depends on whether you are using Auto Receive or
Manual Receive.
x Auto Receive: Leave the watch over night in the location you selected in step 2.
See “Auto Receive” on page E-21 for details.
x Manual Receive: Perform the operation under “To perform manual receive” on
page E-22.
Auto Receive
x With Auto Receive, the watch performs the receive operation each day
automatically up to three times between the hours of 2 a.m. and 4 a.m. (1 a.m.
and 3 a.m. for the Chinese calibration signal). When any receive operation is
successful, none of the other receive operations for that day are performed.
x When a calibration time is reached, the watch will perform the receive operation
only if it is in the regular timekeeping. The receive operation is not performed if a
calibration time is reached while you are configuring settings.
E-20
E-21
To perform manual receive
1. In the regular timekeeping, keep A depressed (for about two seconds) as the
x Second Hand goes through the following sequence.
x Moves to YES (Y) or NO (N) to indicate the last signal reception result, then to
Receiving (RC).
x When the receive operation is successful, the watch
adjusts the time setting accordingly. It does not adjust
the setting if the operation failed.
Note
x To interrupt a receive operation and return to the
regular timekeeping, press any button.
2. The x Second Hand indicates the operations the watch is currently performing.
@
When the x Second
It means this:
Hand is pointed here:
Receiving (RC)
Reception is in progress.
YES (Y)
Reception was completed
successfully.
NO (N)
Reception failed for some reason.
@
E-22
E-23
To check the result of the latest receive operation
In the regular timekeeping, press A.
x The x Second Hand will move to YES (Y) for five
seconds if the latest receive operation was successful,
or NO (N) if it was not. After that, regular timekeeping
will resume.
x You can return to the regular timekeeping manually by
pressing A while the x Second Hand is pointing to YES
(Y) or NO (N).
@
Note
x The x Second Hand will indicate NO (N) if you have
adjusted the time setting manually since the latest
receive operation.
Radio-controlled Atomic Timekeeping Precautions
x Strong electrostatic charge can result in the wrong time setting.
x Even if a receive operation is successful, certain conditions can cause the time
setting to be off by up to one second.
x If you are in an area where signal reception is not possible, the watch keeps time
with the precision noted in “Specifications” (page E-46).
x The receive operation is disabled under any of the following conditions.
− While power is at Level 2 or lower (page E-12)
− When the watch is in the function sleep state (“Power Saving”, page E-15)
− While the b Ornament is moving (page E-32)
E-24
E-25
Timekeeping
Specifying Your Current Location and Setting the Time
Hand Functions
<Module 5098>
B
<Modules 5099 and 5101>
@ +>
B @ + >
<Regular timekeeping>
z Hour Hand
x Second Hand
c Minute Hand
v 24-hour Hand
<Minute counter>
b Ornament
n Minute Hand (elapsed
time)
*
6
*
Use the procedure in this section to specify the location where you will be using
the watch. You also can adjust the time when the watch is unable to receive a time
calibration signal.
1. In the regular timekeeping, keep A depressed (for
@
about five seconds) as the x Second Hand and
b Ornament go through the sequence described below.
x x Second Hand: Last signal reception result o RC o
Current location setting
x b Ornament: Upside down
6
*
E-26
E-27
HONG KONG (HKG)
TOKYO (TYO)
2. Press C to select the location you want.
x Each press of C cycles through the three settings
shown below.
City Name
TOKYO (TYO)
OFF
E-28
Location
Japan
HONG KONG (HKG)
China
OFF
Receive off*
3. Press A. What happens next depends on the
operations you performed in step 2, as described below.
x If you changed the location to TOKYO (TYO) or
HONG KONG (HKG) from another setting, the watch
will resume regular timekeeping when you press A.
x If you changed to OFF or if you did not change the
setting, pressing A will proceed to step 4, below.
* Select OFF for the location setting whenever using the
watch in any other geographic area other than Japan
or China. When OFF is selected, the watch does not
receive any time calibration signal, so you will need to
adjust the time setting manually as required.
E-29
Operation Guide 5098/5099/5101
<Modules 5099 and 5101>
>
<Module 5098>
4. Use C (+1 minute) and B (–1 minute) to change the
current time setting.
x Holding down either button for about two seconds
and then releasing it starts high-speed hand
movement in the applicable direction.
x Pressing C and B at the same time will start highspeed hand movement, which will continue until the
hands complete a 24-hour rotation.
x To stop high-speed hand movement, press any
button.
x Check the v 24-hour Hand to make sure that the time
is set properly (1:00 a.m. = 1 o’clock,
1:00 p.m. = 13 o’clock).
5. After the setting is the way you want, press A.
x This will exit the setting mode and the x Second Hand will resume regular
timekeeping.
x For best timekeeping accuracy, press A on a time signal from the TV or radio.
x The watch will exit the setting mode automatically if you do not perform any
button operation for about two or three minutes.
E-30
E-31
Using the Minute Counter
To perform an elapsed time operation
The minute counter measures elapsed time.
B
B
Start
<Module 5098>
<Modules 5099 and 5101>
6
*
B
(Restart)
B
(Stop)
C
Reset
Hand Functions
b Ornament
n Minute Hand (elapsed time)
*
Stop
Note
x Check the current position of the n Minute Hand (elapsed time). If it is pointed at 5,
for example, it means that five minutes have elapsed.
x The minute counter can indicate elapsed time up to 20 minutes.
x The b Ornament moves with each second, making one revolution per minute
(60 seconds).
x While the minute counter hands are stopped (not moving), press C to reset the
n Minute Hand (elapsed time) to 0.
6
E-32
E-33
Hand Home Position Adjustment
@
+
If the time setting of your watch is not correct even though time calibration signal
reception is being performed normally, use the procedure in this section to check the
home positions of the hands and make adjustments as required.
Note that you do not need to perform the following operation if your watch is showing
the correct time.
Important!
x It can take up to 14 minutes for the hands to move to their home positions for hand
home position adjustment. It also can take up to 14 minutes for the hand to return to
their normal positions following hand home position adjustment.
x When performing the following procedure, it is recommended that after you move to
a home position, you press B to move the setting back one step. Next, press C to
return it to the home position. This helps to ensure better home position adjustment
accuracy.
1. In the regular timekeeping, hold down A for about 10
seconds until the c Minute Hand and x Second Hand
move to 12 o’clock.
x The x Second Hand goes through the sequence
described below.
Last signal reception result o RC o Current location
setting o Keep A depressed until the x Second
Hand starts to move counterclockwise. You can
release A at this time.
x The c Minute Hand and x Second Hand are in their
correct home positions if they are pointed precisely
at 12 o’clock. If the hands are in the correct home
positions, advance to step 4.
E-34
E-35
If the current home positions are within ±15 minutes 00 seconds
2. Use C (+1 second) and B (–1 second) to adjust the
@
+
hand positions so they point to 12 o’clock.
x Holding down either button for about two seconds and
then releasing it starts high-speed hand movement in
the applicable direction.
x To stop high-speed hand movement, press any
button.
x After adjusting the home positions, go to step 4.
If the current home positions are greater than ±15 minutes 00 seconds
2. After performing step 1, hold down C and B at the
same time until the z Hour Hand, c Minute Hand,
B@
+ >
x Second Hand, and v 24-hour Hand all move to 12
o’clock.
<Modules 5099 and 5101>
<Module 5098>
3. Use C (+1 second) and B (–1 second) to adjust the
hand positions so they point to 12 o’clock.
x Holding down either button for about two seconds
and then releasing it starts high-speed hand
movement in the applicable direction.
x To stop high-speed hand movement, press any
button.
x The v 24-hour Hand is synchronized with the
z Hour Hand and c Minute Hand, so separate
adjustment is not required.
x After adjusting the home positions, go to step 4.
E-36
E-37
4. Press A. This will cause the n Minute Hand (elapsed time) to move to its home
position (0).
x If the n Minute Hand (elapsed time) is at the correct home position, advance to
step 6.
<Modules 5099 and 5101>
<Module 5098>
6
E-38
5. Use C (+) and B (–) to adjust the n Minute Hand (elapsed time) so it is at its
home position (0).
x Holding down either button for about two seconds and then releasing it starts
high-speed hand movement in the applicable direction.
x To stop high-speed hand movement, press any button.
x After adjusting the home position, go to step 6.
6. Press A to exit home position correction and return to regular timekeeping.
6
E-39
Operation Guide 5098/5099/5101
Troubleshooting
Hand Movement and Position
■ The x Second Hand is moving at two second intervals.
■ All regular timekeeping hands are stopped at 12 o’clock, the n Minute Hand
(elapsed time) is at its home position (0), and none of the buttons work.
Power may be low. Expose the watch to light until the x Second Hand starts moving
normally, at one-second intervals (page E-12).
■ The hands of the watch suddenly start moving at high speed, even when I do
not perform any operation.
This could be due to any one of the following causes. In all cases, the hand movement
does not indicate malfunction, and should stop shortly.
x The watch is recovering from a sleep state (page E-15).
x The time setting is being adjusted following a successful auto time calibration
signal receive operation (page E-16).
■ The current time setting is off by hours.
Your location setting may be wrong. Check your location setting and correct it, if
necessary (page E-27).
■ The hands are off.
This could indicate that the watch has been exposed to magnetism or strong impact,
which has caused problems with proper hand alignment. Adjust the watch’s hand
home position alignment (page E-34).
Charging
■ The watch does not resume operation after I expose it to light.
This can happen after the power level drops to Level 3 (page E-12). Continue
exposing the watch to light until the x Second Hand starts moving normally (at onesecond intervals).
E-40
E-41
■ The x Second Hand starts to move at one-second intervals, but then suddenly
returns to moving at two-second intervals.
The watch probably is not sufficiently charged yet. Continue keeping it exposed to
light.
Time Calibration Signal
The information in this section applies only when HONG KONG (HKG) or TOKYO
(TYO) is selected as the current location. You need to adjust the current time
manually when OFF is selected as the current location.
■ The x Second Hand indicates NO (N) when I check the result of the latest
receive operation.
Possible Cause
Remedy
Page
x You are wearing or moving the watch,
or performing a button operation
during the signal receive operation.
x The watch is in an area with poor
reception conditions.
Keep the watch in an area where
reception conditions are good while
the signal receive operation is being
performed.
E-19
You are in an area where signal
reception is not possible for some
reason.
See “Approximate Reception Ranges”.
E-17
The calibration signal is not being
transmitted for some reason.
x Check the website of the organization
that maintains the time calibration
signal in your area for information
about its down times.
x Try again later.
—
E-42
E-43
■ The current time setting changes after I set it manually.
You may have the watch configured for Auto Receive of the time calibration signal
(page E-21), which will cause the time to be adjusted automatically according to your
currently selected location. If this results in the wrong time setting, check your location
setting and correct it, if necessary (page E-27).
■ Auto Receive is not performed or I cannot perform Manual Receive.
Possible Cause
Remedy
Page
Your location setting is wrong.
Check your location setting and correct
it, if necessary.
E-27
There is not enough power for signal
reception.
Expose the watch to light to charge it.
E-9
E-44
Specifications
Accuracy at normal temperature: ± 15 seconds a month (with no signal calibration)
Timekeeping: Hour, minutes, seconds, 24-hour
Time Calibration Signal Reception: Auto receive up to three times a day; Manual
receive
Receivable Time Calibration Signals:
Fukushima, Japan (Call Sign: JJY, Frequency: 40.0 kHz); Fukuoka/
Saga, Japan (Call Sign: JJY, Frequency: 60.0 kHz); Shangqiu City,
Henan Province, China (Call Sign: BPC, Frequency: 68.5 kHz)
Minute Counter: Measuring capacity: 20 minutes
Other: Power Saving
Power Supply: Solar cell and one rechargeable battery
Approximate battery operating time: 8 months (no exposure to light after a full
charge; signal reception of approximately 3 minutes per day)
E-46
■ Signal reception is being performed successfully, but the time is wrong.
Possible Cause
Remedy
Page
Your location setting is wrong.
Check your location setting and correct
it, if necessary.
E-27
The watch may have been exposed
to magnetism or strong impact, which
has caused problems with proper hand
alignment.
Adjust the watch’s hand home positions.
E-34
E-45