1
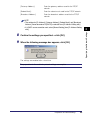
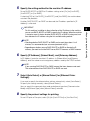
NetworkUI Guide Remote Guide Please read this guide before operating this equipment. After you finish reading this guide, store it in a safe place for future reference. ENG Color imageCLASS MF8180c Network Guide Manuals for the Machine The manuals for this machine are divided as follows. Please refer to them for detailed information. Depending on the system configuration and product purchased, some manuals may not be needed. Guides with this symbol are printed manuals. • Setting Up the Machine • Software Installation and Network Settings • Copying and Printing Instructions • Troubleshooting • Fax Instructions • Troubleshooting • Software Installation and Instructions • Printing and Scanning Instructions • Troubleshooting • Remote User Interface Instructions • Network Connectivity and Setup Instructions CD-ROM Guides with this symbol are PDF manuals included on the accompanying CD-ROM. (See footnote.) Quick Start Guide \ Basic Guide Facsimile Guide Software Guide CD-ROM Remote UI Guide CD-ROM Network Guide (This Manual) CD-ROM Model Name • F148800 (Color imageCLASS MF8180c) • The machine illustration on the cover may differ slightly from your machine. • To view the manual in PDF format, Adobe Reader/ Acrobat Reader/ Acrobat is required. If Adobe Reader/ Acrobat Reader/ Acrobat is not installed on your system, please download it from the Adobe Systems Incorporated website (http://www.adobe.com). How the Manual Is Organized Chapter 1 Before You Start Chapter 2 Specifying the Network Settings Chapter 3 Appendix Includes troubleshooting, network settings, software information, the glossary and the index. Considerable effort has been made to ensure that this manual is free of inaccuracies and omissions. However, as we are constantly improving our products, if you need an exact specification, please contact Canon. Contents Preface . . . . . . . . . . . . . . . . . . . . . . . . . . . . . . . . . . . . . . . . . . . . . . . . . . . . . . . . . .vi How to Use This Manual . . . . . . . . . . . . . . . . . . . . . . . . . . . . . . . . . . . . . . . . . . . .vi Symbols Used in This Manual . . . . . . . . . . . . . . . . . . . . . . . . . . . . . . . . . . . . . . vi Keys Used in This Manual . . . . . . . . . . . . . . . . . . . . . . . . . . . . . . . . . . . . . . . . . vi Displays Used in This Manual . . . . . . . . . . . . . . . . . . . . . . . . . . . . . . . . . . . . . vii Abbreviations Used in This Manual . . . . . . . . . . . . . . . . . . . . . . . . . . . . . . . . . vii Trademarks. . . . . . . . . . . . . . . . . . . . . . . . . . . . . . . . . . . . . . . . . . . . . . . . . . . . . .viii Chapter 1 Before You Start System Environment Requirements . . . . . . . . . . . . . . . . . . . . . . . . . . . . . . . . .1-1 System Environment Requirements for Printing . . . . . . . . . . . . . . . . . . . . . . .1-1 Network Connection Diagram. . . . . . . . . . . . . . . . . . . . . . . . . . . . . . . . . . . . . . .1-2 Chapter 2 Specifying the Network Settings TCP/IP Network Setup Procedures . . . . . . . . . . . . . . . . . . . . . . . . . . . . . . . . . .2-1 Preparation for Protocol Settings. . . . . . . . . . . . . . . . . . . . . . . . . . . . . . . . . . . .2-3 Settings from the Operation Panel . . . . . . . . . . . . . . . . . . . . . . . . . . . . . . . . . .2-4 Settings Using ARP/PING Commands . . . . . . . . . . . . . . . . . . . . . . . . . . . . . .2-6 Settings Using NetSpot Device Installer. . . . . . . . . . . . . . . . . . . . . . . . . . . . . .2-7 Protocol Settings . . . . . . . . . . . . . . . . . . . . . . . . . . . . . . . . . . . . . . . . . . . . . . . .2-10 Settings Using a Web Browser (Remote UI) . . . . . . . . . . . . . . . . . . . . . . . . .2-10 Setting Up a Computer for Printing . . . . . . . . . . . . . . . . . . . . . . . . . . . . . . . . .2-15 Printer Connection Method (LPD/Raw) . . . . . . . . . . . . . . . . . . . . . . . . . . . . .2-16 Print Server Settings . . . . . . . . . . . . . . . . . . . . . . . . . . . . . . . . . . . . . . . . . . .2-19 Printer Management . . . . . . . . . . . . . . . . . . . . . . . . . . . . . . . . . . . . . . . . . . . . .2-21 Printer Management Using a Web Browser (Remote UI) . . . . . . . . . . . . . . .2-21 Printer Management Using NetSpot Device Installer . . . . . . . . . . . . . . . . . . .2-21 Printer Management Using NetSpot Console . . . . . . . . . . . . . . . . . . . . . . . .2-22 Additional Protocol Settings. . . . . . . . . . . . . . . . . . . . . . . . . . . . . . . . . . . . . . .2-23 HTTP . . . . . . . . . . . . . . . . . . . . . . . . . . . . . . . . . . . . . . . . . . . . . . . . . . . . . . .2-23 SNMP. . . . . . . . . . . . . . . . . . . . . . . . . . . . . . . . . . . . . . . . . . . . . . . . . . . . . . .2-24 iv Chapter 3 Appendix Troubleshooting. . . . . . . . . . . . . . . . . . . . . . . . . . . . . . . . . . . . . . . . . . . . . . . . . . 3-1 Network Setting Items. . . . . . . . . . . . . . . . . . . . . . . . . . . . . . . . . . . . . . . . . . . . . 3-3 Network Setting Items Using the Operation Panel. . . . . . . . . . . . . . . . . . . . . . 3-3 Network Setting Items Using NetSpot Console, NetSpot Device Installer, or a Web Browser (Remote UI) . . . . . . . . . . . . . . . . . . . . . . . . . . . . . 3-4 Available Software for Network Settings. . . . . . . . . . . . . . . . . . . . . . . . . . . . . . 3-6 Glossary . . . . . . . . . . . . . . . . . . . . . . . . . . . . . . . . . . . . . . . . . . . . . . . . . . . . . . . . 3-7 Index . . . . . . . . . . . . . . . . . . . . . . . . . . . . . . . . . . . . . . . . . . . . . . . . . . . . . . . . . . 3-11 v Preface Thank you for purchasing the Canon Color imageCLASS MF8180c. Please read this manual thoroughly before operating the machine in order to familiarize yourself with its capabilities, and to make the most of its many functions. After reading this manual, store it in a safe place for future reference. How to Use This Manual Symbols Used in This Manual The following symbols are used in this manual to explain procedures, restrictions, handling precautions, and instructions that should be observed for safety. IMPORTANT Indicates operational requirements and restrictions. Be sure to read these items carefully in order to operate the machine correctly, and to avoid damage to the machine. NOTE Indicates a clarification of an operation, or contains additional explanations for a procedure. Reading these notes is highly recommended. Keys Used in This Manual The following symbols and key names are a few examples of how keys to be pressed are expressed in this manual. The operation panel keys on the machine are indicated within brackets. Menu Press [Menu]. Stop/Reset Press [Stop/Reset]. vi Displays Used in This Manual The keys or buttons which you should press are marked with below. , as shown When multiple buttons or keys can be pressed, they will be highlighted and mentioned in the order in which they should be pressed. Click [OK]. Click this button for operation. Screen shots of computer operation screens used in this manual may differ from the ones you actually see depending on the model or options that come with your machine. Abbreviations Used in This Manual In this manual, product names and model names are abbreviated as follows: Microsoft® Windows® 98 operating system: Microsoft® Windows® 98 Second Edition operating system: Microsoft® Windows® Millennium Edition operating system: Microsoft® Windows® 2000 operating system: Microsoft® Windows® XP operating system: Microsoft® Windows Server™ 2003 operating system: Windows 98 Windows 98SE Windows Me Windows 2000 Windows XP Windows Server 2003 vii Trademarks Canon, the Canon logo, imageCLASS and NetSpot are trademarks of Canon Inc. Microsoft, MS-DOS, the Windows logo, Windows, are registered trademarks of Microsoft Corporation in the United States and other countries. Ethernet is a trademark of Xerox Corporation. Other product and company names herein may be the trademarks of their respective owners. Copyright 2006 by Canon Inc. All rights reserved. No part of this publication may be reproduced or transmitted in any form or by any means, electronic or mechanical, including photocopying and recording, or by any information storage or retrieval system without the prior written permission of Canon Inc. The information in this document is subject to change without notice. CANON INC. MAKES NO WARRANTY OF ANY KIND WITH REGARD TO THIS MATERIAL, EITHER EXPRESS OR IMPLIED, EXCEPT AS PROVIDED HEREIN, INCLUDING WITHOUT LIMITATION THEREOF, WARRANTIES AS TO MARKETABILITY, MERCHANT ABILITY, FOR A PARTICULAR PURPOSE OF USE, OR AGAINST INFRINGEMENT OF ANY PATENT. CANON INC. SHALL NOT BE LIABLE FOR ANY DIRECT, INCIDENTAL, OR CONSEQUENTIAL DAMAGES OF ANY NATURE, OR LOSSES OR EXPENSES RESULTING FROM THE USE OF THIS MATERIAL. viii 1 Before You Start CHAPTER This chapter describes what you need to know before you start using the machine in a network, including the environments the machine is compatible with, and how to check the network environment you are using. System Environment Requirements This section describes the system environments the machine is compatible with. System Environment Requirements for Printing The following network and system environments are compatible when printing with the machine: ■ Supported Protocol • TCP/IP ■ Compatible OS • Microsoft Windows 98/98SE/Me • Microsoft Windows 2000 Server • Microsoft Windows 2000 Professional • Microsoft Windows XP • Microsoft Windows Server 2003 System Environment Requirements 1-1 Network Connection Diagram Refer to the following diagram examples to confirm the network environment that is connected to the machine, and then perform the necessary operations for that environment. Before You Start 1 Connecting the machine directly to the computer Client The Machine (Windows 98/Me/2000) Client (Windows XP) : TCP/IP Connecting the machine to the computer via a print server Client (Windows 98/Me/2000/XP) Print Server (Windows 2000/XP/Server 2003) The Machine Client (Windows 98/Me/2000/XP) : TCP/IP NOTE • For connecting a LAN cable to the machine, refer to the Quick Start Guide. If you connect the machine directly to your computer, use a crossover cable. • For specifying the network settings, see "Specifying the Network Settings," on p. 2-1. 1-2 Network Connection Diagram Specifying the Network Settings 2 CHAPTER This chapter describes the settings and procedures necessary to connect and use the machine with a TCP/IP network. TCP/IP Network Setup Procedures To use a TCP/IP network, it is necessary to perform the following procedures. 1 Network Cable Connection (Refer to "To Use the Machine as a Network Printer (Network Connection)," in the Quick Start Guide.) Connect the network cables in accordance with the Quick Start Guide. 2 Preparation for Protocol Settings (See "Preparation for Protocol Settings," on p. 2-3.) Specify the machine’s basic protocol settings for communication between the machine and computers using the machine. To specify the settings, use: • The machine’s operation panel • NetSpot Device Installer (Canon utility software included in the User Software CD) • ARP/PING commands 3 Protocol Settings (See "Protocol Settings," on p. 2-10.) Specify the machine’s advanced protocol settings. To specify the settings, use: • NetSpot Console (via a web browser) (Canon utility software) • A web browser (Remote UI) 4 Computer Settings for Printing (See "Setting Up a Computer for Printing," on p. 2-15.) Specify the settings for each computer you use for printing. TCP/IP Network Setup Procedures 2-1 IMPORTANT • It is recommended that the network manager perform steps 1, 2, and 3 above. • If you are printing using a TCP/IP network, you can use the following print protocols: - LPD - Raw (Windows 2000/XP only) • If configuring the basic protocol settings for the first time, use the operation panel of this machine. NOTE The utility software of the NetSpot Console is not included in the User Software CD. To use the NetSpot Console, please download it from the Canon website. Specifying the Network Settings 2 2-2 TCP/IP Network Setup Procedures Preparation for Protocol Settings Before you specify the machine’s protocol settings, it is necessary to specify the machine’s IP address to enable communication between the machine and your computers. You can use any of the following to specify the settings. Specify the settings using the easiest method. machine’s operation panel • The ARP/PING commands • NetSpot Device Installer (Canon utility software included in the User Software CD) IMPORTANT • In the following operations, the machine’s MAC address is necessary. To check the MAC address from the machine’s operation panel, print a USER DATA LIST. (Refer to Chapter 6, "Reports and Lists," in the Facsimile Guide.) • Before you perform the following operations in this section, check that the machine is ON and connected to the network. • If you are using ARP/PING commands, the following steps directly allocate the IP address to the machine. For this machine, in addition to direct allocation of the IP address to the machine, you can use DHCP, BOOTP, or RARP to specify the IP address. When the machine is started or reset, it checks whether DHCP, BOOTP, or RARP is being used, and then allocates an IP address using the first available setting method. Because the machine’s IP address is automatically allocated at this time, it is not necessary for you to perform the following operations in this section. However if you are reallocating the IP address, or if DHCP, BOOTP, or RARP is not used, perform the following operations. Preparation for Protocol Settings 2-3 Specifying the Network Settings • The 2 Settings from the Operation Panel IMPORTANT Settings specified from the operation panel become effective after the machine is restarted, after the procedure. 1 Press [Menu]. Specifying the Network Settings 2 2 Press [ (-)] or [ (+)] to select <NETWORK SETTINGS> ➞ press [Set]. 3 Press [ (-)] or [ (+)] to select <LAN SETTINGS> ➞ press [Set]. 4 Press [ (-)] or [ (+)] to select <IP ADDRESS AUTO.> or <IP ADDRESS>. ● If you want to allocate an IP address to the machine automatically: ❑ Select <IP ADDRESS AUTO.> ➞ press [Set]. ❑ Press [ (-)] or [ (+)] to select <ON> ➞ press [Set]. ❑ Press [ (-)] or [ (+)] to select <DHCP>, <BOOTP>, or <RARP> ➞ press [Set]. ❑ Press [ (-)] or [ (+)] to select <ON> or <OFF> ➞ press [Set]. ● If you want to allocate a fixed IP address to the machine: ❑ Select <IP ADDRESS> ➞ press [Set]. ❑ Enter the IP address number using the numeric keys ➞ press [Set]. 2-4 Preparation for Protocol Settings 5 Press [ (-)] or [ (+)] to select <SUBNET MASK> ➞ press [Set]. 6 Enter the number using the numeric keys ➞ press [Set]. 7 Press [ (-)] or [ (+)] to select <DEFAULT GATEWAY> ➞ press [Set]. 8 Enter the number using the numeric keys ➞ press [Set]. 9 Press [ (-)] or [ (+)] to select <ETHERNET DRIVER> ➞ press [Set]. (-)] or [ (+)] to select <AUTO> or <MANUAL>. ● If you want to specify the ethernet driver settings automatically: ❑ Select <AUTO> ➞ press [Set]. ● If you want to specify the ethernet driver settings manually: ❑ Select <MANUAL> ➞ press [Set]. ❑ Press [ (-)] or [ (+)] to select <DUPLEX> ➞ press [Set]. ❑ Press [ (-)] or [ (+)] to select <HALF DUPLEX> or <FULL DUPLEX> for specifying the desired communication mode ➞ press [Set]. ❑ Press [ (-)] or [ (+)] to select <ETHERNET TYPE> ➞ press [Set]. ❑ Press [ (-)] or [ (+)] to select <100 BASE-TX> or <10 BASE-T> for specifying the desired ethernet type ➞ press [Set]. 11 Press [Stop/Reset] to return to the standby display. Preparation for Protocol Settings 2-5 Specifying the Network Settings 10 Press [ 2 Checking the Current Network Settings You can check the network settings of the machine. Settings specified from the operation panel become effective after the machine is restarted, after the procedure. 1 Specifying the Network Settings 2 Press [Menu]. 2 Press [ (-)] or [ (+)] to select <NETWORK SETTINGS> ➞ press [Set]. 3 Press [ (-)] or [ (+)] to select <VIEW IP ADDRESS> ➞ press [Set]. 4 5 Press [ (-)] or [ (+)] to select <IP ADDRESS>, <SUBNET MASK>, or <DEFAULT GATEWAY> for displaying the setting you want to check ➞ press [Set]. Press [Stop/Reset] to return to the standby display. Settings Using ARP/PING Commands 1 2 Start up the MS-DOS prompt or the Command prompt on your computer. Execute the following command to add a static entry to the arp table. arp -s <IP Address> <MAC Address> IP Address: Specify the IP address you want to allocate to the machine. The IP address consists of 4 numbers ranging from 0 to 255, using periods (.) as separators. (ie. 172.20.88.125) MAC Address: Specify the MAC address of the machine. Every second digit is separated by “-”. (ie. 00-00-85-05-70-31) Input Example: arp -s 172.20.88.125 00-00-85-05-70-31 2-6 Preparation for Protocol Settings 3 Execute the applicable command below to set the IP address for the network board. ping <IP Address> -l 479 Input Example: ping 172.20.88.125 -l 479 NOTE • The character “-l” is the alphabet letter “L.” • The Subnet Mask and Gateway Address are set as <0.0.0.0>. 2 Specifying the Network Settings The preparation for the machine’s protocol settings are complete. Settings Using NetSpot Device Installer The following is the procedure for specifying the settings using NetSpot Device Installer. 1 2 3 4 Insert the CD-ROM supplied with the printer into the CD-ROM drive. Double-click the [My Computer] icon on the screen ➞ right-click the CD-ROM drive icon ➞ click [Open] on the pop-up menu. In the [NetSpot_Device_Installer] folder on the CD-ROM, run [nsdi.exe]. From the list, select the device whose [Device Name] is the MAC address of the printer with [Not Configured] displayed in [Status]. Preparation for Protocol Settings 2-7 5 Right-click the selected device ➞ click [Initial Settings] on the popup menu. 6 In the [Initial Settings] dialog box, specify the following items ➞ click [Next]. Specifying the Network Settings 2 7 [Subnet]: If the computer on which NetSpot Device Installer runs is connected to more than one network, select the subnet that the desired device belongs to. [Product Type]: Select the product name of your machine. If the product name of your printer is not displayed, select [imageCLASS MF8180 Series]. Specify the TCP/IP protocol. [IP Address Settings with]: Select the method for setting the IP address. • [Manual Setting]: You need to set the IP address • [DHCP]: [IP Address]: 2-8 Preparation for Protocol Settings manually. The IP address that you enter in [IP Address] is assigned to the network board. The IP address is automatically obtained via DHCP (a DHCP server needs to be active on the network). Enter the IP address assigned to the network board. [Gateway Address]: Enter the gateway address used for the TCP/IP network. [Subnet Mask]: Enter the subnet mask used for the TCP/IP network. [Broadcast Address]: Enter the broadcast address used for the TCP/IP network. 8 Confirm the settings you specified ➞ click [OK]. 9 When the following message box appears, click [OK]. The settings are enabled after a short time. The preparation for the machine’s protocol settings are complete. Preparation for Protocol Settings 2 Specifying the Network Settings NOTE • The settings for [IP Address], [Gateway Address], [Subnet Mask], and [Broadcast Address] cannot be entered if [DHCP] is selected from [IP Address Setting with]. • If a DHCP server cannot be used, select [Manual Setting] from [IP Address Setting with]. 2-9 Protocol Settings You can specify the machine’s protocol settings on the computer by using any of the following software. Specify the settings using the easiest method. •A 2 web browser (Remote UI) Specifying the Network Settings • NetSpot Console (via a web browser) IMPORTANT • If you want to use NetSpot Console or the Remote UI, a web browser is required. • To use NetSpot Console, a computer on the network must have NetSpot Console installed. Install NetSpot Console in one computer on the network. For more details about NetSpot Console, see the NetSpot Console User's Guide (PDF manual), or the NetSpot Console readme file. • To specify the protocol settings using NetSpot Console, you must log in as Administrator. For instructions on how to use NetSpot Console, see the online help for NetSpot Console. NOTE • If you change the IP (Internet Protocol) address on the web browser (Remote UI), the change will not be reflected on the display of the machine. The change become effective after the machine is restarted. You can confirm the change of the IP address by checking <VIEW IP ADDRESS> under the <NETWORK SETTINGS> menu, or by printing the USER DATA LIST. • The utility software of the NetSpot Console is not included in the User Software CD. To use the NetSpot Console, please download it from the Canon website. Settings Using a Web Browser (Remote UI) NOTE Make sure that <USE HTTP> in <LAN SETTINGS> is set to <ON> before using the Remote UI. (See "HTTP," on p. 2-23.) 1 Start the web browser ➞ enter the URL below in [Location] or [Address] ➞ press [Enter] on the keyboard. http://<the IP address of the machine>/ Input Example : 2-10 Protocol Settings http://192.168.203.42/ 2 2 Specifying the Network Settings IMPORTANT • For your web browser, use Internet Explorer 5.01 Service Pack 1 or later, or Netscape Navigator 6.0 or later. • If you are using a connection via a proxy server, use the following settings. (The settings differ depending on the network environment.) - When configuring your web browser to use the proxy server, add the IP address of the machine to Exception (the address not using the proxy server). • Set up the web browser to accept cookies. • If more than one Remote UI is running at the same time, only the last setting specified will be valid. It is recommended that only one Remote UI is running. Select [Administrator Mode] ➞ click [OK]. The Remote UI starts. NOTE If a password has been set for the machine, enter the password ➞ click [OK]. If no password has been set, it is not necessary to enter a password. Protocol Settings 2-11 3 Under [Device Manager] in the left column of the screen ➞ click [Network]. Specifying the Network Settings 2 The [Network] page is displayed. 4 Click [Change] at the right of [TCP/IP]. The [Change TCP/IP Protocol Settings] page is displayed. 2-12 Protocol Settings 5 Specify the setting method for the machine IP address. To use DHCP, BOOTP, or RARP for IP address setting, select [On] for [Use DHCP], [Use BOOTP], or [Use RARP]. If selecting [Off] for [Use DHCP], [Use BOOTP], and [Use RARP], the machine does not check the protocols. If neither DHCP, BOOTP, nor RARP can be used, the IP address specified in [IP Address] is allocated. NOTE • Checking whether DHCP, BOOTP or RARP can be used takes about 1 to 2 minutes; it is recommended you set unused protocols to [Off]. • Depending on whether you use DHCP, BOOTP, or RARP to allocate the IP address, you need to start the DHCP server, BOOTP daemon, or RARP daemon. 6 Specify [IP Address], [Subnet Mask], and [Gateway Address]. In [IP Address], enter the machine’s IP address. In [Subnet Mask] and [Gateway Address], enter the subnet mask and gateway address used by the TCP/IP network. NOTE If you are using DHCP, BOOTP, or RARP, some of the items above are not used. The values obtained from DHCP, BOOTP, or RARP are used. 7 Select [Auto Detect] or [Manual Detect] for [Ethernet Driver Settings]. If you want to specify the ethernet driver settings automatically, select [Auto Detect]. To specify the settings manually, select [Manual Detect]. You can specify the communication mode and ethernet type from [Communication Mode] and [Ethernet Type] when [Manual Detect] selected. 8 Specify the protocol settings for printing. To use LPD print or Raw print, select [On] for [Use LPD Print] or [Use Raw Print]. Protocol Settings 2-13 2 Specifying the Network Settings IMPORTANT For this machine, in addition to direct allocation of the IP address to the machine, you can use DHCP, BOOTP, or RARP to specify the IP address. When the machine is started or reset, it checks whether DHCP, BOOTP, or RARP is being used, and then allocates the IP address using the first available setting method. 9 Click [OK]. The settings become valid after you restart the machine. The protocol settings are complete. Specifying the Network Settings 2 2-14 Protocol Settings Setting Up a Computer for Printing After you have completed the protocol settings of the machine, you are ready to set up each of the computers for printing. ■ Installing the Printer Driver and Specifying the Printer Destination Setting To print from a computer, you must install a printer driver and specify a setting for the printer destination. The printer destination setting differs depending on the print protocol used for printing. Use the following information as a guide to determine the print protocol you are using, and then perform the necessary operations. • LPD (Line Printer Daemon) This is the print protocol generally used with TCP/IP. See "Printer Connection Method (LPD/Raw)," on p. 2-16 to install the printer driver and to specify the printer destination setting. • Raw This is the print protocol used with Windows 2000/XP. It can print at higher speeds than LPD. See "Printer Connection Method (LPD/Raw)," on p. 2-16 to install the printer driver and to specify the printer destination setting. NOTE Configuration of Windows 2000/XP as a print server provides efficient management of your network printer. For the detailed procedure, see "Print Server Settings," on p. 2-19. Setting Up a Computer for Printing 2-15 2 Specifying the Network Settings ■ Connecting to a TCP/IP Network All computers that use the printer must have TCP/IP client software installed and must be enabled for TCP/IP network use. For details, see the manuals provided with the operating system. Printer Connection Method (LPD/Raw) Windows 98/Me 1 Specifying the Network Settings 2 Press [Menu]. 2 Press [ (-)] or [ (+)] to select <NETWORK SETTINGS> ➞ press [Set]. 3 Press [ (-)] or [ (+)] to select <LAN SETTINGS> ➞ press [Set]. 4 Press [ (-)] or [ (+)] to select <LPD SETTINGS> ➞ press [Set]. 5 Press [ (-)] or [ (+)] to select <ON> ➞ press [Set]. 6 7 Specify the LPD port number (default: 515) using the numeric keys ➞ press [Set]. Install the printer driver. (Refer to the Software Guide.) The printer destination settings are complete. 2-16 Setting Up a Computer for Printing Windows 2000/XP Press [Menu]. 2 Press [ (-)] or [ (+)] to select <NETWORK SETTINGS> ➞ press [Set]. 3 Press [ (-)] or [ (+)] to select <LAN SETTINGS> ➞ press [Set]. 4 2 Press [ (-)] or [ (+)] to select <LPD SETTINGS> or <RAW SETTINGS>. ● If you do the LPR protocol printing: ❑ Select <LPD SETTINGS> ➞ press [Set]. ❑ Press [ (-)] or [ (+)] to select <ON> ➞ press [Set]. ❑ Specify the LPD port number (default: 515) using the numeric keys ➞ press [Set]. ● If you do the RAW protocol printing: ❑ Select <RAW SETTINGS> ➞ press [Set]. ❑ Press [ (-)] or [ (+)] to select <ON> ➞ press [Set]. ❑ Specify the RAW port number (default: 9100) using the numeric keys ➞ press [Set]. 5 Install the printer driver. (Refer to the Software Guide.) Setting Up a Computer for Printing 2-17 Specifying the Network Settings 1 6 If you are using LPD, change the port configuration information. ❑ Click the [Ports] tab to display the [Ports] sheet. ❑ Click [Configure Port]. Specifying the Network Settings 2 ❑ Select [LPR] under [Protocol], enter “lp” in [Queue Name] under [LPR Settings] ➞ click [OK]. NOTE If you are using Raw, this step is not required as the default protocol setting is [RAW SETTINGS]. 7 Click [OK] to enable the settings. The printer destination settings are complete. 2-18 Setting Up a Computer for Printing Print Server Settings If Windows 2000/XP/Server 2003 is on your network, the following procedure enables you to set up a print server for more efficient management of network printers. Once a print server is set up, print jobs can be managed by the print server. Also, by setting up an alternate driver for the print server, printer drivers can be installed in each computer via the network. In the printer driver properties dialog box, display the [Sharing] sheet. ❑ Click [start] on the Windows task bar ➞ select [Printers and Faxes] (Windows 2000: [Start] ➞ [Settings] ➞ [Printers]). ❑ Right click the corresponding printer driver icon. ❑ On the pop-up menu, click [Sharing]. 2 Specify the sharing settings. ❑ Select [Share this printer] (Windows 2000: [Shared as]) ➞ enter a share name. ❑ If you are using Windows 2000/XP, click [Additional Drivers] ➞ select the printer driver you want to install. ❑ Click [OK]. Setting Up a Computer for Printing 2-19 2 Specifying the Network Settings 1 When the alternate driver is installed, additional windows will open for entering the location of the file containing the printer driver. Follow the instructions in these windows. NOTE To install the printer driver on another computer, use the [Add Print Wizard] window for selecting the printer destination ➞ select [A network printer, or a printer attached to another computer] (Windows 2000: [Network printer]) ➞ select the shared printer for the computer selected in the print server. 2 Specifying the Network Settings The shared printer settings are complete. 2-20 Setting Up a Computer for Printing Printer Management The machine enables you to use any of the following software to check the status and to specify the settings on your computer. web browser (Remote UI) • NetSpot Device Installer (Canon utility software included in the User Software CD) • NetSpot Console (via a web browser) NOTE The utility software of the NetSpot Console is not included in the User Software CD. To use the NetSpot Console, please download it from the Canon website. Printer Management Using a Web Browser (Remote UI) You can use the built-in Remote UI (User Interface) to manage the machine remotely using a web browser. For instructions on how to start the Remote UI, see step 1 of “Settings Using a Web Browser (Remote UI),” on p. 2-10. For instructions on how to use the Remote UI, refer to Chapter 2, "Remote UI Functions," in the Remote UI Guide. Printer Management Using NetSpot Device Installer NetSpot Device Installer is utility software for specifying the initial settings of Canon devices connected to a network. Available on the CD-ROM, NetSpot Device Installer can be accessed directly without installation, enabling network users to quickly and easily specify the initial settings of network devices. For instructions on how to use NetSpot Device Installer, see the online help for NetSpot Device Installer. Printer Management 2-21 2 Specifying the Network Settings •A Printer Management Using NetSpot Console NetSpot Console is utility software capable of managing devices connected to a network. This software enables network users to set or view various types of information about network devices using a web browser, such as list or map display of devices, detailed protocol settings, display and notification of device status, and job manipulations. For instructions on how to use NetSpot Console, see the online help for NetSpot Console. Specifying the Network Settings 2 2-22 Printer Management Additional Protocol Settings This section describes two additional protocols supported for this machine: HTTP (HyperText Transfer Protocol) and SNMP (Simple Network Management Protocol). The HTTP allows you to communicate between your computer and the machine via a web interface (i.e., Remote UI). Before you use the Remote UI, follow the procedure below to activate HTTP on the machine from the <NETWORK SETTINGS> menu. 1 Press [Menu]. 2 Press [ (-)] or [ (+)] to select <NETWORK SETTINGS> ➞ press [Set]. 3 Press [ (-)] or [ (+)] to select <LAN SETTINGS> ➞ press [Set]. 4 Press [ (-)] or [ (+)] to select <USE HTTP> ➞ press [Set]. 5 Press [ (-)] or [ (+)] to select <ON> ➞ press [Set]. 6 7 Specify the HTTP port number (default: 80) using the numeric keys. Press [Stop/Reset] to return to the standby display. Additional Protocol Settings 2-23 Specifying the Network Settings 2 HTTP SNMP The SNMP helps you monitor the state of the machine and collects its information. The following two items can be set: ■ COMMUNITY NAME Sets the SNMP community name. You can specify up to two community names. ■ SNMP WRITABLE 2 Specifying the Network Settings Allows the PCs on the network to access the machine and modify its settings if this item is activated. You can specify this setting for each community separately. 1 2 Press [ (-)] or [ (+)] to select <NETWORK SETTINGS> ➞ press [Set]. 3 Press [ (-)] or [ (+)] to select <LAN SETTINGS> ➞ press [Set]. 4 Press [ (-)] or [ (+)] to select <SNMP SETTINGS> ➞ press [Set]. 5 Press [ (-)] or [ (+)] to select <ON> ➞ press [Set]. 6 7 8 9 2-24 Press [Menu]. Specify the SNMP port number (default: 161) using the numeric keys ➞ press [Set]. Press [ (-)] or [ (+)] to select <COMMUNITY NAME 1> or <COMMUNITY NAME 2> ➞ press [Set]. Enter the SNMP community name using the numeric keys ➞ press [Set]. Press [ (-)] or [ (+)] to select <SNMP WRITABLE 1> or <SNMP WRITABLE 2> ➞ press [Set]. Additional Protocol Settings 10 Press [ (-)] or [ (+)] to select <ON> or <OFF> ➞ press [Set]. 11 Press [Stop/Reset] to return to the standby display. Specifying the Network Settings 2 Additional Protocol Settings 2-25 3 Appendix CHAPTER This chapter describes how to resolve printing problems, network setting items and software for doing so, the glossary, and the index. Troubleshooting This section describes how to resolve basic printing problems. NOTE If you cannot resolve your technical problem by referring to the information in this section, contact Canon Authorized Service Facilities or the Canon Customer Care Center at 1800-828-4040 between the hours of 8:00 A.M. to 8:00 P.M. EST Monday through Friday and 10:00 A.M. to 8:00 P.M. on Saturday. Unable to Print from a TCP/IP Network Cause 1 The machine and cable are not properly connected. Remedy After checking the following connections, restart the machine. Check that the machine is connected to the network using the proper cable. (Refer to "To Use the Machine as a Network Printer (Network Connection)," in the Quick Start Guide.) Cause 2 TCP/IP network is not properly set up. Remedy Confirm that the IP addresses are properly set up. Check if the IP addresses were set using DHCP, BOOTP, or RARP, and then confirm that they are operating. Cause 3 The computer that is printing is not properly set up. Remedy Check the following: Troubleshooting 3-1 • Confirm that the proper printer driver is installed. If you are printing from a computer, each computer must have a printer driver installed. For instructions on installing printer drivers, refer to the Software Guide. • Confirm that the correct printer is set as the output destination for the computer that is printing. Check the output destination for the printer in the [Control Panel]. The name of the file being printed is too long. Remedy Normally LPR (or the Microsoft TCP/IP Printer, if you are using Windows 2000/ XP) sends jobs either under the name of the application software used for printing, or the file name. However, a job name longer than 255 characters cannot be sent to the printer. To correct this problem, rename the file with a shorter name. Appendix 3 Cause 4 3-2 Troubleshooting Network Setting Items Network Setting Items Using the Operation Panel You can change the settings of the machine with the operation panel of the machine. The setting items you can change are shown below. ■ NETWORK SETTINGS Default Setting Setting Description Appendix Item 3 IP ADDRESS AUTO. ON/OFF (DHCP/BOOTP/RARP, ON/OFF) ON IP ADDRESS IP address 0.0.0.0 SUBNET MASK Subnet Mask 0.0.0.0 DEFAULT GATEWAY Default Gateway address 0.0.0.0 SNMP SETTINGS SNMP settings (ON/OFF), Port No. settings ON (Port No. 161) LPD SETTINGS LPD settings (ON/OFF), Port No. settings ON (Port No. 515) USE HTTP HTTP settings (ON/OFF), Port No. settings ON (Port No. 80) RAW SETTINGS RAW settings (ON/OFF), Port No. settings ON (Port No. 9100) Ethernet driver settings (AUTO/MANUAL (DUPLEX (HALF DUPLEX/FULL DUPLEX), ETHERNET DRIVER ETHERNET TYPE (10 BASE-T/100 BASETX)) AUTO COMMUNITY NAME 1 Community name settings public COMMUNITY NAME 2 Community name settings (null) SNMP WRITABLE 1 SNMP write settings (ON/OFF) ON SNMP WRITABLE 2 SNMP write settings (ON/OFF) OFF Network Setting Items 3-3 Network Setting Items Using NetSpot Console, NetSpot Device Installer, or a Web Browser (Remote UI) You can change the settings of the machine with NetSpot Console, NetSpot Device Installer, or a web browser (Remote UI). The setting items you can change are shown below. ■ Common Settings Item Appendix 3 Setting Description Default Setting Device Name Device name (0 to 63 characters) (null) Location Device installation location (0 to 63 characters) (null) Administrator Device administrator name (0 to 63 characters) (null) Phone Telephone number of contact person (0 to 63 characters) (null) Contact Person Contact person's name (o to 63 characters) (null) Phone Telephone number of contact person (0 to 63 characters) (null) Administrator Password Device password (0 to 15 characters) (null) Permit End-user’s Job Operation* Whether or not to permit operating print job in general user mode (Off) Link** Link name displayed on support link page of the Remote UI (null) URL** URL displayed on support link page of the Remote UI (null) Comments** Comments displayed on support link page of the Remote UI (null) NOTE Items with an asterisk (*) cannot be set using NetSpot Device Installer. Items with asterisks (**) cannot be set using NetSpot Device Installer and NetSpot Console. Set them using the Remote UI. 3-4 Network Setting Items ■ TCP/IP Settings Setting Description Default Setting Use DHCP Whether DHCP is used in setting the IP address (On) Use BOOTP Whether BOOTP is used in setting the IP address (Off) Use RARP Whether RARP is used in setting the IP address (Off) IP Address IP address of the machine 0.0.0.0 Subnet Mask Subnet mask 0.0.0.0 Gateway Address Gateway address 0.0.0.0 Network Setting Items 3 Appendix Item 3-5 Available Software for Network Settings You can specify the network settings of the machine using the following software: =Available =Unavailable NetSpot Console Item Appendix 3 NetSpot Device Installer Web Browser (Remote UI) ARP/PING Commands The Machine Operation Panel TCP/IP Preparation for Protocol Settings (See p.2-4.) TCP/IP Protocol Settings (See p.2-10.) *: The mark 3-6 * * indicates that only some of the items can be set. (See "Network Setting Items," on p. 3-3.) Available Software for Network Settings Glossary BOOTP BOOTstrap Protocol. A protocol that enables a client machine to automatically obtain network setup information from a server over a TCP/IP network. BOOTP enables a client to automatically locate such information as the host name, domain name, and IP address, so that it is not necessary to create these items manually. Buffer size Cookie A file left on a user’s computer when the user visits a web site. A cookie allows the web site to recognize the user on subsequent visits. Cookies are generally used to enable a user to automatically sign on to certain web sites and to customize the features offered by such sites. Daemon A process that runs in the background and performs a specified operation, at predefined times or in response to certain events. Typical daemons include print spoolers and automated network information system protocols. DHCP Dynamic Host Configuration Protocol. A protocol that automatically specifies the network settings of a client on a TCP/IP network. Many of the settings required to set up TCP/IP, which is the standard protocol of the Internet, can be made automatically. Ethernet An industry-standard local area network (LAN) system for connecting together multiple computers. Data is sent from one computer to another by breaking it into packets, and a packet reaches its destination smoothly without any collision with other packets. File server A personal computer or workstation to which two or more users on client personal computers can gain access via a local area network (LAN) in order to share and use its hard disk drive. Gateway Address The default address of a network or Web site. It provides a single domain name and point of entry to the site. Glossary 3-7 Appendix 3 The size of a data area, or buffer, shared by devices or programs working at different speeds or with different priorities. The buffer is designed to prevent one device or process from being held up by another. For this to be possible, the buffer must be set up correctly. HP-GL/2 A graphics language that allows computer applications to draw graphic images using printers. Images in HP-GL/2 are represented as vector graphics. Vector objects describe an image in terms of geometric shapes, such as lines and polygons, and fills. HP-GL/2 is supported by your Canon machine. HTTP Hypertext Transfer Protocol. The client-server TCP/IP protocol used on the World Wide Web for the transfer of HTML (Hypertext Markup Language) documents across the Internet. Internet Protocol (IP) The underlying set of networking rules that describes how data is transmitted across the Internet. Internet Protocol allows data from one computer to be split into packets to be sent to another computer with a specific IP address. Appendix 3 IP address Internet Protocol address. A 32-bit numeric address used by IP (internet protocol) to specify a computer on the Internet. The IP address is usually written as four numbers separated by periods. An example is 128.121.4.5. LAN Local Area Network. It is a network system formed by linking a server, workstations, and computers, which are all located in the same building or some other relatively limited area. Log in Entering a user name and password as a means of user authentication to start a computer session or access to a service. LPD Line Printer Daemon. A daemon is a program that runs, without human intervention, to accomplish a given task. The Line Printer Daemon controls the flow of print jobs to a printer. MAC address Media Access Control address. The hardware address of the network adapter of a computer connected to a local area network. Protocol A set of rules that govern the transmission of data across a network. Examples of protocols are FTP, DHCP, BOOTP, RARP, IPP, and TCP/IP. Proxy server A server that provides a cache of files available on remote servers that are slow or expensive to access. The term “proxy server” normally refers to a World Wide Web server that, on receiving a URL, tries to supply the requested file from its cache. If it cannot locate the file there, the proxy server would bring it from the remote server and also save a copy in its cache so that the next request can be obtained locally. 3-8 Glossary RARP Reverse Address Resolution Protocol. A protocol that associates a network adapter address (MAC address) with an Internet Protocol (IP) address. Raster Raster graphics describes an image as a pattern of dots, compared to vector graphics which represents an image as a geometrical formula. Each row of color dots in the mosaic of color dots constitutes one raster graphic. In a printer, a raster graphic is used as the master image from which a page is printed, because the image can be transferred to paper by printing one raster at a time. Raw This is a print application used with Windows 2000/XP. It can print at higher speeds than LPD. Appendix RIP (Raster Image Processor) The hardware and/or software functions of a printer that convert vector graphic descriptions from a computer into raster graphic images that can be printed. SMB Server Message Block. A protocol that provides file and printer sharing over a network for Windows computers. Source Routing Normally, a host has no control over the route taken by a packet it sends. Source routing is a technique whereby the sender of a packet can specify the route that a packet should take through the network to its destination. Spooling Simultaneous Peripheral Operations On-Line. Spooling means putting jobs in a buffer, which is a special area in memory or on a disk. Because devices access data at different rates, the buffer provides a waiting station where the data can wait until the device for which it is meant is ready to access it. Subnet Mask SUBNETwork mask. The method used to determine which subgroup, or subnet, an IP address belongs to on TCP/IP networks, all devices whose IP addresses have the same prefix would belong to the same subnet. Dividing a network into subnets is useful for both security and performance reasons. Glossary 3 3-9 Switching hub A network connection box to which a number of computers can be connected. The switching hub forwards a data packet from the network to the appropriate computer according to the packet’s address. Conventional hubs simply send every packet to every connected computer. Since a switching hub forwards packets only to their intended recipients, it provides greater efficiency. TCP/IP Acronym for Transmission Control Protocol/Internet Protocol. The protocol used to connect to the Internet and to wide-area networks. URL Uniform Resource Locator. A standard way of specifying the location of an object, usually a web page, on the Internet. The URL for a web page would look something like this: "http://www.w3.org". Here, “http:” indicates that a web page is being accessed, “//www.w3.org” is the address of the server containing the web page. Appendix 3 Vector Graphics (See definition for Raster.) WAN Wide Area Network. 3-10 Glossary Index A G Administrator Mode, 2-11 ARP Table, 2-6 ARP/PING Commands, 2-3, 2-6, 3-6 Available Software Network Settings, 3-6 Gateway Address, 2-7, 2-9, 2-13, 3-7 BOOTP, 2-3, 2-13, 3-1, 3-7 Broadcast Address, 2-9 Buffer size, 3-7 C Change TCP/IP Protocol Settings page, 2-12 Command prompt, 2-6 Common Settings, 3-4 Cookies, 2-11, 3-7 D Daemon, 2-13, 3-7 Default Gateway, 3-3 DHCP, 2-3, 2-13, 3-1, 3-7 E Ethernet, 3-7 Exception, 2-11 3 HP-GL/2, 3-8 HTTP, 3-8 Appendix B H I Internet Protocol (IP), 3-8 IP Address, 2-3, 2-6, 2-8, 2-13, 3-1, 3-3, 3-8 IP Address Auto, 3-3 L LAN, 3-8 Log in, 3-8 LPD, 2-2, 2-15, 2-16, 2-18, 3-8 LPR, 2-18, 3-2 M MAC address, 2-3, 2-6, 3-8 Microsoft Windows 2000 Professional, 1-1 Microsoft Windows 2000 Server, 1-1 Microsoft Windows 2000/XP, 2-17 Microsoft Windows 98/Me, 2-16 Microsoft Windows Server 2003, 1-1 MS-DOS prompt, 2-6 F File server, 3-7 Index 3-11 Appendix 3 N T NetSpot Console, 2-1, 3-4, 3-6 Network Setting Items, 3-3 NETWORK SETTINGS, 3-3 TCP/IP, 3-6, 3-10 Network, 2-1, 3-1 Settings, 3-5 O U Operation Panel, 2-4, 3-3 URL, 2-10, 3-10 P V Ping, 2-7 Preparation for Protocol Settings, 2-3 Print Server Settings, 2-19 Printer Connection Method, 2-16 Printer Management Web Browser (Remote UI), 2-21 Protocol, 3-8 Protocol Settings, 2-10 Proxy server, 2-11, 3-8 Vector Graphics, 3-10 R RARP, 2-3, 2-13, 3-1, 3-9 Raster, 3-9 Raw, 2-2, 2-15, 2-16, 2-18, 3-9 Remote UI, 2-11 RIP (Raster Image Processor), 3-9 S Setting Up Computer for Printing, 2-15 Sharing, 2-19 SMB, 3-9 Source Routing, 3-9 Spooling, 3-9 Subnet Mask, 2-7, 2-9, 2-13, 3-3, 3-9 Switching hub, 3-10 System Environment Requirements for Printing, 1-1 3-12 Index W WAN, 3-10 Web Browser (Remote UI), 2-10, 3-4, 3-6 Windows, 2-15 CANON INC. 30-2, Shimomaruko 3-chome, Ohta-ku, Tokyo 146-8501, Japan CANON U.S.A., INC. One Canon Plaza, Lake Success, NY 11042, U.S.A. CANON CANADA INC. 6390 Dixie Road Mississauga, Ontario L5T 1P7, Canada CANON EUROPA N.V. Bovenkerkerweg 59-61 1185 XB Amstelveen, The Netherlands CANON FRANCE S.A.S. 17, quai du Président Paul Doumer 92414 Courbevoie Cedex, France CANON COMMUNICATION & IMAGE FRANCE S.A.S. 12, rue de l'Industrie 92414 Courbevoie Cedex, France CANON (U.K.) LTD. Woodhatch, Reigate, Surrey, RH2 8BF, United Kingdom CANON DEUTSCHLAND GmbH Europark Fichtenhain A10, 47807 Krefeld, Germany CANON ITALIA S.p.A. Via Milano, 8 20097 San Donato Milanese (MI) Italy CANON LATIN AMERICA, INC. 703 Waterford Way Suite 400, Miami, Florida 33126 U.S.A. CANON AUSTRALIA PTY. LTD 1 Thomas Holt Drive, North Ryde, Sydney, N.S.W. 2113, Australia CANON CHINA CO., LTD 15F, North Tower, Beijing Kerry Centre, 1 Guang Hua Road, Chao Yang District, 100020, Beijing, China CANON SINGAPORE PTE. LTD. 1 HarbourFront Avenue #04-01 Keppel Bay Tower, Singapore 098632 FA7-8573 (000) © CANON INC. 2006 120V