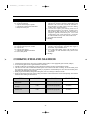
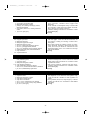
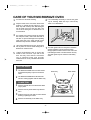
1
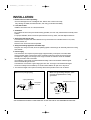
0.9 cu. ft. Microwave Oven
MCD990W/MCD990B
MCD990W/B(¿ )-861G0A 01.7.265:37PM ˘
` 1
PRECAUTIONS TO AVOID POSSIBLE
EXPOSURE TO EXCESSIVE MICROWAVE
ENERGY
(a) Do not attempt to operate this oven with the door open since open-door operation can
result in harmful exposure to microwave energy. It is important not to defeat or tamper with
the safety interlocks.
(b) Do not place any object between the oven front face and the door or allow
soil or cleaner residue to accumulate on sealing surfaces.
(c) Do not operate the oven if it is damaged. It is particularly important that the oven door close
properly and that there is no damage to the: (1) door (bent), (2) hinges and latches (broken or
loosened), (3) door seals and sealing surfaces.
(d) The oven should not be adjusted or repaired by anyone except properly
qualified service personnel.
TABLE OF CONTENTS
PRECAUTIONS ............................................................................................................................... 1
IMPORTANT SAFETY INSTRUCTIONS ......................................................................................... 2
FEDERAL COMMUNICATIONS COMMISSION RADIO FREQUENCY
INTERFENCE STATEMENT (U.S.A ONLY) .................................................................................... 3
GROUNDING INSTRUCTIONS ....................................................................................................... 3
INSTALLATION ............................................................................................................................... 4
SPECIFICATIONS .......................................................................................................................... 5
FEATURES DIAGRAM .................................................................................................................... 6
OPERATION PROCEDURE ........................................................................................................... 8
CONTROLS .................................................................................................................................... 9
SETTING THE CLOCK .............................................................................................................. 9
TIME DEFROSTING .................................................................................................................. 9
WEIGHT DEFROSTING ........................................................................................................... 10
COOKING IN ONE STAGE ...................................................................................................... 11
COOKING IN TWO STAGES ................................................................................................... 11
KITCHEN TIMER MODE .......................................................................................................... 12
SPEEDY COOK ....................................................................................................................... 13
ONE TOUCH COOKING .......................................................................................................... 13
AUTO COOK ............................................................................................................................. 14
LESS, MORE............................................................................................................................. 15
CHILD SAFETY LOCK ............................................................................................................. 15
TO STOP THE OVEN WHILE THE OVEN IS OPERATION .................................................... 15
MICROWAVE UTENSILS ............................................................................................................. 16
COOKING GUIDE ......................................................................................................................... 17
CARE OF YOUR MICROWAVE OVEN ........................................................................................ 26
USE YOUR MICROWAVE OVEN SAFELY .................................................................................. 27
BEFORE YOU CALL FOR SERVICE ............................................................................................ 28
QUESTIONS AND ANSWERS ...................................................................................................... 28
1
IMPORTANT SAFETY INSTRUCTIONS
When using electrical appliances, basic safety precautions should be followed, including the following:
WARNING-To reduce the risk of burns, electric shock, fire, injury to persons or exposure to excessive
microwave energy:
1. Read all instructions before using the appliance.
13. Keep cord away from heated surfaces.
2. Read and follow the specific “PRECAUTIONS
TO
AVOID POSSIBLE EXPOSURE TO
EXCESSIVE
MICROWAVE ENERGY” found on page 1.
14. Do not let cord hang over edge of table or
counter.
15. Either:
a) When cleaning surfaces of door and oven
that comes together on closing the door,
use only mild, non-abrasive soaps or
detergents applied with a sponge or soft
cloth , or
b) When separate cleaning instructions are
provided, See door surface cleaning
instructions on (specific page or section to
be included).
3. This appliance must be grounded. Connect
only to properly grounded outlet.
See “GROUNDING INSTRUCTIONS” found on
page 3.
4. Install or locate this appliance only in accordance with the provided installation instructions.
5. Some products such as whole eggs and
sealed containers - for example, closed glass
jars-may explode and should not be heated
in this oven.
16. To reduce the risk of fire in the oven cavity:
a) Do not overcook food. Carefully attend
appliance if paper, plastic, or other combustible materials are placed inside the
oven to facilitate cooking.
b) Remove wire twist-ties from paper or plastic
bags before placing bag in oven.
c) If materials inside the oven should ignite,
keep oven door closed, turn oven off, and
disconnect the power cord, or shut off
power at the fuse or circuit breaker panel.
d) Do not use the cavity for storage purposes.
Do not leave paper products, cooking
utensils, or food in the cavity when not in
use.
6. Use this appliance only for its intended use
as described in this manual. Do not use
corrosive chemicals or vapors in this appliance.
This type of oven is specifically designed to
heat, cook, or dry food. It is not designed for
industrial or laboratory use.
7. As with any appliance, close supervision is
necessary when used by children.
8. Do not operate this appliance if it has a
damaged cord or plug, if it is not working
properly, or if it has been damaged or dropped.
9. This appliance should be serviced only by
qualified service personnel.
Contact nearest authorized service facility
for examination, repair or adjustment.
10. Do not cover or block any openings on the
appliance.
11. Do not store this appliance outdoors. Do not
use this product near water — for example,
near a kitchen sink, in a wet basement, or
near a swimming pool, and the like.
12. Do not immerse cord or plug in water.
2
MCD990W/B(¿ )-861G0A 01.7.265:37PM ˘
` 3
FEDERAL COMMUNICATIONS COMMISSION
RADIO FREQUENCY INTERFERENCE
STATEMENT (U.S.A. ONLY)
WARNING:
This equipment generates and uses ISM frequency energy and if not installed and used properly,
that is in strict accordance with the manufacturer’s instructions, may cause interference to radio
and television reception.
It has been type-tested and found to comply with limits for an ISM Equipment pursuant to part 18
of FCC Rules, which are designed to provide reasonable protection against such interference in
a residential installation.
However, there is no guarantee that interference will not occur in a particular installation.
If this equipment does cause interference to radio or television reception, which can be
determined by turning the equipment off and on, the user is encouraged to try to correct
the interference by one or more of the followings.
• Reorient the receiving antenna of radio or television.
• Relocate the Microwave oven with respect to the receiver.
• Move the microwave oven away from the receiver.
• Plug the microwave oven into a different outlet so that microwave oven
and receiver are on different branch circuits.
THE MANUFACTURER is not responsible for any radio or TV interference caused by
UNAUTHORIZED MODIFICATION to this microwave oven. It is the responsibility of
the user to correct such interference.
GROUNDING INSTRUCTIONS
This appliance must be grounded. In the event of an electrical short circuit, the grounding plug reduces
the risk of electric shock by providing an escape wire for electric current. This appliance is equipped
with a cord having a grounding wire with a grounding plug. The plug must be plugged into an outlet
that is properly installed and grounded.
WARNING: Improper use of the grounding can result in a risk of electric shock.
Consult a qualified electrician or serviceman if the grounding instructions are not
completely understood, or if doubt exists as to whether the appliance is properly
grounded, and either :
(1) If it is necessary to use an extension cord, use only a 3-wire extension cord
that has a 3-blade grounding plug, and a 3-slot receptacle that will accept
the plug on the appliance. The marked rating of the extension cord shall
be equal to or greater than the electrical rating of the appliance. or
(2) Do not use an extension cord, if the power supply cord is too short,
have a qualified electrician or serviceman install an outlet near the appliance.
3
MCD990W/B(¿ )-861G0A 01.7.265:37PM ˘
` 4
INSTALLATION
1. Examine the oven after unpacking.
Check for damage such as a misaligned door, broken door or dent in the cavity.
If any damage is visible, DO NOT INSTALL, and notify your dealer immediately.
2. Level, flat location.
Install the microwave oven on a level, flat surface.
3. Ventilation.
Do not block air vents. If they are blocked during operation, the oven may overheat and eventually cause
a failure.
For proper ventilation, allow 3 inches of space between oven top, sides, rear and adjacent surfaces.
4. Away from radio and TV sets.
Poor television reception and radio interference may result if the oven is located close to a TV, radio,
antenna, feeder, etc.
Place the oven as far from them as possible.
5. Away from heating appliances and water taps.
Keep the oven away from heat, steam or splashing liquids. These things can adversely affect oven wiring
and contacts.
6. Power supply.
This microwave oven requires a power supply of approximately 12 Amperes, 120 Volts, 60Hz
and a grounded outlet. A short power cord is provided to reduce the risk of the user becoming
entangled in or tripping over a longer cord. Longer cord sets or extension cords are available
and may be used if care is exercised.
If an extension cord is used, the marked electrical rating of the cord should be at least as great
as the electrical rating of the oven.
The extension cord must be a grounding-type 3-wire cord. The longer cord should be arranged
so it does not drape over the table top or counter where children can pull on it or trip over it.
7. The minimum height of free space necessary above the top surface of the oven is 100mm.
When use 3-pronged plug
When use grounding adaptor, make
sure the receptacle box is fully
grounded.
3-prong Receptacle
Grounding
Lead
Receptacle
Box cover
Receptacle Box Cover
3-prong plug
Grounding
Adaptor
Receptacle
“THE CANADIAN ELECTRICAL CODE DOES NOT ALLOW THE USE OF THE GROUNDING ADAPTOR”
4
MCD990W/B(¿ )-861G0A 01.7.265:37PM ˘
` 5
SPECIFICATIONS
POWER SUPPLY
MICROWAVE
120V AC 60 Hz SINGLE PHASE WITH GROUNDING
POWER CONSUMPTION
1350 W
OUTPUT POWER
900 W
FREQUENCY
2450 MHz
OUTSIDE DIMENSIONS (W X H X D)
495 X 294 X 388 mm (19.5 X 11.6 X 15.3 in.)
CAVITY DIMENSIONS (W X H X D)
320 X 228 X 338 mm (12.6 X 9.0 X 13.3 in)
NET WEIGHT
APPROX. 14KG (30.9 lbs.)
TIMER
59 min. 99 sec.
POWER LEVELS
10 LEVELS
* Specifications are subject to change without notice.
360
388
294
279
465
495
5
FEATURES DIAGRAM
1. Door latch-When the door is closed it will
automatically shut off. If the door is opened
while the oven is operating, the magnetron
will automatically shut off.
6. Door release button-Pushing this button
stops oven operation and opens the door.
7. Glass cooking tray-Made of special heat
resistant glass. The tray must always be
in proper position before operating.
Do not cook food directly on the tray.
2. Door seal-The door seal maintains the
microwave within the oven cavity and
prevents microwave leakage.
8. Roller guide-Supports the glass cooking
tray.
3. Oven cavity
4. Spatter shield-Protects the microwave
outlet from splashes of cooking foods.
9. Door screen-Allows viewing of food.
The screen is designed so that light
can pass through, but not the microwaves.
5. Safety interlock system-Prevents the oven
from operating while the door is opened.
6
MCD990W/B(¿ )-861G0A 01.7.265:37PM ˘
` 7
FEATURES DIAGRAM (continued)
88:88
q
M/W DEF TIMER LOCK lb
r
e
1. BREAD
2. SOUP
3. BAKED POTATO
4. FRESH VEGETABLE
5. FROZEN VEGETABLE
POPCORN
MORE
FROZEN
PIZZA
LESS
AUTO
COOK
DINNER
PLATE
AUTO DEFROST
MEAT
POULTRY
w
t
FISH
y
u
i
POWER
DEFROST
o
a
1 2 3
4 5 6
7 8 9
0
KITCHEN
TIMER
STOP/
CLEAR
10. Time set pad-Used to set the cooking time
and the present time.
0
CLOCK
p
START/
SPEEDY COOK
s
17. Power-Used to set power level.
18. Defrost-Used to defrost foods.(for time)
11. Display-Cooking time, power level,
indicators and present time are displayed.
19. Kitchen Timer-Used as a minute timer, to
delay the start of cooking, or to set a
holding time after cooking.
12. One touch-Used to cook or reheat specific
quantities of food.
20. Clock-Used to set clock.
13. Auto Cook-Used to cook or reheat.
21. Stop/Clear-Used to stop the oven
operation
or to delete the cooking data.
14. More-Used to add time to cooking.
15. Less-Used to remove time from cooking.
22. Start/Speedy cook-Used to start the oven
and also used to set a reheat time.
16. Auto Defrost-Used to defrost foods.(for
weight)
7
MCD990W/B(¿ )-861G0A 01.7.265:37PM ˘
` 8
OPERATION PROCEDURE
This section includes useful information about oven operation.
1. Plug power supply cord into a standard 3-pronged 12 Amp, 120V AC 60Hz power outlet.
2. After placing the food in a suitable container, open the oven door and put it on the glass tray.
The glass tray and roller guide must always be in place during cooking.
3. Shut the door. Make sure that it is firmly closed.
oven light is on only when the microwave
1 The
oven is operating.
2
the STOP/CLEAR pad is touched during
7 When
the oven operation, the oven stops cooking and
all information retained. To erase all
information(except the present time), touch the
STOP/CLEAR pad once more. If the oven door
is opened during the oven operation, all
information is retained.
The oven door can be opened at any time
during operation by touching the door release
button on the control panel. The oven will
automatically shut off.
If the START pad is touched and the oven does
time a pad is touched, a BEEP will sound
8
3 Each
not operate, check the area between the door
to acknowledge the touch.
and door seal for obstructions and make sure
the door is closed securely. The oven will not
start cooking until the door is completely closed
or the program has been reset.
oven automatically cooks on full power
4 The
unless set to a lower power level.
display will show “ : 0” when the oven is
5 The
plugged in.
6
Make sure the oven is properly installed and
plugged into the electrical outlet.
Time clock returns to the present time when the
cooking time ends.
WATTAGE OUTPUT CHART
• The power-level is set by pressing the POWER pad. The chart shows the display, the power level and
the percentage of power.
Touch POWER pad
Power level (Display)
Approximate Percentage of Power
once
P-HI
100%
twice
P-90
90%
3 times
P-80
80%
4 times
P-70
70%
5 times
P-60
60%
6 times
P-50
50%
7 times
P-40
40%
8 times
P-30
30%
9 times
P-20
20%
10 times
P-10
10%
11 times
P-00
0%
8
MCD990W/B(¿ )-861G0A 01.7.265:37PM ˘
` 9
CONTROLS
SETTING THE CLOCK
When the oven is first plugged in, the display will flash “:0” and a tone will sound. If the AC power
ever goes off, the display shows “ : 0” when the power comes back on.
CLOCK
1. Touch CLOCK pad.
This is a 12 hour clock system.
2. Touch CLOCK pad once more.
This is a 24 hour clock system.
NOTE : This oven has multiple clock
systems. If you want 12 hour
clock system, omit this step.
3. Enter the correct time of day by touching the numbers
in sequence.
The display stops blinking, and the colon starts
blinking. If you selected 12 hour clock system,
this digital clock allows you to set from 1:00 to
12:59. If you selected 24 hour clock system,
this digital clock allows you to set from 0:00 to
23:59.
4. Touch CLOCK pad.
CLOCK
NOTE: If you attempt to enter an incorrect time, the time will not be set and a error signal tone will
sound. Touch the CLOCK pad and re-enter the time.
TIME DEFROSTING
When DEFROST is selected, the automatic cycle divides the defrosting time into periods of
alternating defrost and stand times by cycling on and off.
1. Touch DEFROST pad.
The DEF indicator lights and “ : 0” is displayed.
DEFROST
The display will show what you touched.
2. Touch number pads for the
desired defrosting time.
Note : Your oven can be programmed for
59 minutes 99 seconds. ( 59 : 99 )
3. Touch START pad.
When you touch START pad, the DEF indicator starts blinking to show the oven is in the DEFROST mode.
The display counts down the time to show you how much defrosting time is left in the DEFROST mode.
The oven beeps during the defrosting cycle to signal that the food needs to be turned or rearranged. When
the defrosting time ends, you will hear 3 beeps.
9
MCD990W/B(¿ )-861G0A 01.7.265:37PM ˘
` 10
WEIGHT DEFROSTING
AUTO DEFROST lets you easily defrost food by eliminating guesswork in determining defrosting time.
Follow the steps below for easy defrosting.
1. Touch MEAT pad.
The lb indicator light and “ 1.0 ” is displayed.
MEAT
2. Select the desired defrosting weight.
(Refer to the weight defrost chart below.)
The display will show what you touched.
3. Touch START pad.
MEAT DEFROSTING begins.
1. Touch POULTRY pad.
The lb indicator light and “ 1.5 ” is displayed.
POULTRY
2. Select the desired defrosting weight.
(Refer to the weight defrost chart below.)
The display will show what you touched.
3. Touch START pad.
POULTRY DEFROSTING begins.
1. Touch FISH pad.
The lb indicator light and “ 0.5 ” is displayed.
FISH
2. Select the desired defrosting weight.
(Refer to the weight defrost chart below.)
The display will show what you touched.
3. Touch START pad.
FISH DEFROSTING begins.
* WEIGHT DEFROST CHART
Touch pad
MEAT
POULTRY
FISH
once
1.0 lb
1.5 lb
0.5 lb
twice
1.5 lb
2.0 lb
1.0 lb
3 times
2.0 lb
2.5 lb
1.5 lb
4 times
2.5 lb
3.0 lb
2.0 lb
The defrosting time is automatically determined by the weight selected.
When you touch START pad, the lb indicator goes off and the DEF indicator blinks and the defrosting time
counts down in the display window. The oven beeps during the defrosting cycle to signal that the food
needs to be turned or rearranged. When the defrosting time ends, you will hear 3 beeps.
10
MCD990W/B(¿ )-861G0A 01.7.265:37PM ˘
` 11
COOKING IN ONE STAGE
POWER
X6
1. Touch POWER pad.
(Select the desired power
level.)
The M/W indicator lights.
The display will show what you touched.
This example shows power level 5.
Note : If steps 1 and 2 are omitted,
the oven will cook at full power.
2. Touch number pads for the cooking time.
The display will show what you touched.
Note : Your oven can be programmed for
59 minutes 99 seconds. ( 59 : 99 )
3. Touch START pad.
When you touch START pad, the M/W indicator starts blinking to show the oven is cooking.
The display counts down the time to show how much cooking time is left. When the cooking time ends, you
will hear 3 beeps.
NOTE: Using lower power levels increases the cooking time which is recommended for foods such
as cheese, milk and slow cooking of meats.
COOKING IN TWO STAGES
All recipes require the frozen foods to be defrosted fully before cooking.
This oven can be programmed to automatically defrost foods before cooking.
1. Touch DEFROST pad.
The DEF indicator lights and “ : 0” is displayed.
DEFROST
2. Touch number pads for the defrosting time you want.
POWER
X6
The display will show what you touched.
3.Touch POWER pad.
The M/W indicator lights and “P-HI” is displayed.
(Select the desired power level. ) The display will show what you touched.
This example shows power level 5.
4. Touch number pads for the desired cooking time.
The display will show what you touched.
5. Touch START pad.
When you touch START pad, the DEF and M/W indicators come on to confirm the power levels
selected. The DEF indicator starts blinking to show you that the oven is in DEFROST mode.
The display counts down the time remaining in DEFROST mode. When the oven beeps, turn over,break
apart and/or redistribute the food. At the end of DEFROST mode, the oven will beep and start M/W cook.
The DEF indicator goes off and the M/W indicator starts blinking. The display counts down the time
remaining in M/W mode. When M/W cook ends, you will hear 3 beeps.
11
MCD990W/B(¿ )-861G0A 01.7.265:37PM ˘
` 12
KITCHEN TIMER MODE
Timer operates as a minute timer, can be set to delay cooking and used to set a holding time after cooking.
However delay cooking can not be programmed for defrost. Timer operates without microwave energy.
HOW TO USE AS A MINUTE TIMER
KITCHEN
TIMER
1. Touch KITCHEN TIMER pad.
The TIMER indicator lights and “ : 0” is
displayed.
2. Press the amount of time you
want to count down.
The display will show what you touched.
3. Touch START pad.
The TIMER indicator starts blinking and the display counts down the time remaining in KITCHEN
TIMER mode. When KITCHEN TIMER mode ends, you will hear 3 beeps.
HOW TO USE TO DELAY THE START OF COOKING
KITCHEN
TIMER
1. Touch KITCHEN TIMER pad.
The TIMER indicator lights and “ : 0” is
displayed.
2. Press the amount of time you want to delay.
The display will show what you touched.
3. Program the desired power level and cooking time for
food to be cooked.
The M/W indicator lights and the selected
power level & cooking time are displayed.
4. Touch START pad.
When you touch START pad, the TIMER indicator starts blinking and the display counts down the
time remaining in KITCHEN TIMER mode. When KITCHEN TIMER mode ends, the oven will beep.
The TIMER indicator goes off and M/W indicator starts blinking. The display counts down the time
remaining in M/W mode. When M/W cook ends, you will hear 3 beeps.
HOW TO USE TO SET A HOLDING TIME
The M/W indicator lights and the selected
time is displayed.
1. Program the desired cooking time.
KITCHEN
TIMER
2. Touch KITCHEN TIMER pad.
3. Press the amount of time you want the oven to hold.
The TIMER indicator lights and “ : 0” is
displayed.
The display will show what you touched.
4. Touch START pad.
The M/W indicator starts blinking and the display counts down the time remaining in M/W mode.
When the M/W cook ends, the oven will beep. The M/W indicator goes off and TIMER indicator
starts blinking. The display counts down the time remaining in KITCHEN TIMER mode. When the
KITCHEN TIMER mode ends, you will hear 3 beeps.
Note : Your oven can be programmed for 59 minutes 99 seconds. ( 59 : 99 )
12
MCD990W/B(¿ )-861G0A 01.7.265:37PM ˘
` 13
SPEEDY COOK
SPEEDY COOK allows you to reheat for 30 seconds at 100% (full power) by simply touching the
SPEEDY COOK pad.
By repeatedly touching the SPEEDY COOK pad, you can also extend reheating time to 5 minutes by 30
second increments.
SPEEDY
COOK
1. Touch SPEEDY COOK pad.
When you touch SPEEDY COOK, ":30" is
displayed.
After 1.5 seconds, the oven starts reheating.
ONE TOUCH COOKING
One touch cook allows you to cook or reheat many of your favorite foods by touching just one pad.
To increase quantity, touch the chosen pad until number in display is same as the desired quantity to
cook. (except for POPCORN)
POPCORN
1. Touch POPCORN pad once
for 3.5 oz bag.
When you touch POPCORN pad once,
“ 3.5” is displayed.
After 1.5 seconds, the display is changed into
cooking time and the oven starts cooking.
NOTE: 1. Use prepackaged room-temperature microwave popcorn.
2. Place bag in oven according to manufacturer’s directions.
3. Pop only one bag at a time.
4. After popping, open bag carefully: popcorn and steam are extremely hot.
5. Do not reheat unpopped kernels or reuse bag.
6. Do not leave oven unattended while popping popcorn.
CAUTION: If prepackaged popcorn is of a different weight than the recommended weight, do not use
the popcorn pad. Follow the manufacturer instruction.
FROZEN
PIZZA
1. Touch FROZEN PIZZA pad
once for 7 oz pizza or
twice for 14 oz pizza.
When you touch FROZEN PIZZA pad once,
“ 7 ” is displayed.
After 1.5 seconds, the display is changed into
the cooking time and the oven starts cooking.
* FROZEN PIZZA *
• 7 oz : Touch FROZEN PIZZA once.
• 14 oz : Touch FROZEN PIZZA twice within 1.5 seconds.
NOTE: 1 Use only one frozen pizza at a time
2. Use only frozen pizza made for microwave ovens.
3. If the cheese of frozen pizza does not melt sufficiently, cook a few seconds longer.
4. Some brands of frozen pizza may require more or less cooking time.
13
MCD990W/B(¿ )-861G0A 01.7.265:37PM ˘
` 14
ONE TOUCH COOKING (continued)
1. Touch DINNER PLATE pad
once for 12 oz of dinner plate
or twice for 15 oz of dinner
plate.
DINNER
PLATE
When you touch DINNER PLATE pad once,
“ 12 ” is displayed.
After 1.5 seconds, the display is changed into
cooking time and the oven starts cooking.
* DINNER PLATE *
• 12 oz : Touch DINNER PLATE once.
• 15 oz : Touch DINNER PLATE twice within 1.5 seconds.
AUTO COOK
AUTO COOK allows you to cook or reheat many of your favorite foods by repeatedly touching auto cook pad.
AUTO
COOK
1. Touch AUTO COOK pad.
When you touch AUTO COOK pad once,
“ AC-1 ” is displayed. By repeatedly touching
this pad, you can select other food category
as shown in the chart below.
CATEGORY
FOOD
WEIGHT
TOUCH PAD
AC-1
BREAD
4slices(1.5-2 oz. each)
Touch AUTO COOK once.
AC-2
SOUP
12 oz.
Touch AUTO COOK twice
AC-3
BAKED POTATO
3potatoes(7-8 oz. each)
Touch AUTO COOK three times
AC-4
FRESH VEGETABLE
7 oz.
Touch AUTO COOK four times
AC-5
FROZEN VEGETABLE
7 oz. package
Touch AUTO COOK five times.
2. Touch START pad.
When you touch START pad, the display is
changed into cooking time and the oven
starts cooking.
START
14
MCD990W/B(¿ )-861G0A 01.7.265:37PM ˘
` 15
LESS, MORE
To alter one touch cooking or cooking time whilst oven is in operation, use LESS or MORE.(except
for defrosting)
Press LESS/MORE to decrease/increase the one touch cooking time in multiples of 10 seconds.
The overall one touch cooking time can be increased to a maximum of 59 minutes 50 seconds.
Press LESS/MORE to decrease/increase the cooking time in multiples of 1 minute.
The overall cooking time can be increased to a maximum of 59 minutes.
CHILD SAFETY LOCK
The safety lock prevents unwanted oven operation such as by small children.
To set, press and hold STOP/CLEAR for 3 seconds, a beep sounds and LOCK indicator lights.
To cancel, press and hold STOP/CLEAR for 3 seconds, a beep sounds and LOCK indicator goes off.
TO STOP THE OVEN WHILE THE OVEN IS OPERATING
1. Press STOP/CLEAR pad.
• You can restart the oven by touching START pad.
• Touch STOP/CLEAR once more to erase all instructions.
• You must enter in new instructions.
2. Open the door.
• You can restart the oven by closing the door and touching START.
NOTE: Oven stops operating when door is opened.
15
MCD990W/B(¿ )-861G0A 01.7.265:37PM ˘
UTENSIL TEST
` 16
Dishes that do not absorb microwave energy are best for
microwave
cooking. Lock on the label to verify that particular cups, glasses,
plates are indeed suitable, especially paper goods. If you are not
sure, try this utensil test to check.
• Put the empty utensil in the microwave oven.
• Put one cup of water in a glass measure next to the empty utensil.
• Heat on HI for 1 minute.
• After 1 minute the water should be warm but the utensil should
not. If the utensil is warm, it is not suitable for microwave cooking.
MICROWAVE UTENSILS
Glass, Ceramic and China
Ovenproof glass or ceramic baking dishes are the most used microwave utensils.
Many of these items are readily available in most homes: glass measures, custard cups, mixing bowls,
covered casseroles, pie plates and round or square cake dishes. Ovenproof dinnerware is usually safe
to use in the microwave.
Do not heat or cook in glass jars or bottles.
Do not use dishes with silver, gold, platinum or other metal trim. Arcing may occur and/or the dish may
break.
Do not use delicate or stemmed glassware. Although the glass may be transparent to microwave
energy, heat from the food may cause the glassware to crack.
Plastics
Plastic dishes, cups, mugs and bowls may be used in the oven for short periods of time. None of these
should be used in the oven for prolonged periods because distortion and melting may occur.
Check manufacturer’s recommendations concerning microwave safety.
Plastic wrap can be used to cover dishes in most recipes if the dish is deep enough to avoid plastic
wrap touching the food. Always vent the wrap by folding back one corner to allow excess steam to
escape.
Plastic cooking bags should be slit before cooking so excess steam can escape.
Do not use wire twist ties to close the bag. Wire twist ties can cause arcing which can damage the
oven.
Paper
Paper cups, wax paper, napkins, paper towels, and plates may be used for short cooking. Prolonged
time in the oven can cause paper to burn. Do not use recycled paper products, such as brown paper
bags.
They contain impurities which may cause arcing and damage the oven.
Metal
Metal utensils should not be used in the oven. Metal reflects microwave energy so foods will not cook
evenly. Metal can cause arcing and damage the oven.
16
MCD990W/B(¿ )-861G0A 01.7.265:37PM ˘
` 17
COOKING GUIDE
EGGS AND CHEESE
Eggs and cheese are delicate foods requiring care in
microwave cooking. Piercing the yolks of eggs helps to
release steam during cooking. Stirring egg mixtures
frequently helps distribute the heat evenly. Because the
microwave energy cooks so quickly, always check to see if
the eggs are done to your satisfaction after the standing time.
At this time, stir, rearrange or turn over. If needed, add
additional time gradually. To cook only one egg, try a lower
Power setting until you get satisfactory results.
stirred into a hot mixture. Cheese may not look melted so
always stir before determining if cheese is melted enough.
Sprinkle cheese over a hot casserole in a thicker layer at the
edges. Microwave energy cooks from the outside in, so the
outer edges will melt faster than the center.
For cheese melt sandwiches, heat filling where possible
before adding it to the bread. Top each sandwich with a slice
of cheese and cook on P-HI for about 15 to 20 seconds for
one sandwich, about 30 seconds for two sandwiches and
about 1 minute for four sandwiches or until cheese is melted.
Shredded soft cheeses and grated hard cheeses melt well if
HARD-COOKED EGGS
4 eggs
1. In a 4-cup glass measure, break eggs. Pierce each yolk
twice with a fork.
2. Cover with wax paper. Press P-5. Cook for 3 minutes;
stir to move cooked eggs from outer edges to the
center - do not mix whites and yolks. Press P-5.
Continue cooking for 3~4 minutes or until yolks are
set; stir once during cooking. Let stand 3 minutes.
4 servings
CREAMY MACARONI AND CHEESE
1
1
1/2
2
1/4
2
1/2
1/4
1/8
11/4
11/2
cup (4 oz.) uncooked macaroni
quart hot water
teaspoon salt
tablespoons margarine or butter
cup chopped onion
tablespoons flour
teaspoon dry mustard
teaspoon salt
teaspoon pepper
cups milk
cups (6 oz.) shredded cheddar cheese
1. In a 2-quart glass casserole, combine macaroni, water
and salt. Cook, uncovered, on P-HI for 7 minutes;
stir once during cooking. Continue cooking on P-HI
for 8 to 10 minutes or until macaroni is tender. Drain;
rinse macaroni in a colander with hot water.
2. Heat margarine in same casserole for 30 to 40 seconds
or until melted. Add onion. Cook, uncovered, on P-HI
for 1 minute or until onion is tender.
3. Add flour, mustard, salt and pepper. Gradually stir in
milk. Cook, uncovered, on P-HI for 7 to 8 minutes or
until sauce boils and thickens; stir after each minute.
Stir in cheese. Continue cooking on P-HI for 1
minute.
4. Add macaroni to cheese sauce; mix well. Cook,
uncovered, on P-HI for 5 minutes or until heated
thoroughly; stir once during cooking. Let stand 1
minute.
4 servings
CHEESE SPREAD
1
1/2
1
2
1
4
package (8 oz.) cream cheese
cup green onions
cup shredded carrots
teaspoons lime juice
cup (4 oz.) shredded Monterey Jack cheese
tablespoons toasted sliced almonds
1. In a 2-quart glass casserole put cream cheese, onions,
carrots and lime juice.
2. Cook, uncovered, on P-HI for 4~5 minutes or until
cream cheese is softened. Add Monterey Jack cheese;
stir until well blended.
3. Spread on bread or crackers and top with almonds.
4 servings
17
MCD990W/B(¿ )-861G0A 01.7.265:37PM ˘
` 18
VEGETABLES
Vegetables are favorite foods when cooked in the
microwave. Because they cook for a shorter time and require
less water than conventional cooking, vegetables cooked by
microwave energy retain more vitamins than when cooked
by other methods.
way microwave energy cooks vegetables.
Consult the “COOKING FRESH VEGETABLES” chart on
page 20 of this cookbook for preparation and stand time
suggestions and for directions to use the automatic FRESH
VEGETABLE pad. See this chart for suggested times for 4
ounce single serving of vegetables.
To cook better in the microwave, vegetables should be cut
into evenly sized pieces. Baked potatoes, squash, or
vegetables with skins can be pierced with a fork and arranged
in a circle for the best cooking results. Uneven vegetables
such as asparagus or broccoli, can be arranged in the dish
alternating thick and thin ends. Stirring, rearranging, turning
over and rotating are effective techniques to maximize the
Use care in removing lid to prevent steam burn. Standing
time is an important element in successful cooking because
additional cooking will take place then. Make a decision
about desired doneness after the standing time then add more
time, if needed.
LIGHT BAKED POTATOES
4
2
1/2
2
baking potatoes, about 8 oz. each salt and pepper
cups low fat cottage cheese
cup sliced green onions
tablespoons chopped fresh parsley
Paprika
1. Scrub potatoes and pierce several times with a fork.
Arrange in a circle on a microwave rack.
2. Cook, uncovered, on P-HI for 8 minutes. Turn each
potato over. Continue cooking on P-HI for 7~9 minutes,
or until potatoes are soft if squeezed lightly. Let stand for
5 minutes. Cut slit on top of potato and press ends to
make opening for stuffing. Salt and pepper to taste.
3. Meanwhile in a small bowl, combine cottage cheese,
green onions and parsley. Divide mixture evenly among
potatoes. Arrange stuffed potatoes in a circle on a
serving platter. Sprinkle with paprika
4 servings
SPINACH AND ARTICHOKE DIP
2
1
1
1
1
1
1
1
1/4
tablespoons chopped onion
medium red bell pepper, chopped (about 1 cup)
clove garlic, minced
package (10 oz.) frozen chopped spinach, defrosted
can (14 oz.) artichoke hearts, drained and chopped
package (8 oz.) cream cheese, softened
tablespoon lemon juice
teaspoon seasoned salt
teaspoon hot pepper sauce
1. In a 2-quart casserole, combine onion, bell pepper, and
garlic.
2. Cook, uncovered, on P-HI for 3 minutes or until red
pepper is crisp-tender; drain spinach and squeeze dry.
Add spinach, artichokes hearts, cream cheese, lemon
juice, salt and hot pepper sauce to red pepper mixture;
stir to mix well. Serve warm.
3 cups
18
BROCCOLI AND CAULIFLOWER SALAD
1 cup broccoli florets
1 cup cauliflower florets
1/2 cup mayonnaise
1 to 2 teaspoons prepared mustard
1/2 teaspoon dried basil, crushed
1/4 teaspoon salt
1. In a 2-quart glass casserole, combine broccoli and
cauliflower
2. Cover with lid or vented plastic wrap. Cook on P-HI for
3 to 4 minutes or until vegetables are tender-crisp; cool.
3. In a small bowl, combine mayonnaise, mustard, basil and
salt. Pour over vegetables; toss gently to mix.
4 servings
HOT JALAPENO SALAD
1. In a 1/2-quart glass casserole, combine cabbage, carrots,
bell pepper, tomatoes, green onion and cilantro. Set
aside.
2. In a 4-cup glass measure, combine cheese cubes,
creamed cheese and vinegar; blend well.
3. Press P-3. Cook, uncovered, for 4 minutes; stir twice
during cooking. Continue cooking on P-HI for 1 minute;
stir. Let stand for 2 minutes; stir until smooth.
Pour cheese over vegetable mixture; toss gently to mix.
4. Cover with vented plastic wrap. Cook on P-HI for about
3 minutes or until mixture is heated thoroughly; stir once
during cooking. Let stand for 2 minutes.
4 servings
11/2 cups shredded cabbage
1/2 cup shredded carrots
1/4 cup medium green bell pepper, cut into 1-inch
long thin strips
1/2 cup sliced cherry tomatoes
1/4 cup sliced green onion
2 tablespoons fresh, chopped cilantro
1/4 cup Monterey Jack jalapeno cheese, cut into
1 inch cubes
3 oz. cream cheese, softened
1 tablespoon white wine vinegar
CHINESE STIR-FRY
2 tablespoons vegetable oil
1 clove garlic, minced
1 teaspoon fresh ginger
cup medium green bell 0 Tw(eese cubes,)Tj1.1042 -1T*-0.00p98(ole4(6 6 -) froz98(pea podsons vegetable o0.00-1 T.9(t)0beaTDpuretsons vegetaJ
19
MCD990W/B(¿ )-861G0A 01.7.265:37PM ˘
` 20
VEGETARIAN CHILI
1/2
1
1/2
1
1
1/4
1/8
1
1
1
2
cup celery, chopped
small onion, chopped (about 1/2 cup)
medium green bell pepper, chopped (1/4 cup)
tablespoon chili powder
teaspoon salt
teaspoon crushed red pepper flakes
teaspoon freshly ground black pepper
can (15 1/2 oz.) mild chili beans in sauce, undrained
can (15 oz.) Great Northern beans, drained
can (15 oz.) chick peas (garbanzo beans), drained
cans (about 15 oz. each) diced tomatoes, undrained
1. In a 2-quart glass casserole, combine celery, onion and
green pepper.
2. Cover with lid or vented plastic wrap. Cook on P-HI for
3 to 4 minutes or until vegetables are tender. Add chili
powder, salt, red pepper and black pepper to vegetables;
mix well. Stir in chili beans with sauce, Great Northern
beans, chick peas and tomatoes.
3. Continue cooking on P-HI for 18 to 20 minutes or until
heated thoroughly; stir once during cooking. Stir before
serving.
4 servings
GLAZED BABY CARROTS
1 pound peeled baby carrots
2 tablespoons butter
1 tablespoon brown sugar
1/2 teaspoon cinnamon
Dash ground cloves
1. In a 1 1/2-quart glass casserole, combine carrots, butter,
brown sugar, cinnamon and cloves.
2. Cover with lid or vented plastic wrap. Cook on P-HI for
11~12 minutes or until carrots are tender; stir every 2
minutes during cooking. Let stand for 3 minutes.
4 servings
CANDIED SWEET POTATOES
2
2
1/4
1/4
1
2
1/4
medium sweet potatoes (about 1 1/4 1bs.)
medium tart baking apples
cup apple cider or juice
cup firmly packed brown sugar
teaspoon cinnamon
tablespoon margarine or butter
cup coarsely chopped pecans or walnuts
1. Wash and peel sweet potatoes and apples; slice in 1/4inch slices. Layer slices in a 1 1/2-quart glass casserole.
Pour juice over the top. In a small bowl, combine brown
sugar and cinnamon; sprinkle on top; cut margarine into
small pieces; place evenly on top. Sprinkle with nuts.
2. Cover with lid or vented plastic wrap. Cook on P-HI for
13~16 minutes or until potatoes are tender.
3. Let stand for 3 minutes.
4 servings
GREEN BEANS IN CREAM SAUCE
1 package (10 oz.) frozen French-style green beans
1 can (10 3/4 oz.) condensed cream of celery soup,
undiluted
1/2 cup sliced fresh mushrooms
1/4 cup milk
1/2 teaspoon soy sauce
1 can (2.8 oz.) French fried onions
1. In a 2-quart glass casserole, place green beans. Cover
with lid or vented plastic wrap. Cook on P-HI for 4 to 5
minutes or until heated. Let stand, covered, for 5
minutes; drain. Stir in mushrooms, soup, milk and soy
sauce.
2. Continue cooking on P-HI for 5 minutes or until heated
thoroughly. Add half onions; stir. Continue cooking on
P-HI for 5 minutes. Sprinkle with remaining onions.
Cook, uncovered, for 1 minute. Let stand, uncovered,
for 2 minutes before serving.
4 servings
20
MCD990W/B(¿ )-861G0A 01.7.265:37PM ˘
` 21
FISH AND SEAFOOD
Delicate, tender fish is the result when cooked in the
microwave. Because it is moist cooking, the finished fish and
seafood, if cooked for the appropriate time, will be opaque
and flake with a fork with no signs of dryness.
each other or the sides of the microwave oven, and be sure
that all ends are tucked under and lie flat to the food. Cover
with wax paper to prevent spattering.
Seafood cooks very quickly in the microwave-about 3 to 4
minutes per pound. Wait for stand time, then proceed
carefully with extra time, to finish cooking without
overcooking. Cooked seafood will be opaque and firm, but
not tough.
Because fish is unevenly shaped, the arrangement is critical
to success. To arrange several fillets in a deep glass pie plate,
put thicker edges to the outside and thinner edges to the
inside. Try to create a circle for best results, even overlap thin
ends where necessary to achieve overall even thickness.
Frozen fish and seafood are convenient to keep on hand. See
the "FISH-AUTO DEFROSTING" chart on page 11 of this
cookbook for defrosting details.
Single items may do better if the thin ends are shielded with a
foil. Some rules apply to the use of foil-Never cover more
than one-third of any item; do not let the foil pieces touch
CRUMB-COATED BAKED FISH
1
1
1
1/2
1
cup seasoned bread crumbs
teaspoon dried parsley
teaspoon lemon pepper
cup plain yogurt
pound fresh or thawed frozen fish fillets
1. In a deep glass pie plate, combine bread crumbs, parsley
and lemon pepper. Coat fish with yogurt;
then coat with crumb mixture.
2. Arrange fish in an 8-inch square glass baking dish with
thick edges to the outside. Cover with a wax paper with
the vented corner. Cook on P-HI for 8~10 minutes or
until fish flakes easily when tested with a fork.
4. servings
FISH ROLL-UPS
1
1
2
1/4
4
1/2
1. Open spinach package. Place package on a paper
towel. Cook on P-HI for 8 minutes. Drain spinach
and place in a mixing bowl. Stir in onion and lemon
juice.
2. Spread cream cheese evenly on fish fillets. Divide
spinach evenly; spread over cream cheese. Roll up
fish; secure with wooden picks. Place fish in a deep
glass pie plate; sprinkle with paprika.
3. Cover with vented plastic wrap. Cook on P-HI for 6 to
8 minutes or until fish flakes easily when tested with
a fork. Remove wooden picks.
4 servings
package (10 oz.) frozen chopped spinach
teaspoon instant minced onion
teaspoons lemon juice
cup soft cream cheese
fresh fish fillets, 1/2-inch thick (about 3/4 lb.)
teaspoon paprika
21
MCD990W/B(¿ )-861G0A 01.7.265:37PM ˘
` 22
FISH FILLET AMANDINE
1/4
1/2
1
1
1
cup margarine or butter, divided
cup slivered almonds
teaspoon almond liqueur, optional
pound fresh or thawed frozen fish fillets
tablespoon lemon juice
1. In a 2-cup glass measure, heat 2 tablespoons
margarine on P-HI for 1 minute or until melted. Add
almonds. Cook, uncovered, on P-HI for 2 minutes or
until almonds are lightly toasted; stir twice during
cooking. Stir in liqueur if desired.
2. In an 8-inch square glass baking dish, heat 2
tablespoons margarine on P-HI for 1 minute. Place
fish in baking dish, turning to coast both sides in
margarine. Sprinkle with lemon juice. Cover with
vented plastic wrap. Cook on P-HI for 7~8 minutes
or until fish flakes easily when tested with a fork.
3. Top with toasted almonds.
4 servings
WINE-POACHED FISH
1
1/4
1/4
1/8
1
1/2
cup dry white wine
teaspoon rosemary leaves, crushed
teaspoon salt
teaspoon white pepper
pound fresh or defrosted fish fillets
lemon, thinly sliced
1. In an 8-inch square glass baking dish, combine wine,
rosemary, salt and pepper. Add fish, thick edges to
the outside. Top with lemon slices.
2. Cover with vented plastic wrap. Cook on P-HI for 5
to 7 minutes or until fish flakes easily when tested
with a fork.
4 servings
COOKING FISH AND SEAFOOD
1.
2.
3.
4.
Arrange fish and seafood on a microwave rack (fillets, steaks, lobster) or in an appropriate glass casserole (scallops).
Cover with wax paper and set on glass turntable in a microwave.
Calculate cooking time by multiplying weight of the fish or seafood by the time recommended per pound.
The microwave will cook on P-HI unless another power level is entered at the time of cooking. To choose another power
level, and begin cooking, press Power continuously to program the recommended power level. Press the number pad to
program the calculated time. Press START.
5. Check progress about halfway through the cooking time; turn over, rearrange or shield, as needed.
6. Within several minutes before the end of cooking check fish or seafood to determine if time needs adjusting. Wait until the
stand time before making the final decision.
ITEM
Fish Fillets--or-Fish Steaks
Shrimp--or-Scallops
Lobster Tail
POWER
COOK
P-HI
5-7 minutes per pound
2 minutes
P-HI
3-4 minutes per pound
2 minutes
P-HI
6-8 minutes per pound
2 minutes
22
STAND TIME
MCD990W/B(¿ )-861G0A 01.7.265:37PM ˘
` 23
POULTRY
Juicy and moist describes poultry cooked by microwave
energy. It is a superior method for cooking chicken to be used
in casseroles, salads, or to have for sandwiches. See Poached
Chicken recipe.
(see page 15). Be sure that all poultry is completely defrosted
before cooking. Check for doneness after stand time is over.
Remember that more cooking will take place during standing
time. Poultry must be cooked to an internal temperature of
160°F for boneless pieces, to 170°F for bone-in pieces and to
185°F for whole birds.
Arrangement is very important with poultry and its uneven
shapes. Try to arrange pieces in a circular pattern wherever
possible for the most even defrosting or cooking. The
rounded part of the drumstick should go at the outer edge, for
example, while the thinner end goes to the middle of the dish.
Continue with other pieces until the overall layer is fairly
even. Cover with wax paper to prevent spattering.
Poultry is done when the meat is no longer pink and the
juices are the colour of chicken broth with no traces of pink.
Be sure to check for these signs by cutting into the inner
thigh. You may also check for the internal temperature with
an instant-read thermometer. Occasionally the bones will
show red spots, but this does not affect the doneness.
Poultry defrosts well with our AUTO DEFROST feature
POACHED CHICKEN
2
1
1
1
1
bone-in chicken breast halves (about 1 lb.)
celery stalk, cut up
medium carrot, cut up
small onion, chopped (about 1/2 cup)
cup chicken broth
1. In a 2-quart casserole, place chicken breast halves.
Add celery, carrot, onion and chicken broth.
2. Cover with lid or vented plastic wrap. Cook on P-HI
for 12 to 15 minutes or until chicken is no longer pink
and juices run clear; turn chicken over halfway
through cooking. Let stand 5 minutes.
4 servings
BBQ CHICKEN
1 broiler-fryer chicken, cut in serving pieces
(21/2 to 3 lbs.)
1/2 cup catsup
2 tablespoons brown sugar
2 tablespoons vinegar
1 teaspoon Worcestershire sauce
1 teaspoon prepared mustard
1/2 teaspoon salt
1/4 teaspoon pepper
1. Rinse chicken and pat dry with paper towels. On a
microwave rack, arrange chicken pieces skin side
down in a single layer with thickest parts to outside.
2. In a 2-cup glass measure, combine catsup, brown
sugar, vinegar, Worcestershire, mustard, salt and
pepper. Reserve 1/2 cup of sauce.
3. Brush half of remaining barbecue sauce over chicken.
Cover with wax paper. Cook on P-HI for 10 minutes.
Rearrange and turn over chicken; brush with
remaining sauce. Continue cooking on P-HI for 8 to
10 minutes or until chicken is no longer pink and
juices run clear. Let stand 3 minutes. Serve with
reserved sauce.
4 servings
MEXICAN CHICKEN RICE CASSEROLE
1. Season chicken with cumin and salt. In a 11/2-quart
casserole, heat margarine on P-HI for 50 to 60
seconds or until melted; stir in chicken and garlic.
2. Cook, uncovered, on P-HI for 7~9 minutes or until
chicken is no longer pink; stir three times during
cooking. Stir in salsa, chicken broth and rice.
3. Cover with lid or vented plastic wrap. Cook on P-HI
for 5~6 minutes or until boiling. Let stand, covered,
until liquid is absorbed, about 4 minutes. Stir; sprinkle
with crushed corn chips and cheese.
4. Cook, uncovered, on P-HI for 2~3 minutes or until
cheese is melted.
4 servings
1 pound boneless, skinless chicken breasts, cut into
strips
1/2 teaspoon cumin
1/4 teaspoon salt
1 tablespoon margarine or butter
1 clove garlic, minced
1 cup mild or medium salsa
1 cup chicken broth
3/4 cup quick cooking rice
1 cup corn chips, crushed to 1/2 cup
1/2 cup (2 oz.) shredded Monterey Jack or cheddar
cheese
23
MCD990W/B(¿ )-861G0A 01.7.265:37PM ˘
` 24
MEATS
Tender cuts of meat do well in the microwave, especially
when cooked at lower power levels. Be sure meat is fully
defrosted before cooking. Consult the meat cooking charts
(pages 30-32) for details.
meat; the higher number for well done. It is always possible
to add time if needed, so it is best to start with the lower
number for calculating the time.
Stand time after cooking is an important aspect of microwave
cooking since more cooking will take place then. The
residual heat in the food will equalize and finish the cooking
process. Always check for doneness after the stand time.
The exact time to cook each piece of meat will depend on the
shape of the meat, the weight, the starting temperature of the
meat and the desired doneness. Our timings assume the meat
is taken from the proper storage (refrigerated). The lower
number in the time range reflects time suggested for medium
MEATBALLS
1
1/3
1/4
1/4
1
1
1
1
1/4
egg, beaten
cup milk
cup quick cooking oats, uncooked
cup dry bread crumbs
pound lean ground meat
(combination of beef and pork or turkey)
medium onion, chopped
tablespoon dried parsley flakes
teaspoon salt
teaspoon freshly ground black pepper
1. In a small bowl, combine egg, milk, oats and bread
crumbs; let stand 2 minutes. In mixing bowl, combine
ground meat, onion, parsley, salt and pepper. Add egg
mixture; mix well. Form meat mixture into 24
meatballs.
2. In a 2-quart casserole, place meatballs in a single
layer. Cover with wax paper. Cook on P-HI for 12 to
14 minutes or until meat is no longer pink; turn
meatballs twice during cooking. Drain meatballs; let
stand for 3 minutes before serving.
4 servings
PEPPER STEAK
1. Slice beef across the grain into strips. In a 2-quart
glass casserole, combine vinegar, water, soy sauce,
garlic, salt, sugar and ground ginger. Add meat to
mixture; coat each piece. Cover with lid or plastic
wrap and marinate in refrigerator for 30 minutes.
2. Remove bowl from refrigerator. Stir in green bell
pepper and onion; cover. Press Power pad
continuously by P-8. Cook, uncovered, for 5 minutes.
Stir in tomatoes and mushrooms.
3. Cover with lid or vented plastic wrap. Press Power
pad by P-9. Continue cooking for 10 minutes or until
meat is tender; stir once during cooking. Add brown
gravy to meat mixture; stir.
4. Continue cooking on P-HI for 4 to 5 minutes or until
meat mixture is thoroughly heated. Let stand for 3
minutes.
4 servings
1 pound beef steak
(flank, round or sirloin)
2 tablespoons white wine vinegar
1 tablespoon water
1/4 cup soy sauce
1 teaspoon garlic/salt
1/2 teaspoon sugar
1/4 teaspoon ground ginger
1 large green bell pepper, cut into strips
1 medium onion, sliced
2 medium tomatoes, peeled and quartered
1 cup fresh mushrooms, sliced
1 cup brown gravy
Hot cooked rice
TIP
Thin pieces of meat are no longer pink when fully cooked. Take meat from the microwave
while slightly pink to prevent overcooking during standing time.
24
MCD990W/B(¿ )-861G0A 01.7.265:37PM ˘
` 25
PORK SAUSAGE CASSEROLE
1
3
2
1
medium red onion
green apples, seeded and cubed
tablespoons margarine or butter
package (12 oz.) bulk pork sausage, cooked,
drained and crumbled
1 sweet potato (about 8 oz.) cooked, peeled and
cubed
1 jar (12 oz.) pork gravy
1. Peel onion and cut in half. Slice it thinly. In a 2-quart
glass casserole, combine onion, apples and
margarine.
2. Cover with lid or vented plastic wrap. Cook on P-HI
for 5 minutes, or until onions and apples are tender.
Stir in sausage, sweet potato and gravy.
3. Continue cooking on P-HI for 8~10 minutes or until
heated thoroughly.
4 servings
SWEET 'N' SOUR PORK
1
3/4
2
2
2
1
1
1
2
2
1/4
pound boneless pork cubes
cup apricot preserves
tablespoons mustard
tablespoons apple cider vinegar
tablespoons light soy sauce
can (8 oz.) sliced water chestnuts, drained
can (8 oz.) pineapple chunks, drained
can (11 oz.) mandarin orange segments, drained
pounds frozen pea pods, cooked and drained
cups cooked rice
cup sliced almonds
1. In a 2-quart glass casserole, place pork cubes. Cover
with wax paper. Cook on P-HI for 8 minutes; stir
once during cooking to rearrange cooked cubes.
Drain pork.
2. Stir in apricot preserves, mustard, vinegar, soy sauce,
water chestnuts, pineapple, oranges and pea pods.
Cook, uncovered, on P-HI for 4 minutes or until
heated thoroughly. Serve over cooked rice and top
with sliced almonds.
4 servings
BEEF, PEPPERS AND PASTA
3 cups bell pepper chunks
(red, yellow and green)
1 cup onion, sliced
2 tablespoons margarine or butter
1 1/2 cups chopped cooked beef
2 cups cooked elbow macaroni, drained
1 can (14.5 oz.) seasoned diced tomatoes, undrained
1 jar (14 oz.) traditional-style pasta sauce
1. In a 2-quart glass casserole, combine bell peppers,
onions and margarine. Cover with lid or vented
plastic wrap. Cook on P-HI for 6 to 7 minutes or until
vegetables are tender.
2. Stir in beef, macaroni, tomatoes and pasta sauce.
Continue cooking on P-HI for 6 to 7 minutes or until
heated thoroughly.
4 servings
LAMB SHEPHERD CASSEROLE
2
1
2
2
2
1
1
1
cups sliced celery
cup sliced carrots
tablespoons margarine or butter
cups cubed cooked potatoes
cups cubed cooked lamb
can (15 1/4 oz.) whole kernel corn, drained
can (10 3/4 oz.) cream of celery soup, undiluted
jar (12 oz.) onion gravy
1. In a 2-quart glass casserole, combine celery, carrots
and margarine. Cover with lid or vented plastic wrap.
Cook on P-HI for 6 minutes or until vegetables are
tender.
2. Stir in potatoes, lamb, corn, soup and gravy. Continue
cooking on P-HI for 8 to 10 minutes or until heated
thoroughly.
4 servings
25
MCD990W/B(¿ )-861G0A 01.7.265:37PM ˘
` 26
CARE OF YOUR MICROWAVE OVEN
1
2
Turn the oven off before cleaning.
3
The outside oven surface should be cleaned
with soap and water, rinsed and dried with a
soft cloth. To prevent damage to the operating
parts inside the oven, water should not be
allowed to seep into the ventilation openings.
4
If the Control Panel becomes wet, clean with a
soft, dry cloth. Do not use harsh detergents or
abrasives on Control Panel.
5
If steam accumulates inside or around the
outside of the oven door, wipe with a soft
cloth. This may occur when the microwave
oven is operated under high humidity
conditions and in no way indicates malfunction
of the unit.
6
It is occasionally necessary to remove the glass
tray for cleaning. Wash the tray in warm sudsy
water or in a dishwasher.
7
The roller guide and oven cavity floor should be
cleaned regularly to avoid excessive noise.
Simply wipe the bottom surface of the oven with
mild detergent water or window cleaner and dry.
The roller guide may be washed in mild sudsy
water.
Keep the inside of the oven clean. When food
spatters or spilled liquids adhere to oven
walls, wipe with a damp cloth. Mild detergent
may be used if the oven gets very dirty. The
use of harsh detergent or abrasives is not
recommended.
ROLLER GUIDE
1
The ROLLER GUIDE and oven floor should
be cleaned frequently to prevent excessive
noise.
2
The ROLLER GUIDE MUST ALWAYS be
used for cooking together with the Glass Tray.
Glass Tray
GLASS TRAY
1
DO NOT operate the oven without the Glass
Tray in place.
2
DO NOT use any other Glass Tray with this
oven.
3
If Glass Tray is hot, ALLOW TO COOL before
cleaning or placing it in water.
4
DO NOT cook directly on the Glass Tray.
26
Roller Guide
MCD990W/B(¿ )-861G0A 01.7.265:37PM ˘
` 27
USE YOUR MICROWAVE OVEN SAFELY
General Use
Do not attempt to defeat or tamper with safety interlocks.
Do not place any object between the oven front frame and the door or allow residue to build up on sealing
surfaces. Wipe with a mild detergent, rinse and dry. Never use abrasive powders or pads.
Do not subject the oven door to strain or weight such as a child hanging on an open door.
This could cause the oven to fall forward resulting in injury to you and damage to the oven.
Do not operate the oven if door seals or sealing surfaces are damaged; or if door is bent;
or if hinges are loose or broken.
Do not operate the oven empty. This will damage the oven.
Do not attempt to dry clothes, newspapers or other materials in the oven. They may catch on fire.
Do not use recycled paper products as they may contain impurities which may cause sparks or fires.
Do not hit or strike the control panel with hard objects. This can damage the oven.
Food
Never use your microwave oven for home canning. The oven is not designed for proper home canning.
Improperly canned food may spoil and be dangerous to consume.
Always use the minimum recipe cooking time. It is better to undercook rather than overcook foods.
Undercooked foods can be returned to the oven for more cooking. If food is overcooked, nothing can
be done.
Heat small quantities of food or foods with low moisture carefully. These can quickly dry out, burn
or catch on fire.
Do not heat eggs in the shell. Pressure may build up and eggs can explode.
Potatoes, apples, egg yolks and sausages are examples of food with non-porous skins.
These must be pierced before cooking to prevent bursting.
Do not attempt to deep fat fry in your microwave oven.
Always stir liquids before heating. Heated liquids can erupt, if not mixed with air.
Do not leave the oven unattended while popping corn.
Do not pop corn in a paper bag unless it is the commercially prepared Microwave Popcorn product.
The kernels can overheat and ignite a brown paper bag.
Do not put packaged Microwave Popcorn bags directly on the oven tray. Place the package on
a microwave safe glass or ceramic plate to avoid overheating and cracking the oven tray.
Do not exceed the Microwave Popcorn manufacturers’ suggested popping time. Longer popping
does not yield more popcorn but it can result in scorch, burn of fire. Remember, the Popcorn bag
and tray can be too hot to handle. Remove with caution and use pot holders.
27
MCD990W/B(¿ )-861G0A 01.7.265:37PM ˘
` 28
BEFORE YOU CALL FOR SERVICE
Refer to the following checklist, you may prevent an unnecessary service call.
* The oven doesn’t work :
1. Check that the power cord is securely plugged in.
2. Check that the door is firmly closed.
3. Check that the cooking time is set.
4. Check for a blown circuit fuse or tripped main circuit breaker in your house.
* Sparking in the cavity;
1. Check utensils. Metal containers or dishes with metal trim should not be used.
2. Check that metal skewers or foil does not touch the interior walls.
If there is still a problem, contact the service station.
A list of these stations is included in the oven.
DO NOT ATTEMPT TO SERVICE THE OVEN YOURSELF !
QUESTIONS AND ANSWERS
* Q : I accidentally ran my microwave oven without any food in it. Is it damaged?
* A : Running the oven empty for a short time will not damage the oven. However, it is not recommended.
* Q : Can the oven be used with the glass tray or roller guide removed?
* A : No. Both the glass tray and roller guide must always be used in the oven before cooking.
* Q : Can I open the door when the oven is operating?
* A : The door can be opened anytime during the cooking operation. Then microwave energy will be
instantly switched off and the time setting will maintain until the door is closed and START is touched.
* Q : Why do I have moisture in my microwave oven after cooking?
* A : The moisture on the side of your microwave oven is normal. It is caused by steam from cooking food
hitting the cool oven surface.
* Q : Dose microwave energy pass through the viewing screen in the door?
* A : No. The metal screen bounces back the energy to the oven cavity. The holes are made to allow light
to pass through. They do not let microwave energy pass through.
28
MCD990W/B(¿ )-861G0A 01.7.265:37PM ˘
` 29
Please send products and
other correspondence to:
Magic Chef
455 E. State Pkwy., Suite 104
Schaumburg, IL 60173
First-Class
Postage
Required
Post Office will
not deliver
without proper
postage.
EHG01-01
Please detach before mailing
PO BOX 174264
DENVER CO 80217-4264
PRODUCT
REGISTRATION
RETURN THIS CARD NOW FOR:
• Warranty Confirmation
With the information you provide, we can confirm the date
of purchase, model and serial number of your product. This
confirmation is of benefit to you if the original proof of
purchase is lost. We will keep the information in our files for
up to ten (10) years.
• $100,000 Give Away lll
We’ll automatically enter you for a chance to win $5,000,
$25,000, or even $50,000!
IMPORTANT:
Please Complete and Return.
You could win up to $50,000 in the
$100,000 Give away lll! See inside...
MCD990W/B(¿ )-861G0A 01.7.265:37PM ˘
` 30
At Magic Chef we are committed to qqality. Please take a moment now th register your
purchase. Your valuable input regarding this purchase helps us create the products
you’ll want in the future. We’ll also enter you in the “$100,000 Give Away lll” for a
chance to win $5,000, $25,000 or even $50,000! Thank you for your time, and thanks for
choosing Magic Chef.
Register online at www.prodregister.com/magicchef
1. 1.
Mr.
2.
First Name
Mrs.
3.
Ms.
4. Miss
Initial Last Name
EHG01-01
Street
IMPORTANT!
PLEASE
COMPLETE AND
RETURN WITHIN
THE NEXT
10 DAYS!
Apt. No.
State
City
ZIP Code
E-mail
2. Telephone #:
12. Which group describes your annual family income?
3. Date of purchase:
4. Model number:
Please refer to your owne’s manual or the back of your
product to locate the model number.
Serial number:
01.
Under $15,000
08.
$75,000-$99,999
02.
$15,000-$19,999
09.
$100,000-$124,999
03.
$20,000-$29,999
10.
$125,000-$149,999
04.
$30,000-$39,999
11.
$150,000-$174,999
05.
$40,000-$49,999
12.
$175,000-$199,999
06.
$50,000-$59,999
13.
$200,000-$249,999
07.
$60,000-$79,999
14.
$250,000 & over
13. For your primary residence, do you: 1.
Own?
2.
14. To help us understand our customers’ lifestyles, please
5. Name of store where purchased:
indicate the interests and activities in which you or your
spouse enjoy participating on a regular basis.
6. Price paid (excluding sales tax): $
.00
7. What factors/features most influenced your decision to purchase this product?
1.
Bible/Devotional Reading
16.
2.
Hunting/Shooting
17.
Culture/Arts Events
Sweepstakes
3.
Health/Natural Foods
18.
Fishing
1.
Magic Chef reputation
5.
Size
4.
Foreign Travel
19.
Stamp/Con Collecting
2.
Previous experience
6.
Salesperson’s Recommendation
5.
Avid Book Reading
10.
Wildlife/Enviornment
with Magic Chef products
7.
Friend’s/Relative’s Recommendation
3.
Price
6.
4.
Style/Appearance
8. Which of the following items do
(check all that apply)
Thanks for taking the time to fill out this questionnaire. Your answers will be used for market research
studies and reports. They will also allow you to receive important mailings and special offers from a
number of fine companies whose products and services relate directly to the specific interests, hobbies,
and other information indicated above. Through this selective program, you will be able to obtain more
information about activities in which you are involved and less about those in which you are not.
you: (A)
(B)
Please check here if, for some reason, you would prefer not to participate in this opportunity.
Currently Plan to Purchase Within Please check here if you do not want to recieve mailings and offers using you e-mail address.
Other ________________
Own?
TV
the Next 6 Months?
Copyright © 2000 All Rights Reserved
1.
VCR
2.
TV/VCR Combo
3.
CD Player
4.
Microwave Oven
5.
DVD Player
6.
Digital TV
7.
9. Your date of birth:
10. Marita status: 1.
Married
2.
Single
11. Not including yourself, what is the GENDER and AGE (in years) of children
Please seal with tape. do not staple.
Official Rules: No Purchase necessary to win. Sweepstakes is sponsored by a number of different
companies and will award the following prizes: one 1 st Prize of $50,000; one 2nd Prize of $25,000; and
five 3rd Prizes of $5,000. Enter by completing this porduct registration card or a 3” x 5” card with you
name, address, city, state, ZIP code, and the words “$100,000 Give Away lll, Dept. EHG” and mail to P.O.
Box 174264, Denver, CO 80217-4264. Mechanically reproduced entries not acceptable. Sweepstakes
begins May 20, 1999, and ends December 31, 2001. Entries are limited to one per household. Not
responsible for late, lost or illegible entries. A random drawing held in january 2002 will select the winners
from all entries collectively received by the sponsoring companies. Odds of winning depend on the
number of eligible entries received. Open to US residents at least 18 years old, except employees and
their families of the contest judge, Daewoo Electronics corporation of America, and their subsidaries and
affiliates. Each winner must submit a signed and notarized affidavit of eligibility. By submitting an entry,
winner agrees to the use of their name, address, and photogragh for advertising/publicity purposes
without compensation. all entries become the property of the contest judge. No transfer or substitution of
prize is allowed. Winner is solely reponsible for all taxes. Offer void in FLORIDA and where prohibited by
law. For notice of contest winners, send a self-addressed, stamped envelope to: $100,000 Give Away lll”,
P.O Box 173133, Denver, CO 80217-3133.
and other adults living in your household?
1.
No one else in household
Male Female
Age
Rent?
2.
Child under 1 year
Male Female
Age
1.
2.
yrs.
1.
2.
yrs.
1.
2.
yrs.
1.
2.
yrs.
For service information on
Magic Chef microwave ovens,
please call 1-800-553-4355
MCD990W/B(¿ )-861G0A 01.7.265:37PM ˘
` 31
Warranty
DAEWOO ELECTRONICS CORPORATION OF AMERICA warrants each new electronic
product manufactured by it to be free from defective material and workmanship and agrees
to remedy any such defect or to furnish a new part (at the Company’s option) in exchange
for any part of any unit of its manufacture which under normal installation, use, and service
disclosed such defect, provided the unit is delivered by the owner to us or to our authorized
distributor from whom purchased or authorized service station, intact, for our examination
with all transportation charges prepaid to our factory, To establish and receive warranty
service at our factory or authorized service facilities, proof of purchase/dated sales invoice is
required
Return authorization must be obtained before any merchandise is returned to the factory.
This warranty does not extend to any of our electronic products which have been subjected
to misuse, neglect, accident, incorrect wiring not our own, improper installation,
unauthorized modification, or to use in violation of instructions furnished by us, nor units
which have been repaired or altered outside of our factory, nor to cases where the serial
number thereof has been removed, defaced, or changed
This warranty is in lieu of all warranties expressed or implied and no representative or
person is authorized to assume for us any other liability in connection with the sale of our
electronic products.
Over-the-counter exchange for units that are initially defective.
“Initially defective” is described as when the dealer opens the unit and finds that it is
inoperative or a customer opens a new unit and finds that it is inoperable. This unit may be
returned to the factory by the dealer for exchange. Under no circumstances will the
customer be permitted to return the defective unit directly to the factory.
Exchange must be directly with the dealer.
Model
Parts
Labor
Magnetron
MCD990W/MCD990B
1 year
1 year
8 years
For Service or Assistance, please call : 1-800-553-4355