Transcript
[GETTING STARTED]
1 PREPARATION
E LE
L A B E LI N G
C T R O N IC
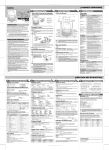
Keyboard & LCD
Unpacking Your P-touch Labeler
SYSTEM
3 REFERENCE
2 OPERATION
Troubleshooting
Error message
Check that the package contains the following before using your P-touch labeler.
USER'S GUIDE
TZ tape cassette
Style
Underline/Frame
Label Length
Caps
Tape Catalog
LW0737001
Printed in China
Tape cutter lever
No Text!
Line Limit!
With your PT-1880, you can create labels for any application. Select from the
many frames, character sizes and styles to design beautiful custom labels. In
addition, the variety of tape cartridges available allows you to print labels with
different widths and exciting colors.
Read this manual carefully before starting and keep the manual in a handy
place for future reference.
Included items may differ by distribution area.
Make sure that the power is turned off when replacing a tape cassette.
• Use only Brother TZ tapes with this machine. Do not use tapes that do not have
the
mark.
• Do not disassemble or modify the machine/AC adapter.
• Do not clean the machine with alcohol or other organic solvents. Only use a soft, dry
cloth.
• Do not touch the print head mechanism. Use a soft wipe (e.g. a cotton swab) when
cleaning the print head.
• To avoid injuries, do not touch the cutter's edge.
• To prevent damage or breakage, do not press on the LCD display.
• Do not put any foreign objects into or heavy objects on the machine.
• Do not leave any rubber or vinyl on the machine for an extended period of time,
otherwise the machine may be stained.
• Do not get the machine/AC adapter/power plug wet, such as by handling them with
wet hands or spilling beverages on to them.
• Do not expose the machine/AC adapter to extremely high temperatures or high
humidity. Never leave them on the dashboard or in the back of your car, near heaters
or other hot appliances. Keep them out of both direct sunlight and rain.
• Avoid using the machine in extremely dusty places.
• Depending on the environmental conditions and the applied settings, some
characters or symbols may be difficult to read.
• Do not pull on the tape being fed from the P-touch labeler, otherwise the tape
cassette or P-touch labeler may be damaged.
• Do not attempt to cut the tape while printing or feeding since this will damage the tape.
• Do not try to print labels using an empty tape cassette set in the P-touch labeler. Doing
so will damage the print head.
• Remove the batteries and disconnect the AC adapter if you do not intend to use the
machine for an extended period of time. (Note: When power is disconnected for more
than five minutes, all text, format settings and any text files stored in the memory will
be cleared.)
• Do not use old and new batteries together or mix alkaline batteries with other type
batteries, or set the positive and negative end in the wrong position. Otherwise, the
batteries may leak or be damaged.
• Do not use metallic articles, such as tweezers or metallic pen, when exchanging the
batteries.
• Always use the specified voltage and the suggested AC adapter (AD-24) for this
machine to prevent any damage or failure.
• To prevent fire or electric shock, make sure that the plug of the AC adapter is fully
inserted into the power outlet. Do not use an outlet that is loose.
Tape compartment
cover
Symbol key
Auto Format key
Insert six new AA-size alkaline
batteries (LR6), making sure that
their poles point in the correct
directions. Always replace all six
batteries at the same time using
brand new ones.
Battery compartment
cover
>
7
2
8
3
9
4
10
5
11
6
12
• To go to the next group, press
• To cancel operations, press
>
3
+
)
[Small]
>
+
>
>
>
+
• To cut off the label, push in the tape cutter lever on the upper-left corner of the
machine.
• To prevent damage to the tape, do not try to cut while the message "Print" or "Feed"
is displayed.
[Vertical]
[Outline]
[Italic]
[Vertical]
Accented Characters
Accented Characters
a
C
c
(
>
[Underline/Frame]
+
)
[Underline]
[Round]
[Candy]
[Callout]
[Banner]
[Wooden]
[Vine]
[Hand]
[Flower]
Setting [Label Length](Auto / 1.2" - 12.0") (
d
E
e
G
g
• You can also select the length by entering the length with Num keys.
• To return to [Auto], press
.
I
i
K
k
Setting [Tab]
L
l
N
n
O
o
R
r
S
s
T
t
U
u
Y
y
Z
z
+
)
>
Display
ABC
>
>
[Tab Length]
+
)
)
[Text Only]
Application
(
+
)
[Copies]
>
>
[Numbering]
To delete all text & format
VHS Spine
MiniDV Spine
Audio Tape
>
+
.
>
[Print Option]
5.5" (140 mm)
1.6" (42 mm)
3.5" (89 mm)
>
[Print]
To Open:
>
[Open]
If you try to store a label when there is already a label stored to that
number, a message "Overwrite?" will appear. Press to save your
new label. Press to cancel.
Function Shortcuts
(
confirm, press
[Mirror]
Application
CD Case Spine
File Tab
Divider Tab
Length
4.4" (113 mm)
3.2" (82 mm)
1.6" (42 mm)
)
and the shortcut key shown in the table below. To
Function
Key
[Margin]
[Width]
[Tab Length]
[Style]
[Print Option]
[Underline/Frame]
[Language]
[File]
[Unit]
[Label Length]
[Clear]
>[Mirror Print?]
Use clear tape in [Mirror], so the labels can be read correctly from the opposite side when attached on glass, windows or other transparent surfaces.
Function
[Size]
[Mirror]
>
+
.
>
[Print Option]
>
>
Select the highest number you wish to be printed when setting the number.
>
>
>
>
[VHS Spine]
Length
[Save]
Example: To print copies of a label containing a serial number (0123, 0124 and 0125)
>
Setting [Auto Format]
>
You can print many copies of the same text while increasing a selected
number by 1 after each label is printed.
• You can also select the length by entering the length with Num keys.
• To return to [Auto], press
.
+
[File]
To Save:
tion just by pressing
[Numbering]
Setting [Tab Length](Auto / 0.0" - 4.0") (
>
you with function shortcuts so you can easily jump to a frequently used func(feed & cut)
[Print Option]
)
In addition to the basic steps to search for a function, the PT-1880 provides
ABC
DEF
ABC
You can also select the number of copies by entering with Num keys.
D
>
Key
>
Tab
>
[Text & Format]
You can also go into [Text & Format] / [Text Only] by pressing
<e.g. 2>
ABC
+
You can save your original labels on to your machine. Up to five labels can
be saved and recalled for printing whenever you desire. You can also edit and
overwrite the stored label.
>
1/6"(4mm) 1/6"(4mm)
You can print up to 9 copies of each label.
Label image
ABC
To delete all text
[Clear]
1/2"(12mm)
[Copies]
You can choose label length from six formats to create labels for various applications.
>
1/2"(12mm)
: ABC
>
To delete a character one by one
>
ABC
Using [Print Option]
Example: To set a tab between "ABC" and "D"
The cursor should be positioned where you set a tab.
(
[Clear]
1"(25mm)
(
To Print:
(feed & cut)
You can make aligned texts by setting tabs.
• To cancel operations, press
.
• The order of accented characters differ by the selected LCD language.
>
:
Chain Print
<e.g. 1>
ABC
D
To Clear
[Full]
[Chain Print] is for printing more than 1 copy of a label with minimum margin
<e.g. 1>. You can also create a label containing text in various styles; print a
text in one style, and before feeding, enter the second text in another style
<e.g. 2>.
FEED THE TAPE BEFORE USING THE CUTTER (see Feeding/Printing).
Otherwise A PART OF THE TEXT MAY BE CUT OFF. Do not try to pull the
tape since this may damage the tape cassette.
Frames cannot be printed on 9/64" (3.5 mm) tape.
[Label Length]
>
[Margin]
ABC
[Underline]
[Off]
>
)
NOTE: Cut along the printed dots (:) with scissors so the text is centered in the label.
Full
Half
Narrow
1"(25mm)
A
+
[Full]/[Half]/[Narrow] is for leaving equal margins on both sides of the text.
Setting [Underline/Frame]
/
(
[Italic Bold]
[Italic Outl](Italic Outline) [Italic Shadow]
>
USEFUL FUNCTIONS
Memory (File)
)
.
>
Peel the printed label from backing and apply the label.
+
>
.
/
Feeding (Tape Feed)
Setting [Margin] (Tape Margin)
[Shadow]
COMPLETED LABELS
• The LCD shows the whole text and the label length (inch/mm), then returns to the
original text.
• Only the text can be previewed, not the font, style, size, underline/frame or any
additional features.
Printing
(
[Bold]
[CREATING LABELS]
Text Preview
• The machine will feed 1" (25mm) of tape, which may be needed when installing a new
tape cassette or when using the [Chain Print] feature.
[×1/2]
[Style]
4
PRINTING LABELS
)
[×2]
[×2]
[Normal]
Stock No.
See the attached "Tape Catalog".
model AD-24
CC3500
[MAX]
(
[Width]
Weight
Power supply
You can preview the text before printing.
[Large]
[Medium]
Specification
6.6" (W) × 8.5" (D) × 2.2" (H)
(167mm (W) × 215mm (D) × 57mm (H))
1.26 lbs. (570 g) (without batteries and tape cassette)
Six AA-size alkaline batteries (LR6) or optional AC adapter
(model AD-24)
Brother TZ tape (width) :
9/64" (3.5 mm), 1/4" (6 mm), 3/8" (9 mm), 1/2" (12 mm), 3/4" (18 mm)
Accessories
(
[Size]
Item
Dimensions
Tape Cassettes
AC Adapter
Carrying Case
Symbols
Entering Accented Characters
• The batteries may be weak. Replace them.
• When power is disconnected for more than five minutes, all
text & formats in the display will be lost. Language and unit
settings will also be cleared.
• There maybe some dust on the print head. Remove the
tape cassette and use a dry cotton swab to gently wipe the
print head with and up-and-down motion.
• The print head can be cleaned more easily if the optional
print head cleaning cassette (TZ-CL4) is used.
• Turn off the machine, and then while holding
Accessories (Supplies may differ by distribution area.)
DESIGNING LABELS
>
1
.
Insert the plug on the adapter cord into
the adapter jack on the right side of the
machine.
Insert the plug into the nearest standard
electrical outlet.
For memory back up, we recommend using
AA-size alkaline batteries (LR6) together
when using the AC adapter.
[Normal]
Group
• Check that the tape cassette has been inserted correctly.
• If the tape cassette is empty, replace it.
• Check the tape compartment cover is properly closed.
All specifications are subject to change without notice.
Setting [Style] (Vertical)
Symbols
/
Tape cassette
Label image
>
[inch]
When using optional AC adapter (model
AD-24)
>
Entering Symbols
>
/
)
• To initialize the P-touch labeler back to factory settings, turn off the
machine and then while holding down
and
, press
to
turn the machine back on. Finally, release
and
.
Attach the battery compartment cover by inserting the three hooks at the
bottom into the slots on the machine, then pushing down firmly on the
cover until it snaps into place.
.
Use either 3/8" (9 mm) or 1/2" (12 mm), or 3/4" (18 mm) wide tape for two line text.
[Unit]
+
/
(
• To cancel operations, press
Setting [Width]
Move the cursor to where the second line starts and press
[English]
Setting unit (inch/mm)
Automatically adjusts the text size according to the tape width.
Select MAX to print with maximum text size when using 3/4" (18 mm) tape, all
texts are in upper case, the Style setting is [Normal], and the Underline/Frame
setting is [Off].
Making Two Line Text
>
/
)
Check that the batteries are correctly inserted.
If the batteries are weak, replace them.
Check that the AC adapter is correctly connected.
Refer to "Setting [Margin] (Tape Margin)" on this users
guide and select [Half] or [Narrow] to have smaller margins
for your label.
Specifications
[Large]
OFF)
[Language]
+
•
•
•
•
The machine has
"locked up" (i.e., nothing
down
and
, press
to turn the machine back
happens when a key is
pressed, even though
on. Finally, release
and
.
the machine is on.)
• Note: The text and formats in the display are erased. Also,
the language and unit settings will be cleared.
The power turns off
• The batteries may be weak. Replace them.
when you try to print.
• Check that the batteries are correctly inserted.
The tape does not feed
• Check that the end of the tape feeds under the tape guides.
properly or the tape gets • The cutter lever is used while printing. Do not touch the
stuck inside the machine.
cutter lever during printing.
All text and format settings • Press
while holding down
, and select [Text&Forneed to be cleared to
mat].
create a new label.
• The machine automatically turns off if no key is pressed within 5
minutes.
>
>
>
(
to cancel.)
Solution
A blank horizontal line
appears through the
printed label.
Setting Language (English/Spanish/
French/Portuguese )
Turn the machine over and remove the battery compartment cover.
If batteries are already installed, remove them.
image
Switching Upper Case/Lower Case
Turning the Power On
Power Supply
Setting [Size]
image
with Shift key to go to beginning/end of the text.
to print with no Frame,
What to do when...
Shift key
Securely close the front cover, making sure that it snaps into place.
Make sure that the power is turned off when replacing batteries.
ON. (Select
Problem
Accent key
Space key
• Use
No Frame OK?
The display stays blank
after you have turned on
the machine.
When the label is
printed out, there is too
much margin (space) on
both sides of the text.
The machine does not
print, or the printed
characters are not
formed properly.
The setting has cleared
on its own.
• The LCD shows one row of 15 characters; however, the text that
you enter can be up to 80 characters in length, which will scroll
across the display.
• Make sure that the end of the tape feeds under the tape guides.
• If the ink ribbon is loose, use your finger to wind the toothed wheel in the
direction of the arrow on the cassette.
After you have installed the tape, feed the tape (
+
) once and then
push in the tape cutter lever to cut the tape.
Text Too Long!
Enter key
Tape guide
2
MAKING TEXT
1
Setting Font
Display
Tab key
Caps key
Shift key
End of tape
GENERAL PRECAUTIONS
Lower case (
Character keys
Insert a tape cassette, making sure that it snaps into place.
Toothed Wheel
Esc key
OK key
Cursor keys
Power key
Function key
Backspace key
Print key
Preview key
Font keys
Open the tape compartment cover by lifting up both sides at the same time.
If a tape cassette is already installed, remove it by pulling it straight up.
This Class B digital apparatus complies with Canadian ICES-003.
Cet appareil numérique de la classe B est conforme à la norme NMB-003 du Canada.
ON)
No Cassette!
Cutter Error!
Full!
Tape Cassettes
Industry Canada Compliance Statement (Canada Only)
Avis de conformité aux normes d’Industrie Canada (Canada seulement)
Group
The batteries are weak. Replace them with new ones.
The installed batteries are about to run out.
• There is no text above the cursor when you set Numbering.
• Invalid character is selected for Numbering.
• Invalid number is selected for Tab Length or Label Length.
• You tried to print a text file when there is no data stored in
the memory.
• The Print key is pressed when no text is entered.
• You tried to set Copies, Numbering or Mirror when no text
is entered.
• You tried to enter a 3rd line by pressing Enter key.
• You tried to print a 2 line text when 9/64" (3.5 mm) or 1/4"
(6 mm) tape is installed.
You tried to print a label when there is no cassette installed.
Tape cutter lever is used in the middle of printing process.
The maximum number of characters (80 characters) have
already been entered.
The text length exceeds the selected label length or the
selected Auto Format setting length.
Printing on 9/64" (3.5 mm) tape with invalid Frame setting
Warranty Card
INTRODUCTION
Upper case (
Cause/Remedy
Battery Weak!
Check Battery!
Invalid!
Cursor
User's Guide
English / Français
www.brother.ca
Message
Width
Size
PT-1880
Contact Information
Website: www.brother.ca
TEL:1-877-Brother