1
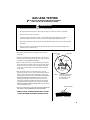
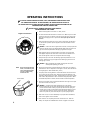
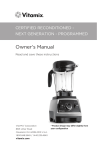
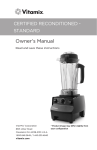
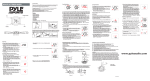
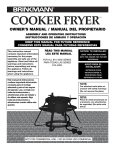
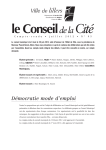
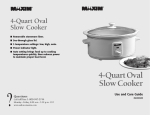
R
WARNING
READ AND FOLLOW ALL WARNINGS AND
INSTRUCTIONS IN THIS MANUAL TO AVOID
PERSONAL INJURY OR PROPERTY DAMAGE.
&
OWNER’S MANUAL
ASSEMBLY AND OPERATING INSTRUCTIONS
for Models:
815-3680-0, 815-3680-S, 815-3680-P
815-3780-0, 815-3782-0, 815-3784-0
E
P
IM
O
R
•
G
U
A
TA
R
G
D
•
F
F
A THIS OF S
S
D GA
.
D
T
VE
AN L.P.RE R LY
N
A REMO ON
IS E FO ON
T
T
S E ON
THLV
NO
GA LV E VA MEN
RNGVA . US L ST
TU IN NK RO JU
US TA NT AD
CO E
AM
FL
T
DO
IMPORTA
NT SAFEGUA
RD
• DO NOT
REMOVE THIS
TAG •
TURN GAS
USINGVALV ON AND OFF
E
TANK. USE ON L.P. GAS
CONTROL THIS RED
VALVE FOR
FLAME ADJUSTMEN
T ONLY.
IMPORTA
NT SAFEGUA
RD
• DO NOT
REMOVE THIS
TAG •
TURN GAS
USINGVALV ON AND OFF
E
TANK. USE ON L.P. GAS
CONTROL THIS RED
VALVE FOR
FLAME ADJUSTMEN
T ONLY.
IMPORTANT SAFETY WARNINGS
WE WANT YOU TO ASSEMBLE AND USE YOUR COOKER AS SAFELY AS POSSIBLE.
THE PURPOSE OF THIS SAFETY ALERT SYMBOL
IS TO ATTRACT YOUR ATTENTION TO POSSIBLE HAZARDS AS YOU ASSEMBLE AND USE YOUR SMOKER.
WHEN YOU SEE THE SAFETY ALERT SYMBOL, PAY CLOSE ATTENTION TO THE INFORMATION WHICH FOLLOWS!
READ ALL SAFETY WARNINGS AND INSTRUCTIONS CAREFULLY
BEFORE ASSEMBLING AND OPERATING YOUR COOKER.
WARNING
1. This cooker is to be used Outdoors Only. Do not operate indoors (house, tent, garage) or in any unventilated or enclosed area. In
windy weather, cooker should be located in an outdoor area that is protected from the wind.
2. Only use cooker on a level, noncombustible, stable surface (concrete, ground, etc.) Do not use on wooden or other surfaces that
could burn. Do not place cooker within 10 feet of materials that could burn (house, fence, tall grass, etc.)
3. Do not use on apartment balconies, campers or patios.
4. Do not leave cooker unattended when hot or in use. Only adults are to operate this cooker; keep children and pets safely away.
Carefully monitor all activity around cooker to avoid burns or other injuries.
5. Hot oil or water can cause severe burns and permanent disfigurement; use caution and common sense when operating this
product.
• Do not move cooker while in use or while pan contains hot liquid.
• Use caution when walking or standing near cooker as splattered oil may have created a slick surface.
• Avoid bumping into cooker or pan/pan handle to prevent hot liquid spills or overturning cooker.
• Should oil spill-over/boil-over occur, be sure to check that flame was not extinguished by liquid. Gas could accumulate creating
a highly flammable and very dangerous situation. Allow all gas to dissipate prior to relighting cooker.
• Smoking oil is an indication that the oil is too hot and may ignite. Reduce flame immediately to avoid igniting oil. Never
exceed 375° F.
• Frozen food should be thawed before placing in hot oil to avoid burns from splattered oil.
• Use extreme caution when lifting basket out of pan; lift slowly to ensure pan and basket are not stuck together and to allow oil to
drain into pan. As contents may be heavy and oil may drip or splatter from basket, extra attention must be used during this
process to avoid overturning pan of hot liquid.
• Always hang basket directly over pan (see illustration on page 5).
• Avoid touching hot surfaces, wear oven mitts to protect your hands and non-slick shoes.
6. Propane gas is extremely flammable, follow these instructions:
• Use only LP gas cylinders marked "Propane" which are U.S. Department of Transportation (DOT) certified.
• Always use the gas pressure regulator supplied with this product which is regulated for an outlet pressure of 15 PSI; the use of
other regulators or no regulator could result in dangerous gas leakage.
• Check all gas connections by following directions in the "Gas Leak Testing" section on page 4 of this manual. Never test for gas
leaks with a lighted match or open flame. Do not operate this cooker with a gas leak.
1
WARNING
• Propane is heavier than air and can accumulate in low places. Keep propane tank, at all times, in a well ventilated area. If you
smell gas – leave the area immediately and call for help.
• Fully extend hose between propane tank and cooker to protect hose from contact with hot surfaces which could create a leak.
Never use a hose that shows signs of cracking or damage. Replace hose every two years.
• Do not use or store cooker near gasoline or other flammable liquids, gases or where flammable vapors may be present.
• Never store propane tank in an enclosed area (house, garage, etc.). Store outdoors in a well ventilated, shaded area, away from
any heat source or open flame and away from children’s reach.
• Turn the cooker "ON" and "OFF" with the propane tank valve; use the regulator control valve ONLY to adjust the flame. Read all
warnings on or accompanying propane tank.
• Disconnect the propane tank from the cooker when not in use. A safety plug should be placed in the propane tank valve.
7. Keep hands, face and hair away from burner. Use long matches or long-nosed lighter to light the burner. Do not wear loose
clothing or allow long hair to hang freely while lighting or using cooker.
8. Only use flat bottom metal cookware and center evenly over burner. Never put an empty pan over an open flame; the bottom of the
pan could melt. Do not use plastic, ceramic or glassware. Any pan larger than the retaining ring will rest on top of the ring. Use
caution to avoid knocking pan from retaining ring.
9. Do not fill cookware beyond one-half full with liquid to allow room for the addition of food and to avoid boil-over of hot liquid. In
some cases, depending on the weight or size of food, even less liquid will be required. If spill-over/boil-over occurs, check to make
sure flame was not extinguished by liquid. Gas could accumulate causing a highly flammable, very dangerous situation. Allow gas
to dissipate prior to relighting cooker.
10. Do not walk between cooker and propane tank as this creates a trip hazard. Tripping over the hose could overturn the cooker or
knock pan of hot liquid from cooker causing severe burns.
11. In case of grease fire, do not use water to extinguish flame. Turn gas OFF at propane tank and use fire extinguisher approved for
use with gas appliances or other appropriate means to extinguish flame.
12. Do not use this cooker on recreational vehicle or boat.
13. Do not use this cooker for other than its intended purpose.
14. Only use replacement/accessory parts manufactured by The Brinkmann Corporation. Repairs should be performed by The
Brinkmann Corporation.
15. Properly dispose of all packaging materials.
USE CAUTION AND COMMON SENSE WHEN OPERATING YOUR COOKER.
FAILURE TO ADHERE TO THE SAFETY WARNINGS AND GUIDELINES IN THIS MANUAL
COULD RESULT IN BODILY INJURY OR PROPERTY DAMAGE.
SAVE THIS MANUAL FOR FUTURE REFERENCE.
2
ASSEMBLY INSTRUCTIONS
READ ALL SAFETY WARNINGS & ASSEMBLY INSTRUCTIONS CAREFULLY
BEFORE ASSEMBLING OR OPERATING YOUR COOKER.
Inspect contents of the box to ensure all parts are included and undamaged.
FOR MISSING PARTS, PLEASE CALL CUSTOMER SERVICE AT 1-800-527-0717.
(Proof of purchase will be required.)
Tools required to assemble your cooker:
2 Adjustable wrenches
OR
Adjustable wrench and the following wrenches:
• d" Open end wrench
All Purpose
Gas Cooker
Turkey Fryer
Gas Cooker
• w" Open end wrench
• f" Open end wrench
PARTS LIST:
1
Owner’s Manual
1
Cooker Stand
1
Burner Assembly
1
Hose & Regulator with Safety Tag
Step 1
Remove nut from bottom of burner assembly.
Step 2
Position the stand upside down as shown.
Step 3
ON
S
THI VE T
EN
NOT GA VE E
N VAL US VAL
TM
K. OLJUS
TURING
US TANNTRAD
COME
FLA
RT
PO
IM
•
D
AR
•
GU
FE S TAG F S
OFGA
SA THI
T OVE AND . D R LY.
L.P RE
AN REM ON
S FO ON
DO
POL Fitting
Female
SAE
Fitting
Place burner assembly
inside stand with
threaded bolt protruding
through support strap
as shown.
Step 4
Thread nut onto bolt and securely tighten. Do not overtighten.
Air Hole
Rotating
Air Shutter
Step 5
Set cooker with burner assembly upright on flat surface. Make sure burner
assembly is securely attached to cooker.
Step 6
NOTE: Make sure the male SAE fitting on the
cooker is screwed into the air shutter
and tightened securely. Do not
over-tighten as the air shutter needs
to move freely in order to adjust air
intake. Check the attachment for
proper connection every time propane
tank is connected to cooker.
3
Attach female SAE fitting on hose
assembly (using w" wrench) to the
male SAE fitting on the burner
(using d" wrench). Hold the male
SAE fitting securely with one wrench
and turn the female fitting with the
other wrench until they are tightly joined.
PROCEED TO “GAS LEAK TESTING” SECTION ON PAGE 4.
GAS LEAK TESTING
THE GAS LEAK TESTING PROCEDURE MUST BE PERFORMED
EVERY TIME THE TANK IS CONNECTED TO COOKER.
WARNING
•
Gas leak testing must be performed outdoors in a well ventilated area.
•
During the gas leak testing procedure, always keep unit away from open flames, sparks or lit cigarettes.
•
Never use a flame to check for gas leaks.
•
If the burner does not light within 5 seconds, turn the propane tank valve and regulator control valve off
immediately. Always wait at least 5 minutes for gas fumes to dissipate before repeating procedure.
•
Always use the propane tank valve to turn the unit ON and OFF. The regulator control valve is used to adjust the
flame ONLY.
•
Never use a unit that has a gas leak. Contact The Brinkmann Corporation’s Customer Service Department for
replacement parts at 1-800-527-0717.
1. Make sure the propane tank valve and regulator control valve are
turned OFF.
Propane Tank
Valve
2. Make sure male SAE fitting is properly attached to air shutter (refer to
Assembly Instructions). Attach POL fitting to tank (using f" wrench)
and tighten by turning COUNTER-CLOCKWISE.
f" Wrench
Regulator
3. Prepare a soapy water solution (one part dishwashing liquid to three
parts water) to test for gas leaks in the hose and connections. Apply a
generous amount of the soapy mixture to the regulator, POL fitting,
control valve, the entire length of hose and SAE fitting (located near
the air shutter).
4. With the regulator control valve in the “OFF” position, open the
propane tank valve two full turns (counter-clockwise). Next, open the
regulator control valve fully and check for bubbles at control valve,
along the entire length of hose and at the SAE fitting. DO NOT LEAVE
GAS ON FOR MORE THAN 10 SECONDS. If soapy mixture starts
bubbling, gas is leaking through the connection or hose. Turn the
propane tank valve OFF and retighten the connection that is leaking
gas. Repeat procedure with soapy mixture until gas no longer leaks.
NEVER USE A FLAME TO CHECK FOR GAS LEAKS. Turn the propane
tank valve OFF after each test.
5. Once all gas leaks have been sealed, WAIT AT LEAST 5 MINUTES FOR
GAS FUMES TO DISSIPATE BEFORE LIGHTING THE BURNER.
NOTE:
POL fittings are made with
a metal to metal seal and
must be made very tight
to prevent leaking.
Watch For Bubbles
CAREFULLY FOLLOW “OPERATING INSTRUCTIONS” ON PAGE 5
TO LIGHT THE BURNER AND PROPERLY OPERATE THIS UNIT.
4
OPERATING INSTRUCTIONS
PLACE THE COOKER OUTDOORS ON A HARD, LEVEL, NONCOMBUSTIBLE SURFACE AWAY FROM
ANY COMBUSTIBLE MATERIAL. IN WINDY WEATHER, THE COOKER SHOULD BE LOCATED IN
AN OUTDOOR AREA THAT IS PROTECTED FROM THE WIND. GAS LEAK TESTING PROCEDURE MUST BE
PERFORMED EVERY TIME THE COOKER IS USED.
READ ALL SAFETY WARNINGS AND INSTRUCTIONS CAREFULLY
BEFORE OPERATING YOUR COOKER.
Regulator Control Valve
1. Make sure the regulator control valve is in “OFF” position.
2. Fill metal cookware with desired amount of water or oil. Never fill pan more than
half way to allow room for addition of food and to avoid boil-over of hot liquids.
Never place an empty pan over an open flame. Do not place pan on cooker at
this time.
3. Open the propane tank valve two full turns. Using a long match, hold the flame
2" above burner porthole. Open the regulator control valve SLOWLY until the
burner lights.
WARNING: If the burner does not light within 5 seconds, turn the propane tank
valve and regulator control valve OFF immediately. Wait at least 5 minutes until
gas fumes have dissipated before attempting to light the burner again.
4. After lighting the burner, open the regulator control valve until a large yellow
flame appears. Adjust the air shutter valve on the cooker until the flame turns
blue. Use the regulator control valve to adjust the flame accordingly.
5. Place pan with liquid on cooker. The retaining ring allows placement of a 14.5"
(36.8 cm) diameter pan. Any pan larger than the retaining ring will rest on the
retaining ring of cooker.
WARNING:
NOTE:
Due to the intense heat from
burner, it is normal for paint
to burn off and discoloration
to occur on cooker during
the first few uses.
Basket Holder
Before proceeding read all safety warnings and instructions
carefully before operating your cooker.
6. Bring liquid to the desired cooking temperature. For best results, use a deep fry
thermometer to check oil temperature. If oil begins to smoke, reduce the flame to
avoid igniting the oil. Never exceed 375°F (190° C).
7. Use pan/pot with a cooking basket or strainer with handle to lower food into hot
liquid. Lower food into the pan slowly. Frozen foods should be thawed to room
temperature before placing in hot liquid. The temperature of liquid will drop when
food is added. Adjust the flame to return to desired cooking temperature. When
the desired temperature is achieved, reduce the heat to maintain temperature.
8. Test food for doneness using a meat thermometer after removing from hot liquid.
Use caution as food will be very hot.
WARNING: Use extreme care when lifting basket out of pan. Always
grip pan handle with one hand while lifting basket with the other. Failure to do
so could create a situation where you pull the pan off the burner spilling the
contents onto yourself or someone else. Always hang basket directly over pan
as illustrated. This allows hot liquid to drip back into the pan. Hanging the
basket in any other way could cause the pan to tip over, spilling hot liquid.
9. When food is done, turn cooker OFF. Always turn propane tank valve OFF first,
then turn the regulator control valve OFF.
10. Allow cooker to cool completely, then follow instructions in the ”After-Use
Safety” and “Proper Care & Maintenance” sections on page 6 of this manual.
5
AFTER-USE SAFETY
WARNING
•
Always allow the cooker, pot and liquid to cool completely before handling.
•
Always disconnect the propane tank from cooker when not in use - a safety plug should be placed in the propane tank valve.
•
Before storing cooker, cover air shutter, top of burner assembly and
POL fitting with plastic and secure with rubber bands to prevent
insects from nesting.
•
Cover and store cooker in a protected area away from children and pets.
•
Never store propane tank in an enclosed area (house, garage, etc.). Store
outdoors in a well ventilated, shaded area away from any heat source or
open flame.
•
Due to the intense heat from burner, it is normal for paint to burn off and
discoloration to occur on cooker during the first few uses.
Proper Care
& Maintenance
ACCESSORIES
Deep Fry Thermometer
250
200
Accurately monitor cooking oil temperature with these high-quality deep fry
thermometers. Designed to clip onto the pot or strainer basket, they are an
essential tool when deep frying to maintain proper cooking temperature. Our 10"
deep fry thermometer is specially designed for use with our large boiling pots.
Our 5" deep fry thermometer is perfect for use with our 2-Gallon Pan and Basket
Set or smaller pots. Stainless steel and dishwasher safe.
Model 072-0009-0 (5" Stem)
300
100
150
350
150
50
°C
100 °F
200
R
400
DISH W
A S H E R S AF E
Model 072-0011-0 (10" Stem)
Fried Turkey Rub’N Spice
This special spice rub is custom-blended specifically for use with our Deep Fried
Whole Turkey recipe. You'll want to use this delicious rub and our recipe all
year round, not just for holidays. Rub'N Spice is also great as a marinade for
roasting, grilling or smoke cooking poultry. Includes our Deep Fried Whole
Turkey recipe on label. Contains 9.25 oz. (269.3 grams).
Model 812-3325-7
Smoke’N Spice Seasoning
Powdered marinade specially blended with no MSG to enhance the flavor of red
or white meat when smoking or grilling. Contains 7.5 oz. (213 grams).
Model 812-3324-0 (Red Meat Seasoning)
Model 812-3325-0 (White Meat Seasoning)
2 Gallon Pan and Basket Set
This restaurant-style aluminum fry pan and chromed wire strainer basket is an
essential tool for frying perfect fish, chicken, french fries, onion rings, and more.
The pan is equipped with a strainer basket holder for draining excess oil. Use
outdoors with Brinkmann All Purpose Gas Cooker, Turkey Fryer or All-In-One to
avoid the mess and odors associated with frying in your kitchen.
Model 815-3610-0
LOOK FOR THESE AND OTHER BRINKMANN ACCESSORIES AT YOUR LOCAL RETAILER WHERE
COOKERS ARE SOLD, OR ORDER DIRECT BY CALLING 1-800-468-5252.
6
ACCESSORIES
24, 30, 36, 42, 60 or 80 Quart
Steamer/Boiling Pot with Strainer Basket
These professional-quality stock pots with lid and boiling baskets are the
number one choice of indoor and outdoor chefs. Made of heavy gauge
aluminum. The boiling baskets have handles for easy lifting. Use with Brinkmann
All Purpose Gas Cooker, Turkey Fryer or All-In-One for boiling, steaming or
frying large quantities of food. Perfect for crab and crawfish boils, fish frys,
soups and stews, canning fruits and vegetables. You can even fry a whole turkey
in these boiling pots.
Model 815-3612-B
Model 815-3622-B
Model 815-3614-B
Model 815-3616-B
Model 815-3620-B
Model 815-3621-B
24 Quart/23 Liter
30 Quart/29 Liter
36 Quart/34 Liter
42 Quart Turkey Pot/40 Liter
60 Quart/57 Liter
80 Quart/76 Liter
LOOK FOR THESE AND OTHER BRINKMANN ACCESSORIES AT YOUR LOCAL RETAILER WHERE
COOKERS ARE SOLD, OR ORDER DIRECT BY CALLING 1-800-468-5252.
ONE YEAR LIMITED WARRANTY
For one year from date of purchase, The Brinkmann Corporation warrants the cooker against defects due to workmanship or
materials to the original purchaser. The Brinkmann Corporation’s obligations under this warranty are limited to the following
guidelines:
•
This warranty does not cover cookers that have been altered or damaged due to: normal wear, abuse, improper
maintenance, improper use, disassembly of parts and/or attempted repair by anyone other than an authorized employee of
The Brinkmann Corporation.
•
This warranty does not cover surface scratching or heat damage to the finish, which is considered normal wear.
•
The Brinkmann Corporation may elect to repair or replace damaged units covered by the terms of this warranty.
•
This warranty extends to the original purchaser only and is not transferable or assignable to subsequent purchasers.
The Brinkmann Corporation requires reasonable proof of purchase. Therefore, we strongly recommend that you retain your
sales receipt or invoice. To obtain repair or replacement of your cooker under the terms of this warranty, please call Customer
Service Department at 1-800-527-0717 for a Return Authorization Number and further instructions. A receipt or proof of
purchase will be required. A Return Authorization Number must be clearly marked on the outside of the box. The Brinkmann
Corporation will not be responsible for any cookers forwarded to us without a Return Authorization Number.
EXCEPT AS ABOVE STATED, THE BRINKMANN CORPORATION MAKES NO OTHER EXPRESS WARRANTY.
THE IMPLIED WARRANTIES OF MERCHANTABILITY AND FITNESS FOR A PARTICULAR PURPOSE ARE LIMITED IN DURATION
TO ONE YEAR FROM THE DATE OF PURCHASE. SOME STATES DO NOT ALLOW LIMITATIONS ON HOW LONG AN IMPLIED
WARRANTY LASTS, SO THE ABOVE LIMITATION MAY NOT APPLY TO YOU.
ANY LIABILITY FOR INDIRECT, INCIDENTAL OR CONSEQUENTIAL DAMAGES ARISING FROM THE FAILURE OF THE COOKER
TO COMPLY WITH THIS WARRANTY OR ANY IMPLIED WARRANTY IS EXCLUDED. CUSTOMER ACKNOWLEDGES THAT THE
PURCHASE PRICE CHARGED IS BASED UPON THE LIMITATIONS CONTAINED IN THE WARRANTY SET OUT ABOVE. SOME
STATES DO NOT ALLOW THE EXCLUSION OR LIMITATION OF INCIDENTAL OR CONSEQUENTIAL DAMAGES, SO THE ABOVE
LIMITATION OR EXCLUSION MAY NOT APPLY TO YOU. THIS WARRANTY GIVES YOU SPECIFIC LEGAL RIGHTS, AND YOU
MAY ALSO HAVE OTHER RIGHTS WHICH VARY FROM STATE TO STATE.
140-7093-0
10/95, 9/98, 9/01
Owner’s Manual for Models
815-3680-0
815-3780-0
815-3680-S
815-3782-0
815-3680-P
815-3784-0