1
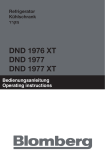
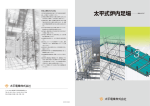
Refrigerator מקרר KFD 9950 X KFD 9952 X Bedienungsanleitung Operating instructions Please read this manual first! Dear Customer, We hope that your product, which has been produced in modern plants and checked under the most meticulous quality control procedures, will provide you an effective service. For this, we recommend you to carefully read the entire manual of your product before using it and keep it at hand for future references. This manual • Will help you use your appliance in a fast and safe way. • Read the manual before installing and operating your product. • Follow the instructions, especially those for safety. • Keep the manual in an easily accessible place as you may need it later. • Besides, read also the other documents provided with your product. Please note that this manual may be valid for other models as well. Symbols and their descriptions This instruction manual contains the following symbols: C Important information or useful usage tips. A Warning against dangerous conditions for life and property. B Warning against electric voltage. Recycling This product is supplied with the selective sorting symbol for waste electrical and electronic equipment (WEEE). This means that this product must be handled pursuant to European Directive 2002/96/EC in order to be recycled or dismantled to minimise its impact on the environment. For further information, please contact your local or regional authorities. Electronic products not included in the selective sorting process are potentially dangerous for the environment and human health due to the presence of hazardous substances. CONTENTS 1 The refrigerator 3 4 Preparation 12 2 Important Safety Warnings4 5 Using your refrigerator 13 Intended use...................................... 4 For products with a water dispenser;.. 6 Child safety......................................... 6 HCA Warning..................................... 6 Things to be done for energy saving... 7 Reccomendations for freshfood compartment...................................... 7 3 Installation 8 Points to be considered when retransporting your refrigerator.............. 8 Before operating your refrigerator....... 8 Electric connection............................. 9 Disposing of the packaging................ 9 Disposing of your old refrigerator........ 9 Placing and Installation..................... 10 Floor balance adjustment................. 10 Adjusting the gap between the upper door................................................. 11 Indicator Panel.................................. 13 Door Open Alarm: ........................... 15 Indicator Panel.................................. 16 Door Open Alarm: ........................... 18 Egg tray............................................ 19 Sliding Body Shelves........................ 19 Chiller compartment......................... 19 Crisper............................................. 20 Movable Middle Section .................. 21 Blue light.......................................... 21 Telescopic Drawer ........................... 22 Door Open Alarm: ........................... 22 Dual cooling system:........................ 22 Freezing fresh food........................... 23 Recommendations for preservation of frozen food....................................... 23 Placing the food............................... 24 Deep-freeze information................... 24 6 Maintenance and cleaning 25 Protection of plastic surfaces . ......... 25 7 Recommended solutions for the problems 26 2 EN 1 The refrigerator A 1 2 3 4 5 6 7 8 9 B A- Fridge compartment B- Freezer compartment 1- Butter & Cheese shelf 2- Fridge compartment door shelves 3- Fridge compartment glass shelves 4- Diffuser cover 5- Illumination lens 6- Movable middle section 7- Chiller compartment 8- Bottle shelf 9- Crisper 10- icebox 11- Movable separators 10 11 11 C Figures that take place in this instruction manual are schematic and may not correspond exactly with your product. If the subject parts are not included in the product you have purchased, then it is valid for other models. 3 EN 2 Important Safety Warnings Please review the following information. Failure to observe this information may cause injuries or material damage. Otherwise, all warranty and reliability commitments will become invalid. The usage life of the unit you purchased is 10 years. This is the period for keeping the spare parts required for the unit to operate as described. • • • Intended use This product is intended to be used – indoors and in closed areas such as homes; – in closed working environments such as stores and offices; – in closed accommodation areas such as farm houses, hotels, pensions. • This product should not be used outdoors. General safety • When you want to dispose/scrap the product, we recommend you to consult the authorized service in order to learn the required information and authorized bodies. • Consult your authorized service for all your questions and problems related to the refrigerator. Do not intervene or let someone intervene to the refrigerator without notifying the authorised services. • For products with a freezer compartment; Do not eat cone ice cream and ice cubes immediately after you take them out of the freezer compartment! (This may cause frostbite in your mouth.) • For products with a freezer compartment; Do not put bottled and canned liquid beverages in the freezer 4 • • • • • • • • EN compartment. Otherwise, these may burst. Do not touch frozen food by hand; they may stick to your hand. Unplug your refrigerator before cleaning or defrosting. Vapor and vaporized cleaning materials should never be used in cleaning and defrosting processes of your refrigerator. In such cases, the vapor may get in contact with the electrical parts and cause short circuit or electric shock. Never use the parts on your refrigerator such as the door as a means of support or step. Do not use electrical devices inside the refrigerator. Do not damage the parts, where the refrigerant is circulating, with drilling or cutting tools. The refrigerant that might blow out when the gas channels of the evaporator, pipe extensions or surface coatings are punctured causes skin irritations and eye injuries. Do not cover or block the ventilation holes on your refrigerator with any material. Electrical devices must be repaired by only authorised persons. Repairs performed by incompetent persons create a risk for the user. In case of any failure or during a maintenance or repair work, disconnect your refrigerator’s mains supply by either turning off the relevant fuse or unplugging your appliance. Do not pull by the cable when pulling off the plug. Place the beverage with higher proofs tightly closed and vertically. • Never store spray cans containing flammable and explosive substances in the refrigerator. • Do not use mechanical devices or other means to accelerate the defrosting process, other than those recommended by the manufacturer. • This product is not intended to be used by persons with physical, sensory or mental disorders or unlearned or inexperienced people (including children) unless they are attended by a person who will be responsible for their safety or who will instruct them accordingly for use of the product • Do not operate a damaged refrigerator. Consult with the service agent if you have any concerns. • Electrical safety of your refrigerator shall be guaranteed only if the earth system in your house complies with standards. • Exposing the product to rain, snow, sun and wind is dangerous with respect to electrical safety. • Contact authorized service when there is a power cable damage to avoid danger. • Never plug the refrigerator into the wall outlet during installation. Otherwise, risk of death or serious injury may arise. • This refrigerator is intended for only storing food items. It must not be used for any other purpose. • Label of technical specifications is located on the left wall inside the refrigerator. • Never connect your refrigerator to electricity-saving systems; they may damage the refrigerator. • If there is a blue light on the refrigerator, do not look at the blue light with optical tools. • For manually controlled refrigerators, wait for at least 5 minutes to start the refrigerator after power failure. 5 • This operation manual should be handed in to the new owner of the product when it is given to others. • Avoid causing damage on power cable when transporting the refrigerator. Bending cable may cause fire. Never place heavy objects on power cable. Do not touch the plug with wet hands when plugging the product. • Do not plug the refrigerator if the wall outlet is loose. • Water should not be sprayed directly on inner or outer parts of the product for safety purposes. • Do not spray substances containing inflammable gases such as propane gas near the refrigerator to avoid fire and explosion risk. • Never place containers filled with water on top of the refrigerator, otherwise this may cause electric shock or fire. • Do not overload your refrigerator with excessive amounts of food. If overloaded, the food items may fall down and hurt you and damage refrigerator when you open the door. Never place objects on top of the refrigerator; otherwise, these objects may fall down when you open or close the refrigerator's door. • As they require a precise temperature, vaccines, heat-sensitive medicine and scientific materials and etc. should not be kept in the refrigerator. EN • If not to be used for a long time, refrigerator should be unplugged. A possible problem in power cable may cause fire. • The plug's tip should be regularly cleaned; otherwise, it may cause fire. • The plug’s tip should be cleaned regularly with a dry cloth; otherwise, it may cause fire. • Refrigerator may move if adjustable legs are not properly secured on the floor. Properly securing adjustable legs on the floor can prevent the refrigerator to move. • When carrying the refrigerator, do not hold it from door handle. Otherwise, it may be snapped. • When you have to place your product next to another refrigerator or freezer, the distance between devices should be at least 8cm. Otherwise, adjacent side walls may be humidified. HCA Warning If your product's cooling system contains R600a: This gas is flammable. Therefore, pay attention to not damaging the cooling system and piping during usage and transportation. In the event of damage, keep your product away from potential fire sources that can cause the product catch a fire and ventilate the room in which the unit is placed. Ignore this warning if your product's cooling system contains R134a. Type of gas used in the product is stated in the type plate which is on the left wall inside the refrigerator. Never throw the product in fire for disposal. For products with a water dispenser; Pressure of water mains should be minimum 1 bar. Pressure of water mains should be maximum 8 bars. • Use only potable water. Child safety • If the door has a lock, the key should be kept away from reach of children. • Children must be supervised to prevent them from tampering with the product. 6 EN Things to be done for energy saving • Do not leave the doors of your refrigerator open for a long time. • Do not put hot food or drinks in your refrigerator. • Do not overload your refrigerator so that the air circulation inside of it is not prevented. • Do not install your refrigerator under direct sunlight or near heat emitting appliances such as ovens, dishwashers or radiators. • Pay attention to keep your food in closed containers. • For products with a freezer compartment; You can store maximum amount of food items in the freezer when you remove the shelf or drawer of the freezer. Energy consumption value stated for your refrigerator has been determined by removing freezer shelf or drawer and under maximum load. There is no harm to use a shelf or drawer according to the shapes and size of food to be frozen. • Thawing frozen food in fridge compartment will both provide energy saving and preserve the food quality. food Reccomendations for freshfood compartment * OPTIONAL • Please do not let any foodstuff to come to contact with the temperature sensor in freshfood compartment. In order to maintain freshfood compartment at ideal storage temperature, the sensor must not be blocked by fodstuffs. • Do not place hot foodstuff in your appliance. food temperature sensor MILK juice etc. 7 EN temperature sensor temperature sensor 3 Installation C Please remember that the manufacturer shall not be held liable if the information given in the instruction manual is not observed. Points to be considered when re-transporting your refrigerator 1. Your refrigerator must be emptied and cleaned prior to any transportation. 2. Shelves, accessories, crisper and etc. in your refrigerator must be fastened securely by adhesive tape against any jolt before repackaging. 3. Packaging must be tied with thick tapes and strong ropes and the rules of transportation printed on the package must be followed. C Always remember... Every recycled material is an indispensable source for the nature and for our national resources. If you wish to contribute to recycling the packaging materials, you can get further information from the environmental bodies or local authorities. Before operating your refrigerator Before starting to use your refrigerator check the following: 1. Is the interior of the refrigerator dry and can the air circulate freely in the rear of it? 8 2. You can install the 2 plastic wedges as illustrated in the figure. Plastic wedges will provide the required distance between your refrigerator and the wall in order to allow the air circulation. (The illustrated figure is only an example and does not match exactly with your product.) 3. Clean the interior of the refrigerator as recommended in the “Maintenance and cleaning” section. 4. Plug the refrigerator into the wall outlet. When the door is open the respective interior light will come on. 5. You will hear a noise as the compressor starts up. The liquid and gases sealed within the refrigeration system may also give rise to noise, even if the compressor is not running and this is quite normal. 6. Front edges of the refrigerator may feel warm. This is normal. These areas are designed to be warm to avoid condensation. EN Electric connection Disposing of your old refrigerator Connect your refrigerator to a grounded socket which is being protected by a fuse with the appropriate capacity. Important: B The connection must be in compliance with national regulations. B The power cable plug must be easily accessible after installation. B The specified voltage must be equal to your mains voltage. B Extension cables and multiway plugs must not be used for connection. B A damaged power cable must be replaced by a qualified electrician. B The appliance must not be operated before it is repaired! There is danger of electric shock! B Warning against electric voltage. Dispose of your old machine without giving any harm to the environment. A You may consult your authorized dealer or waste collection center of your municipality about the disposal of your refrigerator. A Before disposing of your refrigerator, cut out the electric plug and, if there are any locks on the door, make them inoperable in order to protect children against any danger. Disposing of the packaging AThe packing materials may be dangerous for children. Keep the packing materials out of the reach of children or dispose them of by classifying them in accordance with the waste instructions. Do not dispose them of along with the normal household waste. The packing of your refrigerator is produced from recyclable materials. 9 EN Placing and Installation Floor balance adjustment A Caution: Never plug the refrigerator into the wall outlet during installation. Otherwise, risk of death or serious injury may arise. A If your refrigerator is unbalanced; 1- Ventilation cover is removed by unscrewing its screws as illustrated in the figure before the procedure. You can balance your refrigerator by turning the front legs of it as illustrated in the figure. The corner where the leg exists is lowered when you turn in the direction of black arrow and raised when you turn in the opposite direction. Taking help from someone to slightly lift the refrigerator will facilitate this process. A If the entrance door of the room where the refrigerator will be installed is not wide enough for the refrigerator to pass through, than call the authorized service to have them remove the doors of your refrigerator and pass it sideways through the door. 1. Install your refrigerator to a place that allows ease of use. 2. Keep your refrigerator away from heat sources, humid places and direct sunlight. 3. There must be appropriate air ventilation around your refrigerator in order to achieve an efficient operation. If the refrigerator is to be placed in a recess in the wall, there must be at least 5 cm distance with the ceiling and at least 5 cm with the wall. If the floor is covered with a carpet, your product must be elevated 2.5 cm from the floor. 4. Place your refrigerator on an even floor surface to prevent jolts. 2. After the balance issue is remedied, install back the ventilation cover and fasten the screws. D A B C 3. Remove the screws fastening the lower ventilation cover using a Philips screwdriver. 10 EN Adjusting the gap between the upper door C Adjust the door appropriately as you desire by loosing the screws. C Fix the door you have adjusted by tightening the screws without changing the position of the door. C You can adjust the gap between the fridge compartment doors as illustrated in the figures. Door shelves should be empty when adjusting the door height. C Replace the hinge cover and fix with the screw. C Using a screwdriver, remove the screw of upper hinge cover of the door you want to adjust. 11 EN 4 Preparation C Your refrigerator should be installed at least 30 cm away from heat sources such as hobs, ovens, central heater and stoves and at least 5 cm away from electrical ovens and should not be located under direct sunlight. C The ambient temperature of the room where you install your refrigerator should at least be 10°C. Operating your refrigerator under cooler conditions than this is not recommended with regard to its efficiency. C Please make sure that the interior of your refrigerator is cleaned thoroughly. C If two refrigerators are to be installed side by side, there should be at least 2 cm distance between them. C When you operate your refrigerator for the first time, please observe the following instructions during the initial six hours. - The door should not be opened frequently. - It must be operated empty without any food in it. - Do not unplug your refrigerator. If a power failure occurs out of your control, please see the warnings in the “Recommended solutions for the problems” section. C Original packaging and foam materials should be kept for future transportations or moving. 12 EN 5 Using your refrigerator Indicator Panel This touch-control indicator panel allows you to set the temperature without opening the door of your refrigerator. Just touch the relevant button with your finger to set the temperature. * OPTIONAL 1 7 8 17 16 10 4 5 2 15 3 6 14 1. Fridge Compartment Temperature Setting Button 2. Eko-Ekstra Button 3. Freezer Compartment Temperature Setting Button 4. Quick Cool Button 5. Vacation Button 6. Fast Freeze Button 7. Fridge Compartment Temperature Indicator 8. Eco Extra Function Indicator 9. Freezer Compartment Temperature Indicator 10.Quick Cool Function Indicator 9 13 12 11 11.Vacation Function Indicator 12.Quick Freeze Function Indicator 13.Economy Mode Indicator 14.Error Status Indicator 15.Key Lock Indicator 16.Ionizer Indicator Light 17.Humidity Indicator CFigures that take place in this instruction manual are schematic and may not correspond exactly with your product. If the subject parts are not included in the product you have purchased, then it is valid for other models. 13 EN 1- Fridge Compartment Temperature Setting Button Press this button to set the temperature of the fridge compartment to 8, 6, 4, 2, 8... respectively. Press this button to set the desired temperature for the Fridge Compartment. 2- Eko-Ekstra Button Press this button briefly to activate the Eco Extra function. 3- Freezer Compartment Temperature Setting Button Press this button to set the temperature of the freezer compartment to -18, -20, -22, -24, -18... respectively. Press this button to set the desired temperature for the Freezer Compartment. 4. Quick CoolButton Press this button briefly to activate the Quick Cool function. Press this button again to deactivate the selected function. 5- Vacation Button Press this button briefly to activate the Vacation function. To stop ice formation, press the same button for 3 seconds. 6- Fast Freeze Button Press this button briefly to activate the Fast Freeze function. Press this button again to deactivate the selected function. 7- Fridge Compartment Temperature Indicator Indicates the temperature set for Fridge Compartment. 14 8- Eco Extra Function Indicator Indicates that the Eco Extra function is active. If this function is active, your refrigerator will automatically detect the least usage periods and energyefficient cooling will be performed during those times. Economy indicator will be active while energy-efficient cooling is performed. 9- Freezer Compartment Temperature Indicator It indicates the temperature set for Freezer Compartment. 10- Quick Cool Function Indicator Indicates that the Quick Cool function is active. Use this function when you place fresh food into the fridge compartment or when you need to cool your food quickly. When this function is active, your refrigerator will run for 2 hours without stopping. Press the relevant button again to deactivate this function. 11- Vacation Function Indicator Indicates that the vacation function is active. If this function is active, "- -" appears on the indicator of the fridge compartment and no cooling is performed in the fridge compartment. Other compartments will be cooled in accordance with the temperature set for them. Press the relevant button again to deactivate this function. 12- Quick Freeze Function Indicator Indicates that the Quick Freezer function is active. Use this function when you place fresh food into the freezer compartment or when you need ice. When this function is active, your refrigerator will run for 6 hours without stopping. Press the relevant button again to deactivate this function. EN 13- Economy Mode Indicator Indicates that the refrigerator is running in energy-efficient mode. This indicator will be active if the Freezer Compartment temperature is set to -18 or the energy efficient cooling is being performed due to Eco-Extra function. 14- Error Status Indicator If your refrigerator does not cool adequately or if there is a sensor failure, this indicator will be activated. When this indicator is active, Freezer Compartment Temperature indicator will display "E" and Fridge Compartment Temperature Indicator will display numbers such as "1,2,3…". These numbers on the indicator provides information about the error to the service personnel. 15- Key Lock Indicator Use this function if you do not want your refrigerator temperature setting changed. Press Eco Extra Button and Freezer Compartment Temperature Setting Button simultaneously for a long time (3 sec) to activate this feature. Press the relevant buttons again to deactivate this function. 16- Ionizer Indicator Light Indicator light lights up continuously. This light indicates that your refrigerator is protected against the bacteria. 17- Humidity Indicator Indicator light lights up continuously. This light indicates that the food kept in the refrigerator is preserved for a long time under ideal humidity. 15 Door Open Alarm: In case of leaving any of the Fridge Compartment or Cool Control Compartment doors open minimum for 1 minute, audible Door Open Alarm will be activated and heard. Just press any button on the indicator or close the open door to silence the alarm. EN Indicator Panel This touch-control indicator panel allows you to set the temperature without opening the door of your refrigerator. Just touch the relevant button with your finger to set the temperature. * OPTIONAL 1 8 17 16 7 10 4 21 5 2 19 15 6 3 20 14 9 1. Fridge Compartment Temperature Setting Button 2. Eco-Ekstra Button 3. Freezer Compartment Temperature Setting Button 4. Quick Cool Button 5. Vacation Function Button 6. Fast Freeze Button 7. Fridge Compartment Temperature Indicator 8. Eco Extra Function Indicator 9. Freezer Compartment Temperature Indicator 10.Quick Cool Function Indicator 13 12 11 18 11.Vacation Function Indicator 12.Quick Freeze Function Indicator 13.Economy Mode Indicator 14.Error Status Indicator 15.Key Lock Indicator 16.Ionizer Indicator Light 17.Humidity Indicator 18.Ice Machine OFF indicator 19.Ice Machine ON/OFF Button 20.Change Filter Warning Indicator 21.Filter Status Reset Button CFigures that take place in this instruction manual are schematic and may not correspond exactly with your product. If the subject parts are not included in the product you have purchased, then it is valid for other models. 16 EN 1- Fridge Compartment Temperature Setting Button Press this button to set the temperature of the fridge compartment to 8, 6, 4, 2, 8... respectively. Press this button to set the desired temperature for the Fridge Compartment. 2- Eco-Ekstra Button Press this button briefly to activate the Eco Extra function. 3- Freezer Compartment Temperature Setting Button Press this button to set the temperature of the freezer compartment to -18, -20, -22, -24, -18... respectively. Press this button to set the desired temperature for the Freezer Compartment. 4. Quick CoolButton Press this button briefly to activate the Quick Cool function. Press this button again to deactivate the selected function. 5- Vacation Button Press this button briefly to activate the Vacation function. To stop ice formation, press the same button for 3 seconds. 6- Fast Freeze Button Press this button briefly to activate the Fast Freeze function. Press this button again to deactivate the selected function. 7- Fridge Compartment Temperature Indicator Indicates the temperature set for Fridge Compartment. 8- Eco Extra Function Indicator Indicates that the Eco Extra function is active. If this function is active, your refrigerator will automatically detect the least usage periods and energyefficient cooling will be performed during those times. Economy indicator will be active while energy-efficient cooling is performed. 17 9- Freezer Compartment Temperature Indicator It indicates the temperature set for Freezer Compartment. 10- Quick Cool Function Indicator Indicates that the Quick Cool function is active. Use this function when you place fresh food into the fridge compartment or when you need to cool your food quickly. When this function is active, your refrigerator will run for 2 hours without stopping. Press the relevant button again to deactivate this function. 11- Vacation Function Indicator Indicates that the vacation function is active. If this function is active, “- -” appears on the indicator of the fridge compartment and no cooling is performed in the fridge compartment. Other compartments will be cooled in accordance with the temperature set for them. Press the relevant button again to deactivate this function. 12- Quick Freeze Function Indicator Indicates that the Quick Freezer function is active. Use this function when you place fresh food into the freezer compartment or when you need ice. When this function is active, your refrigerator will run for 6 hours without stopping. Press the relevant button again to deactivate this function. 13- Economy Mode Indicator Indicates that the refrigerator is running in energy-efficient mode. This indicator will be active if the Freezer Compartment temperature is set to -18 or the energy efficient cooling is being performed due to Eco-Extra function. EN 14- Error Status Indicator If your refrigerator does not cool adequately or if there is a sensor failure, this indicator will be activated. When this indicator is active, Freezer Compartment Temperature indicator will display “E” and Fridge Compartment Temperature Indicator will display numbers such as “1,2,3…”. These numbers on the indicator provides information about the error to the service personnel. 15- Key Lock Indicator Use this function if you do not want your refrigerator temperature setting changed. Press Eco Extra Button and Freezer Compartment Temperature Setting Button simultaneously for a long time (3 sec) to activate this feature. Press the relevant buttons again to deactivate this function. 16- Ionizer Indicator Light Indicator light lights up continuously. This light indicates that your refrigerator is protected against the bacteria. 17- Humidity Indicator Indicator light lights up continuously. This light indicates that the food kept in the refrigerator is preserved for a long time under ideal humidity. 18-Ice Machine OFF Indicator If you do not want to get ice from the refrigerator, you need to use this function. You may use this function by pressing the ice machine ON/OFF button for 3 seconds. 18 19-Ice Machine ON/OFF Button To stop ice formation, ice machine ON/ OFF button is pressed for 3 seconds. When ice cancel is selected, no water will be sent to the ice box. Despite this, some ice may be left over in the ice box which may be taken from there. To restart ice formation, ice machine ON/ OFF button has to be pressed for 3 seconds. 20- Change Filter Warning İndicator When the filter usage time has elapsed, change filter warning indicator starts to illuminate. 21-Filter Status Reset Button Filter of your refrigerator must be replaced every 6 months. Your refrigerator calculates this time automatically and the filter change waning indicator illuminates when the filter usage time has elapsed. Press filter status reset button for 3 seconds to allow the refrigerator to calculate the new filter time automatically after changing the filter. Door Open Alarm: When the door of the fridge compartment remains open for 1 minute, an audible Door Open Alarm will be activated and heard. Just press any button on the indicator or close the open door to silence the alarm. EN Egg tray Chiller compartment You can install the egg holder to the desired door or body shelf. Never store the egg holder in the freezer compartment Sliding Body Shelves Sliding body shelves can be pulled by slightly lifting up from the front and moved back and forth. They come to a stop point when pulled towards front to allow you reach the foods placed at the back of the shelf; when it is pulled after slightly lifted upwards at the second stop point, the body shelf will be released. The shelf should be hold tightly from the bottom as well in order to prevent it from tipping over. The body shelf is placed on the rails at the sides of the refrigerator body by bringing it to one lower or one upper level. The body shelf should be pushed backwards to seat it completely. Chiller compartments enable the foods to be frozen become ready for freezing. You can also use these compartments to store your food at a temperature a few degrees below the fridge compartment. You can increase the inner volume of your refrigerator by removing any of the chiller compartments. To do this, pull the compartment towards yourself; the compartment will lean against the stopper and stop. This compartment will be released when you lift it about 1 cm and pull it towards yourself. 1 2 3 4 19 EN 1 2 3 4 5 6 Crisper Crisper of your refrigerator is designed specially to keep your vegetables freshly without loosing their humidity. For this purpose, cool air circulation occurs around the crisper in general. Remove the door shelves that align with the crisper before removing the crispers. You can remove the crispers as illustrated in the figure. 7 20 EN Movable Middle Section Movable middle section is intended to prevent the cold air inside your refrigerator from escaping outside. 1- Sealing is provided when the gaskets on the door presses on the surface of the movable middle section while the fridge compartment doors are closed. 2- Another reason that your refrigerator is equipped with a movable middle section is that it increases the net volume of the fridge compartment. Standard middle sections occupy some non-usable volume in the refrigerator. 3- Movable middle section is closed when the left door of the fridge compartment is closed. 4- It must not be opened manually. It moves under the guidance of the plastic part on the body while the door is closed. Blue light Foodstuff stored in the crispers that are enlightened with a blue light continue their photosynthesis by means of the wavelength effect of blue light and thus, preserve their freshness and increase their vitamin content. 21 EN Telescopic Drawer Door Open Alarm: Pay attention not to squeeze any parts of your body such as hands, feet and etc. between the movable parts while the drawer is in use in order to avoid any injury. You can remove the partition in the drawer as illustrated when you want to clean it. You can remove the drawers only for cleaning. It is not possible to group the drawers in their places after loading them with food when they are removed. 22 When the door of the fridge compartment remains open for 1 minute, an audible Door Open Alarm will be activated and heard. Just press any button on the indicator or close the open door to silence the alarm. Dual cooling system: Your refrigerator is equipped with two separate cooling systems to cool the fresh food compartment and freezer compartment. Thus, air in the fresh food compartment and freezer compartment do not get mixed. Thanks to these two separate cooling systems, cooling speed is much higher then other refrigerators. Odours in the compartments do not get mixed. Also additional power saving is provided since the defrosting is performed individually. EN -18°C Fridge Compartment Adjustment 4°C -20,-22 or -24°C 4°C Freezer Compartment Adjustment Quick Freeze 4°C -18°C or colder 2°C -18°C or colder Quick Fridge Explanations This is the normal recommended setting. These settings are recommended when the ambient temperature exceeds 30°C. Use when you wish to freeze your food in a short time. Your refrigerator will return to its previous mode when the process is over. If you think that your fridge compartment is not cold enough because of the hot conditions or frequent opening and closing of the door. You can use it when your fridge compartment is overloaded or if you wish to cool down your food rapidly. It is recommended that you activate quick fridge function 4-8 hours before placing the food. Freezing fresh food • It must be preferred to wrap or cover the food before placing them in the refrigerator. • Hot food must cool down to the room temperature before putting them in the refrigerator. • The foodstuff that you want to freeze must be fresh and in good quality. • Foodstuff must be divided into portions according to the family’s daily or meal based consumption needs. • The foodstuff must be packaged in an airtight manner to prevent them from drying even if they are going to be kept for a short time. • Materials to be used for packaging must be tear-proof and resistant to cold, humidity, odor, oils and acids and they must also be airtight. Moreover, they must be well closed and they must be made from easyto-use materials that are suitable for deep freeze usage. • Frozen food must be used immediately after they are thawed and they should never be re-frozen. • Please observe the following instructions to obtain the best results. 1. Do not freeze too large quantities 23 of food at one time. The quality of the food is best preserved when it is frozen right through to the core as quickly as possible. 2. Placing warm food into the freezer compartment causes the cooling system to operate continuously until the food is frozen solid. 3. Take special care not to mix already frozen food and fresh food. Recommendations for preservation of frozen food • Prepacked commercially frozen food should be stored in accordance with the frozen food manufacturer's instructions for a ( 4 star) frozen food storage compartment. • To ensure that the high quality achieved by the frozen food manufacturer and the food retailer is maintained, the following should be remembered: 1. Put packages in the freezer as quickly as possible after purchase. 2. Ensure that contents are labeled and dated. 3. Do not exceed "Use By", "Best Before" dates on the packaging. Defrosting The freezer compartment defrosts automatically. EN Placing the food Deep-freeze information Freezer compartment shelves Various frozen food such as meat, fish, ice cream, vegetables and etc. Egg tray Egg Fridge compartment shelves Food in pans, covered plates and closed containers Fridge compartment door shelves Small and packaged food or drinks (such as milk, fruit juice and beer) Crisper Vegetables and fruits Freshzone compartment Delicatessen products (cheese, butter, salami and etc.) 24 Food must be frozen as rapidly as possible when they are put in a refrigerator in order to keep them in good quality. The TSE norm requires (according to certain measurement conditions) the refrigerator to freeze at least 4.5 kg of foodstuff at 32°C ambient temperature to -18°C or lower within 24 hours for every 100-liters of freezer volume. It is possible to keep the food for a long time only at -18°C or lower temperatures. You can keep the freshness of food for many months (at -18°C or lower temperatures in the deep freeze). WARNING! A • Foodstuff must be divided into portions according to the family’s daily or meal based consumption needs. • Foodstuff must be packaged in an airtight manner to prevent them from drying even if they are going to be kept for a short time. Materials necessary for packaging: • Cold resistant adhesive tape • Self adhesive label • Rubber rings • Pen Materials to be used for packaging the foodstuff must be tear-proof and resistant to cold, humidity, odor, oils and acids. Foodstuff to be frozen should not be allowed to come in contact with the previously frozen items to prevent their partial thawing. Frozen food must be used immediately after they are thawed and they should never be re-frozen. EN 6 Maintenance and cleaning A Never use gasoline, benzene or similar substances for cleaning purposes. B We recommend that you unplug the appliance before cleaning. B Never use any sharp abrasive instrument, soap, household cleaner, detergent and wax polish for cleaning. C Use lukewarm water to clean the cabinet of your refrigerator and wipe it dry. C Use a damp cloth wrung out in a solution of one teaspoon of bicarbonate of soda to one pint of water to clean the interior and wipe it dry. B Make sure that no water enters the lamp housing and other electrical items. B If your refrigerator is not going to be used for a long period of time, unplug the power cable, remove all food, clean it and leave the door ajar. C Check door seals regularly to ensure they are clean and free from food particles. A To remove door racks, remove all the contents and then simply push the door rack upwards from the base. 25 Protection of plastic surfaces C Do not put the liquid oils or oil-cooked meals in your refrigerator in unsealed containers as they damage the plastic surfaces of your refrigerator. In case of spilling or smearing oil on the plastic surfaces, clean and rinse the relevant part of the surface at once with warm water. EN 7 Recommended solutions for the problems Please review this list before calling the service. It might save you time and money. This list includes frequent complaints that are not arising from defective workmanship or material usage. Some of the features described here may not exist in your product. The refrigerator does not operate. • Is the refrigerator properly plugged in? Insert the plug to the wall socket. • Is the fuse of the socket which your refrigerator is connected to or the main fuse blown out? Check the fuse. Condensation on the side wall of the fridge compartment (MULTIZONE, COOL CONTROL and FLEXI ZONE). • Very cold ambient conditions. Frequent opening and closing of the door. Highly humid ambient conditions. Storage of food containing liquid in open containers. Leaving the door ajar. Switching the thermostat to a colder degree. • Decreasing the time the door left open or using it less frequently. • Covering the food stored in open containers with a suitable material. • Wipe the condensation using a dry cloth and check if it persists. Compressor is not running • Protective thermic of the compressor will blow out during sudden power failures or plug-out plug-ins as the refrigerant pressure in the cooling system of the refrigerator has not been balanced yet. Your refrigerator will start running approximately after 6 minutes. Please call the service if the refrigerator does not startup at the end of this period. • The fridge is in defrost cycle. This is normal for a full-automatically defrosting refrigerator. Defrosting cycle occurs periodically. • Your refrigerator is not plugged into the socket. Make sure that the plug is properly fit into the socket. • Are the temperature adjustments correctly made? • Power might be cut off. 26 EN The fridge is running frequently or for a long time. • Your new product may be wider than the previous one. This is quite normal. Large refrigerators operate for a longer period of time. • The ambient room temperature may be high. This is quite normal. • The refrigerator might have been plugged in recently or might have been loaded with food. Cooling down of the refrigerator completely may last for a couple of hours longer. • Large amounts of hot food might have been put in the refrigerator recently. Hot food causes longer running of the refrigerator until they reach the safe storage temperature. • Doors might have been opened frequently or left ajar for a long time. The warm air that has entered into the refrigerator causes the refrigerator to run for longer periods. Open the doors less frequently. • Freezer or fridge compartment door might have been left ajar. Check if the doors are tightly closed. • The refrigerator is adjusted to a very low temperature. Adjust the refrigerator temperature to a warmer degree and wait until the temperature is achieved. • Door seal of the fridge or freezer may be soiled, worn out, broken or not properly seated. Clean or replace the seal. Damaged/broken seal causes the refrigerator to run for a longer period of time in order to maintain the current temperature. Freezer temperature is very low while the fridge temperature is sufficient. • The freezer temperature is adjusted to a very low temperature. Adjust the freezer temperature to a warmer degree and check. Fridge temperature is very low while the freezer temperature is sufficient. • The fridge temperature might have been adjusted to a very low temperature. Adjust the fridge temperature to a warmer degree and check. Food kept in the fridge compartment drawers are freezing. • The fridge temperature might have been adjusted to a very low temperature. Adjust the fridge temperature to a warmer degree and check. Temperature in the fridge or freezer is very high. • The fridge temperature might have been adjusted to a very high degree. Fridge adjustment has an effect on the temperature of the freezer. Change the temperature of the fridge or freezer until the fridge or freezer temperature reaches to a sufficient level. • Doors might have been opened frequently or left ajar for a long time; open them less frequently. • Door might have been left ajar; close the door completely. • Large amount of hot food might have been put in the refrigerator recently. Wait until the fridge or freezer reaches the desired temperature. • The refrigerator might have been plugged in recently. Cooling down of the refrigerator completely takes time. The operation noise increases when the refrigerator is running. • The operating performance of the refrigerator may change due to the changes in the ambient temperature. It is normal and not a fault. 27 EN Vibrations or noise. • The floor is not even or it is weak. The refrigerator rocks when moved slowly. Make sure that the floor is strong enough to carry the refrigerator, and level. • The noise may be caused by the items put onto the refrigerator. Items on top of the refrigerator should be removed. There are noises coming from the refrigerator like liquid spilling or spraying. • Liquid and gas flows happen in accordance with the operating principles of your refrigerator. It is normal and not a fault. There is a noise like wind blowing. • Fans are used in order to cool the refrigerator. It is normal and not a fault. Condensation on the inner walls of refrigerator. • Hot and humid weather increases icing and condensation. It is normal and not a fault. • Doors might have been left ajar; make sure that the doors are closed fully. • Doors might have been opened frequently or left ajar for a long time; open them less frequently. Humidity occurs on the outside of the refrigerator or between the doors. • There might be humidity in the air; this is quite normal in humid weather. When the humidity is less, condensation will disappear. Bad odour inside the refrigerator. • Inside of the refrigerator must be cleaned. Clean the inside of the refrigerator with a sponge, lukewarm water or carbonated water. • Some containers or package materials might cause the smell. Use a different container or different brand packaging material. The door is not closing. • Food packages may prevent the door's closing. Replace the packages that are obstructing the door. • The refrigerator is not completely upright on the floor and rocking when slightly moved. Adjust the elevation screws. • The floor is not level or strong. Make sure that the floor is level and capable to carry the refrigerator. Crispers are stuck. • The food might be touching the ceiling of the drawer. Rearrange food in the drawer. 28 EN קרא מדריך זה ,תחילה! לקוח יקר, אנו מקווים שמוצר זה ,שיוצר במפעלים מודרניים ונבדק במסגרת נוהלי בקרת האיכות המחמירים ביותר ,ישמש אותך ביעילות. לשם כך ,מומלץ לקרוא בעיון רב את כל המדריך של המוצר לפני שתשתמש בו ולשמור אותו בהישג יד לעת הצורך. מדריך זה • יעזור לך להשתמש במכשיר באופן מהיר ובטוח. • קרא את המדריך לפני התקנת המוצר והפעלתו. • פעל בהתאם להוראות ,במיוחד להוראות הבטיחות. • החזק את המדריך במקום נגיש ,ייתכן שתזדקק לו מאוחר יותר. • יתרה מכך ,קרא גם את המסמכים האחרים המצורפים למוצר. שים לב ,מדריך זה עשוי להיות תקף גם לגבי דגמים אחרים. הסמלים ותיאוריהם מדריך הוראות זה מכיל את הסמלים הבאים: מידע חשוב או עצות שימוש יעילות. C אזהרה מפני מצבים המהווים סכנת חיים או סכנה לרכוש. A אזהרה מפני מתח חשמלי. B תוכן עניינים 1המקרר 3 4הכנה 11 2אזהרות בטיחות חשובות 4 5אופן השימוש במקרר 12 השימוש המיועד4........................................... בטיחות כללית 4............................................ בטיחות ילדים5............................................. אזהרה מפני חומצת 6.............................. HCA פעולות לחיסכון באנרגיה 6.................................. המלצות לתא המזון הטרי 6................................. 3התקנה 7 נקודות שיש לקחת בחשבון לפני הובלת המקרר מחדש 7.... לפני הפעלת המקרר 7...................................... חיבור לחשמל8............................................. השלכת האריזה לאשפה8................................... השלכת המקרר הישן לאשפה 8............................. הצבה והתקנה 8............................................ כוונון ייצוב ביחס לרצפה8................................... כוונון הרווח בין הדלתות העליונות 9......................... HE לוח מחוונים 12............................................ התראת דלת פתוחה13.................................. : לוח מחוונים 14............................................ התראת דלת פתוחה16.................................. : מגש ביצים17.............................................. הזזת מדפי גוף המקרר 17................................. תא קירור באפס מעלות 17................................. מגירת ירקות 18........................................... חלק אמצעי נייד 19........................................ אור כחול19................................................ מגירה טלסקופית 20...................................... 6תחזוקה וניקוי 21 הגנה על משטחי פלסטיק 21............................... 7פתרונות מומלצים לבעיות 2 22 1המקרר A 1 2 3 4 5 6 7 8 9 B -Aתא הקירור -Bתא ההקפאה - 1מדף לחמאה ולגבינה - 2מדפי דלת תא הקירור - 3מדפי הזכוכית של תא הקירור - 4מכסה המפזר - 5עדשת התאורה הפנימית - 6חלק אמצעי נייד - 7תא קירור באפס מעלות - 8מדף הבקבוקים - 9מגירת הירקות - 10תיבת הקרח - 11חוצצים ניידים 10 11 האיורים המופיעים במדריך הוראות זה הם איורים כלליים וייתכן שלא יתאימו בדיוק למוצר שברשותך .אם C החלקים המוצגים במדריך אינם כלולים במוצר שרכשת ,הם בוודאי תקפים לדגמים אחרים. HE 3 11 2 אזהרות בטיחות חשובות עיין במידע הבא .אם לא תפעל בהתאם להוראות ,ייתכן שייגרם נזק גופני או נזק חומרי .אם לא תפעל בהתאם להוראות, ההתחייבות לאחריות ולאמינות לא תהיה תקפה. אורך חיי השימוש של היחידה שרכשת הוא 10שנים .זהו פרק הזמן הנדרש לפעולת חלקי החילוף של היחידה כמתואר. • • • השימוש המיועד • – – – – • מכשיר זה נועד לשימוש ביתי ובסביבות דומות ,כמו מטבחי עובדים בחנויות ,במשרדים ובסביבות עבודה אחרות; בתים כפריים ,וכן לשימוש על ידי אורחי בתי מלון ,אכסניות וסביבות מגורים אחרות; סביבות אירוח על בסיס לינה וארוחת בוקר; שירותי הסעדה או יישומים דומים שאינם קמעונאיים. אין להשתמש בו מחוץ לבית .אין זה מתאים להשתמש במקרר בחוץ ,גם אם המקום מקורה. בטיחות כללית • • • • • • אם ברצונך להיפטר מהמוצר או להשליך אותו לפסולת ,מומלץ להיוועץ בנציג שירות מורשה כדי לדעת איזה מידע דרוש ומיהם הגורמים המורשים. היוועץ בנציג השירות המורשה לגבי כל השאלות והבעיות הקשורות למקרר .אין לבצע או לאפשר למישהו אחר לבצע פעולת התערבות במקרר מבלי להודיע לנציג שירות מורשה. אין לאכול גלידה וקוביות קרח מייד לאחר הוצאתם מתא ההקפאה! (עלולות להיווצר בפיך כוויות). אין להכניס לתא ההקפאה בקבוקי משקה או פחיות משקה .הם עלולים להתפוצץ. אין לגעת בידיך במזון קפוא; הוא עלול להידבק אליהן. אין להשתמש באדים או בחומרי ניקוי עם אדים בתהליכי הניקוי וההפשרה של המקרר .האדים עלולים לבוא במגע עם החלקים החשמליים ולגרום לקצר או להתחשמלות. HE • • • • • • • • • • • 4 * אין להשתמש בחלקים שונים של המקרר, כמו הדלת ,כאמצעי תמיכה או כמדרגה. אין להשתמש במכשירים חשמליים בתוך המקרר. אין לגרום נזק למערכת הקירור באמצעות מכשירי קידוח או חיתוך בעת זרימת חומרי הקירור .חומר הקירור ,שעלול לדלוף כאשר נוצר נקר בצינורות הגז של המאייד, במאריך הצינור או במשטחי הציפוי ,עלול לגרום לגירוי בעור ולפגיעה בעיניים. אין לכסות או לחסום בחומר כלשהו את פתחי האוורור שבמקרר. תיקונים למכשירים החשמליים יבצעו אך ורק אנשי מקצוע מוסמכים .תיקונים המתבצעים על ידי אנשים בלתי מוסמכים עלולים להעמיד את המשתמש בסכנה. במקרה של תקלה בחשמל או במהלך פעולות תחזוקה או תיקונים ,נתק את המקרר מהחשמל על ידי כיבוי הנתיך המתאים או על ידי הוצאת כבל המקרר משקע החשמל. בעת הוצאת התקע מהשקע אין למשוך אותו מהכבל. הנח את המשקאות צמודים זה לזה בצורה אנכית ודאג לרמת אטימות גבוהה יותר. אין לאחסן במכשיר חומרים נפיצים כמו תרסיסים עם חומר נפץ דליק. אין להשתמש בהתקנים מכניים או באמצעים אחרים שאינם מומלצים על ידי היצרן להאצת תהליך ההפשרה. מכשיר זה לא נועד לשימוש על ידי אנשים או ילדים בעלי יכולת פיזית ירודה או בעלי לקויות חישתיות או שכליות או חסרי ניסיון או ידע הולמים ,אלא אם כן הם משתמשים במכשיר תחת השגחתו או לפי הוראתו של אדם האחראי לבטיחותם. אין להפעיל מקרר פגום .אם יש לך ספק, היוועץ בנציג השירות. בטיחות החשמל במקרר שברשותך תהיה מובטחת רק אם מערכת ההארקה בביתך תעמוד בתקנים הדרושים. חשיפת המוצר לגשם ,שלג ,שמש ורוח מסוכנת בכל הנוגע לבטיחות בחשמל. • צור קשר עם נציג השירות המורשה אם נגרם נזק לכבל החשמל וכו' ,כך שלא תעמוד בפני סכנה. • אין לחבר את המקרר לשקע החשמל במהלך ההתקנה .בפעולה זו קיימת סכנת חיים והיא עלולה לגרום לפציעה קשה. • המקרר נועד אך ורק לאחסון מזון .אין להשתמש בו לכל מטרה אחרת. • התווית שבה מופיע המפרט הטכני של המוצר נמצאת בחלק השמאלי האחורי של המקרר. • אין לחבר את המקרר למערכות אלקטרוניות לחיסכון באנרגיה ,מכיוון שחיבור זה עלול לגרום נזק למוצר. • אם במקרר מותקנת נורה כחולה ,אין להביט בה באמצעות מכשירים אופטיים. • אם מקררים בשליטה ידנית נותקו ממערכת אספקת החשמל ,יש להמתין 5דקות עד לחיבורם מחדש למערכת. • יש למסור מדריך זה למי שירכוש את המקרר במקרה של החלפת בעלות. • בעת הזזת המקרר ,יש לוודא שלא נגרם נזק לכבל החשמל .כדי למנוע שריפה ,אין לסובב את כבל החשמל .אין להניח חפצים כבדים על כבל החשמל .כאשר מחברים את המקרר לחשמל ,אין לאחוז את התקע בידיים רטובות. • אין להעמיס את המקרר במזון יתר על המידה .מזון עודף עלול ליפול בעת פתיחת הדלת ולגרום לפציעתך או לנזק למקרר .אין להניח חפצים מעל המקרר ,מאחר שהם עלולים ליפול בעת פתיחתה או סגירתה של דלת המקרר. • אין להחזיק במקרר חומרים אשר נדרשים להם תנאי טמפרטורה מסוימים, כמו תרכיבי חיסון ,תרופות רגישות לטמפרטורה ,חומרים מדעיים וכו'. • אם אין כוונה להפעיל מקרר לפרק זמן ממושך ,יש לנתק אותו מהחשמל .בעיה בבידוד כבל החשמל עלולה לגרום לשריפה. • יש לנקות באופן סדיר את קצה תקע החשמל כדי למנוע שריפה. • יש לנקות את קצה התקע באופן סדיר במטלית יבשה ,שכן הוא עלול לגרום לשריפה. • המקרר עלול לזוז אם הרגליות המתכווננות אינן עומדות בצורה יציבה על הרצפה. בעזרת הרגליות המתכווננות ,תוכל לוודא שהמקרר מוצב בצורה יציבה על הרצפה. • אם למקרר יש ידית ,אין למשוך אותו מהידית בעת הזזתו ,מאחר שהידית עלולה להתנתק מהמקרר. • אם עליך להפעיל את המכשיר בסמוך למקרר או מקפיא אחרים ,יהיה עליך לשמור על מרחק של לפחות 8ס"מ בין המכשירים הסמוכים .מרחק קטן יותר עלול לגרום להתעבות על דפנות המכשירים הסמוכות זו לזו. • אסור שלחץ המים בצינור הראשי יירד מתחת לבר אחד .אסור שלחץ המים בצינור הראשי יעלה על 8ברים. • השתמש אך ורק במים ראויים לשתייה. בטיחות ילדים • • • • אין לחבר את המקרר לחשמל אם שקע החשמל רופף. אין להתיז מים ישירות על החלקים החיצוניים או הפנימיים של המקרר מסיבות בטיחותיות. אין להתיז חומרים דליקים ,כמו גז פרופאן וכדומה ,בקרבת המקרר עקב סכנת שריפה והתפוצצות. אין להניח חפצים מלאים במים מעל המקרר ,שכן הם עלולים לגרום להתחשמלות או לשריפה. HE • אם יש מנעול על הדלת ,יש להרחיק את המפתח מהישג ידם של ילדים. • יש להשגיח על ילדים כדי לוודא שהם אינם משחקים במכשיר. 5 המלצות לתא המזון הטרי אזהרה מפני חומצת HCA אם מותקנת במקרר מערכת קירור המכילה :R600a גזים אלה דליקים .לכן הקפד שלא לגרום נזק למערכת הקירור ולצנרת הקירור במהלך השימוש וההובלה .במקרה של גרימת נזק ,יש להרחיק את המוצר ממקורות אש פוטנציאליים ,שעלולים להביא להתלקחותו. כמו כן ,יש לאוורר את החדר שבו מוצב המקרר. אם מותקנת במקרר מערכת קירור המכילה ,R134aהתעלם מהאזהרה. תוכל לראות את הגז המשמש לייצור המוצר שלך בתווית הנתונים הנמצאת בחלקו הפנימי משמאל. juice temperature להשליך את etc. המוצר לאש. אין sensor • אין לאפשר למצרכי מזון לבוא במגע עם חיישן הטמפרטורה בתא המזון הטרי .כדי לשמור על טמפרטורת אחסון אידיאלית בתא המזון הטרי ,אין לחסום את החיישן במצרכי מזון. • אין להכניס למקרר מזון חם. temperature sensor MILK food פעולות לחיסכון באנרגיה • • • • • • אין להשאיר את דלתות המקרר פתוחות לזמן ממושך. אין להכניס למקרר מזון או משקאות חמים. אין להעמיס את המקרר יתר על המידה כדי לא להפריע בזרימת האוויר בתוכו. אין להציב את המקרר כשהוא חשוף לשמש ישירה או בקרבת מכשירים הפולטים חום, כמו תנורים ,מדיחי כלים או רדיאטורים. הקפד לאחסן את המזון במיכלים סגורים. ניתן להגיע למילוי מרבי של תא המקפיא של המקרר אם מסירים את המדף או את המגירה שלו .ערך צריכת האנרגיה המוצהרת של המקרר נקבע כאשר המדף או המגירה של תא ההקפאה הוסרו וכשהוא מכיל כמות מרבית של מזון .אין כל סכנה אם משתמשים במדף או במגירה בהתאם לצורות ולגדלים של המזון שיש להקפיא. HE temperature sensor 6 MILK juice etc. 3התקנה Cזכור שהיצרן לא יישא באחריות כלשהי אם לא תציית להוראות המופיעות במדריך זה. .3 נקודות שיש לקחת בחשבון לפני הובלת המקרר מחדש .1יש לרוקן ולנקות את המקרר לפני ההובלה. .2לפני האריזה ,יש להדק למקומם במקרר את המדפים, האבזרים הנלווים ,מגירת הירקות וכו' באמצעות סרט הדבקה למניעת טלטולים מיותרים. .3יש להדק את האריזה באמצעות סרטים עבים וחבלים חזקים ולציית לכללי ההובלה המודפסים על האריזה. Cזכור תמיד... כל חומר ממוחזר הוא מקור הנחוץ לטבע ולמשאבים הלאומיים. אם ברצונך לתרום למיחזור חומרי האריזה ,תוכל לקבל מידע נוסף מגורמי איכות הסביבה או מהרשות המקומית. .4 .5 .6 לפני הפעלת המקרר לפני שתתחיל להשתמש במקרר ,בדוק את הנקודות הבאות: .1האם פנים המקרר יבש והאוויר יכול לנוע בחופשיות בחלקו האחורי? .2תוכל להתקין את 2טריזי הפלסטיק כפי שמודגם באיור. טריזי פלסטיק יספקו את המרחק הדרוש בין המקרר לבין הקיר כדי לאפשר זרימת אוויר (האיור מהווה דוגמה בלבד ואינו מתאים בדיוק למוצר שברשותך). HE 7 נקה את פנים המקרר לפי ההמלצות המופיעות בפרק "תחזוקה וניקוי". חבר את המקרר אל שקע החשמל .כאשר הדלת נפתחת נדלקת הנורה הפנימית המתאימה. נשמע רעש כשהמדחס מתחיל לפעול .הנוזלים והגזים האטומים במערכת הקירור עשויים גם הם להשמיע רעש גם אם המדחס אינו פועל; זוהי תופעה רגילה. ייתכן שהקצוות הקדמיים של המקרר יהיו חמים למגע. זוהי תופעה רגילה .אזורים אלה נועדו להיות חמים כדי למנוע התעבות. חיבור לחשמל חבר את המקרר לשקע מוארק המוגן על ידי נתיך בעל קיבולת הולמת. חשוב: Bעל החיבור להתבצע בהתאם לתקנות הארציות. Bעל תקע כבל החשמל להיות נגיש בקלות לאחר ההתקנה. Bהמתח והנתיך המותר להגנה על המקרר מצוינים בסעיף "מפרטים טכניים". Bעל המתח המצוין להיות שווה למתח החשמל. Bאין להשתמש בכבלים מאריכים וברבי שקעים לשם חיבור. Bכבל חשמל פגום יוחלף על ידי חשמלאי מוסמך. Bאין להשתמש במכשיר לפני שיתוקן! קיימת סכנת התחשמלות! Bאזהרה מפני מתח חשמלי. השלכת האריזה לאשפה Aחומרי האריזה עלולים להיות מסוכנים לילדים .שמור את חומרי האריזה הרחק מהישג ידם של ילדים או השלך אותם על ידי סיווגם בהתאם להוראות בדבר פסולת .אין להשליך אותם ביחד עם פסולת ביתית רגילה. אריזת המקרר עשויה מחומרים מתמחזרים. השלכת המקרר הישן לאשפה Aאם דלת הכניסה לחדר המיועד להתקנת המקרר אינה רחבה במידה מספקת למעבר המקרר ,פנה לנציג השירות המורשה כדי להסיר את דלתות המקרר ולהעביר את המקרר מהצד דרך הדלת .1הצב את המקרר במקום נוח לשימוש. .2הרחק את המקרר ממקורות חום ,מקומות חמים ומקומות החשופים לשמש ישירה. .3חייבת להיות זרימת אוויר מספקת סביב המקרר כדי שהמקרר יפעל ביעילות. אם המקרר אינו מוצב בגומחה בקיר ,יש לשמור על מרחק של 5ס"מ לפחות מהתקרה ו 5-ס"מ לפחות מהקיר. אם על הרצפה פרוס שטיח ,על המקרר להיות מוגבה מהרצפה ב 2.5-ס"מ. .4הצב את המקרר על משטח רצפה מאוזן כדי למנוע זעזועים. .5אין להציב את המקרר בחדר שבו הטמפרטורה נמוכה מ 10-מעלות צלזיוס. כוונון ייצוב ביחס לרצפה השלך את המקרר הישן שלך מבלי לגרום נזק כלשהו לסביבה. Aתוכל להיוועץ בסוכן המורשה שלך או לפנות למרכז לאיסוף אשפה בעירייה לגבי השלכת המקרר שלך לאשפה.. Aלפני השלכת המקרר לאשפה ,הוצא את התקע משקע החשמל; אם קיימות נעילות כלשהן בדלת ,נטרל אותן כדי להגן על ילדים מפני סכנה כלשהי. הצבה והתקנה Aזהירות :אין לחבר את המקרר לשקע החשמל במהלך ההתקנה .בפעולה זו קיימת סכנת חיים והיא עלולה לגרום לפציעה קשה. HE 8 Aאם המקרר אינו מיוצב; .1יש להסיר את מכסה המאוורר על ידי שחרור הברגים כפי שמודגם באיור לפני ביצוע הפעולה .ניתן לייצב אותו על ידי סיבוב הרגליות הקדמיות שלו כפי שמודגם באיור. הפינה שבה נמצאת הרגלית מונמכת כאשר מסובבים אותה בכיוון החץ השחור ומוגבהת כאשר מסובבים אותה בכיוון ההפוך .לשם כך ,בקש ממישהו שיעזור לך להרים מעט את המקרר. .2לאחר שהושג האיזון ,החזר את מכסה המאוורר למקומו והדק את הברגים. Cניתן לכוונן את הרווח בין דלתות תא הקירור כפי שמודגם באיורים. בעת כוונון גובה הדלת ,על מדפי הדלת להיות ריקים. D C B A .3הסר את הברגים המהדקים את החלק התחתון של מכסה המאוורר בעזרת מברג פיליפס. Cהסר בעזרת מברג את הבורג של מכסה הציר העליון של הדלת שברצונך לכוונן. כוונון הרווח בין הדלתות העליונות HE 9 Cכוונן את הדלת בצורה נכונה כרצונך על ידי שחרור קל של הברגים. Cקבע את הדלת שכווננת על ידי הידוק הברגים בלי לשנות את מיקום הדלת. בורג י מרכזי Cהחזר את מכסה הציר למקומו וקבע אותו בעזרת הבורג. HE 10 4 הכנה Cיש להתקין את המקרר במרחק של לפחות 30ס»מ ממקור חום ,כמו כיריים ,תנורים, חימום מרכזי ושל לפחות 5ס»מ מתנורים חשמליים .כמו כן ,אין להציבו כשהוא חשוף לשמש ישירה. Cיטמפרטורת החדר שבו יותקן המקרר חייבת להיות לפחות 10מעלות צלזיוס .לא מומלץ להפעיל את המקרר בטמפרטורה נמוכה יותר ,שכן יעילות פעולתו עלולה להיפגע. Cיודא שפנים המקרר נוקה ביסודיות. Cיאם מתקינים שני מקררים זה לצד זה, יש להקפיד על מרחק של לפחות 2ס»מ ביניהם. Cיבעת הפעלת המקרר בפעם הראשונה ,יש לציית להוראות הבאות במהלך שש השעות הראשונות. אין לפתוח את הדלת לעתים קרובות. המקרר חייב לפעול ריק ללא כל מזוןבתוכו. אין לנתק את המקרר מהחשמל .אם אירעהתקלה בחשמל שאינה בשליטתך ,קרא את האזהרות בסעיף «פתרונות מומלצים לבעיות». Cייש לשמור את האריזה המקורית ואת חומר הריפוד לשימוש עתידי במקרה של הובלה או מעבר דירה. HE 11 5אופן השימוש במקרר לוח מחוונים לוח מחוונים זה עם לחצני מגע מאפשר לקבוע את הטמפרטורה מבלי לפתוח את דלת המקרר .רק גע באצבע בלחצן הרלוונטי כדי לקבוע את הטמפרטורה. 4 7 10 8 17 16 1 5 2 15 3 6 13 12 11 14 9 .1לחצן הגדרת הטמפרטורה בתא הקירור .2לחצן חיסכון נוסף .3לחצן הגדרת הטמפרטורה בתא ההקפאה .4לחצן קירור מהיר .5לחצן חופשה .6לחצן הקפאה מהירה .7מחוון הטמפרטורה בתא הקירור .8מחוון פונקציית החיסכון הנוסף .9מחוון טמפרטורת תא ההקפאה .10מחוון פונקציית הקירור המהיר .11מחוון פונקציית החופשה .12מחוון פונקציית ההקפאה המהירהr .13מחוון מצב חיסכוןr .14מחוון מצב שגיאה .15מחוון נעילת מקשים I.16נורית המחוון המיינן .17מחוון הלחות Cהאיורים המופיעים במדריך הוראות זה הם איורים כלליים וייתכן שלא יתאימו בדיוק למוצר שברשותך .אם החלקים המוצגים במדריך אינם כלולים במוצר שרכשת ,הם בוודאי תקפים לדגמים אחרים. HE 12 - 1לחצן הגדרת הטמפרטורה בתא הקירור לחץ על לחצן זה כדי להגדיר את טמפרטורת תא הקירור ל 4 ,6 ,8-ו ...8 ,2בהתאמה .לחץ על לחצן זה כדי לקבוע את הטמפרטורה הרצויה בתא הקירור. - 2לחצן חיסכון נוסף לחץ על לחצן זה במהירות כדי להפעיל את פונקציית החיסכון הנוסף. - 3לחצן הגדרת הטמפרטורה בתא ההקפאה לחץ על לחצן זה כדי להגדיר את טמפרטורת תא ההקפאה ל -22 ,-20 ,--18ו ...-18 ,24-בהתאמה .לחץ על לחצן זה כדי לקבוע את הטמפרטורה הרצויה בתא ההקפאה. - 4לחצן קירור מהיר לחץ על לחצן זה במהירות כדי להפעיל את פונקציית הקירור המהיר .לחץ על לחצן זה שוב כדי לבטל את הפעלת הפונקציה שנבחרה. - 5לחצן חופשה לחץ על לחצן זה במהירות כדי להפעיל את פונקציית החופשה .לעצירת תהליך יצירת הקרח ,יש ללחוץ על אותו לחצן במשך 3שניות. - 6לחצן הקפאה מהירה לחץ על לחצן זה במהירות כדי להפעיל את פונקציית ההקפאה המהירה .לחץ על לחצן זה שוב כדי לבטל את הפעלת הפונקציה שנבחרה. - 7מחוון הטמפרטורה בתא הקירור מציין את הטמפרטורה שנקבעה לתא הקירור. - 8מחוון פונקציית החיסכון הנוסף מציין שפונקציית החיסכון הנוסף פעילה .אם פונקציה זו פעילה ,המקרר יאתר אוטומטית את פרקי הזמן שבו נעשה שימוש מזערי במקרר ובאותם פרקי זמן יבוצע קירור יעיל בצריכת החשמל .מחוון חיסכון יהיה פעיל בעת ביצוע קירור יעיל בצריכת חשמל. - 9מחוון טמפרטורת תא ההקפאה הוא מציין את הטמפרטורה שנקבעה לתא ההקפאה. - 10מחוון פונקציית הקירור המהיר מציין שפונקציית הקירור המהיר פעילה .השתמש בפונקציה זו בעת הנחת מזון טרי בתא הקירור או כאשר אתה צריך לקרר את האוכל שלך במהירות .כאשר פונקציה זו פעילה, המקרר יפעל במשך 2שעות ללא הפסקה. לחץ על הלחצן הרלוונטי שוב כדי לבטל את הפונקציה הזאת. - 11מחוון פונקציית החופשה מציין שפונקציית החופשה פעילה .אם פונקציה זו פעילה, הכיתוב " "- -יופיע במחוון תא הקירור ולא יבוצע קירור בתא הקירור .התאים האחרים יקוררו בהתאם לטמפרטורה שנקבעה עבורם. HE לחץ על הלחצן הרלוונטי שוב כדי לבטל את הפונקציה הזאת. - 12מחוון פונקציית ההקפאה המהירה מציין שפונקציית ההקפאה המהירה פעילה .השתמש בפונקציה זו בעת הנחת מזון טרי בתא ההקפאה או כאשר אתה צריך קרח .כאשר פונקציה זו פעילה ,המקרר יפעל במשך 6שעות ללא הפסקה. לחץ על הלחצן הרלוונטי שוב כדי לבטל את הפונקציה הזאת. - 13מחוון מצב חיסכון מציין שהמקרר פועל במצב של יעילות בצריכת החשמל. מחוון זה יהיה פעיל אם טמפרטורת תא ההקפאה נקבעה ל 18--או שמבוצע קירור יעיל מבחינת צריכת החשמל בזכות פונקציית החיסכון הנוסף. - 14מחוון מצב שגיאה אם המקרר אינו מקרר במידה מספקת או קיימת תקלה בחיישן ,מחוון זה יופעל .כאשר מחוון זה פעיל ,במחוון טמפרטורת תא ההקפאה תוצג האות " "Eובמחוון טמפרטורת תא הקירור יוצגו מספרים כמו "."…1,2,3 מספרים אלה במחוון מספקים מידע על השגיאה לאנשי השירות. - 15מחוון נעילת מקשים השתמש בפונקציה זו אם אינך רוצה שהגדרת טמפרטורת המקרר תשונה .לחץ בו זמנית על לחצן החיסכון הנוסף ועל לחצן הגדרת הטמפרטורה של תא ההקפאה במשך פרק זמן ממושך ( 3שניות) כדי להפעיל תכונה זו. לחץ על הלחצנים הרלוונטיים שוב כדי לבטל את הפונקציה הזאת. - 16נורית המחוון המיינן נורית המחוון דלוקה ברציפות .נורית זו מציינת כי המקרר מוגן מפני חיידקים. - 17מחוון הלחות נורית המחוון דלוקה ברציפות .נורית זו מציינת כי המזון המוחזק במקרר נשמר במשך פרק זמן ממושך בלחות אידיאלית. התראת דלת פתוחה: אם דלת תא הקירור או דלת תא בקרת הקור נשארות פתוחות במשך דקה אחת לפחות ,יופעל ויישמע צליל התראת דלת פתוחה .לחץ על לחצן כלשהו במחוון או סגור את הדלת הפתוחה כדי להשתיק את צליל ההתראה. 13 לוח מחוונים לוח מחוונים זה עם לחצני מגע מאפשר לקבוע את הטמפרטורה מבלי לפתוח את דלת המקרר .רק גע באצבע בלחצן הרלוונטי כדי לקבוע את הטמפרטורה. *אופציונאלי 10 4 16 7 8 17 1 21 5 2 19 15 6 3 18 11 13 12 9 14 20 .12מחוון פונקציית הקפאה מהירה .13מחוון מצב חיסכון .14מחוון סטאטוס שגיאה .15מחוון נעילת מקשים .16נורית המחוון המיינן .17מחוון הלחות .18מחוון כיבוי מכשיר להכנת קרח .19הפעלה/כיבוי של המכשיר להכנת קרח לחצן .20מחוון התראה להחלפת מסנן .21לחצן איפוס מצב מסנן .1לחצן הגדרת הטמפרטורה בתא הקירור .2לחצן חיסכון נוסף .3לחצן הגדרת הטמפרטורה של תא ההקפאה .4לחצן קירור מהיר .5לחצן פונקציית חופשה .6לחצן הקפאה מהירה .7מחוון הטמפרטורה בתא הקירור .8מחוון פונקציית חיסכון נוסף .9מחוון טמפרטורת תא ההקפאה .10מחוון פונקציית הקירור המהיר .11מחוון פונקציית חופשה Cהאיורים המופיעים במדריך הוראות זה הם איורים כלליים וייתכן שלא יתאימו בדיוק למוצר שברשותך .אם החלקים המוצגים במדריך אינם כלולים במוצר שרכשת ,הם בוודאי תקפים לדגמים אחרים. HE 14 - 1לחצן הגדרת הטמפרטורה בתא הקירור לחץ על לחצן זה כדי להגדיר את טמפרטורת תא הקירור ל 4 ,6 ,8-ו ...8 ,2בהתאמה ..לחץ על לחצן זה כדי לקבוע את הטמפרטורה הרצויה בתא הקירור. - 2לחצן חיסכון נוסף לחץ על לחצן זה במהירות כדי להפעיל את פונקציית החיסכון הנוסף. - 3לחצן הגדרת הטמפרטורה בתא ההקפאה לחץ על לחצן זה כדי להגדיר את טמפרטורת תא ההקפאה ל -22 ,-20 ,--18ו ...-18 ,24-בהתאמה .לחץ על לחצן זה כדי לקבוע את הטמפרטורה הרצויה בתא ההקפאה. - 4לחצן קירור מהיר לחץ על לחצן זה במהירות כדי להפעיל את פונקציית הקירור המהיר .לחץ על לחצן זה שוב כדי לבטל את הפעלת הפונקציה שנבחרה. - 5לחצן חופשה לחץ על לחצן זה במהירות כדי להפעיל את פונקציית החופשה .לעצירת תהליך יצירת הקרח ,יש ללחוץ על אותו לחצן במשך 3שניות. - 6לחצן הקפאה מהירה לחץ על לחצן זה במהירות כדי להפעיל את פונקציית ההקפאה המהירה .לחץ על לחצן זה שוב כדי לבטל את הפעלת הפונקציה שנבחרה. - 7מחוון הטמפרטורה בתא הקירור מציין את הטמפרטורה שנקבעה לתא הקירור. - 8מחוון פונקציית החיסכון הנוסף מציין שפונקציית החיסכון הנוסף פעילה .אם פונקציה זו פעילה ,המקרר יאתר אוטומטית את פרקי הזמן שבו נעשה שימוש מזערי במקרר ובאותם פרקי זמן יבוצע קירור יעיל בצריכת החשמל .מחוון חיסכון יהיה פעיל בעת ביצוע קירור יעיל בצריכת חשמל. - 9מחוון טמפרטורת תא ההקפאה הוא מציין את הטמפרטורה שנקבעה לתא ההקפאה. - 10מחוון פונקציית הקירור המהיר מציין שפונקציית הקירור המהיר פעילה .השתמש בפונקציה זו בעת הנחת מזון טרי בתא הקירור או כאשר אתה צריך לקרר את האוכל שלך במהירות .כאשר פונקציה זו פעילה, המקרר יפעל במשך 2שעות ללא הפסקה. לחץ על הלחצן הרלוונטי שוב כדי לבטל את הפונקציה הזאת. HE - 11מחוון פונקציית החופשה מציין שפונקציית החופשה פעילה .אם פונקציה זו פעילה, הכיתוב “ “- -יופיע במחוון תא הקירור ולא יבוצע קירור בתא הקירור .התאים האחרים יקוררו בהתאם לטמפרטורה שנקבעה עבורם. לחץ על הלחצן הרלוונטי שוב כדי לבטל את הפונקציה הזאת. - 12מחוון פונקציית ההקפאה המהירה מציין שפונקציית ההקפאה המהירה פעילה .השתמש בפונקציה זו בעת הנחת מזון טרי בתא ההקפאה או כאשר אתה צריך קרח .כאשר פונקציה זו פעילה ,המקרר יפעל במשך 6שעות ללא הפסקה. לחץ על הלחצן הרלוונטי שוב כדי לבטל את הפונקציה הזאת. - 13מחוון מצב חיסכון מציין שהמקרר פועל במצב של יעילות בצריכת החשמל. מחוון זה יהיה פעיל אם טמפרטורת תא ההקפאה נקבעה ל 18--או שמבוצע קירור יעיל מבחינת צריכת החשמל בזכות פונקציית החיסכון הנוסף. - 14מחוון מצב שגיאה אם המקרר אינו מקרר במידה מספקת או קיימת תקלה בחיישן ,מחוון זה יופעל .כאשר מחוון זה פעיל ,במחוון טמפרטורת תא ההקפאה תוצג האות " "Eובמחוון טמפרטורת תא הקירור יוצגו מספרים כמו "."…1,2,3 מספרים אלה במחוון מספקים מידע על השגיאה לאנשי השירות. - 15מחוון נעילת מקשים השתמש בפונקציה זו אם אינך רוצה שהגדרת טמפרטורת המקרר תשונה .לחץ בו זמנית על לחצן החיסכון הנוסף ועל לחצן הגדרת הטמפרטורה של תא ההקפאה במשך פרק זמן ממושך ( 3שניות) כדי להפעיל תכונה זו. לחץ על הלחצנים הרלוונטיים שוב כדי לבטל את הפונקציה הזאת. - 16נורית המחוון המיינן נורית המחוון דלוקה ברציפות .נורית זו מציינת כי המקרר מוגן מפני חיידקים. - 17מחוון הלחות נורית המחוון דלוקה ברציפות .נורית זו מציינת כי המזון המוחזק במקרר נשמר במשך פרק זמן ממושך בלחות אידיאלית. - 18מחוון כיבוי מכשיר להכנת קרח אם אינך רוצה לקבל קרח מהמקרר ,עליך להשתמש בפונקציה זו .תוכל להשתמש בפונקציה זו בלחיצה על לחצן הפעלה/כיבוי של המכשיר ליצירת קרח במשך 3שניות. 15 - 19לחצן הפעלה/כיבוי של המכשיר להכנת קרח לעצירת תהליך יצירת הקרח ,יש ללחוץ על לחצן הפעלה/ כיבוי של המכשיר יצירת הקרח במשך 3שניות .כאשר בוחרים בביטול יצירת קרח ,לא יועברו מים לתיבת הקרח. למרות זאת ,ייתכן שיישאר מעט קרח בתיבת הקרח ,אשר ניתן להוציאו משם .להפעלת תהליך יצירת הקרח מחדש, יש ללחוץ על לחצן הפעלה/כיבוי של המכשיר ליצירת הקרח במשך 3שניות. - 20מחוון התראה להחלפת מסנן עם חלוף זמן השימוש במסנן ,מחוון ההתראה להחלפת מסנן מתחיל להאיר. - 21לחצן איפוס מצב מסנן את המסנן במקרר יש להחליף פעם ב 6-חודשים .המקרר מחשב פרק זמן זה אוטומטית ומחוון ההתראה להחלפת המסנן יאיר עם חלוף זמן השימוש במסנן .לחץ על הלחצן איפוס מצב מסנן במשך 3שניות כדי לאפשר למקרר לחשב אוטומטית את זמן המסנן החדש לאחר החלפת המסנן. התראת דלת פתוחה: כאשר דלת תא הקירור נשארת פתוחה במשך דקה אחת, יופעל ויישמע צליל התראת דלת פתוחה .לחץ על לחצן כלשהו במחוון או סגור את הדלת הפתוחה כדי להשתיק את צליל ההתראה. HE 16 מגש ביצים ניתן להתקין את המתקן לאחסון ביצים בדלת הרצויה במדף הרצוי בגוף המקרר. אין להתקין את המתקן לאחסון ביצים בתא ההקפאה. הזזת מדפי גוף המקרר את מדפי גוף המקרר ניתן למשוך על ידי הרמתם מעט מקדימה ולהזיזם קדימה ואחורה .הם מגיעים לנקודת עצירה כאשר מושכים אותם קדימה כדי לאפשר לך להגיע למזון המונח בחלקו האחורי של המדף; כאשר מושכים את המדף לאחר הרמה קלה בנקודת העצירה השנייה ,מדף גוף המקרר ייצא ממקומו. יש להחזיק את המדף היטב גם מתחתיתו כדי למנוע את התהפכותו .מדף גוף המקרר יוצב על המעקות שבצדי גוף המקרר על ידי הנמכתו או הגבהתו ברמה אחת. יש לדחוף את מדף גוף המקרר כלפי חלקו האחורי של המקרר כדי שיתקבע במקומו לחלוטין. תא קירור באפס מעלות תאי הקירור באפס מעלות מאפשרים למזון המיועד להקפאה להיות מוכן להקפאה .תוכל גם להשתמש בתאים אלה לאחסון המזון שלך בטמפרטורה של מספר מעלות מתחת לטמפרטורה של תא הקירור. תוכל להגדיל את הנפח הפנימי של המקרר שלך על ידי הסרת תאי הקירור באפס מעלות .לשם כך ,משוך את התא לעברך; התא יישען על המגופה ויעצור .תא זה ישוחרר אם תרים אותו לגובה של כס"מ אחד ותמשוך אותו לעברך. 1 2 3 4 HE 17 2 1 4 3 6 5 מגירת ירקות מגירת הירקות במקרר נועדה באופן מיוחד לשמור על הירקות טריים מבלי שיאבדו את הלחות שבהם .לשם כך, באופן כללי מתרחשת זרימת אוויר קר סביב מגירת הירקות. לפני הסרת מגירות הירקות ,הסר את מדפי הדלת המיושרים לפי מגירות הירקות .ניתן להסיר את מגירות הירקות כפי שמודגם באיור. 7 HE 18 חלק אמצעי נייד החלק האמצעי הנייד נועד למנוע את בריחת האוויר הקר מתוך המקרר החוצה. - 1מובטח איטום כאשר אוטמי הדלת לוחצים על המשטח של החלק האמצעי הנייד בזמן שדלתות תא הקירור סגורות. - 2סיבה נוספת לכך שהמקרר מצויד בחלק אמצעי נייד היא הגדלת נפח תא הקירור .חלקים אמצעיים רגילים תופסים במקרר נפח שלא ניתן לניצול. - 3החלק האמצעי הנייד סגור אם הדלת השמאלית של תא הקירור סגורה. - 4אין לפתוח אותו ידנית .הוא נע לפי תנועת החלק הפלסטי שבגוף המקרר בזמן שהדלת סגורה. אור כחול מצרכי מזון המאוחסנים במגירת הירקות המוארת באור כחול ממשיכים את תהליך הפוטוסינתזה שלהם בהשפעת אורך הגל של הצבע הכחול ובאמצעותו הם שומרים על טריות ומגדילים את תכולת הוויטמינים שלהם. HE 19 מגירה טלסקופית הקפד לא לדחוף איברי גוף כלשהם ,כמו ידיים ,רגליים וכדומה בין החלקים הניידים בזמן שהמגירה נמצאת בשימוש ,כדי למנוע פציעות. לצורך ניקוי ,ניתן להסיר את החוצץ מהמגירה ,כפי שמודגם באיור. ניתן להסיר את המגירות לצורכי ניקוי בלבד .כשהמגירות מחוץ למקרר ,אין אפשרות לשים אותן יחד במקומן לאחר מילויין במזון. HE 20 6תחזוקה וניקוי A B B C C B B C A אין להשתמש בבנזין ,בבנזן או בחומרים דומים למטרות ניקוי. מומלץ לנתק את המקרר מהחשמל לפני הניקוי. אין להשתמש במכשירים חדים או בחומרי ניקוי הגורמים לשריטות ,בסבון ,בתכשירי ניקוי לבית ,בחומרי ניקוי שונים ובחומרי הברקה עם שעווה. השתמש במים פושרים לניקוי החלק החיצוני של המקרר ונגב אותו. השתמש במטלית לחה וסחוטה ,שנטבלה בתמיסת סודה לשתייה ביחס של כפית אחת של סודה לכחצי ליטר מים, כדי לנקות את החלק הפנימי של המכשיר ולנגבו. ודא שלא חודרים מים לתושבת הנורה ולפריטים חשמליים אחרים. אם אין כוונה להשתמש במכשיר לתקופה ארוכה ,כבה אותו ,הסר ממנו את כל המזון ,נקה אותו והשאר את הדלת פתוחה במקצת. בדוק בקביעות את אטמי הדלת כדי לוודא שהם נקיים ושלא נדבקו אליהם חלקיקי מזון. להסרת מגש מהדלת ,רוקן את תכולתו ודחוף את מגש הדלת כלפי מעלה מבסיסו. הגנה על משטחי פלסטיק Cאין להניח במקרר שמן נוזלי או ארוחות שבושלו בשמן במיכלים בלתי אטומים ,מכיוון שהם עלולים לגרום נזק למשטחי הפלסטיק שבמקרר .אם נשפך או נמרח שמן על משטחי הפלסטיק ,נקה ושטוף מייד את החלק המתאים של המשטח במים חמים. HE 21 7פתרונות מומלצים לבעיות שנן רשימה זו לפני שתקרא לנציג שירות .היא עשויה לחסוך לך זמן וכסף .רשימה זו כוללת תלונות נפוצות שאינן נובעות מפגמים בייצור המקרר או משימוש לקוי בחומרים .ייתכן שכמה מהתכונות המתוארות כאן לא יהיו קיימות במוצר שלך. המקרר אינו פועל. • האם המקרר מחובר לחשמל כראוי? הכנס את התקע לשקע החשמל. • האם הנתיך של השקע שאליו מחובר המקרר או הנתיך הראשי נשרפו? בדוק את הנתיך. התעבות בדופן הצדית של תא הקירור (אזור רב-תכליתי ,בקרת קור ואזור גמיש). • תנאי סביבה קרים מאוד .פתיחות וסגירות תכופות של הדלת .לחות גבוהה בסביבת החדר .אחסון מזון המכיל נוזלים במכלים פתוחים .השארת הדלת פתוחה במקצת .כיוון התרמוסטט לדרגה קרה יותר. • קיצור הזמן שבו הדלת תישאר פתוחה או שימוש בדלת לעתים רחוקות יותר. • כיסוי המזון המאוחסן במכלים הפתוחים בחומר מתאים. • נגב את הלחות המתעבה בעזרת מטלית לחה ובדוק התופעה נמשכת. המדחס אינו פועל • מערכת ההגנה התרמית של המדחס תכבה במהלך תקלות פתאומיות בחשמל או כאשר מוציאים את שקע החשמל ומכניסים אותו חזרה למקומו ,מאחר שלחץ חומרי הקירור במערכת הקירור של המקרר לא הספיקו להתאזן .המקרר יתחיל לפעול כעבור כ 6-דקות .אם המקרר אינו מתחיל לפעול עם תום פרק זמן זה ,קרא לנציג שירות. • המקרר נמצא במצב הפשרה .תופעה זו היא רגילה במקרר בעל יכולת הפשרה אוטומטית מלאה .מצב ההפשרה מתרחש מפעם לפעם. • המקרר אינו מחובר לחשמל .ודא שהתקע הוכנס כראוי לשקע. • האם התבצעו כוונוני הטמפרטורה בצורה נכונה? • ייתכן שיש הפסקת חשמל. HE 22 המקרר פועל לעתים תכופות או לפרק זמן ממושך. • ייתכן שהמקרר החדש רחב יותר מהמקרר הקודם .זוהי תופעה רגילה .מקררים גדולים פועלים במשך תקופה ארוכה יותר. • טמפרטורת החדר עלולה להיות גבוהה .זוהי תופעה רגילה. • ייתכן שהמקרר חובר לאחרונה לחשמל או שהועמס בו מזון .קירור המקרר לחלוטין עשוי להימשך כשעתיים. • ייתכן שהונחו לאחרונה במקרר כמויות גדולות של מזון חם .מזון חם גורם להתארכות פעולת המקרר עד שהוא מגיע לטמפרטורת האחסון הבטוחה. • ייתכן שהדלתות נפתחות לעתים תכופות או שנשארו פתוחות מעט משך זמן רב .האוויר החם שנכנס למקרר גורם למקרר לפעול פרקי זמן ממושכים יותר .פתח את הדלתות לעתים רחוקות יותר. • ייתכן שדלת תא ההקפאה או דלת תא הקירור נשארו פתוחות מעט .בדוק אם הדלתות סגורות הרמטית. • המקרר מכוונן לדרגת קור נמוכה מאוד .כוונן את טמפרטורת המקרר לדרגה גבוהה יותר והמתן עד שתושג הטמפרטורה הרצויה. • ייתכן שאטם דלת המקרר או דלת המקפיא מלוכלך ,שחוק ,קרוע או שזז ממקומו .נקה או החלף את האטם .אטם פגום/ שבור גורם למקרר לפעול זמן ממושך יותר כדי לשמור על הטמפרטורה הנוכחית. טמפרטורת המקפיא נמוכה מאוד ואילו טמפרטורת המקרר מספקת. • טמפרטורת המקפיא מכווננת לדרגת קור נמוכה מאוד .כוונן את טמפרטורת המקפיא לרמה גבוהה יותר ובדוק. טמפרטורת המקרר נמוכה מאוד ואילו טמפרטורת המקפיא מספקת. • ייתכן שטמפרטורת המקרר מכווננת לדרגת קור נמוכה מאוד .כוונן את טמפרטורת המקרר לרמה גבוהה יותר ובדוק. המזון המאחוסן במגירות תא הקירור קופא. • ייתכן שטמפרטורת המקרר מכווננת לדרגת קור נמוכה מאוד .כוונן את טמפרטורת המקרר לרמה גבוהה יותר ובדוק. הטמפרטורה במקרר או במקפיא גבוהה מאוד. • ייתכן שטמפרטורת המקרר מכווננת לדרגת קור גבוהה מאוד .כוונון המקרר משפיע על טמפרטורת המקפיא .שנה את טמפרטורת המקרר או המקפיא עד שהיא תגיע לדרגה מספקת. • ייתכן שהדלתות נפתחות לעתים תכופות או שנשארו פתוחות מעט משך זמן רב .אל תפתח אותן לעתים קרובות. • ייתכן שהדלת נשארה פתוחה מעט; סגור אותה לחלוטין. • ייתכן שהונחה לאחרונה במקרר כמות גדולה של מזון חם .המתן עד שמהקרר או המקפיא יגיעו לטמפרטורה הרצויה. • ייתכן שהמקרר חובר לאחרונה לחשמל .קירור המקרר לחלוטין נמשך לאורך זמן. רעש פעולת המקרר מוגבר כאשר המקרר פועל. • ביצועי הפעלת המקרר עשויים להשתנות עקב השינויים בטמפרטורת הסביבה .זוהי תופעה רגילה; אין כאן תקלה. HE 23 רטט או רעש • הרצפה אינה ישרה או שהיא חלשה .המקרר מתנענע כאשר מזיזים אותו לאט .ודא שהרצפה חזקה במידה מספקת המסוגלת לשאת את משקל המקרר; כמו כן ,ודא שהיא ישרה. • ייתכן שמקור הרעש הוא בפריטים המונחים על המקרר .יש להסיר חפצים המונחים על גג המקרר. נשמעים רעשים ,המגיעים מתוך המקרר ,הדומים לשפיכת נוזלים או התזתם. • זרימת נוזלים וגז מתרחשת בהתאם לעקרונות ההפעלה של המקרר .זוהי תופעה רגילה; אין כאן תקלה. נשמע רעש הדומה למשב רוח. • משתמשים במאווררים כדי לאפשר למקרר להתקרר .זוהי תופעה רגילה; אין כאן תקלה. התעבות בדפנות הפנימיות של המקרר. • מזג אוויר חם ולח מגביר את הצטברות הקרח ואת ההתעבות .זוהי תופעה רגילה; אין כאן תקלה. • ייתכן שהדלתות נשארו פתוחות מעט; ודא שהדלתות סגורות לחלוטין. • ייתכן שהדלתות נפתחות לעתים תכופות או שנשארו פתוחות מעט משך זמן רב .אל תפתח אותן לעתים קרובות. לחות מצטברת בחלקו החיצוני של המקרר או בין הדלתות. • ייתכן שקיימת לחות באוויר; זוהי תופעה די רגילה במזג אוויר לח .כאשר הלחות יורדת ההתעבות נעלמת. ריח רע במקרר. • יש לנקות את המקרר מבפנים .נקה את פנים המקרר בספוגית ,מים פושרים או מי סודה. • ייתכן שחלק מהמכלים או מחומרי האריזה גורמים לריח .השתמש במכל אחר או בחומרי אריזה של יצרן אחר. הדלת אינה נסגרת. • אריזות המזון עלולות למנוע את סגירת הדלת .שנה את מקומן של האריזות שמפריעות לסגור את הדלת. • המקרר אינו ניצב על הרצפה בצורה אנכית לגמרי והוא מתנענע בכל פעם שמזיזים אותו מעט .כוונן את בורגי ההגבהה. • הרצפה אינה ישרה או חזקה .ודא שהרצפה ישרה ומסוגלת לשאת את משקל המקרר. המגירות לירקות נתקעות. • ייתכן שהמזון נוגע בתקרת המגירה .ארגן מחדש את המזון במגירה. HE 24 25 HE 48 9376 0000/AC EN-HE