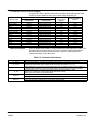
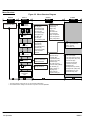
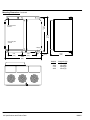
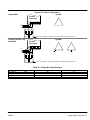
1
Digital Soft–Start Installation & Operating Manual 5/03 MN850 Table of Contents Section 1 General Information . . . . . . . . . . . . . . . . . . . . . . . . . . . . . . . . . . . . . . . . . . . . . . . . . . . . . . . . . . . . . . . . . . . . . . . . . . . . . . Introduction . . . . . . . . . . . . . . . . . . . . . . . . . . . . . . . . . . . . . . . . . . . . . . . . . . . . . . . . . . . . . . . . . . . . . . . . . . . . . . . . . . Limited Warranty . . . . . . . . . . . . . . . . . . . . . . . . . . . . . . . . . . . . . . . . . . . . . . . . . . . . . . . . . . . . . . . . . . . . . . . . . . . . . . Safety Notice . . . . . . . . . . . . . . . . . . . . . . . . . . . . . . . . . . . . . . . . . . . . . . . . . . . . . . . . . . . . . . . . . . . . . . . . . . . . . . . . . Section 2 Installation . . . . . . . . . . . . . . . . . . . . . . . . . . . . . . . . . . . . . . . . . . . . . . . . . . . . . . . . . . . . . . . . . . . . . . . . . . . . . . . . . . . . . . . Receiving, Inspection and Storage . . . . . . . . . . . . . . . . . . . . . . . . . . . . . . . . . . . . . . . . . . . . . . . . . . . . . . . . . . . . . . . Physical Location . . . . . . . . . . . . . . . . . . . . . . . . . . . . . . . . . . . . . . . . . . . . . . . . . . . . . . . . . . . . . . . . . . . . . . . . . . . . . Cover Removal . . . . . . . . . . . . . . . . . . . . . . . . . . . . . . . . . . . . . . . . . . . . . . . . . . . . . . . . . . . . . . . . . . . . . . . . . . . . . . . Remote Keypad Installation . . . . . . . . . . . . . . . . . . . . . . . . . . . . . . . . . . . . . . . . . . . . . . . . . . . . . . . . . . . . . . . . Optional Remote Keypad Installation . . . . . . . . . . . . . . . . . . . . . . . . . . . . . . . . . . . . . . . . . . . . . . . . . . . . . . . . AC Main Circuit . . . . . . . . . . . . . . . . . . . . . . . . . . . . . . . . . . . . . . . . . . . . . . . . . . . . . . . . . . . . . . . . . . . . . . . . . . . . . . . Power Disconnect . . . . . . . . . . . . . . . . . . . . . . . . . . . . . . . . . . . . . . . . . . . . . . . . . . . . . . . . . . . . . . . . . . . . . . . . . Protective Devices . . . . . . . . . . . . . . . . . . . . . . . . . . . . . . . . . . . . . . . . . . . . . . . . . . . . . . . . . . . . . . . . . . . . . . . . UL Required Fuses for Short Circuit Rating . . . . . . . . . . . . . . . . . . . . . . . . . . . . . . . . . . . . . . . . . . . . . . . . . . . Main Input Contactor . . . . . . . . . . . . . . . . . . . . . . . . . . . . . . . . . . . . . . . . . . . . . . . . . . . . . . . . . . . . . . . . . . . . . . Motor Overload and Thermal Protection . . . . . . . . . . . . . . . . . . . . . . . . . . . . . . . . . . . . . . . . . . . . . . . . . . . . . . . . . . In–Delta Connections . . . . . . . . . . . . . . . . . . . . . . . . . . . . . . . . . . . . . . . . . . . . . . . . . . . . . . . . . . . . . . . . . . . . . . Fan Connections . . . . . . . . . . . . . . . . . . . . . . . . . . . . . . . . . . . . . . . . . . . . . . . . . . . . . . . . . . . . . . . . . . . . . . . . . . Wire Size and Protection Devices . . . . . . . . . . . . . . . . . . . . . . . . . . . . . . . . . . . . . . . . . . . . . . . . . . . . . . . . . . . . . . . Three Wire Control . . . . . . . . . . . . . . . . . . . . . . . . . . . . . . . . . . . . . . . . . . . . . . . . . . . . . . . . . . . . . . . . . . . . . . . . Two Wire Control . . . . . . . . . . . . . . . . . . . . . . . . . . . . . . . . . . . . . . . . . . . . . . . . . . . . . . . . . . . . . . . . . . . . . . . . . NEMA 12/4 Installation . . . . . . . . . . . . . . . . . . . . . . . . . . . . . . . . . . . . . . . . . . . . . . . . . . . . . . . . . . . . . . . . . . . . Reversing Contactor . . . . . . . . . . . . . . . . . . . . . . . . . . . . . . . . . . . . . . . . . . . . . . . . . . . . . . . . . . . . . . . . . . . . . . Installation . . . . . . . . . . . . . . . . . . . . . . . . . . . . . . . . . . . . . . . . . . . . . . . . . . . . . . . . . . . . . . . . . . . . . . . . . . . . . . . . . . . Section 3 Operation . . . . . . . . . . . . . . . . . . . . . . . . . . . . . . . . . . . . . . . . . . . . . . . . . . . . . . . . . . . . . . . . . . . . . . . . . . . . . . . . . . . . . . . . Overview . . . . . . . . . . . . . . . . . . . . . . . . . . . . . . . . . . . . . . . . . . . . . . . . . . . . . . . . . . . . . . . . . . . . . . . . . . . . . . . . . . . . Start–Up Procedure . . . . . . . . . . . . . . . . . . . . . . . . . . . . . . . . . . . . . . . . . . . . . . . . . . . . . . . . . . . . . . . . . . . . . . . . . . . Keypad Operation . . . . . . . . . . . . . . . . . . . . . . . . . . . . . . . . . . . . . . . . . . . . . . . . . . . . . . . . . . . . . . . . . . . . . . . . . . . . . Operating Modes . . . . . . . . . . . . . . . . . . . . . . . . . . . . . . . . . . . . . . . . . . . . . . . . . . . . . . . . . . . . . . . . . . . . . . . . . . . . . . System Status Mode . . . . . . . . . . . . . . . . . . . . . . . . . . . . . . . . . . . . . . . . . . . . . . . . . . . . . . . . . . . . . . . . . . . . . . Menu Mode . . . . . . . . . . . . . . . . . . . . . . . . . . . . . . . . . . . . . . . . . . . . . . . . . . . . . . . . . . . . . . . . . . . . . . . . . . . . . . Data Entry Mode . . . . . . . . . . . . . . . . . . . . . . . . . . . . . . . . . . . . . . . . . . . . . . . . . . . . . . . . . . . . . . . . . . . . . . . . . . Menu Structure . . . . . . . . . . . . . . . . . . . . . . . . . . . . . . . . . . . . . . . . . . . . . . . . . . . . . . . . . . . . . . . . . . . . . . . . . . . . . . . Menu Navigation Examples . . . . . . . . . . . . . . . . . . . . . . . . . . . . . . . . . . . . . . . . . . . . . . . . . . . . . . . . . . . . . . . . . . . . . Menu Navigation . . . . . . . . . . . . . . . . . . . . . . . . . . . . . . . . . . . . . . . . . . . . . . . . . . . . . . . . . . . . . . . . . . . . . . . . . . Changing the Power–up Settings & Select Keypad Control . . . . . . . . . . . . . . . . . . . . . . . . . . . . . . . . . . . . . . Select Keypad Starting and Keypad Control . . . . . . . . . . . . . . . . . . . . . . . . . . . . . . . . . . . . . . . . . . . . . . . . . . Motor Starting Definitions . . . . . . . . . . . . . . . . . . . . . . . . . . . . . . . . . . . . . . . . . . . . . . . . . . . . . . . . . . . . . . . . . . Keypad Starting and Running the Motor with Factory Settings . . . . . . . . . . . . . . . . . . . . . . . . . . . . . . . . . . . Keypad Starting and Running the Motor in Optimise Mode . . . . . . . . . . . . . . . . . . . . . . . . . . . . . . . . . . . . . . Remote Start and Running the Motor . . . . . . . . . . . . . . . . . . . . . . . . . . . . . . . . . . . . . . . . . . . . . . . . . . . . . . . . Motor Stopping Definitions . . . . . . . . . . . . . . . . . . . . . . . . . . . . . . . . . . . . . . . . . . . . . . . . . . . . . . . . . . . . . . . . . Stopping the Motor . . . . . . . . . . . . . . . . . . . . . . . . . . . . . . . . . . . . . . . . . . . . . . . . . . . . . . . . . . . . . . . . . . . . . . . . MN850 1-1 1-1 1-3 1-4 2-1 2-1 2-1 2-2 2-2 2-3 2-4 2-4 2-4 2-5 2-5 2-6 2-7 2-7 2-8 2-9 2-9 2-10 2-11 2-12 3-1 3-1 3-2 3-2 3-3 3-3 3-3 3-3 3-4 3-5 3-5 3-6 3-6 3-7 3-8 3-9 3-9 3-10 3-10 Table of Contents i Section 4 Parameter Index . . . . . . . . . . . . . . . . . . . . . . . . . . . . . . . . . . . . . . . . . . . . . . . . . . . . . . . . . . . . . . . . . . . . . . . . . . . . . . . . . . Menu Descriptions . . . . . . . . . . . . . . . . . . . . . . . . . . . . . . . . . . . . . . . . . . . . . . . . . . . . . . . . . . . . . . . . . . . . . . . . . . . . Basic Menu . . . . . . . . . . . . . . . . . . . . . . . . . . . . . . . . . . . . . . . . . . . . . . . . . . . . . . . . . . . . . . . . . . . . . . . . . . . . . . Applications Menu . . . . . . . . . . . . . . . . . . . . . . . . . . . . . . . . . . . . . . . . . . . . . . . . . . . . . . . . . . . . . . . . . . . . . . . . Auto Features Menu . . . . . . . . . . . . . . . . . . . . . . . . . . . . . . . . . . . . . . . . . . . . . . . . . . . . . . . . . . . . . . . . . . . . . . . Advanced Menu . . . . . . . . . . . . . . . . . . . . . . . . . . . . . . . . . . . . . . . . . . . . . . . . . . . . . . . . . . . . . . . . . . . . . . . . . . Permanent Store Menu . . . . . . . . . . . . . . . . . . . . . . . . . . . . . . . . . . . . . . . . . . . . . . . . . . . . . . . . . . . . . . . . . . . . Password Menu . . . . . . . . . . . . . . . . . . . . . . . . . . . . . . . . . . . . . . . . . . . . . . . . . . . . . . . . . . . . . . . . . . . . . . . . . . Inputs Menu . . . . . . . . . . . . . . . . . . . . . . . . . . . . . . . . . . . . . . . . . . . . . . . . . . . . . . . . . . . . . . . . . . . . . . . . . . . . . . Outputs Menu . . . . . . . . . . . . . . . . . . . . . . . . . . . . . . . . . . . . . . . . . . . . . . . . . . . . . . . . . . . . . . . . . . . . . . . . . . . . Parameters Menu . . . . . . . . . . . . . . . . . . . . . . . . . . . . . . . . . . . . . . . . . . . . . . . . . . . . . . . . . . . . . . . . . . . . . . . . . Trips Menu . . . . . . . . . . . . . . . . . . . . . . . . . . . . . . . . . . . . . . . . . . . . . . . . . . . . . . . . . . . . . . . . . . . . . . . . . . . . . . . Mapping to an Output Relay . . . . . . . . . . . . . . . . . . . . . . . . . . . . . . . . . . . . . . . . . . . . . . . . . . . . . . . . . . . . . . . . Parameter Descriptions . . . . . . . . . . . . . . . . . . . . . . . . . . . . . . . . . . . . . . . . . . . . . . . . . . . . . . . . . . . . . . . . . . . . . . . . Section 5 Troubleshooting . . . . . . . . . . . . . . . . . . . . . . . . . . . . . . . . . . . . . . . . . . . . . . . . . . . . . . . . . . . . . . . . . . . . . . . . . . . . . . . . . Safety Notice . . . . . . . . . . . . . . . . . . . . . . . . . . . . . . . . . . . . . . . . . . . . . . . . . . . . . . . . . . . . . . . . . . . . . . . . . . . . . . . . . Preliminary Checks . . . . . . . . . . . . . . . . . . . . . . . . . . . . . . . . . . . . . . . . . . . . . . . . . . . . . . . . . . . . . . . . . . . . . . . . . . . . Power Off Checks . . . . . . . . . . . . . . . . . . . . . . . . . . . . . . . . . . . . . . . . . . . . . . . . . . . . . . . . . . . . . . . . . . . . . . . . . Electrical Noise Considerations . . . . . . . . . . . . . . . . . . . . . . . . . . . . . . . . . . . . . . . . . . . . . . . . . . . . . . . . . . . . . . . . . Relay and Contactor Coils . . . . . . . . . . . . . . . . . . . . . . . . . . . . . . . . . . . . . . . . . . . . . . . . . . . . . . . . . . . . . . . . . . Control Enclosures . . . . . . . . . . . . . . . . . . . . . . . . . . . . . . . . . . . . . . . . . . . . . . . . . . . . . . . . . . . . . . . . . . . . . . . . Special Motor Considerations . . . . . . . . . . . . . . . . . . . . . . . . . . . . . . . . . . . . . . . . . . . . . . . . . . . . . . . . . . . . . . . Analog Signals . . . . . . . . . . . . . . . . . . . . . . . . . . . . . . . . . . . . . . . . . . . . . . . . . . . . . . . . . . . . . . . . . . . . . . . . . . . Section 6 Specifications and Product Data . . . . . . . . . . . . . . . . . . . . . . . . . . . . . . . . . . . . . . . . . . . . . . . . . . . . . . . . . . . . . . . . . . . Identification . . . . . . . . . . . . . . . . . . . . . . . . . . . . . . . . . . . . . . . . . . . . . . . . . . . . . . . . . . . . . . . . . . . . . . . . . . . . . . . . . . Three Phase Digital Soft–Start . . . . . . . . . . . . . . . . . . . . . . . . . . . . . . . . . . . . . . . . . . . . . . . . . . . . . . . . . . . . . . Mounting Dimensions . . . . . . . . . . . . . . . . . . . . . . . . . . . . . . . . . . . . . . . . . . . . . . . . . . . . . . . . . . . . . . . . . . . . . . . . . . Size 1 . . . . . . . . . . . . . . . . . . . . . . . . . . . . . . . . . . . . . . . . . . . . . . . . . . . . . . . . . . . . . . . . . . . . . . . . . . . . . . . . . . . Size 2 . . . . . . . . . . . . . . . . . . . . . . . . . . . . . . . . . . . . . . . . . . . . . . . . . . . . . . . . . . . . . . . . . . . . . . . . . . . . . . . . . . . Size 3 . . . . . . . . . . . . . . . . . . . . . . . . . . . . . . . . . . . . . . . . . . . . . . . . . . . . . . . . . . . . . . . . . . . . . . . . . . . . . . . . . . . Size 4 . . . . . . . . . . . . . . . . . . . . . . . . . . . . . . . . . . . . . . . . . . . . . . . . . . . . . . . . . . . . . . . . . . . . . . . . . . . . . . . . . . . Appendix A CE Guidelines . . . . . . . . . . . . . . . . . . . . . . . . . . . . . . . . . . . . . . . . . . . . . . . . . . . . . . . . . . . . . . . . . . . . . . . . . . . . . . . . . . . . Appendix B Parameter Values . . . . . . . . . . . . . . . . . . . . . . . . . . . . . . . . . . . . . . . . . . . . . . . . . . . . . . . . . . . . . . . . . . . . . . . . . . . . . . . . . Appendix C Replacement Parts . . . . . . . . . . . . . . . . . . . . . . . . . . . . . . . . . . . . . . . . . . . . . . . . . . . . . . . . . . . . . . . . . . . . . . . . . . . . . . . Appendix D Voltage Surge Protection . . . . . . . . . . . . . . . . . . . . . . . . . . . . . . . . . . . . . . . . . . . . . . . . . . . . . . . . . . . . . . . . . . . . . . . . . . Appendix E . . . . . . . . . . . . . . . . . . . . . . . . . . . . . . . . . . . . . . . . . . . . . . . . . . . . . . . . . . . . . . . . . . . . . . . . . . . . . . . . . . . . . . Remote Keypad Mounting Template . . . . . . . . . . . . . . . . . . . . . . . . . . . . . . . . . . . . . . . . . . . . . . . . . . . . . . . . . . . . . ii Table of Contents 4-1 4-1 4-1 4-1 4-2 4-3 4-5 4-5 4-5 4-6 4-6 4-6 4-7 4-8 5-1 5-1 5-1 5-1 5-4 5-4 5-4 5-4 5-4 6-1 6-1 6-1 6-4 6-4 6-5 6-6 6-7 A-1 B-1 C-1 D-1 E-1 E-2 MN850 Section 1 General Information Introduction The Baldor digital three phase multipurpose soft–starter provides reduced voltage, three phase motor starting and control over the four periods of motor operation. First, at “Start–up” (soft–start), the motor starting voltage increases from an initial preset level to full motor voltage to provide smooth motor acceleration to full speed. Second, the “Dwell” period begins when maximum motor voltage is achieved. This dwell period allows time for the motor and load to stabilize. The third period is called “Motor run” (sometimes bypass is used during this portion of the cycle). The last period is “Stop” the motor can be stopped gradually by reducing the torque (useful in pump applications). Soft–start and soft–stop control provide an effective means to start and stop material handling equipment and pumping equipment to minimize spillage and water hammer problems. Selectable preset parameters for specific application allows simple programming. Several product features make this digital soft–start control easy to use: S Selectable preset parameter settings for pumps, high inertia loads, conveyors and compressors. S S S S S S S S S Auto features simplify adjustments for optimum starting. Energy savings through real time power factor monitoring. Smooth starts and stops for impact free machine operation. Familiar interface, 32 character LCD Display and Keypad. Simple parameter access through 4 level programming. Quick exit from programming by using the “#” (Exit) button. Operating Current, Voltage and Power Factor displays. Fault indication and Trip Log. Programmable inputs and outputs. Limited Warranty For a period of two (2) years from the date of original purchase, BALDOR will repair or replace without charge controls and accessories which our examination proves to be defective in material or workmanship. This warranty is valid if the unit has not been tampered with by unauthorized persons, misused, abused, or improperly installed and has been used in accordance with the instructions and/or ratings supplied. This warranty is in lieu of any other warranty or guarantee expressed or implied. BALDOR shall not be held responsible for any expense (including installation and removal), inconvenience, or consequential damage, including injury to any person or property caused by items of our manufacture or sale. (Some states do not allow exclusion or limitation of incidental or consequential damages, so the above exclusion may not apply.) In any event, BALDOR’s total liability, under all circumstances, shall not exceed the full purchase price of the control. Claims for purchase price refunds, repairs, or replacements must be referred to BALDOR with all pertinent data as to the defect, the date purchased, the task performed by the control, and the problem encountered. No liability is assumed for expendable items such as fuses. Goods may be returned only with written notification including a BALDOR Return Authorization Number and any return shipments must be prepaid. MN850 General Information 1-1 Safety Notice This equipment contains voltages that may be as high as 600 volts! Electrical shock can cause serious or fatal injury. Only qualified personnel should attempt the start-up procedure or troubleshoot this equipment. This equipment may be connected to other machines that have rotating parts or parts that are driven by this equipment. Improper use can cause serious or fatal injury. Only qualified personnel should attempt the start-up procedure or troubleshoot this equipment. PRECAUTIONS WARNING: Do not touch any circuit board, power device or electrical connection before you first ensure that power has been disconnected and there is no high voltage present from this equipment or other equipment to which it is connected. Electrical shock can cause serious or fatal injury. WARNING: Be sure that you are completely familiar with the safe operation of this equipment. This equipment may be connected to other machines that have rotating parts or parts that are controlled by this equipment. Improper use can cause serious or fatal injury. Only qualified personnel should attempt the start-up procedure or troubleshoot this equipment. WARNING: Be sure the system is properly grounded before applying power. Do not apply AC power before you ensure that all grounding instructions have been followed. Electrical shock can cause serious or fatal injury. Caution: Install MOV protection for the control. See Appendix D for information. Caution: Do not remove keypad cable with power applied to unit. Disconnecting the keypad cable with power applied will damage the control. Caution: Shearpin trip feature is not equivalent to short circuit overcurrent protection required by NEC. Instantaneous overcurrent protection must be provided by circuit interrupting device (fuse or breaker). Caution: Suitable for use on a circuit capable of delivering not more than the RMS symmetrical short circuit amperes listed here at rated voltage (with fuses specified in Section 2). Rated Amperes RMS Symmetrical Amperes 9–59 5,000 72–242 10,000 300–500 18,000 600–750 30,000 900–1200 42,000 Caution: Do not “Megger” test the motor while it is connected to the soft–start control. Failure to disconnect motor will result in extensive damage to the control. The control is tested at the factory for high voltage / leakage resistance as part of Underwriter Laboratory requirements. Do not megger any part of the control. Caution: Do not connect power factor correction capacitors to motor terminals. If power factor correction capacitors are necessary, contact Baldor. Caution: If a brake motor is used, the initial starting voltage may not be sufficient to release the brake. It may be necessary to provide separate power for the brake release coil. Caution: Do not connect AC incoming line power to the Motor terminals T1, T2 and T3. Connecting AC power to these terminals may result in damage to the control. 1-2 General Information MN850 Section 2 Installation Receiving, Inspection and Storage When you receive your control, there are several things you should do immediately. 1. Observe the condition of the shipping container and report any damage immediately to the commercial carrier that delivered your control. 2. Remove the control from the carton. Inspect for shipping damage and report any damage immediately to your commercial carrier. 3. Verify that the part number of the control you received is the same as the part number listed on your purchase order. 4. If the control is to be stored for several weeks before use, be sure that it is stored in a location that is clean, dry and free from corrosives and contaminants. Storage temperature range is –25°C to 55°C. Be sure to read an become familiar with the safety notices in Section 1 of this manual. Failure to observe the product safety notices can result in injury or equipment damage. If you have questions, please contact your Baldor distributor. Do not proceed unless you understand the installation and operation requirements and safety notices. Physical Location The location of the soft–start control is important. It should be installed in an area that is protected from direct sunlight, corrosives, harmful gases or liquids, dust, metallic particles, and vibration. Exposure to these elements can reduce the operating life and degrade performance of the control. Several other factors should be carefully evaluated when selecting a location for installation: 1. For effective cooling and maintenance, the control should be mounted vertically on a flat, smooth, non-flammable vertical surface. Heat dissipation of 3.3 watts per running FLA of the motor must be provided. All factory supplied enclosures provided adequate heat dissipation with ambient temperatures to 40°C. 2. If the control is mounted in an enclosure, sufficient air flow must be provided (see Table 2-1). The fan or blower must be rated for at least 0.8 cubic feet of 30°C air per minute for each ampere of motor FLA rating. Table 2-1 Air Flow Clearance Requirements Soft–Start Size 1 2 3 3. 4. 5. 6. 7. 8. 9. MN850 Front inches (mm) 1 (25) 1 (25) 1 (25) Top & Bottom inches (mm) 3 (75) 3 (75) 8 (200) Sides inches (mm) 0.6 (15) 0.6 (15) 3.5 (90) Keep high voltage and low voltage wiring separated. If the conduits must cross, be sure that they cross at 90° angles only. Motor overload protection is required for motor branch circuits that do not have an overload protection device. Front access must be provided to allow the control cover to be opened or removed for service and to allow viewing of the Keypad Display (1 inch (25mm) minimum). Altitude derating. Up to 3300 feet (1000 meters), no derating required. Above 3300 feet, derate peak output current by 1% for each 330 feet above 3300 feet. 6600 feet (2000 meters) maximum. Temperature derating. Up to 40°C, no derating required. Above 40°C, derate full load current by 2% per °C above 40°C. Maximum ambient is 60°C (at 40% derate). Short circuit current and overcurrent devices are required for soft–start controls that do not have a circuit breaker or fusible disconnect switch. Dust–proof NEMA 12, NEMA 4 non–ventilated enclosure will require an end of ramp Bypass contactor. This requires additional hardware. Refer to Figure 2-6 for details. Installation 2-1 Cover Removal Size 2 Size 1 Remove Cover 1. Remove two cover screws. 2. Pull bottom of cover (held by cover screws) and lift cover off of top hinge. Cover Screws Remove Cover 1. Remove four cover screws. 2. Remove cover. Cover Screws L1 L2 L3 Control Board Size 3, 4 J2 J3 J4 D5 22 24 21 12 14 11 S0 S1 Remove Cover 1. Remove four cover screws. 2. Open cover (hinges on left side). Cover Screws 115 Inside View (Terminal Locations) T1 T2 T3 X1 X2 Remote Keypad Installation Figure 2-1 Remote Keypad Board Installation Firmware J7 Connector Remote Keypad Board Remote Keypad Connector Procedure: 2-2 Installation 1. Remove cover and locate J7 connector on the control board (Figure 2-1). 2. Remove old Firmware IC and install new Firmware IC. Be careful to use removal and insertion tools and anti–static procedures. 3. Install Remote Keypad Board on the J7 connector. 4. Connect remote keypad cable at Remote Keypad Connector. 5. Install cover. 6. Refer to the following Optional Remote Keypad Installation procedure and mount the keypad. 7. Connect the keypad cable to the remote keypad. MN850 Section 1 General Information Optional Remote Keypad Installation The keypad may be remotely mounted using optional Baldor keypad extension cable. Keypad assembly (white - DC00005A-01; gray - DC00005A-02) comes complete with the screws and gasket required to mount it to an enclosure. When the keypad is properly mounted to a NEMA Type 4X enclosure, it retains the Type 4X rating. Mounting Instruction: Mounting Instructions: MN850 Tools Required: • Center punch, tap handle, screwdrivers (Phillips and straight) and crescent wrench. • 8-32 tap and #29 drill bit (for tapped mounting holes) or #19 drill (for clearance mounting holes). • 1-1/4″ standard knockout punch (1-11/16″ nominal diameter). • RTV sealant. • (4) 8-32 nuts and lock washers. • Extended 8-32 screws (socket fillister) are required if the mounting surface is thicker than 12 gauge and is not tapped (clearance mounting holes). • Remote keypad mounting template. A tear out copy is provided at the end of this manual for your convenience. (Photo copy or tear out.) For tapped mounting holes 1. Locate a flat 4″ wide x 5.5″ minimum high mounting surface. Material should be sufficient thickness (14 gauge minimum). 2. Place the template on the mounting surface or mark the holes as shown. 3. Accurately center punch the 4 mounting holes (marked A) and the large knockout (marked B). 4. Drill four #29 mounting holes (A). Thread each hole using an 8-32 tap. 5. Locate the 1-1/4″ knockout center (B) and punch using the manufacturers instructions. 6. Debur knockout and mounting holes making sure the panel stays clean and flat. 7. Apply RTV to the 4 holes marked (A). 8. Assemble the keypad to the panel. Use 8–32 screws, nuts and lock washers. 9. From the inside of the panel, apply RTV over each of the four mounting screws and nuts. Cover a 3/4″ area around each screw while making sure to completely encapsulate the nut and washer. For clearance mounting holes 1. Locate a flat 4″ wide x 5.5″ minimum high mounting surface. Material should be sufficient thickness (14 gauge minimum). 2. Place the template on the mounting surface or mark the holes as shown on the template. 3. Accurately center punch the 4 mounting holes (marked A) and the large knockout (marked B). 4. Drill four #19 clearance holes (A). 5. Locate the 1-1/4″ knockout center (B) and punch using the manufacturers instructions. 6. Debur knockout and mounting holes making sure the panel stays clean and flat. 7. Apply RTV to the 4 holes marked (A). 8. Assemble the keypad to the panel. Use 8–32 screws, nuts and lock washers. 9. From the inside of the panel, apply RTV over each of the four mounting screws and nuts. Cover a 3/4″ area around each screw while making sure to completely encapsulate the nut and washer. Installation 2-3 AC Main Circuit Power Disconnect A power disconnect should be installed between the input power service and the control for a fail safe method to disconnect power. Protective Devices Recommended fuse sizes are based on the following: 175% of maximum continuous current for time delay. 300% of maximum continuous current for Fast or Very Fast action. Note: These general size recommendations do not consider harmonic currents or ambient temperatures greater than 40°C. Be sure a suitable input power protection device is installed. Use the recommended circuit breaker or fuses listed in Table 2-5 (Wire Size and Protection Devices). Input and output wire size is based on the use of copper conductor wire rated at 75 °C. The table is specified for NEMA B motors. 2-4 Installation Circuit Breaker: 3 phase, thermal magnetic. Equal to GE type THQ or TEB for 230VAC or Equal to GE type TED for 460VAC and 575VAC. Fast Action Fuses: 230VAC, Buss KTN 460VAC, Buss KTS to 600A (KTU for 601 to 1200A) Very Fast Action: 230VAC, Buss JJN 460VAC, Buss JJS Time Delay Fuses: 230VAC, Buss FRN 460VAC, Buss FRS to 600A (KLU for 601 to 1200A) MN850 UL Required Fuses for Short Circuit Rating UL requires R/C fuses, special purpose fuses (JFHR2) or semiconductor fuses rated 700VAC be used to obtain the short circuit current ratings required by UL. Model Number MD9 to MD16 MD23 to MD30 MD44 MD59 MD72 to MD85 MD105 to MD146 MD174 to MD202 MD242 MD300 MD370 MD500 MD600 MD750 MD900 MD1100 MD1200 Fuse Manufacturer Bussman (300 KA A.I.C.) Ferraz (200 KA A.I.C.) Catalog Number Catalog Number 170M3110 6.6 URD 30 D08 A 0063 170M3112 6.6 URD 30 D08 A 0100 170M3114 6.6 URD 30 D08 A 0160 170M3115 6.6 URD 30 D08 A 0200 170M3116 6.6 URD 30 D08 A 0250 170M3119 6.6 URD 30 D08 A 0400 170M3121 6.6 URD 30 D08 A 0500 170M4114 6.6 URD 31 D08 A 0500 170M4114 6.6 URD 31 D08 A 0500 170M4116 6.6 URD 31 D08 A 0630 170M6113 6.6 URD 33 D08 A 0900 170M6113 6.6 URD 33 D08 A 0900 170M6116 6.6 URD 33 D08 A 1250 170M6116 6.6 URD 33 D08 A 1250 170M6116 (2) 170M6116 Main Input Contactor Fuse Current Rating Amperes 63 100 160 200 250 400 500 500 500 630 900 900 1250 1250 1500 (2) 1000 Short Circuit Rating Amperes 5,000 5,000 5,000 5,000 10,000 10,000 10,000 10,000 18,000 18,000 18,000 30,000 30,000 42,000 42,000 42,000 An IEC or NEMA rated contactor is recommended at the input power to the control. The soft–start control uses three pairs of SCR (silicon controlled rectifier) semiconductor devices that do not positively disconnect power. Figure 2-1 shows that the input contactor provides a positive disconnect. Table 2-2 Connection Descriptions Terminal L1, L2, L3 T1, T2, T3 X1, X2 S1, S0 Relay K1 Relay K2 MN850 Description Input AC power terminals. Connect input isolated 3 phase supply (any phase to any terminal). Output Power Terminals. Connect an induction motor to these terminals. For correct motor rotation, connection of these phases must correspond with the supply connections (L1, L2, L3). Control Supply Input. The internal circuits require power from a 115VAC or 230VAC source (Table 2-3). A selector switch is provided to select the voltage range of the source that is connected to this input. Remote Start/Stop Input. A voltage present across these terminals will initiate a “Start”. Removing the voltage from across these terminals will initiate a “Stop”. Note that the factory setting is keypad Start/Stop. Pins 11 and 12 are the normally closed “Run” relay contacts. Pins 11 and 14 are the normally open “Run” relay contacts. Pins 21 and 22 are the normally closed “Top of Ramp” relay contacts. Pins 21 and 24 are the normally open “Top of Ramp” relay contacts. Installation 2-5 Figure 2-1 Power and Motor Circuit Connections 115/230VAC Note 2 L1 Note 1 L2 L3 Earth L1 * Circuit Breaker or *OL Note 6 Note 4, 8 L1 K1 is factory preset as the RUN" relay. L2 14 11 12 K1 X1 X2 Baldor Digital Soft–Start K2 T1 T2 T3 Note 2 T2 T3 Note 7 * AC Motor * Optional components not provided with control. L3 Programmable Input 24 21 22 115VAC Note 1 Note 3 * Input Contactor IC S1 S0 L3 Alternate * Fuse Connection * OT L2 T1 G * OT Motor Thermostat Leads 115/230VAC Note 5, 6 Notes: 1. See “Protective Devices” described previously in this section. 2. Motor Overload and/or Thermal protection is required by NEC. 3. Use same gauge wire for Earth ground as is used for L1, L2 and L3. 4. Metal conduit should be used. Connect conduits so the use of a Reactor or RC Device does not interrupt EMI/RFI shielding. 5. X1 and X2 control terminal power must be present or the logic circuits will not work. Either 115VAC or 230VAC can be used. Be sure the 115/230VAC switch (Control Voltage Selector Switch) is set to the proper voltage before you apply power. 6. The X1 and X2 control voltage input has different VA ratings depending on enclosure size, see Table 2-3. 7. Add appropriately rated protective device for AC relay (snubber) or DC relay (diode). 8. To protect the control, be sure to add MOV protection. Refer to Appendix D for additional information. See Recommended Tightening Torques in Table 2-4. All soft–starters require a separate fused 2 wire, single phase connection at terminals X1 and X2. An external fuse is required and must be sized as described in Table 2-3. Either 115VAC (98 – 126VAC) or 230VAC (196 – 253VAC) input may be used. The control voltage selector switch allows simple selection of 115VAC or 230VAC input power. Table 2-3 Control Supply Size 2 Current Rating (Amps) to 23A 30A to 44A 59A to 146A 174A to 370A Size 3, 4 500A to 1200A Chassis Size Size 1 Nominal Power Consumption (VA) 8VA 10VA 12VA 18VA 8VA – Control card 140VA – separate fan supply 115V Fuse 230V Fuse 125mA 200mA 200mA 200mA 125mA 2A 63mA 100mA 100mA 100mA 63mA 1A Motor Overload and Thermal Protection NEC and local codes may require thermal motor overload protection devices be installed rather than rely only on internal protection devices. Devices such as bi–metallic overload relays may require special Soft–Start settings (such as during low voltage starting to prevent heating). Use of electronic overload relays with this control is not recommended because of the distorted current waveform. A motor with built in thermal cutoff switches (TSTAT’s) is recommended. 2-6 Installation MN850 In–Delta Connections For Delta connected motors, the Soft–Start can be connected inside the delta windings. This connection method is shown in Figure 2-2. Figure 2-2 In–Delta Soft–Start Connections L1 L2 L3 L1 Earth Note 1 * Circuit Breaker Alternate * Fuse Connection Note 2 L2 L3 Note 1 * Optional components not provided with control. Note 3, 9 L1 L2 L3 X1 X2 Baldor Digital Soft–Start T1 T2 T3 115/230VAC In–Delta connections for correct motor rotation Note 6, 7 T3 T1 T2 G T4 * AC Motor T5 Soft–Start Terminal Motor Terminal T1 T2 T3 T3 T1 T2 L1 L2 L3 T5 T6 T4 T6 Note 8 Notes: 1. See “Protective Devices” described previously in this section. 2. Use same gauge wire for Earth ground as is used for L1, L2 and L3. 3. Metal conduit should be used. Connect conduits so the use of a Reactor or RC Device does not interrupt EMI/RFI shielding. 4. Derating factor for soft–start is 57%. 5. Parameter P6– Firing Mode must be set to 1. 6. X1 and X2 control terminal power must be present or the logic circuits will not work. Either 115VAC or 230VAC can be used. Be sure the 115/230VAC switch (Control Voltage Selector Switch) is set to the proper voltage before you apply power. See Recommended Tightening Torques in Table 2-4. 7. The X1 and X2 control voltage input has different VA ratings depending on enclosure size, see Table 2-3. 8. For reversing operation, L1 and L2 should be switched. Reversing any two of the three input phases will reverse the motor rotation. 9. To protect the control, be sure to add MOV protection. Refer to Appendix D for additional information. Fan Connections – Size 3 and 4 only Size 1 and 2 controls do not have fan connections. For Size 3 controls make the fan connections as shown in Figure 2-3.The Fan and Control voltages must be the same (both must be 115VAC or both must be 230VAC). 150VA (minimum) required. Figure 2-3 Fan Connections 115V Connections X1 MN850 X2 230V Connections (150VA minimum) X1 X2 Installation 2-7 Wire Size and Protection Devices Table 2-4 Control Wire Sizes and Tightening Torques Control Size Terminal Wire Gauge * AWG mm2 L1, L2, L3, T1, T2, T3 (M8 Stud for Ring connector) 1 Earth (Ground) Terminal 1/0 50 Terminal Torque Lb–in Nm 106 12 106 12 106 12 106 12 212 24 212 24 4.5 4.5 4.5 4.5 0.5 0.5 0.5 0.5 (M8 Stud for Ring connector) L1, L2, L3, T1, T2, T3 (M8 Stud for Ring connector) 2 Earth (Ground) Terminal (2) 250MCM (2) 120 (M8 Stud for Ring connector) L1, L2, L3, T1, T2, T3 ** (Connector with two M10 holes on 30mm center) Earth (Ground) Terminal 3, 4 (M10 Stud for Ring connector) S0 and S1 X1 and X2 K1 (11, 12, 14) K2 (21, 22, 24) All Busbar size: 45x20 60x10 80x10 14 – 22 0.5 – 2.5 14 – 22 0.5 – 2.5 14 – 22 0.5 – 2.5 14 – 22 0.5 – 2.5 * Use same gauge wire for Earth ground as is used for L1, L2 and L3. ** Use terminal #4–350kcmil,1 per phase (ILSCO Part No.LO–350–S, LO–600–S or LO–1000–S or equivalent). Table 2-5 NEC Wire Size and Protection Devices Control Rating Amps Input Breaker (Amps) 9 16 23 30 44 59 85 105 146 174 202 242 300 370 500 600 750 900 1100 1200 15 30 40 50 70 90 110 175 250 275 300 400 450 600 800 900 1200 1400 1600 1800 Input Fuse (Amps) Fast Acting Time Delay 30 20 50 30 70 40 90 60 150 80 200 110 250 150 350 200 450 275 600 300 600 350 750 450 900 600 1200 700 1500 900 1800 1100 2500 1400 3000 1600 2000 2000 Wire Gauge AWG 12 12 10 8 8 6 4 2 2/0 3/0 4/0 250MCM 350MCM 500MCM (2) 250MCM (2) 350MCM (2) 500MCM (2) 700MCM (3) 700MCM (3) 700MCM mm2 3.31 3.31 5.26 8.37 8.37 13.3 21.2 33.6 67.4 85.0 107.0 127.0 177.0 253.0 (2) 127.0 (2) 177.0 (2) 253.0 (2) 355.0 (3) 355.0 (3) 355.0 Note: All wire sizes are based on 75°C copper wire. Higher temperature smaller gauge wire may be used per NEC and local codes. Recommended fuses/breakers are based on 40°C ambient, maximum continuous control output current and no harmonic current. 2-8 Installation MN850 Three Wire Control Figure 2-4 Three Wire Control Connection 115 / 230VAC Fuse Note: Add appropriately rated protective device for AC relay (snubber) or DC relay (diode). Neutral Stop Start R1 IC X1 X2 S1 S0 R1 IC OT OL IC= Input Contactor Coil OL= Thermal Overload Relay OT= Motor Thermal Overload Relay Baldor Digital Soft–Start 14 11 12 K1 24 21 22 K2 K1 is factory preset as the RUN" relay. * External hardware not provided with control. See Recommended Tightening Torques in Table 2-4. Two Wire Control Figure 2-5 Two Wire Control Connection 115 / 230VAC Fuse Note: Add appropriately rated protective device for AC relay (snubber) or DC relay (diode). Neutral Choose Control Circuit Off On R1 Control Circuit Or Hand Off X1 X2 R1 S1 S0 R1 Auto IC OT OL IC= Input Contactor Coil OL= Thermal Overload Relay OT= Motor Thermal Overload Relay Baldor Digital Soft–Start 14 11 12 K1 24 21 22 K2 K1 is factory preset as the RUN" relay. * External hardware not provided with control. See Recommended Tightening Torques in Table 2-4. MN850 Installation 2-9 NEMA 12/4 Installation When a NEMA12, NEMA4, NEMA4x OR IP65 enclosure is used, a separate Top of Ramp Bypass (or shunt) contactor must be connected in parallel with the soft–start control. This will allow a solid connection of the motor to the AC power lines and eliminate the heating effect caused by the SCR’s. At the completion of the start ramp (when full start voltage is obtained) a Bypass contactor is closed. This contactor is controlled by the “Top of Ramp” relay K2. This ensures that bypass will only occur when motor voltage equals the AC line voltage. Figure 2-6 Top of Ramp (Bypass) Connection 115/230VAC To AC Input Fuse To protect the control, be sure to add MOV protection. Refer to Appendix D for additional information. Neutral X1 X2 BC Note: Add appropriately rated protective device for AC relay (snubber) or DC relay (diode). L1 S1 S0 14 11 12 K1 24 21 22 K2 * External hardware not provided with control. L2 L3 Baldor Digital Soft–Start * BC Bypass Contactor K2 is factory preset as the Top of Ramp" function. T1 T2 T3 See Recommended Tightening Torques in Table 2-4. To Motor 2-10 Installation MN850 Reversing Contactor For this mode, the Stop Time must be set to zero. Also, allow a minimum of 350 milli seconds between the Forward and Reverse commands. Figure 2-7 Motor Reversing Connection To AC Input Forward Contacts Reverse Contacts MI To protect the control, be sure to add MOV protection. Refer to Appendix D for additional information. MI - Mechanical Interlock 115/230VAC Fuse Neutral Forward R F Reverse R L1 X1 X2 F S1 S0 R Note 1 F 14 11 12 K1 24 21 22 K2 * External hardware not provided with control. L2 L3 Baldor Digital Soft–Start K2 is factory preset as the Top of Ramp" function. T1 T2 Note 1: Add appropriately rated protective device for AC relay (snubber) or DC relay (diode). T3 See Recommended Tightening Torques in Table 2-4. MN850 Installation 2-11 Installation 1. Remove cover. (See cover removal described previously in this section.) 2. Mount the panel or enclosure to the mounting surface. The panel or enclosure must be securely fastened to the mounting surface. Refer to the mounting dimensions in Section 6 of this manual. Shock Mounting If the control will be subjected to levels of shock greater than 1G or vibration greater than 0.5G at 10 to 60Hz, the control should be shock mounted. 3. Ground the panel and control per NEC article 250 as well as state and local codes. 4. Use copper wire rated for at least 75°C. Refer to Tables 2-4 and 2-5 for wire size recommendations. 5. Connect the incoming AC power wires from the power disconnect and/or protection devices to L1, L2 and L3 terminals. Tighten each terminal as specified in Section 2 of this manual. To protect the control, be sure to add MOV protection (refer to Appendix D for additional information). 6. Connect 115VAC to the X1 and X2 terminals. This 115VAC input must be fused. Refer to Table 2-3 for ratings. 7. Be sure to set the 115/230VAC switch (Control Voltage Selector Switch) to the 115VAC position. 8. * Connect earth ground to the “GND” of the control. Be sure to comply with local codes. 9. Connect the motor leads to terminals T1, T2, and T3. 10. * Connect motor ground wire to the “GND” of the control. Be sure to comply with all applicable codes. 11. Connect the S0, S1, K1 and K2 control terminals as required for your installation. 12. Verify the input line voltage is correct. 13. Verify the Control Voltage is correct and that the selector switch is correctly set. 14. Complete any optional wiring connections that may be needed for your installation. 15. Install cover. * 2-12 Installation Grounding by using conduit or panel connection is not adequate. A separate conductor of the proper size must be used as a ground conductor. MN850 Section 3 Operation Overview The start–up procedure will help get your system up and running quickly and will allow motor and control operation to be verified. This procedure assumes that the Control and Motor are correctly installed (see Section 2 for procedures) and that you have a basic understanding of the keypad programming & operation procedures. 1. Read the Safety Notice and Precautions in section 1 of this manual. 2. Mount the control. 3. Be sure the cover is on and the keypad is plugged in but all power is OFF. 4. Connect Three Phase AC power (L1, L2, L3). 5. Connect 115VAC 1 phase power (X1, X2). Note: Factory assembled combination and non–combination controllers and controllers in ventilated NEMA 12 enclosures have an internal transformer that provides 115VAC power to X1 and X2 terminals (pre–wired). 6. Pre–Start Checklist Connect the motor. Check of electrical items. CAUTION: After completing the installation but before you apply power, be sure to check the following items. 1. Verify the Three Phase AC line voltage at source matches control rating. 2. Verify the X1, X2 Control Voltage at source is correct. An external fuse is required and must be sized as described in Table 2-3. 3. Verify the Control Voltage Selector Switch is correctly set. 4. Inspect all connections for accuracy, workmanship and tightness as well as compliance to codes. 5. Verify control and motor are grounded to each other and the control is connected to earth ground. 6. Check all signal wiring for accuracy. 7. Be certain all brake coils, contactors and relay coils have noise suppression. This should be an R-C filter for AC coils and reverse polarity diodes for DC coils. MOV type transient suppression is not adequate. Check of Motors and Couplings MN850 1. Verify freedom of motion of motor shaft. 2. Verify that the motor coupling is tight without backlash. 3. Verify the holding brakes if any, are properly adjusted to fully release and set to the desired torque value. Operation 3-1 Start–Up Procedure This procedure assumes that this is the first time the control and motor have been started. The normal start–up procedure would be as follows: 1. Apply X1, X2 Control Voltage power (115VAC). 2. Apply three phase power. The display should show “Stopped & Ready”. 3. Press ENTER and the display should show “Applications”. 4. Press ENTER and the display should show “Settings”. 5. Press the UP or DOWN Arrows and select the desired type of motor load. 6. Press ENTER and the display should briefly display loading of parameters then prompt for “Send to Store?”. Press ENTER to store values. Note: Values must be saved to “Permanent Store” to be restored at power–up. See “Changing the Power–up Settings” in this section. 7. 8. Press “#” twice to exit programming. The display should show “Stopped & Ready”. Press “Start/Stop” to run the motor. First Time Start–up (Apply X1, X2 115 volt power and become familiar with the control). Apply X1, X2 Control Voltage power (115VAC). The backlit LCD display will illuminate and display. The control is now ready for operation. Description Action Apply Control Voltage (115VAC) Keypad Operation Display Comments Keypad Display shows this opening message. Baldor Soft Start Logo display for 2 seconds. If no faults the display will show this message. Stopped & Ready System Status mode. On the control front panel is a keypad and display as shown in Figure 3-1. Figure 3-1 Keypad Definition Keypad Switch ENTER Select store # exit/reset Data Entry Program Menu ENTER Enters the Program menu. Position in the menu structure goes forward (down) one level. (e.g. from Level 2 to Level 3). # No action Position in the menu Cancels any changes to the setting of structure goes back (up) one a menu item. The display returns to level. (e.g. from Level 1 to the menu mode. Level 0). No action Position in the menu Increments a menu item that has an structure goes back (up) one analog value. Or, level. Sets one selected bit to Bit=1 for a menu item that requires a logical selection. No action Position in the menu structure goes back (up) one level. (e.g. from Level 1 to Level 0). Baldor Soft Start PARAMETER SETTING Mode System Status Accepts any changes to the setting of a menu item. The new setting is flashed on the display for 2 seconds then returns to the menu mode. up/increment down/decrement OPTIMISE bit shift left Display is a backlit 2 line x 16 character LCD display (32 character display). Note: For keypad to be active, keypad control must be selected. OPTIMISE Selects or deselects optimizing, when motor is running. Start Stop 3-2 Operation 0000 0000 Shifts left one bit position at a time. Starts or Stops the No action motor. Decrements a menu item that has an analog value. Or, Sets one selected bit to Bit=0 for a menu item that requires a logical selection. Note: Optimise key is used as left right shift key to scroll through the bit map in parameter 18, 51, 52, 53, 54, 86, 95, 96. No action MN850 Operating Modes System Status Mode Description During normal operation, the display shows the status of operation. Menu Mode In the menu mode, a flashing cursor is displayed. Use the ⇑ or ⇓ keys to scroll through the menu items. Use the ENTER key to select a menu item or move to the next level. 183 A Shows that Optimized operation is selected and the load current is 183 amperes. Display APPLICATIONS BASIC Comments V represents blinking cursor. At the menu mode, scroll to the desired parameter value you wish to change. Press enter to view or change the data. (If a blinking cursor is not present, the data is read only.) Description In the data entry mode, a flashing cursor is displayed. Use the ⇑ or ⇓ keys to increase or decrease the value of the parameter. Use the ENTER key to save the data value. The display will flash one time if the value is accepted. The display will flash two times if the value is erroneous. MN850 OPTIMIZE CURRENT Comments At the power up display, press ENTER one time to go to the menu mode and display the level 1 menu. Description Data Entry Mode Display Display START PEDESTAL 20 PERCENT Comments V represents blinking cursor. Operation 3-3 Menu Structure Figure 3-2 Menu Structure Diagram Level 0 Level 1 Level 2 Level 3 ENTER ENTER ENTER ENTER Stopped and ready Applications Auto features Auto features Basic Basic Advanced Advanced Permanent store Permanent store Password Password Inputs Settings Auto Jog (Off) Auto Pedestal (Off) Auto end start (Off) Auto stop (Off) Auto end stop (Off) Auto bypass (On) Auto 3MC (On) Auto off (Off) Stop smoothing (Off) Starting (Keypad) Start pedestal Start time (5s) Stop pedestal (10%) Stop time (0s) Current limit (3.5xle) Power on Param Protection Save parameters Power on parameters Default parameters Enter password Change password Outputs Parameters Trips # # Settings Default (keypad) Small Pump Large Pump Conveyor Low Inertia Fan High Inertia Fan Recip Compressor Screw Compressor Rotary Compressor # Full Full + optimise(Preset) Start + bypass Phase loss only Current Optimise rate (5) Kick start (Off) Kick pedestal (75%) Kick time (25cycles) Dwell time (5s) Low volts stop (On) Contactor delay (160ms) Trip sensitivity (1) Station number (1) Language (44) Firing mode (0) * Stop Smoothing (5) Rated current (Ie) ** Low current (Off) Low amps level (0.1xFLC) Low amps time (50cycles) C/L time out (On) Current limit (3.5xIe) Limit time out (30s) Shearpin (On) Shearpin level (3.125xIe) Shearpin time (100cycles) Overload level (1.1xIe) Overload delay (140) # * The “Firing Mode” must be set to 1 for the In–Delta configuration. ** The “Rated Current” setting is for reference only and is not user adjustable. 3-4 Operation MN850 Menu Navigation Examples Menu Navigation Action Apply Control Voltage (115VAC) This example shows how to go to the Inputs menu and map an input parameter. Description Display Comments Keypad Display shows this opening message. Baldor Soft Start Logo display for 2 seconds. If no faults the display will show this message. Stopped & Ready System Status mode. Press ENTER key APPLICATIONS AUTO FEATURES Press ENTER to access menu mode. Press ⇓ key Scroll to the AUTO FEATURES menu. AUTO FEATURES BASIC Press ENTER to access Basic level 2 parameters if desired. Press ⇓ key Scroll to the BASIC menu. BASIC ADVANCED Press ⇓ key Scroll to the ADVANCED menu. ADVANCED PERMANENT STORE Press ⇓ key Scroll to the PERMANENT STORE menu. PERMANENT STORE PASSWORD Press ENTER to access Advanced level 2 parameters if desired. Press ENTER to access Advanced level 2 parameters if desired. Press ENTER to access Password parameter if desired. Press ⇓ key Scroll to the PASSWORD menu. PASSWORD INPUTS Press ENTER to access Password parameter if desired. Press ⇓ key Scroll to the INPUTS menu. INPUTS OUTPUTS Press ENTER to access Password parameter if desired. Press ENTER key Enter level 2 of inputs menu. DIGITAL I/P 1 Press ENTER key Enter level 3 of inputs menu. MAP TO 52 PARAMETER Press ⇓ key Scroll to the 52 Parameter menu. 52 PARAMETER BIT NUMBER Press ⇓ key Scroll to the Bit Number menu. BIT NUMBER POLARITY Press ENTER key Enter the Bit Number menu. BIT NUMBER 01000000 MASK Press OPTIMISE key Allows you to change the value of the first bit. BIT NUMBER 01000000 MASK Press OPTIMISE key Allows you to change the value of the second bit. BIT NUMBER 01000000 MASK Press OPTIMISE key Allows you to change the value of the third bit. BIT NUMBER 01000000 MASK Press ⇑ key Allows you to change the value of the third bit. BIT NUMBER 01100000 MASK Press ENTER key Accept the change. BIT NUMBER 01100000 MASK Press # key several times Press the # key numerous times to return to the system status mode. MN850 Stopped & Ready System Status mode. Operation 3-5 Changing the Power–up Settings & Select Keypad Control When the Control Supply (115VAC) power is first applied, the control loads the parameter settings into working memory. You may change any of these parameters and operate a motor with the changed settings. However, if these values are not saved they will be lost the next time power is removed. You can save the new values as power–up values so they will be loaded the next time Control Supply power is turned off and turned back on. Procedure: Turn Control Supply power on. Use the menu’s and change any parameters to the new values as desired. When all changes are made, operate the motor to ensure that all values are as desired. Then, stop the control and perform the following: Action Description Press ENTER key Display APPLICATIONS AUTO FEATURES Press ⇓ key several times Scroll to the Permanent Store menu. PERMANENT STORE PASSWORD Press ENTER key Enter level 2 of Permanent Store menu. SAVE PARAM POWER ON PARAM Press ⇓ key several times Scroll to the Default Param menu. DEFAULT PARAM Press ENTER key Stores the new parameter values in permanent memory. Thew display will flash one time to show parameters were successfully saved. DEFAULT PARAM Press # key several times Scroll to the Basic menu. APPLICATIONS AUTO FEATURES Comments Press ENTER to access menu mode. Next time power is applied, these new values will be loaded and used for motor operation. Select Keypad Starting and Keypad Control Action Description Press ENTER key Display APPLICATIONS AUTO FEATURES Press ⇓ key Scroll to the Basic menu. BASIC ADVANCED Press ENTER key Enter level 2 of Basic menu. STARTING (KEYPAD) START PEDESTAL Press ENTER key Accept the change to keypad starting. STARTING (KEYPAD) START PEDESTAL Press # key several times Scroll to the Basic menu. APPLICATIONS AUTO FEATURES 3-6 Operation Comments Press ENTER to access menu mode. MN850 Motor Starting Definitions Term Definition Starting Selectable in Basic Menu as either Keypad or Remote starting method. Voltage Pedestal Initial voltage applied to motor after the 3 cycle power–up ramp. Programmed as parameter 11 or as Start Pedestal in Basic Menu. Kick Pedestal For traction or “frozen” loads, this boost pulse of higher voltage helps the load to start moving. Kick Start is in the Advanced menu. Kick Pedestal is parameter 13 or as Kick Pedestal in Advanced menu. Kick Time Number of cycles duration the kick pedestal voltage is applied. Programmed as parameter 14 or as Kick Time in Advanced menu. Start Time Number of seconds after the 3 cycle power–up to full motor voltage. Programmed as parameter 12 or as Start Time in Basic Menu. Dwell Time Number of seconds that full voltage is applied to the motor before optimizing begins (if optimizing is selected). Programmed as parameter 15 or as Dwell Time in Advanced menu. Optimizing Process of detecting underload condition and reducing the RMS voltage to the motor. This eliminates overflux condition of the motor windings to reduce saturation and results in substantial power savings (up to 2% efficiency increase). Optimizing is selected by the keypad or as parameter 7 or as Protection parameter in Basic Menu. Optimizing Rate A numerical value that represents the rate at which the motor voltage is reduced during optimizing. When this number is large, improves efficiency on stable loads. A lower number for unstable loads will reduce speed variations. Programmed as parameter P19. Contactor Delay A delay is required when an input contactor is energized by the soft–start “Run” relay. This delay allows bouncing contactor armature to settle during the “Closed” position. Programmed as parameter 71 or as Contactor Delay in Advanced menu. 3 Cycle Power–up This non adjustable time is to allow voltage build up from zero to the initial pedestal. It is intended to reduce current inrush and allows for shorted SCR detection. This delay may be turned off to start a motor even with one shorted SCR or to use high inertia loads on class C or D motors. Programmed as the “Auto 3MC” parameter in Auto Features menu. Figure 3-3 Motor Starting Key Terms Motor Voltage Optimise Rate Full Voltage Kick Pedestal Optimizing Auto Pedestal Voltage Pedestal Kick Time 3 Cycle Power–up Contactor Delay MN850 Start Time Time Dwell Time Run Operation 3-7 Keypad Starting and Running the Motor with Factory Settings Action Apply Control Voltage (115VAC) Description Display Comments Keypad Display shows this opening message. Baldor Soft Start Logo display for 2 seconds. If no faults the display will show this message. Stopped & Ready System Status mode. Press ENTER key APPLICATIONS AUTO FEATURES Press ENTER key Access Level 1 Application Menu. Settings Default (Keypad) Press ⇓ key two times Scroll to the correct application. Small Pump Large Pump Press ENTER key Select the application. Large Pump Conveyor Press ENTER key Choose set of parameters for the application. Send to Store ’#’=no Enter=Yes Press ENTER key Scroll to the PASSWORD menu. Storing Press # key twice Press # key two times to exit programming. Large Pump Conveyor Press Start/Stop key Displays motor starting current and full voltage and current. Starting Current 8A Full volts Current 8A 3-8 Operation Large pump is selected in this example. MN850 Keypad Starting and Running the Motor in Optimise Mode Action Apply Control Voltage (115VAC) Description Display Comments Keypad Display shows this opening message. Baldor Soft Start Logo display for 2 seconds. If no faults the display will show this message. Stopped & Ready System Status mode. Press ENTER key APPLICATIONS AUTO FEATURES Press ENTER key Access Level 1 Application Menu. Settings Default (Keypad) Press ⇓ key two times Scroll to the correct application. Small Pump Large Pump Press ENTER key Select the application. Large Pump Conveyor Press ENTER key Choose set of parameters for the application. Send to Store ’#’=no Enter=Yes Press ENTER key Scroll to the PASSWORD menu. Storing Press # key twice Press # key two times to exit programming. Large Pump Conveyor Press Start/Stop key Displays motor starting current and full voltage and current. Starting Current 8A Full volts Current 8A Optimising Current 4A Press OPTIMISE key Large pump is selected in this example. Ready for Remote Start/Stop. Baldor Digital Soft–Start offers three modes of protection during operation: 1. Full protection with full voltage after top of ramp. 2. Full optimize protection with energy optimizing by reduced voltage at lower loads. 3. Start + Bypass protection (during start only). No soft–start protection is provided when during bypass (when soft–start is shorted by the bypass contactor). Remote Start and Running the Motor When Remote Starting is selected, the keypad Start/Stop pushbutton is not active. Action Apply 115VAC at the input terminals S0 and S1. MN850 Description Display Comments Input 1 is Start/Stop input when Remote Starting is selected. (P52 Bit 16 set to terminal.) Operation 3-9 Motor Stopping Definitions Term Definition Stop Pedestal Voltage Stop Pedestal Voltage is the percentage of line voltage applied to the motor after a stop command. Programmed as parameter 16 or as Stop Pedestal in Basic Menu. Stop Time Time in seconds after a stop command to ramp down the motor voltage (Stop Time 1 or 2) Stop Time 1 with low voltage ramp active. Stop Time 2 with no low voltage ramp. Programmed as parameter 17 or as Stop Time in Basic Menu. Stop Smoothing Adjustable voltage ramp for smooth deceleration. Motor current is monitored and stop smoothing will continue until the Start Pedestal value is reached. Programmed as parameter Run Voltage Full voltage or Running Voltage Start Pedestal Voltage Start Pedestal Voltage – end of stop smoothing and beginning of low voltage ramp to zero volts (if low voltage ramp is active). Programmed as parameter 11 or as Start Pedestal in Basic Menu. Figure 3-4 Motor Stopping Key Terms Motor Voltage Run Voltage Stop Smoothing Effect Full Voltage Ideal Stop Pedestal Actual Stop Smoothing End of Stop Smoothing Stop Pedestal Voltage Start Pedestal Voltage Low Voltage Ramp Stop Time 2 Time Stop Time 1 Stopping the Motor When Remote Starting is selected, the keypad Start/Stop pushbutton is not active. Action Press Start/Stop key (Keypad Stop) Remove the 115VAC from S0 and S1. (Remote Stop) 3-10 Operation Description Displays motor starting current and full voltage and current. Display Stopping Current Stopping Current Comments Begins the Stop operation 8A Begins the Stop operation 8A MN850 Section 4 Parameter Index Menu Descriptions Basic Menu Block Title Parameter Description Basic Starting Keypad – Allows motor starting and stopping by pressing Start/Stop key on keypad. Remote – Allows motor starting and stopping by applying or removing 115VAC at terminals S0 and S1 of the control board. Start Pedestal Start Pedestal Voltage – end of stop smoothing and beginning of low voltage ramp to zero volts (if low voltage ramp is active). Start Time Number of seconds after the 3 cycle power–up to full motor voltage. Stop Pedestal Stop Pedestal Voltage is the percentage of line voltage applied to the motor after a stop command. Stop Time Time in seconds after a stop command to ramp down the motor voltage (Stop Time 1 or 2). Stop Time 1 with low voltage ramp active. Stop Time 2 with no low voltage ramp. Current Limit Percentage of running current (P24 and P25). Adjustable from 100 – 800%. Power on Parameter Resets all parameter values to the values at the most recent power up. Display blinks twice to confirm reset is complete. Protection Full – provides shorted SCR protection during start and run, single phase protection during start, optimizing not selected. Full + Optimise – provides shorted SCR protection during start and run, single phase protection during start, optimizing is selected. Start + Bypass – provides shorted SCR protection during start, single phase protection during start, optimizing not selected and no single phase protection during run. This mode must be used with top of ramp bypass contactor. Phase Loss only – shorted SCR protection during start and run is disabled, single phase protection during start, optimizing not selected. This mode is recommended when input power noise frequently causes nuisance trips. Applications Menu Block Title Parameter Description Applications Settings Display starting method, either Keypad or Remote. Also displays operating mode (Optimizing or Full Voltage). Default (Keypad) Sets starting and stopping mode to keypad, resets control and restores all parameters to factory preset values. Small Pump Uses preset parameter values for typical small centrifugal pump. (P11, P12, P16, P17, P30 and P31 values). Large Pump Uses preset parameter values for typical large centrifugal pump. (P11, P12, P16, P17, P30 and P31 values). Conveyor Uses preset parameter values for typical conveyor. (P11, P12, P16, P17, P30 and P31 values). Low Inertia Fan Uses preset parameter values for Low Inertia Fan. (P11, P12, P16, P17, P30 and P31 values). High Inertia Fan Uses preset parameter values for High Inertia Fan. (P11, P12, P16, P17, P30 and P31 values). Reciprocating Compressor Uses preset parameter values for Reciprocating Compressor. (P11, P12, P16, P17, P30 and P31 values). Screw Compressor Uses preset parameter values for Screw Compressor. (P11, P12, P16, P17, P30 and P31 values). Rotary Compressor Uses preset parameter values for Rotary Compressor. (P11, P12, P16, P17, P30 and P31 values). MN850 Parameter Index 4-1 Applications Menu Continued Name Start Pedestal % Start Time Current Limit Level Small Pump 10 % 5 S 3.5 *FLC Stop Pedestal % Stop Time Current Limit Time Optimise Rate Auto Pedestal Auto End Start Auto Bypass Auto 3MC Low Voltage SoftStop Soft Stop Smoothing Name Start Pedestal % Start Time Current Limit Level Large Pump 10 % 7 S 3.5 *FLC Stop Pedestal % Stop Time Current Limit Time Optimise Rate Auto Pedestal Auto End Start Auto Bypass Auto 3MC Low Voltage SoftStop Soft Stop Smoothing Name Start Pedestal % Start Time Current Limit Level Low Inertia Fan 30 % 15 S 3.5 *FLC Stop Pedestal % Stop Time Current Limit Time Optimise Rate Auto Pedestal Auto End Start Auto Bypass Auto 3MC Low Voltage SoftStop Soft Stop Smoothing Name Start Pedestal % Start Time Current Limit Level High Inertia Fan 40 % 3 S 2.8125 *FLC Stop Pedestal % Stop Time Current Limit Time Optimise Rate Auto Pedestal Auto Bypass Auto End Start Auto 3MC Low Voltage SoftStop Soft Stop Smoothing Name Start Pedestal % Start Time Current Limit Level Conveyor 10 % 10 S 3.5 *FLC Stop Pedestal % Stop Time Current Limit Time Optimise Rate Auto Pedestal Auto End Start Auto Bypass Auto 3MC Low Voltage SoftStop Soft Stop Smoothing Name Start Pedestal % Start Time Current Limit Level Reciprocating Compressor 45 % Stop Pedestal % 3 S Stop Time 3.5 *FLC Current Limit Time Optimise Rate 15 Auto Pedestal Auto Bypass Auto End Start Auto 3MC Low Voltage SoftStop Soft Stop Smoothing 4-2 Parameter Index 10 30 25 % S S Auto Jog Auto Stop Auto End Stop 10 45 25 % S S Auto Jog Auto Stop Auto End Stop 0 0 30 % S S Auto Jog Auto Stop Auto End Stop 0 0 60 % S S Auto Jog Auto Stop Auto End Stop 0 7 30 % S S Auto Jog Auto Stop Auto End Stop 0 0 25 Name Start Pedestal % Start Time Current Limit Level Screw Compressor 40 % 7 S 7.8125 *FLC Stop Pedestal % Stop Time Current Limit Time Optimise Rate Auto Pedestal Auto End Start Auto Bypass Auto 3MC Low Voltage SoftStop Soft Stop Smoothing Name Start Pedestal % Start Time Current Limit Level Rotary Compressor 35 % 7 S 3.5 *FLC Stop Pedestal % Stop Time Current Limit Time Optimise Rate Auto Pedestal Auto End Start Auto Bypass Auto 3MC Low Voltage SoftStop Soft Stop Smoothing Name Start Pedestal % Start Time Current Limit Level Crusher 40 % 3 S 3.5 *FLC Stop Pedestal % Stop Time Current Limit Time Optimise Rate 2.8125 Auto Pedestal Auto End Start Auto Bypass Auto 3MC Low Voltage SoftStop Soft Stop Smoothing Name Start Pedestal % Start Time Current Limit Level Grinder 40 3 2.8125 % S *FLC Stop Pedestal % Stop Time Current Limit Time Optimise Rate Auto Pedestal Auto Bypass Auto End Start Auto 3MC Low Voltage SoftStop Soft Stop Smoothing Name Start Pedestal % Start Time Current Limit Level High Torque Start 60 % 3 S 4.375 *FLC Stop Pedestal % Stop Time Current Limit Time Optimise Rate Auto Pedestal Auto End Start Auto Bypass Auto 3MC Low Voltage SoftStop Soft Stop Smoothing 0 0 25 % S S Auto Jog Auto Stop Auto End Stop 0 0 25 % S S Auto Jog Auto Stop Auto End Stop 0 0 60 % S S Auto Jog Auto Stop Auto End Stop 0 0 60 % S S Auto Jog Auto Stop Auto End Stop 0 0 12 % S S Auto Jog Auto Stop Auto End Stop % S S Auto Jog Auto Stop Auto End Stop MN850 Advanced Menu Block Title Parameter Description Advanced Current Rated Current – (View Only) this value is the continuous current rating of the control. Low Current – If on, activates low current trip protection. Useful to detect a low current condition (broken belt, coupling, pump etc.) on driven equipment. Low Current Level – The value of the low current trip detection. Value can be 0 to 100% of the Rated Current parameter value. Parameter 28. Low Current Time – The number of power cycles the motor current is allowed to remain below the low current level before a low current trip occurs. Value can be 5 to 255 cycles. Parameter 29. C/L Time Out – If on, allows current limit time out trip (active). Current Limit – The value of the current limit trip detection. Value can be 1 to 7.9 times the Rated Current parameter value. Parameter 30. Limit Time Out – The number of seconds Value can be 0 to 255 seconds. Parameter 31. Shearpin – If on, Shearpin protection is active. Useful to detect a high current condition (such as a jammed conveyor or press) on driven equipment. Shearpin Level – The value of the high current Shearpin trip detection. Value can be 1 to 5 times the Rated Current parameter value. Parameter 32. Shearpin Time – The number of power cycles the motor current is allowed to remain above the low shearpin level before a Shearpin trip occurs. Value can be cycles. Parameter 33. Overload Level – Provides overload protection for SCR’s. (Not for motor thermal overload). The value of the overload current trip detection. Value can be 0.6 to 2 times the Rated Current parameter value. Parameter 34. Overload Delay – A numerical value that represents the time and current characteristics for overload integration. Value can be 10 to 140. Parameter 35. Note: For applications that have frequent Start/Stop sequences, it is necessary to maintain 115VAC at terminals X1 and X2. Removing 115VAC from these terminals resets the overload delay integration to 140. Overload Set Point Seconds to Trip Delay = 140 Delay = 80 Delay =30 Delay = 10 Overload Level (Motor Current x N) MN850 Optimise Rate A numerical value that represents the rate at which the motor voltage is reduced during optimizing. When this number is large, improves efficiency on stable loads. A lower number for unstable loads will reduce speed variations. Value can be 4 to 30. Parameter 19. Kick Start If on, Kick Start feature is active. Kick Pedestal For traction or “frozen” loads, this boost pulse of higher voltage helps the load to start moving. Value can be 60% to 90% of line voltage. Parameter 13. Kick Time Number of cycles duration the kick pedestal voltage is applied. Value can be 10 to 40. Parameter 14. Dwell Time Number of seconds that full voltage is applied to the motor before optimizing begins (if optimizing is selected). Value can be 1 to 255. Parameter 15. Low Volts Stop Allows decel to zero volts (not just to the level of the start pedestal). (Sometimes helpful for unstable loads or regeneration). Parameter Index 4-3 Advanced Menu Continued Block Title Parameter Description Advanced Contactor Delay A delay is required when an input contactor is energized by the soft–start “Run” relay. This delay allows bouncing contactor armature to settle during the “Closed” position. Value can be 20 to 800 milliseconds. Parameter 71. Trip Sensitivity A numerical value that sets the sensitivity level for all trips. A larger number provides slower response to a trip. Value can be 1 to 15. Parameter 72. Station Number Reserved for future use. Language English (44) is preset. Value can be 1 to 255. Parameter 2. Firing Mode Sets the SCR firing mode to one of the following: (Value can be 0 to 3. Parameter 7.) 0 – Normal, 3 phase induction motor, Soft–Start conducting line current. 1 – Induction motor (Delta), Soft–Start conducting phase current. 2 – Closed loop phase control for electrical loads other than motors. Current sensing is active but current protection is disabled. 3 – Open loop phase control for electrical loads other than motors. Current sensing is disabled and current protection is disabled. Note: Modes 2 and 3 are not suitable for motor loads and may damage motor and control. These modes are suitable for electrical loads such as lighting or resistive heaters. Stop Smoothing Adjustable voltage ramp for smooth deceleration. Motor current is monitored and stop smoothing will continue until the Start Pedestal value is reached. Value can be 1 to 255. Parameter 122. Auto Features Menu Block Title Parameter Description Auto Features Settings Display starting method, either Keypad or Remote. Also displays operating mode (Optimizing or Full Voltage). Auto Jog If on, and Stop is commanded within 0.5 seconds of a start command the control will change to jog mode. In jog mode, the decel ramp is changed to 0 seconds. Repeatedly pushing the Start/Stop button will cause the motor to move slightly in the same direction. Auto Pedestal If on, will automatically increase the voltage pedestal to start motor rotation. Auto End Start If on and motor reaches full speed during ramp up, the start ramp will be terminated and full voltage will be applied to the motor. Auto Stop If on, automatically activates stop smoothing if required by the load during stop for smooth deceleration of the load. Auto End Stop If on, detects a stalled or stopped motor and terminates ramp down (turns SCR’s off) during stop. Auto Bypass If on, control detects the bypass contactor closing and automatically disables shorted SCR detection (activates shorted SCR detection when contactor opens). Auto 3MC If on, reduces inrush current by allowing the motor voltage to build up from zero to the set voltage pedestal over 2 to 3 cycles. On “Sticky” or “Traction” type loads, this mode allows dynamic boost and stall sensing to start load. Auto Off Off – No effect. On – changes the setting of all “Auto” parameters. If on, the parameter turns off etc. Stop Smoothing If on, allows motor deceleration smoothing (see Stop Smoothing Rate, Advanced menu). 4-4 Parameter Index MN850 Permanent Store Menu Block Title Parameter Description Permanent Store Save Parameters Saves all parameter values and overwrites previously saved values. Power on Parameters Restores all parameter values to the values that were last saved (last power up cycle). All parameter values changes since last power up are overwritten. Display blinks twice to confirm reset is complete. Default Parameters Restores all parameter values to the factory settings. All parameter values are overwritten. Display blinks twice to confirm reset is complete. Password Menu Block Title Parameter Description Password Enter Password If a password is set, it prevents unauthorized users from changing any parameter values. Value can be 0 to 255 (0=no password). If the correct password is entered, all parameters are unlocked. Parameter 5. Change Password If the parameters are unlocked, a new password can be set using this option. Value can be 0 to 255 (0=no password). Parameter 5. Note: Remember your password. Removing power etc. will not clear the password. When a password is set, use Enter Password to unlock the parameters. Inputs Menu Block Title Parameter Description Inputs Digital i/p1 Input 1 is available at J10, terminals S1 (hot) and S0 (neutral). May be set as follows: Map to – Value can be parameter 0 – 112. Parameter 65. Bit number – Press “Optimise” to shift one position to the left. Press “⇑” to change that character to a logic 1. Press “⇓” to change that character to a logic 0. The value is stored in Parameter 66. Polarity – Value of each of the 8 I/O bits can be Positive or Inverse Logic. The value is stored in Parameter 54. Digital i/p2 Reserved for future use. Digital i/p3 Reserved for future use. Temperature i/p Reserved for future use. 4–20ma i/p Reserved for future use. DC i/p Reserved for future use. MN850 Parameter Index 4-5 Outputs Menu The internal LED, four digital outputs and two analog outputs can be individually defined as desired. Each digital output can be assigned positive or inverse logic. Block Title Parameter Description Outputs LED Available only on size 2 and 3 controls, this Red LED can represent a variety of status conditions. The LED is located on the control board. K1 Relay output with Form C (1 N.O. and 1 N.C.) single pole, double throw contacts. Contacts are rated for 10Amp @ 250VAC. Parameter 57 contains the parameter number of the status parameter assigned to K1. Parameter 58 contains the bit location for the K1 output. Parameter 54 contains the polarity value for the K1 output. K2 Relay output with Form C (1 N.O. and 1 N.C.) single pole, double throw contacts. Contacts are rated for 10Amp @ 250VAC. Parameter 59 contains the parameter number of the status parameter assigned to K1. Parameter 60 contains the bit location for the K1 output. Parameter 54 contains the polarity value for the K1 output. K3 Available with optional I/O expansion board. Refer to MN851 for information. K4 Available with optional I/O expansion board. Refer to MN851 for information. Analog o/p1 Available with optional I/O expansion board. Refer to MN851 for information. Analog o/p2 Available with optional I/O expansion board. Refer to MN851 for information. Voltage o/p Available with optional I/O expansion board. Refer to MN851 for information. Parameters Menu Allows quick access to parameter values. Useful to view status or change a value of any programmable parameter. Refer to Appendix B for parameter numbers and values. Block Title Parameter Description Parameters P1 – P20 Entry point for viewing or programming parameters P1 – P20. P21 – P40 Entry point for viewing or programming parameters P21 – P40. P41 – P60 Entry point for viewing or programming parameters P41 – P60. P61 – P80 Entry point for viewing or programming parameters P61 – P80. P81 – P100 Entry point for viewing or programming parameters P81 – P100. P101 – P120 Entry point for viewing or programming parameters P101 – P120. P121 – P125 Entry point for viewing or programming parameters P121 – P125. Trips Menu This menu is used to view the last five fault trip conditions. Additional information about fault trips may be found in the troubleshooting section of this manual. Block Title Parameter Description Trips 1–16 External Trip Use the “⇑” and “⇓” keys to scroll through the fault trip list. In this example, 1 = the most recent trip (5 would indicate oldest). 16 = the code for the fault trip. External Trip = the text message for the fault trip. 4-6 Parameter Index MN850 Mapping to an Output Relay Most status values are stored in memory as status words. The following is a list of these status words: Parameter Description (128) 10000000 (64) 01000000 (32) 00100000 (16) 00010000 (8) 00001000 (4) 00000100 (2) 00000010 (1) 00000001 8 Status 1 Stopping Energy Saving Full Conduction Dwell Top of Ramp Current Limit Starting Stopped 9 Status 2 4-20mA level >P46 DC I/p level >P48 Inhibit Start Noise on Power Forced Override Stall Overload Integrating Alarm 10 Status 3 Red LED (Not Used) Input 3 Input 2 Input 1 Relay K4 Relay K3 Relay K2 Relay K1 51 User Flag 1 (for first Param. set) Remote Starting Not Used Thermistor Selector Low Current Selector Shearpin Selector Overload Selector Current Limit Timeout Kickstart Selector 52 User Flag 2 (for first Param. set) Zero Start Time Second Parameter Set Main Contactor Remote Start/Stop Keypad Start/Stop Not Global Enable 2 Not Global Enable 1 Low Voltage Soft–Stop 53 User Flag 3 (for first Param. set) Auto Pedestal Auto End Start Auto Stop Auto End Stop Inverted Control Input User Current Limit User Flag 2 Polarity User Flag 1 Polarity 54 I/O Polarity Red LED Polarity (Unused) Input 3 Input 2 Input 1 Relay K4 Relay K3 Relay K2 Relay K1 86 Auto Config 2 Auto Pedestal Auto Endstart Auto Stop Auto Endstop Auto Jog Auto Bypass Auto 3MC (Unused) 95 User Flag 1 (for 2nd Param. set) Remote Starting Not Used Thermistor Selector Low Current Selector Shearpin Selector Overload Selector Current Limit Timeout Kickstart Selector 96 User Flag 2 (for 2nd Param. set) Zero Start Time Second Parameter Set Main Contactor Remote Start/Stop Keypad Start/Stop Not Global Enable 2 Not Global Enable 1 Low Voltage Soft–Stop 112 Status 4 Thermal Switch Overload Timeout Thermistor Under Current Shearpin RYB Phase Sequence 60Hz Each parameter is an 8 bit word and is used as a bit mask. Any bit of each word can be assigned to an output relay (K1, K2, K3 or K4). MN850 Parameter Index 4-7 Parameter Descriptions Title Parameter Version 5MC (4/2/01) Password Advanced P# P0 P1 P2 P3 P4 P5 P6 Parameter Dummy Parameter Station Number Country Software Type Software Version Password Value Firing Mode Basic P7 Protection Mode Parameters P8 Status 1 P9 Status 2 P10 Status 3 Basic P11 Start Pedestal Advanced P12 P13 P14 Start Time Kick Pedestal Kick Time Auto Features P15 P16 P17 P18 Dwell Time Stop Pedestal Stop Time Auto Config Advanced P19 Optimise Rate Basic 4-8 Parameter Index Description Map unused bits, parameters etc. Unused Determines the language used by the display. 44=English. Manufacturers product code for the Soft-Start software. Version of the software. Allows you to set and enter a password. 0= Normal motor (outside delta or star) 1= Delta (inside delta, no optimization) 2= Closed loop phase control 3= Open loop phase control Determines the fault protection method. 0= Input phase loss detection only. 64= Full protection with full volts after top of ramp. 128= Full protection during start then bypass (no protection) 192= Full protection + Optimization Definition (Preset Value, all = 0) Bit0= Stopped (1=Start/stop signal inactive, SCR's Off, Main contactor open). Bit1= Starting (1= Starter is in Start Ramp). Bit2= Current Limit (1=Motor current has reached limit and is being held). Bit3= Top of Ramp (Full volts) (1=start ramp and current limit is complete). Bit4= Dwell (1=the time at the end of the start ramp when the motor is held at full volts before optimizing to stabilize the load). Bit5= Full Conduction- (1= thyristors in continuous conduction). Bit6= Energy Saving (1=Motor pf is monitored and volts are adjusted to optimum) Bit7= Stopping (1=the stop ramp is active). Definition (Preset Value, all = 0) Bit0= Alarm (1=fault is detected and a trip has occurred) Bit1= Overload Integrating (1=overcurrent is detected and is integrating) Bit2= Stall (1=a stall condition is detected, motor speed decreasing). Bit3= Forced Override (1= Optimizing not available even if selected because motor current>80%FLA). Bit4= Noise (1=Noise on AC input power mains is detected). Bit5= Inhibit Start (1=Start is inhibited for a period to maintain duty cycle). Bit6= DC I/P level reached (1= DC > P48). Bit7= 4-20mA I/P level reached (1= 4-20mA > P46). Definition (Preset Value, all = 0) Bit0= K1 (1= K1 Active). Bit1= K2 (1= K2 Active). Bit2= K3 (1= K3 Active). Bit3= K4 (1= K4 Active). Bit4= Starter I/P 1 (1= Control Input1 is high). Bit5= Starter I/P 2 (1= Control Input2 is high). Bit6= Starter I/P 3 (1= Control Input3 is high). Bit7= Red LED status (unused) Sets the voltage level for the Start of Voltage Ramp". Must be sufficient to allow motor to generate a breakaway torque. Sets the time allowed for motor voltage to equal line voltage. Sets the voltage level at the start of the kickstart operation. Sets the number of cycles that the P13 voltage is applied. Note that for 60 Hz, 40 cycles = 667ms. For 50 Hz, 40 cycles = 800ms. Sets the dwell time allowed after top of ramp is reached. Sets the drop in motor voltage for the Stop Voltage Ramp" operation. Sets the ramp down time for motor stopping. Auto configuration flags to use with the first parameter set. Definition (Preset Value) Bit0= Unused Bit1= Auto 3MC (1, Auto remove low volt. ramp for high start pedestal). Bit2= Auto Bypass (1, Enable Automatic Bypass Contactor detection). Bit3= Auto Jog (0, Disable auto jog detect. If 1, a stop request within .5 sec of a start request is forced to 0 stop time). Bit4= Auto Endstop (0, Do not detect stalled motor at softstop). Bit5= Auto Stop (0, Do not detect variations in pf during stop smooth stall). Bit6= Auto Endstart (0, Do not detect full speed at start and adjust start ramp). Bit7= Auto Pedestal (0, Do not detect rotation at start and adjust pedestal). Sets the optimizing response rate. This parameter helps to stabilize small slip speed motors with low inertia loads. (4=fastest optimizing rate). MN850 Title Parameters P# P20 Parameter Reference PF (Power Factor) Description The calculated power factor to optimize the control loop. P21 Present PF (Power Factor) The present power factor of the motor (load). P22 Delay Angle (SCR OFF time) The period (in degrees) that the thyristors are in the OFF state. P23 Maximum Optimizing Delay Sets the maximum delay angle (max degrees that the thyristors are OFF) used during the optimizing mode. P24 Rated Current (High Byte –Hundreds) The current rating of the soft–start set by manufacturer. P25 Rated Current (Low Byte – Units) The current rating of the soft–start set by manufacturer. P26 Running Current Amps (RatedCurrent) x (7.96875) 32 Peak Start Current (measured at last start) The load current. (Always shown as phase current). P28 Low Current Level (undercurrent trip) (scaling = 0.03125) Sets the under current trip level. (The low current level flag is updated even if the low current trip is disabled). P29 Low Current Time (delay before trip) The number of cycles allowed for a low current level condition (P28) to exist before tripping. For 60 Hz, 40 cycles = 667ms. For 50 Hz, 40 cycles = 800ms. P30 P31 Current Limit Level (scaling = 0.03125) (RatedCurrent) x (7.96875) 32 Current Limit Time (delay before trip) P32 Shearpin Level (overcurrent trip) Sets the level that the start ramp is held. (The start ramp is only held if the P30 value is reached. The current decreases as motor speed increases allowing the ramp to continue). The time allowed for start current to equal P30 value before tripping. Note that for 60 Hz, 40 cycles = 667ms. For 50 Hz, 40 cycles = 800ms. Sets the over current trip level. Shearpin operation begins after start–up is complete. P33 Shearpin Time (delay before trip) P34 Overload Level (SCR protection) P35 Overload Delay (delay before trip) The time allowed for an overload condition before tripping. For 60 Hz, 60 cycles = 1second. For 50 Hz, 50 cycles = 1second. P36 % Overload (status only) The integration of the Current–Time product represented as a % of a value that was preset by the manufacturer. P37 Chassis Temp The heatsink temperature. When the temperature exceeds a threshold value, P37 value will change from <20 to >200. P38 Pot1 The value of RV1 on the control card. 255=fully CW setting for 5VDC input. (Not applicable for keypad operation). P39 Pot2 The value of RV2 on the control card. 255=fully CW setting for 5VDC input. (Not applicable for keypad operation). P40 Pot3 The value of RV3 on the control card. 255=fully CW setting for 5VDC input. (Not applicable for keypad operation). P41 DC I/P 0–12V input for load monitoring or phase angle setpoint etc. P42 Thermistor Monitors the Thermistor I/P (standard motor thermistor). The values are not all that useful as thermistors act much like a switch. P43 4–20mA I/P Monitors the 4 to 20mA input. Note this input is referenced to the PCB 0V and so cannot be used with daisy chained sensors. P44 TEMP Trip Level The value at which Parameter 37 causes a trip. P45 4–20mA MAP Value is the Parameter to which the 4–20mA data is sent. P46 4–20mA Set Level Value is the level at which the 4–20mA level bit will be set. P47 DC Input Map Value is parameter to which the DC input data is sent. P48 Set Level DC I/P Value is the level at which the DC–I/P level bit will be set. P49 MAP DAC O/P 1 The value is the parameter that is the source for DAC 1 (0–10VDC). P50 MAP DAC O/P 2 The value is the parameter that is the source for DAC 2 (0–10VDC). P27 Advanced Current Parameters MN850 The maximum current used during the last start–up. The number of cycles allowed for an overcurrent condition before tripping (only when shearpin flag P51, Bit3=1). For 60 Hz, 60 cycles = 1second. For 50 Hz, 50 cycles = 1second. Sets the overload current level as a portion of FLA. (P34 is always active but P30 is only active during motor starting.) Parameter Index 4-9 Title Parameters Continued P# P51 User Flags 1 P52 User Flags 2 P53 User Flags 3 P54 I/O Polarity Determines the polarity of the digital inputs and outputs. A Bit set=0; is negative logic. A Bit set=1; is positive logic. Example: P54, Bit0=1 (K1 mapped to Main Contactor), P57=52, P58=00100000 P52, Bit 5=1 will cause K1 to close. Definition (Preset Value) Bit0= Relay K1 (1, positive) Bit1= Relay K2 (1, positive) Bit2= Relay K3 (1, positive) Bit3= Relay K4 (1, positive) Bit4= Control Input 1 (1, positive) Bit5= Control Input 2 (1, positive) Bit6= Control Input 3 (1, positive) Bit7= Led (RED) Unused P55 MAP LED Unused P56 LED MASK Unused P57 Map K1 To (Parameter) P58 K1 Bit Mask (P57 bit selected for K1) The parameter number that will control Relay K1. The preset is P52: User Flags 1–2. (P57 operates with P58). (Mapped to means electronic transfer of the analog value.) Sets the bit in the parameter selected by P57 that operates the relay K1 on the control card. The preset is P52:User Flags 1–2, Bit5 (main contactor). (P58 operates with P57). 7 6 5 4 3 2 1 0 Bits 1 0 0 0 0 0 0 0 0 1 0 0 0 0 0 0 0 0 1 0 0 0 0 0 (Preset) 0 0 0 1 0 0 0 0 0 0 0 0 1 0 0 0 0 0 0 0 0 1 0 0 0 0 0 0 0 0 1 0 0 0 0 0 0 0 0 1 P59 Map K2 To (Parameter) 4-10 Parameter Index Parameter Description Note that these bits operate with P52 bit 6 (param group selector). This lets you set a primary and secondary group value: e.g. P14: Kick Time 1 (primary); P82: Kick Time 2 (secondary). Definition (Preset Value) Bit0= Kickstart selector (0, do not select kickstart) Bit1= Current limit timeout (1, trip on timeout) Bit2= Overload selector (1, selects overload operation) Bit3= Shearpin selector (1, selects shearpin operation) Bit4= Low current selector (0, do not select low current operation) Bit5= Thermistor selector (0, do not select thermistor operation) Bit6= Not Used Bit7= Remote input selector (1, start/stop by remote terminals) (See P52 Bit4) Bit0= Bit1= Bit2= Bit3= Bit4= Bit5= Bit6= Bit7= Definition (Preset Value) Low voltage stop selector (0, do not select low voltage part of stop ramp) Not global enable 1 - active low (0, not active signal from terminal) Not global enable 2 - active low (0, not active signal from bus) Keypad Start/Stop (0, Off)- (Available when P51 Bit7=0) Remote Start/Stop (0, Off)- (Available when P51 Bit7=1) Main contactor selector (0, Off)- (use with a relay) Parameter group selector (0, Off= Group 1) Zero Start Time (0, do not use full voltage at motor start) Bit0= Bit1= Bit2= Bit3= Bit4= Bit5= Bit6= Bit7= Definition (Preset Value) User Flag 1 Polarity (1, positive) User Flag 2 Polarity (1, positive) User Current limit (0, do not request a start ramp hold) User trip (0, do not request a trip) Invert Controller Input (1, set point source input is inverted in servo loop) Inhibit restart (0, inhibited restart control is disabled) Thermal Switch 2 Enable (0, Secondary thermal control is disabled) Unused The parameter number that will control Relay K2. The preset is P8: Status 1. (P59 operates with P60). (Mapped to means electronic transfer of the analog value.) MN850 Title Parameters Continued MN850 P# P60 Parameter K2 Bit Mask (P59 bit selected for K2) Description Sets the bit in the parameter selected by P59 that operates the relay K2 on the control card. The preset is P8:Status 1, Bit3 (Top of Ramp or Full Volts). (P60 operates with P59). 7 6 5 4 3 2 1 0 Bits 1 0 0 0 0 0 0 0 0 1 0 0 0 0 0 0 0 0 1 0 0 0 0 0 0 0 0 1 0 0 0 0 0 0 0 0 1 0 0 0 (Preset) 0 0 0 0 0 1 0 0 0 0 0 0 0 0 1 0 0 0 0 0 0 0 0 1 P61 MAP K3 TO (Parameter) Value is the destination parameter number for the K3 bit. Parameter 62 is the mask for P61 (Map K3 To). P62 K3 BIT MASK Parameter 62 is the mask for P61 (Map K3 To). P63 MAP K4 TO (Parameter) Value is the destination parameter number for the K4 bit. Parameter 64 is the mask for P63 (Map K4 To). P64 K4 BIT MASK Parameter 64 is the mask for P63 (Map K4 To). P65 Map I/P1 To (Parameter) The parameter number that will control Input 1 on the control card. The preset is P52: User Flags 1–2. (Parameter 66 is the mask for P65, Map I/P1 To). (Mapped to means electronic transfer of the analog value.) P66 I/P1 Bit Mask (P65 bit selected for I/P1) Sets the bit in the parameter selected by P65 that operates Input 1 of the control card. The preset is P52:User Flags 1–2, Bit4 (Board Start/Stop). (Parameter 66 is the mask for P65, Map I/P1 To). 7 6 5 4 3 2 1 0 Bits 1 0 0 0 0 0 0 0 0 1 0 0 0 0 0 0 0 0 1 0 0 0 0 0 0 0 0 1 0 0 0 0 (Preset) 0 0 0 0 1 0 0 0 0 0 0 0 0 1 0 0 0 0 0 0 0 0 1 0 0 0 0 0 0 0 0 1 P67 Map I/P2 To (Parameter) P68 I/P2 Bit Mask (P67 bit selected for I/P2) The parameter number that will control Input 2 on the control card. The preset is P0. (Parameter 68 is the mask for P67, Map I/P2 To). (Mapped to means electronic transfer of the analog value.) Parameter 68 is the mask for P67, Map I/P2 To. P69 Map I/P3 To (Parameter) P70 I/P3 Bit Mask (P69 bit selected for I/P3) The parameter number that will control Input 3 on the control card. The preset is P0. (Parameter 70 is the mask for P69, Map I/P3 To). (Mapped to means electronic transfer of the analog value.) Parameter 70 is the mask for P69, Map I/P3 To. Parameter Index 4-11 Title Advanced Current Parameters P# P71 Parameter Contactor Delay (after start command) Description Sets the delay time between the request to actuate K1 and the start of firing the thyristors. P72 Trip Sensitivity (1=fastest trip) Unused P73 Last Trip (Most Recent Trip) P73 stores the most recent trip code for the most recent fault. Trip code definitions are as follows: 0 Not Used 1 Phase Loss Fault. One or phases of the incoming three phase AC power is missing. Check fuses etc. 2 Thermal Switch Fault. A thermal switch (fan cooled units only) detected an over temperature condition. P51 (or P95) bit 5 enabled. 3 * Thyristor Signal Fault. Thyristor control signal fault. 4 * Thyristor Firing Fault. One or more thyristors not firing. 5 * Thyristor Signal Fault. Thyristor control signal fault. 6 * Thyristor Signal Fault. Thyristor control signal fault. 7 * Thyristor Sensing Signal Fault. 8 * Thyristor Sensing Signal Fault. 9 * Thyristor Sensing Signal Fault. 10 * Thyristor Short Circuit. Thyristor shorted across the poles. 11 Under Current Fault. When Top of Ramp" is reached, P28 (or P87) Low Current Level and P29 (or P88) Low Current Time become active. If P51, Bit 4 is enabled, a fault will occur if the output current is less than P28 for longer than the P29 time period. 12 Current Limit Fault. During start-up, P30 (or P89) Current Limit Level and P31 (or P90) Current Limit Time are active. If P51, Bit 1 is enabled, a fault will occur if the output current exceeds P30 for longer than the P31 time period. 13 Overload Fault. During normal operation, P34 (or P93) Overload Level and P35 (or P94) Overload Delay are active. If P51, Bit 2 is enabled, a fault will occur if the output current is equal to or greater than P34 for longer than the P35 time period. 14 Shearpin Fault. When Top of Ramp" is reached, P32 (or P91) Shearpin Level and P33 (or P92) Shearpin Time become active. If P51, Bit 3 is enabled, a fault will occur if the output current is greater than P32 for longer than the P33 time period. 15 Thermistor Fault. Motor is overtemperature. 16 External Trip. * Contact Baldor if this fault occurs. P74 2nd Last Trip P74 stores the trip code for the fault previous to P73. See P73 for definitions. P75 3rd Last Trip P75 stores the trip code for the fault previous to P74. See P73 for definitions. P76 4th Last Trip P76 stores the trip code for the fault previous to P75. See P73 for definitions. P77 5th Last Trip (Oldest trip) P77 stores the trip code for the fault previous to P76. See P73 for definitions. P78 Protection Mode 2 (trips or 2nd param set) Determines the fault protection method 0= Input phase loss detection only. 64= Full protection with full volts after top of ramp. 128= Full protection during start then bypass (no protection) 192= Full protection + Optimization P79 Start Pedestal 2 (for 2nd param set) Sets the voltage level for the “Start of Voltage Ramp”. Must be sufficient to allow motor to generate a breakaway torque. P80 Start Time 2 (for 2nd param set) Sets the time allowed for motor voltage to equal line voltage. P81 Kick Pedestal 2 (for 2nd param set) Sets the voltage level at the start of the kickstart operation. P82 Kick Time 2 (for 2nd param set) Sets the number of cycles that the P81 voltage is applied. Note that for 60 Hz, 40 cycles = 667ms. For 50 Hz, 40 cycles = 800ms. P83 Dwell 2 (for 2nd param set) Sets the dwell time allowed after top of ramp is reached. P84 Stop Pedestal 2 (for 2nd param set) Sets the drop in motor voltage for the “Stop Voltage Ramp” operation. P85 Stop Time 2 (for 2nd param set) Sets the ramp down time for motor stopping. 4-12 Parameter Index MN850 Section 1 General Information Title Parameters Continued Parameters Continued MN850 86 P# Parameter Auto Config 2 (for 2nd param set) Auto configuration flags for the second parameter set. Description Definition (Preset Value) Bit0= Unused Bit1= Auto 3MC (1, enable auto removal of low voltage ramp for high start pedestals) Bit2= Auto Bypass (1, enable automatic bypass contactor detection). Bit3= Auto Jog (0, disable jog detection. If enabled a stop request within 0.5 second of a start request is forced to 0 stop time). Bit4= Auto Endstop (0, disabled. If enabled detect a stalled motor during softstop and turn off thyristors). Bit5= Auto Stop (0, do not detect variations in pf during stop smooth stall). Bit6= Auto Endstart (0, disable detection of full speed during start and end of start ramp) Bit7= Auto Pedestal (0, disable detection of motor rotation at start with pedestal adjustment). Sets the under current trip level. P87 Under Current 2 (for 2nd param set) P88 Under Current Time 2 (for 2nd param set) The time allowed for a low current level condition (P87) to exist before tripping. For 60 Hz, 40 cycles = 667ms. For 50 Hz, 40 cycles = 800ms. P89 Current Limit 2 (for 2nd param set) Sets the motor starting current. 90 (for 2nd param set) 91 Shearpin 2 (for 2nd param set) The time allowed for start current to equal P89 value before tripping. Note that for 60 Hz, 40 cycles = 667ms. For 50 Hz, 40 cycles = 800ms. Sets the over current trip level. Shearpin operation begins after start–up is complete. 92 (for 2nd param set) 93 (for 2nd param set) 94 (for 2nd param set) The time allowed for an overload condition before tripping. For 60 Hz, 60 cycles = 1second. For 50 Hz, 50 cycles = 1second. 95 User Flags 1 (for 2nd param set) Note that these bits operate with P96 bit 6 (param group selector). This lets you set a primary and secondary group value. Definition (Preset Value) Bit0= Kickstart 2 (0, Off) Bit1= Current limit selector 2 (1, On) Bit2= Overload selector 2 (1, On) Bit3= Shearpin selector 2 (0, Off) Bit4= Low current selector 2 (0, Off) Bit5= Thermistor selector 2 (0, Off) Bit6= Unused Bit7= Remote starting 2 (1=P96 Bit4) (If 0, 0=P96 Bit 3) 96 User Flags 2 (for 2nd param set) 97 Flag1 I/P Source Address Address of source flag parameter. (Parameter 98 is the mask for P97.) 98 Flag1 I/P Source Mask The bit mask for source flag parameter. 99 Flag1 O/P Destination Address Address of destination flag parameter. (Parameter 100 is the mask for P99.) The number of cycles allowed for an overcurrent condition before tripping (only when shearpin flag P95, Bit3=1). For 60 Hz, 60 cycles = 1second. For 50 Hz, 50 cycles = 1second. Sets the overload current level as a portion of FLA. (P93 is always active but P89 is only active during motor starting.) Bit0= Bit1= Bit2= Bit3= Bit4= Bit5= Bit6= Bit7= Definition (Preset Value) Low voltage Softstop (0, Off) Not global enable 1(2) (0, Off) Not global enable 2(2) (0, Off) Keypad Start/Stop 2 (0, Off)- (Available when P95 Bit7=1) Remote Start/Stop (0, Off)- (Available when P95 Bit7=0) Main contactor 2 (0, Off)- (use with a relay) Second Parameter Set 2 (1, On= Group 2) Zero Start time 2 (0, Off) Parameter Index 4-13 Section 1 General Information Title Parameters Continued Parameters Continued P# 100 Parameter Flag1 O/P Destination Mask Description The bit mask for destination flag parameter. 101 Flag2 I/P Source Address Address of source flag parameter. (Parameter 102 is the mask for P101.) 102 Flag2 I/P Source Mask The bit mask for source flag parameter. 103 Flag2 O/P Destination Address Address of destination flag parameter. (Parameter 104 is the mask for P103.) 104 Flag2 O/P Destination Mask The bit mask for destination flag parameter. 105 Loop Input The parameter number used as the source for control loop setpoint. 106 Loop Feedback The parameter number used as the source for control loop feedback. 107 Error Gain Multiplier for the control loop error signal. 108 Error Divisor Divisor for the control loop error signal. 109 Max Slope The maximum allowed single error in open loop. 110 Guard Gap The minimum allowed firing delay in both open loop and phase control modes. This allows for jitter and power factor of the load. 111 User Parameter This parameter may be set by the user by the serial link. 112 Status 4 113 Drive Type Unused 114 Baud Rate Unused 115 Selected App Value selected from application table. Not implemented on some versions of software. 116 5MC Inhibit Time (restart not allowed) Number of minutes after stop that restart is not allowed. (Protects SCR’s for large loads.) 117 Command Source Unused 118 Action On Bus Error Unused 119 Preset Parameter Number to Display Unused 120 Status 5 121 User Flags 4 122 Soft–Start Smoothing Sets the amount of soft–start smoothing. This parameter helps stabilize jitter caused by unstable loads. 123 Reserved for future use. Unused 124 Reserved for future use. Unused 125 Reserved for future use. Unused 4-14 Parameter Index Bit0= Bit1= Bit2= Bit3= Bit4= Bit5= Bit6= Bit7= Definition (Preset Value, all = 0) The unit is using 60Hz parameters The phase rotation detected at start (RYB Sequence) Indicates current is greater than shearpin level Indicates current is less than under current level Thermistor is overtemperature or I/P's are open circuit Current limit has timed out Overload has passed trip level Heatsink temperature is greater than max allowed Bit0= Definition (Preset Value) Thermal Switch 2 Over temp . Prevents re-start if set. (0, Off) Bit0= Bit1= Bit2= Definition (Preset Value) Unused Allow for quicker comms response (0, Off) enable Soft stop smoothing for pumps (0, Off) MN850 Section 5 Troubleshooting Safety Notice Be sure to read and understand all notices, warning and caution statements in Section 1 of this manual. If you have any questions about the safe operation of this equipment, please contact your Baldor representative before you proceed. Preliminary Checks In the event of trouble, disconnect all input power to the control and perform these preliminary checks. Power Off Checks 1. 2. 3. 4. 5. Check all connections for tightness and signs of overheating. Check for cracked or damaged insulators and terminal blocks. Ensure the correct setting of the overload relay. Check the 115VAC input power. If one or more SCR’s should be replaced, contact Baldor. Table 5-1 Fault Trip Messages This menu is used to view the last five fault trip conditions. Additional information about fault trips may be found in the troubleshooting section of this manual. Note: The control is shipped with five fault messages in the log (P73–P77). The last message is “External Trip”. There is no software method to clear the fault log. Block Title Parameter Description Trips 1 16 External Trip Use the “⇑” and “⇓” keys to scroll through the fault trip list. In this example, 1 = the most recent trip (5 would indicate oldest). Parameters P73 to P77. 16 = the code for the fault trip. External Trip = the text message for the fault trip. 16 error conditions that cause a fault trip to occur are: (E1 – E16) 1 – Phase loss. This is a start–up protection fault that indicates single phase power at the AC input. This error can also indicate phase unbalance or undervoltage (low voltage). 2 – Too Hot. Heat sink temperature exceeded limit. Possible causes are overload, frequent starting, poor ventilation, excessive dirty on heat sink, high ambient temperature or high humidity. 3 – SCR Signal. Excessive electrical noise on input power lines. 4 – SCR Firing. SCR’s are not responding to firing commands. May be a result of a failed control board, voltage spikes on power lines, noise, loose connections or SCR failure. 5 – SCR Signal. Excessive electrical noise on input power lines. 6 – SCR Signal. Excessive electrical noise on input power lines. 7 – SCR Sensing. Loss of the sensing signal from an SCR. May be a result of a failed SCR, loss of phase current when running, undervoltage or phase unbalance when running. 8 – SCR Sensing. Loss of the sensing signal from an SCR. May be a result of a failed SCR, loss of phase current when running, undervoltage or phase unbalance when running. 9 – SCR Sensing. Loss of the sensing signal from an SCR. May be a result of a failed SCR, loss of phase current when running, undervoltage or phase unbalance when running. 10 – SCR Shorted. Shorted SCR is detected. If not using input contactor, it is recommended that you map this fault to an output relay to trip the circuit breaker if the error occurs. When one phase is shorted, motor can be stopped. However, when two or three phases are shorted, the motor cannot be stopped without the input contactor. 11 – Low Current. Motor current is less than full load current level (broken belt or coupling). 12 – C/L Timeout. Motor current exceeded current limit value. Voltage was reduced to limit output current but it still exceeded limit for longer than allowed. 13 – Overload. Provides overload protection for SCR’s. (Not for motor thermal overload). The value of the overload current trip detection was exceeded. 14 – Shearpin. The value of the high current Shearpin trip detection has been exceeded. 15 – Thermistor. Optional with I/O expansion board. Refer to MN851 for information. 16 – External Trip. Optional with I/O expansion board. Refer to MN851 for information. MN850 Troubleshooting 5-1 Table 5-2 Troubleshooting Guide INDICATION Unit fails to start CORRECTIVE ACTION LED’s on control card are OFF and no error messages displayed: 1. Verify that 115VAC is present at X1 and X2 terminals. 2. Verify that 9VAC is present at terminal J2 (see Section 2 cover removal). Green power LED is ON and no error messages displayed: 1. Control board or other component may be defective. Contact Baldor. Unit trips during start 1. Check parameter 73 (last trip) error code and isolate source of problem (see Table 5-1). 2. Verify that all three phases of AC input power and motor power are present (no missing phases). 3. If input contactor is used, verify AC input power is present at L1, L2 and L3 before the contactor delay time is complete. If the SCR’s fire before AC power is present, the “Phase Loss” message is displayed and unit will trip. 4. Verify all connections at the SCR gate connections. (Resistance check: with all power removed, the resistance between adjacent Red & Yellow wires at the control card connections can be checked. Between pins 1–2, 3–4, 5–8 etc. the resistance should be between 10 – 50 ohms ±20%. 5. Verify there are no power factor correction capacitors on the output. Power factor correction capacitors may only be connected on the line side of the control and must be switched out during starting. 6. Verify SCR are not shorted (error display “Motor SCR Loss”). (Resistance check: with all power removed, the resistance can be checked between adjacent Red to Red wires at the control connections. Between pins 1–4 (L3 & T3), 5–8 (L2 & T2) and 9–12 (L1 & T1) the resistance must be greater than 500k ohms. 7. If the “Shearpin” or “Overload” messages are displayed, verify that the soft–start control is correctly sized. 8. If the “Too Hot” message is displayed, verify the thermal switch connection (or jumper is installed) at J4. 9. If the “Sensing Signal” or “SCR Signal” messages are displayed, problem can be excess noise or failure on another circuit board. Contact Baldor. 10. Verify that the motor is less than 328ft.(100m) from the soft–start control. Bad start then unit trips 1. Check parameter 73 (last trip) error code and isolate source of problem (see Table 5-1). 2. Verify that AC input power and motor power wires are not reversed. (The motor will give an initial kick then start very roughly.) 3. Verify all connections at the SCR gate connections. (Resistance check: with all power removed, the resistance between adjacent Red & Yellow wires at the control card connections can be checked. Between pins 1–2, 3–4, 5–8 etc. the resistance should be between 10 – 50 ohms ±20%. 4. Verify there are no power factor correction capacitors on the output. Power factor correction capacitors may only be connected on the line side of the control and must be switched out during starting. 5. Verify SCR are not shorted (error display “Motor SCR Loss”). (Resistance check: with all power removed, the resistance can be checked between adjacent Red to Red wires at the control connections. Between pins 1–4 (L1 & T1), 5–8 (L2 & T2) and 9–12 (L3 & T3) the resistance must be greater than 500k ohms. 6. Verify that the motor is less than 328ft.(100m) from the soft–start control. SCR’s short on first start–up 1. Verify there are no power factor correction capacitors on the output. Power factor correction capacitors may only be connected on the line side of the control and must be switched out during starting. 2. Verify that the soft–start control is correctly sized. Verify the Rated Current, Overload Trip level, and trip delay are correct for the application. 3. Verify that the motor is less than 328ft.(100m) from the soft–start control. Also, verify the motor and motor leads are good. Unit trips during ramp–up 1. Check parameter 73 (last trip) error code and isolate source of problem (see Table 5-1). 2. Verify that all three phases of AC input power and motor power are present (no missing phases). Check for blown fuse if “Phase Loss” message is displayed. 3. Verify that the soft–start control is correctly sized. Verify the Rated Current, Overload Trip level, and trip delay are correct for the application. 4. If the “Too Hot” message is displayed, verify the thermal switch connection (or jumper is installed) at J4. 5-2 Troubleshooting MN850 Table 5-2 Troubleshooting Guide Continued INDICATION Initial motor kick then bad start CORRECTIVE ACTION Verify that AC input power and motor power wires are not reversed. (The motor will give an initial kick then start very roughly.) Current is not displayed 1. Verify the current transformer connections at J3 control terminal. 2. Verify that the soft–start control is correctly sized. Motor does not accelerate 1. Verify the Current Limit parameter value and increase if necessary. 2. Verify the Ramp Time parameter value and decrease if necessary. 3. Excessive motor current, decrease load. 4. Insufficient break away torque. Change pedestal voltage value to allow greater break away torque. Fuse(s) blown 1. Excessive start time. 2. Fuse undersized. Use only specified fuses for UL short circuit current ratings (see Section 2). Cannot change starting from “Remote” to “Keypad” Remote start input. Factory preset start input is Programmable Input 1 terminals S1 and S0. If a start voltage has been applied to S1 and S0, you cannot change to Keypad until the start command is removed. Therefore, remove the start voltage from S1 and S0 and then change to keypad. Figure 5-1 230/460VAC 3 Phase L1 L2 L3 5 5MC–PCB Red Yellow Yellow Red 3 1 1 2 3 4 RUN 6 4 Red Yellow 5 6 Yellow Red 7 8 Red Yellow 9 10 TOR Yellow 11 Red 12 2 T1 T2 T3 3 Phase Motor MN850 Troubleshooting 5-3 Electrical Noise Considerations All electronic devices are vulnerable to significant electronic interference signals (commonly called “Electrical Noise”). At the lowest level, noise can cause intermittent operating errors or faults. From a circuit standpoint, 5 or 10 millivolts of noise may cause detrimental operation. For example, analog speed and torque inputs are often scaled at 5 to 10VDC maximum with a typical resolution of one part in 1,000. Thus, noise of only 5 mV represents a substantial error. At the extreme level, significant noise can cause damage to the drive. Therefore, it is advisable to prevent noise generation and to follow wiring practices that prevent noise generated by other devices from reaching sensitive circuits. In a control, such circuits include inputs for speed, torque, control logic, and speed and position feedback, plus outputs to some indicators and computers. Relay and Contactor Coils Among the most common sources of noise are the coils of contactors and relays. When these highly inductive coil circuits are opened, transient conditions often generate spikes of several hundred volts in the control circuit. These spikes can induce several volts of noise in an adjacent wire that runs parallel to a control-circuit wire. Figure 5-1 illustrates noise suppression for AC and DC relay coils. Figure 5-1 AC and DC Coil Noise Suppression RC snubber AC Coil 0.47 mf + DC Coil Diode 33 W - Control Enclosures Motor controls mounted in a grounded enclosure should also be connected to earth ground with a separate conductor to ensure best ground connection. Often grounding the control to the grounded metallic enclosure is not sufficient. Usually painted surfaces and seals prevent solid metallic contact between the control and the panel enclosure. Likewise, conduit should never be used as a ground conductor for motor power wires or signal conductors. Special Motor Considerations Motor frames must also be grounded. As with control enclosures, motors must be grounded directly to the control and plant ground with as short a ground wire as possible. Capacitive coupling within the motor windings produces transient voltages between the motor frame and ground. The severity of these voltages increases with the length of the ground wire. Installations with the motor and control mounted on a common frame, and with heavy ground wires less than 10 ft. long, rarely have a problem caused by these motor–generated transient voltages. Analog Signals Analog signals generally originate from speed and torque controls, plus DC tachometers and process controllers. Reliability is often improved by the following noise reduction techniques: • • • 5-4 Troubleshooting Use twisted-pair shielded wires with the shield grounded at the drive end only. Route analog signal wires away from power or control wires (all other wiring types). Cross power and control wires at right angles (90°) to minimize inductive noise coupling. MN850 Section 6 Specifications and Product Data Identification Three Phase Digital Soft–Start MD 7 016 C B Control Type MD – Multipurpose Digital Input Voltage 7- 208, 230, 460VAC 8- 230, 460, 575VAC Ampere Rating 009- 9 Amp 016- 16 Amp 023- 23 Amp 030- 30 Amp 044- 44 Amp 059- 59 Amp 072- 72 Amp 085- 85 Amp 105- 105 Amp 146- 146 Amp 174- 174 Amp 202- 202 Amp 242- 242 Amp 300- 300 Amp 370- 370 Amp 500- 500 Amp 600- 600 Amp 750- 750 Amp 900- 900 Amp 1100- 1100 Amp 1200- 1200 Amp MN850 Enclosure A- Open Kit B- Open Chassis (IP20) C- NEMA12 (IP65) P- Panel Mount Note: Open Chassis meets NEMA Type 1 enclosure requirements but does not comply with UL Type 1 requirement for cable bending space. Soft–Start Type A- Combination controller with: S Input circuit breaker S Input contactor S Motor overload S Multipurpose Digital Soft–Start B- Non–Combination controller with: S Input contactor S Motor overload S Multipurpose Digital Soft–Start C- Controller only S Multipurpose Digital Soft–Start Specifications and Product Data 6-1 Input Ratings Input Voltage Range MD7–XXX = 208/230/460 VAC MD8–XXX = 230/460/575 VAC Phase Three Phase Input Frequency 60/50 HZ ± 5% Overload Rating Continuous 115% of FLA; 350% for 30 seconds. Duty Cycle Continuous Peak Inverse Voltage MD7–XXX = 1400VAC MD8–XXX = 1600VAC S0, S1 12VDC or 24VDC X1, X2 115VAC (98 – 126VAC) or 230VAC (196 – 253VAC) +10% to –15% +10% to –15% maximum maximum Storage Conditions Ambient Temperature: –4 to 140°F (-20 to 60 °C) Humidity: 0 - 95% RH Non-Condensing Operating Conditions Enclosure: NEMA 1 – Wall mounted (Industrial indoor, general purpose) For other enclosures, contact Baldor. The SCR’s generate about 3.3 watts of heat per running amp (motor FLA). If the control is mounted in an enclosure, the installer must provide fans or blower with sufficient ventilation. Fan or blower should be rated for at least 0.8 CFM per ampere of motor FLA rating. Baldor provided enclosures are designed to dissipate the heat from the SCR’s. Humidity: 0 - 85% RH Non-Condensing (not to exceed 50% at 40°C ambient). Control Heat Loss 3.3 Watt per running ampere of input current Ambient Operating Temperature: 32-113°F (0 to +40 °C) enclosed 32-122°F (0 to +40 °C) open panel Altitude: Sea level to 3300 Feet (1000 Meters) Derate 1% per 330 Feet (100 Meters) above 3300 Feet Derating Derate Amp rating 1% per 330 Feet (100 Meters) above 3300 Feet Derate Amp rating 2% per °C over 40 °C to 60 °C Max Output Relays – K1 and K2 contacts Category AC1, 230VAC, 3A. 6-2 Specifications and Product Data MN850 Standard Duty: Agitator, Compressor, Centrifuge, Fan, Blower, Chiller, Escalator, Pump, Bandsaw, Low Inertia Fan, Small Pump. Medium Duty: Mill, Conveyor, Drilling Press, Reciprocating Compressor, Elevator, Screw Feeder, Grinder, Hammer Press, Mixer, Large Pump, High Inertia Fan, Pelletizer, Pulper, Flywheel Press, Positive Displacement Pump, Circular Saw, Vibrating Screens. Heavy Duty: Rock Crusher, Pulverizer, Separator, Chipper, Screw Compressor. Catalog Number MD7–009–CB MD7–016–CB MD7–023–CB MD7–030–CB MD7–044–CB MD7–059–CB MD7–072–CB MD7–085–CB MD7–105–CB MD7–146–CB MD7–174–CB MD7–202–CB MD7–242–CB MD7–300–CB MD7–370–CB MD7–500–CB MD7–600–CB MD7–750–CB MD7–900–CB MD8–009–CB MD8–016–CB MD8–023–CB MD8–030–CB MD8–044–CB MD8–059–CB MD8–072–CB MD8–085–CB MD8–105–CB MD8–146–CB MD8–174–CB MD8–202–CB MD8–242–CB MD8–300–CB MD8–370–CB MD8–500–CB MD8–600–CB MD8–750–CB MD8–900–CB MD8–1100–CB MD8–1200–CB MN850 Output Cont. Current 9A 16A 23A 30A 44A 59A 72A 85A 105A 146A 174A 202A 242A 300A 370A 500A 600A 750A 900A 9A 16A 23A 30A 44A 59A 72A 85A 105A 146A 174A 202A 242A 300A 370A 500A 600A 750A 900A 1100A 1200A Standard Duty 230V 460V 575V 5 5 10 7.5 15 10 20 15 30 20 40 25 50 30 60 40 75 50 100 60 125 75 150 100 200 125 250 150 300 200 400 500 600 700 5 7.5 5 10 10 7.5 15 20 10 20 25 15 30 40 20 40 50 25 50 60 30 60 75 40 75 100 50 100 60 125 150 75 150 200 100 200 250 125 250 150 300 300 200 400 400 500 500 600 600 700 700 800 800 900 900 230V 5 7.5 10 15 15 20 30 40 50 60 75 100 125 150 200 5 7.5 10 15 15 20 30 40 50 60 75 100 125 150 200 HP Ratings Medium Duty 460V 5 7.5 10 15 20 30 40 50 60 75 100 125 150 200 250 300 400 500 600 5 7.5 10 15 20 30 40 50 60 75 100 125 150 200 250 300 400 500 600 700 800 575V 230V 5 7.5 10 15 20 30 40 50 60 75 100 125 150 200 5 7.5 10 20 30 40 50 60 75 125 150 200 250 400 500 600 700 800 5 7.5 10 15 20 30 40 50 60 75 100 125 150 200 Heavy Duty 460V 575V 5 7.5 10 15 20 30 40 50 60 75 100 125 150 200 250 300 400 500 5 7.5 10 15 20 30 40 50 60 75 100 125 150 200 250 300 400 500 600 700 5 7.5 10 20 30 40 50 60 100 125 150 300 400 500 600 600 700 Specifications and Product Data 6-3 Mounting Dimensions Size 1 0.23 (M6) Slot 4 Places 16.31 (414) 14.93 (379) 0.23 (M6) Hole 4 Places Ground Ground 1.41 (36) 4.9 (125) 8.74 (222) 7.68 (195) 5.9 (150) Model # –9 –16 –23 –30 –44 –59 –72 –85 –105 –146 6-4 Specifications and Product Data Weight lb (kg) 16.1(7.3) 16.1(7.3) 16.1(7.3) 16.1(7.3) 16.1(7.3) 18.3(8.3) 18.3(8.3) 18.3(8.3) 18.3(8.3) 18.3(8.3) MN850 Mounting Dimensions Continued Size 2 Ground 20.47 (520) 19.68 (500) 0.23 (M6) Hole 2 Places 0.23 (M6) Slot 2 Places 9.84 (250) 10.43 (265) 13.38 (340) Model # –174 –202 –242 –300 –370 MN850 Weight lb (kg) 34.6(15.7) 34.6(15.7) 48.5(22) 48.5(22) 48.5(22) Specifications and Product Data 6-5 Mounting Dimensions Continued Size 3 24.01 (610) 22.64 (575) 0.39 (M10) Hole 3 Places 0.39 (M10) Slot 3 Places 1.38(35) 9.84 (250) 9.84 (250) 15.75 (400) 3.44 (87.5) 26.58 (675) Model # –500 –600 –750 –900 6-6 Specifications and Product Data Weight lb (kg) 143.3(65) 143.3(65) 158.8(72) 158.8(72) MN850 Mounting Dimensions Continued Size 4 12.68 (322) 25 (635) 10.87 (276) 24.45 (621) 5.95 (151) Air Flow 7.88 (200) 7.88 (200) 3.94 (100) 4.13 (105) 1.9 7 (50) 7.59 (193) m10 T1, T2, T3 7.59 (193) 6.58 (167) Model # –1100 –1200 MN850 4.53 (115) L1, L2, L3 Weight lb (kg) 158.8 (72) 165.4 (75) Specifications and Product Data 6-7 6-8 Specifications and Product Data MN850 Appendix A CE Guidelines CE Declaration of Conformity Baldor indicates that the products are only components and not ready for immediate or instant use within the meaning of “Safety law of appliance”, “EMC Law” or “Machine directive”. The final mode of operation is defined only after installation into the user’s equipment. It is the responsibility of the user to verify compliance. The product conforms with the following standards: EN 60947–4–2 Low–voltage switch gear and control gear – Contactors and motor starters – AC semiconductor motor controllers and starters. EMC – Conformity and CE – Marking The information contained herein is for your guidance only and does not guarantee that the installation will meet the requirements of the council directive 89/336/EEC. The purpose of the EEC directives is to state a minimum technical requirement common to all the member states within the European Union. In turn, these minimum technical requirements are intended to enhance the levels of safety both directly and indirectly. Council directive 89/336/EEC relating to Electro Magnetic Compliance (EMC) indicates that it is the responsibility of the system integrator to ensure that the entire system complies with all relative directives at the time of installing into service. Motors and controls are used as components of a system, per the EMC directive. Hence all components, installation of the components, interconnection between components, and shielding and grounding of the system as a whole determines EMC compliance. The CE mark does not inform the purchaser which directive the product complies with. It rests upon the manufacturer or his authorized representative to ensure the item in question complies fully with all the relative directives in force at the time of installing into service, in the same way as the system integrator previously mentioned. Remember, it is the instructions of installation and use, coupled with the product, that comply with the directive. Wiring of Shielded (Screened) Cables Remove the outer insulation to expose the overall screen. MN850 Conductive Clamp Appendix A-1 Using CE approved components will not guarantee a CE compliant system! 1. The components used in the drive, installation methods used, materials selected for interconnection of components are important. 2. The installation methods, interconnection materials, shielding, filtering and grounding of the system as a whole will determine CE compliance. 3. The responsibility of CE mark compliance rests entirely with the party who offers the end system for sale (such as an OEM or system integrator). Baldor products which meet the EMC directive requirements are indicated with a “CE” mark. A duly signed CE declaration of conformity is available from Baldor. L1 AC Main Supply Control L2 Four Wire “Wye” L1 L2 L3 PE T1 T2 T3 Note: Wiring shown for clarity of grounding method only. Not representative of actual terminal block location. L3 PE Route all power wires L1, L2, L3 and Earth (Ground) together in conduit or cable. All shields Note: Motor GND Enclosure Backplane (see Section 2) Use shielded cable for control signal wires. Route control signal wires in conduit. These wires must be kept separate from power and motor wires. A-2 Appendix MN850 EMC Installation Instructions To ensure electromagnetic compatibility (EMC), the following installation instructions should be completed. These steps help to reduce interference. Consider the following: • Grounding of all system elements to a central ground point • Shielding of all cables and signal wires • Filtering of power lines A proper enclosure should have the following characteristics: A) All metal conducting parts of the enclosure must be electrically connected to the back plane. These connections should be made with a grounding strap from each element to a central grounding point . B) Keep the power wiring (motor and power cable) and control wiring separated. If these wires must cross, be sure they cross at 90 degrees to minimize noise due to induction. C) The shield connections of the signal and power cables should be connected to the screen rails or clamps. The screen rails or clamps should be conductive clamps fastened to the cabinet. D) The cable to the regeneration resistor must be shielded. The shield must be connected to ground at both ends. E) The location of the AC mains filter has to be situated close to the drive so the AC power wires are as short as possible. F) Wires inside the enclosure should be placed as close as possible to conducting metal, cabinet walls and plates. It is advised to terminate unused wires to chassis ground. G) To reduce ground current, use at least a 10mm2 (6 AWG) solid wire for ground connections. Grounding in general describes all metal parts which can be connected to a protective conductor, e.g. housing of cabinet, motor housing, etc. to a central ground point. This central ground point is then connected to the main plant (or building) ground. Or run as twisted pair at minimum. Cable Screens Grounding Cable (Twisted Pair Conductors) Conductive Clamp – Must contact bare cable shield and be secured to metal backplane. MN850 Appendix A-3 A-4 Appendix MN850 Appendix B Parameter Values Version 5MC (4/2/01) Title Parameter P# Parameter Read Only Parameter Values Adjustable Range Factory User Setting P0 Dummy Parameter 0–255 0 P1 Station Number 1–99 1 P2 Country 1–255 44 (England) P3 Software Type Factory Set Read Only P4 Software Version Factory Set Read Only Password P5 Password Value 0–255 0 Advanced P6 Firing Mode 0–3 0 Basic P7 Protection Mode 0–192 192 (Full + Optimize) Parameters P8 Status 1 0–255 1 (bit 00000001) P9 Status 2 0–99 0 (bit 00000000) P10 Status 3 0–255 0 (bit 0000000) P11 Start Pedestal 10–60% 20 (% of line volts) P12 Start Time 1–255 seconds 5 (seconds) P13 Kick Pedestal 60–90% 75 (% of Line) P14 Kick Time 10–40 cycles 25 Cycles P15 Dwell Time 1–255 seconds 5 seconds P16 Stop Pedestal 10–60% 10 (% of Line) P17 Stop Time 0–255 seconds 0 seconds Auto Features P18 Auto Config. 0–255 6 (bit 00000110) Advanced P19 Optimise Rate 4–30 5 (for unstable load) Parameters P20 Reference PF (Power Factor) 0–147 degrees 146.7626 degrees P21 Present PF (Power Factor) 0–147 degrees 146.7626 degrees P22 Delay Angle (SCR OFF time) 0–147 degrees 146.7626 degrees P23 Maximum Optimizing Delay 17–147 degrees 57.55396 degrees P24 Rated Current (High Byte –Hundreds) Factory Set Factory Set P25 Rated Current (Low Byte – Units) Factory Set Factory Set P26 Running Current Amps 0–255 Amps 0 Amps P27 Peak Start Current (measured at last start) 0–255 Amps 0 Amps P28 Low Current Level (undercurrent trip) 100–800% of running Amps (P24 & P25) 9.375% of running Amps P29 Low Current Time (delay before trip) 5–255 seconds 50 seconds P30 Current Limit Level (scaling = 0.03125) 1–7.96875 (x Ie) Amps 350% of running Amps P31 Current Limit Time (delay before trip) 5–255 seconds 30 seconds P32 Shearpin Level (undercurrent trip) 1–5 (x Ie) Amps 3.125 x Ie Amps P33 Shearpin Time (delay before trip) 5–255 cycles 100 cycles P34 Overload Level (SCR protection) 0.59–2 (x Ie) Amps 1.09375 x Ie Amps P35 Overload Delay (delay before trip) 10–140 140 Basic Advanced Basic Advanced Current Note: (x Ie) means “Times the rated current of the control (P24 and P25 values).” MN850 Applications B-1 Read Only Parameter Values Title Parameters Advanced Current B-2 Applications P# Parameter Adjustable Range Factory P36 % Overload (status only) 0–100% (100%=Tripped) 0% P37 Chassis Temperature 0–255 0 P38 Pot1 0–255 0 P39 Pot2 0–255 0 P40 Pot3 0–1 0 P41 DC I/P 0–12 0VDC P42 Thermistor 0–255 0 P43 4–20mA I/P 0–20.4 0mA P44 TEMP Trip Level 20–255 30 P45 4–20mA Map 0–125 0 (parameter #) P46 4–20mA Set Level 0.08–20.32 10.24mA P47 DC Input Map 0–125 0 (parameter #) P48 Set Level DC I/P 0.03922–9.960784 5.019608 VDC P49 Map DAC O/P 1 0–125 26 (parameter #) P50 Map DAC O/P 2 0–125 22 (parameter #) P51 User Flags 1 0–255 142 (Bit 10001110) P52 User Flags 2 0–255 0 (Bit 00000000) P53 User Flags 3 0–255 19 (Bit 00010011) P54 I/O Polarity 0–255 127 (Bit 01111111) P55 MAP LED 0–255 9 (x Ie) P56 LED MASK 0–255 1 (x Ie) P57 Map K1 To (Parameter) 0–125 52 (Parameter #) P58 K1 Bit Mask (P57 bit selected for K1) 0–255 32 (bit 00100000) P59 Map K2 To (Parameter) 0–125 8 (Parameter #) P60 K2 Bit Mask (P59 bit selected for K2) 0–128 8 (bit 00001000) P61 Map K3 To (Parameter) 0–125 9 (Parameter #) P62 K3 Bit Mask (P61 bit selected for K3) 0.1–3 1 (bit 00000001) P63 Map K4 To (Parameter) 0–125 9 (Parameter #) P64 K4 Bit Mask (P63 bit selected for K4) 0–3 2 (bit 00000010) P65 Map I/P1 To (Parameter) 0–125 52 (Parameter #) P66 I/P1 Bit Mask (P65 bit selected for I/P1) 0–128 16 (bit 00010000) P67 Map I/P2 To (Parameter) 0–125 0 (Parameter #) P68 I/P2 Bit Mask (P67 bit selected for I/P2) 0–128 0 (bit 00000000) P69 Map I/P3 To (Parameter) 0–125 0 (Parameter #) P70 I/P3 Bit Mask (P69 bit selected for I/P3) 0–128 0 (bit 00000000) P71 Contactor Delay (after start command) 20–800milli seconds 160 milli seconds P72 Trip Sensitivity (1=fastest trip) 1–15 (Status Code) 1 P73 Last Trip (Most Recent Trip) 1–16 (Status Code) 0 User Setting MN850 Section 1 General Information Read Only Parameter Values Title Parameters MN850 P# Parameter Adjustable Range Factory User Setting P74 2nd Last Trip 1–16 (Status Code) 0 P75 3rd Last Trip 1–16 (Status Code) 0 P76 4th Last Trip 1–16 (Status Code) 0 P77 5th Last Trip (Oldest trip) 1–16 (Status Code) 0 P78 Protection Mode 2 0–192 192 (Full + Optimize) P79 Start Pedestal 2 10–60% 50 (% of line volts) P80 Start Time 2 1–255 seconds 5 seconds P81 Kick Pedestal 2 60–90% 75 (% of line volts) P82 Kick Time 2 10–40 seconds 25 seconds P83 Dwell 2 1–255 seconds 5 seconds P84 Stop Pedestal 2 10–60 seconds 10 seconds P85 Stop Time 2 0–255 seconds 0 seconds P86 Auto Config 2 0–255 6 (Bit 00000110) P87 Under Current 2 0–1 (x Ie) Amps 0.125 x Ie Amps P88 Under Current Time 2 5–255 seconds 50 seconds P89 Current Limit 2 0–8 (x Ie) Amps 4 x Ie Amps P90 Current Limit Time 2 5–255 seconds 15 seconds P91 Shearpin 2 1–5 (x Ie) Amps 3 x Ie Amps P92 Shearpin Time 2 5–255 cycles 50 cycles P93 Overload Level 2 0.5–2 (x Ie) Amps 1.09375 x Ie Amps P94 Overload Delay 2 10–140 seconds 140 seconds P95 User Flags 1 (for 2nd param set) 0–255 134 (Bit 10000110) P96 User Flags 2 (for 2nd param set) 0–255 64 (Bit 01000000) P97 Flag 1 I/P Source Address 0–125 0 (Parameter #) P98 Flag 1 I/P Source Mask 0–128 0 (bit 00000000) P99 Flag 1 O/P Destination Address 0–125 0 (Parameter #) P100 Flag 1 O/P Destination Mask 0–255 0 (bit 00000000) P101 Flag 2 I/P Source Address 0–125 0 (Parameter #) P102 Flag 2 I/P Source Mask 0–20 0 (bit 00000000) P103 Flag 2 O/P Destination Address 0–125 0 (Parameter #) P104 Flag 2 O/P Destination Mask 0–11 0 (bit 00000000) P105 Loop Input 0–125 41 (Parameter #) P106 Loop Feedback 0–125 26 (Parameter #) P107 Error Gain 1–255 37 P108 Error Divisor 1–255 7 P109 Max Slope 0–50 10 P110 Guard Gap 0–150 10 Applications B-3 Section 1 General Information Read Only Parameter Values Title Parameters B-4 Applications P# Parameter Adjustable Range Factory P111 User Parameter 0–255 0 P112 Status 4 0–255 0 (bit 00000000) P113 Drive Type 0–255 0 P114 Baud Rate 0–4 0 P115 Selected App 0–9 0 P116 5MC Inhibit Time (restart not allowed) 0–63.75 minutes 0 minutes P117 Command Source Unused P118 Action On Bus Error 0–3 0 P119 Preset Parameter Number to Display 0.1–125 26 (parameter #) P120 Status 5 0–255 0 (bit 00000000) P121 User Flags 4 1–255 0 (bit 00000000) P122 Soft–Start Smoothing 1–15 5 (for unstable load) P123 Reserved for future use. P124 Reserved for future use. P125 Reserved for future use. User Setting MN850 Appendix C Replacement Parts Voltage Independent Parts PART No. SSDTR900 SSDTR370 SSDCBL146 SSDCBL900 SSDCBL370 SSDEBKPD SSDCT044 SSDCT202 SSDCT370 SSDCT900 SSDCVR146 SSDCVR900 Description Control power transformer, 9–44 A & 500–900 A Control power transformer, 59–370 A Keypad Cable, 16–146 A Keypad Cable, 500–900 A Keypad Cable, 174–370 A Keypad for all amp sizes Current transformer, 9– 44 A AND 500–900A Current transformer, 59–202 A Current transformer, 242–370 A Current transformer, 500–900 A Cover, 9–146 A Cover, 174–900 A 460VAC Parts PART No. SSD1PSCR030 SSD1PSCR146 SSD1SCR202 SSD3PC242 SSD1SCR300 SSD3SCR370 SSD1SCR370 SSDPC600 SSD1SCR600 SSDPC900 SSD1SCR900 SSDEB009 SSDEB016 SSDEB023 SSDEB030 SSDEB044 SSDEB059 SSDEB072 SSDEB085 SSDEB105 SSDEB146 SSDEB174 SSDEB202 SSDEB242 SSDEB300 SSDEB370 SSDEB500 SSDEB600 SSDEB750 SSDEB900 SSDCBLGT900 SSDCBLGT059 SSDCBLGT146 SSDCBLGT370 Description 1 Phase SCR pair for 9, 16, 23, 30 A 1 Phase SCR pair for 72, 85, 105, 146 A 1 Phase SCR pair for 174, 202 A 1 Phase power cell for 242, 300A Single SCR 242, 300A, 460V 1 Phase power cell for 370 A Single SCR 370A 1 Phase power cell for 500, 600 A Single SCR 500, 600A 1 Phase power cell for 750, 900 A Single SCR 900A Standard control board for 9 A Standard control board for 16 A Standard control board for 23 A Standard control board for 30 A Standard control board for 44 A Standard control board for 59 A Standard control board for 72 A Standard control board for 85 A Standard control board for 105 A Standard control board for 146 A Standard control board for 174 A Standard control board for 202 A Standard control board for 242 A Standard control board for 300 A Standard control board for 370 A Standard control board for 500 A Standard control board for 600 A Standard control board for 750 A Standard control board for 900 A Gate/Cathode wire assembly, 500–900 A Gate/Cathode wires, 16–59 A Gate/Cathode wires, 72–146 A Gate/Cathode wires, 174–370 A Continued on next page MN850 Appendix C-1 575VAC Parts PART No. SSD1PSCR059 SSD1PSCR8030 SSD1PSCR8059 SSD1PSCR8146 SSD1SCR8202 SSD3PC8242 SSD1SCR8300 SSD3SCR8370 SSD1SCR8370 SSDPC8600 SSD1SCR8600 SSDPC8900 SSD1SCR8900 SSDEB8009 SSDEB8016 SSDEB8023 SSDEB8030 SSDEB8044 SSDEB8059 SSDEB8072 SSDEB8085 SSDEB8105 SSDEB8146 SSDEB8174 SSDEB8202 SSDEB8242 SSDEB8300 SSDEB8370 SSDEB8500 SSDEB8600 SSDEB8750 SSDEB8900 SSDCBLGT8059 SSDCBLGT8146 SSDCBLGT8370 SSDCBLGT8900 C-2 Appendix Description 1 Phase SCR pair for 44, 59 A 1 Phase SCR pair for 9, 16, 23, 30 A 1 Phase SCR pair for 44, 59 A 1 Phase SCR pair for 72, 85, 105, 146 A 1 Phase SCR pair for 174, 202 A 1 Phase power cell for 242, 300A Single SCR 242, 300A 1 Phase power cell for 370 A Single SCR 370A 1 Phase power cell for 500, 600 A Single SCR 500, 600A 1 Phase power cell for 750, 900 A Single SCR 900A Standard control board for 9 A Standard control board for 16 A Standard control board for 23 A Standard control board for 30 A Standard control board for 44 A Standard control board for 59 A Standard control board for 72 A Standard control board for 85 A Standard control board for 105 A Standard control board for 146 A Standard control board for 174 A Standard control board for 202 A Standard control board for 242 A Standard control board for 300 A Standard control board for 370 A Standard control board for 500 A Standard control board for 600 A Standard control board for 750 A Standard control board for 900 A Gate/Cathode wires, 16–59 A Gate/Cathode wires, 72–146 A Gate/Cathode wires, 174–370 A Gate/Cathode wire assembly, 500–900 A MN850 Appendix D Voltage Surge Protection Grounding Proper grounding is extremely important. The symptoms produced by improper grounding are obvious. Sometimes filters and other expensive devices are added to reduce the effects of problems caused by poor grounding. There can be several reference points (neutrals) in a circuit but there should always only be one ground point. Neutral and ground are not the same. Neutral should normally be a non current carrying conductor, but it should be sized to carry momentary current caused be short circuits in the equipment. All of the neutrals in a system should connect at a central point and that point should be connected to the system ground. The goal is to minimize the current through the ground conductor. Circulating ground current is a source of electrical noise normally associated with unbalanced voltages or unbalanced loads. Capacitive or inductive coupling between power lines and the neutral or ground conductors is another noise source. Currents that flow through capacitive paths or from a magnetic field tend to change rapidly and produce high frequency interference called RFI (radio frequency interference). Good grounding is also important to minimize the effects of large voltage spikes that can create significant current flow in the ground conductors. The source of these voltages can be lightning striking the power lines, switching of large power loads and others. A balanced three phase four wire system with a system ground as shown in Figure D-1 can minimize noise problems normally associated with grounding. AC power and motor leads should be as short as possible and enclosed in conduit or shielded cable should be used. Power wires and Motor leads should never be in the same conduit. Figure D-1 Control Enclosure L1 L2 L3 AC Main Supply Note: Wiring shown for clarity of grounding method only. Not representative of actual terminal block location. T1 T2 T3 L1 L2 L3 Earth Safety Ground Driven Earth Ground Rod (Plant Ground) Four Wire “Wye” Route all 4 wires L1, L2, L3 and Earth (Ground) together in conduit or shielded cable. Route all 4 wires T1, T2, T3 and Motor Ground together in conduit or shielded cable. Ground per NEC and Local codes. Connect all wires (including motor ground) inside the motor terminal box. MOV (Metal Oxide Varistor) Baldor recommends that MOV devices be installed at the input power connections to the Soft–Start control to provide “phase–to phase” and “phase–to–ground” voltage spike protection. Three MOV devices can be connected in “WYE” configuration with an additional MOV device connected to ground. Figures D-2 and D-3 shows how to connect the MOV’s into the various power distribution system designs. Voltage spikes on any phase will be conducted to ground by the lowest impedance path (phase–to–phase or phase–to–ground). MN850 Voltage Surge Protection D-1 Figure D-2 WYE Configurations Symbol Ungrounded Control Enclosure L1 L2 L3 T1 T2 T3 L1 L2 L3 Do not ground MOV. Cut off green wire and insulate (cap off) with wire nut. MOV Symbol Grounded or High Resistance Ground Control Enclosure L1 L2 L3 T1 T2 T3 L1 L2 L3 MOV D-2 Voltage Surge Protection MN850 Figure D-3 Delta Configurations Symbol Control Enclosure Ungrounded L1 L2 L3 T1 T2 T3 L1 L2 L3 Do not ground MOV. Cut off green wire and insulate (cap off) with wire nut. MOV Corner or Center–Tap Grounded Symbol Control Enclosure L1 L2 L3 T1 T2 T3 L1 L2 L3 MOV Do not ground MOV. Cut off green wire and insulate (cap off) with wire nut. Table D-1 Baldor MOV Specifications Catalog # Line Voltage Volts Energy Joules Peak Current Amps Clamping Voltage Volts MN850 MOV505L 480 260 6500 1300 MOV620EL 575 300 6500 1580 Voltage Surge Protection D-3 D-4 Voltage Surge Protection MN850 Appendix E MN850 Appendix E-1 Section 1 General Information Remote Keypad Mounting Template 4.00 2.500 (A) (A) Four Places Tapped mounting holes, use #29 drill and 8-32 tap (Clearance mounting holes, use #19 or 0.166″ drill) 5.500 4.810 1-11/16″ diameter hole Use 1.25″ conduit knockout (B) 1.340 (A) (A) 1.250 E-2 Appendix Note: Template may be distorted due to reproduction. MN850 BALDOR ELECTRIC COMPANY P.O. Box 2400 Ft. Smith, AR 72902–2400 (479) 646–4711 Fax (479) 648–5792 www.baldor.com CH TEL: +41 52 647 4700 FAX:+41 52 659 2394 D TEL: +49 89 90 50 80 FAX:+49 89 90 50 8491 UK TEL: +44 1454 850000 FAX:+44 1454 850001 F TEL: +33 145 10 7902 FAX:+33 145 09 0864 I TEL: +39 11 562 4440 FAX:+39 11 562 5660 AU TEL: +61 29674 5455 FAX:+61 29674 2495 CC TEL: +65 744 2572 FAX:+65 747 1708 MX TEL: +52 477 761 2030 FAX:+52 477 761 2010 Baldor Electric Company MN850 Printed in USA 5/03 C&J1500