1
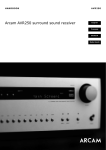
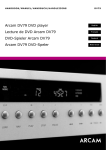
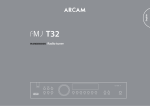
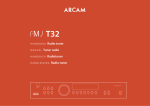
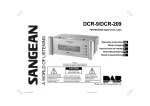
H A N DBOOK/MANUEL/HANDBUCH / H A N D L E I D I N G
Arcam DT91 digital radio tuner
DT91
English
Tuner radio numérique DT91 Arcam
Français
Digitaler Radiotuner Arcam DT91
Deutsch
Arcam DT91 digitale radio tuner
Nederlands
Safety guidelines
CAUTION
ATTENTION
RISK OF ELECTRIC
SHOCK DO NOT OPEN
RISQUE DE CHOC ELECTRIQUE
NE PAS OUVRIR
CAUTION: To reduce the risk of electric shock, do not remove cover (or back). No user serviceable parts inside. Refer servicing
to qualified service personnel.
WARNING: To reduce the risk of fire or electric shock, do not expose this apparatus to rain or moisture.
The lightning flash with an arrowhead symbol within an equilateral triangle, is intended to alert the user to the presence of uninsulated
‘dangerous voltage’ within the product’s enclosure that may be of sufficient magnitude to constitute a risk of electric shock to persons.
The exclamation point within an equilateral triangle is intended to alert the user to the presence of important operating and maintenance
(servicing) instructions in the literature accompanying the product.
CAUTION: In Canada and the USA, to prevent electric shock, match the wide blade of the plug to the wide slot in the socket and
insert the plug fully into the socket.
Important safety instructions
This product is designed and manufactured to meet strict
quality and safety standards. However, you should be aware
of the following installation and operation precautions:
1. Take heed of warnings and instructions
You should read all the safety and operating instructions
before operating this appliance. Retain this handbook for
future reference and adhere to all warnings in the handbook
or on the appliance.
Power supply cords should be routed so that they are not
likely to be walked on or pinched by items placed upon or
against them, paying particular attention to cords and plugs,
and the point where they exit from the appliance.
11. Grounding
Ensure that the grounding means of the appliance is not
defeated.
2. Water and moisture
12. Power lines
The presence of electricity near water can be dangerous. Do
not use the appliance near water – for example next to a
bathtub, washbowl, kitchen sink, in a wet basement or near
a swimming pool, etc.
Locate any outdoor antenna/aerial away from power lines.
3. Object or liquid entry
Take care that objects do not fall and liquids are not
spilled into the enclosure through any openings. Liquid
filled objects such as vases should not be placed on the
equipment.
4. Ventilation
Do not place the equipment on a bed, sofa, rug or similar
soft surface, or in an enclosed bookcase or cabinet, since
ventilation may be impeded.
5. Heat
Locate the appliance away from naked flames or heat
producing equipment such as radiators, stoves or other
appliances (including other amplifiers) that produce heat.
6. Climate
The appliance has been designed for use in moderate
climates.
7. Racks and stands
Only use a rack or stand that is recommended for use with
audio equipment. If the equipment is on a portable rack it
should be moved with great care, to avoid overturning the
combination.
8. Cleaning
Unplug the unit from the mains supply before cleaning.
The case should normally only require a wipe with a soft,
damp, lint-free cloth. Do not use paint thinners or other
chemical solvents for cleaning.
We do not advise the use of furniture cleaning sprays or
polishes as they can cause indelible white marks if the unit
is subsequently wiped with a damp cloth.
9. Power sources
Only connect the appliance to a power supply of the type
described in the operating instructions or as marked on the
appliance.
This is a class 1 appliance and must be earthed.
DT91
E-2
10. Power-cord protection
13. Non-use periods
If the unit has a stand-by function, a small amount of
current will continue to flow into the equipment in this
mode. Unplug the power cord of the appliance from the
outlet if left unused for a long period of time.
14. Abnormal smell
If an abnormal smell or smoke is detected from the
appliance, turn the power off immediately and unplug the
unit from the wall outlet. Contact your dealer immediately.
15. Servicing
You should not attempt to service the appliance beyond that
described in this handbook. All other servicing should be
referred to qualified service personnel.
16. Damage requiring service
The appliance should be serviced by qualified service
personnel when:
A. the power-supply cord or the plug has been damaged,
or
B. objects have fallen, or liquid has spilled into the
appliance, or
C. the appliance has been exposed to rain, or
D. the appliance does not appear to operate normally or
exhibits a marked change in performance, or
E. the appliance has been dropped or the enclosure
damaged.
Safety compliance
This product has been designed to meet the IEC 60065
international electrical safety standard.
Using this handbook
This handbook has been designed to give you all the
information you need to install, connect, set-up and use the
Arcam DiVA DT91. The remote control handset supplied with
the equipment is also described.
It may be that the DT91 has been installed and set-up as
part of your Hi-Fi installation by a qualified Arcam dealer.
In this case, you may wish to skip the sections of this
handbook dealing with installation and setting up the unit,
and move directly to the sections dealing with using the
player. Use the contents list to guide you to these sections.
Safety
Safety guidelines are set out on page 2 of this handbook.
Many of these items are common sense precautions, but for
your own safety, and to ensure that you do not damage the
unit, we recommend that you read them. This is a class 1
product and requires an earth connection.
Safety guidelines ....................................... E-2
Important safety instructions ................. E-2
Safety compliance ................................ E-2
Using this handbook.............................. E-3
Positioning the unit ............................... E-4
Connecting up ...................................... E-4
Installation ............................................... E-4
Setting up the aerial ............................. E-5
Using your tuner ....................................... E-6
Front-panel controls .............................. E-6
Searching for radio stations: DAB ........... E-6
Search for radio stations: FM.................. E-7
Programming a preset radio station......... E-7
Changing the display mode .................... E-7
The CR-389D remote control ....................... E-8
Technical specifications............................... E-9
Remote-control codes .............................. E-10
Guarantee .............................................. E-10
On line registration ............................. E-10
Appendix: Serial programming interface ..... E-11
Introduction....................................... E-11
Command and response formats........... E-11
Command Specifications...................... E-12
DT91
E-3
E nglish
Contents
Installation
Positioning the unit
n
n
n
n
n
Place the DT91 on a level, firm, surface, avoiding direct sunlight and sources of heat or damp.
Avoid placing the DT91 on top of a power amplifier or other source of heat.
The DT91 may run warm during normal operation, so avoid placing the DT91 in an enclosed
space such as a bookcase or closed cabinet unless there is good ventilation.
Make sure the remote-control receiver in the centre of the front panel display is unobstructed,
otherwise remote-control will be unreliable. If line-of-sight is impractical, a remote-control
repeater can be used with the rear panel connector. (see below).
Avoid placing a record deck on top of this unit. Record decks are very sensitive to the noise
generated by mains power supplies which will be heard as ‘hum’ if the record deck is too close.
Connecting up
Digital outputs
The DT91 is fitted with both optical and co-axial
digital audio outputs; the two carry the same
information at all times. If you wish, these can
be connected to an external DAC or your AV
receiver, which may enhance the final audio quality.
Alternatively, they can also be used to connect this
tuner to a digital recording device (such as a CD-R
or Minidisc recorder) for direct recording.
RS232 interface
Supply voltage
Move the slider to 115V
or 230V, depending
on the mains supply
voltage in your area.
The serial interface
is available for
controlling the DT91
from a computer
or other controller.
The remote control
protocol is described
in the Appendix to this
handbook.
When listening to a DAB radio station, these outputs
carry audio with a sample rate of 48kHz; when an
FM station is being received, the sample rate is
32kHz.
AUDIO OUTPUTS
DIGITAL OUT
AERIAL
INPUT
230V
115V
SUPPLY
VOLTAGE
POWER INLET
PROGRAM
RS232
REMOTE
IN
OPTICAL
COAX
L
R
1
2
115/230V
Mains lead
Remote control in
Aerial input socket
Analogue audio outputs
The appliance is normally supplied with
a moulded mains plug already fitted to
the lead. If for any reason the plug needs
to be removed, it must be disposed of
immediately and securely, as it is a potential
shock hazard when inserted into the mains
socket.
If you are using this tuner
with an amplifier that also
features a remote bus
(such as the Arcam DiVA
AVR300) you can connect
the REMOTE OUT of the
amplifier to the REMOTE IN
of the tuner using a 3.5mm
jack lead.
The coaxial cable from
the aerial should be fitted
with a 50Ω F-type (screw)
connector. Connect this to
the aerial socket on the
back of this tuner, pushing
the pin into the centre of
the socket, then screwing
on the cover to lock in
place.
Two pairs of stereo analogue outputs are
provided by the DT91, both of which provide
the same signals. Connect one pair of these
outputs to your amplifier using a suitable
stereo phono cable. The second output pair
may be connected to some other audio
device, as desired, such as a cassette deck.
Check that the plug supplied with the unit
fits your supply and that your mains supply
voltage agrees with the voltage setting
(115V or 230V) indicated on the rear panel
of the unit.
If your mains supply voltage or mains plug
is different, or you require a new lead,
please consult your Arcam dealer.
PLUGGING-IN
Push the plug (IEC line socket) of the power
cable supplied with the unit into the socket
(POWER INLET) in the back of the unit.
Make sure it is pushed in firmly.
This allows the tuner to be
positioned out of sight while
still offering remote control,
since commands are passed
through the amplifier. It
can also be used to route
control signals for multiroom use.
The remote control input
requires a mono 3.5mm
jack, with the tip active and
the sleeve grounded.
The remote control signals
must be in modulated RC5
format, with a voltage level
of between 5V and 12V.
DT91
E-4
Take care not to overtighten the F-connector
(finger tighten only – do
not use tools as this may
damage the circuit board
behind the connector).
See ‘Setting up the aerial’
for further information on
the aerial type to use.
Note that interconnecting cables are not
supplied with this tuner. We recommend
the use of high-quality screened cables,
since inferior-quality cables will degrade
the overall quality of your system. Use
only cables that are designed for an audio
application as other cables will have
different impedance characteristics that will
degrade the performance of your system
(for example, do not use cabling intended
for video use to carry audio signals).
All cables should be kept as short as is
practically possible.
It is good practice when connecting your
equipment to make sure that the mains
power-supply cabling is kept as far away as
possible from your audio cables. This avoids
unwanted noise in the audio signals.
Setting up the aerial
If the transmission signal is strong in your area then the supplied indoor aerial
may be sufficient (it should be hung on a wall with both wires fully stretched out
vertically). An external aerial is recommended in order to receive the highest number
of services.
VH
F/F
DA
M
B
E nglish
Your new Arcam tuner is capable of superb reception, but only if it is receiving a
good quality transmission signal.
DAB transmissions can be in either ‘Band III’ or the ‘L-band’ (or both). To
determine the transmission frequency in your area, contact your dealer, or refer to
www.WorldDAB.org. In Band III transmission areas, use a multi-element Yagi
aerial if you are a long way from a transmitter, or use an omnidirectional or folded
dipole aerial if you are close to more than one transmitter (in the U.K., a Band III
region, this should be mounted with the elements vertically, as the transmissions are
vertically polarised). If the DAB services in your area are transmitted on L-band then
consult your dealer for advice on the best aerial to use.
You may have noticed that, although the DT91 supports both DAB and FM radio,
there is only one aerial connector on the rear panel. If you wish to feed signals from
both aerial types into the unit, a low-loss signal combiner must be used, as shown in
the diagram. Otherwise, choose the aerial type for the medium you use most often.
Whether you decide to install an external aerial, or opt to use the supplied ribbon
cable, it should be connected to the F-type (screw) connector labelled AERIAL INPUT
on the rear of the unit.
Aerial combiner
The type of aerial you should use depends on your listening preferences and the local conditions.
If you listen exclusively to FM transmissions, for example, and the FM signal strength is strong
in your area, then a simple omni-directional aerial mounted in your loft or on your roof may be
sufficient. Listening to DAB in a weak signal area will require a high-gain, roof-mounted aerial.
For the best reception of both DAB and FM signals, an aerial combiner box may be required
(as shown in the diagram above). This combines the signals received by two aerials (one for
DAB, the other for FM), into one cable that then connects to the DT91. If an aerial combiner
is not used, the single aerial chosen for both DAB and FM reception may not give optimum
performance in some regions.
For the best advice, we recommend that you contact your local Arcam dealer or an aerial
installation expert.
DT91
E-5
Using your tuner
Front-panel controls
MENU
Preset station selection
Opens the configuration
menu for the DT91. See
the sections ‘Searching
for radio stations: DAB’
and “Searching for radio
stations: FM”, for further
information.
These buttons allow quick
selection of up to 16 preset
radio stations. For a preset
between 1 and 8, press
and release the appropriate
button – for a preset
between 9 and 16, press and
hold the appropriate button.
SELECT
POWER
The SELECT button
confirms an action
within the configuration
menu.
This switches the tuner
on and off. When the
tuner is switched on
the status LED is green.
DT91 FM + DIGITAL RADIO TUNER
1–9
2–10
3–11
4–12
5–13
6–14
7–15
8–16
SEARCH
STORE
1–8
MENU
SELECT
STORE
9–16
DISPLAY
MODE
DAB/FM
POWER
SEARCH
STORE 1–8, STORE 9–16
Control knob
DAB/FM
In DAB mode, pressing
SEARCH scans for new
DAB radio stations. See
‘Searching for radio
stations: DAB’, for
further information.
These buttons are used
when specifying a preset
location (1–8 or 9–16) to
store a radio station. See
‘Programming a preset
radio station’, for further
information.
In DAB mode, rotate the
control knob to cycle
through stations until the
one you wish to listen
to is displayed. In FM
mode, rotating the control
knob changes the tuning
frequency.
Switches between DAB
and FM mode.
DISPLAY MODE
Press this button to change
the type of information
shown on the display (such
as scrolling text or signal
strength).
Searching for radio stations: DAB
When using the DAB tuner section for the first time, you should perform a search to find the available
services in your area. You may also wish to repeat the search periodically to discover if any new
ensembles (i.e. groups of services) have gone on air, or if you move the tuner to a different area.
To perform a search
Ensure that the DT91 is in DAB mode (by pressing the DAB/FM button until ‘DAB’ is shown on the
display), then press SEARCH or MENU; the display shows ‘DAB Setup: Press SELECT to scan’. Press
SELECT to start searching for new stations. The current search frequency is shown on the display as the
search progresses.
A complete search may take three minutes or so to complete. You cannot cancel a search once started.
If no service is found after the search, then either your aerial is inadequate or you may be outside of the
area covered by DAB broadcasts. Please contact your Arcam dealer for further information or advice.
Selecting a service
Turn the rotary controller (or press 4 or 3 on the remote control) to work through the available
stations and to choose the one you wish to listen to. The service displayed will be selected automatically
after a delay of about two seconds.
Deleting services
Under normal circumstances, you should not need to delete services from the DT91. If you move to a
different region, however, or if a station ceases transmission, stations may be shown as available that
can no longer be received.
Individual stations cannot be deleted. To remove stations from the selection list that can no longer be
received, first press the MENU button; the display shows ‘DAB Setup: Press SELECT to scan’. Turn the
control knob until the display shows ‘DAB Setup: Press SELECT to erase’, then press SELECT. All services
are deleted.
DT91
E-6
A delete operation should always be followed by a search for available stations (as described previously)
otherwise no DAB radio stations will be available for selection.
Search for radio stations: FM
To perform a search
Ensure that the DT91 is in FM mode (by pressing the DAB/FM button until ‘FM’ is shown on the display).
E nglish
There are two methods to search for stations in FM mode. If you know the broadcast frequency of the
station you want, turn the control knob on the front-panel until the desired frequency is displayed.
You should then hear the required radio station. An alternative search method is to press and hold the
4 or 3 keys on the remote control. After a delay of about one second, the DT91 begins scanning for
the next available station. On finding a station with a strong enough signal, the DT91 stops scanning,
plays the station and displays the station details.
If no stations can be received, then your aerial is not providing an adequate signal. Please contact your
Arcam dealer for further information or advice.
Switching to mono
In some weak signal areas it can be beneficial to force the FM tuner to mono output, as mono requires a
much lower signal strength to produce acceptable results. Press MENU, then turn the control knob until
‘Mono’ is displayed. If the signal strength in your area is good, leave this set to ‘Stereo’.
Programming a preset radio station
Preset stations are available for both DAB and FM. Up to 16 stations can be stored as presets.
First select the radio station you wish to assign to a preset. Press STORE 1–8 or STORE 9–16, then press
the appropriate preset button to store the service.
Selecting a preset
To select presets 1 to 8, press and release the corresponding button. To select presets 9 to 16, press and
hold the corresponding button for two seconds.
Changing the display mode
The bottom line of the display can be set to different modes: programme type, transmission frequency,
dynamic label (scrolling text), data rate (showing service data rate and stereo/mono mode) and signalquality (a bar graph). Press DISPLAY MODE on the front panel or MODE on the remote control to cycle
through these display options.
Note that the display modes for DAB and FM are set independently.
Programme type
The ‘programme type’ label is a short description of the type of programme being transmitted, and (if
selected) is displayed below the station name.
Transmission frequency (FM only)
The transmission frequency setting shows the station name (if available), together with the frequency
the station is being transmitted on. This can be useful, in areas where the same station is transmitted on
different frequencies, in ensuring that the correct transmission of the station is selected.
Dynamic label (DAB) / RDS (FM)
This is a 128 character block of scrolling text used by most broadcasters to display programme
information (such as song titles, useful phone numbers and website addresses).
Data rate (DAB only)
The data rate setting allows the data rate of the station, together with the MPEG mode, to be seen. The
data rate is given in kbits/second, with a higher data rate indicating better audio quality. The maximum
data rate supported by the DT91 is 224kbps, but most radio stations are broadcast at 128kbps, or less.
The MPEG mode of the station indicates whether the station is broadcast in stereo or mono.
Signal quality
The signal quality meter is a simple bargraph that gives a quick visual guide to reception quality. For
DAB transmissions, it is an inverse measure of the Viterbi error rate, with zero errors at full scale (all
segments are lit) and 500 errors/second (with all segments off). For FM transmissions, the bar graph
shows a simple analogue measurement of signal strength.
Secondary services (DAB only)
Primary services can have one or more secondary services attached to them. These tend to be
temporary; sporting events such as football matches, for example, may be broadcast as secondary
services. Services that have secondary services attached to them are indicated by a ‘>’ symbol. Turning
the rotary selector clockwise will then reveal these services. The secondary services themselves are
indicated by a ‘<’ symbol.
You need to select a main service in order to see if there are secondary services attached. Note that only
primary services can be attached to a preset.
DT91
E-7
The CR-389D remote control
FM/DAB
MENU
Use this button to switch between FM and
DAB mode. The LED above the FM/DAB
button is lit briefly when the button is
pressed to show which mode is selected.
This button has the same function as the
MENU button on the front panel of the tuner.
DISP
TUNER
FM
This button toggles the tuner’s display
between on and off.
DAB
Preset memory buttons
These buttons allow access to individual preset
stations. To select a preset press the corresponding
button. For presets 9 to 16, press and hold the
corresponding preset button for two seconds.
MODE
This button has the same function as
DISPLAY MODE on the front panel.
FM
DAB
MENU
DISP
1-9
2-10
3-11
4-12
5-13
6-14
7-15
8-16
MODE
TUNE buttons
BAND
These buttons enable you to scroll through the
available stations.
For more information on tuning radio stations
in, see the sections ‘Searching for radio
stations: DAB’ and ‘Searching for radio
stations: FM’ on page 6 and 7.
SP1
BAND
SP2
ENTER
DISP
This button has the same function as
SELECT on the front panel.
SEL
Amplifier controls
These buttons offer basic control over
Arcam amplifiers.
PHONO
AUX
CD
TUNER
AV
DVD
VCR
TAPE
AMPLIFIER
PROG
RPT
CD player controls
DISP
These buttons offer basic control over Arcam CD
players.
CD
CR-389
Note: Remember to install the two AAA batteries
supplied before trying to use your remote control.
DT91
E-8
Do not place anything in front of the tuner (where the
IR receiver is located), or the remote control may not
work.
Technical specifications
Digital audio output
SPDIF co-axial to gold-plated phono sockets
E nglish
Format
SPDIF optical to TOSLINK
Sample rate
48kHz (DAB mode)
32kHz (FM mode)
Output impedance (co-axial)
75Ω unbalanced
Analogue audio output
Connectors
Two pairs of stereo outputs to gold-plated phono sockets
Output level
2.4Vrms at 0dB FS (DAB mode)
0.9Vrms at full modulation (FM mode)
Output impedance
<100Ω
Minimum load
600Ω
Frequency response (±0.5dB)
20Hz–20kHz
RF performance (DAB mode)
Tuning range
174–240MHz (Band III)
1452–1492MHz (L band)
Sensitivity (VHF measurement to EN50248)
better than –91dBm, typically –97dBm
Audio data rate (maximum)
224kbits/s at MPEG protection level 3
RF performance (FM mode)
Tuning range
87–108MHz
Sensitivity (IHF)
3µV typical
Signal to noise ratio
65dB at full modulation, 1kHz
THD+n
0.1% at full modulation, 1kHz
Aerial
Connector
F type
Impedance
50Ω
Remote control interface
Remote bus input
36kHz modulated RC5 on 3.5mm mono jack socket
Serial port
RS232 to 9-way male D connector, DTE pin out. Remote
control codes given in table on following page.
General
Supply voltage
115 or 230Vac, set by rear panel voltage selector switch
Power consumption
<20W
Size
W435 x D320 x H83mm
Weight
3.6kg (net), 6kg (packed)
Supplied accessories
CR-389D remote control
two x AAA batteries
Mains lead
Indoor ribbon aerial
E&OE
Note: All specification values are typical unless otherwise stated.
Continual improvement policy
Arcam has a policy of continual improvement for its products. This means that designs and specifications
are subject to change without notice.
DT91
E-9
Remote-control codes
The following table gives the IR commands accepted by the DT91. The system code for the DT91 is 17
(in common with other Arcam tuners).
Power commands
Command
Decimal Code
Power on
123
Power off
124
Tuner control commands
Command
Decimal Code
Select DAB
126
Select FM
127
MENU
61 or 125
DISP
18 or 71
1–9
1 or 91
2–10
2 or 92
3–11
3 or 93
4–12
4 or 94
5–13
5 or 95
6–14
6 or 96
7–15
7 or 97
8–16
8 or 98
MODE
37 or 121
<
33 or 78
>
32 or 77
BAND
50 or 87
Guarantee
Worldwide Guarantee
This entitles you to have the unit repaired free of charge, during the first two years after purchase, at
any authorised Arcam distributor provided that it was originally purchased from an authorised Arcam
dealer or distributor. The manufacturer can take no responsibility for defects arising from accident,
misuse, abuse, wear and tear, neglect or through unauthorised adjustment and/or repair, neither can
they accept responsibility for damage or loss occurring during transit to or from the person claiming
under the guarantee.
The warranty covers:
Parts and labour costs for two years from the purchase date. After two years you must pay for both parts
and labour costs. The warranty does not cover transportation costs at any time.
Claims under guarantee
This equipment should be packed in the original packing and returned to the dealer from whom it was
purchased, or failing this, directly to the Arcam distributor in the country of residence.
It should be sent carriage prepaid by a reputable carrier – not by post. No responsibility can be accepted
for the unit whilst in transit to the dealer or distributor and customers are therefore advised to insure the
unit against loss or damage whilst in transit.
For further details contact Arcam at:
Arcam Customer Support Department,
Pembroke Avenue, Waterbeach, CAMBRIDGE, CB5 9QR, England.
Problems?
If your Arcam dealer is unable to answer any query regarding this or any other Arcam product please
contact Arcam Customer Support at the above address and we will do our best to help you.
On line registration
You can register your Arcam product on line at: www.arcam.co.uk
DT91
E-10
Appendix: Serial programming interface
E nglish
Introduction
This section of the document describes the remote control protocol for controlling the DT91 via the
RS232 interface.
Conventions
n The remote controller is referred to as the ‘RC’.
n All values in this section are hexadecimal values, unless otherwise specified.
Data transfer format
n Transfer rate: 19,200bps.
n 1 start bit, 8 data bits, 1 stop bit, no parity, no flow control.
Command and response formats
Communication between the RC and the DT91 takes the form of sequences of bytes, with all commands
and responses having the same basic format. Communication between the two is full duplex. The DT91
shall always respond to a received command.
Each transmission by the RC shall be at least five bytes long in the following format:
<STR> <CC> <DL> <Data> <ETR>
n STR (Start transmission): 0x21
n CC (Command code): the code for the command
n DL (Data length): the number of data items following this item, excluding the ETR
n Data: the parameters for the command
n ETR (End transmission): 0xD
Each response by the DT91 shall be at least six bytes long in the following format:
<STR> <RC> <AC> <DL> <Data> <ETR>
n STR (Start transmission): 0x21
n RC (Reply code): = command code
n AC (Answer code): answer code (see below)
n DL (Data length): the number of data items following this item, excluding the ETR
n Data: the information associated with this response
n ETR (End transmission): 0xD
Note that the DT91 shall transmit messages whenever its status changes.
State changes as a result of other inputs
It is possible that the state of the DT91 may be changed as a result of user input via the front panel
buttons or via the IR remote control. Changes resulting from these inputs shall be relayed to the RC
(using the appropriate message type) as they occur.
For example, if the user changed the front panel display brightness using the DISP button on the remote
control, a display message (defined below) would be sent to the RC. A similar action would be taken for
all other state changes.
Answer codes
The following answer codes are defined:
n Command OK
0x1: The command has been accepted and processed completely.
n Command Failed
0x0: The command has failed for some reason.
DT91
E-11
Command Specifications / Spécifications des commandes /
Befehlsspezifikationen / Opdrachtspecificaties
Power / Alimentation / Betrieb / Stroom
��
�
�
��
Change the stand-by state of the DT91.
Permet de modifier l'état de veille du DT91.
Ändern des Stand-by-Zustands des DT91.
De Stand-by status van de DT91 wijzigen.
COMMAND:
Byte:
Description:
CC
0x00 (Command code)
DL
0x01 (Data length)
D1
0x00 – Enter stand-by state
0x01 – Power-on
0xF2 – Toggle power state
0xF3 – Request power state
Example / Exemple / Beispiel / Voorbeeld
��
Command/response sequence to bring the DT91 out of standby:
Séquence de commande/réponse pour désactiver le mode veille du
DT91 :
�
Befehls-/Rückmeldesequenz zur Aktivierung des im Stand-by-Modus
befindlichen DT91:
�
��
Opdracht- en responsreeks om de DT91 uit stand-by te halen:
RESPONSE:
Byte:
Description:
RC
0x00 (Reply Code)
AC
Answer code
DL
0x01 (Data length)
D1
Response:
0x00 – The DT91 is in stand-by state
0x01 – The DT91 is powered on
COMMAND: 0x21 0x00 0x01 0x01 0x0D
RESPONSE: 0x21 0x00 0x01 0x01 0x01 0x0D
Source selection / Sélection de la source / Quellenauswahl / Bronkeuze
��
Switch between DAB and FM.
�
Bascule entre les modes RAN et FM.
�
Wechsel zwischen DAB und FM
��
Schakel om naar DAB en FM.
COMMAND:
Byte:
Description:
CC
0x01 (Command code)
DL
0x01 (Data length)
D1
0x01 – FM
0x02 – DAB
0xF3 – Request current source
Example / Exemple / Beispiel / Voorbeeld
��
�
�
��
Command/response sequence to switch to FM:
Séquence de commande/réponse pour basculer en mode FM :
RESPONSE:
Befehls-/Rückmeldesequenz zum Umschalten auf FM:
Byte:
Description:
Opdracht- en responsreeks om naar FM over te schakelen:
RC
0x01 (Reply Code)
AC
Answer code
DL
0x01 (Data length)
D1
Response:
Source values as given above.
COMMAND: 0x21 0x01 0x01 0x01 0x0D
RESPONSE: 0x21 0x01 0x01 0x01 0x01 0x0D
Display brightness / Luminosité de l'affichage /
Helligkeit des Displays / Helderheid van de display
��
�
�
��
Byte:
Description:
Définit la luminosité de l’affichage.
CC
0x0A (Command code)
Einstellen der Helligkeit des Displays.
DL
0x01 (Data length)
Instellen van de display-helderheid.
D1
0xF0 – Increase the display brightness
0xF1 – Decrease the display brightness
0xF3 – Request current display brightness
Example / Exemple / Beispiel / Voorbeeld
RESPONSE:
Command/response sequence to dim the display one level, where the
result is that the display brightness is at level 1:
Byte:
Description:
� Séquence de commande/réponse pour atténuer la luminosité de
l’affichage d’un cran, à savoir la régler au niveau 1 :
RC
0x0A (Reply Code)
AC
Answer code
DL
0x01 (Data length)
D1
Response:
The new brightness level,
0x00 (off) - 0x02 (full brightness).
��
Befehls-/Rückmeldesequenz zum Dimmen des Displays um eine Stufe.
Die Helligkeit des Displays ist anschließend auf Stufe 1:
�
Opdracht- en responsreeks om het display één niveau te dimmen met als
resultaat dat de display-helderheid zich nu op niveau 1 weergeeft:
��
COMMAND: 0x21 0x0A 0x01 0xF1 0x0D
RESPONSE: 0x21 0x0A 0x01 0x01 0x01 0x0D
DT91
E-12
COMMAND:
Set the display brightness.
Set the display information type.
COMMAND:
�
Définit l’affichage du type d’informations.
Byte:
Description:
�
Einstellen des Display-Informationstypus.
CC
0x0C (Command code)
��
Instellen van het display informatie type.
DL
0x01 (Data length)
D1
If the current source is FM:
0x00 – Set the display to show
0x01 – Set the display to show
0x02 – Set the display to show
0x03 – Set the display to show
frequency
sig. strength
RDS info.
prog. type
If the current source is DAB:
0x00 – Set the display to show
0x01 – Set the display to show
0x02 – Set the display to show
0x03 – Set the display to show
data rate
sig. strength
DLS info.
prog. type
��
Example / Exemple / Beispiel / Voorbeeld
�� Command/response sequence to set the display text to show the
programme type:
� Séquence de commande/réponse permettent de régler l'affichage du
texte pour afficher le type de programme :
Befehls-/Rückmeldesequenz zum Einstellen des Display-Texts für die
Anzeige des Programmtypus:
�
�� Opdracht- en responsreeks zodat de display tekst het programmatype
weergeeft:
COMMAND: 0x21 0x0C 0x01 0x03 0x0D
RESPONSE: 0x21 0x0C 0x01 0x01 0x03 0x0D
RESPONSE:
Byte:
Description:
RC
0x0C (Reply Code)
AC
Answer code
DL
0x01 (Data length)
D1
Response:
The new display setting.
Preset selection / Préréglage de station /
Preset-Auswahl / Selecteren van een voorinstelling
��
Select a preset radio station.
�
Mémorise une station radio préréglée.
�
��
Description:
Auswählen eines voreingestellten Radiosenders.
CC
0x13 (Command code)
Selecteer een vooringestelde zender.
DL
0x01 (Data length)
D1
0x1 - 0x10 – The selected preset.
Example / Exemple / Beispiel / Voorbeeld
��
Command/response sequence to select preset 12:
Séquence de commande/réponse pour sélectionner la station
préréglée 12 :
�
�
��
COMMAND:
Byte:
Befehls-/Rückmeldesequenz zur Auswahl der Voreinstellung 12:
Opdracht- en responsreeks om voorinstelling 12 te selecteren:
RESPONSE:
Byte:
Description:
RC
0x13 (Reply Code)
AC
Answer code
DL
0x1 (Data length)
Dn
Response:
The selected preset.
COMMAND: 0x21 0x13 0x01 0x0C 0x0D
RESPONSE: 0x21 0x13 0x01 0x0C 0x0D
Station selection / Sélection d’une station RAN /
DAB-Senderauswahl / Selecteren van een DAB zender
Increment/decrement the DAB station selection.
COMMAND:
�
Incrémente/décrémente la présélection de station RAN.
Byte:
Description:
�
Erhöhen/Verringern der DAB-Senderauswahl.
CC
0xDE (Command code)
��
Seleceteren van volgende/vorige DAB zender.
DL
0x01 (Data length)
D1
DAB only:
0xF0 – Select the next DAB station
0xF1 – Select the previous DAB station
��
Example / Exemple / Beispiel / Voorbeeld
�� Command/response sequence to increment the DAB station selection,
where the new station is called “DAB STATION 2”:
� Séquence de commande/réponse pour incrémenter la sélection de station
RAN, la nouvelle station s’appelant alors « DAB STATION 2 » :
DAB or FM:
0xF3 – Request the current station name
RESPONSE:
Befehls-/Rückmeldesequenz zur Erhöhung der DAB-Senderauswahl. Der
neue Sender heißt „DAB STATION 2”:
Byte:
Description:
RC
0xDE (Reply Code)
Opdracht- en responsreeks voor het selecteren van de volgende DAB
zender, waarbij de nieuwe zender ‘DAB STATION 2’ wordt benaamd:
AC
Answer code
DL
(Data length)
Dn
Response:
The service label of the radio station, in
ASCII characters
�
��
COMMAND: 0x21 0xDE 0x01 0xF0 0x0D
RESPONSE: 0x21 0xDE 0x01 0x0D 0x44 0x41 0x42 0x20 0x53 0x54
0x41 0x54 0x49 0x4F 0x4E 0x20 0x32 0x0D
DT91
E-13
E nglish
Display information type / Affichage du type d’informations /
Display-Informationstypus / Display informatie type
Radio station information / Informations sur la station radio /
Radiosenderinformationen / Zenderinformatie
��
Request information on the current radio station.
�
Demande des informations sur la station radio actuelle.
�
Abfragen von Informationen zum aktuellen Radiosender.
��
Vraag naar informatie over de huidige zender.
Example / Exemple / Beispiel / Voorbeeld
COMMAND:
Byte:
Description:
CC
0xDF (Command code)
DL
0x02 (Data length)
D1
0xF3 – Request station information
D2
0x00 –
only)
0x01 –
0x02 –
0x04 –
�� Command/response sequence to request the station frequency, where
the source is FM and the frequency is 105.2MHz:
� Séquence de commande/réponse pour demander la fréquence de la
station, la source étant FM et la fréquence 105,2 MHz :
Request the station frequency (FM
Request the station signal strength
Request the station MPEG mode
Request the station data rate
RESPONSE:
Befehls-/Rückmeldesequenz zum Abfragen der Senderfrequenz. Die
Quelle ist FM (analog) und die Frequenz 105,2 MHz:
Byte:
Description:
RC
0xDF (Reply Code)
Opdracht- en responsreeks voor het vragen naar de zendfrequentie, met
als bron FM en de frequentie 105.2Mhz:
AC
Answer code
DL
0x03 (Data length)
D1
0x00
0x01
0x02
0x03
D2
Response to the FM frequency request:
MHz of current frequency
�
��
COMMAND: 0x21 0xDF 0x02 0xF3 0x00 0x0D
RESPONSE: 0x21 0xDF 0x01 0x03 0x00 0x69 0x14 0x0D
Example / Exemple / Beispiel / Voorbeeld
Message
Message
Message
Message
contains
contains
contains
contains
station freq.
signal strength
MPEG mode
data rate
Response to the DAB MPEG mode request:
0x00 – Stereo
0x01 – Joint stereo
0x02 – Dual mono
0x03 – Mono
�� Command/response sequence to request the signal strength, where the
current signal strength is 10:
� Séquence de commande/réponse pour demander la puissance du signal,
la puissance du signal actuelle étant de 10 :
Response to the DAB data rate request:
0x00 - 0xE0 (0 - 224kb/s) – data rate
� Befehls-/Rückmeldesequenz zum Abfragen der Signalstärke. Die aktuelle
Signalstärke ist 10:
Opdracht- en responsreeks om de signaalsterkte na te vragen, waarbij de
signaalsterkte 10 is:
–
–
–
–
Response to the signal strength request:
0x00 - 0x10 – signal strength
��
D3
COMMAND: 0x21 0xDF 0x02 0xF3 0x01 0x0D
Response to the FM frequency request:
kHz (*10) of current frequency
Response to the DAB MPEG mode request:
0x00
RESPONSE: 0x21 0xDF 0x01 0x02 0x0A 0x00 0x0D
Response to the DAB data rate request:
0x00
Response to the signal strength request:
0x00
FM frequency selection / Sélection de la fréquence FM /
FM-Frequenzauswahl / Selecteren van FM-frequentie
Byte:
Description:
�
Incrémente/décrémente la sélection de la fréquence FM.
CC
0xE4 (Command code)
�
Erhöhen/Verringern der FM-Frequenzauswahl
DL
0x01 (Data length)
Selecteren van hogere/lagere FM-frequentie.
D1
0xF0 – Increment the tuned frequency
0xF1 – Decrement the tuned frequency
0xF3 – Request the current tuned frequency
��
Example / Exemple / Beispiel / Voorbeeld
Command/response sequence to decrement the station frequency, where
the new frequency is 97.9MHz:
��
RESPONSE:
Byte:
Description:
Séquence de commande/réponse pour décrémenter la fréquence de la
station, la nouvelle fréquence étant 97,9 MHz :
RC
0xE4 (Reply Code)
AC
Answer code
Befehls-/Rückmeldesequenz zum Verringern der Senderfrequenz. Die
neue Frequenz ist 97,9 MHz:
DL
0x02 (Data length)
D1
MHz of current frequency
Opdracht- en responsreeks om een lagere zenderfrequentie te selecteren,
met als nieuwe frequentie 97.9Mhz:
D2
kHz (*10) of current frequency
�
�
��
COMMAND: 0x21 0xE4 0x01 0xF1 0x00 0x0D
RESPONSE: 0x21 0xE4 0x01 0x02 0x61 0x5A 0x0D
DT91
E-14
COMMAND:
Increment/decrement the FM frequency selection.
��
Radio programme type / Type de programme radio /
Erhöhen/Verringern der FM-Frequenzauswahl / Radioprogramma type
Request information on the current station programme type.
�
Demande des informations sur le type de programme actuellement émis.
�
Abfragen von Informationen zum aktuellen Senderprogrammtypus.
��
Vragen naar informatie over het programmatype van de huidige zender.
Examples / Exemple / Beispiel / Voorbeeld
�� Command/response sequence to request the programme type, where the
programme type is “POP MUSIC”:
COMMAND:
Byte:
Description:
CC
0xE6 (Command code)
DL
0x01 (Data length)
D1
0xF3 – Request programme type
RESPONSE:
Byte:
Description:
Séquence de commande/réponse pour demander le type de programme,
le type de programme étant « POP MUSIC » :
RC
0xE6 (Reply Code)
AC
Answer code
Befehls-/Rückmeldesequenz zum Abfragen des Programmtypus; der
Programmtypus ist „POP MUSIC”:
DL
(Data length)
Dn
Response:
The programme type of the selected
station, in ASCII characters
�
�
E nglish
��
Opdracht- en responsreeks om te vragen naar het programmatype,
waarbij het programmatype “POP MUSIC” is:
��
COMMAND: 0x21 0xE6 0x01 0xF3 0x0D
RESPONSE: 0x21 0xE6 0x01 0x09 0x50 0x4F 0x50 0x20 0x4D 0x55
0x53 0x49 0x43 0x0D
Request RDS/DLS information / Demande d’informations RDS/DLS / Abfragen
von RDS/DLS-Informationen / Vragen naar RDS/DLS informatie
��
Request RDS/DLS (FM/DAB) information from the current radio station.
COMMAND:
Demande des informations RDS/DLS (FM/RAN) sur la station radio
actuelle.
Byte:
Description:
CC
0xE7 (Command code)
Abfragen von RDS/DLS-Informationen (FM/DAB) vom aktuellen
Radiosender.
DL
0x01 (Data length)
D1
0xF3 – Request RDS/DLS information
�
�
��
Vraag naar RDS/DLS (FM/DAB) informatie van de huidige zender.
Examples / Exemple / Beispiel / Voorbeeld
Command/response sequence to request the RDS/DLS information,
where the information is “Playing your favourite music”:
��
Séquence de commande/réponse pour demander les informations RDS/
DLS, les informations étant « Playing your favourite music » (Ecouter votre
musique favorite) :
�
RESPONSE:
Byte:
Description:
RC
0xE7 (Reply Code)
AC
Answer code
DL
(Data length)
Dn
Response:
The RDS/DLS information of the selected
station, in ASCII characters. Up to 128
characters may be returned.
� Befehls-/Rückmeldesequenz zum Abfragen der RDS/DLS-Informationen;
es wird „Playing your favourite music” angezeigt:
�� Opdracht- en responsreeks om naar de RDS/DLS informatie te vragen,
met als informatie “Playing your favourite music”:
COMMAND: 0x21 0xE7 0x01 0xF3 0x0D
RESPONSE: 0x21 0xE7 0x01 0x1C 0x50 0x6c 0x61 0x79 0x69 0x6E
0x67 0x20 0x79 0x6F 0x75 0x72 0x20 0x66 0x61 0x76 0x6F 0x75
0x72 0x69 0x74 0x65 0x20 0x6D 0x75 0x73 0x69 0x63 0x0D
Protocol version / Version du protocole / Protokollversion / Protocol versie
COMMAND:
��
Request the RS232 protocol version of the DT91.
�
Demande la version du protocole RS232 du DT91.
Byte:
Description:
�
Abfragen der RS232-Protokollversion des DT91.
CC
0xED (Command code)
Vraag naar de RS232 protocol versie van de DT91.
DL
0x01 (Data length)
D1
0xF3 – Request protocol version
��
Examples / Exemple / Beispiel / Voorbeeld
RESPONSE:
Command/response sequence to request the protocol version:
Byte:
Description:
�
Séquence de commande/réponse pour demander la version du protocole :
RC
0xED (Reply Code)
�
Befehls-/Rückmeldesequenz zum Abfragen der Protokollversion:
AC
Answer code
Opdracht- en responsreeks om naar de protocol versie te vragen:
DL
0x02 (Data length)
D1
0x01 (Major revision)
D2
(Minor revision)
��
��
COMMAND: 0x21 0xED 0x01 0xF3 0x0D
RESPONSE: 0x21 0xED 0x01 0x02 0x01 0x00 0x0D
DT91
E-15