1
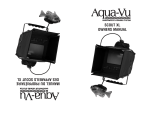
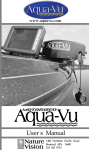
Z-SERIES OWNERS MANUAL
Table of Contents
About your Z-Series . . . . . . . . . . . . . . . . . . . . . . . . .pg 1
In your Z-Series Package . . . . . . . . . . . . . . . . . . . . .pg 1
Easy Setup . . . . . . . . . . . . . . . . . . . . . . . . . . . . . . . .pg 2
Testing Your Unit . . . . . . . . . . . . . . . . . . . . . . . . . . .pg 2
Open Water Use . . . . . . . . . . . . . . . . . . . . . . . . . . .pg 3
On the Ice . . . . . . . . . . . . . . . . . . . . . . . . . . . . . . . .pg 4
The Battery and Charger . . . . . . . . . . . . . . . . . . . . .pg 5
The Fuse . . . . . . . . . . . . . . . . . . . . . . . . . . . . . . . . .pg 5
Gimbal Mount Option . . . . . . . . . . . . . . . . . . . . . . . .pg 6
Video Recording With The Z-Series . . . . . . . . . . . .pg 6
Caring For Your Z-Series . . . . . . . . . . . . . . . . . . . . .pg 6
Frequently Asked Questions . . . . . . . . . . . . . . . . . .pg 7
Some Cautionary Notes . . . . . . . . . . . . . . . . . . . . . .pg 8
Troubleshooting . . . . . . . . . . . . . . . . . . . . . . . . . . . .pg 8
One-Year Limited Warranty . . . . . . . . . . . . . . . . . . .pg 9
Extended Warranty . . . . . . . . . . . . . . . . . . . . . . . . .pg 9
How To Obtain Service . . . . . . . . . . . . . . . . . . . . . .pg 10
MONITOR
CABLE &
BATTERY
SHUTTLE
BATTERY
FRONT VIEWING
FIN
BALLAST
WEIGHTS
THUMBSCREWS
DETACHED
SUNSHIELD
CHARGER
ABOUT YOUR AQUA-VU Z
With your Aqua-Vu Z underwater viewing system you will become an
aquatic explorer much like a skin diver - but without getting wet! Swim your
camera over the bottom landscape of your fishing grounds while watching
"what's really down there." Or, with camera suspended down a hole in the ice,
see how approaching fish react to your bait.
Turn on Aqua-Vu's invisible infrared camera lights to enhance the viewing
of bottom and fish in low-light conditions.
However you employ your Aqua-Vu Z unit - for pure fun as a discovery tool,
for learning while fishing and observing nature, for watching small children or
pets, or for security purposes - you will experience a fascinating new "view."
Your eyes will be glued to the monitor screen!
The Aqua-Vu Z is available with 60- or 120-foot cable options (Choose
from models Z-60 and Z-120.)
IN YOUR AQUA-VU Z PACKAGE. . .
The package contains Aqua-Vu Z components. You'll be viewing-ready in a few
minutes!
• Monitor (weatherproof; attaches to the Carrying Shuttle; tilts up and
down for convenient viewing)
• Carrying Shuttle with handle (allows cable and camera storage; tiltabl
monitor attaches to it)
• Camera with nine infrared lights and 60- or 120-foot cable
• Detachable Sunshield (stores conveniently on carrying shuttle when not
in use)
• Battery (12-volt., 7-amp)
• Battery Charger
• Ballast Weights (for open-water viewing)
• Front-viewing Fin (keeps camera forward-looking as it's pulled through
the water)
If any of the above items are missing, contact your retailer immediately.
Nature Vision, Inc. © Copyright 2000 Pg 1
EASY SETUP
Your Aqua-Vu Z requires no complex assembly. Follow these simple steps:
1. Connect the monitor to the Carrying Shuttle (a one-time procedure) using
the two black plastic headed thumbscrews provided. (You will tighten and
loosen these thumbscrews every time you use the Aqua-Vu Z - for
positioning/tilting the monitor for the most convenient viewing, as well as
for carrying and stowing the unit.)
2. Plug the camera cable into the "CAMERA IN" port (a one-time
procedure).
3. Place the battery into the battery well in the Carrying Shuttle, with
battery terminals towards the lower end of the unit (opposite from
handle). Position the battery lock tabs to secure the battery in place.
Connect the red wire clip to the red terminal on the battery (red to red).
Connect the black wire clip to the black terminal on the battery (black to
black).
You may also power the Aqua-Vu Z via an Auxiliary Power Cord accessory that
plugs into a cigarette lighter in vehicle or boat. The unit can operate off
any 12-volt power source. (The Auxiliary Power Cord accessory is available
through retailers, or online at www.aquavu.com.)
TESTING YOUR UNIT
1. VIEWING AN IMAGE. Locate the ON-OFF-ON/LIGHT switch at the right
end of the control line-up. Turn the switch to the ON position. Look at the
monitor screen. You should see an image. Slowly move the camera,
pointing it towards room furniture, your dog, or even your feet. You
should see a "live" image!
2. CHECKING THE CAMERA'S INFRARED LIGHTS. Turn the
ON-OFF-ON/LIGHT switch to ON/LIGHT. Choose a dark environment. An
image of whatever the camera "sees" - your face or the living room wall should appear on the monitor. (Note: Use the ON/LIGHT position to
activate the Aqua-Vu Z's light source to enhance viewing in low-light
conditions.)
If you fail to see an image on the monitor while conducting these tests,
see the Troubleshooting section of this manual.
Nature Vision, Inc. © Copyright 2000 Pg 2
OPEN-WATER USE
Ballast Weights and Front-viewing Fin
Underwater video cameras may be lowered into the water from
breakwaters, docks, and fishing piers, as well as from anchored boats and pontoons. Innovative bank fishermen use them, too. Much of the
open-water viewing by anglers is done from boats while drifting or
slow-trolling on lakes, or from boats dealing with stream current. For best control of the camera in most of these open-water situations, use the Ballast
Weights and Front-viewing Fin included with your Aqua-Vu Z.
1. Line up the predrilled holes of the ballast weights with those on the
camera's underside. Attach the Ballast Weights to the
camera by means of the two steel bolts and two nylon locknuts.
2. Locate the two predrilled holes at the rear of the camera and use the
two nylon screws and two nylon locknuts to attach the Front-viewing Fin.
(The Front-viewing Fin helps maintain a forward-looking viewing posture
as the camera moves through the water.)
When attaching weights and fin to the camera, notice that the holes match,
but with a "tight fit" to prevent accidental loss. The nylon locknuts require
tightening with a pliers. Note: We recommend removing weights and
fin for ice fishing.
Lower the camera and view!
Begin your viewing trip by simply lowering the camera to the bottom. (Don't
worry! The camera won't break if you bump a rock or suddenly "hit bottom.")
In most waters, fish relate to bottom structure. So, while drifting or
slow-trolling, you'll need to guide the camera over the ups and downs of
bottom contours. You will quickly learn how to "swim" the camera over
bottom terrain. With cable in hand, simply raise or lower the camera,
paying out more or less cable depending on depth and boat speed. As you
move along, you should see on your monitor screen a continuous picture of
the passing bottom and the fish-holding watery zone just above it. When
viewing over soft bottom, make sure the camera is actually above the
bottom and not plowing or "stirring up" the muck. Remember, if you can't see
bottom, raise or lower the camera to "look" for it.
If your camera becomes snagged, maneuver the boat so the direction of pull is
the same as it was when the camera became snagged. A little jiggling or light
tugging will usually enable you to back the camera out of a snag. Avoid pulling
the camera through heavy weed cover or thick brush. With your Aqua-Vu Z
model, you will be fascinated, and often surprised, by the ever-changing "live"
view of underwater scenery: rocks, weeds, other bottom features - and fish!
(For more advice and viewing tips see Frequently Asked Questions in this manual.)
Nature Vision, Inc. © Copyright 2000 Pg 3
ON THE ICE
Your Aqua-Vu is an invaluable ice fishing tool which steps beyond
mysterious flashes on a depthfinder to actually "see" the real picture.
Take advantage of these key benefits:
• View bottom structure and distinguishing features - Observe
weedlines and weed characteristics, sand versus muck, big rocks versus small
rocks, transitions from one bottom type to another. What a big help in
precisely locating fishing holes or fish house!
• Sharpen your fishing techniques - Watch your bait and see how
approaching fish react to it. Learn what lures, colors, and jigging actions
attract fish and trigger strikes.
• Identify fish as to species and size - Seeing the fish "in person" helps
solve mysteries about depthfinder signals and helps with decisions about
fishing techniques and whether to stay or leave.
• Search out new fishing grounds - Move from spot to spot, always
boring two holes a few feet apart - one for your camera, the other for your
bait.Test-fish for a few minutes in each spot. It's possible to choose or
eliminate potential fishing spots on the basis of seeing or not seeing
fish as you move around while prospecting.
That special viewing hole!
Most ice fishing camera owners bore a special "camera hole" several feet
from the fishing hole. Lower your bait or lure to about 6 inches above
bottom. Turn on the Aqua-Vu Z unit and lower the camera through the
camera hole. Raise it slightly off bottom so you have a view of the bottom and
the water above it. Slowly twist the camera cable until you glimpse
your bait. Carefully adjust the cable so the bait is centered on the screen. This
camera positioning provides a view of the bait plus areas just beyond and to
each side of it - ideal for watching bait and approaching fish! Some
anglers rest a bait bucket or other object on the cable to maintain camera
depth and position. Others clamp the cable to a stick placed over the hole.
Another option: Aqua-Vu's Camera Positioning Stand accessory makes it
easier to maintain camera position for watching your lure and the
surrounding area. (Available from retailers or online at www.aqua.vu.com.)
Remove the Ballast Weight and Front-viewing Fin for ice fishing
For ice fishing, most camera users remove the open-water Ballast Weight and
Front-viewing Fin. If weight is needed, a simple clamp-on lead depthfinder is
usually enough for ice fishing use. This weight can be positioned along the bottom or back keel of the camera to control the viewing angle. In most cases the
camera will work best in a horizontal position, but there may be times when
you'll want to view at an up or down angle.
Nature Vision, Inc. © Copyright 2000 Pg 4
THE BATTERY AND CHARGER
The Aqua-Vu Z model includes a 12-volt, 7-amp sealed and spillproof lead
acid battery designed to fit securely in the carrying shuttle. The battery
has a one-way relief valve to release excessive gas pressure in case of
improper charging. (For battery installation, see No. 3 in the "Easy Setup"
section towards the front of this manual.)
Make sure the battery is fully charged before each use. Recharging after
every viewing session is recommended. Expect 8 to 12 hours of continuous
operation from a fully charged battery, depending on use of the infrared
lights. Cold temperatures will also reduce operating time.
Following a few simple rules will prolong battery life and contribute to
efficient use of your Aqua Vu unit:
• Charge the battery as soon as possible after purchase.
• Store the battery at moderately cool temperatures. Service life is
considerably shortened at temperatures above 85 degrees F.
• Fasten the battery securely in its compartment, and minimize shock to the
battery.
• Guard against overcharging. The 500 mA charger (provided with the unit)
will not overcharge the battery in most cases. Do not leave the charger
connected for more than 24 hours. Do not use a charging system with
more than a 2-amp output. High rates of charge can heat up and destroy a
battery in a few hours.
• Avoid prolonged battery storage without charging. Batteries stored in a
discharged state may initially appear to be damaged and will accept less
current than normal. Usually the battery will accept increasing amounts of
current, but may take longer than normal to reach a fully charged state. If
there is no response the battery may have been discharged too long to
recover. Freezing a discharged battery may permanently damage it.
• Always dispose of a battery in a legal and environmentally safe way.
THE FUSE
Between the "Camera In" and "Video In" ports is a "1 AMP" fuse
compartment. (A fuse is factory-installed.) This fuse is designed to blow when
the battery is connected backwards, or if a short occurs in the system. If the
fuse is blown replace it with a standard 1 amp automotive fuse available at
hardware and auto parts stores. To remove the fuse, push the cap in and rotate
counter-clockwise.
Nature Vision, Inc. © Copyright 2000 Pg 5
GIMBAL MOUNT OPTION
You may want to mount the Aqua-Vu monitor on the console (or in the
electronics locker) of your boat, or somewhere other than on the portable
carrying shuttle that comes with the unit. You can easily make the switch.
You'll need a Gimbal Bracket that can be purchased from Aqua-Vu dealers or
online at www.aquavu.com. With a Gimbal Bracket in the desired place,
loosen the two thumbscrews holding the monitor to the Aqua-Vu Z unit,
remove the monitor, and (using the two thumbscrews) attach it to the Gimbal
Bracket.
VIDEO RECORDING WITH THE AQUA-VU Z
Your Aqua-Vu Z's "VIDEO-OUT" jack is for connecting your unit to a
handheld camcorder, or to a larger external monitor. Your Aqua-Vu will
work with any camcorder or any monitor that accepts the NTSC video signal
(the North American standard) and has a "VIDEO-IN" jack. Use an
RCA-style patch cord that comes with most camcorders (also available at most
consumer electronics stores.) For video recording, plug one end of the cord into
the "VIDEO-OUT" jack on the Aqua-Vu; plug the other end into the "VIDEO-IN"
jack on your camcorder. You should be able to watch your Aqua-Vu monitor and
record at the same time.
CARING FOR YOUR AQUA-VU Z
Your Aqua-Vu underwater viewing system requires minimal "common sense"
maintenance.
1. The battery requires regular charging. (See battery charging
instructions.) Always disconnect the red and black power leads before
charging the battery. Never charge while the unit is connected.
2. Clean the monitor and camera lens periodically by using mild
dishwashing soap, warm water, and a very soft cloth. Do NOT use
window cleaner or alcohol-based products, since they may cause
permanent fogging.
3. Periodically run your fingers over the entire length of the cable,
feeling for nicks or other cable damage. A damaged cable should be
returned to the factory for repair. (See the Service section of this manual.)
4. As a precautionary measure, dry off your monitor after it gets wet from
rain or boat spray.
5. Never tug on fishing line that accidentally gets wrapped around the
camera cable. Line can cut and damage the cable.
Nature Vision, Inc. © Copyright 2000 Pg 6
FREQUENTLY ASKED QUESTIONS
How far can I see?
Naturally, the clearer the water, the farther you can see. As a general
rule, the camera can see twice as far as the human eye in water - meaning
that if you can see 3 feet down you will be able to see approximately 6
feet in front of the camera. But this is just a rule of thumb, and all
bodies of water will vary. For anglers studying bottom structure, 2 feet
of visibility is sufficient for underwater viewing.
When do I use the infrared lights?
The infrared lights in your Aqua-Vu camera are designed for use in
low-light situations. Turn the power switch to the "ON/LIGHT" position for
enhanced visibility in low light.
How do I steer the camera?
For viewing in the direction of travel use the Front-viewing Fin. Slowly
troll (less than 2 mph) or drift along the structure you intend to view.
With the Front-viewing Fin, the camera will face the boat's direction of
travel. The opposite holds true when using the Back-viewing Fin which
positions the camera for viewing in the direction opposite from the boat's
travel. (The Back viewing Fin, not included with the unit, is available
from dealers or online at www.aquavu.com.)
Can I splice the camera cable to obtain more length?
No. Attempting to splice in additional cable violates the waterproof
integrity of the camera and cable, voiding the warranty.
Can I attach my camera to a downrigger?
Yes, by using the Cam-Rigger accessory. You can attach your camera to your
downrigger cable at any depth, allowing you to watch your lure - given
adequate water clarity.
How fast can I troll with my camera?
It depends on depth, and also on the length of cable you have out, which
determines water resistance or "drag." The deeper you go, with more cable
out, the more drag there will be, requiring slower travel for good viewing.
Generally, for best viewing, we recommend going less than 2 miles per hour.
Remember, the slower you go, the more detail you will see.
Can I use my Aqua-Vu Z in saltwater?
Yes. All Aqua-Vu cameras are saltwater-rated, using stainless steel
hardware and materials that are impervious to corrosion.
Nature Vision, Inc. © Copyright 2000 Pg 7
Will my unit work in subfeezing conditions?
Aqua-Vu systems are designed to operate at temperatures ranging from minus40 to 120 degrees F. Expect your battery life to decrease in cold conditions.
What is the viewing angle of the camera?
Your camera lens has a viewing angle of 92 degrees. At 4-1/2 feet in front
of the camera you will be viewing an image approximately 6 feet wide.
What is the resolution of my monitor screen?
Your screen has 420 lines of resolution for crystal-clear viewing.
Can I connect my Aqua-Vu to a larger monitor or to a hand-held
recorder? Yes. For use in a permanent fish house or in a large boat with a
built-in video system, your Aqua-Vu can be hooked up to a larger external TV,
provided it has a "VIDEO-IN" jack. The same holds true for a hand-held
video recorder. See the "Video Recording with Aqua-Vu" section of this
manual for more details.
Is Aqua-Vu legal?
To our knowledge, there are no restrictions anywhere that regulate the use
of Aqua-Vu underwater viewing systems. Aqua-Vu is an approved
pre-fishing tool for B.A.S.S. And P.W.T. events, and for other tournament trails
across the country.
SOME CAUTIONARY NOTES
• The charger supplied with this unit does not disconnect or turn off
automatically when a full charge is reached. Please use caution when
charging your battery.
• When adjusting the angle of the monitor, always completely loosen the
thumbscrews to avoid damaging the teeth on the mounting bracket.
Tighten the thumbscrews when the monitor is at the desired angle. Always
make sure the thumbscrews are tight after tilting the monitor down for
carrying or stowing.
• Always keep camera cable away from propellers.
TROUBLE-SHOOTING
NOTHING HAPPENS (SCREEN FAILS TO LIGHT UP) WHEN THE SWITCH IS
IN EITHER THE ON OR ON/LIGHT POSITION.
• Battery not connected. Properly connect the battery: red to red, black to
black.
• Battery not charged.
• Fuse may be blown. (See The Fuse section of this manual on page 5.)
Nature Vision, Inc. © Copyright 2000 Pg 8
THE SCREEN LIGHTS UP, BUT I SEE NO PICTURE.
• Camera cable is disconnected. (Plug the camera cable into the
"Camera-In" jack.
• Camera cable might be damaged. (Consult the "Service" section in this
manual.)
SCREWS FOR BALLAST WEIGHTS AND FRONT-VIEWING FIN WON'T GO
THROUGH HOLES IN THE RUBBER CAMERA HOUSING
• With a screwdriver, screw the bolts through the predrilled holes. (The
holes are a little undersized for firmly gripping the bolts to prevent
their loss.)
I LOWER THE CAMERA TO THE BOTTOM BUT CAN'T SEE ANYTHING.
• The camera may be buried in soft bottom! (Raise the camera off the
bottom.)
• The water might be very murky. Select the ON-LIGHT switch position to
activate infrared lights in your camera for enhanced viewing in low-light
conditions.
THERE IS A NICK IN THE CAMERA CABLE.
• See the "Service" section of this manual for instructions on returning
the camera for repair.
THE IMAGE ON MY SCREEN HAS A DARK MARGIN AROUND IT, OR GETS
BLURRY.
• You're seeing on-screen symptoms of a weakening battery. Charge the
battery, or install a charged battery.
ONE-YEAR LIMITED WARRANTY
Nature Vision, Inc., warrants this product to be free from defects in
materials and workmanship for one year from the date of purchase. This
warranty applies to customers who properly fill out, clip, and return the
warranty card included on the back cover of this manual. Failure to
complete and return the warranty card voids this warranty. Nature Vision,
Inc., will, at its sole discretion and without charging the customer,
repair or replace any components that fail in normal use. Failures due to
abuse, misuse, or unauthorized alteration or repair, are not covered. The
warranty is valid only for the original owner.
EXTENDED WARRANTY
A two-year extended warranty is available through Nature Vision, Inc. You
may purchase this warranty within 30 days of purchasing the unit. Visit www.
aquavu.com for more information.
Nature Vision, Inc. © Copyright 2000 Pg 9
HOW TO OBTAIN SERVICE
We want our products to provide you with a pleasant on-the-water
experience. That means maximum customer satisfaction. If you have a problem
with your unit within 30 days of purchase, you may return it to your
retailer for replacement (subject to retailer's stock). After 30 days,
please contact the factory for a return authorization number (RA#). No
service returns will be accepted without this pre-return authorization,
which must be clearly marked on the outside of the returned package. Nature
Vision, Inc., retains the exclusive right to repair or replace the unit at
its discretion.
To obtain a Return Authorization Number, contact the factory at
(866) 777-0733. You may also email service requests to
[email protected].
The customer is responsible for shipping costs associated with returning
the unit to Nature Vision, Inc. Nature Vision, Inc., will pay for shipping
the repaired unit back to the customer. After obtaining a Return
Authorization Number, the unit should be securely packed and shipped
("pre-paid freight" and insured) to Nature Vision, Inc., at:
Nature Vision, Inc.
RA#____________
213 NW 4th Street
Brainerd, MN 56401
Canadian customers please return to:
Nature Vision, Inc.
C/O Unicity One Step
RA#_____________
1460 Clarence Ave.
Winnipeg, MB R3T 1T6
Nature Vision, Inc. © Copyright 2000 Pg 10