1
DVR-04_HDD_UK.book 1 ページ 2004年4月11日 日曜日 午後6時11分
DVD Recorder
DVR-420H
DVR-520H
DVR-720H
Operating Instructions
®
DVR-04_HDD_UK.book 2 ページ 2004年4月11日 日曜日 午後6時11分
IMPORTANT
CAUTION
RISK OF ELECTRIC SHOCK
DO NOT OPEN
The lightning flash with arrowhead symbol,
within an equilateral triangle, is intended to
alert the user to the presence of uninsulated
"dangerous voltage" within the product's
enclosure that may be of sufficient
magnitude to constitute a risk of electric
shock to persons.
CAUTION:
TO PREVENT THE RISK OF ELECTRIC
SHOCK, DO NOT REMOVE COVER (OR
BACK). NO USER-SERVICEABLE PARTS
INSIDE. REFER SERVICING TO QUALIFIED
SERVICE PERSONNEL.
WARNING: The apparatus is not waterproofs, to
prevent fire or shocks hazard, do not expose this
apparatus to rain or moisture and do not put any
water source near this apparatus, such as vase,
flower pot, cosmetics container and medicine
D3-4-2-1-3_En
bottle etc.
CAUTION
This product contains a laser diode of higher class
than 1. To ensure continued safety, do not remove any
covers or attempt to gain access to the inside of the
product.
Refer all servicing to qualified personnel.
The following caution label appears on your unit.
The exclamation point within an equilateral
triangle is intended to alert the user to the
presence of important operating and
maintenance (servicing) instructions in the
literature accompanying the appliance.
D3-4-2-1-1_En-A
WARNING:
BEFORE PLUGGING IN THE UNIT FOR THE FIRST
TIME, READ THE FOLLOWING SECTION CAREFULLY.
The voltage of the available power supply differs
according to country or region. Be sure that the
power supply voltage of the area where this unit
will be used meets the required voltage (e.g., 230V
D3-4-2-1-4_En
or 120V) written on the rear panel.
CLASS 1
LASER PRODUCT
D3-4-2-1-8_En
This product complies with the Low Voltage Directive
(73/23/EEC, amended by 93/68/EEC), EMC Directives
(89/336/EEC, amended by 92/31/EEC and
D3-4-2-1-9a_En
93/68/EEC).
The STANDBY/ON switch is secondary connected
and therefore, does not separate the unit from mains
power in STANDBY position. Therefore install the
unit suitable places easy to disconnect the MAINS
plug in case of the accident. The MAINS plug of unit
should be unplugged from the wall socket when left
D3-4-2-2-2a_En
unused for a long period of time.
DVR-04_HDD_UK.book 3 ページ 2004年4月11日 日曜日 午後6時11分
WARNING: No naked flame sources, such as
lighted candle, should be placed on the apparatus.
If naked flame sources accidentally fall down, fire
spread over the apparatus then may cause fire.
D3-4-2-1-7a_En
Operating Environment
Operating environment temperature and humidity:
+5 ºC – +35 ºC (+41 ºF – +95 ºF); less than 85 %RH
(cooling vents not blocked)
Do not install in the following locations
• Location exposed to direct sunlight or strong artificial
light
• Location exposed to high humidity, or poorly
D3-4-2-1-7c_En
ventilated location
VENTILATION: When installing this unit, make
sure to leave space around the unit for ventilation
to improve heat radiation (at least 10 cm at top, 10
cm at rear, and 10 cm at each side).
WARNING: Slots and openings in the cabinet are
provided for ventilation and to ensure reliable
operation of the product and to protect it from
overheating, to prevent fire hazard, the openings
should never be blocked and covered with items,
such as newspapers, table-cloths, curtains, etc. Also
do not put the apparatus on the thick carpet, bed,
D3-4-2-1-7b_En
sofa, or fabric having a thick pile.
This product incorporates copyright protection technology
that is protected by method claims of certain U.S. patents
and other intellectual property rights owned by
Macrovision Corporation and other rights owners. Use of
this copyright protection technology must be authorized
by Macrovision Corporation, and is intended for home and
other limited viewing uses only unless otherwise
authorized by Macrovision Corporation. Reverse
engineering or disassembly is prohibited.
This product is for general household purposes. Any failure
due to use for other than household purposes (such as longterm use for business purposes in a restaurant or use in a
car or ship) and which requires repair will be charged for
even during the warranty period.
K041_En
This product includes FontAvenue® fonts licenced by NEC
corporation. FontAvenue is a registered trademark of NEC
Corporation.
POWER-CORD CAUTION
Handle the power cord by the plug. Do not pull out the
plug by tugging the cord and never touch the power
cord when your hands are wet as this could cause a
short circuit or electric shock. Do not place the unit, a
piece of furniture, etc., on the power cord, or pinch the
cord. Never make a knot in the cord or tie it with other
cords. The power cords should be routed such that they
are not likely to be stepped on. A damaged power cord
can cause a fire or give you an electrical shock. Check
the power cord once in a while. When you find it
damaged, ask your nearest PIONEER authorized
service center or your dealer for a replacement. S002_En
Replacement and mounting of an AC plug on the power supply cord of this unit should be performed only by qualified
service personnel.
IMPORTANT
FOR USE IN THE UNITED
KINGDOM
The wires in this mains lead are coloured in
accordance with the following code:
Blue
: Neutral
Brown : Live
If the plug provided is unsuitable for your socket
outlets, the plug must be cut off and a suitable plug
fitted.
The cut-off plug should be disposed of and must
not be inserted into any 13 amp socket as this can
result in electric shock. The plug or adaptor or the
distribution panel should be provided with 5 A fuse.
As the colours of the wires in the mains lead of this
appliance may not correspond with coloured
markings identifying the terminals in your plug,
proceed as follows ;
The wire which is coloured blue must be connected
to the terminal which is marked with the letter N or
coloured black.
The wire which is coloured brown must be
connected to the terminal which is marked with the
letter L or coloured red.
Do not connect either wire to the earth terminal of a
three pin plug.
NOTE
After replacing or changing a fuse, the fuse cover in
the plug must be replaced with a fuse cover which
corresponds to the colour of the insert in the base
of the plug or the word that is embossed on the
base of the plug, and the appliance must not be
used without a fuse cover. If lost replacement fuse
covers can be obtained from your dealer.
Only 5 A fuses approved by B.S.I or A.S.T.A to
B.S.1362 should be used.
D3-4-2-1-2-2_En
DVR-04_HDD_UK.book 4 ページ 2004年4月11日 日曜日 午後6時11分
Contents
01 Before you start
Features . . . . . . . . . . . . . . . . . . . . . . . . . . . . . . . . . . . 6
What’s in the box . . . . . . . . . . . . . . . . . . . . . . . . . . . . 8
Putting the batteries in the remote control . . . . . . . . . 8
Using the remote control . . . . . . . . . . . . . . . . . . . . . . 8
Disc / content format playback compatibility . . . . . . . 9
About the internal hard disk drive . . . . . . . . . . . . . . . 11
02 Connecting up
Rear panel connections . . . . . . . . . . . . . . . . . . . . . . 12
Front panel connections . . . . . . . . . . . . . . . . . . . . . . 12
Extra features for use with compatible TVs . . . . . . . . 13
Easy connections . . . . . . . . . . . . . . . . . . . . . . . . . . . 14
Using other types of audio/video output . . . . . . . . . . 15
Connecting to a cable box or satellite receiver . . . . . 16
Connecting an external decoder box (1) . . . . . . . . . . 17
Connecting an external decoder box (2) . . . . . . . . . . 18
Connecting to an AV amplifier/receiver . . . . . . . . . . 19
Connecting other AV sources . . . . . . . . . . . . . . . . . . 20
Plugging in . . . . . . . . . . . . . . . . . . . . . . . . . . . . . . . . 20
Switching DVD soundtracks . . . . . . . . . . . . . . . . . . . 43
Switching audio channels . . . . . . . . . . . . . . . . . . . . 44
Switching camera angles . . . . . . . . . . . . . . . . . . . . . 44
06 Recording
About DVD recording . . . . . . . . . . . . . . . . . . . . . . . . 45
About HDD recording . . . . . . . . . . . . . . . . . . . . . . . . 45
Recording time and picture quality . . . . . . . . . . . . . . 46
Restrictions on video recording . . . . . . . . . . . . . . . . 46
Setting the picture quality/recording time . . . . . . . . 47
Basic recording from the TV . . . . . . . . . . . . . . . . . . . 47
Setting a timer recording . . . . . . . . . . . . . . . . . . . . . 49
Timer recording FAQ . . . . . . . . . . . . . . . . . . . . . . . . 55
Simultaneous recording and playback . . . . . . . . . . . 55
Recording from an external component . . . . . . . . . . 56
Automatic recording from a satellite tuner . . . . . . . . 56
Recording from a DV camcorder
(DVR-520H/720H only) . . . . . . . . . . . . . . . . . . . . . . . 57
Recording from the DV output
(DVR-520H/720H only) . . . . . . . . . . . . . . . . . . . . . . . 59
Playing your recordings on other DVD players . . . . . 59
Initializing a DVD-RW disc . . . . . . . . . . . . . . . . . . . . 60
03 Controls and displays
Front panel . . . . . . . . . . . . . . . . . . . . . . . . . . . . . . . . 21
Display . . . . . . . . . . . . . . . . . . . . . . . . . . . . . . . . . . . 22
Remote control . . . . . . . . . . . . . . . . . . . . . . . . . . . . . 23
Switching on and setting up . . . . . . . . . . . . . . . . . . . 25
Selecting the hard disk or DVD for playback and
recording . . . . . . . . . . . . . . . . . . . . . . . . . . . . . . . . . 28
Making your first recording. . . . . . . . . . . . . . . . . . . . 28
Using the built-in TV tuner . . . . . . . . . . . . . . . . . . . . 29
Basic playback . . . . . . . . . . . . . . . . . . . . . . . . . . . . . 30
Using the Home Menu . . . . . . . . . . . . . . . . . . . . . . . 33
Displaying disc information on-screen . . . . . . . . . . . 33
Introduction . . . . . . . . . . . . . . . . . . . . . . . . . . . . . . . 61
One Touch Copy (HDD to DVD) . . . . . . . . . . . . . . . . 62
One Touch Copy (DVD to HDD) . . . . . . . . . . . . . . . . 62
Copying from HDD to DVD . . . . . . . . . . . . . . . . . . . . 63
HDD to DVD Copy List menu options . . . . . . . . . . . . 64
Recording the Copy List . . . . . . . . . . . . . . . . . . . . . . 65
HDD to DVD Copy List commands . . . . . . . . . . . . . . 65
Copying from DVD to HDD . . . . . . . . . . . . . . . . . . . . 71
DVD to HDD Copy List menu options . . . . . . . . . . . . 72
Recording the Copy List . . . . . . . . . . . . . . . . . . . . . . 72
DVD to HDD Copy List commands . . . . . . . . . . . . . . 73
Using disc back-up . . . . . . . . . . . . . . . . . . . . . . . . . 74
05 Playback
08 Editing
Introduction . . . . . . . . . . . . . . . . . . . . . . . . . . . . . . . 36
Using the Disc Navigator to browse the contents
of a disc. . . . . . . . . . . . . . . . . . . . . . . . . . . . . . . . . . . 36
Navigating discs and the HDD . . . . . . . . . . . . . . . . . 38
Scanning discs . . . . . . . . . . . . . . . . . . . . . . . . . . . . . 38
Playing in slow motion . . . . . . . . . . . . . . . . . . . . . . . 39
Frame advance/frame reverse . . . . . . . . . . . . . . . . . 39
The Play Mode menu . . . . . . . . . . . . . . . . . . . . . . . . 40
Displaying and switching subtitles . . . . . . . . . . . . . . 43
The Disc Navigator screen . . . . . . . . . . . . . . . . . . . . 76
Disc Navigator menu options . . . . . . . . . . . . . . . . . . 78
Editing VR mode Original, Video mode and HDD
content . . . . . . . . . . . . . . . . . . . . . . . . . . . . . . . . . . . 79
Editing HDD groups . . . . . . . . . . . . . . . . . . . . . . . . . 84
Creating and editing a VR mode Play List . . . . . . . . . 84
04 Getting started
4
En
07 Copying and back-up
DVR-04_HDD_UK.book 5 ページ 2004年4月11日 日曜日 午後6時11分
09 Disc History
15 Index
Using the Disc History . . . . . . . . . . . . . . . . . . . . . . . 89
10 The PhotoViewer
Playing a slideshow . . . . . . . . . . . . . . . . . . . . . . . . . 90
11 The Disc Setup menu
Basic settings . . . . . . . . . . . . . . . . . . . . . . . . . . . . .
Initialize settings . . . . . . . . . . . . . . . . . . . . . . . . . . .
HDD Initialize . . . . . . . . . . . . . . . . . . . . . . . . . . . . .
Finalize settings . . . . . . . . . . . . . . . . . . . . . . . . . . . .
92
93
93
93
12 The Video/Audio Adjust menu
Setting the picture quality for TV and external
inputs . . . . . . . . . . . . . . . . . . . . . . . . . . . . . . . . . . . 94
Setting the picture quality for disc playback . . . . . . 95
Audio DRC . . . . . . . . . . . . . . . . . . . . . . . . . . . . . . . . 96
13 The Initial Setup menu
Using the Initial Setup menu . . . . . . . . . . . . . . . . . . 97
Basic settings . . . . . . . . . . . . . . . . . . . . . . . . . . . . . 97
Tuner settings . . . . . . . . . . . . . . . . . . . . . . . . . . . . . 99
Video In / Out settings . . . . . . . . . . . . . . . . . . . . . . 102
Audio In settings . . . . . . . . . . . . . . . . . . . . . . . . . . 103
Audio Out settings . . . . . . . . . . . . . . . . . . . . . . . . . 104
Language settings . . . . . . . . . . . . . . . . . . . . . . . . . 105
Recording settings. . . . . . . . . . . . . . . . . . . . . . . . . 107
Playback settings . . . . . . . . . . . . . . . . . . . . . . . . . . 109
14 Additional information
Resetting the recorder . . . . . . . . . . . . . . . . . . . . . .
Setting up the remote to control your TV . . . . . . . .
Screen sizes and disc formats . . . . . . . . . . . . . . . .
Troubleshooting . . . . . . . . . . . . . . . . . . . . . . . . . . .
Frequently asked questions . . . . . . . . . . . . . . . . . .
About DV (DVR-520H/720H only) . . . . . . . . . . . . . .
Manual recording modes . . . . . . . . . . . . . . . . . . . .
Language code list. . . . . . . . . . . . . . . . . . . . . . . . .
Country code list . . . . . . . . . . . . . . . . . . . . . . . . . .
On-screen displays and recorder displays . . . . . . .
Handling discs. . . . . . . . . . . . . . . . . . . . . . . . . . . .
Storing discs . . . . . . . . . . . . . . . . . . . . . . . . . . . . .
Damaged discs . . . . . . . . . . . . . . . . . . . . . . . . . . .
Cleaning the pickup lens . . . . . . . . . . . . . . . . . . . .
Condensation . . . . . . . . . . . . . . . . . . . . . . . . . . . .
Hints on installation. . . . . . . . . . . . . . . . . . . . . . . .
Moving the recorder. . . . . . . . . . . . . . . . . . . . . . . .
Glossary . . . . . . . . . . . . . . . . . . . . . . . . . . . . . . . . .
Specifications . . . . . . . . . . . . . . . . . . . . . . . . . . . .
112
112
113
114
116
117
118
119
119
120
121
121
121
122
122
122
122
122
125
5
En
DVR-04_HDD_UK.book 6 ページ 2004年4月11日 日曜日 午後6時11分
Before you start
01
Chapter 1
Before you start
Features
HDD
• HDD recording
You can record up to 102 hours of video (in EP mode) on
the internal 80GB (gigabyte) hard disk (HDD) on the DVR420H/520H, or up to 204 hours on the 160GB DVR-720H.
With both recordable DVD and a high-capacity HDD in
the same recorder, you have the flexibility to keep
recordings on the HDD for quick access anytime, or
record to DVD for archiving or playing on other DVD
players.
• Disc History
The Disc History screen shows disc information,
including how much free space remains for recording,
for the last 30 recordable discs loaded in the recorder.
Every time you load a recordable disc, the Disc History is
automatically updated with the latest information.
• Copy between HDD and DVD
You can copy recordings from the HDD to recordable
DVD, or from DVD to the HDD. Usually you can use the
high-speed copy feature, which can copy an hour of video
in under two minutes (when recorded in EP mode using
a DVD-R Ver. 2.0 / 8x disc).
• Home Menu
The Home Menu gives you on-screen access to all the
recorder’s features in one convenient place, from setting
up the recorder, to programming a timer recording and
editing a recording.
You can also choose to copy material at a different
recording quality from the original. For example, you
might want to copy a FINE mode (highest quality)
recording on the HDD to SP (standard play) quality on a
DVD so that you can fit other recordings on the same
disc.
• One Touch Copy
One Touch Copy makes copying the currently playing title
from HDD to DVD, or DVD to HDD as simple as pressing
a button.
HDD
• Chase play VR mode
Using chase play you can start watching a recording
before the recording has finished. For example, you could
set a timer recording for a program that you’re going to
miss the first 15 minutes of, then start watching while the
recorder is still recording the program 15 minutes ahead
of you.
•
Simultaneous recording and playback
VR mode
HDD
Playback and recording for both DVDs and the built-in
hard disk drive (HDD) are completely independent. For
example you can record a broadcast program to either a
recordable DVD or the HDD, while watching another
recording you already made on the same DVD or on the
HDD.
6
En
• Disc Navigator
The on-screen Disc Navigator makes finding your way
around the contents of a disc or the HDD easy. For
recordable DVD and HDD content, moving thumbnail
images are displayed for ease of use. The Disc Navigator
is also where you can edit HDD and recordable DVD
content.
• Cinema surround sound in your home
Connect this recorder to a Dolby Digital and/or DTScompatible AV amp/receiver to enjoy full surround sound
effects from Dolby Digital and DTS DVD discs.
• Easy Timer Recording
Setting the recorder to record a program is simple from
the Easy Timer Recording screen. Set the channel to
record and the recording quality, then graphically set the
start and end times of the recording. That’s it!
• Program up to 32 timer recordings
You can program the recorder to record up to 32
programs, up to a month in advance, using the
VIDEO Plus+® system* for easy programming if you
want. As well as single programs, you can specify daily or
weekly recordings, too.
This recorder is also compatible with VPS/PDC systems,
which ensure you don’t miss a timer recording, even if
the broadcast is not running to schedule.
*1
is a registered trademark of Gemstar
Development Corporation.
®
The VIDEO Plus+ system is manufactured under
license from Gemstar Development Corporation.
• One Touch Recording
Use One Touch Recording to start recording immediately
in 30 minute blocks. Each time you press the REC
button, the recording time is extended by another 30
minutes.
DVR-04_HDD_UK.book 7 ページ 2004年4月11日 日曜日 午後6時11分
Before you start
• Optimized recording
Optimized recording adjusts the recording quality
automatically if a timer recording will not fit onto a disc
with the settings that you made.
• Auto Start Recording from satellite receiver or
other set top box
With a satellite receiver or other set top box connected to
the AV2/AUTO START REC (INPUT 1/DECODER) inputs
of this recorder, you can start and stop recording
automatically according to the timer settings of the set
top box.
• High quality 16-bit Linear PCM audio
When recording using one of the high quality record
settings (FINE or MN32), the audio is recorded in
uncompressed 16-bit Linear PCM format. This delivers
great sounding audio to accompany the high picture
quality.
• Picture quality adjustment features
During playback, you can adjust various picture quality
settings to improve the picture. You can also adjust the
recording picture quality. For example, if you want to
make a DVD copy of an old video tape, you can optimize
the picture quality before transferring it to disc.
• Find what you want to watch quickly and easily
Unlike video tape that needs to be wound to the correct
place, you can jump right to the part of a DVD disc or the
HDD that you want to watch. Search for a point on a disc
by title, chapter or time.
• Manual recording
In addition to the four preset recording quality modes
(FINE, SP, LP and EP), the manual recording mode allows
you to access 32 different recording quality/time settings,
giving you precise control over the recording.
• Record to and from a DV camcorder (DVR-520H/
720H only)
This recorder has a built-in DV (Digital Video) input/
output jack for connection to a DV camcorder. This
makes it ideal for transferring camcorder footage to DVD
or HDD for editing. You can also transfer DVD or HDD
content back to the camcorder if you need to.
01
•
Play Video mode recordings on a regular DVD
player Video mode
Discs recorded using the Video mode can be played back
on regular DVD players, including computer DVD drives
compatible with DVD-Video playback*.
*
‘DVD-Video format’ recording: The use of the DVDVideo format for recording on DVD-R and DVD-RW discs
is referred to as recording in ‘Video mode’ on Pioneer’s
DVD recorders. Supporting playback of DVD-R / DVDRW discs is optional for manufacturers of DVD
playback equipment, and there is DVD playback
equipment that does not play DVD-R or DVD-RW discs
recorded in the DVD-Video format.
Note: ‘Finalization’ is required.
• WMA, MP3 and JPEG file playback
This recorder can play WMA and MP3 audio files and
JPEG picture files on CD-R, CD-RW or CD-ROM discs.
• Disc Back-up
The disc back-up feature gives you a convenient way to
back-up important material on DVD to another
recordable DVD disc. The material is first copied to the
HDD, then on to a second DVD disc.
HDD
• Recovery Recording
When a timer recording is set to use DVD but the disc
loaded at the time of the recording is unrecordable, the
program will automatically be recorded to the HDD.
HDD
• Auto Replace Recording
This feature is useful for regular timer recordings of a TV
program which you don’t want to keep after watching.
Each time the program is recorded, it replaces the one
currently on the HDD. There’s no need to manually delete
it later.
Note on copying:
Recording equipment should be used only for lawful copying and you
are advised to check carefully what is lawful copying in the country in
which you are making a copy. Copying of copyright material such as
films or music is unlawful unless permitted by a legal exception or
consented to by the rightowners.
• Safe, non-destructive editing VR mode
When you edit a DVD-RW, the actual content of the disc
(the Original content) is not touched. The edited version
(the Play List content) just points to various parts of the
Original content.
HDD
• Chapter marking VR mode
You can easily add chapter markers anywhere in your
recordings for easy editing.
7
En
DVR-04_HDD_UK.book 8 ページ 2004年4月11日 日曜日 午後6時11分
Before you start
01
What’s in the box
Please confirm that the following accessories are in the
box when you open it.
• Remote control
• AA/R6P dry cell batteries x2
• Audio/video cable (red/white/yellow)
• RF antenna cable
• Power cable
• These operating instructions
• Warranty card
Putting the batteries in the remote
control
1 Open the battery compartment cover on the
back of the remote control.
Note
Incorrect use of batteries can result in hazards such as
leakage and bursting. Please observe the following:
• Don’t mix new and old batteries together.
• Don’t use different kinds of batteries together—
although they may look similar, different batteries
may have different voltages.
• Make sure that the plus and minus ends of each
battery match the indications in the battery
compartment.
• Remove batteries from equipment that isn’t going to
be used for a month or more.
• When disposing of used batteries, please comply
with governmental regulations or environmental
public instruction’s rules that apply in your country or
area.
Using the remote control
Please keep in mind the following when using the remote
control:
• Make sure that there are no obstacles between the
remote and the remote sensor on the unit.
2 Insert two AA/R6P batteries into the battery
compartment following the indications ( ,) inside
the compartment.
• Remote operation may become unreliable if strong
sunlight or fluorescent light is shining on the unit’s
remote sensor.
• Remote controllers for different devices can interfere
with each other. Avoid using remotes for other
equipment located close to this unit.
• Replace the batteries when you notice a fall off in the
operating range of the remote.
3
Close the cover.
• When the batteries run down or you change the
batteries, the remote control mode and TV preset
codes are automatically reset. See Remote Control
Set on page 99 and Setting up the remote to control
your TV on page 112 to reset them.
• Use within the operating range and angle, as shown.
30
30
7m
• You can control this recorder using the remote
sensor of another Pioneer component using the
CONTROL IN jack on the rear panel. See Rear panel
connections on page 12 for more information.
8
En
DVR-04_HDD_UK.book 9 ページ 2004年4月11日 日曜日 午後6時11分
Before you start
01
Disc / content format playback
compatibility
Note that older models of DVD recorders and DVD
writers may reject DVD-RW Ver. 1.2 / 4x discs. If you want
to share DVD-RW discs between this recorder and an
older recorder/writer, we recommend using Ver. 1.1
discs.
General disc compatibility
The following table shows older Pioneer DVD recorder
compatibility with DVD-RW Ver. 1.2 / 4x discs.
This recorder is compatible with a wide range of disc
types (media) and formats. Playable discs will generally
feature one of the following logos on the disc and/or disc
packaging. Note however that some disc types, such as
recordable CD and DVD, may be in an unplayable
format—see below for further compatibility information.
Model
DVR-7000
DVR-3100/ DVR-5100H
Playable
Recordable
1,2,3
Yes
Yes1
No
No
1
DVD-Video
Audio CD
DVD-R
Video CD
Discs should be finalized in this recorder before playing. Unfinalized
VR mode and Video mode discs may not play.
2
Cannot read the CPRM information will show in the display when
you load a disc. However, this will not affect playback.
3
Copy-once protected disc titles will not play.
DVD-RW
CD-R
CD-RW
Fujicolor CD
• Also compatible with KODAK Picture CD
•
•
is a trademark of DVD Format/Logo Licensing
Corporation.
is a trademark of Fuji Photo Film Co. Ltd.
This recorder also supports the IEC’s Super VCD
standard. Compared to the Video CD standard, Super
VCD offers superior picture quality, and allows two
soundtracks to be recorded. Super VCD also supports the
widescreen size.
CD-R/RW compatibility
This recorder cannot record CD-R or CD-RW discs.
• Compatible formats: CD-Audio, Video CD/Super
VCD, ISO 9660 CD-ROM* containing MP3, WMA or
JPEG files
* ISO 9660 Level 1 or 2 compliant. CD physical format:
Mode1, Mode2 XA Form1. Romeo and Joliet file
systems are both compatible with this recorder.
• Multi-session playback: Yes (except CD-Audio and
Video CD/Super VCD)
• Unfinalized disc playback: CD-Audio only
Compressed audio compatibility
• Compatible media: CD-ROM, CD-R, CD-RW
• Compatible formats: MPEG-1 Audio Layer 3 (MP3),
Windows Media Audio (WMA)
• Sampling rates: 44.1 or 48kHz
VIDEO
CD
Super Video CD (Super VCD)
DVD-R/RW compatibility
This recorder will play and record DVD-R/RW discs.
Compatible media:
• DVD-RW Ver. 1.1, Ver. 1.1 / 2x and Ver. 1.2 / 4x
• DVD-R Ver. 2.0 and Ver. 2.0 / 4x / 8x
Recording formats:
• DVD-R: DVD-Video format (Video mode)
• DVD-RW: Video Recording (VR) format and DVDVideo format (Video mode)
• Bit-rates: Any (128Kbps or higher recommended)
• Variable bit-rate (VBR) MP3 playback: Yes
• VBR WMA playback: No
• WMA encoder compatibility: Windows Media Codec
8 (files encoded using Windows Media Codec 9 may be
playable but some parts of the specification are not
supported; specifically, Pro, Lossless, Voice and VBR)
• DRM (Digital Rights Management) file playback: No
(see also DRM in the Glossary on page 122)
• File extensions: .mp3, .wma (these must be used for
the recorder to recognize MP3 and WMA files – do
not use for other file types)
• File structure: Up to 99 folders / 999 files (if these
limits are exceeded, only files and folders up to these
limits are playable)
9
En
DVR-04_HDD_UK.book 10 ページ 2004年4月11日 日曜日 午後6時11分
01
Before you start
WMA (Windows Media Audio) compatibility
Frequently asked questions
• What’s the difference between DVD-R and DVD-RW?
The Windows Media® logo printed on the box indicates
that this recorder can playback Windows Media Audio
content.
WMA is an acronym for Windows Media Audio and refers
to an audio compression technology developed by
Microsoft Corporation. WMA content can be encoded by
using Windows Media® Player version 7, 7.1, Windows
Media® Player for Windows® XP, or Windows Media®
Player 9 Series.
Microsoft, Windows Media, and the Windows logo are
trademarks, or registered trademarks of Microsoft
Corporation in the United States and/or other countries.
JPEG file compatibility
• What’s VR mode?
VR (Video Recording) mode is a special mode
designed for home DVD recording. It allows flexible
editing of recorded material compared to ‘Video
mode’. On the other hand, Video mode discs are
more compatible with other DVD players.
• Can I play my recordable discs in a regular DVD player?
Generally, DVD-R discs and DVD-RW discs recorded
in Video mode* are playable in a regular DVD player,
but they must be ‘finalized’ first. This process fixes
the contents of the disc to make them readable to
other DVD players as DVD-Video discs.
DVD-RW discs recorded in VR mode are playable in
some players.
• Sampling ratio: 4:4:4, 4:4:2, 4:2:0
This label indicates playback compatibility with
DVD-RW discs recorded in VR mode (Video
Recording format). However, for discs recorded with
a record-only-once encrypted program, playback can
only be achieved using the CPRM compatible device.
• Vertical resolution: 120 – 3840 pixels
• Progressive JPEG compatible: No
• File extensions: .jpg, jpeg, jif, jfif (must be used for the
recorder to recognize JPEG files – do not use for other
file types)
• File structure: The recorder can load up to 99 folders
/ 999 files at one time (if there are more files/folders
that this on the disc then more can be reloaded)
PC-created disc compatibility
Discs recorded using a personal computer may not be
playable in this unit due to the setting of the application
software used to create the disc. In these particular
instances, check with the software publisher for more
detailed information.
Discs recorded in packet write mode (UDF format) are
not compatible with this recorder.
Check the DVD-R/RW or CD-R/RW software disc boxes
for additional compatibility information.
10
For more information, see About DVD recording on
page 45.
• Compatible formats: Baseline JPEG and EXIF 2.2*
still image files
*File format used by digital still cameras
• Horizontal resolution: 160 – 5120 pixels
En
The most important difference between DVD-R and
DVD-RW is that DVD-R is a record-once medium,
while DVD-RW is a re-recordable/erasable medium.
You can re-record/erase a DVD-RW disc
approximately 1,000 times.
Note that Pioneer cannot guarantee that discs
recorded using this recorder will play on other players.
*
‘DVD-Video format’ recording: The use of the DVDVideo format for recording on DVD-R and DVD-RW discs
is referred to as recording in ‘Video mode’ on Pioneer’s
DVD recorders. Supporting playback of DVD-R / DVDRW discs is optional for manufacturers of DVD
playback equipment, and there is DVD playback
equipment that does not play DVD-R or DVD-RW discs
recorded in the DVD-Video format.
Note: ‘Finalization’ is required.
This recorder supports the recording of ‘copy-once’
broadcast programs using the CPRM copy protection
system (see CPRM on page 46) on CPRM-compliant
DVD-RW discs in VR mode. CPRM recordings can only
be played on players that are specifically compatible
with CPRM.
DVR-04_HDD_UK.book 11 ページ 2004年4月11日 日曜日 午後6時11分
Before you start
01
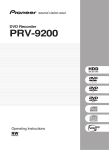
• Do I need two DVD recorders for editing? What kind of
editing can I do?
Unlike editing video tape, you only need one DVD
recorder to edit discs. With DVD, you edit by making
a ‘Play List’ of what to play and when to play it. On
playback, the recorder plays the disc according to the
Play List.
Original
Title 1
Chapter 1
Chapter 2
Chapter 3
Title 2
Title 3
Chapter 1
Chapter 1
About the internal hard disk drive
The internal hard disk drive (HDD) is a fragile piece of
equipment. Please use the recorder following the
guidelines below to protect against possible HDD failure.
We recommend that you back up your important
recordings onto DVD-R/RW discs in order to protect against
accidental loss.
• Do not move the recorder while it is on.
Chapter 2
• Install and use the recorder on a stable, level surface.
• Do not block the rear vent/cooling fan.
• Do not use the recorder in excessively hot or humid
places, or in places that may be subject to sudden
changes in temperature. Sudden changes in
temperature can cause condensation to form inside
the recorder. This can be a cause of HDD failure.
Title 1
Chapter 1
Title 2
Chapter 2
Chapter 1
Chapter 2
Play List
Throughout this manual, you will often see the words
Original and Play List to refer to the actual content
and the edited version.
• Original content refers to what’s actually recorded
on the disc.
• Play List content refers to the edited version of the
disc—how the Original content is to be played.
• While the recorder is switched on, do not unplug
from the wall socket or switch the electricity off from
the breaker switch.
• Do not move the recorder immediately after
switching it off. If you need to move the recorder,
please follow the steps below:
1 After the message POWER OFF is shown in the
display, wait at least two minutes.
2 Unplug from the wall socket.
3 Move the recorder.
• If there’s a power failure while the recorder is on
there is a chance that some data on the HDD will be
lost.
• The HDD is very delicate. If used improperly or in an
unsuitable environment, it is possible that the HDD
will fail after a few years of use. Signs of problems
include playback unexpectedly freezing and
noticeable block noise (mosaic) in the picture.
However, sometimes there will be no warning signs
of HDD failure.
If the HDD fails, no playback of recorded material will
be possible. In this case it will be necessary to
replace the HDD unit.
11
En
DVR-04_HDD_UK.book 12 ページ 2004年4月11日 日曜日 午後6時11分
02
Connecting up
Chapter 2
Connecting up
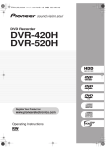
Rear panel connections
1
2
3
4
5 6
7
ANTENNA
OUT
R
AC IN
IN
L
AUDIO
VIDEO
OUTPUT
S-VIDEO
AV 1 (RGB) - TV
AV 2/AUTO START REC
(INPUT 1/DECODER)
6 DIGITAL OUT OPTICAL
For connecting to an AV amplifier/receiver, Dolby Digital/
DTS/MPEG decoder or other equipment with optical
digital input.
2 OUTPUT jacks
Stereo analog audio, video and S-video outputs for
connection to a TV or AV amplifier/receiver.
7
4 AV2/AUTO START REC (INPUT 1/DECODER) AV
connector
Audio/video input/output SCART-type AV connector for
connecting to a VCR, or other equipment with a SCART
connector. The input accepts video, S-video and RGB.
See AV2/L1 In on page 102 for how to set this up.
5 CONTROL IN
Use to control this recorder from the remote sensor of
another Pioneer component with a CONTROL OUT
terminal and bearing the Pioneer mark. Connect the
CONTROL OUT of the other component to the
CONTROL IN of this recorder using a mini-plug cord.
12
OPTICAL
1 ANTENNA IN/OUT
Connect your TV antenna to the ANTENNA IN jack. The
signal is passed through to the ANTENNA OUT jack for
connection to your TV.
3 AV1(RGB)-TV AV connector
Audio/video output SCART-type AV connector for
connecting to a TV or other equipment with a SCART
connector. The video output is switchable between video,
S-video and RGB. See page AV1 Out on page 102 for how
to set this up.
En
IN
CONTROL DIGITAL OUT
AC IN – Power inlet
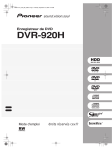
Front panel connections
STANDBY/ON
PULL-OPEN
HDD
DVD
DV IN/OUT
OPEN/CLOSE
REC
ONE TOUCH COPY
DV IN/OUT
S-VIDEO
VIDEO
On the left side of the front panel a flip-down cover hides
a second audio/video input, consisting of an S-video and
standard (composite) video jack, and stereo analog
audio jacks.
DV-520H/720H only: On the right side is the DV input/
output i.LINK connector. This is for connection to a DV
camcorder.
DVR-04_HDD_UK.book 13 ページ 2004年4月11日 日曜日 午後6時11分
02
Connecting up
EPG download
Extra features for use with
compatible TVs
When this recorder is connected to a TV that features T-V
Link, EasyLink, MegaLogic, SMARTLINK, Q-Link, DATA
LOGIC or NexTView Link using a fully-wired 21-pin SCART
cable (not supplied), the following functions are
available:
• Direct TV recording
• Channel preset download
• Electronic Program Guide (EPG) download
• TV auto power on
• System configuration
EPG download allows you to program a timer recording
directly from the electronic program guide displayed on
your TV.
See the manual that came with your TV for more
information on how to use this feature. Note that the SP
and LP options displayed on your TV correspond to the SP
and LP recording modes on this recorder.
TV auto power on
When you play a disc in this recorder, the TV
automatically turns on and switches to the correct video
input. See the manual that came with your TV for how to
use this feature.
Direct TV recording
System configuration
Direct TV recording allows you to record the TV program
that you’re watching, without having to worry about
whether this recorder is set to the same channel. See
Direct recording from TV on page 48 for more on this
feature.
Basic settings, including language, country and TV
screen size (aspect ratio), can be downloaded from your
TV to help set up this recorder for use.
Channel preset download
Note
• For further details and compatibility information, see
also the manual that came with your TV.
This feature allows you to set up the channel presets of
this recorder very simply using the channel presets and
preset names already in your TV. See Switching on and
setting up on page 25 and Auto Channel Setting :
Download from TV on page 100 for more on this feature.
13
En
DVR-04_HDD_UK.book 14 ページ 2004年4月11日 日曜日 午後6時11分
02
Connecting up
Easy connections
The setup described below is a basic setup that allows you to watch and record TV programs, and play discs. Other
types of connections are explained starting on the following page.
Important
• These connections use SCART cables (not supplied). If your TV (or VCR) does not have a SCART connection, see
the following page for connecting up using the supplied audio/video cable.
• The AV1(RGB)-TV AV connector can output ordinary (composite), S-video or RGB video, plus stereo analog audio.
The AV2/AUTO START REC (INPUT 1/DECODER) connector accepts ordinary, S-video and RGB video input, as
well as stereo analog audio. See AV1 Out on page 102 and AV2/L1 In on page 102 for how to set them up.
• Before making or changing any rear panel connections, make sure that all components are switched off and
unplugged from the wall outlet.
1 Connect the cable from the antenna/cable TV
outlet to the antenna input on your VCR.
• If you are not connecting a VCR in the chain, connect
it to the ANTENNA IN jack on this recorder and skip
the next step.
ANTENNA
IN
SCART AV
CONNECTOR
3
4
2 Use an RF antenna cable (one is supplied) to
connect the antenna output of your VCR to the
ANTENNA IN of this recorder.
TV
3 Use another RF antenna cable to connect the
ANTENNA OUT of this recorder to the antenna input
on your TV.
ANTENNA
OUT
R
AC IN
IN
L
AUDIO
VIDEO
OUTPUT
S-VIDEO
AV 1 (RGB) - TV
AV 2/AUTO START REC
(INPUT 1/DECODER)
IN
OPTICAL
CONTROL DIGITAL OUT
5
2
SCART AV
CONNECTOR
ANTENNA
OUT
4 Use a SCART cable (not supplied) to connect the
AV1(RGB)-TV AV connector on this recorder to the
SCART AV connector on your TV.
5 Use another SCART cable to connect the AV2/
AUTO START REC (INPUT 1/DECODER) AV connector
to a SCART AV connector on your VCR.
Note
VCR
• See the following page if you want to use one of the
other kinds of audio/video connection.
ANTENNA
IN
1
Antenna/cable TV
wall outlet
14
En
Tip
• This recorder has a ‘through’ function which allows
you to record a TV program from the built-in TV tuner
in this recorder while watching a video playing on
your VCR. (To use this feature when the recorder is in
standby, Power Save must be set to Off—see Power
Save on page 98).
DVR-04_HDD_UK.book 15 ページ 2004年4月11日 日曜日 午後6時11分
02
Connecting up
Using other types of audio/video output
If you can’t use the SCART AV connector to connect your TV to this recorder, there are standard audio/video output
jacks, as well as an S-video output.
Using the supplied audio/video cable
Using the S-video output
AUDIO
INPUT
AUDIO
INPUT
S-VIDEO
INPUT
VIDEO
INPUT
2
TV
2
1
TV
1
ANTENNA
ANTENNA
OUT
R
AC IN
IN
OUT
L
R
AUDIO
VIDEO
OUTPUT
S-VIDEO
AV 1 (RGB) - TV
AV 2/AUTO START REC
(INPUT 1/DECODER)
IN
AC IN
IN
L
OPTICAL
CONTROL DIGITAL OUT
1 Connect the VIDEO OUTPUT jack to a video input
on your TV.
Use the yellow jack of the supplied audio/video cable for
the video connection.
2 Connect the AUDIO OUTPUT jacks to the
corresponding audio inputs on your TV.
Use the red and white jacks of the supplied audio/video
cable for the audio connection. Make sure you match up
the left and right outputs with their corresponding inputs
for correct stereo sound.
AUDIO
VIDEO
OUTPUT
S-VIDEO
AV 1 (RGB) - TV
AV 2/AUTO START REC
(INPUT 1/DECODER)
IN
OPTICAL
CONTROL DIGITAL OUT
1 Use an S-video cable (not supplied) to connect
the S-VIDEO OUTPUT to an S-video input on your TV,
monitor (or other equipment).
2 Connect the AUDIO OUTPUT jacks to the
corresponding audio inputs on your TV.
You can use the supplied audio/video cable, leaving the
yellow video plug disconnected. Make sure you match up
the left and right outputs with their corresponding inputs
for correct stereo sound.
15
En
DVR-04_HDD_UK.book 16 ページ 2004年4月11日 日曜日 午後6時11分
02
Connecting up
Connecting to a cable box or satellite receiver
If you have a cable or satellite receiver with a built-in decoder, connect it to this recorder and your TV as shown on this
page. If you are using a separate decoder box for your cable/satellite TV, set up following the instructions on the next
page.
Using the setup on this page you can:
• Record any channel by selecting it on the cable box/satellite tuner.
Important
• Do not connect this recorder ‘through’ your VCR, satellite receiver or cable box. Always connect each component
directly to your TV or AV amplifier/receiver.
1 Connect RF antenna cables as shown.
This enables you to watch and record TV channels.
ANTENNA
IN
2 Use a SCART cable (not supplied) to connect the
AV1(RGB)-TV AV connector to a SCART AV connector
on your TV.
This enables you to watch discs.
SCART AV
CONNECTOR
1
2
3 Use another SCART cable to connect the AV2/
AUTO START REC (INPUT 1/DECODER) AV connector
to a SCART AV connector on your satellite/cable
box.
This enables you to record scrambled TV channels.
TV
ANTENNA
OUT
R
AC IN
IN
L
AUDIO
VIDEO
OUTPUT
S-VIDEO
AV 1 (RGB) - TV
AV 2/AUTO START REC
(INPUT 1/DECODER)
IN
OPTICAL
CONTROL DIGITAL OUT
3
1
SCART AV
CONNECTOR
ANTENNA
OUT
Cable/Satellite box
ANTENNA
IN
1
Antenna/cable TV
wall outlet
16
En
Note
• The diagram shows SCART video connections, but
you can alternatively use any of the other audio/video
connections.
Tip
• This recorder has a ‘through’ function which allows
you to record a TV program from the built-in TV tuner
in this recorder while watching a video playing on
your VCR. (To use this feature when the recorder is in
standby, Power Save must be set to Off—see Power
Save on page 98).
DVR-04_HDD_UK.book 17 ページ 2004年4月11日 日曜日 午後6時11分
02
Connecting up
Connecting an external decoder box (1)
If you have an external, dedicated decoder box for your satellite or cable TV system, use the setup described on this
page.
Important
• Do not connect your decoder box directly to this recorder.
• Information from the decoder (for example, relating to pay TV services), is only viewable when this recorder is off
(in standby).
• For timer recording to work properly on this recorder, the VCR/satellite receiver/cable box must also be switched
on during recording.
• It is not possible to watch one TV program and record another using this setup.
SCART AV
CONNECTOR
4
TV
ANTENNA
OUT
R
AC IN
IN
L
AUDIO
VIDEO
OUTPUT
S-VIDEO
AV 2/AUTO START REC
(INPUT 1/DECODER)
AV 1 (RGB) - TV
IN
OPTICAL
CONTROL DIGITAL OUT
3
2
SCART AV
CONNECTOR
Decoder
SCART AV
CONNECTOR
VCR/Satellite receiver
/Cable box
ANTENNA
IN
1
Antenna/cable TV
wall outlet
1 Connect the cable from the antenna/cable TV
outlet to the antenna input on your VCR/satellite
receiver/cable box.
3 Use a SCART cable to connect your VCR/satellite
receiver/cable box to the AV2/AUTO START REC
(INPUT 1/DECODER) AV connector on this recorder.
2 Use a SCART cable (not supplied) to connect your
decoder to your VCR/satellite receiver/cable box.
See the manual for your decoder box for more detailed
instructions.
4 Use a SCART cable to connect the AV1(RGB)-TV
AV connector to your TV.
17
En
DVR-04_HDD_UK.book 18 ページ 2004年4月11日 日曜日 午後6時11分
02
Connecting up
Connecting an external decoder box (2)
If you only have a decoder, connect it to this recorder and your TV as shown on this page.
Using the setup on this page you can:
• Record scrambled channels received using the recorder’s built-in TV tuner.
Important
• Do not connect this recorder ‘through’ your VCR, satellite receiver or cable box. Always connect each component
directly to your TV or AV amplifier/receiver.
1 Connect RF antenna cables as shown.
This enables you to watch and record TV channels.
ANTENNA
IN
1
2 Use a SCART cable (not supplied) to connect the
AV1(RGB)-TV AV connector to a SCART AV connector
on your TV.
This enables you to watch discs.
2
3 Use another SCART cable to connect the AV2/
AUTO START REC (INPUT 1/DECODER) AV connector
to a SCART AV connector on your decoder box.
This enables you to record scrambled TV channels.
TV
SCART AV
CONNECTOR
ANTENNA
OUT
R
AC IN
IN
L
AUDIO
VIDEO
OUTPUT
S-VIDEO
AV 1 (RGB) - TV
AV 2/AUTO START REC
(INPUT 1/DECODER)
IN
OPTICAL
• In order to use this setup, you will need to make the
following settings from the Initial Setup menu:
– Set the AV2/L1 In setting to Decoder from the
Initial Setup menu (see AV2/L1 In on page 102).
– From the Manual CH Setting screen, set the
Decoder setting for the scrambled channels to On
(see Manual CH Setting on page 100).
3
1
SCART AV
CONNECTOR
Antenna/cable TV
wall outlet
18
En
Note
CONTROL DIGITAL OUT
Decoder
DVR-04_HDD_UK.book 19 ページ 2004年4月11日 日曜日 午後6時11分
02
Connecting up
Connecting to an AV amplifier/receiver
To enjoy multichannel surround sound you need to connect this recorder to an AV amplifier/receiver using the digital
optical output.
In addition to a digital connection, we recommend also connecting using the stereo analog connection for
compatibility with all discs and sources.
You’ll probably also want to connect a video output to your AV amplifier/receiver. Use the ordinary video output (as
shown here), or the S-video output.
Important
• Noise may be output from your speakers if the recorder is not set up to work with your AV amplifier/receiver
properly (see Audio Out settings on page 104).
ANTENNA
IN
VIDEO
IN
TV
4
1
VIDEO
OUT
A/V
IN 1
DIGITAL IN
OPTICAL
2
AV amp/
receiver
3
ANTENNA
OUT
R
AC IN
IN
L
AUDIO
VIDEO
OUTPUT
S-VIDEO
AV 1 (RGB) - TV
AV 2/AUTO START REC
(INPUT 1/DECODER)
IN
OPTICAL
CONTROL DIGITAL OUT
1
Antenna/cable TV
wall outlet
1 Connect RF antenna cables as shown.
This enables you to watch and record TV channels.
2 Connect one of the DIGITAL OUT OPTICAL jack
on this recorder to an optical digital input on your
AV amplifier/receiver.
This enables you to listen to multichannel surround
sound.
3 Connect the analog AUDIO OUTPUT and VIDEO
OUTPUT jacks on this recorder to an analog audio
and video input on your AV amplifier/receiver.
Note
• The diagram shows ordinary video connections,
but you can alternatively use an AV connector or
S-video connections, if they’re available.
Important
• Do not connect this recorder to your TV ‘through’
your VCR using A/V cables. Always connect it
directly to your TV.
4 Connect the AV amplifier/receiver’s video
output to a video input on your TV.
19
En
DVR-04_HDD_UK.book 20 ページ 2004年4月11日 日曜日 午後6時11分
02
Connecting up
Connecting a DV camcorder
(DVR-520H/720H only)
Connecting other AV sources
Using the front panel DV IN/OUT jack, it is possible to
connect a DV camcorder or video deck, or DVD-R/RW
recorder and digitally transfer DV tapes or DVD-R/RW
discs to DVD-R/RW.
Connecting a VCR or analog camcorder
DV IN/OUT
AUDIO/VIDEO
OUTPUT
AUDIO/VIDEO
INPUT
1
2
Important
• This jack is for connection to DV equipment only. It is
not compatible with digital satellite tuners or D-VHS
video decks.
DV IN/OUT
Analog camcorder
AUDIO/VIDEO
INPUT
DV
IN/OUT
AUDIO/VIDEO
OUTPUT
DV
IN/OUT
VCR
1 Connect a set of audio and video outputs on
your VCR or camcorder to a set of inputs on this
recorder.
This enables you to record tapes from your VCR or
camcorder.
DV camcorder
1 Use a DV cable (not supplied) to connect the DV
in/out jack on your DV camcorder/deck to the front
panel DV IN/OUT jack of this recorder.
• You can use ordinary video or S-video cables for the
video connection.
• The front panel connections make convenient
connections for a camcorder.
2 Connect a set of audio and video inputs on your
VCR or camcorder to a set of outputs on this
recorder.
This enables you to record from this recorder to your VCR
or camcorder.
• You can use ordinary video or S-video cables for the
video connection.
Plugging in
Before plugging in for the first time, make sure that
everything is connected properly.
AC IN
• Alternatively, you can use the AV2/AUTO START
REC (INPUT 1/DECODER) SCART connector for
audio/video input and output with just one SCART
cable.
1 Plug the supplied AC power cable into the AC IN
inlet and the other end into a standard household
power outlet.
20
En
DVR-04_HDD_UK.book 21 ページ 2004年4月11日 日曜日 午後6時11分
Controls and displays
03
Chapter 3
Controls and displays
Front panel
1
STANDBY/ON
2
3 4
HDD
DVD
5
6
PULL-OPEN
OPEN/CLOSE
REC
ONE TOUCH COPY
DV IN/OUT
15
14 13 12 11 10 9
8
7
Illustration shows DVR-520H
1 STANDBY/ON
Press to switch the recorder on/into standby.
2 HDD
Press to switch to the hard disk drive (HDD) for recording
and playback. The button lights when HDD is selected.
3 DVD
Press to switch to DVD for recording and playback. The
button lights when DVD is selected.
4
IR remote sensor (page 8)
5
Disc tray
6 Front panel display
See Display on page 22 for details.
7 DV IN/OUT jack (DVR-520H/720H only) (page 12,
20, 56, 57, 59, 104, 117)
Digital input/output jack for use with a DV camcorder.
8 +/– (page 29, 31, 48)
Use to change TV channels, skip chapters/tracks, etc.
9 ONE TOUCH COPY (page 62)
Press to start One Touch Copy of the currently playing
title to DVD or the HDD.
10 REC
Press to start recording.
11
Press to stop recording.
12 Press to start or restart playback.
13 Press to stop playback.
14 OPEN/CLOSE
Press to open/close the disc tray.
15 Front panel inputs (page 12)
Pull the cover down where indicated to access the front
panel input jacks. Especially convenient for connecting
camcorders and other portable equipment.
21
En
DVR-04_HDD_UK.book 22 ページ 2004年4月11日 日曜日 午後6時11分
Controls and displays
03
Display
1 2
3
4
5
6
7
8
12 13 14
11
1 /
Arrows indicate the copy direction between the HDD
(
) and DVD (
).
SP
Lights when the recording mode is set to SP
(standard play).
LP
Lights when the recording mode is set to LP (long
play).
4 PL (page 78, 84)
Lights when a VR mode disc is loaded and the recorder is
in Play List mode.
EP
Lights when the recording mode is set to EP
(extended play).
5 2 3 (page 99)
Shows the remote control mode (if nothing is displayed,
the remote control mode is 1).
22
MN
Lights when the recording mode is set to MN
(manual recording level) mode.
11 Character display
12
(page 104)
Indicates which channels of a bilingual broadcast
are recorded.
8 R / RW
Indicates the type of recordable DVD loaded: DVD-R or
DVD-RW.
13 VPS / PDC (page 49)
Lights when receiving a VPS/PDC broadcast during a
VPS/PDC-enabled timer recording.
9
14 NTSC
Lights when playing NTSC format video.
(page 49)
Lights when a timer recording has been set.
(Indicator blinks if the timer has been set to DVD but
there isn’t a recordable disc loaded, or the timer has
been set to HDD but the HDD is not recordable.)
AUTO (page 56)
Lights when Auto Start Recording has been set, and
during Auto Start Recording.
En
15
FINE
Lights when the recording mode is set to FINE (best
quality).
3
(page 28)
The ‘’ and ‘’ indicators light to indicate that the HDD
or DVD is selected for recording/playback.
7 V
Lights when an unfinalized Video mode disc is loaded.
10
10 Recording quality indicators (page 46)
2 PLAY / REC indicators
Lights during playback / recording; blinks when playback
/ recording is paused.
6 REM
Lights when the character display is showing the
remaining available recording time.
9
15 OVER (page 104)
Lights when the analog audio input level is too high.
DVR-04_HDD_UK.book 23 ページ 2004年4月11日 日曜日 午後6時11分
Controls and displays
03
7
Remote control
1
3
5
7
2
STANDBY/ON ONE TOUCH
COPY
OPEN/CLOSE
HDD
ANGLE
ABC
DEF
GHI
JKL
MNO
PQRS
TUV
WXYZ
PLAY MODE
TV/DVD
INPUT
SELECT
10
CHANNEL
CLEAR
VIDEO Plus+
+
13
6
DVD
SUBTITLE
AUDIO
DISC NAVIGATOR
12
15
ENTER
HOME
MENU
RETURN
18
17
REV SCAN
PLAY
PAUSE
STOP
PREV
23
11
CASE
SELECTION
REC
NEXT
STOP REC
FWD SCAN
ANGLE
(page 44)
Switches camera angles on discs with multi-angle
scenes.
8 PLAY MODE (page 40)
Press to display the Play Mode menu (for features such
as search, repeat and program play).
NAVI
MARK
REC MODE
TIMER REC
CHP
MARK
EASY
TIMER
DISPLAY
CHANNEL
VOLUME
9 TV/DVD (page 29)
Press to switch between ‘TV mode’, in which you get the
picture and sound from the TV’s tuner, and ‘DVD mode’,
in which you get picture and sound from the recorder’s
tuner (or an external input).
10 Alphanumeric buttons and CLEAR
Use the number buttons for track/chapter/title selection;
channel selection, and so on. The same buttons can also
be used to enter names for titles, discs and so on.
STEP/SLOW
TV CONTROL
INPUT
SELECT
SUBTITLE
(page 43)
Displays/changes the subtitles included in
multilingual DVD-Video discs.
CM SKIP
OK
DISC
HISTORY
(page 29, 43, 44)
AUDIO
Changes the audio language or channel. (When the
recorder is stopped, press to change the tuner
audio.)
MENU
16
21
9
PLAY LIST
TOP MENU
20
8
CLEAR
14
19
4
DVD playback functions
TV DIRECT
REC
Use CLEAR to clear an entry and start again.
22
24
11 INPUT SELECT (page 56)
Press to change the input to use for recording.
12 CHANNEL +/– (page 29)
Press to change the channel of the built-in TV tuner.
DVD RECORDER
1 ONE TOUCH COPY (page 62)
Press to start One Touch Copy of the currently playing
title to DVD or the HDD.
2 Remote control indicator
Lights when setting up the remote control for use with a
TV (page 112) and when setting the remote control mode
(page 99).
3 STANDBY/ON
Press to switch the recorder on/into standby.
4 OPEN/CLOSE
Press to open/close the disc tray.
5 HDD (page 28)
Press to select the hard disk (HDD) for recording or
playback.
6 DVD (page 28)
Press to select the DVD for recording or playback.
13 VIDEO Plus+ (page 52)
Press, then use the number buttons to enter a
PlusCode® programming number for timer recording.
14 DISC NAVIGATOR (page 36, 76) / TOP MENU
(page 31)
Press to display the Disc Navigator screen, or the top
menu if a DVD-Video disc is loaded.
15 PLAY LIST (page 78, 84) / MENU (page 31)
Press to switch between Original and Play List content on
VR mode discs, or display the disc menu if a DVD-Video
disc is loaded.
16 /// (cursor buttons) and ENTER
Used to navigate all on-screen displays. Press ENTER to
select the currently highlighted option.
17 HOME MENU (page 33)
Press to display the Home Menu, from which you can
navigate all the functions of the recorder.
18 RETURN
Press to go back one level in the on-screen menu or
display.
23
En
DVR-04_HDD_UK.book 24 ページ 2004年4月11日 日曜日 午後6時11分
03
Controls and displays
19 Playback controls (page 30)
REV SCAN / FWD SCAN (page 38)
Press to start reverse or forward scanning. Press
again to change the speed.
PLAY
Press to start playback.
PAUSE
Press to pause playback or recording.
STOP
Press to stop playback.
CM BACK (commercial back)
Press repeatedly to skip progressively backward
through the audio or video playing.
CM SKIP (commercial skip)
Press repeatedly to skip progressively forward
through the audio or video playing.
PREV / NEXT Press to skip to the previous or next title/chapter/
track/folder; or to display the previous or next menu
page.
STEP/SLOW (page 39)
During playback, press to start slow-motion
playback; while paused, press to show the previous
or next video frame.
20 Recording controls (page 28)
REC
Press to start recording. Press repeatedly to set the
recording time in blocks of 30 mins.
STOP REC
Press to stop recording.
REC MODE (page 47)
Press repeatedly to change the recording mode
(picture quality).
TIMER REC (page 51)
Press to set a timer recording from the standard
Timer Recording screen.
EASY TIMER (page 50)
Press to set a timer recording from the Easy Timer
Recording screen.
24
En
21 DISC HISTORY (page 89)
Press to display summary information (disc name,
recording time left, etc.) from the last 30 recordable
discs loaded.
NAVI MARK (page 37)
Press to select a thumbnail picture for the current
title for use in the Disc Navigator screen.
CHP MARK (page 81)
Press to insert a chapter marker when playing/
recording a VR mode DVD-RW disc or the HDD.
22 DISPLAY (page 33)
Displays/changes the on-screen information displays.
23 TV CONTROL (page 112)
After setting up, use these controls to control your TV.
24 TV DIRECT REC (page 48)
Press to start recording whatever channel your TV is set
to.
DVR-04_HDD_UK.book 25 ページ 2004年4月11日 日曜日 午後6時11分
Getting started
04
Chapter 4
Getting started
Switching on and setting up
When you switch the recorder on for the first time, you
can make several basic settings using the Setup
Navigator feature. This takes you through setting the
clock, the internal TV tuner and the video and audio
output settings.
If you’re using the recorder for the first time, we strongly
recommend you use the Setup Navigator before starting
to use the recorder.
1 Switch on your TV and set the video input to this
recorder.
2 Press the STANDBY/ON button on the remote
control or the front panel to switch on.
When you switch on for the first time, your TV should
display the Setup Navigator screen. (If the Setup
Navigator doesn’t appear, you can also access it from the
Initial Setup menu; see page 99).
• If this recorder is connected to a compatible TV using
a fully-wired 21-pin SCART cable, the recorder will
take a few seconds to download country, TV screen
size and language information. (Check the manual
that came with your TV for compatibility information.)
STANDBY/ON
3 Use the / (cursor up/down) buttons to choose
a language, then press ENTER.
Initial Setup
Basic
Tuner
Video In/Out
Audio In
Audio Out
Language
Recording
Playback
ENTER
Language
Clock Set
Input Line System
On Screen Display English
Front Panel Display français
Deutsch
Power Save
Remote Control Set Italiano
Setup Navigator Español
4 Press ENTER to start setting up using the Setup
Navigator.
Initial Setup
Basic
Tuner
Video In/Out
Audio In
Audio Out
Language
Recording
Playback
Clock Set
Complete this setup before you
Input Line System
start using your recorder.
On Screen Display
Front Panel Display Start
Power Save
Remote Control Set Cancel
Please use the Initial Setup if you
Setup Navigator
want to make more detailed settings.
• If you don’t want to use the Setup Navigator, press (cursor down) to select Cancel, then press ENTER to
exit the Setup Navigator.
DVD RECORDER
5 Select the Auto Channel Setting (‘Auto Scan’ or
‘Download from TV’), or ‘Do not set’, then press
ENTER.
Initial Setup
Basic
Tuner
Video In/Out
Audio In
Audio Out
Language
Recording
Playback
Auto Channel Setting
Clock Set
Input Line System
On Screen Display
Front Panel Display Auto Scan
Download from TV
Power Save
Remote Control Set Do not set
Setup Navigator
25
En
DVR-04_HDD_UK.book 26 ページ 2004年4月11日 日曜日 午後6時11分
Getting started
04
• Select Do not set if you want to skip setting up the
channels (because they have already been set up, for
example).
Set ‘Clock Set CH‘ to the channel preset number
that broadcasts a time signal, then move the
cursor down to ‘Start’ and press ENTER.
• You can only use the Download from TV feature if
you connected this recorder to your TV using a
fully-wired 21-pin SCART cable connected to the
AV1(RGB)-TV connector, and if your TV supports this
function (check your TV’s instruction manual for
more details).
Initial Setup
Basic
Tuner
Video In/Out
Audio In
Audio Out
Language
Recording
Playback
• Use the / (cursor left/right) buttons to
choose your country, then press ENTER.
Pr 1
Start
The recorder takes a short while to set the time. After
you see that the time has been set, select Next to
proceed.
Initial Setup
Country Selection
Clock Set
Input Line System
Country
On Screen
Display
Front Panel Display
Power Save
Remote Control Set
Setup Navigator
Basic
Tuner
Video In/Out
Audio In
Audio Out
Language
Recording
Playback
Auto Clock Setting
Clock Set
Input Line System
Date
On Screen Display
TimeDisplay
Front Panel
Power Save
Clock Set CH
Remote Control Set
Setup Navigator
UK
Initial Setup
Basic
Tuner
Video In/Out
Audio In
Audio Out
Language
Recording
Playback
• Auto-tuning channels
The Auto Scan option automatically scans and sets the
channel presets.
01
20
2004
Pr 1
Start
Next
If the time could not be set automatically, press
RETURN to go back to the previous screen and select
Manual.
Tuning
11/107
Cancel
•
• Downloading channels from your TV
Use the Download from TV option to download all the
channels that your TV is tuned to.
Downloading
Auto Clock Setting
Clock Set
Input Line System
Date
On Screen Display THU 01
11
TimeDisplay
Front Panel
Power Save
Clock Set CH
Remote Control Set
Setup Navigator
Pr 5
Manual clock setting
If no stations in your area are broadcasting time
signals, you can set the clock manually.
Use the / (cursor left/right) buttons to set
your time zone.
You can set this by selecting a city or a time relative
to GMT.
Cancel
Initial Setup
6 Select ‘Auto’ for automatic time setting, or
‘Manual’ to set the clock manually, then press
ENTER.
Initial Setup
Basic
Tuner
Video In/Out
Audio In
Audio Out
Language
Recording
Playback
•
26
En
Clock Setting
Clock Set
Input Line System
On Screen Display
Front Panel Display Auto
Power Save
Manual
Remote Control Set
Setup Navigator
Auto clock setting
Some TV channels broadcast time signals together
with the program. This recorder can use these
signals to set the clock automatically.
Basic
Tuner
Video In/Out
Audio In
Audio Out
Language
Recording
Playback
Clock Set
Manual Clock Setting
Input Line System
England
On Screen
TimeDisplay
Zone
London
Front Panel Display
Power Save
Off
Summer
Time
Remote Control Set
Setup Navigator
1/2
Press (cursor down) then use the / (cursor
left/right) buttons to select ‘On’ or ‘Off’ for
summer time, then press ENTER.
Select On if you are currently using summer time.
Initial Setup
Basic
Tuner
Video In/Out
Audio In
Audio Out
Language
Recording
Playback
Manual Clock Setting
Clock Set
Input Line System
England
On Screen
TimeDisplay
Zone
London
Front Panel Display
Power Save
On
RemoteSummer
ControlTime
Set
Setup Navigator
1/2
DVR-04_HDD_UK.book 27 ページ 2004年4月11日 日曜日 午後6時11分
Getting started
04
Set the date (day/month/year) and time, then
press ENTER to make all the settings.
Initial Setup
Basic
Tuner
Video In/Out
Audio In
Audio Out
Language
Recording
Playback
Manual Clock Setting
Clock Set
Input Line System
01
THU 01
Date
On Screen Display
Front Panel
Time Display
00
00
Power Save
England
Time Zone
Remote Control Set
London
Setup Navigator
On
Summer Time
2/2
2004
Use the / (cursor up/down) buttons to change
the value in the highlighted field.
Use the / (cursor left/right) buttons to move
from one field to another.
• You can go back to the previous screen at anytime in
the Setup Navigator by pressing RETURN.
7 Select the TV screen type, ‘Standard (4:3)’ or
‘Wide (16:9)’.
Initial Setup
Basic
Tuner
Video In/Out
Audio In
Audio Out
Language
Recording
Playback
TV Screen Size
Clock Set
Input Line System
On Screen Display
Front Panel Display Wide (16:9)
Power Save
Standard (4:3)
Remote Control SetSetup Navigator
Setup Navigator
8 Is this recorder connected to an AV amplifier/
receiver for digital audio?
9 Is your AV amplifier/receiver compatible with 96
kHz PCM digital audio?
Initial Setup
Basic
Tuner
Video In/Out
Audio In
Audio Out
Language
Recording
Playback
96kHz PCM Compatible
Clock Set
Input Line System
On Screen Display
Front Panel Display Compatible
Not Compatible
Power Save
Remote Control Set Don't Know
Setup Navigator
Use the / (cursor up/down) buttons to select
Compatible, Not Compatible, or Don’t Know, then
press ENTER.
• Check the operating instructions that came with your
AV amplifier/receiver if you’re not sure.
10 Press ENTER to exit the Setup Navigator, or select
‘Go Back’ if you want to start again.
Basic
Tuner
Video In/Out
Audio In
Audio Out
Language
Recording
Playback
Clock Set
Input LineSetup
System
is complete!
On Screen
Display
Enjoy
using your DVD recorder!
Front Panel Display
Finish Setup
Power Save
Remote Control Set Go Back
Setup Navigator
That completes basic setup using the Setup Navigator.
Initial Setup
AV Amp Digital Connect
Clock Set
Input Line System
On Screen Display
Front Panel Display Connected
Power Save
Not Connected
Remote Control Set
Setup Navigator
Use the / (cursor up/down) buttons to select
Connected, or Not Connected, then press ENTER.
• If you select Not Connected, that completes the
setup. Press ENTER to exit the Setup Navigator, or
select Go Back if you want to go back and start again.
• Select the digital audio formats your AV amplifier/
receiver is compatible with.
Initial Setup
Basic
Tuner
Video In/Out
Audio In
Audio Out
Language
Recording
Playback
• Check the operating instructions that came with your
AV amplifier/receiver if you’re not sure what it’s
compatible with.
Initial Setup
Use the / (cursor up/down) buttons to select, then
press ENTER.
Basic
Tuner
Video In/Out
Audio In
Audio Out
Language
Recording
Playback
Use the / (cursor up/down) buttons to select Dolby
Digital, Dolby Digital, DTS or PCM only, then press
ENTER.
AV Amp Compatibility
Clock Set
Input Line System
On Screen Display
Front Panel Display Dolby Digital
Power Save
Dolby Digital, DTS
Remote Control Set PCM only
Setup Navigator
Other settings you can make
After setting up using the Setup Navigator, you should be
ready to start enjoying your DVD recorder. It’s possible,
however, that you may want to make a couple of
additional settings, depending on how the recorder is set
up for terrestrial TV broadcasts.
• Manual channel setting – This setting lets you skip
channels where there is no station, as well as
manually tune to stations. See Manual CH Setting on
page 100.
• VIDEO Plus+ channel setting – This setting lets you
assign guide channels to ensure that the VIDEO
Plus+ programming system works correctly. See Set
VIDEO Plus+ CH on page 101.
• Setting up the remote to control your TV – You can set
up the supplied remote control to control many
brands of TV. See Setting up the remote to control your
TV on page 112.
27
En
DVR-04_HDD_UK.book 28 ページ 2004年4月11日 日曜日 午後6時11分
04
Getting started
Selecting the hard disk or DVD for
playback and recording
The HDD and DVD buttons (remote control and front
panel) are used to select the hard disk (HDD) or DVD for
playback and recording. The indicator in the front panel
display shows which is currently selected.
HDD
1 If they aren’t already on, switch on your TV and
this recorder.
Press STANDBY/ON to switch on.
• Make sure that the video input on your TV is set to this
recorder.
2 Press HDD to record to the HDD, or DVD to record
to a recordable DVD.
If you choose to record to the HDD, skip to step 5 now.
3
4 Load a blank DVD-R or DVD-RW disc with the
label side face-up, using the disc guide to align the
disc.
• When you load a new, blank DVD-RW disc, the
recorder will take a moment to initialize it for
recording.
DVD
Making your first recording
This quick guide shows you how to make a basic
recording of a TV program on either the HDD, or to a
recordable DVD.
5 Use the CHANNEL +/– buttons to select the TV
channel you want to record from.
• You can also use the +/– buttons on the front panel if
the recorder is stopped.
• Channel presets are numbered 1–99.
Recording is covered in much more detail in chapter 6
(Recording).
STANDBY/ON
OPEN/CLOSE
HDD
Press OPEN/CLOSE to open the disc tray.
DVD
• If the recorder is connected to your TV using a SCART
cable and your TV supports Direct Recording, it’s
possible to quickly start recording whatever channel
your TV is tuned to. See Direct recording from TV on
page 48 for detailed instructions.
6
Press REC to start recording.
• By default, the recording will be in SP (standard play)
mode, which will give you around two hours of
recording from a blank DVD disc.
• You can pause recording by pressing PAUSE.
Press REC or PAUSE again to restart recording.
CHANNEL
7
When you want to stop recording, press
STOP REC.
Playing back your recording
The TV program you just recorded should be on the HDD
or DVD disc as a single title with one or more chapters.
PLAY
STOP
REC
STOP REC
DVD RECORDER
28
En
• Press PLAY to start playback.
If you want to stop playback before the end of the
recording, press STOP.
DVR-04_HDD_UK.book 29 ページ 2004年4月11日 日曜日 午後6時11分
Getting started
04
Using the built-in TV tuner
• If the NICAM broadcast is bilingual, you can also
select the language.
NICAM A
Changing TV channels
Regular
There are three different ways to select TV channels. Note
that you can’t change the TV channel during playback,
recording or during recording standby.
NICAM B
NICAM A+B
• You can also select the language for a non-NICAM
bilingual broadcast.
A (L)
B (R)
A + B (L+R)
CHANNEL
• When watching a recording made from an external
input with Bilingual recording selected (see External
Audio on page 103), you can switch the audio
channel between left (L), right (R) or both (L+R).
ENTER
L
R
L+R
• CHANNEL +/– buttons on the remote
• Number buttons on the remote – For example, to
select channel 4, press 4 then ENTER; for channel 34,
press 3, 4, ENTER.
• +/– buttons on the front panel
Note
Note
• When recording to the HDD, or in Video mode, or in
VR mode using the FINE/MN32 setting, only one
channel of a bilingual broadcast is recorded. In this
case, decide which language you want to record
before recording by setting the Bilingual Recording
setting (see Bilingual Recording on page 104).
• Channel presets are numbered 1–99.
• You can’t change TV channels during playback or
recording, or while in recording standby.
Changing audio channels
You can change the audio channel of the broadcast or
external input signal.
Switching between TV and DVD
When the recorder is stopped or recording you can
choose whether to have the audio/video from the built-in
TV tuner (or external input) play on your TV (‘DVD mode’),
or watch the channel that the TV is currently set to (‘TV
mode’).
During playback or when a menu is being displayed onscreen, the sound and video is always routed to your TV
and is unaffected by the TV/DVD mode setting.
AUDIO
Note that the recorder must be connected to your TV
using a SCART cable to be able to use this feature.
• Press AUDIO to change the audio.
The current audio channel is displayed on-screen.
TV/DVD
• If the NICAM audio setting (see NICAM Select on
page 103) is set to NICAM and you are watching a
NICAM broadcast, you can switch between NICAM
and Regular (non-NICAM) audio.
NICAM
• Press TV/DVD to switch between TV mode and
DVD mode.
Regular
29
En
DVR-04_HDD_UK.book 30 ページ 2004年4月11日 日曜日 午後6時11分
04
Getting started
3
Basic playback
This section shows you how to use your recorder for
playback of discs (DVD, CD, etc.), and for playback of
video from the HDD. More playback features, such as
repeat and program play, are covered in the next chapter.
Press OPEN/CLOSE to open the disc tray.
4 Load a disc.
Load a disc with the label side facing up, using the disc
tray guide to align the disc (if you’re loading a doublesided DVD-Video disc, load it with the side you want to
play face down).
• If you want to play a DTS audio CD, please first read
the note on page 32.
Important
• Throughout this manual, the term ‘DVD’ means
playback-only DVD-Video discs and DVD-R/RW. If a
function is specific to a particular kind of DVD disc, it
is specified.
5
• Some DVD-Video discs don’t allow certain playback
controls to operate at certain points in the disc. This
is not a malfunction.
STANDBY/ON
OPEN/CLOSE
Press PLAY to start playback.
• If you’re playing a DVD-Video or Video CD, a disc
menu may appear when you start playback. Use the
/// (cursor) buttons and ENTER to navigate
DVD disc menus, and the number buttons and
ENTER for Video CD menus.
• When playing video from the HDD, playback will
automatically stop after the end of a title is reached.
• See the following sections for more details on playing
specific kinds of discs.
6
To stop playback, press STOP.
7 When you’ve finished using the recorder, eject
the disc and switch the recorder back into standby.
• To open/close the disc tray, press OPEN/CLOSE.
Remove the disc before putting the recorder into
standby.
• Press STANDBY/ON to switch the recorder into
standby.
ENTER
PLAY
STOP
DVD RECORDER
1 Press STANDBY/ON to switch on.
Also turn on your TV and make sure that it is set to the
correct video input.
2 Press HDD to playback from the HDD, or DVD to
play a DVD.
If playing video from the HDD, skip to step 5 below.
30
En
DVR-04_HDD_UK.book 31 ページ 2004年4月11日 日曜日 午後6時11分
Getting started
04
Playing DVD discs
Playing from the HDD
The table below shows the basic playback controls for
DVD-Video, and recordable DVD discs.
The table below shows the basic playback controls when
playing video recorded on the hard disk (HDD).
Press to start playback.
If RESUME is displayed on-screen, playback starts from the place last stopped.
PLAY
STOP
PAUSE
Press to start playback.
If RESUME is displayed on-screen, playback starts from the place last stopped.
Playback automatically stops after the end
of a title is reached.
PLAY
Press to stop playback.
You can resume playback from the same
point by pressing PLAY. (Press STOP
again to cancel the resume function.)
STOP
Pauses playback, or restarts playback
when paused.
PAUSE
REV SCAN
FWD SCAN
PREV
NEXT
CLEAR
ENTER
BACK
CM SKIP
STEP/SLOW
TOP MENU
MENU
Press to start scanning. Press repeatedly
to increase the scanning speed.
Press to skip to previous/next chapter/title.
(You can also use the front panel +/– buttons to do this during playback.)
Except VR mode: During playback, enter a
chapter number then press ENTER to skip
directly to that chapter within the currently
playing title.
On some discs, you can also use the number buttons to select numbered items in
the disc menu.
VR mode only: During playback, enter a
title number then press ENTER.
All: Press CLEAR to clear a number entry
and start again.
(Commercial back/skip) Each press skips
backward/forward progressively up to a
maximum of 10 minutes forward or three
minutes back.
During playback, press to start slowmotion playback. Press repeatedly to
change the playback speed.
While paused, press to advance a single
frame in either direction.
REV SCAN
FWD SCAN
PREV
NEXT
Press to stop playback.
You can resume playback from the same
point by pressing PLAY. (Press STOP
again to cancel the resume function.)
Pauses playback, or restarts playback
when paused.
Press to start scanning. Press repeatedly
to increase the scanning speed.
Press to skip to previous/next chapter/title.
(You can also use the front panel +/– buttons to do this during playback.)
During playback, enter a title number then
press ENTER to skip directly to that title.
Press CLEAR to clear a number entry and
start again.
CLEAR
ENTER
BACK
CM SKIP
STEP/SLOW
(Commercial back/skip) Each press skips
backward/forward progressively up to a
maximum of 10 minutes forward or three
minutes back.
During playback, press to start slowmotion playback. Press repeatedly to
change the playback speed.
While paused, press to advance a single
frame in either direction.
Press to display the ‘top’ menu or menu of
a DVD-Video disc (these are often the
same).
Use the cursor buttons to navigate DVDVideo disc menus; press ENTER to select
items.
ENTER
RETURN
Press to return to the previous level of a
DVD-Video disc menu.
31
En
DVR-04_HDD_UK.book 32 ページ 2004年4月11日 日曜日 午後6時11分
04
Getting started
Playing CDs and WMA/MP3 discs
Playing Video CD/Super VCDs
The table below shows the basic playback controls for
audio CDs, and WMA/MP3 files.
The table below shows the basic playback controls for
Video CD/Super VCDs.
Press to start playback.
PLAY
STOP
Press to stop playback.
Some discs feature Playback Control (PBC for short)
menus. These discs show PBC in the display when you
load them and display a menu on-screen from where you
can select what to watch.
Press to start playback.
Video CD only: If RESUME is displayed onscreen, playback starts from the place last
stopped.
PLAY
PAUSE
REV SCAN
FWD SCAN
PREV
NEXT
CLEAR
Pauses playback, or restarts playback
when paused.
CD and MP3 only: Press to start scanning.
Press again to increase the scanning
speed. (There are two scan speeds; the
current scan speed is shown on-screen.)
STOP
Press to skip to previous/next track (or
folder for WMA/MP3 disc). (You can also
use the front panel +/– buttons to do this
during playback.)
During playback, enter a track number
then press ENTER to skip directly to that
track.
Press CLEAR to clear a number entry and
start again.
PAUSE
REV SCAN
FWD SCAN
PREV
NEXT
ENTER
Note
• If you want to play a DTS audio CD, make sure the
recorder is connected to a DTS-compatible amp/
receiver with a digital connection. Noise will be
output through the analog outputs. Also make sure
that STEREO is selected using the AUDIO button
(see Switching audio channels on page 44).
CLEAR
ENTER
BACK
CM SKIP
• Scanning doesn’t work with WMA tracks.
STEP/SLOW
RETURN
32
En
Press to stop playback.
Video CD only: You can resume playback
from the same point by pressing PLAY.
(Press STOP again to cancel the resume
function.)
Pauses playback, or restarts playback
when paused.
Press to start scanning. Press repeatedly
to increase the scanning speed.
Press to skip to previous/next track. (You
can also use the front panel +/– buttons to
do this during playback.)
When a PBC menu is displayed, press to
display the previous/next page.
During playback, enter a track number
then press ENTER to skip directly to that
track.
Press CLEAR to clear a number entry and
start again.
While a PBC menu screen is displayed,
use to select numbered menu items.
Video CD only: Each press skips backward/
forward progressively up to a maximum of
10 minutes forward or three minutes back.
Note that this function doesn’t work when
playing in PBC mode.
During playback, press to start slowmotion playback. Press repeatedly to
change the playback speed.
While paused, press to advance a single
frame (forward direction only).
Press to display the disc menu of a Video
CD/Super VCD playing in PBC mode.
DVR-04_HDD_UK.book 33 ページ 2004年4月11日 日曜日 午後6時11分
Getting started
04
Note
Note
• When playing in PBC mode, some playback features,
such as search, repeat and program play are not
available. You can play a PBC Video CD/Super VCD in
non-PBC mode by pressing to start playback
instead of PLAY.
Using the Home Menu
From the Home Menu screen you can access all the
features of the recorder. Press HOME MENU to display
the Home Menu screen:
Timer Recording
Disc Setup
Disc Navigator
Initial Setup
Copy
Video/Audio Adjust
Disc History
Play Mode
PhotoViewer
DV Record
• Some options in the Home Menu may be grayed out
sometimes, indicating that they are not available at
the present time. For example, the Photoviewer
option is grayed out unless there is a disc loaded that
contains JPEG image files.
Displaying disc information onscreen
You can display various on-screen information about the
disc loaded or the HDD.
HDD
DVD
DVR-520H/720H screen
Use the /// (cursor) buttons followed by ENTER
to select the option you want. To exit the Home Menu,
press HOME MENU.
ENTER
HOME
MENU
RETURN
Home menu options
Timer Recording
(page 49)
Disc Setup (page 92)
Disc Navigator (page 36,
page 76)
Initial Setup (page 97)
Copy (page 61)
Video/Audio Adjust
(page 94)
Disc History (page 89)
Play Mode (page 40)
PhotoViewer (page 90)
DV Record (DVR-520H/
720H only) (page 57)
DISPLAY
1 Press DISPLAY repeatedly to display/change the
on-screen information.
• Press once to show the HDD and removable disc
(DVD, etc.) activity together. Press again to show the
status of just the currently selected playback/
recording device (HDD or removable disc).
• The on-screen display automatically disappears after
150 minutes.
2 To hide the information display, press DISPLAY
repeatedly until it disappears.
The example displays below are a guide only; actual
displays vary according to the disc loaded, etc.
33
En
DVR-04_HDD_UK.book 34 ページ 2004年4月11日 日曜日 午後6時11分
04
Getting started
HDD and removable disc activity display
Press DISPLAY once to see the HDD and removable disc
(DVD, etc.) activity. Use the HDD and DVD buttons to
switch between the two kinds of display.
The example displays below show high-speed copying
from HDD to DVD, and HDD chase playback.
HDD
DVD-RW Video
Hi-Speed Copy
Remain –h––m
Stop
8 Copy control information
Shows recording restrictions of the current channel
program.
0h08m left
9 Disc name
Shows the disc name.
(For CDs, this area shows playable files other than CD
audio tracks; for example, Multi-format: WMA/MP3.)
Rec Mode SP(2h00m/DVD)
HDD
DVD-RW Video
Remain 10h35m
Chase Play
Rec
Remain 0h52m
Stop
10 Finalized
Shows Finalized if a recordable DVD is finalized.
11 TV/DVD mode
Shows the current mode of the recorder (see Switching
between TV and DVD on page 29).
Recording time
Relative playback position
Stop display 2
Stop display 1
1 2
3
Stop
DVD-RW VR
Original
Disc Name
6 Preset name and number
Shows the preset name and preset number for the
currently selected channel.
7 Audio mode
Shows the broadcast audio mode for the current channel
preset (Mono, Stereo, etc.).
Rec Mode SP(2h00m/DVD)
Remain 10h35m
Stop
5 Recording time remaining
Shows the approximate recording time left on the disc in
the current recording mode.
4
5
Resume
FINE (1h00m/DVD)
Finalized
6
Rem.
0h35m
1
7 8
Stop
DVD-RW VR
Original
ABC Pr 1
Stereo
Copy Once
Titles
Lock Disc
: Comedy shows
DVD Mode
9 10
11
Play List 15
1
Date and time
1 DVD-RW Original / Play List
If a VR mode disc is loaded, this shows whether playback
is currently set to Original or Play List.
2 Number of titles/tracks on disc
For a VR mode DVD-RW, the number of Original and Play
List titles are shown separately.
During preview playback of the Copy List, this shows
Copy List.
Play display 1
3 Recording mode and time
Shows the current recording mode (FINE, SP, LP, etc.),
and the total recording time of the disc.
4 Resume
Shows Resume if playback can be resumed from the last
place stopped.
34
: Original 99
: On
ABC Pr 1
Stereo
Copy Once
TV Mode
2 Disc type and mode
Shows the disc type (HDD, DVD-R, DVD-RW, CD, etc.),
and the disc mode for recordable DVD, if applicable (VR
or Video).
En
14:52 MON 15/11/2004
2
1
Play
DVD-R Video
2
3
4
5
3–2
0. 00. 15
Chapters 15
Title Total 0. 11. 52
DVD Mode
DVR-04_HDD_UK.book 35 ページ 2004年4月11日 日曜日 午後6時11分
Getting started
1
04
Number of chapters in title
2 Current title and chapter number
(For CD/Video CD/Super VCD, shows current track; for
WMA/MP3, shows current folder and track; for JPEG
disc, shows current folder and file.)
3 Elapsed title time
(For CD, WMA, MP3, Super VCD, shows elapsed track
time; for Video CD, shows elapsed disc time.)
4
5 Angle indicator
Lights during multi-angle scenes.
Note
• During real-time copy, the copy source playback
information is displayed.
Play display 2
2 3 4
Play
DVD-R Video
5 Recording mode
Shows the current recording mode (FINE, SP, LP, etc.),
and the total recording time of the disc.
• When using the simultaneous play and record
feature, the display shows information for playback
only.
Total running time of title
1
4 Remaining recording time available
Shows the amount of space left on the disc in the current
recording mode.
5
3–2
0. 00. 15
Chapter Time 0. 00. 21
Chapter Total 0. 01. 52
4.32Mbps
!
• Data transfer rate shows the amount of video and
audio information recorded on the disc. It is not an
indication of picture/audio quality.
• The Video mode disc displays become the same as a
DVD-Video disc once the disc is finalized.
• The total recording time figure shown in parenthesis
is calculated based on a 12cm/4.7GB disc at the
displayed record setting.
Hi-Speed Copy
Title Name
: 21/11 Football match
1 Chase playback, simultaneous record/playback,
copy, disc back-up
Indicates that recording, copying or back-up is in
progress.
• Recording and playback times for TV recordings are
approximately 0.1% shorter than the actual time. This
is because of the slightly different frame rates of TV
broadcasts versus DVD.
• The frame number is shown next to the elapsed time
display when the disc is paused.
2
Elapsed chapter time
3
Total running time of chapter
4 Data transfer rate
Shows the current data rate being read from the disc.
• Copy Once or Can’t Record messages may appear
in the stop or recording displays. These indicate that
the broadcast TV program contains copy control
information.
5 Copy protected material (!)
Shows ‘!’ if the playback material is copy-once protected.
Recording display
1
Rec
DVD-R Video
2
3
0. 00. 15
21:00 – 22:00
FINE (1h00m/DVD)
3
Rem.
4
0h35m
ABC Pr 1
Stereo
Copy Once
DVD Mode
5
1
Current title number
2
Elapsed recording time
3 Timer recording start and stop times
Shows the start and stop times if the current recording is
a timer recording.
35
En
DVR-04_HDD_UK.book 36 ページ 2004年4月11日 日曜日 午後6時11分
05
Playback
Chapter 5
Playback
Introduction
Most of the features described in this chapter make use
of on-screen displays. Navigate these using the ///
(cursor buttons) and ENTER. To go back one level
from any screen, use the RETURN button. Remember
also that the button guide at the bottom of every screen
shows which buttons do what.
Using the Disc Navigator to browse
the contents of a disc.
Use the Disc Navigator to browse the contents of a disc
and start playback.
Many of the functions covered in this chapter apply to the
HDD, DVD discs, Video CDs, Super VCDs, WMA/MP3
discs and CDs, although the exact operation of some
varies slightly with the kind of disc loaded. The following
icons are provided to help you quickly identify which
instructions you need for which kind of disc.
DVD
HDD
DVD
Any kind of DVD, DVD-R or DVD-RW
DISC NAVIGATOR
DVD-Video
Video mode
VR mode
HDD
Commercially produced DVD or finalized
Video mode DVD-R/RW
Video mode DVD-R/RW (unfinalized)
VR mode DVD-RW
HDD
CD
Audio CD
Video CD
Video CD
Super VCD
Super VCD
WMA/MP3
WMA or MP3 files
MP3
ENTER
HOME
MENU
MP3 files
• Some DVD-Video discs don’t allow certain playback
controls to operate at certain points in the disc. This
is not a malfunction.
• When playing Video CDs, some functions, such as
making a program list, are not available in PBC
mode. Stop the disc first, then start playback by
pressing .
• For discs that contain JPEG picture files, see The
PhotoViewer on page 90.
Using the Disc Navigator with playback-only
discs
DVD-Video
CD
Video CD
Super VCD
WMA/MP3
1 Press HOME MENU and select ‘Disc Navigator’
from the on-screen display.
Alternatively, for a CD, Video CD, Super VCD or WMA/
MP3 disc, you can press DISC NAVIGATOR, which takes
you straight to the Disc Navigator screen.
Timer Recording
Disc Setup
Disc Navigator
Initial Setup
Copy
Video/Audio Adjust
Disc History
Play Mode
PhotoViewer
DV Record
DVR-520H/720H screen
2 Select what you want to play.
Use the /// (cursor buttons) to highlight items
and ENTER to select.
36
En
DVR-04_HDD_UK.book 37 ページ 2004年4月11日 日曜日 午後6時11分
Playback
05
Depending on the type of disc you have loaded, the Disc
Navigator looks slightly different.
1 Press HDD or DVD to select the hard disk drive or
the DVD drive.
The screen for DVD discs shows the titles on the left and
the chapters on the right. Select a title, or a chapter
within a title.
2 Press HOME MENU and select ‘Disc Navigator’
from the on-screen display.
Alternatively, you can press DISC NAVIGATOR to go
straight to the Disc Navigator screen.
Disc Navigator
DVD
Title (1-10)
Title 01
Title 02
Title 03
Title 04
Title 05
Title 06
Title 07
Title 08
Chapter (1-003)
Chapter 001
Chapter 002
Chapter 003
3 Select ‘Play’ from the menu options.
Press ENTER to move to the thumbnails area of the
screen.
Disc Navigator
Video Mode
DVD
1
2
3
The screen for CDs and Video CDs shows a list of tracks.
12:30 Wed 4/11 Pr 5 LP
Play
Erase
Ttl Name
Lock
Erase All
Disc Navigator
Track (1-10)
Track 01
Track 02
Track 03
Track 04
Track 05
Track 06
Track 07
Track 08
CD
Total Time 0.58.25
4
DVD Remain
0h37m(FINE)
5
6
Undo
1/1
4 Use the /// (cursor buttons) to select a
title to play.
The screen for WMA/MP3 discs shows a list of folders
and tracks. Select a folder or a track within a folder.
5
Press ENTER to start playback.
Note
Disc Navigator
WMA/MP3
Folder (1-03)
01.Rock
02.Pop
03.Dance
Track (1-004)
001.Intro
002.Escape
003.Everything You Say
004.What I Do
Playback starts after you press ENTER.
• For discs that contain both CD-Audio tracks and
WMA/MP3 tracks, you can switch the playback area
between CD and WMA/MP3. This can only be done
while the disc is stopped.
• It’s not possible to use the Disc Navigator when
playing a Video CD in PBC mode.
• Another way to find a particular place on a disc is to
use the time search mode. See Search Mode on
page 40.
Changing the thumbnail picture for a title
VR mode
Video mode
HDD
You can change the thumbnail picture that appears for
each title in the Disc Navigator screen using the NAVI
MARK button.
Using the Disc Navigator with recordable
discs and the HDD
VR mode
Video mode
ENTER
HDD
When used with a recordable disc or the HDD, the Disc
Navigator gives you access to all the editing features of
this recorder as well as the ability to browse and play
titles. See also Editing on page 76 for more on editing
recordable discs.
PLAY
PAUSE
STEP/SLOW
NAVI
MARK
37
En
DVR-04_HDD_UK.book 38 ページ 2004年4月11日 日曜日 午後6時11分
Playback
05
1 Start playback of the title you want to change
the thumbnail for.
2 Press NAVI MARK anywhere in the title to make
the displayed picture the thumbnail for that title.
• For greater control over the exact frame you want to
use, you can use the PAUSE and/or slow-motion/
frame advance/reverse controls ( /
).
CD
Video CD
Super VCD
WMA/MP3
1 During playback, use the number buttons to
input a track number.
For example, for track 6, press 6; for track 24, press 2,
then 4.
• To clear and start again, press CLEAR.
2
Navigating discs and the HDD
Optionally: Press ENTER.
• Alternatively, just wait a few seconds and playback
will jump to the new track.
ALL
During playback you can easily jump to another title,
chapter or track on a disc using the number buttons on
the remote.
Scanning discs
You can fast scan discs at various speeds, forwards or
backward.
REV SCAN
CLEAR
PLAY
FWD SCAN
ENTER
1 During playback, press or to start
reverse or forward scanning.
• The scanning speed is shown on-screen.
DVD-Video
Video mode
2 Press the same button repeatedly to increase the
scanning speed.
1 During playback use the number buttons to
enter a chapter number within the current title.
For example, for chapter 6, press 6; for chapter 24,
press 2, then 4.
DVD
• Forward:
SCAN 1 SCAN 2 SCAN 3 SCAN 4
• To clear and start again, press CLEAR.
2
• Reverse:
Reverse play SCAN 1 SCAN 2 SCAN 3
SCAN 4
Optionally: Press ENTER.
• Alternatively, just wait a few seconds and playback
will jump to the new chapter.
CD
VR mode
HDD
1 During playback, use the number buttons to
input a title number.
For example, for title 6, press 6; for title 24, press 2,
then 4.
• To clear and start again, press CLEAR.
2
Optionally: Press ENTER.
• Alternatively, just wait a few seconds and playback
will jump to the new title.
HDD
Video CD
Super VCD
MP3
• Forward/Reverse:
SCAN 1 SCAN 2
3
To resume normal playback, press PLAY.
Note
• Depending on the disc, reverse playback may not be
smooth.
• Sound can be heard while scanning audio CDs
(analog output only).
• Scanning is not possible with WMA files.
38
En
DVR-04_HDD_UK.book 39 ページ 2004年4月11日 日曜日 午後6時11分
Playback
05
• No subtitles are displayed while scanning DVD-Video
discs.
Note
• The picture quality during slow motion playback is
not as good as during normal playback and depends
on the disc being played.
• Analog and digital sound is output when scanning
DVDs with Dolby Digital or Linear PCM sound on
forward SCAN 1. (Linear PCM is output from the
optical digital output.*) No sound is output when
using other scan speeds.
* Except during chase playback and simultaneous
recording/playback.
• Reverse slow-motion playback may not be as smooth
as forward and may be better with some discs than
others.
• Depending on the disc, normal playback may
automatically resume when a new chapter is reached
on a DVD disc.
• No sound is output when scanning from the HDD,
except on forward SCAN 1. (Linear PCM is output
from the optical digital output during forward
SCAN 1).
• Depending on the disc, normal playback may
automatically resume when a new chapter is reached
on a DVD disc.
• No sound is output during slow-motion playback.
Frame advance/frame reverse
DVD
Playing in slow motion
DVD
HDD
Super VCD
Video CD
HDD
Super VCD
Video CD
You can advance or back up video on a DVD disc or the
HDD frame-by-frame. With Video CD/Super VCDs, you
can only use frame advance.
You can play video at various slow motion speeds. DVDs
and video on the HDD can be played in slow motion in
either direction, while Video CD/Super VCDs can only be
played forwards in slow motion.
PLAY
PAUSE
STEP/SLOW
PLAY
1
During playback, press PAUSE.
STEP/SLOW
1 Press or to start slow motion reverse or
forward playback.
2 Press the same button repeatedly to change the
slow motion speed.
SLOW 1/16
SLOW 1/2
3
SLOW 1/8
SLOW 1/4
To resume normal playback, press PLAY.
2
3
Press or to back up or advance one frame.
• Hold down or for continuous frame reverse/
frame advance.
To resume normal playback, press PLAY.
Note
• The picture quality when using frame reverse is not
as good as frame advance.
• Depending on the disc, normal playback may
automatically resume when a new chapter is reached
on a DVD disc.
39
En
DVR-04_HDD_UK.book 40 ページ 2004年4月11日 日曜日 午後6時11分
05
Playback
Search Mode
The Play Mode menu
ALL
ALL
The Play Mode menu gives you access to search
functions, repeat and program play functions.
Important
• You can’t use the Play Mode features with Video CD/
Super VCDs playing in PBC mode, or while a DVD
disc menu is being displayed. For other restrictions,
see the following sections.
The Search Mode feature lets you start playback from a
specified point in a disc by time or by title/chapter/folder/
track number.
1
Select ‘Search Mode’ from the Play Mode menu.
2
Select one of the search options.
3 Use the number buttons to enter a title/chapter/
folder/track number or the search time (in hours,
minutes & seconds).
Play Mode
Search Mode
A-B Repeat
Repeat
Program
PLAY MODE
CLEAR
ENTER
PLAY
Time Search
Title Search
Chapter Search
0.01.00
Time Search (Video CD): For example, for 45 minutes into
the disc, press 4, 5, 0, 0.
Title/Chapter/Folder/Track Search: For example, for track 6,
press 6. Alternatively, you can use the / (cursor up/
down) buttons.
Press ENTER.
1 Press PLAY MODE to display the Play Mode menu
screen.
Play Mode
Input Time
Time Search (HDD, DVD): For example, for 25 minutes
into the current title, press 2, 5, 0, 0. For 1 hour and 15
minutes and 20 seconds into the title, press 1, 1, 5, 2, 0.
4
Search Mode
A-B Repeat
Repeat
Program
Time Search
Title Search
Chapter Search
Tip
• You can often select what you want to watch on a
DVD disc from the disc menu. Press MENU or TOP
MENU to display the disc menu.
Note
• When using time search, playback may occasionally
start slightly before or after the time you input.
• You can also access the Play Mode menu from the
Home Menu (press HOME MENU).
2 Use the /// (cursor buttons) and ENTER
to navigate.
• To exit the Play Mode menu, press HOME MENU or
PLAY MODE.
• Time search doesn’t work with Super VCDs.
A-B Repeat
DVD
CD
Video CD
HDD
The A-B Repeat function allows you to specify two points
(A and B) within a track or title that form a loop which is
played over and over.
Important
• You can’t use A-B Repeat with WMA/MP3 or Super
VCD discs.
40
En
DVR-04_HDD_UK.book 41 ページ 2004年4月11日 日曜日 午後6時11分
Playback
05
1 During playback, select ‘A-B Repeat’ from the
Play Mode menu.
VR mode
• For VR mode DVD discs, select Repeat Disc, Repeat
Title or Repeat Chapter (or Repeat Off).
2 With ‘A (Loop Start)’ highlighted, press ENTER at
the point you want the loop to start.
DVD-Video
Video mode
HDD
Play Mode
Search Mode
A-B Repeat
Repeat
Program
• For HDD, DVD-Video and Video mode DVD discs,
select Repeat Title or Repeat Chapter (or Repeat
Off).
A (Loop Start)
B (Loop End)
Off
CD
3 With ‘B (Loop End)’ highlighted, press ENTER at
the point you want the loop to end.
Playback immediately jumps back to the start point and
plays the loop round and round.
4 To resume normal playback, select ‘Off’ from the
A-B Repeat menu.
• You can also press CLEAR to cancel A-B Repeat play
if no menu OSD (such as the Play Mode menu) is
displayed.
Super VCD
• For CDs and Video CD/Super VCDs, select Repeat
Disc or Repeat Track (or Repeat Off).
After setting the loop start point, the highlight will
automatically move down to B(Loop End).
• When playing a DVD-Video/Video mode DVD, or from
the HDD, the start and end points of the loop must be
in the same title.
Video CD
WMA/MP3
• For WMA/MP3 discs, select Repeat Disc, Repeat
Folder or Repeat Track (or Repeat Off).
3 To resume normal playback, select ‘Repeat Off’
from the Repeat Play menu.
• You can also press CLEAR to cancel repeat play if no
menu OSD (such as the Play Mode menu) is
displayed.
Note
• If you switch the camera angle during repeat play of
a DVD-Video disc, repeat play is canceled.
Note
• If there is a program list, you can also select Repeat
Program to repeat the program list.
• If you switch camera angles while using A-B Repeat
with a DVD-Video disc, A-B repeat is canceled.
Program play
Repeat play
DVD-Video
ALL
There are various repeat play options, depending on the
kind of disc loaded, or if you’re using the HDD for
playback. It’s also possible to use repeat play together
with program play to repeat the tracks/chapters in the
program list (see Program play below).
1
Select ‘Repeat’ from the Play Mode menu.
2
Select a repeat play mode.
CD
Video CD
Super VCD
WMA/MP3
This feature lets you program the play order of titles/
chapters/folders/tracks on a disc.
1
Select ‘Program’ from the Play Mode menu.
2 Select ‘Input/Edit Program’ from the list of
program options.
Play Mode
Play Mode
Search Mode
A-B Repeat
Repeat
Program
Search Mode
A-B Repeat
Repeat
Program
Input/Edit Program
Start Program Play
Cancel Program Play
Erase Program List
Repeat Disc
Repeat Title
Repeat Chapter
Repeat Off
The Program edit screen that appears depends on the
kind of disc loaded.
41
En
DVR-04_HDD_UK.book 42 ページ 2004年4月11日 日曜日 午後6時11分
05
Playback
On the left side is the program list, then to the right is a
list of titles (DVD), folders (WMA/MP3), or tracks (CD,
Video CD/Super VCDs). On the far right is a list of
chapters (DVD) or tracks (WMA/MP3).
3 Select a title, chapter, folder or track for the
current step in the program list.
For a DVD disc, you can add a whole title, or a chapter
within a title to the program list.
4 Repeat step 3 to build up a program list.
A program list can contain up to 24 titles/chapters/
folders/tracks.
5 To play the program list, press PLAY.
Program play remains active until you turn off program
play (see below), erase the program list (see below), eject
the disc or switch off the recorder.
• To add a title, select the title.
Tip
• To add a chapter, first highlight the title, then press
(cursor right)and select a chapter from the list.
Program
Step
01. 01-003
02.
03.
04.
05.
06.
07.
08.
Title (1-38)
Title 01
Title 02
Title 03
Title 04
Title 05
Title 06
Title 07
Title 08
• To save your program list and exit the program edit
screen without starting playback, press HOME
MENU or PLAY MODE.
• You can change the program list by selecting Input/
Edit Program from the Play Mode Program menu.
Chapter (1-004)
Chapter 001
Chapter 002
Chapter 003
Chapter 004
• During program play, press to skip to the next
program step.
• Press CLEAR during playback to switch off program
play (if no menu OSD, such as the Disc Navigator, is
displayed). Press while stopped to erase the program
list.
For a CD or Video CD/Super VCD, select a track to add to
the program list.
Other Program play functions
Program
Step
01. 04
02.
03.
04.
05.
06.
07.
08.
Track (1-12)
Track 01
Track 02
Track 03
Track 04
Track 05
Track 06
Track 07
Track 08
Total Time 0.00.00
As well as creating and editing a program list, you can
start program play, cancel program play, and erase the
program list from the Play Mode menu.
1 Press PLAY MODE and select ‘Program’ from the
list of functions on the left.
2
For a WMA/MP3 disc, you can add a whole folder, or a
track within a folder to the program list.
• To add a folder, select the folder.
• To add a track, first highlight the folder, then press (cursor right) and select a track from the list.
Folder (1-06)
01. Pop
02. Electronic
03. Jazz
04. Indie
05. Rock
06. Classic
Track (1-010)
001. Track 01
002. Track 02
003. Track 03
004. Track 04
005. Track 05
006. Track 06
007. Track 07
008. Track 08
After pressing ENTER to add the title/chapter/folder/
track, the step number automatically moves down one.
• To insert a step into the program list, highlight the
step number where you want to insert another step,
then select a chapter/title/folder/track as usual. After
pressing ENTER, all the subsequent steps move
down one.
• To delete a step from the program list, highlight the
step you want to delete, then press CLEAR.
42
En
• Start Program Play – Starts playback of a saved
program list
• Cancel Program Play – Turns off program play, but
does not erase the program list
• Erase Program List – Erases the program list and
turns off program play
Program
Step
01. 01-003
02.
03.
04.
05.
06.
07.
08.
Select a program play function.
• Input/Edit Program – See above
Note
• When playing a program list of DVD-Video chapters,
chapters not included in the program list may be
sometimes be played, depending on the disc.
• You can use repeat play with program play. Start
playback of the program list then select Program
Repeat from the Repeat Play Mode menu (see
Repeat play on page 41).
DVR-04_HDD_UK.book 43 ページ 2004年4月11日 日曜日 午後6時11分
Playback
05
Displaying and switching subtitles
DVD-Video
Switching DVD soundtracks
DVD-Video
Some DVD discs have subtitles in one or more
languages; the disc box will usually tell you which
subtitle languages are available. You can switch subtitle
language during playback.
Check the disc packaging for details of the subtitle
options.
When playing a DVD disc recorded with two or more
soundtracks (often in different languages), you can
switch the soundtrack during playback.
Check the disc packaging for details of the soundtrack
options.
AUDIO
SUBTITLE
• Press AUDIO repeatedly to select an audio
soundtrack.
CLEAR
Audio : 1/2
1 Press SUBTITLE repeatedly to select a subtitle
option.
The current subtitle language is shown on-screen and in
the front panel display.
Subtitle: 1/2 English
Dolby Digital 2/0CH
Note
• The sound may drop out for a few seconds when
switching soundtracks.
The toucan lives in tropical forests
2 To switch off subtitles, press SUBTITLE then
CLEAR.
Note
• Some discs only allow you to change subtitle
language from the disc menu. Press TOP MENU to
access.
• To set subtitle preferences, see Subtitle Language on
page 106.
• Some discs only allow you to change audio language
from the disc menu. Press TOP MENU to access.
• To set audio language preferences, see Audio
Language on page 105.
• Some discs feature both Dolby Digital and DTS
soundtracks. There is no analog audio output when
DTS is selected. To listen to the DTS soundtrack,
connect this recorder to a DTS decoder or AV amp/
receiver with built-in DTS decoder via the digital
output. See Connecting to an AV amplifier/receiver on
page 19 for connection details.
43
En
DVR-04_HDD_UK.book 44 ページ 2004年4月11日 日曜日 午後6時11分
05
Playback
Switching audio channels
VR mode
CD
Video CD
Super VCD
Switching camera angles
WMA/MP3
For VR mode content recorded with bilingual audio, you
can switch between left (L) channel, right (R) channel, or
both (L+R).
When playing Video CDs and audio CDs you can switch
between stereo, just the left channel or just the right
channel.
Some Super VCD discs have two soundtracks. With
these discs you can switch between the two soundtracks
as well as individual channels in each.
DVD-Video
Some DVD-Video discs feature scenes shot from two or
more angles—check the disc box for details: it should be
marked with a
icon if it contains multi-angle scenes.
When a multi-angle scene is playing, the same icon
appears on screen to let you know that other angles are
available (this can be switched off if you prefer—see
Angle Indicator on page 111).
ANGLE
AUDIO
•
1 To display/switch the audio channel, press
AUDIO repeatedly.
The audio channel(s) currently playing are indicated onscreen.
VR mode
• L – Left channel only
• R – Right channel only
Video CD
WMA/MP3
• Stereo – Stereo (default)
• 1/L – Left channel only
• 2/R – Right channel only
Super VCD
• 1 Stereo – Soundtrack 1 / Stereo (default)
• 1 L – Soundtrack 1 / Left channel
• 1 R – Soundtrack 1 / Right channel
• 2 Stereo – Soundtrack 2 / Stereo
• 2 L – Soundtrack 2 / Left channel
• 2 R – Soundtrack 2 / Right channel
Note
• When playing a Bilingual recording on a VR mode
disc, if you are listening to the Dolby Digital
soundtrack via the digital output, you cannot switch
the audio channel. Set Dolby Digital Out to Dolby
Digital PCM (see Dolby Digital Out on page 104)
or listen via the analog outputs if you need to switch
the audio channel.
44
En
• If the disc was paused, playback starts again with the
new angle.
• Repeat play is canceled if you change the angle while
repeat playback is active.
Note
• L+R – Both channels (default)
CD
To switch the camera angle, press ANGLE.
• The angle number is displayed on-screen.
• You can also change the angle from some DVD-Video
disc menus. Press TOP MENU to access.
DVR-04_HDD_UK.book 45 ページ 2004年4月11日 日曜日 午後6時11分
Recording
06
Chapter 6
Recording
About DVD recording
This recorder can record on both DVD-R and DVD-RW
media. The main difference between the two is that DVDR discs can only be recorded once, while DVD-RW can be
recorded, erased and re-recorded many times.
A further difference between the two disc types is that
only DVD-RW can be initialized for VR mode recording,
which offers much more comprehensive editing
functions compared to Video mode recording.
The big advantage, however, of Video mode is its
compatibility with standard DVD players, most of which
will not play VR mode DVD-RW discs (see also the notes
below).
While DVD-R discs can only be recorded using the Video
mode, you can initialize a DVD-RW disc for Video or VR
mode recordings. Once initialized (any previous content
is erased in this operation), all recordings on that disc
will be in the chosen recording mode.
Important
• You cannot play, edit or record on unfinalized DVD-R/
RW discs recorded in Video mode on other DVD
recorders. (Likewise, unfinalized Video mode discs
recorded on this recorder are not playable on other
players/recorders.)
• This recorder cannot record onto CD-R or CD-RW
discs.
• Pioneer takes no responsibility for recording failure
due to power cuts, defective discs, or damage to the
recorder.
• Fingerprints and small scratches on a disc can affect
playback and/or recording performance. Please take
proper care of your discs.
• Although this recorder can record PAL, SECAM,
NTSC and PAL-60, you can’t mix multiple TV line
systems on one disc. A disc can contain PAL and
SECAM recordings, or NTSC and PAL-60. See also
Input Line System on page 98.
Note
• Some DVD players, such as some Pioneer models,
are compatible with VR mode DVD-RW discs. Check
the operating instructions for your player for VR
mode compatibility information.
• The maximum number of titles that can be recorded
on a DVD-R/RW disc is 99.
• The maximum number of chapters recordable on a
DVD-R/RW disc is 999.
• No more recording is possible on a disc that already
contains the maximum number of chapters/titles.
About HDD recording
Recording to the internal hard disk drive (HDD) is
basically similar to recording to a VR mode DVD-RW disc.
You have the full choice of recording quality options,
including the manual mode, and of course you can
record, erase and re-record as many times as you like.
The capacity of the hard disk drive means that you can
store many hours of video on it, even in the higher quality
recording modes. To help you organize the contents, the
HDD is divided into four groups. You can name and use
these groups as you like—for example, you might have a
group for movies, another for TV shows, and one for
camcorder recordings.
Important
• It is possible to record both PAL and NTSC titles on
the HDD. Before recording, you need to make sure
that the Input Line System setting (page 98) matches
the TV line system of the source you’re recording.
Note
• The maximum number of titles that can be recorded
on the HDD is 250.
• You can record up to 102 hours of video (in EP mode)
on the internal 80GB (gigabyte) hard disk (HDD) on
the DVR-420H/ 520H, or up to 204 hours on the
160GB DVR-720H.
• The maximum number of chapters per title
recordable on the HDD is 99.
• No more recording is possible on the HDD after the
maximum number of titles has been reached.
• The maximum continuous recording time is six
hours.
45
En
DVR-04_HDD_UK.book 46 ページ 2004年4月11日 日曜日 午後6時11分
06
Recording
Recording time and picture quality
There are four preset recording quality modes:
• FINE – Highest quality setting, gives about one hour
of recording time on a DVD disc.
• SP (Standard Play) – Default quality, sufficient for
most applications, gives about two hours of
recording time on a DVD.
• LP (Long Play) – Slightly lower video quality, but
doubles the recording time on a DVD to around four
hours.
• EP (Extended Play) – Use when maximum recording
time is most important; EP gives you around six
hours of recording time on a DVD disc.
In addition to these settings, you can access 32 different
recording quality/time settings when manual recording
mode is on (see Manual Recording on page 107), giving
you precise control over the recording.
When setting a timer recording there is a further option,
AUTO, which maximizes the recording quality for the
space available on the disc loaded at the time of
recording. (If recording to the HDD, the recording quality
is maximized to fit on to a DVD disc.)
In all except the FINE/MN32 modes, sound is recorded in
two channel Dolby Digital format. When set to FINE/
MN32, sound is recorded in high quality, uncompressed
Linear PCM format.
If the broadcast audio is bilingual and you are recording
in Video mode or to the HDD, or in VR mode on the FINE/
MN32 setting, use the Bilingual Recording setting
(page 104) to select the A/L or B/R audio channel to
record before recording starts.
• Although this recorder can record PAL, SECAM,
NTSC and PAL-60, you can’t mix multiple TV line
systems on one disc. A disc can contain PAL and
SECAM recordings, or NTSC and PAL-60. See also
Input Line System on page 98.
Note
• Note that all recording times (both here and those
shown by the recorder) are only approximate. This is
because of the way that the video is recorded; you
may get slightly more or slightly less, depending on
what you’re recording.
46
En
Restrictions on video recording
• You cannot record copy-protected video using this
recorder. Copy-protected video includes DVD-Video
discs and some satellite broadcasts. If copyprotected material is encountered during a
recording, recording will pause automatically and an
error message will be displayed on-screen.
• Video that is ‘copy-once only’ can only be recorded on
the HDD or a DVD-RW disc in VR mode (see below).
• When recording a TV broadcast or through an
external input, you can display copy control
information on screen. (see Displaying disc
information on-screen on page 33).
CPRM
CPRM is a copy protection system with scramble system
regarding the recording of ‘copy once’ broadcast
programs. CPRM stands for Content Protection for
Recordable Media.
This recorder is CPRM compatible, which means that
you can record copy-once broadcast programs, but you
cannot then make a copy of those recordings. CPRM
recordings can only be made on CPRM-compatible DVDRW (ver. 1.1 or higher) discs formatted in VR mode or on
the HDD.
DVD CPRM recordings can only be played on players that
are specifically compatible with CPRM.
Recording equipment and copyright
Recording equipment should be used only for lawful
copying and you are advised to check carefully what is
lawful copying in the country in which you are making a
copy. Copying of copyright material such as films or
music is unlawful unless permitted by a legal exception
or consented to by the rightowners.
• This product incorporates copyright protection
technology that is protected by method claims of
certain U. S. patents and other intellectual property
rights owned by Macrovision Corporation and other
rights owners. Use of this copyright protection
technology must be authorized by Macrovision
Corporation, and is intended for home and other
limited viewing uses only unless otherwise
authorized by Macrovision Corporation. Reverse
engineering or disassembly is prohibited.
DVR-04_HDD_UK.book 47 ページ 2004年4月11日 日曜日 午後6時11分
Recording
06
Setting the picture quality/recording
time
VR mode
Video mode
HDD
Before starting a recording, you will usually want to set
the picture quality/recording time. There are four
standard settings available, which allow you to choose a
balance between picture quality and recording time.
It’s also possible to create a fifth, ‘manual’ setting for
picture quality/recording time. Before you can select this,
however, you will need to set the Manual Recording
option in the Initial Settings menu (see Manual Recording
on page 107).
Basic recording from the TV
VR mode
Video mode
HDD
Follow the instructions below to record a TV program.
Recording starts immediately and continues until the
disc is full or you stop the recording.
HDD
DVD
AUDIO
REC MODE
CHANNEL
• Press REC MODE repeatedly to select a recording
setting.
• FINE – Fine picture quality
ENTER
• SP – Standard play
• LP – Long play
PAUSE
• EP – Extended play
• MN – Manual (available only when manual recording
is on)
The setting is indicated in the front panel display, and
shown on-screen together with the recording time for a
blank recordable disc. If a recordable disc is loaded, the
approximate remaining recording time for that disc is
also shown. (Note that if the On Screen Display setting
(see On Screen Display on page 98) is Off then this
information is not displayed.)
REC
STOP REC
REC MODE
DVD RECORDER
1 Press HDD or DVD to record to the hard disk drive
or a recordable DVD respectively.
• If you’re recording to DVD, load a recordable disc (if
you load a new blank DVD-RW disc, the recorder
takes a short while to initialize the disc).
2 Use the CHANNEL +/– buttons to select the TV
channel to record.
The front panel display shows the channel number:
23 30
PR 7
Channel preset
• While the recorder is stopped, you can also use the
number buttons on the remote to select the channel.
(For channel 6, press 6 then ENTER; for channel 24,
press 2, 4 then ENTER)
47
En
DVR-04_HDD_UK.book 48 ページ 2004年4月11日 日曜日 午後6時11分
Recording
06
• If the recorder is stopped, you can also use the +/–
buttons on the front panel to select the channel
number.
3 Use the REC MODE button to set the picture
quality/recording time.
• See Setting the picture quality/recording time above
for detailed instructions.
Direct recording from TV
If you connected this recorder to your TV using a SCART
cable, and your TV supports Direct Recording, you can
record whatever is currently being shown on the TV
without having to worry about what channel preset the
recorder is on. Check the instructions that came with
your TV if you’re not sure whether your TV supports this
feature.
4 Use the AUDIO button to select the audio
channel to record.
See Changing audio channels on page 29 for more on
this.
PAUSE
• When recording in VR mode, if a broadcast is
bilingual, both audio channels are recorded, allowing
you to switch the audio channel on playback. The
only exception to this is when the picture quality is set
to FINE/MN32, in which case you do need to select
the audio channel before recording.
5 Press REC to start recording.
If you want to set a recording end time, press the REC
button repeatedly. The recording time increases in 30
minute increments, up to a maximum of six hours. The
time the recording will end is shown on-screen and in the
front panel display. When the recording ends, the
recorder automatically switches into standby if no other
operation is being performed.
• To cancel the set recording time, press REC.
• If you want to pause recording at any time, press
PAUSE. Press again to restart the recording. (If
recording to the HDD or in VR mode, a new chapter
is started after recording restarts)
6
Tip
• During recording you can turn on/off the SCART loop
through function. During recording, press the front
panel + button to switch to SCART THRU (loop
through on), or – to switch to SCART NORM (loop
though off). Note that you can’t switch loop through
on if recording from the AV2/(INPUT 1/DECODER)
or AV1(RGB)-TV connectors. Also, loop through is
automatically reset to off after recording has
finished.
48
STOP REC
REC MODE
TV DIRECT
REC
1
If necessary, load a recordable disc.
2 Set the picture quality/recording time using the
REC MODE button.
3 Press TV DIRECT REC to start recording.
If you want to set a recording time, press the REC
button repeatedly. The recording time increases in 30
minute increments, up to a maximum of six hours. You
can see the recording time on-screen and in the front
panel display. When the recording ends, the recorder
automatically switches into standby if no other operation
is being performed.
• To cancel the set recording time, press REC.
To stop the recording, press STOP REC.
• If you set the recording time in the previous step, you
can still stop the recording anytime by pressing
STOP REC.
• Recording will stop automatically when there is no
more space on the HDD/DVD, or after six hours of
HDD recording (whichever is sooner).
En
REC
• If you want to pause recording at any time, press
PAUSE. Press again to restart the recording. (If
recording to the HDD or in VR mode, a new chapter
is started after recording restarts)
4
To stop the recording, press STOP REC.
• If you set the recording time in step 3, you can still
stop the recording anytime by pressing STOP REC.
• Recording will stop automatically when there is no
more space on the HDD/DVD, or after six hours of
HDD recording (whichever is sooner).
Tip
• You can press TV DIRECT REC while the recorder is
in standby to switch on and immediately start
recording.
• Please note that you can’t record from another
component (VCR, etc.) that is connected by a SCART
cable to the AV2/(INPUT 1/DECODER) connector
using the TV Direct Recording feature.
DVR-04_HDD_UK.book 49 ページ 2004年4月11日 日曜日 午後6時11分
Recording
06
Setting a timer recording
VR mode
Video mode
HDD
Using the timer recording features you can program up
to 32 timer recordings up to a month in advance. Timer
recording programs can be set to record just once, every
day, or every week.
You can set the recording quality for your timer recording
in the same way as for a regular recording, but with the
added option of an AUTO mode, which maximizes the
recording quality for the space available on the disc (if
recording to DVD), or to fit on to a blank DVD disc (if
recording to HDD).
You can set timer recordings to record to a recordable
DVD or to the hard disk drive. For regular (daily or weekly)
HDD timer recordings that you don’t need to keep, you
can use the Auto Replace Recording feature to
automatically replace the previous timer recording with
the new one. Note that when you use this feature, the
previous recording made on that timer program will be
replaced by the next one, regardless of whether you have
watched it yet or not.
You can also set the recorder so that it will adjust the
recording quality to try and fit the recording on to the disc
if it would not otherwise fit at the recording quality you set
(see Optimized Rec on page 108 for more on this).
Finally, if you set a timer recording to record to DVD but
there isn’t a recordable DVD loaded at the time of the
recording, the Recovery Recording feature will
automatically record the program to the HDD for you.
This recorder is compatible with VPS (Video
Programming System) and PDC (Program Delivery
Control) systems used by many TV stations to ensure that
a timer recording catches the whole program even when
the program is not running to schedule. Up to eight timer
programs can be set with VPS/PDC on.
Important
• A timer recording can’t be set if:
– Auto Start Recording is in progress.
– There are already 32 timer programs waiting to be
recorded.
• Timer recording will not start if:
– The recorder is already recording.
– A disc is being initialized, finalized or unfinalized.
• Timer recording will start when the operation
preventing timer recording has finished.
• If a recordable DVD that doesn’t support
simultaneous playback and recording (see
Simultaneous recording and playback on page 55) is
playing when a DVD timer recording is due to start,
playback will automatically stop to allow the
recording to start.
• The timer indicator ( ) lights in the front panel
display when the timer is active. If the indicator is
blinking it means that (for a DVD timer recording)
there is no disc loaded, or the disc loaded is not
recordable (for an HDD timer recording it means that
the HDD is not recordable).
• Timer recordings have higher priority than the Auto
Start Recording function (see Automatic recording
from a satellite tuner on page 56). A timer recording
will interrupt an Auto Start Recording. (Auto Start
Recording will resume after the timer recording has
finished.)
• Approximately two minutes before a timer recording
is set to start, the recorder will go into timer recording
standby. In timer recording standby you cannot use
some functions.
• The maximum length for timer recordings made to
the HDD is 24 hours. However, because one title is
limited to six hours, recordings over six hours will be
spread over two or more titles. Note that there will be
a break in the recording of a few seconds between
titles.
• VPS/PDC may not work with all broadcast stations in
your country/area. Check with the stations for
compatibility.
49
En
DVR-04_HDD_UK.book 50 ページ 2004年4月11日 日曜日 午後6時11分
Recording
06
Easy Timer Recording
As the name suggests, Easy Timer Recording makes
setting up a timer recording as simple as possible.
• DVD recording: The AUTO option automatically sets
the best recording quality for the space available on
the disc loaded at the time of recording.
• HDD recording: The AUTO option automatically sets
the best recording quality that would fit on to a blank
DVD disc.
• Press DVD to record to DVD disc, or HDD if you want
to record to the hard disk drive.
HDD
DVD
3 Use /// (cursor buttons) to move the
cursor to the recording start date and time on the
grid.
• You can move the cursor forward or back an hour at
a time using the and buttons.
CHANNEL
Current time
Recording start time
Easy Timer Recording
ENTER
HOME
MENU
8:00
RETURN
9:00
10:00
MON
12:00
REC MODE
11:45
13/12
CHANNEL +/– Pr 7
11:00
13:00
14:00
13/12
14/12
15/12
REC MODE FINE
- -:- HDD
HDD/DVD
Each row of the grid is one day (you can set the timer
recording for up to a month in advance). Each column is
a 15 minute interval.
EASY
TIMER
The darker area represents time that has already passed
and can’t therefore be selected. The lighter area is time
that’s available.
4 Press ENTER to set the start time.
The start date and time is displayed in the middle of the
screen.
DVD RECORDER
1 Press EASY TIMER.
Alternatively, you can also access from the Home Menu
(press HOME MENU and select Timer Recording then
Easy Timer Recording).
• You can go back and reset the start time if you need
to by pressing RETURN.
5 Use the / (cursor left/right) to move the
cursor to the recording end time on the grid.
Recording start time
Recording end time
Easy Timer Recording
8:00
9:00
10:00
11:00
12:00
13:00
14:00
13/12
14/12
15/12
Easy Timer Recording
MON
CHANNEL +/–
13/12
Pr 7
9:30
REC MODE
FINE
11:00
--:-HDD/DVD
HDD
MON
2
Set the TV channel and recording quality.
• Use the CHANNEL +/– buttons to set the channel you
want to record.
• Use the REC MODE button to set the recording
quality. Press repeatedly to switch between FINE, SP,
LP, EP and AUTO (and MN if manual recording mode
is on).
50
En
12:00
13:00
14:00
15:00
16:00
17:00
13/12
14/12
15/12
13/12 11:45
CHANNEL +/– Pr 7
REC MODE FINE
13:45
HDD/DVD
HDD
As you move the cursor around the grid, an arrow
stretches from the start time to the current cursor
position, representing the length of the recording. A
recording of up to six hours can be set.
DVR-04_HDD_UK.book 51 ページ 2004年4月11日 日曜日 午後6時11分
Recording
6
06
Press ENTER to set the end time.
7 Select ‘Yes’ to set the timer recording and exit, or
‘No’ to go back to the timer recording screen.
• You can check the timer recording details you just set
from the main timer recording screen (see Standard
timer recording below).
• The amount of free space available on the HDD and
the currently loaded recordable DVD is shown
towards the bottom of the screen.
• In the lower-right corner, the number of timer
programs already set and the number that use VPS/
PDC, is shown next to Tmr Pgms.
• If there are more than eight timer programs already
set, press NEXT to switch page (go back using
the PREV button).
Note
• You can’t use VPS/PDC with Easy Timer Recording.
Use the standard or VIDEO Plus+ timer recording
methods if you want to use VPS/PDC.
Standard timer recording
The timer recording screen you can see all the timer
programs already set, clear programs and set up new
ones.
• You can also clear a timer program before it’s started
(before the recorder enters timer recording standby)
by highlighting it and pressing CLEAR.
2 Select ‘New Input’ to set a new timer program,
then press ENTER.
Timer Recording
Date
12/12 SUN
CLEAR
Rec to
HDD
Start
10
Group
GROUP 1
Stop
00
--
CH
--
Rec Mode
Pr 7
SP
VPS/PDC
OFF
Program Set
Ttl Name Input
ENTER
HOME
MENU
3 Enter the timer recording settings.
Use the / (cursor left/right) buttons to select a field;
use the / (cursor up/down) buttons to change the
value.
PREV
• Date – Choose a date up to one month in advance, or
select a daily or weekly program.
NEXT
TIMER REC
• Start – Set the recording start time.
1 Press TIMER REC to display the Timer Recording
screen.
You can also access the Timer Recording screen from
the Home Menu (press HOME MENU, select Timer
Recording, then Timer Recording (View)).
This screen shows all the timer programs currently set.
Timer Recording
Date
Start
MON 13/12
7:00
EVERY TUE
9:00
Stop
CH
Mode Rec to VPS/PDC
8:00
Pr 3 FINE HDD
Off
10:00
Pr 5 FINE HDD
On
New Input
• Stop – Set the recording end time (maximum length
of a timer recording is 24 hours for HDD recording or
six hours for DVD).
• CH – Choose a channel (1–99, excluding skip
channels), or one of the external inputs from which to
record.
• Mode – Select FINE, SP, LP, EP or AUTO (See
Recording time and picture quality on page 46). If
Manual Recording is on, then you can also select the
MN setting.
• Rec to – Select HDD for hard disk recording or DVD
for DVD recording. Select HDD
for Auto Replace
Recording (daily or weekly timer recording only).
• Group – Select a record group (for HDD recording
only).
HDD Remain
DVD Remain
10h20m(FINE)
0h43m(FINE)
1/1
• Each row is for one timer recording program, with the
date and time information, channel, recording mode,
DVD or HDD and the VPS/PDC setting.
• VPS/PDC – The VPS/PDC system automatically
adjusts the recording time so that even if a program
is not running to schedule you won’t miss it. For VPS/
PDC to work properly, you must input the correct
announced time and date of the program you want to
record. Up to eight timer recordings can be set with
51
En
DVR-04_HDD_UK.book 52 ページ 2004年4月11日 日曜日 午後6時11分
06
Recording
VPS/PDC on.
Note that VPS/PDC may not work with every station
and that Optimized Recording will not work if VPS/
PDC is on.
• Ttl Name Input – Optionally, you can enter a name
for the recording up to 32 characters. (Highlight
Program Set then press (cursor down) to access
this option.)
4 After entering all the timer recording
information, highlight ‘Program set’ and press
ENTER.
The timer recording list screen is displayed again. The
timer program you just input appears in the list. The
rightmost column shows various timer recording status
messages:
Timer recording using the VIDEO Plus+®
programming system
This system makes programming timer recordings very
simple. Most TV guides publish PlusCode programming
numbers with their program details. If you want to make
a timer recording of a program, you just input the
corresponding code. The date, start, stop and channel
settings are made automatically. All you have to do is tell
the recorder the recording mode, and whether it’s a
once-only recording or a regular recording.
HDD
• Standby is displayed when the recorder is in timer
recording standby.
DVD
• Recording is displayed when a timer recording is in
progress.
5 To exit the timer recording screen, press HOME
MENU.
VIDEO Plus+
CLEAR
Note
• For a DVD timer recording, if Optimized Rec (see
Optimized Rec on page 108) is set to On (and VPS/
PDC is off), the recorder will adjust the recording
quality to try and fit the recording on the disc. If the
recording will not fit onto the disc even on MN1
recording quality then the Recovery Recording
feature will automatically make the recording to the
HDD instead.
ENTER
HOME
MENU
REC MODE
• If there is very little free space left on the HDD, an
Auto Replace Recording may not complete
successfully.
• If the HDD is being used for playback or high-speed
copying when an Auto Replace Recording is due to
start, the new timer recording will not replace the old
one. However, the next time the timer recording
starts, both of the older two programs will be erased.
• If you set the timer recording to use VPS/PDC, you
must switch the recorder into standby before the
timer recording is due to start for it to work correctly.
For non-VPS/PDC timer recordings there is no need
to switch the recorder into standby.
1 Press ‘VIDEO Plus+’ to display the VIDEO Plus+
program screen.
You can also access this screen from the Home Menu
(press HOME MENU, select Timer Recording, then
VIDEO Plus+).
VIDEO Plus+
• Stations that use VPS/PDC typically include VPS/
PDC information in the teletext TV guide pages.
Please refer to these when setting your timer
recording.
52
En
39924
PlusCode#
Rec Mode
Rec Times
Tip
Rec to
HDD
VPS/PDC
Off
9
to input
REC MODE to change
to change level
MN21
Once
0
Daily
Weekly
to change
HDD
DVD to change
to change
• Use the number buttons to enter the PlusCode
programming number. (To clear the last digit
entered, press CLEAR.)
DVR-04_HDD_UK.book 53 ページ 2004年4月11日 日曜日 午後6時11分
Recording
06
• Press REC MODE to select FINE, SP, LP, EP or AUTO
(See Recording time and picture quality on page 46). If
Manual Recording is on, then you can also select the
MN setting.
• Use the / (cursor left/right) buttons to select the
Once, Daily or Weekly recording option.
• Press HDD to record to the hard disk drive, or DVD to
record to a DVD.
• Use the and buttons to switch VPS/PDC On
or Off.
2 After making the settings, press ENTER.
The program details are shown at the bottom of the
screen for a few seconds then the screen is automatically
exited.
• If you haven’t set up the guide channels (or at least
the guide channel for the PlusCode programming
number that you entered), the recorder will prompt
you to enter the channel number that the TV program
is showing on.
Important
• You can’t use this feature until you have set up the
guide channels. See Set VIDEO Plus+ CH on
page 101.
• You can’t change the recording mode.
• You can’t program daily or weekly timer recordings.
1 Press ’VIDEO Plus+’.
The front panel display shows the current recording
mode and prompts you to enter the PlusCode
programming number.
P L US CODE
2 Use the number buttons to enter the PlusCode
programming number.
2 9 32 4
• To clear the last digit entered, press CLEAR.
Tip
• You can check the timer program settings by
pressing TIMER REC to display the timer recording
screen.
VIDEO Plus+ programming with the power
off
You can enter a PlusCode programming number when
the recorder is in standby. Note that the recording is
always made to the HDD. If you want to record to a DVD
disc, you’ll need to switch on the power and use the full
VIDEO Plus+ program screen.
• Use the PREV / NEXT button to switch VPS/
PDC on/off. With VPS/PDC on, the front panel VPS/
PDC indicator lights. (Note that a maximum of 8
timer recordings can be set with VPS/PDC on.)
3 Press ENTER.
The display shows the timer settings:
Date Start time End time HDD and Recording
channel.
• If CODE ERROR appears in the display, check that
the PlusCode programming number is correct and
that the guide channel is set (see Set VIDEO Plus+
CH on page 101), then set the timer recording again.
• If CAN’T SET appears in the display, it means that
although you entered a valid PlusCode programming
number, the program has already finished.
VIDEO Plus+
CLEAR
ENTER
PREV
NEXT
53
En
DVR-04_HDD_UK.book 54 ページ 2004年4月11日 日曜日 午後6時11分
06
Recording
Extending a timer recording in progress
You can extend a timer recording beyond the
programmed end time in two different ways. This can be
useful if a broadcast program overruns, for example.
CLEAR
2 Use the (cursor up) button to highlight the
current timer recording (‘Recording’ is shown in the
‘VPS/PDC’ column), then press ENTER.
A screen showing details of the timer recording appears.
From this screen, only the recording stop time can be
changed.
Timer Recording
ENTER
Date
HOME
MENU
Start
13/12 SAT
Rec to
HDD
7
Stop
00
8
CH
00
Rec Mode
Pr 3
FINE
VPS/PDC
Group
GROUP1
OFF
Program Set
Ttl Name Input
PREV
REC
NEXT
STOP REC
TIMER REC
3 Set a new Stop time for the timer recording.
Use the / (cursor left/right) buttons to select the
hour or minute field, then use the / (cursor up/down)
buttons to change the time.
Moving the end time by 30-minute blocks
1 During timer recording, press and hold REC for
three seconds.
The timer indicator disappears from the front panel
display.
2 Press REC repeatedly to extend recording in 30
minute increments.
Canceling and stopping a timer recording in
progress
Programming a new end time
After a timer recording has started, you can cancel the
program (but continue recording), or stop recording
completely if you need to.
Note that it is only possible to program a new end time for
a timer recording when VPS/PDC is off.
1 During timer recording, press TIMER REC to
display the Timer Recording screen.
You can also access the Timer Recording screen from
the Home Menu (press HOME MENU, select Timer
Recording, then Timer Recording (View)).
Timer Recording
Date
Start
Stop
CH
Mode Rec to VPS/PDC
12/13 MON
7:00
8:00 Pr 3 FINE HDD Recording
EVERY TUE
9:00
10:00 Pr 5 FINE HDD On
New Input
HDD Remain
DVD Remain
54
En
4 Press ENTER to set the new time and exit the
screen.
Recording will continue until the new stop time is
reached.
--h--m(FINE)
0h43m(FINE)
1/1
REC
STOP REC
1 During timer recording, press and hold REC for
three seconds.
Only the program is canceled (the timer indicator
disappears); recording continues so that you can
manually stop recording whenever you like.
2 When you want to stop recording completely,
press STOP REC.
DVR-04_HDD_UK.book 55 ページ 2004年4月11日 日曜日 午後6時11分
Recording
Preventing use of the recorder before a
timer recording (child lock)
You can make all the front panel and remote control
buttons inoperative using the child lock feature. This is
useful when you set a timer recording and want to make
sure that the timer settings are not changed before
recording has finished.
1
If the recorder is on, switch it into standby.
2 Press and hold STOP on the front panel for
three seconds to lock the controls.
The front panel display briefly shows LOCK. If any buttons
are pressed on the remote or front panel, LOCK is briefly
displayed again.
• To unlock the recorder, press and hold STOP on
the front panel for three seconds until the display
shows UNLOCK.
• To cancel a timer recording when the recorder is
locked, first unlock the recorder (see above), then
press and hold REC for three seconds.
06
Simultaneous recording and
playback
VR mode
HDD
A feature called Chase Play makes it possible to watch a
recording in progress (DVD or HDD) from the start of the
recording (as in, playback is ‘chasing’ the recording). For
example, perhaps you have to miss the first 30 minutes of
a movie on TV; you can start recording, then start
watching the movie, from the beginning, while the
recorder is still recording 30 minutes ahead of you.
In fact, you’re not just limited to watching the recording
in progress; you can watch anything else already on the
DVD or HDD by selecting it from the Disc Navigator
screen (see Using the Disc Navigator with recordable
discs and the HDD on page 37).
Important
• Note that you must use a DVD-RW Ver. 1.1 / 2x or
Ver. 1.2 / 4x disc to be able to use this feature.
Timer recording FAQ
Frequently Asked Questions
• Even though the timer is set, the recorder doesn’t start
recording!
Check that the disc loaded or HDD is recordable, not
locked (see Lock Disc on page 92), and that there are
fewer than 99/250 titles already on the DVD/HDD.
• The recorder won’t let me enter a timer program! Why
not?
You can’t enter a timer program if the clock isn’t set.
• What happens when two or more timer programs
overlap?
Basically, the program with the earlier recording start
time has priority. However, the recorder will start
recording the program with the later start time after
the earlier program is finished. If two programs have
the same times (but different channels, for example),
the program set most recently takes priority.
If VPS/PDC is active for two timer programs that are
programmed to start at the same time, then the
program that actually starts first takes priority.
• You may not be able to use this feature with a
DVD-RW disc that was first initialized on another
recorder.
• During recording, press PLAY to start playback
from the beginning of the current recording, or press
DISC NAVIGATOR and select another title to play
from there.
You can use all the usual playback controls, such as
pause, slow-motion play, scan and skip.
• To stop playback, press STOP (recording will
continue).
• To stop recording, press
continue).
STOP REC (playback will
Note
• You can’t start playback immediately after recording
starts.
• When scanning a DVD, no sound is output if the
recorder is also recording the DVD (see Scanning
discs on page 38).
• You can’t use this feature during Auto Start
Recording, or in Auto Start Recording standby (the
AUTO indicator is lit in the front panel display).
• You can’t use simultaneous playback and recording
while copying or backing up.
• During recording or in timer recording standby, you
can’t play an HDD title, DVD or Video CD/Super VCD
disc if the Input Line System setting doesn’t match
the TV line system of the disc/HDD title (see also
55
En
DVR-04_HDD_UK.book 56 ページ 2004年4月11日 日曜日 午後6時11分
06
Recording
Input Line System on page 98). Also, during
simultaneous recording and playback, if the TV line
system of the playback track/title changes then
playback will automatically stop.
Recording from an external
component
VR mode
Video mode
HDD
You can record from an external component, such as a
camcorder or VCR, connected to one of the recorder’s
external inputs.
HDD
Check that the Audio In settings for External Audio,
Bilingual Recording and DV Input are as you want them
(see Audio In settings on page 103).
• If the aspect ratio is distorted (squashed or
stretched), adjust on the source component or your
TV before recording.
3
Set up the recorder.
• Use REC MODE to set the recording quality. See
Setting the picture quality/recording time on page 47
for detailed information.
• Press HDD to record to the hard disk drive, or DVD to
record to a DVD.
4 Press REC when you’re ready to start
recording.
• DVR-520H/720H only: The recorder will only start
recording from the DV IN/OUT jack if there is a valid
signal. Recording will also pause if the signal is
interrupted during recording.
DVD
Note
INPUT
SELECT
• If your source is copy-protected using CopyGuard,
you will not be able to record it. See Restrictions on
video recording on page 46 for more details.
CLEAR
Automatic recording from a satellite
tuner
ENTER
HDD
REC
REC MODE
1 Make sure that the component you want to
record from is connected properly to the DVD
recorder.
See Chapter 2 (Connecting up) for connection options.
2 Press INPUT SELECT repeatedly to select one of
the external inputs to record from.
There are two analog inputs and a DV digital input (DVR520H/720H only). The current input is shown on-screen
and in the front panel display:
• AV2/L1 – Input 1/Auto Start Rec
• L2 – Input 2 (front panel)
• DV – DV input/output (front panel) (DVR-520H/720H
only)
56
En
If you have a satellite tuner or some other kind of set top
box connected to the AV2/L1 input, you can have the
recorder start and stop recording automatically with the
timer settings of the connected component. (If the other
component doesn’t have a built-in timer, you’ll need to
use it with an external timer unit.)
After setting up for Auto Start Recording, this recorder
starts recording when it detects a signal from the other
component. When the signal ceases, the recorder stops
recording.
Important
• It takes a little while for this recorder to switch on and
start recording after detecting a signal. Please bear
this in mind when setting the timer.
• If Auto Start Recording is set, it will not start if
another timer recording is in progress.
• Timer recordings take precedence over Auto Start
Recording. Auto Start Recording will stop if a timer
recording is due to start. After the timer recording
has finished, Auto Start Recording will resume.
DVR-04_HDD_UK.book 57 ページ 2004年4月11日 日曜日 午後6時11分
Recording
06
1 Set the timer for the satellite receiver (or other
component), then switch it into standby (if
necessary).
Check the manual that came with the receiver if you’re
not sure how to do this.
Recording from a DV camcorder
(DVR-520H/720H only)
2 Check that the ‘Audio In’ settings for ‘External
Audio’ and ‘Bilingual Recording’ are as you want
them.
See Audio In settings on page 103 for more on these
settings.
You can record from a DV camcorder connected to the
DV IN/OUT jack on the front panel of this recorder. Using
the recorder’s remote, you can control both the
camcorder and this recorder.
3
Set up the recorder.
• Use REC MODE to set the recording quality. See
Setting the picture quality/recording time on page 47
for detailed information.
VR mode
Video mode
HDD
Before recording, make sure that the audio input for the
DV IN/OUT jack is setup (see DV Input (DVR-520H/720H
only) on page 104).
4 Press HOME MENU and select ‘Timer Recording’,
then ‘Auto Start Recording’.
5 Select ‘Yes’ to switch Auto Start Recording on, or
‘No’ to switch off.
HDD
DVD
6 Switch the recorder into standby.
The AUTO indicator in the front panel display lights.
The recorder will automatically switch on and start
recording when the other component comes on.
Recording stops when the external component switches
off.
• To cancel Auto Start Recording, press STANDBY/
ON while the recorder is in standby. The AUTO
indicator goes off.
• To cancel Auto Start Recording once recording has
already started, press REC for three seconds, then
STOP REC.
CLEAR
ENTER
HOME
MENU
REV SCAN
PAUSE
• When a timer recording is in progress ahead of Auto
Start Recording, some functions, such as extending
the timer recording and chase play, are not available.
Press the front panel + button for three seconds to
cancel Auto Start Recording without affecting the
timer recording. The AUTO indicator goes off.
Note
• Auto Start Recordings are always on the HDD. Auto
Start Recording to DVD is not possible.
• You can’t set Auto Start Recording when:
RETURN
PLAY
FWD SCAN
STOP
STEP/SLOW
REC MODE
Important
• The source signal must be DVC-SD format
• Some camcorders cannot be controlled using this
recorder’s remote.
• the recorder is recording or in timer recording
standby.
• If you connect a second recorder using a DV cable,
you cannot control the second unit from this one.
• the HDD is not recordable.
• You can’t control this unit remotely from a
component connected to the DV IN/OUT jack.
• the HDD already contains the maximum number
of titles (250).
• AV2/L1 In is set to Decoder (see AV2/L1 In on
page 102).
• You can’t record date and time information from DV
cassette.
57
En
DVR-04_HDD_UK.book 58 ページ 2004年4月11日 日曜日 午後6時11分
Recording
06
• During DV recording, if a part of the tape is blank, or
has copy-protected material on it, this recorder will
pause recording. Recording will restart automatically
when there is a recordable signal. However, if there is
more than 10 seconds of blank tape, the recorder will
stop recording and the camcorder should stop
(depending on the camcorder).
• For best results when recording from a DV
camcorder to this recorder, we recommend cueing
the camcorder to the place you want to start
recording from and setting the camcorder to playpause.
1 Make sure your digital camcorder is connected to
the front panel DV IN/OUT jack.
Also, set the camcorder to VTR mode.
2
Set up the recorder.
• Use REC MODE to set the recording quality. See
Setting the picture quality/recording time on page 47
for detailed information.
• Make sure a recordable disc is loaded if you want to
record to DVD.
3 From the Initial Settings menu, check that the DV
audio input is setup as you require.
See DV Input (DVR-520H/720H only) on page 104 for more
on this.
• Check also that the Audio In settings for External
Audio and Bilingual Recording are as you want
them (see Audio In settings on page 103).
• If you restart recording after stopping the camcorder,
the first few seconds of the camcorder tape will not
be recorded. Use the pause button on your
camcorder instead and recording will start
immediately.
• HDD and DVD-RW (VR Mode) only: A chapter marker
is inserted every time there is a break in the timecode
on the DV tape. This happens when the recording is
stopped or paused then restarted, for example.
• While recording, you cannot exit the DV recording
screen using the HOME MENU or RETURN button.
Note
• Depending on the connected camcorder, you may
not be able to control it using the remote control
supplied with this recorder.
• If the audio subcode on the DV tape cannot be read
correctly, the audio type will not switch
automatically. You can switch the audio manually
from the External Audio setting (page 103).
• See also DV-related messages on page 117 if you
encounter an error while using the DV IN/OUT jack.
5 Select ‘Record to HDD’ or ‘Record to DVD’ to
record to the hard disk drive or a recordable DVD
respectively.
• I can’t get my DV camcorder to work with the recorder!
• Depending on your camcorder, you can use this
recorder’s remote to control the camcorder using the
, , , , , and buttons.
7 Use the / (cursor up/down) buttons to select
‘Start Rec’ and press ENTER.
Stop
1.02.22
Control with these
buttons
Stop
Start Rec
Pause Rec
Stop Rec
HDD SP (2h00m/DVD)
Remain
1h40m
58
• You can pause or stop the recording by selecting
Pause Rec or Stop Rec from the on-screen display.
You cannot control the camcorder from this remote
control during recording.
4 Press HOME MENU and select ‘DV Record’ from
the menu.
• DV recording only works when the digital camcorder
is in VTR mode with a tape loaded.
6 Find the place on the camcorder tape that you
want to start recording from.
For best results, pause playback at the point from which
you want to record.
En
• Recording is automatically paused if the recorder
detects no signal, or a copy-protected signal.
Recording restarts when there is a non-copyprotected signal.
Frequently Asked Questions
Check that the DV cable is properly connected. Also
make sure that what you’re trying to record is not
copy-protected.
If it still doesn’t work, try switching off the camcorder
then switch back on.
• There’s a picture, but no sound!
Try switching the DV Input setting (see DV Input
(DVR-520H/720H only) on page 104) between Stereo
1 and Stereo 2.
DVR-04_HDD_UK.book 59 ページ 2004年4月11日 日曜日 午後6時11分
Recording
06
Important
Recording from the DV output
(DVR-520H/720H only)
VR mode
Video mode
• Once you’ve finalized a disc recorded in Video mode,
you can’t edit or record anything else on that disc.
However, the finalization on a DVD-RW disc maybe
‘undone’; see Undo Finalize on page 93 for how to do
this.
HDD
You can record non-copy-protected material from the
hard disk drive or from a DVD to a camcorder connected
to the DV IN/OUT jack.
1 Connect the camcorder to the DV IN/OUT jack of
this recorder.
• A VR mode disc can still be recorded and edited on
this recorder even after finalizing.
2
Select the HDD or DVD for playback.
1 Load the disc you want to finalize.
Make sure that the recorder is stopped before
proceeding.
3
Find the place you want to start recording from.
2
Press HOME MENU and select ‘Disc Setup’.
4
Start recording on the camcorder.
3
Select ‘Finalize’.
5
Play the source material.
Disc Setup
Basic
Initialize
Finalize
Finalize
Undo Finalize
Next Screen
Start
Playing your recordings on other DVD
players
VR mode
Video mode
Most regular DVD players can play finalized discs
recorded in Video mode. A number of players (including
many Pioneer models) can also play DVD-RW discs
recorded in VR mode, finalized or not. Check the manual
that came with the player to check what kinds of discs it
will play.
When you finalize a Video mode disc, a title menu is
created from which you can select titles when you play
the disc. There are a number of different styles of title
menu to choose from to suit the content of the disc.
4 Select ‘Finalize’ from the finalize options, then
‘Next Screen’.
5 For Video mode discs only, select a title menu
style, then select ‘Yes’ to start finalization or ‘No’ to
cancel.
The menu you select will be the one that appears when
the ‘top menu’ is selected on any DVD player.
Finalize
TITL E MENU
TITLE MENU
All the title menus are navigated in the usual way,
pressing MENU or TOP MENU to display the menu, then
using the /// (cursor buttons) followed by
ENTER to select titles and start playback.
Finalizing a disc
VR mode
Video mode
Finalizing ‘fixes’ the recordings in place so that the disc
can be played on a regular DVD player or computer
equipped with a suitable DVD-ROM drive.
Note that the disc name will appear in the title menu after
you finalize a disc. Make sure the disc name is as you
want it before you finalize the disc as it can’t be changed
afterwards. If you want to rename the disc, see Input Disc
Name on page 92 before starting the steps below.
• Discs recorded partially or fully on the Pioneer
DVR-7000 DVD recorder do not support this feature.
These discs will have only a text title menu when
finalized on this recorder.
6 The recorder will now start finalizing the disc.
During finalization:
• If the finalization process is going to take more than
around four minutes, you can press ENTER to cancel.
Around four minutes before completion, the option to
cancel disappears.
59
En
DVR-04_HDD_UK.book 60 ページ 2004年4月11日 日曜日 午後6時11分
Recording
06
• How long finalization takes depends on the type of
disc, how much is recorded on the disc and the
number of titles on the disc. A disc recorded in VR
mode can take up to one hour to finalize. A disc
recorded in Video mode can take up to 20 minutes.
Note
• If the TV line system of the disc is different to the
current setting of the recorder, you will not be able to
finalize the disc. See Input Line System on page 98 for
how to change the recorder’s setting.
Initializing a DVD-RW disc
DVD-RW
When you first load a blank disc, the recorder will
initialize it automatically for recording. You can also
manually initialize DVD-RW discs.
You can initialize a disc for either Video mode recording
or VR mode recording.
Important
• Initializing a disc will erase everything recorded on it.
Make sure there is nothing on the disc that you want
to keep!
• You may not be able to re-initialize a disc in a different
format if it was originally initialized on an older DVD
recorder.
1
Press HOME MENU and select ‘Disc Setup’.
2
Select ‘Initialize’.
Disc Setup
Basic
Initialize
Finalize
VR Mode
Video Mode
Start
Start
3 Select ‘Video Mode’ or ‘VR Mode’ from the
initialize options.
4 Select ‘Start’.
It takes about 30 seconds to initialize the disc.
Initializing Disc
Pr 1
1 min left
60
En
Note
• By default, the recorder initializes blank DVD-RW
discs for VR mode recording. See DVD-RW Auto Init.
on page 108 if you want to change the default to
Video mode.
• If a disc was previously finalized on an older DVD
recorder, you may not be able to re-initialize and/or
initialize it for Video mode recording.
DVR-04_HDD_UK.book 61 ページ 2004年4月11日 日曜日 午後6時11分
Copying and back-up
07
Chapter 7
Copying and back-up
that copying can be carried out at the maximum speed
possible.
Introduction
Use the copying features of this recorder to:
• Back up important recordings stored on the HDD to
a DVD
When copying from HDD to DVD, the speed of copying
depends on the recording mode and the kind of DVD disc
you’re using. The table at the bottom of the page shows
the minimum copying time for one hour of material.
• Make a DVD copy of a recording on the HDD to play
in another player.
Note
• Transfer video from a DVD to the HDD for editing.
• Transfer edited video from the HDD to DVD.
The simplest method of copying is to use the One Touch
Copy feature. Using this you can simply copy the title
that’s currently playing from HDD to DVD, or the other
way around.
For more complicated copying tasks you can make a
Copy List which specifies precisely what needs to be
copied. A Copy List is similar to a VR mode Play List in
many ways, and you’ll find that the Copy List commands
are similar to those available for editing a Play List.
• Not all discs are compatible with high-speed copying.
Check with the disc manufacturer for compatibility.
• There may be cases where even 2x/4x/8x compatible
discs do not copy at full speed.
• High-speed copying is not possible when using discs
initialized on another recorder.
• The table below shows disc brands that have been
tested for 8x speed writing compatibility with this
recorder.
Maker
A message showing that copying has finished is
displayed after copying. If the recorder is inactive and no
button is pressed (remote or front panel) then the
recorder will automatically go into standby after 20
minutes.
Sony
That’s
JVC
Fujifilm
TDK
Maxell
Verbatim
Ritek
High-speed copying
Copying between DVD and HDD is a completely digital
process and therefore involves no loss of quality in the
audio or video. This means that you can transfer back
and forth without having to worry about the quality
getting worse with each copy ‘generation’. It also means
(As of April, 2004)
DVD disc type
DVD-R Ver. 2.0
DVD-R Ver. 2.0/4x*3
DVD-RW Ver. 1.1*1
DVD-RW Ver. 1.1/2x*2
DVD-RW Ver. 1.2/4x*3
EP
10 mins.
5 mins.
2.5 mins.
1.25 mins.
LP
15 mins.
7.5 mins.
4 mins.
2 mins.
SP
30 mins.
15 mins.
7.5 mins.
4 mins.
FINE
60 mins.
30 mins.
15 mins.
8 mins.
Rec mode
DVD-R Ver. 2.0/8x*4
Note that all times in the above table are approximate.
*1
Compatible with single speed recording only
Compatible with 2x speed recording
*3
Compatible with 4x speed recording
*4
Compatible with 8x speed recording. Note that actual copy speed varies with the part of the disc being recorded.
*2
61
En
DVR-04_HDD_UK.book 62 ページ 2004年4月11日 日曜日 午後6時11分
07
Copying and back-up
Real-time copying
Real-time copying is also possible, with the advantage
that you can manually set a different recording mode
from the original. For example, you can record a title
originally recorded in FINE mode in SP mode.
When real-time copying from the HDD to a Video mode
DVD, the chapter markers in the original material are not
copied. Chapter markers are put into the copy at
intervals, according to the Auto Chapter (Video) setting
(see also Auto Chapter (Video) on page 108).
One Touch Copy* (HDD to DVD)
The One Touch Copy feature copies the currently playing
title (or currently selected title in the Disc Navigator) from
the HDD to DVD. The whole title is copied, regardless of
where in the title you start copying. The recorder copies
at the maximum speed possible.
For One Touch Copy to work, make sure that a recordable
DVD-R/RW disc is loaded.
* See also Copyright above.
Frame accuracy and copying
The Frame Accurate setting (see Frame Accurate on
page 108) does not affect the actual video content on the
HDD, but it does affect what can be copied and whether
high-speed copying can be used.
When Frame Accurate is set to Off, high-speed copying
can generally be used to copy titles in the Copy List using
a DVD-R or DVD-RW disc in VR or Video mode. However,
copy-once protected material (see Restrictions on
copying below) can’t be added to the Copy List, and the
divide points in edited titles may be out by as much as 0.5
seconds when compared to the original.
When Frame Accurate is On, you can add copy-once
protected titles to the Copy List and divide points in
edited titles are maintained accurately. However,
depending on the content of the Copy List and the disc, it
may not be possible to use high-speed copying.
Restrictions on copying
Some video material is copy-once protected. This means
that it can be recorded to HDD, but it can’t then be freely
copied again. If you want to transfer copy-once protected
material from HDD to DVD, you’ll need to use a VR mode
DVD-RW disc compatible with CPRM Ver. 1.1 or higher
(see CPRM on page 46 for more on this). Only one
instance of a copy-once protected title can be added to
the Copy List, and after it’s been copied, the title is erased
from the HDD (it is therefore not possible to copy a
locked title that is copy-once protected).
You can identify copy-once protected material during
playback by displaying disc information on-screen. If the
current title is copy-once protected, an exclamation mark
( ! ) is shown (see Play display 2 on page 35).
ONE TOUCH
COPY
HDD
DVD
• During HDD playback, press ONE TOUCH COPY to
copy the current title to DVD.
The front panel display indicates that the title is being
copied. Playback continues while copying.
Note
• Title name, chapter markers, as well as thumbnail
picture markers (Navimark) for the Disc Navigator,
are also copied. However, if you copy to a Video mode
DVD-R/RW, only the first 32 characters of a name are
copied.
• The chapter markers in the copy may not be in exactly
the same positions as the original when recording on
to a Video mode disc.
• You can’t use the One Touch Copy function to copy a
title if any part of the title is copy-once protected.
• A title that contains mixed aspect ratios can’t be
copied to a Video mode disc. Use a VR mode DVDRW disc for this type of material.
• Low resolution (EP or LP, or MN1–18) widescreen
material can’t be copied to a Video mode disc. Use a
VR mode DVD-RW disc for this type of material.
One Touch Copy* (DVD to HDD)
Copyright
Recording equipment should be used only for lawful
copying and you are advised to check carefully what is
lawful copying in the country in which you are making a
copy. Copying of copyright material such as films or
music is unlawful unless permitted by a legal exception
or consented to by the rightowners.
One Touch Copy from DVD to HDD copies a single title to
the HDD in real time. You can copy the currently playing
title or the currently selected title in the Disc Navigator.
When you start copying, playback jumps back to the start
of the title, then continues through to the end of the title,
when recording automatically stops. The copy will be
made in the recording mode (FINE, SP, etc.) that is
currently set.
* See also Copyright above.
62
En
DVR-04_HDD_UK.book 63 ページ 2004年4月11日 日曜日 午後6時11分
Copying and back-up
07
• Thumbnail picture markers (Navimark) and chapter
markers for the Disc Navigator are copied, but their
position in the copy may be slightly changed from the
original.
ONE TOUCH
COPY
HDD
• If some part of the title being copied is copyprotected, copying will start, but the copy-protected
portions will not be copied.
DVD
• During DVD playback, press ONE TOUCH COPY to
copy the current title to HDD.
Playback starts again from the beginning of the current
title. The front panel display and an on-screen display
indicate that the title is being copied.
Note
Canceling One Touch Copy
You can cancel a One Touch Copy once it’s started.
• Press and hold ONE TOUCH COPY for more than
a second.
Copying is canceled and the video already copied is
erased.
• The maximum title length for copying is six hours.
• Title name and chapter markers are also copied,
except when copying from a finalized Video mode
disc.
Note
• If you cancel a HDD to DVD-R copy, the space
available for recording does not return to the precopy figure.
Copying from HDD to DVD*
Currently selected HDD title
Title that cannot be
added to Copy List
HDD to DVD Copy
HDD Groups
All
HDD
1
2
3
4
Titles in the selected
HDD Group
HDD
Copy List
menu options
16:00 Sun 8/11
Recording Time
Add
Erase
Ttl Name
Divide
Combine
DVD
1
2
1/3
Pr 5 LP
0h32m55s
3
Information for the
selected title
4
Copy List titles
Copy List
Total 1h30m
1/2
Running time of the
Copy List
Conf List
From the HDD to DVD Copy screen you can build up a
Copy List of titles to copy to DVD. From this screen you
can also edit chapters so that the titles appear as you
want them on your finished DVD.
* See also Copyright on page 62.
Important
• The recorder can only store one Copy List at a time.
• The Copy List is erased if the Frame Accurate setting
is changed in the Initial Settings menu (see Frame
Accurate on page 108), or if the Input Line System
setting is changed (see Input Line System on
page 98).
63
En
DVR-04_HDD_UK.book 64 ページ 2004年4月11日 日曜日 午後6時11分
Copying and back-up
07
• Resetting the recorder to its factory settings (see
Resetting the recorder on page 112) will also erase the
Copy List.
• When in the thumbnails area of the screen, use the
PREV () and NEXT () buttons to display the
previous/next page if there are more titles/chapters
than will fit on the screen.
• As you highlight different thumbnails, information
about the title/chapter is shown in the central area of
the screen. Press DISPLAY to change the
information displayed.
• Press RETURN to get back to the menu options on
the left from the thumbnail area of the Copy List
screen.
ENTER
HOME
MENU
PREV
RETURN
• When selecting HDD titles, you can display titles
from a particular HDD group by pressing (cursor
up), then using the / (cursor left/right) buttons
and ENTER to select a group. Press (cursor down)
to get back to the HDD title thumbnail area.
NEXT
DVD Copy
All
DISPLAY
1
1 Make sure that there’s a recordable DVD disc
loaded.
2
Press HOME MENU and select ‘Copy’.
Disc Setup
Disc Navigator
Initial Setup
Copy
Video/Audio Adjust
Disc History
Play Mode
PhotoViewer
DV Record
• Title Name (Ttl Name) – Name or rename a title in
the Copy List (see page 66).
• Divide – Divide a title in the Copy List into two (see
page 66).
• Combine – Combine two adjacent titles in the Copy
List into one (see page 67).
• Preview – Check the content of a title in the Copy List
(see page 67).
HDD to DVD Copy
• Move – Change the order of titles in the Copy List
(see page 67).
All
2
3
4
HDD
1/3
DVD
Copy List
Total 0h00m
1/1
Conf List
• Use the / (cursor up/down) buttons to highlight
the command you want from the menu options on
the left, then press ENTER. Most commands require
you then to select a title (or chapter) or location from
the thumbnail views area of the screen. Use the /
(cursor left/right) followed by ENTER to do this.
64
En
HDD to DVD Copy List menu options
• Erase – Erase individual titles from the Copy List (see
page 66).
3 Select ‘HDD DVD’.
The HDD to DVD Copy List screen appears.
Add
Erase
Ttl Name
Divide
Combine
4
Use the following commands when making an HDD to
DVD Copy List:
DVR-520H/720H screen
1
3
• Add – Add titles from the HDD to the Copy List (see
page 65).
Timer Recording
HDD
2
• Erase All – Erase the Copy List (see page 68).
• Chapter Edit (Chpt Edit) – Edit chapters within a
Copy List title (see page 68):
• Erase – Erase a chapter.
• Divide – Divide a chapter into two.
• Combine – Combine two chapters into one.
• Move – Change the chapter order.
• Preview – Check the chapter content.
• Erase Section (Erase Sec) – Erase a section of a title
in the Copy List (see page 70).
• Confirm List (Conf List) – Confirm the Copy List and
go to the recording settings screen (see Recording
the Copy List below).
DVR-04_HDD_UK.book 65 ページ 2004年4月11日 日曜日 午後6時11分
Copying and back-up
07
Recording the Copy List
HDD to DVD Copy List commands
After putting together your Copy List, you’re ready to
record it.
1 Select ‘Conf List’ to display the Copy List settings
screen.
2 Use the / (cursor left/right) buttons to select
the Recording Mode.
Add
Use this command to add titles to the Copy List.
1
Select ‘Add’ from the Copy List menu options.
2 Use the / (cursor left/right) buttons to select
a title from the HDD to add to the Copy List, then
press ENTER.
HDD to DVD Copy
HDD
HDD
DVD-RW VIDEO
Required 0h08m
HDD to DVD Copy
All
High Speed
Recording Mode
Add
Erase
Ttl Name
Divide
Combine
HDD
Start
Copy List Total
Current DVD Remain
1175MB
2830MB
/ 4700MB
Conf List
1
2
3
4
HDD
1/3
16:00 Sun 11/8 Pr 5 LP
Recording Time
0h32m55s
Add
Erase
Ttl Name
Divide
Combine
DVD
1
2
Copy List
3
Total 1h30m
4
1/2
Conf List
• High-Speed Copy – The Copy List is copied at the
same recording quality as the original. (See page 61
for more information on high-speed copying.)
• FINE, SP, LP, EP, MN – The Copy List is copied at the
specified recording quality in real-time. (Note that if
you copy at a higher quality setting than the original,
the copy will not be better quality than the original.)
• If you select MN above, you can also change the level
setting (MN1–MN32) from the Recording Quality box
that appears.
• Optimized – The recording quality automatically
adjusted so that the Copy List fits on to the space
available on the disc. Copying is carried out in realtime.
When you change the recording mode setting, you can
see how much disc space it will require. If this is more
than is available, it shows up in red and you won’t be able
to start copying. In this case, either change the recording
quality, or press RETURN to go back to the Copy List
screen and erase one or more titles from the Copy List.
3
Select ‘Start’ to begin copying.
Note
• When the copy mode is set to something other than
High-Speed Copy for copying to a Video mode DVD,
the chapter markers of the original are not copied.
Chapter markers are put into the copy at regular
intervals, according to the Auto Chapter setting (see
also Auto Chapter (Video) on page 108).
The thumbnail appears in the Copy List section in the
lower half of the screen. If there are already titles in the
Copy List, the title is added at the end.
3 Repeat step 2 to add more titles to the Copy List,
or press RETURN to go back to the Copy List menu
options.
Note
• When Frame Accurate is set to Off (see Frame
Accurate on page 108), the following limitations on
adding titles to the Copy List apply:
– When adding titles that contain copy-once
protected material, the copy-once parts will not be
added to the Copy List.
– When adding titles that contain material of more
than one aspect ratio (screen size), each part with a
different aspect ratio will be added as a separate title.
– Widescreen material recorded in LP, EP or MN1–18
will not be added to the Copy List.
– Chapter markers on the copy may be up to 0.5
seconds off compared to the original.
• Only titles which were recorded in the same TV
system as the recorder is currently set to can be
added to the Copy List.
65
En
DVR-04_HDD_UK.book 66 ページ 2004年4月11日 日曜日 午後6時11分
Copying and back-up
Erase
3
Input a name for the selected title.
Use this command to erase individual titles from the
Copy List.
1
Input Title Name
15:00 Wed 7/10 Pr 5 LP
Select ‘Erase’ from the Copy List menu options.
ABC DE F GH I J KLM . , ? !
N O P Q R S T U V WX Y Z ( ) : ;
AA A A A AÆ ç E E E E I I I I #
CAPS
small
2 Use the / (cursor left/right) buttons to select
a title from the Copy List to erase, then press ENTER.
DN O OOO
0 1 2 3 4 5
+ – /@ [
c £ \ §
2 3
´ µ¶ ·
HDD to DVD Copy
OK
O
ø
UUUUY
6 7 8 9 <
¥ ] ˆ ÷ x
¨ © a– << ¬
¸ 1 –o 1/4
<<
07
Delete
= >
± { _|
– ®
1 3
/2 /4 ¿
ß$%
_ &
} ~ ¡
˚
`
Space
All
HDD
1
2
3
4
HDD
DVD
1
2
Copy List
3
• Use the /// (cursor buttons) and ENTER to
select characters.
1/3
15:00 Wed 7/10 Pr 5 LP
Recording Time
0h32m55s
Add
Erase
Ttl Name
Divide
Combine
4
• A name generated automatically by the recorder will
already be in the name input section of the screen.
Use the / buttons to change the cursor
position.
1/2
Total 1h30m
Conf List
• Select CAPS or small to change to upper or lowercase, or use the CASE SELECTION buttons (/
).
3 Select ‘Yes’ to confirm that you want to erase the
title, or ‘No’ to cancel.
4 Repeat steps 2 and 3 to erase more titles from
the Copy List, or press RETURN to go back to the
Copy List menu options.
Title Name (Ttl Name)
• You can also use the CLEAR button to delete
characters directly (press and hold for two seconds
to delete the whole name). For other remote control
key shortcuts, see Using the remote key shortcuts to
input a name on page 80.
Use this command to name or rename titles in the Copy
List (the names of the original titles remain unchanged).
• Press RETURN to go back to the Copy List screen
without changing the name.
1 Select ‘Ttl Name’ from the Copy List menu
options.
4 To confirm the name and return to the main
Copy List screen, highlight ‘OK’ and press ENTER.
2 Use the / (cursor left/right) buttons to select
a title from the Copy List to name or rename, then
press ENTER.
5 Repeat steps 2 to 4 to name other titles in the
Copy List, or press RETURN to go back to the Copy
List menu options.
Divide
HDD to DVD Copy
All
HDD
1
2
3
Use this command to make two titles from a title already
in the Copy List.
4
HDD
15:00 Tue 6/10
Recording Time
Add
Erase
Ttl Name
Divide
Combine
DVD
1
2
Copy List
1/3
Pr 5 LP
0h32m55s
3
Total 1h30m
4
1/2
1
Select ‘Divide’ from the Copy List menu options.
2 Use the / (cursor left/right) buttons to select
a title from the Copy List to divide, then press ENTER.
Conf List
HDD to DVD Copy
All
HDD
1
2
3
4
HDD
1/3
15:00 Wed 7/10 Pr 5 LP
Recording Time
0h32m55s
Add
Erase
Ttl Name
Divide
Combine
Conf List
66
En
DVD
1
2
Copy List
3
Total 1h30m
4
1/2
DVR-04_HDD_UK.book 67 ページ 2004年4月11日 日曜日 午後6時11分
Copying and back-up
07
3 Use the playback controls to find the place you
want to divide the title.
3 Repeat step 2 to combine more titles, or press
RETURN to go back to the Copy List menu options.
Divide Title
HDD
Note
Title
2
16:00 Sun 11/08 Pr 5 LP
0h32m55s
Recording Time
2-1
Play Pause
• When Frame Accurate is set to Off (see Frame
Accurate on page 108), the following limitations apply
when combining titles:
– Mixed aspect ratios (16:9, 4:3, 4:3 (letter box)) can’t
be combined.
– Mixed recording modes (EP/MN1–6, LP/MN7–18,
SP/MN19–31, FINE/MN32) can’t be combined.
0.08.13.26
Divide
Divide
Back
You can use all the usual playback controls, including
PLAY, PAUSE, scan (, ), and slow-motion
(, ).
• Press RETURN or highlight Back and press ENTER to
go back to the main Copy List screen, leaving the title
intact.
4 With ‘Divide’ highlighted, press ENTER to divide
the title at the current playback position.
5 Repeat steps 2 to 4 to divide other titles in the
Copy List, or press RETURN to go back to the Copy
List menu options.
Preview
Use this command to check the content of a title in the
Copy List.
1 Select ‘Preview’ from the Copy List menu
options.
2 Use the / (cursor left/right) buttons to select
a title from the Copy List to preview, then press
ENTER.
The selected title starts playing. You can return to the
Copy List screen by pressing STOP, otherwise
playback will continue until the end of the Copy List.
• During preview, you can select a new thumbnail for
the Disc Navigator by pressing NAVI MARK.
Note
• When Frame Accurate is set to Off (see Frame
Accurate on page 108), the divide points may move by
up to half a second after selecting Divide.
3 Repeat step 2 to preview other titles, or press
RETURN to go back to the Copy List menu options.
Move
Combine
Use this command to make a single title from two
adjacent titles in the Copy List.
1 Select ‘Combine’ from the Copy List menu
options.
2 Use the / (cursor left/right) buttons to select
two adjacent titles from the Copy List to combine,
then press ENTER.
Use this command to change the order of titles in the
Copy List.
1
Select ‘Move’ from the Copy List menu options.
2 Use the / (cursor left/right) buttons to select
a title from the Copy List to move, then press ENTER.
HDD to DVD Copy
All
HDD
1
2
3
4
HDD
HDD to DVD Copy
HDD
1
2
3
4
HDD
1/3
Add
Erase
Ttl Name
Divide
Combine
Conf List
1/3
15:00 Wed 7/10 Pr 5 LP
Recording Time
0h32m55s
All
Preview
Move
Erase All
Chpt Edit
Erase Sec
DVD
1
2
Copy List
3
Total 1h30m
4
1/2
Conf List
DVD
1
2
Copy List
3
Total 1h30m
4
1/2
The thumbnail appears in the Copy List section in the
lower half of the screen.
67
En
DVR-04_HDD_UK.book 68 ページ 2004年4月11日 日曜日 午後6時11分
07
Copying and back-up
3 Use the / (cursor left/right) buttons to select
a new position for the title, then press ENTER.
The thumbnails in the Copy List reflect the new order.
1 Select ‘Chpt Edit’ from the Copy List menu
options.
2 Use the / (cursor left/right) buttons to select
a title from the Copy List to edit, then press ENTER.
HDD to DVD Copy
All
HDD
1
2
3
HDD to DVD Copy
4
All
HDD
HDD
Preview
Move
Erase All
Chpt Edit
Erase Sec
DVD
1
2
Copy List
1
1/3
15:00 Wed 7/10 Pr 5 LP
Recording Time
0h32m55s
2
3
4
HDD
3
1/2
Total 1h30m
1/3
15:00 Wed 7/10 Pr 5 LP
Recording Time
0h32m55s
4
Conf List
Preview
Move
Erase All
Chpt Edit
Erase sec
DVD
1
2
3
Copy List
4
Total 1h30m
1/2
Conf List
Title to move
Copy List insertion point
4 Repeat steps 2 and 3 to move other titles in the
Copy List, or press RETURN to go back to the Copy
List menu options.
Erase All
The chapter editing screen appears with thumbnails of
each chapter.
3 Select a command from the chapter edit menu
options.
Chapter Edit
Use this command to erase the Copy List.
HDD
1 Select ‘Erase All’ from the Copy List menu
options.
2 Select ‘Yes’ to confirm, or ‘No’ to cancel, then
press ENTER.
Erase
Divide
Combine
Move
Preview
15:00 Wed 7/10 Pr 5 LP
Recording Time
0h32m55s
Title
2
Chapter
---h--m
1
2
3
4
5
6
7
8
9
Back
1/1
HDD to DVD Copy
All
HDD
1
2
3
Chapter edit menu
4
HDD
1/3
Preview
Move
Erase All
Chpt Edit
Erase Sec
Conf List
DVD
1
2
Copy List
Erase all titles ?
3
4
Total 1h30m
Yes
1/2
No
Chapter Edit (Chpt Edit)
The Chapter Edit option gives you access to several
commands that you can use to edit chapters within a
Copy List title.
Editing chapters in a Copy List title does not change any
actual content on the HDD. It affects only how the
chapters appear after copying.
The following commands are available:
• Erase – Erase individual chapters: Use the ///
(cursor buttons) and ENTER to select a chapter to
erase. The chapter is erased after confirming.
• Divide – Divide a chapter into two or more new
chapters: See Chapter Edit: Divide below.
• Combine – Combine two chapters into one: See
Chapter Edit: Combine below.
• Move – Change the order of the chapters: See
Chapter Edit: Move below.
• Preview – Check the content of a chapter: Use the
/// (cursor buttons) to select a chapter, then
press ENTER. Once the preview has started, press STOP to return to the chapter edit screen.
4 Press RETURN to get back to the chapter editing
options on the left, or select another chapter
5 Select ‘Back’ (or press RETURN) to go back to the
main Copy List screen.
68
En
DVR-04_HDD_UK.book 69 ページ 2004年4月11日 日曜日 午後6時11分
Copying and back-up
07
Chapter Edit: Divide
Chapter Edit: Combine
You can divide a chapter into as many new chapters as
necessary.
This command lets you combine two chapters into one.
1 Use the /// (cursor buttons) to select the
chapter to divide, then press ENTER.
1 Use the /// (cursor buttons) to select the
space between the chapters to combine.
Chapter Edit
2 Use the playback controls to find the place you
want to divide the chapter.
HDD
15:00 Wed 7/10 Pr 5 LP
Recording Time
0h32m55s
Title
2
Chapter
---h--m
1
2
3
4
5
6
7
8
9
Divide Chapter
HDD
Title 12:18 Wed 7/10
1 Recording Time
SP
0h01m24s
1-3
Play Pause
Erase
Divide
Combine
Move
Preview
Chapter
0h00m
0.00.52.17
Back
Divide
1/1
Divide
Back
2
Press ENTER to combine.
Chapter Edit: Move
You can use all the usual playback controls, including
PLAY, PAUSE, scan (, ), and slow-motion
(, ).
3 With ‘Divide’ highlighted, press ENTER to divide
the chapter at the current playback position.
You can divide the chapter as many times as you want
(up to 99 per title).
This command lets you rearrange the chapters within a
Copy List title.
1 Use the /// (cursor buttons) to select the
chapter you want to move, then press ENTER.
Chapter Edit
HDD
Title
2
4 Select ‘Back’ (or press RETURN) to get back to the
main Chapter Edit screen.
Note
• When Frame Accurate is set to Off (see Frame
Accurate on page 108), the divide point may move by
up to half a second after selecting Divide.
Erase
Divide
Combine
Move
Preview
15:00 Wed 7/10 Pr 5 LP
Recording Time
0h32m55s
Chapter
0h05m
1
2
3
4
5
6
7
8
9
Back
1/1
2 Use the /// (cursor buttons) to select a
new position for the chapter, then press ENTER.
Title to move
Chapter Edit
HDD
Erase
Divide
Combine
Move
Preview
15:00 Wed 7/10 Pr 5 LP
Recording Time
0h32m55s
Title
2
Chapter
---h--m
1
2
3
4
5
6
7
8
9
Back
1/1
Insertion point
The thumbnails in the chapter list reflect the new order.
69
En
DVR-04_HDD_UK.book 70 ページ 2004年4月11日 日曜日 午後6時11分
07
Copying and back-up
Erase Section (Erase Sec)
Using this command you can delete a part of a Copy List
title, ideal for cutting out the commercial breaks in a
recording made from the TV.
1 Select ‘Erase Sec’ from the Copy List menu
options.
2 Use the / (cursor left/right) buttons to select
the title you want to erase a section from, then press
ENTER.
After selecting a title, a screen appears from which you
can mark the start and end points of the section to erase.
Erase Sec
HDD
Title
2
16:00 Sun 11/08 Pr 5 LP
0h32m55s
Recording Time
Erase Sec
2-1
Play Pause
0.06.52.17
A
B
From
To
Back
3 Use the playback controls to find the start of the
section to erase, then (with ‘From’ highlighted) press
ENTER.
You can use all the usual playback controls, including
PLAY, PAUSE, scan (, ), and slow-motion
(, ).
The bar at the bottom of the screen shows the current
play position in the title. After pressing ENTER, a marker
appears under the bar to show the start of the section.
Play Pause
A
From
0.02.09.17
B
T
A
4 In the same way, find the end of the section to
erase, then (with ‘To’ highlighted) press ENTER.
After pressing ENTER, another marker appears under the
bar to show the end of the section, with the section itself
marked in red.
5 Select ‘Yes’ to confirm, or ‘No’ to cancel, then
press ENTER.
In the thumbnail viewer you can see a few seconds of
video either side of the marked section to see how the
edit will look.
70
En
6 Repeat steps 3 to 5 if you want to erase more
sections from the same title.
7 Select ‘Back’ (or press RETURN) to get back to the
main Copy List screen.
Note
• When Frame Accurate is set to Off (see Frame
Accurate on page 108), the ‘From’ time and length of
the erased section may differ by up to 0.5 seconds
from that set.
DVR-04_HDD_UK.book 71 ページ 2004年4月11日 日曜日 午後6時11分
Copying and back-up
07
Copying from DVD to HDD*
Currently selected DVD title
DVD to HDD Copy
Original
DVD
1
2
3
4
DVD
Copy List
menu options
1/3
16:00 Sun 8/11 Pr 5 LP
Recording Time
0h32m55s
Add
Erase
Move
Preview
Erase All
HDD
1
2
3
Information for the
selected title
4
Copy List titles
Copy List
Total 1h30m
1/2
Running time of the
Copy List
Conf List
Use the DVD to HDD Copy screen to transfer video on
DVD to the hard disk.
* See also Copyright on page 62.
ENTER
HOME
MENU
Important
RETURN
• The DVD to HDD Copy screen is not accessible when
a finalized Video mode disc is loaded. However, you
can still use the One Touch Copy function (see One
Touch Copy* (DVD to HDD) on page 62).
PREV
NEXT
• The recorder can only store one Copy List at a time.
• The copy list will be erased if:
– any of the titles on the DVD disc are erased or
edited.
– the disc tray is opened.
– playback is switched between Original and Play
List.
– the DVD disc is re-initialized or finalized.
– the recorder is reset to its factory settings (see
Resetting the recorder on page 112).
DISPLAY
1 Load the recordable DVD disc that contains the
material you want to copy to the HDD.
2
Press HOME MENU and select ‘Copy’.
• It may not be possible to copy from a DVD disc that
was recorded on a different DVD recorder or PC.
Timer Recording
Disc Setup
Disc Navigator
Initial Setup
Copy
Video/Audio Adjust
Disc History
Play Mode
PhotoViewer
DV Record
DVR-520H/720H screen
• Note that the Copy option will not be available if the
TV system of the recorder and the disc do not match.
(See Input Line System on page 98 for how to change
the TV system of the recorder.)
71
En
DVR-04_HDD_UK.book 72 ページ 2004年4月11日 日曜日 午後6時11分
07
Copying and back-up
3 Select ‘DVD HDD’.
The DVD to HDD Copy screen appears.
Recording the Copy List
After putting together your Copy List, you’re ready to
record it.
DVD to HDD Copy
Original
DVD
1
2
3
1 Select ‘Conf List’ to display the Copy List settings
screen.
4
DVD
1/3
Add
Erase
Move
Preview
Erase All
2 Use the / (cursor left/right) buttons to select
the Recording Mode.
HDD
Copy List
Total 0h00m
1/1
DVD to HDD Copy
Original
Conf List
DVD
DVD
• Use the / (cursor up/down) buttons to highlight
the command you want from the menu options on
the left, then press ENTER. Most commands require
you then to select a title or location from the
thumbnail views area of the screen. Use the /
(cursor left/right) followed by ENTER to do this.
Add
Erase
Move
Preview
Erase All
• Move – Change the order of titles in the Copy List
(see page 73).
• Erase All – Erase the Copy List (see page 74).
• Preview – Check the content of a title in the Copy List
(see page 74).
• Erase – Erase individual titles from the Copy List (see
page 73).
• Confirm List (Conf List) – Confirm the Copy List and
go to the recording settings screen (see Recording
the Copy List below).
72
En
Start
Copy List Total
Current HDD Remain
1h30m
30h00m
/ 34h00m
• FINE, SP, LP, EP, MN – The Copy List is copied at the
specified recording quality in real-time. (Note that if
you copy at a higher quality setting than the original,
the copy will not be better quality than the original.)
• Press RETURN to get back to the menu options on
the left from the thumbnail area of the Copy List
screen.
• Add – Select and add titles to the Copy List (see
page 73).
SP
• High-Speed Copy – Only available when copying
Original content from a VR mode disc. The Copy List
is copied at the same recording quality as the
original. (See page 61 for more information on highspeed copying.)
• As you highlight different thumbnails, information
about the title is shown in the central area of the
screen. Press DISPLAY to change the information
displayed.
Use the following commands when making a DVD to
HDD Copy List:
Required 1h30m
Conf List
• When in the thumbnails area of the screen, use the
PREV () and NEXT () buttons to display the
previous/next page if there are more titles than will fit
on the screen.
DVD to HDD Copy List menu options
HDD
Recording Mode
• If you select MN above, you can also change the level
setting (MN1–MN32) from the Recording Quality box
that appears.
When you change the recording mode setting, you can
see how much hard disk space it will require. If this is
more than is available, it shows up in red and you won’t
be able to start copying. In this case, either change the
recording quality, or press RETURN to go back to the
Copy List screen and erase one or more titles from the
Copy List.
3
Select ‘Start’ to begin copying.
DVR-04_HDD_UK.book 73 ページ 2004年4月11日 日曜日 午後6時11分
Copying and back-up
07
Erase
DVD to HDD Copy List commands
Use this command to erase individual titles from the
Copy List.
Add
1
Use this command to add titles to the Copy List.
2 Use the / (cursor left/right) buttons to select
a title from the Copy List to erase, then press ENTER.
1
Select ‘Add’ from the Copy List menu options.
Select ‘Erase’ from the Copy List menu options.
2 Use the / (cursor left/right) buttons to select
a title from the DVD to add to the Copy List, then
press ENTER.
DVD to HDD Copy
Play List
DVD
1
2
3
4
DVD
DVD
1
2
3
Add
Erase
Move
Preview
Erase All
4
DVD
16:00 Sun 8/11
Recording Time
Add
Erase
Move
Preview
Erase All
HDD
1/3
15:00 Wed 7/10 Pr 5 LP
Recording Time
0h32m55s
DVD to HDD Copy
Play List
1
2
Copy List
1/3
Pr 5 LP
0h32m55s
3
Total 1h30m
HDD
1
2
Copy List
3
4
1/2
Total 1h30m
Conf List
4
1/2
Conf List
The thumbnail appears in the Copy List section in the
lower half of the screen. If there are already titles in the
Copy List, the title is added at the end.
3 Repeat step 2 to add more titles to the Copy List,
or press RETURN to go back to the Copy List menu
options.
3 Select ‘Yes’ to confirm that you want to erase the
title, or ‘No’ to cancel.
4 Repeat steps 2 and 3 to erase more titles from
the Copy List, or press RETURN to go back to the
Copy List menu options.
Move
Use this command to change the order of titles currently
in the Copy List.
1
Note
• Titles which were recorded directly to a VR mode disc
or have already been copied real-time, and which
contain bilingual audio or are recorded in recording
modes MN12–MN20 can be added to the Copy List,
however if High-Speed Copy is selected they will not
actually be copied.
• Similarly, a copy-once protected title, recorded from
the TV for example, can be added to the Copy List, but
it will not be copied if High-Speed Copy is selected.
• You may not be able to copy titles when copying a
disc that was created using a PC or another recorder.
Select ‘Move’ from the Copy List menu options.
2 Use the / (cursor left/right) buttons to select
a title from the Copy List to move, then press ENTER.
DVD to HDD Copy
Play List
DVD
1
2
3
4
DVD
1/3
15:00 Wed 7/10 Pr 5 LP
Recording Time
0h32m55s
Add
Erase
Move
Preview
Erase All
HDD
1
2
Copy List
3
Total 1h30m
4
1/2
Conf List
73
En
DVR-04_HDD_UK.book 74 ページ 2004年4月11日 日曜日 午後6時11分
07
Copying and back-up
3 Use the / (cursor left/right) buttons to select
the insertion point for the title, then press ENTER.
1
2
3
4
DVD
1/3
15:00 Wed 7/10 Pr 5 LP
Recording Time
0h32m55s
Add
Erase
Move
Preview
Erase All
HDD
Use this command to erase the Copy List.
1 Select ‘Erase All’ from the Copy List menu
options.
DVD to HDD Copy
Play List
DVD
Erase All
1
2
Copy List
3
Total 1h30m
2 Select ‘Yes’ to confirm, or ‘No’ to cancel, then
press ENTER.
4
DVD to HDD Copy
Play List
DVD
1/2
Conf List
1
2
3
4
DVD
1/3
Title to move
Add
Erase
Move
Preview
Erase All
Copy List insertion point
Conf List
The thumbnails in the Copy List are updated to reflect the
new order.
4 Repeat steps 2 and 3 to move other titles in the
Copy List, or press RETURN to go back to the Copy
List menu options.
Preview
Use this command to check the content of a title in the
Copy List.
1 Select ‘Preview’ from the Copy List menu
options.
2 Use the / (cursor left/right) buttons to select
a title from the Copy List to preview, then press
ENTER.
The selected title starts playing. You can return to the
Copy List screen by pressing STOP, otherwise
playback will continue until the end of the Copy List.
HDD
1
2
3
Copy List
Erase all titles ?
4
Total 1h30m
Yes
1/2
No
Using disc back-up*
This feature offers a simple way to make a back-up copy
of a finalized Video mode disc. The data is copied first to
the hard disk drive, then on to another recordable DVD
disc.
* See also Copyright on page 62.
1
Press HOME MENU.
2
Select ‘Copy’
3
Select ‘Disc Back-up’.
4
Select a back-up option.
Disc Back-up
3 Repeat step 2 to preview other titles, or press
RETURN to go back to the Copy List menu options.
Start new disc back-up
Resume writing data
Erase back-up data
There are three back-up options:
• Start new disc back-up – Start making a back-up of
a disc.
• Resume writing data – Record the back-up data
already on the HDD to a recordable DVD.
• Erase back-up data – Erase the back-up data on the
HDD.
74
En
DVR-04_HDD_UK.book 75 ページ 2004年4月11日 日曜日 午後6時11分
Copying and back-up
5 Press OPEN/CLOSE to open the disc tray and
load the disc you want to make a back-up of, then
close the disc tray.
You can only make back-up copies of finalized Video
mode discs.
Disc Back-up
No Disc.
Please load a disc to be backed-up.
Start
07
• You can cancel the back-up process by pressing ONE
TOUCH COPY for more than one second. However,
this will make the disc unusable (although if you are
using a DVD-RW disc you can re-initialize it in order
to make it usable again—see Initializing a DVD-RW
disc on page 60.)
9 After the recorder has finished recording the
back-up disc, you can select whether to make
another back-up of the same data or exit.
Cancel
Disc Back-up
6
Disc back-up finished.
Select ‘Start’.
To make another back-up copy, please load
a recordable disc.
Disc Back-up
Start
Cancel
Read from disc and save to HDD.
Start reading?
Start
Cancel
• To see the progress of the back-up, press DISPLAY.
• You can cancel the back-up process by pressing ONE
TOUCH COPY for more than one second.
7 When the data has been copied, press OPEN/
CLOSE to open the disc tray. Take out the disc and
load a blank* recordable DVD.
* If you’re using a DVD-RW, the disc doesn’t have to be
blank, although the previous contents of the disc will be
erased in the back-up process.
Disc Back-up
Disc content saved to Hard Disk Drive.
Please eject the disc and load a
recordable disc.
Start
• Select Start to make another back-up copy or Cancel
to finish. If you want to make another back-up copy,
return to step 6 above.
10 If you don’t need to keep the back-up data on
the HDD, you can delete it now.
Select Yes to delete the data from the HDD; select No to
keep it (you can delete it later if you want to).
Disc Back-up
The backed-up data is still on the HDD.
Erasing it will increase the free space
available. OK to Erase?
Yes
No
• If you decide to leave the back-up data on the HDD,
you can make back-up copies to recordable DVD
discs anytime from the Disc Back-up menu.
Cancel
Note
You can use a DVD-R Ver. 2.0 disc, or DVD-RW Ver. 1.1 or
Ver. 1.2 / 4x for the back-up.
• It is not possible to play material on the HDD that has
been backed-up from DVD.
• If you back-up a DVD-R disc to DVD-RW, you cannot
undo the finalization later.
• Actual recordable capacity of discs vary so there may
be cases where the contents of the disc you’re
backing-up will not fit on to a particular blank disc. If
this happens, please try another brand of disc.
8 Select ‘Start’ to start writing the backed-up data
to the blank disc.
Disc Back-up
Write back-up data from Hard Disk Drive.
The disc contents will be overwritten.
OK to start?
Start
Cancel
• To see the progress of the back-up, press DISPLAY.
75
En
DVR-04_HDD_UK.book 76 ページ 2004年4月11日 日曜日 午後6時11分
08
Editing
Chapter 8
Editing
Using the Disc Navigator you can edit video content on unfinalized Video mode and VR mode DVD discs, as well as
video content on the internal hard disk drive (HDD). The editing features available in the Disc Navigator depend on
whether you are editing video on a Video mode or VR mode DVD, or the HDD, and whether you’re editing Original
content, or a Play List.
With unfinalized Video mode DVDs, there are a limited number of editing commands, including naming, locking and
erasing titles. Once a Video mode disc has been finalized, further editing is not possible.
There are two ways to edit VR mode DVD-RW discs. You can directly edit the Original content of the disc, or you can
create and edit a Play List. The Play List doesn’t actually change any of the content on the disc, but just controls how
the content is played back (rather like the program play feature found on CD players).
Editing material recorded on the HDD is similar to editing the Original content of a VR mode DVD-RW, with similar
commands for erasing, naming and locking titles, as well as fine control over the content of chapters within titles.
The Disc Navigator screen
DVD Disc Navigator
Edit mode
Currently selected title
Disc Navigator
Video Mode
DVD
Disc recording
mode
Disc Navigator
menu options
Play
Erase
Ttl Name
Lock
Erase All
1
2
12:30 Wed 4/11 Pr 5 LP
Recording Time
4
5
Undo
76
DVD Remain
0h30m40s
0h37m(FINE)
6
1/1
Information for
selected title
En
3
Locked title
indicator
Recording time
available in the displayed
recording mode
Number of title
pages
DVR-04_HDD_UK.book 77 ページ 2004年4月11日 日曜日 午後6時11分
Editing
08
HDD Disc Navigator
Currently selected title
HDD group tabs
Disc Navigator
All
HDD
Selected Group
Disc Navigator
menu options
All
Play
Erase
Ttl Name
Chpt Edit
Erase Sec
1
Group1
Group2
2
12:30 Wed 4/11 Pr 5 LP
Recording Time
4
5
Group3
3
0h30m40s
6
Group4
New indicator
NEW
Recording time
available in the displayed
recording mode
HDD Remain
6h12m(FINE)
Locked title
indicator
Number of title
pages
1/1
Information for
selected title
Auto Replace
Recording indicator
Important
• Titles that have been recorded with a Line Input
setting different to the current setting of the recorder
are shown in the Disc Navigator with a blank
thumbnail image. See also Input Line System on
page 98.
ONE TOUCH
COPY
HDD
DVD
• During recording, if you display the Disc Navigator
for the HDD, some of the titles may appear with a
mark. These titles were recorded with a Line Input
setting different to the current setting of the recorder.
During recording, these titles cannot be played.
CLEAR
DISC NAVIGATOR
PLAY LIST
ENTER
HOME
MENU
RETURN
PLAY
PREV
NEXT
DISPLAY
DVD RECORDER
77
En
DVR-04_HDD_UK.book 78 ページ 2004年4月11日 日曜日 午後6時11分
08
Editing
1 Press HDD or DVD to select the hard disk drive or
the DVD.
2 Press DISC NAVIGATOR to display the Disc
Navigator screen.
Playback will automatically stop when you do this.
Disc Navigator
Original
DVD
Play
Erase
Ttl Name
Chpt Edit
Erase Sec
1
2
3
4
5
6
DVD Remain
0h37m(FINE)
Undo
1/1
• You can switch between the HDD and the DVD Disc
Navigator screens using the HDD and DVD buttons
(front panel or remote).
You can copy a selected HDD title to DVD, or DVD title to
HDD by pressing ONE TOUCH COPY (see also page 62
for more on One Touch Copy).
When editing HDD content, a row of group names
appears above the title thumbnails (see Editing HDD
groups on page 84 for more details). You can access
these by pressing (cursor up) repeatedly until the All
group is highlighted, then using the / (cursor left/
right) buttons to select a group. Press ENTER to ‘open’
the highlighted group.
Titles on the HDD marked with a
icon are timer
recordings set to Auto Replace Recording (see Standard
timer recording on page 51).
• You can also access the Disc Navigator from the
Home Menu (press HOME MENU, select Disc
Navigator then press ENTER).
Titles on the HDD marked with a
icon are recently
recorded titles that haven’t yet been played.
• Use the / (cursor up/down) buttons to highlight
the command you want from the menu options on
the left, then press ENTER. Most commands require
you then to select a title (or chapter) or location from
the thumbnail views area of the screen. Use the /
// (cursor buttons) followed by ENTER to do
this.
3
• When in the thumbnails area of the screen, use the
PREV () and NEXT () buttons to display the
previous/next page if there are more than six titles/
nine chapters.
• As you highlight different thumbnails, information
about the title is shown in the central area of the
screen. Press DISPLAY to change the information
displayed.
• If you are editing a VR mode disc, press PLAYLIST to
switch between Original and Play List Disc Navigator
screens.
Playlist / Original indicator
1
Remember
• You can change the thumbnail pictures used for titles
using the NAVI MARK button—see Changing the
thumbnail picture for a title on page 37.
Disc Navigator menu options
The commands available from the Disc Navigator for the
VR mode and Video mode discs and the HDD are shown
below.
Video mode
• Play – Play a title (page 79)
• Title Name (Ttl Name) – Name or rename a title
(page 80)
• Lock/Unlock – Lock or unlock a title to prevent
accidental changes being made (page 82)
Disc Navigator
Play List
DVD
To exit the Disc Navigator, press HOME MENU.
2
• Erase – Erase a title (page 79)
3
• Erase All – Erase all titles (page 83)
Play
Erase
Ttl Name
Chpt Edit
Erase Sec
Undo
DVD Remain
0h37m(FINE)
4
5
• Undo – Undo the last change (page 83)
6
VR mode
1/1
• Press RETURN to get back to the menu options on
the left from the thumbnail area of the Disc
Navigator.
(Original)
• Play – Play a title (page 79)
• Title Name (Ttl Name) – Name or rename a title
(page 80)
• Lock/Unlock – Lock or unlock a title to prevent
accidental changes being made (page 82)
• Erase – Erase a title (page 79)
• Erase All – Erase all titles (page 83)
78
En
DVR-04_HDD_UK.book 79 ページ 2004年4月11日 日曜日 午後6時11分
Editing
08
• Undo – Undo the last change (page 83)
• Chapter Edit (Chpt Edit) – Make detailed changes to
chapters in a title (page 81)
• Erase Section (Erase Sec) – Erase a part of a title
(page 82)
Editing VR mode Original, Video
mode and HDD content
These commands affect the actual content stored on the
DVD-R/RW or HDD.
HDD
• Play – Play a title (page 79)
• Title Name (Ttl Name) – Name or rename a title
(page 80)
• Lock/Unlock – Lock or unlock a title to prevent
accidental changes being made (page 82)
• Erase – Erase a title (page 79)
• Erase All – Erase all titles (page 83)
• Chapter Edit (Chpt Edit) – Make detailed changes
to chapters in a title (page 81)
• Divide – Divide a title into two (page 83)
• Change Group (Chg Group) – Assign a title to a
group on the HDD (page 84)
Remember
• If you are editing a VR mode disc, use the PLAYLIST
button to switch to the Disc Navigator Original
screen.
Play
VR mode
1 Select ‘Play’ from the Disc Navigator menu
options.
2 Use the /// (cursor buttons) to select the
title you want to play, then press ENTER or PLAY.
Disc Navigator
Video Mode
• Erase Section (Erase Sec) – Erase part of a title
(page 82)
DVD
1
2
3
12:30 Wed 4/11 Pr 5 LP
(Play List)
Play
Erase
Ttl Name
Lock
Erase All
• Create – Make a new Play List title (page 87)
• Chapter Edit (Chpt Edit) – Make detailed changes to
chapters in a Play List title (page 86)
• Move – Move the position of a title in the Play List
(page 87)
HDD
Use this function to start playback of a title.
• Group Name (Grp Name) – Name or rename an
HDD group (page 84)
VR mode
Video mode
4
5
DVD Remain
0h37m(FINE)
6
Undo
1/1
Playback of the title you selected starts.
• Erase All – Erase all titles in the Play List (page 88)
• Undo – Undo the last change (page 88)
• Play – Play a title (page 85)
• Erase – Erase a title from the Play List (page 85)
• Title Name (Ttl Name) – Name or rename a title in
the Play List (page 85)
• Combine – Combine two Play List titles into one
(page 88)
• Divide – Divide a Play List title into two (page 88)
• Erase Section (Erase Sec) – Erase a part of a title
(page 86)
Erase
VR mode
Video mode
HDD
The Erase title command does slightly different things
depending on what you are currently editing. If you are
editing Original content on a VR mode disc or content on
the HDD, the title will be erased from the disc and the
available recording time will increase accordingly.
If you erase titles from a Video mode DVD-R disc, the title
will disappear from the list of titles, but the available
recording time will not increase. Erasing a title from a
Video mode DVD-RW disc increases the available
recording time only if it is the last title on the disc.
79
En
DVR-04_HDD_UK.book 80 ページ 2004年4月11日 日曜日 午後6時11分
Editing
08
1 Select ‘Erase’ from the Disc Navigator menu
options.
2 Use the /// (cursor buttons) to select the
title you want to erase, then press ENTER.
Disc Navigator
Original
DVD
1
2
3
12:30 Wed 4/11 Pr 5 LP
Play
Erase
Ttl Name
Chpt Edit
Erase Sec
Undo
DVD Remain
0h37m(FINE)
4
Erase Title?
Yes
No
1/1
3 Highlight ‘Yes’ to confirm, or ‘No’ to cancel, then
press ENTER.
4 Press RETURN to go back to the Disc Navigator
menu options, or select another title to erase.
Tip
• Select CAPS or small to change to upper or lowercase, or use the CASE SELECTION buttons (/
).
• You can also use the CLEAR button to delete
characters directly (press and hold for two seconds
to delete the whole name). For other remote control
key shortcuts, see Using the remote key shortcuts to
input a name below.
• For discs formatted on a different DVD recorder, you
will see only a limited character set.
4 Highlight ‘OK’ then press ENTER to enter the
name and return to the main Disc Navigator screen.
• To return to the main Disc Navigator screen without
saving changes to the title name, press RETURN.
5 Press RETURN to go back to the Disc Navigator
menu options, or select another title to name.
Using the remote key shortcuts to input a name
• You can erase a title quickly by pressing CLEAR when
the title is highlighted. Confirm the edit by pressing
ENTER. (You can also use this method to erase titles
when using the Play function, above.)
Video mode
The table below shows the remote control key shortcuts
that you can use to input characters in the name input
screen. Pressing a button repeatedly cycles through the
characters shown.
If you want to enter two characters in succession that are
both on the same button (for example a P and an R),
press to advance the cursor one space manually
between inputting the two characters.
Title Name (Ttl Name)
VR mode
• A name generated automatically by the recorder will
already be in the name input section of the screen.
Use the / buttons to change the cursor
position.
HDD
You can give titles new names of up to 64 characters long
for VR mode and HDD recordings and 32 characters for
Video mode recordings.
Key
Characters
Key
Characters
1
.,’?!–&1
6
mno6öôòóøñ
1 Select ‘Ttl Name’ from the Disc Navigator menu
options.
2
abc2äàáâã
æç
7
pqrs7$
2 Use the /// (cursor buttons) to select the
title you want to name, then press ENTER to go to
the name input screen.
3
def3èéëê
8
tuv8üùûú
4
ghi4îïìí¡
9
wxyz9
3
5
jkl5£
0
0
[cursor back]
[cursor forward]
/
[change case]
CLEAR
[clear character]
<space>
[finish name input]
Input a name for the selected title.
Input Title Name
12:30 Wed 4/11 Pr 5 LP
ABC DE F GH I J KLM . , ? !
N O P Q R S T U V WX Y Z ( ) : ;
AA A A A AÆ ç E E E E I I I I #
DN O OOO
0 1 2 3 4 5
+ – /@ [
c £ \ §
2 3
´ µ¶ ·
OK
Clear
O
ø
ß$%
= > _ &
± { _| } ~ ¡
– ® ˚
1 3
/2 /4 ¿ `
UUUUY
6 7 8 9 <
¥ ] ˆ ÷ x
¨ © a– << ¬
¸ 1 –o 1/4
<<
CAPS
small
Space
VIDEO
Plus+
*1
• Use the /// (cursor buttons) and ENTER to
select characters.
80
En
~
ÿ/ß *1
()_/:;”`^@#∗%¥|+=
{}[]<>
lower-case: ÿ; upper-case: ß
DVR-04_HDD_UK.book 81 ページ 2004年4月11日 日曜日 午後6時11分
Editing
08
Chapter Edit (Chpt Edit)
VR mode
• Preview – Preview chapters: Select the chapter you
want to play; press STOP to return to the chapter
edit screen.
HDD
When editing VR mode DVDs or video on the HDD you
can edit individual chapters within a title, with
commands for erasing, combining and dividing. You can
also play individual chapters to check their content.
1 Select ‘Chpt Edit’ from the Disc Navigator menu
options.
2 Use the /// (cursor buttons) to select the
title that contains the chapters you want to edit,
then press ENTER.
Chapter Edit
Original
Title 15:00 Wed 7/10 Pr 5 LP
1
1
2
DVD
Erase
Divide
Combine
Preview
Undo
Chapter
0h03m
3
4
5
6
7
8
9
• Undo – Undo the last command (only works with VR
mode disc edits).
3 Press RETURN to get back to the menu options on
the left side of the screen.
4 To return to the Disc Navigator screen, press
RETURN again, or select ‘Back’ from the menu
options on the left.
Note
• When editing VR mode Original content, it may not
be possible to erase chapters less than five seconds
long.
• It may not always be possible to combine two
chapters, even though they are adjacent. If a chapter
has been divided into three, then the middle chapter
erased, it is not possible to combine the two
remaining chapters into one.
Back
1/1
After selecting a title, thumbnails of each chapter appear
and you’ll see that the Disc Navigator menu items
change to the chapter editing commands:
• Erase – Erase chapters: Select the chapter you want
to erase and press ENTER (see also the note below).
• Divide – Divide a chapter into two or more parts:
Select the chapter you want to divide. From the
following screen use the playback controls (, ,
, , etc.) to find the point at which you want to
divide the chapter. With Divide highlighted, press
ENTER.
Inserting chapter markers into a title
VR mode
HDD
You can create new chapters within a title using the CHP
MARK button while playing the title or during recording.
This is useful not just for navigation of the disc content
but also for editing purposes.
PAUSE
Divide Chapter
Original
DVD
Title 15:00 Wed 13/12 Pr 5 LP
0h01m24s
1 Recording Time
1-3
Play Pause
Chapter
0h00m
CHP
MARK
0.00.52.17
Divide
Divide
Back
You can keep dividing the chapter as many times as
you wish (up to 999 chapters per DVD disc or 99
chapters per HDD title). Highlight Back and press
ENTER to return to the Chapter Edit screen.
1 Start playback of the title you want to create
new chapter markers in.
You can use the Play command from the Disc Navigator
menu to do this.
2 Press CHP MARK at any point where you want a
new chapter to begin.
A chapter marker icon appears on-screen briefly to
confirm a new chapter mark has been inserted:
• Combine – Combine two adjacent chapters into one:
Highlight the bar divider between two adjacent
chapters and press ENTER (see also the note below)
81
En
DVR-04_HDD_UK.book 82 ページ 2004年4月11日 日曜日 午後6時11分
08
Editing
• For greater control over the exact position of chapter
markers it can be useful to use the PAUSE button
and/or the slow-motion and frame advance/reverse
controls (/
).
Note
3 Use the playback controls (, , , , etc.) to
find the start of the section to erase, then (with
‘From’ highlighted) press ENTER.
The bar at the bottom of the screen shows the current
play position in the title. After pressing ENTER, a marker
appears under the bar to show the start of the section.
• You cannot insert chapter markers during Auto Start
Recording.
Play Pause
• If you pause a recording in VR mode, the recorder
automatically starts a new chapter when you restart
the recording.
• When recording in Video mode, the recorder
automatically puts chapter markers in at regular
intervals. It is not possible to add extra chapter
markers manually after recording (see also Auto
Chapter (Video) on page 108).
• The Play List and Original content on a disc can each
contain up to 999 chapters.
• Each HDD title can contain a maximum of 99
chapters.
• Similar chapter editing commands are available for
HDD content from the HDD to DVD copy screen. See
also Copying from HDD to DVD* on page 63.
From
0.02.09.17
B
T
A
4 In the same way, find the end of the section to
erase, then (with ‘To’ highlighted) press ENTER.
After pressing ENTER, another marker appears under the
bar to show the end of the section, with the section itself
marked in red.
5 Select ‘Yes’ to confirm, or ‘No’ to cancel, then
press ENTER.
In the thumbnail viewer you can see a few seconds of
video either side of the marked section to see how the
edit will look.
• When editing VR mode Original content, you may not
be able to erase very short sections (less than five
seconds).
Erase Section (Erase Sec)
VR mode
A
HDD
Using this command you can delete a part of an Original
title, ideal for cutting out the commercial breaks in a
recording made from the TV.
1 Select ‘Erase Sec’ from the Disc Navigator menu
options.
2 Use the /// (cursor buttons) to select a
title.
After selecting a title, the Erase Sec screen appears from
which you can mark the start and end points of the
section to erase.
6 Erase another section from the same title, or
press RETURN to get back to the main Disc Navigator
screen.
Lock / Unlock
VR mode
Video mode
HDD
You can lock a title so that it can’t be edited or erased
accidently. If you do need to edit it, you can always unlock
it later.
Important
Erase Sec
Original
DVD
Erase Sec
Title
1
15:00 Wed 13/12 Pr 5 LP
Recording Time
0h01m24s
1-1
Play Pause
0.00.52.17
A
B
From
Back
82
En
To
• You can’t undo any edits made before changing the
lock status. You also can’t undo a lock/unlock
command using the Undo option from the Disc
Navigator menu.
DVR-04_HDD_UK.book 83 ページ 2004年4月11日 日曜日 午後6時11分
Editing
08
1 Select ‘Lock’ from the Disc Navigator menu
options.
2 Use the /// (cursor buttons) to select the
title you want to lock (or unlock), then press ENTER.
Disc Navigator
Original
DVD
1
Lock
Erase All
4
2
3
12:30 Wed15/11 Pr 5 LP
DVD Remain
0h37m(FINE)
Undo
VR mode
Video mode
If you make a mistake while editing, you can generally
undo it. There are three levels of undo (in other words,
you can undo the last three edits you made).
• Select ‘Undo’ from the Disc Navigator menu
options.
• You can’t undo anything after ejecting the disc from
the recorder or switching the recorder into standby.
• You can’t undo the following operations: initializing,
recording or finalizing a disc, locking and unlocking
titles.
1/1
Undo
An unlocked title will become locked; a locked title will be
unlocked. Locked titles are shown in the Disc Navigator
with a padlock icon.
Divide
HDD
3 Press RETURN to go back to the Disc Navigator
menu options, or select another title to lock/unlock.
Use this command to divide a title on the HDD into two.
Note that once divided, the two new titles cannot be
recombined into one again.
Erase All
1 Select ‘Divide’ from the Disc Navigator menu
options.
VR mode
Video mode
HDD
This erases all unlocked titles from the disc (see also Lock
/ Unlock on page 82).
1 Select ‘Erase All’ from the Disc Navigator menu
options.
2 Select ‘Yes’ to confirm, or ‘No’ to cancel, then
press ENTER.
2 Select the title that you want to divide, then
press ENTER.
Divide Title
HDD
Title
2
15:00 Wed 13/12 Pr 5 LP
Recording Time
0h01m24s
2-1
Play Pause
0.00.08.26
Divide
Divide
Back
Disc Navigator
Original
DVD
1
Lock
Erase All
4
Undo
2
3
DVD Remain
0h37m(FINE)
3 Use the standard playback controls to find the
place you want to divide the title.
4 With ‘Divide’ highlighted, press ENTER to divide
the title at the current playback position.
Erase all titles?
Yes
No
1/1
5 Select ‘Yes’ to confirm you want to divide the
title.
Select No if you want to cancel and leave the title intact.
6 Press RETURN to go back to the Disc Navigator
menu options, or select another title to divide.
83
En
DVR-04_HDD_UK.book 84 ページ 2004年4月11日 日曜日 午後6時11分
08
Editing
Group Name (Grp Name)
Editing HDD groups
HDD
HDD
Use this command to rename a group.
1
Select ‘Grp Name’ from the Disc Navigator menu.
2 Use the / (cursor left/right) buttons to select
the group that you want to name or rename, then
press ENTER.
Input Group Name
Change Group (Chg Group)
Group 1
HDD
CAPS
small
Use this command to assign titles to a particular group.
ABC DE F GH I J KLM . , ? !
N O P Q R S T U V WX Y Z ( ) : ;
AA A A A AÆ ç E E E E I I I I #
DN O OOO
0 1 2 3 4 5
+ – /@ [
c £ \ §
2 3
´ µ¶ ·
1 Select ‘Chg Group’ from the Disc Navigator
menu, then press ENTER.
OK
Clear
O
ø
ß$%
= > _ &
± { _| } ~ ¡
– ® ˚
1 3
/2 /4 ¿ `
UUUUY
6 7 8 9 <
¥ ] ˆ ÷ x
¨ © a– << ¬
¸ 1 –o 1/4
<<
The large capacity of the HDD means that there may be
many hours of video in the recorder. To help you organize
your HDD video content there are four ‘groups’. You can
move content from group to group, and rename the
groups as you want.
Space
2 Select the title that you want to put into a
different group, then press ENTER.
3 Use the / (cursor up/down) buttons to select
a group for the title, then press ENTER.
• You can select one of the four groups, or choose No
Group, in which case it will only appear when All is
selected.
Disc Navigator
3 Input a name for the group.
The name can be up to six characters long.
4 To finish entering the name, highlight ‘Exit’ and
press ENTER.
5 Press RETURN to go back to the Disc Navigator
menu options, or select another group to name.
HDD
Title 1
21:00 Fri 6/09 Pr 5 LP
No Group
All
Lock
Erase All
Grp Name
Chg Group
Divide
GROUP1
GROUP2
GROUP3
GROUP4
4 Press RETURN to go back to the Disc Navigator
menu options, or select another title to change the
group of.
Creating and editing a VR mode Play
List
VR mode
A Play List is a kind of virtual content based on the actual
(Original) content of the disc. The main advantages of
this type of editing is that it is non-destructive of the video
content on the disc, and it allows greater control over
editing, so that you end up with the content exactly as you
want it.
Remember
• Use the PLAYLIST button to switch to the Play List
edit screen.
• The Play List can contain a maximum of 99 titles.
84
En
DVR-04_HDD_UK.book 85 ページ 2004年4月11日 日曜日 午後6時11分
Editing
08
Play
Title Name (Ttl Name)
VR mode
VR mode
Use this function to start playback of a title.
1 Select ‘Play’ from the Disc Navigator Play List
menu options.
2 Select the title you want to play, then press
ENTER.
Disc Navigator
Play List
DVD
1
You can give titles new names of up to 64 characters
long.
1 Select ‘Ttl Name’ from the Disc Navigator Play
List menu options.
2 Select the title you want to name, then press
ENTER.
3
2
Input a name for the selected title.
3
Input Title Name
DVD Remain
0h37m(FINE)
4
Undo
CAPS
small
ABC DE F GH I J KLM . , ? !
N O P Q R S T U V WX Y Z ( ) : ;
AA A A A AÆ ç E E E E I I I I #
DN O OOO
0 1 2 3 4 5
+ – /@ [
c £ \ §
2 3
´ µ¶ ·
1/1
OK
Clear
O
ø
ß$%
= > _ &
± { _| } ~ ¡
– ® ˚
1 3
/2 /4 ¿ `
UUUUY
6 7 8 9 <
¥ ] ˆ ÷ x
¨ © a– << ¬
¸ 1 –o 1/4
<<
12:30 Wed 4/11 Pr 5 LP
Play
Erase
Ttl Name
Chpt Edit
Erase Sec
12:30 Wed 4/11 Pr 5 LP
Space
Playback of the title you selected starts.
Press ENTER after selecting each character.
Erase
VR mode
This command erases a title only from the Play List. The
title remains in the Original content and the available
recording time does not increase.
1 Select ‘Erase’ from the Disc Navigator Play List
menu options.
2 Select the title you want to erase, then press
ENTER.
Disc Navigator
Play List
DVD
1
2
Undo
DVD Remain
0h37m(FINE)
4
Erase Title?
Yes
• Select CAPS or small to change to upper or lowercase, or use the CASE SELECTION buttons (/
).
• You can also use the CLEAR button to delete
characters directly (press and hold for two seconds
to delete the whole name). For other remote control
key shortcuts, see Using the remote key shortcuts to
input a name on page 80.
• For discs formatted on a different DVD recorder, you
will see only a limited character set.
3
12:30 Wed 4/11 Pr 5 LP
Play
Erase
Ttl Name
Chpt Edit
Erase Sec
• A name generated automatically by the recorder will
already be in the name input section of the screen.
Use the / buttons to change the cursor
position.
No
1/1
4 Highlight ‘OK’, then press ENTER to fix the name
and return to the main Disc Navigator screen.
• To return to the main Disc Navigator screen without
saving changes to the title name, press RETURN.
5 Press RETURN to go back to the Disc Navigator
menu options, or select another title to name.
3 Highlight ‘Yes’ to confirm, or ‘No’ to cancel, then
press ENTER.
4 Press RETURN to go back to the Disc Navigator
menu options, or select another title to erase.
Note
• The remaining recording time doesn’t change when
you erase something from the Play List.
85
En
DVR-04_HDD_UK.book 86 ページ 2004年4月11日 日曜日 午後6時11分
08
Editing
Chapter Edit (Chpt Edit)
• Preview – Preview chapters: Select the chapter you
want to play; press STOP to return to the chapter
edit screen.
VR mode
When editing VR mode DVDs you can edit individual
chapters within a title, with commands for erasing,
moving, combining and dividing. You can also play
individual chapters to check their content.
• Undo – Undo the last command.
3 Press RETURN to get back to the menu options on
the left side of the screen.
1 Select ‘Chpt Edit’ from the Disc Navigator Play
List menu options.
4 To return to the Disc Navigator screen, press
RETURN again, or select ‘Back’ from the menu
options on the left.
2 Select the title that contains the chapters you
want to edit, then press ENTER.
After selecting a title, thumbnails of each chapter appear
and you’ll see that the Disc Navigator menu items
change to the chapter editing commands:
Erase Section (Erase Sec)
Chapter Edit
Play List
Title 15:00 Wed11/12 Pr 5 LP
1
1
2
DVD
Erase
Divide
Combine
Move
Undo
Chapter
0h03m
3
4
5
6
7
8
9
Back
1/1
• Erase – Erase chapters: Select the chapter you want
to erase and press ENTER.
• Divide – Divide a chapter into two or more parts:
Select the chapter you want to divide. From the
following screen use the playback controls (, ,
, , etc.) to find the point at which you want to
divide the chapter. With Divide highlighted, press
ENTER.
Divide Chapter
Play List
Title 15:00 Wed 13/12 Pr 5 LP
0h01m24s
1 Recording Time
DVD
1-3
Play Pause
Chapter
0h00m
0.00.52.17
Divide
Divide
Back
VR mode
Using this command you can delete a part of a Play List
title, ideal for cutting out the commercial breaks in a
recording made from the TV.
1 Select ‘Erase Sec’ from the Disc Navigator menu
options.
2 Use the /// (cursor buttons) to select a
title.
After selecting a title, the Erase Sec screen appears from
which you can mark the start and end points of the
section to erase.
Erase Sec
Play List
DVD
Title
1
15:00 Wed 13/12 Pr 5 LP
0h01m24s
Recording Time
Erase Sec
1-2
Play Pause
0.00.52.17
A
B
From
To
Back
3 Use the playback controls (, , , , etc.) to
find the start of the section to erase, then (with
‘From’ highlighted) press ENTER.
The bar at the bottom of the screen shows the current
play position in the title. After pressing ENTER, a marker
appears under the bar to show the start of the section.
Play Pause
You can keep dividing the chapter as many times as
you want (up to 999 chapters per disc). Highlight
Back and press ENTER to return to the Chapter Edit
screen.
• Combine – Combine two adjacent chapters into one:
Select the dividing line between two adjacent
chapters and press ENTER.
• Move – Rearrange chapters: Select the chapter you
want to move, press ENTER, then highlight the new
location for it, then press ENTER again.
86
En
A
From
0.02.09.17
B
T
A
4 In the same way, find the end of the section to
erase, then (with ‘To’ highlighted) press ENTER.
After pressing ENTER, another marker appears under the
bar to show the end of the section, with the section itself
marked in red.
DVR-04_HDD_UK.book 87 ページ 2004年4月11日 日曜日 午後6時11分
Editing
08
5 Select ‘Yes’ to confirm, or ‘No’ to cancel, then
press ENTER.
In the thumbnail viewer you can see a few seconds of
video either side of the marked section to see how the
edit will look.
4 Press ENTER to add the title.
The new title appears in the updated Play List.
Disc Navigator
Play List
DVD
6 Erase another section from the same title, or
press RETURN to get back to the main Disc Navigator
screen.
1
2
3
DVD Remain
0h37m(FINE)
Create
Move
Divide
Combine
Erase All
Create
Undo
VR mode
Use this function to add an Original title to the Play List.
When you do this, the whole title is put into the Play List
(you can erase bits you don’t need later—see Chapter Edit
(Chpt Edit) on page 86).
The title appears in the Play List complete with the
chapter markers that appear in the Original. However, if
you add more chapter markers to the Original later, these
are not automatically copied over into the Play List title.
1 Select ‘Create’ from the Disc Navigator Play List
menu options.
2 Use the /// (cursor buttons) to select the
insertion point for the new title, then press ENTER.
Disc Navigator
Play List
1
5 Press RETURN to go back to the Disc Navigator
menu options, or select another location for a new
title.
Move
VR mode
Use this function to re-arrange the playing order of Play
List titles.
You can add up to 99 titles to the Play List.
DVD
1 Select ‘Move’ from the Disc Navigator Play List
menu options.
2 Select the title you want to move, then press
ENTER.
Disc Navigator
Play List
2
DVD
DVD Remain
0h37m(FINE)
Create
Move
Divide
Combine
Erase All
1/1
Undo
1/1
1
2
3
12:30 Wed15/11 Pr 5 LP
Create
Move
Divide
Combine
Erase All
DVD Remain
0h37m(FINE)
4
Undo
If there are no titles in the Play List yet, this step does not
apply.
3 Use the /// (cursor buttons) to select an
Original title to put into the Play List.
3 Select a new position in the Play List for the title,
then press ENTER.
Disc Navigator
Play List
DVD
Disc Navigator
Play List
DVD
ORG1
ORG2
12:30 Wed15/11 Pr 5 LP
Create
Move
Divide
Combine
Erase All
Undo
1/1
1
ORG3
DVD Remain
0h37m(FINE)
ORG4
Create
Move
Divide
Combine
Erase All
Undo
1/1
2
3
DVD Remain
0h37m(FINE)
4
1/1
After pressing ENTER, the new, updated Play List is
displayed.
87
En
DVR-04_HDD_UK.book 88 ページ 2004年4月11日 日曜日 午後6時11分
08
Editing
4 Press RETURN to go back to the Disc Navigator
menu options, or select another title to move.
After pressing ENTER, the new, updated Play List is
displayed.
Divide
Disc Navigator
Play List
DVD
VR mode
1
2
3
Use this command to split a title up into two new titles.
1 Select ‘Divide’ from the Disc Navigator Play List
menu options.
2 Select the title that you want to divide, then
press ENTER.
3 Use the playback controls to find the place you
want to divide the title.
Divide Chapter
Play List
DVD
Title
1
1/1
Undo
3 Press RETURN to go back to the Disc Navigator
menu options, or continue combining more titles.
Erase All
15:00 Wed 13/12 Pr 5 LP
0h01m24s
Recording Time
1-1
Play Pause
DVD Remain
0h37m(FINE)
Create
Move
Divide
Combine
Erase All
0.00.08.26
VR mode
This command erases all the titles from the Play List.
Divide
Divide
1 Select ‘Erase All’ from the Disc Navigator Play List
menu options.
Back
2 Select ‘Yes’ to confirm, or ‘No’ to cancel, then
press ENTER.
You can use all the usual playback controls, including
PLAY, PAUSE, scan (, ), and slow-motion
(, ).
Disc Navigator
Play List
DVD
1
2
3
4 With ‘Divide’ highlighted, press ENTER to divide
the title at the current playback position.
Create
Move
Divide
Combine
Erase All
5 To return to the Disc Navigator menu options,
select ‘Back’ and press ENTER.
Undo
DVD Remain
0h37m(FINE)
4
Erase all titles?
Yes
No
1/1
Combine
VR mode
Use this function to combine two adjacent Play List titles
into one.
1 Select ‘Combine’ from the Disc Navigator Play
List menu options.
2 Highlight the bar divider between the two titles
you want to combine, then press ENTER.
Disc Navigator
Play List
DVD
Create
Move
Divide
Combine
Erase All
Undo
88
En
1
2
3
DVD Remain
0h37m(FINE)
4
1/1
Undo
VR mode
If you make a mistake while editing, you can generally
undo it. There are three levels of undo (in other words,
you can undo the last three edits you made).
• Select ‘Undo’ from the Disc Navigator Play List
menu options.
• You can’t undo anything after ejecting the disc from
the recorder or switching the recorder into standby.
• You can’t undo the following operations: initializing,
recording or finalizing a disc, locking and unlocking
titles.
DVR-04_HDD_UK.book 89 ページ 2004年4月11日 日曜日 午後6時11分
Disc History
09
Chapter 9
Disc History
VR mode
Video mode
The Disc History screen lets you see how much recording space remains on the last 30 recordable DVD discs loaded.
It also displays information such as disc name, the first three title names, number of titles recorded, recording mode
and the lock status of the disc.
Available
recording space
Disc name
Disc History
Disc loaded
Selected disc
Other discs
Title information
for the selected
disc
Disc Name
News
Sport
Travel
Movie
Music
Title 1
Title 2
Title 3
DVD Remain
Today's Football
Enjoy Golf!
Social dance Lesson
Titles
: 8
DVD-RW VR
625System
Recorded Line
System of disc
Using the Disc History
1 Press DISC HISTORY to display the Disc History
screen.
The most recently loaded disc appears at the top of the
list, with previously loaded discs below it. If there is a disc
loaded, it is shown in the list with a ‘disc in’ icon.
• The Disc History screen is also accessible from the
Home Menu.
2 Use the / (cursor up/down) buttons to see
title information for other discs in the list.
• To remove a disc from the list, press CLEAR (you
can’t remove the currently loaded disc).
• You can see the available recording time for different
recording modes by pressing the REC MODE button.
1/2
LP
1h54m
2h35m
1h22m
0h30m
1h38m
Recording mode
Recording time
available
Number of
titles on disc
Disc type and
recording mode
Disc lock indicator
3 To exit the Disc History screen, press HOME
MENU or DISC HISTORY.
Note
• When you initialize a DVD-RW disc or record a
DVD-R disc for the first time, the recorder
automatically names the disc DISC ** (where ** is a
number from 1 to 99). You can rename the disc if you
want to (see Input Disc Name on page 92).
• When you change the display for the available
recording time using the REC MODE button, only the
display is changed; the actual recording mode is not
affected.
• The following discs appear in the Disc History list in
gray:
– Discs with no available recording space left
– Locked discs
– Discs that contain the maximum 99 titles and/or
999 chapters
– Discs recorded with a Line Input setting different to
the recorder’s current setting.
• When a Video mode disc is finalized, the information
for that disc disappears from the Disc History.
89
En
DVR-04_HDD_UK.book 90 ページ 2004年4月11日 日曜日 午後6時11分
The PhotoViewer
10
Chapter 10
The PhotoViewer
From the PhotoViewer you can view JPEG photos and picture files stored on a CD-ROM/R/RW on your TV.
Currently selected thumbnail
PhotoViewer
File
Chair No. 2
Date/Time 10:00 12/05/2003
Currently selected
folder in folder list
Pages in
folder list
01. 12/12 TUE
02. 13/12 WED
03. 14/12 THU
04. 15/12 FRI
05. 16/12 SAT
06. 17/12 SUN
07. 18/12 MON
08. 19/12 TUE
2
3
4
5
6
7
8
9
1/2
Playing a slideshow
1 Press HOME MENU and select ‘PhotoViewer’ to
display the PhotoViewer screen.
• The PhotoViewer is only accessible when a disc
containing JPEG files is loaded.
2 Use the / (cursor up/down) buttons to select
a folder from the folder list.
The first nine images from the selected folder are
displayed as thumbnails in the main part of the screen.
3 Press ENTER to move to the thumbnail view area.
The first thumbnail image is highlighted.
• To get back to the folder list, press RETURN.
Pages in file
view
Note
• Up to 999 files or 99 folders are viewable, but if there
are more files/folders than this on the disc it is still
possible to view them all using the Reload function
(see below).
• The time it takes for the recorder to load a file
increases with large file sizes.
• Pictures with an aspect ratio different to your TV
screen will appear with black bars top and bottom, or
either side (depending on the picture).
• If you encounter a disc that will not play, check that
the disc and file formats are compatible with this
recorder (see JPEG file compatibility on page 10).
Reloading files from a disc
5 Press ENTER or PLAY to start playing a
slideshow from the selected thumbnail.
• Use the PREV / NEXT buttons to display the
previous/next picture, or the PAUSE button to
pause the slideshow.
1 Use the (cursor down) button to navigate to
the last entry in the folder list (‘Read next: ...’).
7
90
1/3
File information
4 Use the /// (cursor buttons) to select a
thumbnail.
• Use the and buttons to display the previous/
next page of thumbnails.
6 Press STOP or RETURN to return to the
thumbnail view area.
En
Size 1920 x 1440
1
To return to the folder view area, press RETURN.
• To exit the PhotoViewer, press HOME MENU.
If you have a disc with a large number of files and/or
folders, you can still view all the images using the reload
function.
2 Press ENTER to load the next batch of up to 999
files/99 folders from the disc.
It will take a moment (at most a minute) to load in the
images.
DVR-04_HDD_UK.book 91 ページ 2004年4月11日 日曜日 午後6時11分
The PhotoViewer
10
Note
• You can press HOME MENU to exit the PhotoViewer
screen while the recorder is reloading images. (If you
enter the PhotoViewer again, it will resume
reloading.)
Zooming the screen
During a slideshow you can zoom in to enlarge a portion
of the picture by a factor of two or four. You can also move
the area of the picture displayed.
1 During a slideshow, use the CHANNEL + button
to zoom the picture.
2x Zoom
Repeated presses cycle between zoom off, 2x zoom and
4x zoom. The zoom factor is displayed on-screen.
2 Use the /// (cursor buttons) to move the
zoomed area within the picture.
Rotating the screen
You can rotate the displayed picture during a slideshow
so you can always view pictures the right way up,
whichever way they were taken.
• During a slideshow, press ANGLE to rotate the
displayed picture clockwise by 90º.
Press ANGLE repeatedly to continue rotating the picture
in increments of 90º.
91
En
DVR-04_HDD_UK.book 92 ページ 2004年4月11日 日曜日 午後6時11分
The Disc Setup menu
11
Chapter 11
The Disc Setup menu
•
2 Input a name for the disc up to 64 characters long
for a VR mode disc, or 32 for a Video mode disc.
Input Disc Name
DISC7
Press HOME MENU and select ‘Disc Setup’.
CAPS
small
Timer Recording
Disc Setup
Disc Navigator
Initial Setup
Copy
Video/Audio Adjust
Disc History
Play Mode
PhotoViewer
DV Record
DVR-520H/720H Screen
DN O OOO
0 1 2 3 4 5
+ – /@ [
c £ \ §
2 3
´ µ¶ ·
OK
O
ø
UUUUY
6 7 8 9 <
¥ ] ˆ ÷ x
¨ © a– << ¬
¸ 1 –o 1/4
= >
± { _|
– ®
1 3
/2 /4 ¿
Clear
ß$%
_ &
} ~ ¡
˚
`
Space
• Use the /// (cursor buttons) and ENTER to
select characters.
• Use the / buttons to change the cursor
position.
• Select CAPS or small to change to upper or lowercase, or use the CASE SELECTION buttons (/
).
Basic settings
Input Disc Name
VR mode
ABC DE F GH I J KLM . , ? !
N O P Q R S T U V WX Y Z ( ) : ;
AA A A A AÆ ç E E E E I I I I #
<<
From the Disc Setup menu you can name discs, lock the
contents to prevent accidental recording and erasure,
initialize and finalize discs. The Disc Setup menu is
accessed from the Home menu:
Video mode
When you initialize a disc for recording, the recorder
automatically assigns a name for the disc ranging from
DISC 1 to DISC 99. You can use the Input Disc Name
function to change the default disc name to something
more descriptive. This name appears when you load the
disc and when you display disc information on-screen.
1 Select ‘Input Disc Name’ from the Basic options,
then ‘Next Screen’.
• You can also use the CLEAR button to delete
characters directly (press and hold for two seconds
to delete the whole name). For other remote control
key shortcuts, see Using the remote key shortcuts to
input a name on page 80.
• For discs formatted on a different DVD recorder, you
will see only a limited character set.
Note
• You cannot input a name for a disc if the TV line
system of the disc is different to the current setting of
the recorder. See Input Line System on page 98 for
how to change the recorder’s setting.
Disc Setup
Basic
Initialize
Finalize
Input Disc Name
Lock Disc
Next Screen
Lock Disc
VR mode
• Default setting: Off
Disc Setup
Basic
Initialize
Finalize
Input Disc Name
Lock Disc
On
Off
Set to On to prevent accidental recording, editing or
erasing of the disc loaded. If you need to unlock the disc
to make edits, select Off.
92
En
DVR-04_HDD_UK.book 93 ページ 2004年4月11日 日曜日 午後6時11分
The Disc Setup menu
Important
• A locked disc can still be initialized (which will
completely erase the disc).
11
Finalize settings
Finalize
DVD-R
Note
• You cannot change the lock setting for a disc if the TV
line system of the disc is different to the current
setting of the recorder. See Input Line System on
page 98 for how to change the recorder’s setting.
DVD-RW
Finalizing ‘fixes’ the recordings in place so that the disc
can be played on a regular DVD player or computer
equipped with a suitable DVD-ROM drive.
See Playing your recordings on other DVD players on
page 59 for detailed instructions.
Undo Finalize
Initialize settings
DVD-RW
DVD-RW
You can initialize a DVD-RW disc for either VR mode
recording or Video mode recording. The first time you
load a new DVD-RW disc, it will be automatically
initialized for recording according to the DVD-RW Auto
Init. setting in the Initial Setup menu (see page 108).
The initialize menu here lets you reinitialize a disc, for
example if you want to change the recording format of
the disc. See Initializing a DVD-RW disc on page 60 for
detailed instructions.
You can undo the finalization on DVD-RW discs recorded
on this recorder in Video mode. You need to do this if you
want to record more material or edit material already on
the disc.
You can also undo the finalization of VR mode discs
which have been finalized on other DVD recorders. If
when you load a disc the message This disc cannot be
recorded. Undo the finalization is displayed, use this
command to be able to record on the disc using this
recorder.
1 From the Disc Setup menu, select ‘Finalize’, then
‘Undo Finalize’ from the finalize options.
HDD Initialize
2
Select ‘Start’.
HDD
When your DVD recorder is working without a problem
this option is not visible in the Disc Setup menu.
However, if the HDD file system becomes corrupted for
some reason, you initialize the HDD to fix the problem.
Note that initializing the HDD will erase all the data on it.
•
Select ‘Initialize HDD’ from the disc Setup menu.
Note
• You cannot finalize a disc or use the Undo Finalize
command if the TV line system of the disc is different
to the current setting of the recorder. See Input Line
System on page 98 for how to change the recorder’s
setting.
Disc Setup
Basic
Initialize
Finalize
Initialize HDD
Initialize
Start
• Select ‘Start’ to initialize.
93
En
DVR-04_HDD_UK.book 94 ページ 2004年4月11日 日曜日 午後6時11分
The Video/Audio Adjust menu
12
Chapter 12
The Video/Audio Adjust menu
Using the Video/Audio Adjust menu you can set up the picture quality for the built-in tuner and external inputs, for disc
playback, and for recording.
4
Press ENTER to select the preset.
Setting the picture quality for TV and
external inputs
Creating your own set
Picture Creation lets you choose a set of picture quality
settings for the built-in TV tuner and for each external
input. There are several preset settings that suit various
sources, or you can create up to three of your own sets.
1 Follow Choosing a preset above and select one of
the user presets (Memory 1, 2 or 3).
There are three user presets in which you can save your
own set of picture quality settings.
2
Choosing a preset
Select ‘Detailed Settings’.
Pr 5
1 With the recorder stopped, press HOME MENU
and select ‘Video/Audio Adjust’.
Memory1
Detailed Settings
Timer Recording
Disc Setup
Disc Navigator
Initial Setup
Copy
Video/Audio Adjust
3 Use the / (cursor up/down) buttons to select
the picture quality setting you want to adjust.
Disc History
Play Mode
3-D Y/C
PhotoViewer
DV Record
VNR
Detail
Select ‘Video Adjust’.
3 Use the / (cursor left/right) buttons to
change the preset.
Pr 5
Tuner
Detailed Settings
• Use the INPUT SELECT button to switch between the
built-in TV tuner and the external inputs.
• Use the CHANNEL +/– buttons to change the
channel of the built-in TV tuner.
There are six presets available:
• Tuner – suitable for general TV broadcasts
• VCR – suitable for video cassettes
• LDP – suitable for Laserdiscs
• Memory1 – user preset 1
• Memory2 – user preset 2
• Memory3 – user preset 3
You can press DISPLAY to see the individual settings for
the current preset (Tuner, VCR or LDP).
94
En
Motion
Off
Max
Off
White Level
Min
Black Level
Min
Black Setup
Still
Off
White AGC
DVR-520H/720H screen
2
Pr 5
Memory1
Max
Max
0 IRE
You can adjust the following settings:
• 3-D Y/C – Adjusts the brightness/colour separation
(NTSC video only).
• VNR – Adjusts the amount of noise reduction applied
to the video signal.
• Detail – Adjusts how sharp edges appear.
• White AGC – Turn on for automatic white level
adjustment.
• White Level – Adjusts the intensity of white.
• Black Level – Adjusts the intensity of black.
• Black Setup – Corrects the standard reference black
level (NTSC video only).
• Hue – Adjusts overall balance between red and
green.
• Chroma Level – Adjusts how rich the colours
appear.
DVR-04_HDD_UK.book 95 ページ 2004年4月11日 日曜日 午後6時11分
The Video/Audio Adjust menu
12
4 Use the / (cursor left/right) buttons to adjust
the currently selected picture quality setting.
Creating your own set
5 When you have all the settings as you want
them, press HOME MENU to exit.
You can now use the preset for any other input or the
built-in TV tuner.
1 Follow Choosing a preset above and select one of
the user presets (Memory 1, 2 or 3).
There are three user presets in which you can save your
own set of picture quality settings for disc playback.
2 Move the cursor down and select ‘Detailed
Settings’.
Tip
• To see more of the picture as you adjust different
settings, press ENTER after selecting the setting you
want to adjust.
Memory1
Detailed Settings
3 Select the picture quality setting you want to
adjust.
Note
• DVR-520H/720H only: When the DV input is selected,
only VNR and Detail settings can be adjusted.
• When White AGC is On, the White Level setting
can’t be adjusted.
• The 3-D Y/C and Black Setup settings apply only to
NTSC video input.
Memory1
YNR
Off
Max
CNR
Off
Max
QNR
Off
Max
Detail
Off
Max
White Level
Min
Max
Black Level
Min
Black Setup
Setting the picture quality for disc
playback
This setting determines how the picture will look when
playing discs.
Choosing a preset
1 With a disc playing (or paused), press HOME
MENU and select ‘Video/Audio Adjust’.
2
Select ‘Video Adjust’
3 Use the / (cursor left/right) buttons to
change the setting.
TV(CRT)
Detailed Settings
There are six presets available:
• TV(CRT) – suitable for standard cathode-ray tube TVs
• PDP – suitable for plasma display screens
• Professional – suitable for professional monitors
Max
0 IRE
You can adjust the following settings:
• YNR – Adjusts the amount of noise reduction (NR)
applied to the Y (brightness) component.
• CNR – Adjusts the amount of noise reduction (NR)
applied to the C (colour) component.
• QNR – Adjusts the amount of noise reduction (NR)
applied to the block noise.
• Detail – Adjusts how sharp edges appear.
• White Level – Adjusts the intensity of white.
• Black Level – Adjusts the intensity of black.
• Black Setup – Corrects the standard reference black
level (NTSC video only).
• Hue – Adjusts overall balance between red and
green.
• Chroma Level – Adjusts how rich the colours
appear.
4 Use the / (cursor left/right) buttons to adjust
the currently selected picture quality setting.
5 When you have all the settings as you want
them, press HOME MENU to exit.
• Memory1 – user preset 1
• Memory2 – user preset 2
• Memory3 – user preset 3
You can press DISPLAY to see the individual settings for
the current preset (TV(CRT), PDP or Professional).
4
Tip
• To see more of the picture as you adjust different
settings, press ENTER after selecting the setting you
want to adjust.
Press ENTER to select the preset.
95
En
DVR-04_HDD_UK.book 96 ページ 2004年4月11日 日曜日 午後6時11分
The Video/Audio Adjust menu
12
Note
• The Black Setup setting applies only when playing
NTSC discs.
Audio DRC
• Default setting: Off
When watching Dolby Digital material at low volume, it’s
easy to lose low level sounds completely—including
some of the dialog. Switching on Audio DRC (Dynamic
Range Control) can help by bringing up the low level
sounds, while controlling high level peaks.
1 During playback or when paused, press HOME
MENU and select ‘Video/Audio Adjust’.
2
Select ‘Audio Adjust’.
3 Use the / (cursor left/right) buttons to adjust
DRC from ‘Off‘ to ‘Max’.
Audio Adjust
Audio DRC
Off
Max
Exactly how much difference you can hear between the
settings will depend on the material.
Remember
• Audio DRC is not effective when listening to a disc via
the digital output when Dolby Digital Out is set to
Dolby Digital. In this case adjust the dynamic range
from your AV amplifier/receiver.
96
En
DVR-04_HDD_UK.book 97 ページ 2004年4月11日 日曜日 午後6時11分
The Initial Setup menu
13
Chapter 13
The Initial Setup menu
Set ‘Clock Set CH‘ to the channel preset number
that broadcasts a clock signal, then move the
cursor down to ‘Start’ and press ENTER.
Using the Initial Setup menu
The Initial Setup menu is where you can set various
recorder options for sound, picture, language and so on.
Initial Setup
•
Press HOME MENU and select ‘Initial Setup’.
Timer Recording
Disc Setup
Disc Navigator
Initial Setup
Copy
Video/Audio Adjust
Disc History
Play Mode
PhotoViewer
DV Record
Basic
Tuner
Video In/Out
Audio In
Audio Out
Language
Recording
Playback
• Some settings can only be changed when the
recorder is stopped. During playback these settings
are grayed out in the Initial Setup menu.
• Except for the Setup Navigator, menu screens are
exited automatically after 20 minutes of inactivity.
Pr 1
Start
If the time could not be set automatically, press
RETURN to go back to the previous screen and select
Manual.
•
DVR-520H/720H screen
Clock Setting
Auto Clock Setting
Input Line System
Date
On Screen
Display
TimeDisplay
Front Panel
Power Save
Clock Set CH
Remote Control Set
Setup Navigator
Manual clock setting
If no stations in your area are broadcasting time
signals, you can set the clock manually:
Set your time zone.
You can set this by selecting a city or a time relative
to GMT.
Initial Setup
Basic
Tuner
Video In/Out
Audio In
Audio Out
Language
Recording
Playback
Basic settings
Clock Setting
The date (day, month, year) and time must be set before
you can use any of the timer recording features.
The clock can be set automatically if there is a broadcast
station transmitting clock signals, or manually.
Select Auto to set the clock automatically or Manual to
display the clock setting screen.
Initial Setup
Basic
Tuner
Video In/Out
Audio In
Audio Out
Language
Recording
Playback
•
Clock Setting
Input Line System
On Screen Display
Front Panel Display
Power Save
Remote Control Set
Setup Navigator
Auto
Manual
Clock Setting
Manual Clock Setting
Input Line System
England
On Screen
TimeDisplay
Zone
London
Front Panel Display
Power Save
Off
Summer
Time
Remote Control Set
Setup Navigator
1/2
Move the cursor down and select ‘On’ for
summer time if you are currently on summer
time, then press ENTER.
Initial Setup
Basic
Tuner
Video In/Out
Audio In
Audio Out
Language
Recording
Playback
Clock Setting
Manual Clock Setting
Input Line System
England
On Screen
TimeDisplay
Zone
London
Front Panel Display
Power Save
On
RemoteSummer
ControlTime
Set
Setup Navigator
1/2
Auto clock setting
Some TV channels broadcast time signals together
with the program. This recorder can use these
signals to set the clock automatically.
97
En
DVR-04_HDD_UK.book 98 ページ 2004年4月11日 日曜日 午後6時11分
13
The Initial Setup menu
Set the date (day/month/year) and time, then
press ENTER to make all the settings.
Initial Setup
Basic
Tuner
Video In/Out
Audio In
Audio Out
Language
Recording
Playback
On Screen Display
• Default setting: On
Initial Setup
Manual Clock Setting
Clock Setting
Input Line System
01
THU 01
Date
On Screen Display
Front Panel
Time Display
00
00
Power Save
England
Time Zone
Remote Control Set
London
Setup Navigator
On
Summer Time
2/2
2004
Use the / (cursor up/down) buttons to change
the value in the highlighted field.
Use the / (cursor left/right) buttons to move
from one field to another.
Basic
Tuner
Video In/Out
Audio In
Audio Out
Language
Recording
Playback
Clock Setting
Input Line System
On Screen Display
Front Panel Display
Power Save
Remote Control Set
Setup Navigator
On
Off
On the default setting, the recorder shows on-screen
operation displays (Play, Stop and so on). Change to Off
to hide these displays.
Front Panel Display
Input Line System
• Default setting: On
• Default setting: 625System
Initial Setup
Initial Setup
Basic
Tuner
Video In/Out
Audio In
Audio Out
Language
Recording
Playback
Clock Setting
Input Line System
On Screen Display
Front Panel Display
Power Save
Remote Control Set
Setup Navigator
525System
625System
For standard PAL or SECAM recording, leave the input
line system to 625System. When recording an NTSC or
PAL–60 signal through an external input, change to
525System.
Basic
Tuner
Video In/Out
Audio In
Audio Out
Language
Recording
Playback
Clock Setting
Input Line System
On Screen Display
Front Panel Display
Power Save
Remote Control Set
Setup Navigator
On
Off
On the default setting, the time is shown in the front
panel display when the recorder is in standby. Switch to
Off to have the front panel display switch off completely
when in standby.
Note
Note
• When the current input is a built-in tuner channel
preset, changing the input line system will usually
also affect the input line system of the AV2/AUTO
START REC (INPUT 1/DECODER) input. However if
the AV2/L1 In setting is set to Decoder (see AV2/L1
In on page 102), then the L2 input is affected instead.
• If when this setting is changed, the screen goes
blank (due to incompatibility with your TV), you can
switch back by pressing and holding the front panel
+ button then pressing DVD (also front panel) while
the recorder is stopped.
• When you switch the Line Input System setting the
Copy List is erased. If you switch the setting using the
+ button and DVD buttons as described above, there
is no confirmation, so please use with care.
• You can’t mix recordings of different TV line systems
on the same disc.
• When you change this setting, the Input Colour
System setting also changes (see Input Colour
System on page 102).
98
En
• When set to Off, the display still lights dimly in
standby when setting a timer recording, or during
Auto Start Recording.
Power Save
• Default setting: Off
Initial Setup
Basic
Tuner
Video In/Out
Audio In
Audio Out
Language
Recording
Playback
Clock Setting
Input Line System
On Screen Display
Front Panel Display
Power Save
Remote Control Set
Setup Navigator
Mode1
Mode2
Off
When set to Off, signals arriving at the ANTENNA IN
terminal and at the AV2/AUTO START REC (INPUT 1/
DECODER) AV connector are passed through to the
ANTENNA OUT terminal and to the AV1(RGB)-TV AV
connector, respectively, when the recorder is in standby.
You can cut the standby power consumption of the
recorder by turning off the through function for one or
both terminals:
DVR-04_HDD_UK.book 99 ページ 2004年4月11日 日曜日 午後6時11分
The Initial Setup menu
• Mode1 – Through function only for the antenna
terminal
13
Tuner settings
• Mode2 – No through function
• Off – Through function for both antenna terminal
and AV connector
Note
• When a timer recording is set with VPS/PDC on,
SCART through is always active.
Remote Control Set
• Default setting: Recorder1
You only need to set this if you are using more than one
Pioneer DVD recorder in the same room.
Auto Channel Setting : Auto Scan
This recorder has a built-in TV tuner for recording PAL B/
G, PAL I, SECAM L and SECAM D/K TV programs off the
air or from analog cable TV. We recommend that you first
use the Auto Channel Setting described here to tune into
the channels in your area, then if there are any unwanted
channels, you can disable them using Channel Skip
(described below).
1 Choose ‘Tuner’ from the Initial Setup menu, then
‘Auto Channel Setting’, then ‘Auto Scan’.
Initial Setup
Basic
Tuner
Video In/Out
Audio In
Audio Out
Language
Recording
Playback
Initial Setup
Basic
Tuner
Video In/Out
Audio In
Audio Out
Language
Recording
Playback
Clock Setting
Input Line System
On Screen Display
Front Panel Display
Power Save
Remote Control Set
Setup Navigator
Recorder1
Recorder2
Recorder3
So that each remote control operates only its own
recorder, make this setting different for each recorder
and remote in the room.
Initial Setup
Basic
Tuner
Video In/Out
Audio In
Audio Out
Language
Recording
Playback
After selecting a new recorder ID, you have to confirm the
change by selecting Yes or No (use the / (cursor
left/right) buttons), then pressing ENTER.
To set the remote, press and hold RETURN and a number
button (1, 2 or 3) until the indicator on the remote lights.
Auto Scan
Download from TV
2 Select your country then press ENTER to start
tuning.
There are three different recorder IDs. When set to
Recorder2 or Recorder3, the remote control mode is
shown in the front panel display.
Note that as soon as you change the recorder ID, the
remote becomes inoperative until you change the remote
to the same ID.
Auto Channel Setting
Manual CH Setting
Channel Swapping
Set VIDEO Plus+ CH
Auto Setting
Channel
Auto Channel
Channel
Setting Setting
Auto
Manual CH Setting
Country
UK
Channel Swapping
Set VIDEO Plus+ CH
• You can cancel before auto tuning has finished by
pressing ENTER again.
After auto scanning has finished, the channel mapping
screen appears showing which channels have been
assigned to which program numbers.
Initial Setup
Setup Navigator
Channel Mapping
Pr
System
1
I
2
I
3
I
4
I
5
I
6
I
7
I
8
I
• Default setting: n/a
Initial Setup
Basic
Tuner
Video In/Out
Audio In
Audio Out
Language
Recording
Playback
Clock Setting
Input Line System
On Screen Display
Front Panel Display
Power Save
Remote Control Set
Setup Navigator
Start
The Setup Navigator appears automatically when you
switch on the recorder for the first time (or after resetting
the recorder). It is also available from the Initial Settings
menu should you need it at any other time.
CH
26
33
23
30
37
35
39
26
Name
Pr
9
10
11
12
13
14
15
16
System
I
I
I
I
I
I
I
I
CH
9
25
11
12
13
14
15
16
1/7
Name
Use the PREV/NEXT buttons to display the previous/next
page.
3
Press HOME MENU to exit this screen.
See also Switching on and setting up on page 25.
99
En
DVR-04_HDD_UK.book 100 ページ 2004年4月11日 日曜日 午後6時11分
The Initial Setup menu
13
1
Note
• You can fine-tune individual stations using the
Manual CH Setting feature. See Manual CH Setting
below for how to use this.
Initial Setup
Basic
Tuner
Video In/Out
Audio In
Audio Out
Language
Recording
Playback
Auto Channel Setting : Download from TV
If you connected this recorder to your TV using the
AV1(RGB)-TV AV connector, and if your TV supports this
function, you can download all the channels that your TV
is tuned to. Check your TV’s instruction manual for more
details.
1
Choose ‘Download from TV’.
2
Auto Channel Setting
Manual CH Setting
Channel Swapping
Set VIDEO Plus+ CH
Auto Channel Setting
Manual CH Setting
Channel Swapping
Set VIDEO Plus+ CH
Next Screen
Press ENTER to go to the country setting screen.
2
Select your country.
Initial Setup
Initial Setup
Basic
Tuner
Video In/Out
Audio In
Audio Out
Language
Recording
Playback
Select ‘Manual CH Setting’, then ‘Next Screen’.
Auto Scan
Download from TV
Basic
Tuner
Video In/Out
Audio In
Audio Out
Language
Recording
Playback
Manual
Channel Setting
Auto Channel
Setting
CH Setting
Manual Channel
Setting
Country
UK
Channel Swapping
Set VIDEO Plus+ CH
3 Press ENTER to go to the manual channel setting
screen.
Select your country.
Pr 1
Initial Setup
Basic
Tuner
Video In/Out
Audio In
Audio Out
Language
Recording
Playback
3
Auto Setting
Channel
Auto Channel
Channel
Setting Setting
Auto
Manual CH Setting
Country
UK
Channel Swapping
Set VIDEO Plus+ CH
Press ENTER to start downloading.
Skip
CH System
Channel
AFT
Level
Sound System
Name
Decoder
Off
UK & IE
2
On
I
Off
• Use the CHANNEL +/– buttons or the number
buttons to change channels.
From this screen there are eight parameters you can set:
Downloading
Pr 5
Cancel
After downloading has finished, the channel mapping
screen appears showing which channels have been
assigned to which program numbers.
Tip
• If the channel tuning information is updated in the
TV, the recorder will automatically download the new
information.
Manual CH Setting
The channel skip function lets you skip channels where
there is no station so that as you change channels using
the CHANNEL +/– buttons or the number buttons, you
only change to channels that have a station.
The manual tuning function allows you to manually tune
to stations, should you need to.
100
En
• Skip – If you want to skip the displayed channel
(because there is no station assigned to that
channel), change the Skip setting to On.
• CH System – Set the channel system used in your
area or region.
• Channel – Change the channel number assigned to
the current preset.
• AFT (Auto Fine Tune) – When set to On, the station is
automatically tuned; set to Off to manually fine tune
(see below).
• Level – Set the AFT level (see above).
• Sound System – Set the sound system used for the
current channel.
• Name – Move the cursor right then input a name for
the current station, (up to five characters) then press
ENTER.
• Decoder – If the current channel is scrambled,
requiring a decoder connected to the AV2/AUTO
START REC (INPUT 1/DECODER) connector, set this
to On. (See also AV2/L1 In on page 102.)
DVR-04_HDD_UK.book 101 ページ 2004年4月11日 日曜日 午後6時11分
The Initial Setup menu
13
Channel Swapping
5
The preset swap feature lets you swap the channel
assignments of different programs. This is so that you
can group together station presets which naturally go
together.
6 If you want to swap more presets, press (cursor left), then repeats steps 3 to 5.
1
Select ‘Channel Swapping’.
7
• Default setting: n/a
Auto Channel Setting
Manual CH Setting
Channel Swapping
Set VIDEO Plus+ CH
Guide channels are used by the VIDEO Plus+ system so
that the channel number specified in the PlusCode
programming numbers can be guaranteed to
correspond to the correct station.
Next Screen
1
2 Select ‘Next Screen’ to go to the swap presets
screen.
System
I
I
I
I
I
I
Swap Preset
1/17
CH Name
CC40
2
3
4
5
6
[2]
Pr
1
2
3
4
5
6
1
System
I
I
I
I
I
I
1/17
CH Name
CC40
2
3
4
5
6
1
Initial Setup
Swap Preset
1/17
CH Name
CC40
2
3
4
5
6
[2]
Pr
1
2
3
4
5
6
5
System
I
I
I
I
I
I
1/17
CH Name
CC40
2
3
4
5
6
Set VIDEO
Plus+ CH
Auto Channel
Setting
Manual CHGuide
Setting Preset
Channel Swapping
Pr 4
1
Set VIDEO Plus+
2 CH
3
4
5
1/26
Guide Preset
6
7
8
9
10
• Use the / (cursor up/down) buttons to change
the guide channel for setting.
• Use the / (cursor left/right) buttons to change
the channel number.
1
4 Press (cursor right), then select a preset
station to swap with the first preset.
Next Screen
Initial Setup
Basic
Tuner
Video In/Out
Audio In
Audio Out
Language
Recording
Playback
Initial Setup
System
I
I
I
I
I
I
Auto Channel Setting
Manual CH Setting
Channel Swapping
Set VIDEO Plus+ CH
2 Assign channel numbers to the guide channels as
necessary.
Look in your TV guide to see which channel numbers
should be assigned to which guide channels.
3 Use the / (cursor up/down) buttons to select
a preset station to swap.
• Use the PREV/NEXT buttons to display the previous/
next page.
[1]
Pr
1
2
3
4
5
6
Select ‘Set VIDEO Plus+ CH’, then ‘Next Screen’.
Basic
Tuner
Video In/Out
Audio In
Audio Out
Language
Recording
Playback
Initial Setup
[1]
Pr
1
2
3
4
5
6
Press HOME MENU to finish and exit.
Set VIDEO Plus+ CH
Initial Setup
Basic
Tuner
Video In/Out
Audio In
Audio Out
Language
Recording
Playback
Press ENTER to swap the presets.
• Use the PREV / NEXT button to display the previous/
next 10 guide channels.
3
To return to the Initial Setup menu, press ENTER.
Initial Setup
[1]
Pr
1
2
3
4
5
6
System
I
I
I
I
I
I
Swap Preset
1/17
CH Name
CC40
2
3
4
5
6
5
[2]
Pr
1
2
3
4
5
6
System
I
I
I
I
I
I
1/17
CH Name
CC40
2
3
4
5
6
3
101
En
DVR-04_HDD_UK.book 102 ページ 2004年4月11日 日曜日 午後6時11分
The Initial Setup menu
13
AV1 Out
Video In / Out settings
• Default setting: Video
You only need to make this setting if you connected this
recorder to your TV using the AV1(RGB)-TV SCART AV
connector.
Input Colour System
• Default setting: Auto
Important
Initial Setup
Basic
Tuner
Video In/Out
Audio In
Audio Out
Language
Recording
Playback
Input Colour System
AV1 Out
AV2/L1 In
NTSC on PAL TV
Next Screen
On the default setting, the recorder automatically detects
whether the video signal from the built-in tuner or from
one of the external inputs is PAL, SECAM, 3.58 NTSC or
PAL–60. You may, however, occasionally need to set it
manually if the picture is not displayed properly.
1
Select ‘Input Colour System’, then ‘Next Screen’.
2 Use the CHANNEL +/– buttons or the INPUT
SELECT button to switch between the built-in tuner
and the external inputs.
3 Use the / (cursor left/right) buttons to
change the input colour system for the current input
or built-in tuner.
Pr 5
• If you make a setting here that is incompatible with
your TV, the TV may not display any picture at all. If
this happens either switch everything off and
reconnect to the TV using either the supplied video
cable, or an S-video cable (see Using the S-video
output on page 15 for more on this), or reset the
recorder (see Resetting the recorder on page 112 for
how to do this).
Initial Setup
Basic
Tuner
Video In/Out
Audio In
Audio Out
Language
Recording
Playback
Input Colour System
AV1 Out
AV2/L1 In
NTSC on PAL TV
Video
S-Video
RGB
• Video – Compatible with all TVs, but lowest quality of
the three AV settings.
• S-Video – Almost the same quality as RGB, but can
give better results if you are using a long SCART
cable.
• RGB – If your TV is compatible, this setting gives the
best picture quality.
Auto
• The available settings depend on the Input Line
System setting (see Input Line System on page 98).
The table below shows the different options available.
Input Line System
Built-in tuner
External input
625 System
Auto
Auto
PAL
PAL
SECAM
SECAM
n/a
Auto
AV2/L1 In
• Default setting: Video
You only need to make this setting if you connected this
recorder to another component using the AV2/AUTO
START REC (INPUT 1/DECODER) AV connector.
Initial Setup
525 System
3.58 NTSC
PAL–60
Basic
Tuner
Video In/Out
Audio In
Audio Out
Language
Recording
Playback
Input Colour System
AV1 Out
AV2/L1 In
NTSC on PAL TV
Video
S-Video
RGB
Decoder
The AV2/AUTO START REC (INPUT 1/DECODER)
connector input can be set to one of the following
settings:
• Video – Sets the input signal type to composite
video.
• S-Video – Sets the input signal type to S-video.
• RGB – Sets the input signal type to RGB video.
102
En
DVR-04_HDD_UK.book 103 ページ 2004年4月11日 日曜日 午後6時11分
The Initial Setup menu
13
• Decoder – Use this setting if you are using a decoder
connected to the AV2/AUTO START REC (INPUT 1/
DECODER) input. (For scrambled channels, make
sure that the manual channel Decoder setting is set
to On—see also Manual CH Setting on page 100).
Note that on this setting, it is not possible to use Auto
Start Recording.
Audio In settings
NICAM Select
• Default setting: NICAM
Initial Setup
Note
• When the Input Line System setting is set to 525
System, RGB can’t be selected.
• When the Input Line System setting is set to 625
System, RGB can be selected, but if the Input Line
System is then changed to 525 System, the AV2/L1
In setting automatically changes to Video.
• See also Input Line System on page 98.
NTSC on PAL TV
Basic
Tuner
Video In/Out
Audio In
Audio Out
Language
Recording
Playback
NICAM Select
Tuner Level
External Audio
Bilingual Recording
DV Input
Input Level (L1)
Input Level (L2)
NICAM
Regular Audio
If you want to record the non-NICAM audio in a TV
broadcast, select Regular Audio, otherwise set to
NICAM. (When set to NICAM, you can still select
Regular Audio using the AUDIO button. See Changing
audio channels on page 29.)
• Default setting: On
Tuner Level
• Default setting: Normal
Initial Setup
Basic
Tuner
Video In/Out
Audio In
Audio Out
Language
Recording
Playback
Input Colour System
AV1 Out
AV2/L1 In
NTSC on PAL TV
On
Off
Initial Setup
When set to On, NTSC discs (from the U.S., for example)
will play correctly on a PAL-only TV. Change to Off if your
TV is already NTSC-compatible.
Depending on this setting and the Input Line System
setting (see Input Line System on page 98), the signal
format output when the recorder is stopped varies as
shown in the table below.
Input Line System
NTSC on PAL
TV
Output when
stopped
625 System
Off
PAL
On
PAL
Off
NTSC
On
PAL–60
525 System
Note
• Many recent PAL TVs are capable of correctly
displaying NTSC pictures without the need for this
setting. Check the manual that came with your TV if
you’re not sure whether yours has this feature.
Basic
Tuner
Video In/Out
Audio In
Audio Out
Language
Recording
Playback
NICAM Select
Tuner Level
External Audio
Bilingual Recording
DV Input
Input Level (L1)
Input Level (L2)
Normal
Compression
Set to Compression if the audio level from the built-in
tuner is excessively high causing distortion.
External Audio
• Default setting: Stereo
Initial Setup
Basic
Tuner
Video In/Out
Audio In
Audio Out
Language
Recording
Playback
NICAM Select
Tuner Level
External Audio
Bilingual Recording
DV Input
Input Level (L1)
Input Level (L2)
Stereo
Bilingual
If the external source is standard stereo, leave set to
Stereo. If each channel carries a separate soundtrack,
change to Bilingual.
DVR-520H/720H only: When the external audio is from
the DV input, an audio subcode channel within the DV
audio tells the recorder whether the audio is stereo or
bilingual. This has priority over the setting you make here.
103
En
DVR-04_HDD_UK.book 104 ページ 2004年4月11日 日曜日 午後6時11分
13
The Initial Setup menu
Bilingual Recording
You can adjust the gain of the audio from each external
input individually, from –6dB to +6dB in steps of 3 dB to
optimize the recorded audio level.
• Default setting: A/L
Initial Setup
Basic
Tuner
Video In/Out
Audio In
Audio Out
Language
Recording
Playback
NICAM Select
Tuner Level
External Audio
Bilingual Recording
DV Input
Input Level (L1)
Input Level (L2)
A/L
B/R
Audio Out settings
Digital Out
When recording a bilingual source from an external input
in Video mode or VR mode set to FINE/MN32, or to the
HDD, you can choose to record either the A/L (left), or
the B/R (right) audio channel.
Note
• If you’re recording in VR mode (except when set to
FINE/MN32), both channels will be recorded and you
can switch them as you like on playback.
• Default setting: On
Initial Setup
Basic
Tuner
Video In/Out
Audio In
Audio Out
Language
Recording
Playback
Digital Out
Dolby Digital Out
DTS Out
96kHz PCM Out
MPEG Out
On
Off
If at any time you need to switch off the digital audio
output, set this to Off, otherwise leave it On.
DV Input (DVR-520H/720H only)
• Default setting: Stereo1
Note
You need to set this if you have a camcorder using 32kHz/
12-bit sound connected to the front panel DV IN/OUT jack.
Initial Setup
Basic
Tuner
Video In/Out
Audio In
Audio Out
Language
Recording
Playback
Dolby Digital Out
NICAM Select
Tuner Level
External Audio
Bilingual Recording
DV Input
Input Level (L1)
Input Level (L2)
Stereo1
Stereo2
Mix (Stereo1: 75%)
Mix (Stereo1: 50%)
Mix (Stereo1: 25%)
On the Stereo1 setting, the sound that was recorded
while shooting is used. On the Stereo2 setting, the
overdubbed sound is used. You can also choose a Mix
setting of 25%, 50% or 75% for the Stereo 1 with a
corresponding Stereo 2 setting of 75%, 50% or 25%.
Input Level (L1 / L2)
• Default setting: 0dB
Initial Setup
104
En
NICAM Select
Tuner Level
External Audio
Bilingual Recording
DV Input
Input Level (L1)
Input Level (L2)
You only need to make this setting if you connected this
recorder to an AV amp/receiver (or other component) using
the digital output.
• Default setting: Dolby Digital
Some digital camcorders have two stereo tracks for
audio. One is recorded at the time of shooting; the other
is for overdubbing after shooting.
Basic
Tuner
Video In/Out
Audio In
Audio Out
Language
Recording
Playback
• When set to Off, all the other Audio Out settings are
grayed out and can’t be set.
+6dB
+3dB
0dB
– 3dB
– 6dB
Initial Setup
Basic
Tuner
Video In/Out
Audio In
Audio Out
Language
Recording
Playback
Digital Out
Dolby Digital Out
DTS Out
96kHz PCM Out
MPEG Out
Dolby Digital
Dolby Digital PCM
If your AV amp/receiver (or other connected component)
is Dolby Digital compatible, set to Dolby Digital,
otherwise set to Dolby Digital PCM. Check the
manual that came with the connected component if
you’re unsure whether it is Dolby Digital compatible.
DVR-04_HDD_UK.book 105 ページ 2004年4月11日 日曜日 午後6時11分
The Initial Setup menu
13
DTS Out
MPEG Out
You only need to make this setting if you connected this
recorder to an AV amp/receiver (or other component) using
the digital output.
You only need to make this setting if you connected this
recorder to an AV amp/receiver (or other component) using
the digital output.
• Default setting: MPEG PCM
• Default setting: On
Initial Setup
Basic
Tuner
Video In/Out
Audio In
Audio Out
Language
Recording
Playback
Initial Setup
Digital Out
Dolby Digital Out
DTS Out
96kHz PCM Out
MPEG Out
On
Off
If your AV amp/receiver (or other connected component)
has a built-in DTS decoder, set to On, otherwise set to
Off. Check the manual that came with the connected
component if you’re unsure whether it is DTS
compatible.
Basic
Tuner
Video In/Out
Audio In
Audio Out
Language
Recording
Playback
Digital Out
Dolby Digital Out
DTS Out
96kHz PCM Out
MPEG Out
MPEG
MPEG PCM
If your AV amp/receiver (or other connected component)
is MPEG audio compatible, set to MPEG, otherwise set to
MPEG PCM. Check the manual that came with the
connected component if you’re unsure whether it is
MPEG compatible.
Important
• If you set to On with a non-DTS compatible amp/
receiver, noise will be output when you play a DTS
disc.
Language settings
• When set to On, there is no analog audio output
when playing a DTS DVD-Video disc.
OSD Language
• When playing a DTS audio CD (even when DTS Out
is Off), noise is output from the analog outputs. Do
not play this through your amplifier and speakers.
• When playing a DTS audio CD, make sure that
Stereo is selected using the AUDIO button. See
Switching audio channels on page 44.
96kHz PCM Out
You only need to make this setting if you connected this
recorder to an AV amp/receiver (or other component) using
the digital output.
• Default setting: 96kHz 48kHz
• Default setting: English
Initial Setup
Basic
Tuner
Video In/Out
Audio In
Audio Out
Language
Recording
Playback
OSD Language
Audio Language
Subtitle Language
Auto Language
DVD Menu Language
Subtitle Display
English
Français
Deutsch
Italiano
Español
This sets the language of the on-screen menus and
displays.
Audio Language
• Default setting: English
Initial Setup
Basic
Tuner
Video In/Out
Audio In
Audio Out
Language
Recording
Playback
Digital Out
Dolby Digital Out
DTS Out
96kHz PCM Out
MPEG Out
96kHz 48kHz
96kHz
If your AV amp/receiver (or other connected component)
is compatible with high sampling rate audio (88.2 / 96
kHz), set to 96kHz, otherwise set to 96kHz 48kHz.
Check the manual that came with the connected
component if you’re unsure whether it is compatible with
high sampling rate audio.
Initial Setup
Basic
Tuner
Video In/Out
Audio In
Audio Out
Language
Recording
Playback
OSD Language
Audio Language
Subtitle Language
Auto Language
DVD Menu Language
Subtitle Display
English
French
German
Italian
Spanish
Other
This setting is your preferred audio language for DVD
discs. If the language you specify here is recorded on a
disc, the recorder automatically plays the disc in that
language (although this depends on the Auto Language
setting—see Auto Language on page 106).
105
En
DVR-04_HDD_UK.book 106 ページ 2004年4月11日 日曜日 午後6時11分
13
The Initial Setup menu
Choose Other if you want to specify a language other
than those listed (see Selecting ‘Other’ languages on
page 107).
Tip
• You can switch between the languages recorded on
a DVD disc any time during playback using the
AUDIO button. (This does not affect this setting.)
Set to Off to have the recorder play discs strictly
according to your Audio Language and Subtitle
Language settings.
For Auto Language to work, the Audio Language and
Subtitle Language settings must be the same—see
Audio Language on page 105 and Subtitle Language
above.
Note
• Even when set to On, Auto Language may not work
with some discs. In this case, set the audio and
subtitle languages using the AUDIO and SUBTITLE
buttons.
Subtitle Language
• Default setting: English
Initial Setup
Basic
Tuner
Video In/Out
Audio In
Audio Out
Language
Recording
Playback
OSD Language
Audio Language
Subtitle Language
Auto Language
DVD Menu Language
Subtitle Display
English
French
German
Italian
Spanish
Other
This setting is your preferred subtitle language for DVD
discs. If the language you specify here is recorded on a
disc, the recorder automatically plays the disc with those
subtitles (although this depends on the Auto Language
setting—see Auto Language below).
Choose Other if you want to specify a language other
than those listed (see Selecting ‘Other’ languages on
page 107).
Tip
• You can change or switch off the subtitles on a DVD
disc any time during playback using the SUBTITLE
button. (This does not affect this setting.)
• Default setting: On
Initial Setup
OSD Language
Audio Language
Subtitle Language
Auto Language
DVD Menu Language
Subtitle Display
On
Off
When set to On, the recorder selects the default audio
language on a DVD disc (French dialog for a French
movie, for example), and displays subtitles in your
preferred subtitle language only if that is set to
something different. In other words, movies in your native
language won’t have any subtitles, while foreign
language movies will be shown with subtitles.
106
En
• You can still switch audio and subtitle languages on
playback using the AUDIO and SUBTITLE buttons.
DVD Menu Language
• Default setting: w/Subtitle Language
Initial Setup
Basic
Tuner
Video In/Out
Audio In
Audio Out
Language
Recording
Playback
OSD Language
Audio Language
Subtitle Language
Auto Language
DVD Menu Language
Subtitle Display
w/Subtitle Language
English
French
German
Italian
Spanish
Other
Some multilingual discs have disc menus in several
languages. This setting specifies in which language the
disc menus should appear. Leave on the default setting
for menus to appear in the same language as your
Subtitle Language—see Subtitle Language above.
Choose Other if you want to specify a language other
than those listed (see Selecting ‘Other’ languages on
page 107).
Auto Language
Basic
Tuner
Video In/Out
Audio In
Audio Out
Language
Recording
Playback
Tip
DVR-04_HDD_UK.book 107 ページ 2004年4月11日 日曜日 午後6時11分
The Initial Setup menu
13
Subtitle Display
Recording settings
• Default setting: On
Initial Setup
Basic
Tuner
Video In/Out
Audio In
Audio Out
Language
Recording
Playback
OSD Language
Audio Language
Subtitle Language
Auto Language
DVD Menu Language
Subtitle Display
On
Off
Assist Subtitle
When set to On, the recorder displays subtitles
according to the Subtitle Language and Auto
Language settings. Set to Off to switch subtitles off
altogether (although you may find that some discs
override this setting). Set to Assist Subtitle to have the
recorder display the extra assistive subtitles recorded on
to some DVD discs.
Manual Recording
• Default setting: Off
Initial Setup
Basic
Tuner
Video In/Out
Audio In
Audio Out
Language
Recording
Playback
Manual Recording
Optimized Rec
Navi Mark
Auto Chapter (Video)
Frame Accurate
DVD-RW Auto Init.
On (go to setup)
Off
On the default setting there are four different recording
time/picture quality settings, FINE, SP, LP and EP. If you
want to create a custom setting, switch on Manual
Recording and select one of the 32 manual settings.
Selecting ‘Other’ languages
When recording, you can select your Manual Recording
setting using the REC MODE button.
1 Select ‘Other’ from the language list.
This option appears in the settings for DVD Menu
Language, Audio Language, and Subtitle Language.
1 Select ‘On (go to setup)’ to display the manual
recording setting screen.
2
Select the language you want.
Pr 5
HDD Remain
EP
Initial Setup
Basic
Tuner
Video In/Out
Audio In
Audio Out
Language
Recording
Playback
DVD Menu Language
OSD Language
Audio Language
Language
English
Subtitle Language
Auto Language
Number
0 5 1 4
DVD Menu Language
Subtitle Display
• Select by language name: Use the / (cursor left/
right) buttons to change the language.
• Select by code number: Press (cursor down) then
use the number buttons to enter the four-digit
language code.
See Language code list on page 119 for a list of available
languages and corresponding codes.
3
Press ENTER to confirm and exit the screen.
30h33m
LP
MN 9 (4h00m/DVD) 2.60Mbps
DVD Remain 2h00m
SP
FINE
Preview
2 Use the / (cursor left/right) buttons to
change the manual recording level.
• You can also use the and buttons to cycle
between levels MN1, MN9, MN21 and MN32.
• To preview the recording quality, press (cursor
down) and select Preview. To return to the level
adjust screen, press ENTER.
3 Press ENTER to set the manual recording level
and return to the menu screen.
Note
• The preset picture quality settings correspond to the
following manual settings: FINE: MN32, SP: MN21,
LP: MN9, EP: MN1.
• See Manual recording modes on page 118 for
detailed information on the manual recording levels.
107
En
DVR-04_HDD_UK.book 108 ページ 2004年4月11日 日曜日 午後6時11分
13
The Initial Setup menu
Optimized Rec
Auto Chapter (Video)
• Default setting: Off
• Default setting: 10 minutes
Initial Setup
Initial Setup
Basic
Tuner
Video In/Out
Audio In
Audio Out
Language
Recording
Playback
Manual Recording
Optimized Rec
Navi Mark
Auto Chapter (Video)
Frame Accurate
DVD-RW Auto Init.
On
Off
On the default setting, if a timer program (standard, easy
or VIDEO Plus+ programming system) is set but there
isn’t enough space on the disc at the recording quality
set, the recording will start, but it will be cut off when the
disc is full. Set Optimized Rec to On to have the recorder
automatically adjust the recording quality to fit the
available disc space.
Basic
Tuner
Video In/Out
Audio In
Audio Out
Language
Recording
Playback
Manual Recording
Optimized Rec
Navi Mark
Auto Chapter (Video)
Frame Accurate
DVD-RW Auto Init.
No Separation
10 minutes
15 minutes
When recording in Video mode, a new chapter is started
every 10 minutes on the default setting. You can change
this interval to 15 minutes, or switch off automatic
chapter marking altogether with the No Separation
setting.
Frame Accurate
• Default setting: Off
Note
• You may notice a reduction in picture quality if the
recorder has to fit a lot of extra material into the
remaining time available on the disc.
• If, even on recording level MN 1, there is insufficient
space available on the disc, the recording is made on
the HDD at the quality setting you originally
specified.
• Optimized Recording only compensates for the first
(earliest starting) timer program if more than one has
been set.
• Optimized recording works only with DVD
recordings.
• Optimized recording can’t be used together with
VPS/PDC.
• Default setting: 0 seconds
Manual Recording
Optimized Rec
Navi Mark
Auto Chapter (Video)
Frame Accurate
DVD-RW Auto Init.
0 seconds
30 seconds
3 minutes
In the Disc Navigator, each title is shown with a still
frame picture to remind you what it is. This setting lets
you decide the default still frame. The default setting of 0
seconds takes the first frame of the title, but you can also
set it to 30 seconds or 3 minutes into the title (if the title
is shorter than the setting, then the first frame is used).
108
On
Off
When Frame Accurate setting is Off, exact frame
accuracy is traded for high-speed copying when
recording a Copy List. Switch Frame Accurate On to
preserve the accuracy of the Copy List. However, copying
some edited Video mode titles will be done in real time.
Important
• The Frame Accurate setting has no effect on the
actual video content stored on the HDD.
Initial Setup
En
Manual Recording
Optimized Rec
Navi Mark
Auto Chapter (Video)
Frame Accurate
DVD-RW Auto Init.
• When you change this setting the Copy List is erased.
Make sure it is set how you want it before you start
putting together a Copy List.
Navi Mark
Basic
Tuner
Video In/Out
Audio In
Audio Out
Language
Recording
Playback
Initial Setup
Basic
Tuner
Video In/Out
Audio In
Audio Out
Language
Recording
Playback
DVD-RW Auto Init.
• Default setting: VR Mode
When you load a new, blank DVD-RW disc the recorder
automatically initializes it for recording. You can set it to
initialize the disc for VR mode or Video mode recording.
Initial Setup
Basic
Tuner
Video In/Out
Audio In
Audio Out
Language
Recording
Playback
Manual Recording
Optimized Rec
Navi Mark
Auto Chapter (Video)
Frame Accurate
DVD-RW Auto Init.
VR Mode
Video Mode
DVR-04_HDD_UK.book 109 ページ 2004年4月11日 日曜日 午後6時11分
The Initial Setup menu
13
Seamless Playback
Playback settings
VR mode
HDD
• Default setting: Off
TV Screen Size
• Default setting: 4:3 (Letter Box)
Initial Setup
Basic
Tuner
Video In/Out
Audio In
Audio Out
Language
Recording
Playback
TV Screen Size
Still Picture
Seamless Playback
Parental Lock
Angle Indicator
4:3 (Letter Box)
4:3 (Pan & Scan)
16:9
Initial Setup
If you have a widescreen TV, select the 16:9 setting—
widescreen DVD software is then shown using the full
screen area. When playing software recorded in
conventional (4:3) format, the settings on your TV will
determine how the material is presented—see the
manual that came with your TV for details on what
options are available.
If you have a conventional TV, choose either 4:3 (Letter
Box) or 4:3 (Pan & Scan). In Letter Box mode,
widescreen software is shown with black bars at the top
and bottom of the screen. Pan & Scan chops the sides off
widescreen material to make it fit the 4:3 screen (so even
though the picture looks larger on the screen, you’re
actually seeing less of the movie). See Screen sizes and
disc formats on page 113 for more information.
• Default setting: Auto
Initial Setup
TV Screen Size
Still Picture
Seamless Playback
Parental Lock
Angle Indicator
Basic
Tuner
Video In/Out
Audio In
Audio Out
Language
Recording
Playback
TV Screen Size
Still Picture
Seamless Playback
Parental Lock
Angle Indicator
On
Off
Parental Lock
• Default level: Off
• Default password: none
• Default Country code: us (2119)
Some DVD-Video discs feature a Parental Lock level. If
the recorder is set to a lower level than the disc, it will
require you to enter a password before the disc will play.
This gives you some control about what your children
watch on your DVD recorder.
Some discs also support the Country code feature. The
recorder does not play certain scenes on these discs
depending on the Country code you set.
Still Picture
Basic
Tuner
Video In/Out
Audio In
Audio Out
Language
Recording
Playback
During playback of a VR mode Play List, you may notice
momentary interruption in the picture at edited points.
The Seamless Playback feature lets you trade-off
accuracy of the edit points for more seamless playback.
When switched On, you may notice that the edit points
are a few frames earlier or later than you set.
Field
Frame
Auto
The recorder uses one of two processes when displaying
a still frame from a DVD disc. The default Auto setting
automatically chooses the best setting each time.
• Field – produces a stable, generally shake-free
image.
• Frame – produces a sharper image, but more prone
to shake than field stills.
Before you can set the Parental Lock level or the Country
code you must set a password. As the password owner
you can change the Parental Lock level or Country code
whenever you like. You can also change the password.
Note
• Not all discs that you may consider inappropriate for
your children use the Parental Lock feature. These
discs will always play without requiring the password
first.
• If you forget the password, you can reset the recorder
to its factory settings (see Resetting the recorder on
page 112), then set a new password.
Parental Lock : Set Password
The password you set will enable you to change the
Parental Lock level and Country code setting. It is also the
password that you will need to enter if you want to play a
disc with a parental lock level higher than the recorder.
109
En
DVR-04_HDD_UK.book 110 ページ 2004年4月11日 日曜日 午後6時11分
The Initial Setup menu
13
1
5
Select ‘Set Password’.
Parental Lock : Change Level
Initial Setup
Basic
Tuner
Video In/Out
Audio In
Audio Out
Language
Recording
Playback
Press ENTER.
TV Screen Size
Still Picture
Seamless Playback
Parental Lock
Angle Indicator
Set Password
Change Level
Country Code
1
Select ‘Change Level’.
Initial Setup
Basic
Tuner
Video In/Out
Audio In
Audio Out
Language
Recording
Playback
2 Use the number buttons to input a four-digit
password.
TV Screen Size
Still Picture
Seamless Playback
Parental Lock
Angle Indicator
Change Password
Change Level
Country Code
Initial Setup
Basic
Tuner
Video In/Out
Audio In
Audio Out
Language
Recording
Playback
3
2 Use number buttons to enter your password,
then press ENTER.
Set Size
Password
TV Screen
Still Picture
Seamless Playback
Parental Lock
1 2 3 4
Angle Indicator
Initial Setup
Basic
Tuner
Video In/Out
Audio In
Audio Out
Language
Recording
Playback
Press ENTER to set the password.
Parental Lock : Change Password
To change your password, confirm your existing
password then enter a new one.
1
Parental
TV Screen
Size Lock : Change Level
Still Picture
1 2 3 4
Password
Seamless Playback
Parental Lock
Angle Indicator
Off
3 Use the / (cursor left/right) buttons to select
a new parental lock level.
Select ‘Change Password’.
Initial Setup
Initial Setup
Basic
Tuner
Video In/Out
Audio In
Audio Out
Language
Recording
Playback
TV Screen Size
Still Picture
Seamless Playback
Parental Lock
Angle Indicator
Basic
Tuner
Video In/Out
Audio In
Audio Out
Language
Recording
Playback
Change Password
Change Level
Country Code
4
2 Use the number buttons to enter your existing
password.
Change
TV Screen
Size Password
Still Picture
Seamless Playback
Current Password
Parental Lock
Angle Indicator
New Password
3
Press ENTER.
4
Enter a new password.
1 2 3 4
110
En
Off
Press ENTER to set the new Parental Lock level.
Parental Lock : Country Code
Change
TV Screen
Size Password
Still Picture
Seamless Playback
Current Password
Parental Lock
Angle Indicator
New Password
1
Select ‘Country Code’.
Initial Setup
Basic
Tuner
Video In/Out
Audio In
Audio Out
Language
Recording
Playback
Initial Setup
Basic
Tuner
Video In/Out
Audio In
Audio Out
Language
Recording
Playback
Parental Lock
Angle Indicator
You may also want to refer to the Country code list on
page 119.
Initial Setup
Basic
Tuner
Video In/Out
Audio In
Audio Out
Language
Recording
Playback
Parental
TV Screen
Size Lock : Change Level
Still Picture
1 2 3 4
Password
Seamless Playback
1 2 3 4
5 6 7 8
TV Screen Size
Still Picture
Seamless Playback
Parental Lock
Angle Indicator
Change Password
Change Level
Country Code
DVR-04_HDD_UK.book 111 ページ 2004年4月11日 日曜日 午後6時11分
The Initial Setup menu
2 Use number buttons to enter your password,
then press ENTER.
Initial Setup
Basic
Tuner
Video In/Out
Audio In
Audio Out
Language
Recording
Playback
Parental
TV Screen
Size Lock: Country Code
Still Picture
1 2 3 4
Password
Seamless Playback
Parental Lock
Angle Indicator
us
Code
Number
13
On the default setting, when playing a DVD-Video disc
that features multi-angle scenes, an icon appears onscreen during the parts of the disc where angle switching
is available. Change to Off to hide the on-screen
indicator.
2 1 1 9
3 Select a Country code.
There are two ways you can do this.
• Select by code letter: Use / (cursor left/right) to
change the country code.
Initial Setup
Basic
Tuner
Video In/Out
Audio In
Audio Out
Language
Recording
Playback
Parental
TV Screen
Size Lock: Country Code
Still Picture
1 2 3 4
Password
Seamless Playback
Parental Lock
Angle Indicator
Code
Number
us
2 1 1 9
• Select by code number: Press (cursor down) then
use the number buttons to enter the four-digit
country code (you can find the Country code list on
page 119.)
Initial Setup
Basic
Tuner
Video In/Out
Audio In
Audio Out
Language
Recording
Playback
4
Parental
TV Screen
Size Lock: Country Code
Still Picture
1 2 3 4
Password
Seamless Playback
Parental Lock
Angle Indicator
Code
Number
us
2 1 1 9
Press ENTER to set the new Country code.
Note
• Changing the country code does not take effect until
the next disc is loaded (or the current disc is
reloaded).
Angle Indicator
• Default setting: On
Initial Setup
Basic
Tuner
Video In/Out
Audio In
Audio Out
Language
Recording
Playback
TV Screen Size
Still Picture
Seamless Playback
Parental Lock
Angle Indicator
On
Off
111
En
DVR-04_HDD_UK.book 112 ページ 2004年4月11日 日曜日 午後6時11分
Additional information
14
Chapter 14
Additional information
Maker
Code
Resetting the recorder
Alba
66
If you need to, you can reset the recorder to all its factory
settings.
Bush
76
1
Finlux
84
Fisher
61, 65
Fujitsu
77
Funai
67
Goldstar
79
Grandiente
87
Grundig
51, 82
Hitachi
56, 60, 83, 86
ITT
70
1 Press and hold down the CLEAR button, then
enter the maker code for your TV.
The LED indicator on the remote controls lights.
Mitsubishi
59
Nokia
53, 81
See the table below for the list of maker codes. If there is
more than one code given for your make, input the first
one in the list.
Panasonic
58, 72
Philips
57, 85
• If the maker’s name of your TV doesn’t appear in the
table below, you will not be able to use this remote to
control your TV.
Pioneer
50, 80
RCA
68
2 Press TV to check that the remote works with
your TV.
If the remote is set up correctly, the TV should switch on/
off. If it doesn’t and there is another code given for your
maker, repeat step 1 with a new code.
Salora
71
Samsung
73, 75
Sanyo
74
Sei
78
Using the TV remote control buttons
Sharp
52
The table below shows how to use this remote control
with your TV.
Sony
54
Tandy
69
Telefunken
64
Thomson
62
Toshiba
55
Victor
63
Make sure that the recorder is on.
2 Press and hold STOP and press STANDBY/
ON.
The recorder turns off with all settings reset.
Setting up the remote to control your
TV
You can use the supplied remote to control your TV. To be
able to use this feature you first have to program the
remote with a maker code from the table below.
112
En
Button
What it does
TV
Press to switch the TV on/off (standby)
INPUT SELECT
Press to change the TV’s video input
TV VOLUME
Use to adjust the TV volume
TV CHANNEL
Use to change TV channels
DVR-04_HDD_UK.book 113 ページ 2004年4月11日 日曜日 午後6時11分
Additional information
14
Screen sizes and disc formats
When viewing on a standard TV or monitor
Screen format of disc Setting
Appearance
16:9
4:3 (Letter Box)
The program is shown in
widescreen with black bars at
the top and bottom of the
screen.
4:3 (Pan & Scan)
The sides of the program are
cropped so that the picture
fills the whole screen.
16:9
The program appears
squashed. Set to either 4:3
(Letter Box) or 4:3 (Pan &
Scan).
4:3 (Letter Box)
4:3 (Pan & Scan)
The program is presented
correctly on either setting.
4:3
When viewing on a widescreen TV or monitor
Screen format of disc Setting
Appearance
16:9
16:9
The program is presented in
widescreen.
4:3
16:9
Your TV will determine how the
picture is presented—check
the manual that came with the
TV for details.
113
En
DVR-04_HDD_UK.book 114 ページ 2004年4月11日 日曜日 午後6時11分
14
Additional information
Troubleshooting
Incorrect operation is often mistaken for trouble and malfunction. If you think there is something wrong with this
component, please check the points below. Sometimes the trouble may lie in another component. Investigate the
other components and electrical appliances being used. If the trouble cannot be rectified even after checking the
points below, ask your nearest Pioneer authorized service center or your dealer to carry out repair work.
General
Problem
Remedy
The disc is automatically ejected
after closing the disc tray
• Check that the disc is not a DVD-RAM, DVD+R/RW or other incompatible format
disc (page 9).
• Check that the disc is loaded properly (aligned in disc tray and label-side up).
• Take out the disc and clean it (page 121).
• Check that the disc has a region code compatible with the recorder (page 123).
No picture
• Check that everything is connected properly (page 12).
• Check that the connected TV and/or the AV amp/receiver is set to the correct
input.
Can’t play a disc
• Check that the disc is not a DVD-RAM, DVD+R/RW or other incompatible format
disc (page 9).
• Take out the disc and clean it (page 121).
• Check that the disc is loaded properly (aligned in disc tray and label-side up).
• There may be condensation in the recorder. Leave the recorder for an hour or so
for the condensation to evaporate.
• During HDD recording, you can’t play discs that are recorded with a Line System
different to the current recorder setting.
All settings are reset
• If the recorder is unplugged (or there is a power failure) while the recorder is on,
all the settings will be lost.
• Make sure that you switch the recorder into standby before unplugging the
power cord.
Screen goes blank and controls are
inoperative
• Press STOP then restart playback.
Remote control does not work
• If you connected this recorder to another Pioneer product using the CONTROL
IN jack, point the remote control at the other component to use (page 12).
• Set the remote control to the same ID number as the recorder (page 99). (When
the batteries run down, the remote mode is automatically reset to Recorder1.)
• Use the remote within its operating range (page 8).
• Replace the batteries (page 8).
No sound or sound is distorted
• Make sure that the amp/receiver or TV is set to the correct input and the volume
turned up.
• There is no sound when the picture is paused, or during scanning or slow
motion play. Press PLAY to resume regular playback.
• DTS discs can only be played if this recorder is connected to a DTS decoder or
DTS compatible amp/receiver. If you have connected a suitable decoder, also make
sure that the Initial Setup > Audio Out > DTS Output setting is On.
• Some 96kHz discs do not output audio through the digital jack. In this case,
switch the input of your amp/receiver to analog.
• Check the audio cable connections (page 12).
• If the sound is distorted, try cleaning the cable plugs.
The picture from the external input • If the video signal from the external component is copy-protected, you cannot
connect via this recorder. Connect the component directly to your TV.
is distorted
114
En
DVR-04_HDD_UK.book 115 ページ 2004年4月11日 日曜日 午後6時11分
Additional information
14
Problem
Remedy
The picture is distorted
• Change the Input Line System setting (page 98). (You can also change it by
pressing the + button and DVD on the front panel simultaneously with the
recorder stopped.)
Screen is stretched vertically or hori- • Make sure that the TV Screen Size setting (page 109) is correct for the kind of TV
zontally
you have (see also page 113).
• If you have a widescreen TV, check its aspect ratio settings.
• This recorder’s input switches into wide mode automatically according to the
input signal. When the unit connected is not compatible with VIDEO ID-1
(widescreen signalling), set the connected component to output 4:3 aspect ratio
(standard) video.
Can’t play a disc recorded using this • If the disc was recorded in Video mode, make sure that it’s finalized (page 59).
recorder on another player
•Some players will not play recordable DVD discs, even when recorded in Video
mode and finalized.
• If the disc was recorded in VR mode, the other player must be specifically RW
compatible in order to play it (page 9).
• Discs recorded with copy-once material cannot be played on non-CPRM
compatible players (page 46).
During playback the picture is dark
or distorted
• When a copy-protected disc is played via a VCR, the picture will not display
correctly. Connect the recorder directly to your TV.
Can’t control your TV using this
remote control
• If there is more than one code listed for your make of TV, try each one in turn
(page 112).
• It is possible that none of the codes listed will work with your particular model of
TV, even if the maker appears in the remote control code list.
Can’t record or does not record suc- • Check that there is some remaining blank space on the DVD/HDD.
cessfully
• For a Video mode disc, check that the disc isn’t already finalized.
• The HDD may contain up to 250 titles; one DVD disc 99 (Original) titles and 999
chapters. Check that these limits have not been reached.
• Check that the source you are trying to record is not copy protected.
• For a VR formatted disc, check that the disc isn’t locked (page 92).
• Check that you are recording with the same TV system (PAL, NTSC, etc.) as the
disc has already been recorded in. All recordings on a disc must be in the same TV
system. When recording to the HDD, it is also necessary to set the Input Line
System setting to match what you want to record (page 98).
• The power may have failed during recording.
Timer program doesn’t record successfully
• When setting the recording channel, make sure you set the recorder’s built-in TV
tuner, not the TV’s built-in tuner.
• When recording to a Video mode disc, programs that are copy-once protected
cannot be recorded. Use a VR mode formatted disc for copy-once material
(page 46).
• Two timer programs may have overlapped, in which case only the earlier one will
record completely.
• The power may have failed during recording.
After briefly unplugging or after a
power failure the front panel display shows ‘--:--’
• A backup battery inside the recorder keeps the clock and other settings from
being reset when there is no power to the recorder. This battery should last
approximately five years from factory shipping.
Reset the clock and other recorder settings to use the recorder again. To have the
battery replaced, contact your dealer or a Pioneer Service Center.
Front panel display shows ‘LOCK’
when a button is pressed
• The Child Lock is on; turn off in order to use the recorder (page 55).
115
En
DVR-04_HDD_UK.book 116 ページ 2004年4月11日 日曜日 午後6時11分
14
Additional information
Problem
Remedy
Can’t use One Touch Copy (HDD to
DVD)
• Make sure that there is a recordable DVD loaded with some free space for
recording and fewer than 99 titles already on the disc. Also make sure that for a
Video mode disc, the disc isn’t finalized.
• If the title currently playing contains material that is copy-once protected, One
Touch Copy will not work.
• One Touch Copy doesn’t work if the recorder is already recording to DVD.
Can’t use One Touch Copy (DVD to
HDD)
• Make sure that there is space available on the HDD and that there are fewer than
250 titles on the HDD.
• One Touch Copy doesn’t work if the recorder is already recording to the HDD.
The picture freezes and the front
panel and remote control buttons
stop working
• Press the front panel STANDBY/ON button to switch the power off, then
switch back on and restart playback. If the power fails to switch off, press and hold
STANDBY/ON for 10 seconds until the power switches off.
Note
• If the unit does not operate normally due to external effects such as static electricity, disconnect the power plug
from the outlet and insert again to return to normal operating conditions.
Frequently asked questions
In this section you can find answers to frequently asked
questions on how to use your DVD recorder and what it
can do.
high-speed copy). Alternatively, you could copy the
material in SP (or Optimized) so as to fit it all on to one
disc (note that there will be some loss in picture
quality if you do this).
See also Copying and back-up on page 61.
• How do I make a high-quality copy?
We recommend that you use the high-speed copy
mode. Although the copy is faster than real time,
there is no loss of picture or sound quality compared
to the original.
If there is not enough space on the disc to make a
copy at the same picture quality as the original, we
recommend that you change the recording mode to
‘Optimized’. This will fit the recording on to the
available space on the disc.
See also Copying and back-up on page 61.
• Can I make a DVD copy of, say, a movie that has had
the commercials edited out?
Yes. There are two ways to do this. You can either edit
the video on the HDD then copy the edited version to
DVD, or you can assemble a Copy List that cuts out
the commercials, then record that to DVD.
See also Copying and back-up on page 61.
• I have a two-hour recording on the HDD made in FINE
mode. Can I copy this to DVD in high-speed mode?
A standard DVD disc can hold only an hour of FINE
mode material, so you wouldn’t be able to make a
high-speed copy of this on to one disc. You could
divide up the recording on the HDD into two titles of
an hour each and copy these to two DVDs (using
116
En
• Can I record a bilingual broadcast to the HDD, keeping
both audio channels and switch them on playback?
No. Only the audio channel set in the Bilingual
Recording setting in the Initial Settings menu will be
recorded. If you need to record both channels of
audio, please record using a VR mode DVD-RW disc.
See also Bilingual Recording on page 104.
• Can I record continuously on the HDD for more than
six hours?
Yes, timer recordings made to the HDD can by set for
up to 24 hours. However, because the maximum
length of a title is six hours, the recording will be
spread over two or more titles. Note that there will be
a short break in the recording between titles.
See also Setting a timer recording on page 49.
• Can I copy a finalized Video mode disc (DVD-R or DVDRW) to the HDD?
Yes. Start playing the Video mode disc and use the
One Touch Copy button to copy the currently playing
title to the HDD. Repeat for as many titles on the disc
as you want to copy.
See also One Touch Copy* (DVD to HDD) on page 62.
DVR-04_HDD_UK.book 117 ページ 2004年4月11日 日曜日 午後6時11分
Additional information
• Can I use high-speed copy to copy from DVD to HDD?
You can only use high-speed copy from DVD to HDD
when copying Original titles from a VR mode DVDRW.
See also Copying from DVD to HDD* on page 71.
• Can I copy a copy-once protected program from a
subscription satellite or cable channel to a DVD from
the HDD?
Yes, you can use high-speed copy to copy to a VR
mode DVD-RW disc. You can also divide the
recording on the HDD into a number of smaller titles
if the whole recording won’t fit on to one disc.
14
• Audio output from the DV IN/OUT jack is 16-bit only.
• Audio input to the DV IN/OUT jack should be 32 or
48kHz (not 44.1kHz).
• Picture disturbance in the recording may occur if the
source component pauses playback or plays an
unrecorded section of tape, or if the power fails in the
source component, or the DV cable becomes
disconnected.
DV-related messages
You may see the following messages appear on your TV
screen when using the DV IN/OUT jack.
See also Copying from HDD to DVD* on page 63.
• No DV camcorder connected. – The camcorder is
not connected properly, or the camcorder is switched
off.
• Can I play a DVD I recorded on this recorder on another
DVD player?
• The DV camcorder is recording. – The camcorder is
recording, so you cannot start recording from the
camcorder to this recorder.
Yes, you can generally play DVD-R discs and Video
mode DVD-RW discs recorded on this recorder on
any standard DVD player. You may find, however, that
some players will not play some recordable media.
• You cannot connect more than one DV
camcorder at the same time. – The DV jack on this
recorder supports connection to just one camcorder.
For VR mode DVD-RW discs, look for the ‘RW
Compatible’ mark to see if it will play the disc.
About DV (DVR-520H/720H only)
Using DV, also known as i.LINK, you can connect a DVequipped camcorder to this recorder using a single DV
cable for input and output of audio, video, data and
control signals.
The i.LINK interface is also known as IEEE 1394-1995.
“i.LINK” and the “i.LINK” logo are trademarks.
• This recorder is only compatible with DV-format
(DVC-SD) camcorders. Digital satellite tuners and
Digital VHS video recorders are not compatible.
• You cannot connect more than one DV camcorder at
a time to this recorder.
• You cannot control this recorder from external
equipment connected via the DV IN/OUT jack.
• It may not always be possible to control the
connected camcorder via the DV IN/OUT jack.
• This recorder only outputs HDD/DVD playback video
from the DV IN/OUT jack; signals from the built-in TV
tuner, CD, Video CD and other inputs are not output.
• No tape in the DV camcorder. – There is no
cassette loaded into the connected equipment.
• The DV camcorder is in record-pause mode. – The
camcorder is in record-pause mode.
• DV camcorder playback canceled.
Recording has been paused. – Recording was
paused because the camcorder is not in playback
mode.
• Cannot operate the DV camcorder. – This recorder
cannot control the camcorder. Try switching off the
camcorder then switching it back on.
• Could not operate the DV camcorder. – This
recorder was not able to control the camcorder.
• Recording has stopped because the recorded
material on the tape finished. – When the recorded
part of the DV tape comes to an end, this recorder
automatically stops recording.
• Recording has stopped because DV camcorder
playback stopped. – Recording stopped because
DV camcorder playback was stopped or the
camcorder was disconnected.
• The DV camcorder is not set for playback. Please
select playback mode on the DV camcorder. – The
camcorder is in camera mode.
• Copy-protected or copy-once video is not output from
the DV IN/OUT jack.
• Digital camcorders can usually record audio as
stereo 16-bit/48kHz, or twin stereo tracks of 12-bit/
32kHz. This recorder can only record one stereo
audio track. Set the DV Input setting as required (see
DV Input (DVR-520H/720H only) on page 104).
117
En
DVR-04_HDD_UK.book 118 ページ 2004年4月11日 日曜日 午後6時11分
14
Additional information
Manual recording modes
The table below shows the approximate recording times
for all of the 32 manual recording modes, as well as the
standard recording mode equivalents. Levels separated
by a bold line show where there is a noticeable change in
picture quality. The divisions for HDD recording are the
same as those for Video mode.
Audio recording in all manual recording modes is in
Dolby Digital 2ch format, except for MN32 which is in
Linear PCM format.
Video mode /
HDD
VR mode
118
En
Level
Rec. time
MN 1
MN 2
MN 3
MN 4
MN 5
MN 6
MN 7
MN 8
MN 9
MN 10
MN 11
MN 12
MN 13
MN 14
MN 15
MN 16
MN 17
MN 18
MN 19
MN 20
MN 21
MN 22
MN 23
MN 24
MN 25
MN 26
MN 27
MN 28
MN 29
MN 30
MN 31
MN 32
360 mins.
345 mins.
330 mins.
315 mins.
300 mins.
285 mins.
270 mins.
255 mins.
240 mins.
230 mins.
220 mins.
210 mins.
200 mins.
190 mins.
180 mins.
170 mins.
160 mins.
150 mins.
140 mins.
130 mins.
120 mins.
110 mins.
105 mins.
100 mins.
95 mins.
90 mins.
85 mins.
80 mins.
75 mins.
70 mins.
65 mins.
61 mins.
EP
LP
SP
FINE
Level
Rec. time
MN 1
MN 2
MN 3
MN 4
MN 5
MN 6
MN 7
MN 8
MN 9
MN 10
MN 11
MN 12
MN 13
MN 14
MN 15
MN 16
MN 17
MN 18
MN 19
MN 20
MN 21
MN 22
MN 23
MN 24
MN 25
MN 26
MN 27
MN 28
MN 29
MN 30
MN 31
MN 32
360 mins.
345 mins.
330 mins.
315 mins.
300 mins.
285 mins.
270 mins.
255 mins.
240 mins.
230 mins.
220 mins.
210 mins.
200 mins.
190 mins.
180 mins.
170 mins.
160 mins.
150 mins.
140 mins.
130 mins.
120 mins.
110 mins.
105 mins.
100 mins.
95 mins.
90 mins.
85 mins.
80 mins.
75 mins.
70 mins.
65 mins.
61 mins.
DVR-04_HDD_UK.book 119 ページ 2004年4月11日 日曜日 午後6時11分
Additional information
14
Language code list
Language (Language code letter), Language code
Japanese (ja), 1001
English (en), 0514
French (fr), 0618
German (de), 0405
Italian (it), 0920
Spanish (es), 0519
Chinese (zh), 2608
Dutch (nl), 1412
Portuguese (pt), 1620
Swedish (sv), 1922
Russian (ru), 1821
Korean (ko), 1115
Greek (el), 0512
Afar (aa), 0101
Abkhazian (ab), 0102
Afrikaans (af), 0106
Amharic (am), 0113
Arabic (ar), 0118
Assamese (as), 0119
Aymara (ay), 0125
Azerbaijani (az), 0126
Bashkir (ba), 0201
Byelorussian (be), 0205
Bulgarian (bg), 0207
Bihari (bh), 0208
Bislama (bi), 0209
Bengali (bn), 0214
Tibetan (bo), 0215
Breton (br), 0218
Catalan (ca), 0301
Corsican (co), 0315
Czech (cs), 0319
Welsh (cy), 0325
Danish (da), 0401
Bhutani (dz), 0426
Esperanto (eo), 0515
Estonian (et), 0520
Basque (eu), 0521
Persian (fa), 0601
Finnish (fi), 0609
Fiji (fj), 0610
Faroese (fo), 0615
Frisian (fy), 0625
Irish (ga), 0701
Scots-Gaelic (gd), 0704
Galician (gl), 0712
Guarani (gn), 0714
Gujarati (gu), 0721
Hausa (ha), 0801
Hindi (hi), 0809
Croatian (hr), 0818
Hungarian (hu), 0821
Armenian (hy), 0825
Interlingua (ia), 0901
Interlingue (ie), 0905
Inupiak (ik), 0911
Indonesian (in), 0914
Icelandic (is), 0919
Hebrew (iw), 0923
Yiddish (ji), 1009
Javanese (jw), 1023
Georgian (ka), 1101
Kazakh (kk), 1111
Greenlandic (kl), 1112
Cambodian (km), 1113
Kannada (kn), 1114
Kashmiri (ks), 1119
Kurdish (ku), 1121
Kirghiz (ky), 1125
Latin (la), 1201
Lingala (ln), 1214
Laothian (lo), 1215
Lithuanian (lt), 1220
Latvian (lv), 1222
Malagasy (mg), 1307
Maori (mi), 1309
Macedonian (mk), 1311
Malayalam (ml), 1312
Mongolian (mn), 1314
Moldavian (mo), 1315
Marathi (mr), 1318
Malay (ms), 1319
Maltese (mt), 1320
Burmese (my), 1325
Nauru (na), 1401
Nepali (ne), 1405
Norwegian (no), 1415
Occitan (oc), 1503
Oromo (om), 1513
Oriya (or), 1518
Panjabi (pa), 1601
Polish (pl), 1612
Pashto, Pushto (ps), 1619
Quechua (qu), 1721
Rhaeto-Romance (rm), 1813
Kirundi (rn), 1814
Romanian (ro), 1815
Kinyarwanda (rw), 1823
Sanskrit (sa), 1901
Sindhi (sd), 1904
Sangho (sg), 1907
Serbo-Croatian (sh), 1908
Sinhalese (si), 1909
Slovak (sk), 1911
Slovenian (sl), 1912
Samoan (sm), 1913
Shona (sn), 1914
Somali (so), 1915
Albanian (sq), 1917
Serbian (sr), 1918
Siswati (ss), 1919
Sesotho (st), 1920
Sundanese (su), 1921
Swahili (sw), 1923
Tamil (ta), 2001
Telugu (te), 2005
Tajik (tg), 2007
Thai (th), 2008
Tigrinya (ti), 2009
Turkmen (tk), 2011
Tagalog (tl), 2012
Setswana (tn), 2014
Tonga (to), 2015
Turkish (tr), 2018
Tsonga (ts), 2019
Tatar (tt), 2020
Twi (tw), 2023
Ukrainian (uk), 2111
Urdu (ur), 2118
Uzbek (uz), 2126
Vietnamese (vi), 2209
Volapük (vo), 2215
Wolof (wo), 2315
Xhosa (xh), 2408
Yoruba (yo), 2515
Zulu (zu), 2621
Malaysia, 1325, my
Mexico, 1324, mx
Netherlands, 1412, nl
New Zealand, 1426, nz
Norway, 1415, no
Pakistan, 1611, pk
Philippines, 1608, ph
Portugal, 1620, pt
Russian Federation, 1821, ru
Singapore, 1907, sg
Spain, 0519, es
Sweden, 1905, se
Switzerland, 0308, ch
Taiwan, 2023, tw
Thailand, 2008, th
United Kingdom, 0702, gb
USA, 2119, us
Country code list
Country, Country code, Country code letter
Argentina, 0118, ar
Australia, 0121, au
Austria, 0120, at
Belgium, 0205, be
Brazil, 0218, br
Canada, 0301, ca
Chile, 0312, cl
China, 0314, cn
Denmark, 0411, dk
Finland, 0609, fi
France, 0618, fr
Germany, 0405, de
Hong Kong, 0811, hk
India, 0914, in
Indonesia, 0904, id
Italy, 0920, it
Japan, 1016, jp
Korea, Republic of, 1118, kr
119
En
DVR-04_HDD_UK.book 120 ページ 2004年4月11日 日曜日 午後6時11分
14
Additional information
On-screen displays and recorder displays
The table below shows a list of error messages that you may encounter when using the recorder and an explanation
of their meaning.
120
En
Message
Explanation/Action
• Initializing disc. Please wait a moment.
When you load a blank DVD-RW disc, the recorder automatically
initializes it.
• Incompatible region number.
The disc loaded has an incompatible region number for the
recorder and so will not play.
• Cannot record any more titles.
• No more space for file management data.
• Cannot add any more chapter marks.
The disc control data limit has been reached, or the maximum
number of chapters and/or titles has been reached. Erase titles/
chapters or combine chapters.
• This disc cannot be recorded. Undo the finalization.
The disc was finalized on a non-Pioneer DVD recorder. Undo the
finalization in order to recording/editing.
• Cannot play this disc.
• This disc cannot be recorded.
• Cannot read the CPRM information.
• Could not record the information to the disc.
• Cannot edit.
• Could not initialize disc.
• Could not complete finalization successfully.
• Could not undo finalization successfully.
• Could not successfully unlock the disc.
The disc may be dirty or damaged. Take out the disc, clean it and
retry. If the error persists, use a new disc. If the error appears even
with a new disc, please consult a Pioneer Service Center.
• Incompatible or unreadable disc.
The disc loaded is a DVD-RAM, DVD+R/RW or some other
incompatible disc type. This display may also appear if the disc is
dirty or damaged.
• Cannot record to a disc that is not CPRM compatible.
• Cannot record this content using Video mode
recording.
The video source is copy-once protected. Use a VR mode DVD-RW
disc with CPRM for recording.
• This content is copy protected.
The video source is copy-protected and cannot be recorded.
• Incorrect CPRM information.
The recorder could not read the CPRM information. The recorder
may be damaged—please consult a Pioneer Service Center.
• The audio will conform to the [Bilingual
Recording] setting.
When recording from an external input in Video mode, or in VR
mode set to MN 32, audio is recorded in Linear PCM format. You
can only record the left or right channel; not both.
• Repairing disc.
During recording, the power was cut. This display appears when
the power is restored.
• Could not repair the disc.
The recorder was unable to repair the disc after a power cut. The
contents of the recording will be lost.
• Overheating has stopped operation.
Press DISPLAY to clear this message.
The internal temperature of the recorder has exceeded the
operating limit. If this message reappears, please contact a
Pioneer authorized service center.
DVR-04_HDD_UK.book 121 ページ 2004年4月11日 日曜日 午後6時11分
Additional information
14
Message
Explanation/Action
• There is no DV input or the input signal is unrecordable.
• Cannot preview because there is no DV input
or the input signal is unrecordable.
No signal was detected at the DV input/output jack. This may
appear if a blank section of DV tape is playing in the connected
camcorder. (Applicable to DVR-520H/720H only.)
• This channel’s TV system is different from the
recorder’s setting.
The TV system (PAL, NTSC, etc.) of the current channel is different
from the TV system settings of this recorder.
• Recording failed due to a TV system mismatch.
Press DISPLAY to clear message.
The timer recording failed because the TV system of the channel
set for recording was different from the setting of the recorder.
• Playback has stopped because the TV system is
different than the recording.
During recording or timer recording standby, the TV System (PAL,
NTSC, etc.) of the playback video changed, causing playback to
stop automatically.
Handling discs
When holding discs of any type, take care not to leave
fingerprints, dirt or scratches on the disc surface. Hold
the disc by its edge or by the center hole and edge.
Damaged or dirty discs can affect playback and
recording performance. Take care also not to scratch the
label side of the disc. Although not as fragile as the
recorded side, scratches can still result in a disc
becoming unusable.
Should a disc become marked with fingerprints, dust,
etc., clean using a soft, dry cloth, wiping the disc lightly
from the center to the outside edge as shown in the
diagram below.
If necessary, use a cloth soaked in alcohol, or a
commercially available CD/DVD cleaning kit to clean a
disc more thoroughly. Never use benzine, thinner or
other cleaning agents, including products designed for
cleaning vinyl records.
For more detailed care information see the instructions
that come with discs.
Do not load more than one disc into the recorder.
Damaged discs
Discs spin at high speed inside the recorder. If you can
see that a disc is cracked, chipped, warped, or otherwise
damaged, don't risk using it; you could end up damaging
the recorder.
This recorder is designed for use with conventional, fully
circular discs only. Use of shaped discs is not
recommended for this product. Pioneer disclaims all
liability arising in connection with the use of shaped
discs.
Storing discs
Although CDs and DVD discs are more durable than vinyl
records, you should still take care to handle and store
discs correctly. When you're not using a disc, return it to
its case and store upright. Avoid leaving discs in
excessively cold, humid, or hot environments (including
under direct sunlight).
Don't glue paper or put stickers onto the disc, or use a
pencil, ball-point pen or other sharp-tipped writing
instrument. These could all damage the disc.
121
En
DVR-04_HDD_UK.book 122 ページ 2004年4月11日 日曜日 午後6時11分
14
Additional information
Cleaning the pickup lens
Moving the recorder
The DVD recorder’s lens should not become dirty in
normal use, but if for some reason it should malfunction
due to dust or dirt, consult your nearest Pioneerauthorized service center. Although lens cleaners for CD
players are commercially available, we do not recommend using them since some may damage the lens.
If you need to move the recorder, first remove the disc, if
there’s one loaded, and close the disc tray. Next, press STANDBY/ON to switch the power to standby, checking
that the POWER OFF indication in the display goes off.
Wait at least two minutes. Lastly, disconnect the power
cord. Never lift or move the unit during playback or
recording—discs rotate at a high speed and may be
damaged.
Condensation
Condensation may form inside the recorder if it is
brought into a warm room from outside, or if the
temperature of the room rises quickly. Although the
condensation won’t damage the recorder, it may
temporarily impair its performance. For this reason you
should leave it to adjust to the warmer temperature for
about an hour before switching on and using.
Hints on installation
An electrical signal that directly represents sound.
Compare this to digital audio which can be an electrical
signal, but is an indirect representation of sound. See
also Digital audio.
Aspect ratio
The width of a TV screen relative to its height.
Conventional TVs are 4:3 (in other words, the screen is
almost square); widescreen models are 16:9 (the screen
is almost twice as wide as it is high).
Do...
Chapter
Place on a solid, flat, level surface, such as a table,
shelf or stereo rack.
Just as a book is split up into several chapters, a title on
the HDD/a DVD disc is usually divided into chapters. See
also Title.
Don’t...
Digital audio
Use in a place exposed to high temperatures or
humidity, including near radiators and other heatgenerating appliances.
An indirect representation of sound by numbers. During
recording, the sound is measured at discrete intervals
(44,100 times a second for CD audio) by an analog-todigital converter, generating a stream of numbers. On
playback, a digital-to-analog converter generates an
analog signal based on these numbers. See also
Sampling frequency and Analog audio.
Place on a window sill or other place where the
recorder will be exposed to direct sunlight.
Use in a dusty or damp environment or in a room
where it will be exposed to excessive cigarette smoke.
Place directly on top of an amplifier, or other
component in your stereo system that becomes hot in
use.
Use near a television or monitor as you may
experience interference—especially if the television uses
an indoor antenna.
Use in a kitchen or other room where the recorder
may be exposed to smoke or steam.
Use on a thick rug or carpet, or cover with cloth—this
may prevent proper cooling of the unit.
Place on an unstable surface, or one that is not large
enough to support all four of the unit’s feet.
122
Analog audio
We want you to enjoy using this unit for years to come, so
please bear in mind the following points when choosing
a suitable location for it:
Use in a well-ventilated room.
En
Glossary
Dolby Digital
1
With multichannel audio, this high quality surround
system is used in many movie theaters around the world.
Manufactured under licence from Dolby Laboratories.
“Dolby” and the double-D symbol are trademarks of Dolby
Laboratories.
DVR-04_HDD_UK.book 123 ページ 2004年4月11日 日曜日 午後6時11分
Additional information
DRM (Digital Rights Management)
DRM (Digital Rights Management) copy protection is a
technology designed to prevent unauthorized copying by
restricting playback, etc. of material on devices other the
PC (or other WMA recording equipment) used to record
it. For detailed information, please see the instruction
manuals or help files that came with your PC (or other
WMA recording equipment) and/or software.
DTS
DTS stands for Digital Theater System. DTS is a surround
system different from Dolby Digital that has become a
popular surround sound format for movies.
“DTS” and “DTS Digital Out” are registered trademarks of
Digital Theater Systems, Inc.
Dynamic range
The difference between the quietest and loudest sounds
possible in an audio signal (without distorting or getting
lost in noise). Dolby Digital and DTS soundtracks are
capable of a wide dynamic range, delivering dramatic
cinema-like effects.
EXIF (Exchangeable Image File)
A file format developed by Fuji Photo Film for digital still
cameras. Digital cameras from various manufacturers
use this compressed file format which carries date, time
and thumbnail information, as well as the picture data.
14
MPEG audio
An audio format used on Video CDs and some DVD
discs. This unit can convert MPEG audio to PCM format
for wider compatibility with digital recorders and AV
amp/receivers. See also PCM.
MPEG video
The video format used for Video CDs and DVDs. Video CD
uses the older MPEG-1 standard, while DVD uses the
newer and much better quality MPEG-2 standard.
Optical digital output
A jack that outputs digital audio in the form of light
pulses. Connect components with optical digital jacks
using a special optical cord, available from specialist
audio dealers.
PCM (Pulse Code Modulation)
The most common system of encoding digital audio,
found on CDs and DAT. Excellent quality, but requires a
lot of data compared to formats such as Dolby Digital
and MPEG audio. For compatibility with digital audio
recorders (CD, MD and DAT) and AV amp/receivers with
digital inputs, this unit can convert Dolby Digital and
MPEG audio to PCM. See also Digital audio.
PBC (PlayBack Control) (Video CD/Super VCD only)
File extension
A system of navigating a Video CD/Super VCD through
on-screen menus recorded onto the disc. Especially good
for discs that you would normally not watch from
beginning to end all at once—karaoke discs, for example.
A tag added to the end of a filename to indicate the type
of file. For example, “.mp3” indicates an MP3 file.
Regions (DVD only)
ISO 9660 format
International standard for the volume and file structure of
CD-ROM discs.
JPEG
A file format used for still images, such as photographs
and illustrations. JPEG files are identified by the file
extension “.jpg” or “.JPG”. Most digital cameras use this
format.
MP3
MP3 (MPEG1 audio layer 3) is a compressed audio file
format. Files are recognized by their file extension “.mp3”
or “.MP3”.
2
ALL
(example region code marks)
Regions associate discs and players with particular
areas of the world. This unit will only play discs that have
compatible region codes. You can find the region code of
your unit by looking on the rear panel. Some discs are
compatible with more than one region (or all regions).
Sampling frequency
The rate at which sound is measured to be turned into
digital audio data. The higher the rate, the better the
sound quality, but the more digital information is
generated. Standard CD audio has a sampling frequency
of 44.1kHz, which means 44,100 samples
(measurements) per second. See also Digital audio.
123
En
DVR-04_HDD_UK.book 124 ページ 2004年4月11日 日曜日 午後6時11分
14
Additional information
Title
A collection of chapters on a the HDD/DVD disc. See also
Chapter.
Track
Audio CDs and Video CDs use tracks to divide up the
content of a disc. The DVD equivalent is called a chapter.
See also Chapter.
WMA
WMA is short for Windows Media Audio and refers to an
audio compression technology developed by Microsoft
Corporation. WMA data can be encoded by using
Windows Media Player version 9 or Windows Media
Player for Windows XP. Files are recognized by their file
extension “.wma” or “.WMA”.
Microsoft, Windows Media, and the Windows logo are
trademarks, or registered trademarks of Microsoft
Corporation in the United States and/or other countries.
124
En
DVR-04_HDD_UK.book 125 ページ 2004年4月11日 日曜日 午後6時11分
Additional information
14
Tuner
Specifications
Receivable channels
PAL B/G
General
System . . . . . . . . . . . . . . . . . . HDD, DVD-Video, DVD-R/RW,
Video-CD, Super VCD, CD,
CD-R/RW (WMA, MP3, JPEG, CD-DA)
Power requirements . . . . . . . . . . . . . . . 220–240 V, 50/60 Hz
Power consumption
DVR-420 . . . . . . . . . . . . . . . . . . . . . . . . . . . . . . . . . . . . 51 W
DVR-520 . . . . . . . . . . . . . . . . . . . . . . . . . . . . . . . . . . . . 54 W
DVR-720 . . . . . . . . . . . . . . . . . . . . . . . . . . . . . . . . . . . . 56 W
Power consumption in standby mode
0.68 W
(Front panel display: off /Power Save Mode2)
Weight . . . . . . . . . . . . . . . . . . . . . . . . . . . . . . . . . . . . . . 4.7 kg
Dimensions . . . . . . . . . . . . . . 420 (W) x 59 (H) x 339 (D) mm
Operating temperature . . . . . . . . . . . . . . . . .+5°C to +35°C
Operating humidity . . . . . . . . . . . . . . . . . . . . . . . .5% to 85%
(no condensation)
TV system. . . . . . . . . . . . . . . . . . . . . . . . . . . . . . PAL/SECAM/
NTSC (external input only)
Recording
Recording format . . . . . . . . . . . . . . . . DVD Video Recording
DVD-VIDEO
Recordable discs
DVD-RW (DVD Re-recordable disc)
DVD-R (DVD Recordable disc)
Video recording format
Sampling frequency . . . . . . . . . . . . . . . . . . . . . . . . . 13.5MHz
Compression format. . . . . . . . . . . . . . . . . . . . . . . . . . . MPEG
Audio recording format
Sampling frequency . . . . . . . . . . . . . . . . . . . . . . . . . . . 48kHz
Compression format. . . . . . . . .Dolby Digital or Linear PCM
(uncompressed)
Recording time
HDD—DVR-720H
Fine (FINE) . . . . . . . . . . . . . . . . . . . . . . . . . Approx. 34 hours
Standard Play (SP) . . . . . . . . . . . . . . . . . . . Approx. 68 hours
Long Play (LP) . . . . . . . . . . . . . . . . . . . . . . Approx. 136 hours
Extended Play (EP) . . . . . . . . . . . . . . . . . . Approx. 204 hours
Manual Mode (MN) . . . . . . . . . . . . . . Approx. 34–204 hours
HDD—DVR-420H/520H
Fine (FINE) . . . . . . . . . . . . . . . . . . . . . . . . . . Approx. 17 hours
Standard Play (SP) . . . . . . . . . . . . . . . . . . . Approx. 34 hours
Long Play (LP) . . . . . . . . . . . . . . . . . . . . . . . Approx. 68 hours
Extended Play (EP) . . . . . . . . . . . . . . . . . . Approx. 102 hours
Manual Mode (MN) . . . . . . . . . . . . . . Approx. 17–102 hours
DVD-R/DVD-RW
Fine (FINE) . . . . . . . . . . . . . . . . . . . . . . . . . . . . Approx. 1 hour
Standard Play (SP) . . . . . . . . . . . . . . . . . . . . Approx. 2 hours
Long Play (LP) . . . . . . . . . . . . . . . . . . . . . . . . Approx. 4 hours
Extended Play (EP) . . . . . . . . . . . . . . . . . . . . Approx. 6 hours
Manual Mode (MN) . . . . . . . . . . . . . . . . . Approx. 1–6 hours
PAL I
Frequency
302 - 470 MHz
470 - 862 MHz
Channel
A-C
X-Z
D-J
11, 13
S1 - S20
VHF (low)
Frequency
47 - 89 MHz
VHF (high)
104 - 300 MHz
Channel
E2 - E4
X-Z
E5 - E12
S1 - S20
M1 - M10
U1 - U10
Hyper
UHF
302 - 470 MHz
470 - 862 MHz
S21 - S41
E21 - E69
VHF (low)
Frequency
49 - 65 MHz
Channel
2-4
Frequency
49 - 94 MHz
Channel
R1 - R5
VHF (high)
104 - 300 MHz
5 - 10
B-Q
104 - 300 MHz
R6 - R12
S1 - S20
Hyper
UHF
300 - 470 MHz
470 - 862 MHz
S21 - S41
21 - 69
302 - 470 MHz
470 - 862 MHz
S21 - S41
E21 - E69
SECAM L
44 - 89 MHz
104 - 300 MHz
S21 - S41
E21 - E69
SECAM D/K
STEREO
B/G - A2
I - NICAM
L - NICAM
B/G - NICAM
D/K - NICAM
Timer
Programs . . . . . . . . . . . . . . . . . . . . . . 1 month/32 programs
Clock . . . . . . . . . . . . . . . Quartz lock (24-hour digital display)
Power off memory . . . .Approx. 5 years (after manufacture)
Input/Output
VHF/UHF antenna input/output terminal . . . . VHF/UHF set
75 Ω (IEC connector)
Video input . . . . . . . . . . . . . . . . . . . . . Input 1 (rear), 2 (front)
Input level . . . . . . . . . . . . . . . . . . . . . . . . . . . . . 1 Vp-p (75 Ω)
Jacks . . . . . . . . . . . . . . . . . . . . . . .AV connector 2 (Input 1),
RCA jack (Input 2)
Video output . . . . . . . . . . . . . . . . . . . . . . . . . . . . . AV1 Output
Output level . . . . . . . . . . . . . . . . . . . . . . . . . . . . 1 Vp-p (75 Ω)
Jacks . . . . . . . . . . . . . . . . . . . . . . . . . . AV connector 1 (AV1)
RCA jack (Output)
S-Video input . . . . . . . . . . . . . . . . . . . Input 1 (rear), 2 (front)
Y (luminance) - Input level . . . . . . . . . . . . . . . . 1 Vp-p (75 Ω)
C (colour) - Input level . . . . . . . . . . . . . . . 286 mVp-p (75 Ω)
Jacks . . . . . . . . . . . . . . . . . . . . . . .AV connector 2 (Input 1),
4 pin mini DIN (Input 2)
S-Video output . . . . . . . . . . . . . . . . . . . . . . . . . . AV1 / Output
Y (luminance) - Output level . . . . . . . . . . . . . . 1 Vp-p (75 Ω)
C (colour) - Output level . . . . . . . . . . . . . . 286 mVp-p (75 Ω)
Jacks . . . . . . . . . . . . . . . . . . . . . . . . . AV connector 1 (AV1),
4 pin mini DIN (Output)
RGB input
Input level . . . . . . . . . . . . . . . . . . . . . . . . . . . . 0.7 Vp-p (75Ω)
Jacks . . . . . . . . . . . . . . . . . . . . . . . AV connector 2 (Input 1)
RGB output
Output level . . . . . . . . . . . . . . . . . . . . . . . . . . . 0.7 Vp-p (75Ω)
Jacks . . . . . . . . . . . . . . . . . . . . . . . . . . AV connector 1 (AV1)
125
En
DVR-04_HDD_UK.book 126 ページ 2004年4月11日 日曜日 午後6時11分
14
Additional information
Audio input . . . . . . . . . . . . . . . . . Input 1 (rear), 2 (front) L/R
Input level
During audio input . . . . . . . . . . . . . . . . . . . . . . . . . . .2V rms
(Input impedance: more than 22 kΩ)
Jacks . . . . . . . . . . . . . . . . . . . . . . AV connector 2 (Input 1),
RCA jacks (Input 2)
Audio output . . . . . . . . . . . . . . . . . . . . . . . . . . . . .AV1 Output
During audio output . . . . . . . . . . . . . . . . . . . . . . . . . .2V rms
(Output impedance: less than 1.5 kΩ)
Jacks . . . . . . . . . . . . . . . . . . . . . . . . . AV connector 1 (AV1),
RCA jacks (Output)
Control input . . . . . . . . . . . . . . . . . . . . . . . . . . . . . . . Mini jack
DV input/output (DVR-520H/720H only) . . . . . . . . . . . . 4 pin
(i.LINK/IEEE 1394 standard)
AV Connectors (21-pin connector assignment)
AV connector input/output . . . . . . . . . . . . 21-pin connector
This connector provides the video and audio signals for
connection to a compatible colour TV or monitor.
PIN no.
AV1(RGB)-TV / AV2(INPUT 1)
1 . . . . . . . . . . . . . . . . . . . . . . . Audio 2/R out / Audio 2/R out
2 . . . . . . . . . . . . . . . . . . . . . . . . . . . . . . . . . . – / Audio 2/R in
11 . . . . . . . . . . . . . . . . . . . . . . . . . . . . . . . . . . . . . G out / G in
3 . . . . . . . . . . . . . . . . . . . . . . . . Audio 1/L out / Audio 1/L out
6 . . . . . . . . . . . . . . . . . . . . . . . . . . . . . . . . . . . – / Audio 1/L in
15 . . . . . . . . . . . . . . . . . . . . . . . . . . . . . R or C out / R or C in
4 . . . . . . . . . . . . . . . . . . . . . . . . . . . . . . . . . . . . . . . . . . . . GND
17 . . . . . . . . . . . . . . . . . . . . . . . . . . . . . . . . . . . . . . . . . . . GND
7 . . . . . . . . . . . . . . . . . . . . . . . . . . . . . . . . . . . . . . B out / B in
19 . . . . . . . . . . . . . . . . . . . . . . . Video out or Y out / Video out
20 . . . . . . . . . . . . . . . . . . . . . . . . . . . . . . . . – / Video in or Y in
8 . . . . . . . . . . . . . . . . . . . . . . . . . . . . . . . . . . . . . . . . . . . Status
21 . . . . . . . . . . . . . . . . . . . . . . . . . . . . . . . . . . . . . . . . . . . GND
Supplied accessories
Remote control . . . . . . . . . . . . . . . . . . . . . . . . . . . . . . . . . . . .1
Dry cell batteries (AA/R6P) . . . . . . . . . . . . . . . . . . . . . . . . . .2
Audio / Video cable (red/white/yellow) . . . . . . . . . . . . . . . . .1
RF antenna cable . . . . . . . . . . . . . . . . . . . . . . . . . . . . . . . . . .1
Power cable . . . . . . . . . . . . . . . . . . . . . . . . . . . . . . . . . . . . . .1
Warranty card . . . . . . . . . . . . . . . . . . . . . . . . . . . . . . . . . . . . .1
Operating Instructions
Note: The specifications and design of this product are subject
to change without notice, due to improvement.
126
En
DVR-04_HDD_UK.book 127 ページ 2004年4月11日 日曜日 午後6時11分
Index
15
A
O
Adjusting the picture quality 94–96
Audio DRC 96
Audio language 23, 43, 105
Audio settings 103–105
Auto language 105, 106
Auto Scan - see Automatic channel setup
Automatic channel setup 25, 99
AV amplifier (connecting to) 19, 27
AV connector 12, 14–18, 98, 100, 102, 126
One Touch Copy 6, 21, 23, 61, 62–63, 116
One Touch Recording 7, 48
On-screen display (OSD) 33, 105
Optimized recording 7, 52, 65, 107, 116
Original content 7, 11, 23, 34, 76, 78, 79–83, 87
OSD - see On-screen display (OSD)
B
Bilingual audio 22, 29, 44, 46, 48, 103, 104, 116
C
Camcorder - see DV camcorder
Changing TV channels 29, 112
Chase play - see Simultaneous recording and playback
Copy List 63–74, 108, 116
CPRM 46, 120
D
Disc and file formats 9, 113
Disc compatibility - see Disc and file formats
Disc Navigator 36–37, 76–88, 108
Dolby Digital 6, 27, 43, 44, 46, 96, 104, 122
Downloading channel presets from the TV 13, 25, 100
DV camcorder 7, 20, 57, 58, 117
E
Easy Timer Recording 6, 50
Editing recordings 76–88
F
Finalizing discs 34, 59, 93
I
Initializing discs 45, 60, 93, 108
Input colour system 98, 102
Input line system 98, 102, 103
J
JPEG picture files 7, 10, 35, 90–91, 123
M
Manual channel setup 100
Manual recording mode (MN) 22, 47, 107, 118
MP3 audio 7, 9, 32, 123
MPEG audio 12, 105, 123
N
NICAM audio 29, 103
NTSC 22, 45, 46, 95, 96, 98, 102, 103
English
Index
P
PAL 45, 46, 98, 99, 102, 103
PBC (PlayBack Control for Video CD) 32, 36, 123
PhotoViewer 90–91
Picture quality - see Adjusting the picture quality
and Recording quality
Play List 7, 11, 22, 23, 34, 76, 79, 84–88
Play Mode menu 23, 40–42
Program play 41, 41–42
R
Recording 6–7, 28, 35, 45–60
Recording quality 46, 47, 94
Recovery recording 7, 49
Remote control 8, 23, 99
Repeat play 41, 42
Rotating (a JPEG picture) 91
S
Scanning 24, 38
SCART - see AV connector
SECAM 45, 46, 98, 99, 102
Setting up 25–27, 112
Simultaneous recording and playback 6, 35, 55
Slow motion playback 39
Subtitle langauge 23, 43, 106
T
Timer recording 6, 13, 17, 22, 24, 35, 49–55, 56
TV aspect ratio 108, 113
TV audio channel 29, 48, 103, 104
TV system - see Input line system and Input colour system
V
Video mode 7, 9, 10, 22, 35, 45, 59, 60, 62, 93, 108,
116, 118
VIDEO Plus+ 6, 23, 52–53, 101
Video settings 94–96, 102–103
VPS/PDC 6, 22, 49, 51, 52, 55
VR mode 10, 22, 45, 48, 59, 60, 62, 79, 84, 93, 108,
109, 117, 118
W
WMA audio 7, 9, 32, 124
Z
Zooming (a JPEG picture) 91
127
En
DVR-04_HDD_UK.book 128 ページ 2004年4月11日 日曜日 午後6時11分
Published by Pioneer Corporation.
Copyright © 2004 Pioneer Corporation.
All rights reserved.
PIONEER CORPORATION
4-1, Meguro 1-Chome, Meguro-ku, Tokyo 153-8654, Japan
PIONEER ELECTRONICS (USA) INC.
P.O. BOX 1540, Long Beach, California 90810-1540, U.S.A. TEL: (800) 421-1404
PIONEER ELECTRONICS OF CANADA, INC.
300 Allstate Parkway, Markham, Ontario L3R OP2, Canada TEL: 1-877-283-5901
PIONEER EUROPE NV
Haven 1087, Keetberglaan 1, B-9120 Melsele, Belgium TEL: 03/570.05.11
PIONEER ELECTRONICS ASIACENTRE PTE. LTD.
253 Alexandra Road, #04-01, Singapore 159936 TEL: 65-6472-7555
PIONEER ELECTRONICS AUSTRALIA PTY. LTD.
178-184 Boundary Road, Braeside, Victoria 3195, Australia, TEL: (03) 9586-6300
PIONEER ELECTRONICS DE MEXICO S.A. DE C.V.
Blvd.Manuel Avila Camacho 138 10 piso Col.Lomas de Chapultepec, Mexico,D.F. 11000 TEL: 55-9178-4270
K002_A_En
Printed in the UK
<VRB1340-A>