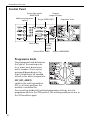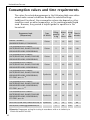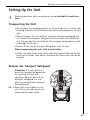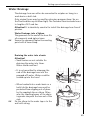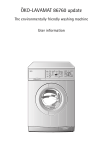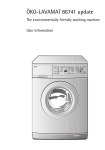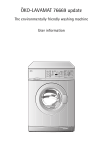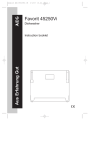
1
ÖKO-LAVAMAT 86740 updatee
The Environmentally-Friendly Washing
Machine
User Information
Dear customer,
Please read this user information carefully.
In particular, pay attention to the section ”Safety” on the first pages.
Keep this user information in a safe place for later reference. Pass it on
to any subsequent owners of the unit.
1
Points which are necessary for your safety or which are important for
the unit's functional capability are highlighted by a warning triangle
and/or signal words (Warning!, Caution!, Attention!). Always remember.
0 1. This symbol guides you step by step in operating the unit.
2. ...
3
After this symbol you will find detailed information on operation and
practical use of the unit.
2
The clover leaf indicates tips and information on the economical and
environmentally-responsible use of the unit.
This user information contains information on remedying any faults
which may occur, see the section ”What to do if ...”.
If these instructions are not sufficient, our After-Sales Service is at your
disposal at any time:
ELGROEP & AEG SERVICE
Bergensesteenweg 719
1502 Lembeek
Tel.: 02/3630444
Here you will receive an answer to any question concerning the features and use of your unit. Of course, we are also pleased to receive any
requests, suggestions and criticism. Our aim is to further improve our
products and services for the benefit of our customers.
In the event of technical problems, our factory customer service in your
area is at your disposal at all times. Also refer to the section ”Service”.
Printed on recycled paper.
Those who think ecologically act ecologically ...
2
Contents
Instructions for use . . . . . . . . . . . . . . . . . . . . . . . . . . . . . . . . . . . . . . . .
6
Safety . . . . . . . . . . . . . . . . . . . . . . . . . . . . . . . . . . . . . . . . . . . . . . . . . . . . . . . .
6
Disposal . . . . . . . . . . . . . . . . . . . . . . . . . . . . . . . . . . . . . . . . . . . . . . . . . . . . . .
8
Environmental Tips . . . . . . . . . . . . . . . . . . . . . . . . . . . . . . . . . . . . . . . . . . . .
8
Unit Description . . . . . . . . . . . . . . . . . . . . . . . . . . . . . . . . . . . . . . . . . . . . . . .
Front View . . . . . . . . . . . . . . . . . . . . . . . . . . . . . . . . . . . . . . . . . . . . . . . . . . . .
Drawer for Washing Powder and Care Agent . . . . . . . . . . . . . . . . . . . . . . .
Control Panel . . . . . . . . . . . . . . . . . . . . . . . . . . . . . . . . . . . . . . . . . . . . . . . . . .
Programme knob . . . . . . . . . . . . . . . . . . . . . . . . . . . . . . . . . . . . . . . . . . . .
Additional programme buttons . . . . . . . . . . . . . . . . . . . . . . . . . . . . . . . .
Programmable functions . . . . . . . . . . . . . . . . . . . . . . . . . . . . . . . . . . . . . .
9
9
9
10
10
12
13
Consumption values and time requirements . . . . . . . . . . . . . . . . . . . . . . 14
Wash Time Display . . . . . . . . . . . . . . . . . . . . . . . . . . . . . . . . . . . . . . . . . . . . . . 15
What does “UPDATE” mean? . . . . . . . . . . . . . . . . . . . . . . . . . . . . . . . . . . . . 15
Water Protection Aqua Control + Aqua Alarm . . . . . . . . . . . . . . . . . . . . 15
Before the first wash . . . . . . . . . . . . . . . . . . . . . . . . . . . . . . . . . . . . . . . . . . 16
Preparing a Wash Load . . . . . . . . . . . . . . . . . . . . . . . . . . . . . . . . . . . . . . . . .
Sorting and preparing a wash load . . . . . . . . . . . . . . . . . . . . . . . . . . . . . . . .
Types of washing and care symbols . . . . . . . . . . . . . . . . . . . . . . . . . . . . . . . .
Washing Detergents and Care Agents . . . . . . . . . . . . . . . . . . . . . . . . . . . . . .
Which washing detergent and care agent? . . . . . . . . . . . . . . . . . . . . . .
How much washing detergent and care agent? . . . . . . . . . . . . . . . . . . .
Water Softener . . . . . . . . . . . . . . . . . . . . . . . . . . . . . . . . . . . . . . . . . . . . . . . . .
16
16
17
18
18
18
18
Carrying out a wash cycle . . . . . . . . . . . . . . . . . . . . . . . . . . . . . . . . . . . . . .
Brief instructions . . . . . . . . . . . . . . . . . . . . . . . . . . . . . . . . . . . . . . . . . . . . . . .
Setting the wash programme . . . . . . . . . . . . . . . . . . . . . . . . . . . . . . . . . . . . .
Change Spin Speed / Select Rinse Hold . . . . . . . . . . . . . . . . . . . . . . . . . . . . .
Setting the delay timer/soaking time . . . . . . . . . . . . . . . . . . . . . . . . . . . . . .
Opening and Closing the Filling Door . . . . . . . . . . . . . . . . . . . . . . . . . . . . . .
Putting in the washing . . . . . . . . . . . . . . . . . . . . . . . . . . . . . . . . . . . . . . . . . .
Add Washing Detergent/Care Agent . . . . . . . . . . . . . . . . . . . . . . . . . . . . . . .
Starting the wash program . . . . . . . . . . . . . . . . . . . . . . . . . . . . . . . . . . . . . . .
19
19
20
21
22
23
23
24
25
3
Sequence of the programme . . . . . . . . . . . . . . . . . . . . . . . . . . . . . . . . . . . . . 26
Wash cycle ended/Remove washing . . . . . . . . . . . . . . . . . . . . . . . . . . . . . . . 27
Programme tables . . . . . . . . . . . . . . . . . . . . . . . . . . . . . . . . . . . . . . . . . . . . .
Wash . . . . . . . . . . . . . . . . . . . . . . . . . . . . . . . . . . . . . . . . . . . . . . . . . . . . . . . . .
Separate Rinsing/Conditioner/Starching/Impregnation . . . . . . . . . . . . . .
Separate Spinning . . . . . . . . . . . . . . . . . . . . . . . . . . . . . . . . . . . . . . . . . . . . . .
29
29
31
31
Cleaning and Care . . . . . . . . . . . . . . . . . . . . . . . . . . . . . . . . . . . . . . . . . . . . .
Control Panel . . . . . . . . . . . . . . . . . . . . . . . . . . . . . . . . . . . . . . . . . . . . . . . . . .
Washing Detergent Drawer . . . . . . . . . . . . . . . . . . . . . . . . . . . . . . . . . . . . . .
Washing Drum . . . . . . . . . . . . . . . . . . . . . . . . . . . . . . . . . . . . . . . . . . . . . . . . .
Filling Door . . . . . . . . . . . . . . . . . . . . . . . . . . . . . . . . . . . . . . . . . . . . . . . . . . . .
Cleaning the drain pump . . . . . . . . . . . . . . . . . . . . . . . . . . . . . . . . . . . . . . . .
32
32
32
33
33
34
What to do if ... . . . . . . . . . . . . . . . . . . . . . . . . . . . . . . . . . . . . . . . . . . . . . . .
Remedying Faults . . . . . . . . . . . . . . . . . . . . . . . . . . . . . . . . . . . . . . . . . . . . . . .
If the washing result is not satisfactory . . . . . . . . . . . . . . . . . . . . . . . . . . . .
Carry Out an Emergency Emptying Operation . . . . . . . . . . . . . . . . . . . . . . .
Emergency Unlocking of the Filling Door . . . . . . . . . . . . . . . . . . . . . . . . . . .
Additional rinse cycle (RINCAGE+) . . . . . . . . . . . . . . . . . . . . . . . . . . . . . . . .
Water cooling . . . . . . . . . . . . . . . . . . . . . . . . . . . . . . . . . . . . . . . . . . . . . . . . . .
Additional rinse cycle and water cooling . . . . . . . . . . . . . . . . . . . . . . . . . . .
Variomatic-loose spinning . . . . . . . . . . . . . . . . . . . . . . . . . . . . . . . . . . . . . . .
35
35
39
40
41
42
43
44
45
Programme security . . . . . . . . . . . . . . . . . . . . . . . . . . . . . . . . . . . . . . . . . . . 46
Child Safety Feature . . . . . . . . . . . . . . . . . . . . . . . . . . . . . . . . . . . . . . . . . . . 47
Setting up and connection instructions
. . . . . . . . . . . . . . . . . 48
Safety Instructions for Installation . . . . . . . . . . . . . . . . . . . . . . . . . . . . . . 48
Setting Up the Unit . . . . . . . . . . . . . . . . . . . . . . . . . . . . . . . . . . . . . . . . . . . .
Transporting the Unit . . . . . . . . . . . . . . . . . . . . . . . . . . . . . . . . . . . . . . . . . . .
Remove the Transport Safeguard . . . . . . . . . . . . . . . . . . . . . . . . . . . . . . . . . .
Prepare the Installation Location . . . . . . . . . . . . . . . . . . . . . . . . . . . . . . . . . .
Setting Up on a Concrete Pedestal . . . . . . . . . . . . . . . . . . . . . . . . . . . . .
Setting Up on a Vibrating floor . . . . . . . . . . . . . . . . . . . . . . . . . . . . . . . .
Compensate for Floor Unevenness . . . . . . . . . . . . . . . . . . . . . . . . . . . . . . . . .
4
49
49
49
51
51
51
52
Electrical Connection . . . . . . . . . . . . . . . . . . . . . . . . . . . . . . . . . . . . . . . . . . 53
Water Connection . . . . . . . . . . . . . . . . . . . . . . . . . . . . . . . . . . . . . . . . . . . . .
Permissible Water Pressure . . . . . . . . . . . . . . . . . . . . . . . . . . . . . . . . . . . . . . .
Water Inflow . . . . . . . . . . . . . . . . . . . . . . . . . . . . . . . . . . . . . . . . . . . . . . . . . .
Water Drainage . . . . . . . . . . . . . . . . . . . . . . . . . . . . . . . . . . . . . . . . . . . . . . . .
Delivery Heads over 1m . . . . . . . . . . . . . . . . . . . . . . . . . . . . . . . . . . . . . . . . .
53
53
54
55
56
Technical Data . . . . . . . . . . . . . . . . . . . . . . . . . . . . . . . . . . . . . . . . . . . . . . . . 56
Dimensions
. . . . . . . . . . . . . . . . . . . . . . . . . . . . . . . . . . . . . . . . . . . . . . . . . . 56
Guarantee conditions . . . . . . . . . . . . . . . . . . . . . . . . . . . . . . . . . . . . .
Customer services
Index
57
. . . . . . . . . . . . . . . . . . . . . . . . . . . . . . . . . . . . . . . . . 59
. . . . . . . . . . . . . . . . . . . . . . . . . . . . . . . . . . . . . . . . . . . . . . . . . . . . . . . . 62
Service
. . . . . . . . . . . . . . . . . . . . . . . . . . . . . . . . . . . . . . . . . . . . . . . . . . . . . . 63
5
Instructions for use
Instructions for use
1
Safety
The safety of AEG electrical appliances conforms to the recognised
technical regulations and the legislation covering the safety of appliances. However, as manufacturers, we still regard it as our responsibility
to inform you of the following safety information.
Before Putting into Operation for the First Time
• Refer to the ”Installation and Connection Instructions” later in this
user information.
• When the unit is delivered in winter months with minus temperatures: Store the washing machine for 24 hours at room temperature
before putting it into operation.
Correct Use
• The washing machine is only designed for normal domestic washing.
If the unit is used for purposes other than that for which it is designed, the manufacturer can accept no liability for any resulting
damages.
• For safety reasons, conversions or modifications to the washing machine are not permissible.
• Use only detergents which are suitable for washing machines. Follow
the washing detergent manufacturer's instructions.
• The washing must not contain any flammable solvents. Also remember this when washing pre-cleaned washing.
• Do not use the washing machine for chemical cleaning.
• Dyes/dye removers may only be used in washing machines if the
manufacturer expressly allows these products. We cannot be held liable for any resulting damage.
• Use only water from the water mains. Use rainwater or service water
only if it meets the requirements outlined in DIN1986 and DIN1988.
• Frost damage is not covered by the warranty! If the washing machine
is in a room which is at risk from frost, an emergency emptying operation must be carried out when there is a frost risk (see the section
”Carry Out Emergency Emptying”).
6
Instructions for use
Child Safety
• Packaging components (e.g. films, polystyrene) can be hazardous to
children. Risk of suffocation! Keep packaging away from children.
• Children often cannot recognise the hazards associated with handling
electrical appliances. Therefore, ensure the necessary supervision during operation and do not allow children to play with the washing machine – there is a risk that children can get trapped inside.
• Ensure that children or small animals cannot climb into the washing
machine's drum.
• When disposing of the washing machine: Pull out the mains plug, destroy the door lock, cut off the electrical supply lead and throw away
the plug and the left-over cable. This means that children at play
cannot shut themselves inside and in so doing be in danger.
General Safety
• Repairs to the washing machine may only be carried out by skilled
persons. Incorrect repairs can cause significant hazards. If repairs are
necessary, consult our Customer Service or your specialist dealer.
• Never put the washing machine into operation if the mains cable is
damaged or if the control panel, work top or base area are damaged
in such a way that the inside of the unit is open and accessible.
• Switch off the washing machine before carrying out cleaning, care
and maintenance work. Also pull the mains plug out of the socket or,
– if it is permanently connected, – switch off the LS switch in the
fuse box or completely unscrew the screw-in fuse.
• If operation is stopped, disconnect the appliance from the mains supply and shut off the tap.
• Never pull the cable to remove the plug from the socket. Always pull
the plug itself.
• Multiple connectors, couplings and extension cables must not be
used. There is a fire risk with overheating!
• Do not spray down the washing machine with a water jet. Electric
shock risk!
• The glass in the filling door becomes hot in the case of washing programs with high temperatures. Do not touch!
• Allow the washing solution to cool down before emergency emptying
of the unit, before cleaning or before emergency opening of the filling door.
7
Instructions for use
• Small animals can chew the power cables and water hoses. Risk of
electric shock and danger of water damage! Keep small animals away
from the washing machine.
2
Disposal
Dispose the packing material!
Dispose of your washing machine's packaging correctly. All the packaging materials used are harmless to the environment and can be recycled.
• Plastic parts are marked with standard international abbreviations:
>PE<
for polyethylene, e.g. sheet wrapping material
>PS<
for polystyrene, e.g. padding material (always CFC-free)
>POM< for polyoxymethylene, e.g. plastic clips
• Cardboard packaging is manufactured from recycled paper and
should be deposited in the waste paper collection for recycling.
Dispose the old appliance!
When you finally put your appliance out of operation,
please bring it to your nearest recycling centre or to your dealer.
2
Environmental Tips
• You do not need to use a pre wash cycle or soak for washing with average soiling. This saves detergent, water and time (and protects the
environment).
• When loaded to the capacities indicated the washing machine is especially efficient.
• For small loads, use only one half to two thirds of the recommended
quantity of detergent.
• By pre-treating stains and marks you will be able to wash at a lower
temperature.
• It is often possible to wash without using softener. Give it a try! If
you use a drier, your washing will be soft and fluffy even without a
softener.
• For medium to high water hardness (from hardness range II, see “Detergents and Conditioners”) you should use water softener. The
detergent can then always be dosed as for hardness range I (= soft).
8
Instructions for use
Unit Description
Front View
Drawer for
washing detergent and
care agent
Control panel
Rating plate
(behind filling
door)
Filling door
Screw feet
(height-adjustable);
rear left:
Automatic
adjustment foot
Flap in front of
solution pump
Drawer for Washing Powder and Care Agent
In-wash stain treatment
Main detergent
(powder) and
water-softener
if required
Pre-wash
detergent/
soaking agent
or water-softener
Liquid care agent
(conditioner,
finisher, starch)
9
Instructions for use
Control Panel
Program
Button Spin speed/
progress-Display
RINSE HOLD
Additional programmeProgramme knob
Button DOOR/LIGHT
Options
Multi display
Button
START/
PAUSE
Button DELAY TIMER
Display OVERDOSING
Programme knob
The programme knob determines
the type of the washing cycle
(e. g. water level, drum movement, number of rinse cycles,
spinspeed) depending on the
type of washing to be handled,
as well as the water temperature.
OFF (UIT, ARRET)
switches the washing machine
Off; in all other positions the
machine is switched On.
For correcting accidentally selected programme settings, turn the
programme knob to the OFF position. The washing machine returns to
the Off condition again.
10
Instructions for use
COTTONS/LINEN, EASY-CARE
(WITTE/BONTE WAS, BLANC/COULEURS,
KREUKHERSTELLEND, DEFROISSABLE)
Wash programme from 20 °C to95 °C can be used universally for cotton/linen, easy-care (e.g. cotton/polyester) and synthetics. The washing
programme adapts itself to the various types of types of weaves and
amount of filling. For mostly cotton/linen, the programme for cotton/
linen will be carriedout; for mostly synthetics, a programme for easycare washing. For purely easy-care loading, the amount of filling should
not exceed 2.5 kg in order to prevent increased creasing build-up.
RINSING (SPOELEN, RINCAGE)
Separate rinse, separate Conditioning, separate impregnation of wet
washing (1 rinse cycle, fluid conditioner from the compartment æ is
rinsed in, spin).
Do not pour conditioner into the compartment if a separate spin cycle
is to be carried out.
PUMP OUT (POMPEN, VIDANGE)
Pumping out the water after a rinse stop (without spinning).
3
Rinse stop means: the washing remains in the last rinse water, it is not
spun.
SPIN (CENTRIFUG., ESSORAGE)
Pumping out the water after a rinse stop and spin, or separate spinning
of hand washed cotton/linen and easy-care washing.
GENTLE SPIN (KORT CENTRIFUG., ESSORAGE DELICAT)
Pumping out the water after a rinse stop and gentle spin or separate
gentle spin of delicate textiles (delicate washing, wool) at low speed.
DELICATE WASHING (FIJNE WAS, LINGE DELICAT)
Wash program for delicate washing at 30 °C or 40 °C.
WOOL (WOL, LAINE)/ P (Hand wash program)
Wash programme (cold to 40 °C) for machine machine-washable wool
as well as for handwashable wool textiles with the easy-care symbol
ï (Handwash programme).
SILK (ZIJDE, SOIE)/ P (handwash)
Wash programme at 30 °C for hand- and machine-washable silk.
3
As silk is a very delicate textile, we recommend washing only one article
of clothing, if possible, and on no account washing it together with
other textiles. For extremely delicate silk textiles, it is possible to obtain
an even more gentle handling by using the TIME SAVE button.
11
Instructions for use
FASHION
Especially gentle programme at 40 °C for modern textilessuch as
Viskose, Modal, Cupro, Lyocell, with more gentle handling than with the
DELICATE (FIJNE WAS, LINGE DELICAT) programme and more intensive
cleaning effect than with the hand wash programme.
REFRESH (OPFRISSEN, RAFRAICHIR)
Ca. 20-minute special programme at 30 °C for short wash cycle washing of textiles, such as sports clothing that has only been worn once
and is only lightly soiled.
EASY IRON (STRIJKVRIJ, SANS REPASSAGE)
Wash programme at 40 °C for easy-care textiles that will only need to
be lightly ironed or not at all after this programme.
2
ENERGY SAVING (ENERGIEBESPAREN, ECONOMIQUE)
Special energy and water saving programme at ca. 60 °C for lightly or
normally soiled cotton/linen with increased washing time.
Additional programme buttons
The purpose of the additional programme buttons is
to adapt the washing programme to the degree of
soiling of the washing. For normally soiled
washing, additional programs such as PREWASH
(VOORWAS, PRELAV.) and STAINS (VLEKKEN,
TACHES) are not necessary.
Depending on the programme, various functions
can be combined.
PRE WASH (VOORWAS, PRELAV.)
(Pre wash/Soaking)
Cold pre wash before the subsequent automatic main wash cycle.
With button DELAY TIMER (STARTTIJDKEUZE, DEPART DIFFERE) will soak
the pre wash for heating.
DELICATE (BEHOEDZAAM, SENSITIVE)
Special additional programme with significantly higher rinse effect
(special spin cycle) with simultaneously improved weave care (reduced
drum movement). Ideal, if washing is to be carried out often, e.g. for
over-sensitive skin. RINSE+ (SPOELEN+, RINCAGE+) can additionally be
selected.
12
Instructions for use
STAINS (VLEKKEN, TACHES)
For handling strongly soiled or stained washing. (Stainssalt or tabs are
rinsed in a time optimized manner during the programme cycle).
3
When setting WOOL (WOL, LAINE) /P (handwash programme) the additional programmes cannot be selected with the buttons.
TIME SAVE
Shortened washing programme for less soiled washing can be selected
in three levels for the programme COTTON/LINEN, EASY CARE (WITTE/
BONTE WAS, BLANC/COULEURS, KREUKHERSTELLEND, DEFROISSABLE)
and in two levels for other programmes.
Programme duration
Programme
Without
TIME SAVE
With
TIME SAVE
Press button Press button
1x
2x
COTTON/LINEN,EASYCARE
(WITTE/BONTE WAS, BLANC/COULEURS,
KREUKHERSTELLEND, DEFROISSABLE)
at 60 °C
119 Min
91 Min
63 Min
Other programmes,
e.g. DELICATE WASH
(FIJNE WAS, LINGE DELICAT)
at 30 °C
68 Min
52 Min
-
Programmable functions
The programmable functions of additional rinsing (RINSE+/SPOELEN+,
RINCAGE+), water cooling and Variomatic-lightspinning are described
in the chapter „What to do if...“.
13
Instructions for use
Consumption values and time requirements
The values for selected programmes in the following table were determined under normal conditions. Besides the selected settings
(additional functions), the consumption values also depend on other
conditions such as water temperature or the washing powder/liquid
used. However, they provide a helpful guide for operation in the
household
Programme knob
(Temperature)
Type
of textile
Filling Water Energy
Time in
quantity
in
in
minutes
in kg
Litres kWh
ENERGY SAVING1)
(ENERGIEBESPAREN, ECONOMIQUE)
Cotton
5
39
0.85
120
COTTON/LINEN, EASY CARE 95
(WITTE/BONTE WAS, BLANC/COULEURS,
KREUKHERSTELLEND, DEFROISSABLE)
Cotton
5
42
1.80
148
COTTON/LINEN, EASY CARE 60
(WITTE/BONTE WAS, BLANC/COULEURS,
KREUKHERSTELLEND, DEFROISSABLE)
Cotton
5
42
0.95
119
COTTON/LINEN, EASY CARE 40
(WITTE/BONTE WAS, BLANC/COULEURS,
KREUKHERSTELLEND, DEFROISSABLE)
Cotton
5
49
0.55
116
COTTON/LINEN, EASY CARE 60
(WITTE/BONTE WAS, BLANC/COULEURS,
KREUKHERSTELLEND, DEFROISSABLE)
ECO TIME press 1x 1)
Synthetics
2,5
48
0.70
91
COTTON/LINEN, EASY CARE 40
(WITTE/BONTE WAS, BLANC/COULEURS,
KREUKHERSTELLEND, DEFROISSABLE)
ECO TIME press 1x 1)
Synthetics
2,5
48
0.50
88
COTTON/LINEN, EASY CARE 40
(WITTE/BONTE WAS, BLANC/COULEURS,
KREUKHERSTELLEND, DEFROISSABLE)
ECO TIME press 2x
Synthetics
2.5
42
0.50
59
DELICATES (FIJNE WAS, LINGE DELICAT) 30 Synthetics
2.5
54
0.35
68
2
42
0.16
35
WOOL (WOL, LAINE) P (Handwash) 30
1) Remarks: Programme setting for testing in accordance with or in similarity to
EN 60 456 and IEC 60 456.
14
Instructions for use
Wash Time Display
3
The wash times for the wash programmes
depend on the usual washing practice and
the ambient conditions at the place of installation. The washing type and quantity,
the type of washing detergent, the water temperature and the room
temperature etc. can influence the duration of the wash programme.
What does “UPDATE” mean?
The wash programmes in your washing machine are controlled by software.
New types of fabric or new detergents may require new wash programmes in the future. In most cases, the software can be adapted to
this.
For further information on a possible “update” please contact customer
service.
Water Protection Aqua Control +
Aqua Alarm
In the event of damage to the supply hose, the system blocks the further supply of water to the unit directly st the water tap.
If water escapes elsewhere, the drainage pump automatically pumps
off – even if the unit is switched off. The washing machine merely has
to be connected to the electricity mains. When the water protection
system responds, a warning signal sounds at the same time.
15
Instructions for use
Before the first wash
0
Carry out a wash cycle without washing; Programme COTTON/LINEN
(WITTE/BONTE WAS, BLANC/COULEURS) 95, with half the washing powder/liquidquantity. In this way, manufacturing remains in the drum and
water container will be removed.
Preparing a Wash Load
Sorting and preparing a wash load
• Sort the washing according to care symbol (see “Washing Types and
Care Symbols”).
• Empty all pockets.
• Remove metal objects (paper clips, safety pins etc.).
• In order to prevent the washing tangling and being damaged: close
zippers, button up duvet covers and pillow cases, and tie up loose
straps such as from aprons.
• Turn articles with double layered fabric inside out (sleeping bags,
anoraks etc.).
• In the case of knitted coloured fabrics and also wool and fabrics with
jewellery attached: turn inside out.
• Place small and delicate articles (baby booties, stockings, bras etc.)
into a washing net, a pillow case with zipper, or in large socks before
washing.
• Handle curtains with particular care. Metal fittings or burred, plastic
fittings must be removed or tied into a net or bag. We cannot accept
liability for damage.
• Do not wash coloured and white washing together. This could transfer colour to white washing or turn it grey.
• New coloured items often have an excess of colour. It is better to
wash such items separately the first time.
• Mix small and large items of washing. This improves the wash efficiency and the washing is more evenly distributed during the spin cycle.
• Shake out washing before placing into the washing machine.
• Do not place folded washing into the drum.
• Observe such washing instructions as “wash separately” and “wash
separately several times”!
16
Instructions for use
Types of washing and care symbols
The care symbols help in the selection of the correct wash programmes.
The washing should be sorted according to type and care symbols. The
temperature information on the care symbols are always maximum
values.
Cottons ç
Textiles of Cotton and Linens with this care symbol are resistant to mechanical loading and high temperatures. For this type of washing the
programme COTTON/LINEN EASY-CARE (WITTE/BONTE WAS, BLANC/
COULEURS, KREUKHERSTELLEND, DEFROISSABLE) is suitable.
Linenè ë
Textiles of cotton and linen with this care symbol are resistant to mechanical loading. For this type of washing the programme
COTTON/LINEN EASY-CARE (WITTE/BONTE WAS, BLANC/COULEURS,
KREUKHERSTELLEND, DEFROISSABLE) is suitable.
Easy-care washing ê í
Textiles such as reinforced cotton, cotton-wool mixtures and synthetics
with this care symbol demand a mechanically milder handling. For
these type of washing the programmes COTTON/LINEN, EASY CARE
(WITTE/BONTE WAS, BLANC/COULEURS, KREUKHERSTELLEND, DEFROISSABLE) and LIGHT IRON (STRIJKVRIJ, SANS REPASSAGE) are avaIlable.
Delicatesì
Textiles such as layered fibres, micro-fibres, synthetics and Curtains with
this care symbol need a caring handling. For these types of washing the
programme DELICATE (FIJNE WAS, LINGE DELICAT) is suitable.
Viskose í ì
Modern textiles such as viskose, cupro, lyocell, modal, among others require a particularly caring handling. For these types of washing the
programme FASHION is suitable.
Wool, Silk and specially delicate wash 9 ì ï
Textiles such as wool, wool mixtures and silk with this care symbolare
particularly sensitive to mechanical loading. For textiles of this sort the
programme WOOL (WOL, LAINE)/P (handwash) and SILK (ZIJDE, SOIE)/
P (handwash) are
suitable.
Caution! Textiles with care symbols ñ (Do not wash!) must not be
washed in the washing machine!
17
Instructions for use
Washing Detergents and Care Agents
Which washing detergent and care agent?
Use only washing detergents and care agents which are suitable for use
in washing machines. Always follow the manufacturer's instructions.
How much washing detergent and care agent?
The amount to be used depends on:
• the dirtiness of the washing
• the hardness category of the mains water supply
• the filling quantity
2
If the detergent manufacturer gives no details of the dosing quantities
for minimum loads, add one third less for half loads and, in the case of
very small loads and for EASY IRON (STRIJKVRIJ, SANS REPASSAGE),
only half the amount of detergent recommended for a full load.
Refer to the detergent/care agent manufacturer's instructions on use
and dosage.
Water Softener
For medium to high water hardness (hardness category II or higher) you
should use water softener. Pay attention to the manufacturer's instructions. Always then meter detergent for hardness category I (= soft). The
responsible water works can provide information on the local water
hardness.
2
Since the water softener is added before the main washing detergent,
(water pre-softening), eighty percent of the softener quantity stated on
the package is sufficient.
Water Hardness Details
Water Hardness °dH
(degrees German
hardness)
Water Hardness in mmol/l
(millimol per litre)
I – soft
0-7
up to 1.3
II – medium hard
7 - 14
1.3 - 2.5
III – hard
14 - 21
2.5 - 3.8
IV – very hard
over 21
over 3.8
Hardness Category
18
Instructions for use
Carrying out a wash cycle
Brief instructions
A wash cycle is carried out in the following steps:
0 1. Setting the correct wash programme:
– Set programme and temperature with the programme knob,
– If necessary, select additional programme.
2. PossiblyChange spin speed, select /RINSE STOP (GEEN CENTR., SANS
ESSOR.).
3. Possibly set DELAY TIMER (STARTTIJDKEUZE, DEPART DIFFERE).
4. Open door, put in washing,
5. Close door.
6. Washing-/Add conditioner.
7. Start the wash programme with the START/PAUSE (START/PAUZE,
MARCHE/PAUSE) button.
After completion of the wash programme:
Caution! if the wash cycle ends with Rinse Stop, carry out PUMP OUT
(POMPEN, VIDANGE), SPIN (CENTRIFUG., ESSORAGE) or SHORT SPIN
(KORT CENTRIFUG., ESSORAGE DELICAT) before opening the door.
8. Open door, remove washing.
9. Switch washing machine Off: Set programme knob to OFF (UIT, ARRET).
19
Instructions for use
Setting the wash programme
3
For suitable programme, correct temperature and possible additional
programs for the respective type of washing, see „Programme tables“.
0 1. With the programme knob, set
the desired wash programme and
temperature.
In the multi-display the
probable duration of the set programmes will be shown in
minutes.
2. Possible Press additional programme button(s):
The display of the selected additional programme
is displayed.
– For changing to another selection, press another
button.
– For resetting, press button again.
20
Instructions for use
Change Spin Speed / Select Rinse Hold
0
If necessary, change the spin speed for the final
spin / select RINSE HOLD (GEEN CENTR., SANS
ESSOR.):
Press the button Spin speed/RINSE HOLD (GEEN
CENTR., SANS ESSOR.) as often as necessary until
the display for the required spin speed (or of
RINSE HOLD/GEEN CENTR., SANS ESSOR.) lights
up.
If RINSE HOLD (GEEN CENTR., SANS ESSOR.) is selected, the washing remains in the last rinsing water and is not spun.
3
If you do not change the spin speed, the final spin is automatically
adapted depending on the washing program:
– COTTONS/LINEN, EASY-CARES
(WITTE/BONTE WAS, BLANC/COULEURS,
KREUKHERSTELLEND, DEFROISSABLE)
– ENERGY SAVING
(ENERGIEBESPAREN, ECONOMIQUE)
– DELICATES
(FIJNE WAS, LINGE DELICAT)
– WOOL
(WOL, LAINE)/ P (Handwash)
– SILK
(ZIJDE, SOIE)/ P (Handwash)
– FASHION
1600 revolutions
per minute
1600 revolutions
per minute
1200 revolutions
per minute
1200 revolutions
per minute
1200 revolutions
per minute
1200 revolutions
per minute
– EASY IRON
1200 revolutions
(STRIJKVRIJ, SANS REPASSAGE)
per minute
The speed of the intermediate spin depends on the selected program
and cannot be changed.
21
Instructions for use
Setting the delay timer/soaking time
Delay timer
The DELAY TIMER (STARTTIJDKEUZE, DEPART DIFFERE) button makes it
possible to delay the start of a wash programme by 1 to a maximum of
19 hours.
0 1. Select wash programme.
2. Press DELAY TIMER (STARTTIJDKEUZE, DEPART
DIFFERE) button.
3. Press START/PAUSE (START/PAUZE,
MARCHE /PAUSE) button.
With a delay in the start, the DELAY TIMER (STARTTIJDKEUZE, DEPART
DIFFERE) display lights up.
Depress the DELAY TIMER (STARTTIJDKEUZE, DEPART DIFFERE) button
until the desired start delay appears, e. g. in the form of 12h for a delay
of the programme start of 12 hours. If19h is displayed and the button
is pressed again, then the delay timer is annulled. There will appear the
duration of the set wash programme (display in minutes, e. g.120).
The set delay timer can also be annulled in that the programme knob is
set to the OFF position.
Soaking duration
With depressed PRE WASH (VOORWAS, PRELAV.) button, by pressing
the DELAY TIMER (STARTTIJDKEUZE, DEPART DIFFERE)
button, the duration of soaking can be extended by 1 to a maximum
of 19 hours.
0 1. Press the PRE WASH (VOORWAS, PRELAV.) button.
2. Press DELAY TIMER (STARTTIJDKEUZE, DEPART DIFFERE) button.
Soaking is set, the DURATION (LOOPTIJD, TEMPS RESTANT) display lights
up.
The soaking time is now ca. 1 hour.
3. By repeated pressing of the DELAY TIMER (STARTTIJDKEUZE, DEPART
DIFFERE) button, the soaking times can be extended in steps of an hour.
The DURATION (LOOPTIJD, TEMPS RESTANT) and DELAY TIMER
(STARTTIJDKEUZE, DEPART DIFFERE) displays light up.
22
Instructions for use
Opening and Closing the Filling Door
0
0
3
Open: Press the button DOOR/LIGHT (DEUR/
LICHT, PORTE/ECLAIR.). The filling door springs
open.
Close: Press the filling door firmly closed.
When the unit is switched on, the display DOOR/LIGHT (DEUR/LICHT,
PORTE/ECLAIR.) shows whether the filling door can be opened:
– green: The door can be opened (not when the program saving function is activated, for details see the section ”Program Saving”)
– off:
The door cannot be opened at present
– red: The door is open
The washing drum is illuminated when the filling door is open. The light
goes out automatically after approx. 3 minutes.
Putting in the washing
For maximum filling quantity see „Programme tables“.
For information on the correct preparation of the washing see „sorting
and preparing the washing“.
0 1. Sort and prepare washing according to type and colour.
2. Open door: Press DOOR/LIGHT (DEUR/LICHT, PORTE/ECLAIR.) button.
Door springs open.
3. Put in washing.
Caution! Do not jam items of washing
when closing the door! Both textiles and
appliance can be damaged!
4. Close door tightly.
3
23
Instructions for use
Add Washing Detergent/Care Agent
For information on wash and care agent,
see chapter „Washing powder and
care agent“.
0 1. Open the washing detergent drawer:
Reach into the flap at the bottom of the
drawer (1), pull drawer out up to the
stop (2).
2. Fill with washing detergent/care agent.
3
Compartment for In-wash stain
treatment/-tabs
(only for additional programme STAINS/
VLEKKEN, TACHES)
Compartment for powdered washing
agent/Tabs
(If you are using water softener and
need the right hand compartment for
the pre-wash/softening agent, add the
water softener to the main washing detergent in this compartment).
Compartment for liquid care agent
(Softener, shape rinse, starch)
Caution! Do not fill compartment
above MAX mark. Thick fluid medium
possibly thin to MAX mark,
dissolve powdered starch.
Remarks: A small amount of remaining water in the
compartment for fluid care agent is normal and
does not affect the rinse results.
Compartment for pre-wash agent/soaking agent
(only for additional programme PRE WASH/VOORWAS, PRELAV.)
or for water softener
3. Push drawer all the way in.
3
24
When using liquid washing agent/Tabs:
liquid washing agent or Tabs with the dosing container provided by the
detergent industry. More instructions on the washing agent packing.
Instructions for use
Starting the wash program
0 1. Checking whether the water tap is open.
2. Starting the wash programme: Press the
START/PAUSE (START/PAUZE, MARCHE /PAUSE)
button.
The wash programme is started or starts after
end of the set delay time.
3
If the DOOR/LIGHT (DEUR/LICHT, PORTE/ECLAIR.) display lights up red
when pressing the START/PAUSE (START/PAUZE, MARCHE /PAUSE) button, then the door is not properly closed. Press the door firmly closed
and press the START/PAUSE (START/PAUZE, MARCHE /PAUSE) button
again.
For a set delay time:
the set delay time runs out, in the multi-display the remaining time up
to the start of the programme is displayed (always in full hours). During
this time, you can add washing or change the delay time or abort.
• Adding washing: Press the START/PAUSE (START/PAUZE, MARCHE /
PAUSE) button. The door can be opened. Then close the door and
press the START/PAUSE (START/PAUZE, MARCHE /PAUSE) button
again.
• Changing the delay time or aborting: Press the DELAY TIMER (STARTTIJDKEUZE, DEPART DIFFERE) button until the desired time is displayed; With a display of the programme duration (display in
minutes, e. g. 120) the wash programme starts immediately.
25
Instructions for use
Sequence of the programme
Programme sequence - display
Before the start, the programme steps to be carried
out will be displayed by the Programme sequence
display. During the washing cycle, the current
programme step is displayed.
Multi display
The expected The remaining wash time (in
minutes) up to the programme end is displayed in the Multi display.
3
During the wash cycle, the remaining wash time can lengthen or remain static for a short time as the washing programme adapts itself to
the different conditions during washing, (e.g. type of washing or quantity, imbalance recognition during spinning, special rinse cycle, etc.).
Changing speed of spinning
During the wash programme, the spin speed can still be changed or
SPIN STOP (GEEN CENTR., SANS ESSOR.)can be set.
Other settings cannot be changed.
0
3
26
Abort programme
For early aborting of the wash programme, turn the programme knob
to OFF (UIT, ARRET).
The programme can be interrupted at any time with the START/PAUSE
(START/PAUZE, MARCHE/PAUSE) button and can be continued by
means of a repeated pressing of the button.
Instructions for use
Wash cycle ended/Remove washing
After the wash programme has been ended, END (EINDE, FIN) is displayed on the Programme cycle display.
• If programme EASY IRON (STRIJKVRIJ, SANS REPASSAGE) has been
selected, then a crease guard programme of ca. 30 minutes is carried
out after the programme end. The multi-display then additionally
shows a rest time of 1 minute and the display END (EINDE, FIN) lights
up. During the crease guard programme, the door can be opened at
any time and the washing can be removed.
• If RINSE STOP (GEEN CENTR., SANS ESSOR.) has been selected, the
display next to the
START/PAUSE (START/PAUZE, MARCHE /PAUSE) button blinks.
0 1. After a rinse stop, the water must first be pumped out:
– Either press the START/PAUSE (START/PAUZE, MARCHE /PAUSE) button (water is pumped out and the washing is spun according to the
position of the programme; with the RINSE STOP (GEEN CENTR.,
SANS ESSOR.) spin speed, the speed of spinning can also still be
changed during spinning),
or
– Turn Programme knob to PUMP (POMPEN, VIDANGE) and press the
START/PAUSE (START/PAUZE, MARCHE /PAUSE) button (the water is
pumped off without spinning),
or
– Turn programme knob to SPIN (CENTRIFUG., ESSORAGE) or SHORT
SPIN (KORT CENTRIFUG., ESSORAGE DELICAT) and press START/PAUSE
(START/PAUZE, MARCHE /PAUSE) button (water is pumped out and
the washing is spun or short spun).
After the end of this programme step, the END (EINDE, FIN) display
lights up.
2. Open filling door.
As soon as the display next to the DOOR/LIGHT (DEUR/LICHT, PORTE/
ECLAIR.) lights green, the door can be opened (not when the programme security is activated. For this see „Programme security„).
3. Remove washing.
4. Turn programme knob to OFF (UIT, ARRET).
27
Instructions for use
5. After washing, pull the washing agent drawer out a little so that it can
dry out. Lean door only against frame do that the washingmachine can
vent out.
3
28
If the display OVER DOSING (OVERDOS., SURDOSAGE)
lights up, too much washing detergent was used in the
washing program just ended. During the next wash, pay
attention to the dosing information of the washing detergent
manufacturer and pay attention to the filling quantity!
Attention! If the washing machine is not used for a long time:
Close the water tap and disconnect the washing machine from the
electricity mains. (Aqua Control water protection with Aqua Alarm
does not operate if the power supply is interrupted.)
Instructions for use
Programme tables
Wash
In the following, there are shown, not all the possible, but only the
commonly used and best settings.
Type of washing,
Cleaning symbol
Cotton/linen3)
èç
Cotton/Linen
ëèç
max. Filling
quantity1)
(dryweight)2)
Programme knob
temperature [in °C]
possible
Additional
programmes
5kg
ENERGY SAVING 60
(ENERGIEBESPAREN,
ECONOMIQUE)
PRE WASH
(VOORWAS, PRELAV.)
DELICATE
(BEHOEDZAAM,
SENSITIVE)
STAINS
(VLEKKEN, TACHES)
TIME SAVE
5kg
COTTON/LINEN,
EASY-CARE
(WITTE/BONTE WAS,
BLANC/COULEURS,
KREUKHERSTELLEND,
DEFROISSABLE) 20 to 95
PRE WASH
(VOORWAS, PRELAV.)
DELICATE
(BEHOEDZAAM,
SENSITIVE)
STAINS
(VLEKKEN, TACHES)
TIME SAVE
2.5 kg
REFRESH (OPFRISSEN,
RAFRAICHIR) 30
29
Instructions for use
Type of washing,
Cleaning symbol
max. Filling
quantity1)
(dryweight)2)
Programme knob
temperature [in °C]
possible
Additional
programmes
2,5kg
COTTON/LINEN,
EASY-CARE
(WITTE/BONTE WAS,
BLANC/COULEURS,
KREUKHERSTELLEND,
DEFROISSABLE) 20 to 60
PRE WASH
(VOORWAS, PRELAV.)
DELICATE
(BEHOEDZAAM,
SENSITIVE)
STAINS
(VLEKKEN, TACHES)
TIME SAVE
EASY IRON (STRIJKVRIJ,
SANS REPASSAGE)4) 40
PRE WASH
(VOORWAS, PRELAV.)
STAINS
(VLEKKEN, TACHES)
TIME SAVE
Easy-care3)
î íê
1kg
Delicates
ì
2.5kg
REFRESH (OPFRISSEN,
RAFRAICHIR) 30
2.5kg (or.
15-20 m2
curtaining)
DELICATES (FIJNE WAS,
LINGE DELICAT) 30, 40
2.5kg
FASHION 40
Wool/HandWashing
9 ì ï
2kg
WOOL (WOL, LAINE) /
P (handwash)
COLD( KOUD, FROID) to
40
Silk/
HandWashingï
1kg
SILK (ZIJDE, SOIE) /
P (handwash) 30
PRE WASH
(VOORWAS, PRELAV.)
STAINS
(VLEKKEN, TACHES)
TIME SAVE
TIME SAVE
1) The load amount inquiry operates in accordance with the EN 60456 standard
load.
2) A 10 litre bucket holds around 2.5 kg of dry clothes (cotton).
3) Programme settings for checking according to, or in similarity to EN 60 456 and
IEC 60 456, are described in chapter „consumption values and time requirements“.
4) Only by adhering to the filling quantity of 1kg (about 5 to 7 men's easy-careshirts) will crease folds in the wash mostly be avoided.
30
Instructions for use
Separate Rinsing/Conditioner/Starching/Impregnation
Max. Filling quantity
(dry weight)
Programme knob
Cotton-/Linen
5kg
RINSING
(SPOELEN, RINCAGE)
Wool/Hand wash
programme
2kg
RINSE (SPOELEN, RINCAGE) +
button TIME SAVE
Type of washing
Separate Spinning
Type of washing
Cotton-/Linen
Max. Filling quantity
(dry weight)
5kg
Easy-care
2.5kg
Delicates
2.5kg
Wool/Hand wash
programme
2kg
Silk
1kg
Programme knob
SPIN
(CENTRIFUG., ESSORAGE)
SHORT SPIN
(KORT CENTRIFUG., ESSORAGE DELICAT)
31
Instructions for use
Cleaning and Care
Control Panel
0
Attention! For cleaning panels and control parts, do not use furniture
polish or any aggressive cleaning agents.
Wipe off control panels with a damp cloth. Use warm water to do this.
Washing Detergent Drawer
The washing detergent drawer should be cleaned from time to time.
0 1. Pull out the washing detergent drawer as far as it will go.
2. Remove the washing detergent drawer with a firm pull.
3. Remove the softener insert from
the middle compartment.
4. Clean the softener insert under
running water.
5. Clean the compartments from the
rear with warm water.
It is best to use a bottle brush.
6. Push on the softener insert as far
as it will go so that it is secure.
32
Instructions for use
7. Use a brush to clean the entire
rinsing-in part of the washing machine, especially the nozzles on the
top side of the rinsing-in chamber.
8. Insert the washing detergent
drawer into the guide rails and
push it in.
Washing Drum
0
The washing drum is made of high-quality stainless steel. Rust deposits
on the drum can occur due to foreign bodies in the washing which can
cause rust.
Attention! Do not clean the stainless steel drum with acidic antiliming
agents, scouring agents containing chlorine or iron or steel wool. Our
Customer Service Department has suitable agents available.
Remove any rust deposits on the drum using a stainless steel cleaning
agent.
Filling Door
0
Check regularly whether there are deposits or foreign bodies in the
rubber sleeve behind the filling door and, if so, remove them.
33
Instructions for use
Cleaning the drain pump
Paper clips, nails and so on can sometimes get into the washing machine with the washing and remain in the drain pump casing. Fluff and
strands of fabric can gather on these items and block the drain pump.
Therefore the drain pump should be cleaned at least once a year.
Warning! Switch off the washing machine and pull out the mains plug
before cleaning the drain pump!
0 1. First carry out an emergency emptying (see section ”Carry Out Emergency Emptying”).
2. Place a towel on the floor in front of the cover of the solution pump.
Residual water can run out.
3. Unscrew the drain pump cover anticlockwise and pull it out.
1
4. Remove any foregin bodies from the
pump housing.
5. Replace the cover. Insert the webs on
the cover laterally into the guide slots
and screw the cover firmly into place
clockwise.
6. Close the emergency emptying hose and
place it in the holder.
7. Close the flap.
34
Instructions for use
What to do if ...
Remedying Faults
In the event of a fault, try to solve the problem yourself with the aid of
the information provided here. If you call Customer Service to deal
with one of the faults listed here or to remedy an operating fault, the
customer service technician's visit will not be free of charge, even during the warranty period.
• It the fault code C1 or C2 appears in the
multi display, you may be able to remedy
the fault yourself (see the fault table below).
After remedying the fault, press the button
START/PAUSE (START/PAUZE, MARCHE/PAUSE). If the fault code is
displayed again, please inform the Customer Service.
• In the case of all other displayed faults (C and number or letter),
please inform the Customer Service and state the fault code.
Problem
Possible cause
Electric plug not inserted.
Remedy
Insert electric plug.
Fuse of the mains installation
Replace fuse.
is not correct.
Washing machine does Door is not properly closed.
not function.
Door cannot be closed.
Water is not entering.
Error code (1 appears.
Close door; Lock must engage audibly .
Button: START/PAUSE
(START/PAUZE, MARCHE /
PAUSE) has not been pressed
long enough.
Press START/PAUSE (START/
PAUZE, MARCHE /PAUSE)
button until the programme
starts.
Child safety feature is
switched On.
Cancel child safety feature
(see section „Childsafety
feature“).
Water tap is switched Off
Open water tap.
Close water tap. Disconnect
Filter in the socket of the inhose from water tap, remove
flow hose connection is
filterand clean under
blocked.
running water.
Water tap is full of lime or
defective.
Check water tap, if necessary
have it repaired.
35
Instructions for use
Problem
Possible cause
Remedy
Transport safeguard has not
been removed.
Remove transport safeguard
according to setting up and
connection instructions.
The height adjustable
threaded feet are not
correctly adjusted.
Align feet according to
setting up and connection
instructions.
Washing machine viThere is very little washing in
brates during operation the drum (e.g. only a dressing Function is not affected by
this.
or is unsteady.
gown).
Wash water of the
mainwashing foams
strongly.
Water leaks out of the
washing machine.
The emptying pump
runs continuously also when the appliance is switched off.
36
Water could not be fully
pumped out before spinning
because drainage hose is
kinked or water pump is
blocked.
Move the path of the hose
and, if necessary, remove
kink or clean water pump
and, if necessary, remove
foreign body from pump
housing.
Probably too much washing
agent has been filled in.
Dose washing agent exactly
according to manufacturers
instructions.
Connection to the inflow
hose is leaking.
Tighten inflow hose
connection.
Drainage hose is leaking.
Check drainage hose and, if
necessary, replace.
Cover of the water pump is
not properly closed.
Close cover properly.
Washing is jammed
in the door.
Abort programme, remove
washing from door. Start
programme again.
Emergency emptying hose is
not properly closed off or is
leaking.
Close off emergency emptying hose (see section „Carry
out energy emptying operation“). In the case of a
leaking emergency emptying
hose, call the customer
service.
Close water tap, remove
Anti-flood system Aqua Conelectric plug and inform
trol has displayed.
customer service.
Instructions for use
Problem
Possible cause
Remedy
Conditioner insert in the
compartment for care agent
is not properly placed on or
is blocked.
Clean detergent drawer, seat
conditioner insert properly.
Washing is badly
creased.
Probably too much washing
has been put in.
Note maximum filling quantity (see programme tables).
For easy-care textiles select
the EASY IRON (STRIJKVRIJ,
SANS REPASSAGE) programme.
The washing has not
been spun as dry as
usual.
The washing was not able to Always load the drum as ful
be distributed evenly in the as possible with a combinadrum prior to spinning.
tion of large and small items.
Conditioner has not
rinsed, compartment
æ for care agent is
filled with water.
There is a kink n the drainage
Remove kink.
hose.
Maximum pump height
(emptying height 1m from
Washing is not spun.
base surface of the appliRemaining water is vis- ance) is exceeded.
iblein the drum.
Error code (2 appears.
Water pump is blocked.
Refer to the customer
service. For pumping heights
over 1m, they have a supplementary set as special spares
available.
Switch off appliance and pull
out electric plug. Clean water pump.
At the siphon connection: SiClean siphon.
phon is blocked.
Door is locked for safety rea- Wait till display DOOR/LIGHT
sons (display DOOR/LIGHT is (DEUR/LICHT, PORTE/ECLAIR.)
Door cannot be opened Off).
lights up green.
when appliance is
Cancel programme security
switched on.
Programme security is
(see section „Programme seswitched On.
curity“).
Water tap is not fully
opened.
Detergent remains
form inthe washing
powder/liquid drawer.
Open water tap fully.
Close water tap. Disconnect
Filter in the socket of the ininflow pipe from water tap
flow hose at the water tap or
and from the appliance and
the appliance is blocked.
clean filter.
37
Instructions for use
Problem
Rinse water is cloudy.
Possible cause
The reason is probably a detergent with a high silicate
content.
Remedy
No negative effect on the
rinse results; possibly use a
liquid detergent.
When pressing an additional programme but- The selected additionalproton, the
gramme cannot be combined Make another selection.
correspondingdisplay
with the set programme.
does not light up.
Programme cycledisplay blinks constantly.
38
Programme security is
switched On; during the
wash cycle the programme
knob has been moved.
Turn programme knob back
to its original position (see
„Programme security“).
Instructions for use
If the washing result is not satisfactory
If the washing is grey and limescale forms in the drum
• Not enough washing detergent added.
• The right washing detergent was not used.
• Special types of stain were not pretreated.
• Program or temperature incorrectly set.
• If binary wahing detergents were used, the individual components
were not added in the correct ratio.
If there are still grey stains on the washing
• Washing contaminated with creams, grease or oils was washing with
too little detergent.
• Washing at too low temperature.
• A frequent cause is that conditioner – particularly concentrated
form, ended up on the washing. Wash out such stains as quickly as
possible and carefully use the right conditioner.
If foam is still visible after the final rinse
• Modern washing detergents can still produce foam, even in the final
rinse. The washing is still sufficiently rinsed.
If there are white residues on the washing
• These are the insoluble components of modern detergents.
They are not the result of an insufficient rinsing effect.
Shake or brush off the washing. Perhaps in future you should turn
the washing before washing it. Check the choice of detergent and use
a liquid detergent if necessary.
39
Instructions for use
Carry Out an Emergency Emptying Operation
• When the washing machine no longer pumps off the washing solution, an emergency emptying operation must be carried out.
• When the washing machine is in a room where there is a frost risk, an
emergency emptying operation must be carried out when there is a
frost risk.
Also: Unscrew the intake hose from the water tap and lay it on the
floor. Empty the drainage hose.
Warning! Switch off the washing machine before carrying out an
emergency emptying operation and pull out the mains plug.
Caution! The washing solution running out of the emergency emptying
hose can be hot. Risk of scalding! Allow the washing solution to cool
down before carrying out emergency emptying.
0 1. Provide a flat collecting vessel to catch the washing solution as it runs
out.
2. Open the flap downwards in the right
part of the base panel and pull it off.
1
3. Remove the emergency emptying hose
from the holder.
4. Place the collecting vessel underneath.
5. Release and pull out the plug of the
emergency emptying hose by turning it
anticlockwise.
The washing solution drains off. Depending on the amount of solution, it
may be necessary to empty the collecting vessel several times. To do this, temporarily close the emergency emptying
hose again with the plug.
40
Instructions for use
When all the washing solution has drained off:
6. Firmly push the plug into the emergency emptying hose and turn it
tight clockwise.
7. Put the emergency emptying hose back into the holder.
8. Insert the flap into the base panel and close.
Emergency Unlocking of the Filling Door
When the filling door can no longer be opened, it can be opened with
the aid of the emergency unlocking facility.
Warning! Switch off the washing machine before operating the emergency unlocking and remove the plug from the mains!
0 1. If you can see water in the viewing window of the filling door, first
carry out an emergency emptying operation (see Section ”Carry out an
emergency emptying operation”).
2. Open the flap downwards in the right
part of the base panel.
3. Turn the rotary knob clockwise with the
aid of a coin. The filling door springs
open.
1
41
Instructions for use
Additional rinse cycle (RINCAGE+)
The washing machine is set to very economical water consumption.
However for people who suffer from an allergy, it can be helpfulto rinse
with more water.
3
When this function is set, an additional rinse takes place for the programmes COTTON/LINEN , EASY-CARE (WITTE/BONTE WAS, BLANC/
COULEURS, KREUKHERSTELLEND, DEFROISSABLE) as well as EASY IRON
(STRIJKVRIJ, SANS REPASSAGE) and DELICATES (FIJNE WAS, LINGE
DELICAT).
On delivery of the machine, no additional rinse cycle is set.
Set additional rinse cycle:
0 1. Turn programme knob to SHORT SPIN (KORT CENTRIFUG., ESSORAGE
DELICAT).
2. Keep button DELICATES (BEHOEDZAAM, SENSITIVE) depressed for at lest
5 seconds.
After the button has been pressed for 5 seconds RINSE+ (SPOELEN+,
RINCAGE+) will blink for 5 seconds.
3. Whilst RINSE+ (SPOELEN+, RINCAGE+) blinks, release DELICATE (BEHOEDZAAM, SENSITIVE) button.
when the blinking has stopped, the additional rinse cycleis set. It is
available until it is canceled again.
When the additional rinse cycle is set, the RINSE+ (SPOELEN+,
RINCAGE+) display will be lit on the programme cycle display before
programme start and during the additional rinse cycle .
4. If you want to check whether the additional rinse cycle is set:
– Turn the programme knob to SHORT SPIN (KORT CENTRIFUG.,
ESSORAGE DELICAT).
– Press the DELICATES (BEHOEDZAAM, SENSITIVE) button briefly.
If RINSE+ blinks on the programme cycle display, then the additional
rinse cycle is set.
42
Instructions for use
Cancel additional rinse cycle
0 1. Turn programme knob to SHORT SPIN (KORT CENTRIFUG., ESSORAGE
DELICAT).
2. Keep button DELICATES (BEHOEDZAAM, SENSITIVE) depressed for at
least 5 seconds.
Immediately on pressing the button, RINSE+ (SPOELEN+, RINCAGE+)
blinks on the programme cycle display. After 5 seconds RINSE+
(SPOELEN+, RINCAGE+) will stop blinking and lights up constantly for a
further 5 seconds.
3. Whilst RINSE+ is lit up constantly, release the DELICATES (BEHOEDZAAM, SENSITIVE) button.
After RINSE+ (SPOELEN+, RINCAGE+) has stopped lighting up, the additional rinse cycle is canceled.
3
With the use of the additional rinse cycle, the water consumption and
programme duration increases.
Water cooling
It may be necessary to cool the wash water before pumping out in order to prevent damage to plastics draining pipes.
3
The wash water is cooled before pumping out at the end of the main
wash cycle (by the addition of cold water).
(This setting is only effective for the programme COTTON/LINEN,
EASY-CARE (WITTE/BONTE WAS, BLANC/COULEURS,
KREUKHERSTELLEND, DEFROISSABLE) with a temperature over 40 °C.)
When supplying the appliance, no water cooling is set except for the
additional programme DELICATES (BEHOEDZAAM, SENSITIVE).
Setting water cooling:
0 1. Turn programme knob to SHORT SPIN (KORT CENTRIFUG., ESSORAGE
DELICAT).
2. Keep the PRE WASH (VOORWAS, PRELAV.) button depressed for at least
5 seconds.
After the button has been depressed for 5 seconds, the MAIN WASH
(HOOFDWAS, LAVAGE) will blink on the programme cycle display for 5
seconds.
3. Whilst MAIN WASH (HOOFDWAS, LAVAGE) blinks,
release PRE WASH (VOORWAS, PRELAV.) button.
When the blinking has stopped, the water cooling is set. It remains set
until it is canceled.
43
Instructions for use
4. if you want to check whether the water cooling is set:
– Turn the programme knob to SHORT SPIN (KORT CENTRIFUG.,
ESSORAGE DELICAT).
– Press the PRE WASH (VOORWAS, PRELAV.) button briefly.
If the MAIN WASH (HOOFDWAS, LAVAGE) blinks on the programme cycle display, then the water cooling is set.
Cancel water cooling:
0 1. Turn programme knob to SHORT SPIN (KORT CENTRIFUG., ESSORAGE
DELICAT).
2. Keep the PRE WASH (VOORWAS, PRELAV.) button depressed for at least
5 seconds.
Immediately after the button is pressed, MAIN WASH (HOOFDWAS,
LAVAGE) will blink on the programme cycle display. After 5 seconds
MAIN WASH (HOOFDWAS, LAVAGE) will stop blinking and will remain
lit constantly for 5 seconds.
3. Whilst MAIN WASH (HOOFDWAS, LAVAGE) is constantly lit, release the
PRE WASH (VOORWAS, PRELAV.) button. The water cooling is canceled
after MAINWASH (HOOFDWAS, LAVAGE) stops blinking,
3
Due to the water cooling the water consumption and and the programme duration increase .
Additional rinse cycle and water cooling
Additional rinse cycle and water cooling can be combined. Setting as
for „Additional Rinse Cycle“ and „Water Cooling“.
44
Instructions for use
Variomatic-loose spinning
Adjustable spin integrated into the end spin. The washing adheres less
to the drum wall and can be removed easier. Can be selected to
COTTON/LINEN, EASY-CARE (WITTE/BONTE WAS, BLANC/
COULEURS, KREUKHERSTELLEND, DEFROISSABLE).
Set loose spin:
0 1. Turn programme knob to SHORT SPIN (KORT CENTRIFUG., ESSORAGE
DELICAT).
2. Keep button STAINS (VLEKKEN, TACHES) depressed for at least 5 seconds.
After the button has been depressed for 5 seconds, the END (EINDE,
FIN) on the programme cycle display blinks for 5 seconds.
3. Whilst END (EINDE, FIN) blinks, release the STAINS (VLEKKEN, TACHES)
button. Loose spin is set when the blinking stops. It is available until it
is canceled again.
4. If you want to check whether loose spin is set:
– Turn programme knob to SHORT SPIN (KORT CENTRIFUG., ESSORAGE
DELICAT).
– Press the STAINS (VLEKKEN, TACHES) button briefly.
If END blinks on the programme cycle display, then loose spin is set
Cancel loose spin:
0 1. Turn programme knob to SHORT SPIN (KORT CENTRIFUG., ESSORAGE
DELICAT).
2. Keep button STAINS (VLEKKEN, TACHES) depressed for at least 5 seconds.
Immediately after pressing the button, END (EINDE, FIN) on the programme cycle display. After 5 seconds END (EINDE, FIN) stops blinking
and lights up constantly for 5 seconds.
3. Whilst END (EINDE, FIN) is constantly lit, release the STAINS (VLEKKEN,
TACHES)
button. Loose spin is canceled after END (EINDE, FIN) has stopped lighting up.
45
Instructions for use
Programme security
In order to secure a programme from undesirable changes (e. g. Overrotating programme knob, additional pressing of buttons, etc.), it is
possible to set the programme security. This will prevent damage to
your washing.
3
Setting and releasing the Programme security is possible at any time
during a programme.
Setting programme security:
0 1. Set the desired washing programme.
2. Press the START/PAUSE (START/PAUZE, MARCHE/PAUSE) button to start
the programme.
3. Simultaneously press the PREWASH (VOORWAS, PRELAV.) and DELICATE
(BEHOEDZAAM, SENSITIVE) buttons for 5 seconds. Programmecycle
display blinks for 5 seconds;
Programme security is switched On.
3
As long as the programme security is switched On, no other settings
can be made. The door cannot be opened with the
DOOR/LIGHT (DEUR/LICHT, PORTE/ECLAIR.) button. Also, the programme security must first be removed after the wash cycle is ended
before the door can be opened.
If an attempt is made during the wash cycle to change the selected
setting by pressing a button, then the programme cycle display will
blink for 5 seconds.
If an attempt is made to change the selected setting by turning the
programme knob, then the programme cycle display will blink until the
programme knob is reset to the original setting. The washing cycle is
not influenced.
3
The programme knob must be in the original positionbefore the
programme security can be released.
0
46
Releasing the programme security:
Keep the PREWASH (VOORWAS, PRELAV.) and DELICATE (BEHOEDZAAM,
SENSITIVE) buttons depressed simultaneously for 5 seconds. Programme
cycle display blinks for 5 seconds, then lights up constantly for 5 seconds. The programme security is released.
Instructions for use
Child Safety Feature
When the child safety feature is
used, the filling door can no
longer be closed and no more
washing programs can be started.
0
1
0
Setting the Child Safety
Feature:
Use a coin to turn the rotary knob
(on the inside of the filling door)
clockwise as far as it will go.
Warning! The rotary knob must
not be pressed in following adjustment, otherwise the child safety
feature is not active. The rotary
knob must project as shown in the
diagram.
Cancelling the Child Safety
Feature:
Turn the rotary knob anticlockwise
as far as it will go.
47
Setting up and connection instructions
Setting up and connection instructions
Safety Instructions for Installation
• Do not tilt the washing machine onto its front or onto its right side
(looking from the front). Electrical components could get wet!
• Check the washing machine for transport damage. Never connect a
damaged unit. Consult your supplier in the event of damage.
• Ensure that all parts of the transport safeguard have been removed
and that the splash guard is fitted to the unit, see ”Removing the
Transport Safeguard”. Otherwise, damage to the unit or to adjacent
furniture could occur during spinning.
• Always insert the plug into a correctly installed PE socket.
• In the case of permanent installation: A permanent installation may
only be made by an authorised specialist.
• Before putting the unit into operation, ensure that the rated voltage
and current type shown on the unit's rating plate are the same as the
mains voltage and current type at the installation location. The required electrical fuse is also shown on the rating plate.
• Should work be carried out on the water supply installations in order
to allow the machine to be connected properly to the water supply,
this work must be carried out by an authorised installer.
• Should work be carried out on the mains supply in order to allow the
machine to be connected properly to the electricity supply, this work
must be carried out by an authorised electrician.
• The mains cable may only be replaced by the Customer Service or by
an authorised specialist.
48
Setting up and connection instructions
Setting Up the Unit
3
Washing machines with curved panels are not suitable for substructures.
Transporting the Unit
• Do not place the washing machine on its front side or on its right side
(looking from the front). Otherwise the electrical components can get
wet.
• Never transport the unit without using the transport safeguard. Do
not remove the transport safeguard until you reach the installation
site. Transporting the unit without the transport safeguard can result
in damage to the unit.
• Never lift the unit by the open filling door or by its base.
When transporting the unit with a sack trolley:
• Attach the sack trolley only at the side. The scoop of the sack trolley
must not be longer than 24cm, otherwise the float switch can be destroyed.
Remove the Transport Safeguard
Attention! It is essential to remove the transport safeguard before putting the unit into
operation! Keep all parts of the
transport safeguard in a safe
place for possible later transport
(moving house).
0 1. Open both hose holders on the
rear of the unit and remove the
hoses and the mains cable.
49
Setting up and connection instructions
2. Firmly pull both hose holders off
the unit.
3
50
The special button A and the plug
caps B (2 ea.) and C (1 ea.) are
supplied with the unit.
3. Remove the screw D, including
the compression spring with the
special button A.
4. Close off the hole with the plug
cap C.
Attention! Push in the plug cap
so firmly that it engages in the
rear panel (this protects the inside
of the unit against splash water).
5. Unscrew the two screws E using
the special button A.
6. Unscrew the four screws F using
the special button A.
7. Remove the transport rail G.
8. Screw the four screws F back in.
9. Close off the two large holes with
the plug caps B.
Attention! Push in the plug caps
so firmly that they engage in the
rear panel (this protects the inside
of the unit against splash water).
Setting up and connection instructions
Prepare the Installation Location
• The installation surface must be clean, dry and free of floor wax residue and other lubricating coatings so that the unit does not slide
away. Do not use any lubricants as sliding aids.
• It is not recommended to set up the washing machine on deep-pile
carpets or on floor coverings with soft foam underlays, as this would
mean that the stability of the unit would not be guaranteed.
• Use ordinary rubber mats as underlays in locations with small-format
tiles.
• Never use wood, card or similar underlays to compensate for minor
floor unevenness. Always use the adjustable screw-type feet of the
machine.
• If, for reasons of space, it is not possible to avoid setting up the unit
next to a gas cooker or coal stove: Insert a thermally-insulating panel
between the washing machine and the cooker (85 x 57cm). This panel
must have an aluminium foil on the side against the cooker.
• The washing machine must not be set up in a room where there
is a danger of frost. Frost damage!
• The intake and drainage hoses must not be bent or pinched.
Setting Up on a Concrete Pedestal
When setting up the washing machine on
a concrete pedestal, it is essential for
safety reasons to fit stand plates in which
the washing machine is then adjusted.
The stand plates are available from the
Customer Service under spare part
number 645 425 058.
Setting Up on a Vibrating floor
In the case of vibrating floors, especially wooden beam floors with flexible boards, securely screw a water-resistant wooden panel at least
15mm thick onto at least 2 of the floor beams. If possible, set up the
unit in a corner of the room where the wooden floor is best firmly installed and is therefore least likely to be susceptible to vibrations.
51
Setting up and connection instructions
Compensate for Floor Unevenness
Automatic Adjustment Foot: Your washing machine's rear left foot is
of a spring leg design. This guarantees good stability of the unit, even
at high spinning speeds.
If the washing machine still does not stand firmly enough during spinning, proceed as follows:
0 1. Adjust the three adjustment feet
to the setpoint 10mm. To do this,
use the supplied special button to
remove the transport safeguard.
If the automatic adjustment foot
still does not reach the floor:
2. Manually extend the automatic
adjustment foot (rear left) by the
necessary amount.
3. If necessary, check the setting
with a spirit level.
Attention! Never use wood, card
or similar underlays to compensate for minor floor unevenness. Always use the adjustable screw-type
feet of the machine.
3
52
Setting up and connection instructions
Electrical Connection
Refer to the rating plate for details
of the mains voltage, current type
and the necessary fuses. The rating
plate is located at the top behind
the filling door.
;
This unit conforms to the following
EU directives:
– the ”Low Voltage Directive" 73/23/EU with changes
– the ”EMC Directive" 89/336/EWG with changes
Water Connection
3
The washing machine has safety features which prevent contamination
of the drinking water and which conform to the legal regulations of
the water authorities (e.g. for Germany: DVGW regulations). Other protection measures in the installation are therefore not necessary.
Attention!
– Units for connection to cold water must not be connected to hot water!
– Use only new sets of hoses for connection!
Permissible Water Pressure
The water pressure must be at least 1bar (= 10N/cm2 = 0.1MPa), maximum 10bar (= 100N/cm2 = 1MPa).
• In the case of more than 10bar: Connect a pressure-reducing valve
upstream.
• In the case of less than 1bar: Unscrew the intake hose on the unit
side on the inlet solenoid valve and remove the flow regulator (to do
this, remove the filter with pointed pliers and remove the rubber
washer behind). Replace the filter.
53
Setting up and connection instructions
Water Inflow
A pressure hose 1.5m in length is supplied.
If a longer inflow hose is required, only a VDE-approved, complete set
of hoses with fitted hose screw connections offered by our Customer
Service is permissible.
– Sets of hoses in lengths of 2.2m, 3.5m and 5m are available for
washing machines without Aqua-Control.
– Sets of hoses in lengths of 2.0m, 2.9m and 3.9m are available for
washing machines with Aqua-Control.
Attention! Never cut into pieces in order to extend the hoses!
Sealing rings are supplied either in the plastic
nuts of the hose screw connection or in the enclosed pack. Do not use other seals!
0 1. Connect the hose with the angled connection to
the machine.
3
Attention!
– Do not lay the supply hose
vertically downwards. Rather,
turn it to the right or left as
shown in the diagram.
– Only tighten the screw
connection manually.
2. Connect the hose with the
straight connection to a water tap with a screw
thread of R 3/4 (inches).
Attention! Only tighten the screw connection
manually.
3. By slowly opening the water tap before putting
the washing machine into operation, check
whether the connection is free of leaks.
54
Setting up and connection instructions
Water Drainage
The drainage hose can either be connected to a siphon or hung in a
wash basin or bath tub.
Only original hoses may be used for extension purposes (max. 3m on
the floor and then up to 80cm high). The Customer Service stocks hoses
in lengths of 2.7 and 4m.
Attention! It is absolutely essential to install the drainage hose free of
pinches.
0
Water Drainage into a Siphon
The grommet on the end of the hose fits
all commonly used siphon types.
Secure the grommet/siphon connecting
point with a hose clamp.
Draining the water into a basin
Attention!
– Small basins are not suitable for
draining the water into them.
Water could overflow!
– It is not permitted to submerge the
end of the drainage hose into the
pumped-off water. Water could be
sucked up into the hose!
0
– When hooked into a wash-basin or a
bath tub the drainage hose must be
protected from slipping out of place
by the supplied slip-on elbow. Otherwise the repelling power of the draining water can press the hose out of the
sink.
Fix the elbow to the water tap or to the
wall with string.
55
Setting up and connection instructions
Delivery Heads over 1m
To pump off the washing / rinsing agent, every washing machine has a
pump which transports liquids via the drainage hose up to a height of
1m, calculated from the machine's floor.
For delivery heads over 1m, consult the Customer Service.
Technical Data
Height adjustment
Filling quantity
(program-dependent)
Use
Drum speed, spin
Water pressure
Dimensions
(Measurements in mm)
56
Approx. +10/-5mm
max. 5kg
Domestic
see rating plate
1-10bar
(=10–100N/cm2 = 0.1–1.0MPa)
Guarantee conditions
Guarantee conditions
Belgium
DECLARATION OF GUARANTEE TERMS.
Our appliances are produced with the greatest of care. However, a defect may still occur. Our consumer services department will repair this upon request, either during or
after the guarantee period. The service life of the appliance will not, however, be reduced as a result.
This declaration of guarantee terms is based on European Union Directive 99/44/EC and
the provisions of the Civil Code. The statutory rights that the consumer has under this
legislation are not affected by this declaration of guarantee terms.
This declaration does not affect the vendor's statutory warranty to the end user. The
appliance is guaranteed within the context of and in adherence with the following
terms:
1. In accordance with provisions laid down in paragraphs 2 to 15, we will remedy free of
charge any defect that occurs within 24 months from the date the appliance is delivered to the first end user.
These guarantee terms do not apply in the event of use for professional or equivalent
purposes.
2. Performing the guarantee means that the appliance is returned to the condition it was
in before the defect occurred. Defective parts are replaced or repaired. Parts replaced
free of charge become our property.
3. So as to avoid more severe damage, the defect must be brought to our attention immediately.
4. Applying the guarantee is subject to the consumer providing proof of purchase showing the purchase and/or delivery date.
5. The guarantee will not apply if damage caused to delicate parts, such as glass (vitreous
ceramic), synthetic materials and rubber, is the result of inappropriate use.
6. The guarantee cannot be called on for minor faults that do not affect the value or the
overall reliability of the appliance.
7. The statutory warranty does not apply when defects are caused by:
• a chemical or electrochemical reaction caused by water,
• abnormal environmental conditions in general,
• unsuitable operating conditions,
• contact with harsh substances.
8. The guarantee does not apply to defects due to transport which have occurred outside
of our responsibility. Nor will the guarantee cover those caused by inadequate installation or assembly, lack of maintenance or failure to respect the assembly instructions or
directions for use.
9. Defects that result from repairs or measures carried out by people who are not qualified
or expert or defects that result from the addition of non-original accessories or spare
parts are not covered by the guarantee.
10. Appliances that are easy to transport may be delivered or sent to the consumer services
department. Home repairs are only anticipated for bulky appliances or built-in appliances.
11. If the appliances are built-in, built-under, fixed or suspended in such a way that removing and replacing them in the place where they are fitted takes more than half an hour,
the costs that result therefrom will be charged for. Connected damage caused by these
removal and replacement operations will be the responsibility of the user.
57
Guarantee conditions
12. If, during the guarantee period, repairing the same defect repeatedly is not conclusive,
or if the repair costs are considered disproportionate, in agreement with the consumer,
the defective appliance may be replaced with another appliance of the same value.
In this event, we reserve the right to ask for a financial contribution calculated according to the length of time it has been used.
13. A repair under guarantee does not mean that the normal guarantee period will be extended nor that a new guarantee period begins.
14. We give a twelve month guarantee for repairs, limited to the same defect.
15. Except in the event where liability is legally imposed, this declaration of guarantee
terms excludes any compensation for damage outside the appliance for which the consumer wishes to assert his rights. In the event of legally admitted liability, compensation will not exceed the purchase price paid for the appliance.
These guarantee terms are only valid for appliances purchased and used in Belgium. For
exported appliances, the user must first make sure that they satisfy the technical conditions (e.g.: voltage, frequency, installation instructions, type of gas, etc.) for the country concerned and that they can withstand the local climatic and environmental
conditions. For appliances purchased abroad, the user must first ensure that they meet
the qualifications required in Belgium. Non-essential or requested adjustments are not
covered by the guarantee and are not possible in all cases.
Our consumer services department is always at your disposal, even after the guarantee
period has expired.
Address for our consumer services department:
ELECTROLUX HOME PRODUCTS BELGIUM
Bergensesteenweg, 719 - 1502 LEMBEEK
Tel.: 02.363.04.44
58
Customer services
Customer services
Belgium
Tel.:
Electrolux Home Products Belgium
ELECTROLUX SERVICE
Bergensesteenweg 719
1502 Lembeek
Province de Liège:
S.D.E.
Rue Gaucet 26
4020 Liege
Fax.:
Consumer services 02/363.04.44 02/363.04.00
02/363.04.60
04/343.11.60 04/343.47.68
59
60
61
Index
Index
A
Aborting the programme . . . . . . . . . . . . . .
Additional programme - buttons . . . .12,
Aqua Control . . . . . . . . . . . . . . . . . 15, 28,
Automatic adjustment foot . . . . . . . . . . 9,
O
26
29
36
52
C
Care agent . . . . . . . . . . . . . . . . . . . . 9, 18,
Child safety feature . . . . . . . . . . . . . . .35,
Conditioner . . . . . . . . . . . . . . . . 9, 11, 19,
Correcting the programme . . . . . . . . . . . .
Cottons . . . . . . . . . . . . . . . . . . . . . . 17, 29,
Cottons/linen, easy-care . . . . . . . . . . . .11,
Curtains . . . . . . . . . . . . . . . . . . . . . . . . . . . .
Customer service . . . . . . . 15, 33, 35, 59,
24
47
31
10
31
29
16
63
D
Delay timer . . . . . . . . . . . . . . .10, 12, 22,
Delicates . . . . . . . . . . . . . . . . . .11, 12, 17,
Detergent . . . . . . . . . . . . . . . . . . . . . 9, 18,
Detergent dispenser drawer . . . . . . . . . . 9,
Drain pump . . . . . . . . . . . . . . . . . . . . . . . . .
25
30
24
24
34
E
Easy iron . . . . . . . . . . . . . . . . . . . . . 12, 30,
Easy-care . . . . . . . . . . . . . . . . . . . . . . . .17,
Emergency emptying . . . . . . . . . . . . . . . . .
Emergency unlocking . . . . . . . . . . . . . . . . .
Energy saving programme . . . . . . . . . .12,
37
30
40
41
29
F
P
Pre-wash . . . . . . . . . . . . . . . . . 12, 20, 24, 29
Pre-wash detergent . . . . . . . . . . . . . . . . 9, 24
Program saving . . . . . . . . . . . . . . . . . . . . . .23
Programme progress display . . . . . . . . 10, 26
Programme security . . . . . . . . . . . . . . . 27, 46
Pumping out . . . . . . . . . . . . . . . . . . . . . 11, 27
R
Rating plate . . . . . . . . . . . . . . . . . . . 9, 53, 63
Refresh . . . . . . . . . . . . . . . . . . . . . . . . . 12, 29
Rinse + . . . . . . . . . . . . . . . . . . . . . . . . . . . . .42
Rinse hold . . . . . . . . . . . . . . . . . . . .11, 21, 27
Rinsing . . . . . . . . . . . . . . . . . . . . . . . . . 11, 31
S
Silk . . . . . . . . . . . . . . . . . . . . . . . . . .11, 17, 30
hand washable . . . . . . . . . . . . . . . . . 11, 30
Soaking . . . . . . . . . . . . . . . . . . . . . . . . . 12, 22
Soaking agent . . . . . . . . . . . . . . . . . . . . 9, 24
Softener . . . . . . . . . . . . . . . . . . . . . . . . . 8, 24
Solution pump . . . . . . . . . . . . . . . . . . . . . . . . 9
Spin . . . . . . . . . . . . . . 11, 19, 21, 23, 26, 31
Stain . . . . . . . . . . . . . . . . . . . . . . . . . . . . . . .39
Stains . . . . . . . . . . . . . . . . . . . . . . . .13, 20, 29
Starching . . . . . . . . . . . . . . . . . . . . . . . . . . . .31
Fashion . . . . . . . . . . . . . . . . . . . . . . 12, 29, 30
Filling quantity . . . . . . . . . . . . . . . . . . .14, 29
Frost hazard . . . . . . . . . . . . . . . . . . . . . . . 6, 40
T
G
Update . . . . . . . . . . . . . . . . . . . . . . . . . . . . . .15
Gentle spin . . . . . . . . . . . . . . . . . . . . . . . . . . 11
W
H
Warranty . . . . . . . . . . . . . . . . . . . . . . 6, 35, 57
Wash time . . . . . . . . . . . . . . . . . . . . . . . . . . .15
Washing detergent . . . . . . . . . . . . . . . . 9, 18
Washing powder/liquid . . . . . . . . . . . . . . . .19
Water
hardness . . . . . . . . . . . . . . . . . . . . . . . 8, 18
pumping out . . . . . . . . . . . . . . . . . . . 11, 27
softener . . . . . . . . . . . . . . . . . . 8, 9, 18, 24
Woollens . . . . . . . . . . . . . . . . . . . . .11, 17, 30
hand washable . . . . . . . . . . . . . . . . . 11, 30
Hand wash . . . . . . . . . . . . . . . . . . . . . . .11, 30
I
In-wash stain treatment . . . . . . . . . . . . 9, 24
L
Linen . . . . . . . . . . . . . . . . . . . . . . . . 17, 29, 31
M
Multidisplay . . . . . . . . . . . . 10, 25, 26, 35, 63
62
Opening the door . . . . . . .23, 27, 37, 41, 46
Over-dosed . . . . . . . . . . . . . . . . . . . . . . . . . .28
Time save . . . . . . . . . . . . . . . . . . . . . . . . 13, 29
U
Service
Service
In the section ”What to do if ...” there is a list of some faults which you
can remedy yourself. Look there first if a fault occurs. If you find no information there, please consult your Customer Service Centre.
Always prepare in advance for the discussion. By doing so you will simplify the diagnosis and the decision on whether customer service is
necessary.
Note the PNC-number and the
S-number. Both can be found on the
rating plate on the inside of the door
on your washing machine.
PNC .....................................................
S-No. .....................................................
Answer as precisely as possible:
• What form does the fault take?
• Under what circumstances does the fault occur?
• Does the multi display show an error message?
When do you incur costs even during the warranty period?
– if you could have dealt with the fault yourself with the aid of the
Faults Table (see the section ”What to do if ...”) ,
– if several trips by the customer service technician are necessary because he had not received all the necessary information before his
visit and must now e.g. fetch spare parts. These multiple trips can be
avoided if you prepare your phone call as described above.
63
From the Electrolux Group. The world´s No.1 choice.
The Electrolux Group is the world´s largest producer of powered appliances for kitchen, cleaning and outdoor
use. More than 55 million Electrolux Group products (such as refrigerators, cookers, washing machines,
vacuum cleaners, chain saws and lawn mowers) are sold each year to a value of approx. USD 14 billion in more
than 150 countries around the world.
AEG Hausgeräte GmbH
Postfach 1036
D-90327 Nürnberg
http://www.aeg.hausgeraete.de
© Copyright by AEG
822 942 968-01-040203-04
Subject to change without notice