1
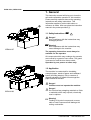
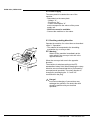
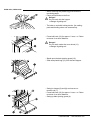
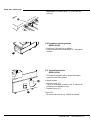
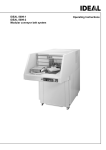
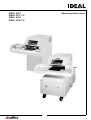
IDEAL IDEAL IDEAL IDEAL Operating Instructions 4107 4107 CC 4109 4109 CC 1 IDEAL 4107; IDEAL 4109 2 1-800-658-8788 - www.abcoffice.com Table of contents 1. General ........................................................ 4 1.1 Safety Instructions ....................................... 4 1.2 Application ................................................... 4 2. 2.1 2.2 2.3 Installation ................................................... 5 Pre-assembly .............................................. 5 Power supply ............................................... 6 Checking rotating direction .......................... 6 3. 3.1 3.2 3.3 Operation .................................................... 7 Operating elements IDEAL 4107 ................. 7 Operating elements IDEAL 4109 ................. 7 Starting the machine ................................... 7 Machine stops due to overloading ............... 8 Machine stops and yellow lamp (3) lights (IDEAL 4109) ............................................... 8 Stopping the machine .................................. 8 Switching off the machine ........................... 8 For short breaks: ......................................... 8 For longer breaks: ....................................... 8 Oiling the shredding mechanism ................. 9 Replacing the plastic bag (IDEAL 4107) ...... 9 Operation of baler (IDEAL 4109) ................ 10 Bale ejection .............................................. 10 Premature ejecting of bale (IDEAL 4109) .. 14 Central lubrication (IDEAL 4109) .............. 14 If signal sounds ......................................... 14 Type of oil .................................................. 14 3.4 3.5 3.6 3.7 3.8 3.9 3 4. Trouble-shooting ........................................ 15 5. Accessories .............................................. 16 6. Technical data ........................................... 16 7. EC-declaration of conformity ..................... 17 IDEAL 4107; IDEAL 4109 1. General This instruction manual will help you to learn the safe and comfortable operation of this machine. Please carefully read and observe the operating instructions and safety instructions. This information applies to both models when no reference is made. After use place the instruction manual in the pocket provided (1). 1.1 Safety Instructions Danger! Non-compliance with the instructions may endanger persons. Warning! Non-compliance with the instructions may cause damage to the machine. IDEAL 4107 The operating instructions must always be available for the operator. All components which may endanger the operator are covered by a guard or have a door. The guard is screwed on and the door has a switch. Operation by one person at a time only. 1.2 Application The machine is constructed for shredding crumpled paper, stacks of paper and cardboard boxes (including staples). Due to reasons of disposal shredding of plastic foils amongst the paper should be avoided. Danger! Children must not operate the machine. Danger! Do not shred any strapping materials or fluids or materials which may explode, chemically react or splinter. IDEAL 4109 Warning! Feeding of big steel components, screws, nails or hard components will damage the cutting mechanism. 4 1-800-658-8788 - www.abcoffice.com 2. Installation The machine is mobile on castors. The machine must be installed on a sturdy, dry, and level floor. Oil level must be visible in the sight glass (2) IDEAL 4109 version. Danger! - The machine may not be installed outside. - Do not use in the vicinity of flammable liquids or gases. - Do not use in humid environments. - Protect the power cable from extreme heat, oil, and sharp edges. - Consider the floor loading. Weight with press approx. 900 kg (1990 pounds). Warning! - Do not cover the ventilation slits (3). 2.1 Pre-assembly - Fix the side tables (4) and (5) to the machine. 5 IDEAL 4107; IDEAL 4109 2.2 Power supply The name plate is located at the rear of the machine. - Data stated on the name plate - Voltage “ V “, - Frequency “Hz”, - Power consumption “A” must correspond to the values of the power supply unit. - Earth wire must be available. - Connect the machine to the mains. 2.3 Checking rotating direction Operate the machine for a short time as described under 3. “Operation“.. - The material is transported to the shredding mechanism by a conveyor belt. Warning! Switch off the machine immediately at the main switch if the conveyor belt runs in the opposite direction. When the conveyor belt runs in the opposite direction: The machine is wired according to the IEC standardized rotary field. When changing the rotary direction we recommend that this is performed by an experienced specialist. The rotary direction is changed by exchanging the “L1“ and “L2“ connections in the plug. Danger! Incorrect exchanging of connections may endanger the operator. If in doubt, this work should be performed by an electrical specialist. 6 1-800-658-8788 - www.abcoffice.com 3. Operation Danger! The machine may only be operated by persons who have read and understood the operating instructions. Danger! Do not reach into the running shredding mechanism! The shredding mechanism may cause serious injury! Danger! The machine will only run when the door is closed. 3.1 Operating elements IDEAL 4107 (1) (2) (3) (4) (5) (6) (7) Start Stop Reverse switch and lamp showing “bag full“ Key switch Standby Mains switch Emergency off 3.2 Operating elements IDEAL 4109 (1) (2) (3) (4) (5) (6) (7) Start Stop and lamp showing “baler full“ Reverse switch and lamp showing “paper jam“ Key switch Standby Mains switch Emergency off 3.3 Starting the machine Danger! Do not shred any material which may loop or splinter. In case of danger, press emergency off button (7). - Turn mains switch (6) to position “ I “ - Emergency off (7) must be unlocked (turn to the right) - Turn key switch (4) on. Standby (5) illuminates. - Press and release the black button (1). - Conveyor belt is running. Distribute the paper over the total width of the conveyor belt. 7 IDEAL 4107; IDEAL 4109 Machine stops due to overloading - Remove any paper left on the conveyor belt. Do not reach behind the flap. - Press and release the yellow key (3) Conveyor belt reverses. - Feed less paper onto the conveyor belt. - Start afresh. Machine stops and yellow lamp (3) lights (IDEAL 4109) - Wait until the yellow light goes out. - Start a fresh, press black button. - Wait until the baler is working and feed less paper onto the conveyor belt. Warning! Avoid continuous overloading of the machine. Stopping the machine - Press white button (2) or emergency off (7) Do not reach into the running shredding mechanism! 3.4 Switching off the machine For short breaks: - Press white button (2) Conveyor belt stops, baler remains in automatic mode. For longer breaks: - Turn main switch (6) to position “0”. The entire machine shuts down. - Turn key switch (4) and remove the key Now the machine is secured from unauthorized use. 8 1-800-658-8788 - www.abcoffice.com 3.5 Oiling the shredding mechanism If the sheet capacity reduces or after “bag full“ we recommend that you oil the shredding mechanism. - Press the oilpump button 3 x. - After lubrication let the machine run several times backwards and forwards alternately. - If tank (8) is empty refill with oil. Type of oil: cutting head oil 3.6 Replacing the plastic bag (IDEAL 4107) Replace bag when “bag full“ indicator lights. - Open the door (9). - Pull out the plastic bag holding the bottom of the bag. - Push down the waste paper. - Pull out the waste bag with frame (10) until it stops. - Remove the round belt (11) from the waste bag frame. - Tie the bag (for sealing parts and binding wires see accessories). - Place a new bag into the bag frame (10) and turn the edge over the outside of the frame. - Fasten the bag with the round belt. The round belt must fit into the channel of the bag frame. - Push the bag frame into the machine and adjust the plastic bag with your foot. - Close the door (9). 9 IDEAL 4107; IDEAL 4109 3.7 Operation of baler (IDEAL 4109) Eject bale when the white control lamp shows Danger! Do not stand behind the bale ejecting guard during baling. Danger of being crushed. Bale ejection - Release safety slide (1). (Pull backwards and turn to the right). Danger! Do not stand behind the bale ejecting guard during baling. Danger of being crushed! - Hold bale ejecting guard (2) with the left hand. - Swing locking lever (3) with right hand nearly into horizontal position . . . . . . until the cam locks into positon (Pressure in the baling chamber decreases). - Hold bale ejecting guard (2) with the left hand and swing locking lever (3) with the right hand into basic position. 10 1-800-658-8788 - www.abcoffice.com - Hold bale ejecting guard (2) with the left hand and swing locking mechanism (4) with the right hand into vertical positon . . . . . . until securing bushing (5) locks into position. - Swing down bale ejecting guard (2). - Press green button (6) until the pump motor switches off. bale is ejected. - Remove clamping (7) and swing out clamps (8) and (9). 11 IDEAL 4107; IDEAL 4109 - While removing the plastic bag push down the remaining paper. - Place pressed bale on the floor. Danger! Do not reach into the hopper. Danger of getting cut! - Tie bales or seal with locking device. (for sealing parts and binding wires see accessories). - Press ball knob (10) for approx. 2 secs. Piston reverses for a short distance. Danger! Do not reach under the cover sheet (11). Danger of getting cut! - Stand upon the bale ejecting guard (12). - Slide new plastic bag (13) over the bale hopper. - Swing in clamps (8) and (9) and secure on tension rod (7). - Press ball knob (10) for approx. 2 secs. Piston reverses for a short distance. - Swing up bale ejecting guard (4). 12 1-800-658-8788 - www.abcoffice.com Close bale - Push up locking bush (5) and swing down locking mechanism (4). - Slightly open the bale ejecting guard (2) with both hands until the lug (14) is above the locking catch (15). - Hold bale ejecting guard with the left hand. Swing locking lever (2) with the right hand until it is almost in horizontal position and after locking into catch return it to the original position. - Check that lug (14) has locked into catch (15). 13 IDEAL 4107; IDEAL 4109 - Important! Lock safety slide (1). (Pull back and turn up.). 3.8 Premature ejecting of bale (IDEAL 4109) - Push knob (16) with pen or similar. - Further procedure as described in 3.7 “Operation of baler“. 3.9 Central lubrication (IDEAL 4109) - The baler is equipped with a central lubrication system for the baler guides. If signal sounds - Remove cover (17). - Top up oil in storage container (18). To refill oil we recommend a standard oil can. - Replace cover (17). Type of oil - All motor oils such as e.g. 15W40 all brands. 14 1-800-658-8788 - www.abcoffice.com 4. Trouble-shooting Danger! Disconnect from the mains before starting any service work or before removing the cover. Malfunction: Standby (5) is not lighting up / machine does not start. Cause: - Door / bale ejecting guard open - Main switch “OFF“ - Emergency button is pressed - Key switch is vertical - Machine is plugged in - On-site fuse - Machine is overloaded - The motor protection switch releases the machine after approx. 2 min. - Central lubrication IDEAL 4109 Malfunction: Motor hums and has no power. Cause: One phase is missing. Remedy: Ensure that voltage is on all 3 phases Malfunction: Machine switches off during normal operation. a) Cause: Indicator for “Bag full“ / “baler full“ lights Shred bag / baler is full. Remedy: Renew plastic bag / empty baler. b) Cause: Machine is overloaded too frequently. Remedy: Check on-site fuse Motor protection switch releases the machine after approx. 2 min. 15 IDEAL 4107; IDEAL 4109 5. Accessories Plastic bags 350 l (50 pieces) Cutting head oil 10 x 0,2 l 9000412 9000610 For fastening plastic bags: Wire twisting tool for one-way plastic bags Wire ties for one-way plastic bags (1000 pieces) 9000591 9000592 Attention! Only use manufacturer recommended accessories. 6. Technical data The exact technical specifications can be found on the technical specifications sticker on the machine. IDEAL 4107 Noise level 76 dB(A). Fuse protection 400V with 16 A. Fuse protection 220V with 20 A. IDEAL 4109 Noise level 75 dB(A). Fuse protection 400V with 32 A. Fuse protection 220V with 50 A. If you have further questions please contact your dealer or directly on the internet [email protected]. 16 1-800-658-8788 - www.abcoffice.com EG-KONFORMITÄTSERKLÄRUNG EC-declaration of conformity Déclaration de conformité CE Declaración CE de conformidad Dichiarazione CE di conformità EG-verklaring van overeenstemming Declaraçao CE de conformidade EF-overensstemmelseserklæring - Hiermit erklären wir, daß die Bauart von - Herewith we declare that - Par la présente, nous déclarons que - Por la presente, declaramos que la - Si dichiara che il modello della - Hiermede verklaren wij, dat de in de handel gebrachte machine - Com a presente, declaramos que o modelo da - Hermed erklæres, at produkttypen 4107; 4107 CC; 6040 S; 6040 C 4109; 4109 CC; 6140 SP; 6140 CP - folgenden einschlägigen Bestimmungen entspricht: - complies with the following provisons applying to it: - sont conformes aux dispositions pertinentes suivantes: - satisface las disposiciones pertinentes siguientes: - è conforme alle seguenti disposizioni pertinenti: - voldoet aan de eisen van de in het vervolg genoemde bepalingen: - está em conformidade com as disposições pertinentes, a saber: - er i overensstemmelse med følgende bestemmelser: EWG-RL 89/392; EWG-RL 73/23; EWG-RL 89/336 - Angewendete harmonisierte Normen insbesondere - Applied harmonized standards in particular - Normes harmonisée utilisées, notamment - Normas armonizadas utilizadas particularmente - Norme armonizzate applicate in particolare - Gebruikte geharmoniseerde normen, in het bijzondere - Normas harmonizadas utilizadas, em particular - Harmoniserede standarder, der blev anvendt, i særdaleshed EN60204; EN55014-1; EN55014-2 EN292; EN294; EN27779 25. 1. 2002 Datu Wolfgang Priester - General Manager - 11AVKon 17