1
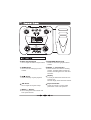
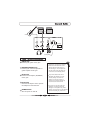
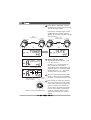
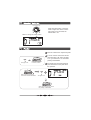
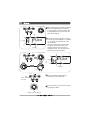
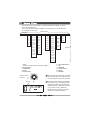
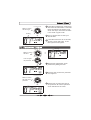
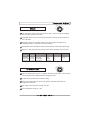
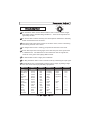
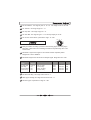
Operators Manual
Rocktile GP-120 Guitar Effect Processor
00028540/00027927
Version 04/2012
Congratulations on your purchase of this Guitar Effects Processor. Now you have
this incredibly advanced multi-effect guitar processor which can enhance your
creative impulses and to learn more about different types of effects. You can create
your own tunes easily through the user-friendly interface, parameters and the built
in drum machine.
You are recommended to study this manual carefully before using the unit.
Before connection, please ensure all
power devices such as amplifiers must
be turned off first, in order to avoid any
damages.
Grab the unit firmly while unplugging
the cables, never pull the audio cables
with stress.
Disconnect all cables before moving
the instrument.
Unplug the AC adapter during electric
storms.
If an AC adapter is used, it should be
unplugged from the AC outlet if the
instrument is not to be used for an
extended period of time.
Physical shocks caused by dropping ,
bumping the instrument, or placing
heavy objects on top of it, can result
in scratches and even more severe
damages.
Avoid using this unit together with the
same circuit of electronic products that
will generate line noises.
Never apply excessive force to the
controls, connectors or other parts of
the instrument.
Do not place this unit too close to heat
sources such as radiators and amplifiers
in order to prevent damages like
interference.
Clean this unit with a soft and dry
cloth. A slightly dampened cloth with
mild detergent might remove stubborn
dirt.
Do not expose this unit under excessive
sunlight, water and moisture.
Never use thinners and alcohol for
cleaning the unit.
Strong vibration and shocks will
damage this unit.
2
A total of 54 effects, up to 11 effects can be used simultaneously.
48 user patches and 48 default settings.
One type of one effect can be adjusted by up to 4 parameters.
The expression pedal can be used to control the volume
and wah by your foot.
User-friendly interface, with simple parameters adjustment function
and a built in drum machine.
3
5-6
General Guide
5
Front Panel
Rear Panel/Connection
6
Power Supply
7
7-9
Patch
Select a Patch
7-8
Patch Function
8-9
9
Factory Reset
Tuner
10
Drum
11
Tap
12
Master Volume
13
Pedal
13
Store
14
Select Effect
15-16
Parameter Adjust
16-23
Nosie Gate
17
Compressor
17
Wah
18
Distortion
18-19
Amp Sim
19
EQ
20
Speaker
20
Modulation
21-22
Delay
22
Reverb
23
Bypass
23
Specifications
24
4
Main
IndexFeatures
STOMP
AMP
STORE
EQ
CAB
WAH
1
COMP
NG
PLAY
TAP
2
MOD
3
TYPE/PARA/M.VOL
4
ON/OFF
6
- BANK +
5
DELAY
REVERB
P. F.
8
PARA 1
PARA 2
PARA 3
PARA 4
9
BANK PATCH
GP120
PATCH-
GUITAR EFFECTS
7
PATCH+/
BYPASS
6 TYPE/PARA/M.VOL Knob
1 Effect Selection Knob
Use to adjust the effects and parameter.
7 PATCH +/- Foot Switches
2 STORE Button
Use to save the settings you have
created.
3
Rotate to select the type/para/master
volume.
These switches are used for selecting
patches, switching effect modules on
and off, controlling the tuner and other
functions.
8 Display
Button
Use to start/stop rhythm playback.
A variety of information about the unit
appears here.
The left display shows the bank number.
9 Expression Pedal
4 TAP Button
Use to adjust the rhythm tempo.
Adjust the volume or various effect
parameters in real time operation.
5 BANK +/- Buttons
Use to change the bank number and
enter patch function.
5
Guitar amplifiers
Guitar
INPUT
PHONES
OUTPUT
9V
1
2
3
4
POWER
5
ON OFF
Headphones
AC adapter
1 INPUT Jack
Connect your guitar to this jack.
Fasten the cord of the AC adapter
around the hook as shown in the
diagram before connecting it to
the AC IN jack. This will prevent
the plug from being disconnected
if the cord is accidentally pulled.
2 PHONES/OUTPUT Jack
Connect your stereo headphones or
guitar amplifier to this jack.
3 DC IN Jack
To prevent malfunction and/or
damaging the speakers or other
devices, always turn down the
volume, and turn the power of
all devices off before making any
connection and disconnection.
Connect an AC adapter (9V,300mA)
to this jack.
4 Cord Hook
Hook the AC adapter cord to prevent
the adapter for disconnection.
If you turn on the unit while the
amplifier is already powered up,
damages to the speaker may result.
Always turn the power of the amplifier
off before making any connection.
5 POWER Switch
Turn the power on and off .
6
INPUT
1
The connections have been completed.
2
Switch the POWER ON/OFF button on
to turn on the unit .
3
After the power is on , the LCD
displays the 'GP- -120', followed by
the current patch, previously saved
name and the effect chain.
PHONES
OUTPUT
9V
POWER
ON OFF
--120
BANK PATCH
Muza
BANK PATCH
The unit has up to 96 patches:
48 default settings (0-1~7-6),
48 user patches (A-1~H-6)
STOMP
WAH
AMP
STORE
CAB
MOD
COMP
NG
PLAY
TAP
EQ
- BANK +
1
If the effect selection knob is set to a
position other than PLAY, set it back
to play.
2
When the status is PLAY, you can use
BANK+ or BANK- button to adjust the
bank number. Press and hold BANK+/to change the bank consecutively. The
LCD displays the current bank number
(0-7) and (A-H) and the relevant tone
name and effect chain.
DELAY
REVERB
P. F.
Set to PLAY
Fat
The PLAY mode will be automatically
selected after you turn the unit on,
even if the knob has been set to a
position other than PLAY.
BANK PATCH
7
Patch
PATCH+/
BYPASS
PATCH-
3
Then press the foot switches PATCH
+/- to select the PATCH in the current
bank. Press and hold PATCH+/- to
change the patch consecutively.
The screen displays the current patch
number (1~6) and the relevant tone
name and effect chain .
BLUE1
BANK PATCH
STORE
TAP
1
- BANK +
Press
simultaneously
P. F.
At the same time the indicator 'P.FU'
will be lighted on the display .
BLUE1
2
BANK PATCH
PATCH-
If you want to switch the tone directly
to your desired tone, you could press
the BANK+ and BANK- buttons simultaneously to activate the patch function.
Press PATCH+/- or BANK+/- to change
the patch display; the tone number
flashes until you press the PATCH+
and PATCH- switches simultaneously.
Press
simultaneously
PATCH+/
BYPASS
PATCH-
PATCH+/
BYPASS
Flashing
BLUE1
GOTBL
BANK PATCH
BANK PATCH
8
STORE
TAP
3
Then press BANK+ and BANK- simultaneously to disable the patch function
and the 'P.FU' symbol will be off.
1
The 48 user patches are the same as
the 48 default patches before storing
your own patches.
2
Turn off the power.
3
Hold down STORE and
buttons
simultaneously, then turn on the power.
The screen appears 'RESET' until the
reset process is finished; the display
window appears '01' tone, its name
and the effects chain.
- BANK +
Press
simultaneously
P. F.
GOTBL
BANK PATCH
INPUT
PHONES
OUTPUT
9V
POWER
ON OFF
Press
simultaneously
STORE
TAP
- BANK +
P. F.
RESET
Please be careful about this function,
since no user data will be remained
after factory reset.
BANK PATCH
Muza
BANK PATCH
9
1
Press
simultaneously
PATCH-
Press PATCH+ and PATCH- switches
simultaneously to enter the tuner mode.
The LCD displays 'TUNER'.
Hold the two switches longer to enter
the MUTE status. The LCD displays
'MUTE'. You can tune your guitar strings
without sound.
PATCH+/
BYPASS
PATCH-
Hold the two
switches longer
TUNER
MUTE
BANK PATCH
BANK PATCH
2
Tuning with the stings
The LCD will display the pitch : A, B,
C, D, E, F, G and b.
Symbols > or < imply whether the
tune is flattened or sharpened .
The distance in the middle implies the
degree of flatless or sharpness. When
the display shows >|< , that means
the string has a correct tuning.
3
The tuner function will activate under
bypass or mute status. Press PATCH+
or PATCH- to exit from the tuner mode.
4
Dial the knob to change the reference
pitch. The frequency of A (the middle
A of a piano) played by an instrument
(such as a piano) that provides the
pitch to which the other instruments
refer in tuning before a performance
begins is called the reference pitch.
The default reference pitch is set to
440 Hz.
----BANK PATCH
PATCH+/
BYPASS
Show the note which is
closest to the current pitch.
BANK PATCH
Imply the string has
the correct tuning.
Reference
pitch
TYPE/PARA/M.VOL
Rotate to change the reference pitch
10
LED
Flashing
STOMP
AMP
STORE
CAB
COMP
MOD
NG
PLAY
TAP
EQ
WAH
The unit has a built-in rhythm
function which plays realistic
drum sounds in various patterns.
- BANK +
1 Dial the knob to PLAY, press
DELAY
button, the indicator PLAY on the
LCD is lighted.
REVERB
P. F.
Set to PLAY
8beat
BANK PATCH
2 Press the dial to adjust the parameter,
rhythm pattern, tempo or rhythm
volume.
Tempo
TYPE/PARA/M.VOL
Level
If no action of the rhythm is taken
in 8s, the LCD will redisplay the patch
name.
Press the dial
8beat
3 Dail the knob to set the value of the
TYPE/PARA/M.VOL
parameter.
SRock
Rotate the dial
4 Press the
again to return to
the previous status.
11
LED
Flashing
STOMP
STORE
AMP
The rhythm tempo can be adjusted
in the range of 40 --- 250 bpm
(beats per minute)
TAP
EQ
WAH
CAB
COMP
MOD
NG
- BANK +
DELAY
1 To continuously change the rhythm
REVERB
PLAY
P. F.
tempo, firstly press the dial switch
to set the tempo as the adjusting
parameter. Then dial the knob.
Set to PLAY
8beat
BANK PATCH
TYPE/PARA/M.VOL
Tempo
Press the dial
2 To manually adjust the rhythm tempo,
LED
Flashing
STORE
TAP
hit the tap button at least two times
in the desired interval.
Tempo
- BANK +
P. F.
Press at least two times.
At the first hit of the TAP button, the
current tempo value is shown on the LCD.
The unit then automatically detects the
interval of the second and subsequent
keypresses and sets the tempo
accordingly.
12
TYPE/PARA/M.VOL
Under the PLAY status, rotate the
knob to adjust the master volume.
The range is from 0 to100, the
default level is 70
Rotate to change the master volume
Muza
BANK PATCH
The light is off
Move back and forth
to control volume
Step on and push strongly,
in order to activate the button.
1
This unit contains the expression pedal.
2
It can be used to control the volume
when the light is off; when the light
is on, you could use it to control the
polarity of Pedal Wah.
3
To activate the expression function,
press the button in the pedal front
for operation.
Muza
The light is on.
BANK PATCH
Move back and forth to control
the polarity of Pedal Wah.
13
STORE
TAP
TYPE/PARA/M.VOL
1 After editing any of the effect programs,
press the STORE button to store up
a new program. The tone number and
a changeable letter of patch name will
flash on the display.
- BANK +
P. F.
2 You can select the tone that you want
Muza
to store by pressing BANK+/- or PATCH
+/-. Only the user patches(A1~H6)
can be chosen.
Press the switch of the dial to select
the letter of the patch name to be
changed. Choose the character by
dialing the knob. You can rename the
patch name by this operation.
BANK PATCH
Flashing
STORE
TAP
TYPE/PARA/M.VOL
- BANK +
Nuza
P. F.
PATCH+/
BYPASS
PATCH-
BANK PATCH
Flashing
STORE
TAP
3 Press the STORE button again to
confirm your store operation.
- BANK +
Press to confirm
the store
P. F.
STOMP
WAH
COMP
AMP
EQ
CAB
4 In this process you can cancel storages
MOD
NG
PLAY
by dialing the knob.
DELAY
REVERB
Rotate to cancel the store
14
The patches of the unit consist 11 serially linked effect modules, as shown
in the illustration below.
You can use all effect modules together or selectively use a certain modules
by setting them on or off.
Effect module
NG
Comp
Wah
Distortion
AMP
Auto
Touch
Wah
Muza
Preamp
Jazz
Clean
Modulation
Delay
Reverb
1x10
Classic
Full Range
Spring
Deluxe
1x12B
US Overdrive
Modern
Blues
Classic DS
Medeli
Pedal
Wah
Speaker
1x12A
Classic OD
Auto
Sweep
Wah
EQ
2x12A
Stereo
Chorus
Step
Flanger
Class A
2x12B
UFO Fuzz
Classic
Black
4x12A
Phaser
4x12B
Random
Phaser
4x12C
Tremolo/Pan
British
Class
Grunge DS
Smash
Distortion
Hi Gain
Heavy Metal
Rectifier
Room
Digital
Delay
Flanger
Super
Distortion
Rat
Distortion
Delay
Chorus
Volume
MultiHead
Delay
Hall
Plate
Reversed
Delay
Effect type
Pitch
Shifter
Vibrato
Clop Slice
Acoustic
Octave
Auto Riff
Auto Ring
Slow attack
1. PLAY
(you can change patch and set the rhythm)
2. NOISE GATE
3. COMPRESS
4. WAH
5. DISTORTION
STOMP
WAH
Rotate to choose
the effect
COMP
AMP
EQ
1 Dial the effect selection knob to choose
CAB
your desired effect to be adjusted and
the LCD displays the type of the effect.
MOD
NG
PLAY
6. AMP SIMULATION
7. EQ
8. SPEAKER
9. MODULATION
10.DELAY
11.REVERB
DELAY
REVERB
2 11 effects can be used simultaneously.
Flashing
In the effect chain, the effect symbol
indicates the effect status. When the
symbol displays, it indicates the effect
is on, when it is off, it indicates a
bypass and if it is flashing, it means
you are now editing this effect.
S.Wah
BANK PATCH
15
TYPE/PARA/M.VOL
3
If the effect symbol flashes continuously,
that means the edited effect is activated.
But if the indicator only flashes a little
while, then stops, that means the effect
is now under a bypass mode.
4
You can dial the knob to select your
desired effect.
5
If the effect selected is not set as PLAY,
the unit is under edit status, so the
EDIT symbol will be lighted .
Rotate to choose
the effect type
Flashing
T.Wah
BANK PATCH
STOMP
WAH
Rotate to choose
the effect
AMP
Flashing
EQ
CAB
S.Wah
MOD
COMP
NG
PLAY
DELAY
REVERB
TYPE/PARA/M.VOL
BANK PATCH
Press to adjust
the parameter
1 All parameter adjustments will be
performed by dialing the knob.
Speed
2 Press the knob to select the parameter
to be adjusted .
BANK PATCH
TYPE/PARA/M.VOL
Rotate to choose
the value of the
parameter
3 Dial the knob to choose the value of
the parameter. All of these operations
will be indicated on the screen.
Speed
BANK PATCH
16
STOMP
AMP
EQ
WAH
CAB
COMP
MOD
NG
DELAY
REVERB
PLAY
1
NOISE GATE is designed to eliminate noise while the signal is on but you are not
playing the instrument. It has only small interference on the guitar sound and it
does not affect the overall color of the tone.
2
Parameter 1 sets the signal strength (threshold) required to enable or disable
the noise gate range from 0(open easily/high sensitivity) to 100(requiring strong/
high sensitivity)
3
Range: 0~100.
Type
name
LCD
Display
Description
Para1
Para 2
Noise
Gate
NG
Reduce noise
Threshold
Release time Attack time
STOMP
WAH
COMP
Para 3
AMP
EQ
CAB
MOD
NG
PLAY
DELAY
REVERB
1
COMPRESSOR produces sustain or simple 'smoothing' by compressing the signal
so that the high levels are suppressed while the low level are not affected.
2
The use of compression can limits the signal of a dynamic range, enhances the
tones with the subsequent effect.
3
Para1 is used to set the compressor threshold level. When the input signal
exceeds this level , limitation will be applied .
4
Para2 determines the volume.
5
Range: 0~100.
Type
name
Compress
LCD
Display
COMP
Description
Banlances the volume level
of the input signal.
17
Para 1
Para 2
Threshold
Level
STOMP
AMP
EQ
WAH
CAB
COMP
MOD
NG
DELAY
REVERB
PLAY
1
The wah effect creates a unique tone like the 'wah' sound of a kid, by changing
the frequency responses of a filter.
2
Pedal Wah allows you to use the expression pedal to obtain real-time control of
the wah effect.
3
Auto Wah creates an automatic wah by cyclically changes of the filter or by
changing the filter in response to the input volume.
4
Sweep Wah creates wah effect based on the frequency of the pedal's given angle.
5
Range: 0~100 (except for the polarity, which will be displayed as up or Down).
Type
name
LCD
Display
Auto Wah
T.Wah
Sweep Wah S . W a h
Pedal Wah P . W a h
Description
Para1
Para 2
Para 3
Auto Wah
Sweep Wah
Pedal Wah
Sens
Speed
Polarity
Q
Q
/
Grade
/
/
STOMP
WAH
COMP
AMP
EQ
CAB
MOD
NG
PLAY
DELAY
REVERB
1
This unit contains the tones of 11 popular distortion stomp boxes , each of which
can be tweaked and modified just like the original model.
2
It offers three parameters for custom setting .
3
Drive is the distortion level; Level is the volume, and Tone determines the
brightness of the tone.
4
The range of tone from low to high: -50~50.
5
Other parameters range: 0~100.
18
Type
name
LCD
Display
Description
Para1 Para 2
Muza Preamp
Boost
Drive
Tone
Level
/
Classic OD
US Overdrive
Classic DS
Super Distortion
UFO Fuzz
Rat Distortion
Grunge DS
Smash Distortion
Heavy metal
Acoustic
TS808
Monky
M104
DS1
Fuzz
Rat
Fx69
SM7
MT2
Acous
This distortion sound boosts
the low and high ends yielding
a clean and rich sound .
Models IBANEZ Ts808
Models DIGITECH BAD MONKEY
Models MXR M104 DS+
Models ROLAND BOSS DS1
Models DUNLOP FUZZ FACE
Models PROCO VINTAGE RAT
Models DOD FX69
Models IBANEZ SM7
Models Roland Boss Mt2
Models natural guitar
Drive
Drive
Drive
Drive
Drive
Drive
Drive
Drive
Drive
Body
Tone
Low
Level
Tone
Level
Tone
Low
Low
Mid
Top
Level
High
/
Level
/
Level
High
High
Mfreq
Level
/
Level
/
/
/
/
Level
Level
Level
/
STOMP
WAH
Para 3
AMP
Para 4
EQ
CAB
COMP
MOD
NG
PLAY
DELAY
REVERB
1
Amp Sim is a technology applies on the simulation of the tones of several popular
and vintage amps.
2
Range: 0~100.
Type
name
Jazz Clean
Deluxe
Modern Blues
Class A
Classic Black
British Class
Hi Gain
Rectifier
LCD
Display
Description
Para1
Jc120
Tweed
Bassm
Ac30
Black
Jtm45
Jcm80
Rectf
Models Roland JC-120
Gain
Gain
Gain
Gain
Gain
Gain
Gain
Gain
Models Fender Bassman
Models VOX AC30
Models BlackFace Fender Deluxe
Models Marshall JTM-45
Models Marshall JCM800
Models MesaBoogie Dual Rectifier
19
Para 2
Level
Level
Level
Level
Level
Level
Level
Level
Para 3
/
/
/
/
/
/
/
/
STOMP
AMP
EQ
WAH
CAB
COMP
MOD
NG
DELAY
REVERB
PLAY
1
EQ further shapes the Bass, Midrange and Treble tones of the output signal.
2
Adjust the frequency of the low ,mid, mid freq and high frequencies with the 4
parameters, which usually known as BASS, MIDDLE, TREBLE.
3
Range of low, middle, high: -50~50.
4
Range of mid_frep: 0~100.
Type
name
Equalizer
LCD
Display
Description
Para1
Para 2
Para 3
Par a 4
EQ
Adjust the tonal
quality
Low
Mid freq
Mid
High
STOMP
WAH
COMP
PLAY
Simulate various speaker sizes and cabinet constructions.
2
3
Speaker simulation table as shown below.
No parameter for adjusting.
Number
1
2
3
4
5
6
7
8
LCD
Display
1x10
1x12
1x12
2x12
2x12
4x12
4x12
4x12
A
B
A
B
A
B
C
20
EQ
CAB
MOD
NG
1
AMP
DELAY
REVERB
STOMP
AMP
WAH
COMP
EQ
CAB
MOD
NG
PLAY
DELAY
REVERB
1
The modulation effect contains different effects such as Chorus, Phaser, Flanger,
Pitch Shifter, Vibrato, Auto Riff, Ring, Modulation.... based on the amplitude and
signal delay variation.
2
The Chorus effect combines the delay time and amplitude modulation to effectively
thicken and add warmth to the sound .
3
Phase effect adds varied phase portions to the direct sound, creates a whooshing
and swirling character to the sound.
4
The Flanger effect creates a twisting, jet-airplane like character to the sound.
5
A Pitch Shift copies the incoming signal, then shifts the pitch of the copied tones
to a different note. The shifted note is then mixed back with the original tone,
sounds as if two guitars were playing different notes.
6
The Vibrato effect creates a slight pitch modulation.
7
The Ring modulation effect creates a bell-like sound by modulating the input signal.
8
Auto Riff allows you to automatically produce a phrase simply by picking a singlenote; this can be used to play extremely rapid phrases.
Type
name
Classic chorus
Stereochorus
Flanger
Step flanger
Phaser
Random phaser
Tremolo
Pitch shifter
Vibrato
Clop slice
Octave
Auto riff
Auto ring
Slow attack
LCD
Display
Para 1
Sinch
Trich
Flang
Stepf
Phase
Stepp
Tremo
Pitch
Vibra
Clop
Octave
Riff
Ring
Slowa
Rate
Rate
Rate
Rate
Rate
Rate
Type
Pitch
Rate
Type
Direct
Type
Rate
Attack
21
Para2
Para 3
Para 4
Pre delay
Pre delay
Depth
Step
Depth
Peak
Speed
Cent
Depth
Speed
Oct1
Speed
Mix
Sensitivity
Depth
Depth
Feedback
Feedback
---------Depth
Mix
--------Oct2
Sensitivity
---------
Level
Level
-----Mix
------------------------------------------------Loop
---------------
9
For Pitch Shifter : the range of pitch is -12~12 . The range of cent is -50~50.
10
For Tremolo : the range of type is 1~3.
11
For Clop Slice : the range of type is 1~4.
12
For Auto Riff : the range of type is 1~8. the loop display on or off.
13
For the rest of the effects, parameters' range : 0~100.
STOMP
WAH
COMP
AMP
EQ
CAB
MOD
NG
PLAY
DELAY
REVERB
1
Delay is an effect recording a portion of the incoming signal, and then play it
back after a short time. The recording can either be repeated only once or for
several times.
2
Parameter1 adjusts the length of the interval between repeated phases.
Range from 10ms to 4000ms.
3
Parameter3 adjusts the volume of the delayed signal. Range from 0 to 100.
Type
name
Full range delay
Digital delay
Multi head delay
Reversed delay
LCD
Display
Description
Para1
Delay
PD
MD
RD
Max 4 s delay
Stereo delay
Multi_tap delay
Reverse delay
Time
Time
Time
Time
4
For Reversed delay, the range of time is 0.01~1.
5
Other types of delay, the range of time will be 0.01~4.
6
All other types of parameters' range: 0~100.
22
Para 2
Feed back
Feed back
Feed back
Feed back
Para 3
Level
Level
Level
Level
STOMP
AMP
EQ
WAH
CAB
COMP
MOD
NG
PLAY
DELAY
REVERB
1
Reverberation is the warm musical 'ambience' you can experience from listening to
the music in a hall or other natural environments. This unit offers several different
reverb effects, simulating types of reverberation as if you are experiencing in a hall,
or a small room. Reverb effect ideally suits to the vocals.
2
Other parameters' range :0~100
Type
name
Sprin reverb
Room reverb
Hall reverb
Plate reverb
LCD
Display
Description
Para1
Sprin
Room
Hall
Plate
Classical sprin reverb
Room reverb
Hall reverb
Metal plate reverb
Time
Time
Time
Time
Para 2
Density
Density
Density
Density
Para 3
Level
Level
Level
Level
1
Press the PATCH+/BYPASS switch, the adjusted effect is bypassed.
2
Press the PATCH+/BYPASS switch one more time to turn the bypass function off.
PATCH-
PATCH+/
BYPASS
bypass
BANK PATCH
23
AD Conversion
Controls
32 bit, 64 times oversampling
Store button
Bank +/- button
Tap button
button
Effect modules knob
Type/Para/M.Vol knob
Patch +/- foot switches
Expression pedal
Power switch
DA Conversion
32 bit, 128 times oversampling
Sampling Rate
48kHz
Display
5 characters (backlit LCD)
5 BCD
Patches
Weight
96 patches: 48 user patches
(0-1~7-6) and 48 default
settings (A-1~H-6).
885g (excluding AC Adaptor)
Dimensions
255(L)X162(W)X60(H)mm
Effect types
Power Supply
54
DC 9V center minus
Effect modules
11
Connections
Input jack
Phones / Output jack
AC in jack
All specifications and appearances are subject to change without prior notice.
24