1
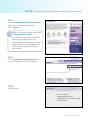
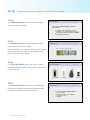
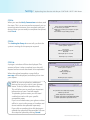
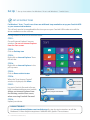
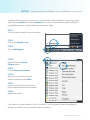
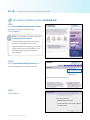
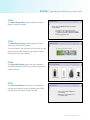
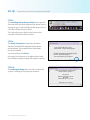
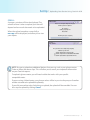
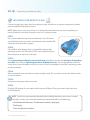
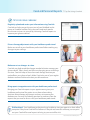
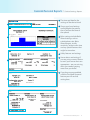
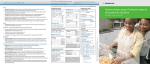
Getting Started
with CareLink® Personal Software
Table of Contents
Understanding CareLink ® Personal Software
Before You Start . . . . . . . . . . . . . . . . . . . . . . . . . . . . . . . . . . . . . . . . . . . . . . . . . . . . . . . . . . . . . . . . . . . . . . . . . . . . . . . . . . . . . . 2
What Is CareLink?. . . . . . . . . . . . . . . . . . . . . . . . . . . . . . . . . . . . . . . . . . . . . . . . . . . . . . . . . . . . . . . . . . . . . . . . . . . . . . . . . . . . . 3
What Do I Need to Start? . . . . . . . . . . . . . . . . . . . . . . . . . . . . . . . . . . . . . . . . . . . . . . . . . . . . . . . . . . . . . . . . . . . . . . . . . . . . . 3
Why is CareLink Useful?. . . . . . . . . . . . . . . . . . . . . . . . . . . . . . . . . . . . . . . . . . . . . . . . . . . . . . . . . . . . . . . . . . . . . . . . . . . . . . . . . 3
SET UP
Signing Up for Your CareLink Account . . . . . . . . . . . . . . . . . . . . . . . . . . . . . . . . . . . . . . . . . . . . . . . . . . . . . . . . . . . . . . . . 4
Before Your Upload to CareLink. . . . . . . . . . . . . . . . . . . . . . . . . . . . . . . . . . . . . . . . . . . . . . . . . . . . . . . . . . . . . . . . . . . . . . . 5
Uploading Your Device with the Bayer CONTOUR® NEXT LINK Meter. . . . . . . . . . . . . . . . . . . . . . . . . . . . . . . . . . 6
Set-up Instructions for Windows® Vista® and Windows® 7 or 8 Users. . . . . . . . . . . . . . . . . . . . . . . . . . . . . . . . . . 10
Uploading Your Device Using CareLink USB. . . . . . . . . . . . . . . . . . . . . . . . . . . . . . . . . . . . . . . . . . . . . . . . . . . . . . . . . . . . 12
Uploading Your Meter to a Mac . . . . . . . . . . . . . . . . . . . . . . . . . . . . . . . . . . . . . . . . . . . . . . . . . . . . . . . . . . . . . . . . . . . . 16
CareLink personal reports
Tips for Using CareLink. . . . . . . . . . . . . . . . . . . . . . . . . . . . . . . . . . . . . . . . . . . . . . . . . . . . . . . . . . . . . . . . . . . . . . . . . . . . . . . . . 17
Reading CareLink Reports. . . . . . . . . . . . . . . . . . . . . . . . . . . . . . . . . . . . . . . . . . . . . . . . . . . . . . . . . . . . . . . . . . . . . . . . . . . . . 18
Device Settings Report. . . . . . . . . . . . . . . . . . . . . . . . . . . . . . . . . . . . . . . . . . . . . . . . . . . . . . . . . . . . . . . . . . . . . . . . . . . . . 20
Quick View Summary Report. . . . . . . . . . . . . . . . . . . . . . . . . . . . . . . . . . . . . . . . . . . . . . . . . . . . . . . . . . . . . . . . . . . . . . . 22
Daily Summary Report. . . . . . . . . . . . . . . . . . . . . . . . . . . . . . . . . . . . . . . . . . . . . . . . . . . . . . . . . . . . . . . . . . . . . . . . . . . . . 24
Sensor Daily Overlay Report . . . . . . . . . . . . . . . . . . . . . . . . . . . . . . . . . . . . . . . . . . . . . . . . . . . . . . . . . . . . . . . . . . . . . . . 26
Sensor Overlay by Meal Report . . . . . . . . . . . . . . . . . . . . . . . . . . . . . . . . . . . . . . . . . . . . . . . . . . . . . . . . . . . . . . . . . . . . 28
APPLYING PERSONAL SOFTWARE IN YOUR LIFE
Therapy Adjustment with CareLink. . . . . . . . . . . . . . . . . . . . . . . . . . . . . . . . . . . . . . . . . . . . . . . . . . . . . . . . . . . . . . . . . . . . . . 30
Preventing Nocturnal Hypoglycemia . . . . . . . . . . . . . . . . . . . . . . . . . . . . . . . . . . . . . . . . . . . . . . . . . . . . . . . . . . . . . . . . . . 31
Improving Insulin Dosing. . . . . . . . . . . . . . . . . . . . . . . . . . . . . . . . . . . . . . . . . . . . . . . . . . . . . . . . . . . . . . . . . . . . . . . . . . . . . . 32
Fine-Tuning Alarm and Alert Settings. . . . . . . . . . . . . . . . . . . . . . . . . . . . . . . . . . . . . . . . . . . . . . . . . . . . . . . . . . . . . . . . . . 34
APPENDIX
Understanding, Generating and Viewing Reports. . . . . . . . . . . . . . . . . . . . . . . . . . . . . . . . . . . . . . . . . . . . . . . . . . . . 35
Saving, Printing and Emailing Reports . . . . . . . . . . . . . . . . . . . . . . . . . . . . . . . . . . . . . . . . . . . . . . . . . . . . . . . . . . . . . . . . . 36
Table of Contents I 1
CareLink Personal Software I
Before You Start
Devices you can read with Carelink PERSONAL SOFTWARE*
MiniMed® series pumps
Guardian® REAL-Time® monitors
Various glucose meters
*See on-line User Guide for complete list of supported devices and meters.
HOW TO USE THIS GETTING STARTED GUIDE
Set-Up and General Overview
This Getting Started Guide will provide you with instructions for setting up your CareLink Personal
account, uploading your devices, and tools to use as you evaluate some of the reports that you can
obtain with CareLink.
This booklet may be used as an ongoing resource for you.
The complete user guide for CareLink Personal software is located in the Help section after you log
in to the web-based software.
Note Prior to updating your computer operating system, you may want to check
http://www.medtronicdiabetes.com/support/carelink-personal to be sure that the
updated operating system will be compatible with the CareLink Personal software.
2 I Before You Start
Understanding CareLink I
Personal Software
What Is CareLink?
CareLink Personal software allows you to upload information from your insulin pump, Continuous
Glucose Monitoring (CGM) device, and blood glucose meter to assess glucose control through a free,
web-based program, making it easier to uncover trends and patterns.
WHAT DO I NEED TO START?
All it takes to get started is an easy upload using the Bayer CONTOUR® NEXT LINK Blood Glucose
Meter or the CareLink USB device provided with a MiniMed series pump or Guardian REAL-Time
monitor.
Why is CareLink Useful?
Easily track your glucose levels and the impact of insulin delivery,
meals and exercise routines.
Store your information securely.
Uncover patterns and make more informed therapy decisions.
Sign up for a CareLink account and get started
by simply uploading information from your pump
using your CareLink communication device.
Understanding CareLink Personal Software I 3
Set Up I
Signing Up for Your CareLink Account
Let’s get started!
For a list of supported OPERATING systems please see:
http://www.medtronicdiabetes.com/support/carelink-personal
Click on Setting Up & Uploading on a Personal Computer or Setting Up & Uploading on a Mac for details.
Signing Up for Your Carelink Account
When you are ready to use CareLink, go to: http://medtronicdiabetes.com/carelink.
Please remember that you should not insert the CareLink USB device until prompted.
This will take you to the CareLink Welcome screen.
Before using CareLink for the first time, you need to set up a user account and password.
To do so, just follow these easy steps:
Step 1:
From the Welcome screen, click the
Sign Up Now button.
Step 2:
After you have accepted the terms of agreement,
you’ll be asked to create a username and password.
The password can be any combination of letters or
numbers from 4 to 20 characters. Be aware that
passwords are case-sensitive. Be sure to save your
user name and password in a safe place, and don’t
share them with anyone else. You can use one of the
cards on the back cover to write down this information.
Step 3:
Enter your personal information in all the
required fields and click the Submit button at
the bottom of the form.
Once you have registered to use CareLink, you can log in from the Welcome screen using your new
username and password.
NOTE Prior to inserting CareLink USB, Windows Vista/7/8 users will need to first follow the
“Set-up Instructions for Windows Vista and Windows 7 and 8 Users” to successfully install
the CareLink USB drivers (on page 10).
4 I CareLink Personal Software Set Up
Set Up I
Uploading to CareLink Software
BEFORE YOUR UPLOAD TO CARELINK
When you are ready to upload to CareLink, make sure to have your insulin pump or Guardian®
monitor and all BG meters on hand. If you are using a linked meter, those BG values will be in your
insulin pump or Guardian and you will not need to upload your meter.
CareLink will walk you through the upload process, telling you which device to upload and when to
connect it. Simply follow the instructions in each window, making sure to click Next > when you are
ready to move on.
Note: Wait until prompted to connect your USB device to a USB port on your computer.
USB
port
Your insulin pump may go into Suspend mode and stop dispensing insulin during the upload process.
The software will automatically return it to normal operation when the upload process is complete.
You may not be able to upload if your pump is in a special feature
mode and you see the open circle next to your reservoir icon on the
pump screen. Complete or cancel any bolus or temp basal in progress.
Make sure your computer and your device(s) are displaying the
current date and time. They should be within one minute of each
other to ensure that the information that is shared between
them is consistent.
If you’re using the Bayer CONTOUR NEXT LINK Meter:
If you’re using the CareLink USB device:
Go to page 6 for upload instructions.
Go to page 12 for upload instructions.
NOTE The data uploaded from your device(s) through the USB is stored on the CareLink secure
server, not on your computer. CareLink meets high standards for security. It’s actually safer than
storing data on your own computer.
For instructions on how to view and print reports, see pages 35–36.
CareLink Personal Software Set Up I 5
Set Up I
Uploading Your Device with Bayer CONTOUR® NEXT LINK Meter
Uploading your device WITH the BAYER CONTOUR® NEXT LINK Meter
For Windows Only
One time Driver install happens the first time you
upload a CONTOUR NEXT LINK (as a meter), or
upload a pump through the CONTOUR NEXT LINK.
The next time you upload you will not see this
screen.
For Windows Only
A password may be requested if in Windows 7, 8
or Vista. Some screens flash by, and then you see
this screen. It displays regardless of whether your
CONTOUR NEXT LINK is plugged in or not.
We need to install a USB driver to read data from
your pump.
You will need to log in as an administrator on your
computer, or provide an administrator password.
1. Connect the CONTOUR® NEXT LINK device
to your computer.
2. Wait a few seconds for your computer to
recognize the device.
3. Click Next.
The following screen shows each time you upload a
pump through the CONTOUR NEXT LINK (including
the first time you upload your device, after driver
install). When you plug in the device, you may see
Windows recognize it in the system tray.
ensure the CONTOUR NEXT LINK device
• isPlease
connected to your computer
ait a few seconds for your computer to
• W
recognize your device
• Click “Finish” to begin reading your pump…
®
Please do not navigate away from this page
until the operation completes.
The system is
finding and setting up
your CONTOUR® NEXT LINK…
Read Progress (0% complete)
6 I CareLink Personal Software Set Up
Set Up I
Uploading Your Device with Bayer CONTOUR® NEXT LINK Meter
Step 1:
Go to www.medtronicdiabetes.com/carelink
Enter your user name and password.
Click on Sign In.
NOTE If you forget your password, click
on Forgot your password?
ou will need to enter your Username
Y
and the e-mail address from your
CareLink profile. A temporary password
will be sent to your e-mail address. You
will then enter a new password into
your account.
Step 2:
Click on Upload Data from My Device. This
screen will display your last five uploads.
Step 3:
Choose device.
Please choose your device:
MiniMed Paradigm® Insulin Pump
Guardian® REAL-Time Continuous Glucose Monitor
Blood Glucose Meter
CareLink Personal Software Set Up I 7
Set Up I
Uploading Your Device with Bayer CONTOUR® NEXT LINK Meter
Step 4:
The Check Pump Status screen verifies that your
pump is ready to upload.
Please check your MiniMed Paradigm® insulin pump
for the following:
• Complete or cancel any bolus in progress
• Complete or cancel any Temp Basal in progress
• Confirm that pump battery indication is NORMAL
• Clear any pump error state
Step 5:
The Identify the pump screen requires that you
enter your pump serial number.
Once you do this, the software will save your current
pump serial number and you won’t have to enter
this the next time you upload.
Please enter your pump’s 6-character serial number:
Step 6:
The Select the Device Screen asks you to choose
the device that you will be using to link your device
to the software.
CONTOUR® NEXT LINK
Step 7:
The Finish Installation screen lets you know that
you are now ready to insert the device you will be
using to link your device to the software.
CareLink® USB
Paradigm Link®
1. Connect the CONTOUR® NEXT LINK device
to your computer.
2. Wait a few seconds for your computer to
recognize the device.
3. Click Next
8 I CareLink Personal Software Set Up
ComLink™
Set Up I
Uploading Your Device with Bayer CONTOUR® NEXT LINK Meter
Step 8:
When you see the Verify Connections window, read
the steps. This is to ensure you have properly set up
communication between your computer and your
device. When you are ready to complete the upload,
click Finish.
Step 9:
The Looking for Pump # xxxxxx tells you that the
system is waiting for the pump to respond.
ensure the CONTOUR NEXT LINK device
• isPlease
connected to your computer
ait a few seconds for your computer to recognize
• W
your device
• Click “Finish” to begin reading your pump…
®
Please do not navigate away from this page
until the operation completes.
The system is
waiting for your pump to respond.
Please wait.
This may take up to 30 seconds.
Read Progress (1% complete)
Step 10:
A progress window will then be displayed. The
amount of time it takes to upload your data will
depend on how much data needs to be uploaded.
When the upload completes successfully, a
message will be displayed, and allow you to view
your reports.
NOTE Be sure to upload any additional
devices that you use, such as your glucose
meter. To do so, follow the above steps.
This will allow you to see all your important
information on your CareLink reports.
To upload a glucose meter you will need
a cable that works with your specific
compatible meter.
Please do not navigate away from this page
until the operation completes.
The system is
reading your pump now.
Please wait...
Read Progress (53% complete)
The system has successfully read your pump.
What can you do next?
the Reports tab to view your data
• CClick
the Logbook tab to add additional information
• Click
• lick the Upload tab to upload another device
I f you use a linked meter, your glucose values
will be in your insulin pump or Guardian and
do not need to be uploaded separately.
If you click on another tab or link during an
upload, the upload will be cancelled. You can
also stop the upload by clicking Cancel.
CareLink Personal Software Set Up I 9
Set Up I
Set-up Instructions for Windows® Vista® and Windows® 7 and 8 Users
Set-up Instructions
For Windows® Vista,® 7 and 8 users there are additional steps needed to set up your CareLink USB
as your communication device.
This will only need to be completed the first time you use your CareLink USB in order to install the
drivers needed to run the software.
If using Windows 8 follow the instructions below:
Step 1:
Close all Internet Explorer® browser
windows. Do not use Internet Explorer
from the Start screen.
Step 2:
Click on Desktop icon
Step 3:
Right click on Internet Explorer® from
the task bar
Step 4:
Right click on Internet Explorer in the
pull-up menu
2
Step 5:
Click on Run as administrator
Step 6:
When the “User Account Control”
window is displayed, click Allow
Step 7:
Log on to CareLink Personal software:
http://medtronicdiabetes.com/carelink.
Always use Internet Explorer from
the Desktop, not the Start screen,
when accessing CareLink Personal.
Step 8:
Upload your device.
Open
5
Run as administrator
Unpin from Taskbar
4
Internet Explorer
Properties
Unpin this program from taskbar
3
HAVING TROUBLE?
Visit www.medtronicdiabetes.com/carelinksetup for step-by-step instructions or call the
Medtronic 24-Hour HelpLine anytime at 1.800.646.4633, option 1 for assistance.
10 I CareLink Personal Software Set Up
Set Up I
Set-up Instructions for Windows® Vista® and Windows® 7 and 8 Users
To find out if the computer you are using is on the Windows Vista or Windows 7 operating system,
right click on Computer then select Properties to view basic information about your computer. If
using Windows Vista or 7, please follow the instructions below
Step 1:
Close all Internet Explorer® browser windows.
Step 2:
Click on the Windows® icon.
Step 3:
Click on All Programs.
Step 4 :
Right-click on the Internet
Explorer option.
3
2
4
5
Step 5:
Click on Run as Administrator.
Step 6:
When the “User Account Control”
window is displayed, click Allow.
Step 7:
Log on to CareLink Personal software:
http://medtronicdiabetes.com/carelink
Step 8:
Upload your device.
At this point, set-up for Windows® Vista® or Windows 7 or 8 is complete. Once you complete an
upload successfully, you do not need to repeat this process.
CareLink Personal Software Set Up I 11
Set Up I
Uploading Your Device Using CareLink USB
Uploading your device using Carelink usb
Step 1:
Go to www.medtronicdiabetes.com/carelink
Enter your user name and password.
Click on Sign In.
NOTE If you forget your password, click
on Forgot your password?
ou will need to enter your Username
Y
and the e-mail address from your
CareLink profile. A temporary password
will be sent to your e-mail address. You
will then enter a new password into
your account.
Step 2:
Click on Upload Data from My Device. This
screen will display your last five uploads.
Step 3:
Choose device.
Please choose your device:
MiniMed Paradigm® Insulin Pump
Guardian® REAL-Time Continuous Glucose Monitor
Blood Glucose Meter
12 I CareLink Personal Software Set Up
Set Up I
Uploading Your Device Using CareLink USB
Step 4:
The Check Pump Status screen verifies that your
pump is ready to upload
Please check your MiniMed Paradigm® insulin pump
for the following:
• Complete or cancel any bolus in progress
• Complete or cancel any Temp Basal in progress
• Confirm that pump battery indication is NORMAL
• Clear any pump error state
Step 5:
The Identify the pump screen requires that you
enter your pump serial number.
Once you do this, the software will save your current
pump serial number and you won’t have to enter
this the next time you upload.
Please enter your pump’s 6-character serial number:
Step 6:
The Select the Device screen asks you to choose
the device that you will be using to link your device
to the software.
CONTOUR® NEXT LINK
Step 7:
The Finish Installation screen lets you know that
you are now ready to insert the device you will be
using to link your device to the software.
CareLink® USB
Paradigm Link®
ComLink™
1. Connect the CareLink® USB device to
your computer.
2. Wait a few seconds for Windows® to
recognize the device.
CareLink Personal Software Set Up I 13
Set Up I
Uploading Your Device Using CareLink USB
Step 8:
The Installing device driver software message will
show up when you have followed the above steps in
setting up your CareLink USB and the drivers for the
CareLink USB are being installed.
This step only occurs the first time you use the
CareLink USB and install the drivers.
Step 9:
The Verify Connections screen lets you know
that the CareLink USB is ready to link your device
to the software. The needed drivers have been
correctly installed.
You now need to click Finish.
Have your insulin pump or Guardian device near
the USB device and your data will begin to upload.
Step 10:
The Looking for Pump # xxxxxx tells you that the
system is waiting for the pump to respond .
The CareLink® USB device is ready.
Click “Finish” to begin reading your pump…
NOTE: The pump will be suspended during reading.
Be sure to check that the pump is no
longer suspended when you are finished.
Please do not navigate away from this page
until the operation completes.
The system is
waiting for your pump to respond.
Please wait.
This may take up to 30 seconds.
Read Progress (1% complete)
14 I CareLink Personal Software Set Up
Set Up I
Step 11:
A progress window will then be displayed. The
amount of time it takes to upload your data will
depend on how much data needs to be uploaded.
Uploading Your Device Using CareLink USB
Please do not navigate away from this page
until the operation completes.
The system is
reading your pump now.
Please wait...
When the upload completes successfully, a
message will be displayed, and allow you to view
your reports.
Read Progress (53% complete)
The system has successfully read your pump.
What can you do next?
•
•
•
lick the Reports tab to view your data
C
Click the Logbook tab to add additional information
Click the Upload tab to upload another device
NOTE Be sure to upload any additional devices that you use, such as your glucose meter.
To do so, follow the above steps. This will allow you to see all your important information
on your CareLink reports.
To upload a glucose meter you will need a cable that works with your specific
compatible meter.
If you are using a linked meter, your glucose values will be in your insulin pump or Guardian
and do not need to be uploaded separately.
If you click on another tab or link during an upload, the upload will be cancelled. You can
also stop the upload by clicking Cancel.
CareLink Personal Software Set Up I 15
Set Up I
Uploading Your Meter to a Mac
Uploading Your Meter to a Mac
If you are using a Mac, there are a few additional steps to follow to set up your computer to upload
your compatible blood glucose meter.
NOTE Make sure to start up your Mac in 32-bit kernel mode whenever you want to upload your
meter. By default, most Mac computers start in 32-bit kernel mode.
Step 1:
Get a serial cable from the meter manufacturer. You will need a
serial cable because most meter manufacturers that provide USB
cables do not provide Mac support.
Step 2:
Get a USB-to-serial adapter that is compatible with your Mac
operating system. You will need a USB-to-serial adapter because
Mac computers do not have serial ports.
Step 3:
Go to www.medtronicdiabetes.com/carelinksetup and click on the link for Setting Up & Uploading
on a MAC. Next, click on Uploading Your Meter & Multiple Devices. This will provide you with links
to any drivers you will need to install to use your USB-to-serial adapter for the MAC operating system
on your computer.
Step 4:
When prompted, enter your Mac username and password. The username must be the Administrator
on your computer.
Step 5:
Restart your computer when instructed.
Step 6:
Plug the USB adapter for your meter cable into your USB port. Plug your meter serial cable into
the USB adapter.
Note The first time you connect the cable after installing the driver, you may see a screen
that tells you that a new network interface has been detected. Do the following:
• Click Network Preferences. The Network window is displayed.
• Click Apply.
• Close the Network window.
16 I CareLink Personal Software Set Up
CareLink Personal Reports I
Tips For Using CareLink
Tips for Using CareLink
Regularly upload and review your information using CareLink
CareLink can help you get the most out of your MiniMed insulin
pump or Guardian monitor. Pick a day each week and spend a
few minutes to invest in yourself by reviewing CareLink reports to
improve your glucose control.
8:00 AM
Review CareLink Reports
Discuss therapy adjustments with your healthcare professional
Make sure to talk to your healthcare professional before making any
changes to your settings.
Make one or two changes at a time
areLink may help reveal the changes needed to better manage your
C
glucose levels. Take it slowly and focus on changing one or two things
at a time. CareLink helps to show how each therapy decision you
make affects your glucose levels. Make CareLink a part of your regular
diabetes routine to achieve the best possible outcomes.
Bring reports to appointments with your healthcare professional
Bringing your CareLink reports to your appointments gives your
healthcare professional the option to use them when making
decisions about therapy adjustments and ways to improve your
diabetes care. You may also identify questions or concerns from the
reports that you want to discuss with your healthcare professional.
Did You Know? Your healthcare professional may be able to view your reports on their office
computer if they have CareLink Pro Software. If they do not have this software, you can print
out your CareLink Personal reports to bring to your next office visit.
CareLink Personal Software Reports I 17
CareLink Personal Reports I
Reading CareLink Reports
Reading Carelink Reports
Reading your reports is as easy as 1-2-3!
Follow these three steps to read your Daily Summary and Sensor Daily Overlay reports.
An overview of these reports can be found on pages 22–25 of this guide.
Step 1: Look at the overnight period
Do you see a pattern of lows?
Consider talking to your healthcare professional (HCP) about reducing
your overnight basal insulin/rates.
Was your BG level already high before bed?
Was there a bedtime snack?
Do you see a pattern of highs?
Consider talking to your HCP about increasing your basal insulin/rates or
if on an insulin pump, changing the timing of your basal rate to increase
during the night.
Step 2: Look at the period before meals
Do you see a pattern of lows?
Consider talking to your HCP about decreasing your basal insulin.
Do you see a pattern of highs?
Consider talking to your HCP about increasing your basal insulin.
Step 3: Look at the period after meals
Determine whether food was
an issue.
Do you see a pattern of lows?
Were you accurately carb counting?
Was insulin given at the right time?
Determine whether food was
an issue.
Do you see a pattern of highs?
Were you accurately carb counting?
Was insulin given at the right time?
Is your carb ratio correct?
If using an insulin pump, consider
whether a Dual Wave® bolus would
have been better for meals high in
carbs and fat.
Is your carb ratio correct?
If using an insulin pump, consider
whether a Dual Wave® bolus would
have been better for meals high in
carbs and fat.
Insulin sensitivity, carb ratios and active insulin may also be contributing factors. Discuss these
and any other changes (such as what to do for exercise) with your healthcare professional.
Use the 1-2-3 approach to reading your reports. Looking at specific sections of each report will
help you and your healthcare professional better manage your diabetes.
Be sure to share any regular patterns with your healthcare professional.
18 I CareLink Personal Software Reports
CareLink Personal Reports I
Reports Overview
CARELINK PERSONAL Reports
CareLink Personal software generates many useful reports. In the beginning, focus on one or two key
CareLink reports. We will review several key reports here beginning with reports for those using the
pump with meter data, the pump with CGM data, and those using CGM only.
Remember Guardian users: In order to see insulin delivery, diet and exercise information in your
reports, you must enter this information using the Capture Events feature in your device or the
Logbook of CareLink.
Report
What is in this report?
How do I use this report?
Quick View
Summary
Summary of insulin delivery, diet and
exercise, and glucose levels.
Uncover potential insulin delivery issues
related to glucose, meals, and/or activity.
Daily
Summary
Glucose readings, basal and bolus insulin
delivery, and carbohydrate and exercise
levels for one day.
See the effect of carbohydrates, exercise and
insulin delivery have on glucose levels.
Logbook
Diary
Logbook information such as BG readings,
carbohydrate entries, and boluses, grouped
by periods of the day.
Review past treatment decisions to
understand possible areas for improvement.
Data Table
All collected information over the
selected reporting period.
Better understand information in
other reports.
Modal Day
Periods
BG readings over a period of time, grouped
by periods in the day.
See how well your glucose stays within your
target range at certain periods of the day.
Modal Day
Hourly
BG readings over a period of time grouped
by the hour of the day.
See patterns in BGs related to the time of day,
as well as an overall summary of BG readings.
Trends
Summary
Statistics of glucose control, insulin usage,
and carbohydrate intake.
See average glucose readings, insulin usage
and carbohydrate intake.
Device
Settings
Insulin pump, CGM device, and meter
settings for a particular time and day.
View pump, CGM, and meter settings.
Sensor
Overlay
7 days of glucose sensor readings in a
single chart.
Identify recurring patterns from day to day.
Sensor
Weekly
Logbook
A table of sensor and Logbook information
broken up into pre-meal, post-meal,
evening and sleep periods.
See how boluses, basal insulin and external
events affect blood sugars.
Sensor
Overlay by
Meal
Sensor readings and glucose averages
around pre-set meal periods (breakfast,
lunch, dinner).
Review the effects of food, bolus insulin and
pre-meal glucose levels on post-meal control.
Data Export
(CSV)
Tool for exporting data out of CareLink into
other programs.
Export the data from CareLink to other
programs to allow for more detailed analysis.
= Shaded reports require the use of CGM to obtain sensor values.
CareLink Personal Software Reports I 19
CareLink Personal Reports I
Device Settings Report
Device Settings Report
This report shows the settings you have programmed into your pump or Guardian monitor — alarm
volume, the remote serial number, alert settings, etc.
It provides a helpful record of your device settings in case of settings loss or allows you to track how
your settings have changed over time. You can also protect device settings by using the Save Settings
feature in the Utilities > User Settings menu on your pump or Guardian monitor.
The date and time you select for your Device Settings report affects the data in the report.
Note This report does not show actual insulin usage, it only displays the basal rates that
have been programmed into the pump. It also shows which basal rate was active at the time
of upload.
20 I CareLink Personal Software Reports
CareLink Personal Reports I
1
The time and date for the
settings of the device listed
2
Shows your basal settings
and highlights the pattern
that is active at the time of
the upload.
3
Bolus settings include Bolus
Wizard settings such as
carbohydrate ratio, Bolus
Wizard targets, insulin
sensitivity, active insulin time
and any special features that
might be turned on.
4
Utility features and settings.
5
Sensor alerts and settings if
you are using a sensor. Review
to see if your sensor alerts are
appropriate – are you missing
alerts you need or getting
more than you desire?
6
If you have a pump enabled
with the Threshold Suspend
feature you will see that
setting here.
1
2
3
4
Device Settings Report
5
6
CareLink Personal Software Reports I 21
CareLink Personal Reports I
Quick View Summary Report
Quick View Summary Report
This report provides you with a summary of the following for the two-week period you select:
• Glucose control (including averages, highs and lows, number of readings, and hypo events)
• Insulin usage (including totals, percent basal and bolus, number and average of boluses, and
priming/filling information)
• Carbohydrate intake (if entered in the Capture Event feature, the Bolus Wizard,® or in
your Logbook)
• Exercise (if entered in your logbook)
• Infusion set changes (if entered in your logbook).
If you are using a sensor-enabled pump or a Guardian® monitor, this report may include glucose data
captured by the sensor. This is in addition to blood glucose information captured by a glucose meter.
If you run the Quick View Summary report for the Guardian monitor only, this report will look slightly
different from what is described here when insulin delivery is shown.
To retrieve certain data from a MiniMed pump or Guardian monitor, you must first have entered
the data by using the Capture Event feature, the Bolus Wizard Calculator, or by entering the data
in the logbook.
IMPORTANT If you enter the same data in multiple places (Capture Event, Bolus Wizard,
or the Logbook), you may see duplicate information. This data is entered manually on the
monitor or pump. It includes meter BG reading, exercise you do, boluses given carbohydrates
eaten and other events. Refer to the Capture Event instructions in the user guide for your
device. (The Capture Event feature is not available for the 515/715 or 522/722 pumps.)
22 I CareLink Personal Software Reports
CareLink Personal Reports I
Quick View Summary Report
1
Total number of glucose
readings and the percentage
you were above, below and
within your target glucose
range during the period.
2
Percentage of total readings
within target range.
3
Circles indicate your average
glucose for the day.
4
Black hash marks identify
Blood Glucose (BG) values
from your BG meter.
5
Vertical lines show your
range of glucose values for
the day.
6
Circles, lines, and statistics in
Blue are Sensor Glucose (SG)
values from the sensor.
7
Number of hypo events
during this period.
8
The total amount of insulin
you received each day, and
breakdown of bolus (solid
black bar) and basal (solid
white bar) insulin.
9
The number of Threshold
Suspends that occurred on
specific days.
10
The days you exercised.
11
When your infusion set
was changed.
1
3
4
5
2
6
7
8
9
10
11
CareLink Personal Software Reports I 23
CareLink Personal Reports I
Daily Summary Report
Daily Summary Report
The Daily Summary Report shows glucose readings, basal and bolus insulin delivery, and
carbohydrate and exercise levels for one day. This report helps you identify the cause and effect
of specific high and low glucose events.
There are four main sections to the Daily Summary Report, shown on the following page:
• Meter and Sensor Glucose Readings
• Insulin Delivery
- A
llows you to see the amount and type of insulin delivered throughout the day,
as well as any pump alarms and times when delivery of insulin was suspended.
- If you have a Threshold Suspend enabled pump, the dashed red lines indicate when the
pump suspended insulin delivery due to sensor value reaching the Threshold Suspend limit.
- An alarm icon will show at the beginning of the suspend.
- A second alarm icon will show if the pump resumes basal
insulin without user interaction with the pump.
• Carbohydrates and Exercise
- Carbohydrates: Get the most out of CareLink by entering carbohydrate information in Capture
Events in your insulin pump or Guardian or by using the Logbook feature in CareLink.
For insulin pump users, every time you use the Bolus Wizard feature, your carbohydrate
information automatically gets recorded for you to view in your CareLink reports.
- Exercise: Enter time, duration and intensity (low, medium, high) of exercise events using the
Logbook feature in CareLink or add the exercise icon in Capture Events on your insulin pump
or Guardian.
• Summary
All three graphs on the Daily Summary Report are in the same chronological order and aligned
throughout the day. Use these graphs together to understand the effect that carbohydrates, exercise
and insulin delivery have on your glucose levels.
IMPORTANT To retrieve certain data from a MiniMed insulin pump or Guardian monitor,
you must first have entered the data by using the Capture Event feature, the Bolus Wizard®
Calculator or entered the data in the CareLink Personal Logbook.
You do not want to enter the same data in multiple places (Capture Events, Bolus Wizard,
CareLink Logbook) or you may see duplicate information.
24 I CareLink Personal Software Reports
CareLink Personal Reports I
1
4
3
2
5
1
Blue line represents
sensor readings.
2
Green shaded area
represents the target
glucose range set in
the preferences section
of CareLink.
3
Black circles represent linked
BG meter readings, marked
“Paradigm BG”.
4
Black squares represent BG
readings manually entered
into the device.
5
The red line is the low
glucose indicator set in
the preferences section of
CareLink. The default setting
is 60 mg/dL. If your device
has a Threshold Suspend
feature you may want to
set this value to match your
Threshold Suspend value.
6
Sensor alarm received.
7
Shows basal and bolus
insulin. This looks different
if you are using Guardian.
8
Pump alarm received
9
Threshold Suspend with
auto resume of basal insulin
after 2 hours identified by
a dashed red line with
alarms at the start and
end of the event.
6
7
10
9
11
Daily Summary Report
8
12
10
Threshold Suspend with
response by user
11
Manual suspend by user
12
The carbs eaten and exercise
information (if entered).
CareLink Personal Software Reports I 25
CareLink Personal Reports I
Sensor Daily Overlay Report
Sensor Daily Overlay Report
The Sensor Daily Overlay Report shows 7 days of glucose sensor readings in a single
chart. Each day has a different color tracing so you can easily tell them apart, allowing
you to identify recurring patterns from day to day or at specific times of day.
The Sensor Daily Overlay Report also helps you identify specific days that you may want to
look at in more detail with the Daily Summary Report. If you see an event in your report that
appears out of the ordinary, use the Daily Summary Report to identify its cause.
For more detail on reading your reports, use the Understanding My Reports tab in
CareLink or refer to the CareLink module in myLearning.
26 I CareLink Personal Software Reports
CareLink Personal Reports I
Sensor Daily Overlay Report
1
This graph shows a 7-day
overlay of sensor glucose
values. Each day is shown
with a different color.
2
The
green shaded area
represents the target
glucose range set in
the preferences section
of CareLink and shows
whether you are meeting
your goals for glucose
control. The default setting
is 70-140 mg/dL.
3
The red line represents the
low glucose indicator set in
the preferences section of
CareLink. The default setting
is 60 mg/dL. If your device
has a Threshold Suspend
feature you may want to
set this value to match your
Threshold Suspend value.
4
Specific information
regarding each day’s sensor
readings and calibrations.
5
The number and
type of excursions outside
the target glucose range.
6
The amount of time spent
above, in and below your
target glucose range on a
pie chart.
1
2
4
3
5
6
CareLink Personal Software Reports I 27
CareLink Personal Reports I
Sensor Overlay by Meal Report
Sensor Overlay by Meal Report
The Sensor Daily Overlay by Meal Report shows your glucose values related to meal times.
You choose up to seven days of glucose tracings you want to see. This report layers the tracings
on top of each other so you can compare the days to each other in time blocks associated with
Breakfast, Lunch and Dinner. Each day has a different color tracing so you can tell them apart.
Averages and totals across all days in the report are displayed in tables for each meal, evening and
sleep time period. In addition, pie charts show the duration of time above, below and within target
range for each time period.
The time periods and target ranges used for this report come from the Advanced Intraday Periods
Preferences you set on the Preferences screen.
You can check the “Guidelines for setting Advanced Intraday Periods” section of the User Guide for
more information on how to change these time periods and target ranges.
28 I CareLink Personal Software Reports
CareLink Personal Reports I
Sensor Daily Overlay by Meal Report
1
A 7-day overlay of glucose
readings at the breakfast,
lunch and dinner periods set
in the CareLink preferences.
The overlay graph will only
show SG readings for days
when carbohydrates have
been entered during the
preset meal period.
2
The range of glucose
readings for the preand post-meal period
over 7 days.
3
The daily average
glucose reading for each
meal period.
4
The duration and
percentage of time spent
above, in and below the
target glucose range for
each meal period.
1
2
3
4
CareLink Personal Software Reports I 29
CareLink Personal Reports I
Applying Personal Software in Your Life
CareLink offers you and your healthcare professional access to information to help you make better
therapy decisions and improve your glucose control.
THERAPY ADJUSTMENT WITH CareLink
In this section, you will see a number of examples of CareLink reports with sample information. These
reports may identify a need for possible adjustments, such as:
Preventing Nocturnal Hypoglycemia
Improving Insulin Dosing
Fine-Tuning Alarm and Alert Settings
The following reports show examples that are intended to help clarify the types of trends and
patterns you may see in your own reports. Use this information as a reference when reviewing your
reports and looking for possible trends or patterns.
30 I CareLink Personal Software Reports
CareLink Personal Reports I
Preventing Nocturnal Hypoglycemia
Preventing Nocturnal Hypoglycemia
Low glucose levels at night are a common issue for many people living with diabetes.
1
2
1
A clear trend of nocturnal
hypoglycemia, heading
lower throughout the
night, as shown by the
average SG line.
2
Low SG shows SG levels
as low as 40 mg/dL during
the night.
3
Shows the duration and
percentage of time spent
below 60 mg/dL.
If you see a trend of low
glucose levels at night
in your CareLink reports,
discuss this with your
healthcare professional, as
you may need an insulin
dose adjustment.
3
CareLink Personal Software Reports I 31
CareLink Personal Reports I
Improving Insulin Dosing
Improving Insulin Dosing
As you adjust to insulin pump therapy and improve your control, you may notice trends associated
with too much or not enough insulin.
Quick View Summary
Jun 18 – Jul 1, 2012
Pump: Paradigm Revel - 523
Glucose - High / Low / Average (mg/dL)
Out of Range
Meter (BG)
Target Range
Hypo
Distribution
2
1
BG Stats
Average
High
Low
Standard Dev.
# of Readings
#Hypo Excurs.
Mon
Jun 18
189
202
173
NA
3
0
Tue
Jun 19
195
306
118
NA
3
0
Wed
Jun 20
197
263
154
NA
3
0
Thu
Jun 21
206
229
184
NA
2
0
Fri
Jun 22
187
197
177
NA
2
0
Sat
Jun 23
272
364
181
NA
2
0
Sun
Jun 24
276
287
265
NA
2
0
Mon
Jun 25
200
209
190
NA
2
0
Tue
Jun 26
275
366
228
NA
3
0
Wed
Jun 27
215
299
149
NA
3
0
Thu
Jun 28
254
335
197
NA
3
0
Fri
Jun 29
328
426
251
NA
3
0
Sat
Jun 30
448
448
448
NA
1
0
Sun
Jul 1
346
346
346
NA
1
0
Average or
Total
243
448
118
81
33
0
Insulin Delivery (Units)
Total (U)
Bolus (%)
Basal (%)
if ≥ 50
Total Insulin
Basal Insulin
Bolus Insulin
# of Boluses
Average Bolus
Fill Amount
Mon
Jun 18
47.7
26.3
21.4
7
3.06
Tue
Jun 19
45.2
27.0
18.2
4
4.55
Wed
Jun 20
44.4
26.3
18.1
4
4.52
Thu
Jun 21
43.6
25.2
18.4
6
3.07
2.2
Fri
Jun 22
41.4
24.1
17.3
4
4.32
Sat
Jun 23
43.8
23.2
20.6
5
4.12
Sun
Jun 24
40.9
23.7
17.2
5
3.44
Mon
Jun 25
37.2
23.8
13.4
5
2.68
1.3
Tue
Jun 26
40.5
22.6
17.9
4
4.48
Wed
Jun 27
40.7
24.2
16.5
4
4.12
Thu
Jun 28
48.8
24.2
24.6
5
4.92
Fri
Jun 29
46.0
24.2
21.8
6
3.63
2.1
Sat
Jun 30
46.2
24.2
22.0
4
5.5
Sun
Jul 1
43.2
24.2
19.0
4
4.75
Average or
Total
43.5
24.5
19.0
4.79
3.98
1.87
102
110
96
40
47
30
20
42
90
96
65
40
0
0
65
NA
0
Logbook
Carbs (grams)
Exercise (min)
Set Changes
Very little time spent within
the target glucose range.
2
Significant percentage of
time spent above the high
glucose target.
(14 days)
HbA1c: No Data
In Range
1
32 I CareLink Personal Software Reports
If your CareLink reports
show a trend of glucose
levels outside of your target
glucose range, discuss
this with your healthcare
professional, as you may
need an adjustment of your
insulin doses.
CareLink Personal Reports I
Improving Insulin Dosing
Improving Insulin Dosing – CGM
As you adjust to CGM and improve your control, you may notice trends associated with too much
or not enough insulin.
1
1
Very little time spent within
the target glucose range.
2
Significant percentage of
time spent above the high
glucose target.
If your CareLink reports
show a trend of glucose
levels outside of your target
glucose range, discuss
this with your healthcare
professional, as you may
need an adjustment of your
insulin doses.
2
CareLink Personal Software Reports I 33
CareLink Personal Reports I
Fine-Tuning Alarm and Alert Settings
Fine-Tuning Alarm and Alert Settings
Too many alarms and alerts are a common concern when using CGM. CareLink helps to show when a
change should be made to your alarm or alert settings.
1
Excessive alarms and alerts
can cause difficulty and
frustration with the system.
If you see a similar pattern
in your reports, consider
modifying your alert or
snooze settings.
1
2
2
Sensor alarms and alerts
throughout the day.
Pump alarms – If you have a
Threshold Suspend enabled
pump and notice a pattern
of Threshold Suspend events
occurring in your reports,
discuss this with your
healthcare professional.
Alarms and alerts
should serve as a helpful
reminder and should not
be a nuisance.
34 I CareLink Personal Software Reports
Appendix I
Understanding, Generating and Viewing Reports
Understanding, Generating and Viewing Reports
1
Understanding Reports –
When you click this link,
CareLink will display
information describing
the report you generated.
Also, where appropriate, it
explains what to look for in
the results.
2
Generating Reports –
Reports are displayed in PDF
format. They can be viewed
online, saved, printed or
emailed. You can share your
reports with your healthcare
professional to help them
make decisions about your
treatment regimen.
2
1
3
Reports can be generated
one at a time or in batches.
Batch reporting allows you
to choose a group of reports
you would like to see and
generate them all at once.
3
Viewing Reports –
Select a report from the
menu on the left-hand side
of the screen. Select the date
or date range for the report
and click the Go button. Your
report is displayed as a PDF
file in a separate window.
Note There is an option to download and install Adobe Reader. The link is located on the
bottom right hand side of the Reports page.
CareLink Personal Software Reports I 35
Appendix I
Saving, Printing and Emailing Reports
Saving, Printing and Emailing Reports
1
Saving Reports – To save your report, click
Save a Copy on the Adobe® Acrobat® toolbar,
as shown. Type a name for the report in the
file name field and click Save.
2
Printing Reports – Once the report you
generated is displayed, click Print on the
Adobe® Acrobat® toolbar to open the print
dialog box and print the report.
3
Emailing Reports – To email a report to
your healthcare professional, Microsoft®
Outlook® users can simply click Email on the
Adobe Acrobat toolbar. An email form will
automatically open with the report already
attached. Simply type in your healthcare
professional’s email address and click Send.
1
2
3
If you have a different email program, be
sure your report is saved where you can
easily find it. Start a new email message to
your healthcare professional and use the
Attach function to embed the report in
the message.
Be sure to get your healthcare professional’s
permission before emailing reports to them.
Also, be aware that email may not be a
secure form of communication. Your
medical information contained within an
emailed report is no longer protected under
the security of the CareLink Personal
Software system.
carelink pro
Medtronic Diabetes also offers a professional version of CareLink, CareLink Pro. It allows your
healthcare professional to view your CareLink information so you don’t have to email or print your
reports. Ask your healthcare professional if they have this software and are able to use it to access
your CareLink reports.
36 I CareLink Personal Software Reports
www.MedtronicDiabetes.com
Medtronic, Inc. | Diabetes
18000 Devonshire Street
Northridge, CA 91325
USA
1-800-646-4633
Mac OS is a registered trademark of Apple Inc. CONTOUR is a registered trademark of Bayer.
13-12132 09/2013
9501483-012 20130930 ©2013 Medtronic MiniMed, Inc. All rights reserved.
Adobe Acrobat is a registered trademark of Adobe Systems, Inc. Microsoft, Windows, Vista, Internet Explorer, Excel and Outlook are registered trademarks of Microsoft Corporation.
MiniMed, Paradigm, Bolus Wizard, CareLink and Dual Wave are registered trademarks of Medtronic MiniMed, Inc.
Still have questions?
Visit www.medtronicdiabetes.com/carelinksetup
or call our Software Support Team at
1.800.646.4633, option 1
M-F, 7am-7pm Central Time.