1
!
III
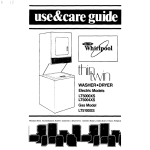
WASHER • DRYER
Electdc Models
LT5000XS
LT5004XS
Gas Model
LT5100XS
Microwave Ovens, Trash Compactors, RoomAir Conditioners, Oehumtdifiers, Automatic Washers, Clothes Dryers, Freezers, Refrigeral
LL
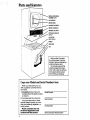
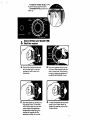
Parts and features
MODEL AND SERIAL
NUMBER PLATE
LINT SCREEN
--
DRYER DRUM
WASHER CONTROLS
DRYERCONTROLS
WASHER LID LATCH
OPTIONAL EXHAUST
OUTLET
LINT FILTER
[Not Shown]
BASKET
AGITATOR
TUB
Remove the Consumer
Buy Guide label. It will be
easier to remove before the
washerodryer
is used.
You should wipe out the
washer basket and dryer
drum with a clamp cloth before using to remove dust
from storing or shipping.
Copy your Model and Serial Numbers
When you need service or call
with a question, have this information ready:
t. Complete Model and Serial
Numbers (from the plate located
as shown).
2. Purchase date from sales slip.
Copy this information in these
spaces. Keep this book, your warranty and sales slip together in a
handy place.
Please complete and mail
the Owner Reglstratlon Card
furnlshed wlth thls product.
here
Model Number
Serial Number
Purchase Date
Service Company Phone Number
LLI
Contents
Page
PARTS
AND
FEATURES
.......
BEFORE USING YOUR
WASHER.DRYER .............
IMPORTANT SAFETY
INSTRUCTIONS ..............
WASHER OPERATING
INSTRUCTIONS ..............
Starting Your Washer .......
What Happens in Each
Cycle ...................
OTHER OPERATING
INSTRUCTIONS ..............
For a Rinse and Spin .......
For a Drain and Spin .......
For a Soak or Pre-Wash ....
Cleaning the Lint Filter .....
DRYER OPERATING
INSTRUCTIONS ..............
Starting Your Dryer .........
Automatic Cycles .........
2
3
d
6
6
8
12
12
12
12
13
13
13
14
@t987 Whirlpool
Timed Drying ..............
Selecting a Cycle
.........
Gentle Heat ...............
DRYING TIPS ................
FLUFFAIR Setting ...........
TUMBLE PRESS® Setting .....
Mixed Loads ..............
Drying Times ..............
Automatic
DRI-MISER®
Control ..................
LINT SCREEN ................
LINT REMOVAL ...............
CARING FOR YOUR
WASHER.DRYER .............
Cleaning Dryer Interior ....
Vacation Care ............
Winterizing
................
IF YOU NEED SERVICE OR
ASSISTANCE ................
WASHER WARRANTY ........
Page
15
15
15
16
16
16
16
16
16
17
17
18
18
19
19
20
24
Corporation
Before using your
THIN TWIN* washer.dryer
For best washing and drying results, you must take some very important
steps before, during and after each load:
1. Prepare and sort each load for washing, (see your "Laundry Guide").
2. Measure and add detergent or soap to washer, (see your "Laundry
Guide").
3. Load the washer properly, (see your "Laundry Guide").
4. Select the water temperature, load size and cycle recommended
for
the fabrics before starting the washer, (see pages 6 and 7).
5. Add other laundry aids to the washer according to instructions,
(see your "Laundry Guide").
6. Properly sort the load for drying, (see your "Laundry Guide").
7. Select the right drying cycle and time for the fabrics, (see pages 14-16).
8. Remove and hang or fold items immediately
after drying.
Important safety instructions
_
injury to persons when using your washer/dryer,
follow
WARNING - To reduce the risk of fire, electric shock, or
basic precautions,
including the following:
Read these Laundry Instructions for important use and
safety information
before using your washer/dryer.
NEVER wash or dry items cleanec _,
was_ed, soaked in or spotted with wax,
paint, gasoline, or flammable
fluids in
the washer. The fumes can create o
FIRE HAZARD or EXPLOSION. ALWAYS
hand launder and air dry fabrics containing these materials.
Use only dryer
cally labeled
the dryer.
FIRE HAZARD
rials can result
NEVER allow children to operate, pla_ '
with, or crawl inside the washer/dryer
Close supervision of children is necessary when the washer/dryer
is used
near children.
• allowing
lint to build-up
inside the
dryer or exhaust system - cleaning
should
be done
by a qualified
person.
Clean lint screen before or after each
load.
When discarding
an old washer/dryer,
ALWAYS remove the lid and door I_o
prevent accidental
entrapmer_t.
NEVER reach into the washer/dryer
unr!
all the motion stops. If the lid is opened
while the washer basket is spinning, the
basket will automatically
stop Jr, a te_:
seconds.
DO NOT install or store washer/dryer
where it will be exposed to the weather.
DO NOT tamper with the controls.
You are personally
responsible
for
making sure that your washer/dryer
is
Installed,
repaired
and parts replaced by a qualified person.
NEVER use or store flammable
fluids
(dry cleaning
solvents, gasoline,
kerosene) in or near your washer/dryer.
Do
not add flammable
fluids to the wash
water. The substances
give off vapors
that can create
a FIRE HAZARD or
EXPLOSION.
and DAMAGE to matefrom:
• drying rubber, rubber-like
and
sensitive materials with heat.
heat
WARNING: If hot water has not been
used recently
(usually two weeks or
longer), hydrogen
gases may build up
in the water heater and the hot water
pipes. HYDROGEN GAS IS EXPLOSIVE.
To prevent injury or damage,
before
using your washer, turn on all hot water
faucets and allow water to run for several minutes. This will allow gases to escape. Do not smoke or use any open
flame near the faucet while it is open,
DO NOT let dust, paper, rags, chemicals, etc. pile up around or under the
washer/dryer
The washer/dryer
must be electrically
grounded.
See
the
"Installation
InstructJons_'
- SAVE THESE INSTRUCTIONS
4
fabric softeners specifias not being harmful to
-
I:11
Additional
Safety Instructions
ALWAYS shut off the gas valve
leaving on vacation.
before
ALWAYS unplug the power supply cord
before attempting
to service the washer/dryer. Shut off GAS VALVE if yours is a
gas dryer.
• FOR YOUR SAFETY •
IF YOU SMELL GAS:
1. OPEN WINDOWS.
2. DON'T TOUCH ELECTRICAL SWITCHES,
3. EXTINGUISH ANY OPEN FLAME.
4. IMMEDIATELY CALL YOUR GAS
SUPPLIER.
DO NOT machine
wash glass fiber
materials. Small particles can stick to
fabrics washed
in following
loads
and cause skin irritation.
HAZARDOUS
FUMES can be formed
if
chlorine
bleach
is used in the same
wash as ammonia
or acids such as vinegar
or rust remover,
ALWAYS store detergent,
laundry
and
other
materials
in a cool,
place where
- in a locked
ALWAYS
read
children
cabinet
and
can't reach
if possible,
follow
aids
dry
them
instructions
on packages
of detergent
and laundry
aids
especially
warnings
and
precautions,
and Your Responsibilities
NEVER operate the washer/dryer
• it is not working right.
• it is damaged.
• parts are missing.
• all panels are not in place.
if...
You are personally
responsible
for
making sure that your washerldryer:
• is properly
maintained.
• is properly installed and leveled in a
well ventilated
room on a floor that
can support the weight.*
• is located
in an area where the temperature
is above
45°F (7.2°C)
because...
- the dryer will not operate properly
at cold temperatures.
- freezing temperatures
can damage the washer.
• is connected
to the proper electrical
supply, outlet, water supply, plumbing
fixtures, drain, and dryer exhausting
system.*
• is not installed
against
drapes
or
curtains.*
• is used only for jobs normally
expected of home automatic
washer/
dryers.
*Refer to the "Installation
Instructions"
for complete
information.
5
Ili
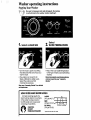
Washer operating instructions
Starting Your Washer
aBesorted
in the and
washer
starting
sure toload
measure
add before
detergent,
thenit.place
1.
Select
a LOAD SIZE
• Turn the knob to point at a setting
that describes the size of load you
want to wash.
• The washer can be set for EX
SMALL, MEDIUM or LARGE loads.
Select the water level that
matches the load size.
See your "Laundry
on load sizes.
2.
Select
WATER TEMPERATURES
• Match the wash water temperature
to the type of fabrics and soils being
washed.
Recommended
wash temperatures
can be found in your "Laundry
Guide:'
Guide" for details
LOAD SIZES AND WATER LEVELS
+'+ liar
(11,3 gal./42.7
MED
L)T'--
II
To hold the washer lid up, lift the
lid until it snaps past the latch.
To release the lid, push the lid
latch up.
CYCLE and
3. Select
Start the washer
A.
WASH TIME;
Push in the Control Knob and
turn itto the right. It must be
pushed in and turned only
clockwise.
Co Start the washer by pulling out
the control knob. The washer
will fill to the level you set with
wash water of the selected
temperature.
After filling, the
washer will agitate for the
selected number of minutes.
B, stop on a number in the cycle
you want. The numbers are minutes of wash time. The drawing
shows 8 minutes of agitation in
the REGULAR NORMAL Cycle.
D°
To stop the washer at any time,
push in the Control Knob. To
restart the washer, pull out the
Control Knob.
Ili
What Happens
in Each Cycle*
Each cycle has different agitation and spin speeds designed for different
kinds of fabrics. Numbers on the dial in each cycle are the minutes of WASH
agitation time.
When the Cycle Control Knob is set to a number and pulled out, the
washer fills before agitation and timing starts. After agitation starts, the knob
REGULAR HEAVY Cycle
I FILLII
WASH
I i WAS"
to illl
Selected
Minutes
ill Low
lO
Minutes
I Level II!'1 High IWl
j
j-j
Speed
I--I
Speed
A cycle for sturdily constructed fabrics that are
heavily soiled.
REGULAR NORMAL
START
_
10
Cycle
6
REGULAR/
DRAIN
No
Agitation
A cycle for sturdily constructed fabrics that are
moderately
soiled.
PERMANENT PRESS C vcle
off Io
6
Pus_ STOP
DRAIN
(Pause)
PERMANENT
PRESS
PARTIALI_
M_
wAnM
A special cycle with the
necessary cool-down
rinse which helps keep
wrinkles from setting
into Permanent Press and
some synthetic fabrics.
COOL
DOWN
REFILL I_
!1i
turns clockwise
until it points to OFF and the cycle ends.
NOTE: You may hear the sound of water spraying during the spin parts of
some cycles. In some cycles, cold water is sprayed on the spinning load to
help with the rinsing.
Gentle
Wash System
For better fabric care in the REGULAR and PERMANENT PRESScycles, the
agitation speed is reduced
during the last few minutes of wash time.
High
141 Low
Ag iNa_ion
I R'"s_
IIBI
I soee°
_'"sE
Ii_ DRA,N
II
RINSE
Low
Speed
I _RAIN
I I SPINI
No 141 High I
Agitationllll
Speed
I
I!'1 3 SprayI
l--lRinses I
I W_HI
s_° I
NOTE: Always
for permanent
use cold rinse water
press fabrics.
High
Speed
3 Spray
Rinses
SP,
N J
II!
KNITS/GENTLE Cycle
$
FLL,
o'W
H'l IWI' SH
jSelected
6
Minutes
I Level I_I
KNITS
12 o_
GENTLE
A cycle that gently washes
and spins delicate items
and washable
knits.
i
I_
Low IV
Minutes
Minutes
(Pause)
Low
Spee_
Alndicates the machine is pausing
for a brief soak period.
SOAK and PRE-WASH Cycles
_
I-_"H'--I I _
I I w_s, I
Ll,,,,,_u,os
Ill"'.u"es
Ill,,,,,.u*.s
l/
I L'V°'
i'1_:_:o
I'1,'0"o"o.1'1
s0..c,
I"
No
High
_Pre-wash
Brief periods of agitation
and soak time help remove
heavy soils and certain
stains that need extra
pretreatment.
Use recommended amount of detergent. The SOAK Cycle
should always be followed by a Wash Cycle.
setting
begins here.
[See page
12).
SUPER WASH Cycle
I
FILL
II4NER WAI4
;
O_
mm
Use for washing heavily
soiled loads that require
maximum soil removal.
Double the amount of
detelgent recommended when using
the SUPER WASH
Cycle.
10
W._HI
IPARTLALJ
se,:o,.01Li
,,,,,r._u.
Ill NDR_o
NILI__2'_°:',I'L
Level
REGULAR/_HEAVY_
1281_
II
I'1_=°I'l_°"°"°"l'l-_=v=_-i
'
]
IIi
_,,"_,o.l/I
s_ Illo:.Ill°_:_I
I'l_,_=l'l
°'"'"I'l
.o
I,I
,o_
r°"°"°°lrJ
_°
I
Special care is needed when soaking or pre-washing
See your "Laundry Guide" for proper use of this cycle.
After the Partial Drain, the
washer automatically
refills
and goes in the REGULAR/HEAVY
Cycle. Be sum to use enough
detergent for the double wash.
laundry.
J
I
Ili
Other operating instructions
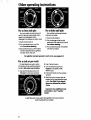
For a rinse and spin
For a drain and spin
You may need an extra rinse and
spin for heavily soiled loads which
need more detergent. (Extra
detergent can require an extra rinse.]
Your washer can be set to drain
and spin out water.
1. PushControl Knob in.
2. Turnclockwise to the bar just
before the OFFarea in any cycle.
See above drawing.
3. Pull Control Knob out. The washer
will drain and spin.
t. Push Control
Knob in.
2. Turn clockwise to any • on the
dial. See above drawing.
3. Pull Control Knob out. The washer
will fill to selected level; agitate 2
minutes; drain and spin.
For agltatlon
and spin speeds
In each cycle, see pages 8-11.
For a soak or pre-wash
For best results, use warm water
for soaking or pre-washing
stained
laundry. Hot water can set stalns.
1. Use recommended
amount of
detergent or pre-soak product.
2. Push Control
Knob in.
3. Turn clockwise to point at a
number in the SOAK or PREWASH Cycle.
4. Pull Control Knob out. The washer
will start.
5. When the cycle is over, add detergent for the next selected wash
cycle. The SOAK Cycle should
always be followed by a Wash
Cycle.
Important: See addltlonal
Informatlon
In your "Laundry
Gulde"
care
Tostartthe soak or pre-wash with agitation, the Cycle Control
Knob mustpoint to a number.
12
Cleaning
the lint filter
Clean filter after every load for best
filtering results. NOTE: The load type
will vary the amount of lint build-up.
To clean:
1. Lift off the agitator barrel.
2. Wash or wipe the filter clean in the
bottom of the agitator barrel. The
filter is not removable.
3. Replace the agitator
snap into place,
barrel and
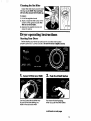
Dryer operating instructions
Starting Your Dryer
Before starting your dryer, be sure laundry is sorted and loaded
properly, (see your "Laundry Guide"). Be sure the door is tightly €losed.
t,
Select
CYCLE and TIME
Turn the Control Knob either way
to point to the time setting you
want in the cycle you want.
2.
Push the START Button
The dryer will start tumbling
when you push the STARTButton.
continued on next page
13
Ill
3,
To Stop and
Restart the Dryer
4,
Changlng the Setting
The seffing can be changed at any
time by turning the Control Knob
to a new setting.
The Cyole
Control Knob should
point to an OFF area when the dryer Is
not Is use. If the dryer Is stopped
before the cycle Is finlshed, turn the
Cycle Control Knob to an OFF area.
To stop, open the door (or turn
the Control Knob to the OFF area).
To restart, close the door and
push the STARTBufton.
The automatic
cycles
The automatic
cycles allow you
to select the degree of dryness you
prefer for the clothes being dried.
The Cycle Control Knob will not
move until the clothes load is
almost dry, or the COOL-DOWN
portion of the cycle has been
reached. After COOL-DOWN, the
knob automatically
moves to an
OFF area and tumbling stops.
Use
AUTOMATIC
REGULAR to
dry heavy
and mediumweight cotton items. The load tumbles
without heat during the last 5 minutes.
This helps make the load easier to
handle.
Use
AUTOMATIC
PERMANENT
PRESSto dry
permanent
press, knits and other synthetic fabrics.
The load tumbles without heat durlng
the last 10 mlnutes. Thishelps keep
wrinkles from setting in, and makes the
load easier to handle.
14
Forthe first few loads, setthe Control
Knob to point to an * in either automatic cycle. When the dryer stops,
feel the dried items.
• Ifitems are drier than you like,use a
setting to the right if the * the next
time you dry a similar load.
• If items are not as dry as you like,
use a setting to the left of the * the
next time you dry a similar load.
!I
Timed drying
Use the TIMED DRYING Cycles for
any load you want to dry by time.
• Turn the Control Knob to the number
of minutes you want- from 10 to 50.
• The last 10 minutes of this cycle are
without heat- a cool-down
time.
This helps make the load easier to
handle.
Selecting
a Cycle
TYPE OF LOAD
COTTON - Unens
EXTRAHEAVY- Bedspreads, mattresspads, quilts ....
HEAVYWEIGHT
FABRICS
- Towels,jeans, corduroys,
work clothes ......................................
MEDIUMWEIGHTCOTTONS- Sheets, pillowcases,
cotton underwear, diapers ........................
LIGHTWEIGHT
CoI"rONS- Batistes,organdies, lingerie
SUGGESTED
CYCLE
AUTOMATIC
REGULAR
PERMANENTPRESS,SYNTHETICSAND BLENDS
HEAVYWEIGHT
FABRICS
- Workclothes, Jackets,
raincoats .........................................
MEDIUMWEIGHTFABRICS- Shirts,play clothes,
sheets,slacks .....................................
LIGHTWEIGHT
FABRICS-Lingerie, blouses,dresses ....
AUTOMATIC
PERMANENT
PRESS
KNITS
HEAVYWEIGHT-Cottons,rayons, blends, T-shirts,
slacks,shirts......................................
LIGHTWEIGHT-Synthetics{polyester,acrylic, etc.]
and blends, lingerie, blouses,dresses .............
AUTOMATIC
PERMANENT
PRESS
LIGHTWEIGHTAND DELICATEFABRICS
Sheer Curtains (2 or 3 panels] .......................
Gauze, lace, etc ....................................
AUTOMATIC
PERMANENT
PRESS
RUBBER,PLASTIC, HEAT-SENSITIVE
FABRICS
FOAM RUBBER-Pillows,bras, stuffedtoys .............
PLASTIC-Shower curtains,tablecloths ..............
OLEFIN.POLYPROPYLENE,
SHEERNYLON ...............
FLUFFAIR
20 MIN.
20 MIN.
15-20 MIN.
Gentle Heat
The dryer automatically
reduces the heating settings in the automatic
cycles. During the last few minutes of these cycles the dryer gradually
reduces to a lower heat se1?ing.Thishelps prevent overdrying.
_5
IIi
Drying tips
TUMBLE
PRESS ®Setting
FLUFF AIR
The dryer does not heat when the
Control Knob is set on FLUFFAIR. This
setting can be used to fluff bedding,
plastic tablecloths,
foam rubber
pillows, stuffed toys, sneakers, etc.
The TUMBLEPRESSsetting
removes wrinkles from dry clothing
such as items that may have been
packed
in a suitcase, closet, or items
not removed from the dryer.
The load will tumble in heated air
for 10 minutes. The heat shuts off and
the dryer continues to tumble the load
for 5 more minutes.
For best results, TUMBLEPRESS
only a few items at a time. Put them
on hangers or fold them as soon as the
dryer stops.
Mixed loads
Drying
When drying a load with different
kinds and weights of fabrics, use
the cycle suggested for the lightest
fabrics. When the dryer stops,"
remove dry items and reset the
control.
Drying times will vary depending
on:
• amount of moisture in the clothes.
• type and weight
• size of the load.
Control
DRY-MISER
of the fabric.
• room temperature
around the
dryer.
• temperature
of the wash rinse
water.
• amount of lint in the lint screen.
To help reduce wrinkles, take the
load from the dryer as soon as
tumbling stops. This is very
important ror permanent
press,
knits and other synthetic fabrics.
Automatic
times
• dryer temperature
®
selection.
see your "Laundry Guide" formore
information.
The thermostatsenses the airtemperature. The dryer automaticallyshuts
(_ff
when theselected dryness isreached.
16
Ill
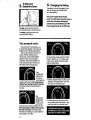
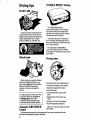
Lint screen
Clean the lint screen before each load. A screen blocked
can increase drying time and may be a FIREHAZARD.
The lint screen is
inside the dryer
Pull
drum, on the
straight
back wall.
out.
.
1. Use the finger
holes to pull
the lint screen
straight out.
=
by lint
Lightly
squeeze the
body, as
shown, while
pulling the
cover off.
Roll lint off the
screen with
your fingers.
Squeeze body;
DO NOT rinse
pull cover off.
or wash the
screen. Wet lint is hard to remove.
4.
Replace the cover on the body
the lint screen.
of
5. Push the lint screen straight back
in until it clicks into place.
Lint removal
Lint can gather inside the dryer and create a FIRE HAZARD. This lint
should be removed at least every 2 to 3 years, or more often, depending
on dryer usage.
Thermostats
i
Heater Box
III
IJl_
Thermostats
Heater Box
\
Exhaust Duct Outlet
Exhaust Duct Outlet
Heat Element Terminals
ELECTRIC DRYERS
Cleaning
should
be done
WARNING:
O
hazard - unplug power
e Avoid
shock
supply electrical
cord or turn
off
electrical
power.
• Avoid Injury or damage - do not
put hands inside cabinet.
• Make sure dryer is cool.
GAS DRYERS
only by a qualified
person.
1. Remove back panel from dryer.
2. Avoid touching wires and
thermostats.
3. Remove lint from shaded area see art- with a soft brush or
vacuum cleaner.
4. Replace back panel, reconnect
and relevel the washer/dryer.
17
I!!
Caring for your washer.dryer
Sharp or heavy objects should
never be put on or in the washer
dryer. Check pockets for bolts,
nuts, etc.
or
When not washing, keep both water
faucets turned off. This takes the pressure off the water inlet valve and
hoses.
Some pretreatment
products
can damage
dials, consoles and finish.
Do not use these products on or near
your washer or dryer.
Never use the washer to...
• soak for more than 2 hours.
• soak with chlorine bleach.
Cleaning
dryer interior
• soak with vinegar or other acids.
• soak or store urine soaked clothes,
Never leave or store wet, damp or
dry laundry in your washer or dryer.
Garments which contain unstable
dyes, such as denim blue jeans or
brightly colored cotton items, may
discolor the dryer interior. If the
interior is discolored,
clean with one
of the following methods to avoid
staining later load items.
Powdered laundry detergent and
very warm water
After washing, use a soft dry cloth
to wipe the outside and inside dry.
Leave washer lid up until the basket
is dry. Wipe up all spills. Spills
allowed to remain may dull or damage
the finish.
Remove loose and sharp objects
from pockets and cuffs before washing
or drying - pins, buckles, etc. Close
metal zippers.
18
Make a paste with detergent and
very warm water. Apply paste to
a soft cloth and scrub area until
all excess dye is removed. Wipe
thoroughly
with a damp cloth
Tumble a load of rags - ORLiquid spray household
cleaner
Spray on stained area. Rub with
a cloth until all excess dye is
removed. Tumble a load of rags.
Vacation care
t. Turn off both water faucets to
take pressure off inlet valves
and hoses.
2. Unplug power supply cord or
turn off electrical
power supply.
3. Clean lint screen and lint filter.
Winterizing
Install and store your washer/dryer
where it won't freeze. Because
some water stays in the washer, freezing can damage
it. If your washer/
dryer is stored or moved during freezing weather, winterize it.
t. Shut off both water
faucets. Disconnect
and drain water
inlet hoses.
To use the washer
2. Put a quart of R,V.
or automobile
type
antifreeze in the
basket.
again...
1. Flush water pipes and hoses.
2. Reconnect water inlet hoses.
3. Turn on both water faucets.
3. Run washer on a
drain and spin setting (see page 12)
for about 30 seconds
to mix antifreeze
and water.
4. Run the washer
through a
complete cycle
with one cup of
detergent to clean
out the antifreeze.
19
lli
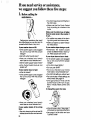
If you need service or assistance,
we suggest you follow these five steps:
1. Before calling for
assistance...
• The drain hose should not fit tightly in
the drain pipe.
• Make sure that the Cycle Control
Knob is pointing to a number in the
cycle.
Make sure the drain hose is higher
than the water level in the washer. If
It Isn't...
Performance problems often result
from Iiffle things you can find and fix
yourself without tools of any kind.
If your washer does not fllh
• Is the power supply cord plugged
into a live circuit with the proper
voltage?
• Are both water faucets open?
• Have you checked
your home's
main fuses or circuit breaker box?
• Are the water supply hoses kinked?
• Is the Cycle Control Knob set and
pulled out?.
If your washer does not spin:
• Is the lid closed?
• Is the power supply cord plugged
into a live circuit with the proper
voltage?
• The washer may seem to be draining during wash and rinse cycles.
• Water can siphon out. (See "Installation Instructions?)
If your washer stops during a cycle:
• Remember, the washer pauses
briefly at different times in each cycle. These pauses are normal.
If your dryer does not run or heat:
• Is the power supply cord plugged
into a live circuit with the proper
voltage?
• Isthe door closed tightly?
• Did you push START?
• Have you checked your home's
main fuses or circuit breaker box?
• The FLUFFAIR setting iswithout heat.
• The last minutes of heat settingsare
without heat. See page 14.
• Isthe gas turned on? If not, turn the
Control Knob to OFF.Turn on gas.
Wait 5 minutes. Reset controls and
start.
If drying times seem too long:
• Have you checked
your home's
main fuses or circuit breaker box?
If your washer drains at the wrong
time:
• The drain hose should be at least 28
Inches above the floor and secured.
20
• Isthe lint screen clean? See page 17
of this book for cleaning instructions.
• See page 16 of this book and your
"Laundry Guide?
[[i
2.
4.
If you need
assistance*..
Call Whirlpool COOL-LINE _, servIce assistance
telephone
number.
Dlal free from anywhere in the U.S.:
1-800-253-1301
and talk with one of our trained Consultants, The Consultant
can instruct
you in how to obtain
satisfactory
operation
from your appliance
or, if
service is necessary, recommend
a
qualified
service company
in your
area.
3.
If you need
service*...
Whirlpool
__Jiol-
has a
nationwide
network
CARE "_'Service Com7-£_'W'-g',4,_£
ponies, TECH-CARE
FRANCHISEOSt.ViCE
service technicians
are trained to fulfill the product
warranty and provide after-warranty
service, anywhere
in the United States.
To locate TECH-CARE service in your
area, call our COOL-LINE service assistance telephone number (see Step 2) or
look in your telephone directory Yellow
Pages under:
APPLIANCES
MAJOR
- HOUSEHOLD
- SERVICE
-
ELECTRICAL
& REPAIR
MAJOR
APPLIANCES
-
REPAIRING
& PARTS
OR
WHIRLPOOL
APPLIANCES
FRANCHPSED TECH CAR_ SERVICE
WHIRLPOOL
APPLIANCES
FRANCHISED
TECH CARE SERVICE
SERVICE
×YZ SERVICECO
SERVICE
×YZ SERVICECO
COMPANIES
123 MAPLE
999-9999
1 ?3 MAPLE
If you have a
problem*..
Call our COOL-LINE service
assistance telephone number (see Step
2) and talk with one of our Consultants,
or if you prefer, write to:
Mr. Robert Stanley
Division Vice President
Whirlpool Corporation
2000 M-63
Benton Harbor, MI 49022
5.
If you need
replacement
FSP _
parts*...
FSP is a registered
trademark
of
Whirlpool
Corporation
for quality
parts. Look for this symbol of quality
whenever
you need a replacement
part for your Whirlpool appliance.
FSP
replacement
parts will fit right and
work right, because they are made to
the same exacting
specifications
used to build every new Whirlpool
appliance.
*If you must call or write, please provide: modet number, serial number,
date of purchase, and a complete
description
of the problem. This information is needed
in order to better
respond
to
your
request
for
assisfa nce.
COMPANIES
999.9999
OR
WASHING
MACHINES,
& IRONERS
WHIRLPOOL
-
FRANCHISED
TECH-CARE
SERVICE
XYZ SERVICE
!23
MAPLE
DRYERS
SERVICING
APPLIANCES
SERVICE
COMPANIES
CO
999,9999
21
I1:
Notes
22
Ill
Notes
23
I L!
WHIRLPOOU
"THIN TWIN"
WARRANTY
LENGTH OF WARRANTY
WHIRLPOOL
FULL ONE-YEAR
WARRANTY
From Date of Purchase
FSP® replacement
parts and repair labor to
correct defects in materials
or workmanship.
Service must be provided
by a franchised
TECH-CARE ® service company.
LIMITED FOUR-YEAR
WARRANTY
Second Through Fifth Year
From Date of Purchase
FSP® replacement
parts for any part of
gearcase
assembly if defective
in materials
or workmanship.The
gearcase
assembly is
shown below.
WHIRLPOOL
WILL PAY FOR
WILL NOT PAY FOR
A. Service calls to:
1. Correct the installation
of the washer/dryer.
2. Instruct
you how to use the washerldryer.
3. Replace house fuses or correct house wiring or plumbing.
4. Replace llghtbulbs.
B. Repairs when washer/dryer isused inother than normal, single-family
household use.
C. Plck up and delivery.Thisproduct isdesigned
the home.
to be repaired in
D. Damage
to washerldryer caused by occident, misuse, fire,
flood,acts
of God or use of products not approved by Whirlpool.
E. Any labor costs during the llmitedwarranty.
WHIRLPOOL CORPORATION SHALL NOT BE LIABLE FOR INCIDENTAL OR CONSEQUENTIAL DAMAGES. Some states do not allow the exclusion
or limitation of
incidental or consequential
damages
so this limitation or exclusion may
not apply to you. This warranty gives you specific legal rights, and you may
also have other rlghts which vary from state to state.
Outside the United States, a different warranty may apply. For details, please
contact your authorized
Whirlpool distributor or military exchange.
GEARCASE ASSEMBLY
COVERED BYYOUR
WARRANTY
Po.
©1987 Whirlpool Corporation
O]
Printed in U.S.A.