1
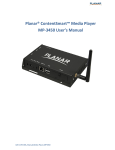
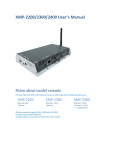
User Manual
DSA-2130SAE
Copyright
The documentation and the software included with this product are copyrighted 2009
by Advantech Co., Ltd. All rights are reserved. Advantech Co., Ltd. reserves the right
to make improvements in the products described in this manual at any time without
notice. No part of this manual may be reproduced, copied, translated or transmitted
in any form or by any means without the prior written permission of Advantech Co.,
Ltd. Information provided in this manual is intended to be accurate and reliable. However, Advantech Co., Ltd. assumes no responsibility for its use, nor for any infringements of the rights of third parties, which may result from its use.
Packing List
Before setting up the system, check that the items listed below are included and in
good condition. If any item does not accord with the table, please contact your dealer
immediately.
DSA-2130SAE Media Player
12V DC output AC Power Adapter
Quick start guide (not shown)
Installation and Documentation Kit CD
Audio Adapter: RCA male to 3.5 mm female (not shown)
Audio Cable: 3.5 mm male to 3.5 mm male (not shown)
Standard Ethernet cable (not shown)
Mounting Bracket
DSA-2130SAE User Manual
Part No. 2008213020
Edition 1
Printed in Taiwan
October 2009
ii
Safety Instructions
1.
2.
3.
Read these safety instructions carefully.
Keep this User Manual for later reference.
Disconnect this equipment from any AC outlet before cleaning. Use a damp
cloth. Do not use liquid or spray detergents for cleaning.
4. For plug-in equipment, the power outlet socket must be located near the equipment and must be easily accessible.
5. Keep this equipment away from humidity.
6. Put this equipment on a reliable surface during installation. Dropping it or letting
it fall may cause damage.
7. The openings on the enclosure are for air convection. Protect the equipment
from overheating. DO NOT COVER THE OPENINGS.
8. Make sure the voltage of the power source is correct before connecting the
equipment to the power outlet.
9. Position the power cord so that people cannot step on it. Do not place anything
over the power cord.
10. All cautions and warnings on the equipment should be noted.
11. If the equipment is not used for a long time, disconnect it from the power source
to avoid damage by transient overvoltage.
12. Never pour any liquid into an opening. This may cause fire or electrical shock.
13. Never open the equipment. For safety reasons, the equipment should be
opened only by qualified service personnel.
14. If one of the following situations arises, get the equipment checked by service
personnel:
The power cord or plug is damaged.
Liquid has penetrated into the equipment.
The equipment has been exposed to moisture.
The equipment does not work well, or you cannot get it to work according to
the user's manual.
The equipment has been dropped and damaged.
The equipment has obvious signs of breakage.
15. DO NOT LEAVE THIS EQUIPMENT IN AN ENVIRONMENT WHERE THE
STORAGE TEMPERATURE MAY GO BELOW -20° C (-4° F) OR ABOVE 60° C
(140° F). THIS COULD DAMAGE THE EQUIPMENT. THE EQUIPMENT
SHOULD BE IN A CONTROLLED ENVIRONMENT.
16. CAUTION: DANGER OF EXPLOSION IF BATTERY IS INCORRECTLY
REPLACED. REPLACE ONLY WITH THE SAME OR EQUIVALENT TYPE
RECOMMENDED BY THE MANUFACTURER, DISCARD USED BATTERIES
ACCORDING TO THE MANUFACTURER'S INSTRUCTIONS.
17. The sound pressure level at the operator's position according to IEC 704-1:1982
is no more than 70 dB (A).
DISCLAIMER: This set of instructions is given according to IEC 704-1. Advantech
disclaims all responsibility for the accuracy of any statements contained herein.
iii
DSA-2130SAE User Manual
DSA-2130SAE User Manual
iv
Contents
Chapter
1
Introduction..........................................1
1.1
1.2
General Introduction.................................................................................. 2
Features .................................................................................................... 2
1.2.1 Hardware features ........................................................................ 2
1.2.2 Software Features......................................................................... 3
Specifications ............................................................................................ 3
Table 1.1: Specifications ............................................................. 3
Input/Output Interfaces.............................................................................. 5
Mechanical Drawing.................................................................................. 6
Figure 1.1 Mechanical Drawing ................................................... 6
1.3
1.4
1.5
Chapter
2
Preparations and Setting Up ..............7
2.1
2.2
2.3
2.4
2.6
Connect the Power.................................................................................... 8
Connecting to a Display ............................................................................ 8
Accessing the menu system ..................................................................... 8
System settings......................................................................................... 9
2.4.1 (for DHCP networks) Automatic Network IP Configuration........... 9
2.4.2 (for nonDHCP networks) USB Keyboard configuration menus..... 9
Factory Reset button............................................................................... 13
2.5.1 Performing a factory reset........................................................... 13
Applying firmware upgrades.................................................................... 13
3
Software Operation ...........................15
3.1
Installation ............................................................................................... 16
3.1.1 Setup process ............................................................................. 16
Operation ................................................................................................ 17
3.2.1 Select Player............................................................................... 17
3.2.2 Program schedule....................................................................... 17
3.2.3 Saving your schedule.................................................................. 19
3.2.4 Export Files ................................................................................. 19
2.5
Chapter
3.2
Chapter
4
Working with SMIL ............................21
4.1
4.2
4.3
Introduction ............................................................................................. 22
Playing a SMIL demo .............................................................................. 22
Customized development with SMIL....................................................... 23
Appendix A
FAQ .....................................................25
A.1
FAQ......................................................................................................... 26
v
DSA-2130SAE User Manual
DSA-2130SAE User Manual
vi
Chapter
1
Introduction
1
1.1 General Introduction
Advantech DSA-2130SAE series consists of application-ready digital signage players
with advanced playback capabilities. DSA-2130SAE receives media content such as
video, graphics, and text, stores the content on its internal storage drive, and displays
the contents according to either a pre-defined play-list or commands through network
input. DSA-2130SAE features the most advanced decoding and graphic processing
functions. It outputs either digital or analog video signals for modern, high definition
display devices such as plasma, LCD, and projectors. It is the ideal networked digital
content player for advertising, presentations, training, and other media applications.
1.2 Features
1.2.1 Hardware features
The DSA-2130SAE Media Player is a native 1080p high definition digital signage
player featuring industrial grade mechanical design and versatile open©\standard
SMIL programmability.
Full-HD 1080p hardware decoding of MPEG, H.264, and VC©\1 media formats
Internal hard drive or industrial-grade solid-state local storage options available
Integrated audio and video output via HDMI
Supports full POPAI Screen Media Formats Standards profiles S1 to S12, and
E1 to E9
Scala ready for compatibility with Scala Content Manager
Includes the easy-to-learn Signage Manager Express management and layout
software
Content authoring via Microsoft PowerPoint (template-based slide show creation)
Supports advanced device programming via the W3C SMIL open API supported
by Adobe, Apple, Microsoft, and Real Networks
DSA-2130SAE User Manual
2
Scala network ready
For industry leading network management, the FDSA-2130SAE
Media Player is certified to work in a Scala Content Manager
networked environment. This provides you with maximum flexibility in a reliable, RISC-based Full-HD signage player.
SMIL Open API for developers
The DSA-2130SAE Media Player uses open XML-based scripting language for extremely flexible content presentation and
playback control, so that your investments are never obsolete.
Using SMIL, the de facto language of multimedia communications, the player understands the language “spoken” by professional tools from multimedia powerhouses such as Adobe,
Apple, Microsoft, and Real Networks. What this means is
quicker, easier, and better integration of your players into your
digital signage networks, leveraging the full potential of the
player.
1.3 Specifications
Table 1.1: Specifications
HDD version
Video format support
POPAI Screen Media Standards
S6 (MPEG-1 SIF, 3 Mbps CBR)
S7 (MPEG-1 480p, 10 Mbps CBR)
S8 (MPEG-1 720p, 15 Mbps CBR)
S9 (MPEG-2 480p, 6 Mbps CBR)
S10 (MPEG-2 720p, 12 Mbps CBR)
S11 (MPEG-4 AVC, 480p, 6 Mbps CBR)
S12 (MPEG-4 AVC, 720p, 10 Mbps CBR)
E4 (VC-1/WMV9, MP@ML, 720p)
E5 (VC-1/WMV9, MP@HL, 1080p)
E6 (MPEG-2, 1080p, 20 Mbps CBR)
E7 (MPEG-4 ASP, 480p, 10 Mbps CBR)
E8 (MPEG-4 AVC, 720p, 10 Mbps CBR)
E9 (MPEG-4 AVC, 1080p, 25 Mbps CBR)
3
DSA-2130SAE User Manual
Introduction
Signage Manager Express software for streamlined digital signage management
Signage Manager Express lets you quickly schedule and
playback programs on your digital signage player. Featuring a visual calendar layout tool, this bundled PC
application makes it easy to deliver dynamic HD-quality
videos, photos, with PowerPoint compatibility (rendered
as static slides) to your intended audience. Signage
Manager Express generates open standard SMIL-compliant instructions, so advanced users can use it in combination with 3rd-party SMIL authoring tools.
Chapter 1
1.2.2 Software Features
Table 1.1: Specifications
Image format support
POPAI Screen Media Standards
S1 (JPEG 480p baseline)
S2 (JPEG 720p baseline)
S3 (JPEG 1080p baseline)
E1 (PNG 24bpp+alpha, 480p)
E2 (PNG 24bpp+alpha, 720p)
E3 (PNG 24bpp+alpha, 1080p)
Audio codec support
POPAI Screen Media Standards
S4 (MPEG L2 audio)
S5 (MP3 audio, 384Kbps)
Playback control
W3C SMIL 3.0 (sub-set): multi-zone, wall-clock,
sequential, parallel, and exclusive scheduling
Content management method LAN - Signage Manager Express
USB direct update
WAN - Scala Network Ready
Physical I/O connectors
HDMI 1.3 (Full-HD 1080p)
USB 2.0 HOST
Video Input: Composite x1 RCA jack
Audio Input: R/L channel analog Unbalanced stereo x2
RCA jack
Video Output: VGA x1 D-sub 15-pin (female)
Audio Output: R/L channel analog x 2 Unbalanced stereo
RCA jack
Ethernet 10/100 Mbps x1 RJ45
Serial Port RS-232C 1 x D-sub 9-pin
Local storage
Internal 160 GB 2.5” HDD (Holds up to 36 hrs of typical 5
Mbps high def. video)
Accessories
RCA male-3.5mm female audio cable
3.5mm male-male audio cable
Ethernet cable
Wall-mount bracket
VESA mounting kit (Optional)
Power requirement
12 V, 2A DC
Power consumption
Typical* 10 W
Environmental
Operating temperature: 0 to 40° C (non-condensing)
Humidity: t5 to 85% @ 40° C (non-condensing
Dimensions
211 x 153 x 43 (mm) (excluding projections)
8.3 x 6 1.7 (inches) (excluding projections)
Weight
1.2 Kg
2.64 lbs.
Safety
UL-approved AC adapters
Certifications
CE/FCC
RoHS
Warranty
One-year limited parts & labor
*typical usage when playing 1080P full resolution video
DSA-2130SAE User Manual
4
5.
6.
7.
8.
Ethernet port for network content update
USB port for USB content update
VGA port for analog video output
HDMI 1.3a connector for digital video and audio combined outputs, or digital
video via option DVI adapter
Stereo RCA audio output
12 V DC for power adapter
S/W Reset button to perform factory reset (see section 2.4)
Reserved (not enabled)
COM
SPDIF
VIDEO-IN
AUDIO-IN L/
5
DSA-2130SAE User Manual
Introduction
1.
2.
3.
4.
Chapter 1
1.4 Input/Output Interfaces
1.5 Mechanical Drawing
Drawing shown with included mounting plate accessory, used for attaching the player
via 4 screws with 76 mm x 228 mm (2.99” x 8.98’) spacing. All dimensions in mm
[inch].
Figure 1.1 Mechanical Drawing
DSA-2130SAE User Manual
6
Chapter
2
Preparations and
Setting Up
2
2.1 Connect the Power
1.
2.
Connect the power adapter cord with the AC power cord.
Connect the power adapter cable to the player’s DC 12 V power port.
3.
Plug the AC power cord into a power outlet and the Power LED (green) will light
up.
Warning! Only use the power adapter packaged with the DSA-2130SAE. Using a
different power adapter could damage the device.
2.2 Connecting to a Display
Connect your display to the Digital Signage Player’s VGA port with the VGA cable
that came with your display. Consult your display’s user manual for cabling specifications.
Note!
If you would like to use the HDMI, Composite or S-Video video output,
you need to change the player’s configuration setting with the DSA Configurator.
2.3 Accessing the menu system
If your network does not support DHCP, requires a static IP setting, or if you are
using USB drives to update contents instead of a network, you can perform these
settings directly via the player’s menu system:
1. Attach a USB keyboard to the player’s USB port.
2. Connect the player to your display or monitor using a VGA or HDMI cable.
3. Connect the player power adapter, and switch the display on.
4. Set your display monitor to the corresponding video input.
When you see the on screen menu system on the display, you can begin configuring
the menu items.
DSA-2130SAE User Manual
8
There are 2 ways of configuring your player, over the network (for DHCP networks)
or using a directly connected USB keyboard (for non-DHCP networks).
2.4.1 (for DHCP networks) Automatic Network IP Configuration
2.4.2 (for nonDHCP networks) USB Keyboard configuration menus
The menu system can also be used to configure these main functions using a USB
keyboard:
1.
Static network IP configuration
2.
Setting the Video Output mode
3.
Calendar and clock
9
DSA-2130SAE User Manual
Preparations and Setting Up
The media player needs a unique IP address to function as a part of your network.
This can be set automatically or manually, depending on how your network is managed.
1. Connect the player to the network using an Ethernet cable.
2. Connect the player to a display via HDMI or VGA port.
3. Find the automatically assigned IP displayed in the menus.
When your player starts up on a network, it will acquire an IP address from your
DHCP server or network router. The acquired IP can be found in the menu system under “Device Information” or from Signage Manager Express. Use this IP
address to locate your player on the network.
Chapter 2
2.4 System settings
2.4.2.1 Navigating the menus
Navigate the menus using arrow keys, space bar, enter key, and numeral keys on
your USB keyboard. Use the keyboard arrow keys to highlight menu items, press the
space bar to move the star (cursor), and then press enter to confirm (<OK>) or reject
(<Cancel>) any changes.
In a selection menu such as the Network setting example above, move the highlight
into an empty selection ( ) with arrow keys then use the space bar to fill in the empty
selection ( ) with a star (*). Remember to press the space bar to move the star (cursor) before you press enter, otherwise changes will not be made.
DSA-2130SAE User Manual
10
Calendar and clock
Calendar and clock Set the correct time zone, time, and date. Daylight Saving (DST)
rules can be configured in Set time zone.
2.4.2.3 Menu overview
The menu offers other settings shown in the expanded menu view on the next page.
11
DSA-2130SAE User Manual
Preparations and Setting Up
Setting the Video Output mode
For best quality, set the output resolution to match your display’s native resolution to
avoid image scaling and blur.
If you are connecting to an LCD TV, the resolution setting is most likely 1360x768,
1280x720, or 1920x1080. If you are connecting a LCD computer monitor, projector,
or plasma display, refer to the device specifications for the best matching setting.
Press the space bar to fill in the star (*) before pressing the enter key for <OK>.
Chapter 2
2.4.2.2 Configuring the 3 main functions
Static network IP configuration
Using a USB keyboard, assign a unique static IP setting for this device. Each network
device needs to have a different address to avoid network conflicts. If you are not
sure which IP address to use, ask your administrator to provide one.
DSA-2130SAE User Manual
12
The S/W RESET button located at the back of the media player can be used to
restore factory settings. Use the button to restore default settings or reset an unstable player state.
2.5.1 Performing a factory reset
2.6 Applying firmware upgrades
Firmware updates can be performed using a USB flash drive. Please read the
release notes carefully regarding the changes that will be made to your player before
applying the upgrade.
1. Obtain the latest firmware and copy it to the root directory of a USB drive.
2. Power on device and plug USB keyboard to the device to enter menu system.
3. Follow on screen instructions and select firmware upgrade option in the menu.
4. When instructed, plug in the USB drive to begin firmware upgrade.
13
DSA-2130SAE User Manual
Preparations and Setting Up
Warning: This procedure will restore all menu settings to factory default and format
the internal storage to factory conditions (all contents removed).
To restore factory settings:
1. Disconnect power cable from the player unit.
2. Press and hold the S/W RESET button.
3. Connect the power cable while holding the S/W RESET button until status light
flashes (about 15 seconds).
4. Wait while the system drive is being formatted.
Chapter 2
2.5 Factory Reset button
DSA-2130SAE User Manual
14
Chapter
3
3
Software Operation
Welcome to Signage Manager Express, a convenient way to manage digital signage
content for ViewSonic digital signage media players. The Signage Manager Express
software is designed to be simple by leveraging the power of your personal computer. Anyone with basic computer skills can quickly create or modify schedules,
delivering the right message to the right audience at the right times.
Add and schedule files
for simple looping playback
or at specific times on the
calendar.
Export all files to your
media player via LAN,
CF card, or USB drive
3.1 Installation
Minimum system requirements
Windows Vista or Windows XP operating systems 1 GHz AMD or Intel CPU
.DirectX 9
512 MB of system memory
.NET Framework 3.0
20 GB hard drive
(higher versions and numbers also compatible)
PowerPoint 2003 or 2007 required for PowerPoint slideshow feature.
Windows Media Player 10 or 11 required for video previews.
3.1.1 Setup process
Insert the Signage Manager Express CD and the installer should pop up automatically. If it does not start, click on “setup.exe” located on your CD using Windows
Explorer. If you haven’t installed .NET Framework, you will be prompted to do so. If it
is already installed, please proceed to the next page.
1. Run the installer and follow the step by step instructions.
2. Close the installer to finish installation.
DSA-2130SAE User Manual
16
3.2.1 Select Player
Select your player from the list. Supported media files for the selected player will be
displayed.
Chapter 3
3.2 Operation
Software Operation
3.2.2 Program schedule
For basic scheduling, choose Simple looping mode. For advanced scheduling,
choose Weekly schedule mode.
3.2.2.1 Simple looping mode
In Program Schedule panel, you can set up the way videos, images, or slides are
played. In this panel you can schedule 2 types of schedules: Looping or Weekly
Schedule. Looping schedule is selected by default.
17
DSA-2130SAE User Manual
“Add” files to the looping playlist
“Remove“ files from the playlist
“Edit” the duration of each imagee,
video, or slideshow in the playlist
“Preview“ all the items in the playlist
Drag and drop to change order
“Schedule screen on/off“halts
playback at certain times of the
day to put display into energysaving sleep mode
Recently edited, played, or scheduled files for
convenience of reuse
Playback of preview window
A playlist can consist of a sequence of images, videos, or PowerPoint slideshows
which are played repeatedly in the specified order and .
3 seconds minimum
duration for all media
Default duuration is 7 seconds
for imags, and full length for
videos and slideshows. Click
“Edit“ above to change these
settings.
3.2.2.2 Weekly schedule mode
Select “Weekly Schedule” from the Program Method drop-down to switch to weekly
schedule mode. Weekly Schedule mode provides finer control over your playlists.
While Looping mode plays several files in a specified order, over and over, Weekly
Schedule mode lets you specify several different Looping mode playlists to be played
at different times of the day and week.
DSA-2130SAE User Manual
18
“Edit“ time slot in a pop-up
window
Recently edited, played, or sheduled files for convenience
of reuse
Schedule templates is a collection of commonly used
schedules for your reference and quick customization
3.2.3 Saving your schedule
You can save your schedule settings so that you can make small adjustments to
them later, rather than starting over from scratch each time. Click on the Signage
Manager Express icon on the top-left to save the current schedule settings or to open
previously created ones
3.2.4 Export Files
The final step in Signage Manager Express lets you export all files and playlist to
your player.
Depending on your player model, you can export via network or removable media
(USB or CF Card).
19
DSA-2130SAE User Manual
Software Operation
“Remove“ a playback time out
Chapter 3
“Create“ a playback time slot
pop-up window
3.2.4.1 Export via Network
Signage Manager Express auto-detects all players on a DHCP network.
“Detecting device” progress bar pops up automatically when you enter
the “Export files” pane.
If you do not see your player in the list of detected
players, click “Auto-detect player“ to search again.
In non-DHCP networks, click “Add device“ to manually enter the player’s IP.
3.2.4.2 Export via USB Drive
If you prefer to update contents without a network, you can export contents to a USB drive and plug it into the player’s USB port for synchronization.
1.
2.
3.
4.
5.
6.
7.
Select USB export mode in the “Export files” pane.
Attach a USB drive to your computer.s USB port and click the “Export” button.
You will be prompted to keep or delete previous contents.
The progress bar shows you an estimate of the remaining time to completion.
Upon transfer complete, remove the USB drive and insert it in the player. The
on-screen display will show you the file(s) being copied.
Upon synchronization complete, the player will begin to play the new files.
Remove the USB drive from the player.
DSA-2130SAE User Manual
20
Chapter
4
4
Working with SMIL
The DSA-2130SAE Media Player uses open communications protocols for extremely
flexible content presentation and playback control. SMIL-compliance means predictable results across multiple devices, and SMIL’s non-proprietary nature means that
your investments are never obsolete.
4.1 Introduction
Using SMIL (pronounced “smile”), the de facto language of multimedia communications, the DSA-2130SAE Media Player understands the language “spoken” by professional tools from multimedia powerhouses such as Adobe, Apple, Microsoft, and
Real Networks. What this means is quicker, easier, and better integration of your
players into your digital signage networks, opening up avenues of software controls
and realizing the full potential of your player hardware down the road.
4.2 Playing a SMIL demo
The demonstration files can be found in the Software and Documentation CD.
Step 1: Prepare contents using a PC
Prepare a formatted USB drive (using the “FAT32” or “FAT”
file system option). Copy the entire sample SMIL directory
with all its content files from Software and Documentation CD
to the USB drive. Make sure the SMIL directory shows up in
the root directory of the USB drive.
Step 2: Upload contents to player
Power up the player. Booting takes about 60 seconds. When the orange boot indicator lamp goes
out, insert USB drive into the USB port to begin
upload. All files under the SMIL directory will be
copied to the player and the tutorial will begin to
play.
DSA-2130SAE User Manual
22
23
DSA-2130SAE User Manual
Working with SMIL
When you’ve laid out a schedule with a full week’s worth of programming in Signage
Manager Express, a complete set of playback instructions are automatically generated for the media player in plain-text SMIL. If you have XML or website HTML experience, you can examine this code to familiarize yourself with how a SMIL playlist is
put together. And just like how different HTML web editors are available for the task,
there are many SMIL tools and resources adopted and developed by Adobe, Apple,
Real Networks, Microsoft, and more.
If you are a developer interested in developing and customizing for the ViewSonic
NMP-550 Media Player using SMIL, please contact your reseller to obtain the Media
Player Developer’s Manual and SDK (software development kit).
Chapter 4
4.3 Customized development with SMIL
DSA-2130SAE User Manual
24
Appendix
A
FAQ
A
A.1 FAQ
What is the maximum file size for a single video file?
The maximum video file size for the Full HD Open API Media Player is 2 GB. We recommend reserving a safety margin to avoid exceeding the limit (i.e. limiting files to
1850 MB).
How do I restore the device back to factory defaults?
The S/W RESET button located at the back of the media player can be used to
restore factory settings.
To restore factory settings:
1. Disconnect power cable from the player unit
2. Press and hold the S/W RESET button
3. Connect the power cable while holding the S/W RESET button until status light
flashes (approx. 15 seconds)
How do I manage the playback of contents?
Playback on a schedule is one of the main functions of the DSA-2130SAE Media
Player. For most users, it can be managed via the easy to use Signage Manager
Express software. Scala users may obtain a player license from Scala to manage the
media player directly from Scala Content Manager. For advanced customization,
there is SMIL compatibility. See the developer’s manual for customizing the player
with open-standard W3C SMIL commands.
About Signage Manager Express: Unlike the difficulty of programming VCRs from a
remote control, the Signage Manager Express software is designed to be simple by
using a graphical personal computer interface. Playback contents are laid out visually
in a calendar view. Anyone with basic computer skills can quickly create or modify
schedules, delivering the right message to the right audience at the right times.
Please refer to the Signage Manager Express User’s Manual for detailed operations
and techniques.
Could the player display Flash or Microsoft PowerPoint presentations?
The player features limited PowerPoint support, but not Flash support.
While PCs can play many formats with varying degrees of success, RISC©\based
media players are designed to reliably play specific video formats (Please see spec
for details). While Microsoft PowerPoint native files could not play directly on a
RISC©\based player, the file is converted through other software (i.e. Signage Manager Express) into an image format to be played as an image slideshow.
Why won’t some media files play smoothly?
The video data bit-rate may be higher than the recommended bit rate.
The video data bit-rate is the amount of video or audio data used per second to store
or play the contents, usually expressed in Mbps (mega-bits per second). Video
encoded with excessive bit-rates will not playback smoothly in the media player,
likely due to storage i/o bottlenecks. You can try recompressing unplayable video
files at lower bit rates using the free and open source Handbrake tool at http://handbrake.fr/. Once you have found the right output settings for size and quality, save
them in Handbrake profiles for future use. Then you can easily recompress any
unplayable files you encounter in the future.
DSA-2130SAE User Manual
26
The media playback looks different on a PC compared to the media player’s
screen. (Wrong aspect ratio)
There are 2 major aspect ratios (width-to-height ratios) for video content, but many
kinds of displays. If you play 4:3 video on a 16:9 display (or vice versa), a circle
becomes oval, and the picture takes on a squeezed or stretched look. To avoid this
distorted look, adding black bars are a common technique.
The Network Media Player can be configured to automatically add black bars for certain types of displays. You can set the output resolution in the media player’s configuration menu to match the native resolution of your display.
Some JPEG images cannot be played in the media player.
Progressive JPEG are not supported. Please convert to baseline JPEG for maximum
compatibility.
JPEG images can be either of 2 types: baseline or progressive compression. Baseline JPEG offers greatest compatibility, while progressive JPEGs are suitable for web
site images. Progressive images are downloaded and displayed “progressively,”
being rendered more clearly as more data is received over the internet. Devices with
local storage such as the CF/Network Media Player are usually incompatible with the
latter type. Make sure to save images as baseline JPEG in your photo editor, or
resave them as baseline JPEGs using free tools such as Paint.net (http://
www.paint.net/).
Does the media player support video streaming?
No, all media files are designed to play from local storage.
During content and schedule sync, contents are transferred to player’s local storage
before being presented on screen. This ensures the best possible presentation and
fluid delivery of your video message. Video streaming raises many playback quality
issues such as image freezing, blocking, or blue-screens, costing you valuable “air
time” and losing your audience's attention.
27
DSA-2130SAE User Manual
Appendix A FAQ
Why won’t some media files play at all?
Despite our best efforts to adhere to video format standards, video compression
introduces many variables, and sometimes the videos you acquire may not be playable on all players. In this case, you should check your compression settings (bitrate,
audio codec, and other parameters) and use a compatible setting.
If the files can play on your PC but not on your player, you should recompress the file
to ensure playback. For greatest compatibility, we recommend outputting to the WMV
format (VC-1 codec, 3 to 5 Mbps bit-rate). You can recompress unplayable video files
with recommended file formats and bit rates using the free and open source Handbrake tool at http://handbrake.fr/. Once you have found the right output settings for
size and quality, save them in Handbrake profiles for future use.
Then you can easily recompress any unplayable files you encounter in the future.
The media player is not playing. What should I do?
Check the player’s messages on the display (OSD, or on screen display) for status
information.
Since RISC-based media player usually lack input devices such as keyboard or
mouse like PCs, troubleshooting is usually based on user’s knowledge and experience with the specific media player. First check the on screen message and stats
reports. Bad play list and timing issues are two major causes of playback problems.
To determine if the problem is caused by a bad play list, simply delete the play list
and restart player. The player should loop through all media files, indicating a fault
with the play list.
If the playback is scheduled to play at specific time, check to see if the device is set to
the right time zone on the world clock. When nothing seems wrong, the time zone
setting is often the reason the program is not played.
How do I eliminate the 1 second display blackout during video or photo transitions?
A 1 second gap between any 2 video files or any 2 photos is a known limitation. Gapless image playback is being added in a future firmware release.
DSA-2130SAE User Manual
28
Appendix A FAQ
29
DSA-2130SAE User Manual
www.advantech.com
Please verify specifications before quoting. This guide is intended for reference
purposes only.
All product specifications are subject to change without notice.
No part of this publication may be reproduced in any form or by any means,
electronic, photocopying, recording or otherwise, without prior written permission of the publisher.
All brand and product names are trademarks or registered trademarks of their
respective companies.
© Advantech Co., Ltd. 2009