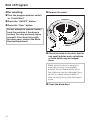
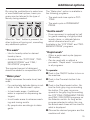
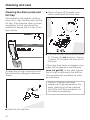
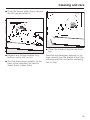
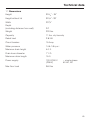
1
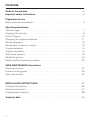
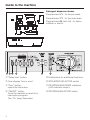
Operating instructions
Washer
W 1918
To prevent accidents
and machine damage,
read these Operating Instructions
before installation or use.
ö
M.-Nr. 05 047 650
Contents
Contents
Guide to the machine. . . . . . . . . . . . . . . . . . . . . . . . . . . . . . . . . . . . . . . . . . . . . . . 3
Important safety instructions . . . . . . . . . . . . . . . . . . . . . . . . . . . . . . . . . . . . . . . . 5
Preparation for use
Help protect our environment . . . . . . . . . . . . . . . . . . . . . . . . . . . . . . . . . . . . . . . . . 6
Operating instructions
Optimal usage . . . . . . . . . . . . . . . . . . . . . . . . . . . . . . . . . . . . . . . . . . . . . . . . . . . . . 7
Preparing the Laundry . . . . . . . . . . . . . . . . . . . . . . . . . . . . . . . . . . . . . . . . . . . . . . . 8
End of Program . . . . . . . . . . . . . . . . . . . . . . . . . . . . . . . . . . . . . . . . . . . . . . . . . . . 10
Changing the program sequence . . . . . . . . . . . . . . . . . . . . . . . . . . . . . . . . . . . . . 11
Adding detergent. . . . . . . . . . . . . . . . . . . . . . . . . . . . . . . . . . . . . . . . . . . . . . . . . . 12
Adding fabric softener or starch . . . . . . . . . . . . . . . . . . . . . . . . . . . . . . . . . . . . . . 13
Program selection . . . . . . . . . . . . . . . . . . . . . . . . . . . . . . . . . . . . . . . . . . . . . . . . . 14
Program sequence . . . . . . . . . . . . . . . . . . . . . . . . . . . . . . . . . . . . . . . . . . . . . . . . 16
Textile care symbols. . . . . . . . . . . . . . . . . . . . . . . . . . . . . . . . . . . . . . . . . . . . . . . . 18
Additional options . . . . . . . . . . . . . . . . . . . . . . . . . . . . . . . . . . . . . . . . . . . . . . . . . 19
Delay start/Time remaining indicator . . . . . . . . . . . . . . . . . . . . . . . . . . . . . . . . . . . 20
USER MAINTENANCE Instructions
Cleaning and care . . . . . . . . . . . . . . . . . . . . . . . . . . . . . . . . . . . . . . . . . . . . . . . . . 21
Problem solving guide . . . . . . . . . . . . . . . . . . . . . . . . . . . . . . . . . . . . . . . . . . . . . . 25
After sales service . . . . . . . . . . . . . . . . . . . . . . . . . . . . . . . . . . . . . . . . . . . . . . . . . 30
INSTALLATION INSTRUCTIONS . . . . . . . . . . . . . . . . . . . . . . . . . . . . . . . . . . . . 31
Plumbing Connections. . . . . . . . . . . . . . . . . . . . . . . . . . . . . . . . . . . . . . . . . . . . . . 36
Electrical connection . . . . . . . . . . . . . . . . . . . . . . . . . . . . . . . . . . . . . . . . . . . . . . . 37
Programmable functions . . . . . . . . . . . . . . . . . . . . . . . . . . . . . . . . . . . . . . . . . . . . 38
Technical data . . . . . . . . . . . . . . . . . . . . . . . . . . . . . . . . . . . . . . . . . . . . . . . . . . . 43
2
Guide to the machine
Guide to the machine
1 Supply cable
5 Control panel
2 High pressure intake hoses
6 Drum door
3 Flexible drain hose, with detachable
swivel elbow
7 Access panel for lint filter and drain
pump
4 Detergent dispenser drawer
8 Four height adjustable legs
3
Guide to the machine
Detergent dispenser drawer
Compartment i - for the pre-wash.
Compartment j - for the main wash.
Compartment p (with lid) - for fabric
softener or starch.
b “Delay start” button.
c Time display “hours, mins”.
d “Door” button;
opens the drum door.
e “ON/OFF” button;
Turns the machine on and off or
interrupts a program.
The “On” lamp illuminates.
4
f Pushbuttons for additional functions.
g SPIN SPEED SELECTOR switch.
h PROGRAM SEQUENCE indicators
(LED indicator lamps).
i PROGRAM SELECTOR switch.
Important safety instructions
Important safety instructions
WARNING - To reduce the risk of fire,
electric shock, or injury to persons
while using your appliance, follow basic
safety precautions, including the following:
1. Read the instructions before using
the appliance.
2. Do not wash materials that have
been previously cleaned or soaked
in gasoline, dry cleaning solvents, or
other flammable or explosive substances. Do not add gasoline, dry
cleaning solvents, or other flammable or explosive substances to the
wash water. These substances give
off vapors that could ignite or
explode.
3. Do not allow children to play on or in
the appliance. Close supervision is
necessary when the appliance is
used near children.
4. Before discarding an old appliance
unplug the unit and remove the
power cord. Also, remove the door to
the wash compartment to prevent
if from becoming a hazard.
9. Do not add gasoline, dry-cleaning
solvents, or other flammable or
explosive substances to the wash
water. These subtances give off
vapors that could ignite or explode.
10. Under certain conditions, hydrogen gas may be produced in a hot
water system that has not been
used for 2 weeks or more.
HYDROGEN GAS IS EXPLOSIVE.
If the hot water system has not
been used for such a period, before using the washing machine,
turn on all hot water faucets and
let the water flow from each for
several minutes. This will release
any built up hydrogen gas.
As the gas is flammable, do not
smoke or use an open flame
during this time.
SAVE THESE INSTRUCTIONS
For installation and grounding
instructions, refer to the Electrical Connection Section of
this manual.
5. Do not reach into the appliance if
the drum is moving.
6. This appliance should never be installed or stored outdoors.
7. Do not tamper with the controls.
8. Do not repair or replace any part of
the appliance, or attempt any servicing unless specifically recommended
in these Operating instructions.
5
Help protect our environment
Help protect our environment
Warning - To reduce the risk of fire,
electric shock, or injury to persons,
read the IMPORTANT SAFETY INSTRUCTIONS before operating this
appliance.
Disposal of the packing
material
The transport and protective packing is
mostly manufactured from the following
recycled or recyclable materials:
Disposal of an old appliance
Old appliances contain materials that
can be recycled. Please contact your
local recycling center about the possibility of recycling these materials.
Before discarding an old appliance,
unplug it from the outlet and cut off
its power cord and remove any
doors to prevent it from becoming a
hazard.
– corrugated paper/cardboard
Before using the first time
– CFC free polystyrene
Since all Miele washing machines are
tested for proper operation before leaving the factory, some residual water
may be left inside.
– polystyrene foil (transparent)
– Untreated wood
– Polypropylene (PP) strapping
Rather than throwing these materials
away, please take them to your community recycling center.
As this water is not visible, we recommend you perform the following steps
before you use your new machine for
the first time, or if it has been in storage
for more than a few weeks between
uses.
^ Do not put any laundry in the machine.
^ Add a small amount of detergent to
compartment j.
^ Turn “On” the machine.
^ Press the “Rapid wash” button.
^ Turn the dial to “COTTONS 140°F”.
The machine will start to run and will
flush out any residual water that may be
inside.
6
Optimal usage
Optimal usage
The key to good wash results is finding
the correct combination of detergent
and temperature, and then allowing the
washing machine to optimize their usage through its programming. Program
lengths can vary for this reason.
The fully electronic controls offer a combination of simple operation with many
optional features. For instance, since a
main wash generally gives good results
for a normal load, the pre-wash cycle
has been made a user selectable option, saving time,water and energy over
older full cycle machines.
With the “Hydromatic” system, the drum
can revolve at various speeds. Faster
and slower agitation speeds along with
pauses for soaking, combine to ensure
excellent wash results.
Economy
To conserve energy, remember the following tips:
– The automatic load control feature
will adjust the water level for loads up
to 11 lbs (5kg). Washing with the
maximum load specified for each
program saves water and energy.
– Use the correct amount of detergent
required for the water hardness in
your area.
– Miele recommends the use of powder detergents, as their characteristics allow them to perform better in
this machine than liquid detergents.
If the wash is not heavily stained, select
a lower temperature than indicated on
the wash care label.
The automatic load control feature ensures the correct water level for the
type of fabric and load being washed
(even though it may appear as if there
is too little water in the drum!).
Operational noise, no matter what program is selected, is minimized through
the use of an accurately balanced drum
and special sound insulation.
7
Preparing the Laundry
Preparing the Laundry
The headings numbered (1,2,3,...)
show the operating sequence and can
be used as a brief guide.
Before washing
1 Prepare the wash load
Dark fabrics often contain “excess dye”
and should be washed separately several times before being included in a
mixed load.
Delicate fabrics should be washed separately using the FINE/DELICATES program.
Only wash wool or wool mixtures if they
are labeled machine washable on the
textile care label.
^ Pre-treat the laundry
Badly soiled areas (e.g. collars and
cuffs) and water soluble stains can be
pre-treated with bar soap, stain remover, or detergent mixed into a solution or paste.
Do not use detergents containing solvents in the machine.
^ Empty all pockets.
Foreign objects accidentally left in
pockets (e.g. nails, coins, paper
clips, etc.) can damage clothes and
the machine.
^ Sort the laundry
Only wash items that are labeled machine washable by the manufacturer.
Some garments will have a Fabric care
label in the collar or side seam. If so,
sort the laundry by care label and color.
8
For curtains:
^ Remove any lead weights or strips.
Woolens and knitted garments should
be turned inside out if recommended
by the manufacturer.
Preparing the Laundry
2 Press the “Door” button to open
the door
3 Load the machine
Unfold the laundry and place it in the
drum. For best results we recommend
washing mixed loads consisting of both
large and small items. This improves
washing effectiveness and helps distribute the load evenly to keep the machine stable and reduce noise during
spinning.
Recommended load sizes are noted
below:
COTTONS. . . . . . . . . . . . 11 lbs (5.0 kg)
To start a program
1 Turn the program selector
to Finish / Start
2 Press the “ON/OFF” button
3 Press any desired “Additional
function” pushbuttons
(See the “Delay start” section if this feature is desired.)
4 Select the final spin speed
5 Turn the program selector to the
desired program
The program selector can be turned to
the left or the right.
PERMANENT PRESS. . . 4.5 lbs (2.0 kg)
FINE/DELICATES . . . . . . 2.0 lbs (1.0 kg)
WOOLENS. . . . . . . . . . . 2.0 lbs (1.0 kg)
FINE RINSE . . . . . . . . . . 4.5 lbs (5.0 kg)
4 Close the machine door
Make sure there are no clothes caught
between the drum door and seal.
5 Add detergent
See the “Adding detergent” section for
details.
9
End of Program
End of Program
After washing
4 Remove the wash.
1 Turn the program selector switch
to “Finish/Start”
2 Press the “ON/OFF” button.
3 Press the “Door” button.
Do not attempt to remove laundry
from the machine if the drum is
turning. You may seriously injure
yourself. If the drum turns with
the door open, contact the Miele
Service Department.
5 Check the folds in the door seal for
any small articles such as buttons
or nails which may be lodged
there.
Make sure the drum is empty by
manually turning it completely
around. Items inadvertently left in
the machine may be damaged (e.g.
shrink) or cause discoloration of
other laundry during the next wash
cycle.
6 Close the drum door.
10
Changing the program sequence
Changing the program sequence
To cancel a program:
^ Turn the program selector to
“Finish/Start”.
To interrupt a program:
^ Press the “ON/OFF” buttton.
To continue the program, turn the machine back on.
To change an incorrectly selected
program:
^ Turn the program selector switch to
“Finish/Start”.
To omit a program stage:
A program stage must first be reached
to be omitted. When the sequence indicator lamp of the program stage you
would like to omit illuminates:
^ Turn the program selector to
“Finish/Start”
As soon as the program sequence indicator lamp for the stage you wish to enter starts flashing:
^ Turn the program selector switch to
the desired program.
When only the “On” lamp is lit, a new
program can be selected.
To change a program which has been
“locked” using the Child Safety feature,
see the “Programmable functions” section.
11
Adding detergent
Adding detergent
Powder detergent should be added to
compartment j (main wash) and
compartment i (pre wash, if selected)
at the beginning of each wash cycle.
Due to the design of the Miele 1/3 to 1/2
the manufacturer’s recommended
amount of detergent is plenty for excellent wash results.
Do not use chlorine bleach!
Water is taken in through compartment
j during the main wash. If your water
is extremely hard (above 400 ppm calcium carbonate) and compartment j
is too small for the amount of detergent
needed, a service technician can reprogram the machine so that water and
detergent can also enter through compartment i.
For small loads:
It is important to use the correct amount of detergent, because...
...too little detergent can result in:
– gray laundry
– grease/stains not being removed
– lime deposits on the heating elements and drum (in hard water areas).
...too much detergent can result in:
– excessive foam
– insufficient agitation
– poor cleaning and rinsing results.
Water Softeners
– Proportionately reduce the amount of
detergent used for each small load.
If you wish to use a water softener to
cut down on detergent usage in hard
water areas:
– Check the wash results and the condition of the laundry.
– add the amount of detergent necessary for a soft water area.
– If the laundry is not clean or if it is
gray or hard to the touch, add
slightly more detergent the next time
you use the machine.
– Add the specified amount of water
softener according to the manufacturer’s instructions.
12
Always add the detergent first, in compartments i and j followed by the
softener, to ensure that both are properly dispensed.
Adding fabric softener or starch
Adding fabric softener or starch
If fabric softener is desired, it will work
more effectively and be gentler on the
clothes if it is dispensed in the final
rinse cycle of the wash, rather than in
the dryer with softener sheets. To automatically dispense fabric softener:
^ Open the lid of compartment p.
At the end of the program a small
amount of water will normally remain in
compartment p. A high water level in
this compartment, however, may indicate that the dispenser drawer was
opened, or the siphon is clogged. In
this case, the siphon tube should be
cleaned (see “Cleaning and Care”).
Starch
Starching can be performed separately
(see below) or can be included in any
wash program as part of the final rinse.
Never mix fabric softener and starch together in compartment p. This can
clog the dispenser.
If starch is used for shirts, blouses, table cloths, napkins, etc., pour the
liquid starch into compartment p (use
the same procedure as for fabric softener).
^ Pour an amount of liquid fabric softener into compartment p according
to the manufacturer’s instructions. Do
not exceed the maximum fill level
marked inside the compartment, as
the excess will prematurely activate
the siphon and be wasted.
^ Close the compartment lid and push
in the dispenser drawer.
The softener will automatically be dispensed during the final rinse cycle.
Using the “Starch” program to dispense liquid starch.
– Prepare the starch solution according to the manufacturer’s instructions
and pour it into compartment i.
– Use the normal water level (Water
Plus button “out”) when starching so
that the solution will have the maximum effect.
“Without final spin” can be selected to
reduce fabric creasing.
13
Program selection
Program selection
Program
COTTONS
For cotton fabrics without
special finishes.
PERMANENT PRESS
For cotton blends, polyester
blends and synthetics such
as acrylic, nylon and ramie.
FINE/DELICATES
For synthetics, machine
washable silks, lace or
crocheted (non-woolen)
items, curtains and knits.
Temperature
range
85 - 105°F
105 - 120°F
140 - 190°F
85°
105 - 120°F
140°F
cold - 85°F
105 - 120°F
140°F
Fabric
For dark colored items.
For light colored items.
Exclusively white items.
For dark fabrics which are a blend or 100%
synthetic fabrics.
For light colored cotton or synthetic items.
For white polyester/cotton items.
For dark colored silks and all synthetic items
(lingerie).
For light colored silks and lace tablecloths.
For white cotton lace and crocheted items.
WOOLENS
For all machine washable
woolens and wool blends.
cold
Use detergents made specifically for wool.
Reduce or turn off the spin speed for “hand
wash only” or nonwool items.
Starch
cold
For tablecloths, napkins, aprons and shirts.
/
Spin
For spinning wet items not washed in the machine (hand washed). Such items must be
suitable for machine spinning.
Drain
For use when the laundry is to be removed
wet for drip drying. Normally used in
conjunction with “Without final spin”.
Fine rinse
For hand washed items that can be gently
rinsed, and if desired, spun.
14
Program selection
max. load
Additional options
available
Normal wash cycle
Rapid wash
cycle
11 lbs
Pre-wash
Water plus
Gentle wash
Available
Available
4.5 lbs
Pre-wash
Water plus
Gentle wash
Available
Available
2 lbs
Pre-wash
Gentle wash
Available
Available
2 lbs
Available
–
11 lbs
Available
–
Available
–
Available
–
Available
–
11 lbs
15
Program sequence
Program sequence
Pre-wash
Main wash
Interim rinse
Graduated rinse
Number of rinses
Rinse and interim spin
Graduated spin rpm
COTTONS
PERMANENT
PRESS
FINE/
DELICATES
ß
ß
Selectable(1)
ß
ß
ß
Selectable(1)
–
–
Selectable(1)
(1)
(1)
–
ß
4
-
3
max. 800(2)
–
ß
ß
ß
ß
3
–
ß
max. 1600
max. 900
(2)
max. 600(2)
“Gentle wash”
Selectable
Selectable
Selectable
Wash rhythm
normal
normal
normal
low(1)
low(1)
low(1)
high
high
high
1h 48 min
1 h 07 min
53 min
Final spin rpm
“Without final spin” available
Water level – wash
– rinse
Approx. running time (Normal cycle)
Explanations:
X Cycle included
– Cycle not included
Interim rinse:
Additional water flows into the drum, and the suds are cooled slightly.
Graduated rinse:
The suds are cooled at the end of the wash cycle by incoming water, and drained in intervals. This
minimizes the danger of creasing by avoiding sudden temperature changes.
(1) Increased water level:
The water level can be increased from the normal level to a higher level by pressing the „ Water plus”
button.
(2)
16
Program sequence
WOOLENS
ß
–
Starch
ß
Spin
Fine rinse
–
–
–
–
–
–
–
–
–
–
–
–
–
2
–
–
2
–
–
–
–
–
–
–
–
max. 1600
max. 900(2)
ß
max. 1200(2)
–
ß
ß
max. 1600
–
–
ß
–
Woolens
normal
–
–
low
low
low
–
–
–
–
high
38 min
18 min
7 min
14 min
Graduated spin:
The speed is gradually increased, until the final spin speed is reached.
Final spin:
The maximum spin speed is held constant for a fixed period of time.
In the program PERMANENT PRESS, WOOLENS and Fine rinse the spin speed is automatically limited
to 900 rpm and in the FINE/DELICATES program to 600 rpm, even if the selector has been set to a
higher speed. A lower speed can also be selected.
Woolens:
Wool is susceptible to damage when it is wet. Agitation times during this program are shorter, and the
drum rotation is slower.
„Without final spin”:
At the end of the final rinse the wash remains suspended in water if the SPIN SPEED SETTING is set to
„ Without final spin”. This helps to reduce creasing if the laundry will not be removed immediately upon
completion of the cycle.
17
Textile care symbols
Textile care symbols
Some clothing manufacture’s place textile care symbols on their products. The
following is an explanation of some of
these symbols.
Washing (°C)
987
COTTONS
4321 PERMANENT PRESS
21
FINE/DELICATES
a@
WOOLENS
The significance of the bar beneath the
wash tub is:
no bar
e
bar
normal (maximum) agitation;
used in the Cottons program
reduced (medium) agitation;
used in the Permanent Press,
Gentle wash, or Delicates
program.
f
broken
bar
g
minimal agitation;
used in the Woolens program
/
h
ABC
D
y
Hand wash
z
not suitable for chlorine
bleaching
do not wash
dry clean only
do not dry clean
suitable for chlorine
bleaching
Tumble dry
q
r
s
at normal temperature
at low temperature
do not tumble dry
Ironing
I
H
G
J
hot iron
medium hot iron
cool iron
do not iron
Temperature Conversion Chart
18
°C
30
40
50
60
70
80
90
°F
85
105
120
140
155
180
190
Additional options
Additional options
By using the pushbuttons to select one
or more additional options, basic programs can be tailored to the type of
laundry being washed.
The “Water plus” option is available in
the following programs:
– The wash and rinse cycle in COTTONS.
– The wash cycle in PERMANENT
PRESS.
“Gentle wash”
When the “Door” button is pressed, the
other buttons will spring out, cancelling
any additional options.
“Pre-wash”
– Use for heavily soiled or stained
laundry items.
– Drum movement is reduced by half
for gentle washing of slightly soiled
laundry items, or delicate fabrics
which otherwise tend to pill.
Available in the “COTTONS” and “PERMANENT PRESS” programs.
“Rapid wash”
– Available in the “COTTONS”, “PERMANENT PRESS” and “FINE /
DELICATES” programs.
– Offers a quick wash cycle (approx.
38 minutes)
– Can be used with or without a
pre-wash. “Rapid wash” is available
in all programs.
The required amount of detergent
should be added to compartment i.
To operate:
“Water plus”
1 Push in the ON/OFF button to turn on
the machine.
Slightly increases the water level, best
used;
2 Push in the Pre-wash button if de-
– For particularly delicate fabrics in addition to the “Gentle wash” option,
3 Push in the Rapid wash button. No-
– In hard water areas, if additional
water is required for dispensing detergent,
– In soft water areas to enhance washing and rinsing results.
– By people who are allergic to detergents.
sired.
tice the thick gray ring surrounding
the button. This gray ring corresponds to the gray ring surrounding
the COTTONS, PERMANENT PRESS,
and FINE / DELICATES programs on
the Selector switch. As long as the
program selected is within this ring,
the actual wash times will be close to
what is displayed.
4 Choose the desired program and the
machine will start.
19
Delay start/Time remaining indicator
Delay start/Time remaining indicator
Time display “H:min”
Remaining time
The Time display has a dual function.
The display will count down the time remaining in the wash program in one
minute increments as soon as:
– It shows the time remaining in the
wash program, and
– it shows the programmed “Start delay” remaining before the program
begins.
Delay Start
Upon turning on the machine, the “Delay start” lamp will be blinking. The start
of the program can be delayed up to 9
hours and 30 minutes.
Entering the start delay:
– Press the button to the left of the “Delay start” lamp as many times as
necessary until the desired time delay appears. Each time the button is
pressed, the delay will increase by
30 minutes.
Select the program
– The display will begin counting backwards in one minute increments. The
“Delay start” lamp will remain lit.
Program start
– When the delay time reaches zero,
the “Time remaining” lamp will illuminate, and the “Delay start” lamp will
go out. The display will now show the
time remaining in the wash program.
Deleting the start delay
– When the display reaches “9 h 30
min”, press the button to the left of
the “Delay start” lamp and the delay
will be deleted.
20
– A program is selected, or
– The time delay reaches zero.
Cleaning and care
Cleaning and care
To clean the washing machine:
^ Clean the casing using a mild nonabrasive detergent or soap and
water, and wipe dry with a soft cloth.
^ Clean the control panel with a damp
cloth.
^ If necessary, the drum can be
cleaned using a stainless steel
cleaner according to the manufacturer’s instructions. A stainless steel
cleaner specially formulated for use
in washing machines is available
from the Miele Technical Service Department.
Do not use abrasive cleaners or solvents.
^ Clean the dispenser compartments
and the fabric softener duct.
Cleaning the detergent drawer
Should the detergent drawer become
clogged or dirty, it can be cleaned as
follows:
^ Pull the drawer out until it stops.
^ Remove the siphon tube from compartment p and rinse in warm water.
^ Press down the red release lever and
pull the drawer out of the machine.
21
Cleaning and care
Cleaning the drain pump and
lint trap
^ Place a 2 quart (2l) capacity container underneath the drain tube.
Occasionally small objects, (buttons,
coins, etc.), may find their way into the
lint trap. If the machine does not drain
completely, the lint trap should be
checked to ensure that it is free of foreign objects.
^ Turn the lint trap lid counterclockwise
2 - 3 times. Do not remove it. Approx.
2 quarts (2 l) of water will drain out of
the hose.
To clean the lint trap, remove the tool
from behind the detergent dispenser
drawer.
If the main drain hose is clogged, more
water will be retained in the machine
(max. 6.5 gal/25l). In this case, tighten
the lint trap lid and empty the dish before repeating the procedure as often
as necessary.
Caution: If laundry has been
washed at a high temperature, the
water draining out of the machine
will still be hot! Stop and allow it to
cool before proceeding.
^ Open the lint trap door.
22
Cleaning and care
^ Once the flow of water stops, remove
the lint trap and clean it.
^ Clean the inside of the lint trap housing.
^ Remove any foreign objects (e.g.
buttons, coins, etc.) or lint.
^ Turn the drain pump impeller (in the
back of the chamber) by hand to
check that it rotates freely.
Remove any detergent deposits or foreign objects from the thread of the filter
housing and filter unit before replacing
the lint trap.
23
Cleaning and care
Cleaning the water inlet filters.
The washing machine has two water inlet filters to protect each inlet valve.
To clean the filter in the inlet hose:
^ Turn off the valve.
^ Carefully unscrew the inlet hose from
the valve by turning the connector
counterclockwise using a wrench if
necessary.
^ Remove the rubber seal from the
connector.
^ Using needle nose pliers, grasp the
plastic filter and pull it out of the hose
connector. Clean the filter under running water and carefully remove any
large particles.
^ Replace the filter and seal and reconnect the hose. Slowly turn on the
valve and check for leaks.
24
Inspect the inlet hose regularly. The
hose should be replaced if there are
small cracks in the surface, or if it has
been otherwise damaged or cut.
If a replacement is necessary, use only
a genuine Miele inlet hose as other
hoses may burst under pressure.
To clean the filter in the inlet valve:
^ Using a wrench, carefully loosen and
remove the plastic hose connector on
the inlet valve.
^ Using needle nose pliers, withdraw
the plastic filter by pulling on the bar
(see illustration). Rinse under water to
clean, and then replace.
The two filters - one at the pressure
hose/valve connection and one at
the inlet connection to the solenoid
valve - must not be removed.
Problem solving guide
Problem solving guide
Any work done on the electrical components of this appliance should only
be performed by a qualified technician in accordance with all local and national codes and regulations. Unauthorized repairs may result in personal
injury and machine damage.
What to do if, . . .
Cause . . .
. . . The program does
not start?
There is no power.
The “ON” indicator lamp
has not lit up.
/
. . . The “Check
indicator lamps are
flashing?
Remedy . . .
Check that..:
– the door is properly
closed.
– the machine is plugged
in.
– the fuse or circuit
breaker has not tripped.
– Turn the program seThere is power and the
lector to the “Finish /
“ON” indicator lamp is on,
but the program selector
Start” position.
has not been turned to
– Select a program.
the “Finish / Start” position.
” The “Check p” indicator – The inlet valve is not
opened far enough.
lamp is flashing, and the
program has started.
– The inlet hose is
The water inlet is blocked.
kinked.
– The water pressure is
too low. Call the Technical Service Dept.
The “Check q” indicator – Clean the drain pump
and lint trap.
lamp is flashing.
The drain is blocked.
– Has the drain hose
been installed too
high? (max drain height
= 4 feet)
25
Problem solving guide
What to do if, . . .
Cause . . .
Remedy . . .
. . . the “Pre-wash”,
“Main wash” or “Rinse
1-2" indicator lamp is
flashing?
There is an internal problem.
Restart the program. If
the indicator lamp starts
flashing again, call the
Service Dept.
. . . The ”Rinse & hold“ The spin speed selector
indicator lamp is flash- has been set to ”Without
final spin”.
ing?
. . . The “Final spin” in- The final spin has not
taken place. The machine
dicator lamp is flashdetected an imbalance.
ing?
Select a spin speed setting.
– Redistribute the laundry load.
– Select a spin speed.
– Turn the program selector to “Spin”.
The
child-safety
feature
is
Go
back to the program
. . . The “ON” indicator
activated,
and
the
prooriginally
selected.
lamp is flashing?
gram has been changed.
. . . The wash is too wet The spin speed selected Select a higher spin
was too low.
speed next time.
after the final spin?
The load was not evenly Mix large and small items
in a load to avoid imbaldistributed in the drum,
and the laundry was spun ance.
at a reduced speed to
protect the machine.
The drain pump or lint
Clean the drain pump or
trap is clogged.
lint trap.
The four feet are not rest- Level the machine (see
. . . The machine
Installation Section).
shakes during the spin ing evenly on the floor.
The shipping struts have Remove the shipping
cycle?
not been removed.
struts.
26
Problem solving guide
What to do if, . . .
Cause . . .
. . . In spite of adequate A water inlet filter is
blocked.
water supply, the water
flows slowly into the machine?
The water pressure is
. . . Large residues of
too low.
detergent remain in the
dispenser drawer?
Remedy . . .
Clean the water inlet filters.
– Clean the filters in the
water inlet system.
– It may help to select
“Water plus”.
Detergent used with a
Pour detergent into the
water softener tends to dispenser before adding
become sticky.
any water softener.
The
dispenser
drawer
Make
sure the drawer is in
. . . Fabric softener is
was
not
pushed
in
when
all
the
way.
not completely disthe
fabric
softener
was
pensed or water remains
compartment? being dispensed.
in the
The siphon tube is either Clean the siphon tube.
incorrectly positioned or
clogged.
Use only a low-sudsing – Follow recommenda. . . There is an excesdetergent at the approtions on the package.
sive build-up of foam?
priate temperature.
– Take the water hardness
into account.
– Use less detergent for
lightly soiled or small
loads.
–
Not
enough
detergent
Use a decalcifier suit. . . Lime deposits aphas
been
used.
able for use in washing
pear on the drum surmachines. A product
face?
called “Quick” is available from the Miele
Technical Service Dept.
– Use the correct amount
of detergent for the
water hardness in your
area.
27
Problem solving guide
What to do if, . . .
Cause . . .
. . . Grey greasy particles cling to washed
laundry?
Insufficient detergent was – Add more detergent.
used to break down the
– Before washing the
particles of grease in
next load run a COTheavily soiled laundry.
TONS 120°F program
with detergent but without a load to clean the
machine.
Liquid detergents do not – Use a general purpose
contain bleaching agents.
powder detergent containing a bleaching
They do not remove
agent.
stains as well as powdered detergents contain- – Pre-treat stains with a
ing non-chlorinated
stain remover.
bleaches.
This is a normal
These fabrics must be
occurance of everyday
handled with care. Wash
wear with some fabrics.
them using the
DELICATES program
and/or select „ Gentle
wash“ in the future.
. . . Liquid detergent
does not give the desired result?
. . . After washing pilling appears on the fabric?
28
Remedy . . .
Problem solving guide
Opening the drum door during
a power failure
To prevent water from spilling on to
the floor, make certain the machine
is drained before opening the door.
^ Turn off the washing machine.
^ Open the lint trap door and drain any
water as described in the Cleaning
and care section.
To check water pressure
^ Place a bucket under the water supply valve.
^ Turn on the valve.
If 1 gallon (3.8 l) of water flows into the
bucket in 15 seconds the water pressure is adequate.
Electricity
– If there is any doubt about the electrical supply or connection, consult a
qualified electrician.
^ Pull down the ring in the upper right
corner of the access area, and the
door will open.
Never reach into a rotating drum! Always make sure the drum is stationary before reaching in to remove
laundry. Reaching into a moving
drum is extremely dangerous.
29
After sales service
After sales service
If problems occur that cannot be easily
fixed, or if the appliance is under warranty, please contact:
– The nearest Miele Technical Service
Department (see back cover).
When contacting the Technical Service
Department, please have the model
and Serial numbers of your appliance
available, both which can be found on
the dataplate visible above the front
glass on the inside of the door.
30
INSTALLATION INSTRUCTIONS
INSTALLATION INSTRUCTIONS
Installation surface
Installation
A concrete floor is the most suitable
surface for a washing machine. Concrete floors are less prone to vibration
during the spin cycle than wooden
floors.
Lift the machine from its shipping pallet
and move it to the installation site.
Please note:
Please note the following points:
^ Ensure that the machine feet and the
floor are dry to prevent slippage during the spin cycle.
^ The machine must be level and securely positioned.
^ To avoid vibration during spinning,
the machine should not be installed
on soft floor coverings.
^ Do not lift the machine by the drum
door.
Removing the shipping struts
^ If installation must be on a wooden
joist floor, we recommend the use of
a plywood base at least 11/4" thick by
23 5/8" X 23 5/8" wide (30mm X
600mm X 600mm). Ideally the base
should be large enough to span several joists and should be anchored to
the joists and not just the floorboards.
^ As a general rule, we recommend the
installation of the machine (or
washer/dryer stack) in the corner of a
room where the stability of the floor is
greatest.
^ If the machine is installed on a raised
platform, it should be secured using
retaining clips (available from the
Miele Technical Service Dept.). If installed on a masonary or concrete
base, the base should be provided
with a rim 1/2" to 3/4" (12-20 mm) high.
^ Turn the left shipping strut 90° counterclockwise.
31
INSTALLATION INSTRUCTIONS
^ Turn the right shipping strut 90°
clockwise.
^ Plug the two holes with the plastic
caps provided.
Movement of the machine without the
shipping struts in place should be kept
to a minimum.
The shipping struts should be
stored in a safe place for future use.
They must be reinstalled before the
machine is moved. Reinstallation
can be performed by reversing the
above procedure.
^ Withdraw the two struts together with
the support plate.
32
INSTALLATION INSTRUCTIONS
Leveling the machine
To ensure smooth operation, it is essential that the machine is level.
^ Unscrew each of the four feet as
much as necessary by turning both
the foot 1 as well as the locking ring 2
to the left using a screwdriver (see illustration).
^ Remove the supports, stand the machine on its feet and check to see if it
is level.
Repeat this procedure as often as necessary until the machine stands level.
Failure to level the machine can result
in the machine “banging” in the spin
cycle or “walking” across the floor during operation. Energy and water use
will also increase.
Adjust the four leveling feet as follows:
^ Tip the machine slightly and place a
support, such as a block of wood,
underneath it.
BEWARE : The washing machine is
heavier than it looks! When tipping
the machine, be careful that it does
not slip or slide along the floor. Take
care not to injure yourself or damage any surrounding furniture.
^ Once level, hold the foot 1 immobile
using a wrench while turning the
locking ring 2 to the right using a
screwdriver. Turn each locking ring
until it is tight against the bottom of
the machine frame.
All four locking rings must be tight
against the bottom of the machine.
In addition, check to see that the
feet were not inadvertently unscrewed while tightening the rings.
Running a machine that is not level
or whose feet are not tight may
cause damage to both the machine
and its surrounding area.
33
INSTALLATION INSTRUCTIONS
If a countertop is placed over the
washer, at least a 1/4 gap must be
left between the top of the machine
and bottom of the countertop; and
nothing should be within 1/2” of any
other side of the washing machine.
Washer / Dryer Stack
This Miele washing machine can be installed as part of a washer dryer stack
in combination with a Miele tumble
dryer. The dryer can only be stacked on
top of the washer and never vice versa.
For this purpose, a stacking kit is available from the Miele Technical Service
department or your Miele dealer.
A washer and dryer should never
be stacked without using the
proper stacking kit. Doing so is
extremely dangerous, as the dryer
may vibrate off of the washing
machine during use.
34
INSTALLATION INSTRUCTIONS
Any residual water left in the
machine from the factory testing process can be flushed out
as follows:
^ Do not put any laundry in the machine.
Water hardness reminder
The amount of detergent needed to
wash clothes depends on various factors, including the water hardness in
your area. You can set the water hardness dial in the detergent dispenser as
a reminder.
^ Place 1/4 of the recommended
amount of detergent in compartment
j.
^ Turn on the machine.
^ Press the “Rapid wash” button.
^ Turn the program selector to the
“COTTONS 140°F” program.
^ Any residual water will be flushed out
during the wash program.
^ Turn the dial to the desired setting.
Use the tool supplied with the machine. It is located behind the detergent drawer, on the left hand side
(see Cleaning and Care).
1 = soft, 4 = very hard water
35
Plumbing Connections
Plumbing Connections
Connect the cold water intake hose
(blue mark) to the cold water valve and
the hot water intake hose (red mark) to
the hot water valve.
Turn on the valves and check for leaks.
The water pressure must be within
15-145 psi (1-10 bar). If the water pressure is greater than 145 psi
(10 bar), a pressure reducer must be
installed. If the water pressure is below
15 psi (1 bar), insufficient water may be
available for a complete fill.
The water intake hoses are equipped
with screen filters. Please do not remove these filters.
Please note
If the machine is being connected to a
cold water supply only, both the hot
and cold water intake hoses should be
attached to the cold water valve
through the use of a Y adapter (available at any hardware store). Both hoses
must be connected to a water source,
or the machine will not function properly. Do not connect the washer to hot
water only.
36
Drain connection
The 5 ft. (1.5 m) drain hose may be
connected as follows:
1. Directly into a sink: hook the hose
over the edge of the sink and secure
it firmly (e.g. by tying the hose to the
water faucet).
2. To a stand pipe: place the drain
hose into a 1 1/2" (38 mm) stand pipe
and firmly secure it.
3. To a floor drain: The machine is
equipped with an airgap/anti-siphoning system so that no minimum drain
height is required.
^ The machine drains using a pump
with a maximum delivery height of
4 ft. (1.2 m).
^ Make sure there are no kinks in the
drain hose.
^ If desired, the drain hose may be extended to 15 ft. (4.5 m) maximum.
Electrical connection
Electrical connection
GROUNDING INSTRUCTIONS
This appliance must be grounded.
In the event of a malfunction or breakdown, grounding will reduce the risk of
electric shock by providing a path of
least resistance for the electric current.
This appliance is equipped with a cord
having an equipment grounding conductor and plug. The plug must be
plugged into an appropriate outlet that
is properly installed and grounded in
accordance with all local codes and ordinances.
Warning
Improper connection of the equipment-grounding conductor can result in the risk of electric shock.
Check with a qualified electrician if
you are in doubt as to whether the
appliance is properly grounded.
Do not modify the plug provided with
the appliance; if it will not fit the outlet,
have the proper outlet installed by a
qualified electrician.
ELECTRICAL INSTRUCTIONS
This installation should be done by an
experienced and qualified technician,
in accordance with local codes and
regulations.
The washing machine is supplied with a
5 ft long, 4 wire cord, ending in a NEMA
14-30 P plug, ready for connection to a
120 V/240V (208 V) 60 Hz, AC power
supply.
The proper outlet can be purchased
from any electrical supply dealer or
from the Miele Technical Service Dept.
Ask for a NEMA 14-30 R receptacle.
“EASY INSTALLATION KIT”
If you don’t have a dedicated 4 wire,
120 V/240 V (208 V), 15 Amp line for
this appliance, but you have a 3 or
4 wire, 240 V (208 V), 30 Amp line, you
can use an optional “Easy Installation
Kit”, which will allow you to connect this
appliance to that line.
For more information on the electrical
connection and the “Easy Installation
Kit” please contact
– the nearest Miele Technical Service
Department.
37
Programmable functions
Programmable functions
Warning - To reduce the risk of fire,
electric shock, or injury to persons,
read the IMPORTANT SAFETY INSTRUCTIONS before operating this
appliance.
The following additional functions can
be programmed into the machine if desired:
A High water level (only in
“Cottons” rinses)
Where rinse results are particularly important (e.g. Soap allergies).
B 5th Rinse in the “Cottons”
program
D Program Lock
(Child Safety Feature)
When activated, the washing machine
will ignore any changes made after the
first three minutes of operation. For example, if the Program Selector is
moved to a different setting or an additional function is selected after the first
three minutes, the “On” lamp will flash,
notifying you that the Child Safety Feature has been activated. The program
will, however, continue uninterrupted.
This prevents children from inadvertently changing or stopping a wash program by playing with the dials.
If the Program Selector is turned to its
original position, the “On” lamp will stop
flashing.
For soft water areas (up to 135 ppm
calcium carbonate).
To change a program once the Program
Lock is activated:
In soft water areas, a higher water level
can be selected in addition to a 5th
rinse cycle, if required.
^ Turn the Program Selector to
“Finish/Start”.
C Extra water intake through
compartment i
A 10 second water intake through compartment i during the main wash can
be added.
After about 30 seconds, the sequence
indicator lamps will start flashing in succession. A new program can be selected as soon as the “On” lamp is the
only one remaining lit.
E Additional rinse in Rapid
wash
For soft water areas.
For an extra thorough rinse.
The functions described above can
be programmed by the owner using
the steps shown on the following
pages.
38
Programmable functions
Step 1:
Turn off the machine, close the door, and release all pushbuttons. Set the
Progam Selector Switch to “Finish/Start”.
Step 2:
4 seconds.
^ Press the “ON/OFF”
button
Step 3:
^ Press the “Water plus”
button 4 times (i.e.
press in and out twice)
The “ON” lamp will illuminate and the
“Pre-wash” and “Main
wash” lamps will flash.
39
Programmable functions
ns
Step 4:
Desired function:
A High water level
^ Set the Program Selector to “Fine rinse”.
Continue with Step 5
to activate.
B 5th rinse cycle
^ Set the Program Selector to “Drain”. Continue with Step 5 to
activate.
C Water intake
^ Set the Program Selector to “Starch”.
Continue with Step 5
to activate.
through compartment i
D Program Lock
(Child safety feature)
40
^ Set the Program Selector to “WOOLENS
cold”. Continue with
Step 5 to activate.
Programmable functions
E Additional rinse in
Rapid wash
^ Set the Program Selector to “WOOLENS 85°”.
Continue with Step 5
to activate.
Step 5:
^ Press the “Water plus”
button twice (i.e. in
and out once) to toggle the function
“ON/OFF”.
The “Rinse 1-2" lamp
will illuminate when the
function is activated.
Step 6:
^ Press the “ON/OFF”
button.
41
Programmable functions
To check if the function has
been stored:
Deleting the additional functions:
^ Perform Steps 1 to 4.
Follow the same instructions given under “To activate the additional functions”, steps 1 to 5.
If the “Rinse 1-2" lamp lights, the programmable function is active.
^ Press the “ON/OFF” button. This finishes the check of the programmable
function.
If, after Step 2, the programm selector is accidentally turned to a setting
other than one of the three shown:
– If the “Rinse 1-2" indicator does
not light – no function was
activated.
– If the “Rinse 1-2" indicator
lights – proceed as in “Deleting
the additional functions”.
Exception: the “Rinse 1-2" indicator
lamp will light up if the programm
selector is set to “COTTONS 190°F".
42
When the “Rinse 1-2" lamp goes out;
^ Press “ON/OFF”.
The additional function has now been
deleted.
Technical data
Technical data
1.1 Dimensions
Height
331/4“ - 34"
Height without lid
321/4" - 33"
Width
231/2“
Depth
(including distance from wall)
24"
Weight
220 lbs.
Capacity
11 lbs. dry laundry
Rated load
2.8 kW
Circuit breaker
15 Amp
Water pressure
14.5-145 p.s.i
Maximun drain height
4.0 ft.
Drain hose diameter
1" I.D.
Maximum drain length
15 ft.
Power supply
120 V/240 V
(208 V)
Max floor load
360 lbs
~ single phase
60 Hz, AC
43
Technical data
1.2 Specifications
Hot and cold water hoses come
equipped with 3/4“ Female hose thread
connections.
Drainage is via a 5 ft. long, 1 1/4“ OD
hose.
This washing machine is supplied with
a 5 foot long cable with plug for connection to a 120/240 V (208 V) 60 Hz
(3-pole-4 wire grounding) power supply.
Program duration (approximate):
Cottons without prewash
Rapid wash - Cottons (3.5 lbs)
190°F
140°F
1 h 48 min
38 min
Spin speed:
Detergent dispenser:
Automatic for:
Temperature control:
44
Pre-wash
Main wash
Fabric softener or starch
45
46
47
Alteration rights reserved/004
3200
These instructions are printed on 100% unbleached, recycled paper are completely Biodegradable.