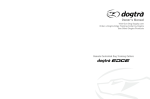
1
Owner's Manual
C
2
Copyright 2010 Dogtra Company (3)
3
by Dogtra
Portable Remote Controlled Dog Training Collars
Owner’s Manual
Please read this manual before operating your system,
and keep it for future reference.
1
Product Safety and
Health Statements
Proper e-collar use
Dogtra e-collars are intended for the sole
SXUSRVHRIEHKDYLRUPRGL¿FDWLRQRIGRJV
They are NOT intended for human use or
use on other animals. Dogtra Company
does not assume any liability for the
improper use of a Dogtra e-collar.
Aggressive dogs
Dogtra highly recommends consulting a
dog training professional when using an
2
Product Safety and Health Statements
e-collar to correct dogs that are aggressive
towards other dogs or people.
Interference with other electronics devices
Dogtra’s industry-leading technology
filtering system ensures minimal
interference with other electronic devices
(garage door openers, mobile phones,
etc.). Our digital microprocessor offers
thousands of unique codes to eliminate
frequency match-up with other Dogtra
e-collars. Dogtra recommends consulting
your physician if you are going to use the
e-collar and you have any type of medical
devices.
Inadvertent activation
If the constant button is held down for 12
seconds or more, the unit will automatically
shut down. It reactivates when the button is
released and depressed again.
3URSHU¿W
A loose fit can allow the collar to move
around on the dog’s neck. When this
happens, the contact points may rub the
skin and cause irritation. If the unit is too
loose, the contact points will not make
proper contact and your dog will not
receive consistent stimulation.
Duration your dog can wear the unit
Leaving the collar/receiver in the same
location on the dog’s neck for an extended
period of time can cause skin irritation.
If the dog is to wear the e-collar for long
periods, occasionally reposition the collar
so that the contact points are moved to a
different location on the dog’s neck. Make
sure you check for skin irritation each
time you use the unit. If your dog exhibits
signs of skin irritation, consult with a
veterinarian.
Product Safety and Health Statements 3
Reaction to the stimulation
Every dog has a different tolerance and
reaction to the stimulation. Please look at
your dog’s reaction to find out just right
stimulation level. The stimulation level
may vary depending on the situation
and distractions. Normally a distracted
dog (chasing another dog, squirrel, etc.)
will require a higher level of stimulation
compared to when there is no distraction.
Training Methods
E-collars can be used with many different
methods. If you have any concerns in the
training methods provided by Dogtra,
consult with a dog training professional.
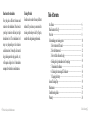
Table of Contents
At a Glance
Main Features of the iQ
Overview
Understanding your training system
1. How to turn on/off the unit
2. How the buttons work
+RZWR¿WWKHFROODURQWKHGRJ
4. Finding the right stimulation level for my dog
5. To maximize the distance
6. Checking the status using LED indicator
7. Charging the battery
General Training Tips
Maintenance
Troubleshooting Guide
Warranty
4
Product Safety and Health Statements
6
7
8
10
11
12
13
14
15
16
17
19
22
23
26
Table of Contents 5
At a Glance
Main Features of the iQ
Included in Package
Transmitter
Receiver
Battery charger
Splitter cable
At a Glance
Nick/constant/pager
Water-resistant transmitter
Low/medium stimulation
400-yard range
For dogs as small as 10 lbs
100 stimulation levels
2-hour quick charge
Owner’s manual
Optional Accessories
Field Auto Charger: designed for use with 5-volt cigarette lighter in your car.
European Charger: designed for use with 230V AC electrical outlets in Europe.
To purchase optional accessories, please visit Dogtra online store (shop.dogtra.com)
or call our customer service at 1-888-811-9111.
6
Waterproof receiver
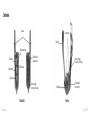
Main Features of the iQ 7
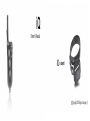
Overview
Antenna
Contact points
Collar strap
Stimulation intensity
dial
On/off activation
magnet (red dot)
Nick button
Constant button
Battery charging
receptacle / rubber plug
LED indicator
Pager button
Battery charging
receptacle / rubber plug
Transmitter
8
Overview
On/off magnetic
switch (red dot)
LED indicator
Receiver
Overview
9
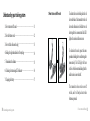
1. How to turn on/off the unit
Understanding your training system
1. How to turn on/off the unit
2. How the buttons work
11
+RZWR¿WWKHFROODURQWKHGRJ
4. Finding the right stimulation level for my dog
5. To maximize the distance
13
14
15
6. Checking the status using LED indicator
7. Charging the battery
12
16
To activate the receiver/collar, place the red
dot on the back of the transmitter to the red
dot on the collar/receiver. Hold the two red
dots together for a moment until the LED
light on the receiver/collar comes on.
To deactivate the unit, repeat the same
procedure holding the two red dots together
momentarily. The LED light will turn
red for a brief moment indicating that the
collar/receiver is now shut off.
17
The transmitter does not have on/off
switch, and it will only activate when
buttons are pressed.
10
Understanding your training system
1. How to turn on/off the unit 11
2. How the buttons work
N - Nick button
Nick is a single rapid pulse of electrical
stimulation.
C - Constant button
Constant gives constant stimulation as
long as the button is pushed, for up to 12
seconds. The unit has an automatic shut off
should the button be depressed for more
than 12 seconds.
There are three buttons in front of the
transmitter.
P - Pager button
Pager is a non-stimulating vibration.
3. How to fit the collar on the dog
The collar should be fitted so that the
surgical stainless steel contact points
press firmly against the dog’s skin. When
properly fitted, you should be able to fit
a finger or two snugly in between the
contact points and your dog’s skin. When
properly fitted, the receiver/collar should
not move on the dog. The best location for
the receiver box is either side of the dog’s
windpipe.
this happens, the contact points may rub
the skin and cause irritation. If the collar
is too tight, the dogs may have difficulty
breathing.
A loose fit can allow the receiver/collar
to move around on the dog’s neck. When
12
2. How the buttons work
+RZWR¿WWKHFROODURQWKHGRJ 13
4. Finding the right stimulation level
for my dog
Stimulation level is controlled by the
stimulation intensity dial: (0) being the
lowest level and (100) being the highest
level. Setting adjustment depends on your
dog’s temperament and threshold for
stimulation. Always start at the lowest level
and work your way up. An appropriate
level is when the dog responds to the
stimulation with a mild negative reaction
such as jerking/tensing of the neck muscles.
When the dog’s attitude changes, especially
during times of increased excitement or
distraction, you may need to adjust the
intensity level upwards.
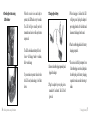
5. To maximize the distance
iQ has a 400-yard range. Depending on the
way you hold your transmitter, the range
may vary. Hold the transmitter away from
your body to get the greatest range. For
maximum signal strength, keep your unit
properly charged.
Maximum Range
14
4. Finding the right stimulation level for my dog
Typical Range
* Avoid touching the antenna as the range
may substantially decrease.
Minimum Range
5. To maximize the distance 15
6. Checking the status using
LED indicator
When the receiver is on and ready to
RSHUDWHWKH/('ÀDVKHVHYHU\VHFRQGV
The LED will glow steadily on both
transmitter and receiver while any buttons
are pressed.
The LED color indicates battery life level.
Green = full charge, Amber = medium,
Red = needs charge
If you continue to operate the unit when
the LED is red (needs charge), it will shut
down.
16
6. Checking the status using LED indicator
7. Charging the battery
3. When charging is finished the LED
will glow green. Unplug the adapter’s
power plug from the AC wall outlet and
disconnect the charger from the unit.
4. Place the rubber plug back in the battery
charging receptacle.
1. Remove the rubber plug temporarily and
plug in the charger.
2. Plug the adapter’s power plug into a
standard AC wall outlet. The LED will
glow red.
* The receiver is still fully waterproof even
if the rubber plug is not closed, but place
the rubber plug in the battery charging
receptacle to make sure dirt does not get
inside.
7. Charging the battery 17
Warning
1. Fully charge the unit before using it for
WKH¿UVWWLPH
2. Do not charge the batteries near any
ÀDPPDEOHVXEVWDQFHV
3. Fully charge the batteries if the unit is to
be stored without use for a period of one
month or more.
4. Always use Dogtra approved chargers.
If improper chargers are used, the LED
ZLOOÀDVKLQDPEHURUPD\QRWOLJKWXSDW
all.
18
7. Charging the battery
General Training Tips
Getting started with your iQ training collar
Your dog must know some very basic
obedience commands before beginning
training with the iQ. A dog learns by first
being shown a command, followed by lots
of repetition over an extended period. As the
dog becomes proficient at these commands,
the trainer can introduce distractions and
different locations to strengthen them. Throw
in the correct amount of positive and negative
reinforcement and you should end up with a
well-mannered dog.
Obedience training on the leash
Your dog must fully understand the
obedience commands (sit, stay, here, heel
and kennel) before using the e-collar for
reinforcement of these commands. A leash
attached to standard collar is used to "teach"
the dog the basic obedience commands (here,
heel, sit, and stay). A tug on the leash/collar
is used to reinforce the command. When
the dog complies with the command, use
positive reinforcement/praise. Once the dog
understands these commands, the e-collar can
be used to reinforce them.
General training tips 19
Beginning electric collar training
When you feel your dog understands the
obedience commands on the leash we can
now start with the electric collar training.
With the dog on the leash wearing the electric
collar continue with your obedience drills.
Light stimulation (nick or constant) is going
to be applied as a command is given, the
stimulation is removed as the dog complies.
Through repetition, a dog learns to turn
off the light stimulation by performing the
command. E-collar training is another form
of negative reinforcement, similar to the leash
and standard collar training. When the dog
complies with the command, we use praise/
20
General training tips
positive reinforcement. The final step is the
avoidance phase in which the dog learns that
he can avoid the stimulation altogether by
performing your commands. When these
training procedures are complete, the electric
collar is used as a reminder when the dog
does not comply with your commands at
KRPHRULQWKH¿HOG.HHS\RXULQLWLDOWUDLQLQJ
sessions short and positive. Dogs have a short
attention span, especially young dogs.
situation. By using only enough stimulation
to get your point across, you will have a more
controllable environment and a dog that is
under less stress. Animals (and humans)
perform better in a less stressful environment.
For more training information, please visit
our website at www.dogtra.com
How much stimulation to use
Always start with low levels of stimulation
and work your way up depending on the
disposition of your dog and any given
General training tips 21
Maintenance
Basic maintenance
Be sure the rubber plugs are always
secured when the collar is in use. After
each session, carefully inspect your unit
for any missing parts or casing damage.
Broken casing on the receiver may affect
the waterproof guarantee of the unit. Rinse
the receiver after each session and clean off
any dirt or debris.
Storage maintenance
Your unit should be fully charged before
extended storage. During storage, the unit
22
Maintenance
should be charged every one month, and
once before the first use. When traveling,
try to store your units in room or slightly
warmer temperatures. Do not transport the
unit exposed in extreme climates.
Troubleshooting
If you suspect your unit is malfunctioning
please refer to the “Troubleshooting Guide”
before sending your unit in for service. If
you have any questions or concerns, you
may direct your inquiries to info@dogtra.
com or call 1-888-811-9111.
Troubleshooting Guide
1. My dog is not reacting to the collar.
- Make sure the receiver is turned on. Place
the two red dots together to activate the
receiver.
- Be sure the collar strap is tight enough so
both contact points are touching the dog’s
skin.
- The contact points may be too short for
your dog’s thick or long coat. To place
an order for longer contact points, please
call 1-888-811-9111. If you are already
using longer contact points, you might
need to trim down the hair on the dog’s
neck, so both contact points are touching
the skin.
- The intensity level may be too low
IRU \RXU GRJ .HHS LQFUHDVLQJ WKH
stimulation until the dog responds
usually by neck movement, head
shaking, looking over his shoulder, etc.
(response may be very subtle so pay
attention.)
2. The LED indicator light comes on, but
I do not feel any stimulation.
- Your tolerance may be higher than your
dog’s. You may need to try the unit on
\RXU¿QJHUWLSVZKHUHVHQVLWLYLW\LVKLJKHU
Troubleshooting Guide 23
and/or increase the stimulation level. Be
sure both contact points are touching
ERWKRI\RXU¿QJHUWLSV
- The battery may be low, check the LED
light for battery life.
- If you have a full charge, and you have
done all of the above, your unit may need
to be serviced. Please contact Customer
Service at [email protected] or 1-888811-9111.
3. The transmitter has no range, or
stimulation is less when the dog is
farther away.
- Check to see if your fingers are
24
Troubleshooting Guide
touching the antenna as the range may
substantially decrease.
- The range indicated on the unit’s box
is for flat terrain(line of sight). Heavy
brush, trees, hills or moisture will affect
the range of your unit. For best range,
hold the transmitter vertically above
your head, and/or try moving to higher
ground.
- Any electrical conductors will affect the
range, such as cars, chain-link dog runs,
metal buildings, and radio towers. For
best results, operate away from these
structures.
4. My units are not holding a charge.
- The charging pin may be damaged. A
metal pin inside the charging port should
VWDQGVWUDLJKWXSDQG¿UPLQWKHFHQWHU,I
the pin is wobbling, broken or missing,
you will need to send the unit in to the
Repair Dept. The charging port must be
clean prior to charging, clean the dirt out
with a cotton swab and some rubbing
alcohol. If the dog is in salt-water, be
sure to rinse the receiver and charging
port with clean water.
- For Dogtra units over two years old from
the purchase date, the batteries may need
to be replaced. You can replace them
yourself by contacting Dogtra. Damages
incurred to the unit due to improper
battery installation are not covered
under any warranty. Dogtra strongly
recommends sending the unit in for
inspection.
5. My dog has skin irritation
- This may be due to the contact points. If
your dog exhibits signs of skin irritation,
consult with a veterinarian. Once the
dog’s skin returns to a normal condition,
continue to use the collar and check your
dog’s neck each time you use the unit.
Troubleshooting Guide 25
WARRANTY AND REPAIR
INFORMATION
1-Year Comprehensive Warranty
Dogtra Company provides the original purchaser with a
1-YEAR WARRANTY for the iQSeries, EF 3000 Gold,
RR Deluxe, YS300, and YS500. The warranty begins from
WKHGDWHRISXUFKDVH)RUWKH¿UVW\HDUFRYHUDJHLVIRU3DUWV
Labor, and Accessories.
$IWHUWKH¿UVW\HDUWKHFRVWRI3DUWV$FFHVVRULHV/DERUIHHV
and Shipping fees incurred are the customer’s responsibility.
Labor fees will be variable depending on the extent of the
work required.
To Qualify for the Dogtra Warranty
All products must be registered and/or a proof of purchase
is required to initiate repair work under warranty. To register
your Dogtra product, log onto our website at www.dogtra.
com, click on the warranty registration link, and fill out
the required information. Registration must be completed
within 30 days of purchase. If you do not have access to a
computer, you can call our toll free number at 1-888-8119111, and one of our customer service representatives will
26
Warranty and repair information
register the product for you. If you were unable to register
your product within 30 days of purchase, we will accept all
products for repair with a proof of purchase. We strongly
recommend keeping the original receipt. If your product is
not registered and a proof of purchase is not available at the
time of service, Dogtra will estimate the age of the unit by
the serial number. Serial number estimates can differ from
the actual purchase date. A serial number estimate is the only
method of determining an approximate date of purchase
without product registration or a proof of purchase.
Not Covered Under Warranty
Dogtra DOES NOT offer warranty for products that have
been bought secondhand or as a resold product.
Dogtra DOES NOT replace defective units or provide
refunds for products purchased from us after 30 days from
the date of purchase.
Dogtra DOES NOT cover the cost of shipping outside of the
Continental United States.
Issues of replacement and refunds on units purchased less
than 30 days from an authorized dealer must be addressed
to the dealer directly. If the products purchased from an
authorized dealer are after 30 days from the date of purchase,
please send the units to Dogtra for service and repair.
Dogtra DOES NOT cover the cost of repairs and
replacements due to misuse by the owner or dog, improper
maintenance, and/or lost units. Any water damage on the
Water Resistant Transmitters of the 175NCP, 180NCP,
200NCP series, 1400NCP Series, 1500NCP Series, and iQ,
and the Water Resistant Receivers of the RRS, RRD, and RR
Deluxe, will not be covered. All replacement costs for either
the transmitter or receiver will be the owner’s responsibility.
The warranty is void if the unit has been altered or an
unauthorized person has damaged the unit while attempting
repair work.
%DWWHU\UHSODFHPHQWE\WKHFXVWRPHUGXULQJWKH¿UVW\HDURI
the 1-Year Comprehensive Warranty is not recommended.
If the customer chooses to replace the batteries, any damage
to the unit during the change-out by the owner will void the
warranty.
The removal of serial numbers from any Dogtra prodcuts
will void the warranty.
Dogtra reserves the right to retain and discard any parts or
accessories that have been found damaged upon replacement
and repair.
sending it to Dogtra for Service.
The cost of shipping products under warranty back to Dogtra
is the customer’s responsibility. Dogtra is not responsible for
units damaged or lost in transition to Dogtra. Dogtra is not
responsible for loss of training time or inconvenience while
the unit is in for repair work. Dogtra does not provide loaner
units or any form of compensation during the repair period.
A copy of the sales receipt showing the purchase date may
be required before warranty work is initiated.
Please include a brief explanation outlining the problem
and include your name, address, city/state/zip code, daytime
phone number, evening phone number, and email address.
Or you can visit our website at www.dogtra.com for a
service request form. If the repair costs are not covered
under warranty, we will call you for payment information
and authorization. For any questions concerning your Dogtra
products, call us toll free at 1-888-811-9111, M-F 8:30AM
- 4:00PM, Pacific Standard Time, or email us at repair@
dogtra.comIRUVSHFL¿FUHSDLULQTXLULHV
Procedure for Repair Work
If the unit is malfunctioning, please refer to the “Trouble
Shooting Guide” in the Owner’s Manual and call customer
service at 1-888-811-9111, for technical support, before
Send repair units to :
Dogtra Company / Repairs
22912 Lockness Avenue Torrance, CA 90501 U.S.A.
Warranty and repair information 27
iQ by Dogtra Company
22912 Lockness Ave.
Torrance, CA 90501
U.S.A.
Tel: 310-534-0101
Fax: 310-534-9111
Toll free: 1-888-811-9111
Email: [email protected]
Website: www.dogtra.com
Store website: shop.dogtra.com
28