1
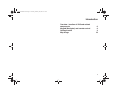
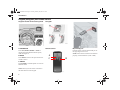
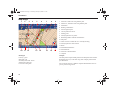
VOLVO S60
volvo navigation system (vns)
operating manual
Volvo Car Corporation TP 10365 (USA & Canada), AT 0820, Printed in Sweden, Göteborg 2008, Copyright © 2000-2008 Volvo Car Corporation
VNS P2w820us.book Page 1 Thursday, February 28, 2008 2:11 PM
Volvo Navigation System (VNS)
VNS is a navigation system developed by Volvo, which is designed to
help guide you to the destination of your choice.
The system includes features that enable you to set itineraries, search for
certain types of facilities along your route, store special destinations, etc.
The system indicates the vehicle’s current location, and shows part or all
of the route to your destination, depending on settings you have made. If
at any time you should decide to deviate from the route originally set by
the system, a new route to the destination will automatically be calculated.
1
VNS P2w820us.book Page 2 Thursday, February 28, 2008 2:11 PM
END USER LICENSE AGREEMENT
You have acquired a device (ROAD & TRAFFIC
INFORMATION SYSTEM) which includes software
licensed by Volvo Car Corporation from one or more
software licensors. Such software products, as well as
associated media, printed materials, and “online” or
electronic documentation (NAVIGATION
SOFTWARE) are protected by international intellectual property laws and treaties. The SOFTWARE
is licensed, not sold. All rights reserved.
IF YOU DO NOT AGREE TO THIS END USER
LICENSE AGREEMENT (“EULA”), DO NOT USE
THE DEVICE OR COPY THE SOFTWARE.
INSTEAD, PROMPTLY CONTACT VOLVO CAR
CORPORATION FOR INSTRUCTIONS ON
RETURN OF THE UNUSED DEVICE(S) FOR A
REFUND. ANY USE OF THE SOFTWARE,
INCLUDING BUT NOT LIMITED TO USE ON
THE DEVICE, WILL CONSTITUTE YOUR
AGREEMENT TO THIS EULA (OR RATIFICATION OF ANY PREVIOUS CONSENT).
GRANT OF SOFTWARE ARE LICENSE. This
EULA grants you the following license:
You may use the SOFTWARE only on the DEVICE.
Connectivity Software. Your Device package may
include desktop connectivity software contained on a
CD-ROM disk. You may install and use the
component(s) of the software contained on the CDROM disk on a computer or computing device with
which you exchange information with the Device, in
accordance with the terms of the end user license
agreement provided with such component(s). If no
separate end user license agreement is provided, you
may install and use only one (1) copy of such
component(s) on a single computer or computing
device with which you use the Device.
2
NOT FAULT TOLERANT. THE SOFTWARE IS
NOT FAULT TOLERANT. VOLVO CAR CORPORATION HAS INDEPENDENTLY DETERMINED
HOW TO USE THE SOFTWARE IN THE DEVICE,
AND MS HAS RELIED UPON VOLVO CAR
CORPORATION TO CONDUCT SUFFICIENT
TESTING TO DETERMINE THAT THE
SOFTWARE IS SUITABLE FOR SUCH USE.
NO WARRANTIES FOR THE SOFTWARE. THE
SOFTWARE is provided “AS IS” and with all faults.
THE ENTIRE RISK AS TO SATISFACTORY
QUALITY, PERFORMANCE, ACCURACY, AND
EFFORT (INCLUDING LACK OF NEGLIGENCE)
IS WITH YOU. ALSO, THERE IS NO
WARRANTY AGAINST INTERFERENCE WITH
YOUR ENJOYMENT OF THE SOFTWARE OR
AGAINST INFRINGEMENT. IF YOU HAVE
RECEIVED ANY WARRANTIES REGARDING
THE DEVICE OR THE SOFTWARE, THOSE
WARRANTIES DO NOT ORIGINATE FROM,
AND ARE NOT BINDING ON, MS.
No Liability for Certain Damages. EXCEPT AS
PROHIBITED BY LAW, MS SHALL HAVE NO
LIABILITY FOR ANY INDIRECT, SPECIAL,
CONSEQUENTIAL OR INCIDENTAL
DAMAGES ARISING FROM OR IN
CONNECTION WITH THE USE OR PERFOMANCE OF THE SOFTWARE. THIS
LIMITATION SHALL APPLY EVEN IF ANY
REMEDY FAILS OF ITS ESSENTIAL
PURPOSE. IN NO EVENT SHALL MS BE
LIABLE FOR ANY AMOUNT IN EXCESS OF
U. S. TWO HUNDRED FIFTY DOLLARS
(U.S.$250.00-).
Limitations on Reverse Engineering, Decompilation, and Disassembly. You may not reverse
engineer, decompile, or disassemble the
SOFTWARE, except and only to the extent that such
activity is expressly permitted by applicable law
notwithstanding this limitation.
SOFTWARE TRANSFER ALLOWED BUT
WITH RESTRICTIONS. You may permanently
transfer rights under this EULA only as part of a
permanent sale or transfer of the Device, and only if
the recipient agrees to this EULA. If the SOFTWARE
is an upgrade, any transfer must also include all prior
versions of the SOFTWARE.
EXPORT RESTRICTIONS. You acknowledge that
SOFTWARE is subject to U.S. jurisdiction. You agree
to comply with all applicable international and
national laws that apply to the SOFTWARE,
including the U.S. Export Administration Regulations, as well as end-user, end-use and destination
restrictions issued by U. S. and other governments.
For additional information see
http://www.microsoft.com/exporting/.
The specifications, design features, and illustrations in this manual are not binding. We reserve
the right to make modifications without prior
notice.
© 2008 Volvo Cars of North America, LLC
VNS P2w820us.book Page 3 Thursday, February 28, 2008 2:11 PM
Introduction
Contents
5
Menu structure
11
Destination
19
Itinerary and guidance
35
Store locations
41
Map
45
Navigation settings
51
Symbols on the map
55
Questions and answers
59
Index
63
3
VNS P2w820us.book Page 4 Thursday, February 28, 2008 2:11 PM
4
VNS P2w820us.book Page 5 Thursday, February 28, 2008 2:11 PM
Introduction
Overview - location of VNS and related
components
Keypad (Navigator) and remote control
Getting started
Map image
6
8
9
10
5
VNS P2w820us.book Page 6 Thursday, February 28, 2008 2:11 PM
Introduction
Overview - location of VNS and related components
1. Main unit (DVD player)
The system’s DVD player, located behind a panel on the left side of the
trunk/cargo area, is only intended for Volvo’s map discs.
The navigation system:
• Calculates the vehicle’s location
• Calculates a route to the selected destination
• Provides voice guidance
2. GPS
(Global Positioning System receiver)
The navigation system uses GPS signals to determine the vehicle’s speed,
and a gyroscope to determine the vehicle’s current location and direction.
3. Keypad (navigator)
The keypad enables you to navigate through the menus and make settings/
selections.
4. Screen
The screen displays the maps and provides detailed information on intersections, distances, etc.
5. Audio system
The audio system’s speakers in the front doors are used to provide
guidance instructions.
6
VNS P2w820us.book Page 7 Thursday, February 28, 2008 2:11 PM
Introduction
Contents of the DVDs
Although the entire network of roads is shown
on both DVDs, detailed information is only
available on the disc intended for the
geographic area in which the destination is
located.
The system will prompt you to change DVDs
when necessary. If the disc is not changed, map
information will still be displayed, but detailed
information such as the location of gas stations
or other points of interest will not be available.
Your navigation system's maps and data are
static. This means that as the network of roads
and other facilities is expanded, the DVD will
not automatically reflect these changes, and
certain information on the DVDs may not be
verified.
Updated DVDs with navigation system map
and facility information are produced on a
regular basis. Please contact your authorized
Volvo retailer for more information about availability.
WARNING!
- Never use the navigation system or any
other feature in your vehicle in a way that
distracts you from the task of driving safely.
- Distraction can lead to a serious accident.
- Set and make changes in your navigation
system only with the vehicle parked.
- Be aware of the current traffic situation.
- Always comply with relevant traffic
regulations.
Screen care
Clean the display screen with a soft, non-static
cloth or paper towel and a mild window
cleaning agent.
Never use petroleum based solvents or abrasive
substances when cleaning the screen.
Upgrading the navigation
system software/map DVD
The navigation system DVD player is located
behind a panel on the left side of the trunk/cargo
area, see the illustration on page 6.
To upgrade or change the navigation
system software/map DVD:
1. With the ignition switched on, press the
Eject button and open the cover to remove
the DVD.
2. Insert the new DVD.
If the DVD contains new software, the
following text will be displayed:
Loading new program – please wait.
The entire procedure will take approximately 5
minutes. When the procedure has been
completed, the introduction screen will be
displayed.
DVD care
• When changing discs, make sure that they
are kept free of oil, grease and other
impurities.
• The discs must not be exposed to
moisture.
• The discs must be kept in their packaging
when not in use. Avoid storing discs in
excessive heat, direct sunlight or in a
dusty environment.
7
VNS P2w820us.book Page 8 Thursday, February 28, 2008 2:11 PM
Introduction
Keypad (Navigator) and remote control
Keypad’s location on the steering wheel
Navigator
A. NAVIGATOR
Press UPP, DOWN, RIGHT or LEFT to
choose between the different menu options,
traffic messages etc.
Remote control
B. BACK
Press BACK to return to the previous menu or
to undo a choice.
C. ENTER
Press ENTER to confirm options or to activate
different menus.
NOTE: The keys on the remote control have
the same functions as the keypad.
8
A
C
IR (infrared) port
Point the remote control toward the IR port on
the upper edge of the screen.
NOTE: If the remote control does not function
properly, check the batteries (AAA or R03).
B
VNS P2w820us.book Page 9 Thursday, February 28, 2008 2:11 PM
Introduction
Getting started
Turning on navigation system
Using this manual
The ignition key must be in at least position I.
Press any of the buttons on the steering wheel
keypad or on the remote control to activate the
system. It may take several seconds to establish
the vehicle’s location and direction.
The manual is divided into chapters describing
the various features and functions of the
navigation system. A page dealing with
common questions and answers, and an index,
can be found at the end of the manual.
Turning off the navigation system
Navigating the menus
Menu selections in this manual are enclosed in
brackets, e.g. [Destination]. Menus are listed
without brackets, e.g. Map mode.
Use the NAVIGATOR to go to [Shut down] in
the main menu and press ENTER.
NOTE: The system can also be used when the
engine is switched off. Keep in mind to turn the
ignition key to 0, or remove it to avoid unnecessary battery drain.
Basic functions
NAVIGATOR - move up, down, left, or right
in the menus/selections.
ENTER - Confirm or activate a selection.
BACK - move back through menus, or undo
selections/spelling, etc.
Menu structure
Each entry in the main menu is comprises a
series of submenus/selections.
The path to a particular menu selection is
described as follows, e.g.: Navigation [map
mode] Address.
The descriptions in the manual assume that you
are using the keypad in the steering wheel, but
the keys remote control functions in the same
way.
Settings
[Settings] in the main menu give you access to
settings menus for the system or navigation.
WARNING!
Navigating safely
Always use good judgment when following
navigation system guidance, and do not
follow guidance that seems contrary to your
own best judgment.
Your navigation DVD contains some information that was not verified at the time your
DVD was produced. Unverified data may be
inaccurate. If you are guided through an area of
unverified data, the guidance provided by your
navigation system may be incorrect.
Your navigation DVD may not contain maps or
data for every road, residence, or point of
interest in your area. Volvo cannot be responsible for the accuracy or completeness of data,
maps, or routing guidance presented by your
navigation system.
Demo
The navigation system contains a function that
demonstrates guidance to a destination.
NOTE: The demo can only be run when the
vehicle is at a standstill. For more information,
see page 54.
9
VNS P2w820us.book Page 10 Thursday, February 28, 2008 2:11 PM
Introduction
Map image
1
2
10
11
3
4
12
5
13
6
14
7
8
9
15
16
17
1.
2.
3.
4.
5.
6.
7.
8.
9.
10.
11.
12.
13.
14.
15.
16.
17.
Direction to take at the next guidance point
Distance to, and name of the next guidance point
Destination
Road sign information
Next navigation point
Current position of the car
Starting point
Facility symbol for city center
Remaining distance and time to destination
Map scale
Name of street on which the car is currently traveling
Facility symbol for Volvo retailer
Route
Intermediate destination
Stored location
Direction to the destination
Compass
Road types
Compass
Freeway - green
Main road - red
Secondary main road - brown
Normal road - dark gray
Local road - dark green
The red tip of the compass needle points in a northerly direction. The blue
destination arrow (16) on the outer ring of the compass points toward
your destination.
10
You can choose to show or hide the compass and destination arrow in
[Screen] in the Settings menu.
VNS P2w820us.book Page 11 Thursday, February 28, 2008 2:11 PM
Menu structure
Start/shut down the system
Help texts
Main menu
Main menu with icons
Destination menu
Map scale
Map scroll
Guidance
Map menu
Detour menu
Settings menu
12
12
13
13
14
14
15
15
16
16
17
11
VNS P2w820us.book Page 12 Thursday, February 28, 2008 2:11 PM
Menu structure
Start/shut down the system
Help texts
[Shut down]
[Settings] [Help]
Starting the system: Turn the ignition key to position I or II, then press
ENTER, BACK or NAVIGATOR.
The help texts give abbreviated information about the functions. The
display options for showing help texts are Long, Short or None. Scroll
RIGHT or LEFT to the desired option and press ENTER.
Shut down the system: Select Shut down from the main menu and press
ENTER.
If the system is in operation when the car’s ignition is switched off, it
restarts when the ignition is turned on. If the system is shut down when
the car’s ignition is switched off then it will remain shut down when the
ignition is turned on.
12
The white help text panel is displayed when an option is selected and then
disappears automatically after a few seconds.
VNS P2w820us.book Page 13 Thursday, February 28, 2008 2:11 PM
Menu structure
Main menu
Main menu with icons
[Destination]
[Settings] [Screen] [First menu] [Text/icons]
The main menu and the various submenus provide access to the system’s
functions. It is always possible to return to the main menu, irrespective of
which screen image is displayed, by pressing BACK one or more times.
The main menu is displayed for several seconds and then disappears
automatically if a menu option is not selected.
The main menu can be displayed with in the form of icons or as text.
13
VNS P2w820us.book Page 14 Thursday, February 28, 2008 2:11 PM
Menu structure
Destination menu
Map scale
[Destination] [Street address]
[Map scale]
There are several search options in the destination menu for specifying the
destination. Select the option in the menu using UP or DOWN and press
ENTER. Press BACK to return to the main menu.
Scroll UP or DOWN using NAVIGATOR to change the map’s scale
(degree of detail) for a given area (see page 46). Confirm with ENTER.
Read more on the different types of destination and search paths on page
20.
14
VNS P2w820us.book Page 15 Thursday, February 28, 2008 2:11 PM
Menu structure
Map scroll
Guidance
[Map scroll]
[Guidance]
Using the NAVIGATOR the pointer moves freely on the map, for
example to select a destination (see page 31). The name of the location to
under the pointer is displayed on the lower part of the map.
Select Guidance from the main menu to repeat voice guidance
(see page 39).
15
VNS P2w820us.book Page 16 Thursday, February 28, 2008 2:11 PM
Menu structure
Map menu
Detour menu
[Map]
[Detour]
In the Map menu, it is possible to choose between displaying one or two
maps, or between displaying the map in the Heading up or with North up.
See also the chapter Map at page 46.
From the Detour menu it is possible to avoid sections of the calculated
route, such as road construction. The system then calculates an alternate
route (see page 40).
16
VNS P2w820us.book Page 17 Thursday, February 28, 2008 2:11 PM
Menu structure
Settings menu
[Settings]
The Settings menu provides access to the system’s various settings (see
page 52).
17
VNS P2w820us.book Page 18 Thursday, February 28, 2008 2:11 PM
Menu structure
18
VNS P2w820us.book Page 19 Thursday, February 28, 2008 2:11 PM
Destination
Destination
State (province)/city
Street address
Search by phrase
Facilities
Facility types
Destination on the map
Last ten destinations
Return trip
Store a location
Stored locations
20
21
22
25
27
28
31
32
32
33
34
19
VNS P2w820us.book Page 20 Thursday, February 28, 2008 2:11 PM
Destination
Destination
Specify an address as destination
[Destination]
Destination types
[Destination] [Street address]
Select Destination using UP or DOWN and press ENTER to access the
destination types menu.
Select Street address using UP or DOWN and press ENTER.
NOTE! If a destination has already been specified, the menu with destination types is accessed as follows: [Destination] [Add to itinerary]
20
Street address: Specify a destination by entering letters.
Facilities: Specify a facility as destination. Choose e.g. a hotel or a
restaurant (see page 27).
Stored locations: Choose a previously stored location as a destination
(see page 34).
Last ten destinations: Select one of the last ten specified destination (see
page 32).
Set destination on the map: Specify a location as a destination directly
from the map (see page 31).
Return trip: Choose the most recent location (the most recent point of
departure) from which Start guidance was used (see page 32).
Search by phrase: Search by part of the name of a street or facility (see
page 25).
VNS P2w820us.book Page 21 Thursday, February 28, 2008 2:11 PM
Destination
State (province)/city
Specify state (province)/city as a destination
[Destination] [Street address] [State]
Specify state (province)/city or select from the list
[Destination] [Street address] [City]
State and City are preset and correspond to the position of the last destination entered.
Select letters using the NAVIGATOR and press ENTER (when there are
no further options the system fills in the remaining letters).
Scroll to State or City using UP or DOWN and press ENTER. Choose the
state or city desired by entering letters or scrolling DOWN and choosing
directly from the menu list.
A list of the first three states (provinces)/cities matching the letters entered
is displayed at the lower section of the screen. The scroll bar at the right
of the screen indicates that there are additional alternatives in the list that
are not currently visible in the window.
Scroll DOWN and choose directly from the menu list. Select using UP or
DOWN and press ENTER.
The scroll bar at the right of the screen indicates that there are additional
alternatives in the list that are not currently visible in the window. The
number in the lower right corner indicates the total number of alternatives.
Return to the letter/number section of the screen by pressing BACK.
Delete the letters entered one at a time by pressing BACK.
The definition of a city or area may vary from state to state, and also
within the same state. In some cases, it may be a metropolitan area and in
others an particular suburb.
21
VNS P2w820us.book Page 22 Thursday, February 28, 2008 2:11 PM
Destination
Street address
Specify a street address for the destination
[Destination] [Street address]
Choose the street address from the list
[Destination] [Street address] [Street]
Select letters using the NAVIGATOR and press ENTER.
It is also possible to search for street addresses in the entire state without
specifying a particular city. Scroll UP to City and press ENTER. Then
scroll to Street and press ENTER. Enter a street name.
A list of the first three addresses matching the letters entered is displayed
on the lower part of the screen. The scroll bar at the right of the screen
indicates that there are additional alternatives in the list that are not
currently visible in the window.
Return to the letter/number section of the screen by pressing BACK.
Delete the letters entered one at a time by pressing BACK.
Choose between the addresses found by scrolling DOWN to the list.
Select address using UP or DOWN and press ENTER.
The system does not list street addresses for small towns. However, it is
always possible to set the town center as a destination.
Return to the letter/number section of the screen by pressing BACK.
The scroll bar at the right of the screen indicates that there are additional
alternatives in the list that are not currently visible in the window. The
number in the lower right corner indicates the total number of alternatives.
22
VNS P2w820us.book Page 23 Thursday, February 28, 2008 2:11 PM
Destination
Specify street number or junction
[Destination] [House no.] [Street]
Specify street number
[Destination] [House no.] [Street]
If the selected address has a street number then this can also be used to
obtain a more precise navigation. An intersection (junction) can also be
used instead of a street number. Scroll to the line for House no. or
Junction and press ENTER.
Scroll to House no. and press ENTER. The existing street number is
displayed on the digit line. Select digits using RIGHT or LEFT and press
ENTER.
It is also possible to scroll directly DOWN to Start guidance and press
ENTER.
Return to the letter/number section of the screen by pressing BACK.
23
VNS P2w820us.book Page 24 Thursday, February 28, 2008 2:11 PM
Destination
Select junction
[Destination] [Street address] [Junction]
Start guidance
[Destination] [Street address] [Junction] [Start guidance]
Scroll DOWN to Junction and press ENTER. The roads that intersect the
selected street are displayed in a list. Select from the streets using UP or
DOWN and press ENTER.
If neither the street number nor the intersection is specified, the system
will guide you to a central point on the selected street.
24
Start guidance: Starts guidance to the destination.
Add to itinerary: Puts the address in the itinerary and provides the option
to enter additional destinations.
Information: Provides details about the destination.
VNS P2w820us.book Page 25 Thursday, February 28, 2008 2:11 PM
Destination
Search by phrase
Street address/facilities
[Destination] [Search by phrase]
Street address
[Destination] [Search by phrase] [Street address]
Search by part of a street name or a facility.
Select Search by phrase using UP or DOWN and press ENTER.
Select Street address using UP or Down and press ENTER.
Read more on the different types of destination and search paths on page
20.
25
VNS P2w820us.book Page 26 Thursday, February 28, 2008 2:11 PM
Destination
Start search by phrase
[Destination] [Search by phrase] [Street address] [Street]
Select option
[Destination] [Search by phrase] [Street address] [Street] [Start search]
Enter the part of the name you know using the NAVIGATOR and
ENTER. Scroll DOWN to Start search and press ENTER.
Scroll using UP or DOWN to the desired option and press ENTER. The
scroll bar at the right of the screen indicates that there are additional alternatives in the list that are not currently visible in the window. The number
in the upper left corner indicates the total number of alternatives.
Press BACK to return to the previous screen.
26
VNS P2w820us.book Page 27 Thursday, February 28, 2008 2:11 PM
Destination
Facilities
Specify a facility as destination
[Destination] [Facilities]
Search options for facilities
[Destination] [Facilities] [Facilities]
Facilities are a collective name for gas stations, hotels, restaurants, Volvo
retailers etc.
Select Facilities using UP or DOWN and press ENTER.
Select Facilities using UP or DOWN and press ENTER to obtain a
submenu with different options.
Read more on the different types of destination and search paths on page
20.
Facilities: Enter the name of a facility, or choose between types of facility
from the list in the menu. The list only displays the facilities in the
selected city or area.
Search around the car: The system searches in a circle of at least 1 mile
(2 km) radius. If fewer than 40 facilities are found, the radius is increased
to a maximum of approximately 65 miles (100 km).
Search along the route: The system searches an area 1 mile (approx. 2
km) wide, and approximately 65 miles (100 km) ahead.
Search around map point: The system searches in the same way as
Search around the car, but the is centered around a chosen point on the
map.
27
VNS P2w820us.book Page 28 Thursday, February 28, 2008 2:11 PM
Destination
Facility types
Specify facility type
[Destination] [Facilities] [Facilities] [Type]
Specify facility name
[Destination] [Facilities] [Facilities] [Name]
Select letters using the NAVIGATOR and press ENTER or scroll
DOWN and choose a facility type directly from the menu list. Select
using UP or DOWN and press ENTER.
Select letters using the NAVIGATOR and press ENTER or scroll
DOWN and choose a facility directly from the menu list.
There is also the option to search by facilities throughout the whole
country without specifying a particular city. Scroll UP to City and press
ENTER. Scroll to Type or Name and press ENTER. Select letters using
the NAVIGATOR or scroll DOWN and choose a facility directly from
the list.
Return to the character chart using BACK. Delete the letters entered one
at a time by pressing BACK.
28
Return to the character chart using BACK. Delete the letters entered one
at a time by pressing BACK.
VNS P2w820us.book Page 29 Thursday, February 28, 2008 2:11 PM
Destination
Sub-categories
[Destination] [Facilities] [Facilities] [Type]
Specify category
[Destination] [Facilities] [Facilities] [Type]
Sub-categories are available for certain facilities (gas stations, restaurants,
hotels and parking areas) there are sub-categories. Choose a restaurant for
example and press ENTER.
The different sub-categories there are for restaurants are displayed.
Select letters using the NAVIGATOR and press ENTER or scroll
DOWN and choose a subcategory directly from the menu list. Select ALL
TYPES to be able to see all facilities irrespective of category. Choose
among the options using UP or DOWN and press ENTER.
The restaurants included in the category are displayed in the list.
Scroll DOWN to the required option and press ENTER.
Return to the character chart using BACK.
29
VNS P2w820us.book Page 30 Thursday, February 28, 2008 2:11 PM
Destination
Facility and guidance
[Destination] [Facilities] [Facilities] [Start guidance]
Information on the facility
[Destination] [Facilities] [Facilities] [Information]
Start guidance: Starts guidance to the facility.
Add to itinerary: Puts the facility in the itinerary and provides the option
to enter further destinations.
Information: Gives details of the facility.
The address, coordinates and telephone number of the facility are
displayed under information. Select map and press ENTER to view the
location of the facility on the map.
30
VNS P2w820us.book Page 31 Thursday, February 28, 2008 2:11 PM
Destination
Destination on the map
Specify a destination on the map using the NAVIGATOR
[Map scroll]
Map scrolling menu
[Map scroll]
Select Map scroll using UP or DOWN and press ENTER.
Using the NAVIGATOR the pointer can be moved freely over a large
area of detailed scale. The center of the pointer specifies the new location
on the map. The address under the pointer is displayed on the lower part
of the screen.
Move the pointer using the NAVIGATOR to the desired position on the
map and press ENTER to obtain the map scrolling menu. Scroll using UP
or DOWN to Select as destination and press ENTER.
NOTE! The function can also be obtained via Destination in the main
menu. Read more on the different types of destination and search paths on
page 20.
31
VNS P2w820us.book Page 32 Thursday, February 28, 2008 2:11 PM
Destination
Last ten destinations
Return trip
Entered destination
[Destination] [Last ten destinations]
Back to starting point
[Destination] [Add to itinerary] [Return trip]
Select Last ten destinations and press ENTER to view the last ten destinations. The scroll bar at the right of the screen indicates that there are
additional alternatives in the list that are not currently visible in the
window.
Scroll using UP or DOWN to Return trip and press ENTER. Select Start
guidance and press ENTER.
The system starts guidance back to the location at which Start guidance
was most recently chosen.
Select destination using UP or DOWN and press ENTER or RIGHT to
access the submenu.
Add to itinerary: Puts the destination in the itinerary and provides the
option of entering further destinations.
Information: Provides details about the destination.
Delete location: Deletes the destination.
Read more on the different types of destination and search paths on page
20.
32
VNS P2w820us.book Page 33 Thursday, February 28, 2008 2:11 PM
Destination
Store a location
Save a specified destination
[Destination]
Symbols and names
[Destination] [Store location]
A destination can be stored so that it does not have to be entered again. Up
to one hundred destinations can be stored.
The stored locations are marked on the map by symbols. Scroll UP to the
symbols to select and press ENTER. The name of the stored destination
is indicated automatically. The original name can be deleted using BACK
and a new name specified.
Scroll to Store location using UP or DOWN and press ENTER.
Scroll to a destination using UP or DOWN and press ENTER or RIGHT
to access the submenu. Select Store location using UP or DOWN and
press ENTER.
It is also possible to store a location using the Map scroll function (see
page 47).
33
VNS P2w820us.book Page 34 Thursday, February 28, 2008 2:11 PM
Destination
Stored locations
Saved destinations
[Destination]
Submenu for stored locations
[Destination] [Stored locations]
Select Stored locations using UP or DOWN and press ENTER. A stored
location is a destination saved earlier (place of work, favorite restaurant,
rest area, etc.).
Choose between the stored locations using UP or DOWN and press
RIGHT to obtain the submenu.
Read more on the different types of destination and search paths on page
20.
34
Add to itinerary: Adds the stored location to the itinerary.
Information: Gives details on the stored location.
Rename: Change icon or name of stored location.
Delete location: Deletes a stored location.
VNS P2w820us.book Page 35 Thursday, February 28, 2008 2:11 PM
Itinerary and guidance
Add to itinerary
Delete itinerary
Guidance – calculating a route
Guidance – intersection
Guidance – list
Guidance - arrow navigation
Guidance – voice message
Detour/ alternate routes
36
37
37
38
38
39
39
40
35
VNS P2w820us.book Page 36 Thursday, February 28, 2008 2:11 PM
Add to itinerary
Destination/intermediate destination
[Destination]
Arrange the itinerary
[Destination]
Enter an itinerary with several intermediate destinations to avoid having
to add several intermediate destinations during the trip. Up to seven intermediate destinations and one final destination can be specified.
Scroll using UP or DOWN to desired destination and press ENTER or
RIGHT to obtain the submenu.
Start guidance: Starts guidance to the destination.
Add to itinerary: Provides the option to enter further destinations.
Route options settings: Sets route setting priorities
Clear the itinerary: Delete the itinerary.
Information: Provides details on the destination.
Delete: Deletes the destination from the itinerary.
Travel order: Change the position in the list of the destination.
Adjust on map: Change the destination location on the map.
Store location: Store the destination.
Select options in the submenu using UP or DOWN and press ENTER.
36
VNS P2w820us.book Page 37 Thursday, February 28, 2008 2:11 PM
Delete itinerary
Guidance – calculating a route
[Destination] [Clear itinerary]
[Destination] [Start guidance]
Select Clear itinerary and press ENTER to delete the entire itinerary.
Destinations deleted remain in the Last ten destinations (see page 32).
When Start guidance is selected, the system starts to calculate the route
and the time/distance to the destination (during which time a yelloworange symbol is displayed at the top of the screen).
If you leave the planned route during the course of the trip, the system
automatically calculates a new route to the set destination.
37
VNS P2w820us.book Page 38 Thursday, February 28, 2008 2:11 PM
Guidance – intersection
Guidance – list
[Guidance]
[Map] [Route outline]
As you approach a guidance point, voice guidance is provided in good
time regarding the distance and the action to take at the intersection/
guidance point. At the same time a detailed map is displayed. The voice
guidance is repeated as you approach the guidance point.
The next guidance point is marked in a light blue panel. Below this
follows a list of the remaining guidance points. The destination is
displayed at the bottom of the screen. In addition to the road name, the
distance between the guidance points is displayed along with an arrow
indicating the direction of the next turn. The guidance points are deleted
as they are passed. If there is a deviation from the specified route the
system calculates a new one.
At the top of the map, the name of, and distance to the next turning point
are displayed. Road sign information is displayed on the line below. When
there is a road number and exit number, or exit name, these are also
displayed. The current position is also displayed on the lower part of the
map.
NOTE! In order for voice guidance to be provided, this option must be
selected in system settings (see page 52).
38
VNS P2w820us.book Page 39 Thursday, February 28, 2008 2:11 PM
Guidance - arrow navigation
Guidance – voice message
[Settings] [Screen] [Map] [Show/Hide]
[Guidance]
Guidance can be displayed without a map. The system instead displays an
arrow indicating the direction of the next turn.
Select Hide using LEFT or RIGHT and press ENTER.
Select Guidance using UP or DOWN and press ENTER to obtain voice
guidance. Also select Guidance to repeat a voice guidance message.
If the distance to the next guidance point is greater than 50 km, the
message: “Continue straight ahead”, is given.
Press ENTER to repeat a voice guidance message.
NOTE! The system always provides voice guidance irrespective of which
menu is active. In order for voice guidance to be provided, this option
must be selected in system settings (see page 52).
39
VNS P2w820us.book Page 40 Thursday, February 28, 2008 2:11 PM
Detour/ alternate routes
Avoid part of the route
[Detour]
Detour – submenu
[Detour]
Select Detour using UP or DOWN and press ENTER.
Using the Detour function, the system can be asked to calculate an
alternate route to avoid part of the originally calculated route to the destination. The system starts the calculation from the car’s current position.
Select the length of the detour using UP or DOWN and press ENTER.
40
NOTE! This function is only available when a destination has been
specified.
VNS P2w820us.book Page 41 Thursday, February 28, 2008 2:11 PM
Store locations
Store a location
Stored locations
42
43
41
VNS P2w820us.book Page 42 Thursday, February 28, 2008 2:11 PM
Store a location
Save a specified destination
[Destination]
Symbols and names
[Destination] [Store location]
A destination can be stored so that it does not have to be entered again. Up
to one hundred destinations can be stored.
The stored locations are marked on the map by symbols. Scroll UP to the
symbols to select and press ENTER. The name of the stored destination
is indicated automatically. The original name can be deleted using BACK
and a new name specified.
Scroll to Store location using UP or DOWN and press ENTER.
Scroll to a destination using UP or DOWN and press ENTER or RIGHT
to access the submenu. Select Store location using UP or DOWN and
press ENTER.
It is also possible to store a location using the Map scroll function (see
page 47).
42
VNS P2w820us.book Page 43 Thursday, February 28, 2008 2:11 PM
Stored locations
Saved destinations
[Destination]
Submenu for stored locations
[Destination] [Stored locations]
Select Stored locations using UP or DOWN and press ENTER. A stored
location is a destination saved earlier (place of work, favorite restaurant,
rest area, etc.).
Choose between the stored locations using UP or DOWN and press
RIGHT to obtain the submenu.
Read more on the different types of destination and search paths on page
20.
Add to itinerary: Adds the stored location to the itinerary.
Information: Gives details on the stored location.
Rename: Change icon or name of stored location.
Delete location: Deletes a stored location.
43
VNS P2w820us.book Page 44 Thursday, February 28, 2008 2:11 PM
44
VNS P2w820us.book Page 45 Thursday, February 28, 2008 2:11 PM
Map
Map scale
Scale - route
Map scroll
Map menu
One map - two maps
46
46
47
49
49
45
VNS P2w820us.book Page 46 Thursday, February 28, 2008 2:11 PM
Map scale
Scale - route
[Map scale]
[Map scale] [route]
Select Map scale using UP or DOWN and press ENTER.
Select route in Map scale using UP or DOWN and press ENTER to view
the entire route from start to final destination.
The thick red line indicates the route.
Choose between different levels, from the most detailed scale of 0.1 miles
up to the 60 mile scale. The scale is displayed on the lower part of the map.
Select scale using UP and DOWN and press ENTER.
If a change of scale is desired when two maps are displayed on the screen
(see page 49), use RIGHT or LEFT to scroll to the map whose scale is to
be changed.
46
VNS P2w820us.book Page 47 Thursday, February 28, 2008 2:11 PM
Map scroll
Move the pointer using the NAVIGATOR
[Map scroll]
Pointer
[Map scroll]
Select Map scroll to view an area outside the screen image. Scroll using
UP or DOWN and press ENTER.
The pointer can be freely moved across the entire map in a detailed scale
using the NAVIGATOR. The center of the pointer specifies the current
location on the map.
Move the pointer using the NAVIGATOR to the desired location on the
map and press ENTER to obtain the map scrolling menu.
47
VNS P2w820us.book Page 48 Thursday, February 28, 2008 2:11 PM
Map scrolling menu
[Map scroll] Map scroll menu
Select options using UP or DOWN and press ENTER
Scale: Function to temporarily change the scale. Press BACK to return to
the original scale, and to return to the car’s current position on the map.
Set as destination: Choose location on the map as a destination or intermediate destination.
Facilities around: The system searches for facilities around a chosen
point on the map. The system searches in a circle with a radius of approximately 1 mile (2 km). If fewer than 40 facilities are found, the radius is
increased to a maximum of 65 miles (100 km).
Store location: Save a location on the map.
48
VNS P2w820us.book Page 49 Thursday, February 28, 2008 2:11 PM
Map menu
One map - two maps
[Map]
[Map] [Two maps]
Select Map using UP or DOWN and press ENTER to obtain the map
menu.
Scroll to One map/Two maps using UP or DOWN. Select Two maps using
RIGHT and press ENTER to obtain two map images.
Route outline: Displays a list of the approaching guidance points.
Show destination: Displays a map image around the destination.
One map/Two maps: Choose between displaying one or two maps on the
screen.
Heading up/North up: Choose whether north or the direction of travel is
to be uppermost on the map.
Facility selections: Choose which facility symbols are to be displayed on
the map image.
Different degrees of detail can be selected for each map. This can be of
useful for obtaining information on the area immediately around the car
on one map, while also displaying a larger area on the other map
The system selects the original map image when you switch back to a one
map screen.
49
VNS P2w820us.book Page 50 Thursday, February 28, 2008 2:11 PM
50
VNS P2w820us.book Page 51 Thursday, February 28, 2008 2:11 PM
Navigation settings
Settings menu
System settings
Route options settings
Screen settings
Help settings
Demo (simulation)
52
52
53
53
54
54
51
VNS P2w820us.book Page 52 Thursday, February 28, 2008 2:11 PM
Settings menu
System settings
[Settings]
[Settings] [System]
The VNS system is supplied with basic settings that can be changed.
Select Settings using UP or DOWN and press ENTER.
Voice volume: 1 is minimum and 5 is maximum volume. Select Off to
switch off voice guidance.
Guiding voice: Choose between a female or male guidance voice.
Distance unit: Choose between kilometers or miles.
Language: Choose the language for voice messages and menus.
Screen saver: If the screen saver is activated the screen goes blank after
30 seconds and relights automatically e.g when guidance information is
provided.
Colors: Select colors. Bright colours are suitable in daylight. Dark
colours are suitable for darkness and with strong sunlight.
GPS information: Displays the number of satellites from which the
system is presently receiving signals, as well as current position.
Reset to factory settings: Reset to basic settings.
Bright/dark colors: Press ENTER to change the background colors of the
map. Light intensity can also be set using the control for the instrument
lighting.
System: See the information in the right column.
Route options: See page 53.
Screen: See 53.
Help: See page 54.
Start demo: See page 54.
Select options in each settings menu using UP or DOWN. Press RIGHT
to access submenus, which are indicated by a black arrow. Select settings
using the NAVIGATOR. Confirm with ENTER.
52
VNS P2w820us.book Page 53 Thursday, February 28, 2008 2:11 PM
Route options settings
Screen settings
[Settings] [Route options]
[Settings] [Screen]
Route type: Select fastest or shortest route at route calculation. If Fast is
selected the system chooses the most major roads available. If Short is
selected the system calculates the shortest route possible to the destination, using all types of roads.
Avoid toll roads: Choose whether toll roads are to be avoided when the
route is calculated.
Avoid freeways: Choose whether freeways are to be avoided at route
calculation.
Avoid ferries: Choose whether car ferries are to be avoided at route calculation.
Reset to factory settings: Reset to basic settings.
NOTE! For technical reasons the system only uses major roads when
calculating routes over longer distances. When NO is selected for toll
roads and freeways, roads of these types will be avoided as far as possible
and only used if no other reasonable alternative is available.
Facility selection: This function makes it possible to set the facility
symbols to be shown or hidden on the map.
Navigation menu: Choose between displaying the main menu in the form
of Text or Icons.
Compass: Choose whether the compass is to be displayed on the screen.
Dest. compass: Points in the direction of the destination.
Time/dist. to go: Indicates estimated time and distance to the destination.
Current location: Choose whether the name of the street on which the car
is currently traveling is to be displayed on the lower part of the screen.
Next guidance: Information on the next guidance point such as distance
to it, street name, road sign information and direction to take at this point.
Map: If the map is hidden the system guides with an arrow.
Reset to factory settings: Reset to basic settings.
53
VNS P2w820us.book Page 54 Thursday, February 28, 2008 2:11 PM
Help settings
Demo (simulation)
[Settings] [Help]
[Settings]
Help type: Select setting for help texts.
About: Displays information on VNS software, map version etc.
Reset to factory settings: Reset to basic settings.
Select Start demo using UP or DOWN and press ENTER. This feature
demonstrates the system by simulating a trip to a specified destination. It
is possible to apply all settings during the demonstration. Stop demo interrupts the simulation.
NOTE! For the demonstration to work a destination must be specified and
the car must be at a standstill.
54
VNS P2w820us.book Page 55 Thursday, February 28, 2008 2:11 PM
Symbols on the map
Symbols - facilities
56
55
VNS P2w820us.book Page 56 Thursday, February 28, 2008 2:11 PM
Symbols - facilities
Airport
City hall
Historical monument
Night life/music club
Amusement park
Community center
Hospital
Park & Ride
Hotel
Parking garage
Ice skating
Parking lot
Library
Police station
Liquid petroleum gas
Public sport airport
ATM
Automobile club
Bank
Bowling
56
Commuter rail station
Compressed natural gas
Conven./exhib. center
Court house
Bus station
Ferry terminal
Major companies
Recreation area
Car rental
Gas station
Marina
Rest area
Casino
Golf course
Movie theater
Restaurant
City center
Grocery store
Museum
School
VNS P2w820us.book Page 57 Thursday, February 28, 2008 2:11 PM
Shopping center
University/college
Ski resort
Volvo retailer
Sports center
Winery
Sports complex
Theater/Opera
Toll booth
Tourist attraction
Tourist information
Train station
57
VNS P2w820us.book Page 58 Thursday, February 28, 2008 2:11 PM
58
VNS P2w820us.book Page 59 Thursday, February 28, 2008 2:11 PM
Questions and answers
Questions and answers
60
59
VNS P2w820us.book Page 60 Thursday, February 28, 2008 2:11 PM
Questions and answers
Questions and answers
Q - The car's position on the map is
incorrect or jumps
A - The Global Positioning System (GPS)
indicates the car's position with an accuracy of
about 65 feet (20 meter). Accuracy may be even
less when driving on roads lying parallel to
another road, winding roads, roads on several
levels and also after driving a long distance
without making any distinct turns. Tall
buildings and mountains, tunnels, viaducts,
over/underpasses etc also have a negative affect
on the reception of GPS signals, which means
that the estimation of the car's position may not
be precise.
Q - VNS does not always calculate the
fastest/shortest route.
A - When calculating a route, distance, width of
road, type of road, number of right or left turns,
traffic circles etc are all taken into account
when calculating the best theoretical route.
Experience and local knowledge may, however,
lead to a more effective choice of route.
Q - The VNS system chooses toll roads,
freeways, and ferries even though I
have opted to avoid them.
A - When calculating routes over longer
distances, for technical reasons the system can
only use major roads. If you select NO for toll
roads, freeways, and ferries, they will be
avoided as much as possible, but will be used if
no other reasonable alternative is available.
60
Q - After being transported, the car's
position on the map is incorrect.
A - If the car is transported, for example by
ferry or train, or in such a way as to impede the
reception of GPS signals, it can take up to 5
minutes to calculate the car's new position
correctly.
largest degree of magnification is 0.3 miles
(500 meters), regardless of speed.
Q - The car's position on the map is
incorrect after the car battery has been
disconnected.
A - If power has been cut from the GPS antenna,
it can take more than 15 minutes for the GPS
signals to be received correctly and the car's
position to be calculated.
Q - One or more menu options are not
available.
A - Go to System options and select Reset to
default to return to factory settings.
Q - The map image does not correspond with actual conditions.
A - Factors such as the constant expansion and
rebuilding of the road network, new traffic
regulations constantly being introduced etc
mean that the digital map database is not always
complete. New maps are periodically
developed and point of interest information
updated. Further information is available from
your Volvo retailer.
Q - The scale of the map sometimes
changes.
A - The scale is affected by the speed of the car.
At speeds in excess of approximately 85 mph
(140 km/h), the largest degree of magnification
is 0.2 miles (250 meters). When speed is
reduced to 75 mph (120 km/h), the system can
once again show all degrees of magnification. If
no detailed map information is available, the
WARNING!
Always observe posted speed limits.
Q - The VNS system indicates the route
on which I am already driving even
though I select Calculate new route or
Detour.
A - The system cannot find a better alternative
to the current route.
Q - The car symbol on screen jumps
forward or spins.
A - The system may need a few seconds to
sense the position and movement of the car
before you drive off. Switch off the VNS
system and the ignition. Switch on the ignition
again and restart VNS, but remain at a standstill
for approximately 15-20 seconds before driving
off.
VNS P2w820us.book Page 61 Thursday, February 28, 2008 2:11 PM
Questions and answers
I am planning a long trip but do not
want to specify destinations in the
cities that I will be passing. What is the
easiest way to set up an itinerary?
Select intermediate destinations on the map
using the pointer. The system will automatically guide you to the final destination even if
you drive past the intermediate destinations.
How can I select a destination that is
not on the map-DVD currently being
used by the system?
Select the destination in the usual way. The
system will prompt you to change DVDs if
necessary.
NOTE: Although the entire network of roads is
shown on both DVDs, detailed information is
only available on the disc intended for the
geographic area in which the destination is
located.
The system now includes several map
DVDs. How do I know which one to
use?
Primarily use the DVD that contains detailed
information of the area in which you normally
drive. The is stated on the DVD’s jacket and is
printed on the disc.
NOTE:
• The system will prompt you to change
DVDs when necessary.
• If you are planning a long trip, be sure to
have all of the maps DVDs in the car.
Will my itinerary disappear if I change
DVDs?
No, your itinerary will remain in the navigation
system’s memory until you delete it.
My map-DVDs are not up-to-date.
Consult your authorized Volvo retailer for the
latest information.
What should I do if my itinerary goes
through an unverified area1?
The system will provide information if the
itinerary takes you through an unverified area.
NOTE: In such areas, the system may be
unable to provide accurate guidance.
WARNING!
Navigating safely
Always use good judgment when following
navigation system guidance, and do not
follow guidance that seems contrary to your
own best judgment.
Why are street addresses not available
for destinations in another state or
province?
Although the entire network of roads is shown
on both DVDs, detailed information is only
available on the disc intended for the
geographic area in which the destination is
located.
1. For example, newly constructed
residential areas, shopping districts, rerouted roads, etc. that are not currently
reflected on your navigation system’s
DVDs. Consult your authorized Volvo
retailer for the most up-to-date information.
61
VNS P2w820us.book Page 62 Thursday, February 28, 2008 2:11 PM
Questions and answers
62
VNS P2w820us.book Page 63 Thursday, February 28, 2008 2:11 PM
Index
A
Address as destination ..................................20
Alternative route ...........................................40
Arrange the itinerary ....................................36
Arrow navigation ..........................................39
B
BACK .........................................................8, 9
Basic functions ...............................................9
Book structure ................................................9
C
Changing DVDs .............................................7
Colors ...........................................................52
Compass .................................................10, 53
D
Delete itinerary .............................................37
Demo (simulation) ........................................54
Destination .............................................19, 20
Destination arrow ...................................10, 53
Destination menu ..........................................14
Destination on the map .................................31
Destination types ..........................................20
Destination/intermediate destination ............36
Detour ...........................................................40
Detour menu .................................................16
Distance unit .................................................52
DOWN ...........................................................8
Driver distraction ............................................7
DVD player ....................................................6
DVD, contents of ............................................7
DVDs, changing .............................................7
H
E
Icons .............................................................13
Information on the facility ............................30
Intermediate destination ...............................10
Introduction ....................................................5
Itinerary and guidance ..................................35
ENTER .......................................................8, 9
Enter an itinerary ..........................................36
Entered destination .......................................32
F
Facilities .......................................................27
Facilities - symbols .......................................56
Facility as destination ...................................27
Facility name ................................................28
Facility type ..................................................28
Ferries ...........................................................53
G
Global Positioning System
receiver ...........................................................6
Guidance .................................................15, 24
Guidance - arrow navigation ........................39
Guidance - calculating a route ......................37
Guidance - intersection .................................38
Guidance - list ..............................................38
Guidance - voice message ............................39
Help texts ......................................................12
I
J
Junction ..................................................23, 24
L
Language ......................................................52
Last ten destinations .....................................32
LEFT ..............................................................8
M
Main menu ....................................................13
Map ...............................................................45
Map DVD care ...............................................7
Map menu .....................................................49
Map scale ..........................................10, 16, 46
Map scroll ...............................................15, 47
Map scrolling menu ................................31, 48
Map, one or two ...........................................49
Menu structure ..............................................11
63
VNS P2w820us.book Page 64 Thursday, February 28, 2008 2:11 PM
N
Navigation settings .......................................51
NAVIGATOR ............................................8, 9
Next guidance point .....................................10
P
Pointer (cursor) .............................................47
Position of the car .........................................60
Present position ............................................10
Q
Questions and answers .................................60
R
Remaining distance and time to destination .10
Remote control ...............................................8
Return trip ....................................................32
RIGHT ............................................................8
Road sign information ..................................10
Road types ....................................................10
Route ............................................................46
Route options settings ..................................53
S
Saved destinations ..................................34, 43
Screen care .....................................................7
Screen saver ..................................................52
Screen settings ........................................53, 54
64
Search by phrase ...........................................25
Settings menu ...............................................17
Shut down .....................................................12
Start the system ............................................12
State/city for destination ...............................21
Steering wheel keypad ...................................8
Store a location .......................................33, 42
Stored locations ......................................34, 43
Street address ................................................22
Street number ...............................................23
Subcategories - facilities ..............................29
Symbols and names ................................33, 42
Symbols on the map .....................................55
System demo ..................................................9
System settings .............................................52
T
Toll roads, avoiding ......................................53
Types of roads ..............................................10
U
UP ...................................................................8
V
Voice ............................................................52
Voice message ..............................................39