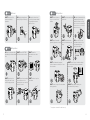
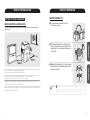
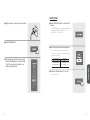
1
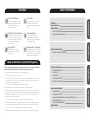
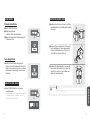
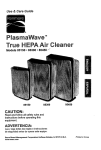
To buy: Contact Sylvane at 800-934-9194 or visit www.sylvane.com
For product support: Contact Winix at 877.699.4649
This marking shown on the product or its literature, indicates that it should not
be disposed with other household wastes at the end of its working life. To
prevent possible harm to the environment or human health from uncontrolled
waste disposal, please separate this from other types of wastes and recycle it
responsibly to promote the sustainable reuse of material resources.
Household users should contact either the retailer where they purchased this
product, or their local government office, for details of where and how they can take this
item for environmentally safe recycling.
Business users should contact their supplier and check the terms and conditions of the
purchase contract. This product should not be mixed with other commercial wastes for
disposal.
WINIX Korea
35-1, Unjung-Dong, Bundang-gu, Seongnam-si, 463-440, South Korea
www.winixcorp.com e-Mail [email protected] Tel +82.31.701.1173(4574)
WINIX Inc
120 Prairie Lake Road, Unit E East Dundee, lllinois 60118
www.winixinc.com e-Mail [email protected] Tel +1.847.551.9900
Thank you for purchasing this WINIX product
WINIX Europe 14 Cours de l'Intendance, 33000 Bordeaux, France
www.winixeu.com e-Mail [email protected] Tel +33.556.448.572
Sep. 2012
FEATURES
TABLE OF CONTENTS
A sensor continually monitors the
environment and adjusts the
performance for optimal humidity
levels.
CleancelTM Anti-Microbial Coating
Auto Sleep Mode
The Winix Air Washer is treated with
CleancelTM to prevent the growth of
odor causing bacteria and microbes
on the cleanable humidifying
collection discs.
The Winix Air Washer will
automatically dim the display
lights and operate at lowest speed
to not disturb sleep.
Auto Shut-Off
Plasma WaveTM Technology
WINIX Air Washer shuts off
automatically when the water
bucket is low.
Attacks pollutants at the molecular
level to neutralize viruses, bacteria,
chemical vapors, odors and gases in
the air leaving the Air Washer.
FEATURES
1
Read all instruction
1
INTRODUCTION
3
SAFETY INSTRUCTIONS
3
PRODUCT AND PARTS VIEWS
7
PRODUCT INSTALLATION
SETTING UP YOUR AIR WASHER
Installation
Auto Mode
The Winix FresHome Air Washer
gently and safely captures odors
and impurities while gently
humidifying the air.
Introduction
2-in-1 Air Treatment
9
9
Read all instruction: Important Safeguards
PRODUCT OPERATION
10
BEFORE TURNING ON
10
1. Always have water in the water tank when operating unit.
AUTO MODE
12
2. Use only clean, cool tap water to fill tank.
SLEEP MODE
13
3. Use only 100~120V AC outlet. As with any electrical device, plug and unplug unit with
dry hands only. Turn unit off prior to unplugging it. Unplug unit when not in use and
before you clean or move the unit.
ADJUSTING FAN SPEED
13
EMPTYING WATER TANK
14
Operation
When using electrical appliances, especially when children are present basic safety
precautions should always have followed, including the following:
4. This unit shuts off automatically when water tank is empty.
5. Never operate unit with a damaged coed or plug. Keep cord straight.
CARE AND MAINTENANCE
15
OUTER SURFACE
15
CLEANING PRE-FILTER
15
CLEANING ANTIMICROBIAL DISK AND WATER BUCKET
16
7. Do not titt or tip unit or attempt to empty or fill it while it is operating.
CLEANING THE UNIT
17
8. The unit should not be left unattended in closed rooms as air could become saturated
and leave condensation on walls or furniture. Always leave room door partially open.
FAQs & TROUBLESHOOTING
19
SPECIFICATIONS
Maintenance
6. Always place unit on an elevated (at least one(1)foot off the ground), flat, level surface
away from direct sunlight. Keep cord away from heated surface and areas where it could
be walked on or tripped over. Do not place on objects that are not resistant to water
damage from spillage or moisture.
21
9. Do not tilt or tip unit or attempt to empty or fill while it is operating.
10. Replace demineralization cartridge every 2~3 months or more frequently as needed.
1
2
INTRODUCTION
WARNING:SAFETY INSTRUCTIONS
WARNING
PROHIBITED
Follow these instructions to avoid any risk of
personal injury, property damage, electrical
shocks or fire hazards.
NOTICE
3
DO connect the power cord
to outlets with a ground
connection ONLY.
DO unplug air washer when DON'T plug power cord
not in use to save energy
into loose or damaged
consumption.
electrical outlet.
(Can lead to overheating or
electrical shock.)
DO NOT DISASSEMBLE
Must Follow
Failure to follow the safety instructions can
lead to personal injury or property damage.
Warning
DIRECTION
▶Power
Introduction
WARNING / NOTICE
Warning
Ground connection protecting
from electrical shock
▶Power Cord
Warning
▶Operation
DON'T unplug the unit by pulling on its
power cord.
DON'T touch the plug with wet hands.
DO NOT attempt to repair,
alter or disassemble the
air washer.
DON'T operate the air
washer if standing water is
present.
DON'T bend or place heavy object(s) on
the power cord.
DON'T replace or modify the power cord.
DON'T pour water into the
top of the air washer, only
place in water tank as
directed.
DON'T operate air washer near flammable materials.
If the power cord/plug is damaged, it must be
replaced by the manufacturer or a qualified
technician.
DON'T operate air washer
on an uneven surface.
4
Note
▶Power
DO unplug the appliance
during filling and cleaning.
DO unplug the unit and
contact your service dealer
if any irregular noise or
smoke occurs.
▶Operation
DON'T allow children to
play on or near the air
washer.
DO clean Antimicrobial disk
regularly with warm tap
water and allow to air dry.
Discs are top-rack dishwasher safe.
Follow directions in the Care and
Maintenance section.
DON'T spray flammable
liquids or gases into the unit.
Note
DON'T use hot water in the
water tank.
Introduction
DON'T disconnect the
power cord during
operation.
Note
DON'T place air washer
near your head when you
sleep.
DO move the top cover
and water bucket of the
unit separately when
moving air washer.
▶Operation
DO use the air washer after
assembling the Antimicrobial
Disk.
DON'T place hands or
body parts near the air
outlet during operation.
DON'T insert ANYTHING
into the air inlet or outlet.
DON'T place the air washer
near curtains or other
materials that can cover the
vents of the unit.
DON'T place the
air washer near a heat
source.
DON'T use flammable material
(such as benzene or alcohol) to clean
the air washer.
DON'T install the unit in direct sunlight
or near inverter lighting or automatic
sensor lights.
DON'T cover the top of the air washer
during operation.
DO NOT spray liquids directly into
air washer during cleaning.
DON'T strike or drop the
air washer.
※ This appliance intended for adult use only.
5
6
PRODUCT AND PARTS VIEWS
Introduction
Display Panel and Controls
Front
Pre-Filter
Power / Function Button
Top Cover
Display Panel
Power Button
Function Button:
Fan/Disk Speed (LOW MEDIUM
HIGH), Sleep Mode, Auto Mode.
Disk Assembly Handle
CleancelTM Antimicrobial Disks
Water Bucket
Current Humidity Level
Fan/Disk Speed
Back
Air Inlet
Auto Mode Indicator
PlasmaWaveTM
On/Off Indicator
Sleep Mode Indicator
Low Water Indicator
Air outlet
Light Sensor
Power Cord
7
8
PRODUCT INSTALLATION
SETTING UP YOUR AIR WASHER
SPACE SELECTION & INSTALLATION
For better performance and longer product life, please select an adequate space to
install the unit.
PRODUCT OPERATION
BEFORE TURNING ON
❶ Lift and remove top section of the
air washer to open.
Water Line
❸ Replace the top section of the air cleaner.
Make sure that it is seated properly and
lines up correctly.
Operation
Do not install the unit under direct sunlight.
Installation
❷ Fill the water tank with cool tap water
up to the indicator line on inside of the
water tank. For optimal performance do
not overfill.
Long Exposure to direct sunlight can cause defects.
Air Washer must be installed and operated on an even surface.
Vibrations and noise can occur on soft or non-flat surfaces.
Products must be installed approximately 4 inches away from the wall and
15 inches from other electronic appliances.
Before operating the air washer, remove any plastic bags and polyfoams from
outside and inside of the unit.
9
Cautions
▶Make sure to unplug the power cord before filling the water tank.
▶Hard water may cause operation defects. Please use filtered water if necessary.
▶Use caution when moving air washer with a full water tank, as it will be heavy.
10
AUTO MODE
❹ Plug the power cord into a power outlet.
❶ Push FUNCTION button to select Auto
mode.
The FUNCTION button will cycle the unit between
MEDIUM
HIGH
the following: LOW
SLEEP MODE
AUTO MODE.
❺ Push POWER button.
❷ AUTO Mode Indicator will illuminate.
Fan and disk speed will automatically adjust,
according to chart below, for optimal humidity
level of around 50%.
❻ The air washer will start in Auto Mode
and the PlasmaWaveTM function will be
ON. If the Low Water Indicator is on,
refill the water bucket.
Humidity Range
More than 60%
From 50% to 59%
Less than 50%
Fan speed
LOW
MEDIUM
HIGH
Operation
❸ Push the POWER button to turn off.
All lights will be off.
11
12
SLEEP MODE
Manual Sleep Mode
❶ Push FUNCTION button.
❷ Select Sleep Mode.
(Indicator light will illuminate)
EMPTYING WATER TANK
❶ Remove the top cover the unit. Lifet the
disk assembly by the handle and carefully
remove it.
❸ Sleep Mode will dim the display lights.
(Fan speed :low)
❷ Remove the use water left in the water
tank and dispose of in an appropriate
manner. Refill water tank. (do not fill
past indicator line as directed)
Auto Sleep Mode
● When in Auto Mode (see previous
section), the light sensor will detect the
light in the room and will turn on Sleep
Mode when external light sources are
dimmed.
❸ Replace the disk assembly. Lay handle
down flush with water tank. Carefully
replace top section of air washer and
assure proper alignment.
Adjust Fan/Disk Speed
Cautions
▶Allows unplug the power cord when removing or adding water to the water tank.
▶If the air washer has not been used for an extended period of time, use fresh water
Maintenance
● Push FUNCTION button to change
Fan/Disk speed.
to avoid performance issues.
The FUNCTION button will cycle the unit between
MEDIUM
HIGH
the following: LOW
SLEEP MODE
AUTO MODE
13
14
CARE AND MAINTENANCE
OUTER SURFACE
● Clean the outside of the unit with a soft
cloth and mild detergent. Wipe clean
with a dry cloth.
CLEANING PRE-FILTER
❶ Use the tab on each side of the prefilter
and gently pull up and out from both
sides.
❷ Rinse pre-filter clean with warm tap
water.
CLEANING ANTIMICROBIAL DISK AND WATER BUCKET
❶ Clean Antimicrobial Discs with warm
tap water.
❷ Clean the inside of water bucket with a
soft cloth and mild detergent.
Clean the water bucket every week to prevent
the growth of mold, germs, and bacteria.
Refill the bucket with clean tap water.
❸ Place CleancelTM Antimicrobial Disk back
into the bucket aligning with grooves
and with handle laid flat.
▶Before cleaning air washer, unplug the power cord.
▶Don’t use flammable materials such as benzene and alcohol to clean air washer.
▶If the air washer has not been used for more than two days, unplug the power cord
Maintenance
Cautions
❸ Use tabs and slide pre-filter back into
original position.
and refill the water bucket with new water.
▶Always clean the antimicrobial discs and water bucket of the unit has not been
used for an extended period of time to prevent contamination.
15
16
CLEANING THE UNIT
❶ Remove the top cover and place it
upside down on an even surface.
❷ Open venting guides until you hear
them 'click'
❸ Remove the fan cover by turning the
locking nut clockwise and lifting the
fan up.
❹ Gently clean the inside of the housing
with a soft cloth or vacuum cleaner
attachment.
❺ Wash the fan with warm water.
Use a soft cloth to wipe dry.
❻ Reassemble in reverse order after
cleaning.
Cautions
▶Only the fan should be washed with water.
Maintenance
17
18
FAQs & Troubleshooting
Check if you can resolve issues before calling customer service.
Symptom
Air washer does not
turn on.
Auto Mode is not
working.
19
Remedy:
▶Power cord is plugged in.
▶Plug the power cord in.
▶Low Water Indicator light
is on
▶Fill the the water tank.
▶Top and bottom sections
are aligned.
▶Make sure the top and
bottom of the air washer
are lined up correctly.
▶Power cord is plugged in.
▶Plug the power cord in.
▶Auto Mode Indicator is on.
▶Push FUNCTION button
to select Auto Mode.
▶Sensor is obstructed.
▶Clean the sensor surface
▶The unit is located on an
uneven surface.
▶Move to even surface.
Symptom
Check if:
Remedy:
▶Water is too cold or icy.
▶Use 68℉ to 77℉
temperature water.
▶Fan speed is on low level.
▶Change to high
fan speed.
Display panel light is
too dark.
▶Protective film is still on.
▶Remove the film.
Unpleasant odors are
present.
▶Air Washer is being used
where strong odors
and/or dust are present.
Low air flow.
▶Manual Sleep Mode is on. ▶Use FUNCTION button to
turn off Sleep Mode.
▶Auto Sleep Mode is on.
▶Replace the water in the
water tank and change
water more frequently.
Maintenance
Vibrates or makes a lot
of noise.
Check if:
20
SPECIFICATIONS
21
Notes
Model No.
AW107 (USA)
AW107 (EU)
Power Supply
110V / 60Hz
230V / 50Hz
Power Consumption
17W
17W
Humidifying Capacity
0.105gal / hour(33.8℉/30%)
400CC / Hour (20℃/30%)
For rooms up to
600 sq. ft.
600 sq. ft.
Tank(Max/Full)
2.64gal/2.11gal
10ℓ/ 8ℓ
Weight
14.3Ib
6.5㎏
Dimension(WXDXH)
12.9In×12.9In×16.5In
330×330×420(mm)
22