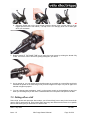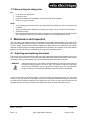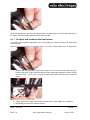
1
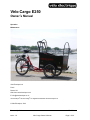
Vélo Cargo E250
Owner’s Manual
Operation
Maintenance
Vélo Electrique Ltd
Poole
Dorset, UK
Web: www.veloelectrique.co.uk
E: [email protected]
®
®
Velo Electrique and Velo Cargo are registered trademark ofVelo Electrique Ltd.
© Vélo Electrique, 2013
Date: 1 July 2013
Issue: 1.0
CD 1001
Vélo Cargo Owner’s Manual
Page 1 of 34
Table of amendments
Issue number
Amendment summary
Date
1.0
Initial issue
1 July 2013
Date: 1 July 2013
Issue: 1.0
CD 1001
Vélo Cargo Owner’s Manual
Page 2 of 34
1
Introduction..................................................................................................................................... 5
2
Important safety instructions .......................................................................................................... 5
2.1
Disclaimer............................................................................................................................... 5
2.2
Symbols used in this manual ................................................................................................. 5
2.3
General safety instructions ..................................................................................................... 6
2.3.1
UK Standards Compliance ............................................................................................. 6
2.3.2
European Standards Compliance .................................................................................. 6
2.3.3
Electrical Modifications ................................................................................................... 7
2.3.4
Mechanical Modifications ............................................................................................... 7
3
General description ........................................................................................................................ 7
4
Specifications ................................................................................................................................. 8
5
4.1
Performance (Speed and Range) ........................................................................................ 10
4.2
Performance (Battery Lifespan) ........................................................................................... 10
Operation...................................................................................................................................... 11
5.1
Pre ride safety checks .......................................................................................................... 11
5.1.1
Check the brakes ......................................................................................................... 11
5.1.2
Check the tyres are inflated to the correct pressure .................................................... 11
5.1.3
Adjusting the handlebars .............................................................................................. 11
Removing the battery ....................................................................................................................... 12
5.2
6
5.2.1
The battery charger ...................................................................................................... 12
5.2.2
Turning the battery on and off and removing from the cycle ....................................... 13
5.2.3
Refitting the battery ...................................................................................................... 14
5.3
Adjusting the saddle ............................................................................................................. 14
5.4
Check all nuts and bolts are secure ..................................................................................... 15
5.4.1
Wheelnuts .................................................................................................................... 15
5.4.2
Cargo box pivot bearing nut ......................................................................................... 15
Packing List .................................................................................................................................. 15
6.1
7
Removing and charging the battery ..................................................................................... 12
Recommended tools ............................................................................................................ 15
Riding the Vélo Cargo for the first time. ....................................................................................... 17
7.1
Pulling off on level ground .................................................................................................... 17
7.2
Pulling off on a hill ................................................................................................................ 18
7.2.1
7.3
Is the hill too steep???? ............................................................................................... 19
Cornering.............................................................................................................................. 19
7.3.1
Entering a turn. ............................................................................................................. 19
7.3.2
Whilst in a turn.............................................................................................................. 19
7.3.3
Cornering whilst going down hills ................................................................................. 19
7.4
Braking ................................................................................................................................. 20
Date: 1 July 2013
Issue: 1.0
CD 1001
Vélo Cargo Owner’s Manual
Page 3 of 34
8
7.5
Parking the Vélo Cargo. ....................................................................................................... 20
7.6
Locking the Vélo ................................................................................................................... 20
7.7
Using the seatbelts ............................................................................................................... 20
7.8
Using the rain cover ............................................................................................................. 21
7.9
Removing the seats ............................................................................................................. 21
7.10
General tricycle riding rules .................................................................................................. 22
Maintenance and inspection ........................................................................................................ 22
8.1
Adjusting and replacing the brakes ...................................................................................... 22
8.1.1
To adjust and rebalance the front brakes .................................................................... 23
8.1.2
To adjust the rear brake. .............................................................................................. 24
8.1.3
Replacing the brake blocks .......................................................................................... 24
8.2
9
Removing a wheel / replacing the tyres ............................................................................... 25
8.2.1
Standard tyre inflation pressures ................................................................................. 26
8.2.2
Removing a front wheel and its tyre ............................................................................. 26
8.2.3
Removing the rear wheel and its tyre........................................................................... 26
8.3
Troubleshooting failure in the motor and electronic control system ..................................... 28
8.4
Actions in the event of damage to the battery bank. ............................................................ 28
Warranty and repair ..................................................................................................................... 28
10
Electrical drawings ................................................................................................................... 29
11
Vélo Cargo logbook .................................................................................................................. 31
12
End user warranty registration card ......................................................................................... 32
Date: 1 July 2013
Issue: 1.0
CD 1001
Vélo Cargo Owner’s Manual
Page 4 of 34
1 Introduction
Thank you for purchasing a VeloCargo E250 electric power assisted cargo tricycle.
Vélo Électrique cargo bikes are sold as an affordable alternative to the second car or delivery vehicle.
They provide low cost family or cargo transport and come with electric power assistance as standard
to make the navigation of our roads comfortable and safe for the rider and its occupants. The electric
assistance is predominately designed for the safe exit/ pull off from junctions into traffic streams and
for the accent of hills, however it can be used as a gentle assistance to the riders pedal power input
at any time.
Our cycles are assembled in the UK and are manufactured using imported and UK produced
components.
The VeloCargo E250 is essentially a cycle like any other; it shares the same components such as
brakes, gears, chain, seats, wheels and tyres. Like a conventional bicycle its effective and safe
operation will depend on the manner in which it is used and also the necessity for frequent inspection
and maintenance. Furthermore there are safety hazards associated with all cycles and this is why we
ask that you read this entire manual carefully.
2 Important safety instructions
Please read these instructions in their entirety before operating the cycle and save these instructions
for future reference.
WARNING:
Read and save all of these instructions.
2.1 Disclaimer
The information in this manual is believed to be correct and reliable. However Vélo Électrique
assumes no responsibility for inaccuracies and omissions. The user of this information and product
assumes full responsibility and risk.
All specifications are subject to change without notice.
Tricycles, electrical power and battery systems are all capable of causing death or serious injury or
fire if damaged, incorrectly operated, or maintained. If in doubt, ensure that all activities are carried
out by trained and competent personnel.
2.2 Symbols used in this manual
WARNING:
Warning: risk of injury or death – proceed with extreme caution
PROFESSIONAL:
Professional person: highly recommended
Date: 1 July 2013
Issue: 1.0
CD 1001
Vélo Cargo Owner’s Manual
Page 5 of 34
IMPORTANT:
Important: please take note
TIP:
Tip: helpful information
2.3 General safety instructions
The Vélo Electrique cargo tricycle is inherently much safer and easier to ride that a bicycle due to the
fact that it has three wheels – if one wheel hits an obstacle such as a stone or pinecone, the tricycle
cannot then easily flip over as a bicycle can. Whilst on the whole the tricycle is a more stable platform
to ride and transport your children or cargo, there are some very important differences to a bicycle
which must be understood.
2.3.1 UK Standards Compliance
The Vélo Cargo is defined as an ‘electric pedal cycle’ by law rather than a ‘vehicle’ (a vehicle requires
tax, MOT, insurance and a licence). The Vélo Electrique Cargo Tricycle conforms to the UK Standard
instrument for Electrically Assisted Pedal Cycle Regulations 1983 (SI 1983/1168), these laws whilst
theoretically superseded by a more recent EU requirement have not been rescinded and still apply.
These require that;
•
•
•
•
•
•
the motor has an average power output limited to 200 W (250 W for tricycles and tandems
unladen weight limited to 40 kg (60 kg for tricycles and tandems)
maximum speed when power-assisted of 15 mph.
manufacturers serial identification plate must be fitted showing motor wattage, battery
voltage and weight.
The operation of the brakes must override and disable the electric propulsion system
The throttle control must be of a type that defaults to zero power assist when released
For electric cycles meeting these requirements, the vehicle does not require registration or periodic
road worthiness assessment, and operators do not require a licence or insurance.
However operators must be at least 14 years of age.
IMPORTANT:
Important: You must be 14 years of age or older in order to ride an electric cycle
2.3.2 European Standards Compliance
If you are going to ride your Vélo Electrique in EU countries there is one difference between the UK
Standards and the EU standards that must be noted. The UK allows the use of a ‘twist and go’ type
throttle whilst the EU favours the use of what is called a ‘Pedelec’ power administration system. This
senses when the rider is pedalling and only allows power to be applied when the rider is pedalling.
This requires the fitment of a ‘hall effect sensor’ to the crank, this is a fairly straight forward
Date: 1 July 2013
Issue: 1.0
CD 1001
Vélo Cargo Owner’s Manual
Page 6 of 34
modification and the existing Vélo Electrique speed controller has a connector where this can be
plugged in. The sensor itself fits over the crank Vélo Electrique can supply these items on request
and at extra charge, fitment instructions are provided so that the job can be completed by a the owner
or a cycle mechanic.
2.3.3 Electrical Modifications
Do not make any modifications to the electrical system including its mounting system, if you do so
your warranty will be voided and you may risk harm to yourself and others through electric shock and
electrical fires. If you still wish to modify or ‘hack’ your electrical system and have the appropriate
knowledge to do so you must do so at your own risk and you must ensure that your modifications
continue to meet the UK or EU standards, notably speed limitation and motor wattage limitation. Vélo
Electrique cannot be held responsible in any way if your modifications contravene these laws.
Electrical Modifications: Risk of burning, fire or electrical shock if the 36V
electrical propulsion system is tampered with. Similarly the battery charger
should not be tampered with. Do not attempt to charge the battery with any other
charger than the one provided.
WARNING:
PROFESSIONAL:
Professional person: All modifications or repairs to the electrical system must
be made by a skilled person who fully understands the risks of working with DC
and AC electrical systems.
2.3.4 Mechanical Modifications
The only modification that is permitted under warranty is that the body of the cargo box may be
repainted in another colour and minor modifications to the layout of the front cargo box. Vélo
Electrique welcomes your creativity in making the front cargo box suit your needs, however you must
remember that you do so at your and your passengers own risk and it is your responsibility to make
sure that the cycle continues to adhere to the UK or EU standards, particularly in terms of unladen
weight being below 60kg.
WARNING:
Do not modify the cycle frame by welding/screwing into it, this may weaken it and
cause it to fail.
Do not overload the cycle; remember that its maximum permitted unladen weight
must not exceed 60kg by law.
Do not make any modifications that impede the movement of any parts of the
steering or make the cycle unbalanced
3 General description
The Vélo Electrique Vélo Cargo is a three wheeled electric cargo tricycle of a design which has been
around for over 100 years. The cycle comprises of a standard rear section of a bicycle with an
elongated and re-enforced front section of frame that attaches to the cargo box.
The cargo box is made of 10mm marine plywood with a steel frame; this box pivots on a central shaft
which utilises two heavy duty taper roller bearings around a shaft. The handlebars are connected to
the rear uprights of the cargo box.
Date: 1 July 2013
Issue: 1.0
CD 1001
Vélo Cargo Owner’s Manual
Page 7 of 34
The cargo box has two bench seats with four sets of seatbelts for four children; the seats can be
removed to carry loads, an animal or an adult as long as the total load capacity is not exceeded.
The electric system comprises of a 36V 10 Ah battery powering a 250W DC brushless motor
controlled by a twist and go throttle and a remote control unit on fitted to the handlebars. Three
different power levels can be selected on the remote control along with a power on/off switch.
The electric power being 250W only is not designed to power the cycle on its own, it requires human
input.
The braking system is comprised of 3 x V-brakes which are operated by two standard brake levers on
the handlebars, both of the front brakes being linked together in order to be applied by one cable.
Each brake lever has an electric power override switch which cuts power to the motor should either
the brake be applied.
The rear brake is fitted with a catch-type handbrake system which allows the brake lever to be locked
in the on position.
The gears are of the derailleur type with a six speed index shift controller, these gears are used in
conjunction with the electric power system to maximise the rider’s power input and extend the battery
range.
4 Specifications
Vélo Cargo E250
Weight (unladen with rain cover and seats fitted)
57kg
Max load (cargo box)
100kg
Max load (rider)
120kg
Max gross weight (rider + cargo + trike weight)
277kg
Width
850 mm
Height
110 mm
Length
225 mm
Front cargo box construction
10mm marine plywood
Front cargo box frame
Mild steel
Rear (cycle) frame
Aluminium
Battery Voltage
36V
Battery Amp hours
10Ah
Battery Watt Hours
360Wh
Date: 1 July 2013
Issue: 1.0
CD 1001
Vélo Cargo Owner’s Manual
Page 8 of 34
Motor Wattage
250W peak continuous
Speed control system
3 speed power limitation coupled
to variable twist and go throttle
on right hand of handlebars
Gears (mechanical)
Shimano
derailleur
Wheels Front
20 inch x 1 inch
Wheels Rear
26 inch x 1.5 inch
Tyres Front (factory spec to maximum size)
20 x 1” to 20 x 2.5”
Tyres Rear (factory spec to maximum size)
26 x 1.5” to 26 x 2”
Date: 1 July 2013
Issue: 1.0
brand
6
speed
CD 1001
Vélo Cargo Owner’s Manual
Page 9 of 34
4.1 Performance (Speed and Range)
Your Vélo Electrique cargo cycle is designed to be ridden like a normal cycle, the electric power being
used only to assist your human effort. Whilst the cycle can be propelled solely by the electric power, it
will dramatically reduce the range and also the amount of ‘cycles’ or lifespan of the battery. You also
risk burning out the motor if it is allowed to grind to a halt without your pedalling assistance.
For optimum range and battery lifespan the Vélo Electrique power should be used to ascend hills, pull
out of junctions and to lightly assist the rider to maintain a satisfactory speed.
If this is the case, distances of 20-50 miles are easily achievable between recharges on terrain with
continual light to moderate hills with a fit adult riding the bike and using the correct gear to optimise
human power input.
We recommend that you use the ‘low’ power setting on level to light hills and use the ‘medium’ power
setting to pull out of junctions and to ascent lengthy or steep hills. ‘Medium’ power setting can be
used all the time if higher road speeds are required.
Every owner's pedalling power, local terrain and traffic conditions are different and hence we cannot
offer more specific figures for range and performance.
4.2 Performance (Battery Lifespan)
Before you use the battery for the first time it is best to give it a full deep charge for 12 hours. To fully
condition your new battery give it complete deep charge, discharge cycles for the first three charges.
This is achieved by charging your battery for 12 hours and then using the bike until the battery is
completely drained. After this “conditioning” process, you can leave the battery charging as and when
you require.
If you are going to leave your battery uncharged for more than eight weeks it is best left half charged.
You should then re charge it every four weeks for two hours to keep it in top condition.
Always remember that you use up to three times more power when pulling off from standstill when
compared to continuous speed. To preserve the life of each charge always set off using your
pedalling power as much as possible.
Check the indicators on the actual battery to see how much power you have left. Please note that the
indicators on the handlebar dashboard (if purchased) lights do not necessarily show the amount of
power you have left, but the amount of load the battery is experiencing at any one point. If the lights
go down to “Empty”, then this is a strong indication that you ought to be pedalling more to take some
of the load off the battery. This will improve the battery life cycle.
Do not expose the bicycle or battery pack to fire, heat sources, acid or alkaline substances.
For best results, always charge the battery at room temperature, batteries behave very strangely if
cold, for example a battery being charged at zero Celsius is only able to receive half the charge that it
would when charged at room temperature.
Always make sure the battery is turned off before detaching/connecting it.
9- If your battery is damaged or appears to be overheating for any reason immediately return it to
your retailer for advice and a safety check.
Date: 1 July 2013
Issue: 1.0
CD 1001
Vélo Cargo Owner’s Manual
Page 10 of 34
5 Operation
5.1 Pre ride safety checks
As with any pedal cycle you should perform basic safety checks before each ride.
5.1.1 Check the brakes
The safe operation of the Vélo Cargo is largely dependent on the correct set up of the brakes. The
cycle has two front V-brakes and one rear V-brake. If the front brakes are out of balance (one bites
before the other) the cycle may pull strongly to the left or right. You should not ride the cycle in this
case, but if you absolutely must you should ride slowly and use the rear brake only using the fronts as
a last resort.
If the front brakes are out of balance you must re-balance them as detailed in the maintenance
section.
Check that the rear brake is also operational and that the handbrake can hold the cycle. If the wheel
still rotates when the handbrake is on full then you need to adjust the back brake also – see
maintenance section.
5.1.2 Check the tyres are inflated to the correct pressure
If the tyres are not inflated to the correct pressure, your safety is at risk. You should ensure that the
tyres are inflated to the correct pressure as per the table below. If you don’t have a tyre pressure
gauge it is advisable to buy a hand held one or purchase a pump with one built in. The tyres can also
be inflated at service station automatic pumps; although the accuracy of these pumps gauges can be
considerably variable, hence it is always better to have your own tyre pressure gauge.
The correct pressures are listed below.
Front Tyres
45 PSI
Rear Tyre
60 PSI
IMPORTANT: If your front tyres have different pressures, you may find that the
cycle pulls to the direction of the side with the lowest pressure. If your tyre pressure
is too high you risk the rapid blow out of a tyre which can cause the cycle to swerve
dangerously.
TIP:
Tip: If you can’t remember the correct tyre pressure, inflate to the maximum
pressure indicated on the sidewall of each tyre (which is the same)
5.1.3 Adjusting the handlebars
The handlebars are adjustable in height by 17cm, the most comfortable position being to have your
forearm horizontal after you have adjusted the saddle to suit your height.
To adjust the handlebars, simply undo the 10mm lock nut and then unwind the M6 socket head screw
with an Allen key. Move the handlebars to the desired position and then firmly tighten the socket head
screw. Then firmly tighten the 10mm lock nut to prevent the screw from loosening.
Date: 1 July 2013
Issue: 1.0
CD 1001
Vélo Cargo Owner’s Manual
Page 11 of 34
Removing the battery
5.2 Removing and charging the battery
5.2.1 The battery charger
Your battery can be charged in or out of the Vélo Cargo. The charger must be plugged into an AC
wall socket and be protected from moisture. The battery is connected to the charger using the socket
underneath the battery handle.
A Red light on the charger means the battery is charging. When the red light turns green, the battery
is fully charged.
NB - Please ignore the green light and carry on charging for 12 hours for the first 3 charges to
condition your battery.
IMPORTANT: Your VeloCargo’s electronics are rain and splash resistant and can
be used in all weathers. However the electrical components, such as motor, battery,
and controller, must not be submerged in water.
Tip:
TIP:
•
•
•
Always connect the charger to the battery before connecting it to the mains.
Always disconnect the charger from the mains before disconnecting the
charger from the battery.
Do not leave the charger connected to the mains when not in use.
Date: 1 July 2013
Issue: 1.0
CD 1001
Vélo Cargo Owner’s Manual
Page 12 of 34
5.2.2 Turning the battery on and off and removing from the cycle
All Vélo Cargo’s from frame no VEL004 onwards have a car type ignition key. It has three positions
•
Battery remove – in this position the battery lock is disabled and the battery can be safely
removed using the handle. The key must be turned fully anticlockwise and the key must be
removed in order for the battery to be able to slide backward on its rail.
•
Battery off but locked – in this position the battery is locked into the bike but is isolated (off)
this position is useful for when you leave the bike locked up whilst on a trip. It prevents the
battery from being stolen (to a certain extent) and also prevents children or others from
enabling the electric system.
NB: In this position the key can be removed.
•
Battery on – in this position the handlebar speed control is enabled and the electrical system
is live. It is not advisable to leave the ignition switch in this position when the bike is in use as
the battery will slowly be drained of power and will probably be flat when you come to use it.
The key must first be depressed and then it can be turned fully clockwise to the on position.
Date: 1 July 2013
Issue: 1.0
CD 1001
Vélo Cargo Owner’s Manual
Page 13 of 34
5.2.3 Refitting the battery
The battery is secured in position by a rail and a locking pin. Care must be taken to ensure that the
battery is sliding on the rail and not above it when refitting.
TIP:
Tip: If the battery is not secure or won’t plug into the electrical contacts at the end
then it is most likely that it is not on the rail properly. In which case, withdraw it and
re-insert it correctly.
5.3 Adjusting the saddle
The saddle can be adjusted like a normal bicycle saddle and has a lever operated quick adjuster. On
no account should the saddle be raised past the ‘max’ stamped position on its stem.
Date: 1 July 2013
Issue: 1.0
CD 1001
Vélo Cargo Owner’s Manual
Page 14 of 34
5.4 Check all nuts and bolts are secure
The Vélo Cargo is factory adjusted to ensure that all of the nuts and bolts are attached to the right
tightness (torque) and either use Nyloc security nuts or a thread locking compound is used to stop the
nuts coming loose.
If the trike starts to rattle during a journey you should immediately stop and inspect the source of the
noise and rectify it or if not rectify it once at your destination if deemed non critical.
The most important securing nuts are the wheel nuts and the cargo box centre pivot nut.
5.4.1 Wheelnuts
Once a week give each wheel a wobble to check for looseness, if it is loose take care to re-align it in
the centre of the brakes/frame and re-tighten it.
5.4.2 Cargo box pivot bearing nut
Once a week check the front cargo box pivot bearing nut for tightness. The way to do this without
getting underneath the trike is to sit on the saddle and gripping the handlebars try and rock them
away from you (upward pressure) and then towards you (downward pressure) in short motion. If there
is a noticeable rock forwards and backwards or clunking then the nut will need re-tightening. This
requires a 27mm socket or spanner, if you do not have one of these then just take the trike to a local
garage/bike shop and they should be able to adjust it for you at little or no cost in just a few minutes.
It only needs to be tightened so that there is not rocking motion, if the cargo box becomes stiff to
steer then it is too tight and needs backing off a little.
6 Packing List
The Vélo Électrique Vélo Cargo is shipped to most parts of the UK unboxed by Vélo Électrique
drivers. Where shipped in a case, the cycle will be completely assembled and will just require the
handlebars to be fitted in their sockets, the saddle fitted and the rain cover fitted.
You should inspect on receipt for damage or missing parts. This should be done before the carrier
departs and any damage informed immediately to the driver or photographed prior to further
unpacking.
Single Carton
Shipping dimensions:
275 x 35 x 30 cm (108” x 14” x 12”)
Shipping weight:
100kg (132 lbs)
6.1 Recommended tools
It is essential that you purchase a bicycle repair kit including common Allen key sizes and a small
wrench or 10mm spanner. These are the essential sizes for adjusting the brakes and handlebars.
In addition an extended tool kit can be made up to cover all of the possible tools needed to
assemble/disassemble the trike.
•
Spanners
8, 10, 13, 14, 15, 18 and 27mm
•
Allen (hex) keys
(2, 3, 4, 5, and 6 mm )
•
Torque wrench
( 5-250Nm)
•
Sockets for torque wrench
8, 10, 13, 14, 15, 18 and 27mm
Date: 1 July 2013
Issue: 1.0
CD 1001
Vélo Cargo Owner’s Manual
Page 15 of 34
•
Phillips screwdrivers large/small
•
Long nose pliers
•
Date: 1 July 2013
Issue: 1.0
Multi-meter
CD 1001
Vélo Cargo Owner’s Manual
Page 16 of 34
7 Riding the Vélo Cargo for the first time.
Before riding the Vélo Cargo for the first time, make sure you have completed the safety checks
indicated in this manual. It is suggested that your first practice ride should be on a quiet back street or
park with some sharp corners and a hills to get practice on cornering and power optimisation on hills.
7.1 Pulling off on level ground
1. Ensure that the saddle and handlebars are set to suit your height.
2. Turn on the battery power as described in section 4 by depressing the key and turning fully
clockwise.
3. On the handlebars press the on switch on the remote control unit – check you battery level on
the meter, if only the first light is on next to the ‘L’ and is flashing it means that you will need
to charge the battery before using.
4. Cycle the ‘mode’ switch through to the lowest power setting
5. Release the handbrake (if applied) by pulling the brake lever towards you and releasing.
Date: 1 July 2013
Issue: 1.0
CD 1001
Vélo Cargo Owner’s Manual
Page 17 of 34
6. Select the lowest gear on the gear selector (push the bottom lever until the chain is on the
biggest sprocket on the rear wheel) – the top lever is for changing down into a faster gear
when you accelerate.
7. Begin to pedal AT THE SAME TIME as you apply the motor power by twisting the throttle fully
round. The electric motor’s life will be greatly prolonged if you do this.
8. As you speed up, you can change down the bike gears as you would on a normal bike and slowly
decrease the power on the twist and go until you need it again on a slope or to pull off again or to
maintain a higher top speed.
9. You can change power assistance ‘mode’ on the remote control on the handlebars at any time
when you are riding and you will notice a marked difference in the power and speed of the bike.
7.2 Pulling off on a hill
Select ‘high’ power and repeat the above steps, you will most likely have to stay in the lowest chain
gear in order to ascent the hill. Every riders power and cargo are different and so there is no specific
rule for what chain gear you should be in to ascent a hill.
Date: 1 July 2013
Issue: 1.0
CD 1001
Vélo Cargo Owner’s Manual
Page 18 of 34
7.2.1 Is the hill too steep????
If you are ascending a hill and with the assist power on ‘high’ and with the chain gear in the lowest
gear and the Vélo Cargo grinds to a halt, you must release the throttle to avoid burning out the motor.
Apply the brakes, step off the cycle and walk the Vélo Cargo up the hill whilst still using the throttle to
provide electric assistance. The Vélo cargo will be able to ascend much steep hills without your
weight on the saddle.
IMPORTANT: The Vélo Cargo’s motor can be severely damaged by applying power
to it with the back wheel not turning. You must release the power if the Vélo ever
grinds to a halt.
Tip:
TIP:
•
•
Get off and walk on very steep hills and use the power to push the bike up
the hill without you on it.
Always use the lowest chain gear on steep hills and provide as much effort
as you can. You will find that the Vélo Cargo can go up some surprisingly
steep hills with an adult and two children in it.
7.3 Cornering
The key difference between a ‘tadpole’ tricycle and a bicycle is that it can’t lean into turns and hence
if the rider doesn’t lean towards the centre of the turn the bike can potentially go on two wheels or
worst still roll on its side. This is not something to worry about in the long run as you learn to turn
corners on a tricycle the same way you learned to ride a bicycle. For most people it takes only a few
minutes to realise the difference.
The Vélo will also have more tendency to tip if you have no load in the front section, so extra care
must be taken when riding like this.
7.3.1 Entering a turn.
•
Lean to the centre of the turn, especially on very tight turns to transfer your weight towards an
imaginary centre of a roundabout for example.
7.3.2 Whilst in a turn
•
Do not increase your speed by using the throttle / pedals as you progress through the turn –
keep steady speed.
7.3.3 Cornering whilst going down hills
•
As you can imagine if you corner on a hill you have an additional risk of making the trike tip
as there is a tendency to go fast and you have the slope of the hill working against your
centre of gravity.
IMPORTANT: The risk of toppling the trike is significant if these golden rules are not
adhered to. You risk damaging the trike, yourself and your precious cargo.
Date: 1 July 2013
Issue: 1.0
CD 1001
Vélo Cargo Owner’s Manual
Page 19 of 34
TIP:
Tip:
•
•
•
GO SLOW AROUND CORNERS UNTIL YOU ARE CONFIDENT AT
RIDING THE BIKE.
Always lean into your turn.
Do not accelerate whilst in a turn.
7.4 Braking
The Vélo Cargo has three strong brakes which can pull the cycle up very quickly in the event of an
emergency stop. As with a car, the front brakes deliver the most stopping power as the inertia of the
trike ‘pins’ the front of the bike down to the road.
It is possible to lock up all three wheels in the wet or get the rear wheel off the ground in an
emergency stop situation, if this is the case you will have to ‘dab’ the brakes as you would in a car to
stop them from locking up.
The brakes should be applied in the following way, back brake first to decrease speed and then bring
in the fronts slowly until you stop. There is no hard and fast rule, you will just notice that this is the
same thing you do on a bicycle because it delivers the best results.
If you are riding on muddy ground with one front wheel in the mud and the other on a hard surface,
the wheel in the mud may skid before the other does causing uneven braking and potentially causing
a swerve. Hence caution should be applied when using the front brakes when the wheels are on
different surfaces
7.5 Parking the Vélo Cargo.
The Vélo Cargo has a handbrake which can keep it from moving on level ground or on slopes only. It
should be noted that the handbrake can be released quite easily by children fiddling with it. Hence,
never leave your Vélo with the handbrake on without it being near to or up against a wall/barrier of
some kind so that if the brake is released it won’t roll anywhere far and cause damage to the trike,
occupants and parked cars for example.
7.6 Locking the Vélo
It is best to lock your Vélo Electrique Cargo Trike by using a flexible heavy duty chain or cable lock. It
is best to pass the lock through one of the front wheels, the front frame corner and a fixed object like
railings or a bike rail. It is much better to lock the front rather than the back wheel as it makes it much
harder to manhandle if a thief were to try and steal it. For overnight storage in a street Velo
recommends that you remove the battery, the saddle and uses locks front and rear.
7.7 Using the seatbelts
There are four three-point seatbelts for children provided as standard. These are fully adjustable and
can also be remounted to provide further adjustment. The seatbelts are adjusted by pulling the
adjustment buckles up or down the strap to lengthen or shorten them.
Date: 1 July 2013
Issue: 1.0
CD 1001
Vélo Cargo Owner’s Manual
Page 20 of 34
If you need to shorten the seatbelts further, you can undo the seatbelt mounting bolt under the seat
and using a bradawl or red hot phillips screwdriver tip, poke a new hole through where suitable and
then remount.
7.8 Using the rain cover
The rain cover comes as standard with a new Velo Cargo. It has zips at each end for access,
however it is best not to encourage the use of these if you have small children as they can easily
break the zips by forcing themselves in and out of the cargo box.
The best way to fit the rain cover is to make sure both zips are done up, and hook it over the front
frame hoop and then pull it down over the rear as showing in the photo sequence below. Take care to
ensure that the Velcro straps are at the rear as these are used to fix the raincover in position around
the base of the handlebars.
7.9 Removing the seats
Both of the front seats can be completely removed. To do this, undo the Phillips screw on either side
of the seat (inside the cargo box). The seats then withdraw including the lower section of the seatbelt.
Refitting is the reverse of removal.
Date: 1 July 2013
Issue: 1.0
CD 1001
Vélo Cargo Owner’s Manual
Page 21 of 34
7.10 General tricycle riding rules
DO
•
•
•
•
Lean, lean, lean, into turns!!!
Go slow on turns
Keep both hands on the handlebars at all times except when signalling
Keep your eyes on the road
DON’T
•
•
•
•
Turn your body to the side and take your hand off to look behind you, you will cause the trike
to swerve
Take your hand off the handlebars to manage your cargo, you will cause the trike to swerve
Accelerate on turns
Ride with your kerbside wheel too close to the kerb or in a rough/dirty gutter as this will cause
you to potentially hit the kerb and have an accident if you hit a large stone or similar.
8 Maintenance and inspection
The Vélo Cargo uses standard bicycle components all round and standard E-bike components in the
36V electrical system. Spare parts are hence easily obtained either from Vélo Electrique or from cycle
or e-bike stores. There are several basic maintenance steps that are very important to pay regular
attention to, these being the condition and adjustment of the brakes, the condition of the tyres and the
tightness of nuts and bolts, most importantly the cargo box pivot bearing /shaft.
8.1 Adjusting and replacing the brakes
The brakes are a of the standard V-brake type, with replacement parts being available at any cycle
store or via Vélo Electrique. It is likely that your brakes will need adjusting from time to time and will
most likely need the pads replacing every year or when they have worn down to the line.
WARNING
If the front brakes are out of balance (one bites before the other) the cycle may pull
strongly (and dangerously) to the left or right. You should not ride the cycle in this
case, but if you absolutely must you should ride slowly and use the rear brake only
using the fronts as a last resort and rebalance the brakes as soon as possible.
There are two ways to adjust the brakes, if the front breaks are balanced and are just not strong
enough, or the rear break is not holding the bike on the maximum handbrake setting it is likely that
the cable has just naturally stretched or the pads have worn a little. In this case the brakes can be
adjusted without any tools by winding out the adjustment wheel on each of the brake levers.
Date: 1 July 2013
Issue: 1.0
CD 1001
Vélo Cargo Owner’s Manual
Page 22 of 34
When this adjustment is fully used the cables must be re-clamped at the V-brake assembly itself on
the wheel. The following two sections describe how to do this.
8.1.1 To adjust and rebalance the front brakes
The brakes can be tightened individually if one is just slightly out or better still start from scratch and
set both brakes.
Wind the adjustment wheel on the brake lever in so that it shows about 2mm of adjustment.
•
With an Allen key slacken the brake cable clamp on one of the front brakes and using your
hands or pliers pull it tight whilst clamping the brake pads tightly against the wheel rim with
your other hand – you can use a G-clamp to clamp the brakes to the wheel rim to make this
easier.
•
•
Tighten up the brake cable clamp noting that it will pull the cable slightly as you tighten it.
Repeat this process on the other front wheel.
Date: 1 July 2013
Issue: 1.0
CD 1001
Vélo Cargo Owner’s Manual
Page 23 of 34
•
•
•
•
The bike should now be hard to push as both front brakes should be rubbing
Now slacken off the adjustment on the front brake lever to loosen the brakes a little, this
should now allow both wheels to rotate with the brake lever released and the pads should
bite fairly strongly with light pressure
Test for balance by pushing the trike forward, if it pulls to the left, the right brake is not biting
at the same time and needs adjusting further, if it pulls to the right, the left brake is not biting
soon enough and needs adjusting earlier.
Properly balanced front brakes should apply at the same time and should not pull the bike to
the left or right at any stage of their application.
8.1.2 To adjust the rear brake.
•
•
•
•
•
•
Wind the adjustment wheel on the brake lever in so that it shows about 2mm of adjustment.
With an Allen key slacken the brake cable clamp on one of the front brakes and using your
hands or pliers pull it tight whilst clamping the brake pads tightly against the wheel rim with
your other hand – you can use a G-clamp to clamp the brakes to the wheel rim to make this
easier.
Tighten up the brake cable clamp noting that it will pull the cable slightly as you tighten it.
The bike should now be hard to push as the rear brake should be rubbing slightly.
Now slacken off the adjustment on the rear brake lever to loosen the brake a little, this should
now allow the wheel to rotate with the brake lever released and the brake blocks should bite
fairly strongly with light pressure.
The handbrake should now hold the bike properly when applied.
8.1.3 Replacing the brake blocks
The brake blocks can be replaced in the following manner.
•
Release the brake cable from the brake assembly by squeezing together the brake arms and
unhooking the brake cable from it.
Date: 1 July 2013
Issue: 1.0
CD 1001
Vélo Cargo Owner’s Manual
Page 24 of 34
•
•
•
•
•
•
With the brakes sprung open, undo the Allen socket head bolt that holds the brake pad to the
brake assembly.
Fit the new brake block and loosely tighten
Press the brake block against the wheel rim as if it were being applied by the brake lever,
align it so that it is flat on the wheel rim and it doesn’t not touch the tyre (allow about 1mm of
clearance).
Whilst still holding the brake block against the wheel rim, tighten the securing bolt.
Repeat on other brakes
Follow steps in section 7.1.1/2 to adjust and balance the brakes if necessary.
8.2 Removing a wheel / replacing the tyres
Changing a wheel on a Cargo Trike is a little different to a conventional bicycle. These differences
particularly the changing of the rear tyre/wheel and its electric connections should not be attempted
by someone without good technical experience.
PROFESSIONAL:
Professional person: highly recommended – a bike shop is your best bet.
The Vélo Electrique cargo trike range uses 20” front tyres and 26” rear tyres as standard. Any tyre
can be fitted to the rim provided it does not rub on the frame or mudguards and does not exceed the
dimensions listed in the table below. If a replacement tyre is fitted that is non-standard, inflate that
tyre to the maximum pressure indicated on its sidewall.
Wheels Front
20 inch x 1 inch
Wheels Rear
26 inch x 1.5 inch
Tyres Front (factory spec to maximum size)
20 x 1” to 20 x 2.5”
Tyres Rear (factory spec to maximum size)
26 x 1.5” to 26 x 2”
Date: 1 July 2013
Issue: 1.0
CD 1001
Vélo Cargo Owner’s Manual
Page 25 of 34
IMPORTANT: If you are replacing a front tyre, replace with the same type. If this is
not possible you must replace both front tyres to avoid potentially dangerous
handling problems.
Tip:
TIP:
•
•
•
Check you tyre pressures frequently!
Check that your wheel isn’t buckled; a buckled wheel will not brake well and
will wear the tyre in only one spot potentially causing a blow-out.
Check your tyres frequently for even or uneven wear – replace if necessary
8.2.1 Standard tyre inflation pressures
Front Tyres
45 PSI
Rear Tyre
60 PSI
8.2.2 Removing a front wheel and its tyre
The removal of the front wheel is fairly straightforward and requires a 15mm spanner. There are
special locking washers under each nut; these have a small tab that locates in the small hole on the
frame. Care must be taken not to damage these washers, nor to over tighten the nuts.
•
•
•
•
Release the brake cable from the brake assembly by squeezing together the brake arms and
unhooking the brake cable from it. The brake arms should swing open allowing the wheel to
pass through the assembly.
Undo the two nuts on the wheel with sufficient slack to allow the locking washer to come free
of their holes.
Withdraw the wheel.
Replacement is the reversal of the above steps, taking care to orient the locking washer in
the locating hole.
8.2.3 Removing the rear wheel and its tyre
Changing the rear tyre or removing the wheel requires quite a lot of care as the hub motor has wires
that connect it to the control unit, these wires cannot be disconnected at the wheel, and hence if the
whole wheel is to be removed then the power cables must be disconnected at speed controller. This
operation requires the use of a skilled professional.
PROFESSIONAL:
Professional person: highly recommended – a bike shop is your best bet.
PLEASE GIVE THEM THIS MANUAL AND ASK THEM TO FOLLOW THE
STEPS BELOW.
It is possible to change a tyre or repair a puncture without having to disconnect the rear wheel
however it again requires a skill and care to avoid damaging the control and power cables.
Date: 1 July 2013
Issue: 1.0
CD 1001
Vélo Cargo Owner’s Manual
Page 26 of 34
To change a tyre /repair a puncture without disturbing the power cables;
•
•
•
•
•
•
•
Remove the battery from the trike to disable the electronics
Place a stand of some sort underneath the crank (pedals) so that the rear wheel is about 3
inches off the ground.
Release the brake cable from the brake assembly by squeezing together the brake arms and
unhooking the brake cable from it. The brake arms should swing open allowing the wheel to
pass through the assembly.
Undo the two nuts on the wheel with noting that on the left hand side, the nut cannot be
removed due to the cables that run down the core of the axle.
Lower the wheel to the ground taking care not to stretch the power cable wires (you may
need to cut through one of the cable ties if there isn’t enough slack in the cable.
With the wheel in this position it is possible to remove the tyre or replace an inner tube /
repair a puncture, however it is hard and absolute care must be taken not to tug at or damage
the power/control cables.
Replacement is the reversal of the above steps, taking care to hook the derailleur and chain
around the cassette.
To change remove the rear wheel completely by disconnecting the power cables
•
•
•
•
•
•
•
Repeat the steps above to release the wheel from the frame
Follow the cable from the left hand side up to the underside of the battery tray as you do so
you will need to cut through each of the cable ties holding the wire in place, make a note of
where each of these are as you will have to replace them with new ones once the wheel is
refitted.
Remove the cover of the motor controller (black enclosure that battery pushes into). The
screws holding this in are very small and must be not be lost!
Under the cover you will see the motor controller, this can be carefully pulled out to reveal all
of the connectors that connect the brake overrides, the handlebar speed controller, throttle
and motor. Not that some connectors are unused.
Follow the motor wires in through the hole in the bottom of the compartment; there should be
3 x larger gauge power wires and one square white connector block. It is these that you need
to separate.
Once disconnected you can feed these wires down through the whole in the bottom and then
completely remove the wheel for repairs on the work bench.
Replacement is the reverse of the above steps, but take extreme care to ensure that the
electrical connectors are properly pushed back together including their sealing covers where
fitted. You will also need to re-attach the cable to the frame with cable ties; these can be
bought at any hardware/bike store.
Date: 1 July 2013
Issue: 1.0
CD 1001
Vélo Cargo Owner’s Manual
Page 27 of 34
8.3 Troubleshooting failure in the motor and electronic control
system
If the Vélo Électrique VeloCargo motor stops working for any reason or is behaving strangely, you
must contact Vélo Electrique in the first instance to assist in troubleshooting the cause of the problem
over the phone.
PROFESSIONAL:
Professional person: Do not attempt to repair yourself without talking to Vélo
Electrique first.
8.4 Actions in the event of damage to the battery bank.
The Lithium battery has typically 360Watt/hours or energy storage capacity. Putting this in simple
terms, that’s enough energy to power 3.6 100 Watt electric light bulbs for one hour. The battery is
deliberately encased in a thick aluminium extrusion to protect it from damage.
If the battery is ever damaged in an accident or by other means, there may be the risk of a small
electrical fire or explosion as with all batteries. The battery is protected by a fuse to prevent it from
being damaged by short circuits in the rest of the electrical system. However is the battery case is
ever damaged you may notice sparking or smoke coming from it.
If possible quickly perform the following steps should you see smoke/sparks emitting from the battery.
•
•
•
•
Get the whole trike outside to avoid any risk of the situation worsening by placing buildings in
jeopardy
If possible try and remove the battery from the bike by using its handle and releasing it with
the key – place it on the ground on anything that is not going to burn, e.g. concrete/grass and
wait at a safe distance for it to stabilise
If it continues to smoke or catches fire, call the fire brigade.
If it stabilises move it to a safe place outside where it cannot be tampered with or moved by
anyone and call Vélo Electrique or the fire brigade for advice on what to do next.
WARNING
For your safety, if in doubt, call the fire brigade if you notice smoke or a fire in your
Vélo Electrique power system.
9 Warranty and repair
Please see Vélo Électrique terms and conditions for details of the warranty. These are available on
request or may be downloaded from the Vélo Électrique website. Please keep your invoice as proof
of purchase.
Please fill in the warranty registration card at the end of this manual when you have received your
trike and send a copy to Vélo Électrique.
The warranty is dependent on correct operation and maintenance of the Vélo Électrique
VeloCargo
Date: 1 July 2013
Issue: 1.0
CD 1001
Vélo Cargo Owner’s Manual
Page 28 of 34
The Vélo Électrique warranty applies to customers who have purchased directly from Vélo Électrique
or from Vélo Électrique authorised distributors or Vélo Électrique authorised installers.
As stated in the Vélo Électrique terms and conditions the warranty is void “if you have used the
product for purposes beyond its intended use or in excess of its specified capacity or if you or others
have altered, repaired, or tried to repair or tampered with it”. If a repair is required then contact Vélo
Électrique or a Vélo Électrique distributor to either gain approval or arrange for Vélo Électrique to
carry out a repair.
Except with prior authorisation from Vélo Électrique or a Vélo Électrique authorised distributor there
are no user repairable parts within the electronics system.
Vélo Électrique reserves the right to change specifications without prior notice in the interest of
product development.
10 Electrical drawings
Date: 1 July 2013
Issue: 1.0
CD 1001
Vélo Cargo Owner’s Manual
Page 29 of 34
Date: 1 July 2013
Issue: 1.0
CD 1001
Vélo Cargo Owner’s Manual
Page 30 of 34
11 Vélo Cargo logbook
Date
Estimated
mileage
Observations / service items / damage
Date: 1 July 2013
Issue: 1.0
CD 1001
Vélo Cargo Owner’s Manual
Page 31 of 34
12 End user warranty registration card
Please fill in and mail or email a photocopy/scanned PDF of this warranty registration card back to Vélo Électrique.
Please keep the original in this owner’s manual for your future reference. We will not use this information for
marketing purposes or sell it.
Vélo Électrique Ltd
Poole Dorset, UK
Web: www.veloelectrique.co.uk
Tel: +44 (0)7917 698 438
[email protected]
About you:
Your name:
Your address:
(include post or zip code)
Your telephone:
Your email:
Heights of riders:
About your trike:
Trike serial number:
Battery serial number:
Trike model :
Box colour:
Frame Colour:
Estimated weekly mileage/km:
Likely cargo box load type:
Date: 1 July 2013
Issue: 1.0
CD 1001
Vélo Cargo Owner’s Manual
Page 32 of 34
Vélo Électrique Ltd
Poole,
Dorset, UK
Web: www.veloelectrique.co.uk
Tel: +44 (0)7917 698 438
[email protected]
®
Vélo Électrique and Velo Cargo are registered trademarks of Vélo Électrique Ltd, manufacturers of custom electric cargo
tricycles.
Date: 1 July 2013
Issue: 1.0
CD 1001
Vélo Cargo Owner’s Manual
Page 33 of 34
© Vélo Électrique, 2013
Date: 1 July 2013
Issue: 1.0
CD 1001
Vélo Cargo Owner’s Manual
Page 34 of 34