1
I
IC
US@F manual
100%
Recycled
Paper
)
th 100 % recycled
paper.
the possibilities
ENGLISH
Thank you for purchasing this Samsung
product. Please register your product at
www.samsung.com/register
1-800-SAMSUNG
SMH1927-XAC_EN.indd
1
(726-7864)
2012-02-24
1:58:42
safety
nforrnat on
©ongratulations on your new Samsung
microwave oven, This manual contains important
information on the installation, use and care of
your appliance, Please take time to read this
manual to take full advantage of your microwave
oven s many benefits and features,
IMPORTANT
SAFETYSYMBOLS
ANDPRECAUTIONS
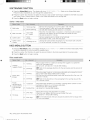
What the icons
manual
mean:
¥
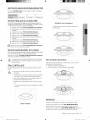
PRECAUTIONS
TOAVOID
POSSIBLEEXPOSURE
TO
EXCESSIVE
MICROWAVE
ENERGY
A. Do not attempt to operate this oven with the door
open since open-door operation can result in harmful
exposure to microwave energy. It is important not to
defeat or tamper with the safety interlocks.
B. Do not place any object between the oven front
face and the door or allow soil or cleaner residue to
accumulate on the sealing surface.
C. Do not operate the oven if it is damaged. It is
particularly important that the oven door close
properly and that there is no damage to the:
1. Door (bent),
2. Hinges and latches, (broken or loosened),
3. Door seals and sealing surface.
D. Only properly qualified service personnel should adjust
or repair the oven. Do not attempt to adjust or repair
the oven yourself.
SAVETHESEINSTRUCTIONS
2
safety
irfformaton
in this
user
Hazards or unsafe practices
WARNING
¥
CAUTION
WHATYOUNEEDTOKNOW
ABOUTSAFETYINSTRUCTIONS
Warnings and Important Safety Instructions in this manual
do not cover all possible conditions and situations that
may occur. It is your responsibility to use common sense,
caution, and care when installing, maintaining, and
operating your microwave oven.
and signs
CAUTION
may result in severe
injury or death.
that
personal
Hazards or unsafe practices that
may result in minor personal
injury or property
damage.
To reduce the risk of fire,
explosion, electric shock, or
personal injury when using your
microwave oven, follow these
basic safety precautions.
Do NOT attempt.
Do NOT disassemble.
Do NOT touch.
Follow directions
explicitly.
Unplug the power plug from the wall
socket.
Make sure the machine is grounded
prevent electric shock.
to
Call the service center for help.
Note
These warning signs are here toprevent
injury to you and others. Please follow them
explicitly. After reading this section, keep it
in a safe place for future reference.
iMPORTANT
SAFETY
iNSTRUCTiONS
When using any electrical appliance, basic safety
precautions should be followed, including the following:
Ak WARNING
WARNING
1.
2.
3.
4.
5.
To reduce risk of burns, electric shock, fire, personal
injury or exposure to excessive microwave energy:
Read all safety instructions before using the
appliance.
Read and follow the specific "Precautions to avoid
possible exposure to excessive microwave energy" on
this page.
This appliance must be grounded. Connect only to
properly grounded outlets. See Important "Grounding
instructions" on page 4 of this manual.
Install or locate this appliance only in accordance with
the provided installation instructions.
Some products such as whole eggs and sealed
containers (for example, closed glass jars) can
explode if heated rapidly. Never heat them in a
microwave oven.
6. Use this appliance only for its intended use as
described in the manual. Do not put corrosive
chemicals or vapors in or on this appliance. This type
of oven is specifically designed to heat, cook, or dry
food. It is not designed for industrial or laboratory use.
7. As with any appliance, close supervision is necessary
when it is used by children.
8. Do not operate this appliance if it has a damaged cord
or plug, if it is not working properly, or if it has been
damaged or dropped.
9. This appliance should be repaired or serviced only
by qualified service personnel. Contact the nearest
authorized service facility for examination, repair, or
adjustment.
10. Do not cover or block any openings on the appliance.
11. Do not tamper with or make any adjustments or
repairs to the door.
12. Do not store this appliance outdoors. Do not use this
product near water, for example, near a kitchen sink,
in a wet basement, near a swimming pool, or similar
locations.
17. To reduce the risk of fire in the oven cavity.
ao Do not overcook food. Carefully attend appliance
when paper, plastic, or other combustible materials
are placed inside the oven to facilitate cooking.
b. Remove wire twist-ties from paper or plastic bags
before placing the bags in the oven.
co If materials inside the oven
door closed, turn the oven
power cord, or shut off the
circuit breaker panel. If the
may spread.
ignite, keep the oven
off, and disconnect the
power at the fuse or
door is opened, the fire
do Do not use the cavity for storage purposes. Do not
leave paper products, cooking utensils, or food in
the cavity when not in use.
18. Liquids, such as water, milk, coffee, or tea can
be overheated beyond the boiling point without
appearing to be boiling. Visible bubbling or boiling
when the container is removed from the microwave
oven is not always present. THIS COULD RESULT
IN VERY HOT LIQUIDS SUDDENLY BOILING OVER
WHEN THE CONTAINER IS DISTURBED OR A
SPOON OR OTHER UTENSIL IS INSERTED INTO
THE LIQUID. To reduce the risk of injury:
ao Do not overheat liquid.
bo Stir liquid both before and halfway through heating
it.
co Do not use straight-sided containers with narrow
necks.
do After heating, allow the container to stand in the
microwave oven for a short time before removing
the container.
e. Use extreme care when inserting a spoon or other
utensil into the container.
A CAUTION
CAUTION
1. Clean Ventilating Hoods Frequently - Grease should
not be allowed to accumulate on hood of filter.
2. When flaming foods under the hood, turn the fan on.
3. Use care when cleaning the vent-hood filter. Corrosive
cleaning agents, such as lye-based oven cleaner, may
damage the filter.
13. Do not immerse the cord or plug in water.
14. Keep the cord away from heated surfaces. (including
the back of the oven).
15. Do not let the cord hang over edge of table or
counter.
16. When cleaning surfaces of the door and oven that
come together when the door closes, use only mild,
nonabrasive soaps, or detergents applied with a
sponge or soft cloth. Unplug the plug before cleaning.
SAVETHESEINSTRUCTI0NS
safety
informaton
3
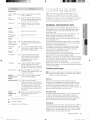
GROUNDING
INSTRUCTIONS
This appliance must be grounded. In the event of an
electrical short circuit, grounding reduces the risk of
electric shock by providing an escape wire for the
electrical current. This appliance is equipped with a cord
that includes a grounding wire and a grounding plug.
The plug must be plugged into an outlet that is properly
installed and grounded.
WARNING
WARNING
Improper use of the grounding plug can result in a risk of
electric shock.
,, Plug into a grounded 3 prong outlet. Do not remove
the third (grounding) prong. Do not use an adaptor or
otherwise defeat the grounding plug.
,, Consult a qualified electrician or service person if you
do not understand the grounding instructions or if you
are not sure if the appliance is properly grounded.
,, We do not recommend using an extension cord with
this appliance. If the power-supply cord is too short,
have a qualified electrician or serviceman install an
outlet near the appliance. However, if it is necessary
to use an extension cord, read and follow the "Use of
Extension Cords" section below.
Use of Extension Cords
A short power-supply cord is provided to reduce the risk
of your becoming entangled in or tripping over a longer
cord. Longer cord sets or extension cords are available
and you can use them if you exercise care. If you use a
long cord or extension cord:
1, The marked electrical rating of the cord set or
extension cord should be at least as great as the
electrical rating of the appliance.
2, The extension cord must be a grounding-type 3-wire
cord and it must be plugged into a 3-slot outlet.
3, The longer cord should be arranged so that it will not
drape over the counter top or tabletop where it can
be pulled on by children or tripped over accidentally.
If you use an extension cord, the interior light may
flicker and the speed of the blower may vary when the
microwave oven is on. Cooking times may be longer
too.
WARNING
CRITICAL
INSTALLATION
WARNINGS
The installation of this appliance must be performed
by a qualified technician or service company.
,, Failing to have a qualified technician install
the oven may result in electric shock, fire, an
explosion, problems with the product, or injury.
Unpack the oven, remove all packaging material and
examine the oven for any damage such as dents
on the interior or exterior of the oven, broken door
latches, cracks in the door, or a door that is not lined
up correctly. If there is any damage, do not operate
the oven and notify your dealer immediately.
SAVETHESEINSTRUCTIONS
4
safety
informaton
Make sure to install your oven in a location with
adequate space.
Remove all foreign substances such as dust or water
from the power plug terminals and contact points
using a dry cloth on a regular basis.
,, Unplug the power plug and clean it with a dry
cloth.
Failing to do so may result in electric shock or fire.
Plug the power cord into a properly grounded
3 pronged outlet. Your oven should be the only
appliance connected to this circuit.
,, Sharing a wall socket with other appliances, using
a power strip, or extending the power cord may
result in electric shock or fire.
Do not use an electric transformer. It may result in
electric shock or fire.
,, Ensure that the voltage, frequency and current
provided match the product's specifications.
Failing to do so may result in electric shock or fire.
Keep all packaging materials out of the reach of
children. Children may use them for play.
appliance must be properly grounded. Read
@This
and follow the specific "Grounding instructions"
found in the beginning of this Section. Do not ground
the appliance to a gas pipe, plastic water pipe, or
telephone line.
This may result in electric shock, fire, an
explosion, or problems with the product
,, Never plug the power cord into a socket that is
not grounded correctly and make sure that it is in
accordance with local and national codes.
Do not cut or remove the third (ground) prong from
the power cord under any circumstances.
Connect the oven to a 20A circuit. If you connect the
oven to a 15A circuit, make sure that circuit breaker
is operable.
not install this appliance in a humid, oily, or dusty
@Do
location, or in a location exposed to direct sunlight or
water (rain drops).
This may result in electric shock or fire.
Plug the power plug into the wall socket firmly. Do
not use a damaged power plug, damaged power
cord, or loose wall socket.
This may result in electric shock or fire.
Do not mount over a sink.
Do not pull or excessively bend the power cord.
Do not twist or tie the power cord.
Do not hook the power cord over a metal object,
place a heavy object on the power cord, insert the
power cord between objects, or push the power
cord into the space behind the appliance.
This may result in electric shock or fire.
Do not pull the power cord when you unplug the
oveR.
,, Unplug the oven by pulling the plug only.
Failing to do so may result in electric shock or fire.
When
thepower
plug
orpower
cord
isdamaged,
contact
yournearest
service
center
fora
replacement
orrepair.
INSTALLATION
CAUTIONS
CAUTION
_
_
WARNING
osition the oven so that the plug is easily
accessible.
Failing to do so may result in electric shock or fire
due to electric leakage.
nplug the oven when it is not being used for long
periods of time or during a thunder/lightning storm.
Failing to do so may result in electric shock or
fire.
CRITICAL USAGE
WARNINGS
lf the microwave appliance is flooded please contact
your nearest service center : Failing to do so may
result in electric shock or fire.
Read and follow the specific "Precautions to Avoid
Possible Exposure to Excessive Microwave Energy",
found in the beginning of this Section.
If the microwave generates a strange noise, a
burning smell or smoke, unplug it immediately and
contact your nearest service center.
Failing to do so may result in electric shock or fire.
In the event of a gas leak (propane gas, LP gas,
etc.), ventilate the room immediately. Do not touch
the microwave, power cord, or plug.
,, Do not use a ventilating fan.
A spark may result in an explosion or fire.
Take care that the door or any of the other parts do
not come into contact with the body while cooking or
just after cooking.
Failing to do so may result in burns.
In the event of a grease fire on the surface units
below the oven, smother the flaming pan on the
surface unit by covering the pan completely with a
lid, a cookie sheet or a flat tray.
Never leave surface units beneath your oven
unattended at high heat settings. Boil over cause
smoking and greasy spillovers that may ignite and
spread if the vent fan is operating. To minimize
automatic fan operation, use adequate sized
cookware and use high heat on surface units only
when necessary.
If materials inside the oven should ignite, keep the
oven door closed, turn the oven off and disconnect
the power cord, or shut off power at the fuse or
circuit breaker panel. If the door is opened, the fire
may spread.
,, Always observe Safety Precautions when using
your oven. Never try to repair the oven on your
own there is dangerous voltage inside. If the
oven needs to be repaired, contact an authorized
service center near you.
Do not attempt to repair, disassemble, or modify the
appliance yourself.
,, Because a high voltage current enters the product
chassis during operation, opening the chassis can
result in electric shock or fire.
You may be exposed to electromagnetic waves.
When the oven requires repair, contact your
nearest service center.
any foreign substance such as water enters the
@ Ifmicrowave,
unplug it and contact your nearest
service center.
Failing to do so may result in electric shock or fire.
not touch the power plug with wet hands.
G Do,, This
may result in electric shock.
Do not turn the appliance off by unplugging the
power plug while the appliance is in operation.
,, Plugging the power plug into the wall socket again
may cause a spark and result in electric shock or
fire.
Keep all packaging materials well out of the reach of
children. Packaging materials can be dangerous to
children.
,, If a child places a bag over its head, the child can
suffocate
Do not let children or any person with reduced
physical, sensory or mental capabilities use this
appliance unsupervised.
Make sure that the appliance is out of the reach of
children.
Failing to do so may result in electric shock, burns
or injury.
Do not touch the inside of the appliance immediately
after cooking. The inside of the appliance will be hot.
,, The heat on the inside of the oven can cause
burns.
Do not put aluminum foil (except as specifically
directed in this manual), metal objects (such as
containers, forks, etc.) or containers with golden or
silver rims into the microwave.
,, These objects can cause sparks or a fire.
Do not use or place flammable sprays or objects
near the oven.
,, Heat from the microwave can cause flammable
sprays to explode or burn.
Failing to do so may result in electric shock or
injury.
Do not tamper with or make any adjustments or
repairs to the door. Under no circumstances should
you remove the outer cabinet.
Do not store or use the oven outdoors.
SAVETHESEINSTRUCTIONS
safety
informat
on ....5
CAUTION
USAGE CAUTIONS
lf the surface of the microwave is cracked, turn it off.
Failing to do so may result in electric shock.
Dishes and containers can become hot. Handle with
care.
Hot foods and steam can cause burns. Carefully
remove container coverings, directing steam away
from your hands and face.
Remove lids from baby food before heating. After
heating baby food, stir well to distribute the heat
evenly. Always test the temperature by tasting
before feeding the baby. The glass jar or surface of
the food may appear to be cooler than the food in
the interior, which can be so hot that it will burn the
infant's mouth.
Make sure all cookware used in the oven is suitable
for microwaving.
Use microwavable cookware in strict compliance
with such manufacturer's recommendations.
Do not stand on top of the microwave or place
objects (such as laundry, oven covers, lighted
candles, lighted cigarettes, dishes, chemicals, metal
objects, etc.) on the appliance.
,, Items, such as a cloth, may get caught in the
door.
This may result in electric shock, fire, problems
with the product, or injury.
Do not operate the appliance with wet hands.
This may result in electric shock.
Do not spray volatile material such as insecticide
onto the surface of the appliance.
,, As well as being harmful to humans, it may also
result in electric shock, fire or problems with the
product.
Do not place the appliance over a fragile object such
as a sink or glass object.
,, This may result in damage to the sink or glass
object.
Do not put your face or body close to the appliance
while cooking or when opening the door just after
cooking.
,, Take care that children do not come too close to
the appliance.
,, Failing to do so may result in children burning
themselves.
Do not place food or heavy objects over the door
when opening the door.
The food or object may fall and this may result in
burns or injury.
Do not abruptly cool the door, the inside of the
appliance, or the dish by pouring water over it during
or just after cooking.
,, This may result in damage to the appliance. The
steam or water spray may result in burns or injury.
Do not try to preheat the oven or operate it while
empty.
Do not cook without the glass tray in place on the
oven floor. Food will not cook properly without the
tray.
SAVETHESEINSTRUCTI0NS
6
safety
informaton
Do
not defrost
frozen beverages
bottles.
The containers
can break.in narrow-necked
Do not scratch the glass of the oven door with a
sharp object.
,, This may result in the glass being damaged or
broken.
Do not store anything directly on top of the appliance
when it is in operation.
Do not use sealed containers. Remove seals and
lids before use. Sealed containers can explode due
to buildup of pressure even after oven has been
turned off.
/t,, CRITICAL CLEANING
WAONINo
INSTRUCTIONS
Do not clean the appliance by spraying water directly
onto it.
Do not use benzene, thinner or alcohol to clean the
appliance.
This may result in discoloration, deformation,
damage, electric shock or fire.
Before cleaning or performing maintenance, unplug
the appliance from the wall socket and remove food
waste from the door and cooking compartment.
Failing to do so may result in electric shock or fire.
Take care not to hurt yourself when cleaning the
appliance (external/internal)
You may hurt yourself on the sharp edges of the
appliance.
Do not clean the appliance with a steam cleaner.
This may result in corrosion.
Keep the inside of the oven clean. Food particles or
spattered oils stuck to the oven walls or floor can
cause paint damage and reduce the efficiency of the
oven.
cont nt
SETTING UP YOUR MICROWAVE
8
8
8
9
10
10
10
10
OVEN
Checking the parts
Warranty and service information
Setting up your microwave oven
Checking the control panel
Turning on the power for the first
time
Setting the time
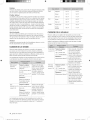
Child Lock
My Settings
COOKING GUIDE
_
17
18
18
19
19
19
19
General microwave tips
Cooking meat
Cooking poultry
Cooking seafood
Cooking eggs
Cooking vegetables
Recipes
CLEANING AND MAiNTAiNING
OVEN
USING YOUR MICROWAVE OVEN
10
10
10
10
10
11
11
11
11
12
12
13
13
14
14
15
15
16
16
Kitchen Timer button
Add 30 sec. button
Vent buttons (4 Speed & On/Off)
Vent Delay Off button
Light Hi/Lo/Off button
Set Timer button
Turntable On/Off button
Metal shelf
Eco Mode
Sensor Cooking buttons
Sensor Reheat button
Auto Defrost button
1 Pound Defrost button
Soften/Melt button
Kids Meals button
Snacks button
Microwave Cooking Times &
Power Levels
Custom Cook button
Warm & Hold
) ...... 20
20
21
21
21
21
21
22
YOUR MICROWAVE
Cleaning the exterior
Cleaning the interior
Cleaning the turntable and roller
rings
Storing and repairing your
microwave oven
Replacing the cooktop/night light
Replacing the oven light
Cleaning the grease filter
Replacing the charcoal filter
TROUBLESHOOTING
APPENDIX
WAR RANTY
COOKWARE GUIDE
16
Microwave-safe utensils
contents 7
WARRANTY AND SERVICE
INFORMATION
sort ncj UD
I
Be sure to follow these instructions closely so
that your new microwave oven works properly,
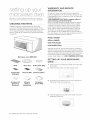
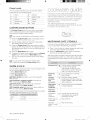
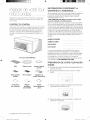
CHECKING
THE PARTS
Carefully unpack your microwave oven, and make
sure you've received all the parts shown below. If your
microwave oven was damaged during shipping, or if you
do not have all the parts, contact Samsung Customer
Service. (Refer to the "Warranty and service information"
on page 8.)
To help us to serve you better, please complete the
enclosed registration card and promptly return it by mail.
If the registration card is missing, you can call Samsung
Electronics, Inc., at
1-800-SAMSUNG
(726=7864} or register online at
www.samsung.com/global/register.
When contacting Samsung, please provide the specific
model and serial number information which is usually
located on the back or bottom of the product. Please
record these numbers in the spaces provided below,
along with the other requested information. Keep this
information in a safe place as a permanent record of
your purchase to aid in identification in case of theft or
loss. Also keep a copy of your sales receipt as a proof of
purchase if warranty service is needed.
MODEL NUMBER
SERIAL NUMBER
DATE PURCHASED
PURCHASED
Microwave
oven (8MH1927}
Warranty service can only be performed by a Samsung
Authorized Service Center. If you should require warranty
service, provide the above information with a copy of your
sales receipt to the Samsung Authorized Service Center.
For service assistance and the location of the nearest
service center, please call 1-800- SAMSUNG (726-7864}.
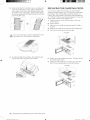
SETTING
OVEN
Shelf
Glass Tray
Roller Guide Ring
FROM
UP YOUR MICROWAVE
1. Open the door by pulling the handle on the right side
of the door.
2. Wipe the inside of the oven with a damp cloth.
Grease filter
(installed)
Hardware kit
(Screws &
Brackets}
Charcoal
filter
Manuals
(User &
Installation}
Exhaust adaptor
3=
Install the pre-assembled ring into the indentation at
the center of the microwave oven.
4.
Place the glass tray securely in the center of the preassembled roller ring.
Templates
(Top & Wail}
i
8 setting up your new m orowave oven
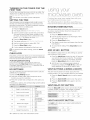
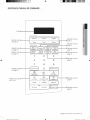
CHECKING
THE CONTROL
PANEL
Display j
See page 121
ISee page 15
Cooking Presets
i See page 14
See page 141
See page 13 j
I See page 16
r! Pound
'!, Defrost
Auto
Defrost
I See page 10
1
3
4
5
6
8
9
t See page 16
See page 15 1
See page 10-111
Stop/Clear
Sec_
Eco Mode
TurntaUe On/Off
Enter!Start
i
I See page 10
Cbck
vent
On/Off
Set Timer
ii
Light
4 Speed
Hi/LoiOff
Delay O_
iil
i_
Hold 3 sec
Y
j See page 10
setting up your new microwave oven 9
TURNING ON THE POWER FOR THE
FIRST TIME
r
The first time you plug the power cord into an outlet, the
display turns on after four seconds with: t_' FASE _O_\<:JS
CL©#:7/<AM/,,"?
SZ-7-T7AXF©F I?/tY
This will also occur after a power interruption
I_}
SETTING
THE TIME
Your microwave oven is equipped with a built-in clock.
Set the clock when first installing your microwave oven
and after a power failure. The time is displayed whenever
the microwave oven is not being used.
1. Press the Clock button.
2, The display will show FNT_f _T7kXF(J/I?AY.
3, Use the number buttons to enter the current time.
You need to press at least three numbers to set
the clock. For example, if the current time is 5:00,
press 5, 0, 0. The display will show: 500.
4. Press the Enter/Start button.
5. The display will show AlexT©UCt 71 t>/_XTt?UCt I/.
6, Use the number button to select AM / PM.
7, Press the Enter/Start button.
8. A colon appears indicating that the time is set.
To check the time while cooking, press the Clock
button.
CHILD LOCK
The Child Lock function allows you to lock the buttons so
that the microwave oven cannot be operated accidentally.
The oven can be locked at any time.
Activating/Deactivating
If you want to activate or deactivate the child lock
function, press the Hold 3 sec button for 3 seconds.
The display will show ('Hi/D i ©C/< ON when the oven is
locked and then redisplays the time.
Cooking has iqever been easier than with your
iqew Samsung microwave oven,
The following section describes everything you
iqeed to know about using your microwave oven,
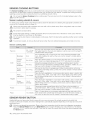
KITCHEN TIMER BUTTON
This microwave allows you to use your microwave oven
as a timer. Use the Kitchen Timer for timing up to 99
minutes, 99 seconds.
1. Press the Kitchen Timer button.
2. Use the number buttons to set the length of time
you want the timer to run.
3. Press the Enter/Start button
4. The display counts down and beeps when the time
has elapsed.
5o To cancel timer setting: Press Stop/Clear button
once.
ADD 30 SEC. BUTTON
This simplified control saves you time, letting you quickly
start cooking at 100% power.
1, Press the Add 30 sec, button for each 30 seconds
you wish the food to be cooked for. For example,
press it twice to cook it for one minute, and then
press the Enter/Start button to start cooking.
2. Add 30 sec. to a cooking program already in
progress by pressing the Add 30 sec. button for
every additional 30 seconds you want to add.
MY SETTINGS
VENT BUTTONS
You can customize your new microwave oven to suit your
preferences. To customize:
1, Press the My Settings button.
2, Press the number button that corresponds to the
function you want to customize.
3, Press the number that corresponds to the option you
want.
The functions, options, and corresponding number buttons
are listed in the table below.
The vent removes steam and other vapors from the
cooking surface. You can manually select the vent setting.
1
Weight mode selected
2
Sound on/off control
3
Clock display control
4
Display
5
Remind end signal
6
Demo mode
7
Daylight Saving time
10 setting
LID
1
2
1
2
1
2
Lbs.
Kg.
Sound ON
Sound OFF
12HR
24HR
1
2
3
1
2
1
2
1
2
Slow speed
Normal speed
Fast speed
ON
OFF
ON
OFF
ON
OFF
VOLlrnew microwave oven
(4 SPEED & ON/OFF)
1. Press the Vent 4 Speed button to set the speed
level.
2. Press the Vent On/Off button to turn the vent on.
3, Press the Vent On/Off button again to turn the
vent off.
VENT DELAY OFF BUTTON
Press the Delay Off button once to turn the fan off after
a certain number of minutes. The number of minutes
depend on how many time you press the button.
LIGHT Hi/LO/OFF
2
3
4
5
3
5
10
30
BUTTON
The Light button allows you to select a light setting for
your microwave.
re(t!
1
High
2Lo
w
3
Off
SET TIMER BUTTON
The shelf gives you the option to reheat more
than one dish at the same time.
You can set the microwave so the light turns on and off
automatically at a preset time. The hght comes on at the
same time every day until reset.
1. Press the Set Timer button.
2. Use the Number button to set the light on time.
3. Press the Enter/Start button.
4. Use the Number button to select AM or PM.
5. Press the Enter/Start button.
6. Use the Number button to set the off time.
7. Press the Enter/Start button.
8. Use the Number button to select AM or PM.
9. Press the Enter/Start button.
" -x - • X
y
•
i ¸ { X "•c
Z--
Press the Set Timer button and "0" button to
cancel the Set Timer.
TURNTABLE
ON/OFF
BUTTON
For best cooking results, leave the turntable on. However,
for large dishes _tcan be turned off.
Press the Turntable On/Off button to turn the turntable
on or off.
_The
turntable may become too hot to touch. Use
....... pot holders to touch the turntable during and after
cooking.
Reheating
food
To reheat food on 2 levels or to reheat food on the lower
level:
Multiply the reheating time by 11/2.
Switch places halfway through the reheating process.
METAL SHELF
Use the metal shelf to cook more than one item at the
same time.
CAUTION
Do not use a microwave browning dish on the
shelf. The shelf could overheat.
Do not use the oven with the shelf on the
microwave floor. This could damage the
microwave.
Use pot holders when handling the shelf as it
may be hot.
Do not use the metal shelf when cooking
popcorn.
Food cooks best on the turntable.
ECO MODE
For best results
Eco Mode reduces standby power usage.
When you press the ECO MODE button once, the
display will go out and the microwave shifts to the mode
which minimizes power usage.
To cancel the ECO MODE, press the ECO MODE
button once again, or press any other button.
Uneven results
usng your m crowave oven 11
SENSOR COOKING
BUTTONS
The Sensor Cooking buttons let you cook favorite foods using preset power levels and times at the touch of a button.
If the food is not thoroughly cooked or reheated when you use the auto cook feature, complete the cooking process by
selecting a power level and cooking the food for an additional amount of time.
/_
Do not use the Sensor Cooking
....... food will overcook.
Sensor
cooking
utensils
buttons continuously. The oven must cool for 5 minutes between uses or the
& covers
To obtain good cooking results using these functions, follow the directions for selecting the appropriate containers and
covers in the Cookware section on page 16.
Always use microwave-safe containers and cover with a lid or plastic wrap. When using plastic wrap, turn back
....... one corner to allow steam to escape.
ik
Fill containers at least half full.
CAUTION
that require stirring or rotating should be stirred or turned at the end of the Sensor Cook cycle, when the
(B Foods
time has started to count down on the display.
not use the Auto Sensor cooking feature continuously. Wait 5 minutes before selecting another sensor cooking
@ Do
operation.
% To avoid poor results, do not use the Auto Sensor when the room ambient temperature is too high or too low.
Sensor
cooking
table
3.0 - 3.5 oz.
Popcorn
1 package
Cook
Use only one microwave popcorn bag at a time. Be careful when removing
the heated bag from the oven and opening it. Let the oven cool for at least 5
minutes before using it again.
Beverage
8 oz.
Use a measuring cup or mug and do not cover. Place the beverage in the
oven. After heating, stir well. Let the oven cool for at least 5 minutes before
using it again.
Chicken
breast
8 to 16 oz.
Place the chicken breasts on a microwave safe plate and cover with plastic
wrap. Cook to an internal temperature of 170 °F. Let stand for 5 minutes.
Frozen
breakfast
4 to 8 oz.
Follow the package instructions for covering and letting stand. Use this
button for frozen sandwiches, breakfast entrees, pancakes, waffles, etc. Let
the oven cool for at least 5 minutes before using it again.
Frozen
dinner
8 to 14 oz.
Remove the food from its wrapping and follow the instructions on the box
for covering and letting stand. Let the oven cool for at least 5 minutes before
using it again.
Place the fresh vegetables in a microwave-safe ceramic, glass or plastic dish
Fresh
vegetables
1 to 4 cups
Frozen
vegetables
1 to 4
servings
Veggies
Potato
1 to6
potatoes,
Pizza
1 to 3 slices
SENSOR
and add 2-4 tbs. water. Cover with a lid or vented plastic wrap while cooking
and stir before letting stand. Let the oven cool for at least 5 minutes before
using it again.
Place the frozen vegetables in a microwave-safe ceramic, glass or plastic dish
and add 2-4 tbs. water. Cover with a lid or vented plastic wrap to cook. stir
before letting stand for 3-5 minutes. Let the oven cool for at least 5 minutes
before using it again.
Pierce each potato several times with a fork. Place on the turntable in a
spoke-like fashion. After cooking, let the potatoes stand for 3-5 minutes. Let
the oven cool for at least 5 minutes before using it again.
Place 1-3 pizza slices on a microwave-safe plate with the wide ends of the
slices towards the outside edge of the plate. Do not let the slices overlap. Do
not cover. Let the oven cool for at least 5 minutes before using it again.
REHEAT BUTTON
Heating leftovers and precooked foods is easy with your new microwave. By actually sensing the humidity that
escapes as the food is heated, the oven's heating time is automatically adjusted depending on the type and amount of
precooked food.
[_
ll food must ah'eady be precooked. Plates of food and casseroles should be stored at refrigerator temperature.
Press the Sensor Reheat button and Enter/Start button to begin reheating your precooked food. The display
will show RS//E½r and the oven will start. If you want to check the current time at any time while reheating, press
the Clock button.
12 usng your microwave oven
Sensor
reheating
table
Follow the instructions below when reheating different types of food.
Dinner plate
1 serving
(1 plate)
Use only precooked, refrigerated foods.
Cover the plate with vented plastic wrap or waxed paper tucked under the plate. If the
food is not as hot as you would like after using the Sensor Reheat function, continue
heating using additional time and power.
Contents:
3-4 oz. meat, poultry or fish (up to 6 oz. with bone)
1/2cup starch (potatoes, pasta, rice, etc.)
1/2cup vegetables (about 3 - 4 oz.)
1 to4
servings
Cover the plate with a lid or vented plastic wrap. If the food is not as hot as you would
like after using the "Sensor Reheat" function, continue heating using additional time and
aower. Stir the food once before serving.
Contents:
Casserole, refrigerated foods.
Pasta: canned spaghetti and ravioli
Casserole
Pasta
AUTO DEFROST
BUTTON
To thaw frozen foods, enter the weight of the food, and the microwave automatically sets the defrosting time, power
level and standing time. Press Enter/Start button to start defrosting.
1. Press the Auto Defrost
button. The display shows: f-NT_.._ V',_Fi(7t
77
2. Press the number buttons to directly enter the weight of the food.
3. Press Enter/Start button.
4. The oven will beep and the display will read 7UiTN 77/_-/-©OD O/!H_ twice during the defrosting process. Open
the oven door, and turn the food over.
Auto defrosting
table
Follow the instructions below when defrosting different types of food.
Roast Beef,
Pork
2.5-6.0 Ibs.
Start with the food placed fat side down. After each stage, turn the food over and shield
any warm portions with narrow strips of aluminum foil. Let stand, covered for 10-20
minutes.
Steaks,
Chops,
Fish
0.5-3.0 Ibs.
After each stage, rearrange the food. If there are any warm or thawed portions of food,
shield them with narrow, flat pieces of aluminum foil. Remove any pieces of food that are
nearly defrosted. Let stand, covered for 5-10 minutes.
Ground
Meat
0.5-3.0 Ibs.
After each stage, remove any pieces of food that are nearly defrosted. Let stand, covered
with foil for 5-10 minutes.
Whole
Chicken
2.5-6.0 Ibs.
Remove giblets before freezing poultry. Start defrosting with the breast side down. After
the first stage, turn the chicken over and shield any warm portions with narrow strips of
aluminum foil. After the second stage, again shield any warm portions with narrow strips
of aluminum foil. Let stand, covered for 30-60 minutes in the refrigerator.
Chicken
Pieces
0.5-3.0 Ibs.
After each stage, rearrange or remove any pieces of food that are nearly defrosted. Let
stand for 10-20 minutes.
®
Check the food when you hear the oven signal. After the final stage, small sections may still be icy; let them stand
to continue the thawing process. The food is not defrosted until all ice crystals have thawed. Shielding roasts and
pieces of steak using small pieces of foil prevents the edges from being cooked before the center of the food has
defrosted. Use narrow, flat, smooth strips of aluminum foil to cover edges and thinner sections of the food.
1 POUND
DEFROST BUTTON
To thaw frozen 1.0 Ibs foods, press this button, and the microwave automatically sets the defrosting time, power level
and standing time. Place directly on turntable tray or wax paper. Do not use extra tray.
1. Press the 1 Pound Defrost button. The display shows: 1.O / B.
2. Press the Enter/Start button to start defrosting.
3. The oven will beep and the display will read 7UiTN 77/_-/-©OD O/!H_ twice during the defrosting process. Open
the oven door, and turn the food over.
4. If you do not turn the food over when 77.XTM/77/_-/-©©©O//_.._ is displayed, the oven will pause until you press the
Enter/Start button.
usng your microwave oven 13
SOFTEN/MELT
BUTTON
1. Press the Soften/Melt
button. The display will show: ,_;F_'
F¢'_T/_/_-NUf 70 4. (Refer to the Soften/Melt table).
Press the button repeatedly to cycle through the available items.
2. Press the number 1 or 2 buttons to select the amount. Only number 1 (serving) is available for the Melt Chocolate
and Soften Cream Cheese options. (Refer to the Soften/Melt table for the serving size).
3. Press the Start button to begin cooking.
Soften / Melt table
iiiiiiiiiiiiiiiiiiiiiiii ,ii i,i , ,j i i i' !
1
ii ii i !i ii !i !i !i !i
1
1 stick (serving)
2
2 sticks (serving)
Remove the wrapping and cut the butter in half vertically.
Place the butter in a dish and cover with wax paper.
Stir well after finishing and let stand for 1-2 minutes.
Melt butter
2
Melt chocolate
1
1 cup chips
or 1 square
Place the chocolate chips or squares in a microwave-safe container.
When the oven beeps, stir the chocolate and restart the oven.
Stir and let stand for 1 minute.
3
Soften butter
1
1 stick
(1/4 Ibs.)
Remove wrapping and cut butter in half vertically.
Place butter in dish, cover with wax paper.
4
Soften cream
cheese
1
1 Package (8-oz)
Unwrap the cream cheese and place on a microwave-safe container.
Cut in half vertically. Let stand for 2 minutes.
KIDS MEALS BUTTON
1. Press the Kids Meals button. The display will show ,_F_'/-C7/\/_-NU / 70 4. (Refer to the Kids meals table). Press
the button repeatedly to cycle through the available items.
2. Press the number 1 or 2 buttons to select the amount. (Refer to the Kids meals table for the serving size.)
3. Press the Start button to begin cooking.
Kids meals table
r,
1
2
rn
4
1 serving
Place a paper towel on a plate and arrange the nuggets in a spoke-like
fashion on the paper towel.
Do not cover. Let stand for 1 minute after heating.
2
2 servings
[_
1
1 serving
2
2 servings
[_
1
1 sandwich
2
2 sandwiches
Place the frozen sandwich in a susceptor "crisping sleeve" (which is in the
package) and place on a microwave-safe plate.
Remove from the "crisping sleeve".
Let stand for 2 minutes after heating.
1
2 hot dogs
Pierce the hot dogs and place them on a plate.
When the oven beeps, add the buns and restart the oven.
2
4 hot dogs
Chicken
nuggets (frozen)
French fries
(frozen)
Frozen
sandwiches (in
3
1
crisping sleeve)
9-oz package
size
Hot dogs
efer to the package directions for the serving size and the amount of
food.
Place two paper towels on a microwave-safe plate and arrange the French
fries on the towels without letting them overlap.
Blot the fries with additional paper towels after removing from the oven. Let
stand for 1 minute.
Refer to the directions on the packaging for the serving size and the
amount of food.
Let stand for 1 minute after heating.
r_
For the best texture, the buns should be added to the hot dogs when
the oven beeps.
14 usng your microwave oven
SMH1927-XAC_EN.indd
14
2012-02-24
1:58:45
SNACKS
BUTTON
1. Press the Snacks button. The display will show ,_/--_'/-_:_71\//_-Ni.J
7 70 4. (Refer to the snack bar table). Press the
button repeatedly to cycle through the available items.
2. Press the number 1 or 2 buttons to select the serving size. Only number 1 (serving) is available for Nachos. (Refer
to the snack bar table for the serving size).
3. Press the Start button to begin cooking.
Snack bar table
Cheese sticks
(frozen)
1
5-6 pcs
2
7-10 pcs
1
5-6 oz.
Chicken wings
7-8 oz.
Place the cheese sticks on a plate in a spoke-like fashion. Do not cover.
Let stand for 1 to 2 minutes after heating.
Use precooked, refrigerated chicken wings.
Place the chicken wings around the plate in a spoke-like fashion and cover
with wax paper.
Let stand for 1 to 2 minutes.
Place the nachos on a plate without letting them overlap. Sprinkle cheese
evenly over them.
Nachos
Potato skins
1 serving
Contents:
2 cups tortilla chips
1/3 cup grated cheese
1 cooked
potato
Cut the cooked potato into 4 even wedges. Scoop or cut out the potato flesh,
leaving about a 14 in. of skin.
Place the skins in a spoke-like fashion around the plate.
Sprinkle with bacon, onions and cheese.
Do not cover.
Let stand 1 to 2 minutes.
2 cooked
potatoes
MICROWAVE
COOKING
TIMES & POWER LEVELS
Your oven allows you to set two different cooking stages, each with its own time length and power level. The power level lets you
control the heating intensity from Warm (1) to High (10).
One-stage
cooking
For simple one-stage cooking, you only need to set the cooking time. The power level is automatically set to High. If you
want to set the power level to any other level, use the Power Level button.
1. Use the number buttons to set a cooking time. You can enter a time from one second right up to 99 minutes and
99 seconds. To select a time greater than one minute, enter the seconds too. (For example, to set a cooking time
of 20 minutes, enter 2, O, O, 0.)
2. If you want to set the power level to a level other than High, press the Power Level button and use the number
buttons to enter the power level. The display will show: _/_W_S $77/R7 OR _/777-? N_7 Si_I#I;EO00_?'NC 77_/E.
3. Press the Start button to begin cooking. If you want to change the power level, press the Stop/Clear
before you press the Start button, and enter all the instructions again.
[_
button
ome recipes
cooking
stages.require different cooking stages at different temperatures. Your microwave allows you to set multiple
Multi-stage
cooking
1. Follow steps 1 and 2 from the "One-stage cooking" section. The display will show: _',_\'_,<},_77//77OR SN7_.._?
NEXT $77/CE CO0/_I/WC 77,A.H_.
2. Press the Power Level button.
3. Use the number buttons to set a second cooking time.
4. Press the Power Level button, then use the number buttons to set the power level for the second cooking
stage. The display shows the selected power level and then displays Pf_i%'S $77/R7 OR SN7_.._NF}_7S77/GE
OO01_'MIG77,AXi-.
5. Press the Start button to begin cooking, or repeat steps 2 and 3 to set a cooking time and power level for a third
cooking stage. When finished, press the Start button.
[_To
set the Power Level to 10, press the Power Level button twice.
using your microwave oven _15
SMH1927-XAC_EN.indd
15
2012-02-24
1:58:45
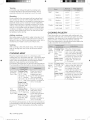
Power
Levels
The 10 power levels allow you to choose the optimal
power level for your cooking needs.
1
Warm
Simmer
2
3
Low
Defrost
7
8
Medium high
Reheat
4
Medium low
9
Saut_
5
Medium
10
High
CUSTOM
COOK BUTTON
For food to cook in the microwave oven, the
microwaves must be able to penetrate the food
without being reflected or absorbed by the dish,
It is important to choose the correct cookware,
therefore, look for cookware that is marked
microwave-safe,
The following table lists various types of
cookware and indicates if and how they should
be used in a microwave oven,
The Custom Cook button lets you store a customized
set of cooking instructions, and recall this setting later
from memory to begin cooking quickly.
Only one set of instructions can be stored at a time.
1.
Press the Custom Cook button. The display shows
7(}UCt / SiXR7 OR h-N777?MiFYV77,A,/i
-.
2, Use the number buttons to enter the cooking time.
The display will show the set time.
3, Press the Power Level button and use the number
buttons to enter the power level. The display will show
the selected power level. You can set the power level
from 0 to 9.
4, Press the Enter/Start button again.
5. To retrieve a Custom Cook setting, press the Custom
Cook button, then press the Enter/Start button.
You can only recall one stored Custom Cook setting
at a time.
M ICROWAVE-SAFE
UTENSILS
If you are not sure whether an item is microwave-safe or
not, you can perform the following simple test:
1,
Place 1 cup of water (in a glass-measuring cup) inside
your oven next to the item to be tested.
2, Press the Add 30 Sec, button twice to heat them
both for one minute at high power.
After one minute, the water should be warm and the item
you are testing should be cool. If the dish is warm, then
it is absorbing microwave energy and is not microwavesafe.
You can check the power level anytime while
cooking by pressing the Power Level button.
Aluminum
WARM & HOLD
You can keep cooked food warm in your microwave oven
for up to 99 minutes 99 seconds.
1. Press Warm Hold button.
2. Enter the cooking time.
3. Press Enter/Start button.
Warm
& Hold operates for up to 99 minutes 99
seconds.
Food that is cooked covered
covered during Warm & Hold.
should also be
Pastry items (pies, turnovers, etc.) should be
uncovered during Warm & Hold.
Complete meals kept warm on a dinner plate can
be covered during Warm & Hold.
Below are the amounts of food we recommend you apply
the Warm and Hold function to by Food Type.
Liquid
1-2 cups
Dry
5-10 oz.
16
cookware
SMH1927-XAC_EN.indd
16
foil
A
Can be used in small quantities
to protect areas against
overcooking. Arcing can occur
if the foil is too close to the oven
wall or you use too much foil.
Browning
plate
Do not preheat for more than
eight minutes.
Ceramic,
porcelain,
and
stoneware
Porcelain, pottery, glazed
earthenware and bone china are
usually suitable, unless decorated
with a metal trim.
Disposable
polyester
cardboard
Some frozen foods are packaged
in these materials.
Fast-food
packaging
Polystyrene
cups/
containers
Can be used to warm food.
Overheating may cause the
polystyrene to melt.
Paper bags or
newspaper
May catch fire.
Recycled
paper or metal
trims
May cause arcing.
guide
2012-02-24
1:58:46
Glassware
Oven-to-table
ware
Can be used, unless decorated
with a metal trim.
Fine
glassware
Can be used to warm foods or
liquids. Delicate glass may break
or crack if heated suddenly.
Glass jars
Regular glass is too thin to be
used in a microwave, and can
shatter.
Metal
Dishes,
Utensils
May cause arcing or fire.
Freezer bag
twist ties
May cause arcing or fire.
Paper
Plates, cups,
napkins and
kitchen paper
For short cooking times and
warming. Also to absorb excess
moisture.
Recycled
paper
Do not use recycled paper towels,
which may contain metal and may
catch fire or cause arcing.
Plastic
Containers
Can be used if heat-resistant
thermoplastic. Some plastics
may warp or discolor at high
temperatures. Do not use
Melamine plastic.
Cling film
Can be used to retain moisture.
Avoid wrapping the food too
tightly. Take care when removing
the film as hot steam will escape.
Freezer bags
Wax
A
Only if boilable or oven-proof.
Should not be airtight. Pierce with
a fork if necessary.
Can be used to retain moisture
and prevent spattering.
or
grease-proof
paper
Microwave energy actually penetrates food,
attracted and aUsorbed by timewater, fat and
sugar in the food, Timemicrowaves cause the
m(}]ecules in the food to move rapidly, The rapid
movement of these molecules creates friction
and the resulting heat cooks the food,
GENERAL
MICROWAVE
TIPS
Dense foods, such as potatoes, take longer to heat
than lighter foods. Foods with a delicate texture should
be heated at a low power level to prevent them from
becoming tough.
Foods with a non-porous skin such as potatoes or hot
dogs, should be pierced to prevent bursting.
Putting heating oil or fat in the microwave is not
recommended. Fat and oil can suddenly boil over and
cause severe burns.
Some ingredients heat faster than others. For example,
the jelly in a jelly doughnut will be hotter than the dough.
Keep this in mind to avoid burns.
The altitude and the type of cookware you are using
can affect the cooking time. When trying a new recipe,
use the minimum cooking time and check the food
occasionally to prevent overeooking.
Home canning in the microwave oven is not
recommended because not all harmful bacteria may be
destroyed by the microwave heating process.
Although microwaves do not heat the cookware, the heat
from the food is often transferred to the cookware. Always
use pot holders when removing food from the microwave
and instruct children to do the same.
Making candy in the microwave is not recommended as
candy can be heated to very high temperatures. Keep this
in mind to avoid injury.
Cookinq
techniques
lf the oven is set to cook for more than 20 minutes, it
will automatically adjust to 70 percent power after 20
minutes to avoid overcooking.
Stirring
Thermometer
Use only those marked
"Microwave-safe" and follow the
directions. Check the temperature
in several places. You can use
conventional thermometers once
the food has been removed from
the oven.
Open the microwave door and stir foods such as
casseroles and vegetables occasionally while cooking
to distribute heat evenly. Food at the outside of the dish
absorbs more energy and heats more quickly, so stir
from the outside towards the center. The oven will turn off
when you open the door to stir your food.
Straw,
wicker, and
wood
Use only for short-term heating,
as these materials can be
flammable.
Arrangement
Recommended to use
A
Arrange unevenly shaped foods, such as chicken pieces
or chops, with the thicker, meatier parts toward the
outside of the turntable where they can receive more
microwave energy. To prevent overcooking, place thin or
delicate parts towards the center of the turntable.
Use with Caution
Unsafe to use / Do not use
Shielding
Shield food with narrow strips of aluminum foil to prevent
overcooking. Areas that need shielding include poultry
wing-tips, the ends of poultry legs, and corners of square
baking dishes. Use only small amounts of aluminum foil.
Larger amounts can damage your oven.
cooknggude
SMH1927-XAC_EN.indd
17
17
2012-02-24
1:58:47
Turning
Turn foods over midway through the cooking cycle
to expose all parts to the microwave energy. This is
especially important with large items such as roasts.
Beef
Standing
Foods cooked in the microwave build up internal heat
and continue to cook for a few minutes after the oven
stops. Let foods stand to complete the cooking process,
especially foods such as roasts and whole vegetables.
Roasts need this time to complete cooking in the center
without overcooking the outer areas. All liquids, such as
soup or hot chocolate should be shaken or stirred when
cooking is complete. Let liquids stand a moment before
serving. When heating baby food, stir well and test the
temperature before serving.
Adding
moisture
Microwave energy is attracted to water molecules. Food
that is uneven in moisture content should be covered or
allowed to stand so that the heat disperses evenly. Add a
small amount of water to dry food to help it cook.
Pork
Poultry
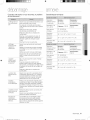
Rare
135 °F
145 °F
Medium
150 °F
160 °F
Well Done
160 °F
170 °F
Medium
150 °F
160 °F
Well Done
160 °F
170 °F
Dark meat
170 °F
180 °F
Light meat
160 °F
170 °F
COOKING
POULTRY
Place the poultry on a microwave-safe roasting rack in a
microwave-safe dish and cover with wax paper to prevent
spattering. Use aluminum foil to shield the bone tips, thin
pieces of meat, or areas that may start to overcook.
Check the temperature in several places before letting the
poultry stand the recommended time.
Venting
After covering a dish with plastic wrap, vent the plastic
wrap by turning back one corner to let excess steam
escape.
COOKING
MEAT
Place the meat fat side down on a microwave-safe
roasting rack in a microwave-safe dish. Use narrow strips
of aluminum foil to shield any bone tips or thin pieces of
meat. Check the temperature in several places before
letting the meat stand the recommended time.
The following temperatures are the removal temperatures.
The temperature of the food will rise during standing time.
Roast beef Cooking Time:
3-9 min. /lb. for
(boneless)
Up to 4 Ibs. 145 °F - Rare
10-15 min./lb, for
160 °F - Medium
12-17 min. / lb. for
170 °F - Well Done
Power Level:
High (10) for first
5 minutes, then
Medium (5).
Pork
Cooking Time:
13-17 min./lb, at
(boneless
170 °F Well Done
or bone-in)
Up to 4 Ibs.
Power Level:
High (10) for first
5 minutes, then
Medium (5).
Place the roast fatside down on the
roasting rack and
cover with wax paper.
Turn over halfway
through the cooking
)rocess. Let stand for
10 to 15 minutes.
Whole
chicken
Up to 4
Ibs.
Cooking Time:
7-11 min. /lb.
180 °F dark
meat
170 °F light
meat
Power Level:
Medium High
(7).
Chicken
pieces
Up to 2
Ibs.
Cooking Time:
7-10 min./lb.
180 °F dark
meat
170 °F light
meat
Power Level:
Medium High
(7).
Place the chicken breastside down on the roasting
rack. Cover with wax paper.
Turn over half way through
cooking process. Cook until
the juices run clear and the
meat near the bone is no
longer pink. Let stand for
5-10 minutes.
Place the chicken bone-side
down on the dish, with the
thickest portions towards
the outside of the dish.
Cover with wax paper. Turn
over halfway through the
cooking process. Cook until
the juices run clear and the
meat near the bone is no
longer pink. Let stand for
5-10 minutes.
Place the roast fatside down on the
roasting rack and
cover with wax paper.
Turn over halfway
through cooking
)rocess. Let stand for
10 to 15 minutes.
The following temperatures are the removal temperatures.
The temperature of the food will rise during standing time.
Expect a 10 °F rise in temperature during the standing
time.
18 cookng gude
SMH1927-XAC_EN.indd
18
2012-02-24
1:58:47
COOKING
SEAFOOD
Place the fish on a microwave-safe roasting rack in a
microwave-safe dish. Use a tight cover to steam the fish.
A lighter cover of wax paper or paper towel will decrease
steaming. Cook the fish until it flakes easily with a fork. Do
not over cook fish. Check it after the minimum cooking
time.
Tuna steaks
and salmon
steaks
Up to 1.5
Ibs.
Fillets
Up to 1.5
Ibs.
Cooking
Time:
6-10 min./lb.
Power Level:
Medium-High
(7).
Cooking
Time:
4-8 min. /lb.
Power Level:
Medium-High
(7).
Shrimp
Up to 1.5
Ibs.
Cooking
Time:
4-6 min. /lb.
Power Level:
Medium-High
(7).
Arrange the steaks on
a roasting rack with the
meaty portions towards
the outside of the rack.
Cover with wax paper.
Turn them over halfway
through the cooking
process. Cook until the
fish flakes easily with a
fork. Let stand for 3-5
minutes.
Arrange the fillets in a
baking dish, tucking any
thin pieces under. Cover
with wax paper. If the
fillets are thicker than 1/2
in., turn them over halfway
through the cooking
process. Cook until the
fish flakes easily with a
fork. Let stand for 2-3
minutes.
Arrange the shrimp in
a baking dish without
overlapping or layering
them. Cover with wax
paper. Cook until firm
and opaque, stirring 2 or
3 times. Let stand for 5
minutes.
the tips toward the center.
When cooking cut vegetables, always cover the dish with
a lid or vented microwavable plastic wrap.
Whole, unpeeled vegetables such as potatoes, squash,
eggplant, etc., should have their skins pierced in several
spots before cooking to prevent them from bursting.
For a more even cooking result, stir or rearrange whole
vegetables halfway through the cook time.
Generally, the denser the food, the longer the standing
time. (The standing time refers to the time necessary for
dense, large foods and vegetables to finish cooking after
they come out of the oven.) A baked potato can stand on
the counter for five minutes before cooking is completed,
while a dish of peas can be served immediately.
RECIPES
Beef and barley stew
11_ Ibs. beef stew cubes, cut into l_-inch pieces
1_2cup chopped onion
2 Tbs. all-purpose flour
1 Tbs. Worcestershire sauce
1 can (13.75-14.5 oz.) beef broth
2 medium carrots, cut into l_-inch slices (about 1 cup)
1_ cup barley
1 bay leaf
1Atsp. pepper
1 pkg. (9-10 oz.) frozen peas, thawed
1. In a 2-quart casserole, combine the beef, onion, flour,
and Worcestershire sauce and mix well. Cover with
lid. Cook at High for 6 to 8 minutes until the beef is no
longer pink, stirring once.
2. Stir in beef broth, carrots, barley, bay leaves, and
pepper. Cover with lid. Cook at Medium for 1 to 11_
hours until carrots and beef are tender, stirring 2 to 3
times.
3. Stir in peas. Cover with lid. Cook at Medium for 10
minutes. Let stand for 10 minutes. Remove bay leaves
before serving.
Makes 6 servings.
Broccoli
COOKING
EGGS
You can use your microwave oven to cook eggs. Cook
them until they are just set as they become tough if they
are overcooked.
Z_
.......
Never cook eggs in their shells and never warm
up hard-boiled eggs in their shells. Eggs cooked
or warmed up in their shells can explode. Always
pierce whole eggs to keep them from bursting.
COOKING
VEGETABLES
Vegetables should be washed prior to cooking. Usually,
no extra water is needed. When cooking dense
vegetables such as potatoes, carrots and green beans,
add about 1Acup water.
Small vegetables (sliced carrots, peas, lima beans, etc.)
will cook faster than larger ones.
Whole vegetables, such as potatoes, acorn squash or
corn on the cob, should be arranged in a circle on the
turntable before cooking. They will cook more evenly if
turned over halfway through the cooking process.
Always place vegetables such as asparagus and broccoli
with the stems pointing towards the edge of the dish and
and cheese
casserole
1Acup butter or margarine
1Acup chopped onion
11/2Tbs. flour
1_ tsp. salt
1Atsp. dry mustard
1/8 tsp. pepper
11_ cups milk
1Acup chopped red pepper
8 oz. (2 cups) cheddar cheese, shredded
1 pkg. (9-10 oz.) frozen chopped broccoli, thawed
4 cups cooked spiral shaped pasta (8 oz. dry)
1. In a 2-quart casserole, cook butter and onion at High
for 1 to 2 minutes until the onion is soft, stirring once.
2. Add flour, salt, mustard, and pepper; mix well. Cook
at High for 30 to 60 seconds until mixture boils. Stir in
milk until smooth.
3. Stir in red pepper. Cook at High for 2 to 3 minutes
until mixture boils and thickens slightly, stirring twice.
Stir in cheese until melted.
4. Add broccoli and pasta. Mix well. Cover with lid. Cook
at High for 4 to 6 minutes until heated through, stirring
once. Stir before serving.
Makes 6 servings.
cooknggude
SMH1927-XAC_EN.indd
19
19
2012-02-24
1:58:47
Warm potato
salad
2 Ibs. small red potatoes, cut into 1/2-inchpieces
4 slices bacon (uncooked), cut into 1/2-inchpieces
1Acup chopped onion
2 tsp. sugar
1 tsp. salt
1 tsp. flour
1/2tsp. celery seed
1/8 tsp. pepper
21/2Tbs. apple cider vinegar
1. In a 2-quart casserole, combine the potatoes and
1Acup water. Cover with lid. Cook at High until the
potatoes are tender (7-10 minutes); stir twice. Drain
and set aside to cool slightly.
2. In a medium bowl, cook the bacon at High until crisp
(21/2-31/2minutes); stir once. Place the bacon on a
paper towel. Reserve 1 Tbs. drippings.
3. Combine the drippings and onion. Cover with plastic
wrap; turn a corner back to vent steam. Cook at High
until tender (11/2-21/2minutes); stir once.
4. Stir in sugar, salt, flour, celery seed, and pepper.
Cook at High until mixture boils (30-40 seconds). Stir
in vinegar and 1/2cup water. Cook at High until liquid
boils and thickens slightly (1-2 minutes); stir once.
Add bacon to dressing. Pour dressing over potatoes.
Stir well.
Makes 6 servings.
Keeping your microwave oven clean improves
its performance, wards off unnecessary repairs,
and lengthens its life,
CLEANING
THE EXTERIOR
It's best to clean spills on the outside of your microwave
oven as they occur. Use a soft cloth and warm, soapy
water. Rinse and dry.
Do not get water into the vents. Never use abrasive
....... products or chemical solvents such as ammonia or
alcohol as they can damage the appearance of your
microwave.
Cleaning
under your microwave
oven
Regularly clean grease and dust from the bottom of your
microwave using a solution of warm water and detergent.
Black bean soup
Cleaning
1 cup chopped onion
1 clove garlic, minced
2 cans (15 oz. each) black beans, drained
1 can (14-16 oz.) stewed tomatoes, chopped
1 can (13.75-14.5 oz.) chicken broth
1 can (7-8.5 oz.) corn
1 can (4 oz.) chopped green chilies
1-2 tsp. ground cumin
1. Place the onion and garlic in a 3-quart casserole.
Cover with lid. Cook at High for 2 to 4 minutes until
tender.
2. Add one can of beans, and mash the beans with a
fork. Add remaining ingredients and mix well.
3. Cook uncovered at High for 10 minutes; stir. Reduce
power to Medium and cook for 5 minutes. Stir before
serving.
Wipe with a damp cloth and dry thoroughly. Do not
use cleaning sprays, large amounts of soap and water,
abrasives or sharp objects on the panel as it is easily
damaged.
Makes about 2 quarts.
Cleaning
the control
panel
the door and door seals
Always ensure that the door seals are clean and that the
door closes properly. Take particular care when cleaning
the door seals to ensure that no particles accumulate and
prevent the door from closing correctly. Wash the glass
door with very mild soap and water. Be sure to use a soft
cloth to avoid scratching.
If a thin film of water accumulates on the inside or outside
of the oven door, wipe it off with a soft cloth. A thin water
film can accumulate when you operate the oven at high
humidity and in no way indicates microwave leakage.
CLEANING
THE INTERIOR
Ensure that the microwave oven has cooled down
....... before cleaning it to avoid injury.
Remove the glass tray from the oven when cleaning
....... the oven or tray. To prevent the tray from breaking,
handle it with care and do not put it in water
immediately after cooking. Wash the tray carefully in
warm sudsy water or in the dishwasher.
Clean the interior surfaces (oven cavity) of your microwave
oven periodically to remove any splashes or stains. To
remove hardened food articles and remove smells, place
2 cups of water (add lemon juice for extra freshness) into
a four-cup measuring glass. Run the microwave at High
power for 5 minutes or until the water boils. Let water
stand in the oven for one or two minutes.
20 c ean ng and maintain ng your m crowave oven
SMH1927-XAC_EN.indd
20
2012-02-24
1:58:47
CLEANING THE TURNTABLE
ROLLER RINGS
AND
Clean the roller rings periodically and wash the turntable
as required. You can wash the turntable safely in your
dishwasher.
STORING AND REPAIRING
MICROWAVE OVEN
5, Remove the
6. Remove the
the lever.
7, Remove the
8. Replace the
9. Replace the
charcoal filter, if present.
cover by pushing the hook and pulling up
bulb by turning it gently.
bulb with a 40 watt appliance bulb.
bulb holder.
YOUR
If you need to store your microwave oven for a short or
extended period of time, choose a dust-free, dry location.
Dust and dampness may adversely affect the ability of the
microwave parts.
A
WARNING
Do not repair, replace or service any part of your
microwave oven yourself. Allow only a qualified
service technician to perform repairs. If the oven
is faulty and needs servicing, or you are in doubt
about its condition, unplug the oven from the
power outlet and contact your nearest service
center.
Do not use the oven if it is damaged, in
particular, if the door or door seals are damaged.
Door damage includes a broken hinge, a worn
out seal, or distorted/bent casing.
Do not remove the oven from its casing.
This microwave oven is for home use only and is
not intended for commercial use.
REPLACING
LIGHT
THE COOKTOP/NIGHT
When replacing the cooktop/night light, make sure that
you are wearing gloves to avoid injury from the heat of the
bulb.
1, Unplug the oven or turn off the power at the main
power supply.
2, Remove the screw from the light cover and lower the
cover.
3. Replace bulb with 20 watt halogen lamp.
4. Replace the light cover and mounting screw.
5 Turn the power back on at the main power supply.
CLEANING
THE GREASE
FILTER
Your microwave oven has reusable grease filter. The
grease filters should be removed and cleaned at least
once a month, or as required.
To order a new grease filter, contact the Parts Department
at 1-800-627-4368 or your Samsung dealer. You can also
order online at www.samsungparts.com
.......
_
To avoid risk of personal injury or property damage,
do not operate the oven hood without the filters in
place.
1. To remove the filter, push the front of the grease filter
case where it says "PUSH".
2. Pull the filter case out of the microwave oven.
Lam p
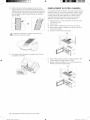
REPLACING
THE OVEN LIGHT
When replacing the oven light, make sure that you are
wearing gloves to avoid injury from the heat of the bulb.
1. Unplug the oven or turn off the power at the main
power supply.
2. Open the door.
3. Remove the vent cover mounting screws (2 middle
screws).
4. Slide the vent grille to the left, then pull it straight out.
c ean ng and maintain ng your m crowave oven 21
SMH1927-XAC_EN.indd
21
2012-02-24
1:59:14
3=
Remove the filter from the filter case by widening the
case, as shown below. Then, soak the grease filter
in hot water mixed with a mild detergent. Rinse well
and shake to dry. If necessary, brush the filter lightly
to remove embedded dirt. When the filter is dry, put it
back in the filter case.
Remove
Widen
REPLACING
THE CHARCOAL
FILTER
If your oven is vented to the inside, the charcoal filter
should be replaced every 6 to 12 months and more often
if necessary. The charcoal filter cannot be cleaned. To
order a new charcoal filter, contact the Parts Department
at 1-800-627-4368 or your Samsung dealer. You can also
order online at www.samsungparts.com
1o Unplug the oven or turn off the power at the main
power supply.
2o Open the door.
3. Remove the vent grille mounting screws (2 middle
screws).
4o Slide the vent grille to the left, then pull it straight out.
5. Push the hook and remove the old filter.
The angle
ADo
not use ammonia or put the grease filter in the
....... microwave oven. The aluminum will darken.
4=
To return the filter to its position, slide the filter case
into the frame slot, and then push it inside.
6o Slide a new charcoal filter into place. The filter should
rest at the angle shown.
7o Replace the vent grille and 2 screws and close the
door. Turn the power back on and set the clock.
The angle
22_ cleaning and maintain ng your microwave oven
SMH1927-XAC_EN.indd
22
2012-02-24
1:59:53
troLAbe hootna
Check these solutions
with your microwave:
The display
and/or the oven
is not working.
The display
is working,
but the power
won't come on.
Is the power
going off before
the set time has
elapsed?
Cooks food too
slowly.
if you have a problem
Make sure the plug is properly
connected to a grounded outlet.
If the wall outlet is controlled by a wall
switch, make sure the wall switch is
turned on.
Remove the plug from the outlet, wait
ten seconds, and plug it in again.
Reset the circuit breaker or replace
any blown fuses.
Plug a different appliance into the
outlet. If the other appliance doesn't
work, call a qualified electrician to
repair the wall outlet.
Plug the oven into a different outlet.
Make sure the door is closed securely.
Check if any packaging material or
anything else is stuck in the door seal.
Check if the door is damaged.
Touch Cancel twice and enter all the
cooking instructions again.
If there was a power outage, the time
indicator will display: 88:88.
If no power outage occurred,
remove the plug from the outlet, wait
ten seconds, and plug it in again.
Reset the clock and any cooking
instructions.
Reset the circuit breaker or replace
any blown fuses.
Make sure the oven has its own 20
amp circuit line. Operating another
appliance on the same circuit can
cause a voltage drop. If necessary,
move the oven to its own circuit.
Has sparks or
arcing.
Remove any metallic utensils,
cookware, or metal ties. If using foil,
use only narrow strips and allow at
least one inch between the foil and the
interior oven walls.
The turntable
makes noise
or becomes
stuck.
Clean the turntable, roller ring and
oven floor.
Make sure the turntable and roller ring
are positioned correctly.
Causes TV
or radio
interference.
This is similar to interference caused
by other small appliances, such as
hair dryers. Move your microwave
(or appliance) away from appliances,
such as your TV or radio.
Specifications
Oven Cavity '
1.9 cu ft
Timer : 99
minutes, 99
seconds
Power Source '
120 VAC, 60 Hz
Power Output :
1000 Watts
Net/Shipping
Weight
ST : 56.0/63.5 Ibs
B / W : 54.7/62.0 Ibs
Outside
Dimensions
29 7/8"(W)X 16 15/1/'(H)X 17 5/1/'(D)
Oven Cavity
Dimensions
20 lS/li'(W) X 10 1'_/_6"(H)
X 14 9/1/'(D)
Shipping
Dimensions
33 s/s"(W) X 19
Oven Cavity '
1.9 cu ft
Controls : 10
power levels,
including defrost
Power
Consumption :
1700 Watts
7/ld'(m)
X 20
s/16"(U)
Timer : 99
Controls
: 10
minutes, 99
seconds
power levels,
including defrost
Power
Power Source '
120 VAC, 60 Hz
Power Output :
950 Watts
Net/Shipping
Weight
ST : 56.0/63.5 Ibs
B / W : 54.7/62.0 Ibs
Outside
Dimensions
29 7/s"(W)X 16 _5/1/'(H)X 17 5/1/'(D)
Oven Cavity
Dimensions
20 lS/li'(W) X 10 _'_/_6"(H)
X 14 9/1/'(D)
Shipping
Dimensions
33 s/s"(W) X 19 7/1/'(H) X 20 s/16"(U)
Consumption
1500 Watts
troubleshooting
SMH1927-XAC_EN.indd
23
2012-02-24
:
23
1:59:56
BUT NOT LIMITED TO, ANY IMPLIED WARRANTIES OF
MERCHANTABILITY OR FITNESS FOR A PARTICULAR
SAMSUNG OVER-THE-RANGE
M ICROWAVE OVEN
Limited
warranty
to original
(OTR)
purchaser
This SAMSUNG brand product, as supplied and distributed by
Samsung Electronics America, Inc. (SAMSUNG) and delivered
new, in the original carton to the original consumer purchaser,
is warranted by SAMSUNG against manufacturing defects in
materials and workmanship for a limited warranty period of:
ONE (1) YEAR PARTS AND LABOR, TEN (10) YEARS
PARTS WARRANTY FOR MAGNETRON
This limited warranty begins on the original date of purchase,
and is valid only on products purchased and used in the United
States. To receive warranty service, the purchaser must contact
SAMSUNG for problem determination and service procedures.
Warranty service can only be performed by a SAMSUNG
authorized service center. The original dated bill of sale must be
presented upon request as proof of purchase to SAMSUNG or
SAMSUNG's authorized service center.
SAMSUNG will repair or replace this product, at our option and
at no charge as stipulated herein, with new or reconditioned
parts or products if found to be defective during the limited
warranty period specified above. All replaced parts and products
become the property of SAMSUNG and must be returned to
SAMSUNG. Replacement parts and products assume the
remaining original warranty, or ninety (90) days, whichever is
longer.
In-home service will be provided during the warranty labor
period subject to availability within the contiguous United States.
In-home service is not available in all areas. To receive in-home
service, the product must be unobstructed and accessible to
service personnel. If during in-home service repair can not be
completed, it may be necessary to remove, repair and return
the product. If in-home service is unavailable, SAMSUNG may
elect, at our option, to provide for transportation of our choice
to and from a SAMSUNG authorized service center. Otherwise,
PURPOSE, SHALL APPLY AFTER THE EXPRESS WARRANTY
PERIODS STATED ABOVE, AND NO OTHER EXPRESS
WARRANTY OR GUARANTY GIVEN BY ANY PERSON, FIRM
OR CORPORATION WITH RESPECT TO THIS PRODUCT
SHALL BE BINDING ON SAMSUNG. SAMSUNG SHALL
NOT BE LIABLE FOR LOSS OF REVENUE OR PROFITS,
FAILURE TO REALIZE SAVINGS OR OTHER BENEFITS, OR
ANY OTHER SPECIAL, INCIDENTAL OR CONSEQUENTIAL
DAMAGES CAUSED BY THE USE, MISUSE OR INABILITY
TO USE THIS PRODUCT, REGARDLESS OF THE LEGAL
THEORY ON WHICH THE CLAIM IS BASED, AND EVEN IF
SAMSUNG HAS BEEN ADVISED OF THE POSSIBILITY OF
SUCH DAMAGES. NOR SHALL RECOVERY OF ANY KIND
AGAINST SAMSUNG BE GREATER IN AMOUNT THAN THE
PURCHASE PRICE OF THE PRODUCT SOLD BY SAMSUNG
AND CAUSING THE ALLEGED DAMAGE. WITHOUT LIMITING
THE FOREGOING, PURCHASER ASSUMES ALL RISK AND
LIABILITY FOR LOSS, DAMAGE OR INJURY TO PURCHASER
AND PURCHASER'S PROPERTY AND TO OTHERS AND THEIR
PROPERTY ARISING OUT OF THE USE, MISUSE OR INABILITY
TO USE THIS PRODUCT SOLD BY SAMSUNG NOT CAUSED
DIRECTLY BY THE NEGLIGENCE OF SAMSUNG. THIS LIMITED
WARRANTY SHALL NOT EXTEND TO ANYONE OTHER
THAN THE ORIGINAL PURCHASER OF THIS PRODUCT,
IS NONTRANSFERABLE AND STATES YOUR EXCLUSIVE
REMEDY.
Some states do not allow limitations on how long an implied
warranty lasts, or the exclusion or limitation of incidental or
consequential damages, so the above limitations or exclusions
may not apply to you. This warranty gives you specific legal
rights, and you may also have other rights which vary from state
to state.
To obtain warranty service, please contact SAMSUNG at:
1-800-SAMSUNG
www.samsung.com
(726-7864)
or
transportation to and from the SAMSUNG authorized service
center is the responsibility of the purchaser.
This limited warranty covers manufacturing defects in materials
and workmanship encountered in normal, noncommercial use of
this product and shall not apply to the following, including, but
not limited to: damage which occurs in shipment; delivery and
installation; applications and uses for which this product was not
intended; altered product or serial numbers; cosmetic damage
or exterior finish; accidents, abuse, neglect, fire, water, lightning
or other acts of nature; use of products, equipment, systems,
utilities, services, parts, supplies, accessories, applications,
installations, repairs, external wiring or connectors not supplied
or authorized by SAMSUNG which damage this product or result
in service problems; incorrect electrical line voltage, fluctuations
and surges; customer adjustments and failure to follow
operating instructions, cleaning, maintenance and environmental
instructions that are covered and prescribed in the instruction
book; problems caused by pest infestations, and overheating or
overcooking by user; glass tray or turntable; reduced magnetron
power output related to normal aging. SAMSUNG does not
warrant uninterrupted or error-free operation of the product.
THERE ARE NO EXPRESS WARRANTIES OTHER THAN
THOSE LISTED AND DESCRIBED ABOVE, AND NO
WARRANTIES WHETHER EXPRESS OR IMPLIED, INCLUDING,
24 troubleshooting
SMH1927-XAC_EN.indd
24
2012-02-24
1:59:56
II
II
I
I
SMH1927-XAC_ENJndd
25
2012-02-24
,_ 1:59:56
I
I
Scan the QR code* or visit
www.samsung.com/spsn
to view our helpful
How-to Videos and Live Shows
*Requires reader to be installed
Scan this
with your
on your smartphone
smartphone
QUESTIONS OR COMMENTS
SMH1927-XAC_EN.indd
26
CANADA
1-800-SAMSUNG
MEXICO
01-800-SAMSUNG
U.S.A
1-800-SAMSUNG
(726-7864)
(726-7864)
www.samsung,com
(726-7864)
2012-02-24
1:59:56
satoN
CU Ss©Iq
61ectrique
100%
Recycled
Paper
,r recycl6
)
a 100 %.
monde de posslbllltes
....
FRAN_AIS
CANADIFN
Nous vous remercions d'avoir choisi ce produit
Samsung. Veuillezenregistrer votre appareil sur
www.samsung.com/register
1-800-SAMSUNG
SMH1927-XAC_CFR.indd
1
(726-7864)
2012-02-24
2:00:47
SYMBOLESDES[tCURITf
t
IMPORTANTSETPRECAUTIONS
Signification
symboles
F6[icitations pour ['acquisition de votre
nouveau four a miero-ondes Samsung.
des ic6nes
utiiis6s
/k
Ce
manuel contient des informations importantes
concernant ['installation, ['uti[isation et ['entretien
AVERTISSEMENT
z_
ATTENTION
CE QUEVOUSDEVEZSAVOIR
SUR LESCONSIGNESDE
SftCURITft
1, Porte (risque de d_formation)
3, Joints de la porte et surfaces d'etanch_it_.
D, Toutes les operations d'ajustement ou de r_paration
doivent 6tre exclusivement effectu_es par un
technicien qualifi_ ; ne tentez jamais d'ajuster ou de
r_parer le four vous-m_me.
Risques ou manipulations
dangereuses susceptibles
d'entratner des blessures
Risques ou manipulations
dangereuses susceptibles
d'entrainer des blessures
16geres ou des d6g_ts
mat6riels.
d'incendie, d'explosion,
d'electrocution ou de
ATTENTION
CONSIGNES
PERMETTANT
D'C:VITER
UNEEXPOSITION
EXCESSIVE
AUXMICRO-ONDES
2, Charni_res et Ioquets (cass_s ou desserr_s)
•
Afin de reduire les risques
Les avertissements et les consignes de securit_
importantes contenus dans ce manuel ne sont pas
exhaustifs. II est de votre responsabilit_ de faire appel
b,votre bon sens et de faire preuve de prudence et de
minutie Iors de I'installation, de I'entretien et de I'utilisation
du four micro-ondes.
C, N'utilisez pas le four si celui-ci est endommag_. Veillez
toujours b,ce que la porte soit ferm_e herm_tiquement
et que les composants suivants ne soient pas
endommag_s :
ce manuel
graves, voire mortelles.
de votre apparei[. Veui[[ez [e [ire attentivement afin
de profiter p[einement des nombreux avantages
et fonctions qu'offre votre four miero-ondes.
A, N'utilisez jamais le four alors que la porte est ouverte ;
vous risqueriez d'6tre expos_ b,une quantit_ trop
importante de micro-ondes. Ne tentez jamais de
neutraliser ou de modifier le verrouillage de s_curit_.
B, Ne placez aucun objet entre la fagade du four et
la porte et ne laissez aucun r_sidu alimentaire ou
de produit d'entretien s'accumuler sur les surfaces
assurant I'_tanch_it_.
dans
et des
blessures Iors de I'utilisation
du four _tmicro-ondes, vous
devez respecter ces regles
de securit6 de base.
Interdit.
NE PAS demonter.
NE PAS toucher.
(_
Suivez scrupuleusement les consignes.
D6branchez la prise murale.
Assurez-vous que I'appareil est relie _tla
terre afin d'eviter tout risque d'electrocution.
Contactez le service d'assistance
technique.
Remarque
Les symboles
d'avertissement
sont I& pour
minimiser
les risques de blessure ; veillez
bien les respecter. Apr_s lecture de cette
rubrique, conservez
le manuel dans un
endroit s_r afin de pouvoir le consulter
ult6rieurement.
CONSERVEZ
PRE¢IEUSEMENT
CES
CONSIGNES
2 consignes de securt6
SMH1927-XAC_CFR.indd
2
2012-02-24
2:00:47
CONSIGNES
DES¢:CURIT¢:
IMPORTANTES
Lorsque vous utilisez des appareils _lectriques, respectez
les consignes de s_curit_ de base suivantes :
ATTENTION
1.
2.
3.
4.
16. Lorsque vous nettoyez les zones de la porte et du
four qui entrent en contact une fois la porte ferm_e,
utilisez uniquement une _ponge ou un chiffon doux
imbibe(e) d'un produit m_nager doux et non corrosif.
D_branchez la prise avant de proc_der au nettoyage.
12. Pour r_duire le risque d'incendie b.I'int_rieur du four
a. Evitez de surcuire vos aliments. Surveillez
attentivement la cuisson Iorsque vous placez
du papier, du plastique ou d'autres mat_riaux
combustibles b. I'int_rieur du four pour faciliter la
cuisson.
AVERTISSEMENT
Consignes visant a r_duire les risques de brOlure,
d'_lectrocution, d'incendie, de blessure ou
d'exposition excessive aux micro-ondes :
Lisez attentivement toutes les consignes de s_curit_
avant d'utiliser I'appareil.
Lisez et respectez les _ Consignes Dermettant d'_viter
une exposition excessive aux micro-ondes _ d_taill_es
sur cette page.
Cet appareil doit _tre reli_ b. la terre. N'effectuez le
branchement que sur des prises correctement mises
b.la terre. Reportez-vous b.la section _ Consignes de
mise b.la terre _ en page 4 de ce manuel.
Installez I'appareil conform_ment aux instructions
fournies.
5. Certains produits tels que les oeufs entiers (avec
leur coquille) et les r_cipients clos (ex. : r_cipients en
verre ferm_s) sont susceptibles d'exploser s'ils sont
chauff_s rapidement. Ne les faites jamais chauffer au
four micro-ondes.
6. Utilisez ce four uniquement pour I'usage auquel
il est destin_ (tel que d_crit dans ce manuel).
N'utilisez pas de produits chimiques ou de vapeurs
b.caractere corrosif dans ce four. Ce type de four est
sp_cialement congu pour faire r_chauffer, cuire ou
d_shydrater des aliments. II n'est pas congu pour _tre
utilis_ dans un laboratoire ou b.des fins industrielles.
2. Comme pour tout appareil, une vigilance extreme
s'impose Iorsque le four est utilis_ par des enfants.
8. N'utilisez pas ce four si un cb.ble ou une prise est
endommag_(e), s'il ne fonctionne pas correctement
ou s'il a _t_ endommag_ ou a subi une chute.
9. La r_paration ou I'entretien de cet appareil doit
imp_rativement _tre assure(e) par une main d'oeuvre
qualifi_e. Contactez le service d'assistance technique
le plus proche de chez vous si vous souhaitez
effectuer un contrOle, une r_paration ou un r_glage.
10. N'obstruez jamais les ouvertures du four.
11. N'essayez pas de modifier, d'ajuster ou de r_parer la
porte.
12. N'entreposez jamais le four b. I'ext_rieur. N'utilisez pas
cet appareil b. proximit_ de I'eau (ex. : pres d'un _vier,
dans une cave humide, b.cOt_ d'une piscine ou dans
des endroits similaires).
13. N'immergez jamais la prise ou le cb.ble dans I'eau.
14. Tenez le cordon _loign_ des surfaces chaudes. (y
compris de I'arri_re du four).
b. Retirez les ligatures m_talliques des sacs en papler
ou en plastique avant de les placer dans le four.
c. En cas de d_part de feu, laissez la porte du four
ferm_e, _teignez I'appareil et d_branchez la prise
ou coupez I'alimentation au niveau du tableau de
fusibles ou du disjoncteur. Si vous ouvrez la porte
du four, I'incendie risque de se propager.
d. N'entreposez pas d'objets b.I'int_rieur du four. Ne
laissez pas de papiers, d'ustensiles de cuisine ou
d'aliments b. I'int_rieur du four Iorsque celui-ci est
inutilis_.
18oTout liquide (ex. : eau, lait, caf_ ou the) est
susceptible de d_passer le point d'_bullition sans
que le phenom_ne soit pour autant visible. Un
bouillonnement n'est par consequent pas toujours
visible Iorsque vous retirez le recipient du four. EN
CAS DE MOUVEMENT BRUSQUE OU DE CONTACT
AVEC UNE CUILLERE OU UN AUTRE USTENSILE,
DE L'EAU BOUILLANTE RISQUE DE SOUDAIN
DFtBORDER DU RECIPIENT. Consignes pour reduire
les risques de blessure :
a. Ne faites pas surchauffer les liquides.
bo Remuez le liquide avant et b.la moiti_ du temps de
chauffe.
c. N'utilisez pas de r_cipients b.col _troit.
do Une fois le temps de chauffe _coule, laissez le
r_cipient dans le micro-ondes pendant quelques
instants avant de le sortir.
e. Soyez extr_mement prudent Iorsque vous
introduisez une cuill_re ou un autre ustensile dans
le r_cipient.
,4,, ATTENTION
ATTENTION
1. Nettoyez r_guli_rement la hotte ' ne laissez pas la
graisse s'accumuler sur le filtre.
2. Si les aliments situ_s sur la cuisini_re s'enflamment,
activez la ventilation.
3. Nettoyez le filtre de la hotte avec precaution. Les
produits caustiques, comme les nettoyants special
four b. base de lessive, risquent d'endommager le
filtre.
15. Ne laissez pas la prise pendre par-dessus le bord
d'une table ou d'un comptoir.
CONSBVEZ
PRECIEUSEMENT
CES
CONSIGNES
consignes de securte 3
SMH1927-XAC_CFR.indd
3
2012-02-24
2:00:48
iNSTRUCTiONS
DEMISEALATERRE
Cet appareil dolt Ctre reliea.la terre. La mise a.la terre reduit le
risque de choc electrique, car ellefoumit au courant un chemin
de sortie en cas de court-circuit. Ce four est equip6 d'un cordon
d'alimentation disposant d'une prise de mise a.laterre. La fiche
dolt Ctre branchee sur une prise secteur posee et mise a.laterre
conformement a.la legislationen vigueur.
Ax, AVERTISSEMENT
ATTENTION
Toute utilisationnon conforme de la prise de mise a.la terre peut
entraTnerun risque d'electrocution.
• Branchez I'appareilsur une prise muraletripolaire relieea.
laterre. Ne coupez ni ne retirezlatroisbme broche (misea.
laterre). N'utilisez pas d'adaptateur et ne demontez pas la
prisede terre.
Contactez un electricien ou un r@arateur qualifiesi les
consignes de mise a.la terre ne vous semblent pas claires
ou si vous n'¢tes pas certain que votre appareil est
correctement relie a.la masse.
IIest deconseill6 d'utiliser une rallongeavec cet appareil.
Si lecordon d'alimentation est trop court, faites installer
une prise a.proximite de votre appareil par un electricien ou
un r@arateur qualifie.Toutefois, s'il s'avere indispensable
d'utiliser une rallonge, lisezet respectez les conseils indiques
dans la rubrique ,, Utilisationde rallonges ,,ci-dessous.
Utilisationde rallonges
Le four est foumi avec un cordon d'alimentation court afin de
limiter les risques d'entravement. Descordons plus longs ou
des rallongessont disponibles et peuvent Ctre utilisessi vous
faites preuvede prudence. En cas d'utilisation d'un cordon plus
long ou d'une rallonge:
1. Les caracteristiques electriques du cordon ou de la rallonge
doivent Ctreau moins egales a.cellesde I'appareil.
2. La rallongedolt Ctreun cordon a.3 ills reliablea.laterre et
brancheesur une prisefemelle tripolaire.
3. En cas d'utilisation d'un cordon plus long, celui-ci ne dolt
pas passer par-dessus le comptoir ou latable afin d'@iter
qu'un enfant ne tire dessus ou que quelqu'un ne s'y
entrave. Si vous utilisezune rallonge, I'intensitede I'eclairage
interieurpeut vaciller et laventilation subir des variations
Iorsquele four micro-ondes fonctionne. Les temps de
cuisson peuvent egalement Ctre plus longs.
A AVERTISSEMENTS
ATTENTION
IMPORTANTS RELATIFS
A L'INSTALLATION
_
'instailationdecet appareildoit _treeffectueeparun technicien
qualifieou I'employed'unesociet6de d@annage.
Lenon-respectdecetteconsignepeutprovoquer
uneelectrocution,un incendie,uneexplosion,un
dysfonctionnement
de I'appareilou des blessures.
DeballezFappareil:retireztouslesel6mentsd'emballageet
verifiezquelefourn'estpas endommage(tracesde choc a.
I'interieurou a.I'exterieur,
Ioquetscass@,fissuresauniveaude la
porteou portemalalignee).Encasde dommages,n'utilisezpasle
fouret contactezimmediatement
votrerevendeur.
®
Veiilez,_cequeiefoursoitinstalledansun emplacement
suffisamment
grand.
Retirezregulbrement
toutesubstanceetrang6re(poussiereou
eau)presentesur lesborneset lespointsde contactde laprise
d'alimentationa I'aided'unchiffonsec.
Debranchez
lapriseet nettoyezda
_tI'aided'unchiffonsec.
Lenon-respectdecetteconsignepeutentrainerunrisque
d'electrocution
ou d'incendie.
Branchezlecordond'alimentationsuruneprisetripolaire
correctementrelieeb.laterre,Nebranchezaucunautreappareil
electriquesur cecircuit,
Partagerlam6meprisemuraieavecd'autresappareilsb.I'aide
d'unemultipriseou d'unerallongerisquede provoquerune
electrocutionou un incendie.
N'utilisezpasde transformateur
electrique.Celapourrait
entrainerunrisqued'electrocutionou d'incendie.
Veilleza.cequelatension,lafrequenceet I'intensitedu
courantsoientconformesaux caracteristiques
de I'appareR
Lenon-respectdecetteconsignepeutentrainerunrisque
d'electrocution
ou d'incendie.
Gardeztousles el6mentsd'embaliagehorsde laporteedes
enfants.Ceux-cirisqueraient
de lesutiliserpourjouer.
dolt_trecorrectementreliea.laterre.Usezet
@Cetappareil
respectezles,,Consignesde misea.laterre,,detaill6esau debut
de cechapitre.Nereliezjamaiscet appareila.uneconduitede
gaz,a untuyaud'eauen plastiqueou b.uneIlgnetel@honique.
Celapourraitentrdinerun risqued'electrocution,d'incendie,
d'explosionou de defaillance
de I'appareik
Nebranchezjamaislecordond'alimentation
suruneprisequi
n'[email protected] assurez-vous
quela
raisea.laterreestconformeauxnormeslocaleset nationales.
Necoupeznine retirezJAMAISlatroisbmebroche(raisea.la
terre)de laficheducordond'alimentation,
Connectezlefour a uncircuitde20 A, Si lefourestconnectea.un
circuitde 15A, assurez-vous
queledisjoncteurfonctionne,
pascet appareildansun endroithumide,graisseuxou
@N'installez
poussiereux
et veilleza.ce qu'ilne soitpasexposedirectementb.
lalumieredusoleilou _tunesourced'eau(eaude piuie).
CelapourraitentraTner
un risqued'electrocutionou d'incendie.
Branchezcorrectementlafichedansla prisemurab.N'utilisez
jamaisuneficheou uncordond'alimentationendommage(e)
ou
uneprisemuraiemalfix@.
Celapourraitentrdinerun risqued'ebctrocutionou d'incendie.
N'installezpasI'appareilau-dessusd'un @ier.
Netirezjamaissur lecordond'alimentation
et ne lepliezpasde
faconexcessive,
Nevrillezet neserrezpaslecordond'alimentation.
Concernantlecordond'alimentation
: ne I'accrochezpassur un
objetmetallique; ne posezpas d'objetIourddessus; nelefaites
passerentredesobjetset nele poussezpas dansI'espaceb.
I'arrierede I'appareik
Celapourraitentrdinerun risqued'ebctrocutionou d'incendie.
Pourdebrancherlafiche,netirezpassur lecordon.
Debranchez
lefourentirantsurlaficheuniquement.
Lenon-respectdecetteconsignepeutentralnerunrisque
d'ebctrocutionou d'incendie.
Si la prise ou le cordon d'alimentation est endommage(e),
contactez le centre de d@annage le plus proche pour demander
b.ce qu'elle soit remplacee.
CONSERVEZ
P E¢IEUSEMENT
CES
CONSIGNES
4 consignesde securte
SMH1927-XAC_CFR.indd
4
2012-02-24
2:00:48
ATTENTION
SYMBOLES
D'AVERTISSEMENT
RELATIFSA
L'INSTALLATION
_
nstallezlefourde tellefagonquelapriserestefacilement
accessible,
Le non-respectde cetteconsignepeutentraTner
un risque
d'electrocutionou d'incendiesuitea unefuiteelectrique.
_
6branchezlaprised'alimentation
si I'appareildoit resterinutilise
pendantuneperiodeprolongeeou en casd'orage.
Le non-respectde cetteconsignepeutentrainerun risque
d'electrocutionou d'incendie.
/k AVERTISSEMENTS
ATTENTION
IMPORTANTS RELATIFS
L'UTILISATION
®
Encasd'inondation,contactezlecentrede d@annageleplus
prochesi votreappareila et6en contactavecI'eau,Lenonrespectde cetteconsignepeutentrainerun risqued'electrocution
ou d'incendie,
Lisezet respectezles<<
Consignespermettantd'eviterune
expositionexcessiveauxmicro-ondes,>detaill6esau debutde ce
chapitre,
Si I'appareilgenereun bruitanormal,uneodeurde brOleou de la
fumee,debranchez-le
immediatement
et contactezleservicede
depannageleplusproche,
Le non-respectde cetteconsignepeutentrdrnerun risque
d'electrocutionou d'incendie,
Respectezsystematiquement
lesconsignesde Securit6
Iorsquevousutilisezvotrefour, Netentezjamaisde reparer
vous-m6meI'appareil; lecourantelectriquecirculanta
I'interieuresttreselev&Si lefour necessitedesreparations,
contactezuncentrede depannage
agr6eprochedechez
VOUS,
@
Netentezpasde reparer,demonterou modifiervous-m6me
I'appareil.
Le chassisde I'appareiletanttraverseparuncouranta haute
tension,ilexisteun risqued'electrocution
ou d'incendie.
Vousrisqueriezd'6treexposea desondes
electromagn6tiques.
Si lefournecessitedes reparations,
contactezlecentrede
depannageleplusprochede chezvous.
unesubstanceetrangeretellequedeI'eaupenetredans
@ SiI'appareil,
debranchez-le
et contactezvotrecentrededepannage
leplusproche,
Le non-respectde cetteconsignepeutentrainerun risque
d'electrocutionou d'incendie.
laprised'alimentation
sivousavezlesmains
@ Netouchezpas
mouillees.
Celapourraitentrainerunrisqued'electrocution,
N'eteignezpasI'appareilendebranchantlecordond'alimentation.
Lefait de rebrancherlecordond'alimentationdansla
prisemuralepeutprovoqueruneetincelleentrainantune
electrocutionou un incendie.
Encasde fuitede gaz(propane,GPL,etc.),aerezimmediatement
lapiecesanstouchera I'appareil,au cordond'alimentation
ou a
lafiche.
N'utilisezpasde ventilateur,
La moindreetincellerisqueraitde provoqueruneexplosionou
un incendie.
Teneztousleselementsd'emballagehorsde porteedesenfants
afind'evitertoutaccident,
Risqued'asphyxieaveclessacsplastique,
Nelaissezpaslesenfantsoutoutepersonnea capacites
physiques,sensorielles
ou mentalesreduitesutilisercetappareil
sanssurveillance.
Veillezace queI'appareilsetrouvehorsde porteedesenfants,
Le non-respectde cetteconsignepeutentrdrnerun risque
d'electrocution,d'incendieou de blessures,
Netouchezpas I'interieurdu fourjusteapressonfonctionnement:
leselementssont encorebrOlants,
La chaleura I'interieurdu fourrisquede provoquerdes
brOlures,
Veillezace quelaporteoutouteautrepartien'entrepasen
contactaveclecorpslotsdufonctionnementdufour etjuste
apressonfonctionnement,
Le non-respectde cetteconsignerisqued'entrdrnerdes
brOlures,
N'utilisezpasde papieraluminium(saufsi indiqueprecisement
dartsce manuel),d'objetsmetalliques
(recipients,fourchettes,etc.)
ou de recipientscomportantdes ornementsdotesou argentes.
Cesobjetsrisquentde provoquerdesetincellesou de
s'enflammer.
Encasde departde feusur lacuisinieresitueesouslefour,
etouffezlesflammesa I'aided'un couvercle,d'uneplaquede
cuissonmetalliqueou d'un plateau,
Lots d'uneutilisationa puissanceelev6e,ne laissezjamaisles
el6mentssituessousI'appareilsanssurveillance.
Encasde
debordement,lesparticulesgrassesprovenantdesaliments
risquentdes'enflammersila hottefonctionne,Afinquelahottene
sedeclenchepasautomatiquement
chaquefoisquevousvous
servezdevotrefour,utilisezdes platsdetailleapproprieeet ne
faitesfonctionnervotretablede cuissona puissancemaximale
queIorsquecelaestvraimentnecessaire.
Encasde departde feua I'interieurdu four,laissezsaporte
fermee,eteignezI'appareilet debranchezlapriseou coupez
I'alimentation
au niveaudu tableaudefusiblesou du disjoncteur,
Sivousouvrezlaportedu four,I'incendierisquede sepropager.
N'utilisezet n'entreposezpasd'aerosolsou d'objetsinflammables
a proximitedu four.
La chaleurdegageeparlefour micro-ondesrisquedefaire
exploserou s'enflammelesgaz,
Le non-respectde cetteconsignepeutentrdrnerun risque
d'electrocutionou desblessures.
N'essayezpasde modifier,d'ajusterou de reparerlaporte.Le
chassisexterieurne doit6treretiresousaucunpretexte.
N'entreposezet n'utilisezjamaislefouren exterieur.
CONSERVEZ
PRECIEUSEMENT
CES
CONSIGNES
consignes de securte 5
SMH1927-XAC_CFR.indd
5
2012-02-24
2:00:48
A AVERTISSEMENTS
ATTENT,ON
RELATIFS
A L'UTILISATION
Si desfissuresapparaissent
a.lasurfacedu fourmicro-on@s,
eteignezcedernier,
• Lenon-respectdecetteconsignerisqued'entrainerune
electrocution,
Lesplatset r@ipientspeuventdevenirextr6mement
chauds.
Manipulezdes
avecpr@aution.
Lesplatschaudset lavapeurpeuventprovoquerdes brOlures.
Retirezlecouvercledes r@ipientsavecpr@autionen veillant_t
eloignerces derniersde votrevisageet de vosmainsafind'@iter
queledegagementde vapeurnevous brClle,
Retirezlescouverclesdes petitspotspour beb6avantde les
fairechauffer,Lorsquevousrechauffez
des alimentspour beb6,
remuez-lesbien pourr@artirlachaleuruniformement,
Testez
toujourslatemperaturedesalimentsavantde lesdonner_tun
b6beContrairement
a cequ'il pardit,lerecipienten verreou la
surfacedesalimentspeuvent6trechaudsau pointde br@ler
la
bouchedu beb6,
Veilleza.cequetouslesustensilesutilisesdanslefoursoient
adaptesa.lacuissonauxmicro-ondes,
Utilisezdesustensilesadaptes_tlacuissonauxmicro-ondesen
respectantrigoureusement
lesrecommandations
desfabricants,
I'appareilet neposezpasd'objetsdessus
@Nemontezpassur
(ex.: linge,couverclede four,bougiesallumees,cigarettes
allum@s,plats,produitschimiques,objetsmetalliques,etc.).
Desarticlespeuventrestercoincesdanslaporte,
Celapourraitentrdinerun risqued'electrocution,d'incendie,de
defaillance
de I'appareilou desblessures.
N'utilisezpasI'appareilaveclesmainsmouilBes,
Celapourraitentrdinerun risqued'electrocution,
Nevaporisezpas de substancesvolatiles(ex.: insecticide)
surla
surfacede I'appareik
Cessubstancessont nonseulementnocivespourlasante,
maisellespeuventegalemententraineruneelectrocution,un
incendieou uneddaillancede I'appareil,
Neplacezpas I'appareilsur unsupportfragile,commeun @ierou
un objeten verre,
• L'@ierou I'objeten verrepourrait6treendommage,
N'approchezpasvotrevisageouvotrecorpsde I'appareil
pendantlacuissonou lotsde I'ouverturede laportejuste apres
lacuisson,
Veillezace quelesenfantsnes'approchentpastrop presde
I'appareik
Lenon-respectdecetteconsignerisqued'entra_ner
des
br@lures
pourlesenfants,
Neplacezpas denourritureou d'objetsIourdssur laportelotsde
de boissonssurgeBescontenues
@Nefaitesjamaisd@ongeler
dansdes bouteillesa.coletroit.Celles-cirisqueraient
d'eclater.
Nerayezpas lasurfacevitreede laportedu foura.I'aided'un
objettranchant,
Celapourraitendommager,
voirebriserlavitre,
Neposezriensur I'appareilIorsquecelui-cifonctionne,
N'utilisezpasde recipientsfermeshermetiquement,
Retirezles
obturateurset lescouverclesavantI'utilisation,Lesrecipients
fermeshermetiquement
peuventexploseren raisonde
I'accumulationde pression,m6meapresI'arr@t
du four.
ATTENTION
CONSIGNESDENETTOYAGE
IMPORTANTES
Nenettoyezpas I'appareilen pulverisantdirectementde I'eau
dessus.
N'utilisezpasde benzene,de diluantou d'alcoolpournettoyer
I'appareil,
Celapourraitentrdinerunedecoloration,uneddormation,des
dommagessurI'appareilainsiqu'unrisqued'electrocutionou
d'incendie.
Avantde nettoyerI'appareilou d'effectuerun entretien,
debranchez-le
cordond'alimentationde laprisemuraleet eliminez
toutrestealimentairede laporteet ducompartimentdecuisson.
Lenon-respectdecetteconsignepeutentrainerunrisque
d'electrocution
ou d'incendie,
Prenezgardea.ne pasvousblesseren nettoyantI'appareil
(ext6rieur/interieur)
Lesar6tesdecelui-cipeuventser6velertrestranchantes.
Nenettoyezpas I'appareila.I'aided'un nettoyeurvapeur.
Celapourraitentrdinerun ph@omenedecorrosion.
Veilleza maintenirI'interieurdufourtoujourspropre,Lesparticules
d'alimentsou lesprojectionsd'huileadherantauxparoisrisquent
d'abimerlefour ou d'en reduireson efficacite,
son ouverture.
• Vousrisqueriezde vousbr@ler
oude vousblesser,
Necreezpasde chocthermiquebrutalau niveaude laporte,de
I'interieurde I'appareiloudu plat(ex.: enversantde I'eaudessus
pendantoujusteapreslacuisson),
• Celarisqued'endommagerI'appareil,Lavapeurou les
projectionsd'eaupourraiententra_ner
des br@lures
ou des
blessures.
Netentezjamaisdefaireprechaufferou fonctionnerlefour microondesa.vide,
Veilleztoujoursa.cequeleplateauen verresetrouvea.I'interieur
du fouravantde mettreen marchecedernier,Danslecas
contraire,lesalimentsne seraientpascuitscorrectement.
CONSERVEZ
PRECEUSEMENT
CES
CONSIGNES
6 consignes de s6curte
SMH1927-XAC_CFR.indd
6
2012-02-24
2:00:48
R_eGLAGEDE VOTRE FOUR MICRO-ONDES
8
8
16
Contr61e du contenu
Informations concernant la
garantie et I'assistance
Preparation de votre four
micro-ondes
Boutons du tableau de
commande
Premiere raise sous tension
Reglage de I'horloge
Securite enfants
Mes reglages
8
9
10
10
10
10
UTILISATION
GUIDE DES R_eCIPIENTS
Ustensiles adaptes a la cuisson
au four micro-ondes
GUIDE DE CUISSON
_
17
18
18
19
19
Conseils generaux d'utilisation du
micro-ondes
Cuisson de la viande
Cuisson de la volaille
Cuisson des fruits de met
Cuisson des oeufs
19
19
Cuisson des legumes
Recettes
DU FOUR MICRO-ONDES
10
10
10
Bouton Minuterie
Bouton Ajouter 30 s.
Boutons Ventilation
(4 vitesses et
Activation/Desactivation)
Bouton
Vent Arr_t retarde du ventilateur
Bouton
Eclairage Qeve/Faible/D6sactiv6
Bouton Reglage de la minuterie
Bouton Marche/Arr6t du plateau
Grille metallique
Mode Eco
10
11
11
11
11
11
12
12
13
Boutons Cuisson par capteur
Bouton Rechauffage par capteur
Bouton D6congelation
automatique
Bouton D6congelation 1 livre
Bouton Ramollir/Faire fondre
Bouton Menus enfants
Bouton En-cas
Temps de cuisson au microondes et puissances
Bouton Cuisson personnalisee
Maintien au chaud
13
14
14
15
15
16
16
NETTOYAGE ET ENTRETIEN
MICRO-ONDES
JT)_
.........
20
20
21
21
21
21
21
22
DE VOTRE FOUR
Nettoyage de la pattie exterieure
Nettoyage de la pattie interieure
Nettoyage du plateau toumant et
de I'anneau de guidage
Rangement et entretien du four
micro-ondes
Remplacement de I'ampoule de
la surface de cuisson/veilleuse
Remplacement de I'ampoule du
four
Nettoyage du filtre a graisse
Remplacement du filtre
charbon
DLePANNAGE
ANNEXE
GARANTIE
s0mmaire 7
SMH1927-XAC_CFR.indd
7
2012-02-24
2:00:48
F
micro-ondes,
CONTROLEDU CONTENU
Sortezlefourmicro-ondesde sonemballageavecprecautionet verifiez
quevousdisposezbiende touteslespiecesmentionnees
ci-dessous.
Si votrefoura et6 endommagedurantletransportou s'il manque
des pieces,contactezleserviceclienteleSamsung(Reportez-vous
a.lasection,,Informations
concernantlagarantieet I'assistance,>en
page8.).
INFORMATIONS CONCERNANT LA
GARANTIE ET L'ASSISTANCE
Afin de b6neficierd'un service d'assistance optimal, remplissez
la carte d'immatriculation ci-jointe et faites-la nous ensuite
parvenir par courtier postal. A defaut de carte, contactez
Samsung Electronics,Inc. au
I=800-SAMSUNG (726-7864} ou inscrivez-vous en ligne
sur www.samsung.com/global/register.
Avant de contacter Samsung, munissez-vousdes informations
qui vous seront demandees lots de votre appel : lesref6rences
et le numero de seriedu modele gen6ralementsitues b.I'arriere
ou sur le dessous de I'appareil.Veuilleznoter ces numeros ainsi
que lesautres informations demandees dans les emplacements
ci-dessous. Conservezsoigneusementces rderences (elles
pourront vous Ctre utilesb.tout moment en cas de perte ou de
vol) ainsi qu'une copie de votre facture qui tiendra lieu de preuve
d'achat Iorsquevous souhaiterezbeneficier des servicesde
garantie.
NUMI_RODE MODI_LE
NUMI_RODE SI_RIE
DATED'ACHAT
LiEUD'ACHAT
Four micro-ondes (SMH1927}
Les servicesde garantie ne peuvent 6tre assures que par
un centre de service Samsung agree. Si vous souhaitezen
beneficier,foumissez b.votre centre de service Samsung agre6
les informations ci-dessus ainsique la copie de votre facture.
Pour b6neficierdu service d'assistance et connaftreles
coordonnees du centre de d@annage le plus proche de chez
vous, appelez le I=800-SAMSUNG (726-7864).
PRI PARATION DE VOTRE FOUR MICROONDES
Grille
Plateau en verre
Filtre a graisses
(installS)
Filtre a charbon
Anneau du plateau
tournant
1. Ouvrez la porte du four en tirant sur la poignee situee sur le
c6te droit de la porte.
2. Essuyezles patois internesdu four b.I'aide d'un chiffon
humide.
Adaptateurdu
systeme d i _vacuation
i
Jeu de pieces
(vis et fixations)
Manuels
(installation
personnalis_e)
Gabarit
(partie sup_rieure et
paroi)
3=
InserezI'anneau de guidage prealablement assembB dans
I'empreinte situee au centre du four.
i
i
4%
D@osez le plateau en verre sur I'anneau, en veillant b.le
positionner correctement.
8 reglag÷de votrefourmicro--ondes
SMH1927-XAC_CFR.indd
8
2012-02-24
2:00:49
BOUTONSDU TABLEAUDE COMMANDE
EcranI
Reportez-vous
a la
Reportez-vous
I
la page12
I
Cooking Presets
I
i page14
I Reportez-vous
a la
page16
Reportez-vous
I
la page14
Reportez-vousI
la page13
r! Pound
'[ Defrost
Ipage15
Reportez-vous
a la
Auto
Defrost
I Reportez-vous
a la
page10
1
3
4
5
6
8
9
t Reportez-vous
a la
page16
Reportez-vous
I
la page15
Reportez-vous
aux I
pp. 10et11
Stop/Clear
Sec_
Eco Mode
TurntaUe On/Off
On/Off
Set Timer
ii
Light
vent
4 Speed
Hi/LoiOff
Enter!Start
i
Cbck
IReportez-vous
a la
page10
DelayO_
iil
i_
Held 3 sec
I Reportez-vous
a la
page10
r6glagede votrefour micro-ondes9
SMH1927-XAC_CFR.indd
9
2012-02-24
2:00:49
PREMIEREMISE SOUSTENSION
La premierefob quevousbranchezI'appareilsur uneprise,lemessage
suivants'afficheau boutde quatresecondes:
"4f_,_',rf_OtiC,'
i (}tOC4AJ\J_}
SET7X,£0 r F},4Y
_U_!/E7 A,qr_U'4q
_SUPLEBOUONQ 0(?_ ffiOf;iOG[; POUR
fT (;LYq'{ '{i[_."r_L,,
1
2
ON(ACTIVEE)
OFF(DESACTIVE)
1
2
ON(ACTIVEE)
OFF(DESACTIVE)
Cemessageapparditegalementapresunecoupurede courant.
RI_GLAGEDE L'HORLOGE
Votrefourmicro-ondesestequip6d'unehorlogeintegr@,L'horloge
dolt @treregl6elotsde I'installationinitialedufour ouapresunecoupure
de courant,L'heures'afficheIorsquelefourmicro-ondesn'est pasen
coursde fonctionnement.
1. Appuyezsur leboutonClock (Horloge),
2. L'@rand'affichageindiquep,jf_cq,7?HrOFD/,Y
f_ECLFi:L'__d{ [ ,,
3. Utiiisezlepavenumeriquepour reglerI'heureactuelle.Vous
devezappuyersur au moinstroischiffrespourr@gler
I'horioge,
Parexempb,s'il est 5h00,saisissez5,0, 0. U@rand'affichage
indique: 500.
4. Appuyezsur leboutonEntedStart (Entr_e/D_part),
5. LemessageAbfTOUC,,iY/bff_OU(?,,i_
J#f TOUO/[ 1!_',fTO"iCii,Y2, s'affiche,
6. Utilisezlepavenumeriquepourselectionner
AM/PM,
7. Appuyezsur leboutonEnter/Start (Entr_e/D_part),
8. DeuxpointsdignotentpourindiquerqueI'heureestregl6e,
PourafficherI'heurependantlacuisson,appuyezsur lebouton
Clock (Horloge).
Avecvotre nouveaufour micro-ondesSamsung,la cuisine
#aura jarnaiset6 aussifacile,
La section suivantedecrit tout ce que vous devez savoirsur
FutiBationde oct appareik
BOUTONMINUTERIE
Votrefourmicro-ondespeut6treutilisecommeminuterie,
Vouspouvez
regbrla minuteriesur99 minuteset 99 secondesaumaximum.
1. Appuyezsur b boutonKitchen Timer (Minuterle}.
2. Utilisezlepavenumeriquepourddinir ladur@de
fonctionnementde laminuterie,
3. Appuyezsur b boutonEnter/Start (Entr_e/D_part},
4. Led@omptes'afficheet unsignalsonoreretentitunefob ce
temps@oul&
5. Pourannubrlereglagede la minuterie:appuyezsur lebouton
Stop/Clear (Arr_t/Supprimer},
SI_CURITEENFANTS
BOUTONAJOUTER30 S.
LafonctionChildLock(S@uriteenfants)vous permetdeverrouillerles
boutonsafinquelefourmicro-ondesne puissepas@tremisen marche
de maniereaccidentelle.Lefour [email protected].
Cettecommandesimplifieevouspermetde gagnerdutempset de
demarrerrapidementlacuissona.pbinepuissance.
Activation/D6sactivation
Pouractiverou d@activerlas@uriteenfants,appuyezpendant
3 secondessur leboutonHold 3 sec {verrouillage 3 s),
L'@ranindiqueCii/1D LO04ON _7/Ci/_qE !-T",/½NL_
AOf',,,iq au
momentduverrouillage,pubaffichea.nouveauI'heure.
MES RI_GLAGES
Vouspouvezpersonnaliser
votrenouveaufourmicro-ondesenfonction
de vosbesoins.Suivezlesconsignesci-dessous:
1. Appuyezsur leboutonMy settings (Mes r_glages},
2. Appuyezsur leboutoncorrespondant
a.lafonctionquevous
souhaitezpersonnaliser.
3. Appuyezsur lenumerocorrespondant
a.I'optiondevotrechoix.
Lesfonctions,lesoptionset lesboutonscorrespondants
figurentdarts
letableauci-dessous.
1',4
Fo :ctJ
1
Unitede poidsselectionn6e
2
Commanded'activation/
desactivation
du son
3
Commanded'affichagede
I'horloge
4
Ecran
5
.....
Signalde rappelde fin
1
Li
2
1
2
1
2
1
2
Kg
Sonactive
Sondesactive
12 heures
24 heures
Vitesselente
Vitessenormale
3
1
2
Vitesserapide
ON(ACTIVEE)
OFF(DESACTIVE)
1. Appuyezsur b boutonAdd 30 sec. (Ajouter 30 s) autant
defoisquevoussouhaitezajouter30 secondesautempsde
cuisson.Parexemple,appuyezdeuxfob sur b boutonpourun
tempsde cuissond'uneminute,puissur lebouton
Enter/Start (Entr_e/D6part} pour demarrerlacuisson.
2. Vouspouvezajouter30 secondes&un programmeencoursen
appuyantsur leboutonAdd 30 sec. (Ajouter 30 s) autantde
fob quevoussouhaitezajouterdetranchesde 30 secondes.
BOUTONS VENTILATION
(4 VITESSESETACTIVATION/DI_SACTIVATION)
Laventilationpermetd'@acuerlavapeurd'eauemiseparlesaliments.
Laventilationpeut@treregleemanuelbment.
1. Appuyezsur leboutonVent4 Speed {Ventilation 2vltesses)
pourregbrlavitesse.
2. Appuyezsur b boutonVentOn/Off (Marche/Arr_t du
ventllateur} pouractiverlaventilation.
3. Appuyeza.nouveausur leboutonVent On/Off(Marche/Arr_t
du ventilateur} pourdesactiverlaventilation.
BOUTON
VENTARR#TRETARDI_
DUVENTILATEUR
Appuyezunefob sur b boutonDelayOff (Arr_t retardS)pourque
leventilateurs'arr@te
unefois@ouleb tempsddink Le nombrede
minutesestfonctiondu hombredefob ou leboutonaete actionn&
1
2
3
4
5
1
3
5
10
30
10 reglagede votrefour micro-ondes
SMH1927-XAC_CFR.indd
10
2012-O2-24
2:00:49
BOUTONI CLAIRAGE
I LEVI /FAIBLE/DI SACTIVI
LeboutonLight(Eclairage}permetde reglerI'intensit6de I'@lairage
dansvotrefourmicro-ondes.
jira
High(Eleve)
2
3
Low(Fable)
Off(D@active)
BOUTONRI-'-GLAGE
DE LA MINUTERIE
Lefourmicro-ondespeut_treregl6pourqueI'@lairages'alhmeet
s'eteigneautomatiquement
a.uneheurepreddinie.L'6clairages'alhme
b.lam6meheuretouslesjoursjusqu'ar6initialisation.
1. Appuyezsur leboutonSet Timer (R_glagede la minuterie},
2. Utilisezlepavenumeriquepourddinir I'heured'alhmagede
I'@lairage.
3. Appuyezsur leboutonEnter/Start (Entr_e/D_part).
4. Utilisezlepavenumeriquepourselectionner
AM ou PM.
5. Appuyezsur leboutonEnter/Start (Entr_e/D_part).
6. Utilisezlepavenumeriquepourddinir I'heured'extinctionde
I'@lairage.
7. Appuyezsur leboutonEnter/Start (Entr_e/D_part).
8. Utilisezlepavenumeriquepourselectionner
AM ou PM.
9. Appuyezsur leboutonEnter/Start (Entr_e/D_part).
R_sultats non homog_nes
Lagrillevouspermetfairer@haufferplusieursplats
simultanement.
"
_
-x
"•
x yi; •
x Y
T"i
Appuyezsur lesboutonsSet Timer (R_glagede la minuterie},
puissur ,,0 ,>pourannulerlaminuterie.
BOUTONMARCHE/ARRI TDU PLATEAU
Pourde meilleursr@ultatsde cuisson,laissezleplateautoumantactiv&
Enrevanche,d@activez-lepourlesplatsde grandetaille.
Appuyezsur leboutonTurntable On/Off (Marche/Arr_tdu plateau)
pouractiverou desactiverleplateautoumant.
z_
Leplateautournantpeutdevenirextr6mementchaud.Utilisez
A_TENTmON
des maniquespourmanipulerleplateautournantpendantet
apreslacubson.
GRILLEMI TALLIQUE
Lagrillemetalliquepermetdefairecuirephsbursalimentsen m_me
temps.
e
ATTENTION
?:(;i}
Faire r@hauffer des aliments
Pourfairer@haufferbs alimentssurdeuxniveauxou pourlesfaire
r@haufferau niveauleplusbas :
* Multipliezb tempsde chauffepar1,5.
* Inversezlesplatsb.lamoitiedu tempsde rechauffage.
Neposezpas deplat b.brunirsur lagrille.IIrisqueraitde
surchauffer.
* N'utilisezpas b four Iorsquelagrillesetrouvesur lasoledu
micro-ondes.
Vousrbqueriezd'endommager
I'appareil.
* Portezdes maniquesIorsquevousmanipulezlagrille,car
ellepeutdevenirextr_mementchaude.
* N'utilisezpas lagrillemetalliquelotsde lacuissonde popcorn,
Lacuissondesalimentsestplushomogenesur leplateau
tournant.
il ......
? x•u
•¸¸ -w_ ¸ K y-
"•"
:_
MODEl CO
Boris r_sultats
LemodeEco(Eco)permetde reduirelaconsommation
enveille.
Lorsquevousappuyezsur leboutonECOMODE(MODEI_CO),
I'@rans'eteintet lefour micro-ondespasseen moded'@onomie
d'@ergie.Pourannubrb modeECOMODE(MODEI_CO),appuyez
nouveausur leboutonou actionnezn'importequelautrebouton.
ut satondu fourmco°ondes 11
SMH1927-XAC_CFR.indd
11
2012-02-24
2:00:50
BOUTONSCUISSONPARCAPTEUR
LesboutonsSensor cooking (Cuissonpar capteur}vouspermettentde fairecuirevosplatsprder@_tI'aided'uneseubpression,Si bs aliments
ne sontpasassezcuitsou pasassezchaudsapresun programmede cuissonautomatique,
terminezlacuissonen selectionnant
manuelbmentune
puissanceet untempsde cuisson,
A
N'utilisezpaslafonctionSensorCooking (Cuissonpar capteur} plusbursfoisd'affilee.Lefourdoit refroidirpendantau moins5 minutes
ATrE.T_ON_
entrechaqueutilisation,Dansb cascontraire,ily a risquede surcuisson,
Ustensiles et couvercles pour la cuisson par capteur
Pourobtenirde bonsr6sultatsde cuissona I'aidede cesfonctions,suivezlesconsignesrelativesau choixdesr@ipientset descouvercbsdansla
sectionconsacreeauxr@ipientsen page16.
z£
A
A]TENTiON
Utilbeztoujoursdesr@ipbntsr@btantsauxmicro-ondeset couvrezdesd'uncouvercbou d'unfilmplastique.Si vousutilbezun film
plastique,m@agezunechemin@en surfaceen rabattantI'undescoinsafinde permettrea.lavapeurde s'@happer.
Remplissez
bs r@ipientsaumoinsjusqu'a,lamoitiede leurcapacite.
A]TENTiON
®
®
%
Lesalimentsn@essitantd'6tremeBng@ou [email protected] cyclede cuissonparcapteur,Iorsqueb d@omptedu
tempsrestants'affiche,
N'utilisezpascontinuelbmentlafonctiondecuissonautomatiqueparcapteur.Patientez5 minutesavantde lancerun autrecyclede
cuissonparcapteur.
Pour@itertoutmauvaisresultat,n'utilisezpasb capteurautomatiqueIorsquelatemperature
ambianteesttrop basseou trop6bvee.
Tableau de cuisson par capteur
3- 3,5 oz
1 sachet
Nefaiteschaufferqu'unseulsachetde pop-cornsp@ialmicro-ondes
b.lafob. SoyezprudentIorsque
vousouvrezlesachetapresI'avoirretiredu four.Laissezlefour refroidirpendantau moins5 minutes
avanttoutenouvelleutilisation,
Boissons
8 oz
VersezleIiquidedansunetassegradu@ou un verremesureur,
Necouvrezpas ler@ipient,Placez
laboissondansb four.Unefob b tempsdechauffe@oule,remuezbien,Laissezb fourrefroidir
pendantau moins5 minutesavanttoutenouvelbutilisation,
Escalopesde
poubt
8 5.16oz
Disposezbs bhncsde poubt dansun platadapteauxmicro-ondeset couvrezletoutd'unfilm
plastique,Faitescuirea.unetemperaturede 170°F,Laissezreposerpendant5 minutes,
Pop-corn
Cuire,
Petit-d@uner 4 b.8 oz
surgele
Suivezlesconsignesfigurantsur remballagepourconna_tre
lamethodedecouvertureet letempsde
repos,Utilisezceboutonpourbs sandwichs,petits-dejeuners,
cr6pes,gaufresetc, surgeles,Laissez
lefour refroidirpendantau moins5 minutesavanttoutenouvelbutilisation,
DTner
surgele 8 b.14oz
Debalbzbs alimentset suivezlesconsignesfigurantsurI'emballagepourconnaitrela methodede
couvertureet letempsde repos.Laissezlefourrefroidirpendantaumoins5 minutesavanttoute
nouvelleutilisation,
Legumesfrais 1 b.4 tasses
Mettezbs legumesfraisdansun platen plastique,en verreou en ceramiqueallantau micro-ondes
et ajoutez2_t4 cuilleresa.souped'eau,Couvrezletoutd'un couvercleou d'un filmplastiqueperfore
avantde procedera lacuisson,pub remuezavantde Bisserreposer,Laissezb four refroidirpendant
au moins5 minutesavanttoutenouvelbutilisation,
Legumes
Legumes
surgel@
Mettezbs legumessurgelesdartsun platadapteauxmicro-on@s,enceramique,enverreou
en plastiqueet ajoutez2 _t4 cuilleres_tsouped'eau,Protegezletoutd'un couvercleou d'unfilm
1 b.4 portions plastiqueperforeletempsde lacuisson,puislaissezreposerpendant3 a.5 minutesapresavoir
remue,Laissezb fourrefroidirpendantaumoins5 minutesavanttoutenouvelbutilisation.
Pommedeterre
Piquezchaquepommedeterreplusbursfoisa I'aided'unefourchette.Disposez-lesenetoibsur b
1 _t6 pommes plateau,Apreslacuisson,laissezbs pommesde terrereposer3 b.5 minutes.Laissezlefour refroidir
deterre,
pendantau moins5 minutesavanttoutenouvelbutilisation,
Pizza(Pizza)
Disposez1 _t3 partsde pizza,pointesvers lecentre,sur unplat adapteauxmicro-ondes,Veilleza.
1 b.3 tranches ce quebs partsne sechevauchentpas.Necouvrezpas.Laissezlefourrefroidirpendantaumoins
5 minutesavanttoute nouvelbutilisation.
BOUTONRI CHAUFFAGEPAR CAPTEUR
Votrenouveaufour micro-ondes
vous permetde fairer@haufferfacibmentlesplatspr@aresou lesrestesde repasGrb.ceb.unsystemepermettant
de detecterlavapeurd'eaus'@happantdesalimentsen coursdecuisson,letempsdechauffedu fourestregleautomatiquement
enfonctionde la
categorieet de laquantited'alimentspr@uits.
(_
Touslesalimentsdoivent6trepr@uits,Lesassbttes-repaset lesplatsmijot@doivent6treconserv@aurdrigerateur,
Appuyezsur b boutonSensorReheat(R_chauffagepar capteur}, pubsur b boutonEnter/Start (Entr_e/D_marrer)pourlancerb
r@hauffage,
Le message£Y/iE4T'T:E(}i,,',4//_,%¢_[
s'afficheet lefour demarreautomatiquement.
Pourverifierb.toutmomentI'heureactuelb
pendantler@hauffage,
appuyezsur leboutonClock (Horloge},
12 ut saton du fourmcro-_ondes
SMH1927-XAC_CFR.indd
12
2012-O2-24
2:00:50
Tableau de chauffe par capteur
RespectezlesinstructionssuivantesIorsquevousfaitesr@haufferdifferentes
categoriesd'aliments.
i
st i
Utilisezuniquementdesalimentspr@uitset conservesau frais.
Assietterepas
1 portion
(I assiette)
Couvrezleplatavecunfilmplastiqueperforeou du papbrsulfurisequevousprendrezsoinde repliersousleplat.
Si lesalimentsnesontpas suffisamment
chaudsapresI'utilisationde lafonctionSensorReheat(R@hauffage
par
capteur),ajoutezdutempset augmentezlapuissance.
Contenu:
3 A4 ozde viande,de volailleou de pobson(jusqu'a6 oz,os/ar6tescomprb)
_Atassedef@ulents(pommesdeterre,pates,riz,etc.)
_Atassede legumes(3 A4 oz env.)
CouvrezI'assietteavecun couvercleou unfilmplastiqueperfore,Si bs alimentsnesont passuffisamment
chauds
apresI'utilisation
de lafonction<<
SensorReheat(R@hauffageparcapteur),>,ajoutezdu tempset augmentezla
)uissance.Remuezavantde servir.
Platmijote
1A4 portions Contenu:
PAtes
Platsmijotesconserv@aufrais.
PAtes:spaghettiet raviolien conserve.
BOUTONDI CONGELATIONAUTOMATIQUE
Pourd@ongebrbs aliments,indiquezbur poids; lemicro-ondesregleraalorsautomatiquement
ladur@de d@ongelation,
lapuissanceet letemps
de repos,Appuyezsur leboutonEnter/Start (Entr_e/D_part}pour commencerlad@on@lation.
1. Appuyezsur leboutonAuto Defrost (D_cong_lationautomatique}.Lemessagesuivants'affiche:f)'\ifEf; ?i5'(;f/T _1/4S/;LEPOiF),_,
2. Utilisezlepavenumeriquepourentrerdirectementlepoidsdesaliments,
3. Appuyezsur leboutonEnter/Start (Entr_e/D_part).
4. Lefouremetun signalsonoreAdeuxreprisespendantlad@on@lationet lemessageT'UPN,77
iE;rOODOXrP!_ET_O
_b',,,'TZ
Lf_¢AL_tTi',,,,'iY;
s'affiche,Ouvrezlaportedufour et retournezlesaliments.
Tableau de d@ongelation automatique
RespectezlesinstructionssuivantesIorsquevousfaitesd@ongebrdifferentescategorbsd'aliments.
R6tide bceuf,
porc
Placezlaviandedanslefour,c6tegrasvers lebas,Unefob la1erephasede d@on@lationtermin@,retournezbs
2,5A6 Ib alimentset recouvrez
touteslespartieschaudesdefinesbandelettesd'ahminium,Couvrezet laissezreposerpendant
10A20 minutes.
Biftecks,
cOtebttes,
poissons
Apreschaquephasede d@on@lation,changezladispositiondesalimentssur b plat, Desquecertainsmorceaux
0,5 A3 Ib sont chaudsou d@ongeles,recouvrez-les
de finesbandebttesd'ahminhm.Retireztouslesmorceauxpresque
[email protected] laissezreposerpendant5 A10 minutes.
Viandehachee 0,5 A3 Ib Apreschaquephasede d@on@lation,retireztouslesmorceauxpresqued@[email protected]'unefeuille
d'ahminhm et laissezreposerpendant5 A10 minutes.
Retirezlesabatsavantde congebrlavolaille,Posezlepoubt cotepoitrineverslebas,pub lancezlad@on@lation,
Poubtentier
2,5A6 Ib Apreslapremierephasede d@on@lation,retoumezlepoubt et recouvreztouteslespartieschaudesdefines
bandebttesd'ahminium,Faitesde m6meapreslasecondephase.Couvrezet laissezreposerpendant30 A
60 minutesaurdri@rateur.
Morceauxde
poulet
0,5 A3 Ib Apreschaquephasede d@on@lation,redisposezou retirezlesmorceauxpresqued@[email protected]
pendant10 A20 minutes.
(_
VerifiezbsalimentsIorsquelefouremetunsignalsonore,ApresI'etapefinale,il estpossiblequede petiteszonessoientencorecongelees,
Laissezdes
reposerquelquesinstantspourquelad@ongelation
sepoursuive,
Lesalimentssontd@engel@unefob lescristauxdeglacedisparus,
Pretegerbs rOtisetlesbiftecksavecdefinesbandelettes
d'ahminiumemp@hequelespartieslesplusfinesnecuisentavantquelecentrenesoit
entierement
d@ongele,Utilisezdefinesbandebttesd'aluminium
pourrecouvrir
lesextremiteset lespartiespeuchamuesdesaliments,
BOUTONDI CONGELATIONI LIVRE
Pourd@ongeler1 livred'aliments,appuyezsurce bouton;lefourmicro-ondesregleraalorsautomatiquement
ladur@de d@ongelation,
lapuissance
et letempsde repos,PlacezI'alimentdirectementsur leplateautournantou surunefeuilledepapiersulfurise.N'utilisezpasletresgrandplateau.
1. Appuyezsur b bouton1 Pound Defrost (D_cong_lation1 Iivre),Lemessagesuivants'affiche: J,OLB, _;,0_
2. Appuyezsur leboutonEnter/Start (Entr_e/D_part}pour commencerlad@on@lation,
3. Lefouremetun signalsonoreAdeuxreprisespendantlad@on@lationet lemessageT'UPN,77
iF;rOODO_,irf_J_E]°_O
_b',,iEZ
Lf_¢AL_tTi',,iiY;
s'affiche,Ouvrezlaportedufour et retournezlesaliments.
4. Si vousne retournezpaslesalimentsIorsquelemessagei{i:N f7iFfOOD ©_,1-q
' / TTOii_v'¢_rq
' LF,SAL_t]ri',,,,",,"-_c_
s'affiche,lefour resteen
pausejusqu'acequeleboutonEnter/Start (Entr_e/D_part)soitactionne.
ut saton du four mcro-ondes13
SMH1927-XAC_CFR.indd
13
2012-02-24
2:00:50
BOUTONRAMOLLIR/FAIREFONDRE
1. Appuyezsur leboutonSo.n/Melt (RamollidFondre),Lesinformationssuivantess'affichent: ,<//FCT_TM'.iJ ,-0 4 ,'_/_'f CPO_',rr_'
U%i',J'iJ Ad. (Reportez-vous
au tableauRamollir/Fondre),
Appuyezplusbursfob sur leboutonpourfairedefilerlesalimentsdisponibles,
2. Appuyezsur lebouton1ou 2 pourselectionnerlenombrede portions,Seulle nombre1(portion)est disponiblepour lesoptionsMelt
Chocolate(Fairefondredu chocolat)et SoftenCreamCheese(Faireramollirdu fromageb.lacreme),(Reportez-vous
autableauRamollir/
Fondrepour lehombredeportions),
3. Appuyezsur leboutonStart (D_part}pourdemarrerlacuisson,
Tableau Ramollir/Fondre
1
2
3
Fairefondredu
beurre
2
Fairefondredu
chocolat
1
Faireramollirdu
beurre
1plaquette(portion) Retirezlebeurrede sonemballageet coupez-leen deuxdanslesensde lalargeur,
Placezle beurredansunplatet couvrezletout de papbrsulfurise.
2 plaquettes(portion)
Remuezbienunefob lebeurrefonduet laissezreposerpendant1 b.2 minutes.
1
1tassede p@ites
dechocolatou un
carre
1
1plaquette(X Ib)
Mettezlescopeauxou lescarr@dechocolatdansun r@ipientallantau micro-ondes.
Lorsquelefouremetunsignalsonore,remuezlechocolatet poursuivezleprogramme,
Remuezb.nouveauet laisserreposeruneminute.
Retirezlebeurrede sonemballageet coupez-leen deuxpartiesegalesdanslesensde la
largeur.
Placezle beurredansunplatet couvrezletout de papiersulfurise.
4
Faireramollirdu
fromagea.lacreme 1
Retirezlefromagea.lacremede sonemballageet placez-ledansun r@ipbntallantau
micro-ondes,
1pot (8oz)
Coupezen deuxdanslesensvertical.Laissezreposerpendant2 minutes.
BOUTONMENUSENFANTS
1. Appuyezsur leboutonKids Meals(Menusenfants). L'@ranaffiche,S[}'ECT_",iU J 7\04 ,SEIfCi!(YN,_'EfHS",iUi A 4,
(Reportez-vous
autableaudesmenusenfants).Appuyezplusieursfob sur leboutonpourfairedefilerlesalimentsdisponibles,
2. Appuyezsur lebouton1ou 2 pourselectionnerlenombrede portions.
(Reportez-vous
autableaudesmenusenfantspourlehombrede portions).
3. Appuyezsur b boutonStart (D_part}pourdemarrerlacuisson,
Tableaudes menus enfants
Placezunefeuillede papierabsorbantsur uneassbtteet disposez-ylesbeignetsenetoile,
1 portion
1
2
Beignetsde poulet
(surgele)
[_
2
2portions
1
1 portion
4
Consultezlesinstructionsfigurantsur I'emballagepour latailledes portionset lesquantit@.
Placezdeuxfeuillesde papierabsorbantsur uneassbtteallantau micro-on@s,puisetalezles
fritessansqu'elbs nese chevauchent,
Apresavoirretirelesfritesdu four,@ongez-lesavecuneautrefeuillede papierabsorbant.Laissez
reposerpendant1minute.
Frites(surgelees)
2
3
Necouvrezpas. Laissezreposer1 minuteapreslacuisson,
2 portions
@
Consultezlesinstructionsfigurantsur I'emballagepourconnaitrelatailledesportionset les
quantites.
Sandwichssurgeles 1
(dansuneenveloppe
sp@iabcroustillante)
paquetde 9 oz
2
1 sandwich
Placezlesandwichsurgeledanssonemballagesp@ial(quisetrouvedanslepaquet)et posez-le
sur uneassietteallantau micro-ondes.
1
2 hot-dogs
Retirezqede son,,enveloppecroustillante,>,
2 sandwichs Laissezreposer2 minutesapreslacuisson.
Hot-dogs
Piquezleshot-dogset posez-lessuruneassiette,
Lorsquelefouremetun signalsonore,ajoutezlespetitspainset redemarrezlefour.
Laissezreposer1 minuteapreslacuisson.
2
4 hot-dogs
r_
Pourunemeilleureconsistance,ajoutezlespetitspainsauxhot-dogsseulementapresle
Lc_J signalsonore,
14 ut saton du fourmcro°ondes
SMH1927-XAC_CFR.indd
14
2012-02-24
2:00:50
BOUTONEN-CAS
1, Appuyezsur leboutonSnacks(En-cas}.L'@ranaffiche,S[Jf CT_i'.,,"b'J 7\04 :?EJfCPO_\_rf __Ci'.,,"i.i
J£ 4}.
(Reportez-vous
au tableaudessnacks).Appuyezplusieursfoissur leboutonpourfaireddiler lesalimentsdisponibbs.
2, Appuyezsur lebouton1 ou 2 pourselectionner
lehombrede portions.Seullehombre1 (portion)est disponiblepourlesnachos.
(Reportez-vous
au tableaudessnackspourlaquantite).
3, Appuyezsur leboutonStart (D_part}pourdemarrerlacuisson.
Tableau des snacks
@ u/Aoti
1
1
B_.tonnets
de
fromage(surgel@) 2
2
Ailesde poulet
5 a 6 morceaux Placezlesb&tonnets
de fromageenetoiledansuneassbtte.Necouvrezpas.
7 b.10 morceaux Laissezreposer1a.2 minutesapreslacuisson.
1
5 a.6 oz.
Utilisezdesailesde pouletpr@uiteset conserveesaufrais.
2
7a8oz.
Placezlesailesde pouleten etoilesur uneassbtteet recouvrez-les
de papiersulfurise.
Laissezreposerpendant1a.2 minutes.
Placezlesnachossur uneassiettesansqu'ils nesechevauchent.Saupoudrez-les
d'unecouche
uniformede fromage.
3
4
Nachos
Pommesde terre
farcies
1
1portion
Contenu:
2tassesdetortillas
_sdetassede fromagerape
1
1pommede
terrecuite
Coupezlapommedeterrecuiteen 4 morceauxde tailleegale.Evidezlapommede terreen
laissantune@aisseurd'environ1/4de pouce.
Placezlespotatoesdeterreenetoilesur I'assbtte.
2
2pommesde
terrecuites
Saupoudrez
de lard,d'oignonetde fromage.
Necouvrezpas.
Laissezreposerpendant1a.2 minutes.
TEMPS DECUISSONAU MICFIO-ONDESETPUISSANCES
Cefour micro-ondes
vous permetder6glerdeuxniveauxde cuissondiff@ents,
chaqueniveauposs6dantunedur6eet unepuissancepropres.Le
boutonde puissancevouspermetde reglerlachaleurde Warm(Chaud)(I) b.High(Elev@
(I 0).
Cuisson en une 6tape
Pourlacuissonsimpleen uneetape,ilvoussuffitde reglerletempsde cuisson.Lapuissancese regleautomatiquement
sur High(Elevee).
Pourregler
lapuissancesur unautreniveau,utilisezleboutonPowerLevel {Puissance).
1, Utilisezlepavenumeriquepourdefiniruntempsdecuisson.Vouspouvezreglerletempsdecuissonde 1 secondea.99 minuteset
99 [email protected],saisissezegalementlessecondes(Parexemple,pourreglerun tempsde
cuissonde 20 minutes,saisissez2, 0,0, 0.)
2, Si voussouhaitezreglerlapuissancesur unautreniveauqueHigh(Eleve),appuyezsur leboutonPowerLevel (Puissance},pub utilisezle
pavenumeriquepoursaisirunepuissance.Lesinformations
suivantess'affichent: ":qTi_SS,_RTOR_,i','TEf;
N_kTSi%CECOOKJi',iC
7_/',_
_:%P,</'4_}
' SUPS,,'%£T
O"/,1/4,?/8S£7
L£ Di),__T,r,DEC"i'SSOXDEL£ PRO()'//_/i'._.,",,_
E,%f_r-L
3, Appuyezsur leboutonStart (D_part}pourdemarrerlacuisson.Si voussouhaitezmodifierlapuissance,appuyezsur leboutonStop/Clear
(Arr_t/Supprimer}avantd'appuyersur Start (D_part}et saisissezb.nouveautouteslesinstructions.
(_
ertainesrecettesn@essitentdifferentesetapesde cuissona.differentestemperatures.
Votremicro-ondesvouspermetde reglerplusieurs
etapesde cuisson.
Cuisson en plusieurs 6tapes
Suivezlesetapes1 et 2 danslasection,, Cuissonen uneetape,>.Lesinformationssuivantess'affichent' PRESSS,%RT©R,f}".i','7_q;
i'.,,",,q:_T
%,"-_.(;E
COOKIi'.ic,,"-'£ ,';_PP_i'4_;
' ,<;'J'£,%,"%£T
O"/,_X41,7188U
_M D"iR/-YDE C"/_SSOi'.i
i_',E
1/_.x:,_v-,i_'Z_,'/-;Tsi-_rt
2.
/lt/x_
ff <
',",Z
,ZI
_L7
Appuyezsur leboutonPowerLevel.
3. Utilisezlepavenumeriquepourddinir undeuxiemetempsdecuisson.
4. Appuyezsur leboutonPower Level (Puissance),pub utilisezlepavenumeriquepourreglerlapuissancede ladeuxiemeetapedecuisson.
Leniveaude puissancequevousavezregleains!quelemessagei>f,r-i1S,S/7mRT
0£ [i\iTE7 54q;_7
S_%¢;E
COOK_i',iC
77,'*',,fE
:½P/</'4_7
S /_ D_i_RT Oii ,_;/48/,<
S//}" LAD'/H _,DECi;&?Oi'.iDEiA ">fOC_i/@,TE
E,%'X s'affichent.
Appuyezsur leboutonStart (O_part}pourcommencerlacuissonou effectuezb.nouveaulesetapes2 et3 pourreglerunedur@de cuisson
et un niveaude puissancepour latroisiemeetapede cuisson.Unefoiscesoperationsterminees,appuyezsur leboutonStart (O_part}.
[_
Pourselectionnerlapuissance10, appuyezdeuxfoissur leboutonPower Level (Puissance).
ut saton du four mc o-_ondes
15
SMH1927-XAC_CFR.indd
15
2012-O2-24
2:00:50
Puissances
Les 10niveauxde puissance
vouspermettentde choisirleniveaule
plusadapteauxalimentsquevouscubinez.
t
Chaud
6
Mijotage
Faible
7
Moyennement
elev6
D@on@lation
8
Fairer@hauffer
4
Moyennement
fable
9
Saute
5
Moyen
10
Eleve
BOUTONCUISSONPERSONNALISI_E
Le boutonCustom cook (Cuissonpersonnalis_e)
permet
d'enregbtrerdesinstructionsde cuissonpersonnalb@safinde bs
utiliserulterburement
et de demarrerlacubsonrapidement.
_Un
Veilbza utiBer un recipientadapte;il doit presenterune
mentionspecifiantqu'ilconvbnt a une cuissonaux microondes,
Le tableausuivantr@erbrb la Bte des diverstypesde
recipientainsique bur methoded'utiBationdans un four
micro-ondes,
seuljeud'instructionspeut6treenregistreb.lafois,
1. Appuyezsur leboutonCustom Cook (Cuissonpersonnalis_e},
L'@ranaffiche,,"L©
iC/7S/}4RTOR5_',,,"
Z}r_i',i,Y
Yi 77,'*'_fF
:?PPi'4rq' SL)RDEf_RTOii ,_IS/f ,'A,,"E
NOU',,IO
ZEDUf_r;.
2. Utiiisezb pay@
numeriquepourreglerletempsdecuisson.
Letempsr@gl@
s'affiche.
3. Appuyezsur leboutonPower Level (Puissance}et utiiisezb pav@
numeriquepoursaisirlapuissance.Lapuissanceselectionn6e
s'affiche,Vouspouvezreglerlapuissancesur 0 b.9,
4. Appuyeza.nouveausurleboutonEnter/Start (Entr_e/D_part),
5. Pourutiliserunerecettepersonnalis@,
appuyezsur lebouton
Custom Cook (Cuissonpersonnalis_e)pubsur lebouton
Enter/Start (Entr_e/D_part).
• Vousnepouvezrappebrqu'uneseubrecetteb.lafois.
(_
Pourfairecuiredes alimentsdans b four micro-ondes,il est
necessaireque bs micro-ondesp6n6trentdans bs aliments
sans 6trerdl6chies ou absorbeespar b platutiBe,
VouspouvezvBrifierb.tout momentlapuissanceencoursde
cuissonen appuyantsur leboutonPower Level (Puissance}.
USTENSILESADAPTI_S,_ LA CUISSONAU
FOURMICRO-ONDES
Si vousnesavezpassi un [email protected]
micro-ondes,effectuezletestsimplesuivant:
1.
Placezunetassed'eau(dansunverremesureur)dansvotrefourb.
cOtedu [email protected],
2. Appuyezunefob sur leboutonAdd 30 Sec.(Ajouter30 s} pour
lesfairechaufferpendantuneminutea puissanceelev6e.
Unefob laminute@oul@,I'eaudoit6trechaudeet ler@ipientquevous
testezdoit 6trefroid.$II estchaud,celasignifiequ'ilabsorberenergb
desmicro-ondeset qu'ilne peutdoricpas6treutilisedansce four.
MAINTIENAU CHAUD
Vouspouvezmaintenirbs alimentsau chauddansvotrefour pendant
uneperiodepouvantallerjusqu'b.99 minuteset 99 secondes.
Papieraluminium
1.Appuyezsur leboutonWarm Hold (Maintien au chaud).
2. Saisissezletempsde cuisson,
3. Appuyezsur leboutonEnter/Start (Entr_e/D@art),
La fonction WARM& HOLD(MAINTENIRAU CHAUD)peut
fonctionnerjusqu'b.99 minuteset99 secondes,
Les aliments couverts pendant la cuisson devrontegabment
@trecouvertsIorsquevousutilisezlafonctionWarm& Hold
(Maintenir au chaud},
Les p_tisseries(tartes,chaussons,etc,)devront_tre
d@ouvertesIorsquevousutilisezlafonctionWarm& Hold
(Maintenir au chaud).
Les repas complets maintenusau chaudsur uneassbtte
peuvent_trerecouvertsIorsquevousutilisezlafonctionWarm&
Hold (Maintenir au chaud),
Letableauci-dessouspresentebs boissonset alimentsquisont leplus
adaptesb.lafonctionWarm& Hold(Maintenirauchaud),
Liquides
1a 2tasses
S@hage
5 a 10 oz.
Zk
Peut6treutiliseen petitequantiteafin
d'emp6chertoutesurcuissonde certaineszones
)eu chamues.Desarcs electriquespeuventse
formersi I'ahminiumestplacetrop presdes
)aroisdu fourou si vousen avezutiliseentrop
grandequantite.
Plat brunisseur
Letempsde prechauffagenedoit pas exceder
huitminutes.
Ustensilesen
cerarnique,
porcelaineet gres
S'ils necomportentpas d'omements
metalliques,les recipientsen ceramique,en
terrecuite,en faienceet en porcelainesont
generalement
adaptes.
Cartonou polyester
jetable
Certainsalimentssurgelessont emballesdans
ce typede matiere.
Emballagesde
fast-food
Tasses/recipients
en
polystyrene
Peuvent6tre utilisespourDire rechaufferdes
aliments.Unetemperaturetropeleveepeutfaire
fondrelepolystyrene.
Sacsen papierou
journal
Peuvents'enflammer.
Papierrecycle
ou omements
Peuventcreerdes arcselectriques.
metalliques
16 guidedes r@ipents
SMH1927-XAC_CFR.indd
16
2012-O2-24
2:OO:51
Platsen verre
Platsde service
V"
adaptesa lacuisson
aufour
Peuvent6treutilisessad s'ilssont ornesde
Platsencristal
Peuvent6treutilisespourfairerechaufferdes
alimentsoudes liquides.Lesobjetsfragibs
peuventsebriserou sefendres'ilssont
brusquementsoumisa unechaleurexcessive.
Potsenverre
Leverreordinaireesttrop finpour pouvoir6tre
utilisedans unmicro-ondeset risquede se
casser.
decorationsmetalliques.
Metal
Plats,ustensibs
Peuventprovoquerdes arcselectriquesou
s'enflammer.
Attachesmetalliques -dessacsde
Peuventprovoquerdes arcselectriquesou
s'enflammer.
congelation
Papier
Assiettes,tasses,
servbttesde tableet
V/
Pourdes tempsde cuissoncourtsou de simples
rechauffages.PourabsorberI'excesd'humidite.
papierabsorbant
N"utilisezpas de serviettesenpapierrecycle
car ellespeuventcontenirdes particules
metalliqueset s'enflammerou provoquerdes
arcs electriques.
Papierrecycle
PlastJque
Utilisabless'il s'agitde thermoplastique
resistant
la chabur.Ce_ainesmatieresplastiques
peuventsevoibr ou sedecolorerIorsqu'elles
sont soumisesa des temperaturesebv6es.
N'utilisezpasde plastiquemelamine.
Recipients
Peut6tre utiliseafinde retenirI'humidite.@itez
Film@able
d'embalbrlesalimentsde manieretrop settee.
Soyezparticulierement
vigilantIorsquevous
retirezlefilmdu recipient; lavapeurs'echappant
ce momentesttreschaude.
Sacsde congelation
Uniquements'ilssupportentlatemperature
d'ebullitionous'ilssont adaptesa la
cuissonau four.Nedoiventpas 6trefermes
hermetiquement.
Perforez-en
lasurfaceavec
unefourchettesi necessaire.
Paplerparaffine ou
sulfurise
v/
Therrnornetre
v/
Ustensilesen
paille, osier et bob
Peut6tre utiliseafinde retenirI'humiditeet
d'emp_cherles projections.
/_,
N'utllisezqueceuxportantlamention
,,Transparentsauxmicro-ondes,>et suivez
les instructions.IIspermettentde contrOler
latemperaturea differentsendrolts.Les
thermometresclassiquespeuvent6treutilises
unefob lesalimentsretiresdu four.
Utilisez-lesuniquementpour rechaufferdes
alimentspendantun courtlapsde tempscarces
matieressent inflammables.
Lesmicro-ondessontd'abordattir@spub absorb@spar bau,
la graisseet b sucrecontenusdansbs aliments,Enpen6trant
dansbs aliments,bs micro-ondesprovoquentuneexcitation
desmd@ubs, Cetteagitationor@desmouvementsde friction
quigenerentlachaburn@essairea la cuissondes aliments,
CONSEILSGI_NERAUXD'UTILISATIONDU
MICRO-ONDES
Lesalimentsdenses,
commelespommesdeterre,chauffentpluslentement
quelesautresaliments.
Lesalimentsdelicatsdoivent6trer@hauffes
aune
puissance
moinselev@afind'@iterqu'ilsnedurcissent.
Lesalimentsdontlapeaun'estpasporeuse,
tebquelespommesde
terreoulessaucisses
pourhot-dogs,doivent6trepercespour@iterqu'ils
if@latent.
IIestd@onseille
demettredeI'huileou delamatieregrassedanslemicroondes.Lesmatieres
grasses
et I'huilepourraient
entrerenebullition
defa@n
soudaine
et,parconsequent,
deborder
et provoquer
degravesbrSlures.
Certainsingredients
chauffentplusvitequed'autres.Parexemple,
la
conflturesitu@aucceurd'unbeignetserapluschaudequelapgtedu
beignet.Souvenez-vous
en afindepr@enirtoutrisquede brSlure.
L'altitudeetletyped'ustensile
utilisepeuventinfluersurletempsde cuisson.
Lorsquevoustestezunenouvelle
recette,@bctionnez
letempsdecuisson
minimaletverifiez
occasionnellement
lesalimentspour@iterqu'ilsnesoient
tropcults.
Laconfection
deconserves
maisonaI'aidedu micro-ondes
n'estpas
recommandee
carcertaines
bacteries
pathog@es
peuventnepas6tre
detruitesIorsdelacuisson.
Benquebsmicro-ondes
nechauffentpasdirectement
bs ustensibs,
la
chaleurdesalimentssetransmet
souventauxustensiles.
Utiliseztoujours
desmaniquesIorsque
vousretirezlesalimentsdufouretapprenez
aux
enfantsa pro@derde m6me.
IIn'estpasrecommande
defairedesbonbonsdanslemicro-ondes
carle
sucrepeutatteindre
destemperatures
treselevees.
Souvenez-vous
enafin
depr@enirtoutrisquede blessure,
Techniques de cuisson
Si lefour estprogrammepouruntempsde cuissonsuperieur_t
20 minutes,il seregleraautomatiquement
b.70 pourcent desa
puissanceapres20minutespour@itertoutesurchauffe.
Melange
Ouvrezlaportedu fourmicro-ondes
et remuezlesalimentsde tempsa.
autre(ex.: lesplatsmijotesou leslegumes)encoursdecuissonafinde
[email protected] nourrituresitueeen peripherie
du plat
absorbeplusd'@ergieet chauffedoricplusrapidement;c'est pourquoi
vousdevezremuerlecontenuen partantdu bordverslecentre.Lefour
s'eteintautomatiquement
Iorsquevousouvrezla portepour remuerles
aliments.
Disposition
Disposezlesalimentsde formesinegales(ex.: morceauxde pouletou
cOtelettes)
detellefagonquelapartielaplus@aissesoitorienteevers
I'exterieurdu plateautournantetregoiveainsiuneplusgrandequantite
de micro-ondes.
Pour@iterlasurcuisson,placezlesmorceauxfinsou
delicatsaucentredu plateautournant.
Protection
_#/
: Elementsconseilles
,_
: A utiliseravecprecaution
_
: Nepas utiliser
Recouvrez
lesalimentsde bandebttesde papieraluminiumpour@iterla
surcuisson.Lesextremit@desailesou descuissesdevolailleainsique
lescoinsdes platscarressentparexempledeszonesparticulierement
sensibles.Utilisezuniquementde petitesquantit@de papieraluminium.
Plusde papieraluminiumrisqued'endommager
votrefour.
guidede cuisson17
SMH1927-XAC_CFR.indd
17
2012-02-24
2:00:52
Rotation
Retoumezlesalimentsa.mi-cuissonafind'en exposertouteslesparties
auxmicro-ondes.Cettemethodeser@eleparticulierement
efficace
pour lacuissonde grandespiecesde viandecommelesr6tis.
Bceuf
Position debout
Lesalimentscuitsauxmicro-ondesconserventlachaleuret continuent
cuirephsieursminutesapresI'arr6tdu four,Laissez-les
doncreposer
quelquesinstantsletempsquelacuissonsetermine.Cetteconsigne
s'appliqueessentiellement
auxrOtiset legumesentiers.Lecentredu
rOticontinuedonca cuiresanspourautantquelespartiesexterieures
ne soienttrop cuites.Touslesliquides(ex.:soupeou chocolatchaud)
doivent_tre remuesou melang6senfin de cuisson,Laissezreposerles
liquidesquelquesinstantsavantde lesservir.Lorsquevousrechauffez
desalimentspour beb6,remuez-lesbienet verifiez-enlatemperature
avantde lesservir.
Porc
Volaille
Saignant
135°F
145°F
Moyen
150°F
160°F
Biencuit
160°F
170°F
Moyen
150°F
160°F
Biencuit
160°F
170°F
Viandenoire
170°F
180°F
Viande
blanche
160°F
170°F
CUISSONDE LA VOLAILLE
Ajout de Iiquide
Lesmicro-ondessont attir@sparlesmoleculesd'eau.Recouvrez
ou
laissezreposerlesalimentsdontlateneureneaun'estpas uniforme,
afinquelachaleurse r@artissedefagonhomogene,Ajoutezunepetite
quantited'eauaux alimentssecspourleurpermettrede cuire.
A6ration
Lorsquevousrecouvrezlesplatsd'un filmplastique,relevezun coindu
filmafinde permettrea.lavapeurde s'echapper.
Placezlavolaillesurunegrille_trOtirtransparenteauxmicro-on@s,
dansun platallantaumicro-ondes,et couvrezde papiersulfurisepour
@iterlesprojections.Recouvrezdefinesbandelettesd'ahminiumles
os, lespartiespeucharnueset leszonessusceptiblesdetrop cuire.
Verifiezlatemperaturea.differentsendroitsavantde laisserlavolaille
reposerpendantladureerecommand@.
CUISSONDELA VIANDE
PlacezlaviandecOtegrasversle bassur unegrillea.r6tiradaptee
a.lacuissonauxmicro-ondeset letoutdansun platdu m6metype.
Recouvrezlesos ou lespartiespeuchamuesde finesbandelettesde
papierahminium,Verifiezlatemperatureadifferentsendroitsavantde
laisserlaviandereposerpendantladureerecommandee,
Pouletentier Tempsde cuisson :
Jusqu'a.4 Ib 7 a.11 min/Ib
180°F viandenoire
Placezlepoulet,cOtepoitrine
versle bas,sur lagrilleb_
r6tir,Couvrezde papier
sulfurise.Retourneza mi170°F viandeblanche
cuisson.Faitescuirejusqu'a
Puissance:
ce quelejuss'@oulantdu
Moyennementelevee(7) )ouletsoitclairet quela
chairautourdesos ne soit
)hs rosee.Laissezreposer
)endant5 a 10 minutes,
Lestemperatures
suivantessontlestemperaturesIorsdu retraitdu four.
Latemperaturedesalimentsaugmentedurantletempsde repos.
R6tide bceuf
(desoss6)
Jusqu'a.4 Ib
Tempsde cuisson :
3 a.9 min/Iba.145°F
(saignant)
10b.15min/Iba.160°F
(a.point)
12a.17min/Iba.170°F
(biencuit)
Puissance:
PlacezlerOticOtegras
verslebassur lagrilleb.
rOtiret couvrezde papier
sulfurise.Retourneza.
lamoitiedu tempsde
cuisson.Laissezreposer
sendant10a.15minutes,
elev@(10)durantles
5 premieresminutes,
puismoyenne(5).
Morceaux
de poulet
Tempsde cuisson :7 a. Placezlepouletdansun
10 min./b
)lat,I'os orientevers lebas
et la partieplus@aisse
jusqu'a.2 Ib 180°F viandenoire
orienteeversI'exterieurdu
170°F viandeblanche
)lat,Couvrezde papier
Puissance:
sulfurise.Retoumeza.la
Moyennementelevee(7) moitiedu tempsde cuisson,
Faitescuirejusqu'_tce quele
juss'@oulantdu pouletsoit
clairet quelachairautour
desosne soitplusrosee,
Laissezreposerpendant5 a.
10 minutes.
Tempsde cuisson :
PlacezlerOticOtegras
(d6sosseou non) 13a.17min/Iba.170°F verslebassur lagrilleb.
rOtiret couvrezde papier
Jusqu'a.4 Ib
(biencuit)
sulfurise,Retourneza.
Puissance:
lamoitiedu tempsde
elev@(10)durantles cuisson.Laissezreposer
5 premieresminutes, sendant10a.15minutes,
puismoyenne(5).
Porc
Lestemperatures
suivantessontlestemperatureslotsdu retraitdu
four,Latemperaturedesalimentsaugmentedurantletempsde repos.
Attendez-vous
_tcequelatemperature
s'elevede 10 °Fpendantle
tempsderepos.
SMH1927-XAC_CFR.indd
18
2012-O2-24
2:00:52
CUISSONDES FRUITSDE MER
Placezlepoissonsur unegrillea.r6tiradapteeb.lacuissonauxmicroondeset dansun platdu m6metype.Utilisezuncouverclehermetique
pourcuirelepoisson&I'etuv6e.L'utilisationde papiersulfuriseou d'une
servietteenpapiercommecouvercleproduitmoinsde vapeur,Faites
cuirelepoissonjusqu'_tce qu'ils'emiettefacilementa lafourchette,
Attentiona.ne pasfairetropcuirele poisson,Privilegiez
letempsde
cuissonminimumet verifiezlacuissonjusteapres.
Avantlacuisson,percezlapeaudeslegumesentiersnonpeles(ex:
pommesde terre,courges,aubergines,
etc,)afind'eviterqu'ilsn'eclatent.
Pourunecuissonplusuniforme,remuezleslegumesentiersou changez
leurdispositiona.mi-cuisson.
Generalement,
plusI'alimentestdense,plusletempsdereposestlong
(letempsde reposcorrespond
autempsnecessaire
auxalimentsdenses
etvolumineux
pourterminerleurcuissonunefoissortisdu four),Une
pommedeterreaufourdolt reposerpendantcinqminutesavantquesa
cuissonneseitterminee,alorsqu'unplatde petitspoispeut6treservi
immediatement.
RECETTES
Steaksde
thonet de
saumon
Placezlessteakssur lagrillea.
r6tir,c6te leplusepaisorientevers
I'exterieurde lagrille,Couvrezde
papiersulfurise,Retourneza la
moitiedu tempsdecuisson.Faites
Moyennement cuirelepoissonjusqu'a,ce qu'il
elev6e(7)
s'emiettefacilementb.lafourchette.
Laissezreposerpendant3 b.
5 minutes,
Filets
Placezlesfiletsdansunplat en
prenantsoinde rentrerlesmorceaux
lesplusfinssouslesfilets,Couvrez
de papiersulfurise,Si I'epaisseur
desfiletsestsuperieurea ½ pouce,
Moyennement retournez-les
_tmi-cuisson,Faites
elev6e(7)
cuirelepoissonjusqu'a,ce qu'il
s'emiettefacilementb.lafourchette.
Laissezreposerpendant2b.
3 minutes,
Tempsde
cuisson :
6a.10 min./Ib
Jusqu'b.1,5Ib Puissance:
Tempsde
Jusqu'b.1,5Ib cuisson :
4 a 8 min/Ib
Puissance:
Crevettes
Tempsde
Jusqu'b.1,5Ib cuisson :
4 a.6 min/Ib
Puissance:
Repartissez
lescrevettesdans
unplat enevitantqu'ellesnese
chevauchent.Couvrezde papier
sulfuris&Faiteslescuirejusqu'a
ce qu'ellesdeviennent
fermeset
Moyennement opaquestouten leschangeant2
6levee(7)
b.3 foisde positionen coursde
cuisson.Laissezreposerpendant
5 minutes,
CUISSONDESCEUFS
Vouspouvezutiliservotrefourb_micro-ondespourcuiredes ceufs,
Faites-lescuirejustece qu'ilfautcar ilsdeviennentdursIorsqu'ilssont
trop cults,
A
Nefaitesjamaiscuiredesceufsou rechauffer
des ceufsdurs
A_TENTmO._
dartsleurcoquillecar ilsrisqueraientd'exploser.Perceztoujours
lesceufsentiersafind'eviterqu'ilsn'eclatent.
CUISSONDES LI GUMES
Lavezleslegumesavantde procedera lacuisson.IIestgen6ralement
inutiled'ajouterde I'eau.Pourleslegumesa.chairdensetelsqueles
pommesdeterre,lescarotteset lesharicotsverts,ajoutezenviron1/4
de
verred'eau,
Lespetitslegumes(rendelles
de carottes,petitspois,haricotsduCap,
etc,)cuisentplusvitequeleslegumesplusvolumineux.
Leslegumesentiers,commelespommesde terre,courgesou episde
mall's,
doivent6tredisposesen cerclesur leplateautoumantavantla
cuisson,IIscuh'ontdemaniereplusuniformesivouslesretoumeza micuisson,
Dirigeztoujeurslatigedeslegumes(ex.: asperges,brocolis)versles
bordsdu plat,pointeverslecentre,
Lorsquevousfaitescuiredeslegumescoupesen merceaux,recouvrez
toujoursleplatd'uncouvercleou d'unfilmplastiqueperforeadaptea.la
cuissonauxmicro-ondes.
RagoUt de bceuf & Forge
1,5 Ibde bceufdecoupeen morceauxd'environ0,5 pouced'epaisseur
b tassed'oignonshaches
2 cuilleresa soupede farine
1 c,b.s, desauceWorcestershire
Bouillonde bceuf(entre13,75et 14,5oz)
2 carottesmoyennes,coupeesen rondellesde _Apouce(1 tasseenv.)
b tassed'orge
1feuillede laurier
1/4cc de poivre
1 paquet(9 a 10oz)de poissurgeles,decongeles
1. Dartsunfaitoutd'unecontenancede2 Iitres,incorporezlebceuf,
lesoignons,lafarineet lasauceWorcestershire.
Melangezbien,
Couvrez,Faitescuirea puissanceeleveependant6a 8 minutes,en
melangeantunefois,jusqu'b,cequelaviandenesoit plusrosee.
2. Ajoutezlebouillon,lescarottes,I'orge,lesfeuillesde laurieret
lepoivre,Remuez,Couvrez,Faitescuirea puissancemoyenne
pendant1h00a lh30, en melangeant2 a3 fois,jusqu'b,cequeles
carotteset lebceufsoientbientendres,
3. Ajoutezlespois,Couvrez.Faitescuirea puissancemoyenne
pendant10 minutes,Laissezreposerpendant10 minutes.Retirez
lesfeuillesde laurieravantde servir.
Pour6 personnes.
Brocolis au fromage
1Atassede beurreou de margarine
1/4
tassed'oignonshaches
1_ cuillereb.soupedefarine
_/_cuillerea cafede sel
1Acuillerea cafede moutarde
Yscc de poivre
1½tassede lait
1/4
tassede poivronrougehache
8 oz(2tasses)de fromagerb.pedetype Cheddar
1 paquet(9 a 10oz)de brocolishachessurgeles,decongeles
4 tassesde patescuitestorsadees(8ozde p&tesseches)
1. Dartsunfaitoutd'unecontenancede2 Iitres,faitescuirelebeurre
et lesoignonsa puissanceeleveependant1a 2 minutes,en
remuantunefois,jusqu'ace quelesoignonssoientbientendres.
2. Ajoutezlafarine,lesel,la moutardeet lepoivre,Melangezbien.
Faitescuirea puissanceeleveependant30 b.60 secondesjusqu'a
ebullition.Incorporezlelaitet melangez
jusqu'aI'obtentiond'un
melangeonctueux,
3. Incorporezlepoivronrouge,Faitescuirea puissanceelevee
pendant2a 3 minutes,enremuantdeuxfois,jusqu'acequele
melangeentreen ebullitionets'epaississelegerement,
Incorporez
lefromageet melangezbienjusqu'b,ce qu'il soitentierement
fondu.
4. Ajoutezlesbrocoliset lesp&tes.Melangezbien,Couvrez,Faites
cuirea puissanceeleveependant4 a 6 minutes,en remuantune
fois,jusqu'b,ce quelemelangesoitbienchaud.Remuezavantde
servir,
Pour6 personnes.
guidede cuisson19
SMH1927-XAC_CFR.indd
19
2012-O2-24
2:00:52
Salade de pommes de terre chaude
2 Ib de petitespommesde terrea peaurouge(Roseval),
coupeesen
morceauxde 0,5 pouce
4 tranchesde lard(cru)coupeesen morceauxde _Apouce
_Atassed'oignonshaches
2 cuilleresb.cafe desucre
1cuillerea.cafede sel
1cuillerea cafede farine
b cuillerea cafede grainesde celeri
Yscc de poivre
2½ cuilleresb.soupedevinaigrede cidre
1. Dansun faitoutd'unecontenancede 2 litres,incorporezles
pommesdeterreavecle_Ade tassed'eau.Couvrez.Faitescuire
puissanceelev6ejusqu'b,ce quelespommesde terresoient
tendres(7a 10min.),en melangeantdeuxfob. Egouttezet laissez
refroidirletoutquelquesinstants.
2. Dartsun saladierdetaillemoyenne,faitescuirelestranchesde lard
puissanceelev6e,en melangeantunefob,jusqu'ace qu'elles
deviennentcroustillantes
(2½a 3½ min.)Disposezlestranchessur
du papierabsorbant.Prelevezunecuillerea soupedegraissede
cuissondu lard.
3. Melangez-la
aveclesoignons.Recouvrez
letoutde filmetirableet
relevez-enun coinpourlaissers'@happerlavapeur.Faitescuire
puissanceelev@jusqu'ace quelapr@arationsoittendre(I ½
2½ min.); melangezunefois.
4. Incorporezlesucre,lesel,lafarine,lesgrainesde celeriet le poivre.
Faitescuireb.puissanceelev6ejusqu'aebullitiondu melange(30
40 s).Ajoutezlevinaigreet une_ tassed'eau.Faitescuire
puissanceelev@jusqu'b,cequeleliquideentreen ebullitionet
s'@aississeleg6rement
(1 a 2 min.),melangez.Ajoutezlestranches
de larda lasauce.Versezlasaucesur lespommesde terre.
Remuezbien.
Pour6 personnes.
Soupe de haricots noirs
1tassed'oignonshaches
1goussed'ail,eminc6e
2 bootes(15oz chacune)de haricotsnoirsegoutt@
1bo_te(entre14 et 16 oz)detomatesconcass@s
Bouillonde poulet(entre13,75et 14,5oz)
1bo_te(entre7 et 8,5 oz)de malta's
1bo_te(4oz)de pimentsvertseminc@
1-2c.a cafe decuminen poudre
1. Mettezlesoignonset Faildansunfaitoutd'unecontenancede
3 litres.Couvrez.Faitescuirea puissanceelev6ependant2
4 minutesjusqu'acequ'ils deviennent
tendres.
2. AjoutezuneboTtede haricotset @rasez-lesa I'aided'une
fourchette.Ajoutezle restedes ingredientset melangezbien.
3. Faitescuireb.puissanceelev6ependant10 minutessans
couvercle; melangez.Reglezlapuissancesur leniveaumoyenet
faitescuirependant5 minutes.Remuezavantde servir.
Pourenvirondeuxlitresde soupe.
Gardervotre four rnicro-ondesproprepermetd'amebrer ses
performances,d'6viterbs reparationsinutibset de prolonger
sa duree de vie,
NETTO¥AGEDE LA PARTIEEXTE_RIEURE
IIest prderablede nettoyerimmediatement
lestracesde projections
I'exterieurdufour.Utilisezunchiffondouxet de I'eauchaude
savonneuse.
Rincezet s@hez.
Z_ Evitezde mouillerlesorificesdeventilation.N'utilisezjamaisde
ATTENTION
produitsabrasifsou desolvantschimiquestelsqueI'ammoniac
ou I'alcool,qui risquerabntd'altererI'apparencedevotremicroondes.
Nettoyage du dessous de votre four micro-ondes
Nettoyezregulierement
lagraisseet lapoussiereaccumul@ssur le
dessousde votremicro-ondes
a I'aided'un melanged'eauchaudeet
de produitde nettoyage.
Nettoyage du tableau de commande
Frottez_tI'aided'un torchonhumide,pubessuyezsoigneusement.
N'utilisezpasde d@apants,de savonet d'eauen grandesquantit@,de
corrosifsou d'objetspointussur letableaucar il estfragile.
Nettoyage de la porte et des joints
Veilbztoujoursace quelesjointsde laportesoientpropreset b.ce que
celle-cifermecorrectement.Nettoyezavecunsointout particulierles
jointsde laporteafinqu'aucuneparticulene s'accumuleet ne nuiseb.
I'etancheitede laporte.Nettoyezlavitrede laporteb.I'aided'eauet de
savontresdoux.Veillezb.utiliserun chiffondouxpour@iterlesrayures.
Si unemincepelliculed'eauseformesur lapard interieureou exterieure
de lavitredufour,essuyezdaa I'aided'un chiffondoux.Cephenom@e
peutsepro@[email protected]'interieurdu four
possedentuneforteteneureneau; celan'indiqueen rienlapr@ence
d'unefuite dartslemicro-ondes.
NETTO¥AGEDE LA PARTIEINTE_RIEURE
que lefourmicro-ondesa refroidiavantde le
z_
Assurez-vous
AT_E,_O,
nettoyerafind'@itertouteblessure.
Z_ Retirezleplateauen verredufour Iorsquevoussouhaitez
_E,T_O,
nettoyerlefourou leplateau.Pourne pasbriserleplateau,
manipulezde
avecpr@autionet ne leplongezpasdans
I'eauimmediatement
apreslacuisson.Lavezleplateauavec
pr@autiondansde I'eauchaudesavonneuse
ou au lavevaisselb.
Nettoyezregulierement
lessurfacesinternes(patois)devotrefourmicroondesafind'eliminerlesprojectionsou lestaches.Poureliminerles
particubsd'alimentsincrust@set lesmauvaises
odeurs,faiteschauffer
2 tassesd'eau(additionn@de jusde citronpourd@odoriseO
dansun
r@ipienten verred'unecapacitede quatretassesa.puissanceelevee
pendant5 minutesoujusqu'aebullition.Laissezreposerdanslefour
pendantunea.deuxminutes.
20 nettoyageet entretiende votrefour m cro-ondes
SMH1927-XAC_CFR.indd
20
2012-02-24
2:00:52
NETTOYAGEDU PLATEAUTOURNANTET DE
L'ANNEAUDEGUIDAGE
9. RemontezlesupportdeI'ampoule,
10. Replacezlagrilleduventilateuret les2vis.
11. Remettezsoustension.
Nettoyezregulierement
I'anneaude guidageet lavezleplateautournant
desquenecessaire.Leplateautournantpeut6trelaveen toutes6curite
au lave-vaisselle.
RANGEMENTET ENTRETIENDU FOUR
MICRO-ONDES
Sivousdevezentreposer
votrefourmicro-ondespouruneperiode
courteou prolongee,choisissezun endroitsecet nonpoussiereux.
La
poussiereet I'humiditerisquentde d6teriorercertainsel6mentsdufour.
A
ATTENTION
Ner@arezpaset ne remplacezpasvous-m6meles
61ements
dufour,Seuluntechnicienqualifiepeuteffectuer
lesr@arations,Si lefour esten panneou necessite
uneintervention
technique,debranchezde
de laprise
d'alimentation
et contactezleserviceapres-venteleplus
pro@e,
N'utilisezpaslefour si laporteparaitendommag@(ex.:
porteoujoints); il peuts'agird'unecharnierecass@,d'un
joint useou d'un habillageddorme,
Neretirezpas lefour deson habillage.
Cefour micro-ondesestconcupour uneutilisation
domestiqueet nonpouruneutilisationcommerciale.
REMPLACEMENTDE L'AMPOULEDE LA
SURFACEDE CUISSON/VEILLEUSE
Lotsde I'operationde remplacement
de I'ampoulede lasurfacede
cuisson/veilleuse,
portezdesgantsafind'@itertoutebr8lure.
1. Debranchez
lefourou coupezI'alimentation
au niveaude laprise
d'alimentation
secteur,
2.
3.
4.
5
NETTOYAGEDU FILTRE,_GRAISSE
Votrefour micro-ondesestequip6d'un filtrea.graissemetallique
r@tilisable,Cesfiltres_tgraissedoivent6treretireset nettoyesau moins
unefoisparmoisou Iorsquenecessaire.
Pourcommanderunnouveaufiltrea.graisse,contactezleServicedes
piecesd6tacheesau 1-800-627-4368ou lerevendeurSamsungleplus
prochede chezvous.Vouspouvezegalementcommanderen lignesur
www.samsungparts.com
A
Pour@itertoutrisquede blessuresou de dommagesmateriels,
ATTENTmON
ne faitesjamaisfonctionnerlahottedu foursanslesfiltres.
1. Pourretirerlefiltre,poussezsur I'avantdu bdtier du filtrea.graisse
sur I'emplacement
oCJ
il estecrit,,PUSH,>,
Retirezlavisdu cachede I'ampouleet abaissezlaprotection,
Installezuneampoulehalogenede 20 W.
Replacezlaprotectionde I'ampouleet lesvisde fixation.
Retablissez
I'alimentationauniveaude laprisesecteur.
2. Tirez le boTtier du filtre hors du four b.micro-ondes.
Lampe
REMPLACEMENTDE L'AMPOULEDU FOUR
Lotsde I'operationde remplacement
de I'ampouledufour, portezdes
gantsafind'@itertoutebrQlure,
1. Debranchez
lefourou coupezI'alimentation
au niveaude laprise
d'alimentation
secteur.
2. Ouvrezlaporte,
3. Retirezlaprotectiondu ventilateurainsiquelesvis(2vis aucentre).
4. Faitescoulisserlagrilledu ventilateurverslagauche,puistirezda
toutdroitvers I'exterieur,
5.
6.
7.
8.
Retirezlefiltre_tcharbonactifs'il yen a un,
Retirezlaprotectionen poussantlecrochetet en levantlelevier.
RetirezI'ampouleen lad@issantdoucement.
Installezuneampouleneuvede 40 W.
nettoyageet entretiende votrefour mcro--ondes21
SMH1927-XAC_CFR.indd
21
2012-02-24
2:01:21
3.
Retirezlefiltrede son boTtier
en elargissantcedernier,comme
indiqueci-dessous.Puis,laisseztremperlefiltrea.graissedansun
detergentdouxdiluedansde Feauchaude,Rincezdeet secouezde
pour [email protected] n@essaire,brossezdoucementb filtrepour
retirerlessabtesincrustees.Lorsquelefiltreestsec, replacez-le
dartsson bditier.
Retrait
Elargir
REMPLACEMENTDU FILTRE CHARBON
Si laventilation
fonctionnea.I'interieurdufour,lefiltreb.charbondolt 6tre
remplacetousles 6 a I2 mob ou plussi n@essaire,Lefiltreb.charbon
ne doitpas6tre nettoye.Pourcommanderun nouveaufiltre_tcharbon,
contactezb Servicedes pbcesd6tacheesau 1-800-627-4368ou
lerevendeurSamsungb plusprochede chezvous.Vouspouvez
egabmentcommanderen lignesurwww.samsungparts.com
1.
Debranchez
lefourou coupezI'alimentationauniveaude laprise
d'alimentation
secteur.
2. Ouvrezlaporte.
3. Retirezlagrilb duventilateurainsiquelesvis (2vis aucentre),
4. Faitescoulisserlagrilb duventilateurverslagauche,pubtirezda
toutdroitversI'exterieur,
5.
Poussezlecrochetet retirezlefiltreusage.
Z_ N'utilisezpasd'ammoniacnine placezlefiltredanslefour
ATTENTION
micro-ondes.L'aluminiumnoircirait.
4.
Pourreplacerlefiltre,faitesglissersonIogementdansI'encoche,
pub poussez-leb.I'interieur.
6.
Placezunfiltreb.charbonactifneufen lefaisantcoulisser.Lefiltre
doit 6treinstalleselonI'angleindiquesur lafigure.
7. Replacezlagrilleduventilateuret les2vis, pubfermezla porte.
Remettezsoustensionet reglezI'horloge.
Angle
..........
22 nettoyageet entretiende votrefour m c o-_ondes
SMH1927-XAC_CFR.indd
22
2012-02-24
2:02:00
I
k...J
Consultez cette section si vous rencontrezun probleme
de fonctionnement :
¸i
Caract@istiquestechniques
! !i ! !! ! i Dimensions
i ii ii ii ii iiiiiiiiiiiiiiii
MJnuterie: ii iiiiiiiiiiiiiiiiiiiiiiiiiiiiiiiiiiiiiiiiiiiiiiiiiii
Commandes:
L'affichageet/oule
four nefonctionne
Assurez-vous
quelaficheest branch@surune
prisecorrectementraiseb.laterre.
interieures
du four:
1,9 piedcube
99 minutes,
99 secondes
10 puissances,
d@ongelationincluse
pas.
Si lapriseest command@parinterrupteur
mural,assurez-vous
quecelui-ciesten position
ouverte.
Alimentation:CA
120V,60 Hz
Puissance: 1000W
Consornmation:
1700W
Retirezlafichede laprise,attendez
dixsecondes,puisrebranchez-la.
Relancezledisjoncteurou remplacezles
fusiblesgrilles.
Branchezunautreappareilsur laprise.Si
I'appareilnefonctionnepas,contactezun
electricienqualifieafinde r@arerla prise
murale.
Poidsnet/avec
emballage
ST: 56,0/63,5Ib
B/ W' 54,7/62,0Ib
Dimensions
exterieures
297/8"(L)X 16 15/16"
Branchezlefoursur uneautreprise.
L'affichage
fonctionnemais
I'appareilne
s'allumepas.
Assurez-vous
quelaporteestcorrectement
fermee.
Verifiezqu'il neresteaucunresidude materiel
d'emballageou toutautremateriausurlejoint
de laporte.
Verifiezquelaporten'estpasendommagee.
Appuyezdeuxfoissur Cancel(AnnuleO
pour
saisir_tnouveautouteslesinstructionsde
cuisson.
L'appareil
s'eteintdlavant
lafin dutemps
programme?
S'ily aeu unecoupurede courant,I'horloge
Si aucunecoupuredecourantnes'est
Droduite,retirezlafichede laprise,attendez
dixsecondes,puisrebranchezda.
ReglezI'heure
et saisissezunenouvellefoislesconsignesde
cuisson.
Dimensions
interieures
Dimensions
dans
I'emballage
20
18/16"
(h)
X
10
13/16"
MJnuterie:
99 minutes,
99 secondes
Poidsnet/avec
emballage
ST: 56,0/63,5Ib
B/ W' 54,7/62,0Ib
Dimensions
ext@ieures
297/8"(L)X 16 15/18"
Dimensions
dans
I'emballage
(m)X
14
9/16"
(P)
33 8/8"(L)X 197/16"(H)X20 8/16"
(P)
Dimensions
interieures
du four:
1,9 piedcube
Alimentation:CA
120V,60 Hz
Dimensions
interieures
17 5/16"
(P)
(H)X
Commandes:
10 puissances,
d@ongelationincluse
Consornmation:
1500W
Puissance:950W
20
18/16"
(h)
X
10
13/16"
(m)X
(m)X
17 5/16"
(P)
14
9/16"
(P)
33 8/8"(L)X 197/16"(H)X20 8/16"
(P)
Relancezledisjoncteurou remplacezles
fusiblesgrilles.
Lacuissondes
alimentsesttrop
lente.
Assurez-vous
quelefoura sonproprecircuit
d'alimentationelectriquede 20A. Uutilisation
d'un autreappareilsur lem6mecircuitrisque
d'entra_ner
unechutedetension.Au besoin,
rebranchez
lefoursurson proprecircuit.
Formation
d'etincellesou
d'arcselectriques.
Retirezdufour les@entuelsustensiles,plats
ou attachesen metal.Si vousutilisezdu papier
aluminium,d@oupezuniquementde petites
bandelettes
et m@agezunespaced'au moins
unpouceentreI'aluminiumet lesparoisinternes
du four.
Leplateautournant Nettoyezleplateautournant,sonanneauet le
fait du bruitou ne
blancherdu four.
tournepas.
Assurez-vous
queleplateautournantet son
anneausont placescorrectement.
Cesinterferences
sont semblables_tcelles
provoqu@sparlesautrespetitsappareils,
telsquelesseche-cheveux.
Eloignezvotre
micro-ondes
(ouI'appareil)desautresappareils
(tel@iseurou radio).
Provoquedes
interferences
sur laradioou le
tel@iseur.
d@annage23
SMH1927-XAC_CFR.indd
23
2012-O2-24
2:02:02
FOURMICRO-ONDES,AHOTTEINTE GREE
DESAMSUNG
Garantie limit_e & I'acqu_reur d'origine
Ce produitde la marqueSAMSUNG,fourniet distribuepar Samsung
ElectronicsAmerica,Inc. (SAMSUNG),Iivreen etat neufdans son
carton d'origine et achete par le consommateuret acquereurd'origine,
s'accompagne d'une garantiede SAMSUNGcentre tout vicede fabrication
au niveaudes pieceset de la main d'ceuvrependant une periodelimiteede :
UN AN (1) POUR LES PII'CES ET LA MAIN D'CEUVRE, DIX ANS
(10) POUR LES PI_:CES DU MAGNE_TRON
Cette limitede garanties'applique a compter de la dated'acquisition et
oeuvreuniquementles produits acheteset utilisesaux Etats-Unis.Pourse
prevaloirdu servicede garantie,I'acheteurdoit contacter SAMSUNGafln
d'etablir les proceduresrelativesau diagnosticeta I'intewentionnecessaire.
Pour 6tre couvertepar la garantie,la maintenancene peut _tre effectueeque
par un servicetechniqueagre6SAMSUNG.Lorsde la remised'un produit
ddectueux a SAMSUNGou a un centrede serviceSAMSUNGagre6,
Facquereuresttenu de presenterlecoupon d'achat d'originea la demande
des interessesa titre de preuved'achat.
La societe SAMSUNGprendraen charge,a saconvenance,lar@aration
ou leremplacementdu produita ses frais telque stipule dans les presentes
conditionset procederaau remplacementou au changementdes pieces
ou des produits si ces demiers s'averentddectueux dans la limitede la
periodede garantie mentionneeprec6demment.Toutepiece ou tout produit
remplacedevientla propriet6de SAMSUNGet doit lui 6tre restitu& Les
pieces et produitsde rechangesent protegespour le restede laperiodede
garantieinitialeou pour quatre-vingt-dix(90)jours,selon I'eventualitelaplus
eJoignee.
En fonctiondes disponibiiitessur leterritoiredes Etats-Uniscontigus, un
sewicea domicileest propose dans la limitede ia periodede garantie.
Le sewicea domicilen'est pas disponiblepour toutes leszones. Pour
bendicier du servicea domicile, I'appareildolt _tre facilementaccessible
notre personnel.Danslecas ot_il seraitimpossiblede r@arerI'appareil
au cours du servicea domicile,il se peut que I'appareildelve@treemporte,
r@are et retourn& En cas d'indisponibilitedu servicea domicile,SAMSUNG
pourra choisir le moyende transport de son choixpour acheminerou
renvoyerI'appareilvers et depuis un centrede serviceagreede SAMSUNG.
Dansle cas contraire,la responsabilitedu transportvers et depuisle centre
de service agreede SAMSUNGincomberaa I'acquereur.
SAMSUNGNE FOURNITAUCUNEAUTREGARANTIEAUTREQUE
CELLESMENTIONNEESET DECRITESCI-DESSUS,Er AUCUNE
GARANTIE,EXPRESSEOU IMPLICITE,Y COMPRIS,MAISSANS S'Y
LIMITER,LESGARANTIESIMPLICITESDEQUALITECOMMERCIALEOU
D'APTITUDEA UN USAGEPARTICULIER,NE DOlTS'APPUQUERAPRES
EXPIRATIONDESPERIODESDEGARANTIEEXPRESSESOONSIDEREES
CI-DESSUS,ETAUCUNEAUTREGARANTIEEXPRESSERELATIVE
AU PRESENTPRODUIT,QU'ELLESOITDONNEEPARUNETIERCE
PERSONNE,UNEENTREPRISEOUUNE PERSONNEMORALENE
POURRAETRECONSIDEREECOMME UN ENGAGEMENTDE LAPART
DE SAMSUNG.SAMSUNGN'ENDOSSEAUCUNERESPONSABILITEEN
CAS DEPERTEDEREVENU,DEMANQUEA GAGNER,D'INOAPACITE
REALISERDESECONOMIESOUTOUTAUTREAVANTAGEFiNANCiER,
OU EN CASDEDOMMAGERESULTANTDE L'UTILISATIONOU D'UNE
MAUVAISEUTILISATIONDECETAPPAREILOU D'UNE INOAPACITE
UTILISERCETAPPAREIL,QUELLEQUESOITLA BASELEGALE
SUR LAQUELLEREPOSELA PLAINTE,ETMEMESI SAMSUNGA ETE
AVERTIDE L'EVENTUALITEDETELSDOMMAGES.TOUTTYPE DE
COMPENSATIONEXIGEEAUPRESDE SAMSUNGNEDEVRAENAUCUN
CAS EXOEDERLE PRIXD'ACHATDU PRODUITVENDUPARSAMSUNG
ETA L'ORIGINEDESDOMMAGESALLEGUES.SANS LIMITERCE QUI
SUIT,L'ACQUEREURPRENDENCHARGETOUSLES RISQUESET
RESPONSABILITES
CONCERNANTLA PERTE,LES DOMMAGESOU LES
BLESSURESINFLIGEES
,_ L'ACQUEREURETAUXBIENSDE CELUI-CI
ET A TOUTEAUTREPERSONNEET BIENRESULTANTDEL'UTILISATION,
LA MAUVAISEUTILISATIONDEL'APPAREILET L'INCAPAOITE
A UTILISER
LE PRESENTAPPAREILVENDUPARSAMSUNGET QUINESERAITPAS
LIEE DIREOTEMENT
A UNENEGLIGENCEDELA PARTDESAMSUNG.
CETTEGARANTIELIMITEEN'ESTVALABLEPOUR PERSONNED'AUTRE
QUE L'ACHETEURINITIALDU PRODUIT,N'ESTPASTRANSFERABLEET
ENONOEVOTRERECOURSEXCLUSIR
CertainsEtats et certainesjuridictions n'autorisentpas de limitationsquant
la dureedes garantiesimplicitesni I'exclusionou la limitationde dommages
accessoiresou indirects; il se peut par consequent que les limitations
et exclusionsenonceesci-dessusne s'appliquent pas a votrecas. Cette
garantievous conferedes droits legauxspecifiques,vous pouvezegalement
avoir d'autresdroits quivarient d'un Etata I'autre.
Pour bendicier d'un service d'assistancecouvert par votre garantie,
contactezSAMSUNGa I'adressesuivante:
1-800-SAMSUNG
(726-7864)
ou
www.samsung.com
Cette garantielimiteecouvre les ddauts de fabricationdes pieceset la
main d'ceuvresurvenantsuitea une utilisationnormale et non commerciale
de ce produit et ne s'applique pas aux problemesci-apres,y compris,
mais sanss'y limiter: tout dommagesurvenantau cours de I'expedition,la
livraisonet I'installation; toute utilisationde I'appareilcontraireau but auquel
il etait destine; tout numerode produitou de serie efface ; tout dommage
du revBtementexterieurou de I'aspectdu produit; tout dommage
cause par accident, abus, negligence,incendie,inondation,foudre ou
autre catastrophenaturelle; toute utilisationde produits,equipements,
systemes,appareils,services,pieces, foumitures,accessoires,applications,
installations,r@arations,c_blagesextemesou connecteursnon foumisou
autorisespar SAMSUNGet susceptiblesd'endommager leditappareilou
de nuirea son fonctionnement; toutesurtension,fluctuationou tension de
ligneelectriqueincorrecte; tout reglageeffectuepar Facquereuret nonrespect des instructionsde fonctionnement,de nettoyage,d'entretienet de
respect de I'environnementcouvertesou prescritesdans lepresentcarnet
d'entretien; tout probleme resultantd'une proliferationd'insectesnuisibles,
d'une surchauffeou d'un plat trop cult par Futilisateur; tout problemerelatif
au plateauen verre ou plateautournantou a unepuissancereduitedu
magnetronen raisond'une usurenormale.SAMSUNGne garantitpas un
fonctionnementcontinuou sans erreurde ce produit.
SMH1927-XAC_CFR.indd
24
2012-02-24
2:02:02
II
II
_r_rqLA_
I
I
SMH1927-XAC_CFR.indd
25
2012-02-24
,2 2:02:02
I
I
Scan the QR code* or visit
www.samsung.com/spsn
to view our helpful
How-to Videos and Live Shows
*Requires reader to be installed
on your smartphone
Scan
this
with
your
smartphone
DES QUESTIONS
CANADA
MEXICO
OU DES GOMMENTAIRES?
1-800-SAMSUNG(726-7864)
www,samsung,com/ca
www.samsung,com/ca
fr (French)
01-800-SAMSUNG(726-7864)
www.samsung,com
U.S.A
SMH1927-XAC_CFR.indd
26
1-800-SAMSUNG(726-7864)
2012-02-24
O 2:02:03