1
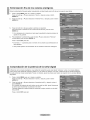
Contact SAMSUNG WORLDWIDE
If you have any questions or comments relating to Samsung products, ptease contact the SAMSUNG
customer care center.
Contacte con SAMSUNG WORLDWIDE
Si tiene alguna pregunta o comentario referente a nuestros productos, per favor contacte con nuestro Servicio de Atenci6n al
CIiente.
Samsung Electronics Canada Inc., Customer
Service 55 Standish Court Mississauga_
Ontario L5R 4B2 Canada
CANADA
1-800-SAMSUNG(726-7864)
www.samsung.com/ca
Samsung Etectronique Canada Inc.,
Service a la Clientele 55 Standish Court
Mississauga,
U.S.A
1-800-SAMSUNG(726-7864)
www.samsung.com
Ontario L5R 4B2 Canada
Samsung Electronics America, Inc.
105 Challenger Road
Ridgefield Park, NJ 07660-0511
imagine the possibilities
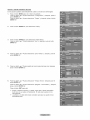
Thank you for purchasing
a Samsung
product,
To receive
a more
comolete
service
olease
register
your
product
at
www.samsung.com/globaliregister
I
Mode
BN68-01514C-00
Serial No,
I important Warranty information Regarding Television Format Viewing
Wide screen format LCD Displays (16:9, the aspect ratio of the screen width to height) are primarily designed to view wide screen format
full-motion video. The images displayed on them should primarily be in the wide screen 16:9 ratio format, or expanded to filt the screen
if your model offers this feature and the images are constantly moving. Displaying stationary graphics and images on screen, such as
the dark side-bars on nonexpanded standard format television video and programming, should be limited to no more than 5% of the total
television viewing per week.
Additionally, viewing other stationary images and text such as stock market reports, video game displays, station loges, web sites or
computer graphics and patterns, should be limited as described above for all televisions. Displaying stationary images that exceed the
above guidelines can cause uneven aging of LCD Displays that leave subtle, but permanent burned-in ghost images in the LCD picture. To
avoid this, vary the programming and images, and primarily display full screen moving images, not stationary patterns or dark bars.
On LCD models that offer picture sizing features, use these controls to view different formats as a fult screen picture
Be careful in the selection and duration of television formats used for viewing. Uneven LCD aging as a result of format selection and use,
as well as burned-in images, are not covered by your Samsung limited warranty.
U.S.A Only
The product und accompanying this user manual is licensed under certain intellectual property rights of certain third parties. In particular,
this product is licensed under the following US patents: 5,991,715, 5,740,317, 4,972,484, 5,214,678, 5,323,396, 5,539,829, 5,606,618,
5,530,655, 5,777,992, 6,289,308, 5,610,985, 5,481,643, 5,544,247, 5,960,037, 6,023,490, 5,878,080, and under US Published Patent
Application No. 2001-44713-A1.
This license is limited to private non-commercial use by end-user consumers for licensed contents. No rights are granted for commercial
use. The license does not cover any product unit other than this product unit and the license does not extend to any unlicensed product
unit or process conforming to ISO/IEC 11172-3 or ISO/IEC 13818-3 used or sold in combination with this product unit. The license only
covers the use of this product unit to encode and/or decode audio files conforming to the ISO/{EC 11172-3 or tSO/IEC 13818-3. No rights
are granted under this license for product features or functions that do not conform to the ISO/tEC 11172-3 or ISO/IEC 13818-3.
Other countries
The product unit accompanying
this user manual is licensed under certain intellectual property rights of certain third parties. This license is
limited to private non-commercial use by end-user consumers for licensed contents. No rights are granted for commercial use. The license
does not cover any product unit other than this product unit and the license does not extend to any unlicensed product unit or process
conforming to ISO/IEC 1t172-3 or ISO/IEC 13818-3 used or sold in combination with this product unit. The license only covers the use of
this product unit to encode and/or decode audio files conforming to the ISO/IEC 11172-3 or ISO/IEC 13818-3. No rights are granted under
th s cense for product features or funct ons that do not conform to the SO EC 11172-3 or SO/EC
13818-3.
8AMSUNG ELECTRONICS NORTH AMERICAN LiMiTED WARRANTY STATEMENT
Subject _otne requirements, conditions, exclusions and I _nitations of tne onginai Limited Warranty supplied with Samsun§ Electromcs
(SAMSUNG) proauc_s, ana the requlremems, eonoi[lons exclusions and iimttanons containea harem SAMSUNG will additional., Drovlae
Narramy Repair Service in the United States on SAMSUNG proaucts purcnased in Canada and in Canada on SAMSUNG products uumnasea
the United States. for the warranty penod onglnally suecified, and to the Originat Purchaser _my.
The above descneea warranty repairs must be perforr-ed by a SAMSUNG Authorized Service CenteL &long with this Statement LheOriginal
Limited Warrant, Statemem ano a dated Bil of Sale as Proof of Purchase must De presemee to the Service Center Transportation to and from
me Service Center is the responstetHty of the uurchaser
_oi" ]luons covered are ltml[ea only "_ontanufacturing defects in ma[enal or worKmansnie, ano only Tnoseencoun[erea in normal use of the
croat. _'(
Excluded cut not ilml[ea [o. are any onginally specified provisions for. in-home or on-sire services minimum or maximum repair rimes
exenanges or reetacements, accessoues, options, upgraaes, or consumables
For the location of a SAMSUNG Authorized Service Center please call [o -free
In the United
States
: 1-800-SAMSUNG
(1-800-726-7864)
in Canada
: "G800-SAMSUNG
See the warranty card for more information on warranty terms.
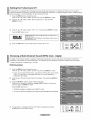
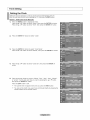
Precauti0ns When Displaying a still Image
A stitt imagemay cause perraanentdamage to the TV screen
• Do not display a still image on the LCD panel for more than 2 hours as it can cause screen image retention. ]-his image retention is atso
known as !'screen burn!'.To avoid such image retention, reducethe dagree of brightness and contrast of the screen 'when disPlayinga stil
image.
Watching the LCD TV in 4:3 format for a long period of time may leave traces of borders displayeden the left, right and
center of the Screencaused by the differenceof tight emissionon the screen.
Playinga DVD or a game conso!e may cause a simila_effect to the screen.
the ab°ve effect are n°t c°vered bYthe Warranty
•Displaying still imagesfrom Video games and PC for tonger than a certain period of time may produce partial after-images.
To preven!this effect, reduce !ha 'brightness'and '€ontrastl"whendisplaying stil! images.
© 2008SamsungElectronicsCo., Ltd All rightsreserved.
Contents
[]
[]
[]
[]
e
List of Features...................................................................... 2
Accessories...................................................................
2
v_ewlngtheControtPane
....3
vlewlng[ne ConnectionPanel .................................
4
RemoteControl...........................................................
[] UsingYourTV as a Computer(PC)Displa_
.....34
[] DisptaI Modes ..............................................
34
[] SettinguptheTVwith.,ourPC ..................................................
35
[] insratltncBatteriesin the RemoteControl....................................
6
[] Settingthe Clock........................................................................
37
.........................................
[] ConnectingCabteTV ...............................................................
7
[] Connectinga DVDPlayeror Cable Box/Satellitereceiver
(Set-TopBox)via HDMI...........
8
[] Connectinga DVDPlayeror Cable Box/Sate!ie rece,,,er
(Set-TopBox) a DVt ..................................................................
8
[] Connectinga DVDPlayeror Cable Box/Satellitereceiver
(Set-TopBox)via ComponentcaoJes...........................................
9
[] Connectinga Camcorder..................................................... 9
[] Connectinga VCR.
10
[] Connecunga DigitalAudioSystem
............I1
[] ConnecnnganAmptlher/DVDHomeTheater
............11
[] Connectinoa PC........................................................................
12
[] Setectir] a MenuLanguage
40
[] Usingthe V-Chi_
......41
[] ViewingClosedCaptions(On-ScreenTextMessages)
- Analog...............................................................................48
[] ViewingClesedCaptions(On-ScreenTextMessages
- Digitat.....................................................................................
49
[] Aojus[Ing[neTV On/OffMelodySouna......................................
50
[] usingthe EnergySavingC_arure......................................... 50
[] dpgradingthe Software..............................................................
51
[]
[]
[]
[]
[]
[]
TurningtheTV Onand Off ........................................................
13
Plug & Play :eature ...............................................................13
ChangingChannels..............
14
Adjusungthe Volume........
15
viewingthe Displa}
..............................................
!5
Viewingthe Menus.....................................................................
15
[]
[]
[]
[]
using
the TOOLSButton.........................................................
11_
Memorizingthe
Channens
..........
To Selectthe Source
.18
To Editthe InputSourceName..................................................
18
[]
[]
[]
[]
Changingthe PictureStandarc .............................................
19
Customizingthe PictureSetnngs............................................19
ConfiguringPictureOpnons...................................................20
Resettingthe PictureSettingsto the Factor, 3efautts...............23
[]
[]
[]
[]
[]
[]
Changingrne SoundStandard.......................
24
Customizingthe Sound
.........24
SettingtheTruSurroundXT....
25
Choosinga Multi-ChannelSound MTS)track - Digital.............25
Choosinga Multi-ChannelSouna MTS)track- Analoc .......26
AutomaucvolumeControl..........................................................
26
[]
[]
[]
[]
[]
[]
[]
Troubleshootinc .....................................................................
52
Howto Adustthe Stand.............................................................
54
Howto Adjustthe Angleof theTV ..........................................54
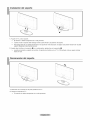
ins[ailingthe WaltMountKit..................
54
installingVESACompliantMountingDevices......................... 54
usingthe DecorationCovers
.................................... 54
installingthe Stand..........
55
DisconnectingtheStand.................................................... 55
[] WaltMountKit Specifications(VESAI .........
56
usingthe AntFTheftKensingtonLOCK
......................................57
58
[] Soecificafions.......................
[] Semngthe TV SpeakersOn/Off..........................
27
[] ConnectingHeadphones(Soldseparately)................................
27
[]
[]
[]
[]
[]
[]
[]
ClearingScrambledChannels- Digital.....................................28
AddingandErasingChannens
.........................................
29
To Set-UpYourFavoriteChannels..........................
30
vie_,,qgthe ChannelLists...........................................
31
LabeIingChannels................................................................ 32
FineTuningAnalogChannets...........
33
Checkingthe Digital-SignalStrengm
.......33
A
m
Symbol
Press
Note
One-Touch
Butter
List of Features
Adjustable picture settings that can be stored in the TV% memory.
* Automatic timer to turn the TV on and off.
A special sleep timer.
Excellent Digital Interface & Networking :
With a built-in HD digital tuner, non-subscription HD broadcasts can be viewed with no Cable Box/Satellite
(Set-Top Box) needed.
* HDMI/DVI connection of your PC to this TV.
* Excellent Picture Quality
SRS TruSurround XT
- SRS TruSurround XT provides a virtual surround system.
receiver
Accessories
Please make sure the following items are included with your LCD TV.
If any items are missing, contact your dealer.
RemoteControl & Batteries (AAA x 2)
(LN19A330J1D: BN59-00678A)
(LN19A331J1D: BN59-00678B)
Power Cord
(3903-000144)
WarrantyCard / RegistrationCard /
Safety Guide Manual
(Not available in alllocations)
>_The items color and shape may vary depending
Wall Mount kit
(BN96-04960A)
on the model.
Cleaning Cloth
(BN63-01798A)
Owner's Instructions
Decoration Cover
(LN19A330J1D: Right: BN63-03217A
Left: BN63-03216A)
(LN19A331J1D: Right: BN63-03217B)
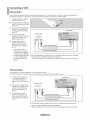
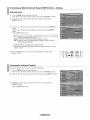
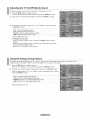
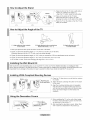
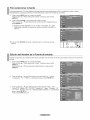
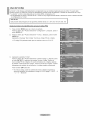
Viewing the Control Panel
Buttons on the Lower-Riqht
Part of the Panel
The buttons on the lower-right panel control your TV's basic features, including the on-screen menu.
To use the more advanced features, you must use the remote control.
SOURCE
MENU
+
VOL
A
CH
v
Touch the right side of each
button to operate.
O SOURCE C,_
Toggles between atl the available input sources
(TV, AV, S-Video, ComponenL PC, HDMI).
In the on-screen menu, use this button as you would
use the ENTER button on the remote control.
0
MENU
Press to see an on-screen menu of your TV's features.
O - VOL
Press
In the
would
+
to increase or decrease the volume.
on-screen menu, use the - VOL + buttons as you
use the ,,I and _ buttons on the remote control.
O vCH ^
Press to change channels.
In the on-screen menu, use thevCH ^ buttons as you
would use the V and A buttons on the remote control.
O POWER iNDICATOR
Blinks and turns off when the power is on and
lights up in stand-by mode.
Q 0 (POWER)
Press to turn the TV on and off.
O REMOTE CONTROL SENSOR
Aim the remote control towards this spot on the TV.
SPEAKERS
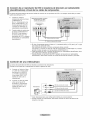
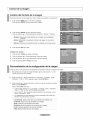
Viewing the Connection Panel
Use the connection panel jacks to connect A/V components that will be connected continuously, such as DVD players or a VCR.
For more information on connecting equipmenL see pages 6~12.
........................................................................................................
J
ANT IN
SERVICE
®
=_Jii
®®
_LOAUO,O
-
...........
@
®®
00®
an
>" The product color and shape may vary depending on the model.
O AUDIO OUT
Connects to the audio input jacks on your Amplifier/
Home theater.
O
KENSINGTON LOCK
The Kensington Lock (optional) is a device used to
physically fix the system when used in a public place.
If you want to use a locking device, contact the dealer
where you purchased the TV.
>-The location of the Kensington Lock may be different
depending on its model.
O
I_ (HEADPHONE}
Connects a set of external headphones for private
listening.
Q
AM iN
O DIGITAL AUDIO OUT (OPTICAL}
Connects to a Digital Audio component.
O PC IN [PC] / [AUDIO]
Connects to the video and audio output jacks on your
PC.
O HDMI/DVI IN / DVI IN [R-AUDiO-L]
Connects to the HDMI jack of a device with an HDMI
output.
Use the HDMI/DVI IN jack for DVI connection to an
external device.
Use a DVt to HDMt cable or DVI-HDMI adapter (DVI to
HDMI) for video connection and the DVI IN [R-AUDIO-L]
jacks for audio.
- No sound connection is needed for an HDMI to HDMI
connection.
- When using an HDMI/DVI cable connection,you must use
the HDMI/DVI IN jack.
O SERVICE, EX-LINK
Connector for SERVICE only.
Q ANT IN
Connects to an antenna or cable TV system.
Video and audio inputs for external
camcorder
or VCR.
S-VIDEO
Connects
an S-Video
signal
from
devices,
a camcorder
such as a
or VCR.
@ COMPONENT iN
The COMPONENT IN jack is also used as the AV IN
jack.
@ POWER
INPUT
Connects the supplied power cord.
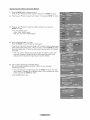
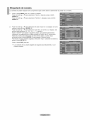
Remote
Control
You can use the remote control up to a distance of about 23 feet from the TV.
O POWER
Turns the TV on and off.
O TV
Selects the TV mode directly.
O NUMERIC BUTTONS
Press to change the channel.
_) MTS
Press to choose stereo, mono
or Separate Audio Program
(SAP broadcast).
_) SOURCE
_(MUTE)
Press to temporarily cut off the
sound.
O VOL_:) / VOL_)
Press to increase or decrease
the volume.
TOOLS
Use to quickly select frequently
used functions.
Q UPA / DOWNT / LEFT_I /
RIGHTI_ / ENTER_
Use to select on-screen menu
items and change menu values.
INFO
SOURCE
PRE CH
Tunes to the previous channel.
Press to select additional
0
TV
Press to display and select the
available video sources.
e_
channels(digital and analog) being
broadcast by the same station.
For example, to select channel
"54-3", press "54", then press "_"
and "3".
POWER
=@@@
@ ca@ / CH@
Press to change channels.
_) RETURN
Returns to the previous menu.
_t EXIT
Press to exit the menu.
--
_) SRS
Selects SRS TruSurround XT
mode.
_D
_) MENU
Displays the main on-screen
menu.
_) FAV.CH
Press to switch to your favorite
channels.
e
RSIZE
Picture size selection.
Press to display information on
the TV screen.
COLOR BUTTONS
Use these buttons in the
Channel list, etc.
@ CC
Controls the caption decoder.
>-The performance of the remote control may be affected by bright light.
-Q
Installing Batteries in the Remote Control
2,
Install two AAA size batteries.
> Make sure to match the "+" and "-" ends of the batteries with the diagram inside the compartment.
3,
Replacethe cover.
> Remove the batteries and store them in a cool, dry place if you won't be using the remote control for a
Iongtime.
The remote control can be used up to about 23 feet from the TV.
[
_
]
I / /
/
I'_,_-_
/
(Assunling typical TV usage, tile batteries should last for about one year.)
1. Is the TV power on?
2. Are the plus and minus ends of the batteries reversed?
3. Are the batteries drained?
L
_'_---_
4. Is there a power outage or is the power cord unplugged?
5. Is there a special fluorescent light or neon sign nearby?
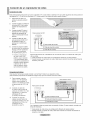
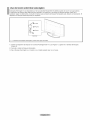
Connecting VHF and UHF Antennas
If your antenna has a set of leads that look like the diagram to the right, see "Antennas with
300 O Flat Twin Leads" below.
If your antenna has one lead that looks like the diagram to the right, see "Antennas with 75
O Round Leads".
If you have two antennas_see "Separate VHF and UHF Antennas".
Antennas with 300 Q Flat Twin Leads
If you are using an off-air antenna (such as a roof antenna or "rabbit ears") that has 300 O twin flat leads, follow the directions
below.
t,
Place the wires from the twin leads under the screws on a 300-75 O adapter
(not supplied).
Use a screwdriver to tighten the screws.
2,
Plug the adaptor into the ANT IN terminal on the back of the TV.
Antennas with 75 Q Round Leads
t,
Plug the antenna lead into the ANT IN terminal on the back of the TV.
Separate VHF and UHF Antennas
If you have two separate antennas for your TV (one VHF and one UHF), you must combine the two antenna signals before
connecting the antennas to the TV. This procedure requires an optional combiner-adaptor (available at most electronics shops).
t,
Connect both antenna leads to the combiner.
2,
Plug the combiner into the ANT IN terminal on the bottom of the rear panel.
1_
J
Connecting Cable TV
To connect to a cable TV system, follow the instructionsbelow.
Cable without a Cable Box
1,
Plug the incoming cable into the ANT IN terminal on the back of the TV.
BecausethisTVis cable-ready,
youdonotneeda cableboxto viewunscrambled
cablechannels.
Connectinq to a Cable Box that Descrambles All Channels
1,
Find the cable that is connected to the ANT OUT terminat on your cabte box.
2,
Connect the other end of this cable to the ANT IN terminal on the backof the TV.
:_ This terminalmightbe labeled"ANTOUT","VHFOUT"or simply,"OUT".
NTIN
ANTOUT_=
Connectinq to a Cable Box that Descrambles Some Channels
If your cable box descrambles only some channels (such as premium channels), follow the instructions below. You wilt need a twoway splitter, an RF (A/B) switch and four lengths of RF cable. (These items are available at most electronics stores.)
1,
Find and disconnect the cable that is
connected to the ANT IN terminal on your
cable box.
:_ This terminalmightbe labeled"ANTIN",
"VHFIN"or simply,"IN".
2,
Connect this cable to a two-way splitter.
Incoming
cable
3,
Connect an RF cable between the OUTPUT
terminal on the splitter and the IN terminal
on the cable box.
Incoming
cable
,===_
Splitter
J
Cable
4,
BOX
Connect an RF cable between the
ANT OUT terminal on the cable box and
incoming
the B-IN terminal on the RF(A/B) switch.
cable
Splitter
Cable
5,
Connect another cable between the other
OUT terminal on the splitter and the A-IN
terminal on the RF (A/B) switch.
BOX
Incoming
cable
RF
Cable
°. onne tthe,ost
OUT terminal on the RF (A/B) switch and
the ANT IN terminal on the rear of the TV.
Incoming
1'70_:
'g s_
/
Box
,,e,et ee t,e
_
_
_ _
....
,11....
_ _
Cab,_Oo×
(A/B)
Switch
_
_i_-7
_.
A,T_,
@
TV Rear
Sw,_ch
After you have made this connection, set the A/B switch to the "A" positionfor normal viewing. Set the A/B switchto the "B" position to
view scrambled channels. (When you set theA/B switchto "B",you will need to tune your TV to the cable box's output channel,which is
usually channel 3 or 4.)
I
I
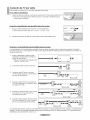
Connecting a DVD Player or Cable Box/Satellite receiver (Set-Top Box) via HDIVll
This connection can only be made if there is an HDMI Output connector on the external device.
1,
Connect an HDMI Cable
between the HDMI/DVI IN jack
on the TV and the HDMI jack
on the DVD Player or Cable
DVD Player or Cable Bo×/aatellite
receiver
(Set-Top Box) Rear Panel
Box/Satellite receiver (Set-Top
TV Rear Panel
___,,
ox,
HDMI Cable (Not supplied)
>What
is HDMt?
• HDMt(High-Definition Multimedia Interface), is an interface that enables the
transmission of digital audio and video signals using a single cable.
The difference between HDMI and DVl is that the HDMI device is smaller in
size and has the HDCP (High Bandwidth Digital Copy Protection) coding feature
installed.
>Each DVD Player or Cable Box/Satellite receiver (Set-Top Box) has a different back
panel configuration.
Connecting
a DVD Player or Cable Box,/Satellite
receiver (Set-Top Box) via DVl
This connection can only be made if there is a DVl Output connector on the external device.
1,
2,
Connect a DVI to HDMI Cable
or DVI-HDMI Adapter between
the HDMI/DVI IN jack on
the TV and the DVI jack on
the DVD Player or Cable
Box/Satellite receiver (Set-Top
Box).
TV Rear Panel
DVD
Satellite
Playeror Cable
receiver
Box/
(Set-Top
Box)
Connect Audio Cables
between the DVI IN
[R-AUDIO-L] jack on the TV
and the DVD Player or Cable
Box/Satellite receiver (Set-Top
Box).
> Each DVD Player or Cable Box/Satellite receiver (Set-Top Box) has a different back
panel configuration.
>When connecting a DVD Player or Cable Box/Satellite receiver (Set-Top Box), match
the color of the connection terminal to the cable.
>When
using an HDMI/DVl cable connection, you must use the HDMI/DVl IN jack.
Connecting
a DVDPlayeror CableBoyJSatellite
receiver(Set-TopBox)viaComponent
cables
The rear panel jacks on your TV make it easy to connect a DVD Player or Cable Box/Satellite receiver (Set-Top Box) to your TV.
1.
Connect a Component Cable
between the COMPONENT
IN [PR_PB,Y] jacks on the TV
and the COMPONENT [Y, PB,
PR] jacks on the DVD Player
or Cable Box/Satellite receiver
TV Rear Panel
DVD Player or Cable Box /
Satellite receiver (Set-Top Box)
(Set-Top Box).
2.
Connect Audio Cables between
the COMPONENT IN
[R-AUDIO-L] jacks on the TV
and the AUDIO OUT jacks
on the DVD Player or Cable
Box/Satellite receiver (Set-Top
Box).
Component Cable (Not supplied)
:>-Component video separates the video into Y (Luminance (brightness)), Pb (Blue) and
Pr (Red) for enhanced video quality.
Be sure to match the component video and audio connections.
For example, if connecting a Component video cable to COMPONENT IN, connect the
audio cable to COMPONENT IN also.
>- Each DVD Player or Cable Box/Satellite receiver (Set-Top Box) has a different back panel
configuration.
>- When connecting a DVD Player or Cable Box/Satellite receiver (Set-Top Box), match the
color of the connection terminal to the cable.
Connecting a Camcorder
They allow you to view the camcorder tapes without using a VCR.
1.
Connect a Video Cable
TV Rear Panel
(or S-Video Cable) between
the AV IN [VIDEO] (or
S-VIDEO) jack on the TV
and the VIDEO OUT jack on
the camcorder.
2.
Connect Audio Cables
between the AV IN
[R-AUDIO-L] jacks on the TV
and the AUDIO OUT jacks
on the camcorder.
eamoorder
>_Each Camcorder has a different back panel configuration.
>- When connecting a Camcorder, match the color of the connection terminal to the cable.
Connecting a VCR
Video Connection
These instructions assume that you have already connected your TV to an antenna or a cable TV system (according to the
instructions on pages 6~7). Skip step 1 if you have not yet connected to an antenna or a cable system.
1.
Unplug the cable or antenna
from the back of the TV.
2,
Connect the cable or antenna to
the ANT IN terminat on the back
of the VCR.
Connect an RF Cable between
the ANT OUT terminal on the
VCR and the ANT IN terminal
on the TV.
4,
Connect a Video Cable
TV Rear Panel
VCR Rear Panel
between the VIDEO OUT jack
on the VCR and the AV IN
[VIDEO] jack on the TV.
5,
Connect Audio Cables
between the AUDIO OUT
jacks on the VCR and the
AV IN [R-AUDIO-L] jacks on
the TV.
>_If you have a "mono"
(non-stereo) VCR, use a
Y-connector (not supplied)
to hook up to the right and
left audio input jacks of the
TV. If your VCRis stereo,
you mustm connect two
cables.
i5_ Audio Cable (Not supplied)
!41} Video
Cable (Not supplied)
i3: RF Cable
(Not supplied)
Follow the instructionsin "Viewing a VCR or Camcorder Tape" to view your VCR tape.
:_ Each VCR has a different back panel configuration.
:_ When connecting a VCR, match the color of the connection terminal to the cable.
S=Video Connection
Your Samsung TV can be connected to an S-Video jack on a VCR.
(This connection delivers a better picture when compared to the regular Video connection above.)
1.
To begin, follow steps 1-3
in the previous section to
connect the antenna or
cable to your VCR and your
TV.
2.
Connect an S-Video Cable
between the S-VIDEO OUT
jack on the VCR and the
AV tN [S-VIDEO] jack on
the TV.
3.
Connect Audio Cables
between the AUDIO OUT
jacks on the VCR and the
AV tN [R-AUDIO-L] jacks on
the TV.
TV Rear Panel
VCR Rear Panel
i;I
RF Cable (Not supplied)
An S-Videocable may be includedwith a VCR. (If not, check your localelectronicsstore.)
>- Each VCR has a different back panel configuration.
:_ When connecting a VCR, match the color of the connection terminal to the cable.
Connecting a Digital Audio System
The rear panel jacks on your TV make it easy to connect a Digital Audio System (Home theater/Receiver) to your TV.
t,
Connect an Optical Cable
between the "DIGITAL AUDIO
OUT (OPTICAL)' jacks on the
TV and the Digital Audio Input
jacks on the Digital Audio
System.
Digital Audio
System
TV Rear Panel
DND
When a Digital Audio System
is connected to the "DIGITAL
AUDIO OUT (OPTICAL)" jack:
Decrease the volume of the
TV and adjust the volume
level with the system's volume
control.
> 5iCH audio is possible when the TV is connected to an externat device supporting 5.1CH.
> Each Digital Audio System has a different back panel configuration.
> When the receiver (home theater) is set to On, you can hear sound output from the TV's
Optical jack. When the TV is displaying a DTV(air) signal, the TV wilt send out 5.1 channel sound to the Home theater receiver. When the source is a digital component such as
a DVD and is connected to the TV via HDMI, only 2 channel sound will be heard from the
Home Theater receiver. If you want to hear 5.1 channel audio, connect the DIGITAL AUDIO
OUT (OPTICAL) jack on the DVD player or Cable/Satellite Box directly to an Amplifier or
Home Theater_not the TV.
Connecting an Amplifier/DVD Home Theater
t,
Connect Audio Cables
between the AUDIO OUT
[R-AUDIO-L] jacks on the TV
and AUDIO IN [R-AUDIO-L]
jacks on the Amplifier/DVD
Home Theater.
AmpJifier/OVD
TV Rear Panel
Home Theater
When an audio amplifier is
connected to the "AUDIO OUT
[R-AUDIO-L]" jacks: Decrease
the volume of the TV and
adjust the volume level with
the Amplifier's volume control.
Audio
Cable (Not supplied)
> Each Amplifier/DVD Home Theater has a different back panel configuration.
> When connecting an Amplifier/DVD Home Theater_ match the color of the connection
terminal to the cable.
Connecting a PC
Using the D-Sub Cable
1,
2,
Connect a D-Sub Cable
between PC IN [PC]
connector on the TV and the
PC output connector on your
computer,
Connect a PC Audio Cable
between the PC IN [AUDIO]
jack on the TV and the Audio
Out jack of the sound card on
your computer.
TV Rear Panel
PC
2'
PC Audio
Cable (Not supplied)
i;/
D-Sub Cable (Not supplied)
Using the HDMI/DVI Cable
1,
2,
Connect a HDMI/DVI cable
between the HDMt/DVI IN
jack on the TV and the PC
output jack on your computer.
Connect a 3.5 mm Stereo
mini-plug/2RCA Cable
between the DVI IN
[R-AUDIO-L] jack on the TV
and the Audio Out jack of the
sound card on your computer.
TV Rear Panel
PC
3.5 rnm Stereo
!;1! HDMI/DVl
Cable
rnini-plug/2RCA
Cable (Not supplied)
(Not supplied)
Each PC has a different back panel configuration.
_--When connecting a PC, match the color of the connection terminat to the cable.
:_When using an HDMI/DVI cable connection, you must use the HDMI/DVI IN jack.
Turning the TV On and Off
Press the POWER(b button on the remote control.
You can also use the POWERd) button on the TV.
/
POWER
SOURCE
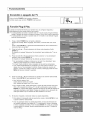
Plug & Play Feature
When the TV is initially
subsequently.
>- The Screen Saver is
minute while "Plug &
>The Screen Saver is
minutes.
1.
powered on_basic settings proceed automatically and
activated if there is no remote control key input for longer than 1
Play' is running.
activated if there is no operating signal for longer than 15
Press the POWER(b button on the remote control.
The message "Menu Language_ Store Demo_Channels and Time wilt be set." is
displayed.
Press the ENTER _ button, then "Select the language of the OSD" menu
is automatically displayed.
2=
Press the A or _' button to select language, then press the ENTER _ button.
The message "Select 'Home Use' when installing this TV in your home." is
displayed.
3=
Press the 4 or 1_ button to select "Store Demo_ or "Home Use", then
press the ENTER _ button.
The message "Select the antennas to memorize." is displayed.
>_ We recommend setting the TV to "Home Use' mode for the best picture in your
home environment.
>* "Store Demo" mode is only intended for use in retail environments.
>* If the unit is accidentally set to "Store Demo' mode and you want to return to
"Home Use" (Standard): Press the Volume button on the TV. When the volume
OSD is displayed_ press and hold the MENU button on the TV for 5 seconds.
4=
Press the ,_ or ,lr button to memorize the channels of the selected connection.
Press the ENTER _ button to select "Start'.
:"--Air: "Air" antenna signal.
Cable: "Cable" antenna signal.
Auto: "Air' and "Cable' antenna signals.
>_ In Cable mode_you can select the correct signal source among STD, HRC, and
IRC by pressing the A, _', 4 or _- button, then press the ENTER _ button.
If you have Digital cable, select the cable system signal source for both Analog
and Digital. Contact your local cable company to identify the type of cable
system that exists in your particular area.
5.
The TV will begin memorizing alt of the available channels.
>To stop the search before it has finished, press the ENTER _
selected.
button with "Stop"
:_Afler all the available channels are stored, it starts to remove scrambled
channels (see page 28). The Auto program menu then reappears.
Press the ENTER _ button when channel memorization is complete. The
message "Set the Clock Mode." is displayed.
Press
theENTER
_ button.
Press
theAorT button
toselect
"Auto",
then
Press
theENTER
_ button.
Themessage
"Set
todaylight
saving
time."
isdisplayed.
Ifyouselect
"Manual",
"Enter
thecurrent
date
and
time."
isdisplayed.
(See
page
37)
7, Press
theAorT button
toselect
"Off"
or"On",
then
press
theENTER
_ button.
Themessage
"Select
thetime
zone
inwhich
youlive."
isdisplayed.
Press
the_, or _r button to highlight the time zone for your local area.
Press the ENTER _ button. If you have received a digital signal, the time will be
set automatically.
If not_see page 37 to set the clock.
9,
The message "Enjoy your watching." is displayed.
When you have finished, press the ENTER _ button.
If you want te reset this feature...
1,
Press the MENU button to display the menu.
Press the A or T button to select "Setup"_ then press the ENTER _
2,
Press the ENTER _ button again to select "Plug & Play'.
For further details on setting up options, refer to the pages 13~14.
button.
>-The "Plug & Play" feature is only available in the TV mode.
Changing Channels
Usinq the Channel
t,
Buttons
Press the CH(_) or CN(_) button to change channels.
>- When you press the CH(_) or CH(_) button, the TV changes channels in
sequence.
You wilt see all the channels that the TV has memorized (The TV must have
memorized at least three channels). You will not see channels that were either
erased or not memorized. See page 16 to memorize channels.
the Number Buttons
t=
Press the number buttons to go directly to a channel. For example, to select
channel 27, press 2, then 7.
:_ For quick channel change, press the number buttons, then press the ENTER
button.
m
Usinq the _Button
The (_ button is used to select stations that broadcast a digital signal.
t.
For example, for Channel 7-1, press 7, then _), then 1.
>` HD indicates the TV is receiving a Digital High Definition signal. SD indicates
the TV is receiving a Standard Definition signal.
>` For quick channet change, press the number buttons, then press the ENTER
button.
Usinq the PRE CN Button to seJect the Previous
t.
Channel
Press the PRE CH button.
The TV will switch to the last channel viewed.
>-To quickly switch between two channels that are far apart, tune to one
channel, then use the number button to select the second channel. Then
use the PRE CH button to quickly alternate between them.
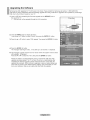
Adjusting
the Volume
Using the Volume Buttons
t.
Press the VOL(_ or VOL(_ button to increase or decrease the volume.
Usinqthe
imt ®
MUTE button
At any time, you can cut offthe sound using the MUTE button.
1.
Press MUTE button and the sound cuts off.
"_'
2.
is displayed on the screen.
To turn mute off, press the MUTE button again or simply press the
VOL(_ or VOL(_ button.
Viewing the Display
The display identifies the current channel and the status of certain audio-video settings.
t.
Press the INFO button on the remote controk
The TV wilt display the channel, the type of sound,
and the status of certain picture and sound settings.
Press the INFO button once more or wait approximately 10 seconds and the
display disappears automatically.
Viewing the Menus
t.
With the power on, press the MENU button.
The main menu appears on the screen. The menu's left side has icons:
Picture, Sound, Channel, Setup, Input.
2.
Press the A or T button to select one of the icons.
Then press the ENTER _
3.
button to access the icon's sub-menu.
Press the EXIT button to exit.
>` The on-screen menus disappear from the screen after about one minute.
Using the TOOLS Button
You can use the Tools button to select your frequently used functions quickly and easily.
The "Tools" menu changes depending on which external input mode you are viewing.
1,
TOOLS
RETURN
Press the TOOLS button.
The "Tools" menu will appear.
2,
Press the _, or T button to select a menu.
3,
Press the A/V'/_I/_/ENTER _ buttons to display, change, or use the selected
items.For a more detailed description of each function, refer to the corresponding
page.
• Picture Mode, see page 19
• Sound Mode, see page 24
"Add to Favorite, see page 30
Switch to Air, see page 16
• Auto Adjustment, see page 35
Memorizing the Channels
Your TV can memorize and store alt of the available channels for both "off-air" (Air) and "Cable" channels. After the available
channels are memorized, use the CH(_) or CH(_) button to scan through the channels. This eliminates the need to change channels
by entering the channel digits. There are three steps for memorizing channels: selecting a broadcast source, memorizing the
channels (automatic) and adding or deleting channels (Channel Lists).
Selectinqthe Video Siqnal-source
Before your television can begin memorizing the available channels, you must specify the
type of signal source that is connected to the TV (i.e. an Air or a Cable system).
1,
2,
Press the MENU button to display the menu.
Press the A or T button to select "Channel", then press the ENTER _
Press the ENTER _
button.
button to select "Antenna".
Press the _, or T button to select "Air" or 'Cable", then press the ENTER _
button.
Press the EXIT button to exit.
Easy Setting
1.
Press the TOOLS button on the remote control.
2.
Press the A or _' button to select "Switch to Air" (or "Switch to Cable"), then press
the ENTER _ button.
Storinq Channels in Memory(Automatic
Method}
1,
Press the MENU button to display the menu.
Press the A or _' button to select 'Channel", then press the ENTER _
2,
Press the A or T button to select "Auto Program", then press the ENTER _
31
Press the _, or • button to select the antenna connection, then press the
ENTER _ button.
button,
button,
:_Air: "Air" antenna signal.
Cable: "Cable" antenna signal.
Auto: "Air" and "Cable" antenna signals.
4,
When selecting the Cable TV system:
Press the ENTER _ button to start the auto program.
Press the 4 or _,- button, then press the A or T to select the correct analog signal
cable system source among "STD", "HRC', and "IRC'. Press the ENTER _ button.
If you have Digital cable TV, select the cable system signal source for both Analog
and Digital.
>-STD, HRC and IRC identify various types of cable TV systems. Contact your
local cable company to identify the type of cable system that exists in your
particular area. At this point the signal source has been selected.
5,
The TV begins memorizing alt available stations.
After all the available channels are stored, it start to remove scrambled
channels(see page 28).
:- If you want to stop Auto Programming, press the ENTER _ button. The "Stop
Auto Program?" message wilt be displayed. Select "Yes" by pressing the _ or
button, then press the ENTER _ button.
Press the EXIT button to exit.
To Select the Source
Use to select TV or other external input sources such as DVD players or Cable Box/
Satellite receivers (Set-Top Box) connected to the TV. Use to select the input source
of your choice.
1,
Press the MENU button to display the menu.
Press the_, or T button to select "Input", then press the ENTER _
2,
Press the ENTER _ button to select "Source List".
Press the A or T button to select signal source, then press the ENTER _
button.
button.
>Available signal sources: TV, AV_S-Video_ Component, PC, HDMI.
>'-You can choose only those external devices that are connected to the TV.
,,, e th SOU C utto o therem
..-.. ..-.. ..--. t
To Edit the input Source Name
Name the device connected to the input jacks to make your input source selection easier.
1,
Press the MENU button to display the menu.
Press theA or T button to select "Input', then press the ENTER _ button.
Press the A or _' button to select "Edit Name"_ then press the ENTER _ button.
2,
Press the A or T button to select "AV', "S-Video", "Component", "PC", "HDMI"
input jack_then press the ENTER C,_ button.
Press the A or • button to select "VCR', "DVD"_"Cable STB', "Satellite STB",
'PVR STB'_ 'AV Receiver', "Game", "Camcorder"_' PC"_"TV', "IPTV', "Blu-Ray"_
"HD DVD", "Digital Media Adapter' input source, then press the ENTER _ button.
Press the EXIT button to exit.
I
Changing the Picture Standard
You can activate either Dynamic, Standard, Movie by making a selection from the menu.
1.
2,
Press the MENU button to display the menu.
Press the ENTER _ button, to select 'Picture".
Press the ENTER _
button to select "Mode".
Press the A or _' button to select the "Dynamic", "Standard" or "Movie'.
Dynamic:Selectsthe pipturefor high-definitionina brightroom.
'*Standard:Setectsthe picturefor theoptimumdisplayina nQrntatenvironment.
,, Movie:Selectsthe picturefor viewingmoviesina darkroom.
3.
Press the EXIT button to exit.
Easy Setting
1.
Press the TOOLS button on the remote control.
2.
Press the & or • button to select "Picture Mode".
3.
Press the _ or _,-button to select the required option.
4.
Press the EXIT or TOOLS button to exit.
Customizing the Picture Settings
Your television has several setting options that allow you to control the picture quality.
1.
To select the desired picture mode, follow the "Changing the Picture Standard'
instructions numbers 1 and 2.
2,
Press the A or T button to select "Backlight', "Contrast', "Brightness",
'Sharpness', "Color" or 'Tint", then press the ENTER _ button.
Press the 4 or I_ button to decrease or increase the value of a particular item.
Press the ENTER _ button.
Press the EXIT button to exit.
When you make changes to "Backlight', "Contrast"_ "Brightness", "Sharpness'_
"Color" or 'Tint'_ the OSD wilt be adjusted accordingly.
> In PC mode, you can only make changes to "Backlight", "Contrast" and
"Brightness'.
> Settings can be adjusted and stored for each external device you have
connected to an input of the TV.
' Back!ight: Adjusts the brightness of LCD back light.
• Contrast: Adjusts the contrast level of the picture.
•"Brightness: Adjust s the brightness !eveI of the picture ,
' Sharpness: Adjusts the edge definition of the picture.
• Color: Adjusts color saturation of the picture
. Tint: Adjusts the color tint of the picture.
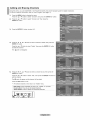
Configuring Picture Options
Activatin
Picture 0 tions
1,
Press the MENU button to display the menu.
Press the ENTER C*_ button, to select "Picture".
2,
Press the A or _r button to select "Picture Options", then press the ENTER
button,
Press the A or _' button to select a particular item. Press the ENTER _ button.
>_When you are satisfied with your setting, press the ENTER _ button.
>- In PC mode, you can only make changes to the "Color Tone" and "Size" from
among the items in 'Picture Options'.
Settin- the Color Tone
1,
Follow the "Activating Picture Options" instructions numbers 1 and 2. (Refer to
page 20)
2,
Press the _, or T button to select "Color Tone_, then press the ENTER _
3,
Press the A or T button to select "Cool2", "Cool1", 'Normal", "Warm1" or "Warm2".
Press the ENTER C,_ button.
button.
:_ "Warm1" or "Warm2" is only activated when the picture mode is "Movie'.
:_ Settings can be adjusted and stored for each external device you have connected
to an input of the TM
Settin
the Screen Size
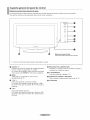
Occasionally, you may want to change the size of the image on your screen. Your TV
comes with six screen size options, each designed to work best with specific types of
video input. Your cable box or satellite receiver may have its own set of screen sizes as
welt. In general, though, you should view the TV in 16:9 mode as much as possible.
1,
Follow the "Activating Picture Options' instructions numbers 1 and 2.
(Refer to page 20)
2,
Press the A or _' button to select "Size", then press the ENTER _
3,
Press the A or T button to select the screen format you want.
Press the ENTER _ button.
button.
Press the EXIT button to exit.
* Wide: Adjusts the p_c[uresize to Wide appropriate for DVDs or w_ae
Droaacasung
.1i}:9: Sets _ne picture to 16:9 wide moae.
, Zoom1: Magnifies the size of the olc_ureon the screen.
- Zoom2: Magnifies the size of the picture more than "Zoom1"
, Wide Fit: Enlarges the aspect ratio of the picture to fit the entire screen.
- 4:3: Sets the picture to 4:3 normal moae.
- ,Just Scan: Use the function to see the futl image w_thout any cutoff when
HDMI (720p/!080i), Component (1080i) or DTV (1080i) signals
are InDUL
Temporary image retention may occur when viewing a static image on the set
for more than two hours.
After selecting "Zooml", "Zoom2" or "Wide Fit":
Press the 4 or _,- button to select "Position', then press the ENTER
button. Press the A or V' button to move the picture up and down.
Reset: Press the ,,_or D,,button to select "Reset", then press the ENTER
button. You can initialize the setting.
After selecting "Just Scan" in HDMI (1080i) or Component (1080i) mode:
Press the A or T button to select "H-Position" or "V-Position", then press the
ENTER button.
Press the 4 or I_ button to adjust the screen Position. Press the
ENTER _ button.
Reset: Press the A or • button to select "Reset", then press the ENTER
button. You can initialize the setting.
HD (High Definition)
16:9 - 1O8Oi(1920x1080), 720p (1280x720)
Settings can be adjusted and stored for each external device you have connected to an input of the TV.
l°putSoo,ce
Pict,,,e
Size
TV, Video, S-Video, Component (480i, 480p)
Wide, 16:9, Zoom1, Zoom2, 4:3
}
DTV(1O80i), Component (1080i), HDMI (720p, 1080i)
_
Wide, 16:9, 4:3, Wide Fit, Just Scan
Alternately,
tOchange
the you
picture
cansize.
press the P.StZE button on the remote control repeatedly
Wide
16:9
F//
(_
_________
@
Zoom1
Adjusts the p_c[ures_zeto Wide appropriate Sets the picture to 16:9 wide mode.
for DVDs or widebroadcasting
Magnifies the size of the oJc_ureon me
screen
Zoom2
JVideFit
4:3
Magnifies the size of the _tcture more
than "Zoom1
Enlarges the aspect ratio of the picture
to fit the entire screen.
Sets the picture to 4:3 normal mode.
Just Sca
Use the function to see the full
mage w_thoutany cutoff when HDMI
720p/1080i), Component (1O8Oi)or
DTV 1080i) signals are input.
Settin_qital
Noise Reduction
If the broadcast signal received by your TV is weak. you can activate the DigitaI Noise
Reduction feature to help reduce any static and ghosting that may appear on the screen.
1.
Follow the "Activating Picture Options' instructions numbers 1 and 2.
(Refer to page 20)
2. Press the A or T button to select "Digital NR", then press the ENTER _
3.
button.
Press the A or T button to select "Off". "Low". "Medium", "High" or "Auto".
Press the ENTER _ button.
, Off: Turns the screen noise reduction function off.
, Low: Reduces screen noise at a low levei.
*Medium: Reduces screen noise at a medium !evek
* High: Reduces screen noise at a high level
* Auto: Automatically recognizes and reduces screen noise.
Press the EXIT button to exit.
Settinq the HDMI Black Level
You can select the black level on the screen to adjust the screen depth.
t.
Follow the "Activating Picture Options" instructions numbers 1 and 2.
(Refer to page 20)
2.
Press the A or T button to select"HDMt Black Level". then
press the ENTER _ button.
3,
Press the A or T button to select "Normal" or "Low", then press
the ENTER _ button.
, Normal: The Screen gets brighter.
• Low: The screen gets darker.
This function is active only when an external device is connected to the TV via
HDMI. "HDMI Black LeveF function may not be compatible with all external
devices.
Press the EXIT button to exit.
Settin
the Film Mode
The TV can be set to automatically sense and process film signals from atl sources and
adjust the picture for optimum quality.
t.
Follow the "Activating Picture Options" instructions numbers 1 and 2.
(Refer to page 20)
2.
Press the A or _' button to select "Film Mode". then press the ENTER C_' button.
Press the A or _' button to select "Off" or "Auto". then press the ENTER _
button.
Press the EXIT button to exit.
:-
"Film mode" is supported in TV. VIDEO. S-VIDEO, COMPONENT(480i / 1080i)
and HDMI(480i / 1080i).
Resetting the Picture Settings to the Factory Defaults
1,
Press the MENU button to display the menu.
Press the ENTER button, to select "Picture".
2,
Press the A or _r button to select "Reset", then press the ENTER C# button.
Press the A or T button to select "OK" or "Cancel" then press the ENTER
button.
Press the EXIT button to exit.
Each mode can be reset.
Changing the Sound Standard
You can select the sound mode to best suit tile programming you're watching.
1.
2=
Press the MENU button to display the menu.
Press the A or _' button to select "Sound", then press the ENTER _
button.
Press the ENTER _ button to select "Mode".
Press the A or T button to select "Standard", "Music", "Movie"_ "Speech", or
"Custom" sound setting, then press the ENTER _ button.
Press the EXIT button to exit.
° standard: selects the normal sound mode.
• Music: emphasizes music Over voices.
Movie Provides the best sound for moyies
, Speech: emphasizes voice over other sounds.
° Custom: recalls your customized sound settings.
(see "Customizing the Sound")
Easy Setting
t.
Press the TOOLS button on the remote control.
2.
Press the A or T button to select"Sound Mode".
3.
Press the _ or _,-buttonto select the required option.
4.
Press the EXIT or TOOLS button to exit.
Customizing
the Sound
The sound settings can be adjusted to suit your personal preference.
t.
2.
Press the MENU button to display the menu.
Press the A or _' button to select "Sound", then press the ENTER _
button.
Press the A or _' button to select "Equalizer", then press the ENTER _
button.
Press the 4 or _,-button to select a particular frequency to adjust.
Press the A or T buttonto increase or decrease the levelof the particularfrequency.
Press the ENTER _
button.
Press the EXIT button to exit.
• L/R Sound Balance Adjustment:
speakers.
To ad ust the Sound balance of the L/R
• Bandwidth Adjustment (100Hz, 300Hz, 1KHz, 3KHz, 10KHz): To adjust the
level of different bandwidth frequencies.
>- If you make any changes to the "Equalizer" settings, the sound mode is
automatically switched to the "Custom" mode.
Setting the TruSurround XT
TruSurround XT is a patented SRS technology that solves the problem of playing 5.1 multichannel content over two speakers.
TruSurround delivers a compelling, virtual surround sound experience through any two-speaker playback system, including internal
television speakers. It is fully compatible with all muttichannet formats.
1.
Press the MENU button to display the menu.
Press the A or T button to select "Sound"_ then press the ENTER C-_ button.
2.
Press the A or V' button to select "SRS TruSurround XT"_then press the
ENTER _ button.
Press the A or _r button to select "Off" or "On", then press the ENTER _
button.
Press the EXIT button to exit.
$R$(_
TruSurround XT, SRS and (o) Symbol are trademarks of
SRS Labs, inc.
TruSurround XT technology is incorporated under license
from SRS Labs, Inc.
[_) Press the SRS button on the remote control to select "Off" or "On".
[1!
®
Choosing a Multi-Channel Sound (MTS) track =Digital
The digitaI-TV transmission system is capable of simultaneous transmission of many audio tracks (for example, simultaneous
translations of the program into foreign languages). The availability of these additional "multitracks' depends upon the program.
>- "Multi-Track Options" is availableonly in TV mode.
Preferred Lan ucLuacJe
Press the MENU button to display the menu.
Press the A or • button to select "Sound", then press the ENTER C,_ button.
> Quick way to access the MTS menu: Just press the "MTS' button on the remote
control. You can listen in a language other than your chosen language by
pressing the MTS button.
2=
Press the _. or • button to select "Multi-Track Options", then press the ENTER
button.
3,
Press the ENTER _ button to select "PreferredLanguage".
Press the A or _' button to choose the language (English, Spanish or French) you
want, then press the ENTER _ button.
Press the EXIT button to exit.
> "Preferred Language' is available only in Digital TV mode.
> You can only select the language from among the actual languages being broadcast.
[5) You can listen in a language other than the Preferred language by pressing
the MTS button on the remote control.
CAD
Choosing a Multi=Channel Sound (MTS) track - Analog
Multi-Track Sound
t,
Press the MENU button to display the menu.
Press the A or _' button to select "Sound", then press the ENTER _
button.
2,
Press the A or T button to select "Multi-Track Options", then press the
ENTER _ button.
3=
Press the A or T button to select 'Multi-Track Sound'_then press the ENTER
button.
Press the A or T button to select a setting you wahl then press the ENTER
button.
Press the EXIT buttonto exit.
• Mono: Choose for channels that are broadcasting in mono or if you are hawing
difficulty
receiving a stereo signal.
• Stereo: Choose for channels that are broadcasting in stereo:
• SAR Choose to listen to the Separate Audio p[ogram, which is USUallya
foreign-language translation.
>_'Multi-Track Sound" isavailable only inAnalog TV mode.
>- Depending on the particular program being broadcast_you can listento "Mono"_
'Stered or "SAP".
Press the MTS buttons on the remote control repeatedly to select ' Mono"_
"Stereo" or 'SAP".
Automatic
Volume Control
Reduces the differences in volume level among broadcasters.
t,
Press the MENU button to display the menu.
Press the A or _' button to select "Sound", then press the ENTER _
button.
2,
Press the A or _' button to select "Auto Votume"_then press the ENTER _
3,
Press the A or T button to set Auto Volume "Off" or "On" then press the
ENTER _ button.
Press the EXIT button to exit.
button.
Setting the TV Speakers On/Off
Sound output from the TV speakers is muted.
t.
Press the MENU button to display the menu.
Press the A or _' button to select "Sound", then press the ENTER _
2.
Press the A or T button to select "TV Speaker",then press the ENTER _
3,
Press the _, or V' button to select "Off", then press the ENTER _
button.
button.
button.
Press the EXIT button to exit.
>-When "TV Speaker' is set to ,,Off,, Sound menus except 'Multi-Track Options'
cannot be adjusted.
_.-The VOL(_), VOL_) and MUTE buttons do not operate when the "TV Speaker"
is set to "Off'.
TV SpeakerOn
Speaker Output
Speaker Output
Speaker Output
TV SpeakerOff
Mute
Mute
Mute
[_['_ _"
D ! G II T A L
Connecting
Sound Output
_: Sound Output _: Sound Output
_: Sound Output
Sound Output :: Sound Output
Manufactured under license from Dolby Laboratories. Dolby and the double-D symbol are trademarks
of Dolby Laboratories.
Headphones (Sold separately)
You can connect a set of headphones to your set if you wish to watch a TV program without disturbing other people in the room.
When you insert the headphone's plug into the headphone jack, you cannot operate
"TV Speaker" in Sound menu.
:_ Prolonged use of headphones at a high volume may damage your hearing.
>_You will not hear sound from the speakers when you connect headphones to the TV.
TV Rear Panel
Clearing Scrambled Channels - Digital
The Clear Scrambled Channel function is used to fitter out scrambled channels after Auto Program is completed.
This process may take up to 20~30 minutes.
1,
2=
Press the MENU button to display the menu.
Press the A or T button to select "Channel", then press the ENTER _
Press the & or T button to select "Clear Scrambled Channel"_then press the
ENTER _ button.
It searches scrambled channels, which are to be removed from the list.
>_ To stop searching scrambled channels:
Press the ENTER _ button to select Stop.
Press the 4 button to select "Yes", then press the ENTER _
3,
button.
button.
When the scrambled channel searching is completed_ press the ENTER C*_
button.
Press the EXIT button to exit.
>- This function is only available in "Cable" mode.
Adding and Erasing Channels
Using this menu, you can Add/Delete or set Favorite channels and use the program guide for digital broadcasts.
To use the Channel List function_ first run "Auto Program" (see page 17).
1.
Press the MENU button to display the menu.
Press the A or T button to select "Channel", then press the ENTER _
2.
Press the A or V' button to select "Channel List"_ then press the
ENTER _ button.
3.
Press the ENTER _
4=
Press the _1, _, A or • button to select a channel to delete_then press the
ENTER _ button.
button.
button to select"All'.
Press the _. or T button to select "Delete', then press the ENTER _
to delete the channel
button
The @ mark will disappear.
Press the 4, 1% A or _' button to select a channel to add, then press the
ENTER _ button.
Press the _, or T button to select "Add", then press the ENTER _
add the channel.
The 0
button to
mark will appear and the channel will be added,
Press the EXIT button to exit,
_" AIt selected channels wilt be shown on "Added" menu.
, Red button: Press repeatedly to select _'AII'!,'_Added'!Orl'FavoriteL
• Green button: Press to add all deleted channels.
, Yellow button: Press to delete all memorized channels.
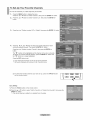
To Set-Up Your Favorite Channels
You can set channels you watch frequently as favorites.
1,
Press the MENU button to display the menu.
Press the A or _r button to select "Channel", then press the ENTER _
2,
Press the A or T button to select "Channel List"_then press the ENTER
button.
3,
Press the A or _' button to select "All" or "Added", then press the ENTER _
4=
Press the 4, _, A or V' button to select your favorite channels to watch
among the labeled channels. Then press the ENTER C*J button.
button.
button.
Press the A or T button to select "Favorite", then press the ENTER C*_
button.
The "_" symbol witl be highlighted and the channel witi be set as a Favorite.
To cancel your Favorite channel selection, press the ENTER _ button until
the "_" symbol is no longer highlighted.
Press the EXiT button to exit.
:_ Only memorized channels can be set as favorite channels.
All favorite channels will be shown in the "Favorite" menu.
,on
se
the
eot
re
the
,co
te
ch
vor
oshtro
eset
nne
ve,VC. //
Easy Setting
1, Press the TOOLS button on the remote control.
2, Press the A or T button to select "Add to Favorite" (or 'Delete from Favorite"), then press the
ENTER _ button.
>" The current channel is added to (or deleted from) Favorites.
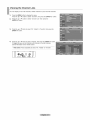
Viewing the Channel Lists
You can display a list of all channets_ added channels or your favorite channels.
1,
Press the MENU button to display the menu.
Press the A or T button to select "Channel", then press the ENTER _
button.
2,
Press the _, or '_' button to select "Channel List"_ then press the
ENTER _ button.
3,
Press the A or T button to select 'AIl"_ 'Added" or "Favoritd_ then press the
ENTER _ button.
4=
Press the A or T button to select "Channer, then press the ENTER _ button.
To toggle between your all channels, add channels or favorite channels,
use the Red button on the remote control.
i Red button: Press repeatedly to se!e_t ':Air, 'Added:' or iEavorite: _
i°2
vii
Labeling Channels
Channels can be labeled so that their call letters appear whenever the channel is selected.
1,
Press the MENU button to display the menu.
Press the A or _r button to select "Channel", then press the ENTER _ button.
Press the A or _r button to select "Name", then press the ENTER G' button.
2=
Press the A or T button to select the channel to be assigned a new name,
then press the ENTER _ button.
Press the A or _r button to select a letter, a number or a blank (Results in this
sequence: A...Z_0...9, +, -, *,/, blank).
Press the _ button to switch to the next field, which will be selected.
Select a second letter or digit by pressing the A or T button, as above.
Repeat the process to select the last three digits. When you have finished,
press the ENTER _ button to assign the new name.
To erase the assigned new name_select "Clear" by pressing the 4 or I,- button,
then press the ENTER _ button.
Press the EXIT button to exit.
The names of digital broadcasting channels are automatically assigned and
cannot be labelled.
Fine Tuning Analog Channels
Use fine tuning to manually adjust a particular channel for optimal reception.
1,
Press the MENU button to display the menu.
Press the ,_ or T button to select "Channel", then press the ENTER _
2,
Press the A or _' button to select "Fine Tune", then press the ENTER _
Press the 4 or I,- button to adjust the fine tuning.
To store the fine tuning setting in the TV's memory_press the ENTER _
button.
button.
button.
If you do not store the fine-tuned channel in memory, adjustments are not saved.
4=
To reset the fine tuning setting, press the _' button to select "Reset",
then press the ENTER _ button.
Press the EXIT button to exit.
:_ "*" wilt appear next to the name of fine-tuned channels.
>
Only analog TV channels can be fine tuned.
Checking the Digital-Signal Strength
Unlike analog channels, which can vary in reception quality from 'snowy' to clear, digital (HDTV) channels have either perfect
reception quality or you wilt not receive them at all. So, unlike analog channels, you cannot fine tune a digital channel. You can,
however, adjust your antenna to improve the reception of available digital channels.
1=
Press the MENU button to display the menu.
Press the A or T button to select "Channel", then press the ENTER _
2,
Press the A or T button to select "Signal Strength'_ then press the ENTER
button.
If the signal strength meter indicates that the signal is weak_ physically adjust your
antenna to increase the signal strength.
Continue to adjust the antenna until you find the best position with the strongest
signal.
Press the EXIT button to exit.
button.
Using Your TV as a Computer (PC) Display
Your PC SoftwareLBased on Windows XPI
The Windows display-settings for a typical computer are shown below. The actual screens on your PC wilt probably be different,
depending upon your particular version of Windows and your particular video card. However, even if your actual screens look
different, the same basic set-up information will apply in almost all cases. (If not, contact your computer manufacturer or Samsung
Dealer.)
1,
First, click on "Control Panel" on the Windows start menu.
2,
When the control panel window appears, click on "Appearance and Themes" and a
display dialog-box wilt appear.
3,
When the control panel window appears, click on "Display" and a display dialog-box
will appear.
4,
Navigate to the "Settings" tab on the display dialog-box.
The correct size setting (resolution)
Optimum: 1440 X 900 pixels
If a vertical-frequency option exists on your display settings dialog box,
the correct value is "60" or "60 Hz". Otherwise, just click "OK" and exit the dialog box.
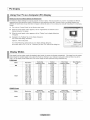
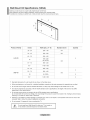
Display Modes
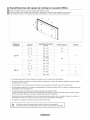
If the signal from the system equals the standard signal mode, the screen is adjusted automatically. If the signal from the system
doesn't equal the standard signal mode, adjust the mode by referring to your videocard user guidel otherwise there may be no
video. For the display modes listed below, the screen image has been optimized during manufacturing.
D-Sub In12_!
Mode
!
ItJlVt
VESA
'
Resolu {ion
720 x 400
840 x 480
840 x 480
840 x 480
800 x 800
800 x 800
800 x 600
1024x 788
1024x 788
1024x 788
1280x 1024
1280x 1024
1360x 788
1440x 900
!
Frequency(kHz
'
_ Frequency Hz)
81.488
[
70.087
59.940
72.809
75.000
60.317
72.188
75.000
60.004
70.069
75.029
60.020
75.025
60.015
59.887
31.469
37.861
37.500
37.879
48.077
46.875
48.363
56.478
60.023
63.981
79.978
47.712
55.935
Frequency(MHz
28.322
25175
31.500
31.500
40000
50.000
49500
65.000
75.000
78.750
108.000
135.000
85.500
106.500
(H/V
'
-/+
-/-/-/-
+/+
+/+
+/+
-/-/-
+/+
+/+
+/+
+/+
-/+
HDMi/DVI_
.
_o_e
1..................
!
• Frequency(kHz)
S
800 x 800
37.879
1024x 788
48.363
i
1280x 1024
83.981
i
1360x 788
47 712
....................................................................................
i
1440x900
55.935
VESA
Ver,,ca,!
!
Frequency(Hz)
Frequency (MHz)!
(H!V)
i
i
i
i
i
80.317
80.004
80.020
80 015
59.887
40.000
85.000
108.000
85 500
108.500
+/+
-/+/+
+/+
-/+
i
i
i
i
i
i
Setting up the TV with your PC
How to Auto Ad'uLustt
Use the Auto Adjust function to have the TV set automatically adjust the video signals it receives.
The function also automatically fine-tunes the settings and adjusts the frequency values and positions.
>* This function does not work in DVI-Digital mode.
>* Preset: Press the SOURCE button to select PC mode.
1,
2=
Press the MENU button to display the menu.
Press the A or _' button to select "Picture", then press the ENTER _
button.
Press the A or _' button to select "Auto Adjustment", then press the ENTER _
button.
Press the EXIT button to exit.
Easy Setting
Ad_
1.
Press the TOOLS button on the remote control.
2.
Press the A or • button to select "Sound Mode'.
3.
Press the _ or _button to select the required option.
4.
Press the EXIT or TOOLS button to exit.
the Screen
ualit
The purpose of the picture quality adjustment is to remove or reduce picture noise. If the noise is not removed by fine tuning
alone, then make the vertical frequency adjustments on your PC and fine tune again. After the noise has been reduced,
re-adjust the picture so that it is aligned on the center of the screen.
>* Preset: Press the SOURCE button to select PC mode.
1,
2,
Press the MENU button to display the menu.
Press the A or T button to select "Picture", then press the ENTER _
Press the A or T button to select "Screen", then press the ENTER _
Press the ENTER _
button.
button.
button to select "Image Lock".
Press the A or T button to select "Coarse" or "Fine", then press the ENTER C,_ button.
Press the _1or _ button to adjust the screen quality.
>*Vertical stripes may appear or the picture may be blurry.
Press the ENTER _
button.
Press the EXIT button to exit.
ChanqJ_l the Screen Position
Adjust the PC's screen positioning if it does not fit the TV screen.
:_
Preset: Press the SOURCE button to select PC mode.
1,
Press the MENU button to display the menu.
Press the A or • button to select "Picture", then press the ENTER _
Press the A or T button to select "Screen", then press the ENTER _
2,
Press the ,_ or T button to select "Position", then press the ENTER _
3,
Press the A or '_' button to adjust the V-Position.
Press the 4 or I_ button to adjust the H-Position.
Press the ENTER _ button.
button.
button.
button.
Press the EXIT button to exit.
Initializincl the Screen Positionj Coarse and Fine
You can replace all image settings with the factory default values.
>* Preset: Press the SOURCE button to select PC mode.
1,
2,
Press the MENU button to display the menu.
Press the _t,or _' button to select "Picture", then press the ENTER _
Press the A or _' button to select "Screen", then press the ENTER _
button.
button.
Press the A or _' button to select "Image Reset", then press the ENTER
button.
Press the EXIT button to exit.
Viewin
the Resolution
You can confirm the resolution configured for the PC.
Setting the Clock
Setting the clock is necessary in order to use the various timer features of tile TV.
Also_you can check the time while watching the TM (Just press the INFO button.)
Option 1: Settinqthe
Clock Manualbz
1,
Press the MENU button to display the menu.
Press the A or T button to select "Setup"_ then press the ENTER _ button.
Press the A or T button to select "Time"_ then press the ENTER _ button.
2,
Press the ENTER _
3,
Press the ENTER _ button to select 'Clock Mode".
Press the A or _' button to select "Manual", then press the ENTER _
4,
button to select "Clock".
button.
Press the A or _' button to select "Clock Set", then press the ENTER
button.
Press the 4 or 1_ button to move to 'Month", "Day", 'Year", "Hour", "Minute",
or "am/pm". Set the date and time you want by pressing the A or T button_
then press the ENTER _ button.
Press the EXIT button to exit.
The current time will appear every time you press the INFO button.
>- You can set the month, day, year, hour and minute directly by pressing the
number buttons on the remote control.
Option 2: Setting the Clock Automatically.
The Clock can be set automatically if you are receiving a digital signal.
1, Press the MENU button to display the menu.
Press the A or _' button to select "Setup", then press the ENTER _ button.
Press the A or _' button to select "Time", then press the ENTER _ button.
2,
Press the ENTER _
button to select "Clock".
3,
Press the ENTER _
button to select "Clock Mode".
Press the A or T button to select 'Auto", then press the ENTER _
button.
4,
Press the A or _' button to select "Time Zone", then press the ENTER _
5,
Press the A or T button to highlight the time zone for your local area,
then press the ENTER _ button.
Press the A or T button to select 'DST", then press the ENTER _
button.
button.
Press the A or T button to select 'Off' or 'On", then press the ENTER _
button.
Press the EXiT button to exit.
>* Depending on the broadcast station and signal, the auto time may not be
set correctly, if this occurs, set the time manually.
The Antenna or cable must be connected in order to set the time automatically.
Settin_
Timer
The sleep timer automatically
shuts off the TV after a preset time (30, 60, 90, I20, I50 and I80 minutes).
1,
Press the MENU button to display the menu.
Press the _t,or T button to select "Setup"_ then press the ENTER C,_ button.
Press the A or T button to select "Time"_then press the ENTER _ button.
2,
Press the A or _' button to select "Sleep Timer", then press the ENTER _
button.
Press the A or T button to adjust "Minute"_then press the ENTER CM button.
Setting the Timer sets the "Activation" to "On" automatically.
To cancel the set sleep timer :
Press the _ or _ button to select "Activation".
Press the A or _' button to select "Off'_ then press the ENTER _
Press the EXIT button to exit.
Easy Setting
1.
Press the TOOLS button on the remote control.
2.
Press the A or • button to select "Sleep Timer".
3.
Press the _ or _ button to select the minute.
4.
Press the EXIT or TOOLS button to exit.
button.
Settinq
the On/Off Timer
1,
Press the MENU button to display the menu.
Press the ,_ or T button to select "Setup", then press the ENTER C_' button.
Press the A or _' button to select "Time", then press the ENTER _ button.
2,
Three different On/Off Timer Settings can be made. Press the A or T button to
select 'Timer 1", "Timer 2" or "Timer 3', then press the ENTER _ button.
Press the 4 or I,- button to select the desired item below.
Press the ,t, or T button to adjust the setting,
- On Time: Set the Hour. Minute. am pm, end Activation/Inactivation.
,To activate timer with the setting you ve cnosen, se[ to
"Actwate".,
o Off Time: Set the Hour Minute. amlum, anu Acbvat_on/tnact_vauon.
•To activate t_mer w_ththe sethng you've chosen set to
Activate".
• Volume: Set the remired volume le_el.
- Channel: Select the desired channel.
* Repeat: Select "Once". "Everyday". "Mon~FrR "Mon~Sat". "Sa[~Sun". or
Manual
When "Manual" is selected, _"ess me i_ DuEon[0 selec[ me desired
aay of the week. Press the ENTER _ button over the desired da,
and the V" mark wilI appear.
Press the EXIT button to exit.
:_ You can set the hour, minute and channel by pressing the number buttons on
the remote control.
Auto Power Off
When you set the timer On, the television will eventually turn off, if no controls
are operated for 3 hours after the TV was turned on by the timer. This function
is only available in timer On mode and prevents overheating, which may occur
if a TV is on for too long time.
Function Description
Selecting a Menu Language
1,
Press the MENU button to display the menu.
Press the A or _' button to select "Setup", then press the ENTER O,_ button.
Press the A or _' button to select "Language"_ then press the ENTER _ button.
2,
Press the A or T button to select "English", "Espa_ol" or "Frangais".
Press the ENTER _ button.
Press the EXIT button to exit.
Using the V=Chip
The V-Chip feature automatically locks out programs that are deemed inappropriate for children. The user must enter a PIN
(personal ID number) before any of the V-Chip restrictions are set up or changed.
>` "V-Chip" function is not available in HDMI, component or PC mode.
>` The Screen Saver is activated if there is no remote control key input for longer than 1 minute while setting up the "V-Chip".
U.S.Aproduct
This
Only is covered by the following U.S.patents • US4,930_158,US4,930_160 i
Setting UUDYour Persona! Ig Number
tPIN_
t.
Press the MENU button to display the menu.
Press the A or T button to select "Setup"_ then press the ENTER _
2.
Press the A or T button to select"V-Chip", then press the ENTER _
The message "Enter PIN" will appear. Enter your 4 digit PIN number.
button.
button.
>-The default PIN number of a new TV set is "0-0-0-0".
The "V-Chip' screen will appear.
Press the A or _' button to select "Change PIN', then press the ENTER _ button.
The Change PIN screen will appear. Choose any 4 digits for your PIN and enter
them. As soon as the 4 digits are entered, the "Confirm Password' screen appears.
Re-enter the same 4 digits. When the Confirm screen disappears, your PIN has
been memorized.
Press the EXIT button to exit.
>_ If you forget the PIN, press the remote-control buttons in the following
sequence, which resets the pin to 0-0-0-0 : Power Off.
Mute
8
2
4
Power On.
How to Enable/Disable
t,
the V-Chip
Press the MENU button to display the menu.
Press the A or _' button to select "Setup", then press the ENTER _
2,
Press the A or _' button to select "V-Chip", then press the ENTER _
The message 'Enter PIN" will appear. Enter your 4 digit PIN number.
button.
button.
The "V-Chip" screen wilt appear.
To enable the V-Chip feature, press the ENTER _ button so that the "V-Chip Lock'
field is "On'. (Pressing the A or _' button will alternate between "On" and "Off".)
Press the ENTER button.
Press the EXIT button to exit.
How to Set u_ Restrictions
Usinqthe
"TV Parental Guidelines"
First, set up a personal identification number (PIN) and enable the V-Chip. (See previous
section.)
Parental restrictions can be set up using either of two methods: The TV guidelines or the
MPAA rating.
t,
Press the MENU button to display the menu.
Press the A or T button to select "Setup", then press the ENTER C# button.
2,
Press the A or _r button to select "V-Chip", then press the ENTER _
The message "Enter PIN" will appear. Enter your 4 digit PIN number.
button.
3. The
"V-Chip" screen will appear. Press the A
Guidelines _,then press the ENTER _
4.
The "TV Parental Guidelines" screen will appear.
Press the A or T button to select one of the six aged based categories:
,
•
•
•
5.
or _' button to select "TV Parental
button.
TV-G: General audience
TV.PG: Parentat guidance
TV-14: Viewers 14 and over
TV-MA: Mature audience
At this point, one of the TV-Ratings is selected.
Press the ENTER C,_ button. Depending on your existing setup, the "_" symbol
will be selected. (Blank = Unbtocked, _ = Blocked)
While "_ '' is selected, press the ENTER _ button to block or unblock the
category.
To select a different TV-Rating, press the A or _' button and then repeat the
process.
:_AIIow all: Press to unlock all TV ratings. / Block all: Press to lock all TV ratings.
>_The TV-Y, TV-Y7, TV-G, TV-PG, TV-14 and TV-MA have additional options.
See the next step to change any of the following sub-ratings:
FV: Fantasy violence / D: Sexually Suggestive Dialog / L: Adult Language /
S: Sexual situation / V: Violence
>_The V-Chip will automatically block certain categories that are "more
restrictive". For example, if you block "TV-Y" category, then TV-Y7 wilt
automatically be blocked. Similarly, if you block the TV-G category, then all the
categories in the "young adult" group will be blocked (TV-G, TV-PG, TV-14 and
TV-MA). The sub-ratings (D, L, S, V) work together similarly.(See next section.)
6.
How to set the FV, D, L, S and V sub-ratings.
First, select one of these TV-Ratings: TV-Y, TV-Y7, TV-G, TV-PG, TV-14 or TV-MA
(See Step 4) and press the _ button. The "_" symbol will be displayed for each
sub-rating.
While "_" is selected, press the ENTER _ button to go to a sub rating.
Press ENTER _ to block the sub rating. To select a different TV-Rating, press the
A or T button and then repeat the process.
• ALL: Lock all TV ratings_
.......
, L: Adult Language
, D: Sexually Suggestive Dialog
The V-chip will automatically block certain categories that are "More restrictive".
For example_ if you block "L" sub-rating in TV-PG_ then the "L" sub-ratings in
TV-14 and TV-MA will automatically be blocked.
7.
Press the EXIT button to clear all the screens. (Or proceed to the next section,
and set up additional restrictions based on the MPAA codes.)
>- These categories consist of two separate groups: TV-Y and TV-Y7 (young
children through age 7) and TV-G through TV-MA (everybody else).
The restrictions for these two groups work independently: If a household
includes very young children as welt as young adults, the TV guidelines must
be set up separately for each age group. (See next step.)
How to Set u_ Restrictions
Usinqthe
MPAA Ratin
s: G PG PG-13
R NC-17 X NR
The MPAA rating system uses the Motion Picture Association of America (MPAA) system and its main application is for movies.
When the V-Chip lock is on, the TV wilt automatically block any programs that are coded with objectionable ratings
(either MPAA or TV-Ratings).
to
Press the MENU button to display the menu.
Press the A or _' button to select "Setup", then press the ENTER _
2.
Press the A or _' button to select "V-Chip", then press the ENTER _
The message 'Enter PIN" will appear. Enter your 4 digit PIN number.
3.
The "V-Chip" screen will appear. Press the A or T button to select
"MPAA Rating", then press the ENTER C# button.
4.
The "MPAA Rating" screen will appear. Repeatedly press the A or T button to
select a particular MPAA category. Pressing the A or _' button will cycle through
the MPAA categories:
button.
button.
, G: General audience (no restrictions).
, PG: Parental guidance suggested.
, PG-13: Parents strongly cautioned.
R: Restricted. Children under 17 should be accompanied by an adutL
, NC.17: No children under age !71
• X: Adults only.
• NR: Not rated.
_'-Atlow alt: Press to unlock all TV ratings.
Block all: Press to lock all TV ratings.
:_ While a particular category is selected, press the ENTER _ button to activate it.
The "_" symbol will be displayed. Press the ENTER _ button to block or
unblock the category.
:_ The V-Chip will automatically block any category that is "more restrictiveL
For example, if you block the "PG-13" category, then "R", "NC-17" and "X" wilt
automatically be blocked also.
Press the EXIT button to exit.
How to Set _
Restrictions
Usinqthe
'Canadian
Enqlish'
t,
Press the MENU button to display the menu.
Press the _, or _' button to select "Setup", then press the ENTER _
2,
Press the A or T button to select "V-Chip", then press the ENTER _
The message "Enter PIN" will appear. Enter your 4 digit PIN number.
3,
The "V-Chip" screen will appear. Press the A or T button to select
"Canadian English", then press the ENTER _ button.
4,
Press the A or T button to select a appropriate restriction.
Press the ENTER C,_ button to activate the restriction selected. The "_"
indicated.
button.
button.
symbol is
Press the EXiT button to exit.
>- Allow all: Press to unlock all TV ratings.
Block all Press to lock all TV ratings.
_ C: Programming intended for children under age 8.
• C8",-_Programming generally conside[ied acceptable for children 8 Years and
over to watch on their own.
• G: General programming, suitable for atl audiences.
• PG: Parenta! Guidance.
, t4+: Programming contains themes or content whicb may not be sgitable for
viewers under the age of 14
• 18+: Adult programming.
>- The V-Chip wilt automatically block any category that is "more restrictive".
For example, if you block G category, then PG, 14+ and 18+ wilt automatically
be blocked also.
How to Set _
Restrictions
Usinqthe
'Canadian
French'
t,
Press the MENU button to display the menu.
Press the _, or _' button to select "Setup", then press the ENTER _
2,
Press the A or T button to select "V-Chip", then press the ENTER _
The message "Enter PIN" will appear. Enter your 4 digit PIN number.
3,
The "V-Chip" screen will appear. Press the A or T button to select
"Canadian French", then press the ENTER _ button.
4,
Press the A or T button to select an appropriate restriction.
Press the ENTER C,_ button to activate the restriction selected. The "_"
indicated.
button.
button.
symbol is
Press the EXIT button to exit.
>Allow alt: Press to unlock all TV ratings.
Block aft: Press to lock all TV ratings.
,,8 arts+: Programming generally considered acceptabl e for ohiIdren 8 years
and over to watch on their own.
, 13 arts÷: Programming may not be suitable for children under the age of 13.
16 arts+: Programming is not suitable for children under the age of 16,
,18 arts+: Programming restricted to adults.
> The V-Chip will automatically block any category that is "more restrictiveL
For example, if you block 8 ans+ category, then 13 ans+, 16 ans+ and 18 ans+
wilt automatically be blocked also.
Usin
the V-Chi
for Di ita! channels
Parental restriction information can be used while watching DTV channels.
t.
Press the MENU button to display the menu.
Press the A or _' button to select "Setup", then press the ENTER _
button.
2.
Press the A or T button to select "V-Chip", then press the ENTER _
The message "Enter PIN" will appear. Enter your 4 digit PIN number.
button.
3.
The "V-Chip" screen will appear. Press the A or T button to select
"Downloadable U.S. Rating", then press the ENTER _ button.
:_ If information is not downloaded from the broadcasting station, the
Downloadable U.S. rating menu is deactivated.
Parental restriction information is automatically downloaded while watching
DTV channels. It may take several seconds.
> The Downloadable U.S. rating menu is available for use after information is
downloaded from the broadcasting station. However, depending on the infer
mation from the broadcasting station, it may not be available for use.
The r_urnbe_of
Rating tide
4.
Press the _, or T button to select a appropriate restriction.
Press the ENTER C# button to activate the restriction selected. The "_"
indicated.
cu_re_/trat r_gtiSe
symbol is
Press the EXIT button to exit.
>Allow all: Press to unlock all TV ratings. / Block all: Press to lock alt TV ratings.
> Parental restriction levels differ depending on the broadcasting station.
>_The default menu name and DownloedabIe US rating changes depending on
the downloaded information.
>_Even if you set the On-screen display to your desired language, the
"Downloadable U.S. Rating" menu wilt appear in English only.
>>The rating will automatically block certain categories that are more restrictive.
> The rating titles(For example: Humor Level.,etc) and TV ratings (For example:
DH, MH, H. etc) may differ depending on the broadcasting station.
Now to Reset the TV after the V-Chil:) Blocks
a Channel {"Ernergencv
Escar:)e"_
If the TV is tuned to a restricted channel, the V-Chip wilt btock it. The screen
wilt go blank and the following message wilt appear:
t.
Enter your PIN.
To resume normal viewing_ tune to a different channel using CH(_ or CH_)
button. Under certain conditions (depending on the rating of the local TV
programs) the V-Chip might lock out all the channels. In this case, use the
V-Chip function for an "emergency escape":
2.
Press the MENU button. Press the A or _' button to select "Setup", then press
the ENTER _ button.
3.
Press the _k or _' button to select "V-Chip", then press the ENTER C,_ button.
4.
Enter your PIN, then press the ENTER _
temporarily disable the V-Chip Lock.
button and press the A or _' button to
> If you forget the PIN_ press the remote-control buttons in the following
sequence_ which resets the pin to O-O-O-O: Power Off.
MUTE
8
2
4
Power On.
The nurl_er of
all rating title
Viewing Closed Captions (On-Screen Text Messages) -Analog
The Analog Caption function operates in either analog TV channel mode or when a signal is supplied from an external device to
TV. (Depending on the broadcasting signal, the Analog Caption function may operate on digital channels.)
1,
Press the MENU button to display the menu.
Press the A or T button to select "Setup"_ then press the ENTER _
2,
Press the A or _' button to select "Caption', then press the ENTER _
3,
Press the ENTER _ button to select "Caption".
Press the A or _' button to select "On"_ then press the ENTER _
4=
button.
button.
button.
Press the A or _r button to select "Caption Mode'_ then press the ENTER
button.
Press the A or V' button to select submenu (DefaulL CC1~CC4 or Textl~Text4)
you want, the press the ENTER _ button.
Press the EXIT button to exit.
- The default is "CCl".
- CCI: The Primary Synchronous Caption Service. These are captions in the
3nmary language that must be tr sync wire the sound preferably
"na[cnea_o a soecific frame.
• CC2: The Special Non-Synchronous Use Caotions.
This channel carries data that ts ntended to augment informa[ion carnea
tn the program.
• CC3: Secondary Synchronous Caption Service
Alternate program-reta[ea cap[ton aata. typically second language
caD[ions.
• CC4: Special Non-S_,ncnronousUse Captions. Similar to CC2
• Te×tf: First Text Service. This may be vanous non-program related data
• Te×t2: Second Text Service. Additional data. usually not program retatea.
- Text3/Text4: Third and Fourth Text Services.
-hese data channels should be used only if Text1 and Text2 are
nol sufficient
The Caution feature aoesn [ WOrKtn Corr 3onent HDMI or PC moaes.
The availability of caotions deeenas on me program Deng Droaacas[
[_ Press the CC button on the remote control to turn the Caption "On_:or 'Off".
Viewing Closed Captions (On-Screen Text Messages) - Digital
The Digital Captions function operates on digital channels.
1,
Press the MENU button to display the menu.
Press the A or T button to select "Setup'_ then press the ENTER _
2,
Press the A or T button to select "Caption', then press the ENTER _
3,
Press the ENTER _ button to select "Caption".
Press the A or _' button to select "On"_ then press the ENTER _
4=
button.
button.
button.
Press the A or T button to select "Caption Mode"_then press the ENTER
button.
Press the A or • button to select submenu (Default_ Servicel~Service6,CCl~CC4
or Textl~Text4) you wanL then press the ENTER C_ button.
Press the A or T button to select "Caption Options", then press the ENTER
button.
>-"Caption Options" are available only when "Default' and "Service 1~Service 6"
can be selected in "Caption Mode".
>-Service1~6 in digital caption mode may not be available depending on the
broadcast.
Press the A or T button to select "Size", then press the ENTER _ button.
Press the A or 'V button to select the desired Caption option, then press the
ENTER _ button.
Press the A or T button to select the desired sub-menu options
(see options below), then press ENTER _ button.
Press the EXIT button to exit.
The availability of captions depends on the program being broadcast.
>_"Default' means to follow the standard set by the broadcaster.
:_ Foreground and Background cannot be set to have the same color.
>-"Foreground Opacity" and "Background Opacity' cannot be both set to
Transparent.
• Size: This option consists of "Default". "Small". "Standard" and "Large". The
default is "Standard".
, Font Style: This outlon consists of 'Default", "Style0 - Style 7". You car'
cnange the font you want. The defau _ is "Style 0L
• Foreground Color: This opuon consists of 'Default. "White". "Black'_.'Red".
Green" 'Blue'_.'Yellow", "Magen[a ann "C/an. YOUcan
change the color of the letter The default is "White'
• Background Color: This oouon consls[s of "Default". 'White". "Black". "Red'
Green". "Blue". "Yellow". "Magen[a ann "C_,an'.You can
change the background color of the caution. The default is
"Black'
• Foreground Opacity: This oution consists of "Default. "Transuarent".
Translucent "Solid" and "F ashing". You can cnange
rne opacay of the letter,
- Background Opacity: This opuon consists of "Default. "Transparem
"Translucent. "Soiid".and "Flashing. Youcan cnange
[ne backgrouna opacity of the cap[ion.
• Return to Default: This oprton sets each of"Size "Font StyW_,"Foregrouna
Color. 'Background Color "Foreground Opaci[_ and
'Background Opacity to its default.
[_i Press the CC button on the remote
control to turn the Caption "On" or
'Off".
Adjusting the TV On/Off Melody Sound
A melody sound can be set to come on when the TV is powered On or Off.
t.
Press the MENU button to display the menu.
Press the A or V button to select "Setup", then press the ENTER _
2.
Press the A or T button to select "Melody"_then press the ENTER _
3,
Press the A or V' button to select "Off"_"Low"_"Medium" or "High", then press
the ENTER _ button.
button.
button.
• Off i Turns off the melody function.
-Low : Sets the melody volume to low.
,Medium : Sets the melody volume to medium.
• High : Sets the melody votume to high.
Press the EXiT button to exit.
The Melody does not play
- When no sound is output from the TV because the MUTE button has been
pressed.
- When no sound is output from the TV because the Volume has been reduced
to minimum with the VOL_ button.
- When the TV is turned off by Timer function.
Using the Energy Saving Feature
This feature adjusts the brightness of the TV in order to reduce power consumption. When watching TV at nigtlL set the
"Energy Saving" mode option to "High" to reduce eye fatigue as welt as power consumption.
t.
Press the MENU button to display the menu.
Press the A or V' button to select "Setup", then press the ENTER _
2.
Press the A or _' button to select "Energy Saving",then press the ENTER _
button.
button.
Selectthe required option ("Off", 'Low", 'Medium", 'High") by pressing the _. or _ button
Press the ENTER _ button.
, Off: Turns off the energy saving function.
, Low: Sets the TV to low energy saving mode.
,* Medium: Sets the TV to medium energy saving mode,
* High: Sets the TV to high energy saving mode.
Press the EXIT button to exit.
Upgrading the Software
Samsung may offer upgrades for TV's firmware in the future. Please contact the Samsung call center at 1-800-SAMSUNG
(726-7864) to receive information about downloading upgrades and using a USB drive. Upgrades will be possible by connecting a
USB drive to the USB port located on your TV.
1, insert a USB drive containing the firmware upgrade into the SERVICE port on
the rear of the TV.
Software can not be upgraded through the LAN connection.
2, Press the MENU button to display the menu.
Press the A or _' button to select "Setup", then press the ENTER _
button•
3, Press the A or _' button to select "SW upgrade", then press the ENTER _
button•
4, Press the ENTER C,# button.
The message "Scanning for USB... It may take up to 30 seconds•" is displayed.
5, The message "Upgrade version XXXX to version XXXX The system would be reset
after upgrade." is displayed.
Press the _ or 1_to select the "Yes", then press the ENTER _ button•
Please be careful to not disconnect the power or remove the USB drive while
upgrades are being applied• The TV will turn off and turn on automatically after
completing the firmware upgrade• Please check the firmware version after the
upgrades are complete• When software is upgraded, video and audio settings you
have made will return to their default (factory) settings. We recommend you write
down your settings so that you can easily reset them after the upgrade.
Troubleshooting
If the TV seems to have a problem, first try this list of possible problems and solutions.
If none of these troubleshooting tips apply, call your nearest Samsung service center.
Problem
Possible Solution
Poor D_cture
Try another channel.
Adjust the antenna.
Check all wire connections.
Poor sound quality
Try another channel.
Adjust the antenna.
No _ ctute or sauna.
Try another channel.
Press the SOURCE button.
Make sure the TV is plugged in.
Check the antenna connections.
No sound or sound is too low al
maximum olume.
First, check the volume of units connected to your TV (digital broadcasting receiver_ DVD_
cable broadcasting receiver, VCR, etc.). Then, adjust the TV volume accordingly.
Picture roils vert_calIy
Check all wire connections.
The TV operates erra[ically.
Unplug the TV for 30 seconds, then try operating it again.
The TV won't turn or,
Remote control malfunctions
_ Replace ihe remote conir0t baiteries.
clean the upper edge of the remote control (transmission window).
Check !he )a!te[y }ermin_als:.............................
Check s 9nal cable" message.
Ensure that the signal cable is firmly connected to the PC source.
}
'Not SupPorted Mode" message.
Check the maximum resolution and connected device's Video frequency.
Compare these values with the data in the Display Modes.
Digkat uroaacasur ] screen
proDtem.
Please check the digital signal strength and input antenna.
The image is too light or too darK.
Adjust the Brightness and Contrast.
Adjust the Fine tuning.
Black bars on the screer
Make sure the broadcast you're receiving is High Definition (HD).
HD channels sometimes broadcast Standard Definition (SD) programming_ which can
cause black bars.
Set your cable/satellite box to stretch or widescreen mode to eliminate the bars.
Picture has a Red Green or
Pink tint.
Make sure the Component cables are connected to the correct jacks.
Closed Caotlon ng not working.
If you are using a Cable/Satellite box_you must set Closed Captioning on the box_
not your TV.
Snowy picture
Your cable box may need a firmware upgrade. Please contact your Cable company.
Ghosting on picture
This is sometimes caused by compatibility issues with your cable box.
Try connecting Component cables instead.
Problem
Possible
Solution
Honzoma_
bars
appear
toflicker. Adjust the Coarse tuning and then adjust the Fine tuning.
litter
orshimmer
ontheimage
VertJcaI
bars
aDuear
toflicken
litter
orshimmer
ontheimage
Screen
isblack
anooower
indicator
gn[blinks
s[eaaHy
image is not s[aole ana maj
appear to vleral[ewnen you nave
a computer connected _othe PC
lnpu_
Adjust the Coarse tuning and then adjust the Fine tuning.
On your corr _uter check: Power, Signal Cable.
The TV is using its power management system.
Vlove the computer's mouse or press any key on the keyboard.
f the setting is not correcL use your computer utility program to change the display settings.
Your TV supports multiscan display functions within the following frequency domain:
donzon[at frequency
(kHz)
30~60
Vertical frequency (Hz)
60~75
PC Maximum refresh rate
1440 X 900
(at 60 Hz)
Image is not centered on me
screen.
Adjus[ me nonzoma and vertical position.
The screen position must be adjusted on the output source (i.e. STB) with a digital signal.
The pictureappearsals_onean_ne
cornerof the screen,
f "Just Scan" is selected with some external devices, the picture may appear distorted in the
corner of the screen. This symptom is caused by the external devices, not TV.
The "Resetsall se_lngsto thedefault
This auuears when you press and hold the EXIT button for a while. The product
va!ues"messageappeals_.................. se_!!ngsart reset !fi !he fac!€,[y defaults:............................................
This TFT LCD panel uses a panel consisting of sub pixels (3 888 000) which require sophisticated technology to produce.
However, there may be few bright or dark pixets on the screen. These pixels witl have no impact on the performance of the
product.
How to Adjust the Stand
1. Place the front of the TV onto a soft cloth or
cushion on a table as in Figure (1).
-Align the TV bottom along the table edge.
2. Press on the center of the TV back.
Adjust the stand as in Figure (2) while
pressing the button on the back of the stand.
3. Place the TV on the table so that the TV sits
safely on the table.
(1)
(2)
How to Adjust
the Angle
( 1 )Angleadjustmentwhen usingthe
TVon its stand,
of the TV
( 2 ) Angle adjustment when converting from
Stand to Wall mount (1 _3, 3d)
( 3 )Angle adjustment
when
TV is wall=mounted
LCD
> When you adjust the stand, press the button on the back of the stand.
1. Figure (1) shows the adjustment angle (-2°-14 °) when you use the LCD on its stand.
Excessive tilting can turn the LCD TV over which may cause damage.
2. Figure (2) shows the adjustment angle (14°-80 °) when you convert the LCD from stand-based use to wall-mount.
3. Figure (3) shows the adjustment angle (0°-10 °) when you mount the LCD TV to a walt.
>You will hear a 'Click" sound when changing the angle from 1 to 2 or 3 to 2.
Installing the Wall Mount Kit
Wall mount items (sold separately) allow you to mount the TV on the wall. For the detailed information on installing the Wall
Mount, see the instruction in the Wall Mount items. Contact a technician for installing the walt bracket. Samsung Electronics is not
responsible for any damage to the product or injury to yourself or others if you choose to install the TV on your own.
installing VESA Compliant Mounting Devices
1. Place the TV face down on a soft cloth or cushion
on a table.
2. Adjust the stand, pressing the button on the back
of the stand.
3. Align the mounting interface pad (not supplied)
with the holes in the stand bottom and secure it
(1)
with the four screws that come with the arm-type
base, wall mount hanger or other bases (not
supplied).
(2)
Using the Decoration Covers
1. When installing the TV on the wall without using
the stand, insert decoration covers into the holes
as described in the picture (1).
2. After inserting the decoration covers, fasten them
with 4 screws as described in the picture (2).
(2)
Installing the Stand
1, Connect your LCD TV and the stand.
Two or more people should carry the TV.
Make sure to distinguish between the front and back of the stand when assembling them.
To make sure the TV is installed on the stand at a proper level, do not apply excess downward pressure to the upper left
of right sides of the TV.
2, Fasten two screws at position O and then fasten two screw at position 0.
Stand the product up and fasten the screws. If you fasten the screws with the LCD TV placed down, it may lean to
one side.
Disconnecting the Stand
1, Remove four screws from the back of the TV.
2, Separate the stand from the TV.
Two or more people should carry the TV.
Wall Mount Kit Specifications (VESA)
Install your watl mount on a solid wall perpendicular to the floor.
When attaching to other building material& please contact your nearest dealer.
If installed on a ceiling or slanted wall, it may fall and result in severe personal injury.
32 ~ 40
_:
46 ~ 52
LCD-TV
200 * 200
M6
600 * 400
...........................................................................................
700 * 400
57
(No VESA)
4
M8
57 ~ 70
800 * 400
80 ~
1400 * 800
42 ~ 50
600 * 400
55 ~ 70
800 * 400
63
No VESA
6
80 ~
1400 * 800
4
PDP-TV
M8
>- Standard dimensions for wail mount kits are shown in the table above.
> When purchasing our walt mount kit, a detailed installation manual and all parts necessary for assembly are provided.
Do not use screws longer than the standard dimension_ as they may cause damage to the inside of the TV set.
>* For waft mounts that do not comply with the VESA standard screw specifications, the length of the screws may differ
depending on their specifications.
Do not use screws that do not comply with the VESA standard screw specifications.
Do not use fasten the screws too strongly, this may damage the product or cause the product to fall, leading to personal injury
Samsung is not liable for these kinds of accidents.
> Samsung is not liable for product damage or personal injury when a non-VESA or non-specified wail mount is used or the
consumer fails to follow the product installation instructions.
>* Do not exceed 15 degrees tilt when mounting this TV.
Do not install your Wail Mount Kit while your TV is turned on.
It may result in personal injury due to electric shock.
Using the Anti-Theft Kensington Lock
The Kensington Lock is a device used to physically fix the system when using it in a public place. The locking device
has to be purchased separately. The appearance and locking method may differ from the illustration depending on the
manufacturer. Refer to the manual provided with the Kensington Lock for proper use. The locking device has to be
_urchased separately.
<Optional>
The location of the Kensington Lock may be different depending on its model.
1, Insert the locking device into the Kensington slot on the LCD TV (Figure 1) and turn it in the locking direction (Figure 2).
2, Connect the Kensington Lock cable.
3, Fix the Kensington Lock to a desk or a heavy stationary object.
Specifications
LNIgA330J1D/LN19A331J1D
Model Name
19 inches
Screen Size tDiagonai)
1440 x 900 @ 66 Hz
PC Resolution
Sound
Outou_
3Wx2
Dimensions
3od_
[WxDxN)
480 X 57.5 X 360.5 mm
(189 X 27 X 14.2 inches)
480 X 180 X 393 mm
With stana
(189 X 71 X 15.5 inches)
Weight
With Stone
5.2 kg (1146 Ibs)
Environmental
Considerations
Oeera_mg Temperature
Oeeratmg Humidity
Storage Temperature
Storage Humlal[y
50 °F to 104 °F (10 °C to 40 °C)
10% to 80%, non-condensing
-4 °F to 113 °F (-20 °C to 45 °C)
5% to 95%, non-condensing
Stand Swivel
Left / Right
>" Design
>-This
-0 ~ 0
and specifications
device
is a Class
>- For the power
supply
are subject
B digital
to change
without
prior notice.
apparatus.
and Power
Consumption,
refer to the label attached
to the product.
I Informacion irnportante sabre la garantia relative al forrnato de visualization del televisor
Las pantallas LCD con formato de pantalla panor_mica (16:9, la relaci6n de aspecto ancho:atto de la pantalla) estan disefiadas
principalmente para visualizar videos de movimiento de formato panoramieo Las imagenes deben estar pfineipalmente en el formato
panor_mico de relaci6n 16:9, o ampliadas para Ilenar la pantalla si el modelo tiene esta opcidn, y las im_genes estan en movimiento
constante. La visuatizaei6n de im_genes y graficos est_ticos en la pantalla, coma las barras oscuras laterales en programaei6n y videos
de televisidn en formato estandar no ampliados, debe limitarse a no mas del 5% del tiempo total de visualizacidn del televisor par semana
Adem_ts, la visualizaci6n de otras im_genes estatieas y texto, coma los informes de balsa, pantallas de videojuegos, Iogotipos de
emisoras, sitios Web o gr_tficos y dibujos de ordenador, deber_ limitarse en todos los televisores coma ya se ha deserito. La visuatizaei6n
de im_genes estaticas que supere los limites de las instrueciones anteriores puede producir un envejecimiento desigual de las pantallas
LCD, Io que provocar_ una reproducci6n superpuesta sutil pero permanente de la imagen de la LCD. Para evitarlo, varie la programaci6n
y las imagenes y, sabre todo, visualice imagenes en movimiento a toda pantalla, no gr_ficos est_ticos ni barras oscuras.
En modelos de LCD que ofrezcan opciones para el tamafio de la imagen, utilice estos eontroles para ver los distintos formatos coma
imagen a toda pantalla.
Tenga cuidado en la seleccidn y duraci6n de los formatos de televisidn utilizados para la visualizaci6n. La garantia limitada de Samsung
no cubre el envejecimiento desigual de la LCD coma resultado de la selecci6n y usa de formatos, asi coma otras im_genes retenidas.
S6to EE.UU.
La unidad del producto que se incluye con este manual del usuario se suministra con liceneia bajo derechos de propiedad inteleetual de
arras empresas. En concreto, este produeto se suministra con licencia bajo las siguientes patentes de EE.UU.: 5,99t,715, 5,740,317,
4,972,484, 5,214,678, 5,323,396, 5,539,829, 5,606,618, 5,530,655, 5,777,992, 6,289,308, 5,610,985, 5,481,643, 5,544,247, 5,960,037,
6,023,490, 5,878,080 y bajo el nOmero de aplicaci6n de patentes publicadas de EEUU. 2001-44713-A1.
Esta licencia est_ limitada al usa no comerciat privado de consumidores que sean usuarios finales para contenido con licencia. No
se otorga ningOn derecho para usa comercial. La licencia no eubre a ninguna unidad del producto que no sea _sta y la licencia no se
extiende a ninguna unidad del producto o proceso sin licencia en conformidad con el ISO/iEC 1t172-3 o ISO/iEC 13818-3 utilizada
o vendida en eombinacidn con esta unidad del produeto. La licencia s61o cubre el usa de esta unidad para codificar y/o descodificar
archivos de audio en conformidad con el ISO/iEC 11172-3 o ISO/tEC 13818-3. No se otorga ningOn derecho bajo esta licencia para
caraeteristieas o funciones del producto que no est_n eonformes con el ISO/IEC 11172-3 o ISO/iEC 13818-3.
Otros paises
La unidad del producto que se incluye con este manual del usuario se suministra con licencia bajo derechos de propiedad
intelectual de
otras empresas. Esta licencia esta limitada al usa no comercial privado de consumidores que sean usuarios finales para contenido con
licencia. No se otorga ning_'_nderecho para usa comercial. La licencia no eubre ninguna unidad del producto que no sea _sta y la liceneia
no se extiende a ninguna unidad del produeto o proceso sin licencia en conformidad con el ISO/IEC 11172-3 o ISO/IEC 13818-3 utilizada
o vendida en eombinaci6n con esta unidad del produeto. La licencia s61o cubre el usa de esta unidad para codifiear y/o descodificar
archivos de audio en conformidad con el ISO/iEC 11172-3 o ISO/tEC 13818-3. No se otorga ningOn derecho bajo esta licencia para
caraeter steas o funcones
de producto que no est_n eonformes con e SO/EC
11172-3 o SO/EC
13818-3.
Precauctones al mostrar en la pantalla una imagen fija
La imagen fija puede causar dar_ospermanentesen la aan[a a eei .televisor.
• No deje una imagenfija en ta pantalla LCD durante mas de dos horas ya que se podria prouuetruna re[eecidnde la lmagen en ta
pantalia.Este fenomeno ae retenei6nde tm&genes[amD1ense denomina ' _uemaaurade pantalla
Para evil:at que se _ "oauzoaesa persls[enolade la Jmagen,reauzoa el nlvet de iumlnoslaau
y ae comras[e ae la pan[ailacuanao
roues[reimageriesfijas.
El usa ee_[eievisor LCD en formato 4:3 durante Jntiempo proiongado puededejar ras[rosrJeeorees en tas
pares tzquteraa,derecna, cemrat ae la pan[aliadebido a tas difereneJasen la em si6n Iuminica de la pan[alia. La
reproaucci6nde un D'_Do ei usa de una consotaee weeojuegos puedenprovocar un efecto similar en te pan[aria.
)roducirun DVD o una viaeoconsola puede causar un efecto similar en la Dan[alia._a garantla no cuure es[os
anises.
•Ver lmagenesfijas de vtdeojuegosy PC durante mas tteIT30det indicado puedeproductr restos de tmagenesparciaies.
Para evitar este efeetc reduzca el 'briIW, el con[ras[e cuaneo vea tmagenesfijas.
© 2008SamsungElectronicsCo., Ltd All rightsreserved.
Contenido
=
=
=
=
m
Llstadode carac[ens[lcas ..........................................................
2
Accesonos......................................................................................
2
Aspectogeneralaelpanelae _on[rol......................
3
AspectogeneralGelpanelae conexlones..............
4
Mandoa d_s[anc_a
..............
5
ins[alaclondelasDiiasenelrnandoadistancJa
.............................
6
= UsodelTV comooamauaaeoroenaaorfPC ..............................
34
Modosde vJsualizacJ6n
...................................
34
= Ajustedettelevisorcon e!ordenador............................................
35
= Configuracbnde!Reto..................................................................
37
= Conexbnde antenasde VHF• UHF......................
6
= 3onexidnde TV potcable............................................................
Conexi6nde un rebroddctorde DVDo recep[oresue [elevlston
3orcable/satelltedecodlflcadoresa travdsdeHC_,4t
...................
8
Conexlonae un rebroductorde UVUo recep[oresde [ele_sion
3orcabte/satelltedecodificadoresa travdsdeDV ......................
S
m Conexbnde un reprodubtorde DVDo recep[oresde television
3orcabte/sat¢titedebodlflcadoresa [ravesdelos cablesde
comDonemes
9
Conexi6nde Jnavlueocamara.................
9
m Conexi6nde un reproauc[o[ae vlaeo.........
I0
= Conexbnde un sis[emaae audioalgtiai
...... 1]
= Conexidnde un amblificador/DVD
pardcineen casa..................1t
= Conexi6naun PC
.12
= Selecci6ndel idiomaaemenu
............................ 40
= UsodeV-Ch u ..............................................................................
4I
= VlSlOndesuDnwiosmensajesae[ex[oenpantalla)-Anatoglbo.48
Visi6nde subtitulos mensajesae[ex[o en pantalla)- DigitaL......49
= Ajustede tamelodiade encendidoy apagadodel[elevisor.........50
Usodela funebndeahorroae energla
.....50
= Guiade abtualizaci6n
deisoftware...............................................
5I
= tdenbflcaclonde proelemas.....................
52
= C6moajus_arelsopone..............................................................
54
m Cdmoajustarelanguloaen_elev_sor
.....
54
i
ins[alaolon
ael equlpo
ae mon[aje
en la pared .............................
54
= Instalaci6nde disposlwosae moma.econformecon VESA
54
= Usodelas tape[asaecorauvas................
54
Instalaclonaelsoporte...........................................................55
= Desconexi6ndelsoGor[e
55
Especfflcaciones
delequlpode montajeen laparedNESA'
56
= uso delclerreantlrrobot_ensHlg[on
..............................................
57
= Especlflcactones
............................................
58
=
=
B
i
Encendidoo apagaaodelTV.............
13
_unci6nPlug& Ptay........................
13
Cambiode candles..........................................................
14
Ajus[eael /olumen...............
15
Vlsuahzaclon
de la pamaila...........................................................
15
vtsuanzaclon
oe tosmenus.
..15
= Usodelbot6nTOOLS....................................................
16
= Memorizaci6nde loscandles................
16
Pardseleccionartafuente.................
18
= Edicidndel Nombrede ta Fuentede entrada...............................
18
R 3ambiodelformatode ta imogen...............................................
I9
Dersonalizabbn
de taconflgurablonae ia imagen
19
m Acttvablonde los opcuonesdela imogen
20
Reajus_eaevaloresae laimagena losvalo[esGredefinidos
de fabrica......................................................................................
23
= Cambiodel estandarae sonluo............................................ 24
= Personalizabidn_elsonldo .......................................................
24
= Configuraci6ndelTruSurroundXT fSRSTS XT'....................... 25
Selecbbnde unaptstadesonldomultlcanal(MTS)- Digitat........25
Selecbidnde unaptstade sonidomultlcana!MTSl-Anaiogibo .26
Controlautomaticode volumen.................................................
26
Eneendiddapagado
del altavozdettelevisor............................ 27
= Conexidnde los auricutares(sevenaepot separaao)
......27
= SuDreslonde lOScanabscodificadosdlgl[aIes.............
28
Adlclony supreslonde canales....................................................
29
Paracon1gurarloscanalesfavoritos
.30
wsuanzaelon
de Ia llstade candles..............................................
31
Etiaue_auoaecandles
............................................................
Sintonizacidnt qa de lOScandlesanalog"os............
33
= Comprobaclon
ae ia 3otenclade laserialdlgl[al.
33
I
Antes d_usar
el equlpo lea es_e manual para_
guarde para futuras referencias
Simbolo
A
,m
Pulse
'qota
Botonde una
pulsacidn
I
Listado de caracteristicas
•
•
•
•
Valores ajustables de la imagen que se pueden almacenar en la memoria del televisor.
Temporizador automatico para encender o apagar el televisor.
Temporizador de desconexi6n especial.
Excelente interfaz digital y capacidad de trabajo en red:
El sintonizador digital HD incorporado permite ver las emisiones HD que no exigen una suscripci6n sin que sea
necesario disponer de un receptor de tetevisi6n per cable/satelite (decodificador).
• Conexi6n HDMI/DVt del PC con este televisor.
• Calidad excelente de ta imagen
• SRS TruSurround XT
- SRS TruSurround XT proporciona un sistema surround virtual.
Accesorios
Compruebe que las opciones siguientes se incluyen con su TV LCD.
Si falta alguna opci6n_ p0ngase en contacto con el proveedor.
MandoA Distancia y Pilas (AAAx 2)
(LN19A330J1D: BN59-00678A)
(LN19A331JID: BN59-00678B)
Patio de limpieza
PaSode limpieza
(3903-000144)
(BN63-01798A)
Tarjeta de garantia / Tarjetas de registro /
Guia de seguridad
Kit de Montaje en Pared
(BN96-04960A)
(no esta disponible en todas las
..................................................
!°t !!dadts!
El color y la forma de los etementos puede variar seg0n et modelo.
Manual de tnstrucciones
Tapetas decorativas
(LN19A330J1D: Derecha: BN63-03217A
lzquierda: BN63-O3216A)
(LN19A331J1D: Derecha: BN63-O3217B)
...............
Aspecto general del panel de control
Bot6nes de ta parte inferior dereeha det panel
Los bot6nes del panel inferior derecho controtan las funciones basicas del televisor_ incluido el men_ en pantalla.
Para usar las funciones mas avanzadas, debe usar el mando a distancia.
SOURCE _,
MENU
e
+
VOL
CH
v
Botones del panel frontal
Toque cada bot0n para activar la funci6n.
>
El color y la forma del producto pueden variar segt_n el modelo.
= ........................................................................................................
O SOURCE
Cambia entre todas las fuentes de entrada disponibles
(TV, AV, S-Video, Componente, PC, HDMt).
En el menQ de la pantalla, utilice este botOn det mismo
modo que el botOn ENTER _ det mando a distancia.
O MENU
Pulse para ver en pantalla un men0 con las
caracteristicas del TV.
O - VOL +
Pulse para aumentar o reducir el volumen.
En el menO de la pantalta, utilice los bot6nes - VOL +
del mismo modo que los bot6nes 4 y I_ det mando a
distancia.
OvCH^
Pulse para cambiar de canal.
En el menO de la pantalta, utilice estos botOnesvCH ^
del mismo modo que los bot6nes • y Jt, det mando a
distancia.
=
O INDICADOR DE ALIMENTAClON
Parpadea y se apaga cuando se enciende el aparato y
se ilumina en el modo en espera.
O O (ENCENDIDO)
Pulse para encender o apagar el TV.
O SENSOR DEL MANDO A DISTANClA
Dirija el mando a distancia hacia este punto del TV.
Q ALTAVOCES
Aspecto general dei panel de conexiones
Use los terrninales del panel de conexi6n para conectar componentes de A/V que estaran disponibles permanentemente,
como un video o un reproductor de DVD. Si precisa informaci6n sobre la conexi6n de equipos+ consutte las paginas 6 a 12.
÷
e
()
ANT IN
®
+
@n
O AUDIO OUT
Permite conectar las tomas de la entrada de audio det
ampliflcador/sistema de Home Cinema.
O
BLOQUEO KENSINGTON
El bloqueo Kensington (opcional) es un dispositivo que
se utiliza para fijar fisicamente el sistema cuando se
utiliza en un sitio pOblico.
Si desea usar un dispositivo de bloqueo, p6ngase en
contacto con el distribuidor deride adquiri6 el televisor.
>- La ubicaci6n del 'Bloqueo Kensington' puede variar
segOn el modelo.
Q
_'_ (AURICULAR)
Pemlite coneotar unos auriculares externos para
audiciones privadas.
Q
AV IN
O DIGITAL AUDIO OUT (OPTICAL)
Se conecta al componente de audio digital.
0
PC IN [PC] / [AUDIO]
Permite conectar alas tomas de salida de audio y de
video de su PC.
HDMI/DVI IN / DVl IN JR-AUDIO-L]
Permite conectar a latoma HDMI de un dispositivo que tenga
satidaHDMI.
Use el terminal HDMI/DVI IN para conectar el DVI a un
dispositivo extemo.
Use un cable de DVl a HDMt o un adaptador de
DVI-HDMt (DVt a HDMt) para la conexi6n del video+ y
las tomas [R-AUDIO-L] de DVl tN para el audio.
- No se necesita ninguna conexi0n de sonido para una
conexi6n de HDMI a HDMt.
- Cuando se usa una conexi6n de cable HDMI/DVI, se
debe conectar en el terminal HDMI/DVI IN.
O SERVICE, EX-LINK
Conector solamente para servicio.
ANT IN
Permite conectar a una antena o un sistema de TV por
cable.
Entradas de video y audio para dispositivos externos+
como una videocamara o un reproductor de video.
S-VIDEO
Permite conectar la sei_al de S-Video de una camara o
de un video.
@ COMPONENT iN
El terminal COMPONENT IN tambien se usa como
terminal AV tN.
_) ENTRADA DE ALIMENTACION
Permite conectar et cable de alimentaci6n suministrado.
Mando a distancia
Puede utitizar el mando a una distancia de hasta 7 metros del televisor.
O
POWER
Enciende o apaga el TV.
O
TV
Selecciona directamente el mode
TV.
O
_
_)
BOTONES NUMI'-:RICOS
O
mono o pro grama de audio
independiente (emisi6n SAP).
SOURCE
(_)
Pulse este bot0n para
seleccionar canales adicionales
(digitales y anal0gicos) emitidos
per la misma emisora. Per
¢
ejemplo_ para eleccionar el canal
"54-3" pulse "54"_"_Y' y "3".
@ RETURN
Vuetve al men_ anterior.
_<(MUTE)
Pulse para desactivar
momentaneamente el sonido.
@
EXIT
Pulse el bot0n para satir.
¢
SRS
Setecciona el modo SRS
TruSurround XT.
O
VOL(_ / VOL_)
Pulse para au mentar o reducir
el velumen.
O
TOOLS
Se usa para seteccionar
rapidamente las funciones que
se usan con mayor frecuencia.
O
ARRIBAA / ABAJO V'/
IZQUIERDA_ / DERECHA_ /
ENTER "_
Sirve para seleccionar los
elementos del menO en pantatla
y cambiar los valores del men_.
TV
@ CH(_) / CH(_)
Permiten cambiar de canal.
@
SOURCE
PRE CH
Sintoniza et canal anterior.
=®®®
®®
O
....
....
MENU
Muestra el men0 de pantatla
principal.
@ FAV.CH
Pulse este botdn para sintonizar
sus canales favorites.
_)
P.SIZE
Setecci6n del tamale de la
imagen.
INFO
POtselo para mostrar informaci6n
en ta pantalla del televisor.
_)
POWER
Pulse este botdn para vet y
seteccionar las fuentes de video
disponibles.
Pulsar para cambiar el canal,
O
MTS
Pulse para elegir est6reo,
Botones de colores
Use estos botones en la lista de
canates, etc.
@ CC
Controla el decodificador de
subtitulos.
>_ El exceso d luz puede influir en et rendimiento del mando a distancia.
TOOLS
RETURN
Instalacibn de las pilas en el mando a distancia
1.
Levante la tapa de la parte posterior dei mando a distancia, como se maestra en la itastraci6n.
2.
Cotoque dos pitas de tamafio AAA.
>- Compraebe que los extremos "+" y "-" de las pilas concaerdan con et diagrama det interior dei
compartimiento.
3.
Vuelva a colocar la tapa.
>_ Si no va a usar el rnando a distanciadurante un largo periodo de tiempo, extraiga las pitas y guardetas
en un lugar fresco y seco.
El mando se puede utilizar hasta una distancia de anos 7 metrosdel televisor.
(Con an uso normal del TV, las pilasduran alrededorde un a_o).
> Si el mando a distancia no funciona, haga estas comprobaciones:
1. _,Estaencendido el TV?
2. _,Estaninvertidos los polos positivo y negativo de la bateria?
3. t,Se han agotado las baterias?
4. t,Ha habido un corte de luz o el cable esta desconectado?
5. _,Hay cerca una laz fluorescente o un letrero de ne6n?
Cortexione$
Conexibn de antenas de VHF y UHF
Si su antena tiene un conjanto de cables con este aspecto, consulte "Antenas de par de cables
pianos de 300 (1" a continuaci6n.
Si {a antena tiene un cable como el que se muestra en el diagrama de la derecha, consulte
"Antenas con cables coaxiales de 75 ohmios'.
Si dispone de dos antenas, consalte "Antenas de VHF y UHF independientes'.
Antenas _ar
de cables ptanos de 300 Q
Si utiliza una antena externa (de techo o de "orejas de conejo') de par de cables pianos de 300 D, siga las indicaciones sigaientes.
1.
Coloque los conductores del par de cables bajo los torniltos del adaptador de 300-75 (1
(no inclaido).
Utilice un destornilIador para apretar los torniflos.
2.
Conecte el adaptador en el terminat ANT IN en la parte posterior del televisor.
Antenas de cable coaxial de 75
1.
Conecte et cable de la antena en el terminal ANT IN de la parte inferior del panel posterior.
Antenas de VHF _endientes
Si dispone de dos antenas independientes para el TV (una de VHF y otra de UHF), debe combinar ambas se_ates de la antena
antes de conectarlas al TV. Este procedimiento precisa an adaptador-combinador especial (disponible en la mayoria de tiendas de
etectr6nica).
1.
Conecte ambos cables de antena al combinador.
2.
Conecte et combinador en el terminat ANT IN de la parte inferior det panel posterior.
1_
Conexibn de TV por cable
Para conectar a un sistema de TV per cable, siga estas instrucciones.
_or
1.
cable sin decodificador
Conecte el cable de entrada en el terminat de ta antena ANT IN de la parte posterior dei TV.
:> DadoqueelTVestapreparadoparalatelevisidnporcable,nosenecesitaundecodificador
paraver
canalesde cableno codificados
Cone×i6n
1.
al decodificador
cLue decodifica
todos los canales
Busque el cable conectado al terminal ANT OUT del decodificador.
NTIN
Esteterminalpuedeestarindicado
como'ANTOUT",'VHF OUT"o "OUT".
2.
ANTOUT_]=
Conecte el otro extreme det cable en el terminalANT IN de la parte posterior delTV.
Conexi6n a un decodificador clue decodifica alqunos canales
Si su decodificador s6to decodifica algunos canales (como los canales de pago), siga las instrucciones siguientes. Necesitara
un divisor de dos vias_ un conmutador de RF (A/B) y cuatro largos de cable RF. (Estas opciones se encuentran en la mayoria de
tiendas de electr6nica.)
Busque y desconecte el cable que esta
conectado al terminal ANT IN (entrada de
antena) de{ decodificador.
> Este terminal puede estar indicado come
"ANT IN", "VHF IN" o 'IN".
2.
Conecte este cable al divisor de dos vias.
_e_tra,,teC_b_e
,i_
_..
Conecte el cable RF entre un terminat
OUTPUT(safda) del divisor y el terminal IN
(entrada) del decodificador.
Cable
entrante
Divisor
J
Servicio
de
Cable
Conecte el cable RF entre el terminal ANT
OUT del decodificador y el terminal B.IN del
conmutador RF (A/B).
Cable
entrante
Ser=_vicio
Conecte otto cable RF entre et otro terminal
OUT del divisor y el terminal A.IN del
conmutador de RF (A/B).
d_
Cabl_-
Conmutador
Cable
entrante
RF
Servicio
6.
OUT del conmutador RF (A/B) y el terminal
Conecte
el la
01time
RF entre
el terminal
ANT IN en
parlecable
posterior
del televisor.
de
Cable
_
_/
_
Cable
/
|
(A/B)
Conmutador
_
M_-q
_
Am-_,
_)
Antena
_
RF
Servicio
de
Cable
del
(A/B)
Conmutador
Una vez hecha esta conexidn, cotoque el conmutador A/B en la posici6n 'A" para la visualizaci6n normal Cotoque el conmutador A/B en
la posicidn "B" para ver los canales codificados. (Cuando sitt3eel conmutador A/B en "B'_debera sintonizar el TV at canal de salida del
decodi%ador, que normalmente es el canal 3 o 4.)
I
I
Cone×ibn
deunreproductor
deDVDoreceptores
detelevision
porcable/sat_lite
(decodificadores)
atray,sdeHDMI
Solo es aplicable si hay un conector de salida de HDMI en et dispositivo externo.
Conecte an cable HDMI
entre la toma HDMI/DVl IN
del televisor y la toma HDMI
del reproductor de DVD o
receptor de television por
cabIe/satelite (decodificador).
receptor
Reproductor de DVD/
de cable/satelite
(decodificador)
Panel
posterior
del TV
>- _,Qu¢ es HDMI?
• HDMt, o interfaz multimedia de alta definici6n, es una interfaz de la siguiente
generaciOn que permite la transmisi6n de se_ales digitales de audio y de video
mediante un cable simple sin compresiOn.
• La diferencia entre los dispositivos HDMI y DVl es que el HDMt es mas peque_o y
tiene instalada la funciOn de codificaciOn HDCP (protecciOn alta de la copia digital
del ancho de banda).
Cada reproductor de DVD o receptor de televisiOn por cable/satetite (decodificador)
tiene una configuraciOn diferente del panel posterior.
C0nexiOn
deunrepr0duct0r
deDVD0 recept0res
detelevision
p0rcable/sat_lite
(dec0dificad0res)
atray,sdeDVI
Solo es aplicable si hay un conector de satida de DVI en et dispositivo externo.
1.
2.
Conecte un cable de DVI a
HDMI o an adaptador de
DVI-HDMI entre la toma
HDMI/DVi IN det televisor y
la toma DVI del reprodactor
de DVD o receptor de
television por cable/satOlite
(decodificador).
Panel posterior
del TV
Reproductor de DVD/
receptor
de cable/sat_lJte
(decodificador)
Conecte cables de audio entre
la toma DVI IN [R-AUDIO-L]
del televisor y el reproductor
de DVD o receptor de
television por cable/satOlite
(decodificador).
Cada reproductor de DVD o receptor de tetevisiOn por cable/sat¢lite (decodificador)
tiene una configuraciOn diferente del panel posterior.
Cuando conecte un reproductor de DVD o receptor de televisi6n por cable/sat_lite
(decodificador), debe hacer coincidir los colores del terminal de conexi6n y del cable.
:_ Cuando se usa una conexi6n de cable HDMI/DVI, se debe conectar en et terminal
HDMI/DVl IN.
Conexi6n de un reproductorde DVDo receptores de televisibn por cable/sat61ite
(decodificadores)a trav6s de los cables de componentes
Las tomas deI panel posterior dei televisorfacititan ia conexi0n de un reproductor de DVD o un receptor de televisidn per cable/
satelite (decodificador) al TV.
1.
Conecte un cable de
componentes entre las tomas
COMPONENT IN
Panel posterior
Reproductor de DVD o receptor
de televisi6n pot cable/
satelite (decodificador)
del TV
[PR,PB, Y] del televisor y las
tomas COMPONENT [Y, PB,
PR]del reproductor de DVD
o receptor de televisi6n per
cable/sat61ite (decodificador).
2.
Conecte cables de audio entre
las tomas COMPONENT IN
[R-AUDIO-L] det televisor y
las tomas AUDIO OUT del
reproductor de DVD o receptor
de televisi6n por cabte/satelite
(decodificador).
i;l"
Cable
de Component
(No incluido}
:_ El video Cornponente separa el video en Y (Luminancia (brilto))_el Pb (azul) y el Pr (rojo)
para reatzar la calidad del video.
Las conexiones de audio y de video componente deben coincidir.
Por ejemplo, si conecta un cable de video de componentes a COMPONENT IN, conecte
tambien el cable de audio a la misma entrada COMPONENT IN.
Cada reproductor de DVD o receptor de television por cabte/satelite (decodificador) tiene
una configuraci6n diferente del panel posterior.
> Cuando conecte un reproductor de DVD o receptor de televisi6n por cable/satelite
(decodificador), debe hacer coincidir los colores del terminal de conexi6n y del cable.
Cone×ibn de una videoc_mara
Las tomas del panel lateral det televisor facilitan la conexi6n de la videocamara.
Permiten vet las cintas de la videocamara sin utitizar un aparato de video.
Conecte un Cable de Video
(o Cable de S-Video) entre
las tomas AV IN [VIDEO]
(o S-VIDEO) del televisor
y las tomas VIDEO OUT
(Salida de audio) de la
videocamara.
Conecte un cable de audio
entre las tomas AV IN
[R-AUDIO-L] del televisor
y las tomas AUDIO OUT
(Salida de audio) de la
videocamara.
Panel posterior
del TV
Videoc&mara
:_ Cada videocamara tiene una configuraci0n distinta en el panel posterior.
Cuando conecte una videocamara, debe hacer coincidir los colores del terminal de
conexi0n y del cable.
Cone×ibn de un reproductor
Conexion
de video
de video
Estas instrucciones presuponen que ya ha conectado el TV a una antena o sistema de TV per cable (sigaiendo las instracciones de
las paginas 6 a 7). Si aQn no ha conectado el TV a una antena o un sistema de cable, saltese et paso 1.
1.
Desconecte el cable o la
antena de la parte posterior
dei TV.
2,
Conecte el cable o ta antena en
el terminalANT IN de ta parte
posterior dei reprodactor de
video.
Conecte el cable RF entre el
terminal ANT OUT (salida de
antena) del reprodactor de
video y el terminal ANT IN del
televisor.
4,
Panel posterior
Panel
posterior
de[ TV
del VCR
Conecte un cable de video
entre el terminal VIDEO OUT
del aparato de video y el
terminal AV IN [VIDEO] del
televisor.
i5_ Cable de Audio (No incluido)
Conecte un juego de cables
de audio entre los conectores
AUDIO OUT del reproductor
de VCR y los conectores
AV IN [R-AUDIO-L] del TV.
Si tiene un reproductor
de video "mono" (sin
est6reo), use el conector
Y (no suministrado) para
conectar los conectores de
entrada de audio izquierdo
o derecho del TV. Si el
video es estereo, tendra
qae conectar dos cables.
Conexion
!4
Cable de video
(No incluido)
!3
Cable RF INo incluido)
Siga las instrucciones de "Visaalizaci6n de una cinta de video o de camara de video" para
ver sas cintas.
Cada reproductor de video tiene una configuraci6n distinta en el panel posterior.
Cuando conecte an rc 9rodactor de video_ debe hacer coincidir los colores del terminal de
conexi0n y det cable.
de S-Video
Este televisor Samsung se puede conectar a an terminal S-Video de un aparato de video.
(Esta conexi6n proporciona una calidad de imagen meier qae ana conexi0n normal de video.)
1.
Para empezar, siga los
pasos 1 a 3 det apartado
anterior para conectar la
antena o el sistema de cable
al reproductor de VCR y al
TV.
2.
Conecte un cable de
S-Video entre la toma de
salida de S-VtDEO OUT del
Panel posterior
Panel posterior
del TV
del VCR
J
reproductor y la toma de
entrada de AV IN
[S-VIDEO] del televisor.
3.
Conecte un juego de
cables de audio entre los
conectores AUDIO OUT del
reproductor de VCR y los
conectores AV IN
[R-AUDIO-L] del TV.
Con et aparatode video se puede incluir una conexi6n S-Video. (En caso contrario, consulte en la
tienda de electr6nica.)
>_Cada aparato de video tiene una configuraci6n diferente del panel posterior.
:'*-Cuando conecte un aparato de video, debe hacer coincidir los colores del terminal de
conexi0n y del cable.
Cone×ibn de un sistema de audio digital
Las tomas del panel posterior del televisor facilitan la conexi6n de an sistema de audio digital (Home Cinema/Receptor) al televisor.
Conecte un cable 6ptico
entre las tomas "DIGITAL
AUDIO OUT (OPTICAL)"
Salida de audio digital, 6ptica
del televisor y las tomas
Digital Audio Input Entrada
de audio digital del sistema
de audio digital.
aistema
de audio digital
DND
Panel posterior
del TV
Cuado un sistema de audio
digital se conecta a la
terminal "DIGITAL AUDIO
OUT (OPTICAL)" terminal:
Reduzca la ganancia
volumen del TV, y ajuste el
voIumen con el control del
amplificador.
> El audio de 5.1 canates es posible cuando el televisor esta conectado a an dispositivo
externo que admita 5.1 canales.
> Cada sistema de audio digital tiene una configuraci6n diferente del panel posterior.
> Cuando el receptor (sistema Home Cinema) esta establecido en On, se puede oir la salida
de sonido del terminal Optical del televisor. Cuando se ve la televisi6n a traves de an DTV
(a6reo), el televisor envia el sonido de 5.1 canales al receptor del sistema Home Cinema.
Cuando la fuente es un componente digital, come un DVD, y esta conectada at televisor a
traves de HDMI, s61ose oye el sonido de 2 canates del receptor del sistema Home Cinema.
Si desea oir audio de 5.1 canales, conecte {a toma DIGITAL AUDIO OUT (OPTICAL) del
reproductor de DVD o det decodificador de cable/sat_lite directamente a un amplificador o
un sistema de cine en casa, no al televisor.
Conexibn de un amplificador/DVD para cine en casa
Conecte un cable de audio
entre las tomas AUDIO OUT
[R-AUDIO-L] det televisor y tas
tomas AUDIO IN [R-AUDIO-L]
del amplificador/DVD para cine
en casa.
Cuando un amplificador
de audio se conecta a los
terminates "AUDIO OUT
[R-AUDIO-L]' : Reduzca ta
ganancia (volumen) del TV, y
ajuste et volumen con et control
del amplificador.
AmplificadodOVO
para
eine en casa
Cable de Audio
Panel posterior
del TV
(No incluido)
Cada Amptificador/DVD para cine en casa tiene una configuraci6n distinta en el panel
posterior.
> Cuando conecte un Amplificador/DVD para cine en casa, debe hacer coincidir los colores
del terminal de conexi6n y del cable.
Conexibn a un PC
Uso del cable D-Sub
1.
Oonecte un cable D-Sub
entre et conector PC IN [PC]
deI televisor y el conector de
salida de PC del ordenador.
Panel
posterior
del TV
PC
Conecte un cable de audio
PC entre la toma PC IN
[AUDIO] deetelevisor y la
toma de salida de audio
de la tarjeta de sonido del
ordenador.
!2!
Cable de Audio
de PC (No incluido)
;I"
Cable de D-Sub
(No incluido)
Uso del cable HDMIIDVI
1.
Conecte un cable HDMI/DVI
entre Ia toma HDMI/DVI IN
Panel posterior
del TV
dei televisor y ta toma de
salida PC del ordenador.
2.
Conecte un cable est_reo
PC
miniclavija/2 RCA de 3,5
mm entre la toma DVl IN
[R-AUDIO-L] del televisor y
la toma de salida de audio
de la tarjeta de sonido del
ordenador.
!2! Cable est6reo miniclavija/2
i¥i Cable HDMI/DVI
RCA de 3,5 mm (No incluido)
(No incluido)
Cada PC tiene una configuraci6n distinta en el panel posterior.
Cuando conecte una PC, debe hacer coincidir los colores del terminal de conexi6n y del
cable.
>--Cuando se usa una conexi6n de cable HDMI/DVI, se debe conectar en el terminal
HDMI/DVI IN.
Encendido o apagado del TV
Pulse el bot6n POWER _) del mando a distancia.
Tambi_n puede usar el bot6n POWER O del televisor.
l/
POWER
SOURCE
Funci6n Plug & Play
Cuando se enciende el televisor por primera vez, se configuran seguidos y
automaticamente dos ajustes basicos del usuario.
>- El salvapantallas se activa si durante mas de 1 minuto no hay ninguna entrada
desde el teclado del mando a distancia mientras "Plug & Play" esta en ejecuciOn.
El salvapantallas se activa si durante mas de 15 minutes no se detecta ninguna
sepal de funcionamiento.
1.
Pulse et bot6n POWER (b en el mando a distancia.
Aparece el mensaje "Menu Language, Store Demo_ Channels and Time will be
set.".
Pulse et bot6n ENTER _ y aparecera automaticamente el menQ "Seleccionar et
idioma dei MenO en pantaila.'.
2.
Pulse los bot6n A o _' para seleccionar el idioma; pulse despu_s el bot6n
ENTER _.
Se muestra et rnensaje "Seieccione 'Uso domiciliario' para instalar este TV en su
casa."
3,
Pulse los bot6n _ o _- para seleccionar "Demo comercio" o 'Use domiciIiario"
despues, pulse el bot6n ENTER _.
Se muestra et rnensaje "Seleccionar las antenas que desea memorizar.".
>- Es recomendabte configurar el televisor en el mode "Uso domiciliario" para
obtener la mejor imagen en un entorno domestico.
>* El modo "Demo comercio" s61o es necesario en los entornos comerciales.
>-Si la unidad accidentalmente se configura en el modo "Demo comercio" y se
desea volver a "Uso domiciliario" (Normal): Pulse el bot6n del volumen del
televisor. Cuando se muestra la OSD del volumen, mantenga pulsado el bot0n
MENU del televisor durante 5 segundos.
4,
Pulse los bot6n _, o _' para memorizar los canaies de la conexi0n seleccionada.
Pulse et bot0n ENTER _ para seleccionar 'lniciar".
:_Aire: SePal de antena "Aire'.
Cable: Se_at de antena de "Cable".
Auto: Se_ates de antena "Aire" y de "Cable'.
>'- En el modo de cable_ puede seleccionar el origen de sepal correcto entre STD,
HRC e IRC putsando los bot0n _._ T, 4 o I_ a continuaci6n_ pulse el bot6n
ENTER _. Si tiene cable digital, seleccione la fuente de la se_at del sistema de
cable para anat6gica y para digital. P6ngase en contacto con su proveedor de
cable para saber el tipo de sistema de cable existente en su zona.
5,
El televisor empezara a memorizar todos los canates disponibles.
Para detener la b_squeda antes de que termine, pulse el bot0n ENTER _
la opci6n ' Detener" seleccionada.
con
>- Una vez guardados todos los canales disponibles, se inicia la eliminaci6n de
los canales codificados (vet pagina 28). Y, a continuaci6n, vueive a rnostrarse
et men_ Guardado automatico. Pulse el bot6n ENTER _ cuando se complete
la memorizaci6n de canales. Aparece automaticamente el men_ 'Configure et
mode de Reloj.".
Pulse
elbotOn
ENTER
_.
Pulse
tosbot6n
AoT para
seleccionar
'Auto
_despu0s_
pulse
etbotOn
ENTER
_.
Sernuestra
elmensaje
"Configurar
lahera
deverano.".
Siselecciona
'Manuat"_
semuestra
'Escriba
lafecha
ylahora.'.
(Consuite
Fas
paginas
37)
7. Pulse
losbotdn
AoVpara
seleccionar
'Apagado"
o'Encendido"
despues,
pulse
elbotOn
ENTER
C#.
Semuestra
elmensaje
"Seleccionar
lazona
horaria
enlaque
vive.".
8. Pulse
losbot6n
Ao• para
resaltar
lazona
horaria
deIarea
local.
Pulse
elbotOn
ENTER
_. Siharecibido
una
serial
digital,
seajustara
lahera
automaticamente.
Encase
negative,
consulte
lapagina
37para
ajustar
etreloj.
9. Aparece
elmensaje
"Disfrutar
suvisi6n.'.
Cuando
termine,
pulse
etbotdn
ENTER
_.
Si desea reiniciar esta funcion...
1.
Pulse el botOn MENU para ver el menQ.
Pulse los botOn A o V para seteccionar "Configuraci0n" despu0s, pulse el bot0n
ENTER _.
2.
Pulse de nuevo et bot6n ENTER _ para seleccionar "Plug & Play".
Si desea mas detalles sobre las opciones de configuraciOn, consulte las paginas
13~14.
>- La funciOn "Plug & Play" esta disponible s01oen el modo TV.
Cambio de canales
Mediante los botones
de canal
Pulse los botdnes CH(_, o CH(_) para cambiar los canales.
:_ Cuando pulse los botdnes CH(_) o CH(_) el TV cambiara los canates per orden.
Vera todos los canaies que ha memorizado el TV (El TV debera haber
mernorizado come minimo tres canales). No vera los canates borrados o no
memorizados. Consulte las paginas 16 para la memorizaciOn de los canales.
Utilizaci6n
de los botones
®
VOL
#
MUTE
num_ricos
Utitice los botones numericos para ir directamente a un canal. Por ejemplo, para
seleccionar el canal 27, pulse 2 y luego 7. El televisor cambiera de canal cuando
pulse el segundo n0mero.
Pulse los botones numericos y despu0s el botdn ENTER C_' para cambiar
rapidamente de canal.
®®®
®®®
CH
_
Uso del bot6n "_"
El botdn "_" se utiliza para seleccionar emisoras que emitan con seSal digital.
1.
Per ejemplo, para seleccionar et canal 7-1, pulse 7, (_) y 1.
>- HD indica que el televisor esta recibiendo una seSal digital de atta definici0n. SD
indica que el televisor esta recibiendo una seSal digital de definicidn estandar.
Pulse los botones numericos y despu_s el bot0n ENTER C,_ para cambiar
rapidamente de canal.
Utilizaci6n
1.
del boton PRE CH Dara seleccionar
el canal anterior
Pulse el botdn PRE CH.
El TV volvera al Oltimo canal visualizado.
Para conmutar rapidamente entre dos canates bastante distantes, sintonice
un canal y use los botOnes num_ricos para seleccionar el segundo.
Despues use el bot6n PRE CH para conmutar rapidamente entre etlos.
Ajuste del volurnen
Utilizad6n
de los botones
de volumen
1. Pulse los bot0nes VOL(_) o VOL(_) para bajar o subir el volumen.
ooTE
®
Uso del bot6n Mute
Puede interrumpir el sonido en cualquier momento pulsando el bot6n MUTE.
1.
Pulse el bot6n MUTE y el sonido se desconectara.
En pantalla se visualiza " _
".
2.
Para recuperar el sonido vuetva a pulsar MUTE o, simplemente, pulse los
bot0nes VOL(_) o VOL(_).
Visualizaci6n
de la pantalla
La pantalla identifica el canal actual y el estado de algunos ajustes de audio-video.
1.
Pulse ei bot6n INFO del mando a distancia.
El TV visualizara el canal, el tipo de sonido y ei estado de determinados ajustes de
sonido e imagen.
_" Pulse el bot6n INFO otra vez o espere unos 10 segundos y desaparecera
autom_ticamente.
Visualizacibn
1.
de los rnen s
Con et aparato encendido, pulse el bot6n MENU.
En ta pantalta aparece el mene principal.
En el lado izquierdo del men_ hay los iconos: lmagen, Sonido, Canal,
Configuraci6n, Entrada.
2.
Pulse los botones A o _' para seleccionar uno de los iconos.
A continuacidn, pulse ENTER C,_ para acceder al submene del icono.
3.
Pulse el botdn EXIT para salir.
>" Pasado aproximadamente un minuto, los menes de la pantalla desaparecen
de esta.
_GD
II I
Uso del botbn TOOLS
Se puede usar el bot6n TOOLS para seleccionar rapida y facilmente las funciones que
se usan con mas frecuencia.
El men_ 'Herramientas" cambia seg0n el mode de entrada externo que se esta viendo.
1.
Pulse el bot6n TOOLS.
Aparece el men_ "Herramientas'.
2.
Pulse los botones A o T para seleccionar un men_.
3.
Pulse los botones _./T/_/_,-/ENTER _ para ver, cambiar o usar las opciones
seteccionadas. Para ver una descripci6n mas detaltada de cada funci6n_ consulte la
pagina correspondiente.
TO LS
RETURN
• Modo de ]m
• Modo sonid0, p_gina 24
,,Temporizador, pagina 39
,,Ag(egar a Favoritos, pagina 30
• Cambiar a Ae_eos, pagina 16
Ajuste Automatico, pagina 35
Memorizacibn de los canales
Et TV puede memorizar y almacenar todos los canales disponibles, tanto de 'antena" como de cable. Una vez memorizados
los canales disponibles, use los bot6nes CH(_) o CH_) para explorarlos. De este mode no es necesario cambiar los canales
introduciendo los digitos. La memorizaci6n de canales tiene tres pasos: seleccionar una emisora de origen, memorizar los canates
(automatico) y agregar o borrar canales (manual).
Selecci6n det oriqen de la sepal de video
Antes de empezar a memorizar los canales disponibtes, debe indicar et tipo de origen de la sei_al conectada at TV
(es decir_antena o sistema de cable).
1.
Pulse el bot6n MENU para visualizar el menO.
Pulse los bot6n A o _' para seleccionar 'Canal" y_despu_s_pulse et bot6n
ENTER _.
2,
Pulse el bot6n ENTER _ para seleccionar "Antena".
Pulse los bot6n A o _' para seteccionar "Aire" o "Cable' despu6s_ pulse et bot6n
ENTER _.
Pulse el bot6n EXIT para salir.
Configuraci6n
sencilla
1.
Pulse el bot6n TOOLS del mando a distancia.
2.
Pulse los botones A o 'I' para elegir "Cambiar a Cable" (o "Cambiar a Aereos') y,
despu_s, pulse et bot6n ENTER _.
Atmacenamiento de los canales en la memoria (metodo autom&tico}
Pulse el bot6n MENU para visuaiizar el menO.
Pulse los bot6n A o _' para seteccionar 'Canal" y, despaes, pulse et bot6n
ENTER _.
Pulse los bot6n A o _' para seleccionar "Prog. Auto" y, despa_s, pulse et bot6n
ENTER _.
Pulse los bot6n A o T para seleccionar la conexi6n de la antena, despues pulse
ENTER _.
:_Aire: Serial de antena "Aire.'.
Cable: Serial de antena de "Cable'.
Auto: Seriales de antena "Aire" y de "Cable".
Ai seleccionar el sistema de TV de cable:
Pulse el bot6n ENTER C_' para iniciar el programa automatico.
Pulse los botones 4 o _ y, a continaaci6n, pulse los botones A o _' para
seleccionar la faente del sistema de cable de seSat anat6gica correcta entre "STD",
"HRC" e "IRC", pulse el bot6n ENTER _. Si tiene un televisor de cable digital,
seleccione la fuente de la sei_al del sistema de cable anat6gica y digital.
:_ STD, HRC e IRC identifican los distintos tipos de sistemas de TV por cable.
P6ngase en contacto con su proveedor de cable para averiguar el tipo de
sistema de cable existente en su zona. En este momento ya se ha seleccionado
et origen de la serial.
El televisor empieza a rnemorizar todas las ernisoras disponibtes.
Una vez gaardados todos los canales disponibles, se inicia la etiminaci6n de los
canales codificados (ver pagina 28).
>-Si desea detener la programaci6n automatica_ pulse el bot0n ENTER _.
Aparece el mensaje '2,Detener programaci6n automatica?". Seleccione "Si' con
los botones 4 o _,-y, a continuaci0n, pulse el bot0n ENTER C,-L
Pulse el bot0n EXIT para salir.
Para seleccionar la fuente
0selo para seleccionar TV u otras fuentes de entrada externas como reproductores de DVD o receptores de cable y sat_lite
(decodificadores)_ conectados at televisor. Permite seleccionar la fuente de entrada que se prefiera.
1.
Pulse el bot6n MENU para ver el men_ en pantalla.
Pulse los bot6n A o _r para seleccionar "Entrada" y_despu6s_pulse el bot6n
ENTER _.
2.
Pulse el botdn ENTER _ para seteccionar "Lista de Origen".
Pulse los bot6n A o _' para seleccionar la fuente de la serial despues pulse el
botdn ENTER _.
>-Origenes de sepal disponibles: TV, AV, S-Video, Componente, PC, HDMI.
>* Puede elegir solamente los dispositivos externos que esten conectados at
televisor.
Pulse el bot0n SOURCE del mando a distancia para ver una fuente de serial
extema.
,,':',,
fq_
Edicibn del Nombre de la Fuente de entrada
Nombre al dispositivo de entrada de informaci6n conectado con las tomas de entrada para facilitar la selecciOn de fuente de
entrada.
Pulse el botdn MENU para ver el men_ en pantalta.
Pulse los botdn A o T para seleccionar "Entrada" y_despu6s_pulse el botdn
ENTER _.
Pulse los bot6n A o _' para seleccionar 'Editar Nombre" y pulse el bot6n
ENTER _.
2.
Pulse tos bot6n A o T para seleccionar la toma de entrada "AV', "S-Video",
"Componente', "PC" o "HDMF y, a continuaci6n pulse et bot6n ENTER _.
Pulse los bot6n _, o • para seleccionar la fuente de entrada "Video", "DVD"_
'Cable STB'_ "Satelite STB', "PVR STB', "Receptor AV", "Juego", "Fitmadora', "PC",
"TV"_ "IPTV', "Blu-Ray", "HD DVD"_"Adaptador digital multimedia"_ y_a continuaci6n
pulse et bot6n ENTER _.
Pulse el bot0n EXIT para salir.
Cambio del formato de la imagen
Puede seleccionar el tipo de imagen que me!or cumpla sus requisitos de visualizacien.
1.
Pulse el bot6n MENU para vet el menOen pantalla.
Pulse el botdn ENTER _ para seleccionar "lmagen'.
2.
Pulse eI boten ENTER _ para seleccionar "Modo".
Pulse los botones A o • para seleccionar "Dinamico", "Normal" o "Pelicula".
• Din_micQi Selecciona ta alta definicidn en !a imagen, en una habitacien
IuminQsa.
,Norma!: Setecciona ta visualjzaciOn 6ptima de la imagen, en un entorno
norma!.
• Pelicula: Selecciona ta visualizacidn para ver peiiculas en una sala oscura.
3.
Pulse et boten EXIT para satir.
Configuracien
sencilla
1.
Pulse et bot6n TOOLS del mando a distancia.
2.
Pulse los botones A o T para seieccionar 'Modo de Imagen'.
3.
Pulse los botones 4 o _- para seleccionar la opcidn deseada.
4.
Pulse los botones EXIT o TOOLS para salir.
Personalizacibn de la configuracibn de la imagen
El televisor tiene varias opciones de configuracien que permiten controlar la calidad de la imagen.
1.
Para seleccionar et modo de imagen deseado, siga las instrucciones 1 y 2 de
"Cambio del formato de la imagen'.
2.
Pulse los boten A o _' para seleccionar "Luz de fondo", "Contraste", "Brilto",
"Definici6n'_ "Color' o "Tinte', despues, pulse el boten ENTER C*_.
Pulse los botch _ o _,- para aumentar o reducir el valor de una opcien concreta.
Putse el boten ENTER _.
Pulse el boten EXIT para salir.
Cuando haga cambios en "Luz de fondd, "Contraste', "Britlo", "Definicien",
"Color" o "Tinte', el color del OSD tambien se ajustara.
En et modo PC, seto se pueden realizar cambios en Ins opciones 'Luz de
fondo", 'Contraste" y "Britlo'.
La configuracien de cada dispositivo externo conectado a la entrada dei
televisor se puede ajustar y guardar.
' Luz de rondo: Ajusta el bri!lo de !a !uz de fondo de la pantalta LCD.
, Contraste: Ajusta eI niveI deI €ont[aste de ta imagen.
, Brilto: Ajusta el hive! det bril!a de !a imagen.
' Definicien: Ajusta ta deflnicidn de !os bordes de !a imagen.
, co!or: Ajusta la saturacidn de! CetO[de ta imagen.
, Tinte: Ajusta el matiz deI color de la imagen.
Activacibn de las opciones de la imagen
Activaci6n de las o_pcionesde la ima eCLe_
1.
Pulse el bot0n MENU para ver el men_ en pantalta.
Pulse el bot0n ENTER _ para seleccionar "lmagen".
2.
Pulse los botdn A o T para seleccionar "Opciones de imagen" y, a continuaci6n_
pulse el bot6n ENTER _.
Pulse los botones A o _' para seleccionar una opcidn concreta. Pulse el bot0n
ENTER C,_.
Cuando est_ satisfecho con los ajustes, pulse et bot6n ENTER _.
En el modo PC s61o se pueden hacer cambios en los elementos 'Tono Color" y
"Tama_o" dei men_ "Opciones de imagenL
Co_uraci6n
del tono del color
1.
Sigas las instrucciones 1 y 2 de "Activaci6n de los opciones de la imagen'.
(Consulte la pagina 20)
2.
Pulse tos bot6n A o _' para seleccionar "Tone Color' y_a continuaci6n, pulse el
bot0n ENTER _.
3.
Pulse los bot6n A o _' para seieccionar "Frio2", "Friol", "Normal", "Tibiol" o
'Tibio2". Pulse et bot6n ENTER _.
"Tibiol' o "Tibio2" s6Io estan disponibIes cuando et mode de imagen esta
configurado en "Pelicula'.
La configuraci0n de cada dispositivo externo conectado a la entrada del
televisor se puede ajustar y guardar.
Confiquraci6n del tomato de _antalla
Es posible que alguna vez desee cambiar el tamafio de la imagen en la pantalla El
televisor se suministra con seis opciones de tama_o de la pantalla_coda una disei_ada
para que funcione Io mejor posible con tipos especMcos de entrada de video Es posible
que el receptor de cable o satelite tenga tambi_n su propia gama de tama_os de pantalla
Sin embargo_en general_debe ver el televisor en el mode 16:9 tanto come sea posible.
1.
Sigas los instrucciones 1 y 2 de "Activaci6n de las opciones de la imogen'.
(Consulte la pagina 20)
2,
Pulse los bot6n A o _' para seteccionar "Tamale" y, a continuaci6n_ pulse et bot6n
ENTER _.
3.
Pulse los bot6n A o _' para seleccionar el formate de pantalla que desee.
Puise el bot0n ENTER _.
Pulse el bot6n EXIT para salir.
• Ancho: Ajus[a el tamai% de a imagen at ancno aaeouaao Dora ver !os
DVD o las emlslones en formato ancho.
• 16:9 : Establece la lmagen en moao panoramico 16:9
• Zoom1: Aumenta el tama_o de la lmagen en }a pamalta.
• Zoom2: Aumenta el tama_o de la lmagen mas a_n que el moao
"Zoom"
• Ajuste ancho: Amptia ta relacion de aspec_oae la _magen para aue se
ajus[e at ancno [o[al de ta pamaila.
• 4:3 : Estabtece la imagen en moao normal 4:3.
• 861o buscar: Use esta funci6n oara ver toaa la imagen sin cortes cuaneo
se reclban se_ates oe HDIV (720D/I080iL ComDoneme
_I080i_ o DTV 11080i/.
Puede producirse una retenci6n temporal de imagen cuando se ve una
imagen estatica durante mas de dos horas.
Despues de seleccionar "Zooml', "Zoom2" o "Ajuste ancho':
Pulse los botones 4 o I_ para seleccionar "Posici6n" y, a continuaci6n, pulse
el bot6n ENTER _. Utilice los botones A o _' para desplazar la imagen
hacia arriba o hacia abajo.
Reiniciar: Pulse los botones 4 o _ para seieccionar "Reiniciar" y, a
continuaci6n, pulse et bot6n ENTER _.
Despu6s de seleccionar "$61o buscar" en los modos HDMI(1080i) o
Component (1080i): Pulse los botones A o T para seleccionar "H-Posici6n"
o "V-Posici6n" y, a continuaci6n, pulse el bot6n ENTER _.
Pulse los botones 4 o I_ para ajustar la posici6n de la pantalta.
Pulse et bot6n ENTER _.
Reiniciar: Pulse tos botones h, o T para seleccionar 'Reiniciar" y, a
continuaci6n_ pulse el bot6n ENTER _.
HD (High Definition)
16:9 - 1O8Oi(1920x1080), 720p (1280x720)
La configuraci6n de cada dispositivo externo conectado a la entrada del televisor se puede ajustar y guardar.
Fuente entrada
TV, Video, S-Video, Componente (480i, 480p)
An@o, 16:9, Zoom1, Zoom2, 4:3
DTV(1O8Oi),Componente (1O8Oi),HDMI (720p,t080i)
An@e, 16:9, 4:3, Ajuste ancho, $61o buscar
PC
Ancho, 16:9, 4:3
AIternativo, pulse el bot6n RSIZE del mando a distancia de forrna repetida para
seleccionar uno de los ajustes de tama_o de imagen.
Ancho
16:c_
Zoom_
Ajustael tamat]ode ta imagenai ancno
aaecuauopara ver los DVDo tas
emisionesen formateanono
-staulece ta imagen en moao
panoramico 16:9.
Aumenta el tamano de a tmagen en ta
Zoom2
_
4:3
Aumenta eI tamaSo de la imagen mas
a_n que eI modo "Zoom1
Amatfa la relaclon de asoecto de laimagen para que se ajusre al ancnototal
ae la bantalla.
EstaDlece ta imagen en moao normal
4:3
S61obusca
Use esta funci6n oara ver toda ta
magen sin cores cuando se reciDan
set]ales de HDMI (720p/1080i),
Componente (1080i) o DTV (!O8Oi).
oamatla.
Confi_uracidn de la reduccidn digital de ruido
Si la serial de emisidn que recibe el televisor es ddbit, puede activarse la funcidn
de reduccidn digital del ruido (Digital Noise Reduction) para reducir la estatica y las
imagenes superpuestas que pueden aparecer en la pantalla.
1.
Sigas las instrucciones 1 y 2 de "Activacidn de las opciones de la imagen".
(Consulte la pagina 20)
2.
Pulse los botdn A o _' para seteccionar "Digital NR" y_a continuacidn, pulse el
botdn ENTER _.
3.
Pulse los botdn A o _' para seleccionar "Apagado", "Bajo", "Medio", "Alto" o "Auto".
Pulse el botdn ENTER _.
• Apagado: APaga la funcidn de la reduccidn del ruido de la pantalla
• Bajo: Reduce el ruido de ta pantalla a un nivel bajo.
• Medio: Reduce el ruido de la pantalla a un nivet medio.
• Alto: Reduce el ruido de la pantalla a un nivel alto.
, Auto: Reconoce y reduce el ruido de la pantaila automaticamente.
Pulse el botdn EXiT para salir.
_uracidn
det nivel de _ro
HDMI
Se puede seleccionar el nivet de negro en la pantatla para ajustar la profundidad de
esta.
1,
Sigas las instrucciones 1 y 2 de "Activaci6n de las opciones de la imagen'.
(Consulte la pagina 20)
2.
Putse los bot6n A o _' para seteccionar "N.neg HDMI" y, a continuacidn, pulse el
botdn ENTER _.
3.
Pulse los bot6n A o _' para seleccionar "Normal" o "Bajo" y, a continuacidn, pulse
el botdn ENTER _.
'Normal: La pantalta adql
, Bajo: La pantalta se oscurece.
Esta funcidn sdlo esta activa cuando un dispositivo externo esta conectado a
HDMI. La funcidn "N. neg HDMI" puede que no sea compatible con dispositivos
externos.
Pulse el botdn EXIT para salir.
_uracidn
del modo _elicula
El televisor se puede configurar para detectar automaticamente y procesar las seriales
de tas peliculas procedentes de todas las fuentes y ajustar la imagen para conseguir
una catidad 6ptima.
1.
Sigas las instrucciones 1 y 2 de 'Activaci6n de las opciones de la imagen'.
(Consulte la pagina 20)
2.
Pulse tos bot6n _, o _' para seleccionar 'Mode pelicula" y, a continuacidn, pulse el
botdn ENTER _.
Pulse los bot6n a, o T para seteccionar "Apagado" o "Auto" y, a continuacidn,
pulse el bot6n ENTER _.
Pulse el botdn EXiT para salir.
"Mode pelicula" es compatible con TV, VIDEO, S-VIDEO,
COMPONENTE(480i / 1080i) y HDMI(480i / 1080i).
Reajuste de valores de la imagen a los valores predefinidos de f_brica
1.
Pulse el bot0n MENU para ver el men_ en pantalla.
Pulse el bet0n ENTER _ para seleccionar 'lmagen'.
2.
Pulse los bot6n A o _' para seteccionar "Reiniciar" y, despues, pulse el bot6n
ENTER _. Pulse los bet6n A o _' para seteccionar 'Aceptar" o 'Cancetar".
Pulse el bot0n ENTER _.
Pulse el bot6n EXIT para salir.
>_ Se puede restaurar cada mode.
Cambio del est ndar de sonido
Puede seteccionar et mode de son!do que mejor se ajuste at programa que esta viendo.
1.
Pulse el bot6n MENU para vet el menO en pantatla.
Pulse los bot6n A o V para seleccionar "Son!do" y, despues, pulse el bot6n
ENTER _.
2. Pulse el bot6n ENTER _ para seleccionar "Mode".
Pulse los bot6n A o _' para seleccionar el ajuste de son!do "Normal", "MOsica",
"Pelicula", "Diatogo" o "Favorite" y pulse el bot6n ENTER _.
Pulse el bot6n EXIT para salir.
o Normal: Se!ecciona ei rood0 de sonido normal,
.................................
• MQsica: Realza la mQsica respecto de tas voces,
• Pelicu!a: Proporciona e! meier s0nido para ver peliculas.
:
,, Di_!ogo: Realza tas voces respected e !os son!dos.
• Favorite: Recupera la configuraci6n de son!do personalizada,
(vea "Personalizaci0n del sonido'_)
Configuraci6n
sencilla
1.
Pulse el bot6n TOOLS det mando a distancia.
2.
Pulse los botones _, o • para seleccionar "Mode son!do".
3.
Pulse los botones ,,I o I_ para seleccionar la opci6n deseada.
4.
Pulse los botones EXIT o TOOLS para salin
Personalizacibn
del sonido
Es posible ajustar los parametros del son!do seg0n sus preferencias personales.
Pulse el botdn MENU para ver el men_ en pantalta.
Pulse los bot6n A o _' para seteccionar "Son!do" y, despues, pulse el botdn
ENTER _.
2,
Pulse los bot6n A o _' para seteccionar "Ecualizador' y, despues, pulse et bot6n
ENTER _.
Pulse los bot6n _ o 1_ para seleccionar una frecuencia determinada con el fin de
ajustarla.
Pulse los bot6n A o _' para aumentar o reducir el nivel de una frecuencia
concreta.
Pulse el bot6n ENTER _.
Pulse el bot6n EXIT para salir.
' Ajuste de balance de son!do l/D: para a ustar et balance de son!do de los
altavoces lID.
o Ajuste del ancho de baada (100Hz, 300Hz, 1KHz, 3KHz, 10KHz)
Para ajustar el nivel de Ias diferentes frecuencias de ancho de banda.
Si reatiza cambios en los valores de "Ecuatizador", et mode de sonido cambiara
automaticamente al mode "Favorite".
Configuracibn del TruSurround XT (SRS TS XT)
TruSurround XT es una tecnologia SRS patentada que solventa el problema de reproducir contenido multicanat 5.1 en dos
altavoces. Trusurround proporciona una experiencia de sonido virtual convincente a traves de cualquier sistema de reproducci6n
con dos attavoces. Es totaimente compatible con todos los formatos multicanal.
1.
Pulse el bot6n MENU para ver el men0 en pantalta.
Pulse los bot6n A o _' para seleccionar 'Sonido" y, despues, pulse el bot0n
ENTER _.
2.
Pulse los bot6n A o _' para seteccionar "Trusurround SRS XT" y, despues, pulse
el bot6n ENTER C,-_.
Pulse los bot6n _, o T para seleccionar 'Apagado" o 'Encendido" y, despu_s,
pulse el bot6n ENTER _.
Pulse el bot0n EXIT para salir.
SRS(_O_
TruSurround XT, SRS y el simbolo (e) son marcas
comerciales de SRS Labs_ Inc.
La tecnologia TruSurround XT esta incorporada bajo
licencia de SRS Labs,Inc.
Pulse et botdn SRS del mando a distancia para seleccionar 'Apagadd o
"Encendido"
I-!/ " "fl
Seleccibn de una pista de sonido multicanal (MTS) - Digital
El sistema de transmisidn de TV digital permite transmitir simultaneamente rnuchas pistas de audio (por ejemplo, traducciones
simultaneas del programa en otros idiomas). La disponibitidad de estas "multipistas" adicionates depende det programa.
"Opc. Multi-track" s61oesta disponible en et modo TV.
Idioma preferido
1.
Pulse el bot6n MENU para ver el menO en pantalla.
Pulse los botdn _. o _' para seleccionar "Sonido" y, despu_s, pulse el botdn
ENTER _.
> Forma rapida de acceder at mene MTS: Pulse el bot6n "MTS' del mando a
distancia. Puede escuchar en un idioma distinto del elegido pulsando et botdn
MTS.
2.
Pulse los botdn A o _' para seleccionar "Opc. Multi-track" y, despues, pulse el bot6n
ENTER _.
3.
Pulselos bot6nes ENTER _ para seleccionar"ldioma preferido'.
Pulselos botdn A o T para etegirel idioma que desee
(English_Espa_ol, Fran9ais)y pulse el botdn ENTER _.
Pulseel bot6n EXIT para salir.
:_ "ldioma preferido" esta disponibie s61oen el modo de televisi6n digital.
S61ose puede seleccionar uno de los idiomas que ofrece laemisora.
['8/ Puede escuchar en un idioma distinto deI configurado como 'ldioma preferido"
pulsando el botdn MTS det mando a distancia.
Seleccibn de una pista de sonido multicanal
Sonido
(MTS) - Analbgico
multi=track
Pulse el bot0n MENU para vet el men_ en pantalta.
Pulse los bot6n A o T para seleccionar 'Sonido" y_despues_ pulse el bot6n
ENTER _.
Pulse los bot6n A o • para seleccionar "Opc. Multi-track' y, despu_s, pulse el
bot6n ENTER _.
Pulse los bot6n A o T para seleccionar "Sonido Multi-track' y, despu_s, pulse el
bot6n ENTER _.
Pulse los bot6n A o 'V para seleccionar una configuraci0n que desee; pulse
despu_s el bot6n ENTER _.
Pulse el bot6n EXIT para satir.
Mono: Elija para canates que emiten en monoaural o si tiene dificultades con
la recepci6n de seSates estereo
, Est_reo! EIija para canates que emiten en est_reo.
• SAP: Elija esta opci6n para escuchar el programa de audio independiente, que
normatmente es una traduccidn de otto idioma.
>_'Sonido Multi-track" esta disponible s61oen el modo de televisi6n anal0gica.
Segen el programa concreto emitido, puede escuchar en 'Mono", 'Estereo" o
"SAP".
[_} Pulse varias veces los bot0nes MTS del mando a distancia para seleccionar "Mono",
"Estereo" o "SAP".
Control autom; tico
de volumen
Reduce las diferencias en el nivel de volumen entre las emisoras.
1.
Pulse el bot6n MENU para ver et men0 en pantalla.
Pulse los botdn A o T para seleccionar "Sonido" y, despu_s, pulse et botdn
ENTER _.
2.
Pulse los bot0n A o T para seleccionar "Vol. Auto" y, despues, pulse el bot0n
ENTER _.
3.
Pulse los bot6n _, o T para seleccionar "Apagado' o "Encendido' y, despues,
putse el bot0n ENTER _.
Pulse el botdn EXIT para salir.
Encendidolapagado del altavoz del televisor
Se silencia la salida de sonido desde los altavoces del televisor.
1.
Pulse el bot6n MENU para vet el men0 en pantatla.
Pulse los botdn A o T para seleccionar "Sonido' y_despu6s_ pulse el botdn
ENTER _.
2.
Pulse los bot6n A o T para seleccionar "Altavoz TV" y_despues, pulse el bot6n
ENTER _.
Pulse los botdn A o T para seleccionar "Apagado" y_despues, pulse et botdn
ENTER _.
Pulse el bot6n EXIT para salir.
_- Cuando "Altavoz TV" se ajusta en "Apagado', el _nico men_ de sonido que se
puede ajustar es "Opc. Multi-track".
Los bot6nes VOL(_:),VOL_) y MUTE no funcionan si "Altavoz TV" esta
establecido en "Apagado'.
AJtavoz
TV
Salida
de
Salida
de
Salida
de
Salida
de sonido
Encendido
altavoces
altavoces
altavoces
Altavoz TV
Apagado
Silencio
Silencio
Sitencio
Salida de sonido
Sllencto
Slienclo
Sllenclo
Sin eel_al deJ
video
DD _"_
D I G II T A L
........
Sllencto
Salida
de sonido
Salida de sonido
i
;
....
Sllencto
Salida
de sonido
Salida de sonido
Stlenclo
Fabricado bajo licencia de Dolby Laboratories. "Dolby" y el simbolo de la dobte D son marcas
registradas de Dolby Laboratories.
Conexibn de los auriculares
(se vende pot separado)
Puede conectar unos auriculares al equipo si desea ver un programa de televisi6n sin molestar alas personas que estan en la
mJsmahabitacidn.
PanellateraldelTV
:_ Cuando se inserta el enchufe de un auricular en el terminal del auricular, no se
puede usar la opci6n 'Altavoz TV" de{ men0 Sound.
>- El uso continOo de auriculares a un volumen elevado puede da_ar la capacidad
auditiva.
No recibira sonido de los altavoces cuando conecte los auriculares at televisor.
Supresibn de los canales codificados digitales
La funci6n Borrar canates codificados se usa para fittrar los canates codificados despues de reatizar una b%queda automatica.
Puede tardar de 20 a 30 minutes.
1.
Pulse el bot6n MENU para ver el men_.
Pulse los bot6n A o _' para seteccionar "Canal" y pulse el bot0n ENTER _.
2,
Pulse los bot6n A o _' para seleccionar 'Borrar canal encriptado" y pulse el bot6n
ENTER _.
Busca los canales codificados para borrarlos de la lista.
Para detener la bQsqueda de canalea codificados:
Pulse los bot6n ENTER O,_ para seleccionar "Detener".
Pulse et bot6n 4 para seteccionar 'SF y_a continuaci6n, pulse el bot0n
ENTER _.
Una vez completada la bt3squeda de los canales codificados_ pulse et bot6n
ENTER _.
Pulse el bot6n EXIT para salir.
Esta funci6n s01oesta disponible en et modo de "Cable'.
Adicibn y supresibn de canales
Con este menO puede agregar y borrar los canales o configurarios como favoritos y usar la guia de programas de las
emisoras digitales. Para usar la funci0n Lista de canates_ primero debe ejecutar "Prog. Auto" (Consulte la pagina 17).
1.
Pulse el botOn MENU para ver el men_ en pantalta.
Pulse los bot6n _. o • para seleccionar 'Canal" y_despu0s_
pulse et bot6n ENTER _.
2.
Pulse los bot6n A o T para seteccionar 'Lista de canates" y, despu0s_
pulse et bot6n ENTER _.
3.
Pulse el bot0n ENTER _
4,
Pulse los bot6n 4, _, A o T para seleccionar el canal que desee
suprimir y pulse el baton ENTER C*_.
para seleccionar "Todos".
Pulse los bot6n A o _' para seleccionar 'Borrar" y pulse et botdn ENTER
para suprimir el canal.
Desaparecera la marca _.
Pulse los bot6n 4, 1_, A o T para seleccionar el canal que desea agregar,
a continuaciOn pulse el baton ENTER C,_.
Pulse los botdn A o _' para seieccionar "Agregar" y, despues, pulse el baton
ENTER _.
Aparece una rnarca @ y el canal se a_ade.
Pulse el botdn EXIT para salir.
> Todos los canates seteccionados se mostraran en "Agregados'.
• BotOn rojo I Pt)tselo varias veces para se!eccionar !'Todos"_
,, BotOn verde: ptJlselo para aSadir todos !os cana!es borrad0s.
* Botbn amarillo: PStselo para borrar todos los canales memorizados.
H
Para configurar los canales favoritos
Puede configurar como favoritos los canales que vea con mas frecuencia.
1.
Pulse ei botdn MENU para ver el men_ en pantalta.
Pulse los bot6n A o _' para seteccionar "Canal' y_despu6s_pulse et botdn
ENTER _.
2.
Pulse los bot6n h, o T para seleccionar 'Lista de canates" y, despu_s_
pulse el botdn ENTER _.
3.
Pulse los bot6n A o T para seteccionar "Todos" o "Agregados' y_despu6s_
pulse el botdn ENTER _.
4.
Pulse los bot6n .,_, 1_, A o T para seleccionar los canates favoritos que
desee vet entre los canates etiquetados.
Pulse los bot6n J, o T para seleccionar 'Favorites" y, despues, pulse el
botdn ENTER _.
Y el simbolo "U' se sobreindicara y el canal sera fijado como favorito.
Para cancetar su selecci6n de canales Favorites, presione et bot6n
ENTER _ hasta que el simbolo '_ no este mas sobreindicado.
Pulse el bot6n EXIT para salir.
S61opueden seleccionarse come favorites los canates memorizados.
Todos los canates seleccionados se mostraran en 'Favoritos'.
Si desea seteccionar los canales favorites que ha configurado, pulse el
bot0n FAV.CH en el mando a distancia.
Configuracidn
sencilla
1. Pulse et bot6n TOOLS del mando a distancia.
2. Pulse los botones A o _' para seleccionar "Agregar a Favoritos" (o "Borrar de Favoritos') y_a
continuacidn, pulse et botdn ENTER _.
>_El canal actual se a_ade o se borra en la lista de favorites.
Visualizacibn de la lista de canales
Puede mostrar una lista de todos los canales_ de los agregados o favoritos.
1.
Pulse el bot6n MENU para ver el men_ en pantalta.
Pulse los bot6n A o _' para seieccionar "Canal' y_despu6s_pulse e{ bot6n
ENTER _.
2.
Pulse los bot6n _, o _' para seteccionar "Lista de canates" y, despu6s_ pulse
el bot6n ENTER C*_.
3.
Pulse los bot6n & o V' para seleccionar 'Todos"_ 'Agregados" o 'Favorites'
y, despues, pulse el bot6n ENTER _.
4,
Pulse los bot6n A o • para seteccionar 'Canal' y_despu6s_pulse et bot6n
ENTER _.
Para atternar entre todos los canales, los agregados o los favoritos pulse el
bot6n Rojo del mando a distancia.
,. Botbn R0]o: PStseto varias veces para seleccionar "Todos",
'Agregados'_o 'fFavoritos'_
Etiquetado de canales
Los canales se pueden etiquetar con et prop0sito de que cuando 6stos se seleccionan se pueda vet su nombre.
Pulse el botdn MENU para ver el men_ en pantalta.
Pulse los bot6n A o _' para seteccionar 'Canal' y, despu6s, pulse et bot6n
ENTER _.
Pulse los bot6n A o _' para seleccionar 'Nombre" y, despues, pulse el botdn
ENTER _.
2,
Pulse los bot6n A o 'I' para seleccionar el canal al que se va a asignar un nuevo
nombre y pulse el botdn ENTER C_.
Pulse los bot6n A o T para seleccionar una letra, un nOmero o un espacio. (Se
produce esta secuencia: A...Z, 0...9, +, -, *,/, espacio).
Pulse el botdn I_ para pasar al siguiente campo, que quedara seleccionado.
Seleccione una segunda letra o digito pulsando los botdn A o _' como antes.
Repita el proceso para seleccionar los tres _ltimos digitos. Cuando haya
terminado, pulse el botdn ENTER _ para asignar el nornbre nuevo.
Para borrar el nuevo nornbre asignado, seleccione "Supr." pulsando los bot0nes y
pulse et bot6n ENTER _.
Pulse el bot0n EXIT para salir.
:_ Los nombres de los canales digitales se asignan automaticamente y no se
pueden etiquetar.
Sintonizacibn fina de los canales analbgicos
Utitice la sintonizaci0n fina para ajustar manuatmente un determinado canal a fin de que la recepci6n sea 6ptima.
1.
Pulse el bot0n MENU para ver el men_ en pantalta.
Putse los bot6n A o _' para seleccionar 'Canal" y_despu0s_pulse et bot6n
ENTER _.
2.
Pulse los bot6n A o _' para seteccionar "Sintonia Find' y_despues, pulse et bot6n
ENTER _.
Pulse los bot6n 4 o _- para ajustar la sintonia con precision.
Para memorizar la sintonia fina en la memoria del televisor_ pulse el bot6n
ENTER _.
:_ Si no almacena en la rnemorie el canal que ha ajustado de manera precisa, los
ajustes no se guardan.
4,
Para restablecer la sintonia fina_ pulse et bot6n _' para seleccionar 'Reiniciar"
a continuaciOn pulse el bot0n ENTER C_.
Putse el bot0n EXIT para salir.
_* El simbolo ..... aparecera junto al nombre de los canales cuya sintonizacion se
haya ajustado.
> S01opuede ajustarse la sintonizaci6n de los canales de televisi6n anatOgicos.
Comprobacibn de la potencia de la sepal digital
A diferencia de los canales anal6gicos, cuya calidad de recepciOn puede variar desde "nebuloso" a claro, los canales digitales
(HDTV) tienen una catidad de recepci6n perfecta o no se reciben en absolute. Pot tanto, a diferencia de los canates anal6gicos,
no puede sintonizar ning_n canal digital. Puede, no obstante, ajustar la antena para mejorar la recepciOn de los canales digitates
disponibles.
1.
Pulse el botOn MENU para ver el men_ en pantalta.
Pulse los bot6n A o _' para seleccionar 'Canal" y_despu0s_pulse et bot6n
ENTER _.
2,
Pulse los bot6n A o _' para seleccionar "lntensidad sepal" y, despues, pulse el
botOn ENTER _.
Si el medidor de potencia de serial indica que la serial es debit, ajuste fisicamente
su antena para incrementar la potencia de la sepal.
Contint_e ajustando la antena hasta que encuentre la mejor posiciOn con la sepal
mas potente.
Pulse el botOn EXIT para salir.
Uso dei TV como pantalla de ordenador (PC)
Instalaci6n del software en el __
A continuaci6n se muestra una pantaila de conflguraci6n normal en un ordenador con Windows. No obstante, las pantaltas reales
en su PC probablemente seran diferentes, en funci6n de su versi6n concreta de Windows y de su tarjeta de video. Pero aunque las
pantallas reales tengan un aspecto diferente, se aplicaran los mismos ajustes basicos e informaci6n en la mayoria de los cases. (Si
no es asi, p6ngase en contacto con el fabricante del ordenador o con un concesionario Samsung.)
1.
Primero, haga clic en "Panel de control" en et menQ Inicio de Windows.
2.
Cuando aparezca la pantatla del Panel de control, haga cfic en 'Apariencia y Temas" y
aparecera un cuadro de dialogo.
3.
Cuando aparezca la pantatla del Panel de control, haga ctic en "Pantalta" y aparecera un
cuadro de dialogo.
4.
Seleccione la ficha "Configuraci6n' en el cuadro de dialogo.
La configuraci6n de tamaSo correcto (resoluci6n)
Mode 6ptimo: 1440 X 900 pixets
Si existe una opci6n de frecuencia vertical en el cuadro de dialogo de configuraci6n de la
pantatla_el valor correcto es '60" o "60 Hz".
Si no, haga clic en "Aceptar" y salga del cuadro de dialogo.
Modos de visuaiizacibn
Si la serial del sistema es iguat al mode de se_at estandar, la pantalta se ajusta automaticamente. Si la sepal del sistema
no es igual al modo de sepal estandar, ajuste el mode consultando ta guia del usuario de la tarjeta de video; de Io contrario,
puede no haber se_at de video. La imagen de pantalta se ha optimizado durante la fabricaci6n para los modes de visuafizaci6n
enumerados a continuaci6n.
D-Sub Entrada
IBM
VESA
720 x 400
640 x 480
640 x 480
640 x 480
800 x 600
800 x 600
800 x 600
1024x 768
1024x 768
1024x 768
1280x 1024
1280x 1024
1360x 788
1440x 900
31469
31,469
37,861
37,500
37,879
48,077
46,875
48,363
56,476
60,023
63,98t
79,976
47,712
55,935
7&087
59,940
72,809
75,000
60,317
72,188
75,000
60,004
70,069
75,029
60,020
75,025
60,015
59,887
+/-/+
-/-
28,322
25,175
31,500
31,500
40,000
50,000
49,500
65,000
75,000
78,750
108,000
135,000
85,500
106,500
+/+
+/+
+/+
-/-/-
+/+
+/+
+/+
+/+
-/+
HDMI/DVl Entrada
Freeuencia
- 1 Frecue.cia
delrel4!
vertical (Hz)
!
60 317
60,004
60,020
60,015
59,887
i
i
i
i
i
de pixeles(MHz) !
40 000
65,000
108,000
85,500
106,500
_olarid_d
de T
Sincronizaci&n
(H/V)
i
i
i
i
i
+/+
-/+/+
+/+
-/+
Ajuste del televisor con el ordenador
C6mo realizar el Ajuste automatieo
Mediante la funci6n Ajuste Automatico se puede establecer que el televisor se ajuste automaticamente de acuerdo
con las se_ales de video que reciba. La funci6n tambi_n ajusta automaticamente con mas configuracidn y ajusta los
valores y tas posiciones de la frecuencia.
>_ Esta funcidn no esta disponible en el modo DVI-Digital.
:_ Preselecci6n: Pulse el bot0n SOURCE para seleccionar et modo PC.
1.
Pulse el bot6n MENU para ver el men_ en pantalta.
Pulse los bot6n A o _' para seleccionar 'lmagen" y_a continuaci6n, pulse el bot0n
ENTER _.
2,
Pulse los bot6n A o _' para seleccionar "AjusteAutomatico" y_despu6s, pulse el bot6n
ENTER _.
Pulse el bot6n EXIT para salir.
Configuracibn sencilla
1.
Pulse el bot6n TOOLS del mando a distancia.
2.
Pulse los botones A o V para seleccionar "Modo sonido _'.
3.
Pulse los botones 4 o i_ para seleccionar la opci6n deseada.
4.
Pulse los botones EXIT o TOOLS para salir.
Aiuste de la calidad de la pantalla
Et prop6sito del ajuste de la catidad de imagen es eliminar o reducir el ruido de la imagen. Si el ruido no desaparece s61o con la
sintonizaci6n fina, realice los ajustes de frecuencia hasta el maximo y vuetva a realizar la sintonizaci6n fina. Despues de reducir
el ruido, vuelva a ajustar la imagen para que quede alineada en et centro de la pantalta.
>- Preselecci6n: Pulse el bot6n SOURCE para seleccionar et modo PC.
Pulse el bot6n MENU para ver el men_ en pantalta.
Pulse los bot6n A o T para seleccionar 'lmagen" y_despu_s_ pulse et bot6n
ENTER _.
Pulse los bot6n A o _' para seleccionar 'Pantalta' y_despu_s_ pulse et bot6n
ENTER _.
2.
Pulse tos bot6n A o _' para seleccionar 'Reiniciar lmagen" y_despu_s_ pulse et
bot6n ENTER _.
Pulse los bot6n A o T para seleccionar "Grueso" o 'Fino" y_despu6s_ pulse et
bot6n ENTER _.
Pulse los bot6n 4 o _ para ajustar la calidad de la pantalta.
>- Pueden aparecer rayas verticales o la imagen tenet poca definici6n.
Pulse el bot6n ENTER _.
Pulse el bot6n EXIT para salir.
Cambio
de la posici6n
de la pantaHa
Ajuste la posici6n de la pantalta del PC si no se acopla a la pantatla del TV.
Preselecci6n: Pulse el bot6n SOURCE para seleccionar et mode PC.
1.
Pulse el bot6n MENU para ver el ment_en pantalla.
Pulse los bot6n A o _' para seteccionar "Imagen' y_despu6s_ pulse et bot6n
ENTER _.
Pulse los bot6n A o _' para seteccionar "Pantalia" y, despues, pulse et bot6n
ENTER _.
2,
Pulse tos bot6n A o _' para seteccionar "Posici6n" y, despues, pulse et bot6n
ENTER _.
3.
Pulse los bot6n A o _' para ajustar Posici6n V.
Pulse los bot6n 4 o _ para ajustar Posici6n H.
Pulse ei bot6n ENTER _.
Pulse el bot6n EXIT para salir.
InicializaciOn de laposici6n
de la antalla
rueso fvfino
Puede recuperar todos los ajustes de imagen predeterminados de f_brica.
:_ Preselecci6r_: Pulse el bot6r_ SOURCE para seleccionar et mode PC.
1.
Pulse el bot6n MENU para ver el ment_en pantalta.
Pulse los bot6n A o T para seleccionar 'lmagen" y, despu_s, pulse et bot6n
ENTER _.
Pulse los bot6n A o _' para seleccionar 'Pantalta' y, despu_s, pulse et bot6n
ENTER _.
2.
Pulse los bot6n A o _' para seleccionar "Reiniciar lmagen" y, despu_s, pulse et
bot6n ENTER _.
Pulse el bot6n EXIT para salir.
Visualizaci6n de la resolucion
Puede confirmar la informaci6n configurada para et PC.
Configuracibn del Reloj
Establecer el reIoj es necesario para usar las distintas caracteristicas de temporizador del TV.
Ademas_puede comprobar la hera mientras esta viendo et TV. (Simplemente pulse INFO.)
O_uste
manual del retoi
Pulse el bot6n MENU para ver el menO en pantatla.
Pulse los bot6n _t, o '_" para seleccionar "Configuraci6n" y, despu_s, pulse et
bot6n ENTER _.
Pulse los bot6n A o V para seleccionar "Tiempo" y, despues, pulse el bot6n
ENTER _.
2.
Pulse el bot6n ENTER _
para seieccionar "Reloj".
3.
Pulse el bot6n ENTER _ para seleccionar "Modo Reloj".
Pulse los bot6n Jt,o V para seleccionar "Manual" y, despu6s, pulse el bot6n
ENTER _.
4.
Pulse los bot6n A o V para seleccionar "Config. Reloj" y, despu_s, pulse et
bot6n ENTER _.
Pulse los bot6n 4 o 1_ para desplazarse a "Mes", "Dia", "A_o", "Hora",
"Minuto" o "amlpm". Seleccione la fecha y la hora que desee pulsando los
bot6nes _t, o _', pulse despuCs el bot6n ENTER _.
Pulse el botSn EXIT para salir.
La hera actual aparecera siempre que se pulse el bot6n INFO.
>- Puede ajustar el mes, et dia, et a_o, la hora y el minuto directamente pulsando los bot6nes num_ricos del mando a distancia.
Opci6n 2: Ajuste autom&tico
del reloj
El retoj puede ajustarse automaticamente cuando se recibe una seral digital.
1.
Pulse el bot6n MENU para ver el menQ en pantalla.
Pulse los bot6n _, o _' para seteccionar "Configuraci6n" y, despues, pulse et
bot6n ENTER _.
Pulse los bot6n A o _' para seteccionar "Tiempo" y, despu_s, pulse et bot0n
ENTER C*_.
2.
Pulse el bot0n ENTER _
3.
Pulse et bot0n ENTER _ para seleccionar "Modo Reloj".
Pulse los bot6n A o _' para seleccionar "Auto" y, despu_s, pulse el bot6n
ENTER C,-_.
4.
Pulse los bot6n • o _' para seteccionar "Zona Tiempo" y, despues, pulse et
bot6n ENTER _.
5.
Pulse los bot6n A o '_ para resaltar la zona horaria del area local, despu_s
pulse el bot0n ENTER _.
para seleccionar "Retoj".
Pulse los bot6n _, o _' para seleccionar "Tiempo Verano", despu6s pulse el
bot6n ENTER _.
Pulse los bot6n _, o T para seteccionar "Apagado" o "Encendido" y, despues,
pulse el bot0n ENTER _.
Pulse et bot6n EXIT para salir.
>- SegOn la estaci6n emisora y la serial, puede que el ajuste automatico
de la hera no se realice correctamente. En este case, ajuste la hera
manualmente.
La antena o el cable debe estar conectado para que se ajuste la hera
automaticamente.
Confiquraci6n
de! Temporizador
de sueho
El temporizador de desconexi6n apaga automaticamente
(entre 30, 60, 90, I20, 150 y 180 minutes).
el televisor despu_s de un periodo prefijado
Pulse el bot6n MENU para ver el men_ en pantalta.
Pulse los bot6n A o T para seleccionar 'Configuraci6n" y, despu_s, pulse et bot6n
ENTER _.
Pulse los bot6n A o _' para seleccionar 'Tiempo" y, despu_s, pulse et bot6n
ENTER _.
2.
Putse los bot6n A o _' para seleccionar "Temporizador" y, despues, pulse et bot6n
ENTER _.
Pulse los bot6n A o _' para seteccionar "Minuto" y, despu_s, pulse el bot6n
ENTER _.
Al ajustar el temporizador, "Activar" se activa automaticamente en "Encendido'.
Para cancelar el temporizador:
Pulse los bot6n 4 o _ para seleccionar "Activar".
Pulse los bot6n A o T para seleccionar "Apagado" y, a continuaci6n, pulse el
bot6n ENTER _.
Pulse el bot6n EXIT para salir.
Configuraci6n
sencilla
1.
Pulse el bot0n TOOLS det mando a distancia.
2.
Pulse los botones A o _' para seleccionar "Temporizador".
3.
Pulse los botones 4 o _,- para seleccionar los minutos.
4.
Pulse los botones EXIT o TOOLS para satir.
Activaci6n
y desactivaci6n
del tem_orizador
Pulse el botdn MENU para ver el men_ en pantalta.
Pulse los botdn A o _' para seteccionar 'Configuraci0n" y_despu6s_ pulse el bot0n
ENTER _.
Pulse los botdn A o _' para seteccionar 'Tiempo' y_despu6s_ pulse et botdn
ENTER _.
2.
La activacidn y desactivaci0n deI temporizador se puede configurar de tres
maneras. Pulse los botones ,t, o T para sebccionar "Temporizador 1",
"Temporizador 2" o "Temporizador 3' y, a continuaci6n, pulse el bot0n ENTER _.
Pulse los botones 4 o 1,- para seleccionar el etemento deseado.
Pulse los botones A o T para ajustar la configuraci0n.
- Hora de eacendJdo: A)uste ta hera tos mmutos, am,3m _ Actlvad
nactivo/Para activar el terroorlzaaor con la
aonfigure.:,idneIegida, establ6zcalo en "Activate".)
* Hora de apagado: Ajus[e la nora. los mmutos, am Dmy Activad Inacttvo
Para activar el temaonzaaor con ta configuraclon
eleglaa, estabI¢zcato en "Activate"
- Volumen: Seleccione et niveI de volumen aeseaao
* Canal: Seieccione el canal aeseaao.
- Repetir: Seleccione 'Una vez". "Cada dia". "Lun~Vie'. "Lun~Sab'
"Sab-Dom" o "Manual".
>
Con "Manual" seleccionado pulse eI baton !_ oara selecclonar e
dia de ta semana. Pulse et bot6n ENTER _ sabre et dia deseado
aparecera la marca _/'.
Pulse el bot6n EXIT para salir.
:'- Puede ajustar la hora, los minutos y et canal pulsando los botones num6ricos
del mando a distancia.
Apagado automatico
Si activa el temporizador, el televisor se apagara si no se pulsa ning_n bot6n
durante 3 horas, despues que el temporizador to haya puesto en marcha. Esta
funci6n s61oesta disponible en el mode Encendido det temporizador y evita el
recalentamiento que se puede producir si el televisor esta encendido durante
demasiado tiempo.
Seleccibn del idioma de men
Pulse el bot6n MENU para ver el mene en pantalta.
Pulse los bot6n A o T para seleccionar 'Configuraci6n" y despu_s, pulse et bot6n
ENTER _.
Pulse los bot6n A o _' para seteccionar "Idioma" y despu_s, pulse el bot0n
ENTER _.
2,
Pulse los bot6n A o _' para seteccionar el idioma apropiado "English', "Espa_ol" o
"Fran9ais".
Pulse el bot0n ENTER _.
Pulse el bot0n EXIT para salir.
Uso de V-CMp
La funci6n V-Chip bloquea automaticamente ta programaci6n que se considera inadecuadapara los nifios. El usuario debe
introducir primero un c6digo PIN (nt_mero de identificaci6n personal) antes de estabtecer o cambiar las restricciones de V-Chip.
:_ La funci6n "V-Chip" no esta disponible en los modos HDMI, componente o PC.
El salvapantallas se activa si durante mas de 1 minuto no hay ninguna entrada desde el tectado de{ mando a distancia durante
la configuraci6n de 'V-Chip'.
$61o
Este producto
EE.UU. esta protegido por las siguientes patentes de EE.UU.: US4,930, 158 US4, 930, 160
Ajuste
de1 n_lmero de identificaci6n__
1.
Pulse el bot6n MENU para ver el menQ en pantalla.
Pulse los bot6n A o V para seleccionar "Configuraci6n" y, despu_s, pulse et
bot6n ENTER _.
2.
Pulse los bot6n ,& o V para seleccionar "V-Chip" y, despues, pulse el bot6n
ENTER _.
Aparecera et mensaje "Escr.C6digo". Escriba su c6digo PIN de 4 digitos.
> El c0digo PIN predeterminado para un televisor nuevo es "0-0-0-0".
Aparecera la pantalla "V-Chip".
Pulse los bot6n A o V para seleccionar "Cambiar C0digo" y, despues, pulse
el bot0n ENTER _. Aparecera la pantalla Cambiar C6digo. Escriba un
nuevo cOdigo PtN de 4 digitos. En cuanto introduzca los 4 digitos, aparece
la pantalla "Confirmar Nuevo C0digo'. Vuelva a escribir los 4 digitos. Cuando
desaparezca la pantalia de confirmaci0n, el c6digo quedara memorizado.
Pulse el bot6n EXIT para salir.
> Si olvida su c6digo, pulse los bot6nes del mando a distancia siguiendo ta
secuencia siguiente, que restablece el c6digo a 0-0-0-0: Apagar
MUTE
.........
2
4
Encender.
8
C6mo activar/desactivar
V-Chip
1.
Pulse el bot6n MENU para ver el menO en pantalla.
Pulse los bot6n _t,o T para seleccionar "Configuraci6n" y, despu_s, pulse et
bot6n ENTER _.
2.
Pulse los bot6n A o T para seleccionar "V-Chip" y, despues, pulse el bot6n
ENTER _.
Aparecera el mensaje "lngresar C0digo". Escriba su c0digo PIN de 4 digitos.
Aparecera la pantalla "V-Chip". Para activar la funciOn V-Chip, pulse el bot6n
ENTER _ para que "BIoqueo V-Chip" se ajuste en "Encendido". (Si se pulsan
repetidamente los bot0n A o • se alterna entre "Encendido" y "Apagado".)
Pulse el bot6n ENTER C_.
Pulse et bot6n EXIT para salir.
Confiquraci6n
de Restricciones
usando la secd6n
"GuiasJ_ater.
TV"
Primero, establezca un n_mero de identificaci6n personal (PIN) y active V-Chip.
(Consulte la secci6n anterior.)
Las restricciones del bloqueo de programas se pueden estabtecer mediante dos
metodos: Las guia de programas o la ctasificaci6n MPAA.
1.
Pulse el bot6n MENU para ver el menO en pantalla.
Pulse los bot6n A o "_' para seleccionar "Configuraci6n" y, despu_s, pulse el
bot6n ENTER _.
2.
Pulse los bot6n Jt,o "_' para seleccionar "V-Chip" y, despues, pulse el bot6n
ENTER _.
Aparecera et mensaje "lngresar C0digo". Escriba su c0digo PIN de 4 digitos.
3. Aparecera
lapantatla
"V-Chip". Pulse los bot0n A
o _' para seleccionar "Guias
para el control paterno de TV" y, despues, pulse el botOn ENTER _.
4.
Aparecera la pantalla "Guias para el control paterno de TV".
Pulse los bot6n A o "f" para seleccionar una de las seis categorias basadas en la
edad:
_
*
,
*
*
5.
TV-Y: Nifios pequefios
7:
TV-Y7; Nifios de mas de 7 afios
TV-G: Todos los ptJblicos
TV-PG: Acompafiados de un ada!to
TV-14: Mayores de t4 aries
TV-MA: Para adultos
En este punto, ya ha se seleccionado una de las clasificaciones.
Pulse el botOn ENTER _. SegQn la configuraci0n, se seleccionara un simbolo _.
(En btanco = Desbloqueada, _ = Bloqueada) Mientras se selecciona "_ "_pulse el
botOn ENTER _ para bloquear o desbloquear la categoria.
Para seleccionar una clasificaciOn de TV distinta, pulse los bot0nes Jt,o _' y,
despu_s, repita el proceso.
:_ Perrn. todo: Se pulsa para desbloquear todos los programas de television. /
Bloq. todo: Se pulsa para bloquear todos los programas de television.
>_TV-Y, TV-Y7, TV-G, TV-PG, TV-14 y TV-MA incluyen opciones adicionales.
Consulte el paso siguiente para cambiar las subclasificaciones:
FV: Fantasia y violencia / D: Di_logos con atusiones sexuates /
L: Lenguaje adulto / S: Situaciones sexuales / V: Violencia
>- La opciOn V-Chip bloqueara automaticamente ciertas categodas que son 'mas
restrictivas'. Por ejemplo, si bloquea la categoria "TV-Y', automaticamente se
bloqueara TV-Y7. De manera similar, si bloquea la categoria TV-G, todas las
categorias en el grupo "adotescente" quedaran bloqueadas (TV-G, TV-PG,
TV-14, y TV-MA). Las subclasificaciones (D, L S, V) funcionan de manera
similar. (Consulte la secciOn siguiente.)
6.
C6mo establecer las subclasificaciones FV, D, L S, y V.
Primero, seteccione una de las clasificaciones de TV: TV-Y_TV-Y7 TV-G, TV-PG_
TV-14, o TV-MA (consulte el paso 4,) y pulse el botOn I_. Per cada subclasificaciOn
aparecera un simbolo "_ ".
Con el "_" seteccionado, pulse el botOn ENTER _ para ira la subclasificaciOn.
Pulse ENTER _ para bloquear la subclasificaciOn. Para seleccionar una
clasificaci6n de TV distint& pulse los botOnes A o T, despuOs, repita el proceso.
' ALL: Btoqaea todas las clasificaoiones de TV.
i PV:
Violencia y fantasia
V: Violencia
, S: SituaciOn Sexual
' L: Lenguaje grosero
, D: Dialogo de contenido sexual
:_ La opciOn V-chip bloqueara automaticamente ciertas categorias que son "mas
restrictivas'. Por ejemplo, si bloquea la subclasificaciOn "U' en TV-PG, las
subclasificaciones "L" en TV-14 y TV-MA se btoquearan automaticamente.
Pulse el botOn EXiT para borrar todas las pantallas. (O continOe en la secciOn
siguiente y establezca restricciones adicionales segQn los cOdigos MPAA.)
> Estas categorias se dividen en dos grupos: TV-Y y TV-Y7 (nifios pequefios y
nifios a partir de 7 aries), y TV-G a TV-MA (todos los demas).
Las limitaciones para estos grupos funcionan de forma independiente:
Si en la familia hay nifios muy pequefios y adultos jOvenes, la opci6n Guia de
programas debe configurarse per separado para grupo de edad. (Consulte el
siguiente paso.)
Confi
_
MPAA: G PG PG-13 R NC-17 X NR
El sistema de ciasificaci6n MPAA utiliza el sistema de la MPAA (Motion Picture Association of America, Asociaci6n americana
de cinematografia) que se aplica principatmente en las peliculas. Si et bioqueo de V-Chip esta activado, el televisor btoqueara
automaticamente programas que est6n codificados con clasificaciones rechazables (de la MPAA o de teievisi6n).
1.
Pulse el bot6n MENU para ver el menO en pantalla.
Pulse los bot6n A o '_' para seleccionar "Configuraci6n" y, despu_s,
pulse el bot6n ENTER _.
2.
Pulse los bot6n A o T para seleccionar "V-Chip" y, despues, pulse el bot6n
ENTER _.
Aparecera et mensaje "lngresar C0digo". Escriba su c0digo PIN de 4 digitos.
3.
Aparecera la pantatla "V-Chip".
Pulse los botdn _, o V para seleccionar "Clas. MPAA", y, despu_s, pulse et
bot6n ENTER _.
Aparecera la pantalla "Clas. MPAA".
Pulse varias veces tos botOn _, o _I' para seleccionar una categoria concreta
de MPAA. Pulsando los bot6n A o _' pasara secuencialmente por todas las
categorias MPAA:
*
,
.
,
G: Todos tos p0blicos (sin restricciones).
PG: Se sugiere la compa_ia de un adutto.
PG-13: Menores ac0mpa_ados de un adulto.
R: Restringido: Los ni_os menore s de t7 a_os deben esta r acompa_ados por
un adutto.
, NC-17: Prohibida ta entrada a menores de 17 afios.
_X: S6to aduttos.
* NR: Sin ctasificacion.
:_ Perm. todo: Se pulsa para desbioquear todos los programas de televisi6n.
Bloq. todo: Se pulsa para bloquear todos los programas de tetevisidn.
>- Con una determinada categoria seleccionada, pulse et bot6n ENTER _ para
activarla.
En la pantalla aparecera un simboto "_ ' seleccionado.
Pulse el bot6n ENTER _ para bioquear o desbloquear la categoria.
:_ La opci6n V-chip bloqueara automaticamente cualquier categoria que sea "mas
restrictiva'.
Por ejemplo, si bloquea la categoria "PG-13", tambi_n se bloquearan
automaticamente "R', "NC-17" y '%'.
Pulse el botdn EXIT para salir.
C6mo confiqurar
las restricciones
en el idioma _
Canadiense'
1.
Pulse el bot6n MENU para ver el menO en pantalla.
Pulse los bot6n A o T para seleccionar "Configuraci6n" y, despu6s, pulse et
bot6n ENTER _.
2.
Pulse los bot6n A o T para seleccionar "V-Chip" y, despu6s, pulse el bot6n
ENTER _.
Aparecera et mensaje "lngresar C6digo". Escriba su c6digo PIN de 4 digitos.
3.
Aparecera la pantatla "V-Chip". ulse los botOn _, o _" para seleccionar "lngl6s
Canadiense" y, a continuaci0n, pulse el bot6n ENTER _.
Pulse los bot6n A o "_ para seleccionar la restricci0n apropiada.
Pulse et bot6n ENTER C,_ para activar la restricci0n seleccionada.
Esta resaltada la "_ ".
Pulse et bot6n EXIT para salir.
>- Perm. Todo: Se pulsa para desbloquear todos los programas de tetevisi6n.
BIoq. Todo: Se pulsa para bloquear todos los programas de televisi6n.
• C: Programaclon Dara ntlios menores de 8 e_os.
• 08+: Programacl6n generaimeme constaeraaa acep_aDleDara nl_os mayores
de 8 arios sln acompa_am_ento de adultos.
• G: Programacion general, ideat Data toaas tas aualenclas.
, PG: Superv slon Daterna.
• 14+: ha programacton comlene temas y contenlaos que pueae que no sear
adecuados Dara menores de 14 aSos.
. !8+: Programaclon para aaultos
> El V-Chip bloqueara automaticamente cualquier categoria que sea
"mas restrictiva". Per ejemplo, si bloquea la categoria G, automaticamente tambi6n se btoqueara PG, 14+ y 18+.
C6mo confiqurar
las restrict{ones
en el idioma
'Franc_s
Canadiense'
1.
Pulse el bot6n MENU para ver el menO en pantalla.
Pulse los bot6n A o T para seleccionar "Configuraci6n" y, despu_s, pulse et
bot6n ENTER _.
2.
Pulse los bot6n A o T para seleccionar "V-Chip" y, despues, pulse el bot6n
ENTER _.
Aparecera el mensaje "lngresar C0digo". Escriba su c0digo PIN de 4 digitos.
3.
Aparecera la pantalla "V-Chip". Pulse los bot0n _ o 'Y' para seleccionar
"Frances Canadiense" y, despu6s, pulse et botdn ENTER _.
Pulse los bot6n A o "_ para seleccionar la restricci0n apropiada.
Pulse et bot6n ENTER C,# para activar la restricci0n seleccionada.
Esta resaltada la "_ ".
Pulse et bot6n EXIT para salir.
Perm. Todo: Se pulsa para desbloquear todos los programas de tetevisi6n.
BIoq. Todo: Se pulsa para bloquear todos los programas de televisi6n.
,, 8 ans+: No recomendada para ni_os pequeSos.
• 13 arts÷: Es posibl e que la programaci6n no sea adecuada Para ni_os
menores de 13 aSos.
• 16 arts+: Es p0sible queta programacidn no sea adecuada para niSos
menores de 16 aSos.
• 18 arts+: Programacidn restringida para adultos.
:_ El V-Chip bloqueara automaticamente cualquier categoria que sea
"mas restrictiva". Por ejemplo, si bloquea la categoria 8 arts+, tambi_n se
bloquearan automaticamente 13 ans+, 16 ans+ y 18 arts+.
Use de V-Chip con los canales
diqitales
La informacien de la restriccidn de bloqueo se puede usar mientras seven los canales DTV.
1.
Pulse el bot6n MENU para ver el menO en pantalla.
Pulse los bot6n A o T para seleccionar "Configuracien" y, despues, pulse et
botdn ENTER _.
2.
Pulse los bot6n A o '_" para seleccionar "V-Chip" y, despues, pulse el bot6n
ENTER _.
Aparecera et mensaje "lngresar COdigo". Escriba su cOdigo PIN de 4 digitos.
Pulse los bot6n A o '_' para seleccionar "Clasificaci0n U.S. Descargable" y,
despues, pulse el botdn ENTER _.
:_ Si la informaci6n no se descarga desde la emisora, el ment_
"Clasificaci6n U.S. Descargable" esta desactivado.
>- La informaci0n de la restricciOn de bloqueo se puede descargar
autom_ticamente mientras se ven los canales DTV. Esto puede tardar
algunos segundos.
>- El menO "Clasificaci6n U.S. Descargable" esta disponible despues de que la
informaci6n se haya descargado desde la emisora. Sin embargo, segOn el
tipo de informaci6n de la emisora, el menO podria no estar disponible para
SU use.
Pulse los bot6n A o T para seleccionar la restricci0n apropiada.
Pulse et botdn ENTER C,_'para activar la restricci0n seleccionada.
Esta resaltada la "_ ".
Pulse el botdn EXIT para salir.
Permitir todo (Perm. Todo): Se pulsa para desbloquear todos los programas
de televisi6n.
BIoquear todo (BIoq. Todo): Se pulsa para bloquear todos los programas de
televisien.
>- Los niveles de restricci6n de bloqueo difieren segOn la emisora.
> El nombre de menO predeterminado y "Clasificacien U.S. Descargable"
cambian segOn la informacien descargada.
>-Aunque configure la visualizaci0n en pantalla en su propio idiom& el menO
"Clasificacien U.S. Descargable" siempre Io vera en ingles.
> La clasificacien bloqueara automaticamente ciertas categorias que son "m_s
restrictivas".
:_ Los titulos de clasificacidn (per ejemplo: Nivel humor, etc) y las
clasificaciones de televisidn (per ejemplo: DH, MH, H, etc) pueden
diferir segOn la emisora.
C6mo reiniciar el televisor
despues
de que V-Chip bloquee
Titulo de c asificac 6n
un canal ("Salida de emergencia")
Si el televisor sintoniza un canal restringido, el V-Chip Io bloquear&
La pantalta quedara en blanco y aparecera el siguiente mensaje:
Escriba su cedigo PtN.
Para votver al mode de visualizaci6n normal, sintonice un canal diferente
con los botones CH(_) o CH(_). En ciertas condiciones (segt_n la clasificaci6n
de los programas de televisi6n locales) la funciOn V-Chip puede bloquear
todos los canates. En este caso_ utllice la funci6n V-Chip come "salida de
emergencia":
2,
Pulse el botOn MENU. Pulse los botones _, o T para seleccionar
"Configuracien" y, a continuacien, pulse ENTER _.
3.
Pulse los botones A o T para seteccionar "V-Chip" y_a continuaciOn_ pulse el
bot6n ENTER _.
4.
Escriba su cOdigo PtN, pulse ENTER _ y, a continuaci6n, los botones _t,o T
para desactivar temporalmente la funci6n BIoqueo V-Chip.
>*Si olvida el PIN_ pulse los botones del mando a distancia en la siguiente
secuencia para reiniciar el cedigo a 0-0-0-0 : Apagar
MUTE
8
2
Encender.
4
E}numefo del ttulo de
clasificacinn actual
El nOmeo de redes os
titubs de clasificacir31}
Visibn de subtitulos (mensajes de te×to en pantalla) - Analbgico
La funci6n de subtitulo anal6gico funciona tanto en ei mode de canal de televisi6n anal6gica come cuando el televisor recibe una
se_ai de un dispositivo extemo. (Dependiendo de la sepal de transmisi6n_ puede funcionar en canaies digitales.)
Pulse el bot6n MENU para ver el men_ en pantalta.
Pulse los bot6n A e _' para seleccionar 'Cenfiguraci6n" y, despues, pulse et bot6n
ENTER _.
2,
Pulse los bot6n A o _' para seleccionar 'Subtitulo' y, despues, pulse el bot6n
ENTER _.
3.
Pulse el bot6n ENTER _ para seleccionar "Subtitulo".
Pulse los bot6n A o _' para seleccionar 'Encendido" y, despu_s, pulse el bot6n
ENTER _.
4,
Pulse los bot6n _t,o T para seleccionar "Mode de Subtitulo" y, despu_s, pulse el
bot6n ENTER _.
Pulse los bot6n A o _' para seleccionar el subment_que desee (Programado,
CC1~CC4, o Textol~Texto4), pulse despu6s el bot6n ENTER _.
Pulse el bot6n EXIT para salir.
- El valor predeterminado es "CCl".
• CCl: EI servlclo Dnmano de subtituIos sincronizados. Son subtffutos
dJoma pnqolDal clue debe estar stnoronlzado con e sonldo
preferibIemente que comclda con ta secuencla especifica.
• CC2: Subtituios esoeclaies ae use no sincronizado. Este cana [ranspor[a
]a[os uue es[an aestmados a am_ ar Ia informaci6n dei programa.
• CC3: Se[ icio de subtitulos secundanos slncronlzados. Datos al[ernauvos
en el
ae subtituios relac 3nados con el programa, tipicamente subtituIos ael
segunao lalonta
• gC4: Subtitulos esoeclaies ae uso no sincronizaao. Similar a CC2
. Textol: Primer servicJo de texto. Se puede tratar de vanos datos no
relaclonaaos con programa atguno.
• Texto2: Segundo servicio de texto. Datos adicionates, normalmeme sin
retaci6n cot programa aJguno.
• Texto3/Texto4: Tercer ,, cualto serviclos ae [exto. Es[os canales de dates s6to
se aeDen usar si Textol y Texto2 no son suficientes.
:_ La funci6n Subtitulo no esta disponible en los modos Componente, HDMI ni PC.
>- La disponibitidad de los subtitulos depende de{ programa que se est6 ernitiendo.
[5} Pulse el bot6n CC del monde a distancia varias veces para seleccionar "Encendido"
u "ApagadoL
Visibn de subtitulos (mensajes de texto en pantalla) - Digital
La funci6n Subtitulo digital funciona en canates digitales.
1.
Pulse el bot6n MENU para ver el men_ en pantalla.
Pulse los bot6n A o _' para seleccionar "Configuraci6n" y_despu6s_ pulse el bot6n
ENTER _.
2.
Pulse los bot6n A o _' para seleccionar 'Subtitulo' y, despues, pulse el bot6n
ENTER _.
3.
Pulse el bot6n ENTER _ para seleccionar "Subtitulo".
Pulse los bot6n A o _' para seleccionar "Encendido" y_despu6s_ pulse el bot6n
ENTER _.
4,
Pulse los bot6n A o T para seleccionar 'Modo de Subtitulo" y_despu_s_pulse el
bot6n ENTER _.
Pulse los bot6n A o •para seteccionar el subment_ (Programado,
Serviciol~Servicio& CC1~CC4 o Textol~Texto4) que desee; pulse despu_s el bot6n
ENTER _.
5.
Pulse los bot6n _, o _' para seteccionar "Opciones - Subtitulo" y, despues, pulse el
bot6n ENTER _.
> Las "Opciones - Subtituld' s6lo estan disponibies cuando "Programado" y "Service
1~Service 6" se pueden seleccionar en "Modo de Subtitulo".
> Los modos de subtitulaci6n Servicio 1-6 pueden no estar disponibles segOn el tipo
de emisi6n.
Pulse los bot6n A o T para seleccionar "Tama_o" y, despues, pulse el botdn
ENTER _.
Pulse los botdn A o _r
despu_s pulse el botdn
Pulse los botdn A o _'
(vea las opciones en la
para seleccionar la opcidn deseada para et Subtitulo;
ENTER _.
para seleccionar las opciones de subment_ que desee
pagina siguiente) y pulse et botdn ENTER _.
Pulse el botdn EXIT para satin
:_ La disponibitidad de los subtitulos depende dei programa que se est6 emitiendo.
>* La opci6n 'Programado _ significa que se sigue et estandar establecido per et
emisor.
Las opciones Opec. Primer Piano y Opac. de Fondo no se pueden ajustar con el
mismo color.
>* "Opacidad de primer piano" y "Opacidad de fondo" no pueden ajustarse ala vez
en Transparent.
• TamaSo:Estaoeci6nconstade "Programaao "Peque_o","Normal"y "Grande".Ei valor
preee[ermlnaaoes"Normal'
- Estilo fuente: Esta oeci6nconstade "Programaeo. EstiloO-Estilo7".Puedecambiarel
eeooe le[ra auedesee.El valor preaezerrrnadoes"Est[o 0"
- Color de primer plane: Estaouci6nconstade "Programaao."Blanco"."Negro","Rojo.
verae. "Azur'."Amarillo"."Magenta,_ "Cian".Puedecamblaret
COlOr ael [ex[o.
El valor
eredeterminaao
es Btanec
• Color de Fondo: Esta oecionconstade "Programado"."Btanco"."Negro","Rojd', "Verde",
"AzuF."Amarillo" Magenta",y Clan". Puedecambiare_co_ordetfonao
oe
lOS suDn[utos.
El valor
preaetermlRado
es
"Negro
- Opacidad de primer piano: Estaopcioeconsl:ade "Programado"."Transuaren'Ee
TraslQcido""S61ido"e "{ntermitente".Puedecamb_arla
oe_;tdaaae ia le[ra.
• Opaeidadde fondo: Estaopcioncons[ade "Programado"."Transparente".
"Traslt]cido"
"S61iaoe 'm[erml[ente'LPuedecamularla 3oacloaa oelfondode
lOS SUDe[UIOS.
• Regresaral Predeter: Estaopc_onreajus[a_asopciones"TamaSo"."Tipode tetra
'Color pnmerplane"."Cotordefondo" "Opacidadprim.ptano"
'Oeacidaddet fondo"a susvatorespredeterm}naaos.
Pulse el bot6n CC del mando
a distancia varies veces pare
seleccionar "Encendido" u
'Apagado'.
Ajuste de la melodia de encendido y apagado del televisor
Puede definirse un sonido de melodia para que suene cuando se encienda o se
apague el TV.
1.
Pulse el bot6n MENU para ver el men_ en pantalta.
Pulse los bot6n A o '_ para seleccionar "Configuraci0n" y_a continuaci0n, pulse
el bot6n ENTER C_'.
2.
Pulse los bot6n A o _' para seleccionar "Melody" y, a continuaci6n, pulse el bot6n
ENTER _.
Pulse los bot6n A o _' para seteccionar "Apagado", "Bajo', "Medio" o "Alto" y, a
continuaci6n, pulse et bot6n ENTER _.
-Apagado: Apaga la funcion dela melodia.
, Bajo: Establece eI volumen de la melodia en un nivet bajo.
• Medio: Establece et volumen de ta melodia en un niveI medio.
• Alto: Establece el votumen de Ia melodia en un nivel alto.
Pulse el bot6n EXIT para salir.
La melodia no se reproduce
- Cuando no hay salida de sonido desde el televisor porque se ha activado el
bot6n MUTE.
- Cuando no hay satida de sonido desde el televisor porque se ha activado el
bot6n VOL_.
- Cuando la funci6n de temporizador ha apagado el televisor.
Uso de la funcibn de ahorro de energia
Esta funci6n ajusta el brilto det televisor, Io cual reduce el consumo de energia. Si desea vet ta tetevisi6n por la noche, ajuste la
opci6n del modo "Ahorro energia" en "Alto"; sus ojos se Io agradeceran y, ademas, reducira el consumo de energia.
1.
Pulse el bot6n MENU para vet el ment_en pantatla.
Pulse los bot6n _, o T para seleccionar "Configuraci6n" y, despues, pulse el bot6n
ENTER _.
2.
Pulse los botdn _. o _' para seleccionar "Ahorro energia" y_despu_s, pulse et botdn
ENTER _.
Seleccione la opcidn deseada ("Apagado","Bajd, "Medio","Alto") pulsandolos bot6nes
A o T. Pulse el botdn ENTER _.
' Apagado:Apaga
la funci6n de ahorro de energia.
, Bajo: Configura el televisor en el modo de ahorro de energia bajo.
, Medio: Configura el televisor en el modo de ahorro de energia medio.
, Alto: Configura el televisor en el modo de ahorro de energia alto.
Pulse el botdn EXIT para salir.
Guia de actualizacibn del software
Samsung puede ofrecer actualizaciones para el firmware del televisoren el futuro. P6ngase en contacto con el centre de llamadas
de Samsung en 1-800-SAMSUNG(726-7864) para recibir informaci6n acerca de la descarga de las actualizaciones y del uso de
un controlador USB. Las actualizaciones se pueden realizar conectando una unidad USB al puerto USB situado en et televisor.
1.
Inserte la unidad USB que contenga la actualizaci6n del firmware en el puerto
SERVICE de la parte posterior del televisor.
2.
Pulse el bot0n MENU para ver el mene. Pulse los bot6n A o _' para seteccionar
'Configuraci6n y" despu6s pulse et bot6n ENTER _.
3,
Pulse los bot6n A o _' para seteccionar "Actuatizaci6n det software" y despues
pulse ENTER _.
4.
Pulse el bot6n ENTER _.
Aparece el mensaje ' Explorando USB... Puede tardar hasta 30 segundos. ".
5.
Aparece el mensaje "_,Actuatizar la versi6n XXXX a la version XXXX? Despu_s de
la actualizaci6n el sistema se debe reiniciar.'.
Pulse los bot6n 4 o _ para seteccionar "Si' y, a continuaci6n, pulse el bot6n
ENTER _.
No desconecte la alimentaci6n ni retire la unidad USB mientras se aplican
las actualizaciones. El televisor se apagara y se encendera automaticamente
despues de completar la actuatizaci6n de firmware. Despues de realizar la
actualizaci6n compruebe la versi6n del firmware. Cuando se actualiza el software,
la configuraci0n del video y audio que se haya efectuado vuetve a la configuraci6n
predeterminada (de fabrica). Es aconsejable anotar la configuraci0n para
recuperarla facilmente despu_s de la actuatizaci6n.
Panel posterior
del TV
Identificacibn de problemas
Si parece que el TV no funciona correctamente, en primer lugar compruebe esta lista de posibles problemas y soluciones.
Si no funciona ninguno de estos consejos, Ilame al centre de servicio mas cercano.
7
Pr0blema
Posible Soluci6n
tmagen deficiente.
Intente sintonizar otto canal.
Ajuste la antena.
Compruebe las conexiones de todos Ios cables.
Catidad de sonido deficiente.
Intente sintonizar otto canal.
Ajuste la antena.
No hay imagen o sonido.
..............................................................................................................................
Pulse el bot6n SOURCE.
Compruebe que el TV este conectado.
Compruebe las conexiones de la antena.
No se percibe ningQnsonido,
o muy baje con el votumenal
maximo,
Primero, compruebe el volumen de los aparatos conectados at TV (por ejemplo, un
receptor digital, DTV, DVD, receptor de cable_ VCR, etc.). A continuaci6n, ajuste el
voIumen del TV segSn sea mas conveniente.
La imagen rueda verticalmente.
Compruebe todas las conexiones de cable.
El TV funciona de fofma irregular,
Desconecte el TV durante 30 segundos y, despues, intente que funcione otra vez.
EI televisor no se enciende.
Compruebe que la toma de la pared funciona.
Anomalias del mando a
distancia.
Remptace las pilas del mando a distancia.
Limpie el borde superior det mando a distancia (ventana de transmisi6n).
Compruebe los terminales de ta pila.
Mensaje "Verificar cable SesaI":
Compruebe que et cable de selial este conectado firmernente con tas fuentes deI PC.
Mensaje !'Modo no compatible".
Compruebe la resoluci6n maxima y la frecuencia de video dei dispositivo
conectado.
........
c_n}l_[e ts!Rs }{a!°!es _0_ I°! d_tC_Sdt
a ....................................................................
ProbIema en Pantatla con la
emisi6n digital.
Compruebe ta potencia de la se_at digital y la antena de entrada.
La imagen es demasiado clara 0
demasiado oscura.
Ajuste Luminos. y Contraste.
Ajuste la funci6n Fino.
Bar[as neg[as en ta pantalta.
Compruebe que la emisi6n que se esta recibiendo es de alta definici6n (HD).
Los canales HDen ocasiones emiten una programaci6n en SD (definici6n estandar) que
puede dar lugar a la aparici6n de barras negras.
Para eliminar las barras configure el decodificador de cable o satelite en los modes
Alargar o Panoramica.
Las imagenes tienen un tono
rojo-verde o rosa.
Los subtitulos para sordos no
funcionan.
Compruebe que los cables de los componentes esten conectados en los terminales
correctos.
Cuando se usa un decodificador de cable o sat6lite, la opci6n de los subtitulos para
.......
...............................................
Las imagenes se yen con nieve
Quizas se necesite actuatizar el firmware. P6ngase en contacto con el proveedor de
cable.
Se yen im_genes superpuestas
Quizas haya probtemas de compatibilidad con el decodificador de cable.
Intente conectarse a traves de los cables de los componentes.
Problema
Unas uarras norlzon[aies
parpaaean, tiemblan u osclian en
ta Jmager
Ajus[e la funci6n Grueso y despu_s ajuste la funci6n Fino.
Unas uarras venloates
parpaaean, [lemelan
u oscitan en
ta lmager
Ajus_e la funci6n Grueso y despues ajuste la funci6n FJno.
La
pamatla es[a negra y
el lndloador tumlnoso de
aiimentacidn parpadea
constamememe.
Comuruebe Io siguiente en el equipo: Alimentaci0n, Cable de sepal.
-I TV utiliza su sistema de gesti6n de energia.
Viueva el rat6n del equJpo o pulse una tecta del teclado.
La imagen no es es[aDle y
parece vlerar cuanao se conecta
el oraenador en la emraaa ae
PC
Si et ajuste no es correcto, use la utilidad del ordenador para cambiar los ajustes de
)an][alia.
El televisor admite funciones de visualizacJ6n muitiscan dentro det siguiente rango de
frecuenoias:
Frecuencia horizonta
[kHz)
Frecuencia vertical (Hz)
30~60
60~75
nalce ae barrido maximo (60 Hz)
La tmagen no esta oentrada en
la pamaHa.
Ajuste la posicJ6n horizontal y vertical.
_a Dosici6n ae la pantalla se debe ajustar respecto a la fuente de satJda (por ejemplo, STB)
con una sepal digital.
La tmagenaparecealS[OrSlonaaa
en
esqulnaae lapamalla
Si "S61obuscar esta seleccionado en atgOndispositivo externo, la imagen puede aparecer
als_orslonaaa en la esquina de la pantalta. Este sintoma se origina en los dispositivos
externos no en el televisor.
ADarece e mensa e "Resets a
se_ungsto the defautt values. '_
Aoarece cuando el bot6n EXIT se mantJene pulsado durante unos momentos.
_a configuraci6n deI producto se restablece con los ajustes predeterminados de fabrica.
El panel LCD TFT utiliza un panel que consta de muchos pixeles de infimo tama_o (3 888 O00) que requieren de una
tecnologia altamente sofisticada para su fabricaci6n. Sin embargo, pueden haber unos pocos pixeles poco iluminados u
oscuros en pantalla. Estos pixeles no suponen una anomalia en et funcionamiento del producto.
Cbmo ajustar el soporte
1. Coloque el frontal del televisor sabre un paso
suave o una almohadilIaencima de una mesa tal
como se muestra en la figura (1).
- Alinee la parte inferior del televisor con el borde
de la mesa.
Botdn
2. Presioneel centro de la parte posterior del
televisor.
Ajuste el soporte como se indica en la figara (2)
mientras pulsa el botdn que se encuentra en la
parte posterior det soporte.
(1)
(2)
3. Coloque el televisor sobre la rues& de manera
que se asiente firmemente.
C6mo ajustar el _ngulo del televisor
( 1 )Ajustedel&ngulodeltelevisor
sobreel soporte.
( 2 ) Ajuste del &ngulo cuando pase del
sopo_e al montaje en la pared (1 4, 3,1)
( 3 ) Ajuste del _ngulo cuando el televisor
LCD est6 montado en la pared,
>- Caando ajuste el soporte, pulse el bot6n qae se encaentra en la parte posterior del soporte.
1. La Figura (1) muestra el angulo de ajuste (-2°~14 °) cuando utiliza ta pantalla LCD en su soporte.
Una inclinacidn excesiva puede hacer que el TV LCD vuelque y que se produzcan da_os.
2. La Figura (2) muestra el angulo de ajuste (14°~80°) cuando la pantalla LCD pase del soporte al montaje en la pared.
3. La Figura (3) muestra el angulo de ajuste (0°~10°) cuando monta la pantalta LCD en una pared.
_Oira un 'clic" caando cambie el angulo de 1 a 2 o de 3 a 2.
Instalaci6n del equipo de montaje en la pared
Los elementos del montaje en la pared (se venden por separado) permiten instalar el televisor en una pared. Si desea mas
inforrnacidn sobre la instalaciOn de los componentes para montaje en la pared, consulte las instrucciones que se facilitan con
dichos elementos. Para la instalacidn del soporte mural, p6ngase en contacto con un t_cnico. Samsung Electronics no se hace
responsable de los da_os causados al producto o al usuario si este ha efectuado la instalaci6n del televisor.
Instalacibn de dispositivos de montaje conformecon VESA
1. Sitt_e el televisor boca abajo sobre un paso suave
o un cojin_ encima de una mesa.
(1)
2. Ajuste el soporte presionando el botOn de la parte
posterior.
3. Alinee el adaptador de montaje (no suministrado)
con los orificios de la parte inferior del soporte
y suj_telo con los cuatro tomillos que se
suministran con el brazo basculante, el soporte
de montaje en pared o cualquier otro mecanismo
de soporte (no suministrado).
(2)
Uso de las tapetas decorativas
1. Cuando instale el televisor en una pared sin
utilizar etsoporte, inserte las tapetas decorativas
como se describe en la ilustracidn (1).
2. Una vez insertadas, afirmelas con los cuatro
tornillos como se describe en la ilustracidn (2).
(2)
Instalacibn del soporte
1. Acople el TV LCD al soporte.
El televisor Io deben transportardos o mas personas.
Cuando monte et soporte debe distinguir entre la parte frontal y la posterior del soporte.
Para asegurarse de que instala el televisor en et soporte at nivet adecuado_ no aplique una presi6n excesiva en la parte
superior izquierda y derecha deI televisor.
2. Apriete dos tornillos en la posiciOn O Y, a continuaci0n_ apriete dos en la posicidn _.
Levante el producto y apriete los tornillos. Si aprieta los tornillos con el TV LCD tumbado, _ste se puede inctinar
hacia un lade.
Desconexibn del soporte
1. Desmonte los 4 tornillos de la parte posterior del TV.
2. Separe el soporte del TV.
El televisor Io deben transportar dos o m_s personas.
Especificaciones del equipo de montaje en la pared (VESA)
tnstale el montaje mural en una pared solid& perpendicular al suelo.
Para colocarlo en otros materiales de construcci0n, pOngase en contacto con el distribuidor mas cercano.
Si se instala en el techo o en una pared inclinada, puede caerse y causar graves lesiones personales.
M6
46 ~ 52
600 * 400
57
700 * 400
(No VESA)
57 ~ 70
800 * 400
80 ~
1400 * 800
LCD-TV
PDP-TV
4
M8
M8
6
4
:_ Las dimensiones estandar de los equipos de montaje mural se muestran en la tabta anterior.
> AI adquirir et equipo de montaje en la pare& tambien se distribuye un manual de instalaci6n detaflado y todas las piezas
necesarias para el montaje.
>- No use torniltos con un tamafio superior at estandar, ya que pueden causar dafios en el interior del televisor.
Para rnontajes murates que no cumplen las especificaciones de torniflos estandar VESA, la Iongitud de _stos puede variar
dependiendo de las especificaciones.
>* No use tornitlos que no cumplan las especificaciones de torniflos estandar VESA.
No apriete excesivamente los torniltos, ya que podria da_ar el producto o provocar la caida de 6ste con riesgo de causar
lesiones personates. Samsung no se hace responsable de este tipo de accidentes.
Samsung no se hace responsabte de dafios o lesiones personales cuando se usa un rnontaje mural que no cumple las
especificaciones VESA o si el cliente no sigue las instrucciones de instalaci6n del producto.
No supere los 15 grados de inclinaci6n cuando monte este televisor.
,L_
No instale el equipo de montaje mural mientras et televisor esta encendido.
]
Se podria producir una descarga electrica con riesgo de causar lesiones personates.
1
Uso del cierre antirrobo kensington
El bloqueo Kensington es un dispositivo que se usa para fijar fisicamente el sistema cuando se usa en un lugar p0blico.
Et dispositivo de bloqueo debe adquirirse pot separado. La apariencia y el m_todo de bloqueo pueden diferir de la
ilustraci6n seg0n los fabricantes. Consulte el manual que acompa_a al bloqueo Kensington para utitizarlo correctamente. El
dispositivo de bloqueo debe adquirirse por separado.
Cable
Figura 2
l
Figura 1
<Opcional>
La ubicaciOn del "Bloqueo Kensington" puede vadar seg_n el modelo
1. lnserte el dispositivo de bloqueo en la ranura Kensington del TV LCD (Figura 1) y girelo en el sentido det bloqueo
(Figura 2).
2. Conecte el cable del bloqueo Kensington.
3. Fije el bloqueo Kensington a un mueble o a un objeto pesado que no se mueva.
Especificaciones
Nombre del Modelo
LN19A330J1D/LN19A331J1D
TamaSo de pantalla (Diagonal)
PC Resoluci6n
Sonido
Salida
Dimensiones (An × Pr x AIi
Cue-po pnnciea
Con sopor[e
Peso
Con e! sooor[e
Factores medioambientales
TemDelaturade funcionamiemc
Humedad de funcionamiento
]-emDera_urade almacenarniento
Humedad de aimacenamlento
Giro de] soporte
ZaUleraa/aerecn_
19 puFgadas
1440
x 900
@ 60 Hz
3Wx2
480 X 57,5 X 360,5 mm
(18,9 X 2,7 X 14,2 pulgadas)
480 X 180 X 393 mm
(18,9 X 7,1 X 15,5 pulgadas)
5,2 kg (11,46 Ibs)
Entre 10°C y 40°C (50°F a 104°F)
De110 % a180 %, sin condensacion
Entre -20°C y 45°C (-4°F a 113°F)
Det 5 % a195 %, sin condensaci6n
-0" ~ 0
>_El disedo y las especificaciones estan sujetos a cambios sin previo aviso.
:_ Este dispositivo es un aparato digital de la Clase B.
>- Para conocer la fuente de alimentaci6n y et consumo de energi& consulte la etiqueta adherida al producto.