1
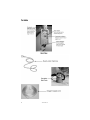
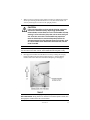
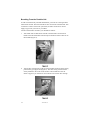
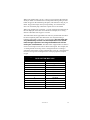
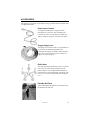
701641 Rev. E
IMPORTANT INFORMATION ABOUT YOUR PRESCRIPTION
Date your unit was received: _________________________________________
Your name: _______________________________________________________
Prescribed oxygen flow setting: _______________________________________
• during sleep _________________________________________________
• at rest ______________________________________________________
• during exercise_______________________________________________
Doctor’s name: ____________________________________________________
Doctor’s phone number: _____________________________________________
Home care company’s name: _________________________________________
Home care company’s phone number: __________________________________
Emergency contact’s name: __________________________________________
Emergency contact’s phone number: ___________________________________
Special Instructions:
________________________________________________________________
________________________________________________________________
________________________________________________________________
________________________________________________________________
________________________________________________________________
701641 Rev. E
TABLE OF CONTENTS
General Safety Precautions . . . . . . . . . . . . . . . . . . . . . . . . . . . . . . . 2-4
Definition of Symbols. . . . . . . . . . . . . . . . . . . . . . . . . . . . . . . . . . . . . . . 5
Environmental Specifications . . . . . . . . . . . . . . . . . . . . . . . . . . . . . 5
Introduction to Your HELiOS Oxygen System . . . . . . . . . . . . . . . . . . 6-8
How to Use Your HELiOS Oxygen System . . . . . . . . . . . . . . . . . . . . . . 9
Filling the Portable Unit. . . . . . . . . . . . . . . . . . . . . . . . . . . . . . . 9-13
Breathing from the Portable Unit . . . . . . . . . . . . . . . . . . . . . . 14-17
Positioning of Portable Unit During Use . . . . . . . . . . . . . . . . . 18-19
Connecting the Portable Unit to the Reservoir Unit . . . . . . . . 20-21
Maintenance . . . . . . . . . . . . . . . . . . . . . . . . . . . . . . . . . . . . . . . . . 22-23
Cleaning . . . . . . . . . . . . . . . . . . . . . . . . . . . . . . . . . . . . . . . . . . . . . . . 24
Troubleshooting. . . . . . . . . . . . . . . . . . . . . . . . . . . . . . . . . . . . . . . 25-26
Accessories . . . . . . . . . . . . . . . . . . . . . . . . . . . . . . . . . . . . . . . . . . 27-28
Important Notice:
Be sure to read and understand this instruction manual
completely before attempting to operate your HELiOS Oxygen
System.
Do not permit anyone who has not read these instructions to
handle or operate this equipment.
The HELiOS Oxygen System is intended only for the delivery of
medical grade oxygen as prescribed by your physician.
This manual is provided to assist in the safe operation of the
HELiOS Oxygen System and to ensure maximum benefit from its
use. If you have any questions about the operation of the of the
equipment, please consult your oxygen supplier.
701641 Rev. E
1
GENERAL SAFETY PRECAUTIONS
Throughout this manual you will see three kinds of special information:
warnings, cautions and notes. Make sure you carefully read and understand this
information. Each is important and may be related to the surrounding
instructional information.
WARNING
A warning identifies a hazard and is boxed in and
accompanied by a symbol. Warnings describe conditions
that concern your personal safety and the safety of
others. They are followed by the actions required to
prevent injury. Ignoring warnings can lead to injury or
death.
CAUTION
A caution informs you about conditions that may cause
possible damage to the equipment or other property; or
situations which may cause reduced, or no oxygen flow.
Ignoring cautions may cause damage to the equipment or
make it unusable.
NOTE: Notes provide important information about using the equipment properly.
2
701641 Rev. E
WARNING
• Oxygen supplied from this equipment is for supplemental
use and is not intended to be life supporting or life
sustaining. This equipment is not intended for use by
patients who would suffer immediate, permanent, or serious
health consequences as a result of an interruption in the
oxygen supply.
• Do not smoke near this equipment. Keep cigarettes or
burning tobacco away from the area where equipment is
operated.
• Keep flammable materials away from this equipment. Oils,
grease, including facial creams and petroleum jelly, ignite easily
and may burn rapidly in the presence of oxygen. Never lubricate
any part of this equipment.
• Do not touch liquid oxygen or parts that have been in
contact with liquid oxygen. Liquid oxygen is extremely cold
(-297 °F / -183 °C). When touched, liquid oxygen, or parts of the
equipment that have been carrying liquid oxygen, can freeze
skin and body tissue.
• Always keep the Reservoir in an upright position.
• Always keep the Portable in one of the following positions:
upright, flat on its back or any position in between.
• Keep this equipment away from electrical appliances. Use
and store Reservoir and Portable units at least five feet from
electrical appliances that may cause heat or sparks.
• Keep oxygen equipment away from open flames. Use and
store Reservoir and Portable units at least five feet away from
equipment such as furnaces, water heaters, and stoves that may
contain open flames.
• Keep equipment in a well-ventilated area at all times. These
units periodically release small amounts of oxygen gas that must
be ventilated to prevent buildup. Do not store liquid oxygen
equipment in a closet, car trunk, or other confined area. Do not
place blankets, draperies, or other fabrics over equipment.
701641 Rev. E
3
WARNING
• Do not carry the Portable unit under your clothing. These
units normally vent oxygen. Wearing a Portable unit under
clothing may saturate fabrics with oxygen and cause them to
burn rapidly if exposed to sparks or flame. It may take several
hours for oxygen levels in fabric to return to normal.
• Never tamper with the equipment. Doing so could create a
hazardous condition and possibly cause the equipment to work
improperly.
• Always keep tubing or oxygen supply line away from path
of walking to avoid potential trip or fall.
• Use only with recommended supply line. Connecting the
portable to a wrong gas source could cause inhalation of
hazardous substances.
CAUTION
• Consistent with the recommendations of the medical
community on the use of conserving devices (which includes
the nasal cannula), it is recommended that the HELiOS System
be qualified on patients in the situations it will be used (rest,
exercise, sleep). Differences in nasal cannula design may vary
the ability to trigger a conserving device.
• Although there are no risks associated with the disposal of any
components within this device, in the interests of
environmental protection, it is recommended that all used or
faulty components be returned to the manufacturer.
• Remove the 9 volt battery from the Reservoir contents
indicator if it will not be used for some time. Carefully dispose
of the 9 volt battery from the Reservoir contents indicator with
due regard for the environment.
• Although the HELiOS Oxygen System complies with IEC 6011:1993, (Electromagnetic Compatibility), it is recommended
that high energy emitting equipment, for example, cellular
phones, are not operated in close proximity to the HELiOS
Oxygen System.
4
701641 Rev. E
DEFINITION OF SYMBOLS
SYMBOL
DEFINITION
Reservoir Full
Reservoir Empty
Portable Full
Portable Empty
Low Battery (9VDC)
Drip Proof
Type BF (Electrical Safety)
Environmental Specifications
Operating:
-20 °C to 40 °C
95% maximum relative humidity
Storage:
-40 °C to 70 °C
90% maximum relative humidity
701641 Rev. E
5
INTRODUCTION TO YOUR HELiOS OXYGEN SYSTEM
Your HELiOS Oxygen System is designed to store and deliver oxygen at a
prescribed rate. The system consists of two units: the Portable and the Reservoir.
The Portable can be supplied with oxygen for you to breathe in two ways. First,
you may fill the Portable with liquid oxygen so you can be free to move about
your home or leave your home for extended periods. Second, you can connect the
Portable to the Reservoir.
The Portable may be used with either a standard HELiOS Reservoir or a HELiOS
Universal Reservoir. The HELiOS Universal Reservoir can also be used to fill
Puritan Bennett Companion® portables. Refer to the Companion portable
operating instructions for procedures to properly fill the Companion portable.
The HELiOS System was designed to maximize your freedom of movement. You
can fill the Portable with liquid oxygen every day to use as far from the Reservoir
as you desire. When you are in your home and not moving about, such as in the
evening or while you are sleeping, you may connect the Portable to the Reservoir
with an oxygen supply line. When the Portable is connected to the Reservoir in
this manner, the oxygen you breathe is supplied by the Reservoir unit.
Your oxygen supplier (e.g. home care provider) must refill your Reservoir unit
periodically depending upon your rate of oxygen use.
6
701641 Rev. E
Become familiar with the various parts of your HELiOS Oxygen System.
701641 Rev. E
7
8
701641 Rev. E
HOW TO USE YOUR HELiOS OXYGEN SYSTEM
Filling the Portable Unit
Fill the HELiOS Portable unit from the Reservoir as follows:
WARNING
•
•
Using a dry cloth that is clean, wipe the fill connector
dry on both the Reservoir and Portable units before
filling to prevent freezing and possible equipment
failure.
Extreme cold hazard. Do not press or disturb the
plastic poppet in the center of the fill connector on
the Reservoir. This will cause a release of liquid oxygen
from the fill connector.
1.
Check the contents indicator on the Reservoir by pressing the blue button to
ensure there is enough liquid oxygen for filling purposes. If the yellow light
comes on, you may proceed with filling the Portable, but you should inform
your oxygen supply company.
2.
Using a dry cloth that is clean, wipe the male fill connector on the Reservoir
and female fill connector on the Portable.
3.
Position the HELiOS Portable over the recessed area in the top of the
Reservoir. (Figure 1).
701641 Rev. E
9
4.
Carefully lower the Portable into place, ensuring that the fill connectors are
properly aligned.
5.
Place one or both hands on top of the Portable and press straight down
directly over the fill connector , being careful not to depress the release
button on the Reservoir when engaging (Figure 2). This will lower the
Portable unit approximately 3/8 inch (10 mm). Continue to apply downward
force to ensure the fill connectors remain engaged.
6.
While holding the Portable unit in the fill position, pull down and hold the
vent valve lever in the open position (90° from the normal “off” position)
(Figure 2). A hissing noise should be noticeable. During filling, maintain a
slight downward force on the unit with one hand to keep the unit steady and
maintain proper filling position.
NOTE: Fill time is usually between 25 and 60 seconds when the Portable is
empty. The amount of time to fill the unit depends on the amount of oxygen
remaining in the Portable.
WARNING
Do not leave the HELiOS Portable unattended during the
filling operation.
10
701641 Rev. E
7.
When you notice a change in the sound of venting gas followed by a dense,
white vapor forming around the Reservoir cover, close the Portable vent
valve by returning the vent lever to the upright position.
CAUTION
If the vent valve fails to close and the hissing continues,
remove the Portable unit by depressing the Portable
release button on the Reservoir unit. The Portable will stop
venting in a few minutes. Allow the unit to warm until you
can close the vent valve. The Portable may require as
much as 60 minutes to restore adequate pressure for
accurate oxygen flow. An alternate source of oxygen, such
as a flow control valve attached to the Reservoir, can be
used if needed.
NOTE: For shorter planned use times, you can partially fill the Portable by closing
the vent valve sooner than normal. The Portable will then be lighter to carry.
8.
Disengage the Portable from the Reservoir unit by holding the carrying
handle and depressing the release button (Figure 3). Always hold the
Portable unit with at least one hand when attempting to disengage it.
NOTE: If the units will not disengage easily, they may have become frozen. DO
NOT USE FORCE. Simply allow a few minutes for the frozen parts to warm, then
disengage the Portable when the ice has melted.
701641 Rev. E
11
WARNING
• If a minor liquid oxygen leak from the Reservoir fill
connector occurs when you disengage the Portable,
re-engage and disengage the unit to help dislodge any
ice or other obstruction. If the liquid oxygen leak
persists, notify your oxygen supplier.
• If a major liquid oxygen leak from the Reservoir fill
connector occurs when you disengage the Portable
unit (that is, a steady stream of liquid oxygen), stay
away from the unit and immediately notify your
oxygen supplier.
NOTE: Immediately after filling, you may hear a slight hiss from the Portable. This
is normal and will stop after a few minutes.
9.
Check the oxygen contents indicator to make sure the Portable unit is filled
to the desired level. The amount of liquid oxygen contained in the Portable is
measured by an internal scale that is built into the unit. To operate the
contents indicator: (1) lift the HELiOS Portable unit by the contents
indicator strap, (2) push the bottom backside of the unit so that it is straight
up and down and (3) observe the green bar that displays the liquid oxygen
contents level inside the clear window (Figure 4).
(1)
(2)
Figure 4
12
701641 Rev. E
(3)
NOTE: Do not try to overfill the Portable. Once you hear the change in the sound
of venting gas and see the cloud of white vapor, the unit is full. Continuing the fill
process will not put any more oxygen in the Portable. Overfilling may cause drops
of liquid oxygen to spray from the bottom of the Portable.
NOTE: After each fill, do not try to refill the Portable again for at least 30 minutes.
This will prevent the possibility of the unit wasting oxygen and prevent the vent
valve from potentially freezing.
NOTE: The number of times that you have to fill up or “top off” your HELiOS
Portable depends on which of the 11 settings is prescribed by your doctor and the
frequency of your breath rate. On average, a setting of 2 lasts about 8 to 10 hours.
However, the actual time may vary depending on your particular circumstances.
NOTE: You may also fill the HELiOS Portable from Puritan-Bennett Companion
C21, C31, C41 Stationary or Companion Low Loss C31LL units.
701641 Rev. E
13
Breathing From the Portable Unit
In order to breathe from your HELiOS Portable, you must do so through a duallumen nasal cannula. The nasal cannula has two connections at the Portable. One
connection is used to sense when you inhale, the other connection is used to
supply oxygen into your nose as you inhale.
Connect a dual-lumen cannula to your Portable as follows:
1.
Attach both ends of dual-lumen cannula to the Portable as shown below.
Either end of the dual-lumen cannula may be attached to either connector on
the Portable (Figure 5).
2.
Turn the flow control knob on the top of the Portable clockwise to the setting
prescribed by your physician (Figure 6). The flow setting value should be
clearly readable in the center of the window. The Portable unit will not
deliver oxygen to you if the flow control knob is set between flow settings.
14
701641 Rev. E
When your Portable unit is set to 1 or above, oxygen will be delivered only
while you inhale. You should notice a small pulse at the beginning of each
breath. Oxygen is delivered during this pulse, and continues as long as you
inhale. Oxygen flow stops when you stop inhaling. It is normal for the
device to occasionally skip a breath or to pulse twice in one breath.
When your portable unit is set below 1, oxygen is delivered continuously at
the rate displayed on the flow control knob. For example, the .5 setting
delivers continuous flow oxygen at .5 L/min.
The table below shows approximate use times for your Portable unit after it
has been completely filled. The table below was constructed using a
breathing pattern that is typical for oxygen patients. Your use time may
vary substantially from the use time listed below. You should
learn through experience how long the Portable unit will last
under your circumstances. The table below of approximate use times is
correct even though in some cases it doesn't seem logical. For example, the
.75 setting doesn't last as long as the 1 setting because the .75 setting is
continuous flow and the 1 setting is demand flow. Also, the 1 setting doesn't
last twice as long as the 2 setting because of unique properties of liquid
oxygen.
Approximate Use Time of a Full Portable Unit.
YOUR USE TIME MAY VARY.
Flow Control Knob Setting
0
.12
.25
.5
.75
1
1.5
2
2.5
3
3.5
4
Approximate Use Time
Not Applicable
15 Hours
15 Hours
10 Hours
6.5 Hours
13 Hours
12 Hours
10 Hours
8.5 Hours
6.5 Hours
6 Hours
5 Hours
701641 Rev. E
15
CAUTION
You must use a dual-lumen cannula of 7 foot length or shorter
(see page 28) to insure proper oxygen delivery from the Portable
unit. Make sure both connections of the dual-lumen cannula are
firmly attached to the Portable Oxygen Outlet and Sensor
connectors.
3.
With the tips of the cannula pointing downward and toward you, place the
two tips into your nostrils. Run the tubing over your ears and then slide the
sleeve up under your chin until the cannula feels comfortable (Figure 7).
Then breathe normally.
NOTE: Make sure that the tips remain in your nostrils and do not slide to one
side.
NOTE: Ocassionally water droplets caused by exhaled humidity may accumulate
in the cannula. This may disrupt the operation of the oxygen conserving device. If
this happens, replace the moist cannula with a dry one. Allow the moist cannula to
dry before using it again.
NOTE: Currently, there are two dual lumen cannula designs available for use with
the HELiOS. One cannula provides sensing and delivery of oxygen in each nostril.
This is the best one to use when experiencing a blocked nasal passage. The other
provides oxygen from one side and senses when to provide oxygen on the other.
Also, the tips are slightly smaller and softer.
16
701641 Rev. E
4.
The contents indicator will show approximately how much liquid oxygen
remains in the unit. To ensure you have enough oxygen to meet your needs,
check the indicator periodically. Hold the unit by the strap and push the
bottom backside of the unit until it is straight up and down to read contents
(Figure 8). When checking the contents, it is important to remove any carry
accessories and to make sure your nasal cannula is not pulling on the
Portable.
Figure 8
701641 Rev. E
17
Positioning of Portable Unit During Use
WARNING
Always keep the Portable in one of the following
positions: upright, flat on its back or any position in
between.
Your HELiOS Portable was designed to operate in a variety of positions for your
convenience. It is important to always keep the portable in one of these positions
or oxygen may escape. This will shorten the time you can be away from home.
Your HELiOS Portable is designed to work when sitting upright, when laying flat
on it’s back or anywhere in between. The unit should not be placed on its front,
on its edge or with the handle lower than bottom of the unit. Figure 9 shows
typical situations and how the Portable should be positioned. Figure 10 shows
unacceptable positions.
18
701641 Rev. E
CAUTION
If your Portable unit was placed in an unacceptable
position for more than five minutes, check the contents
level to see how much oxygen remains, and set the unit in
an acceptable position for at least 15 minutes before
attempting to fill the unit. Placing the Portable in an
unacceptable position may cause loss of oxygen or vent
valve lever to become too cold for filling.
701641 Rev. E
19
Connecting the Portable Unit to the Reservoir Unit
When you no longer wish to leave home or move about for the day, you may
connect the Portable to the Reservoir using the oxygen supply line. This will
reduce wasted oxygen and will improve the efficiency of the Reservoir. To
achieve maximum efficiency from the standard HELiOS Reservoir, you should
connect the Portable to the Reservoir at least 10 hours per 24 hour period. It is
important that the Portable be nearly empty so that the oxygen from the Portable
comes directly from the Reservoir. This will maximize the efficiency of the
system. Connect your Portable to the Reservoir as follows:
1.
Thread the oxygen supply line nut onto the Reservoir oxygen supply outlet
as pictured below (Figure 11). Make sure the connection is tight. If a hissing
sound is heard, tighten until the hissing stops.
2.
Connect the opposite end of the oxygen supply line to the Portable at the
oxygen supply connector by pushing the supply line into the connector
(Figure 12). The connectors should snap together. If the supply line does not
easily engage into the Portable, push the silver release button on the Portable
connector and try again.
20
701641 Rev. E
3. You can now breathe off the Portable unit as long as there is oxygen in the
Reservoir unit. You can determine the oxygen contents in the Reservoir unit
by pushing the blue button on the Reservoir contents indicator (reference
Figure 14). If you get a green light, the level is fine. If the yellow light
appears, inform your oxygen supply company.
CAUTION
When the Reservoir and Portable are connected, avoid
putting the unrolled supply line in places where it might be
damaged or tripped over. One sign of damage is frost on
the supply line, indicating that a puncture or cut is causing
an oxygen leak. If this occurs, disconnect the supply line
from the Reservoir.
4.
To disconnect the supply line from the Portable, push the release button and
gently remove the supply line from the connector.
701641 Rev. E
21
MAINTENANCE
Moisture Container:
If moisture is collected, empty by pulling out the moisture container and pouring
the water into a sink for disposal (Figure 13). To reinstall the moisture container
push it into the Reservoir housing until it is held firmly in place. Empty the
container when the water reaches the full (1/1) line or water may spill onto your
floor.
Low Liquid Oxygen Level:
To determine if the oxygen contents in the Reservoir unit, push the blue button on
the contents indicator (Figure 14). If you get a green light, the level is fine. If the
yellow light appears, inform your oxygen supply company.
22
701641 Rev. E
Low Battery Level:
A yellow light appears on the Reservoir contents indicator when the battery
needs to be replaced. This should happen very seldom. Your oxygen supply
company may change your battery at their next visit or if you choose to change
the battery, use a coin to open the battery door as shown below (Figure 15). Use
only a 9 volt alkaline battery as pictured
(Figure 16).
701641 Rev. E
23
CLEANING
Do NOT use alcohol, solvents, polishes, or any oily substance on oxygen
equipment. If cleaning is necessary, use only warm water and a mild dish
washing detergent. Dampen a cloth in the detergent and water solution and wipe
the outside surfaces of the equipment until clean.
CAUTION
• Do not allow water into any of the controls, the fill
connector, or the oxygen supply connector.
• Never attempt to repair or disassemble this equipment.
You could create a hazardous condition or cause
equipment failure. If you have problems, questions, or
are unsure if equipment is operating properly, call your
liquid oxygen supplier.
24
701641 Rev. E
TROUBLESHOOTING
The following information is intended to help you troubleshoot and solve simple
operational problems that you may experience when using your HELiOS
Portable.
1.
The Portable makes a hissing sound.
Hissing can occur to maintain the correct operating pressure within the
Portable. It is most likely to hiss after filling or when the position of the
Portable is changed. Hissing can last for approximately 10 minutes after
filling. Additionally, it can occur when the flow control valve is at a low
setting.
2.
The Portable does not pulse after filling.
If during the filling process, the Portable is disengaged with the vent valve
lever down, pressure may be reduced within the Portable causing a delay in
the conserving device function. It may require as much as 60 minutes to
restore adequate pressure for accurate oxygen flow. Additionally, improper
filling or lower than normal operating pressure in the Reservoir will
contribute to the unit not pulsing.
3.
The Portable stops pulsing during use.
• Ensure that both connections of the dual lumen cannula are firmly attached
to the Oxygen Outlet and Sensor connectors.
• Change the cannula if water droplets are present from humidified exhaled
gas. Replacing the cannula with a dry one enhances the ability of the
Portable to pulse.
• Ensure that the cannula is not kinked.
• Ensure that the cannula tips remain in your nostrils and do not slide to one
side.
• Ensure that there is oxygen in the Portable.
• With the cannula on, close your mouth and breathe only through your nose
to verify that the Portable has stopped pulsing.
4.
The Portable does not fill.
• Verify that there is oxygen in the Reservoir.
• Ensure that the Portable and Reservoir fill connectors are fully engaged
throughout the filling process.
701641 Rev. E
25
5.
The Portable vent valve does not close properly at the end of the filling
process.
If the vent valve fails to close and the hissing sound and oxygen vapor cloud
continue, carefully remove the Portable by depressing the release button on
the Reservoir. Venting from the bottom of the Portable will stop in a few
minutes. Allow the unit to warm until you can close the vent valve. The
Portable may require as much as 60 minutes to restore adequate pressure for
accurate oxygen flow. If needed, use an alternate source of oxygen such as a
flow control valve attached to the Reservoir.
6.
Frost forms on the oxygen supply line connected to the Reservoir.
Frost on the supply line is most likely the result of a leaky connection or a
split in the line. If the connection at the Reservoir outlet is leaking, keep
tightening the nut until the leak stops. If the supply line is split or damaged,
disconnect the line from the Reservoir and contact your home care provider.
7.
The Portable does not disengage easily from the Reservoir after filling.
The Portable and Reservoir fill connectors may have become frozen. DO
NOT USE FORCE. Allow a few minutes for the frozen parts to warm, then
disengage the Portable when the ice has melted. To prevent the units from
freezing together, always wipe the male fill connector on the Reservoir and
the female fill connector on the Portable with a clean, dry cloth before
filling.
26
701641 Rev. E
ACCESSORIES
The following accessories are available to help you obtain the most benefit from
your HELiOS System.
Dual-Lumen Cannula
An oxygen cannula delivers oxygen from the
Portable unit to your nose. The cannula has two
connections. One is to sense when you inhale, the
other is to deliver oxygen to you while you inhale.
Oxygen Supply Line
The supply line is used to connect your portable unit
to your reservoir. When the portable unit is
connected, the oxygen you breathe comes from the
reservoir. For instructions on how to connect the
supply line, refer to page 20.
Roller Base
The roller base allows the delivery person to roll the
reservoir to your door before taking it from the
house to fill. It is not recommended for patients to
roll the reservoir around frequently in the house. The
reservoir is very heavy and should never be tipped
over.
Portable Belt Pack
The Portable Belt Pack makes it convenient to carry
the Portable unit with you.
701641 Rev. E
27
External Flow Control
An external flow control is available to attach to
your HELiOS reservoir (Figure 17). If your
physician determines that you need an external
flow control, your oxygen supply company will
provide it. It should be attached as shown in the
picture below. You may also be instructed to use a
humidifier bottle with an external flow control
(Figure 18). When using an external flow control,
your oxygen supply company will supply you
with a supply line and a single lumen cannula for
use with the Reservoir.
WARNING
An external flow control that can
be set higher than 10 L/min
should not be attached to your
HELiOS Reservoir.
Accessory
Part Numbers
28
Description
B-701511-00
Dual-Lumen Cannula - 3 ft./0.9 m Length
(Sense and delivery in each nostril)
6-778058-00
Dual-Lumen Cannula - 5 ft./1.5 m Length
(Sense and delivery in each nostril)
6-778057-00
Dual-Lumen Cannula - 7 ft./2.1 m Length
(Sense and delivery in each nostril)
B-701931-00
Dual-Lumen Cannula -4 ft./1.2 m Length
(Sense and delivery in separate nostrils)
B-701930-00
Dual-Lumen Cannula - 7 ft./2.1 m Length
(Sense and delivery in separate nostrils)
B-701656-00
Oxygen Supply Line - 50 ft./15.2 m Length
B-701432-00
Oxygen Supply Line, Extension - 50 ft./15.2 m
Length
B-701537-00
Roller Base
B-701655-00
0-10 LPM External Flow Control
B-701654-00
Portable Belt Pack
701641 Rev. E
701641 Rev. E
Your local supplier:
Manufacturer:
Puritan-Bennett Corp.
2800 Airwest Blvd.
Plainfield, IN 46168 USA
Toll Free: 1-800-635-5267
701641 Rev. E