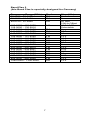
1
AE 230 H Racing Multiband Scanning Receiver Contents Precautions...........................................................................5 Introduction .............................................................................5 Band Plan 1 ............................................................................6 Feature Highlights .................................................................8 General ....................................................................................8 About This Manual............................................................... 11 How the Scanner’s Controls Are ....................................... 11 Represented in This Manual .............................................. 11 Entering Text .........................................................................12 Understanding Scanning ....................................................12 Understanding the Scanner’s Memory ............................12 What is Scanning?...............................................................13 What is CTCSS/DCS? ........................................................13 CTCSS Frequencies (Hz) ..................................................14 DCS Codes (Octal) ..............................................................14 Using the Scanner at the Racetrack ................................15 Conventional Scanning .......................................................15 Simplex Operation ...............................................................15 Repeater Operation .............................................................16 Where To Get More Information........................................16 Information On The Internet...............................................16 Included With Your Scanner ..............................................17 Setting Up Your Scanner ....................................................17 Using Batteries .....................................................................18 Using Rechargeable Batteries ..........................................18 Using Non-rechargeable Batteries ...................................19 Using AC Power ...................................................................20 Connecting the Antenna .....................................................20 Connecting an Outdoor Antenna ......................................20 Connecting an Earphone/Headphone .............................20 Connecting an Extension Speaker ...................................20 Attaching the Belt Clip ........................................................21 Attaching the Wrist Strap ....................................................21 Installing the Demo Software.............................................21 A Look At The Display .........................................................24 Using Menu ...........................................................................25 Using Func ............................................................................25 Using the Scroll Control ......................................................26 Basic Operation ...................................................................26 Turning On the Scanner and .............................................26 Setting the Squelch .............................................................26 Scanning Systems ...............................................................26 Scanning Preprogrammed Races ....................................27 Selecting Driver Frequencies ............................................27 Holding on a Car ..................................................................28 Selecting Interference Eliminator Codes .........................28 Selecting System Channel Groups ..................................29 Locking/Unlocking Systems ...............................................29 Locking/Unlocking Channels .............................................29 Temporarily Holding On a System ....................................29 Holding On a Channel ........................................................30 Quick-Storing Channels ......................................................30 Quickly Recalling Channels ...............................................30 Other Settings ......................................................................31 2 Viewing Memory Used ........................................................31 Viewing the Firmware Version ...........................................31 Adjusting the Key Beep ......................................................31 Locking/Unlocking the Keypad ..........................................31 Turning Power Save On or Off ..........................................31 Priority Scan .........................................................................31 Using the Backlight..............................................................32 Initializing the Scanner’s Memory .....................................32 Using the PC Control and ..................................................32 Cloning Options ...................................................................32 Connecting Your Scanner to a Personal Computer ......33 Cloning the Scanner............................................................34 Using the Menu ....................................................................35 Programming Radio Systems............................................37 Quickly Programming Racing Systems ...........................38 Manually Programming Racing .........................................40 Systems .................................................................................40 Editing the Car .....................................................................40 Entering/Editing a Car Number .........................................41 Editing a Driver.....................................................................41 Setting a Car’s Quick Key ..................................................42 Editing a Car’s Channel ......................................................42 Deleting a Car ......................................................................42 Setting Lockout on a Car ....................................................42 Programming Conventional Systems...............................43 Entering/Editing Conventional Channel Groups ............43 Entering/Editing Conventional Channels .........................44 Programming/Editing Optional Settings ..........................44 System-Level Settings ........................................................44 Editing the System Name...................................................44 Editing the System Quick Key (Conventional Systems Only) .......................................................................................45 Setting Group Lockout ........................................................45 Setting the System Hold Time ...........................................46 Setting the Channel Delay Time .......................................46 Setting Data Skip .................................................................46 Deleting Systems .................................................................47 Copying Systems .................................................................47 Group-Level Settings ..........................................................48 Entering/Editing the Group Name.....................................48 Setting the Group Quick Key .............................................48 Setting Group Lockout ........................................................49 Deleting Groups ...................................................................49 Channel-Level Settings ......................................................49 Editing the Channel Name (Conventional Systems Only) ................................................................................................49 Setting Channel Priority ......................................................50 Setting Channel Alert ..........................................................51 Setting CTCSS/DCS ...........................................................51 Setting Channel Modulation ..............................................52 Setting Channel Attenuation ..............................................52 Setting the Frequency Step ...............................................53 Setting Channel Lockout ....................................................53 Deleting Channels ...............................................................54 Copying/Pasting Channels.................................................54 Searching and Storing ........................................................55 3 Service Search (Air Band) .................................................55 Changing the step of Air Band ..........................................55 Quick Search ........................................................................55 CTCSS/DCS Search ...........................................................56 Custom Search ....................................................................56 Preset Custom Search Ranges ........................................57 BAND PLAN 1 ......................................................................57 BAND PLAN 2 (specially for Germany) ...........................58 BAND PLAN 3 ......................................................................58 Editing a Custom Search Range ......................................58 Auto Search and Store .......................................................59 Selecting a System..............................................................59 Storing a System..................................................................60 Using the Close Call Feature ............................................60 Setting Close Call Options .................................................61 Close Call Hits ......................................................................63 Search and Close Call Options .........................................63 Managing Locked-Out Frequencies .................................63 Unlocking All Frequencies ..................................................64 Reviewing Locked Out Frequencies ................................64 Searching for Subaudible Tones .......................................64 Setting the Maximum Auto Store Value ...........................64 Setting the Modulation Type ..............................................65 Setting Attenuation ..............................................................65 Setting Data Skip .................................................................65 Setting the Delay Time........................................................66 Setting the Search Frequency Step .................................66 Care and Maintenance .......................................................66 Specifications .......................................................................69 Optional Accessories ..........................................................70 Scanner Frequency Planning ............................................70 Collecting Information .........................................................70 Filling Out The Racing System Worksheet .....................72 Racing System Worksheet (Template) ............................72 Filling Out The Conventional System Worksheet ..........73 Conventional System Worksheet (Template) .................74 Preprogrammed Systems ..................................................75 European 2 years warranty................................................75 Declaration of Conformity...................................................76 Recycling Rules ...................................................................76 4 Precautions Before you use this scanner, please read and observe the following. EARPHONE WARNING! Be sure to use the supplied mono headphone. Use of an incorrect earphone or stereo headset with lower impedance might be potentially hazardous to your hearing, when tuned to high volume settings. The output of the phone jack is monaural, but you will hear it in both headphones of a stereo headset. Set the volume to a comfortable audio level coming from the speaker before plugging in the monaural earphone or stereo headset of the proper impedance (32 Ohms recommended). Otherwise, you might experience some discomfort or possible hearing damage if the volume suddenly becomes too loud because of the volume control or squelch control setting. This might be particularly true of the type of earphone that is placed in the ear canal. WARNING! Uniden does not represent this unit to be waterproof. To reduce the risk of fire or electrical shock, do not expose this unit to rain or moisture. Motorola®, PL®, Private Line®, DPL®, and Digital Private Line® are registered trademarks of Motorola, Inc. Uniden® and Bearcat® are registered trademarks of Uniden America Corporation. Close Call™ is a proprietary trademarks of Uniden America Corporation. Other trademarks used throughout this manual are the property of their respective holders. Introduction Your AE230H scanner is a state-of-the-art scanner radio with automatic scanning capabilities. You can store frequencies such as racing, police, fire / emergency, marine, air, and other communications into the scanner. You can carry it with you wherever you go, use it at home as a base unit, or install it in your vehicle as a mobile unit. You can use the scanner’s scroll control to quickly select channels and frequencies, and you can automatically program channels in a system using the AutoStore feature. 5 Use your scanner to monitor: • • • • • • • • Automobile races Public safety systems Police and fire departments, including rescue and Paramedics (please follow the national laws for monitoring such radio services!) Business/Industrial radio Utilities Marine and amateur (ham radio) bands Air band Railroad Communications This table lists the frequency ranges, default frequency step and default mode (AM or FM). To select a band plan from 1, 2 and 3: • • Make sure the power is turned off. While holding down 1, 2 or 3 (corresponding number of the band plan), turn on the scanner. Band Plan 1 Frequency Range (MHz) 25.0000 - 29.9950 30.0000 - 79.9875 80.0000 - 82.9900 83.0000 - 87.2875 108.0000 - 136.9875 108.0000 - 136.9916 137.0000 - 137.9950 138.0000 - 157.9875 158.0000 - 160.5900 160.6000 - 162.5875 162.6000 - 173.9875 216.0000 - 224.9950 400.0000 - 405.9875 406.0000 - 439.9937 440.0000 - 465.9950 466.0000 - 469.9900 470.0000 - 512.0000 806.0000 - 960.0000 1240.0000 - 1300.0000 Mode FM FM FM FM AM FM FM FM FM FM FM FM FM FM FM FM FM FM 6 Step (kHz) 5 12.5 10 12.5 12.5 / 8.33 Selectable 5 12.5 10 12.5 12.5 5 12.5 6.25 5 10 6.25 12.5 12.5 Band Plan 2 (this Band Plan is specially designed for Germany) Frequency Range (MHz) 25.0000 - 49.9950 50.0000 - 84.0100 84.0150 - 87.2950 Mode FM FM FM 108.0000 - 136.9875 108.0000 - 136.9916 137.0000 - 143.9950 144.0000 - 145.9875 146.0000 - 155.9900 156.0000 - 157.4250 157.4375 - 160.5875 160.6000 - 162.0250 162.0375 - 173.9875 216.0000 - 224.9950 400.0000 - 405.9875 406.0000 - 439.9937 440.0000 - 449.9937 450.0000 - 469.9900 470.0000 - 512.0000 806.0000 - 960.0000 1240.0000 - 1300.0000 AM FM FM FM FM FM FM FM FM FM FM FM FM FM FM FM 7 Step (kHz) 5 5 20 with 15kHz Offset 12.5 / 8.33 Selectable 5 12.5 10 12.5 12.5 12.5 12.5 5 12.5 6.25 6.25 10 6.25 12.5 12.5 Band Plan 3 Frequency Rage (MHz) 25.0000 - 29.9950 30.0000 - 79.9937 80.0000 - 82.9937 83.0000 - 87.2937 108.0000 - 136.9875 108.0000 - 136.9916 137.0000 - 137.9950 138.0000 - 157.9937 158.0000 - 160.5937 160.6000 - 162.5937 162.6000 - 173.9937 216.0000 - 224.9950 400.0000 - 405.9875 406.0000 - 439.9937 440.0000 - 465.9937 466.0000 - 469.9937 470.0000 - 512.0000 806.0000 - 960.0000 1240.0000 - 1300.0000 Mode FM FM FM FM AM FM FM FM FM FM FM FM FM FM FM FM FM FM Step (kHz) 5 6.25 6.25 6.25 12.5 / 8.33 Selectable 5 6.25 6.25 6.25 6.25 5 12.5 6.25 6.25 6.25 6.25 12.5 12.5 Feature Highlights General Close CallTM RF Capture Technology - you can set the scanner so it detects and provides information about nearby radio transmissions. See “Using the Close Call Feature” on Page 60 for more information. Dynamically Allocated Channel Memory – your scanner’s memory is organized so that it more closely matches how radio systems actually work, making it easier to program and use your scanner and determine how much memory you have used and how much you have left. Preprogrammed Races - your scanner is preprogrammed with Formula 1 races. Quick Race Programming - lets you quickly and easily enter information about a specific race. Quick Keys – You can set the scanner so you can select a race or systems and groups by pressing a single key. This makes it easy to listen to or quickly lock out those systems 8 or groups you don’t want to scan. Quick Car Select – You can set the scanner so you can select and listen to a car by pressing a single key. Lockout – You can lock out any system, group, frequency, or channel while scanning. If you lock out a system or group, any channels belonging to that system or group are also locked out. You can lock out up to 200 frequencies. The scanner skips locked-out frequencies while using the Close Cal feature or while searching. CTCSS and DCS Squelch Modes – prevent interference from stations not using the mode you select. Dropout Delay – You can set whether the scanner pauses at the end of a transmission to wait for a reply. You can set the delay time for each system you scan, and while searching and using the Close Call feature. Attenuator – You can set the scanner’s input attenuator to reduce the input strength of strong signals by about 18 dB received by the scanner. This allows clearer reception without interferences at locations, where many transmitters are operating close to each other. Repeater Reverse – You can set the scanner so it switches to the input frequency on a conventional repeater system. Channel Alert – You can set the scanner so it alerts you when there is activity on any channel you specify. Memory Check – Lets you see at a glance how much total memory is left. Frequency Step – Lets you select a frequency step (5, 6.25, 7.5, 8.33, 10, 12.5,15, 20, 25, 50 or 100 kHz) for manual mode and chain search mode. The scanner’s auto step feature lets you set the scanner so it automatically chooses the correct step. Quick Recall – Lets you quickly select a specific channel by choosing the system, group, and channel. Scan/Search Delay – You can set the scanner so it remains on a frequency up to 5 seconds after the last transmission to wait for a possible reply. Text Tagging – You can name each race system, conventional system, group, channel and custom search 9 range using up to 16 characters per name. Unique Data Skip – Allows your scanner to skip unwanted data transmissions and reduces birdies. Duplicate Frequency Alert – Alerts you if you try to enter a duplicate name or frequency already stored in the scanner. Memory Backup – If power is lost or disconnected, the scanner retains the frequencies you programmed in its memory. Multi Bands – With Aircraft and 800 / 900 MHz bands. Note: The scanner’s frequency coverage is not continuous. The gaps are technically necessary, but they are so designed that no important frequencies fall within the gaps, where the scanner cannot receive. Custom Search – Lets you program up to 10 custom search ranges. You can search any of these ranges simultaneously. CTCSS/DCS Search – Lets the scanner search for CTCSS or DCS tones. You can identify up to 50 CTCSS tones and 104 DCS tones. Quick Search – Lets you search from the currently-tuned frequency if you are searching a conventional system. Auto Store Frequency AutoStore – Automatically stores all active frequencies within a system you select. Priority Functions Priority Scan – Priority channels let you keep track of activity on your most important channel(s) while monitoring other channels for transmissions. Priority Plus – You can set the scanner so it scans only the priority channels Backlight and Power LCD Back Light – Makes the display easy to see in dim light. You can adjust the back light so it turns on when you press a key, when squelch breaks during a transmission, or manually. Low Battery Alert – The scanner alerts you if the batteries need to be recharged or replaced. 10 Battery Save – You can set the scanner so it reduces the amount of power it needs if there are no transmissions. Key Controls Key Lock – You can deactivate the scanner’s keys to help prevent accidentally changing the scanner’s programming. Key Beep – You can control whether the scanner beeps when you press a key. PC Control and Cloning PC Control – You can transfer programming data to and from your scanner and your personal computer, and control the scanner using a computer. This helps you find frequencies listed on the Internet and load them into the scanner. Clone Mode – You can clone all programmed data,including the contents of the scanner’s memory, menu settings, and other parameters from one AE230H scanner to another AE230H scanner. Special adapters are necessary to establish the Clone functions- these adapters are not supplied- they are available in computer shops. About This Manual The screen displays used in this manual are representations of what might appear when you use your scanner. Since what you see depends on the frequencies for your area and the settings you select, you might notice some differences between what is in this manual and what appears on your scanner. How the Scanner’s Controls Are Represented in This Manual To help navigate the scanner’s menus, the steps shown in this manual show the displays you see and the keys you press or control you operate to get a desired result. This example shows you how to use the scanner’s menu to edit an existing system name. It shows you the key to press ) to select a menu option and the option you see ( it also (PROGRAM SYSTEM) when you press instructs you to turn the scroll control (shown as ) to view a series of choices then select one choice (EDIT NAME). E PROGRAM SYSTEM Select the system EDIT NAME 11 E E To get the most from this manual, review the contents to become familiar with the basic functions available. If you are new to scanning, be sure to read the chapter “Understanding Scanning” for a quick background on the technology. The first thing you’ll need to do is install batteries in the scanner. Then you need to connect the included antenna to the scanner. See pages 17-20 if you need any help doing this. Entering Text • • • • To enter a letter, turn the scroll control until the character you want appears. To enter a number, press a number key. To enter a decimal point, press . then press To move the cursor to the left, hold /4 or rotate the scroll control to the left. To move the cursor to the right, hold then press 6/ • • • or rotate the scroll control to the right. To clear a character, press No twice. To clear all characters, press No 3 times. To accept an entry, press E or press down on the scroll control. Understanding Scanning This section provides you with background on how scanning works. You don’t really need to know all of this to use your scanner, but some background knowledge will help you get the most from your AE230H. Understanding the Scanner’s Memory Your scanner’s memory is organized in an architecture called Dynamic Allocated Channel memory. This type of memory is organized differently and more efficiently than the bank/channel architecture used by traditional scanners. Dynamic Allocated design matches how radio systems actually work much more closely, making it easier to program and use your scanner and determine how much memory you have used and how much you have left. Instead of being organized into separate banks and channels, your scanner’s memory is contained in a pool. You simply use as much memory as you need in the pool to store as many frequencies and alpha tags as you need. No memory space is wasted, and you can tell at a glance how much memory you have used and how much remains. 12 What is Scanning? Unlike standard AM or FM radio stations, most two-way communications do not transmit continuously. Your AE230H scans programmed channels until it finds an active frequency, then stops on that frequency and remains on that channel as long as the transmission continues. When the transmission ends, the scanning cycle resumes until the scanner receives another transmission. What is Searching? The AE230H can search each band and up to 10 frequency bands together to find active frequencies. This is different from scanning because you are searching for frequencies that have not been programmed into the scanner. When you select frequency bands to search, the scanner searches for any active frequency within the lower and upper limits you specify. When the scanner finds an active frequency, it stops on that frequency as long as the transmission lasts. If you think the frequency is interesting, you can program it into the scanner’s memory. If not, you can continue to search. What is CTCSS/DCS? Your scanner can monitor systems using a Continuous Tone Coded Squelch System (CTCSS) and Digital Coded Squelch (DCS) system, which allow squelch to open only when the tone you have programmed with a specific frequency is received along with a transmission. CTCSS and DCS are subaudible tone signaling systems sometimes referred to as PL or DPL (Motorola’s trademarked terms for Private Line and Digital Private Line respectively). CTCSS and DCS are used only for FM signals and are usually associated with both amateur and commercial two-way frequencies. These systems make use of a special subaudible tone that accompanies a transmitted signal. CTCSS and DCS are used for many purposes. In many cases, CTCSS and DCS are used to restrict access to a commercial repeater, so that only those units, which transmit the correct tone along with their signal can “talk” to the repeater. CTCSS and DCS are also used in areas that receive interference where there are several stations with output frequencies close to each other. When this occurs, you might hear multiple communications on the same frequency. The stations might even interfere with each other to the point where it is impossible to clearly receive any of the 13 stations. A scanner equipped with CTCSS and DCS (like your scanner) can code each received frequency with a specific CTCSS or DCS frequency. Then, when you receive multiple signals, you only hear the transmission with the CTCSS or DCS tone you programmed. If you do not receive the correct tone with a signal, the scanner’s squelch remains closed and you hear nothing. You can search for the following CTCSS frequencies and DCS codes. CTCSS Frequencies (Hz) DCS Codes (Octal Code Numbers) 14 Using the Scanner at the Racetrack Keeping up with the action at the racetrack is easy and fun. You can hear drivers communicating with their pit crews, officials communicating with drivers and crews, and track workers communicating with everybody. Each user at the racetrack transmits and receives on one or more frequencies. The scanner organizes racetrack frequencies by the name of the race you are scanning and by car number. For example, you might hear drivers and their pit crews on the car number frequencies and officials and the news media on the race frequencies. When you are scanning, the scanner stops very briefly on each channel to see if there is activity. If there isn’t, the scanner quickly moves to the next channel. If there is, then the scanner pauses on the transmission until it is over. You can activate one racing system and as many conventional systems as you want at the same time. Within a racing system, each driver can have multiple frequencies stored. Conventional Scanning Conventional scanning is a relatively simple concept. Each group of users in a conventional system is assigned a single frequency (for simplex systems) or two frequencies (for repeater systems). Any time one of them transmits, their transmission always goes out on the same frequency. Today there are still many 2-way radio users who operate using a conventional system: • Aircraft • Amateur radio • LPD/PMR users • Broadcast AM/FM/TV stations • Many business radio users When you want to store a conventional system, all you need to know is the frequencies they operate on. When you are scanning a conventional system, the scanner stops very briefly on each channel to see if there is activity. If there isn’t, the scanner quickly moves to the next channel. If there is, then the scanner pauses on the transmission until it is over. Simplex Operation Simplex systems use a single frequency for both transmit and receive. Most radios using this type of operation are limited to line-of-sight operation. This type of radio is 15 frequently used at construction job sites, and with inexpensive consumer radios such as LPD/PMR radios. The range is typically 1-5 km, depending upon the terrain and many other factors. Repeater Operation Repeater systems use two frequencies: one transmits from the radio to a central repeater; the other transmits from the repeater to other radios in the system. With a repeater based system, the repeater is located on top of a tall building or on a radio tower that provides great visibility to the area of operation. When a user transmits (on an input frequency), the signal is picked up by the repeater and retransmitted (on an output frequency). The user’s radios always listen for activity on the output frequency and transmit on the input frequency. Since the repeater is located very high, there is a very large line of sight. Where To Get More Information By itself, this manual really can only provide some basic knowledge of what you need to know to have fun scanning: just how to program and use the scanner. Do understand more about wave propagation and radio communication, You need more specific knowledge about RF technology or You need to be licensed radio amateur. Information On The Internet The Internet is a great source for current frequencies and information about scanning. Many web sites have lists of frequencies for your area. You can use a search engine to find and use them. Make a list of the agencies you want to listen to, then look up the frequencies and systems used by those agencies. If you have access to the internet, you may want to visit the following web sites for additional information: • www.racescanner.eu - Race frequency information, programming software and accessories. • http://groups.yahoo.com/group/AE230HA mailing list of a group for people interested in discussing the AE230H. 16 Included With Your Scanner If any of these items are missing or damaged, immediately contact your place of purchase. • • • • • • • • • Scanner PC Connection Cable AC Adapter Wrist Strap Belt Clip Batteries Antennas Owners Manual Headset Setting Up Your Scanner These guidelines will help you install and set up your new scanner: • If your scanner receives interference or electrical noise, move the scanner or its antenna away from the source. • To improve the scanner’s reception, use an optional external antenna designed for multi-band coverage. (You can purchase this type of antenna at a local distributor). If the optional antenna has no cable, use 50or 75 Ohms coaxial cable for lead-in. A mating BNC adapter plug might be necessary for the optional antennas. Please use only 1 type of coaxial cable for the connection and do never mix cables with different impedances. If started with 50 Ohms, then stay with 50 Ohms cable in the whole installation. If the antenna cable length should exceed about 15 meters, it is recommended to use a low loss cable type like RG 213-U or better. RG 58/U cable cannot be used for longer wiring. • • • • Use the supplied mono headset for private listening. Read the precautions on the inside front cover of this Owners Manual. Do not use the scanner in high-moisture environments such as the kitchen or bathroom. Avoid placing the scanner in direct sunlight or near heating elements or vents. 17 Using Batteries You can power your scanner using supplied rechargeable AA batteries or other non rechargeable batteries of AA size, which are everywhere available. Using Rechargeable Batteries Before you use Ni-MH (or the older Ni-Cd battery types, you must charge them. The scanner has a built-in circuit that lets you recharge Ni-MH or Ni-Cd batteries while they are in the scanner. To charge the batteries: • Make sure the power is turned off. • Slide the battery compartment cover. • Install two batteries in the compartment as indicated by the polarity symbols (+ and -) marked inside. • Replace the cover. • Connect the supplied AC adapter to the scanner's DC 6V to charge the batteries. (See “Using AC Power” on the over next page.) 18 Using Non-rechargeable Batteries You can also use two alkaline batteries to power your scanner. Before you use alkaline batteries, you must remove the sticker in the compartment and move the switch to REG. ALK. BATT position. Cautions: • • • • Use only fresh batteries of the required size and recommended type. When flashes and the scanner beeps every 15 seconds, replace both batteries. Always remove old or weak batteries. Batteries can leak chemicals that destroy electronic circuits. Do not mix old and new batteries, different types of batteries (standard, alkaline, or rechargeable), or rechargeable batteries of different capacities. WARNING! Do not connect either adapter to the scanner if non rechargeable batteries (such as standard or alkaline batteries) are installed in the scanner and REG. ALK. BATT./ NI-MH BATT. is set to NI-MH BATT (this is the default setting with the sticker) or if you are unsure of the switch’s position. Non-rechargeable batteries will get hot and can even burst if you try to recharge them. Before you use Ni-MH or Ni-Cd batteries for the first time, charge them for 16 hours to bring them to a full charge. Discharged batteries take about 16 hours to fully recharge. Notes: • Ni-MH batteries last longer and deliver more power if you occasionally let them fully discharge. To do this, simply use the scanner until it beeps every 15 seconds and flashes. • To prevent damage to Ni-MH batteries, never charge them in an area where the temperature is above 45°C (113°F) or below 4°C (40°F). • If you connect an external power source to the scanner with REG. ALK. BATT./NI-MH BATT. set to REG. ALK. BATT., the scanner does NOT charge the batteries. Make sure that you use the correct batteries and set REG. ALK. BATT./ NI-MH BATT. to the correct position when you connect an external power source. 19 Using AC Power You can power the scanner using the supplied 6V, 500 mA AC adapter. To use the scanner on AC power, plug the AC adapter into the DC 6V socket on the side of the scanner then plug the other end into a standard 230 V AC outlet. If rechargeable batteries are installed without removing the sticker, or, after removing, REG. ALK. BATT./NI-MH BATT. is set to NI-MH BATT., the adapter powers the scanner and recharges the installed batteries at the same time. Connecting the Antenna To attach the supplied stub antenna to the connector on the top of your scanner, align the slots around the antenna's connector with the tabs on the scanner's BNC connector. Then slide the antenna's connector down over the scanner's connector and rotate the antenna connector's outer ring clockwise until it locks into place. The smaller antenna is designed for higher frequency ranges, While the longer antenna is optimized for the 4 m and 2 m Band. Connecting an Outdoor Antenna The scanner's BNC connector makes it easy to connect a variety of optional antennas, including an external mobile antenna or outdoor base station antenna. Note: Always use antenna cable of the same impedance, for example 50-Ohm, RG-58, or RG-213 coaxial cable to connect an outdoor antenna. If the antenna cable is over 15 meters long, use RG-213 low-loss (or better) coaxial cable. You can get a BNC adapter suitable for Your antenna cable from your local electronic distributor. Connecting an Earphone/Headphone For private listening, you can use the supplied headphone or can plug any other 3.5 mm mini-plug earphone (not supplied) into the headphone jack on top of your scanner. This automatically disconnects the internal speaker. See “Earphone Warning” at the front of the manual for important information about using an earphone/ headphone. Connecting an Extension Speaker In a noisy area, an optional amplified extension speaker, positioned in the right place, might provide more comfortable listening. Plug the speaker cable's 3.5-mm plug into your scanner's jack. We recommend to use a standard external PC speaker as extension speaker, because these speakers have exactly the amplifier needed for this purpose. Speakers can be mono or stereo as well (in case of stereo both speakers get the same signal). 20 WARNING! If you connect an external speaker to the scanner's headphone jack, never connect one of the two audio output wires to any power supply or ground terminal. Doing this might damage the scanner, because it has a “floating ground” audio amplifier system. Attaching the Belt Clip To make your scanner easier to carry when you are on the go, use the supplied belt clip. Use a Phillips screwdriver and the supplied screws to attach the clip to the scanner. Attaching the Wrist Strap To keep your scanner safely close at hand, use the supplied wrist strap. Push the small loop on one end of the wrist strap through the lug on the right side of the scanner, then thread the other end of the wrist strap back through the small loop to secure it. Installing the Demo Software You can operate your scanner using a personal computer and the free demo software available at http://www.racescanner.eu Download the software, then double-click on the install package to begin installation. The AE230H Install program installs the software. You must install the software to use the scanner with your computer. After you install the AE230H Install program, start it by double clicking on the desktop icon or by selecting it in the Start Programs list. You can upgrade the included software to a full version by purchasing a registration key at http://www.racescanner.eu Note: The scanner comes with a standard RS 232 cable with 9 pin sub D plug on the computer side. If Your computer should not have any RS 232 socket, You can purchase an USB-to-Serial adapter cable from computer accessory shops. 21 A Look At The Keypad Your scanner's keys have various functions labeled on the key tops and below the keys. To select the function labeled on a key, simply press the key. To select the function on the left side of the labeled below a key, hold down scanner then press the key. appears on the display. If your scanner's keys seem confusing at first, the following information should help you understand each key's function. Key Name Description CAR/ CAR – Selects a car in scan mode. + – Locks and unlocks the keypad. Hold – Holds the scan or the frequency search. Hold/ + – Quickly selects theClose Call feature (see “Setting Close Call Options” Scan/Srch Scan – Scans the stored channels. + Srch – Starts quick search or quickly accesses the search menu. 22 Key Name Description L/O L/O – Lets you lock out a selected channel or skip a specified frequency. + L/O – Press quickly to lock and unlock a selected system in Scan or Scan Hold mode and review search lockout frequencies in Search or Search Hold mode. Press and hold for more than 2 seconds to unlock all groups and channels in a conventional system. / 1-9, 0/Race Press and hold for more than 2 seconds to turn the scanner on or off. Press quickly to cancel a prompt. + – Turns the display backlight on or off 1-9 – Enters a frequency, enters quick key numbers, selects a custom search range in Custom Search mode, and selects systems by quick key in scan mode. 0/Race – Selects the race quick key, enters a frequency, and selects a custom search range in Custom Search mode. 1/Pri 4/ 6/ 7/Rcl + 1-9, 0/Race – Selects groups by quick key in scan mode. 1 – Enters a 1. + Pri – Selects the priority mode in scan hold mode. 4 – Enters a 4. + – Moves the active character to the left while editing data. 6 – Enters a 6. + – Moves the active character to the right while editing data. 7 – Enters a 7. + Rcl – Displays a series of prompts to quickly select a specific channel in the scan hold mode. 23 Key Name Description No/ – Enters a decimal point or dash in a frequency. At a prompt, answers “No.” + Rev – Monitors the currently-tuned frequency’s reverse frequency. E – Press to select input and menu items, to quickly edit a channel in Scan Hold Mode, and store a frequency into memory in Search Hold mode. At a prompt, answers “Yes.” + Att – Turns the scanner’s attenuator on or off for the current channel. /Rev E/Yes/Att A Look At The Display The display has indicators that show the scanner's current operating status. The display information helps you understand how your scanner operates. The dark area shown above the icons in this illustration is the text display area. Information about the currently tuned frequency appears here. SYS shows the currently activated system, appears with numbers (1-9). The currently active system indicator flashes. ATT appears when the attenuator feature is turned on. PRI appears when the priority feature is turned on (see “Priority Scan”) 24 appears when you lock the keypad (see “Locking/Unlocking the Keypad” alerts you when the battery power gets low. GRP shows the currently activated group, appears . The currently active with numbers group indicator flashes. AM/FM NFM appears to show the type of transmission. L/O appears when you manually select a channel you locked out or a skip frequency. appears when you hold down to select a function. appears when the scanner is set to a Close Call feature mode (see “Using the Close Call Feature”) Using Menu Press menu. on the left side of the scanner to enter the Using Func 09 To select the function labeled below a key on the front of the 25 scanner, hold down on the left side of the scanner, then press that key. To hold on a system while scanning or temporarily stop on a channel while searching, press . To select a system in Scan or Scan Hold mode, hold down and rotate the scroll control. Using the Scroll Control Turn the scroll control on top of the scanner to select a channel or frequency in Hold mode, select menu items in Menu mode, and to select a character while editing a name. You can also press the scroll control down instead of pressing E on the keypad to select an item. Basic Operation Turning On the Scanner and Setting the Squelch Note: Make sure the scanner's antenna is connected before you turn it on. 1. Turn Sql fully counterclockwise. 2. Press and hold for about 2 seconds to turn on the scanner, then turn Vol clockwise until you hear a hissing sound. 3. Turn Sql clockwise until the hissing stops. Scanning Systems To begin scanning programmed systems, press Scan. The AE230H scans all unlocked systems in all activated quick-key groups. Notes: If no systems are programmed, or all systems are locked out, an error message appears. Program a system or select a system to scan. • When scanning multiple systems, the AE230H scans 26 systems according to the assigned quick key. • Then the race assigned to the next quick key (1, 2, 3, 4, etc.) is scanned. Systems not assigned to a quick key are scanned last. • Within a quick key, systems are scanned in the order they were assigned. • Within a system, channels are scanned according to the assigned channel group, with the same priority as described above for systems. • The AE230H scans a system for the duration you set using the System Hold Time option (see “Setting the System Hold Time”. All unlocked channels are scanned at least one time regardless of the hold time setting. Scanning Preprogrammed Races Before You Get To The Track Each driver’s team has several different frequencies they can use during a race. These frequencies can change depending on local interference sources or other frequency issues. Your scanner is preprogrammed with all of the drivers and their possible frequencies that were known when it was manufactured. Before you leave for the track, check the Internet to see if there are any frequency updates available for your race. You can save time at the track by setting up as much as possible before you leave. When You Get To The Track When you arrive at the race, get a list of the actual frequencies in use that race day. These are normally available for sale on the way into the facility. This list will show the actual frequency being used by each driver that day, as well as some other useful frequency information. Then, follow the steps in the sections below to adjust the scanner settings. Selecting Driver Frequencies Follow these steps to select the appropriate frequency for each driver. • Press 0 in Scan mode, rotate the scroll control to select the race, then press E. • Press CAR, enter the driver’s number, then press E. • Or press CAR, press E, rotate the scroll control to select the driver, then press E. • Rotate the scroll control to select the driver’s frequency. If the driver’s frequency is not listed, select NEW FREQUENCY then enter the correct frequency. 27 • Press Hold to set the selection. Holding on a Car Follow these steps to hold on a car within the currently-selected racing system. • Press 0 in Scan mode, rotate the scroll control to select the race, then press E. • Press CAR, enter the driver’s number, then press CAR. • Or press CAR twice, rotate the scroll control to select the driver, then press CAR. You can select the car’s first unlocked frequency. Selecting Interference Eliminator Codes Many drivers use special codes in their radios to prevent interference from other nearby radio systems. These codes are commonly referred to as CTCSS, DCS, or subaudible tones. You can use these same codes to prevent interference from other systems. • Press 0 in Scan mode, rotate the scroll control to select the race, then press E. • Press CAR, enter the driver’s number, press E or CAR, press E, rotate the scroll control to select the driver, then press E. • Rotate the scroll control to select the driver’s frequency, then press E. • Press E to enter the channel setting menu. • Rotate the scroll control to select SET CTCSS/DCS, then press E. • Rotate the scroll control to select CTCSS or DCS, then press E. • Rotate the scroll control to select the correct CTCSS/ DCS value, then press E. • Press Hold to set the selection Selecting Systems to Scan To select systems to scan, press Scan then press the number button corresponding to the quick key assigned to the system or systems. To stop scanning the system(s), press Scan again. The SYS indicators on the display show the systems that are currently selected. To select or lock out a system that is not assigned to a key, press and hold while you rotate the scroll control until the desired system is selected. Then, continue to hold and press L/O to either lock out or unlock the system. 28 Selecting System Channel Groups Within a system, you can assign groups of channels to a group quick key (see “Setting the Group Quick Key”) Follow these steps to activate or deactivate a channel group within a system while scanning. to hold on the system (or hold • Press and rotate the scroll control to select the system). • and press the number key Continue to hold corresponding to the channel group you want to activate or deactivate. Locking/Unlocking Systems Follow these steps to lock out a system so that it does not scan even if its quick key is selected. • While holding down , rotate the scroll control to select the system. • Continue to hold down and press L/O to lock out the system. • Repeat Steps 1 and 2 to unlock a system you have previously locked. Note: You can unlock only one race at a time. When you unlock a race, the scanner automatically locks the other races. Locking/Unlocking Channels Follow these steps to lock out a channel so that it does not scan even if its system and channel group are selected. • While holding down , rotate the scroll control to select the system where the channel is stored. • Release then press Hold within 2 seconds to hold on the system. • Rotate the scroll control to select the channel you want to lock or unlock. • 4. Press L/O to lock or unlock the channel. You can also lock out an active channel by pressing L/O while the scanner is stopped on the channel. Temporarily Holding On a System • • • To temporarily hold on a system, press and hold . To hold on a different system, continue to hold and rotate the scroll control to select the system. Normal scanning resumes 2 seconds after you release . 29 Holding On a Channel To hold on a channel, press Hold while the channel is active. To select a different channel, rotate the scroll control. If you scroll past the beginning or end of the current system, the scanner selects channels in the previous or next system. To resume scanning, press Scan. Note: You can select any channel (locked or unlocked). Quick-Storing Channels • • • Hold on an existing channel in any system. Enter the frequency you want to store. To quick-store the channel, press E. Otherwise, press No. If you enter a frequency then press E, the scanner stores it in the QCK SAVE GRP group in a system called QCK SAVE CNV SYS. These are created if they do not exist. Then, the scanner prompts you to save other channel settings. If you pressed No in the last step, the scanner prompts you to select the system and the group where you want to store the frequency. Quickly Recalling Channels • Press Hold to hold on any channel. • Press + Rcl. The scanner prompts you to select the system where the channel is stored. Rotate the scroll control to select the system, then press E. The scanner prompts you to select the channel group where the channel is stored. Rotate the scroll control to select the group, then press E. • • If you selected a conventional system, the scanner prompts you to select a channel. Rotate the scroll control to select the channel, then press E to hold on that channel. Otherwise, if you selected a racing system, the scanner automatically selects an active channel from the car group and holds on that group. 30 Other Settings Displaying System Information Viewing Memory Used SEE SCANNER INFO % MEMORY USED E E A bar showing the percent of memory used appears. Press any key to return to the previous menu. Viewing the Firmware Version SEE SCANNER INFO FIRMWARE VERSION E E Press any key to return to the previous menu. Adjusting the Key Beep ADJUST KEY BEEP E • OFF: The scanner is silent when you press a key. • ON: The scanner beeps when you press a key. Locking/Unlocking the Keypad Press and hold down unlock the keypad. then press Turning Power Save On or Off SET BATTERY SAVE • ON: • OFF: to lock or E The scanner goes into low-power mode when you monitor a conventional channel that has no activity. Power save is off. Priority Scan SET PRIORITY Or, while holding on any channel, press select one of these priority modes: • OFF: Normal scanning • ON: E + 1/Pri to While scanning, the scanner interrupts every 2 seconds and checks the priority channels in each unlocked system. Priority channels in lower priority key numbered systems (starting from 1) 31 have highest priority. PRI appears when you select this mode. • PLUS ON: The scanner only scans priority channels in unlocked systems. PRI flashes when you select this mode. Using the Backlight SET BACKLIGHT E • 10 SEC The backlight stays on for 10 seconds after + . you press • 30 SEC The backlight stays on for 30 seconds after you press + . • SQUELCH The backlight turns on when the squelch opens then stays on for 5 seconds. • KEYPRESS The backlight turns on when any key is pressed then stays on for 10 seconds. • INFINITE The backlight turns on when you press + then stays on until you press + again. Pressing any key while the backlight is on extends the + while the backlight backlight period. Pressing is on turns off the backlight. Initializing the Scanner’s Memory Important! This deletes all preprogrammed data except for the band plan! To initialize the scanner’s memory, turn off the scanner. Then, press 2, 9, and Hold while turning it on. Notes: • If you initialize the scanner after changing the band plan, custom search range is adjusted to match to the band plan. • If you want to program the deleted data again, use the PC Control and cloning options. Using the PC Control andCloning Options Use the included connection cable to connect your scanner to another AE230H scanner or your personal computer. XFER INFORMATION 32 E • PC CONTROL Lets you set the baud rate your scanner uses to communicate with a personal computer. See “Connecting Your Scanner to a Personal Computer”. • WIRED CLONE Lets you set your scanner as a master or a slave, letting you transfer programming to or from another AE230H scanner. See “Cloning the Scanner” Connecting Your Scanner to a Personal Computer To connect your scanner to a personal computer, you must first set the scanner’s baud rate (the rate at which data is transferred between the scanner and the computer, in bits per second (bps)). Hint: If you have trouble transferring data between your scanner and your computer, try setting the baud rate to a slower setting. XFER INFORMATION E PC CONTROL E • OFF The baud rate is not set. • 9600 BPS The baud rate is set to 9600 bps. • 19200 BPS The baud rate is set to 19,200 bps. • 38400 BPS The baud rate is set to 38,400 bps. • 57600 BPS The baud rate is set to 57,600 bps. 33 Cloning the Scanner To clone (copy) data from one AE230H scanner to another AE230H scanner, you must first connect the scanners to each other using the included connection cables and a 9 pin SUB D null modem adapter cable + 9 pin gender changer adapter (neither included), available at most computer stores. Depending on the computer supplier, also combined gender changers with null modem function are available, so that You may need only one common adapter. It is also possible to solder 2 male plugs 9 pin SUB D together according to following scheme: Plug 1 1 Plug 2 4 2 2 3 4 5 6 7 8 9 frei 3 6&1 5 4 8 7 9 frei Then you must set one scanner as the master (source) and the other as the slave (destination). Plug the smaller end of each of the included connection cables into Remote on the right side of each scanner. Then connect the other end of the cables together using the null modem connector and gender changer. Then set up both scanners. XFER INFORMATION WIRED CLONE E E • MASTER This will be the master (source) scanner. • SLAVE This will be the slave (destination) scanner. (Master scanner) E CLONE MASTER PRESS SCAN KEY (Slave scanner) E 34 CLONE SLAVE PRESS SCAN KEY When you are ready to clone the scanner, press Scan on the slave scanner first, then on the master scanner. The master scanner checks the connection between the two scanners, then transfers its data to the slave scanner. When the transfer is complete, Complete appears on both scanners. If the transfer did not work, Error appears on the master scanner. Using the Menu The scanner’s menu lets you select options that let you set up and use the scanner. on the left side of the scanner. To use the menu, press In most cases, the current menu position appears on the upper line of the menu. Menu items and a place to input information appear on the lower line of the menu. To select a menu item, turn the scroll control on top bof the scanner clockwise or counterclockwise. When the menu item you want to select appears, press E or press the scroll control down to select it. To back up a level or return to the previous level, press . To exit the menu mode, press . This table shows the available menu options and where you can find more information about how to use them. Menu Item Lets You ... See Under… Set up Programming the Radio scanner’s Systems scan options. 35 Set up the scanner’s Close Call option. Using the Close Call Feature Set up the scanner’s search option. Searching and Storing 36 Set up the scanner’s Close Call operation . Setting Close Call Options Set up priority options. Priority Scan Set up backlight options. Using the Backlight Set up key beep options. Adjusting the Key Beep Set up battery save options. Turning Power Save On or Off View informati on about your scanner. Displaying System Information Transfer informati on between it and your personal computer . Installing the Demo Software and Using the PC Control and Cloning Options Programming Radio Systems To edit an existing system, use the menu to navigate to the system setting you want to change. This section assumes you are programming a new system. Programming radio systems is completed in two major steps. Don't skip either step! • • Plan the system. Program the system into your scanner according to the plan you prepared in the previous step. To make planning easier, planning worksheets are included in the back of this manual for each system type. Copy the worksheets, then use them to plan out how you will program the scanner. Important! Before you start programming your scanner, make sure the batteries are fresh or fully charged. If the scanner loses power while you program it, its memory might be corrupted which will require you to reinitialize it (see the chapter about “Initializing the Scanner’s Memory”. All information programmed in the scanner, including preprogrammed systems, might be lost. General Notes • You can store up to 200 systems. • The number of system channels you can have is limited only by the amount of scanner memory remaining. • You can store up to 20 channel groups per conventional system. • Total channels are limited to about 2500. • Channels that have text tags use more memory than those that do not. If you use a text tag for every channel, total channels are reduced from 2500 (1600 is typical). 37 Quickly Programming Racing Systems You can use the menu system to program a racing system (see “Manually Programming Racing Systems”). Or you can follow the onscreen prompts as described in this section to quickly program your scanner. These prompts are designed to help you quickly enter a new race from a frequency list purchased at the track (if the system is not already preprogrammed into your scanner). When you complete Steps 5 and 6, almost all cars will use the default settings for the other steps. 1. While scanning, press 0. Then rotate the scroll control to select NEW RACE, then press E. 2. Enter the name of the race, then press E. 3. Enter the first car number (up to 3 digits), then press E. 4. Enter the first driver name (up to 12 characters), then press E. 5. Enter the driver’s frequency, then press E. 6. Set the CTCSS/DCS code, then press E. 38 7. Press E to enter advanced options (Steps 8-11) or press to skip to Step 12. 8. Set the modulation type (AUTO is almost always the correct choice), then press E. 9. Set the attenuator (turn it on to eliminate interference from other sources), then press E. 10. Set the channel priority (turn it on if you want the scanner to interrupt operation every few seconds to check for transmissions by this driver), then press E. 11. Set alert (turn it on if you want the scanner to sound a special alert when this car transmits), then press E. 12. If you have another frequency to enter for this driver, press E then repeat from Step 5. Otherwise, press No. 39 13. To enter another car in this race, press E then repeat from Step 3. Otherwise, press No. 14. When you finish, press Scan to begin scanning the race. Manually Programming Racing Systems PROGRAM SYSTEM NEW SYSTEM E CONFIRM? E RACING E E The scanner creates an empty racing system, with a default name of SYSTEM INN R. NNN increments as you add new systems. R indicates that this is a racing system. Refer to the appropriate chapters to set system-wide options: • See “Editing the System Name” (p.40) • See “Setting Group Lockout” (p.45) • See “Setting the System Hold Time” (p.46) • See “Setting the Channel Delay Time” • See “Setting Data Skip” (p.47) • See “Editing the Car” (p.40) • See “Deleting Systems” (p.47) • See “Copying Systems” (p.47) Editing the Car PROGRAM SYSTEM E Select the system E EDIT CAR E Select the car E Follow these steps to enter the car options. Rotate the scroll control to select one of the following 40 options. Then refer to the appropriate section to set or change a car setting. • See “Entering/Editing a Car Number” (below) • See “Editing a Driver” (below) • See “Setting a Car’s Quick Key” (next page) • See “Editing a Car’s Channel” (next page) • See “Deleting a Car” (next page) • See “Setting Lockout On A Car” (next page) Entering/Editing a Car Number PROGRAM SYSTEM Select the system EDIT CAR E Select the car EDIT CAR NO • • E E E E Rotate the scroll control to select the first digit, then press 0-9 to enter the correct digit. Repeat the last step to enter or correct the second and third digits if necessary, Then press E or press down on the scroll control to accept the setting. Hints: • Each car number can be up to three digits. • Press key to delete the entire car number. Editing a Driver PROGRAM SYSTEM Select the system EDIT CAR E Select the car EDIT DRIVER E E E E 1. Rotate the scroll control to select the first letter. 2. Press and hold down then rotate the scroll control once to select the next letter. 3. Repeat Steps 1 and 2 until you have entered the driver’s name. Then press E or press down on the scroll control to accept the setting. Hints: • Each driver’s name can be up to 12 characters. Abbreviate as necessary to fit. twice to delete the current character. • Press • Press three times to clear the entire driver name. 41 Setting a Car’s Quick Key PROGRAM SYSTEM Select the system EDIT CAR E E E Select the car E SET QUICK KEY E After selecting this option, press 0-9 or rotate the scroll control to assign the car to a quick key or press No to assign the car to no quick key, then press E. Hints: • You can assign as many cars to the same quick key as you want. • To be scanned, a car’s quick key must be activated and the system must be unlocked. Editing a Car’s Channel PROGRAM SYSTEM E Select the system E EDIT CAR E Select the car E EDIT CHANNEL E Deleting a Car PROGRAM SYSTEM Select the system E E EDIT CAR Select the car E DELETE CAR E E The scanner prompts you to confirm deletion. To confirm, press E. To cancel, press No. Note: Deleted cars cannot be restored. You must re-enter them. Setting Lockout on a Car PROGRAM SYSTEM Select the system E EDIT CAR E Select the car SET LOCKOUT 42 E E E This setting determines whether the scanner will scan this car when it is enabled. Select your setting, then press E. LOCKOUT - the car is not scanned. UNLOCKED - the car is scanned. Note: The default setting is Unlocked. Programming Conventional Systems PROGRAM SYSTEM NEW SYSTEM E E CONVENTIONAL E CONFIRM? E The scanner creates an empty conventional system, with a default name of SYSTEM NNN C. NNN increments as you add new systems. C indicates that this is a conventional system. Refer to the appropriate section to set system-wide options: • See “Editing the System Name” • See “Editing the System Quick Key (Conventional Systems Only)” • See “Setting Group Lockout” • See “Setting the System Hold Time” • See “Setting the Channel Delay Time” • See “Setting Data Skip” • See “Deleting Systems” • See “Copying Systems” • See “Entering/Editing Conventional Channel Groups” Entering/Editing Conventional Channel Groups To enter channels in a conventional system, first set up a channel group (or groups) to hold the channels. Then, enter the channel and channel parameters in the group(s). Setting Up a Channel Group EDIT GROUP NEW GROUP E E The scanner creates a group with a default name of GROUP NN. NN increments by one for each new group you create within a system. Refer to the appropriate chapters to set group-wide options: 43 • See “Entering/Editing the Group Name” (p.48) • See “Setting the Group Quick Key” (p.48) • See “Deleting Groups” (p.49) • See “Setting Group Lockout” (p.49) • See “Entering/Editing Conventional Channels” Entering/Editing Conventional Channels EDIT CHANNEL E NEW CHANNEL E INPUT FREQUENCY Enter the frequency for the channel, then press E. Then, refer to the appropriate section to change a channel setting: • See “Editing the Channel Name (Conventional Systems Only)” • See “Setting Channel Priority” • See “Setting Channel Alert” • See “Deleting Channels” • See “Copying/Pasting Channels” To program another channel within the same group, press , then repeat the above. To create another channel group and enter more channels, press four times, then proceed from “Setting Up a Channel Group”. Programming/Editing Optional Settings This section details the instructions for each of the optional programming steps referred to the chapter “Programming Radio Systems”. Use the instructions in the appropriate section to enter or edit a setting. System-Level Settings These settings apply to the entire system. Editing the System Name PROGRAM SYSTEM Select the system EDIT NAME E E E Follow these steps to enter/edit the system name. 1. Rotate the scroll control to select the first letter. 2. Press and hold down then rotate the scroll 44 control once to select the next letter. 3. Repeat Steps 1 and 2 until you have entered the system name. Then press E or press down on the scroll control to accept the setting. Hints: • Each system name can be up to 16 characters. Abbreviate as necessary to fit. • The default system names include C (conventional) or R (race) in the 16th position to indicate the system type: • Press • Press key twice to delete the current character. key three times to clear the entire alpha tag. Editing the System Quick Key (Conventional Systems Only) PROGRAM SYSTEM Select the system EDIT SYS OPTION E E SET QUICK KEY E E After selecting this option, press 1-9 to assign the system to a quick key or press No to assign the system to no quick key, then press E. Hints: • You can assign as many systems to the same quick key as you want. • To be scanned, a system’s quick key must be activated and the system must be unlocked. Setting Group Lockout PROGRAM SYSTEM Select the system EDIT SYS OPTION E E SET LOCKOUT E E This setting controls whether the system is scanned when it’s quick key is enabled. Rotate the scroll control to select your setting, then press E. LOCKED - the system is not scanned 45 UNLOCKED - the system is scanned Note: You can also lock or unlock a system by pressing , selecting the system, then pressing + L/O. Setting the System Hold Time PROGRAM SYSTEM E Select the system EDIT SYS OPTION E E SET HOLD TIME E This setting controls how many seconds the scanner scans a system before moving to the next unlocked system. Enter a value from 0-255, then press E to save the setting. Notes: • • • • If you select 0, the scanner stays on the system for a minimal time (only long enough to check current system activity). The default setting is 2 seconds for each system. All unlocked channels will be scanned at least once regardless of this setting. The scanner moves to the next system after the hold time expires, any current transmission ends, and the channel delay time expires. Setting the Channel Delay Time PROGRAM SYSTEM Select the system E EDIT SYS OPTION E SET DELAY TIME E E This setting controls how many seconds the scanner waits after a transmission ends before resuming scanning. Select a value from 1-5 or Off, then press E. Notes: • • The default setting is 2 seconds for each system. This setting applies to all channels within the system. Setting Data Skip PROGRAM SYSTEM 46 E Select the system EDIT SYS OPTION SET DATA SKIP E E E This setting controls how the scanner behaves when it stops on a channel that has a data signal. ON - the scanner stops briefly on the channel, but then immediately resumes scanning automatically. Press E to select. OFF - the scanner remains on the channel until the transmission stops. Press E to select. Notes: • • This setting is ignored for AM channels. The default setting for this feature is ON. Deleting Systems PROGRAM SYSTEM E Select the system E DELETE SYSTEM E The scanner prompts you to confirm deletion. To confirm, press E. To cancel, press No. Notes: • • • Deleted systems cannot be restored. You must re-enter them. You cannot restore preloaded systems. Copying Systems To copy a system including all settings, groups, and channels: PROGRAM SYSTEM Select the system COPY SYSTEM E E E NEW SYS NAME Enter a name for the copied system, then press E. 47 Group-Level Settings The settings in this section apply to all of the channels stored in the current group. Entering/Editing the Group Name PROGRAM SYSTEM Select the system EDIT GROUP Select the group EDIT NAME E E E E E Follow these steps to enter/edit the group name: 1. Rotate the scroll control to select the first letter. then rotate the scroll 2. Press and hold down control once to select the next letter. 3. Repeat Steps 1 and 2 until you have entered the group name. Then press E or press down on the scroll control to accept the setting. Hints: • Each group name can be up to 16 characters. Abbreviate as necessary to fit. • The group and system name alternate in the top line of the display when the scanner stops on a channel. • Press key twice to delete the current character. • Press key three times to clear the entire alpha tag. Setting the Group Quick Key PROGRAM SYSTEM Select the system EDIT GROUP Select the group SET QUICK KEY E E E E E After selecting this option, press 0-9 to assign the group to a quick key or press No to assign the system to no quick key, then press E. Hints: • • You can assign as many groups to the same quick key as you want. To be scanned, a group’s quick key must be activated. 48 Setting Group Lockout PROGRAM SYSTEM Select the system E E EDIT GROUP E Select the group SET LOCKOUT E E This setting determines whether the scanner will scan this group when it is enabled. Select your setting, then press E. LOCKOUT - the group is not scanned. UNLOCKED - the group is scanned. Note: The default setting is Unlocked. Deleting Groups PROGRAM SYSTEM Select the system EDIT GROUP E E E Select the group DELETE GROUP E E The scanner prompts you to confirm deletion. To confirm, ress E. To cancel, press No. Note: Deleted groups cannot be restored. You must re-enter them. Channel-Level Settings These settings programming. affect only the channel you are Editing the Channel Name (Conventional Systems Only) PROGRAM SYSTEM E Select the system EDIT GROUP Select the group EDIT CHANNEL Select the channel 49 E E E E E EDIT NAME E Follow these steps to enter/edit the channel name. 1. Rotate the scroll control to select the first letter. then rotate the scroll 2. Press and hold down control once to select the next letter. 3. Repeat Steps 1 and 2 until you have entered the channel name. Then press E or press down on the scroll control to accept the setting. Hints: • • • • • • Each channel name can be up to 16 characters. Abbreviate as necessary to fit. The channel name appears on the second line of the display when the scanner stops on a channel. If you do not enter a channel name, the scanner displays the frequency when it stops on a channel. Press key twice to delete the current character. key three times to clear the entire alpha Press tag. Channel names take up extra memory. To maximize channels, use channel names only where necessary. Setting Channel Priority PROGRAM SYSTEM Select the system EDIT GROUP Select the group EDIT CHANNEL Select the channel SET PRIORITY E E E E E E E This setting controls whether the scanner treats the channel as a priority channel while scanning. Select your setting, then press E. ON - when you turn on the Priority feature, the channel will be scanned every 2 seconds. P appears at the end of the default name. OFF - the channel will not be treated with priority. Note: The default setting is OFF. 50 Setting Channel Alert PROGRAM SYSTEM Select the system EDIT GROUP Select the group E E E EDIT CHANNEL E E Select the channel SET ALERT E E This setting controls whether the scanner will alert you when the channel becomes active. Select your setting, then press E. ON - the scanner beeps when the channel becomes active. OFF - no alert sounds. Note: The default setting is OFF. Setting CTCSS/DCS PROGRAM SYSTEM Select the system EDIT GROUP Select the group EDIT CHANNEL Select the channel SET CTCSS/DCS E E E E E E E This setting controls how a subaudible CTCSS or DCS is used for the channel. Select your setting, then press E. OFF any signal opens squelch. SEARCH the scanner searches for and displays any CTCSS or DCS tone that accompanies the transmission. CTCSS the scanner only opens squelch if the CTCSS tone you select is also resent with the signal. The scanner then prompts you to scroll to the desired tone. DCS the scanner only opens squelch if the DCS tone you select is also present 51 with the signal. The scanner then prompts you to scroll to the desired tone. SET LOCKOUT the scanner does not stop on the channel if the tone you select is present. The scanner prompts you to select a CTCSS or DCS tone. Notes: • • The default setting is OFF. See “What is CTCSS/DCS?” for a complete list of CTCSS and DCS tones. Setting Channel Modulation PROGRAM SYSTEM Select the system E EDIT GROUP E Select the group E EDIT CHANNEL E Select the channel E SET MODULATION E E This setting controls the demodulation method used for the channel. Select your setting, then press E. AUTO AM FM NFM the scanner uses the default modulation for the frequency (see the table at the front of the manual). the scanner uses AM (amplitude modulation) for the frequency. the scanner uses FM (frequency modulation) for the frequency. the scanner uses narrow band FM for the frequency. Note: The default setting is AUTO. Setting Channel Attenuation PROGRAM SYSTEM Select the system E EDIT GROUP E Select the group E EDIT CHANNEL E Select the channel E 52 E SET ATTENUATOR E This setting controls whether the scanner attenuates signals on this channel. Select your setting, then press E. ON - the channel is attenuated by about 18 dB. OFF - the channel is not attenuated. Notes: • • The default setting is OFF. You can also toggle this setting by holding on the and E. channel and pressing Setting the Frequency Step PROGRAM SYSTEM Select the system EDIT GROUP Select the group EDIT CHANNEL Select the channel SET STEP E E E E E E E This setting selects the frequency step used for setting the channel's. Select your setting, then press E. AUTO the step is based on the band (see the table at the front of the manual) 5.0 kHz, 6.25 kHz, 7.5 kHz, 8.33 kHz, 10.0 kHz , 12.5 kHz , 15.0 kHz , 20.0 kHz , 25.0 kHz , 50.0 kHz , 100.0 kHz - The scanner uses the selected step. Note: The scanner defaults to Auto. Setting Channel Lockout PROGRAM SYSTEM Select the system EDIT GROUP Select the group EDIT CHANNEL Select the channel SET LOCKOUT E E E E E E E This setting determines whether the scanner will scan this channel when its system and group are enabled. Select your setting, then press E. 53 LOCKOUT - the channel is not scanned. UNLOCKED - the channel is scanned. Notes: • • • The default setting is Unlocked. You can also lock or unlock a channel by selecting it while scanning or holding, then pressing L/O. See also in the chapter “Basic Operation” . Deleting Channels PROGRAM SYSTEM Select the system EDIT GROUP Select the group EDIT CHANNEL E E E E E Select the channel DELETE CHANNEL E E The scanner prompts you to confirm deletion. To confirm, press E. To cancel, press No. Note: Deleted channels cannot be restored. You must re-enter them. Copying/Pasting Channels To copy a channel including all settings: PROGRAM SYSTEM Select the system EDIT GROUP Select the group EDIT CHANNEL E E E E E E E Select the channel COPY CHANNEL The scanner copies the channel into a copy buffer. To paste the channel into the same or another system: PROGRAM SYSTEM Select the system EDIT GROUP Select the group 54 E E E E EDIT CHANNEL PASTE CHANNEL E E Then, if necessary, edit the channel you copied to give it a unique name and other settings. Note: The paste option appears only if you have previously copied a channel from a system of the same type you are currently editing. Searching and Storing Service Search (Air Band) The Air Service Search feature allows you to scroll through the preprogrammed services. . 1. Press 2. Turn the scroll control until SEARCH FOR... appears, then press E. 3. Turn the scroll control until SERVICE SEARCH appears, then press E. The scanner starts Air Service Search. Changing the step of Air Band 1. Press . 2. Turn the scroll control until SRCH/CLOCALL OPT appears, then press E. 3. Turn the scroll control until AIR BAND STEP appears, then press E. 4. Turn the scroll control, the press E to select 12.5 kHz or 8.33 kHz. Note: In the international air band services, the channel spacing system is currently modified worldwide from 12.5 to 8.33 kHz channel spacing. While already some major airports have changed their systems to 8.33 kHz, many airports are still operation on 12.5 kHz spacing. The transition period is scheduled to take some years. Quick Search • • • • Quick Search lets you search from the currently-tuned frequency. Press and Scan/Srch to start quick search. QUICK SEARCH? appears. QUICK SEARCH HOLD appears if you press Hold. Press E to start quick search or No to go to 55 • the search menu. CTCSS/DCS Search CTCSS/DCS Search lets you search for CTCSS or DCS tones when it finds an active frequency in Search and Close Call modes. You can identify up to 50 CTCSS tones and 104 DCS codes. Turning this option on lets the scanner search for CTCSS/ DCS tones. If the scanner detects the tone, it displays the tone’s frequency and DCS code. 1. Press then turn the scroll control until SRCH/CLOCALL OPT appears. Then press E. One of the search feature options appear. 2. Turn the scroll control until CTCSS/DCS SEARCH appears, then press E to select it. 3. Turn the scroll control until ON appears to turn on CTCSS/DCS search or until OFF appears to turn it off, then press E. Custom Search Custom Search lets you program and search 10 custom search ranges. You can search any of these ranges simultaneously and select each custom search range you set. During custom search, the scanner searches starting with the lowest frequency in the search range you select to the highest frequency in the range. Notes: • • Search ranges are preset. See “Editing a Custom Search Range” to change the range. You cannot turn off all custom search ranges. 1. Press then turn the scroll control until SEARCH FOR ... appears, then press E. Or press + Scan/ Srch, then select No. One of the search feature options appear. 2. Turn the scroll control until CUSTOM SEARCH appears, then press E to select it. The scanner starts custom search of the custom search range you selected, stopping on any transmission it finds and displaying the frequency. Turn the scroll control to change the search direction. An arrow appears, showing the current search direction. 56 • • • To turn search ranges on or off, press 0 and 1-9. To hold searching, press Hold. then press To resume searching, press Scan/Srch or Hold again. • To lock out a frequency found while searching, press L/O. SEARCH LOCKOUT? appears. • Press E to lock out the frequency or No to continue monitoring. If you turn off the active custom search range, the scanner skips to the next custom search range and continues searching. Note: If all frequencies in all active custom search ranges are locked out, All LOCKED! appears and the scanner does not stop. Preset Custom Search Ranges The preset frequency ranges are as follows: BAND PLAN 1 Custom Custom 1 Custom 2 Custom 3 Custom 4 Custom 5 Custom 6 Custom 7 Custom 8 Custom 9 Custom 10 Frequency (MHz) 25.0000 87.2875 108.0000 136.9875 137.0000 173.9875 216.0000 224.9950 400.0000 405.9875 406.0000 439.9937 440.0000 469.9900 470.0000 512.0000 806.0000 960.0000 1240.0000 1300.0000 Note: You should select one of the 3 band plans for Your region, where You operate this scanner. It is recommended to keep this setting later, because the band plan setting has influence on the memory locations for storing frequencies and systems. 57 BAND PLAN 2 (specially for Germany) Custom Custom 1 Custom 2 Custom 3 Custom 4 Custom 5 Custom 6 Custom 7 Custom 8 Custom 9 Custom 10 Frequency (MHz) 25.0000 87.2950 108.0000 136.9875 137.0000 173.9875 216.0000 224.9950 400.0000 405.9875 406.0000 439.9937 440.0000 469.9900 470.0000 512.0000 806.0000 960.0000 1240.0000 1300.0000 BAND PLAN 3 Custom Custom 1 Custom 2 Custom 3 Custom 4 Custom 5 Custom 6 Custom 7 Custom 8 Custom 9 Custom 10 Frequency (MHz) 25.0000 87.2937 108.0000 136.9875 137.0000 173.9937 216.0000 224.9950 400.0000 405.9875 406.0000 439.9937 440.0000 469.9937 470.0000 512.0000 806.0000 960.0000 1240.0000 1300.0000 Note: If you want to adjust the preset custom search range to match to the band plan you have selected, initialize the scanner. However, initializing the scanner deletes all the preprogrammed data other than the band plan. Editing a Custom Search Range You can edit up to 10 custom search ranges. The names of the custom search ranges appear on the display. The default custom search range names appear as CUSTOM 1, CUSTOM 2, and so on. then turn the scroll control until 1. Press SEARCH FOR ... appears. Then press E. and Srch, then No. Or press One of the search feature options appear. 2. Turn the scroll control until EDIT CUSTOM appears, then press E to select it. 58 3. Turn the scroll control until the name of the custom search range you want to edit appears, then press E to select it. The following options appear as you turn the scroll control. EDIT NAME lets you edit the custom search range’s name EDIT SRCH LIMIT lets you view and select the frequency ranges to search. The scanner prompts you to enter the upper and lower search limits. SET DELAY TIME lets you set the amount of time the scanner will delay before continuing to search after a transmission ends. SET MODULATION lets you set the custom search range’s modulation type SET ATTENUATOR lets you set whether the scanner will attenuate the input signal reception by appr. 18dB during search. SET DATA SKIP SET STEP lets you set whether the scanner will skip data transmissions during search lets you set the custom search range’s step (the gap between frequencies) 4. Select the option you want to change for the custom search range you selected, then press E. Auto Search and Store Your scanner’s Auto Store feature lets you search for new frequencies in custom search ranges or within a service search range. Selecting a System To store frequencies you find during Auto Store, you must first select a system where the frequencies will be stored. 1. Press then turn the scroll control until SEARCH FOR ... appears. Then press E. One of the search feature options appear. 2. Turn the scroll control until SEARCH AND STORE appears, then press E to select it. 59 3. Turn the scroll control until the system where you want to store the frequencies appears, then press E to select it. Note: You cannot select a racing system. If no systems are programmed, or all systems are locked out, NO SYSTEM STORED appears. Storing a System You can store frequencies into the system you selected in “Selecting a System”. Otherwise, the scanner stores frequencies in a new group it creates. • Follow Steps 1-3 under “Selecting a System”.A search option appears. • Turn the scroll control until the type of search you want appears, then press E to select it. A search band appears. • If all systems are locked out, ALL LOCKED! appears and the scanner does not store any frequencies. When you select a search range, the scanner looks for active frequencies within that range and SEARCH AND STORE appears on the display’s lower line and the system name and search range name appear on the display’s upper line. When the scanner finds an active transmission, it checks to see if the frequency has already been stored in the system. If the frequency has already been stored, the scanner continues to search. If the frequency has not been stored, it stores the frequency into a group named FOUND CHANNELS, then resumes searching. The scanner creates this group if it does not already exist. Using the Close Call Feature Your scanner's Close CallTM feature lets you set the scanner so it detects, displays the frequency of, and lets you hear a nearby strong radio transmission. You can set the scanner so the Close Call feature works "in the background" while you are scanning other frequencies, turn off normal scanning while the Close Call feature is working, or turn off the Close Call feature and use the scanner normally. You can set the scanner so it alerts you when the Close Call feature finds a frequency. You can also set the frequency band where you want the scanner to look for transmissions. 60 • • To turn Close Call detection on (CC DND, CC then . PRI) or Off, press When the feature is on, appears on the display and normal operation is briefly interrupted about every 2 seconds. Notes: • CC DND (Do Not Disturb) - The scanner checks for a Close Call hit every 2 seconds only if the scanner is not currently stopped on a transmission. If the scanner is on a transmission the scanner waits until the signal ends to perform a Close Call check. This prevents breaks in audio during Close Call checks. • CC PRI - Close Call works even if there is a transmission. Checks for a Close Call hit every 2 seconds. • The Close Call feature works well for locating the source of strong local transmissions such as mobile and handheld two-way radios in areas with no other strong transmission sources. Several factors affect Close Call performance, however. Performance is increased with higher transmit power, receive antenna tuned to the target band, and a low background RF level. Other than the antenna, you have no control over these factors, but they explain why performance might vary by both location and time. • The Close Call feature cannot detect satellite dishes or any transmitter with a frequency above or below the frequency ranges listed under “Setting Close Call Options” in the next chapter. • The Close Call feature works better with some types of transmissions than others. It might not correctly display frequency information for transmitters using a highly directional antenna (such as an amateur radio beam antenna) or if there are many transmitters operating at the same time in the same area. Setting Close Call Options 1. Press then turn the scroll control until CLOSE CALL appears. Then press E. Close Call feature options appear. 2. Turn the scroll control to select an option. There are following options for Your choice: 61 • CLOSE CALL ONLY: Lets you set the scanner only for Close Call searching. The scanner does not scan frequencies or channels when this option is turned on. To select this option, press E. • CC AUTO STORE: Lets you select whether the scanner automatically stores Close Call hits into channels. If you turn this option on, the scanner starts Close Call mode and stores any Close Call hits, up to the maximum you specified in the Max Auto Store setting. If the scanner stores more hits than this setting, it stops Autostore operation. Turn the scroll control to display an option, then press E. • SET CC MODE: Lets you select the Close Call mode. If you turn this option on (CC DND, CC PRI), the scanner sets itself to its Close Call settings about once every 2 seconds. Turn the scroll control to display an option, then press E. You can also toggle this setting by pressing then . Notes: • • • • • • • • • CC DND - Close Call does not work while monitoring a transmission. CC PRI - Close Call works even if there is a transmission. SET CC OVERRIDE: Lets you select how the Close Call feature works with other scanning activities. If you turn this option off, when the scanner detects a Close Call signal, CC FOUND! and E TO LISTEN appear for about 3 seconds. Press E when this appears to jump to and hold on the frequency. If this option is turned on, the scanner overrides the current channel and goes to the Close Call hit. The scanner displays CC FOUND! PRESS ANY KEY. When you press a key, the frequency is displayed. Turn the scroll control to display an option, then press E. SET CC ALERT: Lets you select how the scanner alerts you when it receives a Close Call signal. You can select any of the following options. • BEEP+LIGHT (the scanner beeps and the backlight turns on when it receives a Close Call signal) 62 • • • • • • • LIGHT (the backlight turns on when it receives a Close Call signal) BEEP (the scanner beeps when it receives a Close Call signal) NONE (the scanner does not alert) Turn the scroll control to display an option, then press E. SET CC BANDS: Lets you select the Close Call band settings. You can turn the following bands on or off. VHF LOW (25.0000 – max.87.2875 MHz) AIR BAND (108.0000 - 136.9916 MHz) VHF HIGH (137.0000 - 224.9950 MHz, except for 174.0000 - 215.9999 MHz) UHF (400.0000 - 512.0000 MHz) 800MHz+ (806.0000 - 960.0000 MHz) Use the scroll control to select a band, press E, then use the scroll control to select ON or OFF and press E. Turning off undesired bands speeds up Close Call operation. (The Close Call feature does not work for frequencies greater than 960 MHz.) Close Call Hits When the scanner detects a Close Call hit, it alerts you according to the Override and Alert settings in the previous section. While listening to a Close Call hit, you can press Hold to hold on the hit frequency, press E to quickly save the frequency into memory, press L/O to lock out the frequency from Close Call and Search operation, or wait for the transmission to end. If you are in Close Call Only or Close Call Override mode, and you do not press any key, the scanner returns to its previous operation after the transmission ends and the set delay time expires. If you are holding on the frequency, press Hold again to resume the previous operation. Search and Close Call Options The settings in this section affect custom searches, service searches, and Close Call operation. Managing Locked-Out Frequencies While searching or during Close Call operation, if you press L/O while the scanner is stopped on a frequency, that frequency is locked out of these modes. You can lock out up to 200 frequencies. Note: Locking out a frequency does not lock out a channel 63 that contains that frequency. Unlocking All Frequencies SRCH/CLOCALL OPT E FREQ LOCKOUTS UNLOCK ALL E E The scanner prompts you to confirm deletion. To confirm and delete all locked-out frequencies, press E. Otherwise, to cancel, press No. Reviewing Locked Out Frequencies SRCH/CLOCALL OPT E FREQ LOCKOUTS E RVW SEARCH L/O E The scanner displays the first locked-out frequency and prompts you to unlock the frequency. Press E to unlock the frequency. Or, rotate the scroll control or press No to select a different frequency. To exit the review, press . Searching for Subaudible Tones SRCH/CLOCALL OPT E CTCSS/DCS SEARCH E This setting controls whether the scanner will search for a subaudible tone when it stops on a transmission during search or Close Call operation. OFF The scanner does not search for subaudible tones. ON The scanner searches for and displays any subaudible tone found. Note: This feature does not operate when the scanner is in AM modulation mode. (CTCSS and DCS are worldwide only used in FM and never in AM) Setting the Maximum Auto Store Value SRCH/CLOCALL OPT MAX AUTO STORE E E This value sets how many hits the scanner will automatically store when it is in either Search and Store or Close Call Auto Store mode. • Use the number keys to enter a value from 1 - 256, then press E. When the scanner reaches the maximum number of hits 64 you set, it stops the auto-store operation. Setting the Modulation Type SRCH/CLOCALL OPT SET MODULATION E E This setting controls the modulation type used for quick search and Close Call operations. • AUTO AM FM NFM Select your setting, then press E. Uses the default setting for the current frequency Uses AM (amplitude modulation) Uses FM (frequency modulation) Uses narrow band FM Setting Attenuation SRCH/CLOCALL OPT SET ATTENUATOR E E This setting controls the attenuator for quick search, service search and Close Call operation. • OFF ON Select your setting, then press E. The attenuator is off. Reception is attenuated by about 18 dB. Note: Turn on this setting if you are near other strong signal sources. Using the attenuator sometimes helps to reduce interference and desensitization that strong signals create. Setting Data Skip SRCH/CLOCALL OPT E SET DATA SKIP E This setting controls how the scanner behaves when it detects a constant-level transmission during quick search or Close Call operation. • Select your setting, then press E. OFF The scanner remains on the transmission until it ends. ON The scanner quickly resumes searching or Close Call operation. Notes: 65 • • • If you are trying to test the Close Call feature with a nearby transmitter and you do not talk into the transmitter, the scanner will detect this as data and will skip the frequency when Data Skip is on. Turn the feature off or talk into the transmitter. The default for this feature is ON. Setting the Delay Time SRCH/CLOCALL OPT E SET DELAY TIME E This setting determines how long the scanner waits after a transmission ends before resuming quick search, service search or Close Call operation. • Select your setting, then press E. OFF The scanner resumes immediately when the transmission ends. 1-5 SEC The scanner waits the set amount of time after the transmission ends before resuming. Note: The default setting is 2 seconds. Setting the Search Frequency Step SRCH/CLOCALL OPT SET STEP E E This setting selects the frequency step used for setting the channels. • Select your setting, then press E. AUTO The step is based on the band (see the table at the front of the manual) 5.0 kHz, 6.25 kHz, 7.5 kHz, 8.33 kHz, 10.0 kHz, 12.5kHz, 15.0 kHz, 20.0 kHz, 25.0 kHz, 50.0 kHz, 100.0 kHz: The scanner uses the selected step. Note: The scanner defaults to AUTO. Care and Maintenance General Use • • • • • Turn the scanner off before disconnecting the power. Always write down the programmed frequencies in the event of memory loss. If memory is lost, simply reprogram each channel. Always press each button firmly until you hear the 66 • entry tone for that key entry. Location • • • • • Do not use the scanner in high-moisture environments such as the kitchen or bathroom. Avoid placing the unit in direct sunlight or near heating elements or vents. If the scanner receives strong interference or electrical noise, move it or its antenna away from the source of the noise. If possible, a higher elevation might provide better reception. Also try changing the height or angle of the antenna. Cleaning Disconnect the power to the unit before cleaning. Clean the outside of the scanner with a mild detergent. To prevent scratches, do not use abrasive cleaners or solvents. Be careful not to rub the LCD window. Do not use excessive amounts of water. Repairs Do not attempt any repair. The scanner contains no user serviceable parts. Please follow the trouble shooting tables on the next page, before you return the scanner to the distributor. In many cases malfunctions can be solved easily. In case of a real defect, please contact your distributor at first. If the unit is under warranty, your distributor will either replace the unit, repair it or send it to an authorized repair station. If the distributor cannot be reached, please call our repair dept. You will find all contact addresses on the last page of this manual. 67 Troubleshooting If your AE230H is not performing properly, try these steps. Problem The scanner doesn’t work. Possible Cause The scanner might not be receiving any power. Improper reception. The antenna might need to be adjusted. Scan won’t stop. The squelch might need to be adjusted. The antenna might need to be adjusted. One or more channels might be locked out. The channel’s frequency might not be stored in memory. 68 Suggestion Make sure the AC adapter is connected to an AC outlet and the scanner. If there is a wall switch that controls power to the AC outlet where you connected the AC adapter, make sure it is on. Check the antenna connection or move or reposition the antenna. Move the scanner. You might be in a remote area that could require a l multi-band outdoor antenna. Check with your dealer or local distributo. Adjust the squelch threshold. See “Turning On the Scanner and Setting the Squelch” Check the antenna connection. Make sure the channels you want to scan are not locked out. Make sure the channel’s frequency is stored in the scanner’s memory. Problem Scan won’t start. Possible Cause The channel might not be active. You must press Scan to scan. The squelch might need to be adjusted. One or more channels might be locked out. The antenna might need to be adjusted. Suggestion Wait for a transmission on the channel. Press Scan. Adjust the squelch threshold to the point, where it just opens. See also the chapter about “Setting the Squelch” Make sure the channels you want to scan are not locked out. Check the antenna connection. Specifications Dynamic Allocation Capacity (with Name Assigned To Each System, Group, and Channel): Systems: .................................................…....... 200 max Groups: Conventional Systems ...................…..... 20 per system Racing Systems .....................……................... No Limit Channels: ..............................……….............. up to 2500 Attenuation: .............…......... 18 dB (nominal), 10 dB (limit) Frequency Range (MHz): ................... See band plans at the beginning of this manual Operating Temperature: Normal .....................................…….........–20°C to +60°C Close Call .....................................……....–10°C to +60°C Scan Rate: .................…..............100 channels per second (conventional mode) Search Rate: .….…300 steps per second (5 kHz step only) Scan Delay: ..........................…........................0-5 seconds Audio Output:….…...320mW into 8 Ohms internal speaker . 30 mW into 32 Ohms headphone . 6 mW into 64 Ohms earphone Power Requirements: . 2 AA Alkaline Batteries (3V DC) or 2 AA Rechargeable Ni-MH Batteries (2.4V DC), or AC Adapter (6 VDC 500mA) (AD-671) Antenna: ............…......................... 50 Ohms (Impedance) 69 External Connectors: Antenna socket...............................................BNC Type Headphone socket............................................... 3.5mm DC Power socket ………………….. (EIAJ TYPE-2 Center Positive) 4.4mm Remote Connector for PC & Cloning….......... 4 Pin Mini Size: ........... 72.4 mm (W) x 34.5 mm (D) x 138.5 mm (H) Weight: ............................................................appr.180 g Features, specifications, and availability of optional accessories are all subject to change without notice. Optional Accessories Order-No. Accessory Item 6158 Scanner Antenna Albrecht Miniscan 6156 Scanner Antenna Albrecht Maxiscan 61700 Station Antenna Albrecht Allband 71450 Earphone Scanner Frequency Planning Collecting Information Getting your scanner programmed and scanning takes a few steps. This help guides you through these steps that will make it easier for you to start scanning. • Collect information about the system(s) you want to monitor. Do you want to listen to your favorite driver at the track? How about your local recue and fire departments, the highway patrol, ambulance service, and aircraft? You might even want to listen to race officials as they dispatch the pace car. Make a list of the drivers, tracks, and agencies you want to listen to, then look up the frequencies and systems they use. The Internet is a great source for current frequencies and information about scanning. Here are a few useful sites: 70 http://www.racescanner.eu This website offers race frequency programming software and accessories. • information, Before you start to program your scanner, decide how you want to organize the frequencies you want to scan. For example, some areas are best organized by geographic location (east, north, south, west, central, etc), while others are best organized by agency (police, sheriff, ambulance, fire, etc.). You might even find it easier to organize a mixture of frequencies (north, southeast, and west for police but fire all in one group for example). • Organize the system information using these system worksheets included in this appendix. • • • Use “Racing System Worksheet” (see next pages) to organize info about racing frequencies. Use “Conventional System Worksheet” to organize info about conventional frequencies. Follow the instructions in “Filling Out The Racing System Worksheet” and “Filling Out The Conventional System Worksheet” to program your scanner. Important: Please note that in most European countries not all radio services are allowed to be monitored. In some countries it may even be subject to criminal investigations and punishments, if You should store frequencies, which You are not allowed to listen to, in your scanner. Tips: • • • • • • Before you start, make as many copies of the worksheets as you think you'll need. You can also go to the download section of http://www.racsescanner.eu/download and download the worksheets there. All worksheet instructions assume that you have completed the critical Step 1 (collecting the system information). Don't skip this step. Use a pencil to fill out the worksheets. This lets you change information if necessary. 71 Filling Out The Racing System Worksheet Race Name Fill in the name of the race you want to scan. For example, you can enter "Formula 1" here. Car #/Driver-Frequency-Priority-CTCSS/DCS Fill in the details for each car number and driver, frequency, whether the car number/driver is a priority car number/driver, and information about the car number/ driver’s CTCSS/DCS information (if any) you want to store for this race. Racing System Worksheet (Template) Racing System Worksheet Race Name Car #/Driver Frequency Priority 72 CTCSS/DCS Filling Out The Conventional System Worksheet System Name and Quick Key Fill in a name that describes the system you want to create. For example, you can enter "Race Control" or "Amateur Radio" here. If you want to store more than one type of frequency, you can enter "Mixed." Fill in the key you want to press to quickly activate/ deactivate the system. You can assign the same quick key to multiple systems. Group Name and Quick Key Each worksheet documents the settings for one channel group within a system. If you have fewer channels in the group than fits on the page, you can skip a line and enter an additional group of channels (enter the group info in the line you skipped). If you have more channels for the group than will fit on the page, use additional pages. to quickly Fill in the key you want to press with activate/deactivate the channel group. You can assign the same quick key to multiple groups within a system. Frequency-Alpha Tag-Priority-CTCSS/DCS Fill in the details for each channel you want to store in this channel group. 73 Conventional System Worksheet (Template) Conventional System Worksheet System Name Group Name System Quick Key Group Quick Key Frequency Priority Alpha Tag 74 CTCSS/DCS Preprogrammed Systems Your scanner is preprogrammed with frequencies used at races within the Formula 1. By default, one of the racing systems are unlocked, and your scanner begins to scan them when you turn it on. To speed up scanning, you can lock out systems that are beyond your reception area (typically no more than a few kilometers using the supplied stub antenna). Follow these steps to lock out systems:. . 1. Press and hold , rotate the scroll 2. While continuing to hold control to select a system you want to lock out. 3. While continuing to hold , press L/O to lock out the system. 4. Repeat Steps 2, 3, and 4 to lock out additional systems. The preprogrammed systems provide a starting point; you will want to find out more information about your local radio systems so you can customize the programming to better suit your listening preferences. Notes: • • To free up memory, you can delete systems that you will not be monitoring. Data used for the preprogrammed information was supplied courtesy of http://www.racescanner.eu, the Internet’s premier scanning resource. European 2 years warranty The distributor, dealer or retail shop warrants to the original retail purchaser of this product that should this product or any part of it, under normal use and conditions, be proven defective in material or workmanship within 2 years from the date of original purchase, such defect(s) will be repaired or replaced with new or reconditioned product (at the company's option) without charge for parts and repair labor. To obtain repair or replacement within the terms of this warranty, the product is to be delivered with proof of warranty coverage (e.g. dated bill of sale), specification of defect(s), to the distributor, dealer or his authorized repair center. The Company disclaims liability for communications range of this product. The warranty does not apply to any product or part there of which, in the opinion of the company, has suffered or been damaged through alteration, improper installation, mishandling, misuse, neglect, accident, or by removal or defacement of the factory serial number/bar code label(s). 75 The warranty does not apply to accessory parts or problems caused through not authorized or not recommended accessories like of the units like batteries, external power supplies, external antennas, earphone, speakers, and over voltage caused through external power supplies, light bulbs, broken antennas, broken swivel belt clips, broken or damaged acrylic glass windows and cabinet parts. Please contact the dealer or person where you have purchased your Albrecht Scanner. Declaration of Conformity We, Alan Electronics GmbH Daimlerstr. 1 k D- 63303 Dreieich / Germany declare, under our sole responsibility, that this equipment “Albrecht Scanner AE 230 H” is in compliance with the essential requirements and other relevant provisions of the EMC, R&TTE and LVD Council Directives of the EU. The full text of this declaration can be downloaded any time in it’s latest valid issue from our download server under http://www.hobbyradio.de Recycling Rules For recycling of no more used electronic items new European Regulations forbid any disposal via normal household trash. If you should once no more use your scanner, you should bring It to one of the local collecting stations for electronic trash only. This is Your contribution to keep a clean environment, and it will help all involved institutions for better recycling. © 2006 Alan Electronics GmbH Daimlerstr. 1 k D- 63303 Dreieich, Germany www.alan-electronics.de, www.albrecht-online.de Download-Server for technical documentation: http://www.hobbyradio.de Technical enquiries and repair matters: e-mail: [email protected] Fax: (+49) (0)6103-94 81 60 Repair enquiries: Phone (+49) (0)6103 94 81 22 All rights reserved. Printed in P.R.C. UBZZ21346AZ(0) 76