1
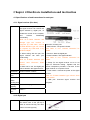
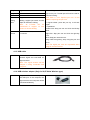
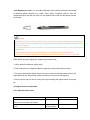
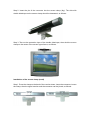
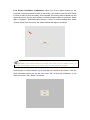
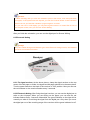
IQ E-Tablet User Manual (Adapted for E001, E002, E003) Copyright(C) 2003-2007 A Brighter Image Pty Ltd. Website: www.iqboard.com.au or www.abimage.com.au Tel: 02.9938 6866 Fax: 02.9938 6899 E-mail: [email protected] Important Statements: 1. Use this product strictly according to the detailed operation instruction in this User Manual to ensure proper use. Please read the instruction thoroughly to save installation time. 2. If this product is defective, please return it to the appointed agent or our company, together with your original sales receipt or invoice for replacement. 3. A Brighter Image Pty Ltd. is not liable for any consequential, incidental or indirect damages (including damages for indirect personal injury, loss of business profits, business interruption, loss of business information and the like) arising out of the use or inability to use this product. 4. The product includes enclosed software, later issue and update as well as correlative electronic documents and printing material. By installing, copying, downloading, visiting or using this product in any way, you agree to the terms and conditions of all the clauses in this user manual. The agreement on these clauses has the same effect as one signed through formal negotiation. You may not use this product unless you have agreed to all the clauses in this user manual 5. A Brighter Image Pty Ltd. will not accept returns of opened packages. 6. Special Notices: ● Please do not deliberately attack or use other tool software to destroy the product’s normal running, or run FDIS/MBR, repartitioning, or low formatting after booting from FD or CD. Otherwise this company assumes no liability for all losses arising herefrom, express or implied. ● This product should not be used for strategic purposes such important network service, military use or critical applications without the authorisation of A Brighter Image Pty Ltd. Otherwise this company assumes no liability for all losses arising herefrom, express or implied. ● Regular backup of important data is still necessary when using this product. A Brighter Image Pty Ltd. does not undertake any compensation responsibility for any losses of HD arising from backup. Copyright Your purchasing of this product does not mean A Brighter Image Pty Ltd or Returnstar Electronic Information Co., Ltd. has transferred the Intellectual Property Right. The product (includes but not limited to any trademarks, images, photos, flash, video, recording music, writing and additional procedure, and other relative product), enclosed printing material, and any copies made under authorisation of A Brighter Image Pty Ltd. are products of A Brighter Image Pty Ltd., and their Intellectual Property are owned by A Brighter Image Pty Ltd. The name of this product and all its copies are consistent in CD and the manual. The framework, organization and source code of this product are A Brighter Image and Returnstar’s commercial secret and may not be transferred. This product is protected by PRC Copyright Law, related international treaties, and the laws of Australia. No part of the product may be copied, modified, rented, leased, transferred in any ways without the writing permission or authorization of A Brighter Image Pty Ltd. You are allowed to use one product on one computer only. Any reverse engineering, re-compiling, and decoding of this product, and retrieving the source code of the product by other ways is also prohibited. A Brighter Image, ABI, Returnstar and Recoverystar are the registered trademarks or company names. Any modification of Copyright marks, product names and brand names of this product and its copies is strictly prohibited. A Brighter Image Pty Ltd. reserves all rights to charge the fee anytime for product replacement, revision and update. The information in this document is subject to change at anytime without notice. Chapter 1 Product Introduction: The IQ E-Tablet is a portable mini electronic whiteboard distributed by A Brighter Image Pty Ltd with exclusive patent technology. The system is mainly composed of receiver, digital pen and wireless adapter (special for wireless type). When writing/ operating on the flat screen (such as LCD or laptop), the digital pen will send out wireless signal so that the receiver can detect and catch the location and the information of their moves, then send all the information to the computer connected through USB line or wireless Bluetooth (special for wireless type). Fixed on flat screen (such as LCD or laptop), the IQ E-Tablet can transform a normal computer screen into a flat panel computer. When used on paper or plastic hard surface, it can save the writing as an original document, electronically sign any text file, or create an electronic image using free drawing or tracing. It therefore substitutes for a writing board, scanner, printer and digital camera; and when used with a projector, it can form an interactive demonstrating system to achieve various teaching and demo effects of interactive whiteboard, without the need for the whiteboard! Simply project the image onto a projection screen for the class or audience to see the real-time interactive effects. The user can use the digital pen instead of mouse, to click, double-click and right-click, to operate and control your computer. Through the IQ Whiteboard Software (included with the Bluetooth version of the pen), various interactive teaching and demonstrating functions can be achieved, such as handwriting, cleaning, mark (mark in character, line, dimension and angle), drag, zoom, reveal, spotlight, screen capture, picture save, screen record and playback, handwriting recognition, keyboard input, text input, hyperlink to video, sound and webpage, and remote conference by Netmeeting. It is also very useful in preparing lessons and presentations for class and conference use. IQ E-Tablet retains traditional writing and lecturing techniques, it only takes you 1 minute to install, and so long as you are skilled in operating computer you can master the its usage within 10 minutes. This product can be widely applied in various occasions requiring electronic and remote education, such as teaching, speaking, Multi-media network conference, electronic business, work report, remote medical, product exhibition, training, military command, Scientific research, engineering, project design, security commentary, Entertainment and telecast, sport, map, meteorology, astronomy, GPS, interactive report, hotel, restaurant, university, college, and school. The wireless version is a tablet mouse and a virtual interactive combined, with storage for 100 pages of A4 notes. Chapter 2 Function Features: 2.1. Integrates various powerful functions such as screen touch and write, electronic notes (record), document draft, table make & fill, drawing design, instant text-image communication, electronic teaching and demonstration; can completely replace a PC touch screen, writing screen, electronic whiteboard, electronic drawing board, writing board, mouse and so on, achieving the perfect combination of traditional teaching techniques with computer usage. 2.1.1 Screen touch and write: By mounting the receiver on the top of screen, users can use the digital pen instead of a mouse to click, double click and right click, thus operating and controlling the computer. Working with IQ whiteboard software, direct writing and various teaching and demonstration effects can be achieved. In this way, the IQ E-Tablet can transform a normal computer to a Tablet PC or a electronic interactive whiteboard. 2.1.2 Digital notes and document drafting: Without changing a person’s normal writing style, IQ E-Tablet can help many types of people (such as student, minute-taker, officer, doctor, document drafter, and writer, etc) to write directly on any paper material and other material, and save the writing content both on paper and as a computer file. Moreover, through the text recognition technology, Note Genius can convert the writing content to text file, thus save enormous time and keep the consistency of your thinking when you are taking note or writing. It can completely replace the noting and handwriting functions of a writing board, scanner, copier and digital camera. Even people with little computer knowledge will find operating a computer as simple as mobile phone. The IQ E-Tablet assists teaching techniques, accelerates the process of educational learning and office automation, provides a portable writing and presentation aid, and removes the need to convert or re-type written notes. 2.1.3 Form filling: You can use IQ E-Tablet to fill various forms using standard layouts, such as filling the bank forms, company reports and various standard government forms. It can save these forms both as the original signed document and as an electronically signed file. The real-time data input and text conversion also greatly improves working efficiency and service quality. 2.1.4 Electronic comment and signature: IQ E-Tablet can retain traditional writing techniques; it supports writing, text editing, marking, picture inserting, drawing, and various special demo effects and assistant functions in POWERPOINT (include Slide Playing Mode), WORD, EXCEL and other software, the file can be saved without changing its format, thus greatly improving efficiency. It also provides electronic signature function for Webpage and OA systems, safe and reliably. 2.1.5 Direct Drawing and Instant Text-image communication: Also supports any special effect tools attached in software. E.g., you can use drawing software like PHOTOSHOP and Paint for direct drawing; you also can directly write in some messengers (MSN, ICQ, QQ) and e-mail; and send a hand written or typed message and e-mail. 2.1.6 Electronic education and demonstration: The IQ E-Tablet retains traditional demo and teaching techniques – lecturing and writing at the same time, but also enables the presentation of demo and teaching lessons in digitalized multi-media. Its capability of pre-lesson preparation, saving new lessons or presentations, saving changes to lessons and standard MS files makes the IQ E-Tablet and software a powerful teaching and presentation tool. The abundant and powerful resource library included in the software makes it easy for the preparation of lessons and presentations to improve the overall learning effect. And because any class content can be saved as a PC file, the audience need not take notes, thus allowing them to pay more attention to the lecture, understand its meaning, share their ideas, and bring more pleasure and interest in their study and conference. Another feature that should not be forgotten is that it prevents teachers or speakers suffering the risk of eyesight strain and/or damage due to their long time lecturing in front of the projector spotlight. 2.2. Simple operation, convenient to carry, the storage version and wireless version also support offline operation and mobile storage function. 2.2.1 Practical design, ergonomic pen body, and storage of the digital pen inside the small receiver, makes it more portable and more comfortable to use. 2.2.2 Built-in, quality hand-writing recognition core system can learn personal handwriting, and become a personal handwriting system. 2.2.3 The gross weight is no more than one kilogram, and it is easy to put into a laptop bag or a brief case to take anywhere. 2.2.4 Data transmission and power are obtained from the computer directly though USB cable. The wireless type adopts wireless Bluetooth (with battery) for connecting to the computer, with a minimum connection distance of 10m, and is very flexible in its usage. 2.2.5 Easy to assemble or disassemble within 2 minutes, and it can be used after attaching the receiver to a writing pad, plastic tablet or computer monitor. So long as you are skilled in operating the computer, you will find the operation of this product is as easy as using a mouse and pen, and can be mastered in 10 minutes. 2.2.6 Two of the IQ E-Tablet models can be used offline. Without connecting to a computer, it can save text and drawings written on normal paper into the receiver, with storage capacity of more than 100 pages. The writing content also can be saved in different documents and pages. This product is especially useful for students, businessmen, and reporters, who have trouble in carrying a computer but also need digital file for saving. 2.3. Precise Orientation, High Resolution and Super Large Writing Area, can be used on any material, any medium and computer screen. 2.3.1 Supports all projectors in the market of any resolution and screens made of any material. You don’t need to worry about equipment compatibility problems. 2.3.2 Rapid reaction and sensitive for operation. 2.3.3 Adopts high precision orientation technologies, in order to ensure the accuracy of writing and operation, and active writing area. 2.3.4 Supports screen size up to 17 inch, the normal effective area on paper or other materials is approx A3 size. 2.3.5 The IQ E-Tablet allows natural writing habits; you can write and draw on any paper, material and computer screen, the save your autograph both in paper and computer. The pen also can be used as a stylus for use as a touch screen or virtual interactive board. 2.4. Environmentally protective, reasonable price of accessories, free software upgrades The IQ E-Tablet integrates most functions of touch screen, writing screen, writing board, drawing pad, mouse and keyboard, while the price is only a small part of their total price. Other than the digital pen battery and ball pen refill, there are no consumables. Moreover, we offer a life-time free update for the driver, orientation program, and relevant electronic whiteboard software. Chapter 3 Specification and Parameter 3.1 Product Specification Model 1-E001 1-E002 1-E003 Type Standard Storage Wireless PC connection USB USB Wireless Bluetooth/ USB Storage Capacity None 100 pages (A4 size) 100 pages (A4 size) 3.2 Standard Configuration: 1 receiver, 1 digital pen (including battery), 2 plastic pen cores, 2 ball pen refills, 1 pen refill clamp, 1 USB cable, 1 wireless adapter (special for wireless type), 1 set of screen companion (receiver screen clamp), 1 installation CD, 1 user manual, 1 carry bag. 3.3 Optional fittings: digital pen. 3.4 Technical Parameters: 3.4.1 Support Windows 2000/XP/2003/Vista 3.4.2 Power Consumption: less than 0.5W 3.4.3 Sensing Height of writing or clicking: 1.5cm, Processing Speed of writing or clicking: 240dots/s, Signal tracking speed: 3m/s. 3.4.4 Effective resolution: 9600×4800, 300dpi. Screen area can be up to 17 inches, and the normal effective area on paper or other materials is almost A3 size. 3.4.5 Working hours of digital pen battery: more than 52 hours, Pressure Induction: >10g. 3.4.6 Uses USB interface for PC connection, plug and play, external power is not required. The wireless type adopts wireless Bluetooth (internal receiver battery is recharged via USB) to connect to the computer, the transfer distance is minimum 10m. 3.4.7 Power supply: digital pen use 3 button cells, the receiver is powered by USB (internal rechargeable battery for wireless Bluetooth use – will last 8 hours without connection to PC). 3.5 System Requirement: CPU: Based on X86 CPU pentium166 or above Memory: 64 MB RAM (recommend 128 MB RAM) Hard Disk: 30 MB free space USB Port: at least one available USB port Projector: any brand, model or resolution Projection media: Paper material or other material, flat screen (LCD or laptop). 3.6 Storage and Operating Specifications: Storage: Temperature:-40 degrees to 60 degrees Humidity: 0% to 95% Operation: Temperature: 0 degree to 40 degrees Humidity: 15% to 85%. Caution: Long time storage in extremely high or low temperatures might shorten the life of the whiteboard and battery. 3.7 Production Certification and Warranty The product passed FCC, CE, and ISO9001 and the hardware is covered by three years warranty (not including consumables) excluding damage or improper usage. Chapter 4 Hardware installation and instruction 4.1 Specifications of and instructions for each part 4.1.1 Signal receiver (Pen box) Function 1. When connecting with computer, the signal receiver can receive the signal emitted by digital pen, to enable the control of the computer, and achieve handwriting functionality. Note: IQ E-Tablet Standard and Storage type can connect to computer by USB cable, and IQ Instruction for each part. E-Tablet Wireless type can connect 1. Red indicator: The power indicator to computer by USB cable or by Note: Refer to “4.3.1 Indicator instruction” for wireless adapter. details. 2. When writing with the pen, the 2. Pen box: Store the digital pen. signal 3. Green indicator: The signal indicator receiver can save your hand-writing. Note: Refer to “4.3.1 Indicator instruction” for Note IQ E-Tablet Standard type details. doesn’t 4. Clamp: Fix the signal receiver on A4 or A3 have Electronic Notes function. paper for Electronic Noting. Together with the 3. When not in use, the digital pen Screen Companion provided, it can also fix the can be stored in the signal receiver. signal receiver on computer screen. Dimension 175mm x 25mm x 20mm 5. Power switch: Controls the power of the signal Charging < 3 hours receiver. time Note: IQ E-Tablet Standard type doesn’t have Continuous 8 hours power switch offline 6. USB port: Connects signal receiver and working time computer. Storage About 100 A4 pages capacity Connect USB 1.1 port 4.1.2 Digital pen Function Handwriting or mouse operation. The button near to the pen tip is used as mouse left key, the other button is mouse right key. Weight 17g When writing on an LCD screen, use the plastic Length 128mm stylus in the pen. The ball pen refill can be used for Diameter 12mm Electronic Noting. Effective Supports 17 inch screen for Screen Note: Refer to “4.2.2 Replace pen core” for the writing Writing, support just under A3 size details of replacing the pen core. area paper for Electronic Noting. 3. Signal emitter: press the pen tip, it will emit Note: Power source IQ E-Tablet can be signal. customized to support 19 inch 4. Operations: screen for Screen Writing. Double-click: Stop pen use and click the left-key 3 AG3 button cells, can be used for twice. 6 months. Right-click: Stop pen use and click the right-key once. Move: Stop pen use and move. Drag: Hold the right-key, stop using the pen and move. Note The digital pen must be suspended when using its mouse functions. 4.1.3 USB cable Function Connect the receiver and computer, transmit signal and read data for signal receiver. Note: The signal receiver will be charged if being connected with computer. 4.1.4 USB wireless adapter (Only for IQ E-Tablet Wireless type) Function Plug the USB wireless adaptor in the USB port of the computer, the signal receiver and computer can be connected wirelessly. 4.1.5 Screen companion Function Fix the signal receiver on the computer screen. 1. Screen clamp (small): Fix the signal receiver on the top centre, left centre, or right centre of the computer screen. Note: this clamp suits a computer screen with narrow frame. 2. Screen clamp (big): Fix the signal receiver on the computer screen. Note: this clamp suits a computer screen with wide frame. 3. Connector: Connect the screen clamp and signal receiver. 4.2 Installation and use of the digital pen 4.2.1 Install batteries: open the battery chamber cover on the top of the digital pen, and put 3 button cells (AG3) in. Make sure the cathode and anode are in the right direction (as marked on the battery chamber), then close the cover. Caution: When you want to replace the battery, just open the cover and take the batteries out, and install the batteries according to the above steps. If the pen will not be used for extended batteries (eg. School holidays), we recommend the removal of the batteries. 4.2.2 Replace pen core: You can select ball pen refill or plastic pen stylus according to different writing material (e.g. paper, table, glass, computer screen). Use the accessorial clip to pull the pen core out, the replace with a new one and press it down. As follows: Caution: 1. Digital pen has power saving function, in some circumstance, it will automatically enter the dormancy status. In dormancy status, all the function of digital pen will be temporarily disabled. Just press any key on the pen to awake. 2. In case the digital pen will not be used for a long time, please take the battery out to avoid the power consumption. 3. When replacing the pen core, twisting the pen core a bit will make the process easier. 4. The pen core used for digital pen is available in supermarket and stationary store, or from ABI. 4.2.3 When using the digital pen, please pay attention that: 1. Write within the effective writing area. 2. There should be no obstacle between digital pen and receiver when writing. 3. To get the best writing effect, the pen should not be over-inclined when writing (The angle between pen and writing surface should not be less than 60 degrees). 4. Don’t hold the pen too low to avoid your finger blocking the signal emitter in the pen tip. 4.3 Signal receiver instruction 4.3.1 Indicator instruction Working status Red light Green light Fail to connect the computer, or the voltage of Off Off receiver is too low when used offline. The receiver battery is under low-voltage Rapidly alarm. (0.25 seconds) flash The power source of receiver is normal. Slowly flash (3 seconds) Charging the receiver battery. Normally on Successfully saved page when used offline. Green light and red light both flash 3 times. Receiving the signal normally On The storage capacity is fully occupied when Normally on recording. 4.3.2 Charge the signal receiver Connect the signal receiver to computer through USB cable and it will automatically charge. The charging time is about 3 hours. Chapter 5 Install and uninstall driver and orientation programs 5.1 Install: When you first use IQ E-Tablet, you must install the driver and orientation program. Put the enclosed small CD in your CD-ROM, double click “Setup.exe” in the CD and install according to the prompt. Prompt: For your convenient usage, the system defaults to run IQ E-Tablet when system starts. After starting IQ E-Tablet, you also can click the taskbar icon, and select “Startup Setting” to enable or disable the autorun function. 5.2 Uninstall: Select Start > Programs > Returnstar Notes Genius >Uninstall to uninstall. You also can open Control Panel, select Add/Remove Programs, and in the list of currently installed Programs, select Returnstar Notes Genius V4.0, then press the Remove button to remove the driver and orientation program. Caution: You must quit Returnstar Whiteboard Software and Returnstar Notes Genius before uninstalling, or the system will prompt an error message. Chapter 6 Operations Caution: Please using Returnstar Whiteboard Software V4.1 as the access software for IQ E-Tablet. 6.1 Screen Writing 6.1.1 Starting IQ E-Tablet After installing the driver and orientation program, the IQ E-Tablet will automatically start every time you start your computer. Otherwise, you can select Start > Programs > Returnstar Notes Genius > Start, to start the Notes Genius. A taskbar icon will appear on the right bottom of the screen, as follows: Screen Orient (Calibration): Orient the screen so the E-Tablet can accurately control the computer. Prompt: Refer to “6.1.4 Screen Orient” for detailed operation steps. Autorun Setting: you can decide whether to run IQ E-Tablet automatically when starting the computer. Click “Autorun Setting” and enter the setting window (as follows). If you select “Autorun Notes Genius when the system starts”, IQ E-Tablet will be automatically started every time you start your computer. Otherwise, you have to start IQ E-Tablet manually. Caution: the system defaults to automatically run IQ E-Tablet when the system starts. Read file from receiver: Read Electronic Noting file saved in receiver. Clear all files in receiver: Clear all Electronic Noting files saved in receiver. Prompt: Refer to “6.2.2 Electronic Noting” for detailed operation steps. About: Click “About” to popup the information window of IQ E-Tablet, as follows Exit: Click “Exit” to quit IQ E-Tablet 6.1.2 Install signal receiver Normally we use the Screen Companion (screen clamp of signal receiver) to fix the receiver on the computer screen. There are two kinds of screen clamps. When your screen frame is wide, you can use the big clamp to fix the receiver on the center of the upper frame, or use the small clamp to fix the receiver on the center of the left or right frame. When you have a small screen frame, you can use the small clamp to fix the receiver on the center of the upper, left or right frame. Installation of the screen clamp (big) Step 1. Press the clamp on the back of the receiver down, insert the connector, loosen the clamp, and then the signal receiver and the connector can be joined, as follows: Step 2. Insert the pin of the connector into the screen clamp (big). The side with double sided tape on the screen clamp should be downward, as follows: Step 3. Tear out the protection layer of the double sided tape, then stick the screen clamp on the center of the screen upper frame, as follows: Installation of the screen clamp (small) Step 1. Press the clamp on the back of the receiver down, insert the connector, loosen the clamp, then the signal receiver and the connector can be joined, as follows: Step 2. turn over the signal receiver to the receiving face, and turn up the pin, make it vertical to the signal receiver, as follows: Step 3. Insert the pin of the connector into the screen clamp (small), then the signal receiver and the connector will be joined, as follows: Step 4. Tear out the protection layer of the double sided tape, then stick the screen clamp on the centre of the screen upper frame, left frame, or right frame, as follows. Caution: 1. Since most people operate using the right hand, if you fix the signal receiver on the right frame, the signal may be blocked, so we suggest you fix the receiver on the centre of the upper frame 2. When fixing the signal receiver, face the receiver to the screen, and keep them parallel. 6.1.3 Connecting the signal receiver to the computer There are two ways for connecting the signal receiver (pen box) with the computer First: use USB cable to connect. Connect one side of the USB cable to the USB port of the computer, the other side to the USB port of signal receiver, then the red indicator of receiver will light up or flash. If you move the digital pen or press the keys on the digital pen within the receiving range, the cursor on will follow your move, and the green indicator on the receiver will be normally on. This means the connection is successful. After you move the digital pen away, the green indicator will turn off. Caution: 1. All types of IQ E-Tablet (Standard, Storage, and Wireless) can use USB cable to connect the signal receiver and computer. 2. When using USB cable for connection, it doesn’t matter whether the power switch on the back of receiver is at “ON” or “OFF” position, because now the signal receiver is powered by USB cable. Second: Use wireless adapter to connect. Plug the wireless adapter into the USB port on computer, turn power switch on the back of the signal receiver at “ON” position, now the receiver is under wireless connecting mode, the red indicator on the receiver flashes once every four seconds. If you move the digital pen or press the keys on the digital pen within the receiving range, the cursor will follow your move, and the green indicator on the receiver will be normally on. This means the connection is successful. If the connection failed, you can try to turn the power switch several times, until you succeed. Caution: 1. The wireless adapter only works on the IQ E-Tablet Wireless type. 2. If the connection still fails after you have turned the power switch on the back of the receiver several times, you can try to charge the receiver before connection. 3. When you want to switch IQ E-Tablet Wireless type from Electronic Noting to Screen Writing, you can turn the power switch on the back of the receiver to “OFF” position first, then turn to “ON” position to switch. 6.1.4 Screen Orientation (Calibration): When you fix the signal receiver on the computer screen and intend to write on the screen, you need to orient the IQ E-Tablet in order to make it work accurately. Once oriented, the moving track of digital pen will match the cursor, and you don’t need to re-orient using the same environment. Select Start > Programs > Returnstar Notes Genius > Orient, or click the taskbar icon, select “Screen Orient” from the menu, the Orient window will appear, as follows: Caution: If you haven’t started IQ E-Tablet, then after you click “Screen Orient”, IQ E-Tablet will be started; click “Screen Orient” again to start orientation program. Hold the pen in normal position, try to keep the pen vertical to the screen, click the three orientation points one by one, then click “OK” to finish the orientation. If you want to re-orient, click “Reset”, as follows: Caution: 1. When orienting, after you click one orientation point on the screen, if the next point does not appear, or the system does not respond, you can click “Cancel” button on the orientation interface to exit, and start the orientation program again to re-orient. 2. If you use CRT or LCD display, you can place a glass screen or a screen filter in front of the computer screen, then you can start Screen Writing. After you finish the orientation, you can use the digital pen for Screen Writing. 6.2 Electronic Noting Prompt: Only IQ E-Tablet Storage and Wireless types have Electronic Noting function; the Standard type does not include this function. 6.2.1 Fix signal receiver: As the above picture, clamp the signal receiver on the top center of the A4 paper or folder; the signal and A4 paper should be in the same plane. Turn the power switch on the back of the receiver to “ON” position. Now you can see the red indicator on the receiver flashes every 3 seconds. 6.2.2 Electronic Noting: After fixing the signal receiver, you can use the digital pen to write on the A4 paper. When you are writing on the paper, you can see the red indicator flashes every 3 seconds. Meanwhile, the green indicator on the right will be normally on when it is receiving the signal from the digital pen. Only when you move the digital pen out of the receiving range of the receiver will the green indicator be off. Caution: 1. If you want to switch IQ E-Tablet Wireless type to Electronic Noting mode, you must first use digital pen to click B Zone, and release after half a second. If the greed indicator flashes six times rapidly, it means the receiver has been switched into Electronic Noting mode. If you haven’t clicked the B Zone, the receiver will be under “Wireless connecting” status instead of “Electronic Noting” mode. 2. You don’t need to orient for Electronic Noting, just directly write on the paper. Change page: When you finish one page and want to change to a new one, use the digital pen to click the B Zone, and release after half a second. If the green indicator and red indicator both flash 3 times, then the page changing is successful and you can replace the page with a new one. Save writing content: In case you want to save your writing content in a file and continue your writing on another file, or in case you have finished your writing and want to save in a file, use the digital pen to click the A Zone, and release after half a second. If the green indicator and red indicator both flash 3 times, it means the saving is successful, the system will automatically create the file (File 1, File 2, etc) to save your writing. When you want to continue your writing, the system will create a new file. Caution: 1. When using the digital pen offline, the effective writing area is A4 size (but the area within 15 mm from the receiver is non-writing area). 2. After you finished noting, do remember to click the A Zone, and make sure the saving is successful (the indicators flash correctly), otherwise your handwriting may not be saved. 5. After you have finished using IQ E-Tablet, please turn the power switch to “OFF” position to save the power. 6.2.3 Read saved file: Connect the signal receiver to computer through USB cable, click the taskbar icon, and select “Read files from receiver” from the menu, the system will popup a window displaying all files saved on receiver. Select a file and click “Open” to see its detailed content. Caution: 1. For IQ E-Tablet Wireless type, please unplug the wireless adapter before reading the file saved in the receiver. 2. When you want to read files from the receiver, please start Returnstar Whiteboard Software first, or the system will prompt an error message. When you open a file, if you haven’t saved the current page, the software will prompt you to save it (as follows). Click “Yes” to save the file, click “No” to discard the file, click “Cancel” to quit the current opening operation. 6.2.4 Clear saved file: Connect the signal receiver to computer through USB cable, click the taskbar icon, and select “Clear all files in receiver”, a prompt window will popup. If you select “OK”, all files in the receiver will be cleared, if you select “Cancel”, the files will remain. Caution: 1. When you want to clear the files, please make sure the signal receiver and the computer are properly connected, or the system will prompt a failure message. 2. When you want to clear the files, please quit the current file reading operation, otherwise, the system will prompt an error message if you read the file again after all files have been cleared. Chapter 7: Warnings 1. Avoid water, dust, shock, bending, and strong light. 2. Fix the signal receiver in a certain position, and do not move during the writing process to ensure accuracy when the computer is displaying your handwriting. 3. The digital pen should be kept in the receiver when not in use. 4. During the writing process, there should be no obstacle between the digital pen and signal receiver. 5. Promptly replace the button cell and pen core when they run out. 6. Do not use the IQ E-Tablet in places having severe electromagnetic interference. 7. Avoid dropping the receiver and digital pen. Chapter 8 FAQs Behavior Reason Solution 1. The computer does not display the writing (the green indicator is not lighting) The writing is not within the effective writing area. Write within the effective writing area (A4 size paper or 17 inch screen). The battery voltage is too low. Replace the battery. The system hardware & software is not properly connected. Connect correctly according to this user manual. The relevant installed. Install the application. 2. The handwriting on computer is messy or intermittent 3. The mouse does not move 4. The mouse is application is not The indicator is not lighting, but the operation is normal. Please contact the dealer or ABI service center The signal emitter on digital pen malfunctions Please contact the dealer Returnstar service centre There are obstacles between the pen and receiver. Make sure that there is no obstacle between the pen and receiver. The pen is held too low, so the finger blocks the signal emitter in the pen tip. Hold the pen in right position, so that the finger won’t block the signal emitter in the pen tip. The battery voltage is too low. Replace the battery. The optical mouse is so close to the digital pen that it affects the operation. Move the optical mouse away from the screen a little bit, or use non-optical mouse. The writing is not within the effective writing area. Write within the effective writing area (A4 size paper or 17 inch screen). The battery voltage is too low. Replace the battery. The digital pen is not started. Select Start > Programs > Returnstar Notes Genius > Start to start the digital pen. The system hardware & software is not properly connected. Connect properly according to this user manual. The signal receiver or the signal emitter in digital pen malfunctions Please contact the dealer or ABI service centre The USB cable needs to be altered. Please contact the dealer or ABI service centre The USB port on the computer malfunctions. Use another USB port. The battery voltage is too low. Replace the battery. or dithering The optical mouse is so close to the digital pen that it affects the operation. Move the optical mouse away from the screen a little bit, or use non-optical mouse. The battery voltage is too low or the battery is not well installed. Replace the battery or re-install the battery. 5. The green indicator and red indicator do not flash alternately when writing. The battery voltage is too low or the battery is not well installed. Replace the battery or re-install the battery. 6. The movement of the digital pen does not correspond to the track of the cursor. Imprecise orientation or the signal receiver is not well installed. Re-orient or install the signal receiver again. For any technical enquiries or problems, contact ABI on 02.9938 6866.