1
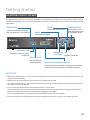
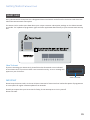
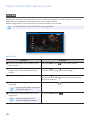
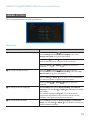
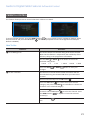
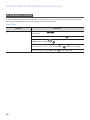
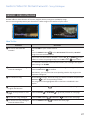
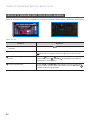
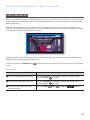
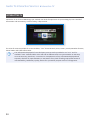
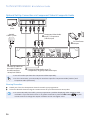
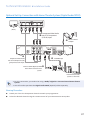
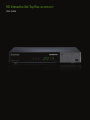
HD Interactive Set-Top Box GX-SH530CF User Guide Contents Getting Started--------------------------------------------------------- 03 HD Interactive Set-top Box . . . . . . . . . . . . . . . . . . . . . . . . . . . . . . . . . . . . . . . . . . . . . 03 StarHub Remote Control . . . . . . . . . . . . . . . . . . . . . . . . . . . . . . . . . . . . . . . . . . . . . . . 04 Smart Card . . . . . . . . . . . . . . . . . . . . . . . . . . . . . . . . . . . . . . . . . . . . . . . . . . . . . . . . . . 05 Guide To High Definition TV Applications-----------------------------06 HDTV . . . . . . . . . . . . . . . . . . . . . . . . . . . . . . . . . . . . . . . . . . . . . . . . . . . . . . . . . . . . . . . 06 Video Resolution . . . . . . . . . . . . . . . . . . . . . . . . . . . . . . . . . . . . . . . . . . . . . . . . . . . . . 07 Surround Sound . . . . . . . . . . . . . . . . . . . . . . . . . . . . . . . . . . . . . . . . . . . . . . . . . . . . . . 08 Guide to Digital Cable Features----------------------------------------09 Main Menu and Options . . . . . . . . . . . . . . . . . . . . . . . . . . . . . . . . . . . . . . . . . . . . . . . Info Bar . . . . . . . . . . . . . . . . . . . . . . . . . . . . . . . . . . . . . . . . . . . . . . . . . . . . . . . . . . . . . Info Page . . . . . . . . . . . . . . . . . . . . . . . . . . . . . . . . . . . . . . . . . . . . . . . . . . . . . . . . . . . . On-Screen TV Guide . . . . . . . . . . . . . . . . . . . . . . . . . . . . . . . . . . . . . . . . . . . . . . . . . . . Genre Search . . . . . . . . . . . . . . . . . . . . . . . . . . . . . . . . . . . . . . . . . . . . . . . . . . . . . . . . More Show Times . . . . . . . . . . . . . . . . . . . . . . . . . . . . . . . . . . . . . . . . . . . . . . . . . . . . Programme Information In Chinese . . . . . . . . . . . . . . . . . . . . . . . . . . . . . . . . . . . . . . Favourite Channels . . . . . . . . . . . . . . . . . . . . . . . . . . . . . . . . . . . . . . . . . . . . . . . . . . . . Last Channel Recall . . . . . . . . . . . . . . . . . . . . . . . . . . . . . . . . . . . . . . . . . . . . . . . . . . . Search . . . . . . . . . . . . . . . . . . . . . . . . . . . . . . . . . . . . . . . . . . . . . . . . . . . . . . . . . . . . . . General Settings . . . . . . . . . . . . . . . . . . . . . . . . . . . . . . . . . . . . . . . . . . . . . . . . . . . . . . Parental Control . . . . . . . . . . . . . . . . . . . . . . . . . . . . . . . . . . . . . . . . . . . . . . . . . . . . . . 09 10 11 12 13 14 15 16 17 18 19 21 Guide to Video On Demand--------------------------------------------23 Catalogue Page . . . . . . . . . . . . . . . . . . . . . . . . . . . . . . . . . . . . . . . . . . . . . . . . . . . . . . . Info Page . . . . . . . . . . . . . . . . . . . . . . . . . . . . . . . . . . . . . . . . . . . . . . . . . . . . . . . . . . . . My Purchased Content . . . . . . . . . . . . . . . . . . . . . . . . . . . . . . . . . . . . . . . . . . . . . . . . KaraOK! - Song Catalogue . . . . . . . . . . . . . . . . . . . . . . . . . . . . . . . . . . . . . . . . . . . . . . KaraOK! - Playlist . . . . . . . . . . . . . . . . . . . . . . . . . . . . . . . . . . . . . . . . . . . . . . . . . . . . . KaraOK! - Favourites . . . . . . . . . . . . . . . . . . . . . . . . . . . . . . . . . . . . . . . . . . . . . . . . . . KaraOK! - Other Features . . . . . . . . . . . . . . . . . . . . . . . . . . . . . . . . . . . . . . . . . . . . . . 23 25 26 27 28 29 30 Guide To Interactive Services------------------------------------------ 31 Instant Buy . . . . . . . . . . . . . . . . . . . . . . . . . . . . . . . . . . . . . . . . . . . . . . . . . . . . . . . . . . Catch Up TV (Available only for Selected Channels) . . . . . . . . . . . . . . . . . . . . . . . . . Start Over and eTV . . . . . . . . . . . . . . . . . . . . . . . . . . . . . . . . . . . . . . . . . . . . . . . . . . . . Interactive TV . . . . . . . . . . . . . . . . . . . . . . . . . . . . . . . . . . . . . . . . . . . . . . . . . . . . . . . . 31 32 33 34 01 Contents Technical Information-------------------------------------------------- 35 Installation Guide . . . . . . . . . . . . . . . . . . . . . . . . . . . . . . . . . . . . . . . . . . . . . . . . . . . . . 35 Recommended Set-Up: Connection via HDMI (High Definition Multimedia Interface)............................................................................................................... 35 Optional Set-Up: Connection via Component Video & Composite Audio............. 36 Optional Set-Up: Connection with Home Theatre System (Digital Audio SPDIF)... 37 Troubleshooting--------------------------------------------------------38 Tips For Improving TV Reception . . . . . . . . . . . . . . . . . . . . . . . . . . . . . . . . . . . . . . . . 38 Signal Leakage--------------------------------------------------------- 39 A Reminder . . . . . . . . . . . . . . . . . . . . . . . . . . . . . . . . . . . . . . . . . . . . . . . . . . . . . . . . . . 39 02 Getting Started HD Interactive Set-top Box The HD Interactive set-top box provides you with a host of features, including the menu system, volume control and channel navigation. You can access these features via the control buttons on the front of the HD Interactive set-top Box. BACK Return to previous screen POWER LED Green LED when box is ON and Red LED when box is on STANDBY MENU Enters and exits MENU NETWORK LED POWER ON/OFF Pressing this button alternates between ON and STANDBY modes NAVIGATION OK BUTTONS Confirm of selection Amber LED when connected to Network RECORD LED Blinking Red LED when recording CLOCK OR CHANNEL DISPLAY Display time during STANDBY or during normal viewing Display channel number when a channel is selected IMPORTANT • When you switch off your TV set, you should always put the HD Interactive set-top box on stand-by mode for regular software updates. • Always place your HD Interactive set-top box on a smooth, flat surface. • Air should circulate freely under and around the box to prevent overheating. Do not place anything on top of your HD Interactive set-top box. • Do not place the HD Interactive set-top box near wet or moist areas. • If the display flickers and the HD Interactive set-top box does not change channels, unplug it from the wall cable point and wait at least ten seconds before plugging it back again. Press the ON/OFF button to reactivate the HD Interactive set-top box and try again. • Do not dismantle the HD Interactive set-top box to attempt servicing it on your own. Please call 1633. 03 Getting Started StarHub Remote Control StarHub Remote Control The StarHub remote control offers you the convenience of accessing the features available from the set-top box remotely. Mute/Unmute Audio Track Selection Power On/Off Numeric Keypad For Channel Selection T oggle Between Favourite Channels Access Interactive TV Info Bar Access Menu Confirmation key Volume Change Up/Down Return To Previous Screen A ccess Smart TV options Change of Output Resolution Access Video On Demand TV Viewing or Last Channel Recall TV Guide Navigation buttons Up/Down/Left/Right Channel Change Up/Down Exit to Live TV Colour Function Keys Record Rewind Play Previous Forward Pause Next Stop Battery Low Indicator IMPORTANT • When using the remote control, make sure there are no obstructions between the remote control and the HD Interactive set-top box. • If the channels can be changed with the HD Interactive set-top box and not with the remote control, check if the remote control batteries are weak. • If you cannot change channels using either the HD Interactive set-top box or the remote control, do not attempt your own servicing. Please call 1633. 04 Getting Started Smart Card Smart Card Every HD Interactive set-top box has a designated Smart Card which can be found in the Smart Card slot at the side of the HD Interactive set-top box. The Smart Card is used to store data about your unique customer subscription package. It also allows StarHub to provide ‘live’ updates of programme rights and other application data directly to your HD Interactive set-top box. How To Insert If you are inserting your Smart Card, please follow the directional arrow indicated on the Smart Card. If your Smart Card is not inserted correctly, an error message will appear on your TV Screen. Smart Card Slot IMPORTANT Please keep the Smart Card in its slot at all times. Removal of Smart Card can lead to disruption of programmes or interruption of regular software updates from StarHub. Should you suspect that your Smart Card is faulty, do not attempt to service it yourself. Please call 1633. 05 Guide To High Definition TV Applications HDTV With HDTV service on StarHub TV, you and your family will embark on a new level of television viewing experience as never before. In addition to crystal-clear images that are 4 times sharper than standard TV and colours that are true to life, you will enjoy HD programmes in widescreen format just like at the cinema. Dolby Digital 5.1 Surround Sound (where available) capability means that you can enjoy multi-dimensional, cinemaquality sound right in your living room. What’s more, your HD Interactive set-top box supports both standard definition (SD) and HD channels. Hence, you can conveniently access and view both SD and HD programmes using the same box. Here’s how to enhance your TV viewing experience. Widescreen Picture (16:9) Get a panoramic view of the action with 33% more of the picture to see. True-to-life-colours Be mesmerized by lifelike images with a display of million more colours. Crystal Clear Images You won’t miss a single detail with 4x more sharpness than ever before. Cinematic Sound Enjoy Dolby® Digital 5.1 surround sound on selected shows with a compatible speaker system. Quality HD Programmes With the suite of HD channels available on StarHub TV, you can enjoy high definition entertainment from worldclass, award-winning channels. \\ To enjoy HDTV, you need to be using a HD-ready TV set that meets the following minimum specifications: -- Supports vertical video resolution of at least 720 lines -- Supports 16:9 Widescreen aspect ratio -- Supports the following Video Input types: Component (Y-Pb-Pr) or High Definition Multimedia Interface (HDMI) -- Supports HDCP copy protection. 06 Guide To High Definition TV Applications Video Resolution Video Resolution HD programmes are broadcasted on a high visual quality with a vertical resolution of up to 1,080 lines. In order to obtain the best viewing experience possible, adjust the video output of the HD Interactive set-top box using the remote control given. The following four video output resolutions are available on the HD Interactive set-top box: 576i, 576p, 720p & 1080i (default). To obtain the best visual experience, set the video output resolution to 1080i. How To Use Functions Directions 1 To view the current video resolution of the HD Interactive set-top box. Press the HEX button on your remote control. The current video output resolution will be shown on screen. 2 To change Video output resolutions to 1080i. Press the HEX button on your remote control again. When you have reached the video output resolution of 1080i, release the HEX button . \\ Please note that on some HD-ready TV sets, you may experience problems displaying video output on the 576i resolution. If you see a black screen on TV, please continue to press the HEX button on your remote control to change to the next higher video output resolution. 07 Guide To High Definition TV Applications Surround Sound Surround Sound Where available, HD programmes are broadcasted with Dolby® Digital 5.1 Surround Sound effects. If you are using a Dolby® Digital 5.1 home theatre system, you can connect the HD Interactive set-top box to your home theatre system to complete your HDTV viewing experience with surround sound digital audio effects. In the set-top box General Settings screen, enable Dolby® Digital audio output selection. How To Use Functions 1 To enable Dolby® Digital 5.1 audio output. Directions Press the MENU button on your remote control. Use the navigation arrow buttons to select Settings followed by General Settings and Dolby Digital. Use the LEFT YES. Press the EXIT or RIGHT arrow button to change the selection to or BACK button to save your selection. \\ Enable Dolby® Digital audio output selection ONLY if you are using a Dolby® Digital 5.1 home theatre system or if your HD-ready TV supports Dolby® Digital surround sound. 08 Guide to Digital Cable Features Main Menu and Options The Main Menu gives you complete access to all the Digital Cable features using a simple and intuitive design. on your remote control and navigate using the To access the Main Menu, press the MENU button navigation arrow buttons. The sub-menu will be displayed at the bottom of the screen (if applicable). In different applications, the MENU button also functions as an Options button. This is applicable to applications with the on-screen MENU for options prompt. Similarly, Options can be navigated using the navigation arrow buttons and the OK button of selection. for confirmation 09 Guide to Digital Cable Features Info Bar Info Bar Info Bar gives you details of the programmes you are watching including the channel number, channel name, programme title, programme start and end times, short synopsis and cast. Details of programmes in the next 24 hours will also be available on the Info Bar. \\ Information may not be available for some programmes. How To Use Functions Directions 1 To access the Info Bar for a programme you have selected. Press the INFO button 2 To access channel information for a programme currently showing on another channel. Use the UP or DOWN arrow button on your remote control to scroll through the channel listings. 3 To check the programmes within 24 hours. Press RIGHT arrow button to proceed to the next programme. Press LEFT arrow button to go back to the previous programme. 4 To access additional programme information (Info Page). Press the INFO button on the remote control. . \\ For more information, refer to the Info Page on page 11. 5 To select your preferred audio track for the programme. \\ Selection is possible only if another language is available. 10 Press the AUDIO button . Guide to Digital Cable Features Info Page Info Page The Info Page offers you detailed information on a programme such as programme genre, programme duration, episode number and title, directors and cast and available audio tracks. To access the Info Page from the Info Bar, press the INFO button . How To Use Functions Directions 1 For More Show Times (if available). Select More Show Times using LEFT or RIGHT arrow buttons. Press the OK button to view more show times. 2 To Search for other programmes. Select Search using the LEFT or RIGHT Press the OK button to confirm. 3 To Lock this channel Select Lock using the LEFT or RIGHT Press the OK button to confirm. 4 To Add to Favourites Select Add to Favourites using the LEFT or RIGHT arrow buttons. Press the OK button to confirm. 5 For Programme Alert of selected programme. Select Alert using the LEFT or RIGHT (for future events) Press the OK button to confirm. arrow buttons. arrow buttons. arrow buttons. 11 Guide to Digital Cable Features On-Screen TV Guide On-Screen TV Guide The On-Screen TV Guide gives you access to comprehensive information on current and upcoming programmes including schedules, synopses, cast and crew, available audio tracks and programme genre for the channel of your choice. (Note: Information may not be available for some programmes). To access the On-Screen TV Guide, press the GUIDE button Channel Listing on your TV screen as shown below. on your remote control. You will see the How To Use Functions Directions 1 To toggle between List Guide and Grid Guide. Press the GUIDE button on your remote control to toggle between List Guide and Grid Guide. 2 To choose a channel. The channel you are currently watching is highlighted. Use the UP or DOWN arrow button on your remote control to scroll through the list of channels and press the OK button to go to the channel you wish to watch. 3 To access current and upcoming programmes list. Press the RIGHT arrow button on your remote control for Programme Listing (for Grid) or DOWN arrow button (for List). 4 To access programme schedules for today. On the Programme Listing Page, press the LEFT or RIGHT arrow buttons (for Grid) and UP or DOWN arrow button (for List) to scroll. 5 To access programme schedules for tomorrow. Press the NEXT button on your remote control. 6 To access programme schedules from 4th to 7th day. Press the NEXT the PREVIOUS 7 To go to the previous or next page. Press the CH UP next page. 8 For additional information on programmes. Press the INFO button button on your remote control. Press button to return to the previous day. or CH DOWN to go to the previous or . \\ Additional programme information such as synopses, cast and audio tracks may not be available for some programmes. 9 To set default Listing or Grid Guide. 12 Press MENU. Select Settings followed by General Settings and Guide Style: select List or Grid. Guide to Digital Cable Features Genre Search Genre Search To help you find your favourite programmes easily, you can sort the channels in the On-Screen TV Guide according to their genre. By default, the channels are arranged according to Channel Number. You can sort the channels in the On-Screen TV Guide based on one of the following: • Alphabetical • Favourites • My Subscribed Channels • International • Ethnic • Sports • Kids • Education • Lifestyle • Entertainment • Movies • News • Chinese How To Use Functions Directions on your remote control. 1 To sort the channels in the On-Screen TV Press the GUIDE button Guide according to genre. The channels are arranged according to Channel Number by default. Press the MENU button for Options and select Sort. Press the OK button to arrange the channels according to your selection. 13 Guide to Digital Cable Features More Show Times More Show Times More Show Times offers you the ease of checking the alternative show times of your favourite programme. How To Use Functions 1 To access more show times function. Directions Press the GUIDE button Press the RIGHT Guide). on your remote control. arrow button to select a programme (for List Press the MENU button for Options and select More Show Times to list the alternative show times of the selected title. OR Press the INFO button for the info Page and select More Show Times to list the alternative show times of the selected title. 14 Guide to Digital Cable Features Programme Information In Chinese Programme Information In Chinese This mode allows for programme information to be in Chinese text for Chinese channels and in English text for all other channels. If you prefer, you may change the Preferred Language Setting to English to view all programme information in English only. How To Use Functions 1 To change the Preferred Language. Directions Press the MENU button , select Settings followed by General Settings then Preferred Language using the arrow buttons. Use the LEFT or RIGHT arrow button to select Bilingual or English as the Preferred Language Setting. Press the EXIT or BACK button to save your selection. \\ Chinese programme information is available only for Chinese programmes. 15 Guide to Digital Cable Features Favourite Channels Favourite Channels You can switch within a pre-selected list of preferred channels by pressing the FAVOURITE button on your remote control. To begin, you must select the channels to be included in your list of favourite channels. How To Use Functions 1 To set a favourite channel. Directions Press the MENU button on your remote control. Select TV Guide followed by Favourites on the TV screen using the arrow buttons. Press the OK to launch Favourites. Press the OK button and press the RIGHT category. on + New Favourite Channel. Select your channel category arrow button to choose the channels in the selected Press the UP or DOWN arrow button to choose the channels and the OK button to add the channel to your Favourites list. Press the BACK 2 To access a favourite channel. \\ The FAVOURITE button will only tune to the channels in the activated Favourites List. 16 button to return to the Favourites list. Option 1 Press the FAVOURITE button on your remote control to access your favourite channels. Surf your favourite channels by pressing the FAVOURITE button . Option 2 Press the GUIDE button while watching TV. Press the MENU button and select Sort. Select Favourites and press the OK button . Your favourite channels will be listed. Select the channel you want to watch and press the OK button . Guide to Digital Cable Features Favourite Channels and Last Channel Recall Favourite Channels How To Use Functions Directions on your remote control. 3 T o remove a favourite Press the MENU button channel. Select TV Guide followed by Favourites on the TV screen using the arrow buttons. Press the OK button to launch Favourites. Press the OK button to select the favourite channel(s) and press the MENU button for options to choose an action: Delete this channel / Delete selected channels / Delete all channels. Last Channel Recall For instant access to the channel you were last viewing, press the LIVE TV button channel. on the viewing 17 Guide to Digital Cable Features Search Search The Search feature allows you to look for your favourite programmes within TV Guide, Video On Demand, Catch UP TV and/or On Demand Channels. You can search based on the programme title. How To Use Functions 1 To access search function. Directions Press the MENU button SEARCH. on your remote control and select Use the navigation arrow buttons to highlight the letter and press the OK button to input into the search. To correct a mistake, select the “” or “” to select the position and select DELETE “” to edit. To clear the search key words, select Clear and press the OK button . After the entry of the key words, navigate to DONE and press the OK button to browse the search result. Use the UP or DOWN arrow button and the OK button to view the details. Press the NEXT search filter. 18 or PREVIOUS button to change the Guide to Digital Cable Features General Settings General Settings This function personalises your viewing preferences. How To Use Functions 1 To change Display Date / Time. Directions Press the MENU button on your remote control. Select Settings followed by General Setting, then select Display Date/Time using the arrow buttons. Use the LEFT or RIGHT arrow button to set whether you wish the Date and Time to appear on the TV screen. Press the EXIT selection. 2 To change Info Bar Duration. or BACK button to save your Press the MENU button on your remote control. Select Settings followed by General Setting, then select Info Bar Duration using the arrow buttons. Use the LEFT or RIGHT arrow button to set the duration you wish the Info Bar to appear on the TV screen. Press the EXIT selection. or BACK button to save your 3 To change Preferred Language. Select Settings followed by General Setting and Preferred Language. Use the LEFT or RIGHT arrow button to change the settings. The default language is Bilingual. This mode allows for programme information to be in Chinese text for Chinese channels and English text for all other channels. 4 To change Preferred Audio. Select Settings followed by General Settings and Preferred Audio. Use the LEFT or RIGHT arrow button to select your preferred Audio language. 19 Guide to Digital Cable Features General Settings General Settings How To Use Functions Directions 5 To change Preferred Subtitles. Select Settings followed by General Settings and Preferred Subtitles. Use the LEFT or RIGHT arrow button to select your preferred subtitle language. 6 To change Time Format. Select Settings followed by General Settings and Time Format. Use the LEFT or RIGHT arrow button to select your preferred Time Format. 7 To change Auto Load Ch Apps. Select Settings followed by General Settings and Auto Load Ch Apps. Use the LEFT or RIGHT arrow button to set whether you wish to load channel applications automatically (like On Demand Channels, KaraOK! or Interactive TV) 8 To change resolution. Select Settings followed by General Settings and Resolution: • 576i • 576p • 720p • 1080i 9 To change Background. Select Settings followed by General Settings and Background. Use the LEFT or RIGHT arrow button to select your preferred background style for the user interface. 20 Guide to Digital Cable Features Parental Control Parental Control This feature allows parents to control what their children can watch. To access Parental Control, press the MENU button on your remote control, navigate to Settings. Select Parental Control and press the OK button . You will be prompted to enter the 6-digit Parental PIN (the default is 000000). How To Use Functions 1 To set Rating Level Directions All content above the selected rating level will be blocked. Note that this feature is subjected to the availability of the advisory rating in the programme information. Use the LEFT or RIGHT arrow button to select the available rating levels: • None • G • PG • PG13 • NC16 • M18 Press the EXIT changes. 2 To lock a channel. or BACK button to save your All channels in the list will be locked at all times and can be unlocked using the Parental PIN when you tune to the channel. Select Channels and press the OK button . Press the OK button on + New. Select your channel category and press the RIGHT arrow button to choose the channels in the selected category. Press the UP or DOWN arrow button to choose the channels and the OK button to select the channel. Press for Options to lock the selected the MENU button channel(s). Press the BACK List. button to return to the Locked Channel 21 Guide to Digital Cable Features Parental Control Parental Control How To Use Functions 3 To unlock a channel Directions Select Channels and press the OK button . To unlock an individual channel: Select the channel in the list and press the OK button to unlock. To unlock all the channels: Select Unlock All and press the OK button . 4 To set Purchase Lock This feature prevents children from making unauthorised purchases on the Set-top Box. Once the Purchase Lock is enabled, the Parental PIN will be requested everytime before the purchase can be completed. Use the LEFT this feature. Press the EXIT changes. 5 To change Parental PIN \\ Please be reminded that the PIN should be kept confidential. or RIGHT arrow button to Enable/Disable or BACK button to save your This feature allows you to replace the default or old PIN of your HD interactive Set-top Box with a new one. The PIN should be kept confidential as it will enable you secured access to selected services or features. . You will be Select Change PIN and press the OK button prompted to enter your new PIN, enter your new 6-digit numeric PIN. On the next screen, enter and confirm your new PIN. Enter again your new 6-digit numeric PIN. A message will appear on-screen to inform you if the change has been successful. Press the OK button again to return to the Parental Control Menu. 6 To change R21 PIN The steps to change your R21 PIN are similar to the Change Parental PIN above. Note that this feature is only applicable to customers who registered for the R21 PIN at StarHub shops or customer service centres. 22 Guide to Video On Demand Catalogue Page StarHub Video On Demand (VOD) services offer you a wide selection of content which you can watch instantly at your convenience. Video On Demand Services Save the hassle of running to the video rental store - Now, you can shop for the video-on-demand titles you want and watch them instantly. Select from a wide variety of content, ranging from movies, sports special to ethnic shows and Asian drama series. For drama series, you can buy a single episode or the entire series and enjoy them in the language you like (for series that come in dual sound). To access Video On Demand services, press the VOD button among Movies, Shows, KaraOK! and On Demand Channels. on your remote control. You can choose For access to On Demand Channels, please check your subscription packages for entitlements. 23 Guide to Video On Demand Catalogue Page How To Use Functions Directions 1 To access Movies or Shows On Demand Press the VOD button on your remote control. Select Movies or Shows and press the OK button . 2 To browse the titles from the different categories Use the LEFT or RIGHT arrow buttons to browse the different categories. Each category will provide a snapshot of the titles available. Press the OK button on the selected category. Use the LEFT RIGHT arrow buttons to browse the different titles. Press the OK button options. 3 To use the Search function 24 or to view the Info Page with the various purchase Press the MENU button for Options and select the Search option. Press the OK button to use the search function. Guide to Video On Demand Info Page Info Page The Info Page provides information on the programme you have selected such as programme title, the duration of the programme, the episode number when applicable and the programme synopsis. At the same time, you can also find the various purchase options available for the selected programme. Information such as the expiry date of the viewing period and pricing details will also be shown on this page. To access the Info Page, select the titles and press the OK button . \\ If titles are free or have been purchased before, title will play immediately. How To Use Functions 1 To purchase a title/individual episode/series Directions For Movies: Press the OK button to complete your purchase. and follow the on-screen instructions and select your purchase option for an For Shows: Press the OK button individual episode or the entire series. Follow the on-screen instructions to complete your purchase. The programme will play immediately once the transaction is successful. 25 Guide to Video On Demand My Purchased Content My Purchased Content In My Purchased Content, you can view the list of the titles/series that you have recently purchased. You can access My Purchased Content from both Movies and Shows On Demand. How To Use Functions Directions 1 To play a purchased title/series. Press the VOD button On Demand. on your remote control to launch Video Select Movies or Shows and press the OK button . for Options and select My Purchased Press the MENU button Content. Press the OK button . In My Purchased Content, use the LEFT or RIGHT arrow buttons to select the title or series. Press the OK button to view the Info Page. In the Info Page, press the OK button 26 to start watching. Guide to Video On Demand KaraOK! - Song Catalogue KaraOK! - Song Catalogue KaraOK! offers a wide selection of Chinese, English, Dialect, Evergreen and Malay songs. You can now sing and practise your favourite or latest songs in the comfort of your home. How To Use Functions 1 To access and subscribe KaraOK! Directions Press Ch 888 on your remote control. OR Press the MENU button , select On Demand followed by KaraOK! using the arrow and OK buttons. If you have not subscribed to KaraOK!, use the UP or DOWN arrow buttons to select the package and press the OK button to purchase. For customers who have subscribed to KaraOK!, the catalogue will appear upon tuning in to Ch 888. 2 To browse and select songs from the catalogue. Use the navigation arrow buttons to scroll through the categories, and press the OK button to confirm. Alternatively, you can press the corresponding number key to go to the respective categories. 3 To schedule a song. At the listings of songs, select the song you wish to schedule and press the OK button or the corresponding number. The song title will be highlighted when it has been scheduled in the playlist. 4 To change the text between English and Chinese. Press the MENU button 5 To go to the previous or next page. Press the CH UP 6 To hide the song catalogue. Press the EXIT button 7 To launch the song catalogue from the video screen. Press the MENU button for Options and select Bilingual/English. or CH DOWN to go to the previous or next page. or OK button to launch the main page. to launch the main page. 27 Guide to Video On Demand KaraOK! - Playlist KaraOK! - Playlist KaraOK! offers a similar experience as the commercial Karaoke outlets, where you can schedule your favourite songs to be played out in a sequence. The order of the songs can be changed and managed from the Playlist. How To Use Functions Directions 1 To launch the Playlist. Press the MENU button Playlist. 2 To insert a song. Select the song and use the LEFT or RIGHT arrow buttons to toggle the mode to Insert and press the OK button . The song will be rescheduled as the next song to the played out. 3 To repeat a song. Select the song and use the LEFT or RIGHT arrow buttons to toggle the mode to Repeat and press the OK button . The song entry will be duplicated in the playlist and will be repeated. 4 To delete a song. Select the song and use the LEFT or RIGHT arrow buttons to toggle the mode to Remove and press the OK button . 28 for Options and select Current Guide to Video On Demand KaraOK! - Favourites KaraOK! - Favourites KaraOK! allows you to add your favourite songs to a favourites list, so that you can have quick access without having to create your playlist from scratch the next time you return. \\ Your favourites list will be accessible according to your subscription period (day pass or monthly subscription). Once your subscription expires, your favourites list will be automatically deleted from the set-top box. How To Use Functions Directions 1 To launch Favourites. Press the MENU button 2 To add a song to Favourites. Select the song and press the MENU button select Add to Favourites. 3 To load Favourites as playlist. Press the MENU button for Options and select Load Favourites. The current playlist will be replaced with the Favourites list. 4 Add a favourite song to playlist. Select the song in Favourites and use the LEFT or RIGHT arrow buttons to toggle to Add and press the OK button . The song will be added to the current playlist. 5 Delete a favourite song. Select the song in Favourites and use the LEFT or RIGHT arrow buttons to toggle to Remove and press the OK button . The song will be deleted from Favourites. for Options and select Favourites. for Options and 29 Guide to Video On Demand KaraOK! - Other Features KaraOK! - Other Features There are many other functions that will complement your home karaoke singing experience such as the search feature. You can also forward or rewind the songs and practise a new song over and over again from the comfort of your home. How To Use Functions Directions 1 To change the audio mode. Press the AUDIO button mode. 2 To view the current and next song on the full video screen. At the full video screen, press the INFO button current and next song. to switch between Karaoke or Audio To hide, press the EXIT button to view the . 3 Rewind or fast forward the song. or FORWARD button on your remote Press the REWIND control to increase the speed by 2x. You can press the REWIND or FORWARD button again to increase the speed. 4 To restart the song. Press the PREVIOUS 5 To go to the next song. Press the NEXT 6 To pause the song. button on your remote control. or STOP Press the PAUSE button button on your remote control. on your remote control. To resume the song, press the PLAY button 7 To search of songs or artiste. . Select one of the Search feature from the main catalogue: -- Search By Artistes (Keyword) -- Search By Artistes (Pinyin) -- Search By Songs (Keyword) -- Search By Songs (Pinyin) Use navigation arrow buttons and press the OK button the alphabets. to select For keyword searches, key in a key word e.g. “World” and all related songs with the word “World” will appear. For Pinyin, key in “ZXY”, if you want to search for “Zhang Xue You”. After the completing the entry, select DONE to start the search. Select the song and press the OK button song. 30 to schedule and play the Guide To Interactive Services Instant Buy Instant Buy allows you to subscribe to selected channels and packages instantly, using your remote control. You can start to enjoy your subscribed channels immediately upon successful transaction. How To Use Functions 1 To subscribe to channel. Directions Tune to the channel you wish to subscribe. to subscribe to this channel. Press the BLUE button Select SUBSCRIBE and press the OK button to confirm. Pricing and subscription information will be displayed. Press the BLUE button to continue. Select YES and press the OK button to process your request. Upon successful transaction, the channel will be activated and you can start viewing it instantly. 2 To preview a short video about the channel Tune to the channel you wish to preview. (if available). Press the BLUE button to preview a short video. If a preview video is available, select PREVIEW and press the OK button to confirm. The video will start to play out instantly. 3 To return to other channels from the application. Press the EXIT button . Select YES and press the OK button Press the CH UP other channels. or DOWN to confirm. arrow button to tune to \\ Video Signal will appear almost instantaneously when the transaction is successful. \\ Additional set-top boxes in the account will be activated with the channel within a short interval. \\ When the network is busy, the video signal may not be activated immediately. A message will be displayed. You may exit and return later to view the channel. 31 Guide To Interactive Services Catch Up TV Catch Up TV (Available only for Selected Channels) Catch Up TV allows you to catch up episodes of TV shows you missed, anytime within 7 days of the first telecast. How To Use Functions 1 To access the list of Catch Up TV channels. Directions Press the MENU button and select Catch Up TV. 2 To access Catch Up TV from a channel. Tune to a channel with Catch Up TV and press the YELLOW button when the icon appears at the top right corner of the screen. 3 To select the categories within Catch Up TV. Use the UP or DOWN arrow buttons to select a category and press OK button or RIGHT arrow button to browse the programmes in that category. 4 To play a programme. Use the UP or DOWN arrow buttons to select a programme and press OK to view the show information. Press th OK button on Watch to play the programme. 32 Guide To Interactive Services Start Over and eTV Start Over and eTV You can now enjoy the ability to restart and watch it from the start. Keep a look out for the on screen prompt for programmes that come with this feature, and press the BLUE button on your remote control to start watching from the beginning. Shows airing on Start Over channels can be restarted multiple times within their normal broadcast time. For example, your favourite Hong Kong TVB series is on VV Drama from 9pm to 10pm, you will be able to Start Over that programme anytime between 9pm and 10pm. eTV provides you more interactivity with your favourite TV programme. You can get more information on the programme you are watching while watching TV. To access eTV, press the GREEN button screen. on the remote control when the eTV icon appears on the top of the How To Use Functions Directions 1 To access the different tabs on eTV. Use the navigation arrow buttons to select the different tabs. Select OK button to confirm. 2 To select the categories within eTV. Use the navigation arrow buttons to select the different tabs. Select OK button to confirm. 3 To exit eTV and return to the last watched channel. Press the BACK , EXIT or LIVE TV buttons. 33 Guide To Interactive Services Interactive TV Interactive TV Interactive TV on channel 899 brings you a whole new level of experience via your existing TV, into a world of information and interactivity, 24 hours a day, 7 days a week. The suite of content available for a start includes, “Live” Financial Stock prices, Lottery results, Weather forecast, Yahoo! News and Traffic Information. \\ The information displayed is from third party sources and is provided on an “as is” and “as available” basis. StarHub Cable Vision Ltd and its affiliates make no representation or warranty as to the accuracy, timeliness, correctness or completeness of any information displayed and expressly disclaim all representations or warranties of any kind including implied warranties of merchantability, satisfactory quality, fitness for a particular purpose and non-infringement. 34 Technical Information Installation Guide Recommended Set-Up: Connection via HDMI (High Definition Multimedia Interface) StarHub Cable TV point TV (Back) Connect RF cable from the cable TV point to the HD Interactive set-top box Cable in DC from Power Adaptor To TV HDMI Input \\ For this connection, your HD-ready TV must support input for HDMI. \\ If your HD-ready TV does not support Dolby® Digital 5.1 surround sound, select No under the Dolby® Digital audio selection at the Preferences Setting screen. \\ Some HD-ready TV models may have compatibility problems with the HD Interactive set-top box when connected using the HDMI connection. If your TV set is "HD-ready" TV but still experience problems displaying video, please connect the set-top box to your HD-ready TV using the Optional set-up (component cables not included). Viewing Procedure 1. Switch your TV to the HDMI channel to watch your programmes. 2. Select the desired channel using the remote control of your HD Interactive set-top box. 35 Technical Information Installation Guide Optional Set-Up: Connection via Component Video & Composite Audio TV (Back) StarHub Cable TV point Component Video/Audio out to TV Component (Y-Pb-Pr) input DC from Power Adaptor Connect RF cable from the cable TV point to the HD Interactive set-top box Cable in Composite Video/Audio out to TV Component (L-R) group video/audio input. \\ You will need to purchase the Component cables separately. \\ For this connection, your HD-ready TV must have input for Component Video (Y-Pb-Pr) and Composite Audio (stereo AV). Viewing Procedure 3. Switch your TV to the Component channel to watch your programmes. 4. Select the desired channel using the remote control of your HD Interactive set-top box. \\ On some HD-ready TV models, you may experience a problem displaying video output on 576i on your resolution. If you see black screen on TV, please continue to press the HEX button remote control to change the output resolution to the next higher value. 36 Technical Information Installation Guide Optional Set-Up: Connection with Home Theatre System (Digital Audio SPDIF) TV (Back) Component Video/Audio out to TV Component (Y-Pb-Pr) input Composite Video/Audio out to TV Component (L-R) group video/audio input. DC from Power Adaptor To HDMI input Connect SPDIF (Optical) HDMI out to home entertainment system. Home Entertainment System 5.1 channels \\ For this connection, you need to be using a Dolby® Digital 5.1 Surround Sound Home Theatre System. \\ You will need to purchase the Digital Audio SPDIF (Optical) cables separately. Viewing Procedure 1. Switch your TV to the Component channel to watch your programmes. 2. Select the desired channel using the remote control of your HD Interactive set-top box. 37 Troubleshooting Tips For Improving TV Reception If you experience any disturbance in your TV reception, the problem may be due to a minor oversight. Here's an important checklist that may help you locate the source of the problem quickly: • Always ensure that all devices (TV, HD Interactive set-top box) are plugged into your power outlet and the power is turned on. • Ensure that all cable connections are intact and tight. • Inspect all cords for wear and tear. In addition, you can also try the following steps: Picture leaning/flipping No picture ▪▪Adjust horizontal control of TV unit. ▪▪Adjust brightness control of TV unit. ▪▪Turn OFF and turn ON the main power to the HD Interactive set-top box. ▪▪Check all connections. ▪▪Check other channels. Blank screen, sound ok Pixelised picture ▪▪Check if TV brightness and contrast controls are adjusted. ▪▪Check other electrical appliance in operation. ▪▪Check for loose connection. ▪▪Check other channels. Picture too bright or dark Picture rolling ▪▪Adjust vertical hold of TV unit. No sound, picture ok ▪▪Adjust TV or HD Interactive set-top box volume control. ▪▪Check if either are in MUTE mode. Remote control not working ▪▪Check for obstacles in the line of sight between the remote control and the HD Interactive settop box. ▪▪Check the batteries of the remote control for the HD Interactive set-top box. Washed-out picture ▪▪Adjust TV contrast control. If you encounter any difficulties which you cannot resolve, we will be pleased to be of assistance. For customer care enquiry, please call 1633 or visit community.starhub.com. 38 Signal Leakage A Reminder It is very important that you do not tamper with the cable wiring in your home once StarHub's signals are connected to your TV points. This is because you could cause signal leakage. Signal leakage is the unwanted radiation of cable signals into the atmosphere from a component in the cable network which is faulty or improperly installed. As some of the cable signals carried in our cable network are on the same frequencies as those used in the air for other communication services like those used by the police, military and other essential services, leakage will be disruptive and is a very serious problem. If you intend to renovate and have your home upgraded to cable ready status, or need to relocate or rewire your TV points, please approach a COPIF approved cable contractor who is trained to do this work. If you need help regarding signal leakage or the cabling in your home, call StarHub's Public Hotline at 6873 2828. \\ Causing signal leakage is a very serious offence as it disrupts the communication services of legitimate users. Infocomm Development Authority of Singapore (IDA) manages and polices the airwaves. When the need arises, StarHub may have to enter your home to test for signal leakage. The penalties for creating communication interference are severe, so be sure to contact a qualified cable contractor. General Information Rovi Product Notice This item incorporates copy protection technology that is protected by U.S. patents and other intellectual property rights of Rovi Corporation. Reverse engineering and disassembly are prohibited. Dolby Digital Product Notice Manufactured under license from Dolby Laboratories. "Dolby" and the double-D symbol are trademarks of Dolby Laboratories. HDMI Product Notice The terms HDMI and HDMI High-Definition Multimedia Interface, and the HDMI Logo are trademarks or registered trademarks of HDMI Licensing LLC in the United States and other countries. Open Source Software License Notice You may find a copy of the open source software and more information at http://opensource.samsung.com 39 Memo 67 Ubi Avenue 1 StarHub Green Singapore 408942