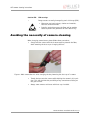
1
AVT Manta Manta Hardware Installation Guide V4.1.0 24 June 2011 Allied Vision Technologies GmbH Taschenweg 2a D-07646 Stadtroda / Germany Legal notice For customers in the U.S.A. This equipment has been tested and found to comply with the limits for a Class B digital device, pursuant to Part 15 of the FCC Rules. These limits are designed to provide reasonable protection against harmful interference when the equipment is operated in a residential environment. This equipment generates, uses, and can radiate radio frequency energy and, if not installed and used in accordance with the instruction manual, may cause harmful interference to radio communications. However there is no guarantee that interferences will not occur in a particular installation. If the equipment does cause harmful interference to radio or television reception, the user is encouraged to try to correct the interference by one or more of the following measures: • • • • Reorient or relocate the receiving antenna. Increase the distance between the equipment and the receiver. Use a different line outlet for the receiver. Consult a radio or TV technician for help. You are cautioned that any changes or modifications not expressly approved in this manual could void your authority to operate this equipment. The shielded interface cable recommended in this manual must be used with this equipment in order to comply with the limits for a computing device pursuant to Subpart B of Part 15 of FCC Rules. For customers in Canada This apparatus complies with the Class B limits for radio noise emissions set out in the Radio Interference Regulations. Pour utilisateurs au Canada Cet appareil est conforme aux normes classe B pour bruits radioélectriques, spécifiées dans le Règlement sur le brouillage radioélectrique. Life support applications These products are not designed for use in life support appliances, devices, or systems where malfunction of these products can reasonably be expected to result in personal injury. Allied customers using or selling these products for use in such applications do so at their own risk and agree to fully indemnify Allied for any damages resulting from such improper use or sale. Trademarks Unless stated otherwise, all trademarks appearing in this document of Allied Vision Technologies are brands protected by law. Warranty The information provided by Allied Vision Technologies is supplied without any guarantees or warranty whatsoever, be it specific or implicit. Also excluded are all implicit warranties concerning the negotiability, the suitability for specific applications or the non-breaking of laws and patents. Even if we assume that the information supplied to us is accurate, errors and inaccuracy may still occur. Copyright All texts, pictures and graphics are protected by copyright and other laws protecting intellectual property. It is not permitted to copy or modify them for trade use or transfer, nor may they be used on web sites. Allied Vision Technologies GmbH 06/2011 All rights reserved. Managing Director: Mr. Frank Grube Tax ID: DE 184383113 Headquarters: Taschenweg 2A D-07646 Stadtroda, Germany Tel.: +49 (0)36428 6770 Fax: +49 (0)36428 677-28 e-mail: [email protected] Manta Hardware Installation Guide V4.1.0 2 Contents Contacting Allied Vision Technologies ................................................... 4 Introduction ............................................................................................................ 5 Document history .......................................................................................................... 5 Manual overview............................................................................................................ 8 Conventions used in this manual...................................................................................... 9 More information.......................................................................................................... 10 Safety instructions ............................................................................................13 General safety instructions............................................................................................. 13 Sensor safety instructions .............................................................................................. 14 Changing filters safety instructions ................................................................................. 14 Cautions: Connecting a camera ....................................................................................... 15 Safety instructions for board level cameras....................................................................... 16 AVT camera cleaning instructions ...........................................................18 Warranty ..................................................................................................................... 18 Avoiding the necessity of camera cleaning ....................................................................... 19 Is it an impurity? – Identifying impurities........................................................................ 20 Where is the impurity? – Locating impurities .................................................................... 20 Cleaning Instructions .................................................................................................... 21 AVT Manta cameras: installing hardware and software .............24 Hardware conditions ..................................................................................................... 24 PoE capable cameras ..................................................................................................... 25 Overview hardware installation ....................................................................................... 26 Installing Gigabit Ethernet network card .......................................................................... 26 Connecting camera to PC or laptop.................................................................................. 33 Start AVT UniCam Viewer application and configure IP settings ........................................... 33 Start GigE Sample Viewer application and configure IP settings ........................................... 35 Using the GigE Sample Viewer ........................................................................................ 37 Camera interfaces .............................................................................................43 Gigabit Ethernet port (MANTA) ....................................................................................... 45 Status LEDs (MANTA)..................................................................................................... 45 Camera I/O connectors (12 pin) and cables: MANTA ........................................................... 46 MANTA (PoE) camera I/O connector pin assignment........................................................... 47 MANTA input description ............................................................................................... 48 MANTA output description ............................................................................................. 51 Troubleshooting ..................................................................................................54 Index...........................................................................................................................60 Manta Hardware Installation Guide V4.1.0 3 Contacting Allied Vision Technologies Contacting Allied Vision Technologies Info • Technical information: http://www.alliedvisiontec.com • Support: [email protected] Allied Vision Technologies GmbH (Headquarters) Taschenweg 2a 07646 Stadtroda, Germany Tel: +49 36428-677-0 Fax: +49 36428-677-28 e-mail: [email protected] Allied Vision Technologies Canada Inc. 101-3750 North Fraser Way Burnaby, BC, V5J 5E9, Canada Tel: +1 604-875-8855 Fax: +1 604-875-8856 e-mail: [email protected] Allied Vision Technologies Inc. 38 Washington Street Newburyport, MA 01950, USA Toll Free number +1 877-USA-1394 Tel: +1 978-225-2030 Fax: +1 978-225-2029 e-mail: [email protected] Allied Vision Technologies Asia Pte. Ltd. 82 Playfair Road #07-02 D’Lithium Singapore 368001 Tel: +65 6634-9027 Fax: +65 6634-902 e-mail: [email protected] Manta Hardware Installation Guide V4.1.0 4 Introduction Introduction This Manta Hardware Installation Guide describes the hardware installation procedures for AVT Manta cameras. The Manta Hardware Installation Guide answers questions about putting AVT cameras into operation, about safety warnings, pin assignments on I/O connectors and GigE ports. Learn how to get more information at the AVT website (accessories), how to get information about software applicable with AVT Manta cameras and how to get deep information from the AVT MANTA Technical Manual. Note Please read through this manual carefully before installing the hardware on your PC or laptop (Gigabit Ethernet network card and cables) and operating the AVT cameras. Document history Version Date Remarks V2.0.0 15.04.10 New Manual - SERIAL status V3.0.1 03.06.10 • • • • V4.0.0 25.10.10 • • Minor corrections Added link to AVT knowledge base in Chapter GigE sample viewer on page 51. Added Manta G-046, G-145, G-201, G-146 Added Pin8/9: RS232 in Figure 25: MANTA: Camera I/O connector pin assignment on page 47 Added Manta G-033, G-504 Added 100 Mbit/s for LEDs, see Status LEDs (MANTA) on page 45 New file format: • Changed file format from FM7 to FM9 Improved descriptions: • For resistor values in Figure 31: MANTA: OutVCC and external resistor on page 51 to be continued on next page Table 1: Document history Manta Hardware Installation Guide V4.1.0 5 Introduction Version Date Remarks continued from last page V4.0.1 06.01.11 • • • • • • Added photo and description: Figure 3: Removing IR cut filter/protection glass using special tool (E9020001) on page 21 Added Caution (sensor damage) in Chapter Sensor safety instructions on page 14 Corrected some namings of SDKs and filters in Chapter AVT Manta cameras: installing hardware and software on page 24 AVT Manta cameras are compliant to GigE Vision V1.2 in Chapter AVT software on page 11 Changed Manta Technical Manual to AVT Manta Technical Manual in Chapter AVT MANTA Technical Manual on page 12 Revised screenshot for Windows 7 in Figure 9: Windows firewall settings (Method 1: Off) on page 29 to be continued on next page Table 1: Document history Manta Hardware Installation Guide V4.1.0 6 Introduction Version Date Remarks continued from last page V4.1.0 24.06.11 Power over Ethernet (PoE) • • • • • • • • • • • • Added PoE voltages in Figure 25: MANTA: Camera I/O connector pin assignment on page 47 Added note about IEEE 802.3at in Chapter Camera interfaces on page 43 Added PoE in Figure 24: Example: Rear view of MANTA camera (left: no PoE; right: PoE capable) on page 44 Added PoE in Table 3: Rear view of AVT Manta cameras (HIROSE and Gigabit Ethernet RJ-45 port) on page 44 Added PoE in Chapter Overview hardware installation on page 26 Added PoE in Chapter Connecting camera to PC or laptop on page 33 Added PoE in Chapter Gigabit Ethernet port (MANTA) on page 45 Added description of third LED: see Figure 24: Example: Rear view of MANTA camera (left: no PoE; right: PoE capable) on page 44 and Table 6: Status LED3: PoE cameras only and Manta G-145-30fps / Manta G-201-30fps (non PoE) on page 45 Added Chapter MANTA PoE input block diagram (incl. Manta G-145-30fps/201-30fps) on page 49 Added Chapter MANTA PoE delay and minimum pulse width on page 50 (same values as non-PoE Manta cameras) Added note that higher external values will increase the delay times: see Chapter Test conditions on page 52. Added cross reference to: Application Note: Hardware Selection for AVT GigE Cameras: on page 11 Manta board level • Deleted (PWR output on demand) at pin 2, see: Figure 33: MANTA board level camera: I/O pin assignment on page 53 to be continued on next page Table 1: Document history Manta Hardware Installation Guide V4.1.0 7 Introduction Version Date Remarks continued from last page V4.1.0 24.06.11 Manta G-145-30fps and Manta G-201-30fps (non PoE) [continued] [continued] • • • • ... have same I/O pin assignment (input circuits and voltage range), power LED and upside down PoE plug as PoE models: see Note Exception on page 43 Table 6: Status LED3: PoE cameras only and Manta G-14530fps / Manta G-201-30fps (non PoE) on page 45 Manta G-145-30fps/201-30fps non-PoE behave like standard PoE cameras. on page 47 Chapter MANTA input block diagram (not: Manta G-14530fps/201-30fps) on page 48 Table 1: Document history Manual overview The manual overview describes each chapter of this manual shortly. • Chapter Contacting Allied Vision Technologies on page 4 lists AVT contact data for both: – Technical information / ordering – Commercial information • Chapter Introduction on page 5 (this chapter) gives you the document history, a manual overview and conventions used in this manual (styles and symbols). Furthermore you learn how to get more information on AVT accessories, available AVT software and the AVT MANTA Technical Manual. • Chapter Safety instructions on page 13 describes safety instructions for AVT cameras in general and special safety instructions for camera families/models. – Read this chapter carefully before operating any AVT camera. – Follow all safety instructions, especially the cautions when connecting cameras. – Take special care when operating board level cameras (CautionESD, general warnings, loading and dirty environments). Read all notes and safety instructions before operating any AVT board level camera. • Chapter AVT camera cleaning instructions on page 18 describes warranty precautions as well as safety instructions/cautions valid for AVT Manta cameras in case of cleaning lenses, optical filters/protection glass or sensors. • Chapter AVT Manta cameras: installing hardware and software on page 24 describes the hardware installation procedures. In this chapter you get Manta Hardware Installation Guide V4.1.0 8 Introduction • links to the AVT website (accessories) and you learn how to get more information on installing software. – Read this chapter before installing any hardware. – Read and follow the caution when connecting a camera to PC or laptop. Chapter Camera interfaces on page 43 describes the interfaces of AVT Manta cameras (I/O connector and GigE port). – Read all notes and cautions carefully. Conventions used in this manual To give this manual an easily understood layout and to emphasize important information, the following typographical styles and symbols are used: Styles Style Function Example Bold Programs, inputs or highlighting bold important things Courier Code listings etc. Input Upper case Register REGISTER Italics Modes, fields Mode Parentheses and/or blue Links (Link) Table 2: Styles Symbols Note This symbol highlights important information. Caution This symbol highlights important instructions. You have to follow these instructions to avoid malfunctions. Manta Hardware Installation Guide V4.1.0 9 Introduction Caution-ESD This symbol highlights important ESD instructions. Only qualified personnel is allowed to install and operate components marked with this symbol. www This symbol highlights URLs for further information. The URL itself is shown in blue. Example: http://www.alliedvisiontec.com More information In this chapter you get more information on GigE Vision/GenICam, AVT accessories, available AVT software and the AVT MANTA Technical Manual. GigE Vision and GenICam • Introduction to GigE Vision and GenICam http://www.alliedvisiontec.com/emea/support/application-notes.html • AVT Manta camera controls http://www.alliedvisiontec.com/emea/support/downloads/product-literature.html AVT accessories Note Allied Vision Technologies offers a wide range of accessories for the use of AVT GigE cameras and the easy integration in already existing applications. • • Gigabit Ethernet accessories (Gigabit Ethernet network cards, hubs and switches, cables) Lenses (for cameras with sensors of type 1/3, 1/2, 2/3, 1 and 1.2) Manta Hardware Installation Guide V4.1.0 10 Introduction www For more information on accessories go to: http://www.alliedvisiontec.com/emea/products/ accessories.html For more information on third party hardware components tested with AVT GigE cameras, read: Application Note: Hardware Selection for AVT GigE Cameras: http://www.alliedvisiontec.com/emea/support/applicationnotes.html For more information on lenses go to: http://www.alliedvisiontec.com/emea/products/ accessories/lenses.html To order accessories online (by clicking the article and sending an inquiry) visit the AVT web shop at: http://www.alliedvisiontec.com/emea/products/ accessories.html AVT software Note AVT Manta cameras are compliant to GigE Vision V1.2. Moreover AVT cameras offer many more functions than specified in the GigE Vision V1.2 standard: so-called AVT SmartFeatures. These features are accessible via camera controls, or by using special functions provided in the following AVT Software Packages: • • AVT Universal Package (see AVT Universal Package User Guide) AVT PvAPI SDK (see AVT PvAPI Programmer’s Reference Manual) All software packages provided by AVT are free of charge and contain the following components: • • • • • Drivers Software Development Kit (SDK) for camera control and image acquisition Examples based on the provided APIs of the SDK Documentation and release notes Viewer application to operate/configure the cameras and access/test the AVT smart features. Manta Hardware Installation Guide V4.1.0 11 Introduction www All software packages (including documentation and release notes) provided by AVT can be downloaded at: http://www.alliedvisiontec.com/emea/support/downloads/ software.html There is no product CD. www In addition to the AVT Software Packages Allied Vision Technologies offers special Integration Packages to integrate AVT cameras into any third-party vision software that supports the GigE Vision standard. For more information refer to the Software Package Selector Guide. Go to: http://www.alliedvisiontec.com/emea/produkte/ software.html Here you also find the AVT Software Packages for download and additional software documentation: • • AVT Universal Package User Guide Release Notes AVT MANTA Technical Manual Note Besides hardware installation procedures (this guide) and the software documentation there is an in-depth description of AVT Manta cameras in the following manuals: • • AVT Manta Technical Manual AVT Manta Camera controls Here you find: technical data, functional descriptions, features of the camera and how to use. www For downloading the Technical Manuals go to: http://www.alliedvisiontec.com/emea/support/downloads/ product-literature.html Manta Hardware Installation Guide V4.1.0 12 Safety instructions Safety instructions This chapter describes safety instructions/cautions valid for AVT Manta cameras and special safety instructions/cautions depending on the AVT Manta camera model used. General safety instructions Note • • • Note • There are no switches or parts inside the camera that require adjustment. The guarantee becomes void upon opening the camera casing. If the product is disassembled, reworked or repaired by anyone other than a recommended service person, AVT or its suppliers will take no responsibility for the subsequent performance or quality of the camera. The camera does not generate dangerous voltages internally. All color models are equipped with an optical filter to eliminate the influence of infrared light hitting the sensor. Please be advised that, as a side effect, this filter reduces sensitivity in the visible spectrum. The optical filter is part of the back focus ring, which is threaded into the C-Mount. Manta Hardware Installation Guide V4.1.0 13 Safety instructions Sensor safety instructions Caution Sensor may be damaged Light intensity or exposure time exceeding the saturation of the sensor may damage the sensor irreparably. This may occur in following situations: • • • Laser light hitting the sensor directly Bright light sources (e.g. sunlight) hitting the sensor directly Camera is exposed to X-rays Damages may be caused by: • • Overheating of color filters, microlenses or pixel structures Accelerated aging of color filters or pixel structures To avoid sensor damage • • • • • • Use light source with lower intensity Use external shutter Use optical filters Use lens cap (when camera not in use) Vary local light spot / laser spot on sensor X-rays: – Keep camera out of X-ray path. Guide the light source via mirrors to the sensor. Or – Use lead glass to protect lens and sensor. – Use lead jacket for the body of the camera. The warranty does not cover damaged cameras caused by X-ray applications or too much light/laser light. Changing filters safety instructions Caution • Mount/dismount lenses and filters in a dust-free environment, and do not use compressed air (which can push dust into cameras and lenses). • Use only optical quality tissue/cloth if you must clean a lens or filter. Ask your dealer if you are not familiar with these procedures. Manta Hardware Installation Guide V4.1.0 14 Safety instructions Cautions: Connecting a camera Caution MANTA CAMERAS • Use only DC power supplies with insulated cases. These are identified by having only two power pins. Manta Hardware Installation Guide V4.1.0 15 Safety instructions Safety instructions for board level cameras Note Caution-ESD Read the Manta Technical Manual and this safety instructions before use. Abuse or misapplication of the camera may result in limited warranty or cancelation of warranty. Board level cameras: ESD warnings • • • • • • Only qualified personnel is allowed to install and operate the board level cameras. Board level cameras are delivered without housing. Handle the sensor board and main board with care. Do not bend the boards. Do not touch the components or contacts on a board. Hold a board by its edges. Sensor board and main board are sensitive to electrostatic discharge. To avoid possible damage, handle all static-sensitive boards and components in a static-safe work area. Follow the procedures below. ESD (electrostatic discharge): Static electricity can damage the sensor board or the main board of your Board level cameras. To prevent static damage, discharge static electricity from your body before you touch any of your Board level cameras’s electronic components, such as sensor board or main board. To do so, use a static-safe work area with static-dissipative mat and wear a static-dissipative wrist strap. Do not hold any components of your Board level cameras against your clothing. Even if you are wearing a wrist strap, your body is grounded but your clothes are not. Do not remove the sensor board and main board from its anti-static packaging unless your body is grounded. ESD shielding: To protect the boards from radiation of other modules or devices use a special ESD protective housing. Manta Hardware Installation Guide V4.1.0 16 Safety instructions Caution Board level cameras: General warnings • • • • • • • Caution Be sure that all power to your board level cameras is switched off, before mounting the sensor board or making connections to the camera. Do not connect or disconnect any cables during an electrical storm. Do not use your board level cameras during an electrical storm. To help avoid possible damage to the sensor board or main board, wait 5 seconds after power is switched off, before connecting or disconnecting any cable to the board level cameras. Ensure that nothing rests on the cables of your board level cameras. Keep your board level cameras away from radiators and heat sources. Do not spill food or liquids on your board level cameras. Board level cameras: Loading • • Avoid any mechanical forces to the board level cameras, the boards and its components, especially torsional, tensile and compressive forces. Any of these forces may result in damage of the board level cameras, the boards and its components. To avoid damages of the boards, provide cables with an external pull relief so that no force is applied to the connectors itself. Caution Board level cameras: Dirty environments • • Always use clean boards. To protect the boards from dirt like dust, liquids or swarf always use the board level cameras only in clean room environment or use a protective housing. Manta Hardware Installation Guide V4.1.0 17 AVT camera cleaning instructions AVT camera cleaning instructions This chapter describes safety instructions/cautions valid for all AVT GigE camera families in case of cleaning lenses, optical filters/protection glass or sensors. Note • • Caution Warranty precautions • Please read these instructions before you contact your AVT camera dealer for assistance. Ask your AVT camera dealer if you are not familiar with the procedures described below. Warranty • To ensure your warranty remains in force: – Do not open the camera housing. – Follow instructions described below. – Use only optical quality tissue/cloth if you must clean a lens or filter. – Use only optics cleaner (60% ethyl alcohol, 40% ether). Never use aggressive cleaners like benzine or spirit. Such cleaners may destroy the surface. – Do not use compressed air which can push dust into camera and lens. AVT does not warranty against any physical damage to the sensor/filter/protection glass or lenses caused by the user during the cleaning process. Caution General warnings • • • Do not touch any optical component with bare fingers. Oil or other impurities may damage the surface. Only follow the processes described below if you are familiar with these procedures and if you have the necessary equipment. If you are uncomfortable with the outlined precautions, please return your camera to AVT for cleaning. Manta Hardware Installation Guide V4.1.0 18 AVT camera cleaning instructions Caution-ESD ESD warnings Image sensors are easily damaged by static discharge (ESD). • • Please use anti-static gloves, clothes and materials. Also use conductive shoes. Install a conductive mat on the floor and/or working table to prevent the generation of static electricity. Avoiding the necessity of camera cleaning When changing camera lenses please follow these procedures: • Simply hold the camera with the C-mount opening towards the floor, when removing the dust-cap or changing the lens: Figure 1: Hold camera like this while changing the lens/removing the dust cap of a camera • • Thread the lens onto the camera while holding the camera in this position. This will minimize the possibility of any contaminants falling on the glass surface. Always store cameras and lenses with dust-caps installed. Manta Hardware Installation Guide V4.1.0 19 AVT camera cleaning instructions Is it an impurity? – Identifying impurities If you observe any image artefacts in your video preview of your AVT camera you may have impurities either on the lens, filter/protection glass or, theoretically on the sensor protection glass, although every AVT camera gets cleaned prior to sealing and shipment. Impurities (dust, particles or fluids) on the sensor or optical components (Figure 2: Image with tiny dust on the filter (left) and dust on the sensor (right) on page 20) will appear as a dark area, patch or spot on the image and will remain fixed in the preview window while you rotate the camera over the target. Do not confuse this with a pixel defect which will appear as a distinct point. It is crucial to differentiate between dust (e.g. flakes of skin, particles) and other dirt (e.g. liquids, fingerprints, grease). Particles can either rest loosely or can be more or less stuck to the optical surface. Figure 2: Image with tiny dust on the filter (left) and dust on the sensor (right) Where is the impurity? – Locating impurities Before you dismount the lens you should find out if the impurity is on the filter, lens or sensor. Therefore you should record a uniform image (e.g. a white sheet of paper) with the camera. The affected optical surface is identified when a suspected optical component is moved and the dirt follows this movement. 1. If you move only the lens (not the camera) and the impurity moves as well, the impurity is on the lens. 2. If you move the IR cut filter/protection glass window and the impurity moves as well: Please carefully remove the filter/protection glass and clean it on both sides using the techniques explained below. Manta Hardware Installation Guide V4.1.0 20 AVT camera cleaning instructions Note • • Taking out the filter requires special care. Ask your dealer to help you if you are not confident with the procedure. Figure 3: Removing IR cut filter/protection glass using special tool (E9020001) 3. If the impurity is neither on the lens nor the IR cut filter/protection glass, it is probably on the sensor. Cleaning Instructions Perform all cleaning operations (lenses, filter/protection glass, sensor in a dust-free clean-room. The optical components are very fragile so it is important to avoid touching them with your fingers or any hard material. 1. Unplug the camera from any power supply before cleaning. 2. Apply a small amount of optics cleaner (60% ethyl alcohol, 40% ether) to clean, new lens cleaning tissue. Acceptable material includes medical-grade sterile optical cotton, or lens tissue that is chemically pure and free from silicones and other additives. – Do not use cosmetic cotton. – Do not use consumer eyeglass cleaning cloths pre-treated with silicon. Manta Hardware Installation Guide V4.1.0 21 AVT camera cleaning instructions Figure 4: Medical-grade sterile optical cotton The cotton or lens tissue should be moist, but not dripping. Please hold the camera away from your body to avoid falling particles like flakes from skin on the sensor. Hold the camera sensor diagonally upwards. 3. Wipe the glass surface with a spiral motion from the centre to the rim. Normally several spiral wipes are recommended. Wipe only on glass avoiding contact to metal surfaces, because microscopic dirt could be released and could cause scratches on the glass. Figure 5: Sensor cleaning 4. When you've finished cleaning, examine the surface in a strong light. Take an out-of-focus picture of a flat, illuminated surface to see if any dirt or dust remains. 5. If dust spots remain, repeat this procedure using new clean lens tissue (as described above). Caution • • Never wipe lenses with dry swabs or tissue - this causes scratches. Do not use any disposable cotton cosmetic swabs; they are not free from contamination. Manta Hardware Installation Guide V4.1.0 22 AVT camera cleaning instructions Figure 6: Don’t use compressed air 6. If despite warnings you want to clean your camera with compressed air: Caution • • 7. Use an air blower/compressed air only if you are familiar with cleaning a camera with this instrument. Compressed air may push dust into cameras and lenses. Therefore keep the pressure at a moderate strength only: – The pressure at the tube should be less than 1 bar – operating distance: 5-30 cm Gently blow the impurities off with dust-filtered, oil-free air (< 1 bar). Using ionized air will help to remove any dirt stuck to the optical component because of static electricity. Note If dust spots remain after cleaning twice, please contact your AVT dealer. Manta Hardware Installation Guide V4.1.0 23 AVT Manta cameras: installing hardware and software AVT Manta cameras: installing hardware and software This chapter describes the hardware installation of AVT Manta cameras, Gigabit Ethernet network cards (PC or laptop) and the necessary cabling. Note www For software/driver installation read the documentation of the AVT Universal Package or AVT PvAPI SDK. Read this chapter carefully and follow the instructions. nevertheless, if you get problems read Chapter Troubleshooting on page 54. Documentation of AVT Universal Package or AVT PvAPI SDK: http://www.alliedvisiontec.com/emea/support/downloads/ software.html Hardware conditions • • • AVT Manta camera with corresponding lens PC or laptop with built-in Gigabit Ethernet interface The following Gigabit Ethernet network cards are recommended for full camera performance: – Intel Pro 1000 GT (PCI, 1 port) – Intel Pro 1000 PT (PCIe x1, 1 port) – Intel CT (PCIe x1, 1 port) – Intel Pro 1000 PT Dual Port (PCIe x4, 2 ports) – Intel Pro 1000 PT Quad Port Low Profile (PCIe x4, 4 ports) Manta Hardware Installation Guide V4.1.0 24 AVT Manta cameras: installing hardware and software • • To maximize PC hardware performance, devices that offer jumbo packet support (8 kB MTU size) are recommended. For best performance all network devices including cameras, PCs and switches should support the packet size output by the camera. Note • • The best way is to use a separate (second) Gigabit Ethernet network card in your PC for GigE camera applications. This is important to avoid conflicts and because image transfers from your GigE camera require considerable bandwidth through your network card. AVT offers a wide range of Gigabit Ethernet network cards for PCs www For more information on accessories go to: http://www.alliedvisiontec.com/emea/products/ accessories.html For more information on lenses go to: http://www.alliedvisiontec.com/emea/products/ accessories/lenses.html To order accessories online (by clicking the article and sending an inquiry) visit the AVT web shop at: http://www.alliedvisiontec.com/emea/products/ accessories.html PoE capable cameras Note How can I distinguish between PoE capable cameras and cameras that are not PoE capable? PoE capable cameras have the letters PoE written on the camera’s label on the bottom side of the camera. Manta Hardware Installation Guide V4.1.0 25 AVT Manta cameras: installing hardware and software Overview hardware installation • • • Install Gigabit Ethernet network card (recommended: a second network card for your PC) and configure network card (Jumbo Frames, Receive Descriptors, Performance Options and IP address settings). Install software (AVT Universal Package incl. viewer application or AVT PvAPI SDK plus corresponding viewer application) and start the viewer: see AVT Universal Package User Guide or Chapter Start GigE Sample Viewer application and configure IP settings on page 35 Connect camera to PC or laptop and ensure that the camera is powered. – If you are supplying power via PoE, the power provided must comply with IEEE 802.3at. Note www Read the software manual (AVT Universal Package User Guide/AVT PvAPI Programmer’s Reference Manual) to get information on acquiring your first image with UniCam or GigE sample viewer and troubleshooting. Documentation of AVT Universal Package or AVT PvAPI SDK: http://www.alliedvisiontec.com/emea/support/downloads/ software.html For GigE sample viewer see Chapter Using the GigE Sample Viewer on page 37. Installing Gigabit Ethernet network card Note Use a recommended network card listed in Chapter Hardware conditions on page 24. The following steps describe the installation of an Intel PRO/ 1000 GT network card in your host computer. For other network cards, the steps required are almost the same. Notes are included for other (non-Intel) network cards where there is likely to be a difference. Read also the documentation from your network card manufacturer before installing the network card. Manta Hardware Installation Guide V4.1.0 26 AVT Manta cameras: installing hardware and software 1. PC: Install the (second) Gigabit Ethernet network card in your host computer according to the instructions you got from your network card manufacturer. 2. Cancel the Found new Hardware Wizard window that may appear when Windows detects your network card. 3. Install the network card driver from your network card manufacturer. 4. [Windows XP] Click Start Control Panel Network connections [Windows Vista] Click Start Right-click Network Properties Manage Network Connections Click Properties [Windows 7] Click Start Right-click Network Change adapter settings Right-click on connection corresponding to the network card Click Properties (The Properties window opens; skip the next step.) 5. Double-click the network connection corresponding to the network card that was just installed. [The following steps and screenshots show the Intel PRO/1000 GT as an example.] The Properties window opens. Figure 7: Network card main properties window (Intel PRO/1000 GT under Windows Vista) 6. Click Configure and click on Advanced tab to configure the network card for Jumbo Frames/Packet. Manta Hardware Installation Guide V4.1.0 27 AVT Manta cameras: installing hardware and software Note The Property list on this tab will be different between different types/brands of Gigabit Ethernet network cards. Common expressions are Jumbo Frames or Jumbo Packet. If Jumbo Frames or Jumbo Packet does not appear in this list, then your network card probably does not support it. If your card does not support Jumbo Frames or Jumbo Packet, then you may not be able to achieve the full performance of the camera. The following window opens: Figure 8: Network card Advanced Properties window (Intel PRO/1000 GT under Windows Vista) 7. In the Property list adjust the following: – Select Jumbo Frames or Jumbo Packet and change the value to 9014 bytes or higher. – Select Receive Descriptors or Receive Buffers on the same list and change the value to 512. – Select Performance Options and set Interrupt Moderate Rate to Extreme. [On newer cards:] Set Interrupt Moderation Rate to Extreme. 8. Click Ok to validate your change. Method 1 (firewall off) 9a. [Windows XP] Again double-click the network connection corresponding to the network card that was just installed. [The following steps and screenshots show the Intel PRO/1000 GT as an example.] The Properties window opens. On Advanced tab click on Settings. Choose Manta Hardware Installation Guide V4.1.0 28 AVT Manta cameras: installing hardware and software Off to turn off the Windows firewall. [If you installed the GigE filter driver, skip this step. Installation and deinstallation of GigE filter driver can be done with AVT Universal Package.] [Windows Vista] Click Start Control Panel Security Turn Windows Firewall on or off Choose option Off [Windows 7] Click Start Control Panel System & Security Windows Firewall Turn Windows Firewall on or off Choose option Off (dependent on your surrounding: see Windows 7 screenshot) [Windows XP, Windows Vista] [Windows 7] Figure 9: Windows firewall settings (Method 1: Off) Note If your IT environment doesn’t allow to deactivate the firewall, then choose Method 2: setting the firewall to on and defining an exception for the AVT UniCam viewer (see the following alternative step b). Method 2 (firewall on and defining exception for viewer) 9b. [Windows XP, Windows Vista, Windows 7] Choose option On (instead Off). [Windows XP, Windows Vista] On Exceptions tab click Add program..., search for the viewer file (AVT_UniCam.exe) and click Open. In the next two windows click OK. [Windows 7] Go back to the Windows Firewall screen. Click Allow a program or feature through Windows Firewall Check if there is Manta Hardware Installation Guide V4.1.0 29 AVT Manta cameras: installing hardware and software already an exception in the list shown. If not, click Allow another program. [Windows XP, Windows Vista] [Windows XP, Windows Vista] [Windows 7] Figure 10: Windows firewall setting (Method 2: On) Manta Hardware Installation Guide V4.1.0 30 AVT Manta cameras: installing hardware and software Go on configuring network (Method 1+2) 10. [Windows XP] Again double-click the network connection corresponding to the network card that was just installed. [The following steps and screenshots show the Intel PRO/1000 GT as an example.] [Windows Vista] Click Start Right-click Network Properties Manage Network Connections Click Properties [Windows 7] Click Start Right-click Network Change adapter settings Right-click on connection corresponding to the network card Click Properties (The Properties window opens; skip the next step.) The Properties window opens. Figure 11: Internet Protocol (TCP/IP) Properties 11. In the list of items select [Windows XP] Internet Protocol (TCP/IP) [Windows Vista, Windows 7] Internet Protocol Version4 (TCP/IPv4) and click Properties. Manta Hardware Installation Guide V4.1.0 31 AVT Manta cameras: installing hardware and software Figure 12: Internet Protocol Version 4 (TCP/IPv4): IP address 12. Choose Obtain an IP address automatically and click OK. – If there is a DHCP server in your network, then the IP address for your network card will be distributed from the DHCP server. – If there is no DHCP server in your network, then the Link-Local Address mechanism (APIPA or Auto IP) provides your network card with an IP address. Note For more information on the differences and problems of obtaining an IP address automatically or setting the IP address manually see Chapter Troubleshooting on page 54. 13. If this network connection is used for the camera only: In the Properties window, deactivate every item except Internet Protocol (TCP/IP) and click OK. Your Gigabit Ethernet network card is now fully configured and optimized for use with AVT GigE cameras. Manta Hardware Installation Guide V4.1.0 32 AVT Manta cameras: installing hardware and software Connecting camera to PC or laptop Caution • Use only DC power supplies with insulated power pins. These are identified by having only two power connectors. 1. Insert one end of the CAT-5e (or better) Ethernet cable into your Gigabit Ethernet network card. 2. Insert the other end of the CAT-5e (or better) Ethernet cable into your GigE camera. 3. Connect the external power supply to the GigE camera and check that the camera is powered. – You can power the camera via I/O connector or – You can power the camera via PoE (must comply with IEEE 802.3at). Start AVT UniCam Viewer application and configure IP settings Note 1. The following description refers to the AVT Universal Package with AVT UniCam Viewer. For description of GigE sample viewer see Chapter Using the GigE Sample Viewer on page 37. Start the AVT UniCam viewer: Start All Programs Allied Vision Technologies Universal Package AVT UniCam Viewer Your GigE camera should appear in the list of cameras in the viewer application. This may take a few seconds. Note It may take some time for your GigE camera to be recognized by the host computer. • • • 2. If your GigE camera doesn’t appear in the viewer application’s list after 1 minute, reset your GigE camera by disconnecting and re-connecting the power. If it still doesn’t appear, restart the viewer application. If it still doesn’t appear, read Chapter Troubleshooting on page 54ff. Optional: Configure IP settings manually: Again double-click the network connection corresponding to the network card that was just installed. In the list of items select Internet Protocol (TCP/IP) and Manta Hardware Installation Guide V4.1.0 33 AVT Manta cameras: installing hardware and software click Properties. You can see the automatically obtained IP address. Take over this IP address by choosing Use the following IP address and click OK. 3. Optional: Open the IP settings from AVT UniCam viewer: Right-click desired GigE camera and choose IP settings or in menu click on Camera IP settings. Take over the IP address/Subnet mask from your camera list. Choose Use the following Persistent IP address, enter this IP address/Subnet mask and click OK. Figure 13: Using Persistent IP address for camera Note Background: Automatic acquiring of an IP address may take some time (up to one minute). To shorten this time, you can manually enter IP address for your Gigabit Ethernet network card and also for your GigE camera as described above. If you want to enter IP addresses manually without getting IP address automatically before, you need knowledge about your network (DHCP server, APIPA) and knowledge of private IP addresses. For more information read Chapter Troubleshooting on page 54ff. 4. Check exposure time and gain. You should now see an image. Manta Hardware Installation Guide V4.1.0 34 AVT Manta cameras: installing hardware and software Figure 14: AVT UniCam Viewer Start GigE Sample Viewer application and configure IP settings Note The following description refers to the AVT PvAPI SDK plus corresponding viewer application (GigE Sample Viewer). For more information of GigE Sample Viewer see Chapter Using the GigE Sample Viewer on page 37. 1. Download the GigE Sample Viewer from the AVT website and install it. 2. Start the GigE Sample Viewer: Start All Programs Prosilica GigEViewer Your GigE camera should appear in the list of cameras in the viewer application. This may take a few seconds. Note It may take some time for your GigE camera to be recognized by the host computer. • • • If your GigE camera doesn’t appear in the viewer application’s list after 1 minute, reset your GigE camera by disconnecting and re-connecting the power. If it still doesn’t appear, restart the viewer application. If it still doesn’t appear, read Chapter Troubleshooting on page 54ff. Manta Hardware Installation Guide V4.1.0 35 AVT Manta cameras: installing hardware and software 3. Optional: Configure IP settings manually: Again double-click the network connection corresponding to the network card that was just installed. In the list of items select Internet Protocol (TCP/IP) and click Properties. You can see the automatically obtained IP address. Take over this IP address by choosing Use the following IP address and click OK. 4. Optional: Open the IP settings from IPConfig program (which is installed automatically when installing the GigE Sample Viewer program): 5. Start All Programs Allied Vision Technologies GigEIPConfig or C:\Program Files\Allied Vision Technologies\GigEViewer\ipconfig.exe) 6. Choose desired GigE camera and click Change. Take over the IP address/ Subnet mask from your camera list. Choose Use the following Persistent IP address, enter this IP address/Subnet mask and click OK. Figure 15: Using Persistent IP address for camera Note Background: Automatic acquiring of an IP address may take some time (up to one minute). To shorten this time, you can manually enter IP address for your Gigabit Ethernet network card and also for your GigE camera as described above. If you want to enter IP addresses manually without getting IP address automatically before, you need knowledge about your network (DHCP server, APIPA) and knowledge of private IP addresses. For more information read Chapter Troubleshooting on page 54ff. 7. Check exposure time and gain. You should now see an image. Manta Hardware Installation Guide V4.1.0 36 AVT Manta cameras: installing hardware and software Using the GigE Sample Viewer This application is used to stream live view images from the camera, adjust the camera parameters and test basic functionality. This can include testing the external trigger cabling by configuring the camera to accept an external trigger rather than run continuously. Open liveview Select the desired camera from the cameras window of the GigE Sample Viewer. Left-click the eyeball icon A new View window will appear. Figure 16: GigE Sample Viewer: Live View window Using default camera settings this will start continuous acquisition from the camera using freerun trigger mode, 15 ms exposure time and 0 dB gain. Note If the images are too dark, point the camera directly at a light source to ensure images are not being dropped. Manta Hardware Installation Guide V4.1.0 37 AVT Manta cameras: installing hardware and software Adjust camera controls Select the desired camera from the cameras window of the GigE Sample Viewer. Left-click the wrench icon The controls window will appear: Figure 17: GigE Sample Viewer: Controls window The controls window is used to configure the camera frame rate, exposure time, color balance, imaging mode, strobe functionality, pixel format, and much more. www A detailed explanation of AVT Manta camera controls can be found in the AVT Manta camera controls manual http://www.alliedvisiontec.com/emea/support/downloads/productliterature.html Manta Hardware Installation Guide V4.1.0 38 AVT Manta cameras: installing hardware and software Live histogram Select the desired camera from the cameras window of the GigE Sample Viewer. To start Live View from the camera left-click the eyeball icon Left-click the histogram icon An 8-bit live histogram will appear: Figure 18: GigE Sample Viewer: Live histogram A histogram graphs number of pixels on the vertical axis and digital number value on the horizontal axis. Camera information Select the desired camera from the cameras window of the GigE Sample Viewer. Left-click the information icon The information window will appear: Figure 19: GigE Sample Viewer: Information window The information window provides camera identify information including the serial and part number. Manta Hardware Installation Guide V4.1.0 39 AVT Manta cameras: installing hardware and software Event channel Select the desired camera from the cameras window of the GigE Sample Viewer. Left-click the film icon The Events window will appear: Figure 20: GigE Sample Viewer: Event channel window and Controls window (EventControl) This is a tool used to monitor in-camera events such as AcquisitionEnd, ExposureStart, ExposureEnd, etc. The factory default settings disable all event notifications. Use the camera controls to select which events to monitor. View the EventID to understand the display format in the Events window. RS232 serial interface Select the desired camera from the cameras window of the GigE Sample Viewer. Left-click the 1101 icon Manta Hardware Installation Guide V4.1.0 40 AVT Manta cameras: installing hardware and software The SerialIO window will appear: Figure 21: GigE Sample Viewer: SerialIO window This is a tool used to control the camera’s RS232 port which communicates across the RxD and TxD pins on the camera I/O port. All GigE Vision cameras from AVT offer an RS232 port. RS232 communication can be used for interfacing the camera to a motorized lens, temperature and pressure sensors, pan tilt zoom and others. Seek camera Select the desired camera from the cameras window of the GigE Sample Viewer. Left-click the seek camera icon The seek camera window will appear. Enter the camera’s IP address into the window shown below: Figure 22: GigE Sample Viewer: Seek camera window Manta Hardware Installation Guide V4.1.0 41 AVT Manta cameras: installing hardware and software The seek camera window is used when the camera UDP discover broadcast packets are either disabled or blocked by hardware or network administrator preventing the camera from being recognized by the Sample Viewer. Export camera settings Select the desired camera from the cameras window of the GigE Sample Viewer. Left-click the floppy disk icon A file explorer window will appear: Figure 23: GigE Sample Viewer: Export camera settings window + exported text file The file explorer window requests a download location for the camera setup file. This file captures the current camera settings and creates a simple text file. This file can be uploaded to other cameras allowing both units to utilize the same camera settings. Note Load camera settings to other cameras using the CamSetup example code found in PvAPI SDK from AVT. Manta Hardware Installation Guide V4.1.0 42 Camera interfaces Camera interfaces Each AVT Manta camera has the following interfaces: • The 12-pin camera I/O connector provides different control inputs and output lines and external power (via external power supply). • One GigE connector with screw lock mechanism provides access to the GigE network and thus makes it possible to control the camera and output frames. For cameras that are PoE capable, the GigE connector can be used to provide power to the camera. Note For information on status LEDs see Chapter Status LEDs (MANTA) on page 45. Note • • If you supply power via PoE, the power must comply with IEEE 802.3at. If both interfaces are used for power (I/O and GigE connector via PoE), the camera will only use the power from the I/O connector. How can I distinguish between PoE capable cameras and cameras that are not PoE capable? • PoE capable cameras have the letters PoE written on the camera’s label on the back side and the bottom side of the camera. • PoE capable cameras have the GigE jack upside down. Exception Manta G-145-30fps and Manta G-201-30fps (non PoE): • ... have same I/O pin assignment (input circuits and voltage range), power LED and upside down PoE plug as PoE models. Manta Hardware Installation Guide V4.1.0 43 Camera interfaces 12-pin camera I/O connector (+ ext. power) Status LEDs LED1 (orange) GigE port no PoE GigE port PoE LED2 (green) LED3 (green for power) PoE Figure 24: Example: Rear view of MANTA camera (left: no PoE; right: PoE capable) MANTA HIROSE (left) GigE (right) Table 3: Rear view of AVT Manta cameras (HIROSE and Gigabit Ethernet RJ-45 port) Manta Hardware Installation Guide V4.1.0 44 Camera interfaces Gigabit Ethernet port (MANTA) This port conforms to the IEEE 802.3 1000BASE-T standard for Gigabit Ethernet over copper. It is recommended that Cat 5e or Cat 6 compatible cabling and connectors be used for best performance. Cable lengths up to 100 m are supported. You can also use the Gigabit Ethernet port to provide Power over Ethernet (PoE) to the camera. Power must be compliant to IEEE 802.3at. Note There is no Gigabit Ethernet cable provided with the camera. For accessories contact customer care: See Chapter Contacting Allied Vision Technologies on page 4. Status LEDs (MANTA) The color of the LEDs have the following meaning: LED color Status Solid orange Ethernet link with 1 Gbit/s established Flashing orange Ethernet activity with 1 Gbit/s Table 4: Status LED1 LED color Status Solid green Ethernet link with 100 Mbit/s established Flashing green Ethernet activity with 100 Mbit/s Table 5: Status LED2 LED color Status Solid green Camera is powered (HIROSE or PoE) LED off No power Table 6: Status LED3: PoE cameras only and Manta G-145-30fps / Manta G-201-30fps (non PoE) Manta Hardware Installation Guide V4.1.0 45 Camera interfaces Camera I/O connectors (12 pin) and cables: MANTA The 12-pin camera I/O connector (MANTA) is also designed for industrial use and, in addition to providing access to the inputs and outputs on the camera, it also provides a serial interface for e.g. the firmware update. The 12-pin camera I/O connector (MANTA) provides also power if PoE is not used. The connector is available in straight and angled version. Note www Note AVT supplies suitable I/O cables and trigger cables of different lengths (up to 10 m). For more information on cables and on ordering cables online (by clicking the article and sending an inquiry) go to: http://www.alliedvisiontec.com/emea/products/accessories/ firewire-accessories.html For pinning of the I/O connectors as viewed in pin direction see: • Chapter MANTA (PoE) camera I/O connector pin assignment on page 47 Manta Hardware Installation Guide V4.1.0 46 Camera interfaces MANTA (PoE) camera I/O connector pin assignment Manta G-145-30fps/201-30fps non-PoE behave like standard PoE cameras. Pin Signal 10 3 11 4 External GND GND for ext. power External Ground for external power 2 External Power +8 ... +30 V DC Power supply 3 --- --- --- --- 4 Camera In 1 In Uin(high) = 2.5 V...6.0 V Camera Input 1 (GPIn1) Uin(low) = 0 V...0.8 V PoE: Uin(high) = 3 V...24 V up to 36 V with external resistor of 3.3 k in series Uin(low) = 0 V...1 V 8 12 5 Description 1 9 1 2 Direction Level 7 6 5 --- --- --- --- 6 Camera Out 1 Out Open emitter, max. 20 mA Camera Output 1 (GPOut1) 7 Camera In GND In Common GND for inputs Camera Common Input Ground (In GND) 8 RxD RS232 In RS232 Terminal Receive Data 9 TxD RS232 Out RS232 Terminal Transmit Data 10 Camera Out Power In Common VCC for outputs max. 30 V DC External Power for digital outputs (OutVCC) 11 Camera In 2 In Uin(high) = 2.5 V...6.0 V Camera Input 2 (GPIn2) Uin(low)=0 V...0.8 V PoE: Uin(high) = 3 V...24 V Uin(low) = 0 V...1 V 12 Camera Out 2 Out Open emitter, max. 20 mA Camera Output 2 (GPOut2) Figure 25: MANTA: Camera I/O connector pin assignment Manta Hardware Installation Guide V4.1.0 47 Camera interfaces MANTA input description MANTA input block diagram (not: Manta G-145-30fps/201-30fps) extern intern 330R GPIn1 330R GPIn2 InGND Figure 26: MANTA input block diagram The inputs can be connected directly to +3.3 V and 5 V systems. If a voltage higher than 6.0 V is used, an external resistor must be placed in series. Used input voltage (UinVCC) External series resistor 2.5 V ... 6.0 V none 6.0 V ... 14.0 V 680 14.0 V ... 30.0 V 1.5 k Table 7: MANTA: external resistors for different voltages Parameter Value Uin (low) 0 V ... 0.8 V Uin (high) 2.5 V ... 6.0 V Current 4 mA ... 17 mA depends on input voltage Flux voltage of the LED (@ 10 mA) 1.15 V typical Table 8: MANTA input parameters Manta Hardware Installation Guide V4.1.0 48 Camera interfaces MANTA PoE input block diagram (incl. Manta G-145-30fps/201-30fps) extern intern 180R GPIn1 180R GPIn2 InGND Figure 27: MANTA PoE input block diagram The inputs can be connected directly to the system. An external resistor is not necessary. Note Customers can further use their systems with external resistor without restrictions. Parameter Value Uin (low) 0 V ... 0.8 V Uin (high) 3 V ... 24 V Current 3 mA ... 10 mA depends on input voltage Table 9: MANTA PoE input parameters Manta Hardware Installation Guide V4.1.0 49 Camera interfaces MANTA delay and minimum pulse width The minimum pulse width for all MANTA cameras is: IF 44 µs 0 6 µs t 20 kHz Figure 28: MANTA minimum pulse width Test conditions The input signal was driven with 3.3 V and no external additional series resistor. MANTA PoE delay and minimum pulse width The minimum pulse width for all MANTA cameras is: IF 44 µs 0 6 µs t 20 kHz Figure 29: MANTA PoE minimum pulse width Test conditions The input signal was driven with 3.3 V and no external additional series resistor. Manta Hardware Installation Guide V4.1.0 50 Camera interfaces MANTA output description MANTA block diagram (also PoE) intern extern OutVCC GPOut1 R GPOut2 R Figure 30: MANTA: output block diagram Caution MANTA • • Max. 20 mA per output OutVCC 30 V may damage the camera. OutVCC Resistor value* 5V 1.0 k 12 V 2.4 k 24 V 4.7 k 5V 270 12 V 620 24 V 1.2 k at 5 mA minimum required current draw at 20 mA maximum allowable current draw * Resistor required if GPOut1/2 connected to a device with < 5 mA draw, i.e. high impedance Figure 31: MANTA: OutVCC and external resistor Manta Hardware Installation Guide V4.1.0 51 Camera interfaces MANTA delay (also PoE) The cycle delay for all MANTA cameras is: tpdLH < 3.5 µs and tpdHL < 30 µs Note Optocoupler input (intern) For this reason we recommend to trigger on the rising edge. This will guarantee a reaction time that is as fast as possible. IF 0 t Optocoupler output (extern) IC 100% 90% 10% 0 td tr ton td delay time tr rise time ton(=td+tr) turn-on time ts tf t toff ts storage time fall time tf toff(=ts+tf) turn-off time Figure 32: MANTA output switching times For all MANTA models: Parameter and value td 1 µs tr 1 µs ton = td + tr 2 µs ts 26 µs tf 21 µs toff = ts + tf 47 µs (toff can deviate by 5 µs) Table 10: Parameters for MANTA Test conditions Output: external 2.4 k resistor to GND, power input for output ports set to 12 V. Note Higher external values will increase the times in table above. Manta Hardware Installation Guide V4.1.0 52 Camera interfaces MANTA board level camera: I/O pin assignment The following diagram shows the 13-pole I/O pin connector of a Manta board level camera: 7 = GND (for Inputs) 8 = RxD 9 = TxD 10 = Power Input (for Output ports) 11 = Input 2 12 = Output 2 13 = Chassis GND Molex PicoBlade Vertical Header 53047-1310 Receptacle Housing 51021-1300 Crimp Terminal 13 x 50079-8000 13-pole screw terminal 13-pole connector (53047-1310) 11.9 cooling plate n27.5 4.1 6.5 16.2 11.9 7.7 main board GigE connector 9.1 FFC45 cable IO-AD-Board 24 FFC45 cable length: ----------------------------FFC45 L = 56 mm K7500307 FFC45 L = 110 mm K7500318 FFC45 L = 152 mm 1817 FFC45 L = 200 mm 1824 29 1 = GND (for RS232, Ext PWR) 2 = Ext PWR input 3 = PWM-Out 4 = Input 1 5 = not used 6 = Output 1 13-pole I/O connector: spacer M2x5 (4x) sensor board 53.5 12 44 2.25 40 2.25 2.25 6 2 36 17 2.25 50.25 24 55.7 Figure 33: MANTA board level camera: I/O pin assignment Manta Hardware Installation Guide V4.1.0 53 Troubleshooting Troubleshooting In which way does a new device (GigE camera) get its IP address in the network? The following flowchart shows the way to access a new device in the network (implemented by AVT): 1. Persistent IP (factory default: disabled) 2. DHCP (if enabled; factory default: enabled) 3. Link-Local Address (APIPA or Auto IP) (always enabled) Note Link-Local Address is abbreviated commonly with LLA. Other terms are: APIPA or Auto IP Begin Is Persistent IP Configured? Yes Use Persistent IP (unique) No Is DHCP enabled? (4 attempts, ca. 14 seconds) Yes Use DHCP Was IP address assigned? Yes No No Use Link-Local Address End Figure 34: IP address allocation flowchart Manta Hardware Installation Guide V4.1.0 54 Troubleshooting Which private IP addresses can I use in my network? In principal there are 3 private address ranges that can be used. These ranges are defined in RFC 1918. These addresses are private because they are not globally assigned. IP address range Networks 10.0.0.1 ... 10.255.255.254 255.0.0.0 1 class A network Description For more information see: 172.16.0.01 ... 172.31.255.254 16 class B networks 255.240.0.0 RFC 1918 192.168.0.1 ... 192.168.255.254 256 class C networks 255.255.0.0 Table 11: Private IP addresses It is common for organizations to divide it into smaller /16 or /24 networks. A /24 network for example has the range 192.168.1.0 ... 192.168.1.255 and has therefore 254 hosts. A second set of special networks is the Link-Local Address (APIPA or Auto IP) range. These ranges are defined in RFC 3330 and RFC 3927: 169.254.0.0 255.255.0.0 What is most done wrong, when connecting a GigE camera to a network is the usage of different network masks for the IP devices (that is GigE camera and PC with Gigabit Ethernet network card). Example of 2 hosts in different networks (Host1 could be a GigE camera, Host2 could be PC or laptop): Host IP address Description Host1 192.168.0.1 255.255.255.0 In this example you can see: Host2 192.168.1.2 255.255.255.0 Host2 is in a different network compared to Host1. Therefore Host1 and Host2 cannot communicate with each other. Solution: Take care that both hosts are in same network: • • Either set third number of Host1 from 0 to 1 or Set third number of Host2 from 1 to 0. Table 12: Wrongly addressed IP devices Manta Hardware Installation Guide V4.1.0 55 Troubleshooting www For additional information, see: RFC 1918 RFC 3330 RFC 3927 http://www.rfc-editor.org/ Example of GigE camera and PC in different networks: 192.168.0.254 192.168.1.254 192.168.0.0 255.255.255.0 192.168.1.0 255.255.255.0 Router GigE Camera 192.168.0.1 255.255.255.0 Default Gateway: 192.168.0.254 192.168.1.1 255.255.255.0 Default Gateway: 192.168.1.254 Figure 35: Two cameras from different networks cannot communicate without router Because GigE camera and PC are in different networks, they need a router to communicate with each other. For this communication you need a default gateway additionally. If both cameras are in different subnets, check if each camera has the right default gateway. Note Using Link-Local Address (APIPA or Auto IP) you cannot communicate between different subnets. Therefore the host would need a default gateway. But when you use Link-Local Address (APIPA or Auto IP) the default gateway is not distributed (see screenshot IPconfig: Default gateway is 0.0.0.0) Manta Hardware Installation Guide V4.1.0 56 Troubleshooting Which possibilities do I have to gain a valid IP address in my network? To open the IP configuration tool: 1. Start the AVT UniCam viewer: Start All Programs Allied Vision Technologies Universal Package AVT UniCam Viewer. 2. Right-click desired GigE camera and choose IP settings or in menu click on Camera IP settings. Figure 36: IP settings: 3 methods to get an IP address for GigE camera In principle you can get the IP address for your GigE camera in 3 ways according to GigE Vision specification: Manta Hardware Installation Guide V4.1.0 57 Troubleshooting • • • Parameter Automatically: via DHCP (recommended) Automatically: via Link-Local Address (APIPA or Auto IP) Manually: assign the IP address manually Link-Local Address (APIPA or Auto IP) DHCP Persistent IP (manually) Installation effort (seen Only use Link-Local Recommended from camera’s point of Address if DHCP server is • Least installation view) not available. effort [IP settings: automatic • Full automatic rollback to Link-Local installation Address (Auto IP) if • Communication via DHCP was chosen] several subnets possible • To control the address the DHCP server must have an appropriate configuration. • • • Much effort for person who installs camera High fault liability Communication via several subnets possible Advantage • • Very easy • In most cases an IP address is found fast (sometimes several minutes) Communication • between several subnets possible (but not possible when using AVT UniCam Viewer from AVT Universal package Use GigE sample viewer from AVT PvAPI SDK instead). Communication between several subnets possible (but not possible when using AVT UniCam Viewer from AVT Universal package Use GigE sample viewer from AVT PvAPI SDK instead) Disadvantage • No communication between several subnets, because camera gets no default gateway No disadvantages • from user’s point of view (prerequisite: a correctly configured DHCP server) • When using multicamera applications: high configuration effort Knowledge of network configuration needed • Table 13: Methods of getting an IP address Manta Hardware Installation Guide V4.1.0 58 Troubleshooting When do I need the option Obtain an IP address automatically using Link-Local Address (Auto IP, 169.254.xxx.yyy)? This option is ideal for all scenarios which need a short test of the GigE camera. With this method there is no need for a configuration from administrator’s side. What to do if I have no experience in configuration of networks (DHCP/Persistent IP)? Ask your administrator, he will do for you. For a short test of the GigE camera use Link-Local Address (APIPA or Auto IP). Note the disadvantage (no communication between subnets): see Table 13: Methods of getting an IP address on page 58. What can I do to have a simple life? Use 2 Gigabit Ethernet network cards in your PC: one for the PC, one for the GigE camera. If a DHCP server is available in the same network as the GigE camera, then there are two possibilities for configuring your Gigabit Ethernet network card in your PC: • Get IP address automatically • Manually configuring of IP address (Persistent IP) Manta Hardware Installation Guide V4.1.0 59 Index Index A F APIPA ............................................... 56, 58 Auto IP ............................................. 56, 58 AVT UniCam Viewer .................................. 35 AVT UniCam viewer starting ............................................ 33 AVT Universal Package hardware conditions ........................... 24 firewall off.............................................. 28 firewall on .............................................. 29 B board level cameras dirty environments ............................. 17 general warnings ................................ 17 loading ............................................. 17 safety instructions.............................. 16 G Gigabit Ethernet network card.................... 24 Gigabit Ethernet RJ-45 port....................... 44 GigE network card installing .......................................... 26 GND for ext. power................................... 47 GPIn1 .................................................... 47 GPIn2 .................................................... 47 GPOut1................................................... 47 GPOut2................................................... 47 H C camera rear view........................................... 44 camera interfaces..................................... 43 Cat 5e .................................................... 45 Cat 6...................................................... 45 changing filters ....................................... 14 cleaning instructions ........................... 18, 21 common GND inputs............................................... 47 common vcc outputs............................................. 47 compressed air ........................................ 23 configure IP settings ........................... 33, 35 D defining exception for viewer .................... 29 DHCP...................................................... 58 document history....................................... 5 dust-free clean-room ................................ 21 dust-free environment .............................. 14 E External GND ........................................... 47 hardware conditions AVT Universal Package ........................ 24 hardware installation overview ........................................... 26 I identifying impurities............................... 20 IEEE 802.3 1000BASE-T............................. 45 In GND ................................................... 47 inputs ............................................... 43, 46 common GND ..................................... 47 installing GigE network card .............................. 26 Internet Protocol (TCP/IP) ................... 33, 36 IP address settings................................... 26 I/O connector pin assignment.................... 47 J Jumbo Frames .................................... 26, 28 Jumbo Packet.......................................... 28 jumbo packet support ............................... 25 L Legal notice .............................................. 2 Manta Hardware Installation Guide V4.1.0 60 Index Link-Local Address .............................. 56, 58 locating impurities................................... 20 M minimum pulse width MANTA.............................................. 50 MTU size................................................. 25 W warranty................................................. 18 ESD warnings ..................................... 19 general warnings................................ 18 warranty precautions ................................ 18 O optical filter............................................ 13 optical quality tissue ................................ 14 outputs .................................................. 46 common vcc ...................................... 47 OutVCC .............................................. 47, 51 P Performance Options ................................ 26 Persistent IP ........................................... 58 PoE...........................25, 26, 33, 43, 45, 46, 47 power connectors ........................................ 33 DC............................................... 15, 33 GND.................................................. 47 pins ................................................. 15 private IP addresses ................................. 55 R rear view of camera .................................. 44 Receive Descriptors .................................. 26 Reference documents USA.................................................. 15 RFC 1918 ........................................... 55, 56 RFC 3330 ................................................ 56 RFC 3927 ................................................ 56 RS232 .................................................... 47 RxD_RS232.............................................. 47 S safety instructions ................................... 13 sensor cleaning ....................................... 22 starting AVT UniCam viewer ............................. 33 status LEDs ............................................. 45 styles ....................................................... 9 symbols .................................................... 9 Manta Hardware Installation Guide V4.1.0 61