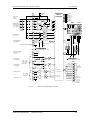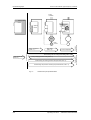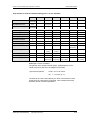
1
SIMOVERT MASTERDRIVES Vector Control Betriebsanleitung Operating Instructions Frequenzumrichter (AC-AC) Bauform Einbaugerät Frequency Converter (AC-AC) Chassis Type Ausgabe / Edition: AB 476 869 4070 76 J AB-74 Diese Betriebsanleitung gilt für den Gerätesoftwarestand V 3.1. Änderungen von Funktionen, technischen Daten, Normen, Zeichnungen und Parametern vorbehalten. These Operating Instructions are valid for software release V 3.1 We reserve the right to make changes to functions, technical data, standards, drawings and parameters. Weitergabe sowie Vervielfältigung dieser Unterlage, Verwertung und Mitteilung ihres Inhalts nicht gestattet, soweit nicht ausdrücklich zugestanden. Zuwiderhandlungen verpflichten zu Schadenersatz. Alle Rechte vorbehalten, insbesondere für den Fall der Patenterteilung oder GM-Eintragung. Wir haben den Inhalt der Druckschrift auf Übereinstimmung mit der beschriebenen Hard- und Software überprüft. Dennoch können Abweichungen nicht ausgeschlossen werden, so daß wir für die vollständige Übereinstimmung keine Garantie übernehmen. Die Angaben in dieser Druckschrift werden jedoch regelmäßig überprüft und notwendige Korrekturen sind in den nachfolgenden Auflagen enthalten. Für Verbesserungsvorschläge sind wir dankbar SIMOVERT ist ein Warenzeichen von Siemens The reproduction, transmission or use of this document or its contents is not permitted without express written authority. Offenders will be liable for damages. All rights, including rights created by patent grant or registration of a utility model or design, are reserved. We have checked the contents of this document to ensure that they coincide with the described hardware and software. However, differences cannot be completely excluded, so that we do not accept any guarantee for complete conformance. However, the information in this document is regularly checked and necessary corrections will be included in subsequent editions. We are grateful for any recommendations for improvement. Siemens AG 1998 All rights reserved SIMOVERT Registered Trade Mark Vector Control Chassis Type Frequency Converter Contents Contents 1 DEFINITIONS AND WARNINGS ..................................................................... 1-1 2 DESCRIPTION ................................................................................................. 2-1 3 TRANSPORT, STORAGE, UNPACKING........................................................ 3-1 4 TECHNICAL DATA .......................................................................................... 4-1 4.1 Notes on water-cooled units ........................................................................... 4-13 4.2 Installation notes ............................................................................................. 4-15 4.3 Characteristic data type K............................................................................... 4-17 4.4 Venting the heat sinks..................................................................................... 4-18 5 INSTALLATION................................................................................................ 5-1 5.1 5.1.1 5.1.2 Installing the unit ............................................................................................... 5-1 Installing units of types E, F, G ......................................................................... 5-2 Installing units of type K .................................................................................... 5-3 5.2 Installing the optional boards ............................................................................ 5-8 6 INSTALLATION IN CONFORMANCE WITH EMC REGULATIONS .............. 6-1 7 CONNECTING-UP............................................................................................ 7-1 7.1 Power connections............................................................................................ 7-4 7.2 Auxiliary power supply, main contactor or bypass contactor............................ 7-7 7.3 Control connections .......................................................................................... 7-8 8 PARAMETERIZATION..................................................................................... 8-1 8.1 Parameter input via the PMU............................................................................ 8-1 8.2 Parameter input via the OP1S .......................................................................... 8-5 8.3 Parameterizing by download............................................................................. 8-8 9 PARAMETERIZING STEPS............................................................................. 9-1 9.1 Parameter reset to factory setting..................................................................... 9-3 9.2 9.2.1 9.2.2 9.2.3 Quick parameterization procedures .................................................................. 9-6 Parameterizing with user settings ..................................................................... 9-6 Parameterizing by loading parameter files (download P060 = 6)..................... 9-7 Parameterizing with parameter modules (quick parameterization, P060 = 3)9-10 Siemens AG 476 869 4070 76 J AB-74 SIMOVERT MASTERDRIVES Operating instructions 1 Contents Vector Control Chassis Type Frequency Converter 9.3 9.3.1 9.3.2 9.3.3 Detailed parameterization ............................................................................... 9-32 Power section definition .................................................................................. 9-32 Board configuration......................................................................................... 9-34 Drive setting .................................................................................................... 9-37 9.4 9.4.1 9.4.2 Notes on parameterization.............................................................................. 9-44 Drive setting according to process-related boundary conditions .................... 9-46 Changes to the function selection parameter (P052) VC(former) .................. 9-48 10 FIRST START-UP .......................................................................................... 10-1 11 FAULTS AND ALARMS................................................................................. 11-1 12 MAINTENANCE ............................................................................................. 12-1 12.1 Replacing the fan ............................................................................................ 12-2 12.2 Replacing the fan fuse (type K) ...................................................................... 12-3 12.3 Replacing the fan transformer fuse -F3, -F4 (type K) ..................................... 12-4 12.4 Replacing the fan transformer ........................................................................ 12-4 12.5 Replacing the starting capacitor ..................................................................... 12-5 12.6 Replacing the capacitor battery ...................................................................... 12-5 12.7 Replacing the SML and the SMU ................................................................... 12-6 12.8 Removing and installing the module busbars (from type G)........................... 12-6 12.9 Replacing the balancing resistor..................................................................... 12-7 12.10 Replacing the PCU (types E to G) .................................................................. 12-7 12.11 Replacing the PCC (types E to G) .................................................................. 12-7 12.12 Replacing the rectifier module ........................................................................ 12-8 12.13 Replacing the IVI............................................................................................. 12-8 12.14 Replacing the VDU and the VDU resistor....................................................... 12-9 12.15 Replacing the PSU.......................................................................................... 12-9 12.16 Replacing the IGD......................................................................................... 12-10 12.17 Replacing the TDB (type K) .......................................................................... 12-11 12.18 Replacing the IGBT module.......................................................................... 12-11 12.19 Replacing the thyristor modules (V1 to V3, type K) ...................................... 12-12 12.20 Replacing the PMU ....................................................................................... 12-13 12.21 Replacing the pre-charging resistors (R1 - R4, type K) ................................ 12-14 12.22 Replacing the circuit resistor......................................................................... 12-14 13 FORMING ....................................................................................................... 13-1 14 ENVIRONMENTAL FRIENDLINESS ............................................................. 14-1 15 CERTIFICATES.............................................................................................. 15-1 2 476 869 4070 76 J AB-74 Siemens AG Operating instructions SIMOVERT MASTERDRIVES Vector Control Chassis Type Frequency Converter 1 Definitions and Warnings Definitions and Warnings Qualified personnel For the purpose of this documentation and the product warning labels, a "Qualified person" is someone who is familiar with the installation, mounting, start-up, operation and maintenance of the product. He or she must have the following qualifications: ♦ Trained or authorized to energize, de-energize, ground and tag circuits and equipment in accordance with established safety procedures. ♦ Trained or authorized in the proper care and use of protective equipment in accordance with established safety procedures. ♦ Trained in rendering first aid. DANGER For the purpose of this documentation and the product warning labels, "Danger" indicates death, severe personal injury or substantial property damage will result if proper precautions are not taken. WARNING For the purpose of this documentation and the product warning labels, "Warning" indicates death, severe personal injury or property damage can result if proper precautions are not taken. CAUTION For the purpose of this documentation and the product warning labels, "Caution" indicates that minor personal injury or material damage can result if proper precautions are not taken. NOTE For the purpose of this documentation, "Note" indicates important information about the product or about the respective part of the documentation which is essential to highlight. SIEMENS AG 476 869 4070 76 J AB-74 SIMOVERT MASTERDRIVES Operating Instructions 1-1 Definitions and Warnings WARNING Vector Control Chassis Type Frequency Converter Hazardous voltages are present in this electrical equipment during operation. Non-observance of the warnings can thus result in severe personal injury or property damage. Only qualified personnel should work on or around the equipment This personnel must be thoroughly familiar with all warning and maintenance procedures contained in this documentation. The successful and safe operation of this equipment is dependent on correct transport, proper storage and installation as well as careful operation and maintenance. NOTE This documentation does not purport to cover all details on all types of the product, nor to provide for every possible contingency to be met in connection with installation, operation or maintenance. Should further information be desired or should particular problems arise which are not covered sufficiently for the purchaser’s purposes, the matter should be referred to the local SIEMENS sales office. The contents of this documentation shall not become part of or modify any prior or existing agreement, commitment or relationship. The sales contract contains the entire obligation of SIEMENS AG. The warranty contained in the contract between the parties is the sole warranty of SIEMENS AG. Any statements contained herein do not create new warranties or modify the existing warranty. 1-2 476 869 4070 76 J AB-74 Siemens AG Operating Instructions SIMOVERT MASTERDRIVES Vector Control Chassis Type Frequency Converter Definitions and Warnings Components which can be destroyed by electrostatic discharge (ESD) CAUTION The board contains components which can be destroyed by electrostatic discharge. These components can be easily destroyed if not carefully handled. If you have to handle electronic boards, please observe the following: Electronic boards should only be touched when absolutely necessary. The human body must be electrically discharged before touching an electronic board. Boards must not come into contact with highly insulating materials - e.g. plastic parts, insulated desktops, articles of clothing manufactured from man-made fibers. Boards must only be placed on conductive surfaces. Boards and components should only be stored and transported in conductive packaging (e.g. metalized plastic boxes or metal containers). If the packing material is not conductive, the boards must be wrapped with a conductive packaging material, e.g. conductive foam rubber or household aluminium foil. The necessary ESD protective measures are clearly shown again in the following diagram: ♦ a = Conductive floor surface ♦ b = ESD table ♦ c = ESD shoes ♦ d = ESD overall ♦ e = ESD chain ♦ f = Cubicle ground connection d d b b d e e f a f f c c Sitting Standing Fig. 1-1 a f f c a Standing / Sitting ESD protective measures SIEMENS AG 476 869 4070 76 J AB-74 SIMOVERT MASTERDRIVES Operating Instructions 1-3 Definitions and Warnings Vector Control Chassis Type Frequency Converter Safety and Operating Instructions for Drive Converters (in conformity with the low-voltage directive 73/23/EEC) 1. General 4. Installation In operation, drive converters, depending on their degree of protection, may have live, uninsulated, and possibly also moving or rotating parts, as well as hot surfaces. The installation and cooling of the appliances shall be in accordance with the specifications in the pertinent documentation. In case of inadmissible removal of the required covers, of improper use, wrong installation or maloperation, there is the danger of serious personal injury and damage to property. The drive converters shall be protected against excessive strains. In particular, no components must be bent and/or isolating distances altered in the course of transportation or handling. No contact shall be made with electronic components and contacts. For further information, see documentation. All operations serving transport, installation and commissioning as well as maintenance are to be carried out by skilled technical personnel (observe IEC 364 or CENELEC HD 384 or DIN VDE 0100 and IEC Report 664 or DIN VDE 0110 and national accident prevention rules). Drive converters contain electrostatic sensitive components which are liable to damage through improper use. Electronic components must not be mechanically damaged or destroyed (potential health risks). For the purposes of these basic safety instructions, "skilled technical personnel" means persons who are familiar with the installation, mounting, commissioning and operation of the product and have the qualifications needed for the performance of their functions. When working on live drive converters, the applicable national accident prevention rules (e.g. VBG 4) must be complied with. 2. Intended use Drive converters are components designed for inclusion in electrical installations or machinery. 5. Electrical connection The electrical installation shall be carried out in accordance with the relevant requirements (e.g. crosssectional areas of conductors, fusing, PE connection). For further information, see documentation. In case of installation in machinery, commissioning of the drive converter (i.e. the starting of normal operation) is prohibited until the machinery has been proved to conform to the provisions of the EC directive 89/392/EEC (Machinery Safety Directive - MSD). Account is to be taken of EN 60204. Instructions for the installation in accordance with EMC requirements, such as screening, grounding, location of filters and wiring, are contained in the drive converter documentation. They must always be complied with, also for drive converters bearing a CE marking. Observance of the limit values required by the EMC law is the responsibility of the manufacturer of the installation or machine. Commissioning (i.e. the start of normal operation) is admissible only where conformity with the EMC directive (89/336/EEC) has been established. 6. Operation The drive converters meet the requirements of the lowvoltage directive 73/23/EEC. They are subject to the harmonized standards of the series prEN 50178/DIN VDE 0160 in conjunction with EN 60439-1/DIN VDE 0660 Part 500 and EN 60146/DIN VDE 0558. The technical data as well as information concerning the supply conditions shall be taken from the rating plate and from the documentation and shall be strictly observed. 3. Transport, storage The instructions for transport, storage and proper use shall be complied with. The climatic conditions shall be in conformity with prEN 50178. Installations which include drive converters shall be equipped with additional monitoring and protective devices in accordance with the relevant applicable safety requirements, e.g. Act respecting technical equipment, accident prevention rules, etc. Changes to the drive converters by means of the operating software are permissible. After disconnection of the drive converters from the voltage supply, live appliance parts and power terminals must not be touched immediately because of possibly energized capacitors. In this regard, the corresponding signs and markings on the drive converter must be respected. During operation, all covers and doors shall be kept closed. 7. Maintenance and servicing The manufacturer’s documentation shall be followed. Keep these safety instructions in a safe place! 1-4 476 869 4070 76 J AB-74 Siemens AG Operating Instructions SIMOVERT MASTERDRIVES Vector Control Chassis Type Frequency Converter 2 Description Description Range of application The frequency converter is a power electronics component for feeding three-phase drives in the output range from 37 kW to 400 kW. The unit can be operated from a three-phase system with a frequency of 50/60 Hz and a voltage in the range of the values entered on the rating plate (380...480 / 500...600 / 660...690 V). The three-phase current from the system is rectified, smoothed and fed onto the capacitor DC link. The inverter enables a variable output frequency between 0 Hz and a maximum of 600 Hz to be generated from the DC current with the pulse width modulation method (PWM). The internal DC 24 V voltage is supplied through an integral power supply unit. The unit is controlled by the internal closed-loop electronics, the functions are provided by the unit software. Operator control is via the PMU operator control panel, the user-friendly OP1S operator control panel, the terminal strip or via the serial interfaces of the bus system. For this purpose, the unit is provided with a number of interfaces and six slots for the use of optional boards. Pulse encoders and analog tachometers can be used as encoders on the motor. Terminal strip Optional boards PMU Control electronics Serial interface Pre-charging DC link U1/L1 U2/T1 V1/L2 V2/T2 Motor connecW2/T3 tion W1/L3 Inverter Rectifier C / L+ D/LPE1 PE2 Fig. 2-1 Circuit principle of the frequency converter SIEMENS AG 476 869 4070 76 J AB-74 SIMOVERT MASTERDRIVES Operating Instructions 2-1 Vector Control Chassis Type Frequency Converter 3 Transport, Storage, Unpacking Transport, Storage, Unpacking The units and components are packed in the manufacturing plant corresponding to that specified when ordered. A packing label is located on the outside of the packaging. Please observe the instructions on the packaging for transport, storage and professional handling. Transport Vibrations and jolts must be avoided during transport. If the unit is damaged, you must inform your shipping company immediately. Storage The units and components must be stored in clean, dry rooms. Temperatures between -25 °C (-13 °F) and +70 °C (158 °F) are permissible. Temperature fluctuations must not be more than 30 K per hour. NOTE If the storage period of one year is exceeded, the unit must be newly formed. See Section ”Forming". Unpacking The packaging comprises board and corrugated paper. It can be disposed of corresponding to the appropriate local regulations for the disposal of board products.The units and components can be installed and commissioned after they have been unpacked and checked to ensure that everything is complete and that they are not damaged. SIEMENS AG 476 869 4070 76 J AB-74 SIMOVERT MASTERDRIVES Operating Instructions 3-1 Vector Control Chassis Type Frequency Converter 4 Technical Data Technical Data EU low-voltage directives 73/23/EEC and RL93/68/EEC EU directive EMC 89/336/EEC EU machine directive 89/392/EEC Approval Switching at the input Cooling method Permissible ambient and coolingmedium temperature • during operation • during storage • during transport Installation altitude Permissible humidity rating Climatic class Degree of pollution Overvoltage category Degree of protection • Standard • Option Class of protection Touch protection Radio interference suppression • Standard • Options Interference immunity Paint finish Mechanical specifications - Vibrations EN 50178 EN 61800-3 EN 60204-1 UL: E 145 153 CSA: LR 21 927 2 switching operations per minute Air cooling with built-in fan or air cooling with additional water cooling 0° C to +40° C ( 32° F to 104° F) (up to 50° C see Fig. "Derating curves") -25° C to +70° C (-13° F to 158° F) -25° C to +70° C (-13° F to 158° F) ≤ 1000 m above sea level (100 % load capability) > 1000 m to 4000 m above sea level (for load cap., see Fig. “Derating curves”) Relative humidity ≤ 95 % during transport and storage ≤ 85 % during operation (moisture condensation not permissible) Class 3K3 to DIN IEC 721-3-3 (during operation) Pollution degree 2 to IEC 664-1 (DIN VDE 0110. Part 1). Moisture condensation during operation is not permissible Category III to IEC 664-1 (DIN VDE 0110. Part 2) EN 60529 • IP00 • IP20 (only E, F and G types of construction) Class 1 to IEC 536 (DIN VDE 0106. Part 1) to EN 60204-1 and DIN VDE 0106 Part 100 (VBG4) to EN 61800-3 No radio interference suppression Radio interference suppression filter for Class A1 to EN 55011 Industrial to EN 61800-3 For interior installation to DIN IEC 68-2-6 During stationary use: Constant amplitude • of deflection • of acceleration During transport: • of deflection • of acceleration 0.075 mm in the frequency range 10 Hz to 58 Hz 9.8 m/s² in the frequency range > 58 Hz to 500 Hz 3.5 mm in the frequency range 5 Hz to 9 Hz 9.8 m/s² in the frequency range > 9 Hz to 500 Hz to DIN IEC 68-2-27 / 08.89 30 g. 16 ms half-sine shock - Shocks (only E, F and G types of construction) Table 4-1 General data SIEMENS AG 476 869 4070 76 J AB-74 SIMOVERT MASTERDRIVES Operating Instructions 4-1 Technical Data Vector Control Chassis Type Frequency Converter Permissible rated current in % 100 75 50 7 6 5 4 3 2 1 25 0 0 2,5 3 5 6 7,5 9 12 15 16 Pulse frequency in kHz Permissible rated output voltage in % acc. to VDE 0110 / IEC 664-1 (not necessary acc. to UL / CSA) 100 <2> <1> 75 50 0 1000 2000 3000 4000 <1> The derating curve only applies to the following units: - Sizes E to G with a rated input voltage of 380 - 480 V only in the case of an actual input voltage of 380 - 400 V - Sizes J to Q with a rated input voltage of 500 - 600 V <2> The derating curve only applies to the following units: - Sizes J to Q with a rated input voltage of 380 - 480 V - Sizes J to Q with a rated input voltage of 500 - 600 V only in the case of an actual input voltage of 500 V Installation altitude above sea level in m Permissible rated current in % 100 Temp [°C] Derating factor K2 50 0,76 75 50 20 30 40 1,0 1,125 * 30 1,25 * 25 1,375 * Altitude [m] Derating factor K1 1000 1,0 2000 0,9 3000 0,845 4000 0,8 0 10 0,879 40 35 25 0 45 50 * See the following Note Cooling-medium temperature in °C Permissible rated current in % 100 90 80 70 60 0 1000 2000 3000 4000 Installation altitude above sea level in m Fig. 4-1 4-2 Derating curves 476 869 4070 76 J AB-74 Siemens AG Operating Instructions SIMOVERT MASTERDRIVES Vector Control Chassis Type Frequency Converter Technical Data The derating of the permissible rated current for installation altitudes of over 1000 m and at ambient temperatures below 40 °C is calculated as follows: Total derating = Deratingaltitude x Deratingambient temperature K = K1 x K2 NOTE It must be borne in mind that total derating must not be greater than 1! Example: Altitude: 3000 m Ambient temperature: 35 °C K1 = 0.845 K2 = 1.125 ⇒ Total derating = 0.845 x 1.125 = 0.95 SIEMENS AG 476 869 4070 76 J AB-74 SIMOVERT MASTERDRIVES Operating Instructions 4-3 Technical Data Vector Control Chassis Type Frequency Converter Designation Value Order No. 6SE70... Rated voltage [V] • Input • Output Rated frequency [Hz] • Input • Output: V/f = constant V = constant Rated current [A] • Input • Output DC link voltage [V] Rated output [kVA] Auxiliary power supply [V] 31-0EE60 • Max. aux.-curr. requirement[A] Standard version at 20 V • Max. aux.-curr. requirement[A] Max. version at 20 V 1.7 31-2EF60 31-5EF60 31-8EF60 32-1EG60 3 AC 380 (- 15 %) to 480 (+ 10 %) 3 AC 0 to rated input voltage 50 / 60 ± 6 % 0 to 600 8 to 300 101 92 61 to 76 2.7 136 124 160 205 231 286 146 186 210 260 510 to 650 (- 15 % / + 10 %) 82 to 103 97 to 121 123 to 154 139 to 174 172 to 216 DC 24 (20 - 30) 2.1 2.3 3.2 3.5 Pulse frequency [kHz] 1.7 to 16 1.7 to 16 1.7 to 9 1.7 to 9 1.7 to 7.5 Derating curve (see Fig. 4-1) ô ô í Load class II to EN 60 146-1-1 Base load current [A] 0.91 x rated output current Base load duration [s] 240 Overload current [A] 1.36 x rated output current Overload duration [s] 60 Load class II to EN 60 146-1-1 (additional) Base load current [A] 0.91 x rated output current Base load duration [s] 270 Overload current [A] 1.6 x rated output current Overload duration [s] 30 Losses, cooling, power factor Power factor • Line cosϕ1N ≥ 0.98 • Converter cosϕU < 0.92 ind. Efficiency η (rated operation) ≥ 0.97 ≥ 0.98 Power loss (at 2.5 kHz) [kW] 1.18 1.67 1.95 2.17 2.68 Cooling-air requirement [m³/s] 0.10 0.14 0.14 0.14 0.31 Sound-pressure levels, types of construction, dimensions, weights Sound-pressure level IP00 [dB(A)] 69 69 69 69 80 Type of construction E F F F G Dimensions [mm] • Width 270 360 360 360 508 • Height 1050 1050 1050 1050 1450 • Depth 350 350 350 350 450 Weight approx. [kg] 55 65 65 65 155 Table 4-2 4-4 32-6EG60 1.7 to 7.5 í 3.4 0.31 80 G 508 1450 450 155 Air-cooled converter (part 1) 476 869 4070 76 J AB-74 Siemens AG Operating Instructions SIMOVERT MASTERDRIVES Vector Control Chassis Type Frequency Converter Designation Technical Data Value Order No. 6SE70... 33-2EG60 33-7EG60 35-1EK60 36-0EK60 37-0EK60 Rated voltage [V] • Input 3 AC 380 (- 15 %) to 480 (+ 10 %) • Output 3 AC 0 to rated input voltage Rated frequency [Hz] • Input 50 / 60 ± 6 % • Output: V/f = constant 0 to 600 V = constant 8 to 300 Rated current [A] • Input 346 407 561 649 759 • Output 315 370 510 590 690 DC link voltage [V] 510 to 650 (- 15 % / + 10 %) Rated output [kVA] 208 to 261 244 to 307 336 to 424 389 to 490 455 to 573 Auxiliary power supply [V] DC 24 (20 - 30) • Max. aux.-curr. requirement[A] 2.3 3.1 Standard version at 20 V • Max. aux.-curr. requirement[A] Max. version at 20 V 3.5 4.3 Pulse frequency [kHz] 1.7 to 6 1.7 to 6 1.7 to 6 1.7 to 5 1.7 to 2.5 Derating curve (see Fig.4-1) ÷ ÷ ÷ û ù Load class II to EN 60 146-1-1 Base load current [A] 0.91 x rated output current Base load duration [s] 240 Overload current [A] 1.36 x rated output current Overload duration [s] 60 Load class II to EN 60 146-1-1 (additional) Base load current [A] 0.91 x output current not additional Base load duration [s] 270 not additional Overload current [A] 1.6 x output current not additional Overload duration [s] 30 not additional Losses, cooling, power factor Power factor • Line cosϕ1N ≥ 0.98 • Converter cosϕU < 0.92 ind. Efficiency η (rated operation) ≥ 0.98 ≥ 0.98 Power loss (at 2.5 kHz) [kW] 4.3 5.05 7.1 8.2 10,2 Cooling-air requirement [m³/s] 0.41 0.41 0.46 0.46 0,6 Sound-pressure levels, types of construction, dimensions, weights Sound-pressure level 82 82 77 77 80 IP00 [dB(A)] Type of construction G G K K K Dimensions [mm] • Width 508 508 800 800 800 • Height 1450 1450 1750 1750 1750 • Depth 450 450 551 551 551 Weight approx. [kg] 155 155 400 400 460 Table 4-3 Air-cooled converter (part 2) SIEMENS AG 476 869 4070 76 J AB-74 SIMOVERT MASTERDRIVES Operating Instructions 4-5 Technical Data Vector Control Chassis Type Frequency Converter Designation Value Order No. 6SE70... Rated voltage [V] • Input • Output Rated frequency [Hz] • Input • Output: V/f = constant V = constant Rated current [A] • Input • Output DC link voltage [V] Rated output [kVA] Auxiliary power supply [V] 26-1FE60 26-6FE60 28-0FF60 31-1FF60 31-3FG60 31-6FG60 3 AC 500 (- 15 %) to 600 (+ 10 %) 3 AC 0 to rated input voltage 50 / 60 ± 6 % 0 to 600 8 to 300 67 61 73 66 53 to 63 58 to 68 • Max. aux.-curr. requirement[A] Standard version at 20 V • Max. aux.-curr. requirement[A] Max. version at 20 V 1.7 87 119 79 108 675 to 810 (± 15 %) 69 to 82 94 to 112 DC 24 (20 - 30) 2.1 2.7 3.2 141 128 172 156 111 to 133 136 to 162 2.3 3.5 Pulse frequency [kHz] 1.7 to 16 1.7 to 16 1.7 to 9 1.7 to 7.5 1.7 to 7.5 1.7 to 6 Derating curve (see Fig.4-1) ô í í ÷ Load class II to EN 60 146-1-1 Base load current [A] 0.91 x rated output current Base load duration [s] 240 Overload current [A] 1.36 x rated output current Overload duration [s] 60 Load class II to EN 60 146-1-1 (additional) Base load current [A] 0.91 x rated output current Base load duration [s] 270 Overload current [A] 1.6 x rated output current Overload duration [s] 30 Losses, cooling, power factor Power factor • Line cosϕ1N ≥ 0.98 • Converter cosϕU < 0.92 ind. Efficiency η (rated operation) ≥ 0.97 ≥ 0.98 ≥ 0.97 Power loss (at 2.5 kHz) [kW] 0.91 1.02 1.26 1.80 2.13 2.58 Cooling-air requirement [m³/s] 0.10 0.10 0.14 0.14 0.31 0.31 Sound-pressure levels, types of construction, dimensions, weights Sound-pressure level IP00 [dB(A)] 69 69 69 69 80 80 Type of construction E E F F G G Dimensions [mm] • Width 270 270 360 360 508 508 • Height 1050 1050 1050 1450 1450 1450 • Depth 350 350 350 450 450 450 Weight approx. [kg] 55 55 65 65 155 155 Table 4-4 4-6 Air-cooled converter (part 3) 476 869 4070 76 J AB-74 Siemens AG Operating Instructions SIMOVERT MASTERDRIVES Vector Control Chassis Type Frequency Converter Designation Technical Data Value Order No. 6SE70... 32-0FG60 32-3FG60 33-0FK60 33-5FK60 34-5FK60 Rated voltage [V] • Input 3 AC 500 (- 15 %) to 600 (+ 10 %) • Output 3 AC 0 to rated input voltage Rated frequency [Hz] • Input 50 / 60 ± 6 % • Output: V/f = constant 0 to 600 V = constant 8 to 300 Rated current [A] • Input 211 248 327 400 497 • Output 192 225 297 354 452 DC link voltage [V] 675 to 810 (± 15 %) Rated output [kVA] 167 to 199 195 to 233 258 to 308 307 to 367 392 to 469 Auxiliary power supply [V] DC 24 (20 - 30) • Max. aux.-curr. requirement[A] 2.3 3.1 Standard version at 20 V • Max. aux.-curr. requirement[A] Max. version at 20 V 3.5 4.3 Pulse frequency [kHz] 1.7 to 6 1.7 to 6 1.7 to 3 1.7 to 3 1.7 to 2.5 Derating curve (see Fig.4-1) ÷ ÷ ø ø ù Load class II to EN 60 146-1-1 Base load current [A] 0.91 x rated output current Base load duration [s] 240 Overload current [A] 1.36 x rated output current Overload duration [s] 60 Load class II to EN 60 146-1-1 (additional) Base load current [A] 0.91 x output current not additional Base load duration [s] 270 not additional Overload current [A] 1.6 x output current not additional Overload duration [s] 30 not additional Losses, cooling, power factor Power factor • Line cosϕ1N ≥ 0.98 • Converter cosϕU < 0.92 ind. Efficiency η (rated operation) ≥ 0.98 ≥ 0.97 ≥ 0.98 Power loss (at 2.5 kHz) [kW] 3.4 4.05 5.80 6.80 8.30 Cooling-air requirement [m³/s] 0.41 0.41 0.46 0.46 0.46 Sound-pressure levels, types of construction, dimensions, weights Sound-pressure level IP00 [dB(A)] 82 82 77 77 77 Type of construction G G K K K Dimensions [mm] • Width 508 508 800 800 800 • Height 1450 1450 1750 1750 1750 • Depth 450 450 551 551 551 Weight approx. [kg] 155 155 400 400 400 Table 4-5 Air-cooled converter (part 4) SIEMENS AG 476 869 4070 76 J AB-74 SIMOVERT MASTERDRIVES Operating Instructions 4-7 Technical Data Vector Control Chassis Type Frequency Converter Designation Value Order No. 6SE70... Rated voltage [V] • Input • Output Rated frequency [Hz] • Input • Output: V/f = constant V = constant Rated current [A] • Input • Output DC link voltage [V] Rated output [kVA] Auxiliary power supply [V] 26-0HF60 28-2HF60 31-0HG60 31-2HG60 31-5HG60 3 AC 660 to 690 (± 15 %) 3 AC 0 to rated input voltage 50 / 60 ± 6 % 0 to 600 8 to 300 66 60 90 82 69 to 71 94 to 97 • Max. aux.-curr. requirement[A] Standard version at 20 V • Max. aux.-curr. requirement[A] Max. version at 20 V 2.1 107 130 160 188 97 118 145 171 890 to 930 (± 15 %) 111 to 115 135 to 141 166 to 173 196 to 204 DC 24 (20 - 30) 2.3 3.2 3.5 Pulse frequency [kHz] 1.7 to 7.5 1.7 to 7.5 1.7 to 7.5 1.7 to 7.5 1.7 to 6 Derating curve (see Fig.4-1) í í í í ÷ Load class II to EN 60 146-1-1 Base load current [A] 0.91 x rated output current Base load duration [s] 240 Overload current [A] 1.36 x rated output current Overload duration [s] 60 Losses, cooling, power factor Power factor • Line cosϕ1N ≥ 0.98 • Converter cosϕU < 0.92 ind. Efficiency η (rated operation) ≥ 0.98 Power loss (at 2.5 kHz) [kW] 1.05 1.47 1.93 2.33 2.83 Cooling-air requirement 0.10 0.10 0.31 0.31 0.41 [m³/s] Sound-pressure levels, types of construction, dimensions, weights Sound-pressure level IP00 [dB(A)] 69 69 80 80 82 Type of construction F F G G G Dimensions [mm] 508 508 508 360 360 • Width 1450 1450 1450 1050 1050 • Height 450 450 450 350 350 • Depth Weight approx. [kg] 65 65 155 155 155 Table 4-6 4-8 31-7HG60 1.7 to 6 ÷ ≥ 0.97 3.60 0.41 82 G 508 1450 450 155 Air-cooled converter (part 5) 476 869 4070 76 J AB-74 Siemens AG Operating Instructions SIMOVERT MASTERDRIVES Vector Control Chassis Type Frequency Converter Technical Data Designation Value Order No. 6SE70... 32-1HG60 33-0HK60 33-5HK60 34-5HK60 Rated voltage [V] • Input 3 AC 660 to 690 (± 15 %) • Output 3 AC 0 to rated input voltage Rated frequency [Hz] • Input 50 / 60 ± 6 % • Output: V/f = constant 0 to 600 V = constant 8 to 300 Rated current [A] • Input 229 327 400 497 • Output 208 297 354 452 DC link voltage [V] 890 to 930 (± 15 %) Rated output [kVA] 238 to 248 340 to 354 405 to 423 517 to 540 Auxiliary power supply [V] DC 24 (20 - 30) • Max. aux.-curr. requirement[A] 2.3 3.1 Standard version at 20 V • Max. aux.-curr. requirement[A] Max. version at 20 V 3.5 4.3 Pulse frequency [kHz] 1.7 to 6 1.7 to 2.5 1.7 to 2.5 1.7 to 2.5 Derating curve (see Fig.4-1) ÷ ù ù ù Load class II to EN 60 146-1-1 Base load current [A] 0.91 x rated output current Base load duration [s] 240 Overload current [A] 1.36 x rated output current Overload duration [s] 60 Losses, cooling, power factor Power factor • Line cosϕ1N ≥ 0.98 • Converter cosϕU < 0.92 ind. Efficiency η (rated operation) ≥ 0.97 ≥ 0.98 Power loss (at 2.5 kHz) [kW] 4.30 6.60 7.40 9.10 Cooling-air requirement [m³/s] 0.41 0.46 0.46 0.46 Sound-pressure levels, types of construction, dimensions, weights Sound-pressure level[dB(A)] 82 77 77 77 Type of construction G K K K Dimensions [mm] 800 800 800 508 • Width 1750 1750 1750 1450 • Height 551 551 551 450 • Depth Weight approx. [kg] 155 400 400 400 Table 4-7 Air-cooled converter (part 6) SIEMENS AG 476 869 4070 76 J AB-74 SIMOVERT MASTERDRIVES Operating Instructions 4-9 Technical Data Water-cooled converter Vector Control Chassis Type Frequency Converter Order No. Power loss (at 2.5 kHz) [kW] Cooling water requirement [L/min] Maximum additional heat dissipation at Tair ≤ 30 °C [kW] 12 12 12 12 26 26 26 26 0.7 0.7 0.7 0.7 1.5 1.5 1.5 1.5 12 12 12 26 26 26 26 26 0.7 0.7 0.7 1.5 1.5 1.5 1.5 1.5 12 12 26 26 26 26 26 0.7 0.7 1.5 1.5 1.5 1.5 1.5 Rated input voltage 3 AC 380 to 480 V 6SE7031-0EE60-1AA0 6SE7031-2EF60-1AA0 6SE7031-5EF60-1AA0 6SE7031-8EF60-1AA0 6SE7032-1EG60-1AA0 6SE7032-6EG60-1AA0 6SE7033-2EG60-1AA0 6SE7033-7EG60-1AA0 1.18 1.67 1.95 2.17 2.68 3.40 4.30 5.05 Rated input voltage 3 AC 500 to 600 V 6SE7026-1FE60-1AA0 6SE7026-6FF60-1AA0 6SE7028-0FF60-1AA0 6SE7031-1FF60-1AA0 6SE7031-3FG60-1AA0 6SE7031-6FG60-1AA0 6SE7032-0FG60-1AA0 6SE7032-3FG60-1AA0 0.91 1.02 1.26 1.80 2.13 2.58 3.40 4.05 Rated input voltage 3 AC 660 to 690 V 6SE7026-0HF60-1AA0 6SE7028-2HF60-1AA0 6SE7031-0HG60-1AA0 6SE7031-2HG60-1AA0 6SE7031-5HG60-1AA0 6SE7031-7HG60-1AA0 6SE7032-1HG60-1AA0 Table 4-8 NOTE 1.05 1.47 1.93 2.33 2.83 3.50 4.30 Water-cooled converter These units and the air-cooled converters are identically constructed. Instead of the heat sink for air, an air/water cooler has been installed. All the technical data not listed in Table 4-8 for a particular unit are the same as those of the air-cooled converter. The first 12 positions of the Order No. are identical. The supplement "-1AA0” indicates water cooling. Refer to the tables in Section 4.3 for the data for water-cooled units of type K. 4-10 476 869 4070 76 J AB-74 Siemens AG Operating Instructions SIMOVERT MASTERDRIVES Vector Control Chassis Type Frequency Converter Cooling, power requirement for fan, sound-pressure level Technical Data The following values apply to units of K type of construction: Fan voltage / frequency 230 / 50 230 / 60 [A] 2.45 3.6 [m3/s] 0.46 0.464 [dB(A)] 77 77.5 Sound-pressure level for chassis in IP20 - cabinet [dB(A)] 70.5 71.5 Sound-pressure level for chassis in IP42 - cabinet with dust filter. 400 mm high cabinet cover [dB(A)] 70.5 71 Fan power requirement Flow Sound-pressure level IP00 [V / Hz] The following values apply to unit 6SE7037-0EK60: Fan voltage / frequency 230 / 50 230 / 60 [A] 5.0 7.4 [m3/s] 0.6 0.6 [dB(A)] 80 82 Sound-pressure level for chassis in IP20 - cabinet [dB(A)] 76 77 Sound-pressure level for chassis in IP42 - cabinet with dust filter. 400 mm high cabinet cover [dB(A)] 74 75 Fan power requirement Flow Sound-pressure level IP00 [V / Hz] Condition for sound-pressure measurement: ♦ Room height: 6 m ♦ Distance to next reflecting wall: 4 m SIEMENS AG 476 869 4070 76 J AB-74 SIMOVERT MASTERDRIVES Operating Instructions 4-11 Technical Data Vector Control Chassis Type Frequency Converter Significance of the options codes Option Significance Option EB1: Expansion Board 1 CBP: Profibus G11 G13 G14 G15 G16 G17 Slot A Slot C Slot D Slot E Slot F Slot G G61 G63 G64 G65 G66 G67 Slot A Slot C Slot D Slot E Slot F Slot G G71 G73 G74 G75 G76 G77 Slot A Slot C Slot D Slot E Slot F Slot G Table 4-9 4-12 Slot A Slot C Slot D Slot E Slot F Slot G LBA backplane bus adapter SLB: SIMOLINK G41 G43 G44 G45 G46 G47 Slot A Slot C Slot D Slot E Slot F Slot G EB2: Expansion Board 2 CBC: CAN-Bus G21 G23 G24 G25 G26 G27 Significance K11 installed in the electronics box K01 K02 Mounting pos. 2 (slot D, E) Mounting pos. 3 (slot F, G) ADB adapter board Significance of the options codes 476 869 4070 76 J AB-74 Siemens AG Operating Instructions SIMOVERT MASTERDRIVES Vector Control Chassis Type Frequency Converter 4.1 Technical Data Notes on water-cooled units Cooling system The cooling system function is ensured by connecting the unit to an external cooling-water circuit. This cooling-water circuit configuration with the aspects ♦ open or closed circuit ♦ material selection and material pairing ♦ composition of the cooling water ♦ cooling of the cooling water (re-cooling, fresh supply...) ♦ etc. are essential features for the operational safety and service life of the entire equipment. Cooling water definition CAUTION Water which has a chemically neutral reaction is pure and clean of solid matter (in connection with the motor cooling water). Max. grain size of any conveyed particles < 0.1 mm pH value 6.0 to 8.0 Chloride < 40 ppm Sulphate < 50 ppm Dissolved substances < 340 ppm Total hardness < 170 ppm Cooling water inlet temperature + 5 ... 38 °C Cooling water warming per unit ∆ T ≈ 5 °C Operating pressure max. 1 bar Higher operating pressures are not permitted! If the unit is to be operated at a higher pressure, a reduction to 1 bar admission pressure has to be made on each unit. The material is not seawater-proof, i.e. direct cooling with seawater is not permitted! Filters (strainers) with a particle size < 100 µm must be used in the unit's cooling water circuit! If there is a danger of frost, frost-protection measures for operation, storage and transport are necessary, e.g. emptying and blowing out with air, additional heating, etc. WARNING The warnings of the "standard units" are applicable. Installation and service work on water sections may only be performed when the unit is disconnected from the supply. SIEMENS AG 476 869 4070 76 J AB-74 SIMOVERT MASTERDRIVES Operating Instructions 4-13 Technical Data Vector Control Chassis Type Frequency Converter Anti-freeze agent Only Antifrogen N (make: Hoechst) is permitted as an anti-freeze agent. The mixing ratio must be in the range of 20 % < Antifrogen N < 30 %. This ensures protection against frost from -10 °C to -17 °C. WARNING If other agents are used, this could result in a reduction of the service life. If less than 20 % Antifrogen N is added, there is a higher risk of corrosion which may cause a reduction in the service life. If more than 30 % Antifrogen N is added, the heat transfer and thus the function of the unit is affected. It must be observed that the necessary pump delivery must be adjusted if Antifrogen N is added. The following table can be used as a guide (coolant temperature 20 °C) Antifrogen N proportion of the coolant Kinematic viscosity [mm²/s] Relative pressure loss 0 1.05 0.95 20 1.07 1.14 30 2.5 1.24 The required coolant current must be achieved. If the coolant circuit is emptied, you either have to fill it up again after 14 days, or you have to flush it with water several times, and then blow out the heat sinks. If an anti-freeze agent (Antifrogen N) is used, no potential differences are allowed to occur in the entire coolant circuit. If necessary, the components have to be connected with a potential equalization bar. PVC hoses are not suitable when anti-freeze agents are used! Moisture condensation of the unit is not permissible (see standard units). 4-14 476 869 4070 76 J AB-74 Siemens AG Operating Instructions SIMOVERT MASTERDRIVES Vector Control Chassis Type Frequency Converter 4.2 Technical Data Installation notes A separate circuit is recommended for the converters of stainless steel design which dissipates the heat to the system.via a water/water heat exchanger. To avoid any electro-chemical corrosion and the transmission of oscillations, the SIMOVERT MASTERDRIVES units have to be connected at the infeed and return points with a flexible, electrically non-conductive hose. The length of the hose should be > 1.5 m. If the piping of the system is of plastic, this hose is not necessary. The hose connecting nipples on the heat sink side have to be made of stainless steel or thick-walled aluminium. The connecting nipples are not permitted to be made of brass or copper. The water hoses have to be connected up prior to installation of the converter (see chapter "Dimension drawings" in the VC Compendium). If hose clips are used for installation, these must be checked for a tight fit at 3-monthly intervals. Wall penetration Flexible connection (hose > 1.5m, electr. non-conduc.) Return Infeed e.g. piping 1) Cooling-water circuit 2) Amot valve SIMOVERT converter Mounting cabinet Fig. 4-2 Cooling-water circuit for SIMOVERT converters SIEMENS AG 476 869 4070 76 J AB-74 SIMOVERT MASTERDRIVES Operating Instructions 4-15 Technical Data Vector Control Chassis Type Frequency Converter 1) The working pressure depends on the flow conditions of the coolingwater network in the infeed and return and must be determined during start-up. The necessary cooling-water quantity/time unit has to be set, e.g. via valves with a flow rate indicator (e.g. by Messrs. "OSTACO Armaturen AG”, CH-8902 Urdorf, Tel.++4117355555). Measures have to be envisaged by the user to maintain the max. permissible operating pressure. The use of a pressure controller is necessary. For closed cooling systems, pressure compensating devices with safety valves (< 1.5 bar) and venting devices have to be provided. The cooling system has to be vented when it is filled. A vent cock is installed on the water heat sinks of chassis 2 units for this purpose (see below). Cooling-water installations in a mixed system with copper or copper connections should be avoided and are only possible under special measures, e.g. closed cooling water circuit, full filter system (i.e. Cu ions are filtered out), water additives (e.g. products of Messrs. “Schilling Chemie GmbH” PF 1136, D-71687 Freiberg, Tel. 07141-703-0). Application suggestions for various system configurations are contained in the A&D DS Information E20125-C6038-J702-A1-7400 dated February 1997. The utmost care must be taken when laying the water pipes. The pipes must be securely restrained and checked for leakages. Special measures are necessary to protect against moisture condensation. This is particularly necessary if the entry temperature of the cooling water is considerably lower than the ambient temperature of the air. For this purpose, a suitable valve device has to be provided in the infeed, e.g. temperature-controlled valve device using the "bypass method" called "Amot valve” (source: Eng. consultants: Neundörfer Fichtenstr.5, 91094 Langensendelbach, Tel.: 09133/3497). 4-16 476 869 4070 76 J AB-74 Siemens AG Operating Instructions SIMOVERT MASTERDRIVES Vector Control Chassis Type Frequency Converter 4.3 Technical Data Characteristic data type K The components not mounted on the heat sink, such as the electronics and the DC link capacitors, are cooled by heat transfer at the heat sink fins. Therefore, when installing the chassis unit in a cabinet, you must make sure that the air being discharged from the fan can flow into the inside of the chassis. The partitions to be provided on units with air cooling are a disturbing factor in this case! They should not be mounted. For an application in the IP54 type of protection (or higher), a distance of at least 90 mm must be observed between the top of chassis and top of cabinet (see section "Installing units of type K"). The units do not require external cooling air. Additional losses cannot be dissipated! The circulating cooling air inside the chassis is monitored via a temperature measurement point. 1-inch internal threads are envisaged for the water connection. The connecting nipples should be made of stainless steel or thick-walled aluminium. Ideally, the connection should have flat seals. If the connecting pieces enclosed with the units are used, these should be sealed with Loctite 542 or with teflon tape. Cooling water infeed (blue) and return (red) must be connected according to the color scheme! The color markings can be found next to the 1-inch water connection below the heat sink. The following tables indicate the (nominal) water flow in litres per minute and the differential pressure (in Pa) via the heat sink at nominal flow. MLFB Voltage range Flow Differential pressure Sound level IP42 (dBA)* Sound level IP54 (dBA)* Water heating (k) (Pa) Sound level IP20 (dBA)* AC (V) (l/min) 6SE7035-1EK60-1AA0 380-480 27 7300 76 75 72 4.5 6SE7036-0EK60-1AA0 380-480 28 8000 76 75 72 4.5 6SE7037-0EK60-1AA0 380-480 30 9000 76 75 72 4.8 6SE7033-0FK60-1AA0 500-600 20 4000 76 75 72 4.5 6SE7033-5FK60-1AA0 500-600 23 5200 76 76 73 4.5 6SE7034-5FK60-1AA0 500-600 28 7700 76 76 73 4.5 6SE7033-0HK60-1AA0 660-690 21 4700 76 76 73 4.5 6SE7033-5HK60-1AA0 660-690 24 5800 76 76 73 4.5 6SE7034-5HK60-1AA0 660-690 30 9000 76 76 73 4.5 Table 4-10 Converters of construction type K SIEMENS AG 476 869 4070 76 J AB-74 SIMOVERT MASTERDRIVES Operating Instructions 4-17 Technical Data Vector Control Chassis Type Frequency Converter * The sound level was determined under the following boundary conditions: ♦ Distance to the unit 1m, height above floor level 1 m, distance to the next reflecting wall 4 m, room height 6 m. ♦ The chassis were installed in Siemens 8MC cabinets without any special soundproofing measures. Fan voltage/frequency 230/50 230/60 2.45 3.6 Current requirement A Sound pressure level IP20 dB(A) Table values Table values + 1.0 Sound pressure level IP42 dB(A) Table values Table values + 0.5 Sound pressure level IP54 dB(A) Table values Table values Table 4-11 4.4 V/Hz Operating data of fan Venting the heat sinks The position of the connecting elements is shown in the annex "Dimension drawings" of the VC Compendium. ♦ Venting must be performed when the equipment is disconnected from the supply. ♦ Dismantle the lock screw in front of the actual vent valve. ♦ Perform venting. ♦ Close the vent cock. ♦ Tighten the lock screw again. ♦ Check for tightness. 4-18 476 869 4070 76 J AB-74 Siemens AG Operating Instructions SIMOVERT MASTERDRIVES Vector Control Chassis Type Frequency Converter 5 Installation 5.1 Installing the unit WARNING Installation Safe converter operation requires that the equipment is mounted and commissioned by qualified personnel taking into account the warning information provided in these Operating Instructions. The general and domestic installation and safety regulations for work on electrical power equipment (e.g. VDE) must be observed as well as the professional handling of tools and the use of personal protective equipment. Death, severe bodily injury or significant material damage could result if these instructions are not followed. Clearances When positioning the units, it must be observed that the mains connection is located at the top section of the unit and the motor connection at the lower section of the unit. The units can be mounted flush with each other. When mounting in switch cabinets, you must leave a clearance at the top and the bottom of the units for cooling. Please refer to the dimension drawings on the following pages regarding these minimum clearances. When mounting in switch cabinets, the cabinet cooling must be dimensioned according to the dissipated power. Please refer to the Technical Data in this regard. Requirements at the point of installation ♦ Foreign particles The units must be protected against the ingress of foreign particles as otherwise their function and operational safety cannot be ensured. ♦ Dust, gases, vapors Equipment rooms must be dry and dust-free. Ambient and cooling air must not contain any electrically conductive gases, vapors and dusts which could diminish the functionality. If necessary, filters should be used or other corrective measures taken. ♦ Cooling air The ambient climate of the units must not exceed the values of DIN IEC 721-3-3 class 3K3. For cooling air temperatures of more than 40°C (104°F) and installation altitudes higher than 1000 m, derating is required. SIEMENS AG 476 869 4070 76 J AB-74 SIMOVERT MASTERDRIVES Operating Instructions 5-1 Installation 5.1.1 Vector Control Chassis Type Frequency Converter Installing units of types E, F, G 350 mm Mounting surface Cooling air Type E,F G Clearances 400 320 [mm] Fig. 5-1 Minimum clearances for cooling air requirement (types E, F, G) The following are required for mounting: ♦ Dimension drawing for the relevant construction type ♦ M8 or M10 screws, refer to dimension drawing for the quantity 350 mm 10 mm 1025 mm 1025 mm 1050 mm Mounting surface Cutouts for M8 screw 10 mm 180 mm 270 mm Type E Side view Fig. 5-2 5-2 270 mm 360 mm Type F Front view Dimension drawing for types E, F 476 869 4070 76 J AB-74 Siemens AG Operating Instructions SIMOVERT MASTERDRIVES Vector Control Chassis Type Frequency Converter Installation 1375 mm 1450 mm Mounting surface 25 mm 119 mm 270 mm 508 mm Front view 350 mm Side view Fig. 5-3 5.1.2 Cutout for M8 screw Dimension drawing for type G Installing units of type K Cutout for M8 / M10 screw 1675 1730 Mounting surface Oblong holes 9 x 15 for M8 screw Side view 708 213 483 25 550 800 Front view Fig. 5-4 Dimension drawing for type K SIEMENS AG 476 869 4070 76 J AB-74 SIMOVERT MASTERDRIVES Operating Instructions 5-3 Installation Air cooling Vector Control Chassis Type Frequency Converter Door/roof openings An underpressure is created in the openings of the cabinet doors due to the flow of air. This is dependent on the volumetric flow and the hydraulic cross-section of the openings. The flow causes a build-up (over) pressure in the roof or in the top cover. As a result of the difference in pressure between the overpressure at the top and the underpressure at the bottom of the cabinet, a flow of air is created inside the unit, a so-called arcing short-circuit. This can be stronger or weaker depending on the volumetric flow and the door/roof opening cross-section. As a result of the flow inside the unit, air which is already pre-heated enters the heat sinks which causes an excessively high component temperature rise. In addition, a different, more unfavourable operating point is set for the fan. If the units are operated with an arcing short-circuit, this will result in the failure of the units or in their destruction! An arcing short-circuit must be prevented by the provision of partitions. The switch cabinets adjacent to the inverter cabinets must also be taken into consideration in this case. The figure 5-6 shows the necessary partition measures. Partitions should be executed up to the cabinet frame and should be designed in such a way that the discharged air flow is taken around the cabinet beams and not pressed into them. Partitions are necessary with all types of protection higher than IP20. The necessary opening cross-sections are indicated in the table. The indicated opening cross-section is made up of several holes. In order to keep the pressure loss here to a minimum, the cross-sectional 2 surface has to be at least 280 mm per hole (e.g. 7 mm x 40 mm). The opening and hole cross-sections ensure functioning even with high types of protection. These are implemented by using wire-lattices (wire fabric DIN 4189St-vzk-1x0.28) in front of the openings or the filters indicated in the following. If finer filters are used, the filter surface and thus the opening cross-section (upwards) have to be adapted accordingly. If filters are used, the intervals for their replacement must be observed! 5-4 476 869 4070 76 J AB-74 Siemens AG Operating Instructions SIMOVERT MASTERDRIVES Vector Control Chassis Type Frequency Converter Filters Installation The following filter mat is approved for use: FIBROIDELASTOV made by DELBAG-Luftfilter GMBH Technical filter data in accordance with DIN 24185: Design FIBROID ELASTOV 10 Filter class EU 2 3 2 Volumetric flow V (m /h) x m 2500 - 10000 Initial pressure difference ∆pA Pa End pressure difference ∆pE Average degree of separation Pa 300 % 72 Dust storage capability g/m 9 - 46 2 - Fire behaviour (DIN 53438) F1/K1 Heat resistance max. °C 80 Humidity resistance (rel. humidity) % 100 Dimensions: 1000 x 1500 x 10 mm Order No.: 16 065 81 Manufacturer: DELBAG-Luftfilter GMBH Holzhauser Straße 159 13509 Berlin 27 Initial pressure difference ∆pA [Pa] Telephone: (030) 4381-0 Fax: (030) 4381-222 100 80 60 40 20 0 0 2000 4000 6000 8000 10000 Volumetric flow V [(m³/h) x m²] Fig. 5-5 Data sheet of the filter mat SIEMENS AG 476 869 4070 76 J AB-74 SIMOVERT MASTERDRIVES Operating Instructions 5-5 Installation Fans, volumetric flow, opening crosssections Vector Control Chassis Type Frequency Converter MLFB 6SE70xx-xEJ60 6SE70xx-xFJ60 6SE70xx-xGJ60 Fan 6SE7037-0EK60 2 x RH28M 2 x RH28M Minimum volumetric flow [m3/s] 0.46 0.6 Min. opening cross-section in the cabinet doors [m2] Type of protection IP00 to IP42 0.26 0.26 Min. opening cross-section in the top cover [m2] Type of protection < IP20 0.26 0.26 Min. opening cross-section in the roof section [m2] Type of protection IP22 to IP42 0.26 0.26 Table 5-1 Fans, volumetric flow, opening cross-sections Opening cross-section in the roof section at the top (also possible at the front and/or at the side) Direct partition between the fan box and the cabinet frame from all 4 sides Cabinet frame Partition to adjacent cabinets on the left, on the right and at the rear Opening crosssections in the doors (maybe with filters situated behind them) Fig. 5-6 5-6 Partition measures 476 869 4070 76 J AB-74 Siemens AG Operating Instructions SIMOVERT MASTERDRIVES Vector Control Chassis Type Frequency Converter Water cooling Installation The units with water cooling (MLFB Annex: -1AA0) are suitable for installing in an enclosed cabinet (IP54). The components not mounted on the heat sink, such as the electronics and the DC link capacitors are cooled by heat transfer at the heat sink fins. To enable this heat transfer to take place, air circulation inside the unit is necessary. Therefore, when installing the chassis unit in a cabinet, you must make sure that the air being discharged from the fan can flow into the inside of the chassis. The partitions to be provided in units with air cooling are a disturbing factor in this case! They should not be mounted. For an application in the types of protection > IP40, a distance of at least 90 mm must be observed between the top of the units and the top of the cabinet. The units do not require external cooling air. Additional losses cannot be dissipated! 1-inch internal threads are envisaged for the water connection. The connecting nipples should be made of stainless steel or thick-walled aluminium. Ideally, the connection should have flat seals. If the connecting pieces enclosed with the units are used, these should be sealed with Loctite 542 or with teflon tape. Cooling water infeed (blue) and return (red) must be connected according to the color scheme! The color markings can be found next to the 1-inch water connection below the heat sink. Built-in components in the roof section If components are built into a cabinet roof section (DC bus, DC 24 V supply), these should be placed in the center if possible so that the air leaving the fans can reach the openings in the roof cover unobstructed. Implementation of In order to ensure that the units can function satisfactorily (in view of the DC 24 V auxiliary electromagnetic influences), it may be necessary to provide each supply chassis unit with its own DC 24 V auxiliary supply with an isolating transformer. SIEMENS AG 476 869 4070 76 J AB-74 SIMOVERT MASTERDRIVES Operating Instructions 5-7 Installation 5.2 WARNING Vector Control Chassis Type Frequency Converter Installing the optional boards The boards may only be replaced by qualified personnel. It is not permitted to withdraw or insert the boards under voltage. Slots A maximum of six slots are available in the electronics box of the unit for installing optional boards. The slots are designated with the letters A to G. Slot B is not provided in the electronics box. It is used in units of the Compact PLUS type of construction. If you wish to use slots D to G, you will additionally require the following: ♦ Bus expansion LBA (Local Bus Adapter), which is used for mounting the CU board and up to two adaption boards, and ♦ An adaption board (ADB - Adaption Board) on which up to two optional boards can be mounted. The slots are situated at the following positions: ♦ Slot A CU board Position: top ♦ Slot C CU board Position: bottom ♦ Slot D Adaption board at mounting position 2 Position: top ♦ Slot E Adaption board at mounting position 2 Position: bottom ♦ Slot F Adaption board at mounting position 3 Position: top ♦ Slot G Adaption board at mounting position 3 Position: bottom Mounting position 1 Mounting position 3 Mounting position 2 Fig. 5-7 NOTE Position of the slots for Compact and chassis type units Mounting position 2 can be used for technology boards (T100, T300, TSY). Mounting positions 2 and 3 can also be used for communication boards SCB1 and SCB2. 5-8 476 869 4070 76 J AB-74 Siemens AG Operating Instructions SIMOVERT MASTERDRIVES Vector Control Chassis Type Frequency Converter Installation WARNING The unit has hazardous voltage levels up to 5 minutes after it has been powered down due to the DC link capacitors. The unit must not be opened until at least after this delay time. CAUTION The optional boards contain components which could be damaged by electrostatic discharge. These components can be very easily destroyed if not handled with caution. You must observe the ECB cautionary measures when handling these boards. Disconnecting the unit from the supply Disconnect the unit from the incoming power supply (AC or DC supply) and de-energize the unit. Remove the 24 V voltage supply for the electronics. Open the front panel. Preparing installation Remove the CU board or the adaption board from the electronics box as follows: ♦ Disconnect the connecting cables to the CU board or to the optional boards. ♦ Undo the two fixing screws on the handles above and below the CU board or the adaption board. ♦ Pull the CU board or the adaption board out of the electronics box using the handles. ♦ Place the CU board or the adaption board on a grounded working surface. Installing the optional board Insert the optional board from the right onto the 64-pole system connector on the CU board or on the adaption board. The view shows the installed state. Screw the optional board tight at the fixing points in the front section of the optional board using the two screws attached. Re-installing the unit Re-install the CU board or the adaption board in the electronics box as follows: ♦ Insert the CU board into mounting position 1 and the adaption board into mounting position 2 or 3. NOTE Mounting position 3 cannot be used until at least one adaption board has been installed at mounting position 2. Boards should first be installed in mounting position 2, before mounting position 3 is used. ♦ Secure the CU board/adaption board at the handles with the fixing screws. Re-connect the previously removed connections. Check that all the connecting cables and the shield sit properly and are in the correct position. SIEMENS AG 476 869 4070 76 J AB-74 SIMOVERT MASTERDRIVES Operating Instructions 5-9 Vector Control Chassis Type Frequency Converter 6 Installation in Conformance with EMC Regulations Installation in Conformance with EMC Regulations The following contains a summary of general information and guidelines which will make it easier for you to comply with EMC and CE regulations. ♦ Ensure that there is a conductive connection between the housing of the converters or inverters and the mounting surface. The use of mounting surfaces with good conducting properties (e.g. galvanized steel plate) is recommended. If the mounting surface is insulated (e.g. by paint), use contact washers or serrated washers. ♦ All of the metal cabinet parts must be connected through the largest possible surface area and must provide good conductivity. If necessary, use contact washers or serrated washers. ♦ Connect the cabinet doors to the cabinet frame using grounding strips which must be kept as short as possible. ♦ For the connection between converter/inverter and motor, use shielded cables which have to be grounded on both sides over a large surface area. If the motor terminal box is of plastic, additional grounding strands have to be inserted. ♦ The shield of the motor supply cable must be connected to the shield connection of the converter and to the motor mounting panel through the largest possible surface area. ♦ The motor cable shield must not be interrupted by output reactors, fuses or contactors. ♦ All signal cables must be shielded. Separate the signal cables according to signal groups. Do not route cables with digital signals unshielded next to cables with analog signals. If you use a common signal cable for both, the individual signals must be shielded from each other. ♦ Power cables must be routed separately away from signal cables (at least 20 cm apart). Provide partitions between signal cables and power cables. The partitions must be grounded. ♦ Connect the reserve cables/conductors to ground at both ends to achieve an additional shielding effect. ♦ Lay the cables close to grounded plates as this will reduce the injection of undesired signals. ♦ Eliminate any unnecessary cable lengths because these will produce unnecessary coupling capacitances and inductances. ♦ Use cables with braided shields. Cables with foil shields have a shielding effect which is worse by a factor of five. SIEMENS AG 476 869 4070 76 J AB-74 SIMOVERT MASTERDRIVES Operating Instructions 6-1 Installation in Conformance with EMC Regulations Vector Control Chassis Type Frequency Converter ♦ Use a noise suppression filter in the incoming powerline. Connect the noise suppression filter to ground and to the converter through a large surface area. It is best to directly mount the noise suppression filter on the same good conductive mounting surface as the converter or inverter. You must insert a line reactor between the noise suppression filter and the unit. ♦ Contactor operating coils that are connected to the same supply network as the rectifier unit or that are located in the close proximity of the rectifier unit must be connected to overvoltage limiters (e.g. RC circuits, varistors). You will find further information in the brochure "Installation Instructions for EMC-correct Installation of Drives" (Order No.: 6SE7087-6CX878CE0). 6-2 476 869 4070 76 J AB-74 Siemens AG Operating Instructions SIMOVERT MASTERDRIVES Vector Control Chassis Type Frequency Converter 7 WARNING Connecting-up Connecting-up SIMOVERT MASTERDRIVES units are operated at high voltages. The equipment must be in a no-voltage condition (disconnected from the supply) before any work is carried out! Only professionally trained, qualified personnel must work on or with the units. Death, severe bodily injury or significant property damage could occur if these warning instructions are not observed. Hazardous voltages are still present in the unit up to 5 minutes after it has been powered down due to the DC link capacitors. Thus, the appropriate delay time must be observed before working on the unit or on the DC link terminals. The power terminals and control terminals can still be live even when the motor is stationary. When working on an opened unit, it should be observed that live components (at hazardous voltage levels) can be touched (shock hazard). The user is responsible that all the units are installed and connected-up according to recognized regulations in that particular country as well as other regionally valid regulations. Cable dimensioning, fusing, grounding, shutdown, isolation and overcurrent protection should be particularly observed. SIEMENS AG 476 869 4070 76 J AB-74 SIMOVERT MASTERDRIVES Operating Instructions 7-1 Connecting-up Vector Control Chassis Type Frequency Converter PE1 / GND Mains connection DC link connection Aux. contactor, external DC24 Vsupply X9 PMU X300 X108 X101 Mount.pos. 1 (CUVC) X102 X103 Optional board in slot C Mounting position 3 Mounting position 2 Shield connection for control cables Terminals for setting the fan voltage Motor connection PE2 / GND Fig. 7-1 NOTE Connection overview for type E and F Due to the 230 V fan a transformer is integrated into the converters. The terminals on the primary side of the transformer must be connected corresponding to the rated input voltage. 7-2 476 869 4070 76 J AB-74 Siemens AG Operating Instructions SIMOVERT MASTERDRIVES Vector Control Chassis Type Frequency Converter Connecting-up Mains connection DC link connection PE1 / GND PMU X300 X108 X101 Mount.pos. 1 (CUVC) X102 X103 Optional board in slot C Mounting position 3 Mounting position 2 Aux. contactor, external DC24 V supply X9 Shield connection for control cables Terminals for setting the fan voltage Motor connection PE2 / GND Fig. 7-2 NOTE Connection overview for type G Due to the 230 V fan a transformer is integrated into the converters. The terminals on the primary side of the transformer must be connected corresponding to the rated input voltage. SIEMENS AG 476 869 4070 76 J AB-74 SIMOVERT MASTERDRIVES Operating Instructions 7-3 Connecting-up 7.1 WARNING Vector Control Chassis Type Frequency Converter Power connections If the input and output terminals are mixed up, the unit will be destroyed! If the DC link terminals are mixed up or short-circuited, the converter will be destroyed! The unit must not be operated via an earth leakage circuit-breaker (DIN VDE 0160). The supply terminals are marked as follows: Supply connection: U1/L1 V1/L2 W1/L3 Motor connection: U2/T1 V2/T2 W2/T3 Protective conductor connection: PE1 PE2 Line voltage 3 AC 380 V to 480 V Order Line side number Rated input current cross-section Recommended fuses 6SE70... VDE AWG gR (SITOR) gL lvhrc North America [A] [mm²] [A] 3NE.. [A] 3NA Typ [V] [A] 31-0EE60 101 1x70 1x000 100 1021-0 125 3032 AJT,LPJ 600 125 31-2EF60 136 2x35 2x0 160 1024-0 160 3036 AJT,LPJ 600 175 31-5EF60 160 2x50 2x00 160 1224-0 200 3140 AJT,LPJ 600 200 31-8EF60 205 2x50 2x00 200 1225-0 250 3144 AJT,LPJ 600 250 32-1EG60 231 2x50 2x00 250 1227-0 315 3252 AJT,LPJ 600 300 32-6EG60 286 2x95 2x4/0 315 1230-0 315 3252 AJT,LPJ 600 350 33-2EG60 346 2x120 2x300 350 1231-0 400 3260 AJT,LPJ 600 400 33-7EG60 407 2x120 2x300 400 1332-0 500 3365 AJT,LPJ 600 500 35-1EK60 561 2x300 2x800 560 1435-0 630 3372 36-0EK60 649 4x300 4x800 630 1436-0 800 3375 37-0EK60 759 4x300 4x800 800 3475 Line voltage 3 AC 500 V to 600 V Order Line side number Rated input current cross-section Recommended fuse 6SE70... VDE AWG gR (SITOR) gL lvhrc North America [A] [mm²] [A] 3NE [A] 3NA Typ [V] [A] 26-1FE60 67 1x35 1x0 63 1818-0 80 38241) AJT,LPJ 600 80 26-6FF60 73 1x50 1x00 80 1820-0 100 38301) AJT,LPJ 600 90 28-0FF60 87 1x50 1x00 100 1021-0 100 38301) AJT,LPJ 600 100 31-1FF60 119 1x70 1x000 125 1022-0 160 31361) AJT,LPJ 600 150 31-3FG60 141 1x95 1x4/0 160 1224-0 160 31361) AJT,LPJ 600 170 31-6FG60 172 1x120 1x300 200 1225-0 200 31401) AJT,LPJ 600 200 32-0FG60 211 2x70 2x000 250 1227-0 250 32441) AJT,LPJ 600 250 32-3FG60 248 2x95 2x4/0 250 1227-0 315 32521) AJT,LPJ 600 300 33-0FK60 327 2x300 2x800 350 1231-0 400 32601) AJT,LPJ 600 400 33-5FK60 400 2x300 2x800 400 1332-0 500 32651) AJT,LPJ 600 500 34-5FK60 497 2x300 2x800 500 1334-0 630 32721) AJT,LPJ 600 600 7-4 Motor side Line reactor 400/480 V 50/60 Hz 4E.. P4000-2US P4000-6US U2451-2UA00 U2551-4UA00 U2551-8UA00 U2751-0UB00 U2751-7UA00 U2751-8UA00 U3051-5UA00 U3051-6UA00 U3651-8UA00 cross-section VDE AWG [mm²] 1x35 1x0 2x25 2x2 2x25 2x2 2x35 2x0 2x50 2x00 2x50 2x00 2x95 2x4/0 2x95 2x4/0 2x300 2x800 4x300 4x800 4x300 4x800 Motor side Line reactor 500 V/50 Hz 4E.. P3900-1US P4000-7US P4000-1US P4000-8US U2451-1UA00 U2551-2UA00 U2551-6UA00 U2751-2UA00 U2751-3UA00 U2751-4UA00 U3051-2UA00 cross-section VDE AWG [mm²] 1x25 1x2 1x25 1x2 1x35 1x0 2x16 2x4 1x70 1x000 1x95 1x4/0 2x35 2x0 2x53 2x00 2x300 2x800 2x300 2x800 2x300 2x800 476 869 4070 76 J AB-74 Siemens AG Operating Instructions SIMOVERT MASTERDRIVES Vector Control Chassis Type Frequency Converter Connecting-up Line voltage 3 AC 660 V to 690 V Order Line side number Rated input current cross-section Recommended fuse 6SE70... VDE AWG gR (SITOR) gL lvhrc North America [A] [mm²] [A] 3NE [A] 3NA Typ [V] [A] 26-0HF60 66 1x35 1x0 63 1818-0 80 3824-6 28-2HF60 90 1x50 1x0 100 1021-0 100 3830-6 31-0HG60 107 1x50 1x0 125 1022-0 160 3136-6 31-2HG60 130 1x70 1x000 160 1024-0 160 3136-6 31-5HG60 160 1x95 1x4/0 160 1224-0 200 3140-6 31-7HG60 188 1x120 1x300 200 1225-0 250 3244-6 32-1HG60 229 2x70 2x000 250 1227-0 315 3252-6 33-0HK60 327 2x300 2x800 250 1227-0 315 3252-6 33-5HK60 400 2x300 2x800 250 1227-0 315 3252-6 34-5HK60 497 2x300 2x800 500 1334-0 630 3NE14 36-0 Motor side Line reactor 690 V/50 Hz 4E.. P4000-3US U2451-3UA00 U2551-7UA00 U2551-3UA00 U2551-0UB00 U2751-5UA00 U2751-6UA00 U3051-3UA00 U3051-4UA00 U3651-5UA00 cross-section VDE AWG [mm²] 1x25 1x2 2x35 2x0 1x50 1x00 1x70 1x000 1x95 1x4/0 1x95 1x4/0 1x95 1x4/0 2x300 2x800 2x300 2x800 2x300 2x800 AWG: American Wire Gauge Table 7-1 Conductor cross-sections, fuses, line reactors 1 ):The indicated fuses are only valid for converters with AC 3-phase 500 V input voltage. For converterw with a higher input voltage, fuses up to 660 V must be used. The order numbers of these fuses can be obtained by adding on the corresponding 500 V fuse “-6”. e.g.: for 500 V 3NA3830 for 660 V 3NA3830-6 NOTE The connection cross-sections are determined for copper cables at 40 °C (104 °F) ambient temperature (according to DIN VDE 0298 Part 4 / 02.88 Group 5). WARNING gL fuses only provide reliable protection to the cables, and not to the semiconductors. If the units are connected to the supply system without a main contactor which can interrupt the incoming supply in the event of a fault, the unit may suffer further damage. Possible connection cross-sections, screw connection Type Order number Max. connection crosssections mm² lt. VDE AWG Screw connection E 6SE703_-__E_0 2 x 70 2 x 00 M10 F 6SE703_-__F_0 2 x 70 2 x 00 M10 G 6SE703_-__G_0 2 x 150 2 x 300 M12 K 6SE703_-__K_0 4 x 300 4 x 800 M12 / M16 Table 7-2 Maximum connectable cross-sections SIEMENS AG 476 869 4070 76 J AB-74 SIMOVERT MASTERDRIVES Operating Instructions 7-5 Connecting-up Vector Control Chassis Type Frequency Converter Protective conductor connection The protective conductor has to be connected both on the line side and on the motor side. It has to be dimensioned according to the power connections. DC link connection The "braking unit" and "dv/dt filter" options can be connected up to the DC link terminals C/L+ and D/L-. These terminals are not suitable for connecting up other inverter units (e.g. DC units). This connection is not suitable for connecting up a rectifier or rectifier/feedback unit. With the M65 option, it is possible to move the DC link terminals to the bottom of the unit. NOTE type E to G Due to the 230 V fan a transformer is integrated into the converters. The terminals on the primary side must be connected corresponding to the rated input voltage. NOTE Type K Due to the 230 V fan a transformer is integrated into the converters. The terminals on the primary side have to be reconnected according to the rated input voltage, if necessary. If this is not done, the fuses F3, F4 or F101, F102 may blow. Fig. 7-3 7-6 Fan transformer (-T10), fan transformer fuses (-F3, -F4) 476 869 4070 76 J AB-74 Siemens AG Operating Instructions SIMOVERT MASTERDRIVES Vector Control Chassis Type Frequency Converter 7.2 Connecting-up Auxiliary power supply, main contactor or bypass contactor Types E, F, G: X9 - external DC 24 V supply, main contactor control 5 4 3 2 1 The 5-pole terminal strip is used for connecting up a 24 V voltage supply and a main or bypass contactor. The voltage supply is required if the inverter is connected up via a main or bypass contactor. The connections for the contactor control are floating. The position of the terminal strip can be seen from the connection overviews. Terminal Designation Description Range 5 Main contactor control Main contactor control AC 230 V 4 Main contactor control Main contactor control 1 kVA 3 n.c. Not connected 2 0V Reference potential 0V 1 +24 V (in) 24 V voltage supply DC24 V ≤ 3.5 A Connectable cross-section: 2.5 mm² (AWG 12) Table 7-3 Connection of external DC 24 V aux. voltage supply and main contactor control (types E, F, G) NOTE The excitation coil of the main contactor has to be damped with overvoltage limiters, e.g. RC element. Type K: X9 - external DC 24 V supply, main contactor control The 5-pole terminal strip is used for connecting up a 24 V voltage supply and a main or bypass contactor. The connection base is easily accessibly located on the DIN rail below the slide-in unit of the electronics box. The voltage supply is required if the inverter is connected up via a main or bypass contactor. The connections for the contactor control are floating. 5 4 3 2 1 Terminal Designation Description Range 5 Main contactor control Main contactor control AC 230 V 4 Main contactor control Main contactor control 1 kVA 3 n.c. Not connected 2 0V Reference potential 0V 1 +24 V (in) 24 V voltage supply DC24 V ≤ 4.3 A Connectable cross-section: 2.5 mm² (AWG 12) Table 7-4 NOTE Connection of external DC 24 V aux. voltage supply and main contactor control (Type K) The excitation coil of the main contactor has to be damped with overvoltage limiters, e.g. RC element. SIEMENS AG 476 869 4070 76 J AB-74 SIMOVERT MASTERDRIVES Operating Instructions 7-7 Connecting-up 7.3 Standard connections Vector Control Chassis Type Frequency Converter Control connections In the basic version, the unit has the following control connections on the CUVC: ♦ Serial interface (RS232 / RS485) for PC or OP1S ♦ A serial interface (USS bus, RS485) ♦ A control terminal strip for connecting up a HTL unipolar pulse enocder and a motor temperature sensor (PTC / KTY84) ♦ Two control terminal strips with digital and analog inputs and outputs. X108 S1 S2 S3/3,4 S3/1,2 X101 X102 X103 Fig. 7-4 7-8 S4/4,5,6 S4/1,2,3 View of the CUVC 476 869 4070 76 J AB-74 Siemens AG Operating Instructions SIMOVERT MASTERDRIVES Vector Control Chassis Type Frequency Converter X101 1 Controller P24V 2 M24 Out In Out In 5 6 4 bidirectional digital inputs/outputs 5V 8 5V In 24V 9 In 24V RS485P 10 Serial interface 2 USS (RS485) 9 8 7 6 5 4 3 2 1 5V Inputs Out In In 24V Digital inputs Ri = 3,4 kΩ RS485N 11 X300 Out In 24V 7 PMU Out In Out/In 5V Slot G BOOT UART BOOT RS485P RS232 RxD n.c. 4 Outputs Slot D Slot E In Bidirectional digital inputsand outputs Iout ≤ 20 mA Slot C Slot F 3 Out Slot A Microcontroller RS485N RS232 TxD P5V Aux. power supply 150 mA Connecting-up 12 Reference potential RS485 S2 +5V X102 Switch for USS bus connection Reference voltage P10 V / N10 V I ≤ 5 mA 13 14 P10 AUX ≥1 N10 AUX S1 15 A S3 Analog input 1 (non-floating) D +5V Switch for USS bus connection AI 1 1 2 11 bit + sign U: Rin = 60 kΩ I: Rin = 250 Ω (Close S3) In 16 X103 17 A S3 Analog input 2 (non-floating) Tacho M In D Track A AI 2 3 4 18 AO 1 D 19 20 M D 21 A Analog output 2 Fig. 7-5 1 2 AO 2 22 3 A Analog output 1 10 bit + sign U: I ≤ 5 mA I: R ≤ 500 Ω S4 S4 6 4 5 -10...+10 V 0...+20 mA A S I C Track B Zero pulse Control Tacho P15 -10...+10 V 0...+20 mA M Mot. temp BS Mot.temp 23 24 25 Pulse encoder I≤190 mA 26 27 28 29 Motor temperature 30 sensor KTY84 or PTC thermistor Overview of the standard connections SIEMENS AG 476 869 4070 76 J AB-74 SIMOVERT MASTERDRIVES Operating Instructions 7-9 Connecting-up X101 – Control terminal strip Vector Control Chassis Type Frequency Converter The following connections are provided on the control terminal strip: ♦ 4 optionally parameterizable digital inputs and outputs ♦ 3 digital inputs ♦ 24 V aux. voltage supply (max. 150 mA) for the inputs and outputs ♦ 1 serial interface SCom2 (USS / RS485) Terminal Designation Significance Range 1 P24 AUX Aux. voltage supply DC 24 V / 150 mA 2 M24 AUX Reference potential 0V 3 DIO1 Digital input/output 1 24 V, 10 mA / 20 mA 4 DIO2 Digital input/output 2 24 V, 10 mA / 20 mA 5 DIO3 Digital input/output 3 24 V, 10 mA / 20 mA 6 DIO4 Digital input/output 4 24 V, 10 mA / 20 mA 7 DI5 Digital input 5 24 V, 10 mA 8 DI6 Digital input 6 24 V, 10 mA 9 DI7 Digital input 7 24 V, 10 mA 10 RS485 P USS bus connection SCom2 RS485 11 RS485 N USS bus connection SCom2 RS485 12 M RS485 Reference potential RS485 Connectable cross-section: 1.5 mm² (AWG 16) Terminal 1 is at the top when installed. Table 7-5 7-10 Control terminal strip X101 476 869 4070 76 J AB-74 Siemens AG Operating Instructions SIMOVERT MASTERDRIVES Vector Control Chassis Type Frequency Converter X102 – Control terminal strip Connecting-up The following connections are provided on the control terminal strip: ♦ 10 V aux. voltage (max. 5 mA) for the supply of an external potentiometer ♦ 2 analog inputs, can be used as current or voltage input ♦ 2 analog outputs, can be used as current or voltage output Terminal Designation Significance Range 13 P10 V +10 V supply for ext. potentiometer +10 V ±1.3 %, Imax = 5 mA 14 N10 V -10 V supply for ext. potentiometer -10 V ±1.3 %, Imax = 5 mA 15 AI1+ Analog input 1 + 11 bit + sign 16 M AI1 Ground, analog input 1 Voltage: 17 AI2+ Analog input 2 + ± 10 V / Ri = 60 kΩ 18 M AI2 Ground, analog input 2 Current: Rin = 250 Ω 19 AO1 Analog output 1 10 bit + sign 20 M AO1 Ground, analog output 1 Voltage: 21 AO2 Analog output 2 ± 10 V / Imax = 5 mA 22 M AO2 Ground, analog output 2 Current: 0...20 mA R ≥ 500 Ω Connectable cross-section: 1.5 mm² (AWG 16) Terminal 13 is at the top when installed. Table 7-6 X10³ – Pulse encoder connection Control terminal strip X102 The connection for a pulse encoder (HTL unipolar) is provided on the control terminal strip. Terminal Designation Significance Range 23 - VSS Ground for power supply 24 Track A Connection for track A HTL unipolar 25 Track B Connection for track B HTL unipolar 26 Zero pulse Connection for zero pulse HTL unipolar 27 CTRL Connection for control track HTL unipolar 28 + VSS Power supply pulse encoder 15 V Imax = 190 mA 29 - Temp Minus (-) connection KTY84/PTC 30 + Temp Plus (+) connection KTY84/PTC KTY84: 0...200 °C PTC: Rcold ≤ 1.5 kΩ Connectable cross-section: 1.5 mm² (AWG 16) Terminal 23 is at the top when installed. Table 7-7 Control terminal strip X103 SIEMENS AG 476 869 4070 76 J AB-74 SIMOVERT MASTERDRIVES Operating Instructions 7-11 Connecting-up Vector Control Chassis Type Frequency Converter X300 - Serial interface Either an OP1S or a PC can be connected up via the 9-pole Sub D socket. 5 9 Pin Name Significance 1 n.c. Not connected 2 RS232 RxD Receive data via RS232 RS232 3 RS485 P Data via RS485 RS485 4 Boot Control signal for software update Digital signal, low active 5 M5V Reference potential to P5V 0V 6 P5V 5 V aux. voltage supply +5 V, Imax = 200 mA 7 RS232 TxD Transmit data via RS232 RS232 8 RS485 N Data via RS485 RS485 9 n.c. Not connected 1 6 Table 7-8 Switch settings Serial interface X300 Switch S1 Significance SCom1 (X300): Bus terminating resistor • open • Resistor open • closed • Resistor closed S2 7-12 Range SCom2 (X101/10,11): Bus terminating resistor • open • Resistor open • closed • Resistor closed S3 (1,2) AI1: Changeover current/voltage input • open • Voltage input • closed • Current input S3 (3,4) AI2: Changeover current/voltage input • open • Voltage input • closed • Current input S4 (1,2,3) AO1: Changeover current/voltage output • Jumper 1, 3 • Voltage output • Jumper 2, 3 • Current output S4 (4,5,6) AO2: Changeover current/voltage output • Jumper 4, 6 • Voltage output • Jumper 5, 6 • Current output 476 869 4070 76 J AB-74 Siemens AG Operating Instructions SIMOVERT MASTERDRIVES Vector Control Chassis Type Frequency Converter 8 Parameterization Parameterization The functions stored in the units are adapted to your specific application by means of parameters. Every parameter is clearly identified by its parameter name and its parameter number. In addition to the parameter name and number, many parameters also have a parameter index. These indices enable several values to be stored for a parameter under one parameter number. Parameter numbers consist of a letter and a three-digit number. The upper-case letters P, U, H and L represent the parameters which can be changed, and the lower-case letters r, n, d and c represent the visualization parameters which cannot be changed. Examples: DC Bus Volts r006 = 541 Parameter name: Parameter number: Parameter index: Parameter value: DC Bus volts r006 Does not exist 541 V Src ON/OFF1 P554.2 = 20 Parameter name: Parameter number: Parameter index: Parameter value: Src ON/OFF1 P554 2 20 Parameters can be input as follows: ♦ Via the PMU parameterizing unit which is permanently mounted on the front of the units, ♦ Via the user-friendly optional OP1S operator control panel or ♦ Via a PC and the SIMOVIS service program. The parameters stored in the units can only be changed under certain conditions. The following preconditions must be satisfied before they can be changed. ♦ The parameter must be a changeable parameter. (Designated by upper-case letters in the parameter number). ♦ Parameter access must be granted. P053 = 6 for parameterizing via the PMU or the OP1S). ♦ The unit must be in a status which permits parameters to be changed. (Carry out initial parameterization only in powered-down status). ♦ The lock and key mechanism must not be activated (Deactivation by parameter reset to factory setting). 8.1 Parameter input via the PMU The PMU parameterizing unit enables parameterization, operator control and visualization of the converters and inverters directly on the unit itself. It is an integral part of the basic units. It has a four-digit seven-segment display and several keys. SIEMENS AG 476 869 4070 76 J AB-74 SIMOVERT MASTERDRIVES Operating Instructions 8-1 Parameterization Vector Control Chassis Type Frequency Converter Raise key Seven-segment display for: Drive statuses Alarms and faults Reversing key ON key Parameter numbers Toggle key OFF key Parameter indices Lower key X300 Fig. 8-1 Key PMU parameterizing unit Significance Function • For energizing the drive (enabling motor activation). • If there is a fault: For returning to fault display OFF key • For de-energizing the drive by means of OFF1, OFF2 or OFF3 (P554 to 560) depending on parameterization. Reversing key • For reversing the direction of rotation of the drive. The function must be enabled by P571 and P572 Toggle key • For switching between parameter number, parameter index and parameter value in the sequence indicated (command becomes effective when the key is released). • If fault display is active: For acknowledging the fault ON key Raise key Lower key Hold toggle key and depress raise key Hold toggle key and depress lower key Table 8-1 8-2 Parameter values For increasing the displayed value: • Short press = single-step increase • Long press = rapid increase For lowering the displayed value: • Short press = single-step decrease • Long press = rapid decrease • If parameter number level is active: For jumping back and forth between the last selected parameter number and the operating display (r000) • If fault display is active: For switching over to parameter number level • If parameter value level is active: For shifting the displayed value one digit to the right if parameter value cannot be displayed with 4 figures (left-hand figure flashes if there are any further invisible figures to the left) • If parameter number level is active: For jumping directly to the operating display (r000) • If parameter value level is active: For shifting the displayed value one digit to the left if parameter value cannot be displayed with 4 figures (right-hand figure flashes if there are any further invisible figures to the right) Operator control elements on the PMU 476 869 4070 76 J AB-74 Siemens AG Operating Instructions SIMOVERT MASTERDRIVES Vector Control Chassis Type Frequency Converter Toggle key (P key) Parameterization As the PMU only has a four-digit seven-segment display, the 3 descriptive elements of a parameter ♦ Parameter number, ♦ Parameter index (if parameter is indexed) and ♦ Parameter value cannot be displayed at the same time. For this reason, you have to switch between the individual descriptive elements by depressing the toggle key. After the desired level has been selected, adjustment can be made using the raise key or the lower key. With the toggle key, you can change over: • from the parameter number to the parameter index • from the parameter index to the parameter value • from the parameter value to the parameter number Parameter number P P Parameter value Parameter index P If the parameter is not indexed, you can jump directly to the parameter value. NOTE If you change the value of a parameter, this change generally becomes effective immediately. It is only in the case of acknowledgement parameters (marked in the parameter list by an asterisk ‘ * ’) that the change does not become effective until you change over from the parameter value to the parameter number. Parameter changes made using the PMU are always safely stored in the EEPROM (protected in case of power failure) once the toggle key has been depressed. SIEMENS AG 476 869 4070 76 J AB-74 SIMOVERT MASTERDRIVES Operating Instructions 8-3 Parameterization Vector Control Chassis Type Frequency Converter Example The following example shows the individual operator control steps to be carried out on the PMU for a parameter reset to factory setting. Set P053 to 0002 and grant parameter access for PMU Î P053 Ì ∇ P Î 0000 Ì ∇ Ì Î 0001 Ì 0002 P Î P053 Select P060 ∇ Ì Î P053 P060 Set P060 to 0002 and select "Fixed settings" menu P Î P060 Ì ∇ Ì Î 1 Ì P Î 2 P060 Select P970 Î Ì ∇ ∇ Ì P060 Î P366 P970 Set P970 to 0000 and start parameter reset P970 8-4 P Î Ì 1 ∇ Ì Î Ì 0 P Î °005 476 869 4070 76 J AB-74 Siemens AG Operating Instructions SIMOVERT MASTERDRIVES Vector Control Chassis Type Frequency Converter 8.2 Parameterization Parameter input via the OP1S The operator control panel (OP1S) is an optional input/output device which can be used for parameterizing and starting up the units. Plaintext displays greatly facilitate parameterization. The OP1S has a non-volatile memory and can permanently store complete sets of parameters. It can therefore be used for archiving sets of parameters, but first the parameter sets must be read out (upread) from the units. Stored parameter sets can also be transferred (downloaded) to other units. The OP1S and the unit to be operated communicate with each other via a serial interface (RS485) using the USS protocol. During communication, the OP1S assumes the function of the master whereas the connected units function as slaves. The OP1S can be operated at baud rates of 9.6 kBd and 19.2 kBd, and is capable of communicating with up to 32 slaves (addresses 0 to 31). It can therefore be used in a point-to-point link (e.g. during initial parameterization) or within a bus configuration. The plain-text displays can be shown in one of five different languages (German, English, Spanish, French, Italian). The language is chosen by selecting the relevant parameter for the slave in question. Order numbers NOTE Components Order Number OP1S 6SE7090-0XX84-2FK0 Connecting cable 3 m 6SX7010-0AB03 Connecting cable 5 m 6SX7010-0AB05 Adapter for installation in cabinet door incl. 5 m cable 6SX7010-0AA00 The parameter settings for the units connected to the OP1S are given in the corresponding documentation of the unit (Compendium). SIEMENS AG 476 869 4070 76 J AB-74 SIMOVERT MASTERDRIVES Operating Instructions 8-5 Parameterization Vector Control Chassis Type Frequency Converter 8.2 A 25 V 00 # 100.000 min-1 * 100.000 min-1 Run LED red LED green LCD (4 lines x 16 characters) 9-pole SUB-D connector on rear of unit Fault Run Reversing key ON key I OFF key O Jog key Jog Raise key Lower key P Key for toggling between control levels 7 8 9 4 5 6 1 2 3 0 +/- Reset 0 to 9: number keys Reset key (acknowledge) Sign key Fig. 8-2 View of the OP1S 100.0A 380.0V zz #-300.000Hz *-300.000Hz Betrieb Fault Run I O P USS-Bus Jog 7 8 9 4 5 6 1 2 3 0 +/- Reset US S v ia RS OP1S 48 5 Connecting cable 9 8 7 6 5 4 3 2 1 5 4 3 2 1 9 8 7 6 OP1S side: Unit side: 9-pole SUB D socket 9-pole SUB D connector Fig. 8-3 NOTE 8-6 The OP1S directly connected to the unit In the as-delivered state or after a reset of the parameters to the factory setting, a point-to-point link can be adopted with the OP1S without any further preparatory measures and parameterization can be commenced. 476 869 4070 76 J AB-74 Siemens AG Operating Instructions SIMOVERT MASTERDRIVES Vector Control Chassis Type Frequency Converter Key O Jog P Significance • For energizing the drive (enabling motor activation). The function must be enabled by means of parameterization. OFF key • For de-energizing the drive by means of OFF1, OFF2 or OFF3, depending on parameterization. This function must be enabled by means of parameterization. Jog key • For jogging with jogging setpoint 1 (only effective when the unit is in the "ready to start" state). This function must be enabled by means of parameterization. Reversing key • For reversing the direction of rotation of the drive. The function must be enabled by means of parameterization. Toggle key • For selecting menu levels and switching between parameter number, parameter index and parameter value in the sequence indicated. The current level is displayed by the position of the cursor on the LCD display (the command comes into effect when the key is released). • For conducting a numerical input • For leaving menu levels • If fault display is active, this is for acknowledging the fault. This function must be enabled by means of parameterization. Raise key Lower key +/- Function ON key Reset key Reset Parameterization For increasing the displayed value: • Short press = single-step increase • Long press = rapid increase • If motorized potentiometer is active, this is for raising the setpoint. This function must be enabled by means of parameterization For lowering the displayed value: • Short press = single-step decrease • Long press = rapid decrease • If motorized potentiometer is active, this is for lowering the setpoint. This function must be enabled by means of parameterization. Sign key • For changing the sign so that negative values can be entered Number keys • Numerical input to Table 8-2 NOTE Operator control elements of the OP1S If you change the value of a parameter, the change does not become effective until the toggle key (P) is pressed. Parameter changes made using the OP1S are always stored safely in the EEPROM (protected in case of power failure) once the toggle key has been pressed. SIEMENS AG 476 869 4070 76 J AB-74 SIMOVERT MASTERDRIVES Operating Instructions 8-7 Parameterization Vector Control Chassis Type Frequency Converter Some parameters may also be displayed without a parameter number, e.g. during quick parameterization or if "Fixed setting" is selected. In this case, parameterization is carried out via various sub-menus. Example of how to proceed for a parameter reset. 2x P Î Ì 0.0 A 0 V 00 VectorControl # 0.00 min-1 *Menu selection * 0.00 min-1 OP: Upread Ready OP: Download P Î ∇ Ì Fixed Setting *Select FactSet FactSet. Î Ì Fixed Setting *Select FactSet #FactSet. P Î Ì Menu Selection *User Param. Param Menu.. Fixed Set... P Î Ì Fixed Setting FactSet. *No FactSet ∇ Î Menu Selection *User Param. Param Menu.. #Fixed Set... ∇ Ì Î Factory Setting #FactSet. *No FactSet Selection of factory setting P Î Ì wait Î Factory Setting Menu Selection #FactSet. *User Param.. *No FactSet Param. Menuü.. busy............ FixedSet... Start of factory setting NOTE 8.3 It is not possible to start the parameter reset in the "Run" status. Parameterizing by download Downloading with the OP1S The OP1S operator control panel is capable of upreading parameter sets from the units and storing them. These parameter sets can then be transferred to other units by download. Downloading with the OP1S is thus the preferred method of parameterizing replacement units in a service case. During downloading with the OP1S, it is assumed that the units are in the as-delivered state. The parameters for power section definition are thus not transferred. (Refer to Section "Detailed parameterization, power section definition") 8-8 476 869 4070 76 J AB-74 Siemens AG Operating Instructions SIMOVERT MASTERDRIVES Vector Control Chassis Type Frequency Converter Parameterization With the "OP: Download" function, a parameter set stored in the OP1S can be written into the connected slave. Starting from the basic menu, the "OP: Download" function is selected with "Lower" or "Raise" and activated with "P". Ì VectorControl *Menu Selection OP: Upread #OP: Download P Î Download *1909199701 MASTERDRIVES VC Example: Selecting and activating the "Download" function One of the parameter sets stored in the OP1S must now be selected with "Lower" or "Raise" (displayed in the second line). The selected ID is confirmed with "P". The slave ID can now be displayed with "Lower" or "Raise" (see section "Slave ID"). The "Download" procedure is then started with "P". During download, the OP1S displays the currently written parameter. Ì Download *1909199701 MASTERDRIVES VC P Î Ì Î P Download *1909199701 MASTERDRIVES VC VectorControl 00 Download Pxxx Example: Confirming the ID and starting the "Download" procedure With "Reset", the procedure can be stopped at any time. If downloading has been fully completed, the message "Download ok" appears and the display returns to the basic menu. After the data set to be downloaded has been selected, if the identification of the stored data set does not agree with the identification of the connected unit, an error message appears for approximately 2 seconds. The operator is then asked if downloading is to be discontinued. Ì Download *1909199701 MASTERDRIVES VC P Î Ì Download *1909199701 MASTERDRIVES VC Î P Error: Different IDs Yes: Downloading is discontinued. No: Downloading is carried out. SIEMENS AG 476 869 4070 76 J AB-74 SIMOVERT MASTERDRIVES Operating Instructions Ì 2s Î VectorControl 00 Stop download? #yes no 8-9 Vector Control Chassis Type Frequency Converter 9 Parameterizing steps Parameterizing steps In general, parameterization can be subdivided into the following main steps: Detailed parameterization 1. Power section definition (P060) = 8) 2. Board definition (P060 = 4) 3. Drive definition (P060 = 5) 4. Function adjustment. Not all parameterizing steps have to be run through in detail in each case during start-up. It is possible under certain conditions to combine some of the steps and shorten parameterization by using quick procedures. The following quick procedures are possible: Quick parameterization 1. Parameterizing with user settings (Fixed setting or factory setting, P060 = 2) 2. Parameterizing with existing parameter files (Download, P060 = 6) 3. Parameterizing with paramater modules (Quick parameterization, P060 = 3) Depending on the specific prevailing conditions, parameterization can be carried out either in detail or in accordance with one of the specified quick procedures. By activating a fixed setting (P060 = 2), the parameters of the unit can also be reset to the original values. SIEMENS AG 476 869 4070 76 J AB-74 SIMOVERT MASTERDRIVES Operating Instructions 9-1 Parameterizing steps Vector Control Chassis Type Frequency Converter Supply conditions Power sections CUVC Optional boards Motor Drive setting (P060 = 5) Function adjustment Parameterizing with user settings (fixed setting, P060 = 2) Factory settings (parameter reset) (P060 = 2) Parameterizing with existing parameter files (download, P060 = 6) Parameterizing with parameter modules(quick parameterization, P060 = 3) Fig. 9-1 9-2 Procedures for quick parameterization Power section definition (P060 = 8) As-delivered state Board configuration (P060 = 4) Detailed parameterization Motor encoder Detailed and quick parameterization 476 869 4070 76 J AB-74 Siemens AG Operating Instructions SIMOVERT MASTERDRIVES Vector Control Chassis Type Frequency Converter 9.1 Parameterizing steps Parameter reset to factory setting The factory setting is the defined initial state of all parameters of a unit. The units are delivered with this setting. You can restore this initial state at any time by resetting the parameters to the factory setting, thus canceling all parameter changes made since the unit was delivered. The parameters for defining the power section and for releasing the technology options and the operating hours counter and fault memory are not changed by a parameter reset to factory setting. Parameter number Parameter name P070 Order No. 6SE70.. P072 Rtd Drive Amps P073 Rtd Drive Power P366 Select FactSet Table 9-1 NOTE Parameters which are not changed by the factory setting Parameter factory settings which are dependent on converter or motor parameters are marked with ’(~)’ in the block diagrams. Grant parameter access 6: Parameter changes permitted via PMU and serial interface SCom1 (OP1S and PC) P053 = 6 P060 = 2 Select "Fixed settings" menu Select desired factory setting 0: Standard 1: Standard with OP1S 2: Cabinet unit with OP1S (BICO1) or terminal strip (BICO2) 3: Cabinet unit with PMU (BICO1) or terminal strip (BICO2) 4: Cabinet unit with NAMUR terminal strip (SCI) Note: This parameter was correctly set prior to delivery of the unit and only needs to be changed in exceptional cases. P366 = ? Start parameter reset 0: Parameter reset 1: No parameter change P970 = 0 Unit carries out parameter reset and then leaves the "Fixed settings" menu Fig. 9-2 Sequence for parameter reset to factory setting SIEMENS AG 476 869 4070 76 J AB-74 SIMOVERT MASTERDRIVES Operating Instructions 9-3 Parameterizing steps Vector Control Chassis Type Frequency Converter Factory settings dependent on P366 Parameters dependent on P366 Designation of the parameter on the OP1S (Src = Source) Normal factory setting Factory setting with OP1S Cabinet unit with OP1S or terminal strip Cabinet unit with PMU or terminal strip Cabinet unit with NAMUR terminal strip (SCI) P366 = 0 P366 = 1 P366 = 2 P366 = 3 P366 = 4 BICO1 BICO2 BICO1 BICO2 BICO1 BICO2 BICO1 BICO2 BICO1 BICO2 (i001) (i002) (i001) (i002) (i001) (i002) (i001) (i002) (i001) (i002) P443 Src MainSetpoint P554 Src ON/OFF1 KK058 KK040 KK040 KK040 KK040 KK040 KK058 KK040 KK058 K4101 B0005 B0022 B2100 B0022 B2100 B0022 B0005 B0022 B2100 B4100 P555 Src1 OFF2 B0001 B0020 B0001 B0020 B0001 B0001 B0001 B0001 B0001 B0001 P556 Src2 OFF2 B0001 B0001 B0001 B0001 B0001 B0001 B0001 B0001 B0001 B4108 P565 Src1 Fault Reset B2107 B2107 B2107 B2107 B2107 B2107 B2107 B2107 B2107 B2107 P566 Src2 Fault Reset B0000 B0000 B0000 B0000 B0000 B0000 B0000 B0000 B4107 B4107 P567 Src3 Fault Reset B0000 B0018 B0000 B0018 B0000 B0010 B0000 B0010 B0000 B0000 P568 Src Jog Bit0 B0000 B0000 B2108 B0000 B2108 B0000 B0000 B0000 B0000 B0000 P571 Src FWD Speed B0001 B0001 B2111 B0001 B2111 B0001 B0001 B0001 B0001 B0001 P572 Src REV Speed B0001 B0001 B2112 B0001 B2112 B0001 B0001 B0001 B2112 B4109 P573 Src MOP UP B0008 B0000 B0008 B0000 B0008 B0000 B0008 B0000 B2113 B4105 P574 Src MOP Down B0009 B0000 B0009 B0000 B0009 B0000 B0009 B0000 B2114 B4106 P575 Src No ExtFault1 B0001 B0001 B0001 B0001 B0018 B0018 B0018 B0018 B0018 B0018 P588 Src No Ext Warn1 B0001 B0001 B0001 B0001 B0020 B0020 B0020 B0020 B0020 B0020 P590 Src BICO DSet B0014 B0014 B0014 B0014 B0012 B0012 B0012 B0012 B4102 B4102 P651 Src DigOut1 B0107 B0107 B0107 B0107 B0000 B0000 B0000 B0000 B0107 B0107 P652 Src DigOut2 B0104 B0104 B0104 B0104 B0000 B0000 B0000 B0000 B0104 B0104 P653 Src DigOut3 B0000 B0000 B0000 B0000 B0107 B0107 B0107 B0107 B0000 B0000 P693.1 SCI AnaOutActV 1 K000 K000 K000 K000 K000 K000 K000 K000 KK020 KK020 P693.2 SCI AnaOutActV 2 K0000 K0000 K0000 K0000 K0000 K0000 K0000 K0000 K0022 K0022 P693.3 SCI AnaOutActV 3 K0000 K0000 K0000 K0000 K0000 K0000 K0000 K0000 K0024 K0024 P698.1 Src SCI DigOut 1 B0000 B0000 B0000 B0000 B0000 B0000 B0000 B0000 B0100 B0100 P698.2 Src SCI DigOut 2 B0000 B0000 B0000 B0000 B0000 B0000 B0000 B0000 B0120 B0120 P698.3 Src SCI DigOut 3 B0000 B0000 B0000 B0000 B0000 B0000 B0000 B0000 B0108 B0108 P698.4 Src SCI DigOut 4 B0000 B0000 B0000 B0000 B0000 B0000 B0000 B0000 B0107 B0107 P704.3 SCom TlgOFF SCB 0 ms 0 ms 0 ms 0 ms 0 ms 0 ms 0 ms 0 ms 100ms 100ms P796 Compare Value 100.0 100.0 100.0 100.0 100.0 100.0 100.0 100.0 2.0 2.0 P797 Compare Hyst 3.0 3.0 3.0 3.0 3.0 3.0 3.0 3.0 1.0 1.0 r229 r229 P405 P405 P405 P405 r229 r229 r229 r229 P049.4 OP OperDisp Table 9-2 Factory setting dependent on P366 All other factory setting values are not dependent on P366 and can be taken from the parameter list or from the block diagrams (in the Compendium). The factory settings for Index 1 of the respective parameter are displayed in the parameter list. 9-4 476 869 4070 76 J AB-74 Siemens AG Operating Instructions SIMOVERT MASTERDRIVES Vector Control Chassis Type Frequency Converter Parameterizing steps Significance of the binectors and connectors for factory setting: Entry Description See function diagram (in Compendium) B0000 Fixed binector 0 -15.4- B0001 Fixed binector 1 -15.4- B0005 PMU ON/OFF -50.7- B0008 PMU MOP UP -50.7- B0009 PMU MOP DOWN -50.7- B0010 DigIn1 -90.4- B0012 DigIn2 -90.4- B0014 DigIn3 -90.4- B0016 DigIn4 -90.4- B0018 DigIn5 -90.4- B0020 DigIn6 -90.4- B0022 DigIn7 -90.4- B0100 Rdy for ON -200.5- B0104 Operation -200.5- B0107 No fault -200.6- B0108 No OFF2 -200.5- B0120 CompV OK -200.5- B2100 SCom1 Word1 Bit0 -100.8- B2115 SCom1 Word1 Bit15 -100.8- B4100 SCI1 Sl1 DigIn -Z10.7- / -Z30.4- B4115 SCI1 Sl1 DigIn -Z30.8- r229 n/f(set,smooth) -360.4- / -361.4- / -362.4- / -363.4- / -364.4- P405 Fixed setpoint 5 -290.3- KK0020 Speed (smoothed) -350.8- / -351.8- / -352.8- K0022 Output Amps (smoothed) -285.8- / -286.8- K0024 Torque (smoothed) -285.8- KK0040 Current FixSetp -290.6- KK0058 MOP (Output) -300.8- ... ... Bxxxx = Binector = freely assignable digital signal (values 0 and 1) Kxxxx = Connector = freely assignable 16-bit signal (4000h = 100 %) KKxxxx = Double connector = SIEMENS AG 476 869 4070 76 J AB-74 SIMOVERT MASTERDRIVES Operating Instructions freely assignable 32-bit signal (4000 0000h = 100 %) 9-5 Parameterizing steps 9.2 Vector Control Chassis Type Frequency Converter Quick parameterization procedures The following quick procedures are always used in cases where the application conditions of the units are exactly known and no tests and related extensive parameter corrections are required. Typical examples of applications for quick parameterization are when units are installed in standard machines or when a unit needs replacing. 9.2.1 Parameterizing with user settings During parameterization by selecting user-specific fixed settings, the parameters of the unit are described with values which are permanently stored in the software. In this manner, it is possible to carry out the complete parameterization of the units in one step just by setting a few parameters. The user-specific fixed settings are not contained in the standard firmware; they have to be compiled specifically for the customer. NOTE If you are interested in the provision and implementation of fixed settings tailored to your own requirements, please get in contact with your nearest SIEMENS branch office. P060 = 2 Select "Fixed settings" menu Select desired user setting 0...4: Factory settings 5: User setting 1 (currently as P366 = 0) 6: User setting 2 (currently as P366 = 0) : 10: Lift and lifting equipment Start parameter reset 0: Parameter reset 1: No parameter change P366 = ? P970 = 0 Unit carries out parameter reset and then leaves the "Fixed settings" menu Fig. 9-3 9-6 Sequence for parameterizing with user settings 476 869 4070 76 J AB-74 Siemens AG Operating Instructions SIMOVERT MASTERDRIVES Vector Control Chassis Type Frequency Converter 9.2.2 Parameterizing steps Parameterizing by loading parameter files (download P060 = 6) Download When parameterizing with download, the parameter values stored in a master unit are transferred to the unit to be parameterized via a serial interface. The following can serve as master units: 1. OP1S operator control panel 2. PCs with SIMOVIS service program 3. Automation units (e.g. SIMATIC) The interface SCom1 or SCom2 with USS protocol of the basic unit and field bus interfaces used for parameter transfer (e.g. CBP for PROFIBUS DP) can serve as serial interfaces. Using download, all changeable parameters can be set to new values. 100.0A 380.0V zz *-300.000Hz #-300.000Hz Run Operating mode Type of construction O Individual operation Compact, chassis X300 (SCom1) Bus operation Compact, chassis X101 Operating mode Type of construction Terminal P USS-Bus Jog 7 8 9 4 5 6 1 2 3 0 +/- Reset SIEMENS Terminal Fault Run I US S via RS 48 5 OP1S Individual operation Compact, chassis USS via RS232 X300 X300 (SCom1) Laptop Operating mode Type of construction Bus operation Optional board CBx e. g. X448 e. g. CBP for Profibus for CBP Terminal ific ec -sp s bu Automation unit (e. g. SIMATIC S7) Fig. 9-4 Parameter transfer from various sources by download SIEMENS AG 476 869 4070 76 J AB-74 SIMOVERT MASTERDRIVES Operating Instructions 9-7 Parameterizing steps Downloading with the OP1S Vector Control Chassis Type Frequency Converter The OP1S operator control panel is capable of upreading parameter sets from the units and storing them. These parameter sets can then be transferred to other units by download. Downloading with the OP1S is thus the preferred method of parameterizing replacement units in a service case. During downloading with the OP1S, it is assumed that the units are in the as-delivered state. The parameters for power section definition are thus not transferred. (Refer to Section "Detailed parameterization, power section definition") Parameter number Table 9-3 Parameter name P060 Menu selection P070 Order No. 6SE70.. P072 Rtd Drive Amps(n) P073 Rtd Drive Power(n) Parameters you cannot overwrite during download The OP1S operator control panel also stores and transfers parameters for configuring the USS interface (P700 to P704). Depending on the parameterization of the unit from which the parameter set was originally upread, communication between the OP1S and the unit can be interrupted on account of changed interface parameters after downloading has been completed. To enable communication to recommence, briefly interrupt the connection between the OP1S and the unit (disconnect OP1S or the cable). The OP1S is then newly initialized and adjusts itself after a short time to the changed parameterization via the stored search algorithm. Download with SIMOVIS 9-8 By using the SIMOVIS PC program, you can upread parameter sets from the units, store them on the hard disk or on floppy disks and transfer them back to the units by download. You have the additional possibility of editing the parameters off-line and of creating parameter files especially for your application. These files do not have to contain the complete parameter scope. They can be limited to parameters which are relevant for the particular application. 476 869 4070 76 J AB-74 Siemens AG Operating Instructions SIMOVERT MASTERDRIVES Vector Control Chassis Type Frequency Converter NOTE Parameterizing steps Successful parameterization of the units by download is only ensured if the unit is in the "Download" status when the data is being transferred. Transition into this status is achieved by selecting the "Download" menu in P060. P060 is automatically set to 6 after the download function has been activated in the OP1S or in the SIMOVIS service program. If the CUVC of a converter is replaced, the power section definition has to be carried out before parameter files are downloaded. If only parts of the entire parameter list are transferred by download, the parameters of the following table must always be transferred too, as these automatically result during the drive setting from the input of other parameters. During download, however, this automatic adjustment is not carried out. Parameter number Parameter name P109 Pole pair number P352 Reference frequency = P353 x P109 / 60 P353 Reference frequency = P352 x 60 / P109 Table 9-4 Parameters which always have to be loaded during download If parameter P115 = 1 is described during download, the automatic parameterization is then carried out (according to the setting of parameter P114). In the automatic parameterization, the controller settings are calculated from the data of the motor rating plate. If the following parameters are described during download, they are not then re-calculated by the automatic parameterization: P116, P128, P215, P216, P217, P223, P235, P236, P240, P259, P278, P279, P287, P295, P303, P313, P396, P471, P525, P602, P603. SIEMENS AG 476 869 4070 76 J AB-74 SIMOVERT MASTERDRIVES Operating Instructions 9-9 Parameterizing steps 9.2.3 Vector Control Chassis Type Frequency Converter Parameterizing with parameter modules (quick parameterization, P060 = 3) Pre-defined, function-assigned parameter modules are stored in the units. These parameter modules can be combined with each other, thus making it possible to adjust your unit to the desired application by just a few parameter steps. Detailed knowledge of the complete parameter set of the unit is not required. Parameter modules are available for the following function groups: 1. Motors (input of the rating plate data with automatic parameterization of open-loop and closed-loop control) 2. Open-loop and closed-loop control types 3. Setpoint and command sources Parameterization is effected by selecting a parameter module from each function group and then starting quick parameterization. In accordance with your selection, the necessary unit parameters are set to produce the desired control functionality. The parameters necessary for fine adjustment of the control structure (all the parameters of the respective function diagrams) are automatically adopted in the user menu (P060 = 0). NOTE Parameterizing with parameter modules is carried out only in BICO data set 1 and in function and motor data set 1. Quick parameterization is effected in the "Download" converter status. Function diagram modules Function diagram modules (function diagrams) are shown after the flow chart for parameter modules stored in the unit software. On the first few pages are the : ♦ setpoint and command sources, on the following pages are the ♦ analog outputs and the display parameters and the ♦ open-loop and closed-loop control types. It is therefore possible to put together the function diagrams to exactly suit the selected combination of setpoint/command source and open/closed-loop control type. This will give you an overview of the functionality parameterized in the units and of the necessary assignment of the terminals. The function parameters and visualization parameters specified in the function diagrams are automatically adopted in the user menu and can be visualized or changed there. The parameter numbers of the user menu are entered in P360. Reference is made in the function diagrams to the respective function diagram numbers (Sheet [xxx]) of the detail diagrams (in the Compendium). 9-10 476 869 4070 76 J AB-74 Siemens AG Operating Instructions SIMOVERT MASTERDRIVES Vector Control Chassis Type Frequency Converter P060 = 3 Select "Drive setting" menu Menu selection "Quick parameterization" Input unit line voltage in V AC units: r.m.s. alternating voltage DC units: DC link voltage The input is important, e.g. for voltage limitation control (Vdmax control, P515 = 1) P071 = ? P095 = ? P095 = 10 P095=11 P100 = ? P102 = ? P105 = ? P106 = ? P107 = ? Enter the motor type 10: Async. IEC (international standard) 11: Async. NEMA (US standard) Enter the open/closed-loop control type (sheet r0...r5) 0: v/f open-loop control + n-controller with pulse encoder (P130 = 11) 1: v/f open-loop control 2: v/f open-loop control, textile 3: Vector control without tachometer (f-control) 4: Vector control with tachometer (n-speed) with pulse encoder (P130 = 11) 5: Torque control (M control) with pulse encoder (P130 = 11) For v/f control (0..2), a linear curve will be set in P330 (P330 = 1: parabolic). The pulse encoder has a pulse number of P151 = 1024 per revolution. The following inputs of motor data are necessary if the motor deviates from the converter data, if one of the vector control types (P100 = 3, 4, 5) has been selected, or if speed feedback is used (P100 = 0). In the case of motor outputs higher than approx. 200 kW, one of the vector control types should be used. P101 = ? P104 = ? Parameterizing steps Enter the rated motor voltage in V as per rating plate Enter the rated motor current in A as per rating plate (group drives: total of all motor currents) IEC motor: Cos (phi) as per rating plate NEMA motor: nominal rating [Hp] (group drives: total of all ratings) Enter the motor efficiency in % as per rating plate Enter the rated motor frequency in Hz as per rating plate SIEMENS AG 476 869 4070 76 J AB-74 SIMOVERT MASTERDRIVES Operating Instructions 9-11 Parameterizing steps Vector Control Chassis Type Frequency Converter P108 = ? Enter the rated motor speed in rpm as per rating plate P109 = ? Enter the motor pole pair number (is automatically calculated) Only for vector control: Process-related boundary conditions for control 0: Standard drives (default) 1: Torsion, gear play 2: Acceleration drives 3: Load surge 4: Smooth running characteristics 5: Efficiency optimization 6: Heavy-duty starting See section "Drive setting" P114 = ? Thermal motor protection desired? no yes P382 = ? P383 = 0 P383 = ? P368 = ? P368 = 0,1,2,3 4,7 5 6 P700.01 = ? P740 = ? P918.01 = ? P370 = 1 P060 = 0 9-12 System with motor protection according to UL regulation? The motor temperature is calculated via the motor current. (In the pre-setting, motor overload protection in accordance with UL regulation is activated!) Specify motor cooling 0: self-ventilated 1: forced-ventilated Enter the thermal time constant of the motor in s The values can be taken from the table on the next page. The motor load limit (P384.2) is pre-assigned to 100 %. Select setpoint and command source (sheet s0...s4, s7) 0: PMU + MOP 1: Analog and digital inputs on the terminal strip 2: Fixed setpoints and digital inputs on the terminal strip 3: MOP and digital inputs on the terminal strip 4: USS1 (e.g. with SIMATIC) 5: SIMOLINK (SLB) (without fig.) 6: PROFIBUS (CBP) (without fig.) 7: OP1S and fixed setpoints via SCom1 (X300: PMU) Enter the USS bus address Enter the SIMOLINK module address Enter the PROFIBUS address Start of quick parameterization 0: No parameter change 1: Parameter change in accordance with selected combination of parameter modules (automatic factory setting according to P366 = 0) Return to the user menu End of quick parameterization 476 869 4070 76 J AB-74 Siemens AG Operating Instructions SIMOVERT MASTERDRIVES Vector Control Chassis Type Frequency Converter Parameterizing steps P383 Mot Tmp T1 Thermal time constant of the motor Setting notes Activation of the i2t calculation is made by setting a parameter value ≥ 100 seconds. Example: for a 1LA5063 motor, 2-pole design, the value 480 seconds has to be set. The thermal time constants for Siemens standard motors are given in the following table in seconds: 1LA-/1LL motors Type 2pole 4pole 6pole 8pole 10pole 12pole 1LA5063 480 780 - - - - 1LA5070 480 600 720 - - - 1LA5073 480 600 720 - - - 1LA5080 480 600 720 - - - 1LA5083 600 600 720 - - - 1LA5090 300 540 720 720 - - 1LA5096 360 660 720 840 - - 1LA5106 480 720 720 960 - - 1LA5107 - 720 - 960 - - 1LA5113 840 660 780 720 - - 1LA5130 660 600 780 600 - - 1LA5131 660 600 - - - - 1LA5133 - 600 840 600 - - 1LA5134 - - 960 - - - 1LA5163 900 1140 1200 720 - - 1LA5164 900 - - - - - 1LA5166 900 1140 1200 840 - - 1LA5183 1500 1800 - - - - 1LA5186 - 1800 2400 2700 - - 1LA5206 1800 - 2700 - - - 1LA5207 1800 2100 2700 3000 - - 1LA6220 - 2400 - 3300 - - 1LA6223 2100 2400 3000 3300 - - 1LA6253 2400 2700 3000 3600 - - 1LA6280 2400 3000 3300 3900 - - 1LA6283 2400 3000 3300 3900 - - 1LA6310 2700 3300 3600 4500 - - 1LA6313 - 3300 3600 4500 - - 1LA831. 2100 2400 2700 2700 3000 3000 1LA835. 2400 2700 3000 3000 3300 3300 1LA840. 2700 3000 3300 3300 3600 3600 1LA845. 3300 3300 3600 3600 4200 4200 SIEMENS AG 476 869 4070 76 J AB-74 SIMOVERT MASTERDRIVES Operating Instructions 9-13 Parameterizing steps 1LA7 motors 1PH6 motors Vector Control Chassis Type Frequency Converter Type 2pole 4pole 6pole 8pole 10pole 12pole 1LL831. 1500 1500 1800 1800 2100 2100 1LL835. 1800 1800 2100 2100 2400 2400 1LL840. 2100 2100 2100 2100 2400 2400 1LL845. 2400 2100 2400 2400 2700 2700 1LA135. 1800 2100 2400 - - - 1LA140. 2100 2400 2700 2700 - - 1LA145. 2400 2700 3000 3000 3300 3300 1LA150. 3000 3000 3300 3300 3900 3900 1LA156. 3600 3300 3600 3600 4200 4200 1LL135. 1200 1200 1500 - - - 1LL140. 1500 1500 1800 1800 - - 1LL145. 1800 1800 1800 1800 2100 2100 1LL150. 2100 1800 2100 2100 2400 2400 1LL156. 2400 2100 2100 2100 2400 2400 The data for 1LA5 motors are also applicable for 1LA7 motors with the same designation. Type T1 in s 1PH610 1PH613 1PH616 1PH618 1PH620 1PH622 1500 1800 2100 2400 2400 2400 Exceptions: 1PH610 at n = 1150 rpm: T1 = 1200 n 1PA6 motors 1PL6 motors 9-14 Shaft height 100 132 160 180 225 T1 in s 1500 1800 2100 2400 2400 Shaft height 180 225 T1 in s 1800 1800 476 869 4070 76 J AB-74 Siemens AG Operating Instructions SIMOVERT MASTERDRIVES Vector Control Chassis Type Frequency Converter Parameterizing steps Reference quantities The reference quantities for current (P350), voltage (P351), frequency (P352), speed (P353) and torque (P354) are set to the rated quantities of the motor for displaying the visualization parameters and for calculating the connector values. With this parameterization, it is possible to display signals up to twice the rated motor quantities. If this is not sufficient, change over to the "Drive setting" menu (P060 = 5) in order to adjust the reference quantities. Example P107 = 52.00 Hz Rated motor frequency P108 = 1500.0 rpm Rated motor speed P109 = 2 Motor pole pair number Pre-assignment: P352 = 52.00 Hz Reference frequency P353 = 1560 rpm Reference speed If the reference speed is to be 1500 rpm, you have to set parameter P353 to this value. The reference frequency is automatically adjusted (P352 = P353 / 60 x P109) P352 = 50.00 Hz P353 = 1500 1/min A setpoint speed of 1500 rpm corresponds to a setpoint frequency of 50.00 Hz or an automation value of 100.0 %. The representation area ends at 3000 rpm (2 x 1500 rpm). Normally the reference speed has to be set to the required maximum speed. If calculation is made with frequencies, not with speeds, the reference frequency has to be adjusted. The reference speed is automatically calculated (P353 = P352 x 60 / P109) Reference frequencies of P352 = P107, P352 = 2 x P107, P352 = 4 x P107 are favourable for the calculating time. Torque reference value The reference value for torque can be set in P354. The rated torque of the motor has to be set beforehand in P113. P113 does not have any influence on the torque accuracy of closed-loop control; it only affects signal representation. SIEMENS AG 476 869 4070 76 J AB-74 SIMOVERT MASTERDRIVES Operating Instructions 9-15 Parameterizing steps Automatic motor identification Vector Control Chassis Type Frequency Converter For exact determination of the motor parameters, it is possible to carry out automatic motor identification and speed controller optimization. For this purpose, the procedures of the "Drive setting" have to be observed. If one of the vector control types (P100 = 3, 4, 5) of a converter without a sinusoidal output filter and of an induction motor without an encoder or with a pulse encoder (correct number of pulses in P151) is used, the motor identification procedure can be shortened. In this case, "Complete motor identification" has to be selected (P115 = 3) and the converter has to be powered up accordingly if the alarms A078 and A080 appear. WARNING During motor identification inverter pulses are released and the drive rotates! For reasons of safety, identification should first be carried out without coupling of the load. 9-16 476 869 4070 76 J AB-74 Siemens AG Operating Instructions SIMOVERT MASTERDRIVES SIEMENS AG 476 869 4070 76 J AB-74 SIMOVERT MASTERDRIVES Operating Instructions Sh.[50] P Reference to the current path sheet "a0" "Analog outputs and display variables" : 1 1 2 Setpoint source PMU and MOP (P368=0) Reference to T-controller (see rXX-sheets) : Reference to N-controller (see rXX-sheets) : N See Compendium Sheet 300 3 The keys "Raise MOP" and "Lower MOP" are only effective if the operating display (r000) is selected. Note: X300 O I M Sh. [300] : Explanations: PMU Lower key OFF key Toggle key ON key Reversing key Raise key Seven segment display P48 PMU Operating Display Terminal strip Sh. [90] MOP I 1=operation -X101/4 4 Sheet [300] O B P652.1 (104) B P651.1 (107) Lower MOP Raise MOP ON/OFF1 B0009 B0008 B0005 B0104 B0107 B P422 MOP (min.) 5 6 0xx0 = ... without storing after OFF 0xx1 = ... Storing after OFF P425 Conf.MOP operation no fault 9-17 MASTERDRIVES VC 7 8 - s0 - M (for T control) N Src.T Setp P486.B (58) to sheet [320.1] KK to sheet [180] from sheet [200] Src Main Setp MOP(Outp) P443.B (58) to sheet [316.1] KK058 KK MOP(Outp) r424 Src Lower MOP Src Raise MOP Src ON/OFF1 MOP (max) P421 P574.1 (9) B P573.1 (8) B P554.1 (5) Accel Time MOP Decel Time MOP P431 P432 Toggle key (acknowledge) 0=fault -X101/3 P M24 -X101/2 Vector Control Chassis Type Frequency Converter Parameterizing steps 9-18 Sheet [90] A A D -100 .... 100 % corresponds to 0-10 ... 10 V D -X101 AnaIn2 Smoothing P634.2 AnaIn1 Smoothing P634.1 1 2 Setpoint source Analog input and terminal strip (P368=1) X102/18 X102/17 Analog input 2 X10²/16 X102/15 Analog input 1 Sheet [80] If used as digital inputs, the parameters P651.B, P652.B, P653.B and P654.B have to be set to 0! Analog inputs *) Terminal strip P24 B0022 B0020 B0018 B0016 P654.1 B B0014 3 AnaIn2 Offset P631.2 *) *) *) *) Src ON/OFF1 4 (only T-control) 5 Srce.T setpoint P486.B (11) to sheet[320.1] KK Src Main setpoint P443.B (11) to sheet[316.1] KK Src1 OFF2 P554.1 (22) B Src3 Acknowledge alarm operation no fault P555.1 (20) B P567.1 (18) B P561.1 (16) B B0115 B0104 B0107 AnaIn2 Setpoint K0013 AnaIn2 Setpoint r637.2 AnaIn1 Setpoint K0011 AnaIn1 Setpoint r637.1 P653.1 (115) B B0012 P652.1 (104) B B0010 P651.1 (107) B M24 AnaIn1 Offset P631.1 /9 /8 /7 /6 /5 1=fault /4 0=fault /3 /2 /1 M N 6 to sheet [180] from sheet [200] 476 869 4070 76 J AB-74 Siemens AG Operating Instructions SIMOVERT MASTERDRIVES 7 -20 ... 20 mA -20 ... 20 mA -04 ... 20 mA -10 ... 10 V -10 ... 10 V MASTERDRIVES VC 2 3 4 0 1 AnaIn Conf.. P632 closed open CUVC S3 switch 8 - s1 - Parameterizing steps Vector Control Chassis Type Frequency Converter SIEMENS AG 476 869 4070 76 J AB-74 SIMOVERT MASTERDRIVES Operating Instructions Fixed setpoint8 P408.F P407.F Fixed setpoint7 P406.F Fixed setpoint6 P405.F Fixed setpoint5 P404.F Fixed setpoint4 P403.F Fixed setpoint3 P402.F Fixed setpoint2 P401.F Fixed setpoint1 Sheet [290] KK0048 KK0047 KK0046 KK0045 KK0044 KK0043 KK0042 KK0041 -X101 1 2 Setpoint source Fixed setpoints and terminal strip (P368=2) in Hz in % Sheet[90] If used as digital inputs, the parameters P651.B, P652.B, P653.B and P654.B have to be set to 0! Fixed setpoints *) Terminal strip 3 /9 /8 /7 /6 /5 1=operation /4 0=fault /3 /2 /1 P24 B0022 B0020 B0018 B0016 P654.1 B B0014 P653.1 B B0012 P652.1 B B0010 P651.1 B M24 4 *) *) *) *) 5 Src ON/OFF1 P554.1 (22) B 0 0 0 0 0 0 0 0 1 1 1 1 0 0 0 0 FSetp FSetp Bit 2 Bit 3 P418.B P417.B Src1 OFF2 Src3 Acknowledge Src FSetp Bit 1 Src.FSetp Bit 0 operation no fault P555.1 (20) B P567.1 (18) B P581.1 (16) B P580.1 B B0104 B0107 1 1 0 0 1 1 0 0 6 1 0 1 0 1 0 1 0 9-19 7 (for T control) 8 - s2 - Src T setpoint P486.B (40) to sh. [320.1] KK Src Main Setpoint P443.B (40) to sh. [316.1] KK MASTERDRIVES VC Act.FSetp KK0040 Active FSetp r420 to sheet [180] from sheet [200] M N Vector Control Chassis Type Frequency Converter Parameterizing steps 9-20 MOP MP Sheet [300] If used as digital inputs, the parameters P651.B, P652.B, P653.B and P654.B have to be set to 0! Sheet [90] 1 2 Setpoint source MOP and terminal strip (P368=2) *) MOP and terminal strip -X101 3 /9 /8 /7 /6 /5 1=operation /4 0=fault /3 /2 /1 P24 B0012 Lower MOP Raise MOP B0022 B0020 B0018 B0016 P654.1 B B0014 P653.1 B Src ON/OFF1 4 5 0xx0 = ... without storing after OFF 0xx1 = ... storing after OFF P425 Conf MOP P422 MOP (min.) MOP (max) P421 Src1 OFF2 P554.1 (22) B Src3 Acknowledge P567.1 (18) B P555.1 (20) B Src Lower MOP Src Raise MOP P574.1 (16 ) B P573.1 (14) B operation no fault Accel Time MOP Decel Time MOP P431 P432 *) *) B0104 ) P652.1 (104) * B B0010 B0107 ) P651.1 (107) * B M24 6 Mot.poti(Ausg.) KK058 Mot.poti(Ausg.) r424 476 869 4070 76 J AB-74 Siemens AG Operating Instructions SIMOVERT MASTERDRIVES MASTERDRIVES VC 7 (for T control ) Src T Setpoint P486.B (58) to sheet [320.1] KK Src Main Setpoint P443.B (58) to sheet [316.1] KK to sheet [180] from sheet [200] M N 8 - s3 - Parameterizing steps Vector Control Chassis Type Frequency Converter Baud rate: 9.6 kB PKW: 4 PZD: 2 PKW # P702.1 PcD # P708.1 ZUW1 PcD1 (Data word1) 1 Setpoint source USS1 (P368=4) 15 1 Set/actual deviation P704.1 = Tlg failure time Reserve pos./neg. speed setp Ramp-function gen. active Energize main cont. Undervoltage fault Comp. Setp reached PZD-Führung Sheet [100] Receive Transmit Sheet [110] 2 0 • PKW 3 PKW • PKW Reserved for read operations of parameter data 4 Reserved for write operations of parameter data PKW PZD1 (Data word1) 5 PcD1 (Data word 1) 6 Raise MOP 9-21 B (2112) P572.1 B (2111) P571.1 B (2108) P568.1 B (2107) P565.1 P555.1 B (2101) MASTERDRIVES VC 7 External fault Raise MOP Negative Spd B2111 B2113 PcD control Positive Spd B2110 B2112 Jog Bit1 Jog Bit0 B2109 B2108 B2106 Acknowledge No RGen Stop Setpoint Release B2105 B2107 Inv. Release RGen Release B2104 OFF3 (QStop) B2102 B2103 OFF2 (electr.) M 8 - s4 - to sheet [180] control word 1 r550 Src Neg. Spd Src Pos Spd Src Jog Bit0 Src 1 Acknow Src OFF2 P554.1 B (2100) Src ON/OFF1 N from sheett [200] from sheet [350.7], [351.7] [352.7], [400.7] Src T setpoint P486.B to sheet [320.1] K B2101 Bit14 B2114 Bit15 B2115 Bit7 Bit1 ON/OFF1 Receive setpoints For T control: K2002 SComWord2 r709.2 K2001 ZUW1 r552 n/f(act) Main setpoint to sheet [316.1] P443.B K (2002) K0032 P707.1(32) K SCom1Word1 r709.1 KK0148 P707.2 K Transmit actual values Bit0 B2200 up to Bit15 B2215 Bit0 B2100 PZD2 (Data word 2) Control word Status word PZD2 (Data word 2) • • • • • • Alarm effective Switch-on ihibit OFF3 effective OFF2 effective Fault effective Operation Ready Ready for ON SIEMENS AG 476 869 4070 76 J AB-74 SIMOVERT MASTERDRIVES Operating Instructions P700.1 = Bus address /11 RS485N /10 RS485P -X101 Baud rate P701.1 Vector Control Chassis Type Frequency Converter Parameterizing steps • • • • • • ZUW1 Sheet [100] Receive 0 • PKW • PKW I Jog Reset O OP1S keys P049 = OP operating display PKW Reserved for read operations of parameter data 4 Reserved for write operations of parameter data PKW 1 2 3 Setpoint source OP1S / SIMOVIS and fixed setpoints at USS1 (P368=7) PZD1 (Data word1) 1 Baud rate: 9.6 kB PKW:127 PcD: 2 Sheet [110] Transmit PcD # P708.1 PZD1 (Data word1) PZD1 (Data word1) 5 6 PZD2 (Data word 2) Control word 1 Status word 1 PZD2 (Data word 2) • • • • • • 15 Set/actual deviation P704.1 = Tlg failure time P700.1 = Bus address /11 RS485N /10 RS485P -X101 Baud rate PKW # P701.1 P702.1 Reserve pos./neg. speed setp Ramp-function gen. active Energize main cont. Undervoltage fault Comp. setpoint reached PcD control 9-22 Alarm effective Switch-on inhibit OFF3 effective OFF2 effective Fault effective Operation Ready Ready for ON Bit15 Bit12 Bit11 Bit8 Bit7 Bit1 PcD control B2110 Raise MOP 476 869 4070 76 J AB-74 Siemens AG Operating Instructions SIMOVERT MASTERDRIVES 7 External fault Src Jog Bit0 P568.1 B (2108) 8 - s7 - to sheet [180] control word 1 r550 P572.1 B (2112) Src negative spd P571.1 B (2111) Src positive spd Src1 Acknow. P565.1 B (2107) MASTERDRIVES VC B2115 Lower MOP B2113 B2114 Negative Spd B2112 Positive Spd Jog Bit1 B2109 B2111 Jog Bit0 B2108 Acknowledge Setp Release B2106 B2107 No RGen Stop B2105 Inv Release RGen Release B2103 B2104 OFF2 (electr.) OFF3 (QStop) P554.1 B (2100) Src ON/OFF1 M B2102 ON/OFF1 N Src T setpoint P486.B to sh. [320.1] K Main setpoint to sh. [316.1] from sh. [200] from sh. [350.7], [351.7] [352.7], [400.5] P443.B K (2002) B2101 Bit0 B2200 bis Bit15 B2215 Bit0 B2100 Receive setpoints for T control: K2002 SCom1Word2 r709.2 K2001 ZUW1 r552 n/f(act) Setpoint via process data (only SIMOVIS): K0032 P707.1 K SCom1Word1 r709.1 KK0148 P707.2 K Transmit actual values Parameterizing steps Vector Control Chassis Type Frequency Converter • • • • • • SIEMENS AG 476 869 4070 76 J AB-74 SIMOVERT MASTERDRIVES Operating Instructions 2s 30 ms 2s 2s *) DC Link Volts r006 Torque r007 Output power Output voltage 1 2 Analog outputs and display variables n/f(act) KK148 Actual speed KK020 ) *) 3 UZk(ist) K0240 DC Link Volts K0025 T(act) * K0241 Torque K0024 Output power K0023 U(set,v/f) K0204 Output voltage K0021 I(Ausg.Betrag) K0242 Output Amps K0022 Actual Speed r015 n/f (act) r218 Output Amps r004 Rot Freq r002 * Torque display only with n/f/T control ) from sheet [285.3] [286.3] 6 from sheet [285.7] from sheet [285.7] [286.7] from sheet [285.3] [286.3] 3 from sheet [285.3] [286.3] 4 from sheet [350.7] [351.7] [352.7] [400.5] 2 2s Display variables 4 P038.x K K P040.x K K K P042.x K K K .01 .02 .01 .02 .03 .01 .02 .03 % 5 Reference torque P354 rpm Reference speed P353 Hz Reference frequency P352 *) y y Display torque r039.1 to .2 Display speed r041.1 to .3 *) 6 AA2 Offset P644.2 AA1 Offset P644.1 Display frequency r043.1 to .3 y(v) = x / 100% * P643 AA2 Scaling P643.2 y(v) = x / 100% * P643 AA1 Scaling P643.1 Display parameters Src Analog Output P640.2 x K (22) Src Analog Output P640.1 x K (148) Analog outputs D D -X102/22 -X102/21 -X102/20 -X102/19 AA2 AA1 0 mA ... 20 mA -10 V ... 10 V 2-3 1-3 AA1 Switches on CUVC S4: 9-23 7 8 5-6 4-6 AA2 - a0- Reference to the current path of rXX sheets MASTERDRIVES VC 1 Sheet [300]: See Compendium sheet 300 Explanations: Sheet [30] 0 ... 20 mA A 5 4 +/- 10 V 6 Switch S4 0 ... 20 mA A 2 1 +/- 10 V 3 Switch S4 Sheet [81] Vector Control Chassis Type Frequency Converter Parameterizing steps 9-24 Normalization Tacho M Track A Track B Zero track Control tr. Tacho P15V n/f(act,encoder) KK091 Ana.tach. Imp.tach. Motor encoder P130.M (11) * ) Sheet 250 P453.F (-110.0%) * ) n/f(max,neg.Spd) n/f(max,pos.spd) P452.F (110.0%) * ) 1 2 3 V/f characteristic with speed controller (P100=0) 2 n/f(act) KK148 n/f(act) r218 Sheet 352 KK075 n/f(set) r482 Sheet 318 *) Parameter only adjustable in the "Drive setting" state (P60=5) P138.M (3000) Ana.TachScale 23 24 25 26 27 28 X103 Sheet 317 Setpoint channel P462.F (10s) P464.F (10s) Accel Time Decel Time Pulse # P151.M (1024) * ) N Src main setpoint P443.B KK Srce AddSetp1 P433.B (0) KK Ref. Frequency: P352 * ) Speed: P353 * ) Sheet 316 Smooth. n/f(act) P223.M r014 Setpoint speed n/f(set,smooth) r229 4 – P235.M n/f-Reg.Gain1 P240.M n/f-Reg.Tn Sheet 364 Speed controller – 5 r129 – 4 Imax-Ctrl Gain P331.M Output current Current Lim. Maximum current P128.M f(Slip) KK0188 Imax-Ctrll.Tn P332.M Sheet 401 Speed limitation controller 6 3 1 N M 476 869 4070 76 J AB-74 Siemens AG Operating Instructions SIMOVERT MASTERDRIVES 7 8 Reference to current path sheet "a0" "Analog outputs and display variables" 6 Asyc. Mot. 3~ - r0 - Reference to setpoint source (see sXX-sheets) MASTERDRIVES VC : : Motor encoder Smooth. vd(act) P287.M Sheet 286 Gating unit f(set,stator) KK199 Explanations: Sh. [300] : See Compendium Sheet 300 P330.M Src SelCurve *) – Volts mod depth FSetp Boost P325.M Mot.voltage P101.M * ) max.Outp Volts r346 Boost End Field Weak Freq Mot.Freq.(n) Freq P326.M P107.M (50) * ) P293.M Sheet 405 v/f characteristic Parameterizing steps Vector Control Chassis Type Frequency Converter SIEMENS AG 476 869 4070 76 J AB-74 SIMOVERT MASTERDRIVES Operating Instructions P462.F (10 s) P464.F (10 s) Accel time Decel time Sheet 317 n/f(max,pos.spd) P452.F (110,0%) * ) 1 2 V/f characteristic (P100=1) 3 KK075 n/f(set) r482 Sheet 318 P453.F (-110.0%) * ) n/f(max,neg.spd) Setpoint channel *) Parameter only adjustable in the "Drive setting" status (P60=5) N Src main setpoint P443.B KK Src add. setp.1 P433.B (0) KK Ref, frequency: P352 * ) speed: P353 * ) Sheet 316 r129 4 – f(Slip) KK188 4 Imax controller Tn P332.M Imax controller Kp P331.M Output Amps Current lim. Maximum current P128.M r014 Setpoint speed n/f(set,smooth) r229 Slip comp Kp P336.M (0) 5 – n/f(ist) r218 2 KK148 Sheet 400 Current limitation controller 6 9-25 7 3 8 6 Asyc. Mot. 3~ - r1 - Smooth vd(act) P287.M Sheet 286 Gating unit f(set,Stator) KK199 MASTERDRIVES VC P330.M Src Select Char. – Volt. Mod. Depth FSetp Boost P325.M Mot. Volts P101.M * ) max.Outp Volts. r346 Boost end Field weak. frequency Mot.Freq.(n) frequency P326.M P107.M (50) * ) P293.M Sheet 405 V/f characteristic Vector Control Chassis Type Frequency Converter Parameterizing steps 9-26 P462.F (10 s) P464.F (10 s) Accel Time Decel Time Sheet 317 Setpoint channel P453.F (-110,0%) * ) n/f(max,neg.spd) n/f(max,pos.spd) P452.F (110,0%) * ) Src Add Setp2 P438.B (0) KK KK075 n/f(set) r482 Sheet 318 1 2 V/f characteristic (P100=2) Textile 3 *) Parameter can only be adjusted in the "Drive setting" status (P60=5) N Src main setpoint P443.B KK Src AddSetp.1 P433.B (0) KK Ref. frequency: P352 * ) speed: P353 * ) Sheet 316 r129 4 – 4 Imax controller Tn P332.M Imax controller Kp P331.M Output Amps Current lim. Maximum currents P128.M r014 Setpoint speed n/f(set,smooth) r229 5 n/f(act) r218 2 KK148 Sheet 402 Current limitation controller 6 476 869 4070 76 J AB-74 Siemens AG Operating Instructions SIMOVERT MASTERDRIVES 7 3 8 6 Asyc. Mot. 3~ - r2 - Smooth Vd(act) P287.M Sheet 286 Gating unit f(set,stator) KK199 MASTERDRIVES VC P330.M Src Select Char. – Volt. Mod. Depth FSetp boost P325.M *) Mot.voltage P101.M *) max.outp. volts r346 Boost end Field weakening frequency Mot.Freq.(n) frequency P326.M P107.M (50) * ) P293.M Sheet 405 V/f characteristic Parameterizing steps Vector Control Chassis Type Frequency Converter SIEMENS AG 476 869 4070 76 J AB-74 SIMOVERT MASTERDRIVES Operating Instructions Scal.T(pre) P471.M (0) P493.B (170) Src TorqLimit1 Src TorqLimit1 FSetp P492.F (100%) Sheet 319 KK075 Smooth.n/f(act) P223.M r014 Setpoint speed – n/f(set,smooth) r229 P235.M n/f-Reg.Kp1 Field weak. charac. 5 P127.M (80%) R(rotor)Ktmp Current model Sheet 396 Slip frequency KK188 + Smoothing I(set) P280.M T(droop) P278.M T(dynam.) P279.M Sheet 382 x y max.mod. depth r346 ModDepth Headrm P344.M Sheet 381 Msoll,reg K0153 K0165 T(set,limitr) r269 TorqLImit2,act K0173 TorqLimit1,act K0172 Torque limitation r129 Sheet 372 Maximum current Pw,max(gen) P128.M P259.M Torque/current limit Sheet 367 i-Anteil K0155 P240.M n/f-Reg.Tn Sheet 362 Speed controller 1 2 3 4 Closed-loop speed control without encoder (frequency control) P100=3 Master drive (P587 = 0) 2 *) Parameter can only be changed in the "Drive setting" status (P60=5) n/f(ist) r218 P453.F (-110,0%) * ) n/f(max,neg.spd) n/f(ist) KK148 Sheet 351 Sheet 318 K P499.B (171) n/f(max,pos.spd) P452.F (110,0%) * ) n/f(set) r482 K171 K170 K Src TorqLimit2 FSetp Src TorqLimit2 P498.F (-100%) P462.F (10 s) P464.F (10 s) Accel Time Decel Time Start-up time P116.M Sheet 317 Setpoint channel The current injection of P278 T(droop) (Fig. 382) is only calculated for frequencies below approx. 10% of the rated motor frequency. Note: N Src main setpoint P443.B KK Src Add. Setp1 P433.B (0) KK P354 is referred to P113 *) Ref. frequency: P352 * ) speed: P353 * ) torque: P354 * ) Sheet 316 6 Kp P283.M Tn P284.M EMF model Isd (act) – 9-27 8 6 Asyc. Mot. 3~ - r3 - Smooth Vd(act) P287.M Sheet 285 Gating unit f(set,stator) KK199 MASTERDRIVES VC 7 i-comp. + P339.M *) ModSystem Release Volt. Mod. Depth 3 P315.M P316.M EMF Reg.Kp EMF-Reg.Tn – Kp Tn Isq(act) P283.M P284.M K0184 – Isq(set) K0168 Sheet 390 Current controller Vector Control Chassis Type Frequency Converter Parameterizing steps 9-28 T-add. FSetp P505.F (0.0) Start-up time P116.M (~) P453.F (-110,0%) * ) n/f(max,neg.spd) n/f(max,pos spd) P452.F (110 %) * ) -1 2 n/f(soll) r482 r502 Mgrenz2 n/f(act) KK148 n/f(act) r218 Sheet 351 KK075 Mgrenz2 FSW P498.F (-100%) TorqLimit1 FSetp P492.F (100%) TorqLimit1 r496 Sheet 320 Smooth.n/f(act) P223.M r014 setpoint speed – n/f(setl,smooth) r229 P235.M n/f-Reg.Kp1 5 P127.M (80%) R(rotor)Ktmp Current model Sheet 396 Slip frequency KK188 + SmoothingI (set) P280.M T(droop) P278.M T(dynam.) P279.M Sheet 382 Field weak. charac. ModDepth Headrm P344.M max.Ausg.spg. r346 K0165 M(set,limitr) r269 x y TorqLimit2, act K0173 TorqLimit1,act K0172 Torque limitation Sheet 372 Maximum current Pw,max(gen) P128.M P259.M Torque/current limit Sheet 381 Tset,reg K0153 i-comp. K0155 P240.M n/f-Reg.Tn Sheet 363 Speed controller 1 2 3 4 Closed-loop speed control without encoder (frequency control) P100=3 Slave drive (P587 = 1) *) Parameter can only be changed in the "Drive setting" status (P60=5) M Src Torq Setp P486.B K P354 is referred to P113 *) Ref. frequency: P352 * ) speed: P353 * ) torque: P354 * ) Setpoint channel 6 Kp P283.M Tn P284.M – P339.M *) ModSystem Release Volt. Mod. Depth 3 476 869 4070 76 J AB-74 Siemens AG Operating Instructions SIMOVERT MASTERDRIVES + Smooht. Vd(act) P287.M Sheet 285 - r31 - 8 6 Asyc. Mot. 3~ Gating unit f(set,Stator) KK199 MASTERDRIVES VC 7 P315.M P316.M EMF Reg Gain EMF Reg.Tn EMF Model Isd (act) – Kp Tn Isq(act) P283.M P284.M K0184 – Isq(set) K0168 Sheet 390 Current controller Parameterizing steps Vector Control Chassis Type Frequency Converter SIEMENS AG 476 869 4070 76 J AB-74 SIMOVERT MASTERDRIVES Operating Instructions Normalization Tacho M Track A Track B Zero track Control track Tacho P15V n/f(act,encoder) KK091 Ana.tach. Imp.tach. P493.B (170) Src TorqLimit1 K Sheet 318 Smooth.n/f(pre) P216.M 1 2 Closed-loop speed control (P100=4) Master drive (P587 = 0) KK075 3 2 n/f(ist) KK148 n/f(act) r218 Sheet 350 P453.F (-110,0%) * ) n/f(max,neg.spd) n/f(max,pos.spd) P452.F (110,0%) * ) n/f(set) r482 Src Add Setp2 P438.B (0) KK K171 P499.B (171) K170 K TorqLimit2 FSetp P498.F (-100%) Src TorqLimit2 TorqLimit1 FSetp P492.F (100%) Sheet 319 *) Parameter can only be changed in the "Drive setting" status P60=5 P138.M (3000) Ana.TachoComp 23 24 25 26 27 28 X103 Motor encoder P130.M (11) * ) Sheet250 P462.F (10 s) P464.F (10 s) Accel Time Decel Time Scal.Torq(pre.) P471.M Sheet 317 Setpoint channel Start-up time P116.M Pulse # P151.M (1024) * ) N Src main setpoint P443.B KK Src Add Setp.1 P433.B (0) KK P354 is referred to P113 *) Ref. frequency: P352 * ) speed: P353 * ) torque: P354 * ) Sheet 316 Smooth n/f(act) P223.M r014 Setpoint speed n/f(set,smooth) r229 – 4 P235.M n/f-Reg.Kp1 Torque/current limit 5 P127.M (80%) R(rotor)Ktmp Current model Blatt 395 ModDepth Headrm P344.M Sheet 380 Msoll,reg K0153 Slip frequency KK188 + Field weakening characteristic max.outp.volt. r346 x y K0165 T(set,limitr) r269 TorqLimit2,act K0173 TorqLimit1,act K0172 Torque limitation r129 Sheet 365 Sheet 370 Maximum current Pw,max(gen) P128.M P259.M i-Anteil K0155 P240.M n/f-Reg.Tn Sheet 360 Speed controller 6 Kp P283.M Tn P284.M – 9-29 7 P316.M EMF Reg.Tn + P339.M *) ModSystem Release Volt. Mod. Depth 3 8 6 Asyc. Mot. 3~ - r4 - Motor encoder Smooth Vd(act) P287.M Sheet 285 Gating unit f(set,Stator) KK199 MASTERDRIVES VC P315.M EMF Reg Gain EMF Model Isd (act) – Kp Tn Isq(act) P283.M P284.M K0184 – Isq(set) K0168 Sheet 390 Current controller Vector Control Chassis Type Frequency Converter Parameterizing steps 9-30 Normalization Tacho M Track A Track B Zero track Control track Tacho P15V n/f(act,encoder) KK091 Ana.tach. IPulse tach. Motor encoder P130.M (11) * ) Sheet 250 2 n/f(act) KK148 n/f(act) r218 Sheet 350 KK075 n/f(set) r482 r502 P498.F (-100%) TorqLimit2 TorqLimit2 FSetp Smooth.n/f(FWD) P216.M P453.F (-110,0%) n/f(max,neg.spd) * ) n/f(max,pos spd) P452.F (110 %) * ) -1 TorqLimit1 FSetp P492.F (100%) TorqLimit1 r496 Sheet 320 r014 Setpoint speed n/f(set, smooth) r229 – 4 P235.M n/f-Reg.Kp1 5 P127.M (80%) R(rotor)Ktmp Current model Sheet 395 Slip frequency KK188 + Field weakening characteristic max.outp. volts r346 K0165 M(set,limitr) r269 TorqLimit2,act K0173 TorqLimit1,act K0172 Torque limitation ModDepth Headrm P344.M Sheet 380 Tset,reg K0153 x y Sheet 371 Torque/current limit Maximum current Pw,max(gen) P128.M P259.M i-comp. K0155 P240.M n/f-Reg.Tn Sheet 361 Speed limitation controller Smooth n/f(act) P223.M 1 2 3 Closed-loop speed control / torque control (P100=4/5) Slave drive (P587 = 1) *) Parameter can only be changed in the "Drive setting" status (P60=5) P138.M (3000) Ana.TachoComp 23 24 25 26 27 28 X103 Pulse P151.M (1024) * ) M Src Tsetpoint P486.B K Torq Add. FSetp P505.F (0.0) P354 is referred to P113 * ) Ref. frequency: P352 * ) speed: P353 * ) torque: P354 * ) Setpoint channel 6 Kp P283.M Tn P284.M – 476 869 4070 76 J AB-74 Siemens AG Operating Instructions SIMOVERT MASTERDRIVES 7 P316.M EMF-Reg Tn + P339.M * ) Pulse system release Volt. Mod. Depth 3 8 6 Asyc. Mot. 3~ - r5 - Motor encoder Smooth. Vd(act) P287.M Sheet285 Gating unit f(set, stator) KK199 MASTERDRIVES VC P315.M EMF Reg Gain EMF model Isd (act) – Kp Tn Isq(act) P283.M P284.M K0184 – Isq(set) K0168 Sheet 390 Current controller Parameterizing steps Vector Control Chassis Type Frequency Converter Vector Control Chassis Type Frequency Converter Parameterizing steps Parameter assignments depending on setpoint source (P368) and control type (P100): P368 = Setpoint source Parameter description P368 = 2 FSetp + terminals P368 = 3 MOP + terminals P368 = 4 USS P368 = 7 OP1S + FSetp B0022 B0022 B0022 B2100 B2100 P368 = 0 P368 = 1 PMU + MOP Analog inp. + terminals B0005 P554.1 Src ON/OFF1 P555.1 Src OFF2 1 B0020 B0020 B0020 B2101 1 P561.1 Src InvRelease 1 B0016 1 1 1 1 P565.1 Src1 Fault Reset B2107 B2107 B2107 B2107 B2107 B2107 P567.1 Src3 Fault Reset 0 B0018 B0018 B0018 0 0 P568.1 Src Jog Bit0 0 0 0 0 B2108 B2108 P571.1 Src FWD Speed 1 1 1 1 B2111 B2111 P572.1 Src REV Speed 1 1 1 1 B2112 B2112 P573.1 Src MOP Up B0008 0 0 B0014 0 0 P574.1 Src MOP Down B0009 0 0 B0016 0 0 P580.1 Src FixSetp Bit0 0 0 B0014 0 0 0 P581.1 Src FixSetp Bit1 0 0 B0016 0 0 0 P590 Src BICO DSet 0 0 0 0 0 0 P651.1 Src DigOut1 B0107 B0107 B0107 B0107 B0107 B0107 P652.1 Src DigOut2 B0104 B0104 B0104 B0104 B0104 B0104 P653.1 Src DigOut3 0 B0115 0 0 0 0 P654.1 Src DigOut4 0 0 0 0 0 0 KK0058 K0011 KK0040 KK0058 K2002 KK0040 Setpoint conn. parameter v/f characteristic + n/f-control: Setpoint connector parameter (Setp-KP) = P443 T-control + n/f control: Setpoint connector parameter (Setp-KP) = P486 P100 = control type Parameter description P100 = 0 V/f + n P100 = 1 V/f P100 = 2 Textile f-Reg. n-Reg. (P587 = 0) (P587 = 0) P100 = 5 T-Reg. P038.1 DispTorqConn.r39.1 - - - - - Sw-KP P038.1 DispTorqConn.r39.2 - - - - - K0165 P040.1 DispSpdConn.r41.1 Setp CP Setp CP Setp CP Setp CP Setp CP KK0150 P040.2 DispSpdConn.r41.2 KK0148 KK0148 KK0148 KK0148 KK0148 KK0148 P040.3 Disp Freq Conn.r41.3 - - - KK0091 KK0091 KK0091 P042.1 Disp Freq Conn.r43.1 Setp CP Setp CP Setp CP Setp CP Setp CP KK0150 P042.2 Disp Freq Conn.r43.2 KK0148 KK0148 KK0148 KK0148 KK0148 KK0148 P042.3 Disp Freq Conn.r43.3 KK0199 KK0199 KK0199 KK0091 KK0091 KK0091 Bxxxx = Binector (Digital signal; values 0 and 1) Kxxxx = Connector (16-bit signal; 4000h = 100 %) KKxxxx = Double connector (32-bit signal; 4000 0000h = 100 %) SIEMENS AG 476 869 4070 76 J AB-74 SIMOVERT MASTERDRIVES Operating Instructions 9-31 Parameterizing steps 9.3 Vector Control Chassis Type Frequency Converter Detailed parameterization Detailed parameterization should always be used in cases where the application conditions of the units are not exactly known beforehand and detailed parameter adjustments need to be carried out locally. An example of a typical application is initial start-up. 9.3.1 Power section definition The power section definition has already been completed in the asdelivered state. It therefore only needs to be carried out if the CUVC needs replacing, and is not required under normal circumstances. During the power section definition, the control electronics is informed which power section it is working with. This step is necessary for all Compact, chassis and cabinet type units. WARNING If CUVC boards are changed over between different units without the power section being re-defined, the unit can be destroyed when it is connected up to the voltage supply and energized. The unit has to be switched to the "Power section definition" state for carrying out the power section definition. This is done by selecting the "Power section definition" menu. The power section is then defined in this menu by inputting a code number. P060 = 8 P070 = ? P060 = 1 Select "Power section definition" menu Input the code number for the unit concerned The code number is allocated to the order numbers (MLFB). The order number can be read off the unit’s rating plate. The list of units is on the following pages. Return to parameter menu Fig. 9-5 NOTE 9-32 Sequence for performing the power section definition To check the input data, the values for the converter supply voltage in P071 and the converter current in P072 should be checked after returning to the parameter menu. They must tally with the data given on the unit rating plate. 476 869 4070 76 J AB-74 Siemens AG Operating Instructions SIMOVERT MASTERDRIVES Vector Control Chassis Type Frequency Converter 3AC 380 V to 480 V 3AC 500 V to 600 V 3AC 660 V to 690 V Order number Parameterizing steps In [A] PWE Air-cooled PWE Water-cooled 6SE7031-5EF60 146.0 90 - 6SE7031-8EF60 186.0 98 - 6SE7032-1EG60 210.0 102 - 6SE7032-6EG60 260.0 108 - 6SE7033-2EG60 315.0 112 - 6SE7033-7EG60 370.0 116 - 6SE7035-1EK60 510.0 147 233 6SE7036-0EK60 590.0 151 237 6SE7037-0EK60 690.0 164 - Order number In [A] PWE Air-cooled PWE Water-cooled 6SE7026-1FE60 61.0 60 - 6SE7026-6FE60 66.0 62 - 6SE7028-0FF60 79.0 68 - 6SE7031-1FF60 108.0 78 - 6SE7031-3FG60 128.0 84 - 6SE7031-6FG60 156.0 94 - 6SE7032-0FG60 192.0 100 - 6SE7032-3FG60 225.0 104 - 6SE7033-0FK60 297.0 136 222 6SE7033-5FK60 354.0 141 227 6SE7034-5FK60 452.0 143 229 Order number In [A] PWE Air-cooled PWE Water-cooled 6SE7026-0HF60 55.0 58 - 6SE7028-2HF60 82.0 72 - 6SE7031-0HG60 97.0 76 - 6SE7031-2HF60 118.0 80 - 6SE7031-5HG60 145.0 88 - 6SE7031-7HG60 171.0 96 - 6SE7032-1HG60 208.0 106 - 6SE7033-0HK60 297.0 137 223 6SE7033-5HK60 354.0 142 228 6SE7034-5HK60 452.0 146 232 SIEMENS AG 476 869 4070 76 J AB-74 SIMOVERT MASTERDRIVES Operating Instructions 9-33 Parameterizing steps 9.3.2 Vector Control Chassis Type Frequency Converter Board configuration During board configuration, the control electronics is informed in what way the installed optional boards have to be configured. This step is always necessary if optional boards are used. The unit must be switched to the "Board configuration" status for this purpose. This is done by selecting the "Board configuration" menu. In this menu, parameters are set which are required for adapting the optional boards to the specific application (e.g. bus addresses, baud rates, etc.). After leaving the menu, the set parameters are transferred and the optional boards are initialized. Select "Board configuration" menu P060 = 4 SCB inserted ? yes no P696 = ? SCB protocol 0: SCI 1: USS 4-wire 2: USS 2-wire 3: Peer-to-Peer CBx inserted ? no yes P711.1...2 = ? to P721.1...10 = ? 9-34 Enter the CB parameters 1 to 11 necessary for the inserted communications boards CBx The necessary CB parameters and their significance can be derived from the function diagrams of the individual communications boards. 476 869 4070 76 J AB-74 Siemens AG Operating Instructions SIMOVERT MASTERDRIVES Vector Control Chassis Type Frequency Converter Parameterizing steps SLB inserted ? no yes Enter the SLB module address 0: Unit operates as a dispatcher greater than 0: Unit operates as a transceiver P740 = ? Enter the SLB telegram failure time in ms 0: No monitoring greater than 0: Monitoring time in ms P741 = ? P742 = ? P740 > 0 P740 = 0 P743 = ? Enter the SLB transmit power (for plastic fiber-optic cables) 1: weak up to 10 m fiber-optic cable length 2: medium up to 25 m fiber-optic cable length 3: strong up to 40 m fiber-optic cable length NOTE: If glass fiber-optic cables are used, the possible lengths are increased by the factor 7.5. Enter the number of modules (incl. dispatcher) in the SIMOLINK ring P745 = ? Enter the number of channels per module P746 = ? Enter the SIMOLINK cycle time in ms P749.1...8 = ? Enter the SLB read addresses CBx inserted ? nein ja P918.1...2 = ? P060 = 1 Enter the CB bus addresses Return to the parameter menu SIEMENS AG 476 869 4070 76 J AB-74 SIMOVERT MASTERDRIVES Operating Instructions 9-35 Parameterizing steps Board codes Vector Control Chassis Type Frequency Converter The visualization parameter r826.x is used for displaying the board codes. These codes enable the type of the installed electronic boards to be determined. Parameter Index Position r826 1 Basic board r826 2 Slot A r826 3 Slot B r826 4 Slot C r826 5 Slot D r826 6 Slot E r826 7 Slot F r826 8 Slot G If a technology board (T100, T300, TSY) or an SCB1 or SCB2 is inserted in mounting positions 3 or 2, their board code can be found in the following indices: General board codes: Special board codes: Parameter Index Position r826 5 Mounting position 2 r826 7 Mounting position 3 Parameter value 90 to 109 Mainboards or Control Unit 110 to 119 Sensor Board (SBx) 120 to 129 Serial Communication Board (Scx) 130 to 139 Technology Board 140 to 149 Communication Board (Cbx) 150 to 169 Special boards (Ebx, SLB) Board Significance Parameter value CUVC Control Unit Vector Control 92 CUMC Control Unit Motion Control 93 Tacho and synchronization board 110 SCB1 Serial Communication Board 1 (fiber-optic cable) 121 SCB2 Serial Communication Board 2 122 T100 Technology board 131 T300 Technology board 131 T400 Technology board 134 CBX Communication Board 14x EB1 Expansion Board 1 151 EB2 Expansion Board 2 152 SLB SIMOLINK bus interface 161 TSY 9-36 Significance 476 869 4070 76 J AB-74 Siemens AG Operating Instructions SIMOVERT MASTERDRIVES Vector Control Chassis Type Frequency Converter 9.3.3 Parameterizing steps Drive setting During the drive setting, the control electronics is informed about the incoming voltage supply with which the drive converter is operating, about the connected motor and about the motor encoder. In addition, the motor control (V/f open-loop control or vector control) and the pulse frequency are selected. If required, the parameters necessary for the motor model can be calculated automatically. Furthermore, the normalization values for current, voltage, frequency, speed and torque signals are determined during the drive setting. For start-up of the induction motor, first enter the manufacturer’s parameters completely (see below): ♦ In doing so, you must observe whether the induction motor has a star or a delta connection. ♦ You must always use the S1 data from the rating plate. ♦ You must enter the rating data for mains duty (not converter duty). ♦ You must always enter the correct rated motor current P102 (rating plate). If there are two different rated currents on the rating plate for special fan motors, you must use the value for M ~ n for constant 2 torque (not M ~ n ). A higher torque can be set with the torque and active-current limits. ♦ The accuracy of the rated motor current has a direct effect on the torque accuracy, as the rated torque is normalized to the rated current. If a rated current is increased by 4 %, this will also approximately result in a 4 % increase in the torque (referred to the rated motor torque). ♦ For group drives, you have to enter the total rated current P102 = x*Imot,nenn ♦ If the rated magnetizing current is known, you should enter it during the drive setting in P103 (in % Imot,nenn). If this is done, the results of the "Automatic parameterization" (P115 = 1) will be more precise. ♦ As the rated magnetizing current P103 (not to be confused with the no-load current during operation with rated frequency P107 and rated voltage P101) is usually not known, you can first enter 0.0 %. With the aid of the power factor (cosPHI) P104, an approximate value is calculated and displayed in r119. Experience shows that the approximation supplies values which are rather on the large side in the case of motors with a high rating (over 800 kW), whereas it supplies values which are slightly too low in the case of motors with low rating (below 22 kW). The magnetizing current is defined as a field-generating current component during operation at the rated point of the machine (U = P101, f = P107, n = P108, i = P102). SIEMENS AG 476 869 4070 76 J AB-74 SIMOVERT MASTERDRIVES Operating Instructions 9-37 Parameterizing steps Vector Control Chassis Type Frequency Converter ♦ The rated frequency P107 and the rated speed P108 automatically result in the calculation of the pole pair number P109. If the connected motor is designed as a generator and the generator data are on the rating plate (oversynchronous rated speed), you have to correct the pole pair number manually (increase by 1 if the motor is at least 4-pole), so that the rated slip (r110) can be correctly calculated. ♦ For induction motors, you have to enter the actual rated motor speed, and not the synchronous no-load speed in P108, i.e. the slip frequency at nominal load has to be derived from parameters P107...P109. ♦ The rated motor slip (1 - P108/60 x P109/P107) should usually be greater than 0.35 % x P107. These low values are, however, only achieved in the case of motors with a very high rating (above approx. 1000 kW). Motors with average rating (45..800 kW) have slip values around 2.0...0.6 %. Motors with low rating (below 22 kW) can also have slip values up to 10 %. ♦ It is possible to achieve a more accurate evaluation of the rated slip after standstill measurement (P115 = 2) by taking into account the temperature evaluation for the rotor resistance P127. On cold motors (approx. 20 °C), the value is usually around 70 % (± 10 %) and on warm motors (operating temperature) around 100 % (± 10 %). If there are any large differences, you can proceed on the assumption that the rated frequency P107 or the rated speed P108 do not correspond to the real values. ♦ If the rated motor frequency (engineered!) is below 8 Hz, you have to set P107 = 8.0Hz in the drive setting. The rated motor voltage P101 has to be calculated in the ratio 8 Hz / f Mot,N and the rated motor speed P108 should result in a much greater slip: P108 = ((8 Hz - P107old) x 60 / P109) + P108old. 9-38 476 869 4070 76 J AB-74 Siemens AG Operating Instructions SIMOVERT MASTERDRIVES Vector Control Chassis Type Frequency Converter P060 = 5 Select "Drive setting" menu Output filter P068 = ? P095 = ? P095=11 P100 = ? P101 = ? P102 = ? P103 = ? P104 = ? P105 = ? P106 = ? P107 = ? 0 = without output filter 1 = with sinusoidal output filter 2 = with dv/dt output filter Input unit line voltage in V AC units: r.m.s. alternating voltage DC units: DC link voltage P071 = ? P095 = 10,12,13 Parameterizing steps Enter type of motor 10: Induct. IEC (international standard) 11: Induct. NEMA (US standard) 12: Sync. motor, separately excited (special applications) 13: Sync. motor permanently excited (special applications) Enter the type of open-loop/closed-loop control 0: v/f control + speed control 1: v/f control 2: v/f control textile 3: Speed control without tachometer (f control) 4: Speed control with tachometer (n control) 5: Torque control (M control) Note: For motor ratings over approx. 200 kW one of the vector control types should be used (P100 > 2) Enter the rated motor voltage in V as per rating plate Enter the rated motor current in A as per rating plate (group drives: total of all motor currents) Enter the motor magnetizing current as a % of the rated motor current If value is not known, set P103 = 0, the value is then automatically calculated when you leave the drive setting (see r119). IEC motor: Cos (phi) as per rating plate NEMA motor: nominal rating [Hp] (group drives: total of all ratings) NEMA motor: Enter the motor efficiency in % as per rating plate Enter the rated motor frequency in Hz as per rating plate SIEMENS AG 476 869 4070 76 J AB-74 SIMOVERT MASTERDRIVES Operating Instructions 9-39 Parameterizing steps Vector Control Chassis Type Frequency Converter P108 = ? Enter the rated motor speed in rpm as per rating plate P109 = ? Enter the motor pole pair number (is automatically calculated if P107 and P108 are changed) P113 = 1 P100 = 0,1,2 P100 = 3,4,5 P114 = ? P115 = 1 Process-related conditions for closed-loop control 0: Drive for standard applications (e.g. pumps) 1: Drive with strong torsion, gear play, large moments of inertia (e.g. paper machine) 2: Drive for very dynamic accelerations (without load moments) (e.g. shears) 3: Drive for strong shock stressing (e.g. roll drive) 4: Drive with high smooth running characteristics at low speeds. 5: Drives with modest response requirements, which can be optimized in their efficiency with frequent part-load operation. 6: Drive with high starting moments. Calculate motor model "Automatic parameterization" P130 = ? P130 = 10,13,14 Enter the rated motor torque in Nm as per rating plate or motor catalog (is only used for normalizing the process data and visualization parameters) P130 = 11,12,15,16 P151 = ? Select the motor encoder 10: Without motor encoder 11: Pulse encoder 12: Pulse encoder with control track 13: Analog input 1 14: Analog input 2 15: Pulse encoder with zero track 16: Pulse encoder with zero and control track Enter the pulse number/revolution of the pulse encoder P100 = 0,1,2 P330 = ? P339 = ? 9-40 Characteristic 0: Linear characteristic (constant torque drives) 1: Parabolic characteristic (fans/pumps) Release the edge modulation systems (FLM) 0: All systems 1: Edge modulation systems from 60 Hz 2: Edge modulation systems from 100 Hz 3: No edge modulation systems 4: Overmodulated space vector modulation 476 869 4070 76 J AB-74 Siemens AG Operating Instructions SIMOVERT MASTERDRIVES Vector Control Chassis Type Frequency Converter Enter the pulse frequency in kHz Pulse frequency for asynchronous space vector modulation Notes: - The adjustable range depends on the converter/inverter - An increase in the pulse frequency results in a reduction of the maximum output current (see "Technical Data", derating curves) P340 = ? Enter the reference value for all current quantities in A (Normalization quantity for current limitations as well as current setpoints and actual values) P350 = ? Enter the reference value for all voltage quantities in V (Normalization quantity for voltage limitations as well as voltage setpoints and actual values) P351 = ? Enter the reference value for all frequency quantities in Hz (Normalization quantities for frequency limitations, frequency setpoints and actual values) Note: The parameter P353 is automatically adjusted. P352 = ? Enter the reference value for all speed quantities in rpm (Normalization quantity for speed limitations, speed setpoints and actual values) Note: The parameter P352 is automatically adjusted. P353 = ? Enter the reference value for all torque quantities in Nm (Normalization quantity for torque limitations, torque setpoints and actual values) P354 = ? Enter the sampling time T0 in ms The sampling time T0 is for determining the calculating frequency of all functions. The sampling times T1...T19 are multiples of sampling time T0 Note: A very short sampling time T0 can lead to a calculation time overload if several function blocks are activated at the same time! P357 = ? Thermal motor protection desired? no Parameterizing steps yes System with motor protection according to UL regulation? The motor temperature is calculated via the motor current. (In the pre-setting, motor overload protection in accordance with UL regulation is activated!) P380 = ? Enter the motor temperature for output of the alarm A023 "Motor overtemperature" P381 = ? Enter the motor temperature for output of the fault F020 "Motor overtemperature" P382 = ? P383 = ? Specify motor cooling 0: self-ventilated 1: forced-ventilated Enter the thermal time constant of the motor in s SIEMENS AG 476 869 4070 76 J AB-74 SIMOVERT MASTERDRIVES Operating Instructions 9-41 Parameterizing steps P384.02 = 0 Vector Control Chassis Type Frequency Converter P384.02 = ? Enter the motor load limit 1...300 % Enter the maximum frequency or speed in positive direction of rotation in % The value is referred to P352 (reference frequency) and P353 (reference speed) Enter the maximum frequency or speed in negative direction of rotation in % The value is referred to P352 (reference frequency) and P353 (reference speed) P452 = ? P453 = ? P060 = 1 Return to the parameter menu Note When the "Drive settings" menu is exited, the entered parameter values are checked for their plausibility. Nonplausible parameter settings result in a fault. The erroneously set parameters are entered in parameter r949 (fault value). P128 = ? Enter the maximum output current in A P462 = ? Enter the acceleration time from standstill up to reference frequency (P352) Enter the unit for acceleration time P462 0 = Seconds 1 = Minutes 2 = Hours P463 = ? Enter the deceleration time from reference frequency (P352) up to standstill P464 = ? Enter the unit for deceleration time P464 0 = Seconds 1 = Minutes 2 = Hours P465 = ? Sinusoidal filter (P068=1) or synchronous motor? no P115 = 2 9-42 yes Calculate motor model "Motor identification at standstill" Note Current flows through the motor and the rotor rotates! After pressing the "P" key, the alarm message "A087" appears. The converter must be turned on within 20 secs! 476 869 4070 76 J AB-74 Siemens AG Operating Instructions SIMOVERT MASTERDRIVES Vector Control Chassis Type Frequency Converter Analog tachometer? no Parameterizing steps Analog tachometer present? yes Adjust tachometer Adjust tachometer Tachometer to ATI: See operating instructions for ATI Tachometer to terminal strip: See function diagrams for analog inputs f, n, m control? (P100 = 3, 4, 5) no yes P115 = 4 Wait P536 = ? P115 = 5 Wait Calculate motor model "No-load measurement" Note: Current flows through the motor and the rotor rotates! After "P" key is pressed, the alarm message "A080" appears. The converter must be switched on within 20 seconds! Wait until the converter is "Ready for ON" again (°009) For fault "Fxxx", refer to chapter "Faults and alarms" Enter the dynamic performance of the speed control circuit in % Important for subsequent controller optimization. Calculate motor model "Controller optimization" Note: Current flows through the motor, the rotor rotates! After "P" is pressed, the alarm message "A080" appears. The converter must be switched on within 20 seconds! Wait until the converter is powered-down (Operating status "Ready for ON" (°009)) For fault "Fxxx", see chapter "Faults and alarms" Finished SIEMENS AG 476 869 4070 76 J AB-74 SIMOVERT MASTERDRIVES Operating Instructions 9-43 Parameterizing steps 9.4 Vector Control Chassis Type Frequency Converter Notes on parameterization The parameter list covers the setting parameters and visualization parameters of all available motor types (induction motors and synchronous motors), as well as all possible open-loop and closed-loop control modes (e.g. V/f characteristic, speed control). The constellation under which this parameter is influenced or whether it is displayed at all is indicated under "Preconditions" in the parameter description. Unless otherwise specified, all percentage values refer to the reference quantities in P350 to P354. If reference quantities are changed, this will also change the significance of the parameters with percentage normalization (e.g. P352 = Maximum frequency). Function diagrams and start-up instructions for separately excited synchronous motors (with damping cage and excitation via sliprings) are available as separate instructions. The following parameters are only effective for these synchronous motors: P75 to P88; P155 to r168, P187, P258, P274, P297, P298, P301, r302, P306 to P312. The following parameters are calculated or set to fixed values during automatic parameterization (P115 = 1): P116 P236 P295 P337 P117 P240 P303 P339 P120 P258 P306 P344 P121 P259 P313 P347 P122 P273 P315 P348 P127 P274 P316 P388 P128 P278 P319 P392 P161 P279 P322 P396 P215 P283 P325 P471 P216 P284 P326 P525 P217 P287 P334 P536 P223 P291 P335 P602 P235 P293 P336 P603 ♦ P350 to P354 are only set to the rated motor quantities in the converter status "Drive setting" (P060 = 5) or "Quick parameterization (P060 = 3). ♦ Automatic parameterization is also carried out by the standstill measurement P115 = 2, 3. 9-44 476 869 4070 76 J AB-74 Siemens AG Operating Instructions SIMOVERT MASTERDRIVES Vector Control Chassis Type Frequency Converter Parameterizing steps ♦ During the standstill measurement P115 = 2, 3, the following parameters are measured or calculated: • P103, P120, P121, P122, P127, P347, P349. The controller settings resulting from these values are in: P283, P284, P315, P316. ♦ During the rotating measurement P115 = 3, 4, P103 and P120 are adjusted. ♦ During the n/f controller optimization P115 = 5, the parameters P116, P223, P235, P236, P240 and P471 are determined. In principle, automatic parameterization (P115 = 1) or motor identification (P115 = 2, 3) should be carried out as soon as one of the following parameters are adjusted in the converter status "Drive setting" (P060 = 5): P068 = Output filter P095 = Motor type P100 = Control type P101...P109 = Motor rating plate data P339 = Release of modulation system P340 = Pulse frequency P357 = Sampling time In exceptional cases this is not necessary: ♦ If P068 is only adjusted between 0 and 2 (dv/dt filter). ♦ If P340 is adjusted in integer increments, e.g. from 2.5 kHz to 5.0 kHz...7.5 kHz... etc. ♦ If P339 is not set to overmodulated space vector modulation. If P339 = 4 the modulation depth P342 must be additionally set to approx. 90 %. ♦ If changeover is made between speed and torque control (P100 = 4, 5). ♦ If changeover is made between speed and frequency control and the following parameters are adapted: f-control (P100 = 3) n-control (P100 = 4) P315 = EMF Reg.Kp 2 x Kp Kp P223 = Smooth.n/f(act) ≥ 0 ms ≥ 4 ms P216 = Smooth. n/f(pre) ≥ 4.8 ms ≥ 0.0 ms P222 = Src n/f(act) KK0000 KK0000 (KK0091) The speed controller dynamic response may have to be reduced in the case of encoder-less speed control (frequency control) (Reduce gain (P235); increase Tn (P240)). SIEMENS AG 476 869 4070 76 J AB-74 SIMOVERT MASTERDRIVES Operating Instructions 9-45 Parameterizing steps 9.4.1 Vector Control Chassis Type Frequency Converter Drive setting according to process-related boundary conditions In order to support start-up, process-related characteristics can be entered in P114. In a subsequent automatic parameterization (P115 = 1) or motor identification (P115 = 2, 3) and controller optimization (P115 = 3, 5), parameter adjustments are made in the closed-loop control which are advantageous for the selected case, as experience has shown. The parameter adjustments can be taken from the following table. The table clearly shows which parameters have a decisive influence on the closed-loop control. The values themselves are understood to be qualitative values and can be further adjusted according to the processrelated requirements. If the type of process-related boundary conditions is not evident in the current case (e.g. high smooth running characteristics at low speeds with simultaneously fast acceleration processes), the parameter settings can also be combined (manually). In any case, it is always sensible to perform start-up with the standard setting in order to then set the indicated parameters one after the other. The settings of P114 = 2...4 are only possible if no gearless conditions are present P114 = 0: Standard drive (e.g. pumps, fans) 1: Torsion, gear play and large moments of inertia (e.g. paper machines) 2: Acceleration drives with constant inertia (e.g. shears) 3: High load surge requirements (in the case of f-control only possible from approx. 20%fmot,n) 4: High smooth running characteristics at low speeds (in the case of n-control; with a high encoder pulse numberl) 5: Efficiency optimization at partial load by flux reduction (low dynamic loading drives) 6: High start-up torque (heavy-duty start-up) 9-46 476 869 4070 76 J AB-74 Siemens AG Operating Instructions SIMOVERT MASTERDRIVES Vector Control Chassis Type Frequency Converter Parameterizing steps Only deviations from the standard setting (P114 = 0) are indicated: P114 = 0 P216=Smooth n/f(FWD) P114 = 1 P114 = 2 P114 = 3 P114 = 4 0=off P223=Smooth n/f(act) 4ms (n-Reg.) 0ms (f-Reg.) 2=on (n-R.) 100ms P235=n/f-Reg Gain1 3.0 or 5.0 12.0 (n-Reg.) P236=n/f Reg Gain2 3.0 or 5.0 12.0 (n-Reg.) 400ms 40ms (n-R.) P279=Torque (dynamic) P114 = 6 0ms (n-Reg.) 4.8ms (n-R.) 4ms (f-Reg.) P217=Slip Fail Corr’n P240=n/f-Reg Tn P114 = 5 0.0% 80% (f-Reg.) P287=Smooth Vd(act) 9 0 0 P291=FSetp Flux (set) 100% P295=Efficiency Optim 100%=off 99.9% 50% P303=Smooth Flux (set) 10-20ms 60ms 100 (n-Reg.) 500 (f-Reg.) P315=EMF Reg Gain Gain(n) 110% 1.5*Gain(n) (f-Reg.) 1.5*Gain(n) (f-Reg.) 3=only RZM 3=only RZM 200 (n-Reg.) 100 (f-Reg.) 200 (n-Reg.) 50% (f-Reg.) P339=ModSystemRelease 0=All syst 3=only RZM 3=only RZM P344=ModDepth Headrm 0.0% 3.0% 3.0% P536=n/f RegDyn(set) 50% 20% 100 (n-Reg.) 50% (f-Reg.) 25% 100 (n-Reg.) 50% (f-Reg.) RZM=Space vector modulation The gain Kp of the speed controller (P235, P236) depends on the inertia of the drive and has to be adapted if necessary. Symmetrical optimum: P235 = 2 x P116 / P240 Kp = 2 x Tramp up / Tn The start-up time is the time taken by the drive to accelerate to rated speed when the rated torque is specified. This is determined during automatic speed controller optimization. SIEMENS AG 476 869 4070 76 J AB-74 SIMOVERT MASTERDRIVES Operating Instructions 9-47 Parameterizing steps 9.4.2 Vector Control Chassis Type Frequency Converter Changes to the function selection parameter (P052) VC(former) The function selection parameter P052 of the firmware versions for the previous MASTERDRIVES VC units was used to select the various special functions and start-up steps. In order to make this important parameter more comprehensible for the user, the function groups "Special functions" and "Start-up steps" in the CUVC firmware have now been stored in two different parameters as follows: P060 Menu selection (Special functions) P052 Function selection P115 Calculation of motor parameters Fig. 9-6 Division of parameter P052(former) into P060 and P115 In addition to this, the new special function "User parameter" has been introduced, and the special function "Drive setting" (P052 = 5) has been subdivided into the functions "Quick parameterization" and "Drive setting". The new special function "Quick parameterization" involves parameterization for standard applications, and the new special function "Drive setting" involves parameterization for expert applications. The special function "Download/Upread" (P052 = 3) has been subdivided into the functions "Download" and "Upread". P060 Menu selection P052 (former) Function selection 0= User parameter -- See parameter list P060 1= Parameter menu 0= Return 2= Fixed settings 1) 1= Param. Reset 3= Quick parameterization 5= Drive Setting 4= Board configuration 4= HW Config. 5= Drive setting 5= Drive Setting 6= Download 3= Download 7= Upread 3= Download 8= Power section definition 2= MLFB input 1) Selection in the factory setting menu (P366 Factory setting type, activation with P970) 9-48 476 869 4070 76 J AB-74 Siemens AG Operating Instructions SIMOVERT MASTERDRIVES Vector Control Chassis Type Frequency Converter P115 Calculation of motor model Parameterizing steps P052 (old) Function selection 1= Automatic parameterization 6= Auto Param. 2= Motor identification at standstill 7= Mot ID Stop 3= Complete motor identification 8= Mot ID All 4= No-load measurement 9= No Load Meas 5= n/f controller optimization 10= Reg. Optim. 6= Self-test 11= Auto Test 7= Tachometer test 12= Tach Test The new special function P060 = 0 (User parameter) enables the user to put together an important list of parameters especially for his own application. When P060 = 0 (User parameter) is selected, apart from parameters P053, P060 and P358, only those parameters whose numbers have been entered in indices 4 to 100 of parameter P360 are visible. SIEMENS AG 476 869 4070 76 J AB-74 SIMOVERT MASTERDRIVES Operating Instructions 9-49 Vector Control Chassis Type Frequency Converter 10 First Start-up First Start-up First start-up of a unit comprises the following work steps: Unpack and check the units After removing the packaging, check that the unit is intact and undamaged. Only intact units may be started-up. Please also check that the unit is complete, that the correct optional boards are fitted and that the technology option has been released, if ordered. Mount the unit and install optional boards which have not yet been fitted Retrofit any optional boards which have not yet been installed, if necessary. Then install the units taking into account the requirements at the point of installation and the EMC instructions. Form the DC link capacitors, if necessary See "Transport, Storage, Unpacking" See "Installation" and "Installation in Conformance with EMC Regulations" If the DC link of the unit was de-energized for more than one year, you have to newly form the DC link capacitors. See "Forming" Connect the protective conductor, the power cables or the DC link buses and, if present, the external 24 V incoming supply Starting with the protective conductor, please connect See the power cables or the DC link buses and, if "Connecting-up" present, the external 24 V supply. When laying the cables, please observe the EMC instructions. During and "Installation in Conformance this work step, please do not yet connect control with EMC cables, communication cables, encoder cables Regulations" and motor cables (exception: cables for connecting up an OP1S, if parameterization is intended to be carried out via the OP1S). Power up the external 24 V supply or the line voltage After checking that the cabling has been correctly connected and that it sits properly, power up the external 24 V supply or the line voltage. After the electronic power supply is started, the unit initializes itself. This action can take several seconds. The drive status is subsequently shown on the PMU. If necessary, carry out parameter reset to factory setting If the PMU does not show status °005 after completion of the unit initialization, or if the unit has already been parameterized before, you shoud carry out a parameter reset to factory setting. SIEMENS AG 476 869 4070 76 J AB-74 SIMOVERT MASTERDRIVES Operating Instructions See "Parameterization" 10-1 First Start-up Vector Control Chassis Type Frequency Converter Parameterizing by download or with parameter modules Connect control cables, communication cables, encoder cables and motor cables See "Parameterization" Please connect the remaining control, communication, encoder and motor cables. When laying the cables, please observe the EMC instructions. See "Connecting-up" and "Installation in Conformance with EMC Regulations" After checking the unit and the cabling once more, power up the line voltage or DC bus voltage, if you have not already done so, and perform a function test according to your parameterization. Function test Warning: It must be ensured that no danger for persons and equipment can occur by energizing the power and the unit. It is recommended not to couple the driven machine until the function test has been successfully completed. Further start-up and parameterization according to your specific requirements 10-2 476 869 4070 76 J AB-74 Siemens AG Operating Instructions SIMOVERT MASTERDRIVES Vector Control Chassis Type Frequency Converter 11 Faults and Alarms Faults and Alarms Faults General information regarding faults For each fault, the following information is available: Parameter r947 r949 r951 P952 r782 Fault number Fault value Fault list Number of faults Fault time If a fault message is not reset before the electronic supply voltage is switched off, then the fault message will be present again when the electronic supply is switched on again. The unit cannot be operated without resetting the fault message. (Exception: Automatic restart has been selected, see P373). Fault number F001 Fault Counter-measure Main contactor checkback P591 Src Contactor Msg If a main contactor checkback is configured, no checkback takes place within the time set in P600 after the power-up command. Parameter value must be in conformance with the connection of the main contactor checkback. In the case of externally excited synchronous Check the checkback loop of the main motors (P095 = 12), there is no checkback for contactor (or the checkback of the excitation the excitation current unit. current unit in the case of synchronous motors). F002 Pre-charging Check the supply voltage, When pre-charging, the minimum DC link voltage (P071 Line Volts × 1.34) of 80 % has not been reached. Compare with P071 Line Volts (compare P071 with the DC link voltage on DC units). The maximum pre-charging time of 3 seconds has been exceeded. SIEMENS AG 476 869 4070 76 J AB-74 SIMOVERT MASTERDRIVES Operating Instructions Check the rectifier/regenerative unit on DC units. The rectifier/regenerative unit must be switched on before the inverter is switched on. 11-1 Faults and Alarms Fault number F006 Vector Control Chassis Type Frequency Converter Fault Counter-measure DC link overvoltage Check the supply voltage or input DC voltage. Shutdown has occurred due to excessive DC link voltage. Converter is operating in regenerative mode without rectifier possibility. Line voltage I DC voltage I range 200 V - 230 V I 270 V – 310 V I appr. 410 V If the converter supply voltage is at the upper tolerance limit and it is operating at full load, F006 can also be caused by a line phase failure. 380 V - 480 V I 510 V – 650 V I appr. 820 V 500 V - 600 V I 675 V – 810 V I appr. 1020 V 660 V - 690 V I 890 V – 930 V I appr. 1220 V I Shutdown I threshold Possibly: • • • • Increase P464 Decel Time, Activate P515 DC Bus Volts Reg (check P071 beforehand) Reduce P526 Fly Search Speed. Reduce P259 Max Regen Power (only for P100 = 3, 4 or 5) For parallel-connected converters (BF L) r949 = 1: Overvoltage in the DC link of the master r949 = 2: Overvoltage in the DC link of the slave. F008 DC link undervoltage Check: The lower limit value of 76 % of the DC link • voltage (P071 Line Volts), or of 61 % when • kinetic buffering has been enabled, has been fallen short of. Undervoltage in the DC link in ’normal’ operation (i.e. no SIMULATION). Undervoltage in the DC link with active kinetic buffering and speed less than 10 % of the rated motor speed. It was a ’brief power failure’ which was not detected until system recovery (auto restart flag). F011 Overcurrent Overcurrent shutdown has occurred. The shutdown threshold has been exceeded. F012 I too low During excitation of the induction motor, the current did not rise above 12.5 % of the setpoint magnetizing current for no-load operation. 11-2 Input DC voltage DC link Check • the converter output for short-circuit or ground fault • the load for an overload condition • whether motor and converter are correctly matched • whether the dynamic requirements are too high. Only for closed loop n/f/T control (P100 = 3, 4 or 5) If no motor is connected, go into the simulation mode P372. Check current detection, check power section. 476 869 4070 76 J AB-74 Siemens AG Operating Instructions SIMOVERT MASTERDRIVES Vector Control Chassis Type Frequency Converter Fault number F015 Faults and Alarms Fault Counter-measure Motor stall Motor has stalled or is locked: • Reduce load • Release brake • if the static load is too high • Increase current limits • if the acceleration or deceleration time is too fast or if load change is too fast and too great, • Increase P805 PullOut/BlckTime • Increase P792 response threshold for set/actual deviation • • due to incorrect parameterization of the pulse encoder pulse number P151 or of the analog tachometer scaling P138. Only for f/n/T control (P100 = 3, 4, 5) due to disturbed speed signals (tachometer shield not connected) Only n/T control or v/f control with speed controller: (P100 = 0, 4, 5) The fault is only generated after the time set in P805. The binector B0156 is set, in the status word 2 r553 Bit28. To detect whether the drive is locked, see P792 (Perm Deviation) and P794. With n/f control, this fault is tripped if the torque limits have been reached (B0234). • Increase torque limits or torque setpoint • Check tachometer cable breal • Check pulse encoder pulse number • Check analog tachometer scaling • Connect shield of tachometer cable on motor side and converter side • Reduce smoothing of speed pre-control P216 (only n/T control) Only frequency control: (P100 = 3) With speed control (P100 = 4) and master • Slow down acceleration time (see also drive (see P587), the fault can also point to P467-ProtRampGen Gain) an interruption in the encoder cable. This • Increase current in the lower frequency case has the same significance as if the drive range (P278, P279, P280) is locked. • Switch in speed controller pre-control (P471>0) With v/f control, the I(max) controller has to • Set EMF controller more dynamically be activated (P331). The monitor does not (P315) to max. approx. 2 operate with v/f textile applications (P100 = 2). • Increase changeover frequency for the EMF model (P313) • Replace by speed control with pulse encoder Motor has stalled or is locked: • By reaching the maximum frequency in the case of synchronous motors (P095 = 12,13) In the case of overmodulated n/f controller: As a result of missing or excessively high excitation current in the case of externally excited synchronous motors (P095 = 12): (flux is too small or too great). • When the maximum frequency (including control reserves) (B0254) has been reached on synchronous motors, the fault is generated immediately. If the deviations in the rotor flux are too great, first of all, the converter current is switched to zero, the excitation current is reduced and, after some time, the fault message is tripped at the level of the double damping time constant (2*r124.1). During this wait time, the status word bit is set already B0156 (r553.28) Only for synchronous motor: (P095 = 12) SIEMENS AG 476 869 4070 76 J AB-74 SIMOVERT MASTERDRIVES Operating Instructions Track speed setpoint with the speed actual value so that the set/actual deviation is always less than that set in P792. • Check current limits of the excitation unit. • Check excitation current setpoint and actual value (incl. wiring) • Check voltage limits of the excitation unit during dynamic current changes. • Check drive system for resonance oscillations. 11-3 Faults and Alarms Fault number Vector Control Chassis Type Frequency Converter Fault Counter-measure F017 SAFE OFF in operation Check whether the switch for SAFE OFF (X009/5-6) is open (only for devices with Order No....-11, ...-21,...-31,...-61). F018 F set fly The found set-frequency could not be implemented because the additional setpoint is too high. Check additional setpoint. F019 Motor not found Motor has not been found (during flying restart without tachometer). Power up after coasting. Possibly increase P525 Fly Search Amps. F020 Motor temperature Check the motor (load, ventilation, etc.). The actual motor temperature can be read in r009. Check P381 Mot Tmp Fault The motor temperature limit value has been exceeded. r949 = 1 Limit value of motor temperature exceeded r949 = 2 Short-circuit in the cable to the motor temperature sensor or sensor defective Power up after coasting. Release both directions of rotation. Check the KTY84 input at connector X103:29,30 for short-circuit. r949 = 3 wire break in the cable to the motor temperature sensor or sensor defective F021 Motor I2t Check: P383 Mot Tmp T1 Parameterizable limit value of the I2t monitoring for the motor has been exceeded. F023 Inverter temperature The limit value of the inverter temperature has been exceeded. r949 = 1: Limit value of inverter temperature has been exceeded. Measure the air intake and ambient temperature. Please observe the reduction curves at ϑ >40 ºC. Check: • r949 = 2: Sensor 1: Wire break of sensor cable or sensor defective Whether the fan -E1 is connected and is rotating in the correct direction. • r949 = 18: Sensor 2: Wire break of sensor cable or sensor defective That the air entry and discharge openings are not restricted. • Temperature sensor at -X30 r949 = 34: Sensor 3: Wire break of sensor cable or sensor defective r949 = 50: Sensor 4: Wire break of sensor cable or sensor defective F025 11-4 UCE Ph. L1 Check: There has been an UCE shutdown in phase L1. • Phase L1 for short-circuit or ground fault (-X2:U2 – including motor). • That CU is correctly inserted. • That the switch for ‘SAFE OFF’ (X9/5-6) is open (only for units with Order No. ...-11, ...-21,...-31,...-61). 476 869 4070 76 J AB-74 Siemens AG Operating Instructions SIMOVERT MASTERDRIVES Vector Control Chassis Type Frequency Converter Fault number F026 F027 Faults and Alarms Fault Counter-measure UCE Ph. L2 Check: There has been an UCE shutdown in phase L2. • Phase L2 for short-circuit or ground fault (-X2:V2 – including motor). • That CU is correctly inserted. • That the switch for ‘SAFE OFF’ (X9/5-6) is open (only for units with Order No. ...-11, ...-21,...-31,...-61). UCE Ph. L3 Check : There has been an UCE shutdown in phase L3. • Phase L3 for short-circuit or ground fault (-X2:W2 – including motor). • That CU is correctly inserted. • That the switch for ‘SAFE OFF’ (X9/5-6) is open (only for units with Order No. ...-11, ...-21,...-31,...-61). F028 Supply phase The frequency and the amplitude of the DC link ripple indicate a single-phase power failure. Check the supply voltage. F029 Meas. value sensing Fault in measured value sensing. A fault has occurred in the measured value sensing system; Fault in power section (valve cannot block) F035 F036 • (r949 = 1) Offset adjustment not possible in phase L1 • (r949 = 2) Offset adjustment not possible in phase L3 • (r949 = 3) Offset adjustment not possible in phases L1 and L3 • (r949=65) Autom. Adjustment of the analog inputs is not possible Fault on CU Ext. fault 1 Check: Parameterizable external fault input 1 has been activated • whether there is an external fault • whether the cable to the appropriate digital input has been interrupted • P575 Src No ExtFault1 Ext. fault 2 Check: Parameterizable external fault input 2 has been activated • Whether there is an external fault • Whether the cable to the appropriate digital input has been interrupted • P586 Src No ExtFault2 SIEMENS AG 476 869 4070 76 J AB-74 SIMOVERT MASTERDRIVES Operating Instructions 11-5 Faults and Alarms Fault number F037 Vector Control Chassis Type Frequency Converter Fault Analog input Counter-measure Check the connection to • Analog input 1 -X102:15, 16. • Analog input 2 -X102: 17, 18. Check parameters • P632 CU AnaIn Conf • P634 CU AnaIn Smooth • P631 CU AnaIn Offset F038 Voltage OFF during parameter storage During a parameter task, a voltage failure occurred on the board. Re-enter the parameter. The number of the parameter concerned can be seen in fault value r949. F040 AS internal Incorrect operating status Replace CU (-A10) F041 EEPROM fault A fault has occurred when storing the values in the EEPROM. Replace CU (-A10) F042 Calculating time Calculating time problems Reduce the calculating time load: • Increase P357 Sampling Time • Calculate individual blocks in a slower sampling time Observe r829 CalcTimeHdroom. F044 BICO Manager F045 Opt. Board HW A hardware fault has occurred when accessing an optional board. Replace CU Par. Task Power the unit down and up again. F046 Check connection of the board subrack to the boards Replace CU (-A10). F047 Internal calculating time The calculating time in the gating unit computer is not sufficient. Replace CU (-A10). For synchronous motors (P095 = 12): Pulse frequency is set too high (P340 > 2kHz). F048 Internal pulse frequency Change P340 Pulse Frequency. F049 SW Version Use uniform firmware The firmware versions on the CU have a different firmware release. F050 11-6 TSY Init. Check: Error when initializing the TSY board • Whether the TSY is correctly inserted 476 869 4070 76 J AB-74 Siemens AG Operating Instructions SIMOVERT MASTERDRIVES Vector Control Chassis Type Frequency Converter Fault number F051 Faults and Alarms Fault Counter-measure Speed encoder Check the parameters: Digital tachometer or analog tachometer sensing are faulty. • P130 Src SpdActV • P151 • P138 AnalogTachScale • P109 Motor #PolePairs The product of P109 and P138 must be smaller than 19200. Check or replace tachometer. Check connection to tachometer. Replace CU F052 n-Cntr. Input The fault input on the TSY has been active. Cancel tachometer with control track P130 Src Spd ActV Replace TSY. Check the tachometer connection at the TSY. Several versions are possible, depending on the type of tachometer. F053 Tachometer dn/dt The permissible change value of the speed encoder signal P215 dn(act,perm) has been doubly exceeded. Check tachometer cables for interruptions. Check earthing of tachometer shield. • The shield must be connected both at the motor and the converter side. • The encoder cable must not be interrupted. • The encoder cable must not be laid together with the power cables. • Only recommended encoders should be used. • In the case of a signal fault, the DT1 board may have to be used. If necessary, change P215 F054 Sensor board initialization fault Fault value r949 1: Board code incorrect 2: TSY not compatible 20: TSY board double F056 SIMOLINK telegram failure Check: F058 Parameter error during parameter task SIEMENS AG 476 869 4070 76 J AB-74 SIMOVERT MASTERDRIVES Operating Instructions • Fiber-optic cable ring • Whether an SLB in the ring is without voltage • Whether an SLB in the ring is faulty • Check P741 (SLB Tlg OFF) No counter-measure 11-7 Faults and Alarms Fault number Vector Control Chassis Type Frequency Converter Fault Counter-measure F059 Parameter error after factory setting/initialization The number of the inconsistent parameter is indicated in fault value r949. Correct this parameter (ALL indices) and power down and power up the voltage again. Depending on circumstances, several parameters may be concerned, i.e. repeat the procedure. F060 MLFB is missing This is set if the MLFB = 0 after exiting INITIALIZATION (0.0 kW). MLFB = order number. After acknowledgement, in INITIALIZATION enter a suitable MLFB in parameter P070 MLFB (6SE70..). (Only possible with the corresponding access stages to both access parameters). F061 Incorrect parameterization A parameter entered during drive setting (e.g. P107 Mot Rtd Freq, P108 Mot Rtd Speed, P340 Pulse Frequency) is not in a permissible range (depending on control type) Acknowledge the fault and change the corresponding parameter value. The missing parameter is indicated in r949 as a fault value. 11-8 476 869 4070 76 J AB-74 Siemens AG Operating Instructions SIMOVERT MASTERDRIVES Vector Control Chassis Type Frequency Converter Fault number F062 Faults and Alarms Fault Multi-parallel circuit Fault in connection with the multi-parallel circuit or board ImP1 has been detected. Counter-measure r949 = 10: Communications card does not reply. When writing the control word, BUSY is not active if CSOUT is inactive. Communications card is probably not inserted. r949 = 11,12: Timeout during BUSY during initialization. BUSY does not become active within 1 sec. r949 = 15: Timeout during BUSY during normal communication. BUSY does not become active within 1 sec. r949 = 18: Timeout when reading out the fault information from the ImPIs. Within one second after activation of FAULT no fault cause can be supplied by the ImP1. r949 = 20+i: HW conflict. This is set if bit HWCONF is set in status word of slave i. (Fault in the configuration of the multi-parallel circuit) r949 = 30+i: HW version of ImPI is not compatible. The relevant slave number is contained in i. r949 = 40: Number of slaves does not tally with the setpoint number of slaves of the unit. r949 = 50+i: Inconsistency in the number of slaves. The number of slaves notified by the ImPI is not in conformance with the number of status words or with the setpoint number of slaves of the MLFB. Counter-measure: F065 SCom Telegram No telegram was received at an SCom interface (SCom/USS protocol) within the telegram failure time. • Check ImPI or communications card and replace, if necessary. • Check configuration of multi-parallel circuit. • Check parameterization. • Replace CU. • Replace ImPI. r949 = 1 SCom1 r949 = 2 SCom2 • • • SIEMENS AG 476 869 4070 76 J AB-74 SIMOVERT MASTERDRIVES Operating Instructions Check the connection CU -X100:1 to 5 and check the connection PMU -X300. Check “Scom/SCB TLG OFF“ P704.01 (SCom1) and P704.02 (SCom2) Replace CU (-A10). 11-9 Faults and Alarms Fault number F070 Vector Control Chassis Type Frequency Converter Fault Counter-measure SCB Init. r949 = 1: Board code incorrect Error during initialization of the SCB r949 = 2: SCB board not compatible r949 = 5: Initialization data error • Check parameter SCB Protocol P696 parameter and Scom/SCB Baud Rate P701.03 r949 = 6: Timeout during initalization r949 = 7: SCB board double r949 = 10: Error in configuration channel F072 EB initialization error r949 = 2: 1. EB1 not compatible r949 = 3: 2. EB1 not compatible r949 = 4: 1. EB2 not compatible r949 = 5: 2. EB2 not compatible r949 = 21: There are three EB1 boards r949 = 22: There are three EB2 boards F073 AnaIn1 SL1 4 mA at analog input 1, slave1 fallen short of Check the connection between the signal source and the SCl1 (Slave 1) -X428:4, 5. F074 AnaIn2 SL1 4 mA at analog input 2, slave1 fallen short of Check the connection between the signal source and the SCI1 (Slave 2) -X428:7, 8. F075 AnaIn3 SL1 4 mA at analog input 3, slave1 fallen short of Check the connection between the signal source and the SCI1 (Slave 3) -X428:10, 11. F076 AnaIn1 SL2 4 mA at analog input 1, slave2 fallen short of Check the connection between the signal source and the SCI1 (Slave1) -X428:4, 5. F077 AnaIn2 SL2 4 mA at analog input 2, slave2 fallen short of Check connection between signal source and SCI1 (Slave 2) -X428:7,8. F078 AnaIn3 SL2 4 mA at analog input 3, slave2 fallen short of Check connection between signal source and SCI1 (Slave 3) -X428:10, 11. F079 SCB Telegram • Check connection of SCB1(2). No telegram has been received by the SCB (USS, Peer-to-Peer, SCI) within the telegram failure time. • Check P704.03“SCom/SCB TLG OFF“. • Replace SCB1(2). • Replace CU (-A10). 11-10 476 869 4070 76 J AB-74 Siemens AG Operating Instructions SIMOVERT MASTERDRIVES Vector Control Chassis Type Frequency Converter Fault number F080 Faults and Alarms Fault TB/CB Init. Error during initialization of the board at the DPR interface Counter-measure r949 = 1: TB/CB not inserted or TB/CB board code incorrect r949 = 2 TB not compatible r949 = 3: CB not compatible r949 = 5: Error in initialization data r949 = 6: Timeout during initialization r949 = 7: TB/CB board double r949 = 10: Error in configuration channel Check that the T300 / CB board is inserted correctly Check the CB initialization parameter: F081 F082 F087 Opt. Board Heartb TB, CB or SCB no longer processes the monitoring counter • P918 CB Bus Address • P711 to P721 CB parameters 1 to 11 r949 = 0: TB/CB Heartbeat counter r949 = 1: SCB Heartbeat counter • Replace SCB, TB or CB • Check connection between subrack and optional boards TB/CB Tlg r949 = 1: TB/CB No new process data have been received by the TB or the CB within the telegram failure time. r949 = 2: 2. CB SIMOLINK initialization fault • Check the connections of the CB/TB. • Check P722 “CB/TB TLG OFF“. • Replace CB or TB. • Replace CU • Replace SLB F090 MId Param. An error occurred when attempting to change a parameter from the standstill measurement or the rotating measurement (Mot ID). Power down and power up again. If it reoccurs, replace the CU. F091 MId Time Eliminate the cause and re-start the measurement (power up the converter again). If it re-occurs, replace the CU. The rotating measurement takes longer than programmed in a measured status. Possible causes: • Load torque too high • Load torque not uniform • Ramp-function generator disabled SIEMENS AG 476 869 4070 76 J AB-74 SIMOVERT MASTERDRIVES Operating Instructions 11-11 Faults and Alarms Fault number F095 Vector Control Chassis Type Frequency Converter Fault Counter-measure MId n(set) • Permissible phase sequence • Maximum frequency, There must be a 10% frequency range which lies above 1.1 times the changeover frequency and below 0.9 times the start of field-weakening frequency. Possible counter-measures; • Minimum speed, • Permit both phase sequences • Changeover frequency between V and I model, • Increase maximum frequency • Reduce minimum speed, • Start of field-weakening frequency, • • Frequency suppression bandwidth Reduce changeover frequency between the V and I model. Due to entries for It was not possible to determine a permissible • frequency range for the rotating measurement. F096 MId abort Reduce or remove the frequency suppression bandwidth. The fault value in r949 defines the type of intervention: The rotating measurement was aborted due to inadmissible external intervention. 4 Setpoint inhibit 5 Changeover, setpoint channel 8 Unexpected change in the converter status 12 Motor data set changeover (for function selection "Compl. Mot ID“) 13 Changeover to slave drive 14 Motor data set changeover to data set with v/f_charac 15 Controller inhibit is set 16 Ramp-function generator is disabled 17 Selection "Tacho test" for F controller 18 Ramp-function generator stopped Eliminate cause F097 MId measured value The measured values for the nominal rampup time when optimizing the controller deviate too greatly. If necessary, increase the torque limit values to 100 percent Cause: very unsteady load torque 11-12 476 869 4070 76 J AB-74 Siemens AG Operating Instructions SIMOVERT MASTERDRIVES Vector Control Chassis Type Frequency Converter Fault number F098 Faults and Alarms Fault MId Tachof The rotating measurement has detected a fault in the speed actual value signal. The fault value defines the type of fault. Counter-measure The fault value in r949 defines the type of intervention 4 No speed signal present 5 Sign of the signal is incorrect The fault message may have been 6 erroneously generated if the drive speed is externally forced (e.g. completely locked drive 7 generates the "no signal" message) 8 A track signal is missing Incorrect gain Incorrect pulse number Checking the measurement cables. Checking the parameters F100 GRND Init During the ground fault test, a current not equal to zero has been measured, or an UCE or overcurrent monitoring has responded, although no valve has yet been triggered. • P130 Src Speed ActV • P151 Encoder Pulse # The cause of the fault can be read out from r376 "GrdFltTestResult". Check the converter output for short-circuit or ground fault (-X2:U2, V2, W2 – including motor). Check that the CU is inserted correctly. Sizes 1 and 2: • Check the transistor modules on the PEU board -A23 for short-circuit. Size 3 and 4: • F101 GRND UCE During the ground fault test, the UCE monitoring has responded in a phase in which no valve has been triggered. Check the transistor modules -A100, -A200, -A300 for short-circuit Check valves in the power section for shortcircuit, and on converters with fiber-optic gating, check the gating unit wiring and the UCE checkbacks for correct assignment. r376 can be interrogated to indicate which UCE monitoring has responded. F102 GRND Phase The fault value can be read out from r949. During the ground fault test, a current flows in The digit of the xth position indicates the a phase in which no valve has been triggered valve where the fault occurred at power-up or the UCE monitoring has responded in the x = 1 = V+ x = 2 = Vx = 3 =U+ phase in which the valve has been triggered. x = 4 = U- x = 5 = W+ x = 6 =WThe figure of the xth digit indicates the phase in which I ≠ 0 and thus a valve must be defective (always conductive). x = 1 = Phase 1 (U) x = 3 = Phase 3 (W) x = 4 = Phase 1 (U) or 3 (W) Examine phase for defective valves (always conductive). SIEMENS AG 476 869 4070 76 J AB-74 SIMOVERT MASTERDRIVES Operating Instructions 11-13 Faults and Alarms Fault number F103 Vector Control Chassis Type Frequency Converter Fault Counter-measure There is a ground fault or a fault in the power section. Read out fault value from r949. The digit of the xth position indicates the valve where the fault occurred at power-up. Ground fault During the ground fault test, a current flows from the phase in which a valve has been triggered, the overcurrent comparator has responded, or a UCE monitoring has responded in a phase in which a valve has been triggered. x = 1 = V+ x = 2 = Vx = 4 = U- x = 5 = W+ x = 3 =U+ x = 6 =W- Check the motor including the feeder cable for short-circuit. If no ground fault is present, check the power section for defective valves (always conductive). The digit of the xth position indicates the phase in which I ≠ 0 and therefore a valve must be defective (always conductive). 1 = Current in phase 1 (U) 2 = UCE in phase 2 (V) 1) 3 = Current in phase 3 (W) 4 = Only overcurrent occurred The speed of the motor shaft during the ground fault test should be less than 10 % of the nominal speed! 1) A ground fault or a defective valve (aways conductive) is present in phase V or the switch for ‘SAFE OFF’ (X9/5-6) is open (only for units with Order No. ...-11, ...21,...-31). F107 MId I = 0 A fault has occurred during the test pulse measurement. Read out fault value from r949. The figures of the grey shaded areas indicate which fault has occurred. xx = 01: Both current actual values remain 0 xx = 02: Motor-converter cable phase U interrupted xx = 03: Motor-converter phase V interrupted xx = 04: Motor-converter phase W interrupted xx = 05: Current actual value I1 remains 0 xx = 06: Current actual value I3 remains 0 xx = 07: Valve U+ does not trigger xx = 08: Valve U- does not trigger xx = 09: Valve V+ does not trigger xx = 10: Valve V- does not trigger xx = 11: Valve W+ does not trigger xx = 12: Valve W- does not trigger xx = 13: Sign I1 incorrect xx = 14: Sign I3 incorrect xx = 15: Sign I1 and I3 incorrect xx = 16: I1 confused with I3 xx = 17: I1 confused with I3 and both currents have an incorrect sign The digit of the grey shaded area indicates where the fault has occurred. 11-14 476 869 4070 76 J AB-74 Siemens AG Operating Instructions SIMOVERT MASTERDRIVES Vector Control Chassis Type Frequency Converter Fault number Faults and Alarms Fault Counter-measure x = 0 = Single converter x = 1 = Inverter 1 x = 2 = Inverter 2 x = 3 = Inverters 1 and 2 Check that all 3 motor feeder cables and the motor windings do not have any interruption. Check the connection between the current converter and the electronics and check the current converter itself. Check the correct input of the rating plate data for the motor data set valid during the measurement. F108 MId Unsym During the DC measurement, the measurement results for the individual phases differ significantly. The fault value indicates which quantity(ies) is (are) concerned and in which phase the greatest deviation occurred. Read out fault value from r949. The digit of the xth position indicates; Transverse voltage too high x = 1 = phase R; x = 2=phase S; x = 3 = phase T Dev. stator resistance (1, 2, 3 as above) Dev. rotor resistance (1, 2, 3 as above) Dev. dead-time compensation (1, 2, 3 as above) Deviation valve voltage (1, 2, 3 as above) The motor, power section or actual-value sensing are significantly non-symmetrical. F109 F110 MId R(L) The rotor resistance determined during DC measurement deviates too significantly from the value which was calculated by the automatic parameterization from the rated slip. • Incorrect input of rated speed or rated frequency • Pole pair number incorrect MId di/dt During test pulse measurement, the current has increased significantly faster than was st expected. Thus for the 1 test pulse, an overcurrent condition occurred within the first half of the minimum switch-on time. • There may be a short-circuit between two converter outputs. • The motor rating plate data have not been correctly parameterized. • The motor leakage is too low. F111 Fault e_Func A fault has occurred while calculating the equalization function. F112 Unsym l_sigma The individual leakage test results deviate too significantly. SIEMENS AG 476 869 4070 76 J AB-74 SIMOVERT MASTERDRIVES Operating Instructions 11-15 Faults and Alarms Vector Control Chassis Type Frequency Converter Fault number Fault Counter-measure F114 MId OFF The converter has automatically aborted the automatic measurement as the time limit was exceeded up to converter power-up, or due to an OFF command during the measurement; the selection in P115 Function Select is reset. For P115 Function Select = 2 restart "Motor data identification at standstill". The ON command must be provided within 20 s after the alarm message A078 = standstill measurement appears. F115 KF internal Power-down the converter and electronics and power-up again. F148 Fault 1 Function blocks Check cause of fault, see function diagram 710 F149 Fault 2 Function blocks Check cause of fault, see function diagram 710 F150 Fault 3 Function blocks Check cause of fault, see function diagram 710 F151 Fault 4 Function blocks Check cause of fult, see function diagram 710 F243 Link int. Faults in internal linking. One of the two linked partners does not reply. Replace CU (-A10). F244 ParaLink int. Release comparison of MWH software and CU software regarding the transfer parameters. Fault in the internal parameter linking Withdraw the OFF command, and restart the measurement. Replace CU (-A10). F255 Fault in the EEPROM Table 11-1 11-16 Switch off the unit and power it up again. If it occurs again, replace the CU. Fault numbers, causes and their counter-measures 476 869 4070 76 J AB-74 Siemens AG Operating Instructions SIMOVERT MASTERDRIVES Vector Control Chassis Type Frequency Converter Alarms Faults and Alarms The alarm message is periodically displayed on the PMU by A = alarm/ alarm message and a 3-digit number. An alarm cannot be acknowledged. It is automatically deleted once the cause has been eliminated. Several alarms can be present. The alarms are then displayed one after the other. When the converter is operated with the OP1S operator control panel, the alarm is indicated in the lowest operating display line. The red LED additionally flashes (refer to the OP1S operating instructions). Alarm number Param. No. Cause Counter-measure Bit No. A001 r953 0 A002 A014 r953 13 A015 r953 14 Calculating time The CUVC board calculating time utilization is too high • Observe r829 CalcTimeHdroom • Increase P357 Sampling Time or • Reduce P340 Pulse Frequency. SIMOLINK start alarm Check Simulation active alarm The DC link voltage is not equal to 0 when the simulation mode is selected. (P372 = 1) • the fiber-optic cable ring • whether there is an SLB without voltage in the ring • whether there is a faulty SLB in the ring • P741 (SLB Tlg OFF) • Set P372 to 0 • Reduce DC link voltage (disconnect the converter from the supply) External alarm 1 Check Parameterizable external alarm input • Whether the cable to the corresponding 1 has been activated digital input is interrupted. • A016 r953 15 External alarm 2 Check Parameterizable external alarm input • Whether the cable to the corresponding 2 has been activated digital input is interrupted. • A017 r954 0 A020 r954 3 A021 r954 4 Parameter P588 Src No Ext Warn1 Parameter P589 Src No Ext Warn2 SAFE OFF alarm active Close switch X9 5-6 and thus release the inverter pulses. The switch for blocking the inverter pulses (X9 terminal 5-6) has been opened (only for units with Order No. ...-11, ...-21,...-31,...-61). Overcurrent An overcurrent condition has occurred. Overvoltage An overvoltage condition has occurred. SIEMENS AG 476 869 4070 76 J AB-74 SIMOVERT MASTERDRIVES Operating Instructions Check the driven load for an overload condition. • Are the motor and the converter matched? • Have the dynamic performance requirements been exceeded? Check the supply voltage. The converter regenerates without regeneration possibility. 11-17 Faults and Alarms Alarm number Param. No. Vector Control Chassis Type Frequency Converter Cause Counter-measure Bit No. A022 r954 5 Inverter temperature The threshold for initiating an alarm has been fallen short of. • Observe r833 Drive Tmp. Measure intake air or ambient temperature. Observe reduction curves at ϑ >40 ºC . Check: A023 r954 6 A024 r954 7 A025 r954 8 A029 r954 12 A033 r955 0 A034 r955 1 11-18 • Whether the fan -E1 is connected and is rotating in the correct direction. • The air intake and discharge openings for blockage. • The temperature sensor at -X30. Motor temperature The parameterizable threshold for initiating an alarm has been exceeded. Check the motor (load, ventilation, etc.). The current temperature can be read in r009 Motor Tmp. Check the KTY84 input at connector X103:29,30 for short-circuit. Motor movement The motor has moved during motor data identification in first start-up. Lock the motor I2t Inv. If the instantaneous load condition is maintained, then the inverter will be thermally overloaded. Motor load cycle exceeded! Check the parameters: P382 Motor Cooling P383 Mot Tmp T1 P384 Mot Load Limits I2t motor The parameterized limit value for the I2t monitoring of the motor has been exceeded. Motor load cycle is exceeded! Check the parameters: P382 Motor Cooling P383 Mot Tmp T1 P384 Mot Load Limits Overspeed Bit 3 in r553 status word 2 of the setpoint channel. The speed actual value has exceeded the value of maximum speed plus the set hysteresis. P804 Overspeed Hyst plus P452 n/f(max, FWD Spd) or P453 n/f(max,REV Spd) has been exceeded. Increase the parameter for the maximum frequencies or reduce the regenerative load. Setpoint/actual value deviation Bit 8 in r552 status word 1 of setpoint channel. The difference between frequency setpoint/actual value is greater than the parameterizable value and the control monitoring time has elapsed. Check: • Whether an excessive torque requirement is present. • Whether the motor has been dimensioned too small. Increase values P792 Perm Deviation Frq/ set/actual DevSpeed and P794 Deviation Time 476 869 4070 76 J AB-74 Siemens AG Operating Instructions SIMOVERT MASTERDRIVES Vector Control Chassis Type Frequency Converter Alarm number Param. No. Faults and Alarms Cause Counter-measure Bit No. r955 Wire break The clockwise and/or the counterclockwise rotating field is not enabled, or a wire breakage is present in the terminal wiring (both control word bits are zero) Check whether cable(s) to the corresponding digital input(s), P572 Src REV Speed/ P571 Src FWD Speed is (are) interrupted or released. A036 Brake checkback "Brake still closed“ Check the brake checkback (see FD 470) A037 Brake checkback "Brake still open" Check brake checkback (see FP 470) Vdmax controller inhibit The line voltage is too high or the drive line voltage (P071) is incorrectly parameterized. The Vdmax controller is disabled despite parameter access (P515), as otherwise the motor would accelerate immediately in operation to the maximum frequency. Check: Motor stall/lock Motor is stalled or locked. Check: • Whether the drive is locked. The alarm cannot be influenced by P805 “ PullOut/BlckTime”, but by P794 “Deviation Time”. • Whether the encoder cable is interrupted during speed control and whether the shield is connected. • Whether the drive has stalled. • For synchronous motors (P095=12): excitation current injection A035 2 A041 r955 8 A042 r955 9 A043 r955 10 n-act jump The permissible change value of the speed encoder signal (P215) has been exceeded. Additionally for synchronous motors (P095=12): The motor rotates with more than 2 % of the rated speed at the time of inverter release. The inverter status "Ready for operation" is not exited. • Line voltage • P071 Line Volts Check the tachometer cables for interruptions. Check the earthing of the tachometer shield. • The shield must be connected both on the motor and on the converter side. • The encoder cable must not be interrupted. • The encoder cable must not be laid with the power cables. • Only the recommended encoders should be used. • If there is a signal fault, use the DTI board if necessary. If necessary, change P215 • SIEMENS AG 476 869 4070 76 J AB-74 SIMOVERT MASTERDRIVES Operating Instructions Additionally for synchronous motors (P095=12): Do not grant inverter release until the motor is at standstill. 11-19 Faults and Alarms Alarm number Param. No. Vector Control Chassis Type Frequency Converter Cause Counter-measure Bit No. A044 r955 11 I too low Only for synchronous motors (P095=12) in operation: Only for synchronous motors P095 = 12 Check: The difference smoothed with P159 between excitation current setpoint and actual value (r160 - r156 ) deviates from zero by more than 25 % of the rated magnetizing current. A045 r955 12 A049 r956 0 A050 r956 1 A051 r956 2 A052 r956 3 A053 r956 4 11-20 • Whether the current limitation of the excitation current control is too small. • Whether the dynamic performance of the excitation current injection is too low. • Whether the excitation current injection function is operating, • Whether the wiring of excitation current actual-value P155 is correct, • Whether the wiring of excitation current setpoint r160 is correct, • Whether there is a wire breakage between MASTERDRIVES and the excitation device. • Whether the voltage limitation is too low for dynamic excitation current control. • Whether the analog output for r160 takes place without isolating amplifiers (despite cable length > 4m). DC braking activated • The DC braking function has been activated and the motor frequency is still above the frequency at which DC braking begins (P398). Increase frequency at which DC braking begins. No slave At ser. I/O (SCB1 with SCI1/2) no slave is connected or fiber-optic cable is interrupted or slaves are without voltage. P690 SCI AnaIn Conf Slave incorrect At ser. I/O the slaves required according to a parameterized configuration are not present (slave number or slave type). Check P690 SCI AnaIn Conf Peer Bdrate In a peer-to-peer connection, a baud rate has been selected which is too high or too different. Adjust the baud rate in conjunction with the SCB boards P701 SCom/SCB Baud Rate • Check slave. • Check cable. Peer PcD L Reduce number of words In a peer-to-peer connection, a PcD P703 SCom PcD #. length has been set which is too high (>5). Peer Lng f. In a peer-to-peer connection, the PcD length of transmitter and receiver do not match. Adjust the word length for transmitter and receiver P703 SCom/SCB PcD # 476 869 4070 76 J AB-74 Siemens AG Operating Instructions SIMOVERT MASTERDRIVES Vector Control Chassis Type Frequency Converter Alarm number Param. No. Faults and Alarms Cause Counter-measure Bit No. r956 TB Param Occurs when a TB is logged on and present, but parameter tasks from the PMU, SCom1 or SCom2 are not answered by the TB within 6 seconds. Replace TB configuration (software). A061 Alarm 1 function blocks Check cause of alarm (see FP 710) A062 Alarm 2 function blocks Check cause of alarm (see FP 710) A063 Alarm 3 function blocks Check cause of alarm (see FP 710) A064 Alarm 4 function blocks Check cause of alarm (see FP 710) Auto restart active The auto restart option (P373) restarts the drive. A possibly parameterized power-up delay time (P374) expires if flying restart is not selected. During pre-charging of the DC link, there is no time monitoring i.e. with an external electronics power supply, it is also switched-in again. Caution! fsyn > fmax The measured target frequency of the external converter (or supply) is greater than the parameterized maximum frequency of the synchronizing converter. Check: fsyn < fmin The measured target frequency of the external converter (or supply) is less than the minimum frequency required for synchronizing. Check: fsyn<>fsoll The setpoint frequency of the synchronizing converter deviates too significantly from the measured target frequency of the external converter (or supply). The permissible deviation can be set in P529. Adjust total setpoint (main and additional setpoints) to the target frequency displayed in visualization parameter r533. RGen active Synchronizing is not started as long as the ramp-function generator in the synchronizing converter setpoint channel is active. This alarm is only output if synchronizing is selected. Wait until acceleration has been completed. A057 8 A065 r957 0 A066 r957 1 A067 r957 2 A068 r957 3 A069 r957 4 SIEMENS AG 476 869 4070 76 J AB-74 SIMOVERT MASTERDRIVES Operating Instructions Personnel could be in danger when the drive automatically restarts. Check whether the auto restart function is really required! • P452 n/f(max, FWD Spd)/ P453 n/f(max,REV Spd) are correct and • Correct motor data set P578 Src MotDSet Bit0 are selected. • r533 Sync Target Freq • Synchronising cable Check whether: • P462 Accel Time • P463 Accel Time Unit has been correctly set. 11-21 Faults and Alarms Alarm number Vector Control Chassis Type Frequency Converter Param. No. Cause Counter-measure Bit No. A070 r957 5 A071 r957 6 A076 r957 11 A077 r957 12 A078 r957 13 A079 r957 14 A080 r957 15 A081.. A096 A097.. A112 A113.. A128 r958 1...15 r959 1...15 r960 1...15 Sync. Error This alarm is output if the phase difference goes outside the synchronizing window (P 391) after successful synchronization. The alarm can only be deleted after synchronization has been exited. TSY missing An attempt was made to start synchronization with either the synchronizing board not inserted or not parameterized. Insert the TSY board in the subrack. t-comp lim The determined compensation time was limited to the value range of 0.5µs - 1.5µs. The converter output and the motor output are too different. Check motor data entries P095 to P109. r-g limit Converter output and motor output are too The measured resistance was limited different. to the maximum value of 49 %. Check motor data entries P095 to P109. Stands. Meas If the standstill measurement can be The standstill measurement is executed without any danger: executed when the converter is • Power up the converter powered-up. With this measurement, the motor can align itself in any direction of rotation. MId Inv Stop The rotating measurement has been aborted or cannot commence because an inverter stop command is present. or re-start the measurement by powering-up the converter. MotId:Dr.M. If the rotating measurement can be executed without any danger: When the converter is powered-up, the rotating measurement • Power-up the converter automatically accelerates the drive. The drive can then only be externally controlled in a very restricted fashion. CB alarm See user manual for CB board TB alarm 1 See user manual for TB board TB alarm 2 See user manual for TB board Table 11-2 11-22 P561 Src InvRelease – Release the inverter Alarm numbers, causes and their counter-measures 476 869 4070 76 J AB-74 Siemens AG Operating Instructions SIMOVERT MASTERDRIVES Vector Control Chassis Type Frequency Converter Fatal errors (FF) Faults and Alarms Fatal errors are serious hardware or software errors which no longer permit normal operation of the unit. They only appear on the PMU in the form "FF<No>". The software is re-booted by actuating any key on the PMU. FFxx Error message FF01 Time slot overflow A non-removable time sector overflow was identified in the higher priority time sectors. • Increase sampling time (P357) or reduce pulse frequency (P340) • Replace CU Access error, optional board Fatal errors occurred when accessing external optional boards (CB, TB, SCB, TSY ..) • Replace CU • Replace LBA • Replace optional board Stack overflow Overflow of the stack. • Increase sampling time (P357) or reduce pulse frequency (P340) • Replace CU Other fatal errors • Replace CU E Fatal hardware errors • Replace CU EEEE Fatal firmware errors • Replace CU • Re-load firmware FF03 FF06 FFxx Table 11-3 Power-down the converter and power-up again. Call the service personnel if a fatal error message is displayed again Fatal errors SIEMENS AG 476 869 4070 76 J AB-74 SIMOVERT MASTERDRIVES Operating Instructions 11-23 Vector Control Chassis Type Frequency Converter 12 WARNING Maintenance Maintenance SIMOVERT MASTERDRIVES units are operated at high voltages. All work carried out on or with the equipment must conform to all the national electrical codes (VBG 4 in Germany). Maintenance and service work may only be executed by qualified personnel. Only spare parts authorized by the manufacturer may be used. The prescribed maintenance intervals and also the instructions for repair and replacement must be complied with. Hazardous voltages are still present in the drive units up to 5 minutes after the converter has been powered down due to the DC link capacitors. Thus, the unit or the DC link terminals must not be worked on until at least after this delay time. The power terminals and control terminals can still be at hazardous voltage levels even when the motor is stationary. If it is absolutely necessary that the drive converter be worked on when powered-up: ♦ Never touch any live parts. ♦ Only use the appropriate measuring and test equipment and protective clothing. ♦ Always stand on an ungrounded, isolated and ESD-compatible pad. If these warnings are not observed, this can result in death, severe bodily injury or significant material damage. SIEMENS AG 476 869 4070 76 J AB-74 SIMOVERT MASTERDRIVES Operating Instructions 12-1 Maintenance 12.1 Vector Control Chassis Type Frequency Converter Replacing the fan The fan is designed for an operating time of L10 ≥35 000 hours at an ambient temperature of Tu = 40 °C. It should be replaced in good time to maintain the availability of the unit. Construction types E-G The fan assembly consists of: ♦ the fan housing ♦ a fan The fan assembly is installed between the capacitor battery and the motor connection. Replacement ♦ Withdraw connector X20. ♦ Remove the cable fastening. ♦ Undo the two M6x12 Torx screws. ♦ Pull out the fan assembly towards the front. ♦ Install the new fan assembly in reverse sequence. Prior to start-up, check that the fan can run freely and check for correct direction of air flow. The air must be blown upwards out of the unit. Torx M6x12 Torx M6x12 Fan Fig. 12-1 Construction type K Fan housing Fan assembly The fan assembly consists of: ♦ the fan housing ♦ a fan. The fan assembly is installed at the top of the chassis. ♦ Withdraw connector X20. ♦ Undo the two M8 screws of the fan assembly. ♦ Pull out the fan assembly towards the front (if necessary, tilt it slightly downwards at the front) and lay it down safely. 12-2 476 869 4070 76 J AB-74 Siemens AG Operating Instructions SIMOVERT MASTERDRIVES Vector Control Chassis Type Frequency Converter CAUTION Maintenance The fan assembly weighs up to 38 kg, depending on its design. ♦ Undo the cable fastenings and fan connections. ♦ Take the fan support plate out of the fan assembly and remove the fan from the support plate. ♦ Install the new fan assembly in the reverse sequence. Prior to start-up, check that the fan can run freely and check for correct direction of air flow. The air must be blown upwards out of the unit. The direction of rotation is counter-clockwise when seen from above. Fig. 12-2 12.2 Fan assembly -E1, fan transformer primary fuse, starting capacitor -C110 Replacing the fan fuse (type K) The fuses are in a fuse holder which is mounted on a DIN rail in the bottom of the unit. The fuse holder has to be opened to replace the fuses. SIEMENS AG 476 869 4070 76 J AB-74 SIMOVERT MASTERDRIVES Operating Instructions 12-3 Maintenance 12.3 Vector Control Chassis Type Frequency Converter Replacing the fan transformer fuse -F3, -F4 (type K) Construction type K: Fuses -F3, -F4 The fuses are in a fuse holder which is arranged below the fan in front of the air baffle plate. To replace the fuses, the fuse holder has to be opened. Fig. 12-3 12.4 Fan transformer (-T10), fan transformer fuses (-F3, -F4) Replacing the fan transformer Construction types E-G The fan transformer is screwed on behind the motor connection. Construction type K ♦ Mark the connecting cables on the transformer and disconnect them. ♦ Undo the screw connections at the bottom on the transformer plate and remove the transformer. Type K: Secure the transformer against falling down! ♦ Install the new transformer in the reverse sequence. 12-4 476 869 4070 76 J AB-74 Siemens AG Operating Instructions SIMOVERT MASTERDRIVES Vector Control Chassis Type Frequency Converter 12.5 Maintenance Replacing the starting capacitor The starting capacitor is situated • next to the fan connection (types E-G), • inside the fan housing (type K, -C110). ♦ Withdraw the plug connections on the starting capacitor. ♦ Unscrew the starting capacitor. ♦ Install the new starting capacitor in reverse sequence (4.5 Nm). 12.6 Replacing the capacitor battery The unit is an assembly which consists of the DC link capacitors, the capacitor support and the DC link bus module. Construction types E and F ♦ Disconnect the electrical connection to the inverter bus module. ♦ Undo the mechanical interlock. ♦ Swing the capacitor battery out towards the front and lift the unit out towards the top. Construction Type G ♦ Remove the connection for the balancing resistor (cable lug M6). ♦ Detach the mechanical fastening. ♦ Swing the capacitor battery out towards the front and lift the unit at an angle of 45 ° out of the converter. Construction type K The capacitor battery consists of three modules. Each module has a capacitor support and a DC link bus module. ♦ Withdraw the plug connections. ♦ Detach the mechanical fastening (four screws: two on the left, two on the right). Swing the capacitor battery out as far as it will go, slightly raise the unit and pull it forwards out of the converter. CAUTION The capacitor battery weighs up to 15 kg, depending on the converter output! SIEMENS AG 476 869 4070 76 J AB-74 SIMOVERT MASTERDRIVES Operating Instructions 12-5 Maintenance 12.7 Vector Control Chassis Type Frequency Converter Replacing the SML and the SMU SML: Snubber Module Lower SMU: Snubber Module Upper ♦ Remove the capacitor battery. ♦ Undo the fixing screws (4 x M8, 8 - 10 Nm or 4 x M6, 2.5 - 5 Nm, 1 x M4, max 1.8 Nm). ♦ Remove the modules. Install the new modules in the reverse sequence. 12.8 Removal Removing and installing the module busbars (from type G) ♦ Remove the capacitor battery. ♦ Undo the screws of the module busbars. M8 power connections M6 fastening on spacers M4 circuit. ♦ Take out the insulation of the SMU / SML. ♦ Lift out the module busbars. Installation NOTE The spacing between the plus busbar and the minus busbar must be at least 4 mm. In order to install the module busbars, you must therefore use a template, e.g. a 4 mm thick piece of plastic. ♦ Place the module busbars and SMU/SML insulation on spacer bolts and fix in place (M6). ♦ Place the template instead of the DC link bus module in the module busbars. ♦ Locate the SMU and SML and tighten the modular connections (M8, 8 - 10 Nm, M6, 2.5 - 5 Nm). ♦ Screw the nuts tight on the spacer bolts (6 Nm). ♦ Connect the circuit resistors (M4, 1.8 Nm). ♦ Tighten the power connections (M8, 13 Nm). ♦ Remove the template from the module busbars. Template 4 mm Module screw connection − Module screw connection + 4 Fig. 12-4 12-6 Installing the module busbars 476 869 4070 76 J AB-74 Siemens AG Operating Instructions SIMOVERT MASTERDRIVES Vector Control Chassis Type Frequency Converter 12.9 Maintenance Replacing the balancing resistor The balancing resistor is situated in the rear installation level on the heat sink between the inverter modules, i.e. behind the capacitor battery and the module busbars. ♦ Remove the capacitor battery. ♦ Remove the module busbars and the IGD module. ♦ Undo the fixing screws and take out the balancing resistor. ♦ Install the new component in reverse sequence. ♦ The balancing resistor is tightened with 1.8 Nm. Coat the base plate evenly and thinly with a thermo-lubricant, paying attention to correct contact assignment. 12.10 Replacing the PCU (types E to G) PCU: Pre-Charge Unit Construction types E and F ♦ Withdraw connector X39. ♦ Remove the screws at the bus connection U1/L1, V1/L2, W1/L3, C, D and PE1. ♦ Unlock the spacers and take out the PCU. ♦ Install the new PCU in the reverse sequence. Construction type G ♦ Take out the PCC unit. ♦ Withdraw connector X39. ♦ Remove the screws at the bus connection U1/L1, V1/L2, W1/L3, C, D and PE1. ♦ Unlock the spacers and take out the PCU. ♦ Install the new PCU in the reverse sequence. 12.11 Replacing the PCC (types E to G) PCC: Precharge Control Circuit ♦ Take out the PCU (type E and F). ♦ Withdraw connector X11, X12, X13 and X246 on the PCC. ♦ Disconnect the NUD cable. ♦ Remove the fixing screws of the PCC unit. ♦ Unlock the spacers and take out the PCC. ♦ Install the new PCC in the reverse sequence. SIEMENS AG 476 869 4070 76 J AB-74 SIMOVERT MASTERDRIVES Operating Instructions 12-7 Maintenance 12.12 Vector Control Chassis Type Frequency Converter Replacing the rectifier module Removal ♦ Remove the PCC and the PCU. Construction types E and F ♦ Dismantle the input bus module and the rectifier bus module. Construction type G ♦ Remove the PCC together with the support plate ♦ Undo the screws of the faulty module and remove it. ♦ Remove the PCU, PSU and the electronics box. ♦ Dismantle the input bus module and the rectifier bus module. ♦ Install the new PCU in the reverse sequence. ♦ Coat the contact surfaces of the heat sink thinly and evenly with a thermo-lubricant. Installation ♦ Tighten the fixing screws of the rectifier module with 4 Nm. ♦ Re-install the remaining components in the reverse sequence. 12.13 Replacing the IVI IVI: Inverter-Value Interface (interface board for the power section) The IVI board is screwed on at the rear of the electronics box. Construction types E to G ♦ Withdraw the connections X205, X206, X208, X31 and X33 from the IVI board. ♦ Remove the capacitor battery (types E and F). ♦ Disconnect the fiber-optic cables (type G with rated input voltage 3 ph. AC 660 - 690 V or DC 890 - 930 V). ♦ Remove the PSU together with its insulation (type G) ♦ Take all the units out of the electronics box and place them on a suitable surface which is not statically charged. ♦ Undo the two fixing screws of the electronics box. ♦ Push the electronics box out of its interlock and remove it towards the front. ♦ Pull out the ABO adaption board. ♦ Unscrew the IVI board and take it out. ♦ Install the new IVI in reverse sequence. 12-8 476 869 4070 76 J AB-74 Siemens AG Operating Instructions SIMOVERT MASTERDRIVES Vector Control Chassis Type Frequency Converter Construction type K Maintenance ♦ Unscrew the two screws of the electronics slide-in unit and pull it out to its endstops. ♦ Disconnect the ground cable of the electronics slide-in unit. ♦ Remove all boards from the electronics box and place them on a suitable surface which cannot be statically charged. ♦ Unscrew the two fixing screws of the electronics box. ♦ Push the electronics box out of its interlock and take it out towards the front. ♦ Pull out the ABO Adaption Board. ♦ Disconnect the fiber-optic cables. ♦ Unscrew the IVI board and take it out. ♦ Install the new IVI in the reverse sequence. 12.14 Replacing the VDU and the VDU resistor VDU: Voltage-Dividing Unit The VDU and the VDU resistor are only found on converters with higher supply voltages. The VDU bracket is an integral component of the electronics slide-in unit. ♦ Detach the plug-in connections. VDU ♦ Undo the fixing screw ♦ Take out the VDU. ♦ Install the new VDU in the reverse sequence. ♦ Unscrew the cable fasteners. VDU resistor ♦ Detach the plug-in connections. ♦ Take out the VDU resistor. ♦ Install the new VDU resistor in the reverse sequence. 12.15 Replacing the PSU PSU: Power Supply Unit Construction types E to G ♦ Withdraw connectors X18, X258 and X70. ♦ Remove the Torx screw with ground connection from the side panel. ♦ Push the PSU out of its locking pins and take it out sideways and frontwards under the input bus. ♦ Install the new PSU in the reverse sequence. SIEMENS AG 476 869 4070 76 J AB-74 SIMOVERT MASTERDRIVES Operating Instructions 12-9 Maintenance Vector Control Chassis Type Frequency Converter Construction type K ♦ Remove the VDU and the VDU resistor (if present). ♦ Remove the VDU retainer plate. ♦ Detach the plug-in connections on the PSU. ♦ Undo the screws (six Torx M4 screws) on the PSU. ♦ Take out the PSU. ♦ Install the new PSU in the reverse sequence. 12.16 Replacing the IGD IGD: IGBT Gate Drive Construction types E and F ♦ The IGD board is mounted directly on the IGBT modules. ♦ Take out the capacitor battery. ♦ Remove the electronics box with IVI board for type E. ♦ Mark the output wiring U2/T1, V2/T2 and W2/T3 and disconnect it. ♦ Remove the inverter bus module after unscrewing the twelve M6 screws. ♦ Withdraw connector X295. ♦ Undo the fixing screws and remove the IGD board. Construction type G ♦ The IGD board is mounted directly on the IGBT modules. ♦ Take out the capacitor battery. ♦ Remove the SML and SMU modules. ♦ Remove the module busbars. ♦ Remove the fiber-optic cables or connector X295. ♦ Withdraw connectors X290 and X291. ♦ Undo the fixing screws and remove the IGD board. NOTE The spacing between the plus busbar and the minus busbar must be at least 4 mm. In order to install the module busbars, you must therefore use a template, e.g. a 4 mm thick piece of plastic. Construction type K ♦ The IGD board is situated behind the module busbars. ♦ Take out the capacitor battery. ♦ Take out the SML and SMU modules. ♦ Remove the module busbars. ♦ Remove the nine fiber-optic cables at the top of the IGD. ♦ Withdraw the P15 feeder cable. ♦ Undo the fixing screws and remove the IGD board. ♦ Install the new IGD in the reverse sequence. Make sure when doing so that you push in the fiber-optic cables up to the endstop. 12-10 476 869 4070 76 J AB-74 Siemens AG Operating Instructions SIMOVERT MASTERDRIVES Vector Control Chassis Type Frequency Converter 12.17 Maintenance Replacing the TDB (type K) TDB: Thyristor Drive Board The TDB is arranged in front of the thyristor modules. These are situated in the rectifier section between the fan assembly and the inverter. ♦ Remove the cover (undo screws, then first of all detach the righthand snap hook, and then the left-hand snap hook) ♦ Withdraw connectors X246, X11, X12 and X13. ♦ Disconnect the PUD and NUD connections of the pre-charging resistors R1 and R2 (M4, Torx). ♦ Disconnect the connections to phases U, V, W . ♦ Disconnect the NUD1, NUD2, NUD3 connections. ♦ Remove the TDB board. ♦ Install the new TDB in the reverse sequence. See figure under section "Replacing the thyristor modules" 12.18 Replacing the IGBT module Replacement is carried out as in the case of the IGD board, with the following additions: ♦ Remove the fixing screws of the faulty IGBT module and take it out. ♦ Install a new IGBT module, paying attention to the following: • Coat the contact surfaces thinly and evenly with a thermolubricant. • Tighten the fixing screws of the IGBT module with 5 Nm, observing the sequence of tightening. ♦ Modules with the same type designation e.g. FZxxxxRYYKF4 must be installed in every phase (type K). 1 4 3 2 3 C E 6 1 2 5 4 Screw on IGBT module: 1. Hand-tighten (~ 0.5 Nm) Sequence 1 - 2 - 3 - 4 - 5 - 6 2. Tighten with 5 Nm (Order No. 6SE7031-8EF60: 2.5 - 3.5 Nm) Sequence 1 - 2 - 3 - 4 - 5 - 6 Fig. 12-5 Screwing on the IGBT module SIEMENS AG 476 869 4070 76 J AB-74 SIMOVERT MASTERDRIVES Operating Instructions 12-11 Maintenance 12.19 Vector Control Chassis Type Frequency Converter Replacing the thyristor modules (V1 to V3, type K) Replacement as in the case of the TDB, with the following additions: ♦ Disconnect the supply cables C+ D− of the option terminals ♦ Disconnect the connection of the C and D bars between the rectifier and the inverter. ♦ Disconnect the connections U, V, W of the modules. ♦ Disconnect the connections between modules and C(+) bar. ♦ Remove the connecting bar C(+). ♦ Disconnect the connections between modules and D(−) bar. ♦ Remove the connecting bar D(−). ♦ Undo the module fixing screws (M6, Torx). ♦ Remove the module (weight approx. 500 g). ♦ Clean the contact surface. ♦ Coat the new modules thinly and evenly with a thermo-lubricant and mount them. Tightening torque of the fixing screws: 6 Nm ± 15 %. ♦ Further installation is performed in the reverse sequence. Tightening torque of the electrical connections (C and D): 12 Nm (+ 5 %, − 10 %). Fig. 12-6 12-12 TDB board, pre-charging resistors and thyristor modules V1, V2, V3 476 869 4070 76 J AB-74 Siemens AG Operating Instructions SIMOVERT MASTERDRIVES Vector Control Chassis Type Frequency Converter 12.20 Maintenance Replacing the PMU ♦ Remove the ground cable on the side panel. ♦ Carefully press the snap catches on the adapter section together, remove the PMU with adapter section from the electronics box. ♦ Withdraw connector X108 on the CUx board. ♦ Carefully lift forward the PMU out of the adapter section using a screwdriver. ♦ Install the new PMU in the reverse sequence. Adapter section PMU Snap catches E-box Fig. 12-7 PMU with adapter section on the electronics box SIEMENS AG 476 869 4070 76 J AB-74 SIMOVERT MASTERDRIVES Operating Instructions 12-13 Maintenance 12.21 Vector Control Chassis Type Frequency Converter Replacing the pre-charging resistors (R1 - R4, type K) These are situated on the right next to the TDB board in the rectifier section. ♦ Remove the cover (undo screws, then detach first the right-hand snap catch and then the left-hand snap catch). ♦ Disconnect the PUD and the NUD connections of the pre-charging resistors R1 - R4 (M4, Torx). ♦ Detach the pre-charging resistors and take them out. ♦ Install the new pre-charging resistor with torque of 20 Nm ± 10 %. CAUTION Do NOT tilt the pre-charging resistor! ♦ Mount the fastenings and the connections in the reverse sequence. See figure under section "Replacing the thyristor modules" 12.22 Replacing the circuit resistor Construction type K ♦ Take out the capacitor battery. ♦ Take out the SML and SMU modules. ♦ Remove the module busbars. ♦ Undo the fixing screws (2 x M5, torque: max. 1.8 Nm) and take out the circuit resistor. ♦ The new resistor must be thinly and uniformly rolled in a thermolubricant. ♦ Max. torque of the electrical connections: 1.8 Nm. ♦ Install the new circuit in the reverse sequence. 12-14 476 869 4070 76 J AB-74 Siemens AG Operating Instructions SIMOVERT MASTERDRIVES Vector Control Chassis Type Frequency Converter 13 Forming Forming If a unit has been non-operational for more than one year, the DC link capacitors have to be newly formed. If this is not carried out, the unit can be damaged when the line voltage is powered up. If the unit was started-up within one year after having been manufactured, the DC link capacitors do not have to be re-formed. The date of manufacture of the unit can be read from the serial number. How the serial number is made up (Example: A-J60147512345) Digit Example Significance 1 and 2 A- Place of manufacture 3 H 1996 J 1997 K 1998 4 1 to 9 January to September O October N November D December 5 to 14 Not relevant for forming The following applies for the above example: Manufacture took place in June 1997. During forming, the DC link of the unit is connected up via a rectifier, a smoothing capacitor and a resistor. As a result, the DC link capacitors receive a defined voltage and a limited current, and the internal conditions necessary for the function of the DC link capacitors are restored. 3AC A C R C / L+ D / L- Forming Disconnect Motorconnection Pre-charging U1/L1 U2/T1 V1/L2 V2/T2 W1/L3 W2/T3 DC link PE1 Rectifier Fig. 13-1 Inverter PE2 Forming circuit SIEMENS AG 476 869 4070 76 J AB-74 SIMOVERT MASTERDRIVES Operating Instructions 13-1 Forming Components for the forming circuit (suggestion) Vector Control Chassis Type Frequency Converter Types E to G: Vrated A R C 3AC 380 V to 480 V SKD 62 / 16 330 Ω / 150 W 22 nF / 1600 V 3AC 500 V to 600 V 3 x SKKD 81 / 22 470 Ω / 200 W 22 nF / 1600 V 3AC 660 V to 690 V 3 x SKKD 81 / 22 470 Ω / 100 W 22 nF / 1600 V A R C 3AC 380 V to 480 V SKD 62 / 16 100 Ω / 500 W 22 nF / 1600 V 3AC 500 V to 600 V 3 x SKKD 81 / 22 150 Ω / 500 W 22 nF / 1600 V 3AC 660 V to 690 V 3 x SKKD 81 / 22 150 Ω / 500 W 22 nF / 1600 V Type K: Vrated Procedure ♦ Before you form the unit, all mains connections must be disconnected. ♦ Connect the required components in accordance with the circuit example. ♦ Energize the forming circuit. The duration of forming depends on the idle time of the converter. 6 Forming time in hours 5 4 3 2 Off-circuit idle time in years 1 1 Fig. 13-2 13-2 2 3 4 5 Forming time as a function of converter idle time 476 869 4070 76 J AB-74 Siemens AG Operating Instructions SIMOVERT MASTERDRIVES Vector Control Chassis Type Frequency Converter 14 Environmental Friendliness Environmental Friendliness Environmental aspects during the development The number of components has been significantly reduced over earlier converter series by the use of highly integrated components and the modular design of the complete series. Thus, the energy requirement during production has been reduced. Special significance was placed on the reduction of the volume, weight and variety of metal and plastic components. Plastic components ABS: PMU support panel LOGO LDPE: Capacitor ring PA6.6: Fuse holders, mounting rail, capacitor holder, cable retainer, connecting strips, terminal strip, supports, PMU adapter, covers PC: Covers PP: Insulating boards bus retrofit PS: Fan housing UP: Tensioning profile retaining bolts Halogen-containing flame retardants were, for all essential components, replaced by environmentally-friendly flame retardants. Environmental compatibility was an important criterium when selecting the supplied components. Environmental aspects during production Purchased components are generally supplied in recyclable packaging materials (board). Surface finishes and coatings were eliminated with the exception of the galvanized sheet steel side panels. ASIC devices and SMD devices were used on the boards. The product is emission-free. Environmental aspects for disposal The unit can be broken-down into recyclable mechanical components as a result of the easily releasable screw- and snap connections. The plastic components and moulded housing are to DIN 54840 and have a recycling symbol. Units can be disposed of through certified disposal companies. Addresses are available from your local Siemens partner. SIEMENS AG 476 869 4070 76 J AB-74 SIMOVERT MASTERDRIVES Operating Instructions 14-1 Vector Control Chassis Type Frequency Converter 15 Certificates Certificates Automation and Drives Confirmation Erlangen, 01.05.1998 This confirms that Equipment • Type AC drive converter • Order No.: 6SE70... SIMOVERT MASTERDRIVES is manufactured in conformance with DIN VDE 0558, Part 2 and EN 60204, Part 6.2 (= DIN VDE 0113, Part 6.2). This equipment fulfills the protection requirements against electric shock according to DIN VDE 0106 Part 100 when the following safety rules are observed: • Service work in operation is only permissible at the electronics box • The converter must be switched into a no-voltage condition and isolated from the supply when replacing any part/component • All panels must be closed during operation. Thus, this equipment conforms to the appropriate regulations in Germany according to VBG 4 §2 (2) (VBG is a German regulatory body for safety-related issues). The local operating regulations (e.g. EN 50110-1, EN 50110-2) must be observed when operating the equipment. A&D DS A P1 Mickal SIEMENS AG 476 869 4070 76 J AB-74 SIMOVERT MASTERDRIVES Operating Instructions 15-1 Certificates Vector Control Chassis Type Frequency Converter Automation and Drives Test certificate Erlangen, 01.05.1998 Equipment AC drive converter • Type SIMOVERT MASTERDRIVES • Order No.: 6SE70... 1) The 100% inspection was performed according to test instructions 475 100.9000.00 QP type A - D 476 100.9000.00 QP type E - G 476 200.9000.00 QP type J - L Test scope: I. Insulation test • refer to EN 50178, Part 9.4.5.2 and UL508/CSA 22.2-14.M 91, Part 6.8 II. Function test acc. to EN 50178 • • • • III. RUN-IN IV. Function test acc. to EN 50178 Initialization and start-up Customer terminal test Power section inspection Inspection of protection and monitoring equipment • Continuous test > 5 hours ambient temperature 55 °C • see II. function test The equipment complied with the test requirements. The test results are documented within the test data base 1) For complete type, serial number and technical data please see rating plate. A&D DS A PE D P Schlögel 15-2 476 869 4070 76 J AB-74 Siemens AG Operating Instructions SIMOVERT MASTERDRIVES Vector Control Chassis Type Frequency Converter Factory certificate Certificates * regarding electromagnetic compatability 4SE.476 000 0001.00 WB EMV Manufacturer: Siemens Aktiengesellschaft Automation & Drives Group Business Division Variable-speed drives Sub-Division AC-Drive systems P.O. Box 3269 D-91050 Erlangen Address: Product name: SIMOVERT Type 6SE70 Chassis units AC-AC and DC-AC When correctly used, the designated product fulfills all the requirements of Directive 89/336/EEC regarding electromagnetic compatibility. We confirm the conformance of the above designated product with the Standards: EN 61800-3 10-1996 EN 61000-4-2 (old IEC 801-2) EN 61000-4-4 (old IEC 801-4) EN 61000-4-5 (old IEC 801-5) IEC 1000-4-3 (old IEC 801-3) EN 55011 (DIN VDE 0875 Part 11) Note: These instructions relating to EMC-correct installation, correct operation, connecting-up conditions and associated instructions in the product documentation supplied must be observed. Erlangen, 01.05.1998 H. Mickal A&D DS A P1 *) acc. to EN 10204 (DIN 50049) This declaration does not guarantee any features. A&S DS 4102x Copyright () SIEMENS AG 1997 All rights reserved SIEMENS AG 476 869 4070 76 J AB-74 SIMOVERT MASTERDRIVES Operating Instructions Page 1 of 1 15-3 Bisher sind folgende Ausgaben erschienen: Ausgabe Interne Sachnummer AA 476 869 4070 76 J AA-74 AB 476 869 4070 76 J AB-74 Ausgabe AB besteht aus folgenden Kapiteln: Kapitel Änderungen Seitenzahl Ausgabedatum überarbeitete Ausgabe 4 05.98 1 Definitionen und Warnungen 2 Beschreibung überarbeitete Ausgabe 1 05.98 3 Transportieren, Lagern, Auspacken überarbeitete Ausgabe 1 05.98 4 Technische Daten überarbeitete Ausgabe 18 05.98 5 Montage überarbeitete Ausgabe 9 05.98 6 EMV-gerechter Aufbau überarbeitete Ausgabe 2 05.98 7 Anschließen überarbeitete Ausgabe 12 05.98 8 Parametrierung überarbeitete Ausgabe 9 05.98 9 Parametrierschritte überarbeitete Ausgabe 49 05.98 10 Erstinbetriebsetzung überarbeitete Ausgabe 2 05.98 11 Störungen und Warnungen überarbeitete Ausgabe 23 05.98 12 Wartung überarbeitete Ausgabe 14 05.98 13 Formieren überarbeitete Ausgabe 2 05.98 14 Umweltverträglichkeit überarbeitete Ausgabe 1 05.98 15 Bescheinigungen überarbeitete Ausgabe 3 05.98 The following editions have been published so far: Edition Internal Item Number AA 476 869 4070 76 J AA-74 AB 476 869 4070 76 J AB-74 Version AB consists of the following chapters: Chapter Changes Pages Version date 1 Definitions and warnings reviewed edition 4 05.98 2 Description reviewed edition 1 05.98 3 Transport, Storage, Unpacking reviewed edition 1 05.98 4 Technical Data reviewed edition 18 05.98 5 Installation reviewed edition 9 05.98 6 Installation in Conformance with EMC Regulations reviewed edition 2 05.98 7 Connecting-up reviewed edition 12 05.98 8 Parameterization reviewed edition 9 05.98 9 Parameterizing steps reviewed edition 49 05.98 10 First Start-up reviewed edition 2 05.98 11 Faults and Warnings reviewed edition 23 05.98 12 Maintenance reviewed edition 14 05.98 13 Forming reviewed edition 2 05.98 14 Environmental friendliness reviewed edition 1 05.98 15 Certificates reviewed edition 3 05.98 Group: Automation and Drives (A&D) Division: Variable-Speed Drive Systems Postfach 3269, D-91050 Erlangen Siemens Aktiengesellschaft Subject to change Printed in the federal Republic of Germany 05.98