1
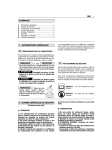
M150
FR MANUEL D’UTILISATION
EN OPERATOR’S MANUAL
DE GEBRAUCHSANWEISUNG
IT
MANUALE DI ISTRUZIONI
NL GEBRUIKERSHANDLEIDING
ES MANUAL DE INSTRUCCIONES
PT MANUAL DE INSTRUÇÕES
EL ∂°Ã∂πƒπ¢π√ √¢∏°πø¡
TR KULLANIM KILAVUZU
MK УПАТСТВА ЗА УПОТРЕБА
NO INSTRUKSJONSBOK
SV BRUKSANVISNING
DA BRUGSANVISNING
FI
KÄYTTÖOHJEET
CS NÁVOD K POUŽITÍ
PL INSTRUKCJE OBSŁUGI
HU HASZNÁLATI UTASÍTÁS
RU êìKéÇéÑëíÇé èé ùKëèãìÄíÄñàà
HR PRIRUČNIK ZA UPORABO
SL PRIROČNIK ZA UPORABU
1
3.1
3
2
3.2
CHOKE
FAST
10
SLOW
4
5
5.1.1
STOP
6
9
7
1
8
3a
5.1.2
1
2
MAX
MIN
3
1
5.1.3
1
5.1.4
2
1
1 2
3
5.2-3
5.5-6
CHOKE
1
3
3
1
STOP
EN
1
TABLE OF CONTENTS
1.
2.
3.
4.
5.
6.
7.
8.
General information ...................................
Safety regulations .....................................
Components and controls ........................
What you need to know ............................
Standards of use ......................................
Maintenance .............................................
Troubleshooting ........................................
Technical data ...........................................
1
1
2
3
4
5
7
8
1. GENERAL INFORMATION
1.1
The number before the paragraph title refers to
the text references and their related figures
(shown inside front and back covers).
READING AND UNDERSTANDING
THE MANUAL
Some paragraphs in the manual containing information of particular importance for safety and
operation are highlighted at various levels of
emphasis, and signify the following:
NOTE
IMPORTANT
or
These give details or further information on
what has already been said, and aim to prevent
damage either to the engine or other damages.
! WARNING!
Non-observance will result in the risk of injury to oneself or others.
! DANGER!
1.2
SAFETY SYMBOLS
Your engine should be used with due care and
attention. Symbols have therefore been placed
on the engine to remind you of the main precautions to be taken. Their full meaning is explained
later on.
You are also asked to carefully read the safety
regulations in the applicable chapter of this
handbook.
Non-observance will result in the risk of serious injury or death to
oneself or others.
NOTE
All indications,
“front”, “rear”, “right” and “left”,
are to be taken as referring to the
engine positioned with the spark
plug facing forwards with respect
to the observer.
2. GENERAL SAFETY STANDARDS
(to be strictly applied)
A) TRAINING
1) Carefully read the instructions contained
in this manual and the instructions of the
machine on which this engine is installed.
Learn how to stop the motor quickly.
2) Never allow people unfamiliar with these
instructions to use the engine.
3) Never use the engine while people, especially children, or pets are nearby.
4) Remember that the operator or user is
responsible for accidents or hazards occurring to other people or their property.
Warning! - Read instructions before
using.
Warning! - Keep away from hot surfaces.
B) PREPARATION
1) Do not wear loose-fitting clothing, dangling drawstrings, jewels or items that could
become caught; tie up long hair and keep at
safe distance while starting the lawnmower.
2) Turn engine OFF and let it cool before
removing gas cap.
3) WARNING: DANGER! Fuel is highly flammable:
– store the fuel in special containers;
– refuel only outdoors by using a funnel;
never smoke while refueling and/or handling fuel;
– add fuel before starting the engine. Never
remove the cap of the fuel tank or add fuel
while the engine is running or when the
engine is hot;
2
EN
– if you have spilt some fuel, do not attempt
to start the engine but move the machine
away from the area of spillage and avoid
creating any source of ignition until the fuel
has evaporated and fuel vapours have dissipated.
– always put the tank and fuel container caps
back on and tighten well.
4) Replace faulty silencers and the guard, if
damaged.
C) OPERATION
1) Do not operate the engine in a confined
space where dangerous carbon monoxide fumes can collect.
2) Do not use starting fluids or similar products.
3) Do not change the engine governor settings or overspeed the engine.
4) Do not tilt the machine onto its side to prevent fuel leaks from the fuel tank cap.
5) Do not touch the cylinder fins and/or the
silencer guard until the engine has cooled
down.
6) Stop the engine and disconnect the spark
plug cable before checking, cleaning or servicing the machine or the engine.
7) Do not crank the engine with spark plug
removed.
8) Transport the machine with an empty fuel
tank.
3. COMPONENTS AND CONTROLS
3.1
1.
2.
3.
4.
5.
6.
7.
8.
9.
10.
ENGINE COMPONENTS
Rope handle
Fuel tank fillercap
Oil fillercap with dipstick
Air cleaner cover
Silencer
Silencer guard
Spark plug
Spark plug cap
Speed control lever
Engine code
✍
Note your engine
serial number here
3.2
ACCELERATOR CONTROL
The throttle trigger (generally a lever), fitted to
the machine, is connected to the engine by a
cable (1).
Consult the machine’s Instructions Manual to
identify the throttle trigger and its positions, usually marked by symbols, corresponding to:
D) MAINTENANCE AND STORAGE
CHOKE = to be used for cold starting.
1) A routine maintenance is essential for
safety and for keeping a high performance
level.
2) Do not store the machine with fuel in the
tank in an area where the fuel vapours could
reach an open flame, a spark or a strong heat
source.
3) Allow the engine to cool before storing in
any enclosure.
4) To reduce fire hazards, keep the engine,
exhaust silencer, and fuel storage area free of
grass cuttings, leaves, excessive grease or
any other easily inflammable material.
5) If the fuel tank has to be drained, this
should be done outdoors once the engine has
cooled down.
6)On safety ground, never use the engine
with either worn or damaged parts. Parts are
to be replaced and not repaired. Use genuine
spare parts. Parts that are not of the same
quality can damage the engine and impair
your safety.
FAST
= corresponds to maximum revs;
to be used when working.
SLOW = slowest speed.
STOP
= engine stop (if fitted).
EN
4. WHAT YOU NEED TO KNOW
The engine performance, reliability and life are
influenced by many factors, some external and
some strictly associated with the quality of the
products used and with the scheduled maintenance.
The following information allow a better understanding and use of your engine.
4.1
ENVIRONMENTAL CONDITIONS
The operation of a four-stroke endothermic
engine is affected by:
a) Temperature:
– Working in low temperatures could lead to a
difficult cold starting.
– Working in very high temperatures could lead
to a difficult hot starting due to the evaporation of the fuel either in the carburetor float
chamber or in the pump.
– In any case, the right kind of oil must be used,
according to the operating temperatures.
b) Altitude:
– The higher the altitude (above sea level), the
lower the max power developed by an
endothermic engine.
– When there is a considerable increase in altitude, the load on the machine should be
reduced and particularly heavy work avoided.
4.2
FUEL
A good quality fuel is the major issue for the
engine reliability of operation.
a) Use unleaded gasoline, with a minimum of 90
octane.
b) Use clean, fresh fuel; purchase fuel in quantity that can be used within 30 days, to prevent
gum from forming inside the container or the
tank.
c) Do not use fuel which contains Methanol.
d) Do not add neither oil nor any kind of fuel
additive.
4.3
OIL
Use always high quality oils, choosing their viscosity grade according to the operating temperature.
3
a) Use only detergent oil classified SF-SG.
b) Choose the SAE viscosity grade of oil from
this chart:
– from 5 to 35 °C
– from -15 to + 5 °C
= SAE 30
= 5W-30 or 10W-30
(Multi-viscosity)
– from -25 to + 35 °C = Synthetic oils
5W-30 or 10W-30
(Multi-viscosity)
c) The use of multi-viscosity oils in hot temperatures will result in higher than normal oil consumption; therefore, check oil level more frequently.
d) Do not mix oils of different brands and features.
e) SAE 30 oil, if used below 5°C, could result in
possible engine damage due to inadequate
lubrication.
f) Oil should be at “MAX” mark (see 5.1.1): do
not overfill. Overfilling with oil may cause:
– Smoking;
– Spark plug or air filter fouling, which will
cause hard starting.
4.4
AIR FILTER
The air filter must always be in perfect working
order, to prevent debris, dirt or dust from getting
sucked into the engine, reducing the efficiency
and working life of the machine.
a) Always keep the filter element free of debris
and dirt in perfect working order (see 6.5).
b) If necessary, replace the filtering element with
an original spare part. Incompatible filtering
elements can impair the efficiency and life of
the engine.
c) Never start the engine without mounting the
filtering element properly.
4.5
SPARK PLUG
Not all the spark plugs for endothermic engines
are the same!
a) Use only spark plugs of the recommended
type, with the right heat range.
b) Check the length of the thread, because – if
too long – it will damage the engine beyond
repair.
c) Make sure that the electrodes are clean and
their gap is correct (see 6.6).
4
EN
5. STANDARDS OF USE
5.1
BEFORE EVERY USE
Before every use, perform the following checking
procedures in order to assure a regular operation.
5.1.1 Check oil level
See the specific chapter (see 8.1) for the oil to be
used.
a) Place engine level.
b) Clean around oil fill.
c) Remove the fillercap (1), clean the tip of the
dipstick (2), insert and tighten down.
d) Remove dipstick again and check the oil level
that must be between the “MIN” and “MAX”
marks.
e) If oil is required, add oil of the same kind up
to the “MAX” mark, being careful not to spill
any outside the oil fill.
f) Close the fillercap (1) and wipe off any spilled
oil.
5.1.2 Air filter check
The efficiency of the air filter is fundamental for
the engine to work properly. Do not start the
engine if the filtering element is missing or broken.
a) Clean the area around the filter cover (1).
b) Remove the cover (1) by releasing the rear
tab (2) and check the condition of the filtering
element (3 - 3a). It must be intact, clean and
in perfect working order; if not, either replace
it or carry out maintenance (see 6.5).
c) Remount the cover (1).
5.1.3 Adding fuel
IMPORTANT
Do not drip petrol onto the
plastic parts of the motor or the machine to
prevent damaging them and remove all traces
of spilt petrol immediately. The warranty does
not cover damage to plastic parts caused by
petrol.
See the specific chapter (see 8.1) for the fuel
characteristics.
Add fuel only when the engine is cold.
a) Place the lawnmower level.
b) Clean around the fillercap (1).
c) Remove the fillercap (1).
d) Using a clean funnel (2), fill tank to approximately 5 mm below the inner edge of the filler
neck (3), being careful not to spill fuel.
e) Tighten the fillercap (1) back and clean any
spilled fuel.
5.1.4 Spark plug cap
Firmly connect the cable cap (1) to the spark
plug (2), making sure that there are no traces of
debris or dirt inside the cap or on the spark plug
terminal.
5.2
STARTING THE ENGINE (cold starting)
The engine must only be started when all the
accessory devices are disconnected (if fitted on
the machine) and when the gear (where fitted) is
in neutral.
a) Move throttle control (1) to “CHOKE” position.
b) Set the machine controls as indicated in the
machine’s Instructions Manual.
c) Grasp rope handle (3) and pull slowly until
resistance is felt. Then pull cord rapidly.
d) When engine starts, release the rope.
e) After a few seconds, slowly move throttle (1)
from “CHOKE” to “FAST” or “SLOW” position.
NOTE
If the engine does not start,
repeat from section b).
NOTE
If the engine starts but does
not keep running, repeat the whole starting
procedure with throttle control in “FAST” position.
5.3
STARTING THE ENGINE (hot starting)
•) Follow the whole cold-starting procedure
with throttle control (1) in “FAST” position.
5.4
USE OF THE ENGINE IN OPERATION
Maximum revs must be used to optimise the
engine’s yield and performance, by setting the
throttle lever to “FAST”.
! WARNING!
Keep your hands away
from the silencer and surrounding areas
that can become extremely hot. With the
5
EN
engine running, do not get loose-fitting
clothing (ties, scarves, etc.) or hair closer to
the top part of the engine.
! WARNING!
Remove the spark plug
cap and read instructions before carrying
out any cleaning, repair or maintenance
operation. Wear proper clothing and working gloves whenever your hands are at risk.
Do not perform maintenance or repair operations without the necessary tools and
technical knowledge.
STOPPING DURING OPERATION
a) Move the throttle (1) to “SLOW”.
b) Stop the engine as described in the machine’s instructions manual.
6.2
LONG STORAGE (over 30 days)
In case the engine has to be stored for a long
time (for example at the end of the season), a
few precautions are needed to help the future
start-up.
a) Drain fuel from tank to prevent build-ups
inside the tank.
b) Remove the spark plug and pour inside the
spark plug hole about 3 cl of clean engine oil.
Close the hole with a cloth, then pull, slowly
and carefully, the starting rope so that, with a
few engine revolutions, the oil will be distributed on the cylinder inner walls. Reinstall the
spark plug without connecting the cable cap.
MAINTENANCE SCHEDULE
Follow the hourly or calendar – whichever occur
first – maintenance schedule shown in the following table.
Operation
Check oil level
(see 5.1.1)
Change oil 1)
(see 6.3)
Clean silencer and
engine (see 6.4)
Check air cleaner 2)
(see 6.5)
Oil air cleaner 2)
(see 6.5)
Check spark plug
(see 6.6)
Replace spark plug
(see 6.6)
-
✔
-
-
-
✔
-
-
✔
-
-
-
✔
-
-
-
-
✔
-
-
-
-
✔
-
-
-
-
✔
-
-
-
-
-
✔
-
Every 100 hours
CLEANING AND STORAGE
a) Do not spray with water or use hydraulic
lances to clean the exterior of the engine.
b) Preferably use a compressed air gun (max. 6
bars), to prevent debris, dirt or dust from penetrating inside the machine.
c) Store the lawnmower (and the engine) in a dry
place, sheltered from severe weather conditions and sufficiently ventilated.
5.8
IMPORTANT
If necessary (if foreseen in
the Machine’s Instruction Manual), the engine
can be laid down on its left side, or the front
part can be lifted, taking care not to allow oil or
fuel to leak out.
STOPPING AT THE END
OF OPERATION
a) Move the throttle (1) to “SLOW”.
b) Stop the engine as described in the machine’s instructions manual.
c) Once the engine has cooled, disconnect the
spark plug cap (3).
d) Remove all traces of debris or dirt from the
engine and especially around the exhaust
silencer to reduce the risk of fire
5.7
IMPORTANT
Never get rid of used oil, fuel
or other pollutants in unauthorised places.
Every 25 hours or
every season
Every 50 hours or
every season
5.6
SAFETY RECOMMENDATIONS
Every 5 hours or
daily
5.5
6.1
After First 5 hours
IMPORTANT
Do not operate on over 15°
inclines to prevent malfunctioning of the
engine.
6. MAINTENANCE
Change oil every 25 hours if the engine is operating under heavy load or in ht weather.
2)
Clean air cleaner more frequently if the
machine is operating in dusty areas.
1)
6
EN
See the specific chapter (see 8.1) for the oil to be
used.
any dust, debris or dirt, taking care not to
push anything into the induction pipe (5).
e) Put the filtering element (3 - 3a) back in place
and close the cover (1).
! WARNING!
• Sponge filtering element (3)
6.3
CHANGE OIL
Drain oil while the engine
is warm, being careful not to touch the hot
engine nor the drained oil.
a)
b)
c)
d)
e)
Place engine level.
Clean around oil fill (1).
Remove the fillercap (1).
Have a container ready (2) to collect the oil.
Lay the engine on its left side to allow the oil
to flow from the refill inlet (3) or follow the procedures indicated in the Machine’s Instruction Manual.
f) When the engine is upright, top it up with new
oil.
g) Check the oil level on the dipstick (4). Oil
should be at “MAX” mark.
h) Close the fillercap and wipe off any spilled oil.
NOTE
The oil capacity is about 0.6
liter.
Keep the filtering element clean and soaked in
oil. Replace it if it is disintegrating, cut or broken.
IMPORTANT
Do not use compressed air
to clean the filtering element.
– Clean the sponge filtering element with water
and detergent and dry it with a clean cloth.
– Soak the filtering element in 2 tablespoonfuls
of clean engine oil and wring it well to distribute the oil evenly.
– Remove any excess oil with a clean cloth.
If you need to replace the filtering element, oil
the new filter as described above.
• Cartridge filtering element (3a)
– Blow compressed air from the inside to remove dust and debris.
IMPORTANT
Do not use water, petrol,
detergents or any other products to clean the
filtering element.
6.4
CLEAN SILENCER AND ENGINE
Silencer must be cleaned when the engine is
cold.
a) Use a jet of compressed air or a brush to remove any debris and dirt that could cause a
fire from the silencer (1) and its protective
cover (2).
b) Clean the cylinder and cylinder head fins (3)
to ease engine cooling and prevent overheating.
c) Clean the plastic components with a sponge
(4) soaked in water and detergent.
6.6
SPARK PLUG SERVICE
a) Remove the spark plug (1) using a spark plug
socket wrench (2).
b) Clean the electrodes (3) with a metal brush
and remove any carbonaceous build-up.
c) Using a thickness gauge (4), check for the
right gap (0.6 - 0.8 mm) between the electrodes.
d) Install the spark plug (1) and tighten with a
socket wrench (2).
Replace the spark plug if the electrodes are
burnt or if the porcelain is broken or damaged.
6.5
AIR FILTER MAINTENANCE
a) Clean the area around the filter cover (1).
b) Remove the cover (1) by releasing the rear
tab (2) and remove the filtering element (3 3a).
c) Carry out maintenance on the filtering element as described below for each type.
d) Clean inside the filter housing (4) to get rid of
! WARNING!
Fire hazard! Do not check
the ignition system with spark plug removed.
IMPORTANT
Use only spark plugs of the
recommended type (see 8.1).
EN
6.7
ADJUSTMENT OF THE
ACCELERATOR CABLE
If the engine does not reach its maximum rpm
with the throttle control in “FAST” position, this is
likely due to an out-of-phase connection between the accelerator lever and the governor lever.
To restore the correct phase:
a) Stop the engine, remove the spark plug cap
and wait until the engine has cooled.
b) Loosen the screw (1) of the clamp (2) so that
the cable casing (3) is free to move.
c) Move the throttle control to “SLOW”.
d) Move governor control lever (4) forward as far
as possible and, by keeping it in this position,
lock the casing (3) full tightening the screw (1)
of the clamp (2).
7. TROUBLESHOOTING
PROBLEM
a) Hard starting
LIKELY CAUSE
SOLUTION
– No fuel
– Check and top up (see 5.1.3)
– Stale fuel or build-ups in tank
– Empty fuel tank and refill with fresh fuel
– Incorrect starting procedure
– Perform the starting procedure correctly
(see 5.2)
– Spark plug disconnected
– Check that the spark plug cap fits well
over the plug terminals (see 5.1.4)
– The spark plug is wet or the spark plug
– Check (see 6.6)
electrodes are dirty or placed inadequately
b) Inconsistent
working
c) Loss of power
whilst operating
7
– Air filter clogged
– Check and clean (see 6.5)
– Incorrect oil for the season
– Replace with proper oil (see 6.3)
– Fuel evaporation in the carburetor
(vapor lock) due to high temperatures
– Wait for a few minutes then start again
(see 5.3)
– Fault in carburation
– Contact a Licensed Service Centre
– Hard starting
– Contact a Licensed Service Centre
– Dirty electrodes or incorrect gap
– Check (see 6.6)
– The spark plug cap is inserted incorrectly
– Check that the cap is fitted correctly
(see 5.1.4)
– Air filter clogged
– Check and clean (see 6.5)
– Throttle trigger in “CHOKE” position
– Move the lever to the “FAST” position
– Fault in carburation
– Contact a Licensed Service Centre
– Fault in ignition
– Contact a Licensed Service Centre
– Air filter clogged
– Check and clean (see 6.5)
– Fault in carburation
– Contact a Licensed Service Centre
– Governor out of phase with respect
to the accelerator
– Adjust the cable (see 6.7)
8
EN
8. TECHNICAL SPECIFICATIONS
8.1
REFILLING AND OPERATION MATERIALS
Fuel .......................................................................................... Unleaded gasoline, minimum 90 octane
Tank capacity .............................................................................................................................. 0.8 liter
Engine oil: from 5 to 35 °C......................................................................................................... SAE 30
from -15 to +5 °C .................................................................................... 5W-30 or 10W-30
from -25 to +35 °C .................................................................. Synthetic 5W-30 or 10W-30
Oil capacity .................................................................................................................................. 0.6 liter
Spark plug ......................................................................................... QJI9LM (Champion) or equivalent
Spark plug gap ................................................................................................................... 0.6 - 0.8 mm
6.3
6.4
1
3
4
4
MAX
MIN
2
3
1
2
6.5
4
5
3
3a
2
1
1
3
6.6
0,6-0,8
mm
1
2
4
1
1
6.7
3
1
4
2
Manufactured by:
SUMEC - Nanjing, China
© by GGP - ITALY
Realizzazione: EDIPROM / bergamo
SPA
Via del Lavoro, 6
I-31033 Castelfranco Veneto (TV) ITALY
71520122/2
GGP ITALY