1
User's Manual
TOSHIBA AT200
TOSHIBA AT200
Table of Contents
Chapter 1
Legal & Regulatory
Copyright ................................................................................................ 1-1
Disclaimer .............................................................................................. 1-1
Trademarks ............................................................................................ 1-2
H.264/AVC, VC-1 and MPEG-4 License Notice ................................... 1-3
FCC information .................................................................................... 1-3
CE compliance ....................................................................................... 1-4
Working environment ............................................................................ 1-4
Additional environments not related to EMC ...................................... 1-5
REACH - Compliance Statement .......................................................... 1-5
Following information is only valid for EU-member States: ............. 1-6
Canadian regulatory information (Canada only) ................................ 1-7
Canada - Industry Canada (IC) ............................................................. 1-7
Following information is only for Turkey: ........................................... 1-7
Chapter 2
Introduction
About the guide ..................................................................................... 2-1
Instruction Manual for Safety and Comfort ......................................... 2-1
Safety icons ........................................................................................... 2-1
Chapter 3
Getting Started
Check the components ......................................................................... 3-1
Grand tour .............................................................................................. 3-1
Hardware ................................................................................................ 3-4
Using the tablet for the first time ......................................................... 3-6
Care and use of the battery ................................................................ 3-11
Charging the battery ........................................................................... 3-11
Chapter 4
Basics
Using the touch screen ......................................................................... 4-1
Getting to know the HOME screen ....................................................... 4-1
Opening and switching applications ................................................... 4-3
Monitoring your tablet’s status ............................................................ 4-3
Quick Settings ....................................................................................... 4-3
Managing Notifications ......................................................................... 4-4
Locking your screen ............................................................................. 4-5
Customizing the Home screen ............................................................. 4-5
Changing the Screen Orientation ........................................................ 4-6
User's Manual
ii
TOSHIBA AT200
Managing Tasks and Applications ....................................................... 4-7
Connecting to a computer .................................................................... 4-7
Factory Reset ......................................................................................... 4-8
Chapter 5
Applications
Analog clock .......................................................................................... 5-1
Browser .................................................................................................. 5-1
Calculator ............................................................................................... 5-3
Calendar ................................................................................................. 5-3
Camera ................................................................................................... 5-4
Clock ....................................................................................................... 5-5
Contacts ................................................................................................. 5-6
Downloads ............................................................................................. 5-7
Email ....................................................................................................... 5-7
Gallery .................................................................................................... 5-8
Music ...................................................................................................... 5-9
Picture frame ....................................................................................... 5-10
Service Station .................................................................................... 5-10
TOSHIBA Media Player ....................................................................... 5-12
TOSHIBA File Manager ....................................................................... 5-13
Online Manual ...................................................................................... 5-15
Chapter 6
Settings
Wireless & networks ............................................................................. 6-1
Sound ..................................................................................................... 6-6
Screen .................................................................................................... 6-6
Multimedia .............................................................................................. 6-7
Location & security ............................................................................... 6-7
Applications ........................................................................................... 6-9
Accounts & sync ................................................................................... 6-9
Privacy .................................................................................................. 6-10
Storage ................................................................................................. 6-10
Language & input ................................................................................ 6-11
Accessibility ........................................................................................ 6-12
Date & time ........................................................................................... 6-12
About tablet .......................................................................................... 6-13
Chapter 7
Optional Accessories
Memory media slot ................................................................................ 7-1
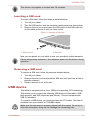
SIM card slot .......................................................................................... 7-3
User's Manual
iii
TOSHIBA AT200
USB device ............................................................................................. 7-4
HDMI device ........................................................................................... 7-5
Optional TOSHIBA Accessories .......................................................... 7-6
Chapter 8
Troubleshooting
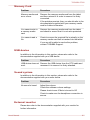
Problem solving process ...................................................................... 8-1
Hardware and system checklist ........................................................... 8-2
TOSHIBA Support .................................................................................. 8-4
Chapter 9
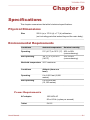
Specifications
Physical Dimensions ............................................................................ 9-1
Environmental Requirements .............................................................. 9-1
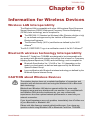
Chapter 10
Information for Wireless Devices
Wireless LAN Interoperability ............................................................ 10-1
Bluetooth wireless technology Interoperability ............................... 10-1
CAUTION about Wireless Devices ..................................................... 10-1
Wireless Devices and your health ..................................................... 10-2
Radio Regulatory Information ............................................................ 10-2
Device Authorization ........................................................................... 10-7
Radio approvals for wireless devices ............................................... 10-7
User's Manual
iv
TOSHIBA AT200
Chapter 1
Legal & Regulatory
Copyright
© 2011 by TOSHIBA Corporation. All rights reserved. Under the copyright
laws, this manual cannot be reproduced in any form without the prior
written permission of TOSHIBA. No patent liability is assumed, with respect
to the use of the information contained herein.
TOSHIBA AT200 User’s Manual
First edition October 2011
Disclaimer
This manual has been validated and reviewed for accuracy. The
instructions and descriptions it contains are accurate for this device at the
time of this manual’s production. However, succeeding devices and
manuals are subject to change without notice. TOSHIBA assumes no
liability for damages incurred directly or indirectly from errors, omissions or
discrepancies between this device and the manual.
This product incorporates copy protection technology that is protected by
U.S. and foreign patents, including patent numbers 5,315,448; 5,583,936;
6,836,549; and 7,050,698 and other intellectual property rights. The use of
Rovi Corporation's copy protection technology in the product must be
authorized by Rovi Corporation. Reverse engineering or disassembly is
prohibited.
TO THE MAXIMUM EXTENT PERMITTED BY APPLICABLE LAW,
TOSHIBA CORPORATION, ITS AFFILIATES AND/OR SUPPLIERS
(“TOSHIBA”) DISCLAIM ALL WARRANTIES WITH REGARD TO THE
SOFTWARE, EITHER EXPRESSLY -IMPLIED, OR STATUTORY,
INCLUDING, BUT NOT LIMITED TO, THE WARRANTY OF
NONINFRINGEMENT OF THIRD PARTY RIGHTS, AND THE IMPLIED
WARRANTIES AND CONDITIONS OF MERCHANTABILITY
ANDFITNESS FOR A PARTICULAR PURPOSE. THE ENTIRE RISK AS
TO THE QUALITY AND PERFORMANCE OF THE SOFTWARE IS WITH
YOU. TOSHIBA SHALL NOT WARRANT THAT THE FUNCTIONS
CONTAINED IN THE SOFTWARE WILL MEET YOUR REQUIREMENTS
OR THAT THE OPERATION OF THE SOFTWARE WILL BE
UNINTERRUPTED OR ERROR-FREE.
Notwithstanding the above, portions of the software include software files
subject to certain open source license agreements, and such open source
software files are subject to the notices and additional terms and conditions
User's Manual
1-1
TOSHIBA AT200
that are referenced in the End User License Agreement (“EULA”) shown in
“Toshiba Legal Information” section of the “Legal information” available
under the “About tablet” tab on the “Settings” menu. (EULA document is
also in this package.) Such open source software files are provided on an
“AS IS” basis to the maximum extent permitted by applicable law.
Please carefully read “Open source licenses” section of the “Legal
Information” available under the “About tablet” tab on the “Setting” menu for
the relevant copyright and licensing terms. If there is any discrepancy
between the terms and conditions of the applicable open source license
agreement and the EULA, the terms and conditions of the applicable open
source license agreement prevail with respect to the applicable open
source software.
Until the date that is three years after you acquired the Software, you may
obtain a copy of the source code corresponding to the binaries for GPLlicensed file by sending a request to TOSHIBA customer service at [http://
support.toshiba-tie.co.jp/android/index_e.htm], and TOSHIBA will send you
a link to such source code.
Trademarks
Google, Android, Android Market, Google Mobile, Google Apps, Google
Calendar, Google Latitude, Google Maps, Google Talk and Picasa are
trademarks of Google Inc.
Availability of Google applications, services, and features may vary by
country, carrier, phone model, and manufacturer.
Texas Instruments and OMAP are trademarks of Texas Instruments
Incorporated.
Bluetooth is a trademark owned by its proprietor and used by TOSHIBA
under license.
Wi-Fi is a registered trademark of the Wi-Fi Alliance.
Secure Digital and SD are trademarks of SD Card Association.
HDMI, the HDMI logo and High-Definition Multimedia Interface are
trademarks or registered trademarks of HDMI Licensing LLC.
Adobe, Adobe PDF, Flash, AIR and the Flash logo, AIR logo are either
registered trademarks or trademarks of Adobe Systems Incorporated in the
United States and/or other countries.
is a trademark of SRS Labs, Inc.
SRS Premium Voice PRO technology is incorporated under license from
SRS Labs, Inc.
TouchSense is a trademark of Immersion Corporation.
Other trademarks and registered trademarks not listed above may be used
in this manual.
User's Manual
1-2
TOSHIBA AT200
H.264/AVC, VC-1 and MPEG-4 License Notice
THIS PRODUCT IS LICENSED UNDER THE AVC, THE VC-1 AND
MPEG-4 VISUAL PATENT PORTFOLIO LICENSE FOR THE PERSONAL
AND NON-COMMERCIAL USE OF A CONSUMER TO (i)ENCODEING
VIDEO IN COMPLIANCE WITH THE AVC STANDARD ("VIDEO") AND/
OR (ii)DECODEING AVC, VC-1 AND MPEG-4 VIDEO THAT WAS
ENCODED BY A CONSUMER ENGAGED IN A PERSONAL AND NONCOMMERCIAL ACTIVITY AND/OR WAS OBTAINED FROM A VIDEO
PROVIDER LICENSED BY MPEG LA TO PROVIDE SUCH VIDEO. NO
LICENSE IS GRANTED OR SHALL BE IMPLIED FOR ANY OTHER USE.
ADDITIONAL INFORMATION INCLUDING THAT RELATING TO
PROMOTIONAL, INTERNAL AND COMMERCIAL USES AND
LICENSING MAY BE OBTAINED FROM MPEG LA,L.L.C. SEE http://
www.mpegla.com
FCC information
FCC notice "Declaration of Conformity Information"
This equipment has been tested and found to comply with the limits for a
Class B digital device, pursuant to part 15 of the FCC rules. These limits
are designed to provide reasonable protection against harmful interference
in a residential installation. This equipment generates, uses and can
radiate radio frequency energy and, if not installed and used in accordance
with the instructions, may cause harmful interference to radio
communications.
However, there is no guarantee that interference will not occur in a
particular installation. If this equipment does cause harmful interference to
radio or television reception, which can be determined by turning the
equipment off and on, the user is encouraged to try to correct the
interference by one or more of the following measures:
Reorient or relocate the receiving antenna.
Increase the separation between the equipment and receiver.
Connect the equipment into an outlet on a circuit different from that to
which the receiver is connected.
Consult the dealer or an experienced radio/TV technician for help.
Only peripherals complying with the FCC class B limits may be attached to
this equipment. Operation with non-compliant peripherals or peripherals not
recommended by TOSHIBA is likely to result in interference to radio and
TV reception. Shielded cables must be used between the external devices
and the TOSHIBA AT200 device’s Universal Serial Bus (USB 2.0) ports,
HDMI port and microphone/headphone combo jack. Changes or
modifications made to this equipment, not expressly approved by
TOSHIBA or parties authorized by TOSHIBA could void the user’s authority
to operate the equipment.
User's Manual
1-3
TOSHIBA AT200
FCC conditions
This device complies with part 15 of the FCC Rules. Operation is subject to
the following two conditions:
1.
2.
This device may not cause harmful interference.
This device must accept any interference received, including
interference that may cause undesired operation.
Contact
Address:
TOSHIBA America Information Systems, Inc.
9740 Irvine Boulevard
Irvine, California 92618-1697
Telephone:
(949) 583-3000
Caution: Exposure to Radio Frequency Radiation.
The radiated output power of the Wireless LAN is far below the FCC radio
frequency exposure limits. Nevertheless, the Wireless LAN shall be used in
such a manner that the potential for human contact during normal
operation is minimized.
In the usual operating configuration, the distance between the antenna and
the user should not be less than 20cm. Please refer to the "Grand Tour"
section in this manual for the details regarding antenna location.
The installer of this radio equipment must ensure that the antenna is
located or pointed such that it does not emit RF field in excess of Health
Canada limits for the general population; consult Safety Code 6, obtainable
from Health Canada’s website.
CE compliance
This product is carrying the CE-Mark in compliance with
the related European Directives. Responsible for CEMarking is Toshiba Europe GmbH, Hammfelddamm 8,
41460 Neuss, Germany. The complete and official EU
Declaration of Conformity can be found on TOSHIBA’s
web site http://epps.toshiba-teg.com on the Internet.
Working environment
The Electromagnetic Compliance (EMC) of this product has been verified
typically for this product category for a so called Residential, Commercial &
Light Industry Environment. Any other working environment has not been
verified by Toshiba and the use of this product in these working
environments is maybe restricted or cannot be recommended. Possible
consequences of the use of this product in non verified working
User's Manual
1-4
TOSHIBA AT200
environments can be: Disturbances of other products or of this product in
the nearby surrounding area with temporarily malfunction or data loss/
corruption as result. Example of non verified working environments and
related advices:
Industrial environment (e.g. where 3-phase 380V mains is being used
mainly): Danger of disturbances of this product due to possible strong
electromagnetic fields especially near to big machinery or power units.
Medical environment: The compliance to the Medical Product Directive has
not been verified by Toshiba, therefore this product cannot be used as a
medical product without further verification. The use in usual office
environments e.g. in hospitals should be no problem if there is no
restriction by the responsible administration.
Automotive environment: Please search the owner instructions of the
related vehicle for advices regarding the use of this product (category).
Aviation environment: Please follow the instructions of the flight personnel
regarding restrictions of use.
Additional environments not related to EMC
Outdoor use: As a typical home/office equipment this product has no
special resistance against ingress of moisture and is not strong shock
proofed.
Explosive atmosphere: The use of this product in such special working
environment (Ex) is not allowed.
REACH - Compliance Statement
The new European Union (EU) chemical regulation, REACH (Registration,
Evaluation, Authorization and Restriction of Chemicals), entered into force
on 1 June 2007. Toshiba will meet all REACH requirements and is
committed to provide our customers with information about the chemical
substances in our products according to REACH regulation.
Please consult the following website www.toshiba-europe.com/computers/
info/reach for information about the presence in our articles of substances
included on the candidate list according to article 59(1) of Regulation (EC)
No 1907/2006 („REACH“) in a concentration above 0.1% weight by weight.
User's Manual
1-5
TOSHIBA AT200
Following information is only valid for EUmember States:
Disposal of products
The crossed out wheeled dust bin symbol indicates that
products must be collected and disposed of separately
from household waste. Integrated batteries and
accumulators can be disposed of with the product. They
will be separated at the recycling centres.
The black bar indicates that the product was placed on the
market after August 13, 2005.
By participating in separate collection of products and
batteries, you will help to assure the proper disposal of
products and batteries and thus help to prevent potential
negative consequences for the environment and human
health.
For more detailed information about the collection and
recycling programmes available in your country, please
visit our website (http://eu.computers.toshiba-europe.com)
or contact your local city office or the shop where you
purchased the product.
Disposal of batteries and/or accumulators
The crossed out wheeled dust bin symbol indicates that
batteries and/or accumulators must be collected and
disposed of separately from household waste.
If the battery or accumulator contains more than the
specified values of lead (Pb), mercury (Hg), and/or
cadmium (Cd) defined in the Battery Directive (2006/66/
EC), then the chemical symbols for lead (Pb), mercury
(Hg) and/or cadmium (Cd) will appear below the crossed
out wheeled dust bin symbol.
By participating in separate collection of batteries, you will
help to assure the proper disposal of products and
batteries and thus help to prevent potential negative
consequences for the environment and human health.
For more detailed information about the collection and
recycling programmes available in your country, please
visit our website (http://eu.computers.toshiba-europe.com)
or contact your local city office or the shop where you
purchased the product.
User's Manual
1-6
TOSHIBA AT200
These symbols may not stick depending on the country and region where
you purchased.
Canadian regulatory information (Canada only)
This digital apparatus does not exceed the Class B limits for radio noise
emissions from digital apparatus as set out in the Radio Interference
Regulation of the Canadian Department of Communications.
Note that Canadian Department of Communications (DOC) regulations
provide, that changes or modifications not expressly approved by
TOSHIBA Corporation could void your authority to operate this equipment.
This Class B digital apparatus meets all requirements of the Canadian
Interference-Causing Equipment Regulations.
Cet appareil numérique de la class B respecte toutes les exgences du
Règlement sur le matériel brouileur du Canada.
Canada - Industry Canada (IC)
This device complies with RSS 210 of Industry Canada.
Operation is subject to the following two conditions: (1) this device may not
cause interference, and (2) this device must accept any interference,
including interference that may cause undesired operation of this device.
The term "IC" before the equipment certification number only signifies that
the Industry Canada technical specifications were met.
Following information is only for Turkey:
Compliant with EEE Regulations: Toshiba meets all requirements of
Turkish regulation 26891 “Restriction of the use of certain hazardous
substances in electrical and electronic equipment”.
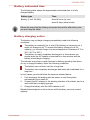
The number of possible pixel failures of your display is defined
according to ISO 9241-307 standards. If the number of pixel failures is
less than this standard, they will not be counted as defect or failure.
Battery is a consumption product, since the battery time depends on
the usage of your tablet. If the battery can not be charged at all, then it
is a defect or failure. The changes in battery time is not a defect or
failure.
User's Manual
1-7
TOSHIBA AT200
Chapter 2
Introduction
Welcome and thank you for choosing a TOSHIBA product.
About the guide
For your convenience, your TOSHIBA product is furnished with two guides:
a Quick Start Guide, and
this comprehensive PDF User’s Manual
We recommend making a backup this User's Manual in case of future
reference.
Please backup your personal data saved in the internal storage before
updating the platform.
Instruction Manual for Safety and Comfort
All important information on the safe and proper use of this tablet is
described in the enclosed Instruction Manual for Safety and Comfort. Be
sure to read it before using the tablet.
Safety icons
Safety icons are used in this manual to bring important information to your
attention. Each type of icon and its implication are identified as shown
below.
Indicates a potentially hazardous situation, which could result in death or
serious injury, if you do not follow instructions.
Pay attention! A caution informs you that improper use of equipment or
failure to follow instructions may cause data loss or damage your
equipment.
Please read. A note is a hint or advice that helps you make best use of
your equipment.
User's Manual
2-1
TOSHIBA AT200
Chapter 3
Getting Started
This chapter provides a general overview of your tablet and some basics
before using your tablet.
Some of the features described in this manual may not function properly if
you use an operating system that was not pre-installed by TOSHIBA.
Check the components
Check to make sure you have all of the following items:
Hardware
TOSHIBA AT200 Tablet
AC adaptor (2-pin or 3-pin)
Power cable
Documentation
TOSHIBA AT200 Quick Start Guide
Instruction Manual for Safety and Comfort
If any of the items is missing or damaged, contact your dealer immediately.
Grand tour
Please handle your product carefully to avoid scratching or damaging the
surface.
The following figure shows each important part of your tablet.
User's Manual
3-1
TOSHIBA AT200
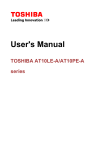
Figure 3-1 Grand tour of the tablet
5
4
3
2
11
1
12
13
6
14
7
8
9
10
15
17
18
19
16
1. Display screen
3. Ambient light sensor
5. Microphone
7. Headphone/Microphone combo
jack
9. Micro HDMI port
11. Power button
13. Volume down/up button
15. Speakers
17. Wireless LAN, 3G* and Bluetooth
antennas (not shown)
19. Camera (back)
17
15
2. Web Camera (front)
4. Web Camera indicator
6. SIM card slot*
8. Micro USB port
10. Memory media slot
12. LED indicator
14. Multi function switch
16. Docking interface
18. Camera flash
*Provided with some models.
Product appearance depends on the model you purchased.
User's Manual
Display screen
Display screen brightness can be adjusted in the
Display settings.
Camera
Your tablet is equipped with a front Web Camera
and a back Camera used for recording video or
taking photographs.
Ambient light sensor
Ambient light sensor can detect the light quality
and intensity outside and can use this information
to automatically adjust the display screen
brightness.
3-2
TOSHIBA AT200
Web Camera indicator The Web Camera indicator will glow blue when
the Web Camera is in operation.
Microphone
A built-in microphone allows you to import and
record sounds for your application.
SIM Card slot
This slot lets you insert a single SIM card which
enables a high-speed access to the Internet,
corporate Intranet and your email while you are
away from office.
Micro USB port
Micro USB port allows you to connect the tablet
to a computer for transferring data. This port also
supports OTG (On-the-Go) technology, which
enables the tablet to fast and directly
communicate with other portable devices without
the assistance of a computer.
Please refer to the USB device section in
"Optional Accessories" chapter for details.
Micro HDMI port
Micro HDMI port can connect to HDMI cable with
Type D connector.
An HDMI cable sends video and audio signals. In
addition to this, it can send and receive control
signals.
Please refer to the HDMI device section in
"Optional Accessories" chapter for details.
Power button
Press and hold this button to turn on/off the
tablet.
LED indicator
This indicator shows the power conditions of your
tablet. It glows white when charging and off when
fully charged.
Volume down/up but- Press these buttons to decrease or increase the
ton
volume.
Multi function switch
This switch functions as a lock for screen
orientation, hardware keys or muting.
Please refer to the section Multi function switch
for details.
User's Manual
Speakers
The speakers emit sound generated by your
software as well as audio alarms, such as low
battery condition, generated by the system.
Docking interface
The AC adaptor connects to this interface in
order to power up the tablet and charge the
battery.
3-3
TOSHIBA AT200
Wireless LAN, 3G and Some models are equipped with these antennas.
Bluetooth antennas
Camera flash
This LED flash can be used as a light source
when the ambient light is not bright.
Memory media slot
This slot lets you insert a single microSD™ Card
which enables you to transfer data from devices,
such as digital camera, onto your tablet.
Please refer to the Memory media slot section in
"Optional Accessories" chapter for details.
Keep foreign metal objects, such as screws, staples and paper clips, out of
the memory media slot. Foreign metal objects can create a short circuit,
which can cause damage and fire, possibly resulting in serious injury.
Headphone/Microphone combo jack
A 3.5 mm mini headphone/microphone combo
jack enables connection of a monaural
microphone or a stereo headphone.
Both the internal and external microphones will be disabled if you use a
headset other than a 4-pin headset headphone.
Multi function switch
The switch on your tablet is multi functional. Please refer to Multi function
switch settings section in “Settings” chapter for details. Available function
settings are described in below table.
Function
Description
Lock screen orientation
Switch to lock/unlock automatic rotation of the
screen orientation.
Mute sound
Switch to mute/unmute system volume.
Hardware
This section identifies the various components and the hardware of the
tablet - it is recommended that you become familiar with each before you
operate the tablet.
The actual specifications may vary depending on the model you
purchased.
User's Manual
3-4
TOSHIBA AT200
This tablet does not support CD/DVD/Blu-ray Disc™.
Content that is copyright protected or has limited access rights, cannot
be played on this tablet.
Processor
CPU
Your tablet is equipped with a Texas
Instruments® OMAP™ 4 Mobile Processor.
Memory
Memory on board
This tablet is equipped with a 1GB memory on
board. The actual amount of usable system
memory will be less than the installed memory
modules. This tablet does not support memory
expansion.
Flash Memory
This tablet is equipped with a flash memory.
Power
Battery
The tablet is powered by one lithium-ion battery.
AC adaptor
The AC adaptor provides power to the system
and recharges the battery when it is low.
As the AC adaptor is universal, it can receive a
range of AC voltages from 100 to 240 volts,
however you should note that the output current
varies among different models. Using the wrong
adaptor might damage your tablet.
Display
The tablet's internal display panel supports high-resolution video graphics
and can be set to a wide range of viewing angles for maximum comfort and
readability.
Display panel
25.7cm (10.1") LCD screen configured with the
following resolution:
1280 horizontal x 800 vertical pixels
Graphics controller
User's Manual
The graphics controller maximizes display
performance.
3-5
TOSHIBA AT200
Multimedia
Web Camera
Web Camera is a device that allows you to
record video or take photographs with your
tablet. You can use it for video chatting or video
conferences by using a communication tool.
Communications
Bluetooth
Bluetooth wireless communication function
eliminates the need for cables between electronic
devices such as computers, printers and mobile
phones. When it is enabled, Bluetooth will
provide the wireless personal area network
environment which is safe and trustworthy, that is
quick and easy.
Wireless LAN
The tablet is equipped with a Wireless LAN/
Bluetooth combo module that is compatible with
other Wireless LAN systems based on Direct
Sequence Spread Spectrum/Orthogonal
Frequency Division Multiplexing radio technology
that complies with the IEEE 802.11 Standard.
3G
Some models are equipped with a 3G module.
Using the tablet for the first time
This section provides basic information about how to start using your tablet.
It covers below steps followed by the details.
Connecting the AC adaptor
Turning on the power
Initial Setup
Turning off the power
Use a virus-check program and make sure it is updated regularly.
Never format storage media without checking its content - formatting
destroys all stored data.
It is a good idea to periodically backup internal storage of the tablet to
an external media. General storage media is not durable or stable
over long periods of time and under certain conditions may result in
data loss.
Connecting the AC adaptor
When battery power becomes low, you must recharge it.
User's Manual
3-6
TOSHIBA AT200
Use only the tablet connected to an AC power source or TOSHIBA Tablet
Dock to charge the battery. Never attempt to charge the battery with any
other charger.
The AC adaptor can automatically adjust to any voltage ranging from 100
to 240 volt and to a frequency of either 50 or 60 hertz, enabling you to use
this product in almost all country/region. The adaptor converts AC power to
DC power and reduces the voltage supplied to this tablet.
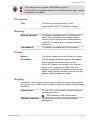
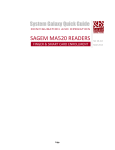
Figure 3-2 The AC adaptor & power cable
2-pin
3
2
1
3-pin
4
1. AC adaptor
3. Power connector
2. Power cable
4. USB connector
Depending on the model, either a 2-pin or 3-pin AC adaptor will be
bundled with the tablet.
The supplied power cable conforms to safety rules and regulations in
the region the tablet is bought and should not be used outside of this
region. In order to use the AC adaptor or tablet in other regions, you
should buy a power cable that conforms to the safety rules and
regulations in that particular region.
Attach the AC adaptor when you need to charge the battery or you want to
operate from AC power. It is also the fastest way to get started, because
the battery will need to be charged before you can operate from battery
power.
Always use the TOSHIBA AC adaptor that was included with your
tablet, or use AC adaptors specified by TOSHIBA to avoid any risk of
fire or other damage to the tablet. Use of an incompatible AC adaptor
could cause fire or damage to the tablet possibly resulting in serious
injury. TOSHIBA assumes no liability for any damage caused by use
of an incompatible adaptor.
Never plug the AC adaptor into a power source that does not
correspond to both the voltage and the frequency specified on the
regulatory label of the unit. Failure to do so could result in a fire or
electric shock, possibly resulting in serious injury.
User's Manual
3-7
TOSHIBA AT200
Always use or purchase power cables that comply with the legal
voltage and frequency specifications and requirements in the country
of use. Failure to do so could result in a fire or electric shock, possibly
resulting in serious injury.
When you connect the AC adaptor to the tablet, always follow the
steps in the exact order as described in the User’s Manual.
Connecting the plug to a live electrical outlet should be the last step
otherwise the DC output plug could hold an electrical charge and
cause an electrical shock or minor bodily injury when touched. As a
general safety precaution, avoid touching any metal parts.
Never place your tablet or AC adaptor on a wooden surface, furniture,
or any other surface that could be marred by exposure to heat since
the tablet base and AC adaptor's surface increase in temperature
during normal use.
Always place your tablet or AC adaptor on a flat and hard surface that
is resistant to heat damage.
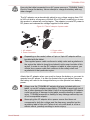
1.
Plug the USB connector of the power cable into the USB port on the
AC adaptor.
Figure 3-3 Connecting the AC adaptor 1
2-pin
3-pin
2.
Plug the power connector of the power cable into the docking interface
on your tablet.
Figure 3-4 Connecting the AC adaptor 2
3.
User's Manual
Plug the AC adaptor into a live wall outlet.
3-8
TOSHIBA AT200
You can charge the tablet by connecting the power cable to a USB port on
a computer. TOSHIBA recommends charging when the tablet goes into
sleep mode.
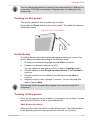
Turning on the power
This section describes how to power up your tablet.
Press and hold Power button to turn on the tablet. The tablet will vibrate to
indicate the status.
Figure 3-5 Turn on the tablet
Initial Setup
The Setup Screen will be the first screen displayed when you turn on the
power. Setup your tablet according to the following steps:
1.
2.
3.
4.
5.
Choose your preferred language and tap Start to continue.
Connect to a wireless network via Wi-Fi.
You can choose to skip and turn Wi-Fi on later in Settings screen.
Choose whether to use Google Location Service™ and tap Next to
continue.
Set date and time or use network-provided time and tap Next to
continue.
Register or sign in with a Google™ account. You can also skip this
step by tapping Skip.
The last step will be automatically skipped if you choose to skip Wi-Fi
connection.
Turning off the power
If you are not going to use your tablet for a long time, shut it down. You can
also turn the LCD off in order to extend battery life.
Shut down the tablet
When you shut down the tablet, no data will be saved. The tablet will boot
to the operating system's main screen the next time it is turned on.
User's Manual
3-9
TOSHIBA AT200
1.
If you have entered data, either save it to flash memory or to other
storage media.
Never turn off the power while an application is running. Doing so
could cause loss of data.
Never turn off the power, disconnect an external storage tablet or
remove storage media during data read/write. Doing so can cause
data loss.
2.
3.
Turn off or remove any peripheral devices connected to the tablet.
Press and hold Power button for 2 seconds and select OK to turn off
the tablet.
In any emergency case, you can also press and hold Power button for
about 10 seconds to force power off.
Do not turn the tablet back on immediately - wait a short period to
avoid any potential damage.
Turning the LCD off/on
You can turn the LCD off (while the system is still running) in one of the
following ways:
Press Power button.
Set the screen timeout in Settings.
To turn the LCD on:
Press Power button once again.
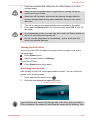
Unlocking your screen
After turning on the LCD, the screen remains locked. You can unlock the
screen in the following ways:
1.
Press and hold the unlock icon (
2.
Slide the icon towards the appearing circle.
).
Figure 3-6 Lock screen
If you have set up a screen lock through one of the three ways as pattern,
PIN or password, the method of unlocking the screen will be different. See
User's Manual
3-10
TOSHIBA AT200
Location & security section for other ways to protect your tablet and
privacy.
Care and use of the battery
This section provides the important safety precautions in order to handle
your battery properly.
Refer to the enclosed Instruction Manual for Safety and Comfort for
detailed precautions and handling instructions.
The lithium ion battery can explode if not used, handled or disposed of
properly. Dispose of the battery as required by local ordinances or
regulations.
Charge the battery only in an ambient temperature between 5 and 35
degrees Celsius. Otherwise, the electrolyte solution might leak, battery
performance might deteriorate and the battery life might be shortened.
Never try to remove or replace the battery by yourself which may
possibly result in serious injury. Please contact an authorized Toshiba
service provider, if necessary.
Charging the battery
When the battery power becomes low, you must recharge it to avoid losing
any data.
Procedure
To recharge the battery, connect the AC adaptor to the tablet. The tablet
will be powered up automatically and the LED indicator will glow white
while the battery is being charged.
Charging time
The following table shows the approximate time required to fully charge a
discharged battery when the AC adaptor is connected to the tablet.
Battery type
Charging time
Battery (3 cell, 24.4Wh)
about 6 hours
Please be aware that the charging time when the tablet is on is affected by
ambient temperature, the temperature of the tablet and how you are using
the tablet - if you make heavy use of external devices for example, the
battery might scarcely charge at all during operation.
User's Manual
3-11
TOSHIBA AT200
Battery exhausted time
The following table shows the approximate exhausted time of a fully
charged battery.
Battery type
Time
Battery (3 cell, 24.4Wh)
about 8 hours (in use)
about 5 days (sleep mode)
Please be aware that the battery exhausted time will be affected by how
you are using the tablet.
Battery charging notice
The battery may not begin charging immediately under the following
conditions:
The battery is extremely hot or cold (if the battery is extremely hot, it
might not charge at all). To ensure the battery charges to its full
capacity, you should charge it at room temperature of between 5°C to
35°C (41°F to 95°F).
The battery is nearly completely discharged. In this instance you
should leave the AC adaptor connected for a few minutes and the
battery should begin charging.
The indicator may show a rapid decrease in battery operating time when
you try to charge a battery under the following conditions:
The battery has not been used for a long time.
The battery has completely discharged and been left unattended for a
long time.
In such cases you should follow the steps as detailed below:
1.
2.
3.
Fully discharge the battery with the power on until the system
automatically turns itself off.
Connect the AC adaptor to the docking interface of the tablet, and to a
wall outlet that is supplying power.
Charge the battery until the LED indicator is off.
Repeat these steps two or three times until the battery recovers normal
capacity.
User's Manual
3-12
TOSHIBA AT200
Chapter 4
Basics
This chapter describes the basic operations of your tablet and the Home
screen.
Using the touch screen
You can use your finger to manipulate icons, buttons, menu items, the
onscreen keyboard, and other items on the touch screen.
Tap
Simply tap your finger on the touch screen to act on items on the
screen, such as application and settings icons, to type letters and
symbols using the onscreen keyboard, or to tap onscreen buttons.
Press & hold
Press & hold an item on the screen until an action occurs. It functions
like the right-click on a standard mouse.
Drag
Press & hold an item for a moment and then, without lifting your finger,
move your finger on the screen until you reach the target position. You
can drag items on the Home screen to reposition them.
Swipe or slide
To swipe or slide, you quickly move your finger across the surface of
the screen, without pausing when you first touch it (so you don’t drag
an item instead). For example, you slide the screen up or down to
scroll a list.
Double tap
Tap quickly twice on a webpage, map or other screen to zoom.
Pinch
In some apps (such as Browser and Gallery), you can zoom in/out by
placing two fingers on the screen at once and pinching them together
or spreading them apart.
Getting to know the HOME screen
The HOME screen is your starting point for using all the installed
applications on your tablet. You can customize the HOME screen to display
the widgets, application shortcuts, wallpapers and other shortcuts you
prefer.
User's Manual
4-1
TOSHIBA AT200
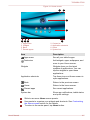
Figure 4-1 Home screen
1
2
3
4
5
6
7
1. Apps menu
3. Widgets
5. Back
7. Recent appss
Item
8
2. Customize
4. Application shortcuts
6. Home
8. System bar
Description
Apps menu
See all your tablet’s apps.
Customize
Add widgets, apps, wallpapers, and
more to your Home screen.
Widgets
Widgets show you the latest
updates of applications. You can
tap the widgets to open these
applications.
Application shortcuts
Tap these icons on Home screen to
open applications.
Back
Return to the previous screen.
Home
Return to the home screen.
Recent apps
See recent applications.
System bar
Show app notifications, tablet status
and quick settings.
Slide to see more Home screen panels.
Use panels to organize your widgets and shortcuts. See Customizing
the Home screen section for the details.
To return to the center panel, tap Home button.
User's Manual
4-2
TOSHIBA AT200
Apps menu
Tap the
menu.
icon at the upper right corner of Home screen to open Apps
You can find all your apps in this place.
To manage your apps, tap Settings -> Applications -> Manage
applications.
Opening and switching applications
The Apps menu, which you can open from the Home screen, holds icons
for all the applications on your tablet.
Tap My apps tab on the top of Apps menu screen to view applications
that you downloaded and installed.
Opening an application
You may open any application by:
Tapping an application icon on the Home screen.
Tapping an application icon from the Apps menu.
Switch to a recently used application
You may switch to recently used application by:
Tapping Recent apps icon (
want to switch.
), and select the application that you
Monitoring your tablet’s status
The status bar appears on the bottom of every screen. It displays time and
icons indicating that you have received notifications and icons indicating
the tablet’s status, along with the current time.
Status icons
The icons on the right of the status bar indicate the status of your tablet.
Notification icons
The icons on the left of the status bar indicate different types of
notifications. In addition to system notification icons, applications you
installed on your tablet may use their own notification icons.
Quick Settings
You can use Quick Settings to change settings, such as Airplane mode,
Wi-Fi, Auto-rotate screen, Brightness, Notifications. Double tap the
status bar to open Quick Settings screen, and tap the area outside of the
Quick Settings screen to close it.
User's Manual
4-3
TOSHIBA AT200
Airplane mode
Turn on airplane mode to disable all wireless radios.
Wi-Fi
Tap to open Wi-Fi Setting screen.
Auto-rotate screen
Turn on this option to enable automatic screen orientation as you turn
your tablet sideways.
Brightness
Set the brightness of display. You can also tap AUTO to adjust
brightness automatically.
Notifications
Turn on this option to show notification on system bar.
Settings
Tap this option to open Settings screen.
Managing Notifications
Notification icons report the arrival of new messages, calendar events, and
alarms, as well as ongoing events.
When you receive a notification, its icon appears in the status bar, along
with a summary that appears only briefly.
You can open the Notifications panel to view a list of all your notifications.
Depending on your settings and the model of your tablet, you may also
hear a notification sound.
Adjusting sound volume and other general notifications settings is
described in the Sound settings in "Settings" chapter.
Applications that produce notifications, such as Email, have their own
settings, which you can use to configure whether and how they send
notifications. See the sections on those applications for details.
Opening the Notifications panel
Tap the status bar to open the notifications panel. The notifications panel
displays a list of your current notifications. Notifications about ongoing
activities are listed first, followed by notifications about events, such as a
new mail notifications.
Responding to a notification
To respond to a notification, follow the below steps:
1.
Open the notifications panel.
Your current notifications are listed in the panel, each with a brief
description.
User's Manual
4-4
TOSHIBA AT200
2.
Tap a notification to respond to it.
The notifications panel closes. What happens next depends on the
notification.
Closing the Notifications panel
Tap the area out of the notifications panel to close the notifications panel.
Locking your screen
You can lock your screen so that only you can unlock it to access your
data, run applications and so on. See Location & security section for other
ways to protect your tablet and privacy.
Locking your screen with a Pattern lock
For example, you can use a Pattern lock to lock your screen with following
steps.
1.
2.
Open the Location & security settings by tapping the Apps ->
Settings -> Location & security.
Tap Configure lock screen -> Pattern.
The first time you open it, a short tutorial about creating an unlock pattern
will appear. Then you’re prompted to draw and redraw your own pattern.
Follow the onscreen instructions to finish the creation.
The next time you turn on your tablet or wake up the screen, you will be
prompted to draw your unlock pattern to unlock the screen.
Customizing the Home screen
You can add application icons, shortcuts, widgets and other items to any
part of the Home screen. You can also change the wallpaper.
Adding an item to the Home screen
To add an item to the Home screen, follow the steps listed below:
1.
2.
3.
Tap the
icon at the upper right corner of the home screen.
Tap on tab of Widgets, App shortcuts, Wallpapers or More.
Drag the Widgets, shortcuts, or other items to the Home screen panel
you want.
You can also tap Widgets, shortcuts to add them to current Home
screen panel.
The number of Widgets you can add depends on the size of Widgets.
User's Manual
4-5
TOSHIBA AT200
Widgets
Add any number of different miniature applications to your Home
screen, including an analog clock, a music player, and a picture frame.
You can also download widgets from other websites.
App shortcuts
Add shortcuts to applications you have installed.
Wallpapers
Add a wallpaper you like or change the wallpaper for your Home
screen from the Gallery, Live Wallpapers or Wallpapers.
More
Add shortcuts to bookmarks, contacts, playlists and so on.You can
also add items to the Home screen by following ways:
Press and hold an empty area of the Home screen.
Press and hold an app shortcut on Apps menu, and drag it to the
Home screen panel you want.
Moving an item on the Home screen
To move an item on the Home screen, follow the steps below:
1.
2.
Press and hold the item you want to move until its icon is magnified.
Don’t lift your finger from the screen.
Drag the item to a new location on the screen.
3.
It will pause at the left or right edge of the screen to drag the item onto
extended Home screen.
When the item is at where you want it, lift your finger.
Removing an item from the Home screen
To remove an item from the Home screen, follow the steps below:
1.
Press and hold the item you want to remove until its icon is magnified.
2.
3.
A Trash bin icon appears on the top right corner.
Drag the item to the Trash bin icon.
When the icon glows red, lift your finger.
Changing the Screen Orientation
You can change the screen orientation to Portrait mode by rotating the
tablet sideways. The screen orientation automatically changes according to
the rotation angle detected.
You can also lock the auto rotation and use the tablet always in Portrait or
Landscape mode. These settings can be performed in the Screen settings.
Please refer to Screen section for details.
User's Manual
4-6
TOSHIBA AT200
In the Portrait mode, some drivers/utilities may not perform install and
uninstall operation. If it occurs, switch to the Landscape mode to proceed.
Managing Tasks and Applications
You can manage some of the running applications, please follow the steps
below:
1.
2.
Tap Apps -> Settings -> Applications -> Manage applications.
Tap an item you want to manage from Downloaded/Running/All tab.
Please refer to Applications in Settings section for details.
You can close an item by tapping Force stop, or remove an item by
tapping Uninstall.
In order to improve the performance of your tablet, close some of the
running applications.
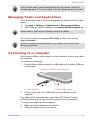
Connecting to a computer
With a micro USB port on the tablet, you are allowed to connect your tablet
to a computer.
To connect to a computer:
1.
Plug the Micro USB connector of a USB cable into the Micro USB port
on this tablet.
Figure 4-2 Connecting an USB cable
1
2
1. Micro USB port
2.
2. Micro USB connector
Plug the other end of the USB cable into the USB port on the
computer.
Your tablet will be recognized as a removable MTP (Media Transfer
Protocol) device and you can access its content from the computer.
To remove this tablet from the computer:
1.
2.
User's Manual
Make sure all file operations are finished.
Unplug the tablet from your computer.
4-7
TOSHIBA AT200
Make sure the connector is properly aligned with the socket. Do not try
to force the connection, doing so can damage the connecting pins.
Factory Reset
The tablet provides you with the function to reset it. Before executing this
function, you need to backup the system settings, application settings, user
installed applications and data in the internal storage.
To perform the factory data reset, please follow the steps below:
1.
2.
Tap Apps -> Settings -> Privacy -> Factory data reset -> Reset
tablet -> Erase everything.
The factory data reset will be done.
Please note that the following data will be erased:
System settings and application settings
User installed applications
Internal storage files, such as music or photos
Data in the removable media will not be erased.
User's Manual
4-8
TOSHIBA AT200
Chapter 5
Applications
This chapter describes the applications & widgets and how to use them.
Your tablet has some Google Mobile™ services installed depending on the
model you purchased.
Analog clock
Analog clock is a widget to display a clock in the Home screen based on
the system time so that you can watch time directly from the clock.
You can also use it to set an alarm clock. For details, please refer to the
Clock section.
Browser
Browser is used to view webpages and to search for information on the
web.
To open the Browser, tap Apps -> Browser.
Browser can also open when you tap a web link, for example, in an email
or text message.
When you open Browser, the last webpage you were viewing is displayed.
If you have not used Browser recently, your home page will open.
Go to a webpage
1.
2.
3.
Tap the URL box on the top of the Browser screen. If the URL box
isn’t visible, drag the page down until the URL box comes into view.
Enter the address (URL) of the webpage by using the onscreen
keyboard.
Tap a suggestion or enter an address and tap Enter with the onscreen
keyboard.
The Browser cannot display some webpages correctly if the web
page has a complicated layout. This is dependent on the web page.
The Browser does not support file uploading function.
The Browser might connect to a “mobile” web site rather than a “PC”
web site, depending on the site. If you want to access the PC web site,
please manually select the correct site.
User's Manual
5-1
TOSHIBA AT200
Zoom in or zoom out on a webpage
You can zoom on a webpage in either of the following ways.
Double tap at the area where you want to zoom.
Pinch two fingers together or apart to zoom out or in on a webpage.
Multiple Browser tabs
You can open several Browser windows (up to sixteen) and switch among
them with tabs.
Open a new Browser window
You may open a new Browser window in either of the following ways:
Tap Menu (
) and select New tab.
Tap the
with tabs.
New window will open with your home page.
Switch between Browser windows
You may switch between different Browser windows by tapping the tabs of
browser windows.
Close a Browser window
You may tap the cross on the tab to close the current browser window.
Bookmarks
You may bookmark webs to open it conveniently.
1.
2.
3.
Tap the pentagram icon (
) with the URL bar.
Enter a Label for the website or use the default Label.
Tap OK to add it to Bookmarks.
You can also add it to Home screen or Other folder by tapping and
choosing from Add to menu.
You may open the website from the bookmarks.
1.
Tap the bookmark icon (
2.
go to bookmarks.
Tap a page in the list to open it.
) at the upper right corner of the screen to
View your Browser history
As you browse the web, Browser will keep track of the pages you visit, to
help you find your way back later.
1.
User's Manual
Tap the bookmark icon (
) at the upper right corner of the screen.
5-2
TOSHIBA AT200
2.
Tap the History tab.
3.
4.
The pages you’ve visited are grouped chronologically. Bookmarked
pages have a star.
Tap a time period to view the pages you’ve visited.
Tap a page in the history to reopen it.
Web page options
), you can access a number of brower options like:
By tapping Menu (
New tab, New incognito tab, Find on page, Share page, Save page,
Page info, Downloads, Settings.
Browser settings
You can configure a number of Browser settings, including some that you
can use to manage your privacy.
To open the Browser settings screen, tap Menu (
) -> Settings.
There are four tabs: General, Privacy & Security, Advanced and Labs.
Calculator
You can use Calculator to solve simple arithmetical problems or use its
advanced operators to solve more complex equations.
1.
2.
3.
4.
5.
Open Calculator as follows:
Tap Apps -> Calculator.
Enter numbers and arithmetical operators on the basic screen.
Press and hold the Calculator’s display to copy the numbers.
) to delete the last number or operator you
Tap Clear icon (
entered. Press and hold this icon to delete everything in the display.
Tap CLR to clear the display after calculation.
Calendar
You can use Calendar to remind your date.
Add events to Calendar
You can add events to Calendar by following these steps:
1.
User's Manual
2.
Tap any blank period on your calendar or the New Events icon (
on the top right corner of Calendar screen.
Enter Event name and set details for this date.
3.
You can add guests by entering their email addresses.
Tap Done to save.
)
5-3
TOSHIBA AT200
Camera
Camera is a combination of camera and camcorder that you can use to
shoot and share pictures and videos. Pictures and videos are stored in the
Gallery.
Open Camera and take pictures/videos
You can take pictures and shoot videos with the Camera.
To open the Camera, tap Apps -> Camera.
Camera will open, ready to take a still picture. You can switch Camera to
video mode anytime by tapping option 6.
The back camera is set for default. You can switch to front camera by
tapping
icon (option 5).
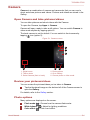
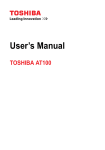
Figure 5-1 Camera screen
1
2
3
4
5
1. Digital zoom
3. Take a photo
5. Select camera (front or back)
6
2. Photo options
4. Go to Gallery
6. Choose photo or video mode
Review your pictures/videos
You can review the pictures/videos you’ve taken in Camera.
Tap the thumbnail image on the bottom left of the Camera screen to
open the Gallery.
For details, refer to the Gallery section.
Photo options
Many options are displayed on the screen.
Flash mode ( ): Choose how the camera flash works.
White balance ( ): Adjust for lighting conditions.
Color effect ( ): Pick a cool effect.
User's Manual
5-4
TOSHIBA AT200
Scene mode ( ): Choose your environment.
Camera settings ( ): General settings can be found here.
Store location
Turn on to add location information to pictures you take.
Focus mode
Choose the focus mode for the camera.
Exposure
Adjust the value to change the exposure rate.
Picture size
Choose the size of the pictures you take.
Picture quality
Choose the quality of the pictures you take.
Restore defaults
Restore factory default settings.
Video options
Similarily, in Video mode, video options are displayed on screen.
Flash mode ( ): Choose how the camera flash works.
White balance ( ): Adjust for lighting conditions.
Color effect ( ): Pick a cool effect.
Video quality ( ): Tap to select the quality of the videos you take.
Time lapse interval( ): Choose a time interval for time lapse
recording.
Clock
In addition to displaying the date and time, the Clock application plays
slideshows and music. You can also use Clock to set an alarm.
To open Clock, tap Apps -> Clock.
Setting an alarm
1.
2.
Tap the Alarm icon ( ) below the time display.
Tap an existing alarm clock to change its time and other attributes.
3.
4.
Or tap Add alarm to add a new one.
Tap Time to set the time of the alarm.
Tap Repeat to set the days when you want the alarm to sound.
5.
6.
7.
User's Manual
If you don’t set a repeat, the alarm sounds only once.
Tap Ringtone to select a ringtone for the alarm.The ringtone plays
when you select it.
Tap Vibrate to enable vibration when the alarm sounds.
Tap Label to enter a name for the alarm.
5-5
TOSHIBA AT200
8.
Tap Done to finish.
Contacts
Contacts gives you quick and easy access to the people you want to
reach. Information about your contacts is shared with other applications,
such as Gallery (for sharing photos and videos) and so on.
If you have more than one account with contact information, Contacts
merges duplicate contacts into a single entry. You can also manage that
process manually.
Open Contacts
To open your contact, tap Apps -> Contacts.
All of your contacts are displayed alphabetically in a scrolling list.
Tap a contact to view the details. Entries for communicating with the
contact are followed by details. Tap a communication method to start
texting or emailing the contact by using the listed number, address and so
on.
Import and export contacts
If you have contacts stored in vCard format in the Internal storage, you can
import them into Contacts on your tablet. You can also copy contacts from
SD card by TOSHIBA File Manager. You can export contacts in vCard
format onto an SD card for backup using TOSHIBA File Manager. You can
also send a contact via email or Bluetooth.
Search for a contact
You can search for a contact by name.
1.
2.
Open your Contacts.
Tap Find contacts (
3.
Start entering the name or number of the contact you’re searching for.
4.
As you type, contacts with matching names appear below the search
box.
Tap a matching contact in the list to open its details screen.
). The search box appears.
Display options
You can sort contacts list by First name or Last name.
1.
2.
3.
User's Manual
Open your Contacts.
Tap Menu icon ( ) and then tap Settings.
Set Sort list by and View contact names as.
5-6
TOSHIBA AT200
Edit or delete contacts
To edit a contact, tap the contact, and then tap ( ).
To delete a contact, tap the contact, and then tap Menu -> Delete
contact.
Downloads
You can use the Downloads application to view and manage downloaded
files.
To open the Downloads, tap Apps -> Downloads.
Email
You can use the Email application to read and send emails. Email includes
a wizard that makes it easy to configure it for several popular email service
providers.
To open the Email, tap Apps -> Email.
After you add an Email account, next time when you open Email it will open
to the last screen you were viewing. If you have not used Email recently, it
will display the contents of your Inbox (if you have only one account) or the
Accounts screen (if you have multiple accounts).
If you have configured Email to send and receive emails from more than
one account, you can view all emails sent to all accounts in your Combined
Inbox.
Read an email
You can read emails in the Inbox or other folders for individual accounts.
1.
2.
Open the combined Inbox, an account’s Inbox or another folder of
emails.
Tap the email to read. The email opens in a screen with information
about who sent it, the date it was sent and related information on the
top, followed by the contents of the email.
Send an email
You can send an email to your contacts or to other people.
To send an email:
1.
2.
Tap (
Tap (
) and enter the recipient, subject and message.
) to add attachments.
When you enter text in the To: field, your tablet shows possible matches
from your Contacts list, if any exist.
User's Manual
5-7
TOSHIBA AT200
Respond to an email
You can reply to or forward an email that you’ve received. You can also
delete emails and manage them in other ways.
While reading an email, tap Menu (
Forward or Delete.
) and then tap Reply, Reply all,
Manage email accounts
The Email application enables you to add email accounts from popular
web-based email service providers. You can also delete an email account
or edit an email account settings.
To add an email account:
Tap Menu -> Account settings -> Add account.
To delete an email account:
1. Tap Menu -> Account settings.
2. Tap the account you want to delete. On the options menu, tap
Remove account and then tap OK.
To edit an email account settings:
Tap Menu -> Account settings.
You can make any changes to general, notification or server settings
from this screen.
Gallery
You can use Gallery to view pictures and play videos that you’ve taken
with the Camera, downloaded or copied onto your tablet.
Open Gallery
To open Gallery to view your pictures and videos, tap Apps -> Gallery.
Gallery presents the pictures and videos on your tablet, including those
you’ve taken with Camera and those you downloaded from the web or
other locations.
If you have a large number of pictures or videos on your tablet, it may
take Gallery a few minutes when you open it to discover and organize
them.
Gallery will display all images and videos without distinction of internal
or external storage.
View and browse pictures/videos
All the albums are displayed in the screen.
1.
User's Manual
Tap an album to open it and view its contents. The pictures and videos
in the album are displayed in chronological order. You can view the
5-8
TOSHIBA AT200
2.
3.
pictures and videos in your albums in stacks, sorted By album, time,
location, tags and size.
Tap Images and videos you can choose to view Images only,
Videos only, or both.
Tap a picture or video in an album to view it.
You can pinch the picture by two fingers or apart to zoom in or zoom
out. Slide left or right to view other pictures/videos.
You can also return to the main Gallery screen at any time by tapping
its icon (
) on the top left of the screen.
Take pictures/videos
You can also tap the camera icon on the top right corner of the screen to
take pictures or videos directly. Please refer to the Camera section for
more information.
Work with pictures/videos
After opening a picture or a video, you can work with it as follows:
1.
2.
3.
4.
Start a slideshow: Tap .
Share photo: Tap to send the photo in a message, transfer it using
Bluetooth, email, or post it online.
Delete photo: Tap .
Tap Menu to see details, rotate, crop, or set as a contact photo or
wallpaper.
Music
You can use Music to organize and listen to music and other audio files
that are in your tablet, SD card or USB storage.
Music supports a wide variety of audio files formats so it can play music
that you purchase from online stores, or copied from your CD collection
and so on. For the details of supported formats, please refer to TOSHIBA
Media Player in this chapter.
To open the Music screen, tap Apps -> Music.
The Music library screen will open with tabs that you can tap to view your
music library organized by New and recent, Albums, Artists, Songs,
Playlists or Genres.
Play Music
You can listen to music by using your tablet’s built-in speakers.
To play music:
Tap a song in your library to listen to it.
User's Manual
5-9
TOSHIBA AT200
Work with playlists
You can create playlists to organize your music files into sets of songs,
which you can play in the order you set or in a shuffle.
To create a playlist:
1.
2.
3.
Tap sort tab on the Music library screen and choose Playlists tab.
Tap plus icon to add a new playlist.
Enter a name and tap OK to save.The new playlist is added to the
Playlist library.
You can add other songs that are playing in the Now playing screen in a
playlist by tapping Menu and tapping Add to playlist.
Choose an existing playlist, or tap New playlist to create a new playlist.To
edit, delete, and rename a playlist, press and hold the playlist.
To edit, delete, and rename a playlist, press and hold the playlist.
Picture frame
Picture frame is a widget to display the pictures or photos on the screen
as if in a container. This makes it easier for users to enjoy the pictures. You
can select pictures directly.
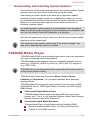
Service Station
The Service Station utility is used to provide you with updates for both
application and system software. It will notify you when new versions of
your software are available, as well as download and install them.
To open Service Station:
Tap Apps -> Service Station.
When you run the Service Station for the first time, you are prompted to
accept the access agreement. The agreement authorizes the utility to
collect certain basic information about your tablet and send it to the
TOSHIBA servers as part of the process of obtaining updates. Accept or
Decline the agreement by tapping the buttons. While it is possible to
decline the agreement, it is not recommended, as this means the Service
Station utility will not run, and you will not be notified of new software
updates for your tablet.
Main Window
The main window of this application includes three areas: Header,
Buttons, and Information.
Header
This section runs along the top of the screen, and contains basic
information about your system such as the version of the operating
system, the tablet part number and serial number.
User's Manual
5-10
TOSHIBA AT200
Buttons
Buttons are displayed on the screen. These buttons will change,
depending on what actions you have available on the current screen.
Information
The main part of the screen displays information such as the list of
available updates, or more detailed information about a specific
update.
Check for Updates
During normal operations, the Service Station will periodically check to see
if there are any updates for your system. This is done automatically. If there
are new updates available, you will be notified with the Service Station icon
in the status bar of your tablet.
While the Service Station will periodically check for updates in the
background, you can request that it check for updates immediately. Tap the
Check for Updates button, and the application will refresh the list of
available updates.
It is not normally necessary to check for updates manually, as the
utility checks for them automatically and informs you when one is
available.
Please connect the AC adaptor before updating.
Downloading Updates
When an update is available, it will appear on the information area of the
screen. Tap the item displayed. More details for that item are displayed on
the screen.
To download the update, tap the Download button. This will begin the
download process. A progress indicator is displayed.
Tapping Home (
) allows the download to continue while you use
your tablet. A notification of the download completion will appear in the
system status bar.
Tapping Back (
) will abort the download process.
Installing Updates
Once an update has been downloaded, it can be installed. If you are not on
the display showing the information for that item, go to the screen by
launching the Service Station utility, or by tapping the download completion
notice on the system status bar.
Tap the Install button. This will launch the application installer. Continue
with installation.
User's Manual
5-11
TOSHIBA AT200
Downloading and Installing System Updates
Service Station will download both application and system updates. System
updates require that your tablet is rebooted during the update.
Downloading a system update is the same as an application update.
Installing a system update is similar to an application update, but you will
be reminded that the tablet will be rebooted during the installation process.
Make sure to close any other applications and save all work prior to
installing a system update.
It is important that a system update is not interrupted once it has begun.
Make sure the AC power is plugged in before beginning the installation and
don’t turn the tablet off while the installation is in progress.
Note that the system may reboot more than once during an system update,
depending on the update itself.
This application only updates system area in the internal storage. User
data area is kept after the system is updated.
TOSHIBA Media Player
TOSHIBA Media Player is a multimedia player where users can experience
and enjoy outstanding multimedia playback.
TOSHIBA Media Player supports common multimedia playback such as
video (e.g. H.264/AVC, MPEG-4), music (e.g. MP3, AAC-LC) and photo
(e.g. JPEG, PNG).
TOSHIBA does not guarantee that all the audio/video files with the above
coding will be played correctly.
TOSHIBA Media Player has five panels: Music, Videos, Photos,
Podcasts and Downloads. You can switch between these panels by
swiping left/right.
TOSHIBA Media Player supports home network functions such as DMS
(Digital Media Server), DMC (Digital Media Controller) and DMP (Digital
Media Player).
Connectable Digital Media Servers
TOSHIBA Media Player supports browsing DMS that has search
function only. That is, it only supports Windows Media Player Network
Sharing Service in Microsoft® Windows® 7.
Connectable Digital Media Renderers
Toshiba Media Player is connectable with the following DMRs.
Microsoft Windows Media Player 12 in Microsoft Windows 7
Toshiba TV with DMR functions
User's Manual
5-12
TOSHIBA AT200
Do not eject (or unmount) external media during contents search as
this will cause music playback to stop.
Some "double-byte" characters might not be displayed correctly. This
is the Operating System limitation.
TOSHIBA File Manager
TOSHIAB File Manager is a featured application that manages files and
folders. It allows you to create, rename, copy, cut, paste or delete files and
folders stored in both internal and external storage.
To open TOSHIBA File Manager:
Tap Apps -> File Manager from the Home screen.
System files cannot be accessed by TOSHIBA File Manager.
TOSHIBA File Manager may not be able to open a file without its
associated application.
Navigation
The main window of TOSHIBA File Manager is divided into four panels.
Each panel’s function is described as below.
Device panel
Device panel lists icons of available storage devices. By default you
will see Internal Storage and Screen Capture icon. You are also
allowed to add folder shortcut into this panel.
Address panel
Address panel shows you the current device name followed by relative
(not full) path of current folder.
Control panel
Control panel contains several functional icons for file and folder
operations.
Files and folders panel
Explore files and folders with optional layout in this panel. You can
easily read and collect additional information such as size, thumbnail
of the files, name and last modified date and time of the folders. When
items are selected, they are tagged with a tick.
Operations on Files & Folders
Basic operations
Basic file and folder operations include Cut, Copy, Paste and Delete.
Press and hold an item to select it while enabling the multi-selection mode,
therefore these command buttons will be visible in the Control panel.
User's Manual
5-13
TOSHIBA AT200
Select All
Tap
to open the menu and tap Select All.
Deselect All
Tap
to open the menu and tap Deselect All.
Cancel Selection
Tap Done to cancel selection.
Copy, Cut and Paste
Tap Copy(
) or Cut(
) in the Control panel. After TOSHIBA File
Manager exits the multi-selection mode, you can redirect to a folder
) in the Control
where to paste the selected items. Tap Paste (
panel to complete the operation.
Delete
Tap Delete(
) in the Control panel to delete the item(s) you have
selected. Confirm the operation by tapping OK.
Grid/List view
You can change how files and folders appear by simply tapping Grid/List
view switching icon(
) in the Control panel.
Grid view(
)
By default, files and folders are shown in a gird.
List view(
)
Files and folders are shown in a scrolling list enabling you to view
detailed information about an item.
Creating a folder
You can create a folder by following below steps:
1.
2.
3.
Navigate to the directory where to create a new folder.
Tap
in the Control panel.
A dialog will appear, enter the folder name and tap OK.
Renaming a file or a folder
You can rename a file or folder by following the steps below:
1.
2.
3.
Press and hold a file or folder you want to rename.
Tap
to open the menu and tap Rename.
A dialog will appear. Enter a new folder name and tap OK.
Sorting files and folders
You can sort and view files and folders by name, time, size and type.
1.
2.
User's Manual
Tap
in the Control panel.
Tap By name, By size, By time or By type as you want.
5-14
TOSHIBA AT200
By default, items are arranged in ascending order. Simply tap the option to
switch to descending order.
Adding folder shortcut
Folder shortcut makes it faster to access the folder. TOSHIBA File
Manager is designed to create folder shortcut in the Device panel.
1.
2.
Press and hold a folder and tap
to open the menu.
Tap Add to shortcut to add it to the Device panel.
To remove a folder shortcut from the Device panel, simply press and hold
the shortcut and tap OK. However, the storage device icon cannot be
removed.
Storage Structure
The following table lists the description of each storage device icon in the
Device panel.
TOSHIAB File Manager only shows the storage device connected to the
tablet.
Name
Description
Internal Storage
All contents (excluding system files) in the
tablet’s internal storage are shown.
SD card
All contents in SD card are shown.
USB Storage (0-7)
Supporting up to eight USB storage devices
connected to tablet powered by OTG technology.
Screen Capture
Screeshot image files are shown if a screen
capture application is installed.
Online Manual
Online Manual is an application to launch the pre-installed online manual
(this manual) for this tablet.
User's Manual
5-15
TOSHIBA AT200
Chapter 6
Settings
This chapter will describe different setting options in the Settings
application.
You can use Settings to configure how your tablet sounds, communicates
and operates in many other ways.
A scrollbar is displayed in right side of the screen. This scrollbar is only
used to show the position of the displayed area. You can scroll the settings
items using your fingers.
Wireless & networks
Your tablet can connect to a variety of networks and devices, mobile
networks for voice and data transmission, Wi-Fi data networks and
Bluetooth devices, such as headsets.
You can use Wireless & networks settings to configure and manage
these connections. You can also use wireless controls to turn off all radios
with Airplane mode.
Airplane mode
Check this option to disable all wireless radios.
Wi-Fi
Check this option to turn on Wi-Fi and connect to Wi-Fi networks.
Wi-Fi settings
Tap to set up and manage wireless access points.
Bluetooth
Check this option to turn on Bluetooth and connect to Bluetooth
devices.
Bluetooth settings
Tap to manage connections, set device name & discoverability.
Tethering & portable hotspot settings
Tap to set up USB/Bluetooth tethering and portable hotspot.
This function is only supported by 3G models.
VPN settings
Tap to set up and manage Virtual Private Networks (VPNs).
User's Manual
6-1
TOSHIBA AT200
Mobile networks
Tap to set options for roaming, networks and APNs.
This function is only supported by 3G models.
Connecting to mobile networks
This section only applies to models with 3G modules.
When you assemble your tablet with a SIM card from your wireless service
provider, your tablet is configured to use your provider’s mobile networks
for transmitting data.
Your tablet is configured to work with many mobile carriers’ networks. If
your tablet does not connect to a network when you insert a SIM card and
turn it on, contact your carrier to obtain the details of its access point name.
Disabling data when roaming
1.
2.
Open the Settings screen.
Tap Wireless & networks -> Mobile networks, and uncheck Data
roaming.
With Data roaming unchecked, you can still transmit data with a Wi-Fi
connection.
Editing or creating a new access point
If you and your wireless service provider determine that you need to
change the settings of your current access point name (APN) or to create a
new one, you must obtain the APN and detailed settings from your
provider.
1.
2.
3.
Open the Settings screen.
Tap Wireless & networks -> Mobile networks -> Access Point
Names.
Tap an existing APN to edit it, or tap New APN to create a new one.
4.
Enter the APN settings that you obtained from your wireless service
provider by tapping each setting that you need to edit.
When you finished, tap Save.
If you have created a new APN, tap it in the APNs screen to start
using it.
Connecting to Wi-Fi networks
Wi-Fi is a wireless networking technology that can provide Internet access
at distances of up to 100 meters, depending on the Wi-Fi router and your
surroundings.
User's Manual
6-2
TOSHIBA AT200
To use Wi-Fi on your tablet, you need to access a wireless access point, or
“hotspot”. Some access points are open and you can simply connect to
them. Others are hidden or implement other security features, so you must
configure your tablet so it can connect to them.
There are numerous systems for securing Wi-Fi connections, including
some that rely on secure certificates or other schemes to ensure that only
authorized users can connect.
Turn off Wi-Fi when you are not using it to extend the life of your battery.
The Status bar displays icons that indicate Wi-Fi status.
Connected to a Wi-Fi network (waves indicate
connection strength)
Notification that an open Wi-Fi network is in range
Turning Wi-Fi on and connecting to a Wi-Fi network
You may turn on and connect to a Wi-Fi network by following steps:
1.
2.
3.
Open the Settings screen.
Tap Wireless & networks.
Tap Wi-Fi to turn it on.
The tablet scans for available Wi-Fi networks and displays the names
of those it finds. Secured networks are indicated with a Lock icon.
If the tablet finds a network that you connected to previously, it will connect
to it automatically.
4.
Tap Wi-Fi settings and choose a network to connect it.
If the network is open, you are prompted to confirm that you want to
connect to that network by tapping Connect.
If the network is secured, you’re prompted to enter a password or
other credentials. (Ask your network administrator for details.)
When you connected to a network, tap on the network name in the WiFi settings screen for details about the speed, security, address, and
related settings.
Receiving notifications when open networks are in range
By default, when Wi-Fi is turned on, you will receive notifications in the
Status bar when your tablet detects an open Wi-Fi network.
1.
2.
Turn on Wi-Fi if it is not already on.
In the Wi-Fi settings screen, check Network notification.
You can uncheck this option to stop receiving notifications.
User's Manual
6-3
TOSHIBA AT200
Adding a Wi-Fi network
You can add a Wi-Fi network so the tablet will remember it, along with any
security credentials, and connect to it automatically when it is in range. You
must also add a Wi-Fi network to connect to it, if it does not broadcast its
name (SSID), or to add a Wi-Fi network when you are out of range.
To join a secured network, you need to contact the network’s administrator
to learn what security scheme is deployed on it and to obtain the password
or other required security credentials.
1.
2.
3.
4.
5.
Turn on Wi-Fi if it is not already on.
In the Wi-Fi settings screen, tap Add Wi-Fi network.
Enter the Network SSID (name). If the network is secured, tap the
Security menu and then tap the type of security deployed on the
network.
Enter any required security credentials.
Tap Save.
The tablet will connect to the wireless network. Any credentials that
you enter will be saved, so you can connect automatically the next
time you come within range of this network.
Forgetting a Wi-Fi network
You can make your tablet forget about the details of a Wi-Fi network that
you added. For example, if you don’t want the tablet to connect to it
automatically or if it is a network that you no longer use.
1.
2.
3.
Turn on Wi-Fi if it’s not already on.
In the Wi-Fi settings screen, tap the name of the connected network.
Tap Forget in the dialog that opens.
Connecting to Bluetooth devices
Bluetooth is a short-range wireless communications technology that
devices can use to exchange information over a distance of about 8
meters. The most common Bluetooth devices are headphones for making
calls or listening to music, hands-free kits for cars, and other portable
devices, including cell phones.
This tablet does not support Bluetooth connections via ad-hoc network.
To connect to a Bluetooth device, you must turn on your tablet’s Bluetooth
radio. The first time you use a new device with the TOSHIBA AT200
Tablet, you must “pair” them so that they know how to connect securely to
each other. After that, you can simply connect to a paired device.
Turn off Bluetooth when you’re not using it, to extend the life of your battery
between charges. You may also be required to turn Bluetooth off in some
locations. Bluetooth is turned off in Airplane mode.
User's Manual
6-4
TOSHIBA AT200
Turning Bluetooth on or off
1.
2.
3.
Open the Settings screen.
Tap Wireless & networks.
Check or uncheck Bluetooth to turn it on or off.
Changing your tablet’s Bluetooth name
Your tablet has a generic Bluetooth name by default, which is visible to
other devices when your connect them. You can change the name so that
it is more recognizable.
1.
2.
Open the Settings screen.
Tap Wireless & networks -> Bluetooth settings.
3.
4.
The Bluetooth settings screen will be displayed.
If Bluetooth is not turned on, check Bluetooth to turn it on.
Tap Device name. Enter a name and tap OK.
Pairing your tablet with a Bluetooth device
You must pair your tablet with another device before you can connect to it.
Once you pair your tablet with another device, they stay paired unless you
unpair them.
1.
2.
3.
4.
5.
6.
Open the Settings screen.
Tap Wireless & networks -> Bluetooth settings.
If Bluetooth is not turned on, check Bluetooth to turn it on.
Your tablet will scan for and display the Bluetooth names of all
available Bluetooth devices in range.
If the device you want to pair with is not included in the list, make it
discoverable. See the documentation that came with your device to
learn how to make it discoverable by your tablet, and for other
instructions for pairing.
If your tablet stops scanning before you make the other device
discoverable, tap Find nearby devices.
Tap on the Bluetooth name of the device in the list in settings to pair
them.
The devices pair with each other. If you’re prompted to enter a , try
entering 0000 or 1234 (the most common default passcodes), or
consult the documentation that came with the device to learn its
passcode. If the pairing is successful, your tablet connects to the
device.
Connecting to a Bluetooth device
Once paired, you can connect to a Bluetooth device. For example, to
switch devices or to reconnect after your TOSHIBA AT200 Tablet and this
device come back into range.
1.
2.
User's Manual
Open the Settings screen.
Tap Wireless & networks -> Bluetooth settings.
6-5
TOSHIBA AT200
3.
In the list of Bluetooth devices, tap a paired but unconnected device. If
the device you expected isn’t displayed, tap Scan for devices.
When your tablet and this device are connected, this device is shown
as connected in the list.
Disconnecting from a Bluetooth device
1.
2.
Tap the device in the Bluetooth settings screen.
Tap OK to confirm that you want to disconnect.
Unpairing a Bluetooth device
You can unpair a Bluetooth device to erase all pairing information related to
a specific device.
1.
2.
Press and hold the device in the Bluetooth settings screen.
Tap Unpair or Disconnect & unpair in the menu that opens.
Sound
You can use Sound settings to configure many aspects of notification
ringtones, music and other audio.
Sound settings contains the following options:
Volume
Tap to open a dialog where you can drag a slider to set the volume for
media, notification and alarm.
Notification ringtone
Tap to open a dialog where you can set the default notification tone
when you receive a notification.
Audible selection
Check this option to play sound when making screen touch.
Screen lock sounds
Check this option to play sound when locking and unlocking the
screen.
Haptic feedback
Check this option to vibrate when pressing soft keys and on certain UI
interactions.
Screen
You can use Screen settings to configure the brightness and other screen
settings.
Screen settings contains the following options:
Brightness
On tap of "Brightness" a dialog appears, the slider to adjust is enabled
only when Automatic brightness is unchecked.
User's Manual
6-6
TOSHIBA AT200
Auto-rotate screen
Check this option to lock screen orientation as you turn your tablet
sideways.
Animation
Tap to open a dialog where you can select whether to show
animations.
Timeout
Tap to open a dialog where you can set how long to wait before the
screen automatically turns off.
Multi function switch settings
Tap to open a dialog where you can select how the switch will work.
HDMI video mode
Tap to switch between HDMI video output mode.
Multimedia
You can use Multimedia settings to enhance multimedia effect.
Multimedia settings contains the following options:
Video enhancement
Check this option to enable video enhancer function with Adaptive
Display.
Audio enhancement
Tap to setup and enable audio enhancer function with SRS and
Toshiba Technologies.
SRS Premium Voice PRO information
SRS Premium Voice PRO™ provides a superior voice communication and
multimedia experience for the PC.
Location & security
You can use Location & security settings to configure settings that help
secure your tablet and its data.
Location & security contains the following options:
Use wireless networks
Check this option to find your location via wireless networks.
Use GPS satellites
Check this option to find your location via GPS satellites.
User's Manual
6-7
TOSHIBA AT200
Use location for Google Search
Check this option to optimize Google Search™ and other Google™
services by retrieving location information.
Configure lock screen
Tap to open a screen where you can configure the tablet to lock
screen with a pattern, PIN or password. You can also choose Off to
disable screen lock.
Owner info
Tap to open a dialog where you can enter text to display on the lock
screen.
Encrypt tablet
Tap to open a dialog where you can set numeric PIN or password to
decrypt your tablet each time you power it on.
A PIN or password must be set (using Configure lock screen option)
before tapping the "Encrypt tablet" option.
Set up SIM card lock
Tap to open a screen where you can configure the tablet to require
entering the SIM PIN to use the tablet and where you can change the
SIM PIN.
This function is only supported by 3G models.
Visible passwords
Check this option to briefly show each password character as you
enter them, so that you can see what you enter.
Device administrators
Tap to open a screen where you can add or remove device
administrators.
Use secure credentials
Check this option to allow applications to access your tablet’s
encrypted store of secure certificates and related passwords and other
credentials. You can use credential storage to establish some kinds of
Wi-Fi connections. If you have not set a password for credential
storage, this setting is dimmed.
Install from storage
Tap to install a secure certificate from the storage.
Set password
Tap to open a dialog where you can set or change the password for
your secure credential storage. Your password must have at least 8
characters.
User's Manual
6-8
TOSHIBA AT200
Clear credentials
Tap to delete all secure certificates and related credentials and erases
the secure storage’s own password, after prompting you to confirm
that you want to do this.
Applications
You can use the Applications settings to view details about the
applications installed on your tablet, to manage their data and force them to
stop.
Manage applications
Tap to open a list of downloaded applications and other software
installed on your tablet, along with their size. These are sorted in
alphabetical order.
Running services
Tap to open a list of services - applications or parts of applications that
provide services to other applications or that run even when their main
application isn’t running. Above each service, one or more gray bars
show which processes the running service needs and how much
memory it’s using. Depending on the service, when you tap it in the list
it will either open a dialog in which you can stop it or open its Settings
screen.
Storage use
Tap to open a list of all applications and software installed on your
tablet, along with their size.
Battery use
Tap to open a screen of battery usage data.
Unknown sources
Check this option to permit installation of applications that are not
downloaded from or available in Andriod Market™.
Development
This option contains settings that are useful for developing
applications.
This tablet does not support another Operating System.
TOSHIBA cannot guarantee or support applications that are installed
by a user.
Accounts & sync
You can manage your mail or exchange accounts by using Accounts &
sync settings.
User's Manual
6-9
TOSHIBA AT200
Add account
Tap Add account tab on the top right corner to add a mail account or
an exchange account. You can sync your contacts, calendar or other
applications data via an exchange account.
Background data
Check this option to enable applications to sync, send, and receive
data at any time.
Auto-sync
Check this option to sync applications data automatically.
Manage accounts
You can tap to edit an account. Settings vary with different account
type.
Privacy
You can use the Privacy settings to manage your personal information.
Back up my data
Check this option to back up application data, Wi-Fi passwords, and
other settings to Google™ servers.
Backup account
Tap to display the Google Account that your settings and other data
are backed up with.
Automatic restore
Check this option to restore backup settings or other data when you
reinstall an application.
Factory data reset
Tap to erase all user data in the internal storage. Follow the on-screen
instructions to reset it. Please note that data in the removable media
won’t be erased. Please refer to the section Factory Reset in "Basic"
chapter for details.
Storage
Storage settings show your internal storage and external storage status.
Internal storage
Internal storage contains the following options:
Total Space
Shows the total space amount of internal storage in your tablet.
Applications
The amount of application data of internal storage.
Downloads
The amount of downloaded data of internal storage.
User's Manual
6-10
TOSHIBA AT200
Pictures, Videos
The amount of picture and video data of internal storage.
Audio (music, ringtones, podcasts etc)
The amount of audio data of internal storage.
Misc.
The amount of misc data of internal storage.
Available
Shows the free space of internal storage.
SD card
SD card contains the following options depending on the devices that you
have inserted:
If an SD card is inserted
Unmount SD card
Tap to unmount the SD card for safe removal.
USB storage
USB storage contains the following options depending on the devices that
you have inserted:
Unmount USB0 - Unmount USB7
Tap to unmount the USB memory device for safe removal.
Language & input
You can use Language & input settings to select the language for the text,
voice input and voice output on your tablet and for configuring the onscreen
keyboard, including words that you’ve added to its dictionary.
Select language
Tap to select the language for the text on your tablet from a list.
User dictionary
Tap to add words in user dictionary.
Text-to-speech settings
Tap to open a dialog where you can set the voice data required for
text-to-speech function.
User's Manual
6-11
TOSHIBA AT200
Keyboard settings
Current input method
Tap to open a dialog where you can select the input method you
want to use, if you have more than one installed, or touch
Configure input method to open the screen where you can
configure the current input method.
Input method selector
Tap to open a dialog where you can set whether to show or hide
the input method selector in the system bar, to the left of the time.
Configure input methods
Tap to open a dialog where you can configure the input methods.
Mouse and trackpad settings
Configure the mouse and trackpad settings.
Accessibility
You can use Accessibility settings to enable accessibility functions, such
as text-to-speech or enlarge text on screen.
You should download accessibility scripts from Google™ first.
Date & time
You can use Date & time settings to set your preferences for how dates
are displayed. You can also use these settings to set your own time and
time zone, rather than obtaining the current time from the mobile network.
Automatic date & time
Uncheck this option to set the date, time and time zone on the tablet
manually rather than obtaining the current time from the network.
Automatic date & time Settings
Setup an NTP server address and the interval for automatic date &
time synchronization.
Automatic time zone
Uncheck this option to set the time zone on your tablet manually rather
than obtaining the local time zone from the network.
This function is only supported by 3G models.
Set date
If Automatic date & time is unchecked, tapping it will open a dialog
where you can manually set the date.
The system date cannot be set beyond Jan/18/2038.
User's Manual
6-12
TOSHIBA AT200
Set time
If Automatic date & time is unchecked, tapping it will open a dialog
where you can manually set the time.
Select time zone
If Automatic time zone is unchecked, tapping it will open a dialog
where you can set the tablet’s time zone.
Use 24-hour format
Check this option to display the time using 24-hour time format - for
example, 13:00 rather than 1:00 pm.
Select date format
Tap to open a dialog where you can select the format for displaying
dates.
About tablet
About tablet includes information about your tablet.
System update
Tap to open the screen to check your system for update.
Status
Tap to open the Status screen with a long list of information about
your battery, mobile network connection and other details.
System information
Tap to open a screen that displays some basic information of your
tablet, such as Manufacture, Product name, Product version and
Serial number, etc.
Battery use
Tap to open a list of the applications and operating system
components you have used since you last connected the tablet to a
power source, sorted by the amount of power they have used.
Legal information
Tap to open a screen where you can obtain legal information about
the softwares included with your tablet.
Model number
Display the model number of your tablet.
Android version
Display the current version of the Android™ platform installed in your
tablet.
Baseband version
Display the baseband version.
This function is only supported by 3G models.
User's Manual
6-13
TOSHIBA AT200
Kernel version
Display the kernel version.
Build number
Display the build number.
User's Manual
6-14
TOSHIBA AT200
Chapter 7
Optional Accessories
Optional devices can expand the tablet's capabilities and its versatility. This
section describes the connection or installation of the following devices:
Cards
Memory media slot
Secure Digital™ (SD) Card (microSD/SDHC/SDXC card)
SIM card slot
Peripheral devices
USB device
HDMI device
Memory media slot
The tablet is equipped with a Memory media slot that can accommodate
some kinds of memory media with various memory capacities so that you
can easily transfer data from devices, such as digital cameras and
Personal Digital Assistants.
This Memory media slot supports the following memory media
Secure Digital (SD) Card (microSD/SDHC/SDXC Card).
Please note that not all memory media have been tested and verified
to work correctly. Therefore, it is not possible to guarantee that all
memory media will operate properly.
Ultra High Speed (UHS-I) function is supported.
The slot does not support Magic Gate functions.
Memory media
This section provides the important safety precautions in order to handle
your memory media.
Points to note about the microSD/SDHC/SDXC memory card
microSD/SDHC/SDXC memory cards comply with SDMI (Secure Digital
Music Initiative), which is a technology adopted to prevent unlawful copy or
playback of digital music. For this reason, you cannot copy or playback
protected material on another device or other device, and you may not
reproduce any copyrighted material except for your personal enjoyment.
User's Manual
7-1
TOSHIBA AT200
The supported maximum capacity of microSD memory card is 64GB.
Memory media format
New media cards are formatted according to specific standards. If you wish
to reformat a media card, be sure to do so with a device that uses media
cards.
Formatting a mircoSD/SDHC/SDXC memory card
microSD/SDHC/SDXC memory cards are sold already formatted in
conformity to specific standards. If you reformat a microSD/SDHC/SDXC
memory card, be sure to reformat it with a device such as digital camera or
digital audio player that uses the microSD/SDHC/SDXC memory cards, not
with the format command provided within Windows.
Should you need to format all areas of the memory card, including the
protected area, you will need to obtain an appropriate application that
applies the copy protection system.
Media care
Observe the following precautions when handling the card.
Card care
Do not twist or bend cards.
Do not expose cards to liquids or store in humid areas or lay media
close to containers of liquid.
Do not touch the metal part of a card or expose it to liquids or let it get
dirty.
After using card, return it to its case.
The card is designed so that it can be inserted only one way. Do not
try to force the card into the slot.
Do not leave a card partially inserted in the slot. Press the card until
you hear it click into place.
Memory card care
Memory cards have a limited lifespan, so it is important to backup
important data.
Do not write to a card if the battery power is low. Low power could
affect writing accuracy.
Do not remove a card while read/write is in progress.
For more details on using memory cards, see manuals accompanying the
cards.
User's Manual
7-2
TOSHIBA AT200
Inserting a memory media
The following instructions apply to all types of supported media devices. To
insert a memory media, follow the steps as detailed below:
1.
2.
3.
Turn the memory media so that the contacts (metal areas) are facing
down.
Insert the memory media into the memory media slot on the tablet.
Push the memory media gently to ensure a firm connection is made.
Figure 7-1 Inserting a memory media
1
2
1. Memory media slot
2. Memory media
Make sure memory media is oriented properly before you insert it. If
you insert the media in wrong direction, you may not be able to
remove it.
When inserting memory media, do not touch the metal contacts. You
could expose the storage area to static electricity, which can destroy
data.
Do not turn the tablet off or switch to Sleep Mode while files are being
copied - doing so may cause data loss
Removing a memory media
The following instructions apply to all types of supported media devices. To
remove a memory media, follow the steps as detailed below:
1.
2.
3.
4.
Make sure all file operations are finished.
Tap Apps -> Settings -> Storage -> Unmount SD card.
Push the memory media until you hear a click to partially release it.
Grasp it and pull it out of the slot.
Do not remove the memory media while the tablet is in Sleep mode. The
tablet could become unstable or data in the memory media could be lost.
SIM card slot
Some models are equipped with a SIM card slot that allows you to
assemble a SIM card from your wireless service provider to use your
provider’s mobile networks for transmitting data.
User's Manual
7-3
TOSHIBA AT200
This section only applies to models with 3G modules.
Inserting a SIM card
To insert a SIM card, follow the steps as detailed below:
1.
2.
3.
Turn off your tablet.
Turn the SIM card so that the contacts (metal areas) are facing down.
Remove the slot cover and insert the SIM card into the SIM card slot
on the tablet and push it until you hear a click.
Figure 7-2 Inserting a SIM card
1
2
1. SIM card slot
2. SIM card
Now you can power on your tablet to use your provider’s mobile networks.
Please always keep minimum 1.5cm distance apart from the device during
operation.
Removing a SIM card
To remove a SIM card, follow the steps as detailed below:
1.
2.
3.
Turn off your tablet.
Remove the slot cover and push the SIM card until you hear a click to
partially release it.
Grasp it and pull it out of the slot.
USB device
This tablet is equipped with a micro USB port supporting OTG technology.
This allows you to connect the following USB devices to the tablet: USB
flash memory, and HID (Keyboard and Mouse). This port complies with
USB 2.0 standard.
To connect a USB device, you must purchase an OTG cable. This item is
available from your reseller or TOSHIBA dealer.
Make sure the connector is properly aligned with the socket. Do not try to
force the connection, doing so can damage the connecting pins.
User's Manual
7-4
TOSHIBA AT200
This tablet does not support a printer.
As the port operation of all USB devices has not been confirmed,
some USB devices may not function properly.
HDMI device
The tablet is equipped with a Micro HDMI port that can send video by
connecting with external devices. 1080p, 720p, 576p and 480p signal
formats are supported, but actually available signal format depends on
each HDMI device. Your tablet supports two output modes: Mirror &
Video area only.
Mirror
The external display device copys the image on the tablet screen.
Video area only
The external display device shows the playback when you open a
multimedia.
Please refer to HDMI video mode in "Settings" chapter for details.
To connect external devices, follow the steps as detailed below:
As the port operation of all HDMI (High-Definition Multimedia Interface)
display devices have not been confirmed, some HDMI display devices may
not function properly.
1.
2.
Plug Type D connector of the HDMI cable into the Micro HDMI port on
your tablet.
Plug the other end of the HDMI cable into the HDMI port of the HDMI
device.
Figure 7-3 Connecting an HDMI cable
1
2
1. Micro HDMI port
2. Micro HDMI (Type D) connector
Please connect or disconnect an HDMI display device to or from the tablet
under the following conditions:
The tablet is turned on.
The tablet is completely turned off.
User's Manual
7-5
TOSHIBA AT200
Do not do so when the tablet is in Sleep Mode.
When you connect a television or external monitor to the HDMI port,
the display output device is set to HDMI.
When you unplug the HDMI cable and re-plug it, please wait at least 5
seconds before you re-plug the HDMI cable again.
Optional TOSHIBA Accessories
You can add a number of options and accessories in order to make your
tablet even more powerful and convenient to use. For reference, the
following list details some of the items that are available from your reseller
or TOSHIBA dealer:
AC Adaptor
User's Manual
If you frequently use your tablet at more than one
site, it may be convenient to purchase an
additional AC adaptor to be kept at each site.
7-6
TOSHIBA AT200
Chapter 8
Troubleshooting
TOSHIBA have designed this tablet for durability, however, should
problems occur you are able to use the procedures detailed in this chapter
to help determine the cause.
All users should become familiar with this chapter as knowing what might
go wrong can help prevent problems from occurring in the first place.
Problem solving process
Resolving problems will be much easier if you observe the following
guidelines:
Stop immediately when you recognize a problem exists as taking
further action may result in data loss or damage, or you may destroy
valuable problem related information that can help solve the problem.
Observe what is happening - write down what the system is doing and
what actions you performed immediately before the problem occurred.
Make a screenshot of the current display.
Please also be aware that the questions and procedures described in this
chapter are meant only as a guide, they are not definitive problem solving
techniques. In reality many problems can be solved simply, but a few may
require help from TOSHIBA Support - if you find you need to consult
others, be prepared to describe the problem in as much detail as possible.
Preliminary checklist
You should always consider the simplest solution first - the items detailed
in this checklist shall provides easy fixes for issues which appear to be
serious problems.
Make sure you turn on all peripheral devices before you turn on the
tablet - this includes your printer and any other external device you are
using.
Before you attach an external device you should first turn the tablet
off, then when you turn the tablet back on again it will recognize the
new device.
Make sure all optional accessories are configured properly in the
tablet's setup program and that all required driver software has been
loaded (please refer to the documentation included with the optional
accessories for further information on its installation and
configuration).
User's Manual
8-1
TOSHIBA AT200
Check all cables to ensure they are correctly and firmly attached to the
tablet - loose cables can cause signal errors.
Inspect all connecting cables for loose wires and all connectors for
loose pins.
Always try to make detailed notes of your observations and keep them in a
permanent error log - this will help you to describe your problems to
TOSHIBA Support. In addition, if a problem recurs, the log you have made
will help to identify the problem faster.
Hardware and system checklist
This section discusses problems caused by your tablet’s hardware or
attached peripherals. Basic problems may occur in the following areas:
Internal display panel
Memory Media Card
Wireless LAN
Sound system
External monitor
USB device
Bluetooth
Internal display panel
Apparent tablet's display panel problems may be related to the tablet's
setup and configuration.
User's Manual
Problem
Procedure
Markings appear on
the tablet's display
panel.
These marks may have come from contact with the
keyboard and Touch Pad while the display panel
has been closed. You should try to remove the
marks by gently wiping the display panel with a
clean dry cloth or, if this fails, with a good quality
LCD screen cleaner. In the latter case you should
always follow the instructions with the screen
cleaner and always ensure you let the display
panel dry properly before closing it.
Problems above
remain unresolved
or other problems
occur
You should initially refer to the documentation
supplied to you with the software to understand the
cause of the problems.
If you are still unable to resolve the problem,
contact your reseller, dealer or service provider.
8-2
TOSHIBA AT200
Memory Card
Problem
Procedure
Memory media card
error occurs
Remove the memory media card from the tablet
and then reinsert it in order to ensure it is firmly
connected.
If the problem persists, then you should refer to the
documentation supplied with your memory media
card for further information.
You cannot write to
a memory media
card
Remove the memory media card from the tablet
and check to ensure that it is not write protected.
You cannot read a
file
Check to ensure the required file is actually on the
memory media card that is inserted into the tablet.
If you are still unable to resolve the problem,
contact TOSHIBA Support.
USB device
In addition to the information in this section, please also refer to the
documentation supplied with your USB device.
Problem
Procedure
USB device does not Remove the USB device from the OTG cable and
work
reconnect it to ensure it is firmly attached.
Sound system
In addition to the information in this section, please also refer to the
documentation supplied with your audio device.
Problem
Procedure
No sound is heard
Adjust the volume.
Check the software volume settings.
Please check to see if Mute is turned to Off
Check to make sure the headphone connection is
secure.
External monitor
Please also refer to the documentation supplied with your monitor for
further information.
User's Manual
8-3
TOSHIBA AT200
Problem
Procedure
Monitor does not
turn on
After confirming that the monitor's power switch is
on, you should check the connections to make
sure that the power cord/adaptor is firmly
connected to the monitor and to a working power
outlet.
No display
Try adjusting the contrast and brightness controls
on the external monitor.
Display error occurs
Check that the cable connecting the external
monitor to the tablet is firmly attached.
If you are still unable to resolve the problem,
contact TOSHIBA Support.
Wireless LAN
If the following procedures do not restore LAN access, consult your LAN
administrator.
Problem
Procedure
Cannot access
Wireless LAN
Make sure the tablet's Wireless communication
function is on.
If problems persist, contact your LAN
administrator.
Bluetooth
Problem
Procedure
Cannot access
Bluetooth device
Check to ensure the tablet's Bluetooth functionality
is set to on in Apps -> Settings -> Wireless &
networks -> Bluetooth.
TOSHIBA Support
If you require any additional help using your tablet or if you are having
problems operating the tablet, you may need to contact TOSHIBA for
additional technical assistance.
Before you call
Some problems you experience may be related to software or the
operating system so it is important that you investigate other sources of
assistance first. Before contacting TOSHIBA, try the following:
User's Manual
8-4
TOSHIBA AT200
Review troubleshooting sections in the documentation supplied with
your software and/or peripheral devices.
If a problem occurs when you are running software applications,
consult the software documentation for troubleshooting suggestions
and consider calling the software company's technical support
department for assistance.
Consult the reseller or dealer from where you purchased your tablet
and/or software - they are your best resource for current information
and support.
TOSHIBA technical support
If you are still unable to solve the problem and suspect that it is hardware
related, visit TOSHIBA technical support website http://www.toshiba.co.jp/
worldwide/.
User's Manual
8-5
TOSHIBA AT200
Chapter 9
Specifications
This chapter summarizes the tablet’s technical specifications.
Physical Dimensions
Size
255.6 (w) x 175.6 (d) x 7.7 (h) millimeters
(not including parts that extend beyond the main body).
Environmental Requirements
Conditions
Ambient temperature
Relative humidity
Operating
5°C (41°F) to 35°C (°F) 20% to 90%
(noncondensing)
Non-operating
-20°C (-4°F) to 60°C
(140°F)
10% to 95%
(noncondensing)
Wet-bulb temperature 29°C maximum
Conditions
Altitude (from sea
level)
Operating
0 to 6,561 feet (2,000
meters)
Non-operating
0 to 40,000 feet
(12,192 meters)
Power Requirements
AC adaptor
100-240V AC
50 or 60 Hz (cycles per second)
Tablet
User's Manual
5V DC
9-1
TOSHIBA AT200
Chapter 10
Information for Wireless Devices
Wireless LAN Interoperability
The Wireless LAN is compatible with other LAN systems Direct Sequence
Spread Spectrum (DSSS) /Orthogonal Frequency Division Multiplexing
(OFDM) radio technology, and is compliant to:
The IEEE 802.11 Standard on Wireless LANs (Revision a/b/g/n or b/g/
n), as defined and approved by the Institute of Electrical and
Electronics Engineers.
The Wireless Fidelity (Wi-Fi®) certification as defined by the Wi-Fi
Alliance®.
The Wi-Fi CERTIFIED™ logo is a certification mark of the Wi-Fi Alliance®.
Bluetooth wireless technology Interoperability
Bluetooth™ Cards from TOSHIBA are designed to be interoperable with
any product with Bluetooth wireless technology that is based on Frequency
Hopping Spread Spectrum (FHSS) radio technology, and is compliant to:
Bluetooth Specification Ver. 3.0+HS or Ver. 3.0 (depending on the
model you purchased), as defined and approved by the Bluetooth
Special Interest Group.
Logo certification with Bluetooth wireless technology as defined by the
Bluetooth Special interest Group.
CAUTION about Wireless Devices
The wireless devices have not completed verification of connection and
operation with all devices which are using the Wireless LAN or Bluetooth
radio technology.
Bluetooth and Wireless LAN devices operate within the same radio
frequency range and may interfere with one another. If you use Bluetooth
and Wireless LAN devices simultaneously, you may occasionally
experience a less than optimal network performance or even lose your
network connection.
If you should experience any such problem, immediately turn off either one
of your Bluetooth or Wireless LAN.
Please visit http://www.pc.support.global.toshiba.com, if you have any
questions about using Wireless LAN or Bluetooth Card from TOSHIBA.
User's Manual
10-1
TOSHIBA AT200
In Europe visit http://www.toshiba-europe.com/computers/tnt/bluetooth.htm
Your Bluetooth product is not compatible with devices using Bluetooth
Version 1.0B specifications
Wireless Devices and your health
Wireless products, like other radio devices, emit radio frequency
electromagnetic energy. The level of energy emitted by Wireless products
however is far much less than the electromagnetic energy emitted by
wireless devices like for example mobile phones.
Because Wireless products operate within the guidelines found in radio
frequency safety standards and recommendations, TOSHIBA believes
Wireless products is safe for use by consumers. These standards and
recommendations reflect the consensus of the scientific community and
result from deliberations of panels and committees of scientists who
continually review and interpret the extensive research literature.
In some situations or environments, the use of Wireless products may be
restricted by the proprietor of the building or responsible representatives of
the organization. These situations may for example include:
Using the Wireless products equipment on board of airplanes, or
In any other environment where the risk of interference to other
devices or services is perceived or identified as harmful.
If you are uncertain of the policy that applies on the use of wireless devices
in a specific organization or environment (e.g. airports), you are
encouraged to ask for authorization to use the Wireless device prior to
turning on the equipment.
Radio Regulatory Information
The Wireless device is must be installed and used in strict accordance with
the manufacturer’s instructions as described in the user documentation that
comes with the product. This product complies with the following radio
frequency and safety standards.
Europe
Restrictions for Use of 2400.0-2483.5MHz Frequencies in
Europe
France:
User's Manual
Outdoor use
limited to 10mW
e.i.r.p. within the
band
2454-2483.5MHz
Military Radiolocation use.
Refarming of the 2.4GHz band has
been ongoing in recent years to
allow current relaxed regulation Full
implementation planned 2012.
10-2
TOSHIBA AT200
Italy:
-
For private use, a general
authorization is required if WAS/
RLAN’s are used outside own
premises. For public use, a general
authorization is required.
Luxembourg:
Implemented
General authorization required for
network and service supply.
Norway:
Implemented
This subsection does not apply for
the geographical area within a
radius of 20 km from the centre of
Ny-Alesund.
Russian
Federation:
-
Only for indoor applications.
Restrictions for Use of 5150-5350MHz Frequencies in Europe
Italy:
-
For private use, a general
authorization is required if WAS/
RLAN’s are used outside own
premises.
Luxembourg:
Implemented
General authorization required for
network and service supply.
Russian
Federation:
Limited
e.i.r.p 100mW. Permitted to use
only for indoor applications, closed
industrial and warehouse areas,
and on board aircraft.
1.
2.
Permitted to use for local
networks of aircraft crew
service communications on
board aircraft in area of the
airport and at all stages of
flight.
Permitted to use for public
wireless access local networks
on board aircraft during a flight
at the altitude not less than
3000m.
Restrictions for Use of 5470-5725MHz Frequencies in Europe
Italy:
User's Manual
-
For private use, a general
authorization is required if WAS/
RLAN’s are used outside own
premises.
10-3
TOSHIBA AT200
Luxembourg:
Implemented
General authorization required for
network and service supply
Russian
Federation:
Limited
e.i.r.p 100mW. Permitted to use
only for indoor applications, closed
industrial and warehouse areas,
and on board aircraft.
1.
2.
Permitted to use for local
networks of aircraft crew
service communications on
board aircraft in area of the
airport and at all stages of
flight.
Permitted to use for public
wireless access local networks
on board aircraft during a flight
at the altitude not less than
3000m.
To remain in conformance with European spectrum usage laws for
Wireless LAN operation, the above 2.4GHz and 5GHz channel limitations
apply for outdoor usage. The user should use the wireless LAN utility to
check the current channel of operation. If operation is occurring outside of
the allowable frequencies for outdoor use, as listed above, the user must
contact the applicable national spectrum regulator to request a license for
outdoor operation.
Canada - Industry Canada (IC)
This device complies with RSS 210 of Industry Canada.
Operation is subject to the following two conditions: (1) this device may not
cause interference, and (2) this device must accept any interference,
including interference that may cause undesired operation of this device.
The term “IC” before the equipment certification number only signifies that
the Industry Canada technical specifications were met.
USA-Federal Communications Commission (FCC)
This equipment has been tested and found to comply with the limits for a
Class B digital device, pursuant to Part 15 of FCC Rules. These limits are
designed to provide reasonable protection against harmful interference in a
residential installation.
Refer to the FCC information section for the detailed information.
Caution: Exposure to Radio Frequency Radiation
The radiated output power of the Wireless device is far below the FCC
radio frequency exposure limits. Nevertheless, the Wireless device shall be
User's Manual
10-4
TOSHIBA AT200
used in such a manner that the potential for human contact during normal
operation is minimized.
In the usual operating configuration, the distance between the antenna and
the user should not be less than 20cm. Please refer to the tablet user’s
manual for the details regarding antenna location.
The installer of this radio equipment must ensure that the antenna is
located or pointed such that it does not emit RF field in excess of Health
Canada limits for the general population; consult Safety Code 6, obtainable
from Health Canada’s website www.hc-sc.gc.ca
Caution: Radio Frequency Interference Requirements
This device is restricted to indoor use due to its operation in the 5.15 to
5.25GHz frequency range.
Taiwan
Article 12
Without permission granted by the NCC, any
company, enterprise, or user is not allowed to
change frequency, enhance transmitting power or
alter original characteristic as well as performance
to an approved low power radio frequency devices.
Article 14
The low power radio-frequency devices shall not
influence aircraft security and interfere legal
communications;
If found, the user shall cease operating
immediately until no interference is achieved.
The said legal communications means radio
communications is operated in compliance with the
Telecommunications Act.
The low power radio-frequency devices must be
susceptible with the interference from legal
communications or ISM radio wave radiated
devices.
Using this equipment in Japan
In Japan, the frequency bandwidth of 2,400MHz to 2,483.5MHz for second
generation low-power data communication systems such as this equipment
overlaps that of mobile object identification systems (premises radio station
and specified low-power radio station).
1. Important notice
The frequency bandwidth of this equipment may operate within the same
range as industrial devices, scientific devices, medical devices, microwave
ovens, licensed radio stations and non-licensed specified low-power radio
User's Manual
10-5
TOSHIBA AT200
stations for mobile object identification systems (RFID) used in factory
production lines (Other Radio Stations).
1.
2.
3.
Before using this equipment, ensure that it does not interfere with any
of the equipment listed above.
If this equipment causes RF interference to other radio stations,
promptly change the frequency being used, change the location of
use, or turn off the source of emissions.
Contact an authorized TOSHIBA service provider if you have
problems with interference caused by this product to Other Radio
Stations.
2. Indication for Wireless LAN
The indication shown below appears on this equipment.
1.
2.
3.
4.
5.
2.4 : This equipment uses a frequency of 2.4GHz.
DS : This equipment uses DS-SS modulation.
OF : This equipment uses OFDM modulation.
4 : The interference range of this equipment is less than 40m.
: This equipment uses a frequency bandwidth from 2,400MHz
to 2,483.5MHz. It is possible to avoid the band of mobile object
identification systems.
3. Indication for Bluetooth
The indication shown below appears on this equipment.
1.
2.
3.
4.
2.4 : This equipment uses a frequency of 2.4 GHz.
FH : This equipment uses FH-SS modulation.
1 : The interference range of this equipment is less than 10 m.
: This equipment uses a frequency bandwidth from 2,400
MHz to 2,483.5 MHz. It is impossible to avoid the band of mobile
object identification systems.
4. About the JEITA
5GHz Wireless LAN supports W52/W53/W56 Channel.
User's Manual
10-6
TOSHIBA AT200
Device Authorization
This device obtains the Technical Regulation Conformity Certification and it
belongs to the device class of radio equipment of low-power data
communication system radio station stipulated in the Telecommunications
Business Law of Japan.
REGZA Tablet AT700
Japan Approvals Institute for Telecommunications Equipment
Approval Number: 003WWA111201 003WWA111200 D111202003
The following restrictions apply:
Do not disassemble or modify the device.
Do not install the embedded wireless module into other device.
Radio approvals for wireless devices
Approved Countries/Regions for REGZA Tablet AT700
This equipment is approved to the radio standard by the countries/regions
in the following table.
Do not use this equipment in the countries/regions which are not listed in
the table below.
As of September 2011
User's Manual
Argentina
Australia
Austria
Bahrain
Bangladesh
Belgium
Bolivia
Belarus
Bulgaria
Cambodia
Canada
Chile
Colombia
Costa Rica
Croatia
Cyprus
Czech Republic
Denmark
Ecuador
Egypt
Estonia
Finland
France
Germany
Greece
Hong Kong
Hungary
Iceland
India
Indonesia
Ireland
Italy
Japan
Jordan
Algeria
Kenya
Latvia
Lebanon
El Salvador
Lithuania
Luxembourg
Malaysia
Malta
Guatemala
Morocco
Netherlands
New Zealand
Norway
Oman
Panama
Peru
Philippines
Poland
Portugal
Romania
Russia
Saudi Arabia
Serbia
Singapore
Slovak Republic
10-7
TOSHIBA AT200
User's Manual
Slovenia
South Africa
South Korea
Spain
China
Sweden
Switzerland
Taiwan
Thailand
Turkey
UAE
UK
Uruguay
USA
Venezuela
Vietnam
Honduras
Mexico
Nicaragua
Puerto Rico
Rep Dominicana Kuwait
Nigeria
Tunisia
Ukraine
Yemen
Zambia
Pakistan
Sri Lanka
Papua New
Guinea
Zimbabwe
10-8