1
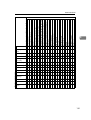
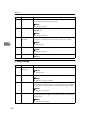
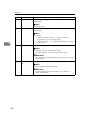
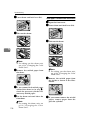
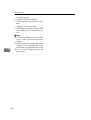
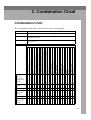
3. Combination Chart
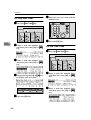
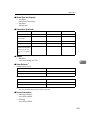
Combination Chart
This combination chart shows which modes can be used together.
✩
means that these modes can be used together.
X
means that these modes cannot be used together.
*1
means that these modes cannot be used together (the function chosen second takes priority)
*2
means that these modes cannot be used together (the function chosen first
takes priority)
Function specified earlier
Letter, Photo, Letter/Photo, Pencil, Tint mode
Economy mode
Auto Cycle
Preset Reduce/Enlarge
Zoom
Auto Magnification Selection
Directional Magnification (%)
Directional Magnification (size)
Combine Originals (2 Images on one sheet)
Combine Originals (4 Images on one sheet)
Memory Combine mode (4 Originals)
Memory Combine mode (8 Originals)
Memory Combine mode (16 Originals)
Edge Erase
All Class mode
Auto Class mode
Manual Class mode
Class mode
Job Separation
Overlay
Form
Storage Overlay
Date Stamp
Page Stamp
Stamp
Repeat
Make-up
Original Storage
Skip Feed
On Line
Function chosen second
Letter, Photo, Letter/Photo,
Pencil, Tint
mode
-- ✩ ✩ ✩ ✩ ✩ ✩ ✩ ✩ ✩ ✩ ✩ ✩ ✩ ✩ ✩ ✩ ✩ ✩ ✩ ✩ ✩ ✩ ✩ ✩ ✩ *1 *1 ✩ *1
Economy
mode
✩ -- ✩ ✩ ✩ ✩ ✩ ✩ ✩ ✩ ✩ ✩ ✩ ✩ ✩ ✩ ✩ ✩ ✩ ✩ ✩ ✩ ✩ ✩ ✩ ✩ ✩ ✩ ✩ ✩
Auto Cycle
✩ ✩ -- ✩ ✩ ✩ ✩ ✩ ✩ ✩ ✩ ✩ ✩ ✩ ✩ ✩ ✩ ✩ ✩ ✩ ✩ ✩ ✩ ✩ ✩ ✩ ✩ ✩ ✩ ✩
Preset Reduce/Enlarge
✩ ✩ ✩ -- *1 *1 *1 *1 ✩ ✩ ✩ ✩ ✩ ✩ ✩ ✩ ✩ ✩ ✩ ✩ ✩ ✩ ✩ ✩ ✩ ✩ ✩ *1 ✩ *1
Zoom
✩ ✩ ✩ *1 -- *1 *1 *1 ✩ ✩ ✩ ✩ ✩ ✩ ✩ ✩ ✩ ✩ ✩ ✩ ✩ ✩ ✩ ✩ ✩ ✩ ✩ *1 ✩ *1
Auto Magni- ✩ ✩ ✩ *1 *1 -- *1 *1 ✩ ✩ ✩ ✩ ✩ ✩ ✩ ✩ ✩ ✩ ✩ ✩ ✩ ✩ ✩ ✩ ✩ *1 ✩ *1 ✩ *1
fication Selection
137
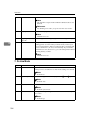
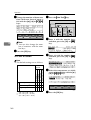
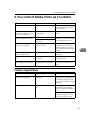
Combination Chart
Letter, Photo, Letter/Photo, Pencil, Tint mode
Economy mode
Auto Cycle
Preset Reduce/Enlarge
Zoom
Auto Magnification Selection
Directional Magnification (%)
Directional Magnification (size)
Combine Originals (2 Images on one sheet)
Combine Originals (4 Images on one sheet)
Memory Combine mode (4 Originals)
Memory Combine mode (8 Originals)
Memory Combine mode (16 Originals)
Edge Erase
All Class mode
Auto Class mode
Manual Class mode
Class mode
Job Separation
Overlay
Form
Storage Overlay
Date Stamp
Page Stamp
Stamp
Repeat
Make-up
Original Storage
Skip Feed
On Line
Function chosen second
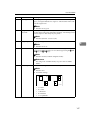
3
Directional
Magnification (%)
✩ ✩ ✩ *1 *1 *1 -- *1 ✩ ✩ ✩ ✩ ✩ ✩ ✩ ✩ ✩ ✩ ✩ ✩ ✩ ✩ ✩ ✩ ✩ ✩ ✩ *1 ✩ *1
Directional
Magnification (size)
✩ ✩ ✩ *1 *1 *1 *1 -- ✩ ✩ ✩ ✩ ✩ ✩ ✩ ✩ ✩ ✩ ✩ ✩ ✩ ✩ ✩ ✩ ✩ ✩ ✩ *1 ✩ *1
✩ ✩ ✩ ✩ ✩ ✩ ✩ ✩ -- *1 *1 *1 *1 ✩ ✩ ✩ ✩ ✩ ✩ *2 *2 *2 *2 *2 *2 *1 ✩ *2 ✩ *1
Combine
Originals (2
Images on
one sheet)
Function specified earlier
✩ ✩ ✩ ✩ ✩ ✩ ✩ ✩ *1 -- *1 *1 *1 ✩ ✩ ✩ ✩ ✩ ✩ *2 *2 *2 *2 *2 *2 *1 ✩ *2 ✩ *1
Combine
Originals (4
Images on
one sheet)
138
Memory
Combine
mode (4
Originals)
✩ ✩ ✩ ✩ ✩ ✩ ✩ ✩ *1 *1 -- *1 *1 ✩ ✩ ✩ ✩ ✩ ✩ *2 *2 *2 *2 *2 *2 *1 *2 *2 ✩ *1
Memory
Combine
mode (8
Originals)
✩ ✩ ✩ ✩ ✩ ✩ ✩ ✩ *1 *1 *1 -- *1 ✩ ✩ ✩ ✩ ✩ ✩ *2 *2 *2 *2 *2 *2 *1 *2 *2 ✩ *1
Memory
Combine
mode (16
Originals)
✩ ✩ ✩ ✩ ✩ ✩ ✩ ✩ *1 *1 *1 *1 -- ✩ ✩ ✩ ✩ ✩ ✩ *2 *2 *2 *2 *2 *2 *1 *2 *2 ✩ *1
Edge Erase
✩ ✩ ✩ ✩ ✩ ✩ ✩ ✩ ✩ ✩ ✩ ✩ ✩ -- ✩ ✩ ✩ ✩ ✩ ✩ ✩ ✩ ✩ ✩ ✩ ✩ ✩ *1 ✩ *1
All Class
mode
✩ ✩ ✩ ✩ ✩ ✩ ✩ ✩ ✩ ✩ ✩ ✩ ✩ ✩ -- *1 *1 *1 ✩ ✩ ✩ ✩ ✩ ✩ ✩ ✩ ✩ ✩ ✩ *1
Manual
Class mode
✩ ✩ ✩ ✩ ✩ ✩ ✩ ✩ ✩ ✩ ✩ ✩ ✩ ✩ *1 *1 -- *1 ✩ ✩ ✩ ✩ ✩ ✩ ✩ ✩ ✩ ✩ ✩ *1
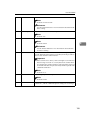
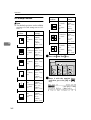
Combination Chart
Letter, Photo, Letter/Photo, Pencil, Tint mode
Economy mode
Auto Cycle
Preset Reduce/Enlarge
Zoom
Auto Magnification Selection
Directional Magnification (%)
Directional Magnification (size)
Combine Originals (2 Images on one sheet)
Combine Originals (4 Images on one sheet)
Memory Combine mode (4 Originals)
Memory Combine mode (8 Originals)
Memory Combine mode (16 Originals)
Edge Erase
All Class mode
Auto Class mode
Manual Class mode
Class mode
Job Separation
Overlay
Form
Storage Overlay
Date Stamp
Page Stamp
Stamp
Repeat
Make-up
Original Storage
Skip Feed
On Line
Function chosen second
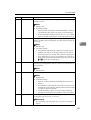
Class mode
✩ ✩ ✩ ✩ ✩ ✩ ✩ ✩ ✩ ✩ ✩ ✩ ✩ ✩ *1 *1 *1 -- ✩ ✩ ✩ ✩ ✩ ✩ ✩ ✩ ✩ ✩ ✩ *1
Job Separation
✩ ✩ ✩ ✩ ✩ ✩ ✩ ✩ ✩ ✩ ✩ ✩ ✩ ✩ ✩ ✩ ✩ ✩ -- ✩ ✩ *1 ✩ ✩ ✩ ✩ ✩ ✩ ✩ ✩
Overlay
✩ ✩ ✩ ✩ ✩ ✩ ✩ ✩ *2 *2 *2 *2 *2 ✩ ✩ ✩ ✩ ✩ ✩ -- *1 *1 *2 *2 *2 *2 *2 *2 ✩ *1
Form
✩ ✩ ✩ ✩ ✩ ✩ ✩ ✩ *2 *2 *2 *2 *2 ✩ ✩ ✩ ✩ ✩ ✩ *1 -- -- *2 *2 *2 *2 *2 *2 ✩ *1
Storage
Overlay
✩ ✩ ✩ ✩ ✩ ✩ ✩ *2 *2 *2 *2 *2 ✩ ✩ ✩ ✩ ✩ ✩ *1 *1 -- ✩ ✩ ✩ *2 *2 *2 *2 ✩ *1
Date Stamp
✩ ✩ ✩ ✩ ✩ ✩ ✩ ✩ *2 *2 *2 *2 *2 ✩ ✩ ✩ ✩ ✩ ✩ *2 *2 ✩ -- ✩ ✩ *2 ✩ *2 ✩ *1
3
Function specified earlier
Page Stamp ✩ ✩ ✩ ✩ ✩ ✩ ✩ ✩ *2 *2 *2 *2 *2 ✩ ✩ ✩ ✩ ✩ ✩ *2 *2 ✩ ✩ -- ✩ *2 ✩ *2 ✩ *1
Stamp
✩ ✩ ✩ ✩ ✩ ✩ ✩ ✩ *2 *2 *2 *2 *2 ✩ ✩ ✩ ✩ ✩ ✩ *2 *2 *2 ✩ ✩ -- *2 ✩ *2 ✩ *1
Repeat
✩ ✩ ✩ ✩ ✩ *2 ✩ ✩ *1 *1 *1 *1 *1 ✩ ✩ ✩ ✩ ✩ ✩ *2 *2 *2 *2 *2 *2 -- *2 *2 ✩ *1
Make-up
*2 ✩ ✩ ✩ ✩ ✩ ✩ ✩ ✩ ✩ *2 *2 *2 ✩ ✩ ✩ ✩ ✩ ✩ *1 *1 *2 *2 *2 *2 *2 -- -- ✩ *1
Original
Storage
*2 ✩ ✩ *2 *2 *2 *2 *2 *2 *2 *2 *2 *2 ✩ ✩ ✩ ✩ ✩ *2 *2 *2 ✩ *2 *2 *2 *2 -- ✩ ✩ *2
Skip Feed
✩ ✩ ✩ ✩ ✩ ✩ ✩ ✩ ✩ ✩ ✩ ✩ ✩ ✩ ✩ ✩ ✩ ✩ ✩ ✩ ✩ ✩ ✩ ✩ ✩ ✩ ✩ ✩ -- ✩
On Line
*2 ✩ ✩ *2 *2 *2 *2 *2 *2 *2 *2 *2 *2 *2 *2 *2 *2 *2 ✩ *2 *2 *2 *2 *2 *2 *2 *2 *2 ✩ --
Image Rota- ✩ ✩ ✩ ✩ X ✩ X X X X ✩ ✩ ✩ ✩ ✩ ✩ ✩ ✩ ✩ X X X X X X X X X ✩ X
tion
139
Combination Chart
3
140
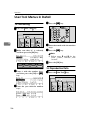
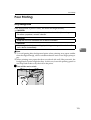
4. User Tools
Accessing the User Tools
The user tools allow you to customize
various default settings. This section
is intended for the machine administrator.
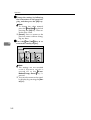
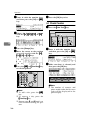
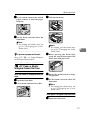
A Press the {User Tools}} key.
Stamp
Image Density
Lighter
On Line
Note
❒ [Next]: Press to go to the next
page.
❒ [Prev.]: Press to go back to the
previous page.
B Press the [OK] key.
C Search for the desired user tool
number of each function with
the {~}, {}}, {|}, or {{} key.
D Press the [OK] key.
Normal
Darker 1
Make-Up
Darker 2
Auto On Line
ZDZS110N
B Select
the desired user tools
menu. See p.143 “User Tools
Menu”.
Using the number keys
A Enter the desired user tool
number (1 to 7) with the number keys.
Using the {~}, {}}, {|}, or {{}
key
A Search for the desired user tool
number (1 to 7) with the {~},
{}}, {|}, or {{} key.
B Press the [OK] or {q} key.
C Enter the desired user tool
number of each function with
the number keys.
D Press the [OK] or {q} key.
141
User Tools
C Change the settings by following
the instructions on the panel display, and then press the [OK] key.
Note
❒ To change the value entered,
press the {Clear/Stop}
} key before
pressing the [OK] key. Then enter the new value.
❒ [Cancel]: Press to return to the
previous menu without changing any data.
D Press the {User Tools}} key to re-
4
turn to the standby display.
Stamp
Image Density
Lighter
On Line
Normal
Darker 1
Make-Up
Darker 2
Auto On Line
ZDZS110N
Note
❒ The settings are not canceled
e v en i f th e m a i n sw it ch is
turned off or the {Clear
Mode s/Energy Sa ver } key is
pressed.
❒ You can also return to the standby display by pressing the [Cancel] key.
142
User Tools Menu
User Tools Menu
Reference
For accessing the user tools, see p.141 “Accessing the User Tools”.
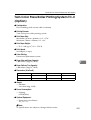
1. System
No.
Mode
Description
1
Auto Reset
The machine returns to its initial condition automatically after
your job is finished. The automatic reset time can be set from 1 to
5 minutes or off (0 minutes).
4
Note
❒ Default: Off
2
R. Cntr. Display
Use to display the total number of masters and prints.
Note
❒ A trial print delivered to the paper delivery tray after pressing the {Start}
} key will not be counted.
3
Reset R. Counter
Choose whether the total number of masters and prints is reset.
Note
❒ Default: Not clear
4
mm/inch
Choose the units of measurement shown on the panel display.
Note
❒ Default:
• Metric version: mm
• Inch version: inch
5
Language on LCD The language used for panel display messages can be selected.
Note
❒ Default: English
6
Time Setting
Use to set the machine's internal clock.
Note
❒ The clock must be adjusted if you change the clock to daylight
saving time/summer time, or return to standard time.
Reference
For setting the clock, see p.156 “1-6 Time Setting”.
143
User Tools
No.
Mode
Description
7
Data Print
Use to print out the following data.
Note
❒ Available settings:
• Log Data (Number of prints made, how many times paper
misfeeds occur and so on.)
• Reset Counters (Number of prints and master made under
each user code.)
• Store Class (Registered number of students in each class.)
8
Energy Saving
You can set the time until the Energy Saver mode starts.
Note
❒ Default: 3 Min. (minutes)
4
2. Set Operat'n Mode
No.
Mode
Description
1
Min. Quantity
The minimum print quantity can be set between 0 and 9999.
Example: If you specify 20 as the minimum number of prints, runs
of 20 or more prints will be accepted, print runs of less than 20
prints will not be accepted.
Note
❒ Default: 0
2
Max. Quantity
The maximum print quantity can be set between 0 and 9999.
Note
❒ Default: 9999
3
CopyCount Display
The counter can be set to show the number of prints made (Up),
or the number of prints left to be made (Down).
Note
❒ Default: Down
5
Panel Beeper
Turns the beeper on or off.
Note
❒ Default: STD. (standard)
❒ Available settings:
• ALL OFF (The beeper does not sound when you press keys
or when warning messages appear on the panel display.)
• STD. (When you press a key, the beeper does not sound.
When warning messages appear on the panel display, the
beeper sounds.)
• ALL ON (The beeper sounds when you press a key or
when warning messages appear on the panel display.)
6
144
LCD Contrast
You can adjust the brightness of the panel display.
User Tools Menu
3. Initial Setting
No.
Mode
Description
1
Paper Type
Specifies the paper type at power on.
Note
❒ Default: Std. (Standard)
2
MSTR Makg.
Density
Specifies the image density at power on.
Note
❒ Default: Std. (Standard)
3
Original Priority
Specifies the original mode at power on.
4
Note
❒ Default: Letter
4
Reproduct'n Ratio
Adjust a fixed reproduction ratio between 50 and 200%.
Note
❒ Default:
• Metric version: 71%, 82%, 87%, 93%, 100%, 115%, 122%,
141%
• Inch version: 65%, 74%, 77%, 93%, 100%, 121%, 129%,
155%
Reference
For setting the ratios, see p.156 “3-4 Reproduction Ratio” 3–4
Reproduction ratio.
5
Class Enter No.
Before using All Class or Auto Class mode, register the number
of students in each class with this function.
Note
❒ You can store student numbers for up to 9 grades with 12
classes in each, giving a maximum of 108 classes. Each class
can have up to 9999 students.
Reference
For registering the number of students, see p.157 “3-5 Class
Enter No.” 3–5 Class NO.
6
LT/Photo Contrast
Specifies the contrast level for Letter/Photo when the power is
switched on or after mode settings are cleared.
Note
❒ Default: Standard
7
LT/Photo Priority
Specifies the screen image in Letter/Photo mode when you press
the [Original] key.
Note
❒ Default: Letter
145
User Tools
No.
Mode
Description
8
Photo Contrast
Specifies the contrast level for Photo when the power is switched
on or after mode settings are cleared.
Note
❒ Default: Standard
9
Photo(Screen)
Specifies the screen image in Photo mode when you press the
[Original] key.
Note
❒ Default: Standard
10
Eco.Mode
ON/OFF
Specifies whether Economy Mode is set to “On” or “Off” when
the power is switched on or after mode settings are cleared.
Note
4
❒ Default: Off
11
Margin Eras.Area Adjusts the erase edges margin.
Note
❒ Default: 2 mm, 0.1"
12
Ratio Priority
You can set the primary ratio on the display when you press the
[Ratio] key.
4. Mode Setting
No.
Mode
Description
1
Auto Cycle
ON/OFF
Specifies whether Auto Cycle mode is selected at power on.
Note
❒ Default: ON
2
Class Manual Set
Use one original or multiple originals in Manual Class mode.
Note
❒ Default: Std. (One original)
3
Ignore Paper Size If you are making prints on non-standard paper and the original
image does not entirely appear on the print, set paper size detection to “Ignore”. The machine will not detect the paper length.
Note
❒ Default: Not to ignore
4
No Orig. Size DF
When you set long originals in the optional document feeder, set
original detection to “Ignore”. The machine will not detect the
original size.
Note
❒ Default: Not to ignore
146
User Tools Menu
No.
Mode
Description
5
No Orig. Size
When you place originals of non standard sizes on the exposure
glass, set original detection to “Ignore”. The machine will not detect the original size.
Note
❒ Default: Not to ignore
6
Background
ON/OFF
When you make prints in Photo, Letter/Photo, or Tint mode, the
background of the prints might become dirty. Turn Background
“On” to improve the clarity of your prints.
Note
❒ Default: W/O back. correction (off)
7
Longer Paper
Use paper longer than 432mm, 17.0".
4
Note
❒ Default: Not to use
8
Combine
If you select “Automatic (Auto Combine mode)”, you can make
two or four identical images on one sheet by pressing the {Combine}
} key and {Start}
} key.
Note
❒ Default: Normal (Combine Originals mode)
Reference
For using Auto Combine mode, see p.69 “Auto Combine
Mode”.
9
Comb. Sep. Line
You can select a separation line in Memory Combine mode.
Note
❒ Default: None
❒ Available settings:
a
b
d
c
e
GRLINE0E
• a = None
• b = Solid
• c = Broken1
• d = Broken2
• e = CropMarks
147
User Tools
No.
Mode
Description
10
Cancel Comb.
Specifies whether Combine Originals or Memory Combine mode
is cleared after finishing your print job.
Note
❒ Default: Not to cancel
11
No. of Skip Feed
Specifies the number of drum rotations in Skip Feed mode at
power on. You can also select whether you can change the number of drum rotations temporarily when you press the {Skip Feed}
}
key. See p.71 “Skip Feed Printing”.
Note
❒ Default:
• Panel display: Display
4
• Number of Skip Feed: 2
Reference
For changing the number of rotations, see p.159 “4-11 No. of
Skip Feed”.
12
Idling for Q.start
When you use the Manual Quality Start mode, you can select
how many times the drum unit idles.
Note
❒ Default: 7
13
Setting Q.start
If the machine is not used for a long period of time, the ink on the
drum might dry causing image quality to deteriorate. The Auto
Quality Start mode automatically recovers image density quality
after a selected time has passed. If Auto Quality Start mode is set
to “Not to use”, you can regain print quality by making a few extra prints or you can use the Manual Quality Start mode.
Note
❒ Default:
• Before print: Yes
• After print: Yes
14
No. of Q.start
You can select how many times the drum unit idles after the displayed time periods have passed in Auto Quality Start mode.
Note
❒ Default: See p.160 “4-14 No. of Q.start”.
❒ To increase the print image density, increase the number of
drum rotations, and vice versa.
Reference
For changing the number of idle spins, see p.160 “4-14 No. of
Q.start”.
148
User Tools Menu
No.
Mode
Description
15
Deflector Angle
You can change the angle of the wing guide depending on the paper type you use.
Note
❒ Default: Auto
❒ Available settings:
• Up (Select this setting when standard thickness or thin paper misfeeds at the paper exit section occur frequently.)
• Down (Select this setting when A4 – B5, 81/2" × 11" thick
paper is not delivered properly to the paper delivery tray.)
16
Auto Class
When you do not use the Separation mode, you can select the machine's condition after each printing set is fed out to the paper delivery tray.
4
Note
❒ Default: Stop
❒ Available settings:
• Start printing automatically (After the last page of each
printing set is fed out to the paper delivery tray, the machine stops for a few seconds. Then, the next cycle begins.)
• Stop (After the last page of each printing set is fed out to
the paper delivery tray, the machine stops. If you press the
{Print}
} key, the next cycle begins.)
17
Auto Separate
Specifies whether Job Separation mode is automatically carried
out when you make prints in All Class, Auto Class, Manual Class,
or Class mode.
Note
❒ Default: ON
18
Ink/Master Left
Specifies whether you can check the amount of ink and master.
Note
❒ Default: OFF
❒ Available settings:
• OFF (You cannot check the remaining amount of ink or
master.)
• ON (When the remaining amount of ink or master is less
than half, the panel display indicates these amounts when
you turn on the main switch.)
• Check remaining volume (You can see the remaining
amounts of ink and master regardless of these amounts.)
19
Type of Paper
When one kind of paper misfeed occur frequently, you can register its paper type in “User1” or “User2”.
Reference
For registering a special paper type, see p.161 “4-19 Type of
Paper”.
149
User Tools
No.
Mode
Description
20
Auto Rotation
When the direction in which your original is placed differs from
that of the paper, the machine automatically rotates the original
image by 90° to match the paper direction. You can cancel this
setting.
Note
❒ Default: ON
21
Master length
The machine determines the master length according to the number of originals placed in the optional document feeder and the
paper sizes. If you wish to use A3/11" × 17" master regardless of
the number of originals set and the paper sizes, select “A3”.
Note
❒ Default: Auto
4
27
Cancel Stor.O.lay
Specifies whether settings for Storage Overlay are retained, or
not, when a storage overlay job has finished.
Note
❒ Default: Not to cancel
28
Double Feed
Warng
Specifies whether a warning is displayed or not when a double
feed is detected.
Note
❒ Default: OFF
150
User Tools Menu
5. Stamp
No.
Mode
Description
1
Type
You can select the stamp message at power on with the Stamp
mode.
Note
❒ Default: CONFIDENTIAL
2
Size
You can edit the preset stamp sizes.
Note
❒ Default: Standard
❒ Adjustment values:
4
• Double size
3
Stamp Density
You can select the style of the stamps.
Note
❒ Default: Solid-fill
4
Stamp Position
You can edit the preset stamp position.
Note
❒ Default: See p.162 “5-4 Stamp Position”.
❒ Available settings: See p.162 “5-4 Stamp Position”.
Reference
For adjusting the stamp position, see p.162 “5-4 Stamp Position”.
5
Date Style Set
You can select the format of the date stamp.
Note
❒ Default: Month Day Year
6
Date Position Set
You can select the date stamp direction at power on in Date Stamp
mode.
Note
❒ Default: Upper Left
7
Position(Date)
You can edit the date stamp position.
Note
❒ Default: See p.163 “5-7 Position (Date)”.
❒ Available settings: See p.163 “5-7 Position (Date)”.
Reference
For adjusting the date stamp position, see p.163 “5-7 Position
(Date)”.
151
User Tools
No.
Mode
Description
8
Type(Page)
You can select the page numbering style at power on in Page
Stamp mode.
Note
❒ Default: P1,P2
9
Direction(Page)
You can select the page numbering direction at power on in Page
Stamp mode.
Note
❒ Default:
• When you select “P1,P2” or “1/5,2/5” with the
“Type(Page)” user tool: Upper Right
• When you select “-1-,-2-” with the “Type(Page)” user tool:
Down Center
4
10
Position(Page)
You can edit the page numbering position.
Note
❒ Default: See p.164 “5-10 Position (Page)”.
❒ Available settings: See p.164 “5-10 Position (Page)”.
Reference
For adjusting the page numbering position, see p.164 “5-10 Position (Page)”.
11
Make/Chg. Pattern
Make your own background pattern in Make-up mode.
Note
❒ You can edit the 40 preset patterns.
Reference
For changing the background pattern, see p.165 “5-11
Make/Chg. Pattern”.
152
User Tools Menu
6. Administrator Mode
❖ User Codes
If user codes are turned on, operators must enter their user codes before they can operate
the machine. The machine keeps count of the number of copies made under each user code.
Turn this function on with the “Set User Code(s)” user tool. You can also turn on Key Operator Code mode so that only the key operator (administrator) can use the functions below.
1
Check Counter
You can check the number of masters and copies made under
each user code.
Reference
For checking the number of masters and copies, see p.166
“6-1 Check Counter”.
2
Reset Counters
4
You can clear each or all user code counters.
Note
❒ Default: Single
Reference
For clearing the number of masters and copies, see p.167 “62 Reset Counters”.
3
Set User Code
Selects User Code mode. For details about User Code mode, see
p.153 “6. Administrator Mode” Use Code(s).
Enter the key Operator Code if you have already set it. See
p.153 “6. Administrator Mode”.
Note
❒ Default: Not to use
4
Reg. User Code
You can register user codes.
Note
❒ Up to 20 user codes (up to 4 digits) can be registered.
5
Chg. User Code
You can change user codes.
Note
❒ The number of copies made under the old code is added to
that made under the new user code.
Reference
For changing the user codes, see p.168 “6-5 Chg. User
Code”.
153
User Tools
6
Del. User Code
You can delete user codes.
Note
❒ The number of copies made under the deleted code is also
deleted.
Reference
For deleting user codes, see p.168 “6-6 Del. User Code”.
7
Key Operator Code
Use to turn Key Operator Code mode on or off.
Note
❒ Default: Not to use
4
8
Reg/Chg KeyOpCode
You can register or change key operator codes. (up to 4 digits)
9
Restrict. Access
In Key Counter mode, you have to set the key counter before
making prints. (To turn on Key Counter mode, contact your
service representative.) If Key Counter mode is on, Restricted
Access is turned on (“To use”) automatically. If you turn Restricted Access off (“Not to use”), you can make prints without
inserting the key counter.
Note
❒ Default: Not to use
7. On Line Mode
No.
Mode
Description
1
Set aut-O/L def
Specifies whether Auto On Line mode is set to “On” or “Off”
when power is switched on or after mode settings are cleared.
Note
❒ Default: On
2
Ppr. Size [Online]
Specifies the paper size when you press the {On Line}
} key.
Note
❒ Default: Auto
3
List/Test Print
Prints the current set content of this machine.
Note
❒ Default: System Print
4
Print PS Errors
Setting for when printing the PS Error List when a PostScript error occurs.
Note
❒ Default: Off
154
User Tools Menu
5
IP Address
Sets the IP Address.
Note
❒ Default: 011.022.033.044
Reference
See the Printer Reference 1 for information about the IP Address setting.
6
Ethernet Speed
Sets the Ethernet communication speed.
Note
❒ Default: Auto
7
Network
Sets the Network boot.
Note
4
❒ Default: NONE
Reference
See the Printer Reference 1 for information about the Network boot setting.
8
I/O Timeout
Sets the time to enable the interface after data stops being received. When the time set here is exceeded, it will be possible to
receive data from the other interface.
Important
❒ If the set time is too short, a time out might occur while one
data is being received. As a result, data from another interface might cut in and be printed, or the emulation retrieval
from half of the data may be activated, and be replaced with
a different emulation.
Note
❒ Default: 30 sec.
9
I/O Buffer
Sets the capacity of the reception buffer.
Note
❒ Default: 512KB
10
Menu Reset
You can reset the factory settings. However, the “IP Address”,
“Network”, and the “Ethernet Speed” settings do not change.
155
User Tools
User Tool Menus in Detail
E Press the {q} key.
1-6 Time Setting
A Press the {User Tools}} key.
Stamp
Image Density
Lighter
On Line
Normal
4
Darker 1
Make-Up
Darker 2
Auto On Line
ZDZS110N
B Make
sure that “1” is selected,
and then press the [OK] key.
F Enter the month with the number
keys.
G Press the {q} key.
Note
❒ Follow steps F and G for the
"date", "hour", "minute", and
"second".
H Press the [OK] key.
3-4 Reproduction Ratio
C Enter
6 with the number keys,
and then press the [OK] or {q}
key.
A Press the {User Tools}} key.
Stamp
D Enter the year with the number
keys.
Image Density
Lighter
On Line
Normal
Darker 1
Make-Up
Darker 2
Auto On Line
ZDZS110N
156
User Tool Menus in Detail
B Enter
3 with the number keys,
and then press the [OK] or {q}
key.
3-5 Class Enter No.
A Press the {User Tools}} key.
C Enter
4 with the number keys,
and then press the [OK] or {q}
key.
Stamp
Image Density
Lighter
On Line
Normal
Darker 1
Make-Up
Darker 2
Auto On Line
ZDZS110N
D Select the ratio you want to adjust
with the [←
←] [→
→] or {~} {}} keys.
4
B Enter
3 with the number keys,
and then press the [OK] or {q}
key.
C Enter
5 with the number keys,
and then press the [OK] or {q}
key.
E Press the [Adjust.] key.
F Enter the desired ratio
with the
[←
←] [→
→] or {~} {}} keys.
Note
❒ You can also enter the ratio with
the number keys.
←] [→
→]
D Select the grade with the [←
or {~} {}} keys.
G Press the [OK] key twice.
E Press the [Enter] key.
157
User Tools
←] [→
→]
F Select the class with the [←
or {~} {}} keys.
3-11 Margin Erase Area
A Press the {User Tools}} key.
Stamp
Image Density
Lighter
On Line
Normal
G Enter
the number of students
with the number keys, and then
press the {q} key.
4
Darker 1
Make-Up
Darker 2
Auto On Line
ZDZS110N
B Enter
3 with the number keys,
and then press the [OK] or {q}
key.
C Enter
Note
❒ Repeat steps F and G until you
have finished registering the
number of students in each
class.
H Press the [OK] key.
Note
❒ Repeat steps D through H until
you have finished registering
the number of students in each
class for the each grades.
11 with the number keys,
and then press the [OK] or {q}
key.
D Select the original size you will
use with the [←
←] [→
→] or {~} {}}
keys.
I Press the [OK] key.
E Press the [Select] key.
158
User Tool Menus in Detail
F Adjust the erase edge margin.
If you selected A3 to A6 or 11" ×
17" to 51/2" × 81/2"
A Adjust the erase edge margin
with the [←
←] [→
→] or {~} {}}
keys.
4-11 No. of Skip Feed
The following procedure explains
how to change the number of drum
rotations.
A Press the {User Tools}} key.
Stamp
Image Density
Lighter
On Line
Normal
4
Darker 1
Make-Up
Darker 2
Auto On Line
ZDZS110N
Note
❒ You can also enter the ratio
with the number keys and
the {q} key.
B Enter
4 with the number keys,
and then press the [OK] or {q}
key.
If you selected p
A Enter the erase edge margin
with the number keys.
B Press the {q} key.
C Enter the vertical length with
the number keys.
D Press the {q} key.
E Enter the horizontal width
with the number keys.
F Press the {q} key.
C Enter
11 with the number keys,
and then press the [OK] or {q}
key.
D Press the [Change] key.
G Press the [OK] key twice.
159
User Tools
E Change the number of drum rotations while one sheet of paper is
fed with the [←
←] [→
→] or {~} {}}
keys.
A Press the {User Tools}} key.
Stamp
Image Density
Lighter
On Line
Normal
Darker 1
Make-Up
Darker 2
Auto On Line
ZDZS110N
B Enter
Note
❒ You can also change the number of rotations with the number keys.
4
4 with the number keys,
and then press the [OK] or {q}
key.
F Press the [OK] key.
C Enter
14 with the number keys,
and then press the [OK] or {q}
key.
4-14 No. of Q.start
Note
❒ The default settings are as follows.
Temperature
0 – 4 hours
4 – 24 hours
24 – 72 hours
More than 72 hours
Time
period
*1
*2
*3
160
Low Tmp.
*1
Normal Tmp.
High Tmp.
D Select
the temperature at which
you use this machine with the [←
←]
[→
→] or {~} {}} keys.
0 7 7 7
*2
*3
(10 – 15°C, 50 – 59°F)
(15 – 28°C, 59 – 82.4°F)
(28 – 30°C, 82.4 – 86°F)
0 5 5 5
0 5 5 5
E Press the [OK] key.
User Tool Menus in Detail
F Select the time period (hours) the
drum unit idles for with the [←
←]
[→
→] or {~} {}} keys.
B Enter
4 with the number keys,
and then press the [OK] or {q}
key.
C Enter
19 with the number keys,
and then press the [OK] or {q}
key.
G Press the [OK] key.
H Select the number of drum rota-
tions with the [←
←] [→
→] or {~} {}}
keys.
4
D Select [User1] or [User2] with the
[←
←] [→
→] or {~} {}} keys.
I Press the [OK] key.
E Press the [OK] key.
F Select the paper type and misfeed
4-19 Type of Paper
condition with the [←
←] or [→
→] key.
A Press the {User Tools}} key.
Stamp
Image Density
Lighter
On Line
Normal
Darker 1
Make-Up
Darker 2
Auto On Line
ZDZS110N
G Press the [OK] key.
H Press the [Cancel] key.
161
User Tools
Stamp
positions
5-4 Stamp Position
Note
❒ The default position and available
settings of each stamp are as follows.
Stamp
positions
a
b
4
Default
Available
settings
a = 24mm,
0.96"
a=8–
104mm,
0.32" – 4.16"
b = 24mm,
0.96"
GPSPOS0E
b
c
GRSPOS1E
a=8–
104mm,
b = 0mm, 0" 0.32" – 4.16"
b = – 72 –
c = center
72mm,
–
line
2.88" – 2.88"
a = 24mm,
0.96"
a
b
b = 24mm,
0.96"
GRSPOS2E
a = 24mm,
0.96"
b
a
b = 24mm,
0.96"
GRSPOS3E
b
a
GRSPOS4E
b
a
GRSPOS5E
b = 24mm,
0.96"
GRSPOS6E
a
c
b
GRSPOS7E
c
a=8–
104mm,
0.32" – 4.16"
b=8–
144mm,
0.32" – 5.76"
a
GRSPOS8E
a = 0mm, 0" a = – 52 –
b = 24mm, 52mm, –
2.08" – 2.08"
0.96"
c = center
line
b=8–
144mm,
0.32" – 5.76"
a = 0mm, 0" a = – 52 –
b = 0mm, 0" 52mm, –
2.08" – 2.08"
c = center
b = – 72 –
line
72mm, –
2.88" – 2.88"
c = center
line
b=8–
144mm,
0.32" – 5.76"
A Press the {User Tools}} key.
Stamp
a=8–
104mm,
0.32" – 4.16"
b=8–
144mm,
0.32" – 5.76"
Available
settings
a = 0mm, 0" a = – 52 –
b = 24mm, 52mm, –
2.08" – 2.08"
0.96"
b
b=8–
144mm,
0.32" – 5.76"
a=8–
104mm,
b = 0mm, 0" 0.32" – 4.16"
b = – 72 –
c = center
72mm, –
line
2.88" – 2.88"
a = 24mm,
0.96"
162
a=8–
104mm,
0.32" – 4.16"
a = 24mm,
0.96"
c
c
b=8–
144mm,
0.32" – 5.76"
a = 24mm,
0.96"
a
b
a
Default
Image Density
Lighter
On Line
Normal
Darker 1
Make-Up
Darker 2
Auto On Line
ZDZS110N
B Enter
5 with the number keys,
and then press the [OK] or {q}
key.
User Tool Menus in Detail
C Enter
4 with the number keys,
and then press the [OK] or {q}
key.
D Select
the stamp position you
want with the [←
←] [→
→] or {~} {}}
keys.
5-7 Position (Date)
Note
❒ The default position and available
settings of each date stamp are as
follows.
Stamp positions
b
a
dd.mm.yy
Default
Available
settings
a = 8mm,
0.32"
a=8–
40mm, 0.32"
– 1.60"
b = 20mm,
0.80"
GRDPOS0E
dd.mm.yy
a
E Press the [Change] key.
F Adjust the horizontal stamp posi-
b=8–
40mm, 0.32"
– 1.60"
4
b
GRDPOS1E
a = 20mm,
0.80"
b
b = 12mm,
0.48"
dd.mm.yy
tion with the {|} or {{} key, and
then press the {}} key.
a
GRDPOS2E
a = 20mm,
0.80"
Note
❒ The value increases or decreases
in 4mm, 0.16" steps.
G Adjust the vertical stamp position
with the {|} or {{} key.
dd.mm.yy
a
b
b = 8mm,
0.32"
GRDPOS3E
A Press the {User Tools}} key.
H Press the [OK] key twice.
Stamp
Image Density
Lighter
On Line
Normal
Darker 1
Make-Up
Darker 2
Auto On Line
ZDZS110N
163
User Tools
B Enter
5 with the number keys,
and then press the [OK] or {q}
key.
C Enter
7 with the number keys,
and then press the [OK] or {q}
key.
5-10 Position (Page)
Note
❒ The default position and available
settings of each page stamp are as
follows.
❖ P1 or 1/5
Stamp positions
a
P.1
4
D Select
Available
settings
a = 8mm,
0.32"
a=8–
40mm, 0.32"
– 1.60"
b = 12mm,
0.48"
GRPPOS0E
a = 12mm,
0.48"
a
b
P.1
the date stamp position
you want to adjust with the [←
←]
[→
→] or {~} {}} keys.
b
Default
b=8–
40mm, 0.32"
– 1.60"
b = 12mm,
0.48"
GRPPOS1E
❖ -1Stamp positions
E Press the [Change] key.
F Adjust the horizontal date stamp
position with the {|} or {{} key,
and then press the {}} key.
sition with the {|} or {{} key.
H Press the [OK] key twice.
164
a = 8mm,
0.32"
a=8–
40mm, 0.32"
– 1.60"
a = 8mm,
0.32"
a=8–
40mm, 0.32"
– 1.60"
GRPPOS2E
–1–
G Adjust the vertical date stamp po-
Available
settings
–1–
a
a
GRPPOS3E
Note
❒ The value increases or decreases
in 4mm, 0.16" steps.
Default
User Tool Menus in Detail
A Press the {User Tools}} key.
Stamp
Image Density
Lighter
F Adjust the horizontal page numbering position with the {|} or
{{} key, and then press the {}}
key.
On Line
Normal
Darker 1
Make-Up
Darker 2
Auto On Line
ZDZS110N
B Enter
5 with the number keys,
and then press the [OK] or {q}
key.
C Enter
10 with the number keys.
Then press the [OK] or {q} key.
Note
❒ The value increases or decreases
in 4mm, 0.16" increments.
G Adjust the vertical page number-
4
ing position with the {|} or {{}
key.
Note
❒ You need not follow step G
when you select “-1-” as the direction in step D.
H Press the [OK] key twice.
5-11 Make/Chg. Pattern
D Select the page numbering direc-
A Press the {User Tools}} key.
tion you want to adjust with the
[←
←] [→
→] or {~} {}} keys.
Stamp
Image Density
Lighter
On Line
Normal
Darker 1
Make-Up
Darker 2
Auto On Line
ZDZS110N
E Press the [Change] key.
B Enter
5 with the number keys,
and then press the [OK] or {q}
key.
165
User Tools
C Enter
11 with the number keys,
and then press the [OK] or {q}
key.
H Press the [OK] key twice.
6-1 Check Counter
A Press the {User Tools}} key.
D Select
the background pattern
with the {~}, {}}, {|}, or {{}
key.
Stamp
Image Density
Lighter
On Line
Normal
Darker 1
Make-Up
4
Darker 2
Auto On Line
ZDZS110N
E Press the [Change] key.
F Move the cursor to the position
you wish to edit with the { ~ } ,
{}}, {|}, or {{} keys.
G Press the {q} or {Clear/Stop}} key
B Enter
6 with the number keys,
and then press the [OK] or {q}
key.
C Make sure that 1 is selected, and
then press the [OK] key.
to edit the pattern.
Note
❒ To add a dot, press the {q}
key.
❒ To remove a dot, press the
{Clear/Stop}
} key.
❒ Repeat steps F and G until you
have finished editing the pattern.
166
Note
❒ The number of masters and
prints made under the first user
code will be displayed in the
panel display.
User Tool Menus in Detail
→] or {}} key
D Keep pressing the [→
to display the number of masters
and prints made under your user
code.
C Enter
2 with the number keys,
and then press the [OK] or {q}
key.
←]
D Select [Single] or [All] with the [←
[→
→] or {~} {}} keys.
E Press the [OK] key after checking
4
the number of masters and prints
made under your user code.
6-2 Reset Counters
E Press the [OK] key.
A Press the {User Tools}} key.
If you selected [Single]
Stamp
Image Density
Lighter
A Keep pressing the [→
→] or {}}
key to display the number of
masters and prints made under
your user code.
On Line
Normal
Darker 1
Make-Up
Darker 2
Auto On Line
ZDZS110N
B Enter
6 with the number keys,
and then press the [OK] or {q}
key.
B Press the [OK] key.
C Press the [Yes] key.
D Press the [Cancel] key twice.
If you selected [All]
A Press the [Yes] key.
167
User Tools
F Enter the new user code with the
6-5 Chg. User Code
number keys.
A Press the {User Tools}} key.
Stamp
Image Density
Lighter
On Line
Normal
Darker 1
Make-Up
Darker 2
Auto On Line
ZDZS110N
4
B Enter
6 with the number keys,
and then press the [OK] or {q}
key.
G Press the [OK] key.
6-6 Del. User Code
A Press the {User Tools}} key.
C Enter
5 with the number keys,
and then press the [OK] or {q}
key.
Stamp
Image Density
Lighter
On Line
Normal
Darker 1
Make-Up
Darker 2
Auto On Line
ZDZS110N
→] or {}} key
D Keep pressing the [→
to display your user code.
B Enter
6 with the number keys,
and then press the [OK] or {q}
key.
C Enter
6 with the number keys,
and then press the [OK] or {q}
key.
E Press the [OK] key.
168
User Tool Menus in Detail
→] or {}} key
D Keep pressing the [→
to display your user code.
E Press the [OK] key.
F Press the [Yes] key.
4
169
User Tools
4
170
5. Troubleshooting
If Your Machine Does Not Operate as You
Want
If a malfunction or a misfeed occurs, the following messages will appear on the
panel display.
Message
Meaning
Check the original direction.
The paper is not placed in the same direction as the original.
Place the original in the same direction as the paper.
If you press the {Print}
} key, the selected paper will be used for printing.
Size of original and paper is not the same.
Set a paper size that matches the reproduction ratio you have selected and your original.
The reproduction ratio selected by Auto Magnification mode is too
big or too small.
Note
❒ You can make prints if you press the {Print}
} key.
Set original.
Make prints after confirming whether there is an original on the exposure glass.
Make sure that you have changed the original on the exposure glass
before pressing the {Start}
} key.
Max. quantity: ****
The number of prints exceeds the maximum print quantity.
You can change the maximum number of prints that can be made in
one operation with the user tools. See “Max. Quantity” on p.144 “2.
Set Operat'n Mode”.
Min. quantity: ****
The number of prints does not exceed the minimum print quantity.
You can change the minimum number of prints that can be made in
one operation with the user tools. See “Min. Quantity” on p.144 “2.
Set Operat'n Mode”.
Drum unit is not set. Set
Drum unit.
Slide in the drum until it clicks.
Communication error
Turn the main switch off and on.
Turn the main switch off
then on
If the message appears again, contact your service representative.
Overloaded for the delivery tray
Remove the paper from the delivery tray.
Please remove the paper
Make sure that the drum is completely set in position.
Reference
See “Delivery Capacity” on p.144 “2. Set Operat'n Mode”.
171
Troubleshooting
Message
Meaning
Print image is larger
than the selected paper
size.
The master image previously printed is larger than the paper, the
image exceeds the paper size.
Change the paper size.
Make prints again after pressing the [Exit] key and selecting the paper size again.
Note
❒ If you press the [Exit] key to erase the message and press the
{Print}
} key, the machine starts to make the prints. However, the
image might not fit on the paper.
- When a service call message is shown on the panel display
Press the [Exit] key. Then turn the main switch off and back on again. If a service
code appears again, contact your service representative.
Note
❒ If a service code appears on the panel display after you turn the main switch
off and on a few times, do not continue turning it on and off. Leave the machine off.
5
❒ When you make masters continuously using originals with solid images,
“SC-03-03” tends to appear on the panel display. In this case, turn off the main
switch and wait for a while. Then turn on the main switch.
172
If You Cannot Make Prints as You Want
If You Cannot Make Prints as You Want
Problem
Cause
Misfeeds occur frequently.
Improper paper type is select- Select proper paper type. See
ed.
p.43 “Printing onto Various
Kinds of Paper”.
When you try to set several
functions at a time, you cannot set some functions.
Some functions cannot be
used together.
See p.137 “Combination
Chart”.
Parts of the image are not
printed in Edge Erase mode.
Erase margin is too wide.
Set a narrower erase margin
with the user tools. See p.158
“3-11 Margin Erase Area”.
Prints are blank or parts of the
image are not printed.
The paper feed side plates are
not set correctly.
Edge margins of original are
too narrow.
Action
Make sure that the paper feed
side plates touch the paper
lightly and the proper paper
size is displayed in the panel
display.
2nd printing with another
drum is unsatisfactory.
The 1st print image is still wet. Wait until the 1st image becomes dry.
An uneven solid image appears.
Large solid image wrinkles
the master.
“Double feed detect at output” is displayed frequently.
The reverse or the face of
Set to “Off” of the “Double
printed paper is printed again. Feed Warng” with the user
tools.
5
Increase the print speed or select photo mode.
Combine Originals Mode
Problem
Cause
Action
Prints are blank or parts of the
image are not printed.
Original size and direction are
not correct.
You cannot use originals of
different sizes and directions
in Combine Originals mode.
Use originals of same size and
direction.
Print image is not correct.
Original set order is not correct.
Place originals face up in the
optional document feeder.
The first original should be on
top.
Place original face down on
the exposure glass. The first
original should be set first.
173
Troubleshooting
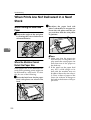
Loading Paper
The Load Paper indicator (B) lights
when the paper feed tray runs out of
paper.
C Adjust the paper feed side plates
to match the paper size.
Limitation
❒ Load paper when the paper feed
tray is completely empty. If you
add paper when some paper is left
in the tray, it may cause multiple
feeds or misfeeds.
Reference
For available paper sizes, see p.11
“Print Paper”.
A Raise the lock lever for the paper
5
feed side plates to release the
lock.
ZDCY030E
D Push the lock lever for the paper
feed side plates down to lock the
side plates into position.
ZDCY041E
ZDCY061E
B Load the paper in the paper feed
tray.
ZDCY020E
Note
❒ Correct any paper curl before
loading the paper.
174
Note
❒ Make sure that the paper size
and direction shown on the
panel display match the size
and direction of paper loaded in
the paper feed tray.
x Clearing Misfeeds
x Clearing Misfeeds
R CAUTION:
• Be careful not to cut yourself on
any sharp edges when you reach
inside the machine to remove
misfed sheets of paper or masters.
- To prevent paper misfeeds:
Check the following before restarting
the printing run.
• Did you select an appropriate paper type with the [Ppr.Type] key?
Note
❒ After clearing misfeeds, make sure
that all the doors, covers, and units
are closed and the x indicator is
off.
❒ To prevent misfeeds, do not leave
any torn scraps of paper, originals,
or masters in the machine.
❒ When clearing misfeeds, do not
turn off the main switch. If you do,
your print settings will be cleared.
❒ If misfeeds occur repeatedly,
please contact your service representative.
5
• Are the side pads in the correct positions?
x + A” Paper Misfeeds in the
”x
Paper Feed Section
A Remove the misfed paper.
ZDCY140E
To print on thin paper (47.1g/m2,
12.5 lb), slide the levers behind the
paper feed side plates in the direction of the arrow (see illustration).
• When paper is curled, correct as
shown.
Z066
175
Troubleshooting
• When paper edges stick together
or paper is not fed in, fan the paper
as shown.
x + A + B” Paper Misfeeds in
”x
the Paper Feed Section
A Open the front door.
B Lower drum unit lock lever (B1).
B1
Z067
• When printing onto postcards or
thick paper, lower the printing
speed to setting 1 or 2. See p.27
“Changing the Printing Speed”.
C Take out the drum.
5
B2
B3
B2
• When a multiple feed occurs or the
paper comes out skewed, make
sure that the paper feed side plates
are properly adjusted. When you
load paper on the paper feed tray,
make sure that the paper edge
touches the back fence and paper is
placed on the proper paper size
scale. Only use paper where the
leading edge has two right angle
corners.
176
Note
❒ For taking out the drum unit,
see p.132 “Changing the Color
Drum Unit”.
D Gently pull out the misfed paper
from the inside.
x Clearing Misfeeds
E If you cannot remove the misfed
paper, remove it from the paper
feed tray.
C Take out the drum.
B2
B3
F Set the drum unit and close the
B2
front door.
Note
❒ For setting the drum unit, see
p.132 “Changing the Color
Drum Unit”.
- To prevent paper misfeeds:
See p.175 “”x + A” Paper Misfeeds
in the Paper Feed Section”.
Note
❒ For taking out the drum unit,
see p.132 “Changing the Color
Drum Unit”.
5
D While
pressing the drum lock,
grasp the edge of the master (the
white area) and peel it off.
x + B” Paper or Master
”x
Wrapped Around the Drum
When the master is wrapped around the
drum
A Open the front door.
B Lower drum unit lock lever (B1).
B1
E Return the drum lock to its original position.
F Set the drum unit and close the
front door.
Note
❒ For setting the drum unit, see
p.132 “Changing the Color
Drum Unit”.
When paper is wrapped around the drum
A Open the front cover.
177
Troubleshooting
B Lower drum unit lock lever (B1).
When paper is misfed inside the machine
A Open the front cover.
B Lower drum unit lock lever (B1).
B1
C Take out the drum.
B2
B1
C Take out the drum.
B2
5
B3
B2
B3
B2
Note
❒ For taking out the drum unit,
see p.132 “Changing the Color
Drum Unit”.
D Remove
the misfed paper from
the drum.
Note
❒ For taking out the drum unit,
see p.132 “Changing the Color
Drum Unit”.
D Remove
the misfed paper from
the inside as shown in the illustration.
E If you cannot find misfed paper
around the drum (as in step D ),
check the pressure cylinder. Remove any misfed paper.
F Set the drum unit and close the
front door.
178
Note
❒ For setting the drum unit, see
p.132 “Changing the Color
Drum Unit”.
E If you cannot remove the misfed
paper, remove paper from the
pressure cylinder.
x Clearing Misfeeds
F Set the drum unit and close the
front door.
Note
❒ For setting the drum unit, see
p.132 “Changing the Color
Drum Unit”.
x + C” Paper Misfeeds in the
”x
Paper Exit Section
A Slowly,
but firmly pull out the
misfed paper.
- To prevent paper misfeeds:
If the paper is curled or the original's
leading edge margin is too narrow,
the following action is necessary.
• When you use curled paper, correct as shown.
Z066
• When the leading edge margin of
the original is less than 8mm, 0.32"
or there is a solid image on the
leading edge, insert the original
with the widest margin first or
make a leading edge margin by
making a copy.
- To prevent paper misfeeds:
5
When thin paper misfeeds in the paper exit section, reduce the printing
speed with the {W}{V} {Speed}
} keys.
See p.27 “Changing the Printing
Speed”. If you cannot reduce the
printing speed, close the trailing edge
guides or move the end plate toward
the paper delivery tray edge.
x + D” Master Misfeeds in
”x
the Master Feed Section
A Pull out the master tray until it
stops.
B Open the master guide.
C Open the master tray cover (1).
*: Less than 8mm, 0.32"
179
Troubleshooting
D Remove the master roll (2).
2
1
x + D + B” Master Misfeeds
”x
in the Master Feed Section
A Open the front door.
B Lower drum unit look lever (B1).
E Reset the master roll (1).
Note
❒ The master roll must be positioned as shown in the illustration in step F.
F Close the master tray cover (2).
B1
C Take out the drum.
5
B2
1
2
B3
G Position the master roll so that the
B2
edge reaches the interior of the
master holder.
Note
❒ For taking out the drum unit,
see p.132 “Changing the Color
Drum Unit”.
H Close the master guide.
I Push
stops.
180
in the master tray until it
D Pull out the misfed master from
inside.
x Clearing Misfeeds
E Set the drum unit and close the
front door.
D Grasp
handle (E1) and pull out
the master eject unit until it stops.
Note
❒ For setting the drum unit, see
p.132 “Changing the Color
Drum Unit”.
E1
x + B + E” Master Misfeeds
”x
in the Master Eject Section
E Pull out lever (E3) and remove the
A Open the front door.
B Lower drum unit lock lever (B1).
E3
misfed master.
5
B1
C Take out the drum.
B2
F Return lever (E3) and the master
eject unit to their original positions.
G Set the drum unit and close the
front door.
B3
B2
Note
❒ For setting the drum unit, see
p.132 “Changing the Color
Drum Unit”.
Note
❒ For taking out the drum unit,
see p.132 “Changing the Color
Drum Unit”.
181
Troubleshooting
x + E” Master Misfeeds in
”x
the Master Eject Section
A Slide out the master tray.
A Open the front door.
B Grasp handle (E1) and
pull out
the master eject unit until it stops.
E1
B Open the cover at the bottom of
C Check
the master tray while holding the
lever and remove the fragments.
where the misfed master
is. Remove the misfed master.
5
D Return the master eject unit to its
original position and close the
front door.
C Close the black cover and slide in
- If master misfeeds occur often
Note
❒ Make sure that you securely
close the black cover before sliding in the master tray.
If the master misfeeds often, fragments of the master might be left in
the bottom of the master tray. Remove the fragments.
182
the master tray.
x Clearing Misfeeds
E Return the document feed sheet
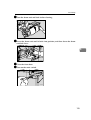
x + P” Original Misfeeds
”x
Occur When Using the
Optional Document Feeder
to its original position.
F Close the document feeder (ADF)
A Open the document feeder (ADF)
cover until it clicks in position
and if necessary, close the document feeder.
cover.
ZDCY100E
5
ZDCY090E
B Pull out the misfed original gently.
ZDCY120E
C If you cannot remove misfed originals as in step B, open the document feeder.
D Pull the green knob towards you
and remove the misfed original.
TPEH220E
- To prevent originals
misfeeding:
Placing the following kinds of originals on the exposure glass may cause
misfeeds.
• Originals heavier than 128g/m2, 34
lb
• Originals lighter than 52g/m2, 14
lb
• Originals smaller than 148mm ×
210mm, 5.9" × 8.3"
• Originals larger than 297mm ×
864mm, 11.6" × 34.0"
• Stapled or clipped originals
• Perforated or torn originals
• Curled, folded, or creased originals
• Originals with any kind of coating,
such as thermal fax paper, art paper, aluminum foil, carbon paper,
or conductive paper
• Bound originals such as books
• Damaged originals
• Originals with glue on them
183
Troubleshooting
• Pasted originals
• Originals written in pencil
• Thin originals that have low stiffness
• Originals with index tabs
• Transparent originals such as OHP
transparencies or translucent paper
Note
❒ Do not mix different sizes of originals in the optional document
feeder.
❒ Remove staples or paperclips from
originals. Fan originals that have
had staples or paperclips removed.
❒ Do not stack originals above the
limit mark.
5
184
When the Open Cover/Unit Indicator (M) Lights
When the Open Cover/Unit Indicator (M
M)
Lights
MMake sure that the following
doors/covers are closed.
❖ Front door
Close the front door completely.
5
❖ Optional document feeder (ADF) cover
Close the document feeder (ADF)
cover until it locks in position.
ZDCY100E
185
Troubleshooting
When the Add Ink Indicator (j
j) Lights
The Add Ink indicator (j) lights when it is time to supply ink.
R CAUTION:
• If ink comes into contact with your eyes, rinse immediately in running water.
For other symptoms, consult a doctor.
R CAUTION:
• Keep the ink or ink container out of reach of children.
R CAUTION:
• If ink is ingested, induce vomiting by drinking a strong saline solution. Consult a doctor immediately.
R CAUTION:
• Our products are engineered to meet high standards of quality and functionality, and we recommend that you use only the expendable supplies available at an authorized dealer.
5
Note
❒ Be sure to supply ink of the same color as the current drum.
❒ Ink is easily removed from skin by waterless hand cleaners followed by washing with soap and water.
❒ Be careful not to get any ink on your clothing.
❒ Store ink under low temperature and humidity conditions.
❒ Do not store ink where it will be exposed to heat or direct sunlight.
❒ Store on a flat surface.
A Open the front door.
B Pull out the ink holder.
186
When the Add Ink Indicator (j) Lights
C Remove the used ink cartridge.
D Remove the cap of the new ink cartridge.
5
E Insert the new cartridge into the ink holder.
Note
❒ Always supply ink of the same color.
F Return the ink holder to its original position until it clicks.
G Close the front door.
The machine will start idling to supply ink to the drum.
187
Troubleshooting
When the Master End Indicator (C
C) Lights
The Master End indicator (C) lights when it is time to replace the master roll or
when you need to set the master roll.
R CAUTION:
• Our products are engineered to meet high standards of quality and functionality, and we recommend that you use only the expendable supplies available at an authorized dealer.
A Pull out the master tray until it stops.
B Open the master guide.
5
C Open the master tray cover (1).
D Remove the used master roll (2).
2
1
Note
❒ When the Master End indicator is lit, it is necessary to replace the master
roll even if some master remains on the old roll.
E The new master roll must be positioned as shown in the illustration (1).
F Close the master tray cover (2).
1
2
188
When the Master End Indicator (C) Lights
G Position the master roll so that the edge reaches the interior of the master
holder.
H Close the master guide.
5
I Push in the master feed unit until it stops.
189
Troubleshooting
When the Master Eject Indicator (k
k) Lights
The Master Eject indicator (k) lights
when it is time to empty the master
eject unit or when you need to set the
master eject unit.
F Remove the used master by pushing down the handle (1) towards
the waste container (2).
Note
❒ Ink is easily removed from skin by
waterless hand cleaners followed
by washing with soap and water.
❒ Be careful not to get any ink on
your clothing while emptying the
master eject unit.
A Prepare a container for the used
master.
5
B Open the front door.
C Use handle (E1) to pull
out the
master eject unit until it stops.
Note
❒ If you cannot remove the used
master completely, repeat step
F until all the master is removed.
G Reinstall
the master eject unit,
making sure it clicks into position.
H Close the front cover.
E1
D Pull up handle (E2) and pull out
the master eject unit completely.
1
E2
E1
2
E Hold the master eject unit upper
handle and turn it clockwise with
one hand while holding handle
(E1) with other hand (1).
190
When Other Indicators Are Lit
When Other Indicators Are Lit
Indicator
Meaning and action
The key counter (option) is not set. Insert the key counter.
TPES270E
• (Metric version)
Color drum unit is installed.
A3 A4
TPES280E
• (Inch version)
m
81/2 Color
TPES280N
• (Metric version)
A3/11" × 17" drum unit is set.
A3 A4
5
TPES290E
• (Inch version)
Drum
17 81/2 Co
TPES290N
• (Metric version)
A4/81/2" × 11" drum unit is set.
A3 A4
TPES300E
• (Inch version)
Drum
17 81/2 Co
TPES300N
191
Troubleshooting
When Prints Are Not Delivered in a Neat
Stack
When Printing on Small Size
Paper
A Adjust the angle of the end plate
B Re-adjust
the paper feed side
plates so that there is no space between the side plates and the paper, and then lock the side plates
in position.
by turning the screw clockwise or
counterclockwise.
5
ZDCY030E
ZDCH150E
When the Machine Cannot
Detect the Paper Size
If the paper size is not detected correctly when printing, prints might not
be delivered in a neat stack. To solve
this, do one of the following:
A Raise the lock lever for the paper
feed side plates to release the
lock.
ZDCY111E
192
Note
❒ Make sure that the paper size
and direction in the panel display match the actual paper size
and direction of the paper on
the feed tray.
❒ If the paper on the paper feed
tray has a solid image on its
back side, the machine may not
be able to detect the size correctly. Place a sheet of paper of the
same size without an image on
the back at the bottom of the paper stack.
Poor Printing
Poor Printing
Dirty Background
If the background of prints is dirty, the drum unit might be dirty.
R CAUTION:
• If ink comes into contact with your eyes, rinse immediately in running water.
For other symptoms, consult a doctor.
R CAUTION:
• Keep the ink or ink container out of reach of children.
R CAUTION:
• If ink is ingested, induce vomiting by drinking a strong saline solution. Consult a doctor immediately.
5
Note
❒ To avoid getting dirty background prints when printing onto paper smaller
than the original image, select a suitable reduction ratio or use larger print paper.
❒ When printing onto paper that does not absorb ink well, like postcards, the
background of prints might be dirty. In this case, lower the printing speed or
use Skip Feed mode to dry the ink on the prints.
A Turn off the main switch.
TPEH020E
193
Troubleshooting
B Pull out the drum unit.
TPEH101E
Note
❒ For taking out the drum unit, see p.132 “Changing the Color Drum Unit”.
C While pressing the drum lock, turn the drum until you can see the trailing
edge of the master.
5
D With a dry soft cloth, remove any ink that has accumulated on the trailing
edge of the drum unit.
Important
❒ Do not use benzine, thinner, or other organic liquids—doing so can damage the machine.
194
Poor Printing
E Turn the drum unit and lock it after cleaning.
F Insert the drum unit until it locks into position, and then lower the drum
unit lock lever.
5
TPEH091E
G Close the front door.
H Turn on the main switch.
TPEH021E
195
Troubleshooting
Black Lines/Stained Prints
Check the platen cover and clean it if dirty. See p.201 “Cleaning the platen cover”.
Check the exposure glass and clean it if dirty. See p.201 “Cleaning the exposure
glass”.
Check the sheet of the optional document feeder and clean it if dirty. See p.202
“Cleaning the Sheet”.
Note
❒ If black lines or stains still appear on prints even following the cleaning procedures above, please contact your service representative.
Faint Prints
If the machine is not used for a long period of time or you change the color drum
unit, the ink on the drum might dry causing print quality to deteriorate. To solve
this problem, use Quality Start mode. See p.77 “Quality Start Mode”.
If the print density is still too light even if you use Quality Start mode, remake
the master.
5
196
6. Remarks
Do's and Don'ts
R CAUTION:
• Unplug the power cord from the wall outlet before you move the machine.
While moving the machine, you should take care that the power cord will not
be damaged under the machine.
Important
❒ Make sure that the m indicator on the PC controller operation panel is off before unplugging the power cord.
• While printing, do not turn off the main switch.
• While printing, do not unplug the power cord.
• While printing, do not open the door or covers.
• While printing, do not move the machine.
• Open and close all doors and covers carefully.
• When printing onto paper that contains images on the back, make sure there
is a 10mm (0.4") margin at the back leading edge. If there is no margin, the machine might wrongly detect that paper is wrapped around the drum and stop
printing.
• When you use envelopes or pasted print paper, the leading edge of the prints
might be damaged.
• Always make a few trial prints to check the image position because the image
position of the trial print might not correspond with that of the original.
• The leading edge of the prints might become stained if the edge touches the
image of prints on the paper delivery tray.
• Print ink on the paper delivery tray might stick to the back side of the next
print.
• Press the {Proof}
} key to perform a test print as the image density of the first
few prints might be light.
• When the machine is on and the power source is less than 90% of the specified
amount, printing quality will decrease. Therefore, make sure the supply from
your electrical outlet is at least 90% of the required amount.
• When you make a lot of prints from a small image, ink might ooze out from
the edges of the master, especially in high temperatures and when printing in
two or more colors. In these cases, make a new master.
• Remove the paper from the tray before relocating the machine. If you relocate
the machine leaving the paper on the tray, reset the paper after the relocation.
If the main switch of the machine is turned on without resetting the paper correctly, the sensor might be broken.
197
Remarks
• If the printed paper is stored for more than one day, the paper may become
wrinkled. If this paper is used, wrinkles may also appear on the master. If the
paper will be stored for more than one day, store it in its original wrapping
paper or other protective covering.
• Shadowing may occur if the printed image at the rear edge of the paper is a
solid color, when the printing speed is set to 1. If this occurs, print the image
with the printing speed set to 3.
• If there are fine lines within 5mm to 10mm, 0.2" to 0.4" of the edge of the image, shadowing may occur.
• Depending on the type of paper being used, speckles may appear within
5mm to 10mm, 0.2" to 0.4" of the edge of the image at around 1000 prints.
• When two or more sheets of paper feed at once, you can select whether the
warning message is displayed or not. Set to “On” of the “Double Feed
Warng” with the user tools. See p.82 “Double Feed”.
• When two or more sheets of paper feed at once, set paper on the paper feed
side plates securely. See p.15 “Printing Preparations”.
• When paper misfeeds occur, select the proper paper type from [Ppr.Type]. See
p.43 “Printing onto Various Kinds of Paper”. If the problem persists, fan or
turn the paper over.
• If the paper skews, make sure to set the paper feed side plates securely. See
p.15 “Printing Preparations”.
• Make sure originals on the exposure glass are correctly positioned and
aligned with the scale.
• If the edges of the paper are rounded, skewing might occur. Change the paper's orientation or replace.
• If the paper becomes creased, make sure the correct paper type has been selected [Ppr.Type]. See p.43 “Printing onto Various Kinds of Paper”.
• If non-standard papers crease frequently, use the standard paper type.
6
198
Where to Put Your Machine
Where to Put Your Machine
Environment
Your machine's location should be carefully chosen because environmental conditions greatly affect its performance.
Optimum environmental conditions
R CAUTION:
• Keep the machine away from humidity and dust. Otherwise a fire or an electric shock might occur.
• Do not place the machine on an unstable or tilted surface. If it topples over,
an injury might occur.
R CAUTION:
• If you use the machine in a confined space, make sure there is a continuous
air turnover.
6
R CAUTION:
• After you move the machine, use the caster fixture to fix it in place. Otherwise the machine might move or come down to cause an injury.
•
•
•
•
Temperature: 10 – 30°C, 50 – 86°F
Humidity: 20 – 90% RH
A strong and level floor.
The machine must be level within 5mm, 0.2" both front to rear and left to
right.
Environments to avoid
• Locations exposed to direct sunlight or strong light (more than 1500 lux).
• Locations directly exposed to cool air from an air conditioner or heated air
from a heater (sudden temperature changes might cause condensation within
the machine).
• Places where the machine might be subjected to frequent strong vibration.
• Dusty areas.
• Areas with corrosive gases.
199
Remarks
Power Connection
R WARNING:
• Connect the machine only to the power source described on the inside
front cover of this manual. Connect the power cord directly into a wall
outlet and do not use an extension cord.
• Do not damage, break or make any modifications to the power cord.
Do not place heavy objects on it. Do not pull it hard nor bend it more
than necessary. These actions could cause an electric shock or fire.
R CAUTION:
• Unplug the power cord from the wall outlet before you move the machine.
While moving the machine, you should take care that the power cord will not
be damaged under the machine.
R CAUTION:
• When you disconnect the power plug from the wall outlet, always pull the
plug (not the cable).
Make sure the plug is firmly inserted in the outlet.
6
Machine Clearance
Place the machine near the power source, providing clearance as shown.
❖ Main frame
* Paper delivery tray
1. More than 10cm, 4.0"
2. More than 60cm, 23.7"
3. More than 60cm, 23.7"
4. More than 60cm, 23.7"
200
Maintaining Your Machine
Maintaining Your Machine
To maintain high print quality, clean
the following parts and units regularly.
❖ Cleaning the machine
Wipe the machine with a soft,
damp cloth. Then wipe it with a
dry cloth to remove the water.
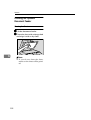
Cleaning the platen cover
A Lift the platen cover.
B Clean the platen cover
with a
damp cloth and wipe it with a dry
cloth.
Important
❒ Do not use chemical cleaner or organic solvents, such as thinner or
benzene. If they get into the machine or melt plastic parts, a failure
might occur.
❒ Do not clean parts other than those
specified in this manual. Such
parts should be cleaned by your
service representative.
Cleaning the Main Frame
Cleaning the exposure glass
A Lift the platen cover or document
feeder.
AM1P0100
6
Note
❒ If you do not clean the platen
cover, marks on the cover will
be printed.
Cleaning the paper feed roller (Paper
feed tray)
A Wipe dust off the paper feed roller with a damp cloth, and then
wipe it with a dry cloth.
B Clean A and B.
TPEH120E
ZDCH130E
Note
❒ If you do not clean the paper
feed roller, paper misfeeds tend
to occur.
201
Remarks
Cleaning the Optional
Document Feeder
Cleaning the Sheet
A Lift the document feeder.
B Clean the sheet with a damp cloth
and wipe it with a dry cloth.
AM1D600
6
Note
❒ If you do not clean the sheet,
marks on the sheet will be printed.
202
7. Specifications
Main Frame
❖ Configuration:
Floor standing (with custom table or cabinet).
❖ Printing Process:
Full automatic one drum system
❖ Original Type:
Sheet/Book
❖ Original Size:
Maximum 305mm × 432mm, 12.0" × 17.0"
❖ Pixel Density:
600dpi
❖ Image Mode:
Photo mode
Letter mode
Letter/Photo mode
Pencil mode
Tint mode
❖ Reduction Ratios:
• Inch version:
93%, 77%, 74%, 65%
• Metric version:
93%, 87%, 82%, 71%
❖ Enlargement Ratios:
• Inch version:
155%, 129%, 121%
• Metric version:
141%, 122%, 115%
❖ Zoom:
From 50% to 200% in 1% steps
❖ Directional Magnification:
• Vertical:
From 50% to 200% in 1% steps
• Horizontal:
From 50% to 200% in 1% steps
203
Specifications
❖ Printing Area:
• A3 drum:
• Inch version: More than 290 × 420mm, 11.4" × 16.5"
• Metric version: More than 290mm × 410mm, 11.4" × 16.1"
• A4 drum:
More than 290mm × 200mm, 11.4" × 7.8"
❖ Print Paper Size:
Maximum recommended: 297mm × 432mm, 11.6" × 17.0" (Maximum: 320mm
× 447mm, 12.6" × 17.6")
Minimum: 70mm × 148mm, 2.8" × 5.8"
❖ Leading Edge Margin:
Less than 8mm, 0.32"
❖ Print Paper Weight:
• 47.1 – 209.3g/m2, 12.5 – 55.6 lb
❖ Print Speed:
60 – 120rpm (5 steps)
❖ First Copy Time (Master Process Time):
Less than 31 seconds (A3, 11" × 17"L)
Less than 25 seconds (A4, 81/2" × 11"K)
7
❖ Second Copy Time (First Print Time):
Less than 32 seconds (A3, 11" × 17")
Less than 26.5 seconds (A4, 81/2" × 11")
❖ Color Printing:
Drum unit replacement system
❖ Image Position:
• Vertical:
• Inch version: ± 10mm, ± 0.4"
• Metric version: ± 15mm, ± 0.6"
• Side:
± 10mm, ± 0.4" (for either side)
❖ Paper Size and Paper Capacity:
1,000 sheets (80g/m2, 20 lb)
❖ Paper Delivery Tray Capacity:
1,000 sheets (80g/m2, 20 lb)
204
Main Frame
❖ Master Eject Unit Capacity:
• A3 drum
More than 70 masters
• A4 drum
100 masters
❖ Dimensions (W × D × H)
Width
Depth
Height
Stored
730mm, 28.8"
700mm, 27.6"
585mm, 23"
Stored with document feeder
730mm, 28.8"
700mm, 27.6"
695mm, 27.4"
Set up
1435mm, 56.5"
700mm, 27.6"
585mm, 23"
Set up with cabinet
1435mm, 56.5"
700mm, 27.6"
1,020mm, 40.2"
Set up with cabinet
1435mm, 56.5"
and document feeder
(when you use A3,
11" × 17" or larger paper)
700mm, 27.6"
1,130mm, 44.5"
❖ Weight:
• Machine:
Less than 105kg, 231.5 lb
7
❖ Noise Emission
Sound power level
*1
Mainframe only
Stand-by
--
During printing
120cpm
Sound pressure level *2
Mainframe only
Stand-by
--
During printing
120cpm
*1
*2
The above measurements made in accordance with ISO 7779 are actual value.
It is measured at the position of the operator.
❖ Power Consumption:
• Making a master:
Less than 0.26kW
• Printing:
Less than 0.25kW
205
Specifications
❖ Optional Equipment:
• Drum unit: Color Drums
Type 80(L) A3, 11" × 17"
Type 80(S) A4, 81/2" × 11"
• Key Counter
• Document Feeder
• PC Controller
Note
❒ Specifications are subject to change without notice.
7
206
Document Feeder (Option)
Document Feeder (Option)
❖ Original Type:
Sheet
❖ Original Weight:
52.3g/m2 to 127.9g/m2, 13.9 lb to 34 lb
❖ Original Size:
Max. 297mm × 864mm, 11.7" × 34.0"
Min. 149mm × 210mm, 5.9" × 8.3"
❖ First Copy Time (Master Process Time):
Less than 34 seconds (A3, 11" × 17")
Less than 28.5 seconds (A4, 81/2" × 11")
❖ Second Copy Time (First Print Time):
Less than 35 seconds (A3, 11" × 17")
Less than 30 seconds (A4, 81/2" × 11")
❖ Original Capacity:
50 sheets (80g/m2, 20 lb)
7.5mm, 0.3" height
Color Drum Type 80(L) A3, 11" × 17"
(Option)
7
Color Drum Type 80(S) A4, 81/2" × 11"
(Option)
Exposure Glass Cover (Option)
Printer Unit Type 80 RCP80 (Option)
Interface Cable Type 85 (Option)
207
Specifications
Editing Function Type 85 (Option)
PC Controller (Option)
Key Counter (Option)
7
208
Twin Color Press Roller Printing System TC-II (Option)
Twin Color Press Roller Printing System TC-II
(Option)
❖ Configuration:
Floor standing (with custom table or cabinet)
❖ Printing Process:
Twin color press roller printing system
❖ Print Paper Size:
Maximum: 297mm × 432mm, 11.6" × 17.0"
Minimum: 70mm × 250mm, 2.8" × 9.8"
❖ Print Paper Weight:
• 52.3 – 209.3g/m2, 13.9 – 55.6 lb
❖ Print Speed:
90–120cpm (3 steps)
❖ Color Printing:
Drum unit replacement system
❖ Paper Size and Paper Capacity:
1,000 sheets (80g/m2, 20 lb)
7
❖ Paper Delivery Tray Capacity:
1,000 sheets (80g/m2, 20 lb)
❖ Dimensions (W × D × H)
Width
Depth
Height
Stored
920 mm, 36.2"
630 mm, 24.8"
555 mm, 21.9"
Set up
1,610 mm, 63.4"
630 mm, 24.8"
555 mm, 21.9"
❖ Weight:
• Machine:
Less than 88kg, 194 lb
❖ Power Consumption:
• Printing:
0.55kW(Max)
❖ Optional Equipment:
• Drum unit: color Drums
A3, 11" × 17"
Note
❒ Specifications are subject to change without notice.
209
Specifications
Consumables
Name
Size
Remarks
Master:
Length: 140m, 520ft/roll
A3 drum
Width: 320mm, 12.6" 2 Rolls/case
More than 255 masters can be made
per roll
A4 drum
410 masters can be made per roll
Ink-Black
1,000ml/pack
Ink-Red
1,000ml/pack
Environmental conditions: -5 to
40°C 10 – 95% RH
Ink-Blue
Ink-Green
Ink-Brown
Ink-Purple
Ink-Yellow
Ink-Navy
Ink-Maroon
Ink-Teal
Ink-Orange
Ink-Gray
7
Ink-Violet
Ink-Hunter green
Ink-Burgundy
Ink-Gold
High Density InkBlack
High Density InkBlue
High Density InkGreen
High Density InkReflex Blue
High Density InkRed
High Density InkNavy
High Density InkTeal
Note
❒ Specifications are subject to change without notice.
210
INDEX
{~
~}{}
}}{|
|}{{
{}, 6
16 single-sided originals → 1 single-sided
print of 16 images, 118
1 single-sided original → 1 single-sided
print of 2 images, 69
1 single-sided originals → 1 single-sided
print of 4 images, 69
2 single-sided originals → 1 single-sided
print with 2 images, 64
2 single-sided originals → 1 single-sided
print with 4 images, 64
4 single-sided originals → 1 single-sided
print of 4 images, 118
8 single-sided originals → 1 single-sided
print of 8 images, 118
A
A3/11" × 17" drum indicator, 7
A3/11" × 17" drum unit, 191
A4/81/2" × 11" drum indicator, 7
A4/81/2" × 11" drum unit, 191
accessing the user tools, 141
Add Ink Indicator (j), 186
adjusting the image density of prints, 25
adjusting the position of printed images,
24
Administrator Mode, 153
All Class mode, 52
Auto Class, 149
Auto Class mode, 54
Auto Combine mode, 69
Auto Cycle, 51
{Auto Cycle}
} key, 6
Auto Cycle ON/OFF, 146
Auto Magnification, 31
{Auto On Line}
} key, 5
Auto Quality Start, 77
Auto Reset, 143
Auto Rotation, 150
Auto Separate, 149
B
Background ON/OFF, 147
background patterns, 89
black line/stain, 196
C
Cancel, 8
Cancel Comb., 148
changing the printing speed, 27
Check Counter, 153, 166
Chg. User Code, 153, 168
Class Enter No., 145, 157
{Class}
} key, 6
Class Manual Set, 146
Class mode, 62
clearing misfeeds, 175
{Clear Modes/Energy Saver}
} key, 6
{Clear/Stop}
} key, 6
closed area method, 94
color drum, 132, 191
color drum indicator, 7
color printing, 132
combination chart, 137
Combine, 147
{Combine}
} key, 5
combine originals, 64
Combine printing, 129
Comb. Sep. Line, 147
command sheet, 90
consumables, 210
CopyCount Display, 144
counter, 7
D
Data In indicator (Green), 7
Data Print, 144
Date Position Set, 151
Date Stamp, 111
Date Style Set, 151
Deflector Angle, 149
Del. User Code, 154, 168
diagonal line method, 92
Directional Magnification (%), 36
Directional Magnification (Size), 38
Direction(Page), 152
dirty background, 193
document feeder (ADF), 4
Double Feed, 82
drum size, 136
drum unit, 3
drum unit handle B2, 133
drum unit lock lever B1, 3
211
E
Eco.Mode ON/OFF, 146
Economy mode, 50
{Economy Mode}
} key, 5
Edge Erase, 41
{Edge Erase}
} key, 5
Energy Saver mode, 22
Energy Saving, 144
envelopes, 44
environment, 199
erasing center and edge margins, 40
Error indicator (Red), 7
Ethernet Speed, 155
Exit, 8
exposure glass, 3
Exposure glass cover, 3
F
flip up cover, 1
Format, 108
front door, 1
H
handle E1, 2
I
Idling for Q.start, 148
Ignore Paper Size, 146
{Image Density}
} key, 5
Image Overlay, 108
Image Rotation, 85
indicators, 7
Initial Setting, 145
ink, 186, 210
ink holder, 3
Ink/Master Left, 149
I/O Buffer, 155
I/O Timeout, 155
IP Address, 155
J
Job Separation, 79
{Job Separator}
} key, 5
K
Key counter, 4, 191, 206
Key Operator Code, 154
keys, 5
212
L
Language on LCD, 143
LCD Contrast, 144
Letter mode, 46
Letter/Photo mode printing, 46
List/Test Print, 154
Loading Paper, 15
loading paper, 174
Load Paper indicator (B), 174
Longer Paper, 147
LT/Photo Contrast, 145
LT/Photo Priority, 145
M
machine clearance, 200
machine exterior, 1
machine interior, 2
main switch, 2
maintaining your machine, 201
Make/Chg. Pattern, 152, 165
{Make-Up}
} key, 5
Make-up printing, 97
Make-up printing features, 86
Make-up samples, 100
Manual Class mode with One Original, 57
Manual Class mode with two or more
originals, 59, 130
Manual Quality Start, 77
master, 188, 210
Master Eject indicator (k), 190
Master End Indicator (C), 188
Master length, 81, 150
master misfeeds in the master eject
section, 181, 182
master misfeeds in the master feed
section, 179, 180
master tray, 1
Max. Quantity, 144
Memory Combine, 118
Menu Reset, 155
Min. Quantity, 144
mm/inch, 143
Mode Setting, 146
monitor indicators, 7
MSTR Makg. Density, 145
N
Network, 155
Next, 8
No. of Q.start, 148, 160
No. of Skip Feed, 148, 159
No Orig. Size, 147
No Orig. Size DF, 146
Number keys, 6
O
OK, 8
{On Line}
} key, 5
On Line Overlay, 108
On Line printing, 83
Open Cover/Unit Indicator (M), 185
operation panel, 1, 5
optional document feeder, 127
options, 4, 206, 207
original misfeeds, 183
Original mode, 46
Original Priority, 145
originals, 13, 127
Overlay, 108
{Overlay}
} key, 5
P
Page Stamp, 113
Panel Beeper, 144
panel display, 7, 8
panel display layout, 9
paper alignment wings, 2
paper delivery end plate, 2
paper delivery side plates, 2
paper delivery tray, 2
paper feed side plates, 1
Paper feed side plates knob, 1
Paper feed tray, 1
Paper feed tray down key, 1
paper misfeeds in the paper exit section, 179
paper misfeeds in the paper feed section,
175, 176
paper or master wrapped around the
drum, 177
Paper Type, 43, 44, 45, 145
PC controller, 83, 109
Pencil mode printing, 48
Photo Contrast, 146
Photo mode printing, 47
Photo(Screen), 146
poor printing, 193
Position(Date), 151
Position(Page), 152
power connection, 200
Prev., 8
printing in two colors, 134
{Print}
} key, 6
print paper, 11, 43, 174
Print PS Errors, 154
Program, 73
{Program}
} key, 6
{Proof}
} key, 6
protecting a program, 74
Q
{q
q} key, 6
{Quality Start}
} key, 5
Quality Start mode, 77
R
R. Cntr. Display, 143
recalling a program, 75
reducing and enlarging using preset
ratios, 29
Reg/Chg KeyOpCode, 154
Reg. User Code, 153
Remarks, 197
removing program protection, 74
Repeat, 123
repeating an image over the entire print, 118
Reproduction Ratio, 156
Reproduct'n Ratio, 145
Reset Counters, 153, 167
Reset R. Counter, 143
Restricted Access, 154
S
Safety Information, i
{Security}
} key, 5
Security mode, 76
Select, 8
service call, 172
Set Operat'n Mode, 144
Setting Q.start, 148
Setting Up The Paper Delivery Tray, 16
Set User Code, 153
Size, 151
{Skip Feed}
} key, 5
Skip Feed printing, 71
special feature indicator, 7
213
special kinds of paper, 44
specifications, 203
Stamp, 116, 151
Stamp Density, 151
{Stamp}
} key, 5
Stamp Position, 151, 162
standard paper, 43
standard printing, 19
{Start}
} key, 6
stopping a multi-print run, 28
Storage Overlay, 108
storing a program, 73
System, 143
T
thick paper, 43
Time Setting, 143, 156
Tint Mode, 26
trailing edge guides, 3
troubleshooting, 171
Type, 151
Type of Paper, 149, 161
Type(Page), 152
U
user code, 18, 153
user tools, 141
{User Tools}
} key, 5
user tools menu, 143
W
what you can do with this machine, vi
when the image density is too light, 196
where to put your machine, 199
{W
W} {V
V} keys (Speed keys), 6
Z
Zoom, 34
214
MEMO
215
MEMO
216
UE
USA C244