1
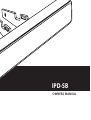
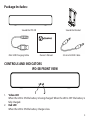
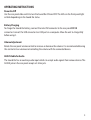
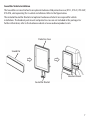
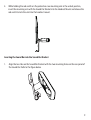
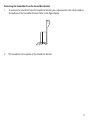
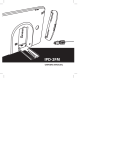
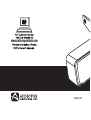
www.audiovoxproducts.com
128-9131
IPD-SB
OWNERS MANUAL
INTRODUCTION
Congratulations on your purchase of the IPD-SB Sound Bar. Please read the instruction
manual for this product before using. The documentation provided will allow you to fully
enjoy all the features this unit has to offer. Please save this manual for future reference.
WARNING! Never install this unit where operation and viewing could interfere with safe
driving conditions.
WARNING! Never disassemble the unit.
WARNING! To prevent injury from shock or fire, never expose this unit to moisture or
water.
2
Package Includes:
Sound Bar IPD-SB
Mini USB Charging Cable Owner’s Manual
Sound Bar Bracket
3.5 mm AUX-IN Cable
CONTROLS AND INDICATORS
IPD-SB FRONT VIEW
1
2
1. Y
ellow LED
When the LED is ON the battery is being charged. When the LED is OFF the battery is
fully charged.
2. Red LED
When the LED is ON the battery charge is low.
3
IPD-SB REAR VIEW
1
1.
2.
3.
4.
5.
6.
2
3
4
5
6
evice Holder
D
When the stand is in the open position, most tablet devices, MP3 players or cell phones can
placed and held within the stand notches.
STAND
Opens to hold most tablet devices or cell phones placed within the stand notches.
-VOL+ Adjustment
Rotate to increase or decrease the volume.
AUX IN Jack
Accepts a 3.5mm jack which is used to accept audio inputs from an external device.
OFF/ON Switch
Slide switch used to turn the Sound Bar On and Off.
DC 5V Mini USB Connector
Allows for the connection of a mini USB connector which is used the charge the Sound Bar
battery.
4
OPERATING INSTRUCTIONS
Power On/Off
Use the rear panel slide switch to turn the Sound Bar ON and OFF. The LEDs on the front panel light
or blink depending on the Sound Bar status.
Battery Charging
To charge the Sound Bar battery, connect the mini USB connector to the rear panel DC 5 V
connector. Connect the USB connector to a USB port on a computer. Allow the unit to charge fully
before using it.
Volume Adjustment
Rotate the rear panel volume control to increase or decrease the volume. It is recommended leaving
this control at max volume and controlling the volume with the connected device.
AUX-IN Cable for Audio
The Sound Bar has an auxiliary audio input which can accept audio signals from various devices. The
AUX-IN jack on the rear panel accepts a 3.5mm jack.
5
Sound Bar Device Stand (may not work with all devices)
1. Place the Sound Bar on a flat surface and open
the rear panel stand as shown.
2.
lace the device in the Sound Bar holding slot
P
which provide the best fit for your device.`
3.
T he viewing angle of the device in the stand can be
adjusted by moving the two stands as shown.
6
Sound Bar Vehicle Installation
The Sound Bar can be attached to an optional Audiovox iPad protective case (IPD-1, IPD-2C, IPD-2HP,
IPD-2FM, sold separately) for in-vehicle installations. Refer to the figure below.
The included Sound Bar Bracket and optional Audiovox vehicle kit are required for vehicle
installations. The headrest post mount and protective case are not included in this package. For
further information, refer to the Audiovox website at www.audiovoxproducts.com.
Protective Case
Sound Bar
Headrest Mount
Sound Bar Bracket
7
Sound Bar Bracket Installation
The Sound Bar can be attached to a protective case using the Sound Bar bracket for in vehicle
installations. Refer to the figure below.
NOTE: Before installing the Sound Bar set the Sound Bar volume to the maximum setting. The Sound
Bar volume will be controlled through the volume control of the iPad, if the headphone audio out of
the iPad is connected to the audio-in of the Sound Bar.
Protective Case
Mounting Bar
Headrest Mount
1.
2.
3.
LOCK
UNLOCK
Mounting Bar
RED Switch
Sound Bar Bracket
Hold the RED switch on the Protective Case in the UNLOCK position.
While holding the RED switch on the Protective Case mounting arm in the UNLOCK position,
insert the Sound Bar Bracket on the Mounting Bar.
When the Sound Bar Bracket is fully inserted on the mounting arm, release the RED switch on
the Protective Case mounting arm moving the switch to the LOCK position.
8
4.
hile holding the red switch on the protective case mounting arm in the unlock position,
W
insert the mounting arm with the Sound Bar Bracket into the Headrest Mount and release the
red switch to lock the unit into the headrest mount.
Inserting the Sound Bar into the Sound Bar Bracket
1.
lign the two tabs on the Sound Bar Bracket with the two mounting holes on the rear panel of
A
the Sound Bar. Refer to the figure below.
9
2.
Push the Sound Bar down and back into the Sound Bar Bracket.
3.
The Sound Bar will snap into place on the Sound Bar Bracket.
10
Removing the Sound Bar from the Sound Bar Bracket
1. To remove the Sound Bar from the Sound Bar Bracket, press downward on the tab located on
the bottom of the Sound Bar Bracket. Refer to the figure below.
2.
The Sound Bar will snap free of the Sound Bar Bracket.
11
Product Specifications
Power Input
5V DC 500mA
Battery Life
About 8-10 hrs
(Depending on output volume level)
Loudspeaker
2W X 2
Output
85 dB @ 0.5m
Dimensions
1.61 inch (H) X 9.44 inch (W) X 1.10 inch (D)
(41mm (H) X 240mm (W) X 28mm (D) )
Weight
8 ounces
(218 grams)
Operating Temperature
32°- 113°F
(01°- 45°C )
12
12 MONTH LIMITED WARRANTY
Applies to Audiovox Mobile Video Products
AUDIOVOX ELECTRONICS CORP. (the Company) warrants to the original retail purchaser of this product that should this product
or any part thereof, under normal use and conditions, be proven defective in material or workmanship within 12 months from
the date of original purchase, such defect(s) will be repaired or replaced with reconditioned product (at the Company’s option)
without charge for parts and repair labor. A game controller, if supplied, is similarly warranted for ninety (90) days.
To obtain repair or replacement within the terms of this Warranty, the product is to be delivered with proof of warranty coverage
(e.g. dated bill of sale), specification of defect(s), transportation prepaid, to the Company at the address shown below.
This Warranty does not extend to the elimination of externally generated static or noise, to correction of antenna problems, to
costs incurred for installation, removal or reinstallation of the product, or to damage to digital memory/media devices, gaming
devices, discs, speakers, accessories, or vehicle electrical systems.
This Warranty does not apply to any product or part thereof which, in the opinion of the Company, has
suffered or been damaged through alteration, improper installation, mishandling, misuse, neglect, accident,
or by removal or defacement of the factory serial number/bar code label(s). THE EXTENT OF THE COMPANY’S
LIABILITY UNDER THIS WARRANTY IS LIMITED TO THE REPAIR OR REPLACEMENT PROVIDED ABOVE AND, IN
NO EVENT, SHALL THE COMPANY’S LIABILITY EXCEED THE PURCHASE PRICE PAID BY PURCHASER FOR THE
PRODUCT.
This Warranty is in lieu of all other express warranties or liabilities. ANY IMPLIED WARRANTIES, INCLUDING
ANY IMPLIED WARRANTY OF MERCHANTABILITY, SHALL BE LIMITED TO THE DURATION OF THIS WRITTEN
WARRANTY. ANY ACTION FOR BREACH OF ANY WARRANTY HEREUNDER INCLUDING ANY IMPLIED WARRANTY
OF MERCHANTABILITY MUST BE BROUGHT WITHIN A PERIOD OF 24 MONTHS FROM DATE OF ORIGINAL
PURCHASE. IN NO CASE SHALL THE COMPANY BE LIABLE FOR ANY CONSEQUENTIAL OR INCIDENTAL DAMAGES
FOR BREACH OF THIS OR ANY OTHER WARRANTY. No person or representative is authorized to assume for the
Company any liability other than expressed herein in connection with the sale of this product.
Some states do not allow limitations on how long an implied warranty lasts or the exclusion or limitation of incidental or
consequential damage so the above limitations or exclusions may not apply to you. This Warranty gives you specific legal rights
and you may also have other rights which vary from state to state.
Audiovox Electronics Corporation, 150 Marcus Blvd., Hauppauge, New York 11788
1-800-645-4994
128-5495F
13