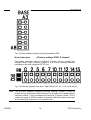
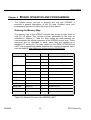
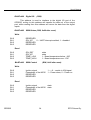
1
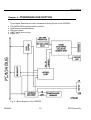
GPRS35
900/1800MHz GPRS Modem Module
User’s Manual
Hardware revision 1.1
User’s Manual
GPRS35
GSM GPRS Modem Module
User’s Manual
REAL TIME DEVICES FINLAND OY
LEPOLANTIE 14
FIN-00660 HELSINKI
FINLAND
Phone: (+358) 9 346 4538
FAX: (+358) 9 346 4539
EMail
[email protected]
[email protected]
Websites
http://www.rtdfinland.fi/
http://www.rtdusa.com/
GPRS35
2
RTD Finland Oy
User’s Manual
WARNING
LIFE SUPPORT APPLICATIONS
This product is not designed for use in life support appliances, devices or systems
where malfunctioning of these products can reasonably be expected to result in
personal injury. RTD customers using or selling this product for use in these
applications do so at their own risk and fully agree to indemnify RTD for any
damages resulting from such improper use or sale.
SAFETY PRECAUTIONS FOR THE USER
1) AIRCRAFT SAFETY
The MC35 cellular engine used on the GPRS35 can interfere with an aircraft’s
navigation system and it’s cellular network. Using your GPRS35 on board aircraft
is forbidden by law. Failure to comply with this prohibition may lead to temporary
suspension or permanent cancellation of cellular services for the person who
infringes this prohibition and/or legal action against said person.
2) ENVIRONMENTS WITH EXPLOSIVE SUBSTANCES
Users are not advised to use the GPRS35 in automotive service stations. Users
are reminded of the necessity to comply with restrictions regarding the use of
radio devices in fuel depots, chemical plants and locations where explosives are
ignited.
3) ELECTRONICS IN MEDICAL APPLICATIONS
Radio transmitters such as the GPRS35 can interfere with the operation of
inadequately protected medical devices. Please address all questions to a doctor
or manufacturer of the medical device.
4) PRECAUTIONS IN THE EVENT OF LOSS/THEFT
OF GPRS35 AND SIM CARD
If your GPRS35, SIM card or both go missing, notify your network operator
immediately in order to avoid misuse.
GPRS35
3
RTD Finland Oy
User’s Manual
Revision History
05/04/2002
HW Release 1.0, Preliminary version, released
CE Conformity of MC35 cellular engine:
•
89/336/EC (EMC Directive)
•
73/23/EC
•
91/263/EC (telecommunications terminals directive)
(Low voltage directive)
Standards:
•
EMC
ETS 300 342-1
•
Safety
EN60950
•
GSM Network
TBR 19, TBR 20
Notice: We have attempted to verify all information in this manual as of
the publication date. Information in this manual may change without prior
notice from RTD Finland Oy.
Published by:
Real Time Devices Finland Oy
Lepolantie 14
FIN-00660 Helsinki
Finland
Copyright 2002 Real Time Devices Finland Oy
All rights reserved
Printed in Finland
PC/XT, PC/AT are registered trademarks of IBM Corporation.
PC/104 is a registered trademark of the PC/104 Consortium.
The Real Time Devices Logo is a registered trademark of Real Time Devices.
utilityModule is a trademark of Real Time Devices.
All other trademarks appearing in this document are the property of their respective owners.
GPRS35
4
RTD Finland Oy
User’s Manual
Table of Contents
List of illustrations and tables ................................ 6
Chapter 1 Introduction ............................................ 7
Features .................................................................................................. 7
GPRS GSM cellular modem.................................................................... 7
16C550 compatible UART....................................................................... 8
I/O interfaces........................................................................................... 8
Mechanical description............................................................................ 8
Connector description ............................................................................. 8
What comes with your board?................................................................. 9
Using this manual.................................................................................... 9
When you need help ............................................................................... 9
Chapter 2 Board settings ...................................... 10
Factory configured jumper settings ....................................................... 11
Base address jumpers........................................................................... 12
Host interrupts....................................................................................... 14
Chapter 3 Board installation ................................. 15
Board installation................................................................................... 15
General purpose digital I/O connector .................................................. 16
SIM card holder ..................................................................................... 17
Chapter 4 Hardware description ........................... 19
The GPRS GSM wireless modem module............................................. 20
GSM antenna considerations ................................................................ 20
SIM card reader .................................................................................... 21
UART serial port circuitry ...................................................................... 21
Digital I/O .............................................................................................. 22
GPRS35
5
RTD Finland Oy
User’s Manual
Chapter 5 Board operation and programming..... 23
Defining the memory map .................................................................... 23
GSM BASE+400h Digital I/O................................................................. 24
GSM BASE+402h status register .......................................................... 24
GSM BASE+403h control register......................................................... 24
Starting up and logging into the GSM network...................................... 25
Interrupts ............................................................................................... 25
Chapter 6 GPRS35 Specifications ........................ 31
Chapter 7 Return policy and warranty.................. 32
List of illustrations and tables
Fig. 2-1 GPRS35 Board layout showing jumper locations
Fig. 2-2 Base address jumpers illustrating address 2E8h
Fig. 2-3 Interrupt jumpers from left to right: IRQ 2,5,6,7,10,11,12,15 and G
Fig. 3-1 GPRS35 integrated in a RTD PC/104 cpuModule stack
together with a HPWR104HR and a CMM series cpuModule
Fig. 3-2 Digital I/O connector layout of the GPRS35
Fig. 3-3 External SIM card interface of the GPRS35
Fig. 3-4 ESIM2035 External SIM card interface board
Fig. 3-5 External SIM card header J25 (Only on GPRS35-2 boards)
Fig. 4-1 Block diagram of the GPRS35
Table 2-1 Factory configured jumper settings
Table 2-2 Base address jumper settings GPRS35
Table 3-1 Pin outs of the GPRS35 digital I/O interface connector
Table 5-1 General I/O map of the GPRS35 UART
GPRS35
6
RTD Finland Oy
User’s Manual
Chapter 1 - INTRODUCTION
This user’s manual describes the operation of the RTD GPRS35 integrated
global GSM wireless modem designed for mobile, marine, and automotive
applications.
Features
Some of the key features of the GPRS35 include:
•
•
•
•
•
•
•
•
•
•
•
•
•
Low power Dual band Siemens MC35 cellular engine, GSM900/1800Mhz
9,6/14,4 kbit/s datarate, group 3 faxes, SMS and SMS cell broadcast
up to 50 kbit/s using GPRS data connection (may be limited by network)
Onboard SIM-card socket for 3V standard cards
16C550 UART interfaces to host computer
Supports COM1,COM2,COM3,COM4 or COMx
Available IRQ’s 2,5,6,7,10,11,12,14,15
Status LED indicating GSM activity and status
16 TTL I/O’s 8 outputs 8 inputs
+5V only operation, 2.3W typical
Wide operating temperature range –20 to + 70C guaranteed
Onboard temperature sensor
Fully PC/104 compliant, IDAN versions available
The following paragraphs briefly describe the major features of the GPRS35. A
more detailed discussion is included in Chapter 4 (Hardware description) The
boards installation is described in Chapter 2 (Board Installation).
GSM cellular modem
The Real Time Devices GPRS35 wireless GPRS GSM modem unit
provides a direct and reliable GPRS connection stationary or GSM
900/1800 mobile fields around the world. GSM connectivity is achieved
using the Siemens MC35 engine. This unit works in the 900/1800MHz
band supporting GSM 02.22 network and service provider
personalisation.
Connect any standard GSM antenna directly to the OSX connector of the
GPRS35. The antenna should be connected to the MC35 using a flexible
50-Ohm antenna cable. In IDAN installations the antenna connection is
brought to the front side of the IDAN-frame. The antenna used should
meet the following specifications: Frequency 890-910MHz (TX), 935960MHz (RX); Impedance 50 Ohms; VSWR 1,7:1 (TX) 1,9:1 (RX); Gain
<1,5dB references to 1/2-dipole; 1W power (cw) max 2W peak at 55
degrees Centigrade.
GPRS35
7
RTD Finland Oy
User’s Manual
A SIM-card socket is located on the solder side of the module. The card
can only be removed while the MC35 has been placed in shutdown mode.
If only GSM data in required the GSM35 is also available using the dual
band TC35 GSM Modem. During the 3Q 2002 RTD Finland will also
release a triple band GPRS module that will operate in the 1900MHz
band. The part number will be GPRS45. Engineering samples will be
available in August 2002.
16C550 compatible UART
Communication to the GPRS35 board is performed through a standard
UART channel. This onboard serial port leaves the other system serial
ports free for the user. All operating systems will recognize and support
this 16C550 standard UART, and therefore no special communication
drivers are needed to receive data from your GPRS35 board. The address
and interrupt of your serial channels can be individually set with the
onboard jumper fields.
I/O interfaces
The GPRS35 can be controlled and monitored from the software through
two dedicated I/O registers. A special I/O connector is available for the
user to connect to the general-purpose TTL level digital I/O.
Mechanical description
The GPRS35 is designed on a PC/104 form factor. An easy mechanical
interface to both PC/104 and RTD IDAN systems can be achieved. Stack
your GPRS35 directly on a PC/104 compatible CPU module using the
onboard mounting holes and standoffs.
Connector description
The GPS and GSM antenna interfaces use an OSX type miniature coaxial
connector. Connect your antenna directly to the GPRS35 antenna
connectors, or use a short cable inside your enclosure to connect to a
feed through connector to allow connection of the antennas to the wall of
your enclosure. All I/O connections are made using header type terminals.
GPRS35
8
RTD Finland Oy
User’s Manual
What comes with your board
Your GPRS35 package contains the following items:
•
•
GPRS35 board
User's manual
Note: Device drivers and example software available on our website
If any item is missing or damaged, please send an EMAIL to Real Time
Devices Finland sales service department at Internet address:
<[email protected]>.
Note that RTD Finland also can offer a GPRS35 starter kit that will include
an active antenna with ready cables for direct evaluation and testing of
this module. The part number for this starter kit is SK-GPRS35.
Using this manual
This manual is intended to help you install your new GPRS35 module and
get it working quickly, while also providing enough detail about the board
and it's functions so that you can enjoy maximum use of it's features even
in the most demanding applications.
When you need help
This manual and all the example programs will provide you with enough
information to fully utilize all the features on this board. If you have any
problems installing or using this board, contact our Technical support
department at <[email protected]>. When sending us an Email
request please include the following information: Your company's name
and address, your name, your telephone number, and a brief description
of the problem.
GPRS35
9
RTD Finland Oy
User’s Manual
Chapter 2 -
BOARD SETTINGS
The GPRS35 board has jumper settings, which can be changed to suit
your application and host computer configuration. The factory settings are
listed and shown in the diagram at the beginning of this chapter. Make
sure you completely study and understand this chapter before making
changes to these settings.
GPRS35
10
RTD Finland Oy
User’s Manual
Factory-Configured Jumper Settings
Table 2-1 below illustrates the factory jumper setting for the GPRS35.
Figure 2-1 shows the board layout of the GPRS35 and the locations of the
jumpers. The following paragraphs explain how to change the factory
jumper settings to suit your specific application.
Table 2-1 Factory configured jumper settings (Please see figure 2-1 below
for more detailed locations)
JUMPER NAME
BASE
IRQ
DESCRIPTION
Base Addresses
Host interrupts
NUMBER OF JUMPERS
6
11+1
FACTORY SETTING
2E8 / 6E8
5, G – jumper closed
Fig. 2-1 GPRS35-1 Board layout showing jumper locations
GPRS35
11
RTD Finland Oy
User’s Manual
Base address jumpers (Factory setting: 2E8h / 6E8h)
The GPRS35 is I/O mapped into the memory space of your host XT/AT.
The board occupies a consecutive memory window of 8 bytes starting
from the base address for UART communication and 4 consecutive bytes
starting from BASE+400h for the board control and status registers. As an
example if your base address is set to be 2E8h for the serial port, the
onboard control registers will start from 6E8h.
The most common cause of failure when you are first setting up your
module is address contention: some of your computers I/O space is
already occupied by other devices and memory resident programs. When
the GPRS35 attempts to use it's own reserved memory addresses (which
are being already used by another peripheral device) erratic performance
can occur and the data read from the board may be corrupted.
To avoid this problem make sure you set up the base address by using
the six jumpers on the right side of the board, this allows you to choose
from a number of different addresses in your host computer’s I/O map.
Should the factory-installed settings be incompatible to your system
configuration, you may change this setting to another using the options
illustrated in Table 2-2 (overleaf). The table shows the jumper settings
and their corresponding values in hexadecimal form. Ensure that you
verify the correct location of the base address jumpers. When the jumper
is removed it corresponds to a logical "0", connecting the jumper to a "1".
When you set the base address of the module, record the setting inside
the back cover of this manual.
GPRS35
12
RTD Finland Oy
User’s Manual
GPRS35 Base address configuration
BASE
200
208
210
218
220
228
230
238
240
248
250
258
260
268
270
278
280
288
290
298
2A0
2A8
2B0
2B8
2C0
2C8
2D0
2D8
2E0
2E8
2F0
2F8
A8 A7 A6 A5 A4
0 0 0 0 0
0 0 0 0 0
0 0 0 0 1
0 0 0 0 1
0 0 0 1 0
0 0 0 1 0
0 0 0 1 1
0 0 0 1 1
0 0 1 0 0
0 0 1 0 0
0 0 1 0 1
0 0 1 0 1
0 0 1 1 0
0 0 1 1 0
0 0 1 1 1
0 0 1 1 1
0 1 0 0 0
0 1 0 0 0
0 1 0 0 1
0 1 0 0 1
0 1 0 1 0
0 1 0 1 0
0 1 0 1 1
0 1 0 1 1
0 1 1 0 0
0 1 1 0 0
0 1 1 0 1
0 1 1 0 1
0 1 1 1 0
0 1 1 1 0
0 1 1 1 1
0 1 1 1 1
0 = JUMPER OFF
A3
0
1
0
1
0
1
0
1
0
1
0
1
0
1
0
1
0
1
0
1
0
1
0
1
0
1
0
1
0
1
0
1
BASE
300
308
310
318
320
328
330
338
340
348
350
358
360
368
370
378
380
388
390
398
3A0
3A8
3B0
3B8
3C0
3C8
3D0
3D8
3E0
3E8
3F0
3F8
A8 A7 A6 A5 A4
1 0 0 0 0
1 0 0 0 0
1 0 0 0 1
1 0 0 0 1
1 0 0 1 0
1 0 0 1 0
1 0 0 1 1
1 0 0 1 1
1 0 1 0 0
1 0 1 0 0
1 0 1 0 1
1 0 1 0 1
1 0 1 1 0
1 0 1 1 0
1 0 1 1 1
1 0 1 1 1
1 1 0 0 0
1 1 0 0 0
1 1 0 0 1
1 1 0 0 1
1 1 0 1 0
1 1 0 1 0
1 1 0 1 1
1 1 0 1 1
1 1 1 0 0
1 1 1 0 0
1 1 1 0 1
1 1 1 0 1
1 1 1 1 0
1 1 1 1 0
1 1 1 1 1
1 1 1 1 1
A3
0
1
0
1
0
1
0
1
0
1
0
1
0
1
0
1
0
1
0
1
0
1
0
1
0
1
0
1
0
1
0
1
1 = JUMPER CLOSED
Table 2-2 Base address jumper settings for the GPRS35, the default
jumper setting is highlighted.
GPRS35
13
RTD Finland Oy
User’s Manual
Fig. 2-2 Base address jumpers illustrating address 2E8
Host interrupts
(Factory setting: IRQ5, G closed)
The header connector, shown in Figure 2-3 below, lets you connect the
onboard control logic interrupt outputs to one of the interrupt channels
available on the host computer XT/AT bus.
Fig. 2-3 Interrupt jumpers from left to right IRQ2,5,6,7,10,11,12,14,15 and G
Note: The GPRS35 hardware supports interrupt sharing! Jumper G must be
closed on one module per used interrupt. For example if two boards share
interrupt number 7 only one board may have the G jumper closed. The G
jumper connects a 1KOhm resistor to ground while the shared interrupts
are 3-stated pulling the line to an inactive level.
GPRS35
14
RTD Finland Oy
User’s Manual
Chapter 3
BOARD INSTALLATION
The GPRS35 GSM modem module is designed to directly mount on top or
under your RTD PC/104 cpuModule stack. This chapter tells you step-bystep how to install your GPRS35 into your system.
Board installation
Keep your board in its antistatic bag until you are ready to install it to your
system! When removing it from the bag, hold the board at the edges and
do not touch the components or connectors. Please handle the board in
an antistatic environment and use a grounded workbench for testing and
handling of your hardware. Before installing the board in your computer,
check the power cabling. Failure to do so may cause the power supply
unit to malfunction or even cause permanent damage.
General installation guidelines:
•
•
•
•
•
•
GPRS35
Touch the grounded metal housing of your computer to discharge any
antistatic buildup and then remove the board from its antistatic bag.
Hold the board by the edges and install it in an enclosure or place it on
the table on an antistatic surface
Install your board in your system, and wire the power supply correctly.
Failure to do so may cause the power supply unit to malfunction or
even cause permanent damage to the device.
Check all wiring connections once and then once more again
Connect the SIM card and the GSM antenna to the OSX connector on
the GPRS35 board
Apply power to your system
15
RTD Finland Oy
User’s Manual
Fig. 3-1 GPRS35 integrated in a RTD PC/104 cpuModule stack together
with a HPWR104HR power supply module and a CMM series cpuModule
General purpose digital I/O connector
The Table 3-1 below shows the pin outs of the GPRS35 digital I/O
interface. The signals in this geader connector can be used as general
purpose TTL level I/O lines to interface to LCD displays, LED’s, bush
buttons or relays. Note that Figure 3-2 shows two connectors together.
The connector J28 carries all inputs and J3 carries all the outputs.
PIN J2
Description
PIN J2
Description
1
3
5
7
9
GND
Out1
Out3
Out5
Out7
2
4
6
8
10
Out0
Out2
Out4
Out6
+5V
PIN J16
Description
PIN J16
Description
1
3
5
7
9
GND
In1
In3
In5
In7
2
4
6
8
10
In0
In2
In4
In6
+5V
Table 3-1 Pin outs of the GPRS35 digital I/O interface connector
GPRS35
16
RTD Finland Oy
User’s Manual
Fig 3-2 Digital I/O connector layout of the GPRS35
SIM card holder
The figure 3-3 below shows the mechanical construction of the +3V
standard SIM-card holder. In the figure the card is in the ejected state.
Press the card carrier into the holder. To eject the SIM-card, press the
yellow ejector button. The GPRS35 also supports an external SIM card
interface board the ESIM2035. This external card interface can be
attached to the wall of your enclosure with a 150mm long cable. This is
the maximum guaranteed length.
Fig 3-3 External SIM card interface of the GPRS35.
GPRS35
17
RTD Finland Oy
User’s Manual
Figure 3-4 below shows a picture of the external SIM card interface board.
Fig 3-4 ESIM2035 board
Note that the ESIM2035 is configured differently for the GSM20 and the
GPRS35/GPRS35. The units are not interchangeable, the GPRS35 and
the GPRS are identical in their SIM interfaces. Once the MC35 GSM
modem is able to initialise itself after power-up and correctly detect the
SIM card the green status LED will be lit. If the LED is not illuminated you
can not interface to your GSM modem. See Figure 3-3 for the location of
the “STAT” LED. The header/mounting holes immediately next to the LED
can be used to connect to an LED externally mounted to the enclosure
wall for example. The “STAT” LED will not indicate detection of the GSM
field or network access.
External SIM card interface J25
The figure 3-4 below shows the GPRS35 external SIM card interface
header J25 that is used to connect to board the ESIM2035.
Fig 3-5 External SIM card header J25 available only on GPRS35-2 boards
GPRS35
18
RTD Finland Oy
User’s Manual
Chapter 4 -
HARDWARE DESCRIPTION
This chapter describes the major hardware building blocks of the GPRS35:
•
•
•
•
•
The GPRS GSM wireless modem module
GSM antenna considerations
SIM card reader
UART serial port circuitry
Digital I/O
Fig. 4-1 Block diagram of the GPRS35
GPRS35
19
RTD Finland Oy
User’s Manual
The GPRS GSM wireless modem module
The GPRS35 wireless GSM modem is built around the Siemens MC35
dual band 900/1800MHz GPRS GSM cellular engine. It is designed both
for handling complex industrial applications such as telemetry, telematics
or communication, and for integration in stationary or mobile fields all over
the world. General information on these products is available at the
following Internet addresses: http://www.siemens.de/gsm_e and
http://www.siemens.de/gsm in german language.
The GPRS35 is capable of powerful communication over a speed of 9,6
kbps or CSD up to 14,4 kbps (as of 06/2001) using GSM data interfacing.
GPRS datarates can reach up to 50 kbit/s depending on the network
capacity and the network load. In very loaded GSM networks GPRS data
throughput may be at the level of 9600 baud. Engineers must take into
account that GPRS datarates will vary dynamically depending on network
conditions. This must be considered when designing software and system
specifications. Roaming agreements and GPRS data support may not in
all cases be available when moving from country to country. Check with
your local network provider for GPRS coverage.
The GPRS35 is capable of FAX and standard SMS text messages. The
data terminal rate is 9600 baud for all host commands (AT commands).
The GPRS35 modem module antenna interface connector uses an OSX
connector. The mating antenna connectors and cables are supplied from
RTD Finland Oy. Temperature monitoring is possible using the onboard
temperature sensor. Limit data can be interrogated from the GPRS35
status register bits 2-3.
GSM Antenna considerations
The antenna used must meet the following specifications: Frequency 890910 MHz (TX), 935-960MHz (RX); Impedance 50 Ohms; VSWR 1,7:1 (TX)
1,9:1 (RX); Gain <1,5dB references to 1/2-dipole; 1W power (cw) max 2W
peak at 55 degrees Centigrade. Typically standard GSM antennas use a
female FME connector. This connector needs an adapter unit before it
can be connected to the GPRS35.
RTD Finland Oy recommends the use of high quality antennas with the
GPRS35. We have tested successfully with antennas from Hirschmann
Rheinmetall Elektronik.
Visit http://www.hirschmann.de/ for information on GSM antennae.
GPRS35
20
RTD Finland Oy
User’s Manual
A very useful AT command that shows quality of the signal reception is :
AT+SCQ, the signal quality +CSQ: value (Value should be > 11) shows
the quality of the network signal.
SIM-card reader
Standard 3V and dual voltage SIM-cards can be used with the GPRS35.
Older 5V SIM cards will not work, though they may operate in standard
GSM cellular phones. These new 3V SIM cards are no older than two
years. The SIM-card holder has a card detection circuit that will in theory
allow hot insertion and removal of the card. This is NOT recommended,
since the SIM card contenets can become corrupted if it is removed while
the MC35 GSM modem is writing to it.
A very useful AT command that shows detestion of the SIM card is:
AT^SCID. The SIM card identifier is given as a reply ^SCID: value shows
the ID of the SIM card. If no ID is detected the MC35 can not read the SIM
card and can not connect to the GSM service provider network.
To add an entry to your SIM card you may use the AT+CPBW command.
In this example we add the RTD Finland phone number +358 9 346 4538
to the SIM card memory location “1” with the following AT command set:
AT+CPBW=1,35893464538,145,RTDFinland
AT+CREG? Will indicate if the GPRS35 is logged into the network. If the
reply for example is +CREG: 0,1 it means that connection to the home
network is valid. A complete AT-instruction set documentation is included
in the MC35 user’s manual.
UART serial port circuitry
GSM data is sent and received through a standard 16C550 compatible
UART. All today’s operating systems will recognize and support this serial
communication device. The GPRS35 uses its own onboard serial port and
will not reserve serial port resources from the system. The I/O base
address and interrupt for this serial port can be flexibly set as has been
described in previous chapters of this manual. This user’s manual will not
wade into details of serial port programming. This information is
commonly available today. You can use any communication software
package or terminal program to connect to your GPRS35 UART. Just
make sure you set up the I/O and IRQ are set right. The correct terminal
speed for AT commands is 9600 baud, 8 databits, no parity, one stopbit,
and hardware handshake. The UART on the board is specified for full
operation from –40 to +85C. The oscillator frequency is set to be
GPRS35
21
RTD Finland Oy
User’s Manual
1.8432MHz. Note that the UART interrupt can be disabled or enabled
from software by writing to bit 01 in address BASE+0x402.
Digital I/O
For general-purpose digital I/O interfacing a 16-bit digital I/O port is
provided. This port includes 8 TTL-level digital outputs that are cleared (to
0) after system reset. Also are included 8 digital inputs with 10K Ohm pulldown resistors. These I/O’s are located on the left side of the board.
These I/O’s are ideal to be used to interface to LCD displays, LED’s
pushbuttons or other low power controls.
GPRS35
22
RTD Finland Oy
User’s Manual
Chapter 5
BOARD OPERATION AND PROGRAMMING
This chapter shows you how to program and use your GPRS35. It
provides a general description of the I/O map. Detailed serial port
programming tips are not within the scope of this manual.
Defining the Memory Map
The memory map of the GPRS35 occupies two groups of eight bytes of
host PC I/O space. This window is freely selectable by the user as
described in Chapter 2, Table 2-2. After setting the base address you
have access to the internal resources of the GPRS35 control logic. These
resources are not described in detail, since they are mapped as a
standard PC serial port. For more details on the EXAR ST16C550IJ44
UART chip programming please download the component specific data t
from the website: http://www.exar.com/products/st16c550.html
ADDR (hex)
REGISTER
DIR
COMMENTS
BASE
TXD
O
Only if control reg. Bit 7=0
RXD
I
Only if control reg. Bit 7=0
BASE+1
BAUD div. Low
Only if control reg. Bit 7=1
BAUD div. High
Only if control reg. Bit 7=1
IRQ enable
Only if control reg. Bit 7=0
BASE+2
IRQ ID
BASE+3
Line control
BASE+4
Modem control
BASE+5
Line status
BASE+6
Modem status
BASE+400
Digital I/O
I/O
Digital I/O port
BASE+402
GSM status
I/O
Configuration registers
BASE+403
GSM control
I/O
Power control
Table 5-1a General I/O map of the GPRS35 UART
GPRS35
23
RTD Finland Oy
User’s Manual
BASE+400
Digital I/O
(R/W)
This address is used to interface to the digital I/O port of the
GPRS35, writing to this address will transfer the data out of the output
port, while reading from this address will return the data from the digital
inputs.
BASE+402
GSM Status (R/W, 0x00 after reset)
Write
Bit 0
Bit 1
Bit 2
Bit 3
RESERVED
/EN_INT
0 – UART interrupt enabled; 1 - disabled
RESERVED
RESERVED
Read
Bit 0
Bit 1
Bit 2
Bit 3
/EN_RST
/EN_INT
TEMP_LOW
TEMP_HIGH
state
state
1 - Board temperature below –20C
1 - Board temperature over +70C
BASE+403 GSM Control
(R/W, 0x00 after reset)
Write
Bit 0
Bit 1
Bit 2
Bit 3
Ignition signal
Powerdown of the MC35
RESERVED
RESERVED
1 – > 0 – results in IGN signal
1 – Power down; 0 – Power on
Ignition signal
Powerdown of the MC35
RESERVED
RESERVED
state
state
Read
Bit 0
Bit 1
Bit 2
Bit 3
GPRS35
24
RTD Finland Oy
User’s Manual
Starting up and logging into the GSM network
With no power applied insert your +3V or dual voltage SIM into the cardholder on the solder side of the board. Connect the antenna cable to the
MC35 antenna connector and power up your PC/104 system. The
GPRS35 will initialise with the system. After this the status LED will blink
for a while until the MC35 is logged into the network. If you have the PIN
code enabled, the GPRS35 status LED will continue to blink until the PIN
code is given through the terminal mode with AT command
AT+CPIN”XXXX”, unless AT^SFLC (facility lock for PIN code) has been
set. Once the GPRS35 is logged onto the network the LED will be lit
continuously.
INTERRUPTS
What is an interrupt?
An interrupt is an event that causes the processor in your computer to
temporarily halt its current process and execute another routine. Upon
completion of the new routine, control is returned to the original routine at
the point where its execution was interrupted.
Interrupts are a very flexible way of dealing with asynchronous events.
Keyboard activity is a good example; your computer cannot predict when
you might press a key and it would be a waste of processor time to do
nothing whilst waiting for a keystroke to occur. Thus the interrupt scheme
is used and the processor proceeds with other tasks. When a keystroke
finally occurs, the keyboard then 'interrupts' the processor so that it can
get the keyboard data. It then places it into the memory, and then returns
to what it was doing before the interrupt occurred. Other common devices
that use interrupts are A/D boards, network boards, other used serial
ports etc.
Interrupt request lines
To allow different peripheral devices to generate interrupts on the same
computer, the PC AT bus has interrupt request channels (IRQ's). A rising
edge transition on one of these lines will be latched into the interrupt
controller. The interrupt controller checks to see if the interrupts are to be
acknowledged from that IRQ and, if another interrupt is being processed,
it decides if the new request should supercede the one in progress or if it
has to wait until the one in progress has been completed. The priority
level of the interrupt is determined by the number of the IRQ as follows;
IRQ0 has the highest priority whilst IRQ15 has the lowest. Many of the
GPRS35
25
RTD Finland Oy
User’s Manual
IRQ's are already used by the standard system resources, IRQ0 is
dedicated to the internal timer, IRQ1 is dedicated to the keyboard input,
IRQ3 for the serial port COM2, and IRQ4 for the serial port COM1. Often
interrupts 2,5,7,10,11 and 15 are free for the user.
8259 Programmable Interrupt Controller
The chip responsible for handling interrupt requests in a PC is the 8259
Interrupt Controller. To use interrupts you will need to know how to read
and set the 8259's internal interrupt mask register (IMR) and how to send
the end-of-interrupt (EOI) command to acknowledge the 8259 interrupt
controller.
Interrupt Mask Register (IMR)
Each bit in the interrupt mask register (IMR) contains the mask status of
the interrupt line. If a bit is set (equal to 1), then the corresponding IRQ is
masked, and it will not generate an interrupt. If a bit is cleared (equal to
0), then the corresponding IRQ is not masked, and it can then generate
an interrupt. The interrupt mask register is programmed through port 21h.
End-of-Interrupt (EOI) Command
After an interrupt service routine is complete, the 8259 Interrupt Controller
must be acknowledged by writing the value 20h to port 20h.
What exactly happens when an interrupt occurs?
Understanding the sequence of events when an interrupt is triggered is
necessary to correctly write interrupt handlers. When an interrupt request
line is driven high by a peripheral device (such as the GPRS35), the
interrupt controller checks to see if interrupts are enabled for that IRQ. It
then checks to see if other interrupts are active or requested and
determines which interrupt has priority. The interrupt controller then
interrupts the processor. The current code segment (CS), instruction
pointer (IP), and flags are pushed onto the system stack, and a new set if
CS and IP are loaded from the lowest 1024 bytes of memory.
This table is referred to as the interrupt vector table and each entry to this
table is called an interrupt vector. Once the new CS and IP are loaded
from the interrupt vector table, the processor starts to execute code from
the new Code Segment (CS) and from the new Instruction Pointer (IP).
When the interrupt routine is completed, the old CS and IP are popped
from the system stack and the program execution continues from the point
where interruption occurred.
GPRS35
26
RTD Finland Oy
User’s Manual
Using Interrupts in your Program
Adding interrupt support to your program is not as difficult as it may seem
especially when programming under DOS. The following discussion will
cover programming under DOS. Note that even the smallest mistake in
your interrupt program may cause the computer to hang up and will only
restart after a reboot. This can be frustrating and time-consuming.
Writing an Interrupt Service Routine (ISR)
The first step in adding interrupts to your software is to write an interrupt
service routine (ISR). This is the routine that will be executed
automatically each time an interrupt request occurs for the specified IRQ.
An ISR is different from other sub-routines or procedures. First on
entrance the processor registers must be pushed onto the stack before
anything else! Second, just before exiting the routine, you must clear the
interrupt on the GPRS35 by writing to the Status register, and write the
EOI command to the interrupt controller. Finally, when exiting the interrupt
routine the processor registers must be popped from the system stack and
you must execute the IRET assembly instruction. This instruction pops the
CS, IP and processor flags from the system stack. These were pushed
onto the stack when entering the ISR.
Most compilers allow you to identify a function as an interrupt type and will
automatically add these instructions to your ISR with one exception: most
compilers do not automatically add the EOI command to the function, you
must do it yourself. Other than this and a few exceptions discussed below,
you can write your ISR as any code routine. It can call other functions and
procedures in your program and it can access global data. If you are
writing your first ISR, we recommend you stick to the basics; just
something that enables you to verify you have entered the ISR and
executed it successfully. For example: set a flag in your ISR and in your
main program check for the flag.
Note: If you choose to write your ISR in in-line Assembly, you must push
and pop registers correctly and exit the routine with the IRET
instruction instead of the RET instruction.
There are a few precautions you must consider when writing ISR's. The
most important is, do not use any DOS functions or functions that call
DOS functions from an interrupt routine. DOS is not re-entrant; that is, a
DOS function cannot call itself. In typical programming, this will not happen
because of the way DOS is written. But what about using interrupts?
GPRS35
27
RTD Finland Oy
User’s Manual
Consider then the following situation in your program: If DOS function X is
being executed when an interrupt occurs and the interrupt routine makes a
call to the same DOS function X, then function X is essentially being called
while active. Such cases will cause the computer to crash. DOS does not
support such operations. The general rule is that do not call any functions
that use the screen, read keyboard input or any file I/O routines, these
should not be used in ISR's.
The same problem of re-entrancy also exists for many floating-point
emulators. This effectively means that you should also avoid floating point
mathematical operations in your ISR.
Note that the problem of reentrancy exists, no matter what programming
language you use. Even, if you are writing your ISR in Assembly language,
DOS and many floating point emulators are not re-entrant. Of course there
are ways to avoid this problem, such as those which activate when your
ISR is called. Such solutions are, however, beyond the scope of this
manual.
The second major concern when writing ISR's is to make them as short as
possible in term of execution time. Spending long times in interrupt service
routines may mean that other important interrupts are not serviced. Also, if
you spend too long in your ISR, it may be called again before you have
exited. This will lead to your computer hanging up and will require a reboot.
Your ISR should have the following structure:
•
•
•
•
•
Push any processor registers used in your ISR.
Put the body of your routine here
Clear the interrupt bit by reading GPRS35 RXD register
Issue the EOI command to the 8259 by writing 20h to 20h
Pop all registers. Most C compilers do this automatically
The following C example shows what the shell of your ISR should be like:
/*------------------------------------------------------------------------------| Function: new_IRQ_handler
| Inputs:
Nothing
| Returns:
Nothing
|-------------------------------------------------------------------------------*/
void interrupt far new_IRQ_handler(void)
{
IRQ_flag = 1;
// Indicate to process interrupt has occurred
{
// Your program code to read UART
// read to a data buffer for example:
Guc_buffer[Gi_bufpos++] = inp(gi_SERIAL_DATA);
}
outp(0x20, 0x20); // Acknowledge the interrupt controller
}
GPRS35
28
RTD Finland Oy
User’s Manual
Saving the Startup Interrupt Mask Register (IMR) and interrupt vector
The next step after writing the ISR is to save the startup-state of the
interrupt mask register, (IMR) and the original interrupt vector you are
using. The IMR is located in address 21h. The interrupt vector you will be
using is located in the interrupt vector table which is an array of pointers
(addresses) and it is locate din the first 1024 bytes of the memory
(Segment 0 offset 0). You can read this value directly, but it is better
practice to use DOS function 35h (get interrupt vector) to do this. Most C
compilers have a special function available for doing this. The vectors for
the hardware interrupts on the XT - bus are vectors 8-15, where IRQ0 uses
vector 8 and IRQ7 uses vector 15. Thus if your GPRS35 is using IRQ5 it
corresponds to vector number 13.
Before you install your ISR, temporarily mask out the IRQ you will be using.
This prevents the IRQ from requesting an interrupt while you are installing
and initializing your ISR. To mask the IRQ, read the current IMR at I/O port
21h, and set the bit that corresponds to the IRQ. The IMR is arranged so
that bit 0 is for IRQ0 and bit 7 is for IRQ7. See the paragraph entitled
Interrupt Mask Register (IMR) earlier in this discussion for help in
determining your IRQ's bit. After setting the bit, write the new value to I/O
port 21h.
With the startup IMR saved and the interrupts temporarily disabled, you
can assign the interrupt vector to point to your ISR. Again you can
overwrite the appropriate entry in the vector table with a direct memory
write, but this is not recommended. Instead use the DOS function 25h (Set
Interrupt Vector) or, if your compiler provides it, the library routine for
setting up interrupt vectors. Remember that interrupt vector 8 corresponds
to IRQ0, vector 9 for IRQ1 etc.
If you need to program the source of your interrupts, do that next. For
example, if you are using transmitted or received messages as an interrupt
source program it to do that. Finally, clear the mask bit for your IRQ in the
IMR. This will enable your IRQ.
Common Interrupt mistakes
Remember hardware interrupts are from 8-15, XT IRQ's are numbered 0-7.
Do not forget to clear the IRQ mask bit in the IMR Forgetting to send the
EOI command after ISR code. Disables further interrupts.
GPRS35
29
RTD Finland Oy
User’s Manual
Example on Interrupt vector table setup in C-code:
void far _interrupt new_IRQ1_handler(void );
#define IRQ1_VECTOR 3
void (interrupt far *old_IRQ1_dispatcher)
(es,ds,di,si,bp,sp,bx,dx,cx,ax,ip,cs,flags);
old IRQ_Vector */
void far _interrupt new_IRQ1_handler(void );
/* ISR function */
/* Name for IRQ */
/* Variable to store
/*---------------------------------------------------------------------| Function: init_irq_handlers
| Inputs:
Nothing
| Returns:
Nothing
| Purpose: Set the pointers in the interrupt table to point to
|
our funtions ie. setup for ISR's.
|----------------------------------------------------------------------*/
void init_irq_handlers(void)
{
_disable();
old_IRQ1_handler = _dos_getvect(IRQ1_VECTOR + 8);
_dos_setvect(IRQ1_VECTOR + 8, new_IRQ1_handler);
Gi_old_mask = inp(0x21);
outp(0x21,Gi_old_mask & ~(1 << IRQ1_VECTOR));
_enable();
}
|/*---------------------------------------------------------------------| Function: restore, do this before exiting program
| Inputs:
Nothing
| Returns:
Nothing
| Purpose: Restore the interrupt vector table.
|----------------------------------------------------------------------*/
void restore(void)
{
/* Restore the old vectors */
_disable();
_dos_setvect(IRQ1_VECTOR + 8, old_IRQ1_handler);
outp(0x21,Gi_old_mask);
_enable();
}
GPRS35
30
RTD Finland Oy
User’s Manual
Chapter 6 -
GPRS35 SPECIFICATIONS
Host interface
16-bit PC/104 bus, XT-bus used for data, XT and AT interrupts available
GSM modem specifications
Operational
GSM compatibility
Datarate
EGSM900 and GSM1800 phase 2/2+
9600 baud, 14400 baud CSD
Up to 50 kbit/s with GPRS connection
GSM data transmisson, SMS, Fax group 3
GSM 02.22
1 LED
Class 4 (4W) EGSM900
Class 1 (1W) GSM1800
Services supported
Network personalisation
Status indicator
Output power
SIM card reader
Voltage
Compatibility
Detection
3V or dual voltage cards
GSM11.11 and 11.12
SIM card detection supported
Antenna Interface
Impedance
VSWR
50 Ohms
TX: max 1.7:1 installed
RX: max 1.9:1 installed
> 1.5dB, referenced to 1/2L dipole
vertical 80 deg , horizontal 360 deg
1W (cw), 2 W peak at +55C ambient
OSX
Gain
3dB width of cone
Maximum power
Connector
UART and I/O
UART compatibility
Oscillator frequency
Connection
Base addresses
Interrupts
Digital I/O
16C550 compatible
1.8432MHz
Full hardware handshaking supported
32+4
2,5,7,10,11,12,14 and 15
8 TTL outputs, 8 TTL inputs w. 10K pull-down
GPRS35 Electromechanical
Operating temperature range
Humidity
Altitude
Vibration
Power consumption
GPRS35
-20 to +70 C, for the GSM operation
RH up to 95% non condensing
-1000 to 60.000 ft
Survival 10G peak
2,3W min
31
RTD Finland Oy
User’s Manual
Chapter 7 -
RETURN POLICY AND WARRANTY
Return Policy
If the module requires repair, you may return it to us by following the procedure listed
below:
Caution:
Failure to follow this return procedure will almost always delay repair! Please help
us expedite your repair by following this procedure.
1) Read the limited warranty, which follows.
2) Contact the factory and request a Returned Merchandise Authorization (RMA) number.
3) On a sheet of paper, write the name, phone number, and fax number of a technically
competent person who can answer questions about the problem.
4) On the paper, write a detailed description of the problem with the product. Answer the
following questions:
• Did the product ever work in your application?
• What other devices were connected to the product?
• How was power supplied to the product?
• What features did and did not work?
• What was being done when the product failed?
• What were environmental conditions when the product failed?
5) Indicate the method we should use to ship the product back to you.
We will return warranty repairs by UPS Ground at our expense.
Warranty repairs may be returned by a faster service at your expense.
Non-warranty repairs will be returned by UPS Ground or the method you select, and
will be billed to you.
6) Clearly specify the address to which we should return the product when repaired.
•
•
•
7) Enclose the paper with the product being returned.
8) Carefully package the product to be returned using anti-static packaging! We will not
be responsible for products damaged in transit for repair.
7) Write the RMA number on the outside of the package.
8) Ship the package to:
Real Time Devices Finland Oy
Lepolantie 14
FIN-00660 Helsinki
FINLAND
GPRS35
32
RTD Finland Oy
User’s Manual
Limited Warranty
Real Time Devices, Inc. warrants the hardware and software products it manufactures
and produces to be free from defects in materials and workmanship for one year following
the date of shipment from REAL TIME DEVICES. This warranty is limited to the original
purchaser of product and is not transferable.
During the one year warranty period, REAL TIME DEVICES will repair or replace, at its
option, any defective products or parts at no additional charge, provided that the product
is returned, shipping prepaid, to REAL TIME DEVICES. All replaced parts and products
become the property of REAL TIME DEVICES. Before returning any product for repair,
customers are required to contact the factory for an RMA number.
THIS LIMITED WARRANTY DOES NOT EXTEND TO ANY PRODUCTS WHICH HAVE
BEEN DAMAGED AS A RESULT OF ACCIDENT, MISUSE, ABUSE (such as: use of
incorrect input voltages, improper or insufficient ventilation, failure to follow the operating
instructions that are provided by REAL TIME DEVICES, "acts of God" or other
contingencies beyond the control of REAL TIME DEVICES), OR AS A RESULT OF
SERVICE OR MODIFICATION BY ANYONE OTHER THAN REAL TIME DEVICES.
EXCEPT AS EXPRESSLY SET FORTH ABOVE, NO OTHER WARRANTIES ARE
EXPRESSED OR IMPLIED, INCLUDING, BUT NOT LIMITED TO, ANY IMPLIED
WARRANTIES OF MERCHANTABILITY AND FITNESS FOR A PARTICULAR
PURPOSE, AND REAL TIME DEVICES EXPRESSLY DISCLAIMS ALL WARRANTIES
NOT STATED HEREIN. ALL IMPLIED WARRANTIES, INCLUDING IMPLIED
WARRANTIES FOR MECHANTABILITY AND FITNESS FOR A PARTICULAR
PURPOSE, ARE LIMITED TO THE DURATION OF THIS WARRANTY. IN THE EVENT
THE PRODUCT IS NOT FREE FROM DEFECTS AS WARRANTED ABOVE, THE
PURCHASER'S SOLE REMEDY SHALL BE REPAIR OR REPLACEMENT AS
PROVIDED ABOVE. UNDER NO CIRCUMSTANCES WILL REAL TIME DEVICES BE
LIABLE TO THE PURCHASER OR ANY USER FOR ANY DAMAGES, INCLUDING ANY
INCIDENTAL OR CONSEQUENTIAL DAMAGES, EXPENSES, LOST PROFITS, LOST
SAVINGS, OR OTHER DAMAGES ARISING OUT OF THE USE OR INABILITY TO USE
THE PRODUCT.
SOME STATES DO NOT ALLOW THE EXCLUSION OR LIMITATION OF INCIDENTAL
OR CONSEQUENTIAL DAMAGES FOR CONSUMER PRODUCTS, AND SOME
STATES DO NOT ALLOW LIMITATIONS ON HOW LONG AN IMPLIED WARRANTY
LASTS, SO THE ABOVE LIMITATIONS OR EXCLUSIONS MAY NOT APPLY TO YOU.
THIS WARRANTY GIVES YOU SPECIFIC LEGAL RIGHTS, AND YOU MAY ALSO
HAVE OTHER RIGHTS, WHICH VARY FROM STATE TO STATE.
GPRS35
33
RTD Finland Oy