1
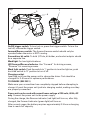
OPERATING MANUAL
4V Lithium-Ion Screwdriver Kit
241-0716
IMPORTANT:
Carefully read this Owner’s Manual before using this tool. Pay close attention to all Safety Instructions, Warnings, and Caution sections. Use this tool
properly, and only for its intended use.
Safety symbols in this Manual are used to flag possible dangers. The safety symbols and their explanations require the operator’s full understanding.
The safety warnings do not, by themselves, eliminate any danger, and they are
not a substitute for proper accident prevention measures.
This Safety Alert Symbol indicates caution, warning, or danger. Failure to
obey a safety warning can result in serious injury to yourself or others. To reduce
the risk of injury, fire, or electric shock, always follow the safety precautions.
TABLE OF CONTENTS
Specifications……………..……………………………………...…… Page 2
Rules for Safe Operation……………..……………………………...… Page 3
Description……………..……………………………………………... Page 6
Maintenance……………..………………………………………......... Page 9
Accessories ……………..……………………………………….......... Page 9
Warranty……………..……………………………………………........Page 9
SPECIFICATIONS
Model
Rechargeable Battery
241-0716
Input: 120V~ 60Hz
Output: 6V DC, 300mA
4V DC, LITHIUM-ION
Normal Charging Time
3~5 Hours
Forward / Reverse Rotation
LED Indicator
No Load Speed
180 RPM
Bit Size
1/4” Hex Collet
Power Unit
2
RULES FOR SAFE OPERATION
KNOW THE TOOL
To operate this tool, carefully read this Owner’s Manual and all labels affixed
to the tool before using. Keep this Manual available for future reference.
IMPORTANT
This tool should only be serviced by a qualified service technician.
READ ALL INSTRUCTIONS THOROUGHLY
GENERAL SAFETY RULES FOR ALL POWER TOOLS
WARNING! Read and understand all instructions. Failure to follow all instructions listed below may result in electric shock, fire, and/or serious personal injury. The term “power tool” in all of the warnings listed below refers to
corded power tools or battery-operated (cordless) power tools.
SAVE THESE INSTRUCTIONS
WORK AREA
eep the work area clean and well lit. Cluttered benches and dark areas
K
invite accidents.
o not operate power tools in an explosive environment, such as in the
D
presence of flammable liquids, gases, or dust. Power tools create sparks
which may ignite dust or fumes.
eep bystanders, children, and visitors away while operating a power
K
tool. Distractions can cause you to lose control.
ELECTRICAL SAFETY
battery-operated tool with batteries or separate battery pack must be
A
recharged only with the specified charger for the battery. A charger that
may be suitable for one type of battery may create a risk of fire when used
with another battery.
se battery operated tool only with specifically designated battery pack.
U
Use of any other batteries my create a risk of fire.
PERSONAL SAFETY
tay alert, watch what you are doing and use common sense when
S
operating a power tool. Do not use the tool while tired or under the
influence of drugs, alcohol, or medication. A moment of inattention while
operating power tools may result in serious personal injury.
ress properly. Do not wear loose clothing or jewelry. Contain long hair.
D
Keep your hair, clothing, and gloves away from moving parts. Loose
clothes, jewelry, or long hair can be caught in moving parts.
3
void accidental starting. Be sure switch is off before plugging in or
A
attaching the battery. Carrying tools with your finger on the switch or
powering tools that have the switch on invites accidents.
emove adjusting keys or wrenches before turning the tool on. A wrench
R
or a key that is left attached to a rotating part of the tool may result in
personal injury.
o not overreach. Keep proper footing and balance at all times. Proper footing
D
and balance enables better control of the tool in unexpected situations.
se safety equipment. Always wear eye protection. Dust mask, non-skid safety
U
shoes, hard hat, or hearing protection must be used for appropriate conditions.
efore connecting the tool to a power source (receptacle, outlet, etc.), be
B
sure voltage supplied is the same as that specified on the nameplate of
the tool. A power source with voltage greater than that specified for the
tool can result in serious injury to the user – as well as damage to the tool.
TOOL USE AND CARE
se clamps or other practical way to support and secure the workpiece to
U
a stable platform. Holding the work by hand or against your body is unstable
and may lead to loss of control.
o not force the tool. Use the correct tool for your application. The
D
correct tool will do the job better and more safely at the rate for which is
designed.
o not use the tool if the switch does not turn it on or off. Any tool that
D
cannot be controlled with the switch is dangerous and must be repaired.
isconnect the tool from the power source before making any adjustments,
D
changing accessories, or storing the tool. Such preventive safety measures
reduce the risk of starting the tool accidentally.
tore idle tools out of reach of children and other untrained persons. Tools
S
are dangerous in the hands of untrained users.
aintain tools with care. Keep cutting tools sharp and clean. Properly
M
maintained tools, with sharp cutting edges are less likely to bind and are
easier to control.
heck for misalignment or binding of moving parts, breakage of parts,
C
and any other condition that may affect the tools operation. If damaged,
have the tool serviced before using. Many accidents are caused by poorly
maintained tools.
se only accessories that are recommended by the manufacturer for
U
your model. Accessories that may be suitable for one tool, may become
hazardous when used on another tool.
4
o not alter or misuse tool. These tools are precision built. Any alteration
D
or modification not specified is misuse and may result in a dangerous
condition.
Service
T ool service must be performed only by qualified repair personnel. Service or
maintenance performed by unqualified personnel could result in a risk of injury.
hen servicing a tool, use only identical replacement parts. Follow
W
instructions in the Maintenance section of this manual. Use of unauthorized
parts or failure to follow Maintenance Instructions may create a risk of
electric shock or injury.
SPECIFIC SAFETY RULES
old the tool by its insulated gripping surfaces when performing an
H
operation where the tool may contact hidden wiring or its own cord.
Contact with a “live” wire will make exposed metal parts of the tool “live”
and shock the operator.
Do not use dull or damaged bits and accessories.
Only connect the power unit to a 120VAC supply.
efore screwing into a wall, check with a metal/voltage detector to be
B
sure you are not driving into an electricity, gas, or water supply line.
Avoid frequent stalling when operating, as this could damage the tool.
I f the tool stalls, release the trigger immediately, reverse the direction of
rotation and slowly squeeze trigger to back out the bit.
o not expose the tool and power unit to rain; also protect them from
D
moisture.
F or best results, your battery tool should be charged in a location where the
temperature is more that 32°F (0°C) but less that 104°F (40°C). Do not store
outside or in vehicles.
o not charge the tool in a damp or wet location. Following this rule will
D
reduce the risk of electric shock.
o not operate power unit if it has received a sharp blow, been dropped,
D
or other-wise damaged in any way; take it to a qualified service person or
contact or visit the nearest Menards store for more information.
isconnect the power unit from the power supply when not in use.
D
Following this rule will reduce the risk of electric shock, fire, or serious
personal injury.
T his power unit is intended to be correctly orientated in a vertical or floor
mount position.
5
SAFETY SYMBOLS FOR YOUR TOOL
The label on your tool may include the following symbols.
V
A
Hz
W
min
~
no
.../min
Volts
Amperes
Hertz
Watts
Minutes
Alternating current
Direct current
No-load speed
Class II construction, Double Insulated
Revolutions or Strokes per minute
Indicates danger, warning or caution. It means attention!
Your safety is involved.
DESCRIPTION
The screwdriver is a light-duty tool for tightening and loosening screws. It
is lightweight and easy to use, featuring both a forward / reverse indicator
and work light. To secure your new rechargeable screwdriver from possible
failure, it is supplied in a low charge condition when shipped out.
1) On/Off Trigger Switch
2) Forward/Reverse Switch
3) Screwdriver Bit Collet
4) Work Light
5) LED Forward/Reverse Indicator
6) Work Light Switch
7) Charging Socket
8) Power Unit
9) Power unit jack
6
Fig.1
7
5
4
6
8
3
2
1
9
On/Off trigger switch. To turn tool on, press the trigger switch. To turn the
tool off, release the trigger switch.
Forward/Reverse switch. The forward/reverse switch should only be
operated when the motor is NOT running.
Screwdriver bit collet. To hold 1/4" bits, bit holder, and socket adaptor should
be a separate line.
Worklight. For low-light situations.
LED Forward/Reverse Indicator. Use “Forward” for driving screws,
“Reverse” for removing screws.
Work light switch. Push the switch to ‘|’ position to turn the light on; push
back the switch to ‘O’ position to turn it off.
Charging socket.
Insert the jack from the power unit to charge the driver. Tool should be
charged for 3–5 hours for optimum performance.
TO CHARGE (SEE FIG.1)
Make sure your screwdriver has completely stopped before attempting to
charge it. Insert the power unit jack into charging socket, making sure they
are properly connected.
Power unit can be used with normal house voltage of 120 volts, 60 Hz, AC
only. Connect the power unit to the power supply.
During the charge, the Reverse indicator (red light) will turn on, after fully
charged, the Forward indicator (green light) will turn on.
After normal usage, the battery requires approximately 3-5 hours charging
time to reach full capacity.
7
Do not place the power unit in an area of extreme heat or cold. It works best
at normal room temperature. The base of the tool or power unit may become
warm during charging.
WARNING! Only use the original power unit to charge the tool; use of
other power units may cause fire, explosions, and serious injury.
NOTE: During the charge, the tool can’t be turned on.
FITTING SCREWDRIVER BITS
Place a 1/4” bit into the magnetic bit holder and then insert the bit holder into
the screwdriver collet.
Note: Your drill is intended for light-duty use. For best results, 1⁄4”
screwdriver bits are recommended.
Never engage the trigger switch when changing screwdriver bits.
Always lock the trigger switch when changing drill bits. (See forward/reverse
switch instructions.)
FORWARD/REVERSE SWITCH
Fig. 2
FORWARD
REVERSE
The forward/reverse switch
determines the running direction of
the tool and also serves as a trigger
switch lock.
To select the “forward” motion,
release the trigger switch and push
the forward/reverse lever to the right
side of the tool. To select the “reverse”
motion, push the forward/reverse lever
to the left side of the tool.
SWITCH LOCKED
IN CENTER POSITION
The center position of the switch
locks the tool in the “OFF” posi-tion.
When changing the position of the switch, be sure the trigger is is not
depressed.
WARNING! Charging time must not exceed 15 hours; the battery may be
damaged with excessive charging. Avoid charging your screwdriver in freezing conditions. The power unit provided must only be used with this screwdriver and not with any other products.
Do not insert metal objects into the power unit.
Never change the forward/reverse switch while the screwdriver is rotating,
as this will damage the screwdriver.
8
MAINTENANCE
WARNING! It is recommended that all the repair or replacement for this
tool shall be performed by a qualified service technician. Contact or visit the
nearest Menards store for more information.
WARNING! Always use only a soft, dry cloth to clean your screwdriver,
never use any detergent or alcohol.
Disconnect the power unit from the main supply before cleaning.
CAUTION! No chemical agents are approved for use in cleaning this power
tool. Clean with a dry cloth or towel only.
ACCESSORIES
Charger.....................................................................................................................1 pc
24-pice accessory kit
Phillips driver bits ................................................................................................5 pcs
Hex driver bits ..................................................................................................... 8 pcs
Slotted driver bits ............................................................................................... 6 pcs
Nut drivers ........................................................................................................... 4 pcs
Magnetic bit holder .............................................................................................. 1 pc
WARRANTY
If, during normal use, this MASTERFORCE™ power tool breaks or fails due to a
defect in material or workmanship within three years from the date of original
purchase, simply bring this tool and its sales receipt back to your nearest
Menards® retail store for a free equivalent replacement within those three years.
The warranty:
(1) e xcludes expendable parts including but not limited to blades, bits, light bulbs,
and/or batteries;
(2) s hall be void if this tool is used for commercial or/and rental purposes; and
(3) d oes not cover any losses, injuries to persons/properties, or costs. This
warranty does give you specific legal rights and you may have other rights,
which vary from state to state.
9
10
11